


Operating Instructions
Facsimile Transceiver
Model No. UF-5500
UF-4500
Before operating this machine, please carefully read this manual, and keep this documentation in a safe place for future reference.
Panasonic assumes no responsibility for injuries or property damage resulting from failures
arising out of improper installation or operation inconsistent with this Operating Instructions  English manual.
Appendix Problem Solving Printout Journals PanasonicManagementDocumentSystem Network Advanced Basic Programming Installing Your Getting to Know and Lists (UF-5500 Only) Features Features Operations Your Machine Machine Your Machine

Main Unit and Accessories
Unpack the carton and check that you have all the accessories illustrated.
Machine |
Toner Cartridge |
(starter)*1 |
Drum Cartridge |
|
|
|
|
|
|
|
Telephone Line Cable |
|
Power Cord |
|
Important Information Guide |
||
|
|
|
|
|
|
|
Quick Installation Guide |
|
CD-ROM |
|
Recording Paper Tray |
|
|
|
|
|
Final Installed View
Document Tray
*1 Prints about 500 pages.
2

Table of Contents |
|
Getting to Know Your Machine |
|
Main Unit and Accessories............................................................................................ |
2 |
Safety Information.......................................................................................... |
8 |
Precautions..................................................................................................................... |
13 |
Security Suggestions for Key Operators ..................................................................... |
14 |
External View .................................................................................................................. |
15 |
Control Panel .................................................................................................................. |
16 |
Function Key................................................................................................................... |
18 |
Connections.................................................................................................................... |
19 |
Installing Your Machine |
|
Installing the Toner and Drum Cartridge ..................................................................... |
20 |
Loading the Recording Paper ....................................................................................... |
23 |
How to Load the Recording Paper ................................................................. |
23 |
Setting the Dialing Method (Tone or Pulse)................................................................. |
24 |
Adjusting the Volume .................................................................................................... |
25 |
User Parameters............................................................................................................. |
26 |
General Description........................................................................................ |
26 |
Setting the Date and Time.............................................................................. |
26 |
Setting Your LOGO (NAME/COMPANY) ....................................................... |
27 |
Setting Your Character ID .............................................................................. |
28 |
Setting Your ID Number (Fax Telephone Number) ........................................ |
29 |
Setting the Key Operator Password ............................................................... |
30 |
Entering Characters ....................................................................................................... |
31 |
Programming Your Machine |
|
One-Touch/Abbreviated Dialing Numbers ................................................................... |
32 |
Entering One-Touch/Abbreviated Dialing Numbers ....................................... |
32 |
Editing One-Touch/Abbreviated Dialing Numbers.......................................... |
34 |
Printing Out a Directory Sheet........................................................................ |
36 |
Customizing Your Machine ........................................................................................... |
37 |
General Description........................................................................................ |
37 |
Setting the Fax Parameters........................................................................... |
37 |
Fax Parameter Table...................................................................................... |
38 |
Basic Operations |
|
Loading Documents....................................................................................................... |
44 |
Documents You Can Send............................................................................. |
44 |
Documents You Cannot Send........................................................................ |
44 |
How to Load Documents ................................................................................ |
45 |
Basic Transmission Settings ........................................................................................ |
46 |
General Description........................................................................................ |
46 |
Contrast.......................................................................................................... |
46 |
Resolution ...................................................................................................... |
46 |
Communication Journal (COMM. JOURNAL) ............................................... |
47 |
3

Basic Operations |
|
Sending Documents....................................................................................................... |
48 |
General Description ....................................................................................... |
48 |
Memory Transmission.................................................................................... |
50 |
Wrong Transmission Prevention Function ..................................................... |
54 |
Direct Transmission ....................................................................................... |
57 |
Voice Mode Transmission.............................................................................. |
61 |
Transmission Reservation ............................................................................. |
62 |
Redialing ........................................................................................................ |
65 |
Receiving Documents.................................................................................................... |
66 |
Reception Modes ........................................................................................... |
66 |
Telephone Mode ............................................................................................ |
67 |
Fax / Tel Auto Switching Mode ...................................................................... |
68 |
Fax Mode ....................................................................................................... |
69 |
TAM (Telephone Answering Machine) Interface Mode.................................. |
70 |
Print Reduction .............................................................................................. |
72 |
Receiving Oversize Documents..................................................................... |
73 |
Substitute Memory Reception........................................................................ |
74 |
Making Copies ............................................................................................................... |
75 |
Copies............................................................................................................ |
75 |
Advanced Features |
|
Timer Controlled Communications .............................................................................. |
76 |
General Description ....................................................................................... |
76 |
Deferred Transmission................................................................................... |
76 |
Deferred Polling ............................................................................................. |
77 |
Polling ............................................................................................................................. |
78 |
General Description ....................................................................................... |
78 |
Setting the Polling Password ......................................................................... |
78 |
Preparing to be Polled ................................................................................... |
79 |
To Poll Documents from Another Station....................................................... |
80 |
Program Keys ................................................................................................................. |
81 |
General Description ....................................................................................... |
81 |
Setting for Group Dialing................................................................................ |
81 |
Setting for Deferred Transmission ................................................................. |
82 |
Setting for Deferred Polling............................................................................ |
83 |
Setting for Normal Polling .............................................................................. |
84 |
Changing or Erasing the Program Key Settings ............................................ |
85 |
Edit File Mode ................................................................................................................. |
86 |
General Description ....................................................................................... |
86 |
Printing a File List .......................................................................................... |
86 |
Viewing the Contents of a File List................................................................. |
87 |
Changing the Start Time or the Station of a File............................................ |
88 |
Deleting a File ................................................................................................ |
89 |
Printing Out a File .......................................................................................... |
90 |
Adding Documents into a File ........................................................................ |
91 |
Retry an Incomplete File ................................................................................ |
92 |
4

Table of Contents
Access Code................................................................................................................... |
93 |
General Description........................................................................................ |
93 |
Setting the Access Code ................................................................................ |
93 |
Operating Your Machine with the Access Code............................................. |
94 |
Receive To Memory........................................................................................................ |
95 |
General Description........................................................................................ |
95 |
Setting the RCV To Memory Password.......................................................... |
95 |
Setting RCV To Memory ................................................................................ |
96 |
Printing Out Documents ................................................................................. |
97 |
Junk Fax Filtering........................................................................................................... |
98 |
General Description........................................................................................ |
98 |
Set the Filter ................................................................................................... |
99 |
Receive without ID ......................................................................................... |
100 |
Received ID Print ........................................................................................... |
101 |
Register Junk Fax Number............................................................................. |
102 |
Distinctive Ring Detector (DRD) ................................................................................... |
103 |
General Description........................................................................................ |
103 |
Fax Cover Sheet ............................................................................................................. |
104 |
General Description........................................................................................ |
104 |
To use the Fax Cover Sheet .......................................................................... |
104 |
PIN Code Access............................................................................................................ |
106 |
General Description........................................................................................ |
106 |
Selecting the Access Method (Prefix or Suffix) .............................................. |
106 |
Dialing with a PIN Code ................................................................................. |
107 |
Fax Forward .................................................................................................................... |
108 |
Setting Fax Forward ....................................................................................... |
108 |
Department Code ........................................................................................................... |
110 |
General Description........................................................................................ |
110 |
Setting the Department Code......................................................................... |
110 |
Changing or Erasing the Department Code ................................................... |
112 |
Sending Document with Department Code .................................................... |
114 |
Printing a Department Code List .................................................................... |
115 |
Printing a Department Code Journal .............................................................. |
116 |
Multiple LOGO ................................................................................................................ |
118 |
General Description........................................................................................ |
118 |
Setting the Multiple LOGO ............................................................................. |
118 |
Changing or Erasing the Multiple LOGO........................................................ |
119 |
Sending Document with Multiple LOGO......................................................... |
120 |
Printing a Multiple Logo List ........................................................................... |
121 |
5

Network Features |
|
Selective Reception ....................................................................................................... |
122 |
General Description ....................................................................................... |
122 |
Setting the Selective Reception ..................................................................... |
122 |
Password Communications .......................................................................................... |
123 |
General Description ....................................................................................... |
123 |
Compatibility with Other Machines................................................................. |
123 |
Setting Password Transmission..................................................................... |
124 |
Setting Password Reception.......................................................................... |
125 |
Using Password Transmission....................................................................... |
126 |
Using Password Reception............................................................................ |
127 |
Confidential Mailbox ...................................................................................................... |
128 |
General Description ....................................................................................... |
128 |
Confidential Mailbox....................................................................................... |
128 |
Sending a Confidential Document to a Remote Station's Mailbox................. |
129 |
Polling a Confidential Document from a Remote Station's Mailbox ............... |
130 |
Receiving a Confidential Document to Your Machine's Mailbox.................... |
131 |
Storing a Confidential Document in Your Machine's Mailbox ........................ |
132 |
Printing Out a Confidential Document from Your Machine's Mailbox ............ |
133 |
Deleting a Confidential Document Stored in Your Machine's Mailbox ........... |
134 |
Sub-addressing .............................................................................................................. |
135 |
What is Sub-Addressing? .............................................................................. |
135 |
To set the Sub-address into a One-Touch/ABBR. Dialing Numbers.............. |
136 |
To send a Document with Sub-address......................................................... |
137 |
Panasonic Document Management System (UF-5500
Only)
Setting the Network Parameters ................................................................................... |
138 |
Setting the User (Network) Parameters ......................................................... |
138 |
Setting the User Parameters for the LAN Interface ....................................... |
139 |
Installing the Printer Driver and Application Software ............................................... |
140 |
General Description ....................................................................................... |
140 |
When Connecting using a USB Port.............................................................. |
142 |
When Connecting using a Network Port ........................................................ |
144 |
Using the machine as a Printer..................................................................................... |
146 |
Printing from Windows Applications............................................................... |
146 |
Using the machine as a Scanner .................................................................................. |
147 |
Scanning from Your Computer (USB Connection) ........................................ |
147 |
Setting the Scanner Parameters.................................................................... |
148 |
Scanner Parameter Table.............................................................................. |
149 |
Scanning from Your Machine (Network Connection)..................................... |
150 |
Using the machine as a PC Fax .................................................................................... |
152 |
Sending Documents from Your PC (USB Connection).................................. |
152 |
Sending Documents from Your PC (Network Connection) ............................ |
153 |
6

Table of Contents |
|
Printout Journals and Lists |
|
Journals and Lists.......................................................................................................... |
154 |
General Description........................................................................................ |
154 |
Transaction Journal........................................................................................ |
154 |
Individual Transmission Journal (IND. XMT JOURNAL) ................................ |
155 |
Communication Journal (COMM. JOURNAL) ................................................ |
158 |
One-Touch/Abbreviated and Directory Search List........................................ |
160 |
Program List ................................................................................................... |
163 |
FAX Parameter List ........................................................................................ |
164 |
Toner/Drum Cartridge Order Forms ............................................................... |
165 |
Problem Solving |
|
Troubleshooting ............................................................................................................. |
166 |
Troubleshooting.............................................................................................. |
166 |
Information Codes .......................................................................................... |
170 |
Clearing a Recording Paper Jam ................................................................... |
173 |
Clearing a Document Jam.............................................................................. |
174 |
Cleaning the Document Scanning Area ......................................................... |
176 |
Checking the Telephone Line......................................................................... |
177 |
Appendix |
|
Specifications ................................................................................................................. |
178 |
Recording Paper Specifications ................................................................................... |
180 |
Options and Supplies .................................................................................................... |
181 |
FCC Notice for Users in USA ........................................................................................ |
182 |
Notice to Users in Canada............................................................................................. |
184 |
Glossary .......................................................................................................................... |
186 |
ITU-T Image No. 1 ........................................................................................................... |
189 |
Index ................................................................................................................................ |
190 |
Information of copyrights and licenses ....................................................................... |
192 |
Important Information .................................................................................................... |
199 |
7

Safety Information
For Your Safety
To prevent severe injury and loss of life, read this section carefully before using your machine to ensure proper and safe operation of your machine.
■ This section explains the Warnings and Cautions used in this Operating Instructions manual.
WARNING |
Denotes a potential hazard that could result in serious injury, or death. |
|
|
CAUTION |
Denotes hazards that could result in minor injury, or damage to the machine. |
|
|
■This section also explains the graphic symbols used in this Operating Instructions manual. (Graphic symbols below are the examples)
These symbols are used to alert operators to a specific operating procedure that must not be performed.
These symbols are used to alert operators to a specific operating procedure that must be emphasized in order to operate the machine safely.
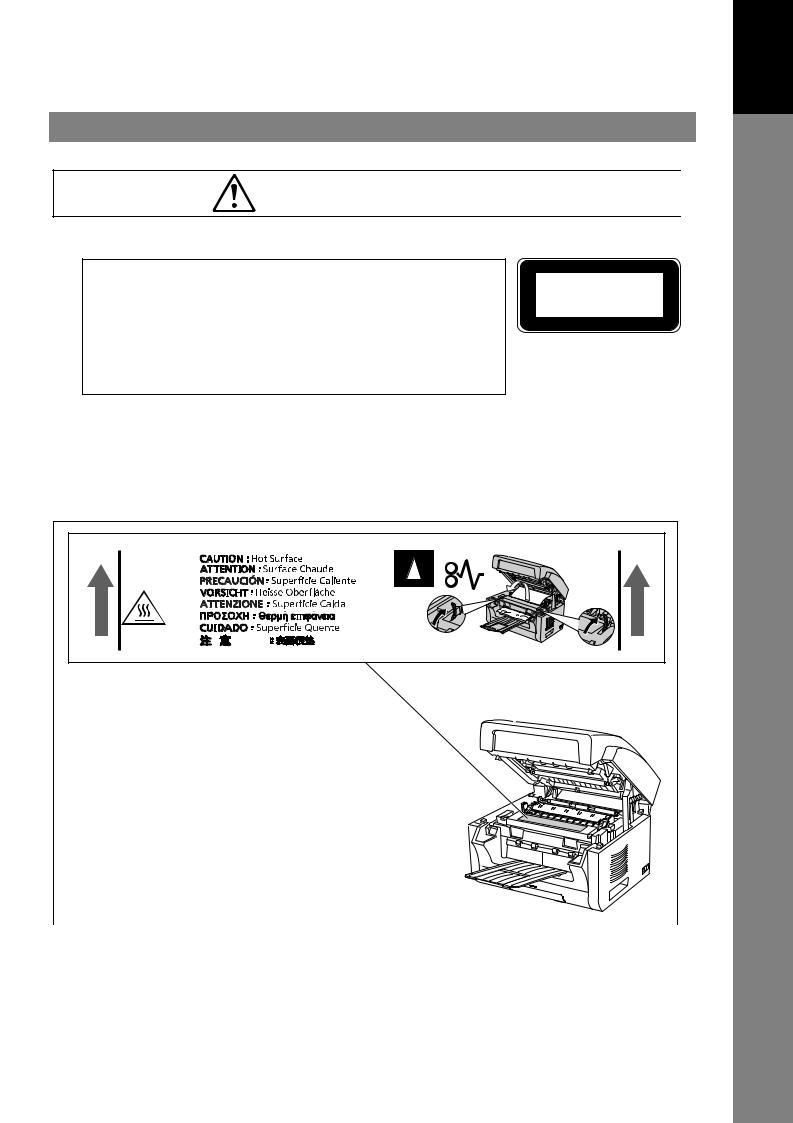
This symbol is used to alert operators to a heated surface that may cause burns and requires close attention.
WARNING
Power and Ground Connection
Cautions
Ensure that the plug connection is free of dust. In a damp environment, a contaminated connector can draw a significant amount of current that can generate heat and eventually cause fire if left unattended over an extended period of time.
Always use the power cord provided with your machine.
If you use a cord with an unspecified current rating, the machine, or plug may emit smoke, or become hot to the touch.
Do not attempt to repair, pull, bend, chafe, or otherwise damage the power cord. Do not place a heavy object on the cord. A damaged cord can cause fire, or electric shocks.
Never touch a power cord with wet hands. Danger of electric shock exists.
If the power cord is broken, or insulated wires are exposed, contact the authorized Panasonic dealer for a replacement. Using a damaged cord can cause fire, or electric shocks.
When disconnecting the machine, grasp the plug instead of the cord. Pulling on a cord forcibly can damage it and cause fire, or electric shock.
Stop operation immediately if your machine emits smoke, excessive heat, unusual noise or smell, or if water is spilt onto the machine.
These conditions can cause fire. Immediately unplug the machine and contact the authorized Panasonic dealer.
When the machine is not used over an extended period of time, unplug it. If an unused machine is left connected to a power source for a long period, degraded insulation can cause electric shocks, current leakage or fire.
Be sure to unplug the machine before accessing the interior of the machine for cleaning, maintenance or fault clearance. Access to a live machine’s interior can cause electric shock.
Once a month, unplug the machine and check the power cord for the following. If you notice any unusual condition, contact the authorized Panasonic dealer.
●The power cord is plugged firmly into the receptacle.
●The plug is not excessively heated, rusted, or bent.
●The plug and receptacle are free of dust.
●The cord is not cracked or frayed.
8

Safety Information
Operating Safeguards
Do not touch areas where these caution labels are attached to, the surface may be very hot and may cause severe burns.
Do not place any liquid container such as a vase or coffee cup on the machine. Spilt water can cause fire or shock hazard.
Do not place any metal parts such as staples or clips on the machine. If metal and flammable parts get into the machine, they can short-circuit internal components and cause fire or electric shocks.
If debris (Metal or liquid) gets into the machine, unplug the machine immediately.
Contact the authorized Panasonic dealer. Operating a debris-contaminated machine can cause fire or electric shock.
Never open or remove machine covers that are secured with screws unless specifically instructed in the “Operating Instructions”. A highvoltage component can cause electric shocks.
Do not try to alter the machine configuration or modify any parts. An unauthorized modification can cause smoke or fire.
Consumable Safeguards
Never dispose of toner into an open flame. Toner remaining in the cartridge can cause an explosion, burns, and/or injuries. For disposal or recycling information, contact your local authorities, or your local waste officials.
CAUTION
Installation and Relocation
Cautions
Do not place the machine near heaters or volatile, flammable, or combustible materials such as curtains that may catch fire.
Do not place the machine in a hot, humid, dusty or poorly ventilated environment. Prolonged exposure to these adverse conditions can cause fire or electric shocks.
Place the machine on a level and sturdy surface that can withstand a weight of the machine. If tilted, the machine may tip-over and cause injuries.
When relocating the machine, contact the authorized Panasonic dealer.
When moving the machine, be sure to unplug the power cord from the outlet. If the machine is moved with the power cord attached, it can cause damage to the cord which could result in fire or electric shock.
Operating Safeguards
Do not place a magnet near the safety switch of the machine. A magnet can activate the machine accidentally, resulting in injuries.
Do not use a highly flammable spray or solvent near the machine. It can cause fire.
Never touch heated areas near the heat roller. You can get burnt.
If a sheet of paper is wrapped around the heat roller, do not try to remove it yourself to avoid injuries or burns. Unplug the machine immediately and contact an authorized Panasonic dealer.
Do not use conductive paper. Ex: carbon paper, and coated paper. When paper misfeed occurs, it can cause a short-circuit and fire.
Do not place any heavy objects on the machine. An off-balanced machine can tip-over or the heavy object can fall, causing damage and/or injuries.
Keep the room ventilated when using the machine for an extended period of time to minimize the ozone density in the air.
When removing misfed paper, make sure that no pieces of torn paper are left in the machine. A piece of paper remaining in the machine can cause fire. If a sheet of paper is wrapped around the heat roller or when clearing a misfed paper that is difficult or impossible to see, do not try to remove it by yourself. Doing so can cause injuries or burns. Unplug the machine immediately and contact an authorized Panasonic dealer.
If accessing the inner components of the machine to clear misfed paper, etc., exercise care not to touch heated areas, or you may get burned.
9
Your Machine
Getting to Know

Safety Information
For Your Safety
CAUTION
Caution on Toner Use
■Avoid ingestion, inhalation, eye or skin contact.
●If ingestion occurs, drink several glasses of water to dilute stomach contents.
●If inhalation occurs, exit the area immediately into the fresh air.
●If skin contact occurs, wash thoroughly with soap and water.
●If eye contact occurs, flush thoroughly with water.
●In all cases, seek medical treatment if adverse symptoms occur.
■When the toner cartridge is at the end of its life, do not dispose of it into a fire. It can cause an explosion and you can get burnt.
■Keep the toner cartridge out of children’s reach. Store in a cool and dry place (low humidity).
Do not unseal the toner cartridge unless you are ready to use it.
Black Toner INGREDIENTS:
Polyester resin
Carbon black(1333-86-4)
Others
For USA only
Distributed by Panasonic System Networks Company of America, Unit of Panasonic Corporation of North America One Panasonic Way Secaucus, NJ 07094
Consumable Safeguards
Never heat the drum cartridge, or scratch its surface. A heated or scratched drum can be hazardous to your health.
Others
■The machine has a built-in circuit for protection against lightning-induced surge current. If lightning strikes in your neighborhood, maintain ample distance from the machine and do not touch the machine until the lightning has stopped.
■If you notice flickering or distorted images or noises on your audio-visual units, your machine may be causing radio interference. Unplug the machine and if the interference disappears, the machine is the cause of the radio interference. Perform the following procedure until the interference is corrected.
●Move the machine and the TV and/or radio away from each other.
●Reposition or reorient the machine and the TV and/ or radio.
●Unplug the machine, TV and/or radio, and replug them into outlets operating on different circuits.
●Reorient the TV and/or radio antennas and cables until the interference stops. For an outdoor antenna, ask your local electrician for support.
●Use a coaxial cable antenna.
■This product contains a CR Coin Cell Lithium Battery which contains Perchlorate Material - special handling may apply. See www.dtsc.ca.gov/hazardouswaste/perchlorate

 IMPORTANT SAFETY INSTRUCTIONS
When using your telephone equipment, basic safety precautions should always be followed to reduce the risk of fire, electric shock, and injury to persons, including the following:
●DO NOT USE THIS PRODUCT NEAR WATER, FOR EXAMPLE, NEAR A BATH TUB, WASH BOWL, KITCHEN SINK OR LAUNDRY TUB, IN A WET BASEMENT OR NEAR A SWIMMING POOL.
●AVOID USING A TELEPHONE (OTHER THAN A CORDLESS TYPE) DURING AN ELECTRICAL STORM. THERE MAY BE A REMOTE RISK OF ELECTRIC SHOCK FROM LIGHTNING.
●DO NOT USE THE TELEPHONE TO REPORT A GAS LEAK IN THE VICINITY OF THE LEAK.
SAVE THESE INSTRUCTIONS.
10
Safety Information
CAUTION
Denotes hazards that could result in minor injury or damage to the machine.
Do not place the machine near heaters or volatile, flammable, or combustible materials such as curtains that may catch fire.
Avoid exposure to direct sunlight.
Install the machine on a flat surface, leave at least 10 cm (4") of space between the machine and other objects.
Do not block the ventilation openings.
Do not place any heavy objects on the machine. An off-balanced machine can tip-over or the heavy object can fall, causing damage and/or injuries.
11
Your Machine
Getting to Know

Safety Information
Installation
■The maximum power consumption is approx. 950 W. A properly wired (grounded), dedicated, 15A, 120V AC outlet is required. Do not use an extension cord. Please ensure that the machine is installed near a wall outlet and is easily accessible.
■The machine should not be installed in areas with the following conditions:
●Extremely high or low temperature and humidity. The machine should be installed under the following
ambient conditions:
Temperature : 50 to 90.5 ˚F (10 to 32.5 ˚C) Relative Humidity : 20 to 70 %
●In areas with chemical fume concentration.
●With unstable or uneven conditions (floors, etc.).
●Direct exposure to sunlight or fluorescent light.
●In areas of high dust concentration.
●Directly in the air conditioning flow.
●In areas of poor ventilation.
●In areas with extreme vibration.
Supplies
■Store the toner and paper in a cool area with low humidity.
■Use of other than genuine Panasonic supplies can damage the machine. This may void the warranty of the machine and supplies. Be sure to use only genuine Panasonic Toner Cartridge (UG-5591) / Drum Cartridge (UG-5590) designed for optimum performance.
■Dispose of Toner Cartridge and/or OPC Drum Unit(s) according to your local regulations.
Illegal Copies
It is unlawful to make copies of certain documents.
Copying certain documents may be illegal in your country. Penalties of fines and/or imprisonment may be imposed on those found guilty. The following are examples of items that may be illegal to copy in your country.
●Currency
●Bank notes and cheques
●Bank and government bonds and securities
●Passports and identification cards
●Copyright material or trademarks without the consent of the owner
●Postage stamps and other negotiable instruments
This list is not inclusive and no liability is assumed for either its completeness or accuracy.
In case of doubt, contact your legal counsel.
Notice:
Install your machine near a supervised area to prevent illegal copies from being made.
Others
Panasonic is not responsible for data loss and any consequence caused by computer virus infection or external shocks.
Moving the unit
When moving the unit, hold by the grips (A) on both sides.
A
A
12
Precautions
Precautions
■ Laser Safety
LASER SAFETY
This unit employs a laser. Only qualified service personnel should attempt to service this device due to possible eye injury.
CAUTION:
USE OF CONTROLS, ADJUSTMENTS OR PERFORMANCE PROCEDURES OTHER THAN THOSE SPECIFIED HEREIN MAY RESULT IN HAZARDOUS RADIATION EXPOSURE.
CLASS 1 LASER PRODUCT APPAREIL A LASER DE CLASSE 1
■ Laser diode properties:
Laser output: Max. 15 mW Wavelength: 760 nm - 800 nm Emission duration: Continuous
■ Caution Label |
PNQT2154ZA |
13
Your Machine
Getting to Know

Security Suggestions for Key Operators
To keep your machine’s highly-sensitive document data secure, the designated Key Operators are instructed to perform the recommended security measures described below for the initial machine installation, network connection, network configuration, setup of security functions, and replacement and disposal of the machine.
1.Key Operators are required to verify the identity of the manufacturer’s service technician, or of an affiliated company’s staff, or marketing company, by requesting their ID Card.
Do not give the device information by phone or Email.
2.Always connect through a Firewall when installing your device on a network that is connected to the Internet. When connecting this device to a client PC or a server, we recommend configuring your network environment with a switching hub to prevent your device from being wiretapped.
3.A Key Operator ID Code and Passwords is essential to maintaining the security of the device. Key Operators are required to change the ID Code and Passwords from the initial setting, and keep the ID Code and Passwords confidential and in a safe place.
4.To prevent illicit use by unauthorized personnel, perform the following for ID/password settings.
1)Use the maximum number of digits.
2)Use a variety of the accepted character types.
3)Change the ID and password periodically.
Make sure that the setting screen can only be seen by the Key Operator when setting/changing various ID and passwords. Keep this information confidential.
5.Delete the data completely before transferring or destroying the device.
6.Scanned(text and images), received and set/ registered information(addresses) are your responsibility. If the device mulfunctions and the data are deleted, it cannot be recovered and is not covered in the warranty.
7.Incorrect settings may leak settings or impede use of this device. Check the details carefully when performing settings.
8.On occasion, the clock may need adjustment. (lunar inequality: 1 minute)
The Key Operator plays a critical part in maintaining and controlling the security of the device and in prevention of its unauthorized access, therefore, it is of utmost importance that you understand the content described in the Operating Instructions and that you follow the suggestions herein.
14
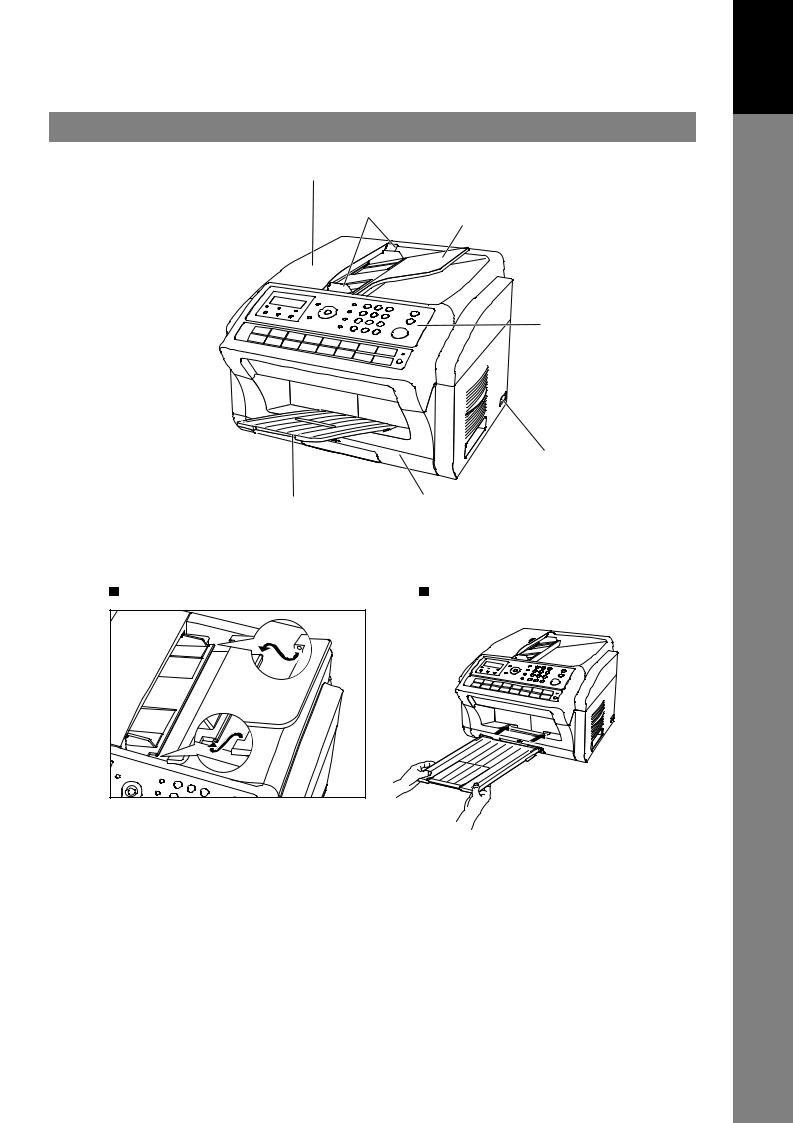
External View
ADF (Automatic Document Feeder) Cover
Document Guides
Document Tray
Control Panel
Power Switch
Recording Paper Tray |
Recording Paper Cassette |
Document Tray |
Recording Paper Tray |
15
Your Machine
Getting to Know

Control Panel
2 |
4 |
5 |
6 |
8 |
10 |
12 |
14 |
16 |
1 |
3 |
7 |
|
9 |
11 |
13 |
15 |
18 |
17 |
* The pictured model is UF-5500.
*The picture shows the position of the UF-4500 Resolution button.
No. |
Icon |
Contents |
No. |
Icon |
Contents |
|
|
- Used to set to Normal, Lighter |
|
|
Status LED lamp (RED) |
|
|
or Darker. (See page 46) |
|
|
- Lights/Flashes when trouble |
|
|
|
|
|
occurs. |
|
|
|
|
|
Lights: Machine has detected a |
trouble status
- No paper in the selected tray or toner has run out.
- Machine has detected trouble, such as paper misfed or jammed.
Flashes: Machine detected an alarm status
- No paper in the tray. (Tray not selected)
- Toner is getting low, etc.
16

Control Panel
No. |
Icon |
Contents |
No. |
Icon |
Contents |
|
|
Active LED lamp (GREEN) |
|
|
- Used to set to Standard, Fine, |
|
|
Flashes: When machine is |
|
|
Super-Fine or Halftone. |
|
|
active. |
|
|
(See page 46) |
|
|
Lights: When the received fax |
|
|
|
|
|
message is in memory. |
|
|
|
|
|
Used for Scanner Function. |
|
|
- Use this button when |
|
|
(For UF-5500 only) |
|
|
resetting all the previously |
|
|
|
|
|
set functions. |
- Used to start or select the function. (See page 18)
|
Used for the following: |
|
|
- |
Used to carry out setting operations. |
|
- |
Search for a station name. (See pages 52 and 60) |
|
- |
Adjust the monitor and ringer volume. (See page 25) |
8 |
- |
Move the cursor while entering numbers and characters. |
-Search the station name for Directory Search Dialing.
-Confirm the entered station for multi-station communication.
-Confirm the current communication modes (Ex: Page number, ID, Dialed Telephone number, File number) when the unit is ON LINE.
|
- |
Used to start On-Hook |
|
- |
Used to separate the Sub- |
|
9 |
|
Dialing. (See page 61) |
10 |
|
Address from the telephone |
|
|
|
|
|
|
|
number. |
|
- |
Used to enter a pause when |
|
- |
Used to start Abbreviated |
|
11 |
|
entering or dialing a telephone |
12 |
|
Dialing. |
|
|
number, or to redial the last |
|
(See pages 51 and 59) |
|||
|
|
|
|
|||
|
|
dialed number. |
|
|
|
|
|
|
Keypad |
|
|
|
|
|
|
- |
Used for manual number dialing, entering phone numbers, and numerical |
|||
13 |
|
|
entries. |
|
|
|
|
|
Key |
|
|
|
|
|
|
|
|
|
|
|
|
|
- |
Used to temporarily change the dialing mode to Tone when Pulse mode is set. |
|||
|
- |
Press this key to start activation. |
|
- |
Used for copy operations. |
|
14 |
|
|
|
15 |
|
(See page 75) |
|
|
|
|
|
||
|
- |
Press this button when you want |
|
Used to switch between the |
||
16 |
|
to stop communication, |
17 |
upper row (01-16) or lower row |
||
|
registration operation, or audible |
(17-32) of the One-Touch Keys. |
||||
|
|
|
||||
|
|
tone. |
|
|
|
|
18 |
One-Touch Keys (01-32) |
|
|
|
||
- |
Used for One-Touch Dialing. (See pages 51 to 58) |
|
|
|||
17
Your Machine
Getting to Know

Function Key
Any function can be started by first pressing Function and then entering the function number, or by
pressing the |
|
or |
scroll keys repeatedly until the desired function appears on the display. |
|
|
|
1 |
Deferred Communication |
|
|
|
|||
|
|
|
1 |
= XMT |
|
|
|
2 |
= Polling |
2
3
6
7
8
9
Advanced Communication
1 = Not Used
2 = Confidential Communication
Polling
1 = Polling
2 = Polled
Print List
1 = Journal (Print/View)
2 = One-Touch/Abbreviated/Directory Search List
3 = Program List
4 = Fax Parameter List
5 = Not Used
6 = Individual XMT Journal
Set Mode
1 = User Parameters
•Date & Time
•Company Name
•Character ID
•ID Number (Fax Telephone Number)
•IP Address (This is a partial list, for additional Functions, see page 138) 2 = One-Touch/Abbreviated Numbers
3 = Program Keys
4 = Fax Parameters
5 - 7 = Not Used
8 = Maintenance
•Clean Drum Count
•Toner/Drum Order Forms
Select Mode
1 = Communication Journal = OFF/ON/INC
2 = Not Used
3 = Cover Sheet = OFF/ON
4 = Password-XMT = OFF/ON
5 = RCV to Memory = OFF/ON
6 - 8 = Not Used
9 = Memory XMT = OFF/ON
Edit File Mode
1 = File List (Print/View)
2 = Change Time/Station
3 = Delete File
4 = Print File
5 = Add Document
6 = Retry Incomplete File
18
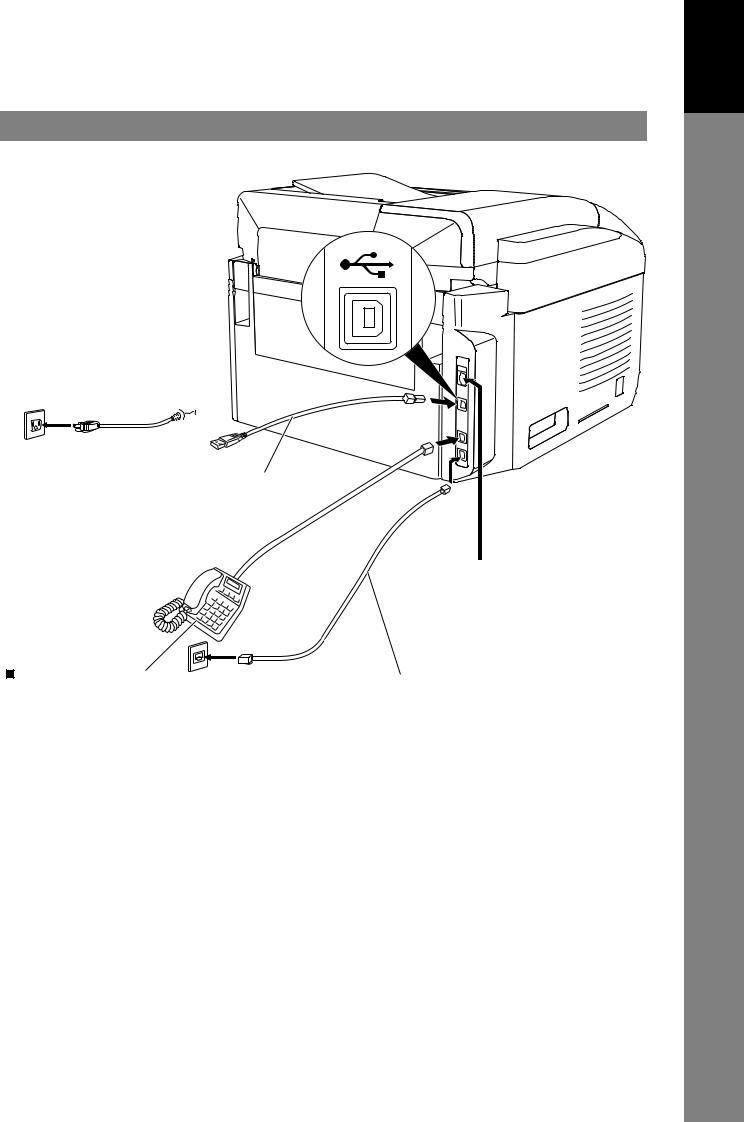
Connections

 Power Cord
Plug the supply cord into the main AC socket outlet.
Connect the supply cord coupler into the main supply inlet on
the rear of the machine.
Warning: This apparatus must be properly grounded. Do not modify the AC outlet.
Power Cord (Included) 


 USB Cable (Optional) (USB 2.0): UF-5500 Only
For connecting a USB Cable when using your machine as printer and/or scanner.
External Telephone
Telephone Jack
(Optional) (Included)
You can connect an additional standard single line telephone to the machine. To connect the telephone, break off the protective tab on the TEL jack.
If using an External Telephone option with the machine, the machine does not detect the external telephone being in use.
When sending a Fax, ensure the external telephone is hung up before dialing.

 LAN Cable (Optional) : UF-5500 Only
For connecting a LAN Cable when using your machine as printer, scanner and/or PC Fax.

 Telephone Line Cable
Plug one end of the telephone line cable into the telephone jack supplied by the telephone company and the other end into the LINE jack on the left side of the machine.
Do not extend the telephone line cord. In the event of problems, you should contact your equipment supplier in the first instance.
Warning:
•To assure continued emission limit compliance;
–use only shielded USB cable (Example:Hi-Speed USB 2.0 certified cable).
–use only shielded LAN cable (category 5 straight cable).
•To protect the unit, use only shielded USB cable in areas where thunderstorms occur.
19
Your Machine
Getting to Know
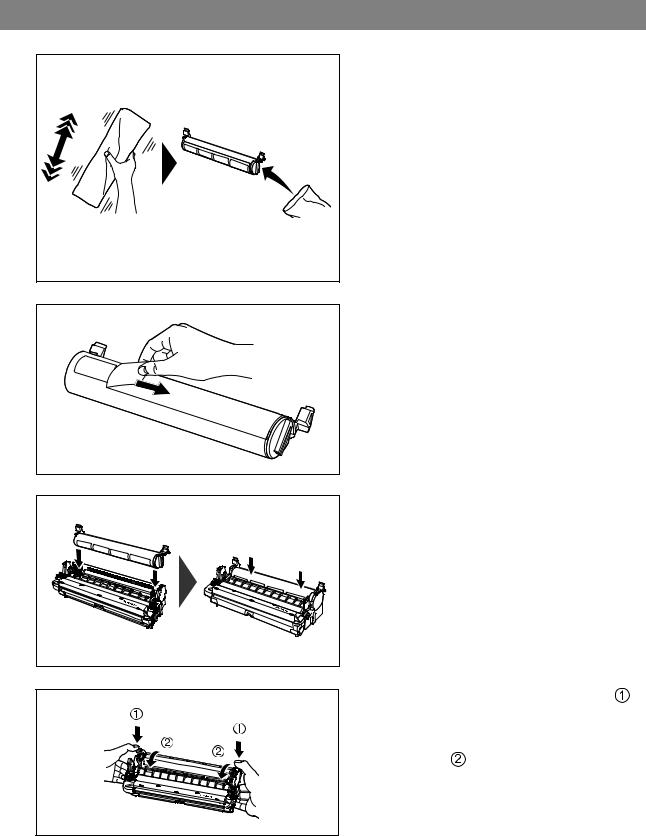
Installing the Toner and Drum Cartridge
1 |
Shake vertically more than 5 times. |
|
2 |
3 |
Remove the protective seal.
Note: Pull on the seal slowly and straight out.
Set the Toner Cartridge into the Drum Cartridge.
4 |
Firmly press down on the toner cartridge ( ). |
Keep pressing down while turning both levers |
|
|
located on each side of the toner cartridge |
|
towards you ( ). |
20
Installing the Toner and Drum Cartridge
|
|
|
|
|
|
|
|
|
5 |
|
|
|
|
|
|
|
Make sure that the arrows match, to install the |
|
|
|
|
|
|
|
||
|
|
|
|
|
|
|
toner cartridge correctly. |
|
|
|
|
|
|
|
|
||
|
|
|
|
|
|
|
|
|
|
|
|
|
|
|
|
|
|
|
|
|
|
|
|
|
|
|
|
|
|
|
|
|
|
|
|
|
|
|
|
|
|
|
|
|
|
|
|
|
|
|
|
|
|
|
|
|
|
|
|
|
|
|
6 |
Open the Printer Cover. |
|
Printer Cover |
Watch fingers |
7 |
Set the Toner and Drum Cartridge into the machine.
Machine
Installing Your
21

Installing the Toner and Drum Cartridge
8 |
Verify that the arrow marks match. |
|
9 |
Close the Printer Cover. |
|
Printer Cover |
Watch fingers
NOTE
1. Used toner cartridge should be disposed of properly according to local regulations.
22

Loading the Recording Paper
How to Load the Recording Paper
Paper Specifications
In general, most bond papers will produce excellent results. Most photocopy papers will also work very well. There are many "name" and "generic" brands of paper available. We recommend that you test various papers until you obtain the desired results. For detailed recommended paper specifications, (See page 180).
1 |
Pull the Paper Cassette until it clicks into |
place, then pull it out, lifting the front part of |
|
|
the cassette. |
|
1. Load the paper into the Paper Cassette. |
|
Slide the paper width and length guides |
Paper Cassette |
until they lightly touch the stack of paper |
|
without bending the paper. |
|
2. Insert the Paper Cassette into the |
|
machine, lifting the front part of the |
|
cassette. Then push it completely into |
|
the machine. |
2 |
|
Caution for the Paper Cassette
• Do not drop the Paper Cassette. • Hold the Paper Cassette with both hands when removing or installing. The Paper Cassette weighs approximately 2 kg (4.4 lb) when fully loaded with recording paper.
Approx. 2 kg
|
|
NOTE |
1. If you neglect to change the Recording Paper Size setting in Fax Parameter No. 23, when a |
different paper is installed in the cassette, the unit will Stop printing after receiving an |
|
|
unmatched paper size (up to 3 pages) of Incoming Fax, then, the Recording Paper Size setting |
|
will automatically adjust to the proper size, and the unit resumes reprinting the Incoming Fax |
Machine
Installing Your
from the 1st page.
23
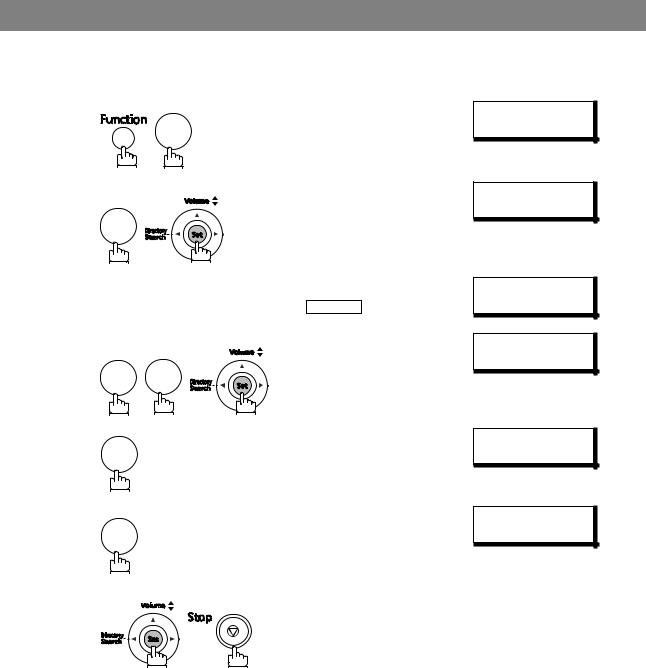
Setting the Dialing Method (Tone or Pulse)
Your machine can operate with either of two dialing methods (Tone or Pulse), depending on the type of telephone line you are connected to. If you need to change the dialing method to Tone or Pulse, follow the procedure below.
1
2
3
4
5
6
|
|
|
SET MODE (1-8) |
|
|
7 |
|
ENTER NO. OR |
|
|
|
|
KEY OPERATOR ID |
|
4 |
|
|
ENTER ID= |
|
|
|
|
|
|
Enter the Key Operator Password (The factory default |
FAX PARAMETERS |
|||
password is 00000000.) and press |
Set . |
NO.= |
(01-169) |
|
|
|
|
DIALING METHOD? |
|
0 |
6 |
|
|
TONE<> |
|
|
|
||
1 |
|
|
DIALING METHOD? |
|
|
|
|
PULSE<> |
|
|
for “PULSE“. |
|
or |
|
or |
|
|
|
|
|
|
DIALING METHOD? |
||
|
|
|
||
2 |
|
|
|
TONE<> |
for “TONE“.
24

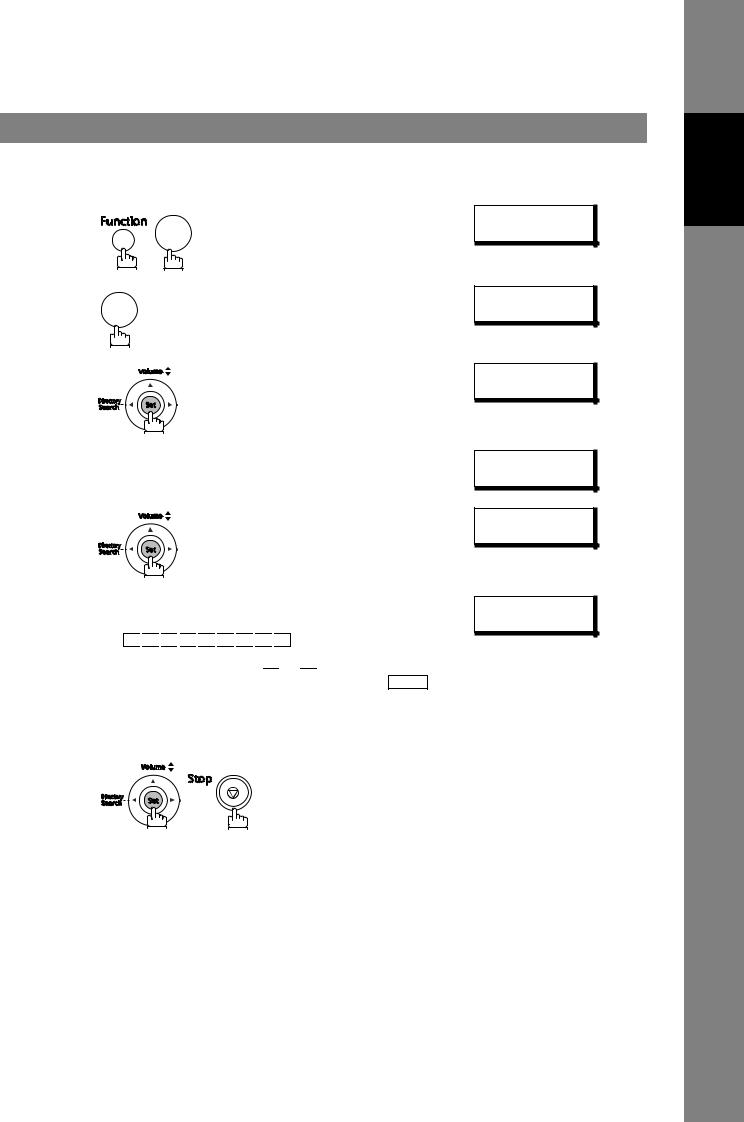
Adjusting the Volume
You can adjust the monitor and ringer volume on your machine. The built-in speaker enables you to hear the dial tone, dialing signals, and busy tone. The ringer sounds when your machine receives a call.
Setting the Monitor Volume
1 |
* MONITOR * |
|
|
|
You will hear the dial tone through the speaker. |
2 |
|
MONITOR VOLUME |
||
|
L |
[ |
] H |
|
|
repeatedly to raise the volume. |
|
|
|
|
or |
|
|
|
|
|
MONITOR VOLUME |
||
|
|
L |
[ |
] H |
|
repeatedly to lower the volume. |
|
|
|
3 |
|
|
|
|
Setting the Ringer Volume |
|
|
|
|
1 |
Standby |
MMM-dd 15:00 |
||
2 |
|
|
|
00% |
|
RINGER VOLUME |
|||
|
|
(((( |
)))) |
|
repeatedly to raise the volume.
or
RINGER VOLUME
repeatedly to lower the volume.
3
|
|
|
NOTE |
1. You can also adjust the volume of the key touch tone and the volume of the buzzer in the Fax |
|
Parameter No. 10 (KEY/BUZZER VOLUME). (See page 38) |
||
|
Machine
Installing Your
25

User Parameters
General Description
Your facsimile machine has several basic settings (User Parameters) to help you keep records of the documents you send or receive. For example, the built-in clock keeps the current date and time, and your LOGO and ID number help to identify you when you send or receive documents.
Setting the Date and Time
At standby the display will show the date and time. Once the standby display is set, it will automatically be updated.
1
2
3
4
5
6
7
7
1
Enter the Key Operator Password.
Enter the new date and time. Ex: 0 8 Month: August
1 2 Date: 12th
2 0 1 1 Year: 2011
1 5 0 0 Time: 3:00 PM
If you made a mistake, use 

 or
or 

 to move the cursor over the incorrect number, then overwrite it with the correct one.
SET MODE (1-8) ENTER NO. OR
USER PARAMETERS? PRESS SET
KEY OPERATOR ID ENTER ID=
KEY OPERATOR ID ENTER ID=******
DATE & TIME 1-01-2011 00:00
DATE & TIME 8-12-2011 15:00
NOTE
1.The clock may occasionally require adjustment. (Lunar inequality : ±1 minute)
2.The clock of your machine is equipped with D.S.T. (Daylight Saving Time) system. (Set the Daylight Time according to your local regulation.)
If your state does not use the D.S.T. system, change the Fax Parameter No. 35 (DAYLIGHT TIME) to "OFF" . (See page 39)
3.The current Date & Time must be set because it is required by the Telephone Consumer Act of 1991. (For details, see FCC NOTICE at the end of this Operating Instructions)
26
User Parameters
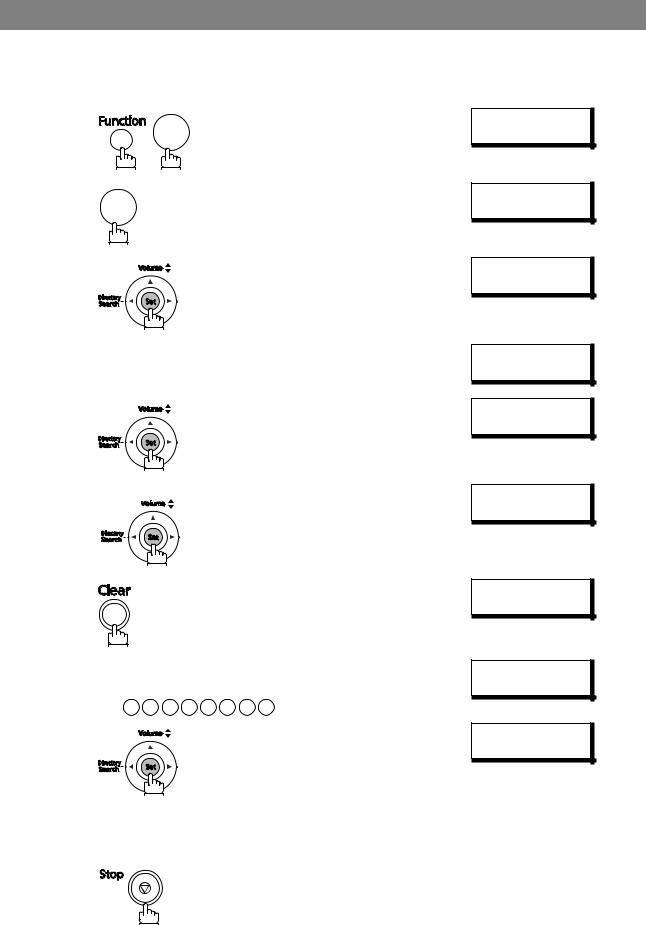
Setting Your LOGO (NAME/COMPANY)
When you send a document, your LOGO appears on the top of the copy printed out at the other station. The LOGO helps to identify you to someone who receives your document.
1 |
7 |
SET MODE (1-8) |
|
|
|
|
|
ENTER NO. OR |
2 |
1 |
USER PARAMETERS? |
|
||
|
PRESS SET |
|
3 |
|
KEY OPERATOR ID |
|
|
|
|
|
ENTER ID= |
4 |
Enter the Key Operator Password. |
KEY OPERATOR ID |
|
||
5 |
|
ENTER ID=****** |
|
COMPANY/NAME |
|
|
|
|
6 |
repeatedly until display shows; |
|
Enter your LOGO (Up to 25 characters and digits) by |
COMPANY/NAME |
|
|
using the Keypad. |
PANASONI |
Ex: P 
 A
A 
 N
N 
 A
A 
 S
S 
 O
O
 N
N 
 I
I 
 C
C
If you made a mistake, use  or
or 

 to move the cursor
one space beyond the incorrect character, press Clear and then re-enter the new character.
If more than 16 characters are entered, the left side characters will scroll off the display.
7
Machine
Installing Your
27

User Parameters
Setting Your Character ID
If the remote machine has Character ID capabilities, when you are sending or receiving, your Character ID will appear on the remote machine's display and the remote machine's Character ID will appear on your display.
1
2
3
4
5
|
SET MODE (1-8) |
7 |
ENTER NO. OR |
1 |
USER PARAMETERS? |
PRESS SET |
|
|
KEY OPERATOR ID |
|
ENTER ID= |
Enter the Key Operator Password. |
KEY OPERATOR ID |
|
ENTER ID=****** |
|
CHARACTER ID |
repeatedly until display shows;
6 |
Enter your Character ID (Up to 16 characters and digits) |
|||||
|
||||||
|
by using the Keypad. |
|
|
|
|
|
|
Ex: H E A D |
|
O |
F F |
I C E |
|
|
Abbr Dial/Space |
|||||
|
If you made a mistake, use |
or |
to move the cursor |
|||
|
beyond the incorrect character, press |
|
and then re- |
|||
|
Clear |
|||||
|
enter the new character. |
|
|
|
|
|
CHARACTER ID HEAD OFFIC
7
NOTE
1.The special characters Å, å, Ä, ä, Ö, ö, Ü, ü, È, è, É, é, Æ, æ and Ñ cannot be used for Character ID.
28

User Parameters
Setting Your ID Number (Fax Telephone Number)
If the remote machine does not have a Character ID but has an ID Number, when sending or receiving, your ID Number will appear on the remote machine's display and their ID Number will appear on your display.
We suggest you use your facsimile telephone number as your ID number. (Up to 20 digits)
1 |
|
7 |
SET MODE (1-8) |
|
|
|
|
2 |
|
|
ENTER NO. OR |
1 |
|
USER PARAMETERS? |
|
|
|
||
3 |
|
PRESS SET |
|
|
|
KEY OPERATOR ID |
|
|
|
|
|
|
|
|
ENTER ID= |
4 |
Enter the Key Operator Password. |
KEY OPERATOR ID |
|
5 |
|
|
ENTER ID=****** |
|
|
FAX TEL NO |
|
|
|
|
|
6 |
|
repeatedly until display shows; |
FAX TEL NO |
Enter your ID (up to 20 digits) by using the keypad and |
|||
press the |
Abbr Dial/Space key to enter a space between |
201 555 1212 |
|
numbers. |
|
|
|
|
Ex: 2 0 |
1 Abbr Dial/Space 5 5 5 |
|
Abbr Dial/Space 1 2 1 2
If you made a mistake, use  or
or 

 to move the cursor
one space beyond the incorrect number, press Clear and then re-enter the new number.
If more than 16 characters are entered, the left side 7 characters will scroll off the display.
NOTE 1. You may use  to enter a "+" character at the beginning of the ID number to indicate the following digit(s) for your country code.
Ex:+1 XXX XXX XXXX+1 for U.S.A. country code. +81 X XXX XXXX +81 for Japan country code.
2.Your Fax Telephone Number must be set as your ID Number because it is required by the Telephone Consumer Act of 1991. (For details, see FCC NOTICE at the end of this Operating Instructions)
Machine
Installing Your
29
User Parameters
Setting the Key Operator Password
The Key Operator Password is user-definable. (The factory default password is 00000000.)
Using the keypad on the control panel, you can enter numbers, letters (case-sensitive), and symbols (@, ., _, SPACE) for the password. (The  and
and  keys cannot be used.)
1 |
7 |
SET MODE (1-8) |
|
|
|||
2 |
ENTER NO. OR |
||
1 |
USER PARAMETERS? |
||
|
|||
3 |
PRESS SET |
||
|
KEY OPERATOR ID |
||
|
|
||
|
|
ENTER ID= |
|
4 |
Enter the Key Operator Password. |
KEY OPERATOR ID |
|
5 |
|
ENTER ID=****** |
|
|
DATE & TIME |
||
|
|
||
|
|
8-12-2011 00:00 |
|
6 |
|
KEY OPERATOR ID |
|
|
|
||
|
|
**** |
repeatedly until the display shows;
7
8
Enter the new Key Operator Password (up to 8 characters and digits) by using the keypad.
Ex: 1 2 3 4 5 6 7 8
KEY OPERATOR ID
KEY OPERATOR ID
*******
9
10
11
ENTER ID AGAIN
Enter the new Key Operator Password again and press |
PLEASE MEMORIZE |
|
|
. |
NEW ID |
Set |
||
30
 Loading...