


 Loading...
Operating Instructions
(For Advanced Operations)
Facsimile Transceiver
Model No. UF-8200
UF-7200
Before operating this machine, please carefully read this manual, |
|
and keep this documentation in a safe place for future reference. |
English |
|
Product |
Overview |
||
|
|
||
Basic Facsimile |
Feature |
||
|
|
|
|
Advanced |
Facsimile |
Feature |
|
|
|
|
|
|
Copy Feature |
|
|
|
|
||
Internet Fax/ |
Email Features |
||
|
|
|
|
Advanced |
Internet Fax |
Feature |
|
|
|
||
Network |
Scanner Feature |
||
|
|
||
Setting Your |
Machine |
||
|
|
|
|
|
Problem Solving |
|
|
|
Appendix |
|
|
|
|
|
|

How to Read This Manual
The following notations are used throughout this manual.
Sample
Programming Auto Dialer
Your machine has 2 types of Auto Dialers. The default dialer can be selected by changing the setting of Fax Parameter No.119 (QWERTY KEYBOARD).
When the setting is set to:
"1:One-Touch": You can manually select the desired One-Touch Key, ABBR. Dialing and the Program Key. "2:Quick Name Search": You can select the station by searching the Station Name, and the Program Name.
ATTENTION
•The required Six (6) Basic Internet Parameters must be set when setting Email Address. (See page 132)
•Up to 580 stations, plus additional 420 with the optional SD Memory Card installed. (See page 186)
Programming Address Book
1 |
|
|
FUNCTION |
(1-9) |
|
|
|
ENTER NO. OR |
|
2 |
|
|
ADDRESS BOOK |
(1-3) |
|
|
|
ENTER NO. OR |
|
3 |
|
|
ADD STATION |
|
|
|
|
ENTER TEL. NO. |
|
4 |
To change the input mode (between enter Email Address and |
|
|
|
Telephone Number), press |
. |
|
|
|
5 |
Enter the Telephone Number using the Number Pad (up to 36 digits) |
ENTER NAME |
|
|
or the Email Address using the QWERTY Keyboard (up to 60 |
|
|||
335 |
|
|||
characters), then press |
. |
|
||
|
|
|||
|
Ex: 335 or admin@pana |
|
ENTER NAME |
|
|
|
|
|
|
|
|
|
admin@pana |
|
6 |
Enter the Station Name using the QWERTY Keyboard (up to 15 |
ADD STATION |
|
|
characters), then press |
. |
|
||
ENTER TEL. NO. |
|
|||
|
|
|
ADD STATION |
|
|
|
|
ENTER EMAIL ADDRESS |
|
NOTE
1.Use 


 to enter a space between the num bers to make it easier to read.
2.Use 

 or
or 

 to move the cursor beyond the incorrect character, press


 then re-enter the new character.
3.If you are using Pulse dialing and you wish to change to Tone dialing in the middle of dialing,
press 


 (represented by a"/"). The dialing method will be changed from Pulse to Tone after dialing the digit "/".
4.When using Address Book Dialing, you cannot use ABBR. Number Dialing.
Continued on the next page... |
XX |
Machine
Setting Your
ATTENTION
Indicates items that need to be registered in advance.
Keys with a pointing finger indicate keys you need to press.
Ex: Press the Function Key.
Indicates pressing keys sequentially.
Ex: Press 7, 2, the Set Key in sequence.
ADD STATION
ENTER EMAIL ADDRESS
Indicates messages shown on the LCD display.
NOTE
Indicates additional information on operations or features.
Indicates keys on the Control Panel.
The shape is different from the actual keys on the machine.
The functions of some of the keys are marked in parentheses.
For details about the keys on the Control Panel, refer to Control Panel in the Operating Instructions (For Basic Operations) of provided booklet.
2

Table of Contents |
|
How to Read This Manual.................................................................................................................. |
2 |
Product Overview |
|
Mode Setting................................................................................................................... |
8 |
Using the Functions ........................................................................................................................... |
8 |
Basic Transmission Settings ........................................................................................ |
10 |
General Description ........................................................................................................................... |
10 |
Contrast ............................................................................................................................................. |
10 |
Resolution .......................................................................................................................................... |
10 |
Verification Stamp.............................................................................................................................. |
11 |
Dual G3 Communication Port with Optional G3 Communication Port Kit.......................................... |
11 |
Basic Facsimile Feature |
|
Sending Documents....................................................................................................... |
12 |
Memory Transmission........................................................................................................................ |
12 |
Sending Documents........................................................................................................................... |
13 |
To Stop the Transmission .................................................................................................................. |
14 |
Quick Name Search Dialing / Email Addressing................................................................................ |
15 |
One-Touch Dialing / Email Addressing .............................................................................................. |
16 |
ABBR. Dialing / Email Addressing ..................................................................................................... |
17 |
Manual Number Dialing (Up to 50 Stations) ...................................................................................... |
18 |
Directory Search Dialing / Email Addressing ..................................................................................... |
18 |
Redialing the Last Dialed Number ..................................................................................................... |
19 |
Direct Transmission Reservation (Priority Transmission Reservation).............................................. |
19 |
Canceling the Direct Transmission Reservation ................................................................................ |
20 |
Duplex Sending.................................................................................................................................. |
21 |
On-Hook Dialing................................................................................................................................. |
23 |
Off-Hook Dialing (Voice Mode Transmission).................................................................................... |
24 |
Job Build ............................................................................................................................................ |
25 |
Preventing Accidental Transmission to Wrong Destinations.................................... |
27 |
Restricting Direct Dialing.................................................................................................................... |
27 |
Restricting Multiple Destinations........................................................................................................ |
27 |
Re-entering Dialing ............................................................................................................................ |
28 |
Confirming Destination....................................................................................................................... |
29 |
Receiving Documents.................................................................................................... |
30 |
Automatic Reception.......................................................................................................................... |
30 |
Manual Reception .............................................................................................................................. |
30 |
Substitute Memory Reception............................................................................................................ |
31 |
Print Collation Mode........................................................................................................................... |
31 |
Print Reduction Setting ...................................................................................................................... |
32 |
Advanced Facsimile Feature |
|
Timer Controlled Communications .............................................................................. |
33 |
Deferred Transmission....................................................................................................................... |
33 |
Deferred Polling ................................................................................................................................. |
34 |
Batch Transmission ....................................................................................................... |
36 |
Real-Time Batch Transmission.......................................................................................................... |
36 |
Polling ............................................................................................................................. |
37 |
Setting the Polling Password ............................................................................................................. |
37 |
Preparing to be Polled ....................................................................................................................... |
38 |
Poll Documents from Another Station................................................................................................ |
39 |
3

Table of Contents |
|
Sub-Address Communication....................................................................................... |
40 |
What is Sub-Addressing? .................................................................................................................. |
40 |
Sending Fax with Sub-Address ......................................................................................................... |
41 |
Setting the Sub-Address into the Address Book................................................................................ |
41 |
Password Communications .......................................................................................... |
43 |
General Description ........................................................................................................................... |
43 |
Setting Password Transmission ........................................................................................................ |
44 |
Setting Password Reception.............................................................................................................. |
45 |
Using Password Transmission .......................................................................................................... |
46 |
Using Password Reception................................................................................................................ |
46 |
Fax Cover Sheet ............................................................................................................. |
47 |
Using the Fax Cover Sheet................................................................................................................ |
48 |
PIN Code Access............................................................................................................ |
49 |
General Description ........................................................................................................................... |
49 |
Selecting the Access Method (Prefix or Suffix).................................................................................. |
49 |
Dialing with a PIN Code..................................................................................................................... |
50 |
Receive to Memory......................................................................................................... |
51 |
What is Memory Reception?.............................................................................................................. |
51 |
Setting Receive to Memory Password............................................................................................... |
52 |
Setting the Receive to Memory.......................................................................................................... |
52 |
Printing Documents ........................................................................................................................... |
53 |
Department Code ........................................................................................................... |
54 |
General Description ........................................................................................................................... |
54 |
Setting the Department Code ............................................................................................................ |
54 |
Changing or Erasing the Department Code....................................................................................... |
55 |
Setting Document with Department Code ......................................................................................... |
56 |
Printing a Department Code Journal ................................................................................................. |
57 |
Edit File Mode ................................................................................................................. |
59 |
General Description ........................................................................................................................... |
59 |
Printing a File List .............................................................................................................................. |
59 |
Viewing the Contents of a File List .................................................................................................... |
60 |
Changing the Start Time or the Station of a File................................................................................ |
61 |
Deleting a File.................................................................................................................................... |
62 |
Printing Out a File .............................................................................................................................. |
63 |
Adding Documents into a File............................................................................................................ |
64 |
Retry an Incomplete File.................................................................................................................... |
65 |
Access Code................................................................................................................... |
66 |
General Description ........................................................................................................................... |
66 |
Setting the Access Code ................................................................................................................... |
66 |
Operating Fax with the Access Code ................................................................................................ |
66 |
Dial Prefix........................................................................................................................ |
67 |
General Description ........................................................................................................................... |
67 |
Setting the Dial Prefix ........................................................................................................................ |
68 |
Copy Feature |
|
Basic Copy...................................................................................................................... |
69 |
General Description on Using the ADF When Copying ..................................................................... |
69 |
Copying the Same Size Originals ...................................................................................................... |
69 |
Multi-Size Feeding ............................................................................................................................. |
70 |
Sort Mode .......................................................................................................................................... |
70 |
Copy Output Order Mode .................................................................................................................. |
71 |
Copying with Variable or Preset Zoom Ratios ................................................................................... |
72 |
4

|
Table of Contents |
Creative Feature ............................................................................................................. |
73 |
2J1 Copy (2-sided J 1-sided Copy)................................................................................................. |
73 |
Internet Fax/Email Features |
|
Pre-Installation Information/Features........................................................................... |
75 |
What is Internet Fax?......................................................................................................................... |
75 |
Using the Internet Fax Feature .......................................................................................................... |
75 |
What Internet Fax Can Do.............................................................................................. |
76 |
Sending Email.................................................................................................................................... |
76 |
Receiving Email ................................................................................................................................. |
76 |
Inbound Routing................................................................................................................................. |
77 |
Internet Relay Transmission .............................................................................................................. |
78 |
Message Delivery Notice (MDN)........................................................................................................ |
79 |
Direct Internet Fax Transmission (Using Direct SMTP) ..................................................................... |
80 |
SMTP Authentication ......................................................................................................................... |
80 |
Lightweight Directory Access Protocol (LDAP).................................................................................. |
81 |
Tips for Using Internet Fax............................................................................................ |
82 |
Preparing to Use Internet Fax ....................................................................................... |
84 |
Program Network Parameters ........................................................................................................... |
84 |
Sending Documents....................................................................................................... |
85 |
Manual Email Addressing .................................................................................................................. |
85 |
Auto Dialer Email Addressing ............................................................................................................ |
87 |
Entering the Email Header................................................................................................................. |
88 |
Duplex Sending.................................................................................................................................. |
89 |
Returned Email .................................................................................................................................. |
91 |
Receiving Documents.................................................................................................... |
92 |
Configuring to Receive Email............................................................................................................. |
92 |
Receiving Email Automatically........................................................................................................... |
92 |
Unattended Email Reception from the POP Server........................................................................... |
93 |
Receiving an Email on a Computer .............................................................................. |
94 |
Receiving Email on Your Computer................................................................................................... |
94 |
Opening Email ................................................................................................................................... |
95 |
Convenient Application Software ................................................................................. |
96 |
Advanced Internet Fax Feature |
|
Sender Selection ............................................................................................................ |
97 |
Setting the Sender Selection ............................................................................................................. |
97 |
Sending Documents with Sender Selection....................................................................................... |
98 |
Inbound Routing............................................................................................................. |
99 |
What is Inbound Routing?.................................................................................................................. |
99 |
Routing Setup Flow............................................................................................................................ |
99 |
Setting for Inbound Routing ............................................................................................................... |
100 |
Quick Name Search Email Addressing for Inbound Routing ............................................................. |
101 |
Fax Forward .................................................................................................................... |
102 |
Setting Fax Forward........................................................................................................................... |
103 |
Relayed Transmission ................................................................................................... |
104 |
What is Relay Feature? ..................................................................................................................... |
104 |
Setting Up a Relayed Transmission Network .................................................................................... |
106 |
Example of a Relayed Transmission Network ................................................................................... |
107 |
Sample Entries in Address Book ....................................................................................................... |
108 |
Function Parameter for Relay Station................................................................................................ |
110 |
Settings for Initial Sending Station ..................................................................................................... |
111 |
5

Table of Contents |
|
Programming the End Receiving Station into Your Auto Dialer......................................................... |
112 |
Sending Documents via an Internet Relay ........................................................................................ |
113 |
Sending Documents from a PC to a G3 Fax Machine....................................................................... |
115 |
Printouts and Reports ........................................................................................................................ |
117 |
Email Report ................................................................................................................... |
119 |
Receiving Transmission Result Notification by Email........................................................................ |
119 |
Network Scanner Feature |
|
Document Scanning....................................................................................................... |
121 |
Document Scanning to PC ................................................................................................................ |
121 |
Adding Your PC's IP Address ....................................................................................... |
123 |
Editing/Deleting Your PC's IP Address ........................................................................ |
125 |
Editing Your PC's IP Address ............................................................................................................ |
125 |
Deleting Your PC's IP Address .......................................................................................................... |
127 |
Function .......................................................................................................................... |
129 |
Scan File Select Mode....................................................................................................................... |
129 |
Direct Connection with Crossover Cable ........................................................................................... |
131 |
Setting Your Machine |
|
Setting the Internet Parameters .................................................................................... |
134 |
Basic Parameters for Internet Fax/Email Features............................................................................ |
134 |
Programming Auto Dialer.............................................................................................. |
137 |
Programming Address Book.............................................................................................................. |
137 |
Programming One-Touch Dialing Numbers....................................................................................... |
139 |
Programming ABBR. Dialing Numbers.............................................................................................. |
140 |
Printing the Directory Sheet............................................................................................................... |
141 |
Changing the Address Book .............................................................................................................. |
142 |
Deleting Station from Address Book.................................................................................................. |
143 |
Changing or Deleting the Setting of the One-Touch/ABBR. Dialing Numbers .................................. |
144 |
Programming Program Keys......................................................................................... |
146 |
General Description ........................................................................................................................... |
146 |
Setting for Group Dialing ................................................................................................................... |
146 |
To Set a Program Key for Deferred Transmission............................................................................. |
147 |
To Set a Program Key for Deferred Polling ....................................................................................... |
148 |
To Set a Program Key for Normal Polling.......................................................................................... |
149 |
Changing or Erasing the Program Key Setting.................................................................................. |
151 |
Customizing Your Machine ........................................................................................... |
152 |
Fax Parameters ................................................................................................................................. |
152 |
Copier Parameters............................................................................................................................. |
163 |
Scan Parameters ............................................................................................................................... |
165 |
Printer Parameters............................................................................................................................. |
167 |
Changing the Default Setting ........................................................................................ |
169 |
Changing the Paper Size................................................................................................................... |
169 |
Changing the Original Size ................................................................................................................ |
171 |
Energy Saver (Power Saver Mode, Sleep/Shutdown Mode)............................................................. |
173 |
Printing Journals and Lists ........................................................................................... |
174 |
Transaction Journal ........................................................................................................................... |
174 |
Communication Journal (COMM. JOURNAL) ................................................................................... |
177 |
One-Touch/ABBR. and Directory Search List.................................................................................... |
179 |
Program List ...................................................................................................................................... |
181 |
Fax Parameter List ............................................................................................................................ |
183 |
6

|
Table of Contents |
Problem Solving |
|
Troubleshooting/Maintenance |
...................................................................................... 184 |
Verification Stamp.......................................................................................................... |
186 |
Appendix |
|
Specifications ................................................................................................................. |
187 |
Glossary .......................................................................................................................... |
190 |
ITU-T Image No.1 ............................................................................................................ |
195 |
Index ................................................................................................................................ |
196 |
7

Mode Setting
Using the Functions
The following functions can be started by first pressing 


 and then entering the Function Number or by pressing

 or
or 

 scroll key repeatedly until the desired function appears on the LCD display.
|
|
|
|
|
|
|
|
|
|
|
|
|
|
Deferred Communication |
|
|
|
|
|
|
|
|
|
||||||||||
|
|
|
|
|
|
|
|
|
|
1 = |
Deferred Transmission |
(See page 33) |
||||
|
|
|
|
|
|
|
|
|||||||||
|
|
|
2 = |
Deferred Polling |
(See page 34) |
|||||||||||
|
|
|
3 = |
Advanced Communication |
|
|||||||||||
|
|
|
|
|
|
|
|
|
|
|
|
|
|
Advanced Communication |
|
|
|
|
|
|
|
|
|
|
|
|
|
|
|
|
|
||
|
|
|
|
|
|
|
||||||||||
|
|
|
|
|
|
|
||||||||||
|
|
|
|
|
|
|
|
|
4 = |
Sub-Address Transmission |
(See page 40) |
|||||
|
|
|
|
|
|
|
||||||||||
|
|
|
5 = |
LAN Relay Transmission |
(See Note 1) |
|||||||||||
|
|
|
|
|
|
|
|
|
|
|
|
|
|
|
(For Internet Fax / Email function only) |
|
|
|
|
|
|
|
|
|
|
|
|
|
|
|
Polling |
|
|
|
|
|
|
|
|
|
|
|
|
|
|
|
|
|
|
|
|
|
|
|
|
|
|
|
|||||||||
|
|
|
|
|
|
1 = |
Polling |
(See page 39) |
||||||||
|
|
|
|
|
||||||||||||
|
|
|
2 = |
Polled |
(See page 38) |
|||||||||||
|
|
|
|
|
|
|
|
|
|
|
|
|
|
Print Out |
|
|
|
|
|
|
|
|
|
|
|
|
|
|
|
|
|
||
|
|
1 = |
Journal (Print / View) |
(See page 174) |
||||||||||||
|
||||||||||||||||
2 = |
Address Book List |
|
||||||||||||||
|
|
|
|
|
|
|
|
|
|
|
|
|
|
|
(One-Touch / ABBR. List) |
(See page 179) |
3 = |
Program List |
(See page 181) |
||||||||||||||
4 = |
Fax Parameter List |
|
||||||||||||||
|
|
|
|
|
|
|
|
|
|
|
|
|
|
|
(& User Parameter List) |
(See page 183) |
6 = |
Individual Transmission Journal |
|
||||||||||||||
7 = |
Directory Sheet (See Note 2) |
(See page 141) |
||||||||||||||
|
|
|
|
|
|
|
|
|
|
|
|
|
|
|
|
|
|
|
|
|
|
|
|
|
|
|
|
|
|
|
|
|
|
NOTE
1.If Fax Parameter No.140 (LAN RLY XMT REQ) is not preset to "2:Valid", the display will not show the function.
2.Available when Fax Parameter No.119 (QWERTY KEYBOARD) is set to "1:One-Touch". (See page 157)
8

Mode Setting
Set Mode
1 = |
User Parameters |
|
|
(See page 134) |
|||
|
|
|
|
|
• |
Date & Time |
|
|
|
|
|
|
• |
Logo |
|
|
|
|
|
|
• |
Character ID |
|
|
|
|
|
|
• |
ID Number (Fax Telephone Number) |
|
2 = |
Address Book |
|
|
|
|||
|
|
|
|
(One-Touch / ABBR. Numbers) |
(See page 137) |
||
3 = |
Program Keys |
|
|
(See page 146) |
|||
4 = |
Fax Parameters |
|
|
(See page 152) |
|||
8 = |
Maintenance |
• |
Toner Order Form |
(See page 184) |
|||
|
|
|
|
|
• |
Toner Replacement |
|
|
|
|
|
|
• |
LCD Brightness (See Note 1) |
|
|
|
|
Select Mode (See Note 2) |
|
|
|
|
|
|
|
|
|
|
||
|
|
1 = |
Communication Journal = OFF / ON / INC |
(See page 177) |
|||
|
|||||||
2* = |
Delivery Notice = OFF / ON |
(See page 79) |
|||||
3 = |
Cover Sheet = OFF / ON |
(See page 48) |
|||||
4 = |
Password-Transmission = OFF / ON (See Note 3) |
(See page 43) |
|||||
5 = |
RCV to Memory = OFF / ON / PRINT |
(See page 51) |
|||||
6* = |
File Type and Name = TIFF / PDF |
(See page 129) |
|||||
9 = |
Memory Transmission =OFF / ON |
(See page 12) |
|||||
|
|
|
|
(*:2 and 6 for Internet Fax / Email function only) |
|
||
|
|
|
Edit File Mode |
|
|
|
|
|
|
|
|
|
|
||
|
|
1 = |
File List (Print / View) |
|
(See page 59) |
||
|
|
||||||
2 = |
Change Time / Station |
|
(See page 61) |
||||
3 = |
Delete File |
|
|
(See page 62) |
|||
4 = |
Print File |
|
|
(See page 63) |
|||
5 = |
Add Document |
|
|
(See page 64) |
|||
6 = |
Retry Incomplete File |
|
(See page 65) |
||||
|
|
|
|
|
|
|
|
|
|
|
|
|
|
|
|
NOTE
1. To adjust the character brightness of the LCD display, press |
|
|
|
, |
|
, and then press |
|
or |


 until the desired brightness is achieved.
2.The Select Mode ( 


 ) settings can be temporarily changed for the current communication. Upon its completion, however, these parameters are returned to their preset default values (Home position). You can change the default setting Home position of these settings in the Fax Parameters mode. (See page 152)
3.This feature can be used when a password is set in Fax Parameter No.43 (PASSWORD-XMT).
Overview
Product
9

Basic Transmission Settings
General Description
You can temporarily change the Transmission Settings either before or after you place the document on the ADF.
The Transmission Settings are as follows,
•Contrast
•Resolution
•Verification Stamp
After your document(s) have been sent, your machine will automatically return to the preset settings.
Contrast
Adjusting the contrast of scanned image data by pressing cursor keys
Lighter Normal Darker
CONTRAST
- [ |
|
|
|
|
|
] + |
Resolution
Adjust the resolution to send documents by pressing resolution key.
|
STANDARD |
for standard originals |
|
|
FINE |
for detailed originals |
|
|
S-FINE |
for finer detailed originals |
|
|
600 dpi |
for 600 dpi detailed originals |
|
|
HALFTONE (FINE) |
for photo originals with Fine Resolution |
|
|
HALFTONE (S-FINE) |
for photo originals with S-Fine Resolution |
|
|
HALFTONE (600 dpi) |
for photo originals with 600 dpi Resolution |
|
|
|
|
|
|
|
|
|
NOTE
1.To change the preset contrast position, change the setting of Fax Parameter No.1 (CONTRAST (HOME)). (See page 153)
2.To change the preset resolution position, change the setting of Fax Parameter No.2 (RESOLUTION (HOME)). (See page 153)
3.When transmitting documents at S-Fine or 600 dpi Resolution, there is a possibility that printing quality may deteriorate at the receiving station due to its reception capability. If this occurs, resend by Direct Transmission or transmit documents at Fine Resolution.
10
Basic Transmission Settings
Verification Stamp
The Verification Stamp helps you to confirm successful transmissions by stamping the bottom of each successfully transmitted page with a small  mark.
mark.
Verification Stamp
ON :The light is lit.
OFF :The light is off.
Dual G3 Communication Port with Optional G3
Communication Port Kit
The optional G3 Communication Port maximizes the benefit of your machine’s high-speed Super G3 communication by providing you with a dual line communication capability. It is like having two faxes in one. Each line can be used independently by taking advantage of simultaneous transmission/reception or one line can be utilized exclusively for transmission and the other for reception. Either way, the waiting time to perform Multi-Transmissions will be reduced in half.
You must set the Dialing Method (Tone or Pulse) for each port when you use first.
By default the machine selects the available telephone line for transmission automatically. To change the Home position of the Telephone Line Selection to either Line-1 or Line-2, change Fax Parameter No. 88 (LINE SELECTION) accordingly. (See page 156)
Overview
Product
11
Sending Documents
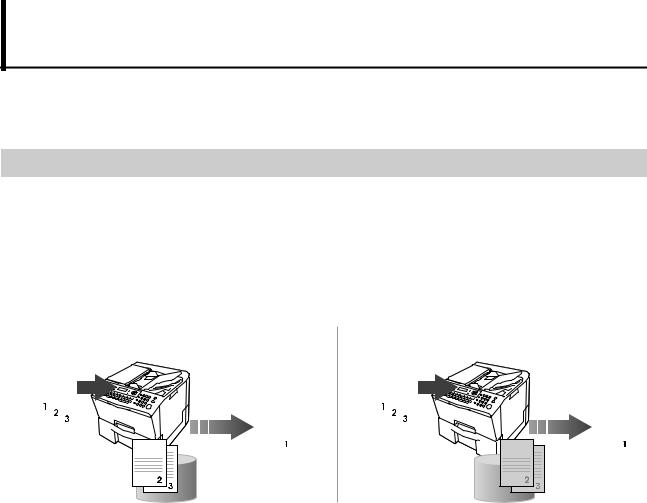
When you transmit a document by Memory Transmission, the document is stored in memory before it is transmitted. When you transmit a document by Direct Transmission, the document is transmitted immediately without being stored in memory. Memory Transmission is the default setting.
Memory Transmission
There are two ways to transmit a document by Memory Transmission:
•Ordinary Memory Transmission
•Quick Memory Transmission
When you use the Quick Memory Transmission, a file number is assigned for each communication. The document is transmitted immediately after the first page is stored in memory.
Ordinary Memory Transmission
|
|
|
|
|
|
|
|
|
|
|
Stores all the document(s) |
|||
|
|
|
|
|
|
|
|
|
|
|
into memory first, and then |
|||
Document(s) |
|
starts its transmission. |
||||||||||||
|
|
|
|
|
|
|
|
|
|
|
|
|
|
|
|
|
|
|
|
|
|
|
|
|
|
|
|
|
|
|
|
|
|
|
|
|
|
|
|
|
|
|
|
|
|
|
|
|
|
|
|
|
|
|
|
|
|
|
|
|
|
|
|
|
|
|
|
|
|
|
|
|
|
|
|
|
|
|
|
|
|
|
|
|
|
|
|
|
|
|
|
|
|
|
|
|
|
|
|
|
|
|
|
|
|
|
|
|
|
|
|
|
|
|
|
|
|
|
|
|
|
|
|
|
|
|
|
|
|
|
|
|
|
|
|
|
|
|
|
|
|
|
|
|
|
|
|
|
|
|
|
|
|
|
|
|
|
|
|
|
|
|
|
|
|
|
|
|
|
|
|
|
|
|
|
|
|
|
|
|
|
|
|
|
|
|
|
|
|
|
|
|
|
|
|
|
|
|
|
|
|
|
|
|
|
|
|
|
|
|
|
|
|
|
|
|
|
|
|
|
|
|
|
|
|
|
|
|
|
|
|
|
|
|
|
|
|
|
|
|
|
|
|
|
|
|
|
|
|
|
|
|
|
|
|
|
|
|
|
|
|
|
|
|
|
|
|
|
|
|
|
|
|
|
|
|
|
|
|
|
|
|
|
|
|
|
|
|
|
|
|
|
|
|
|
|
|
|
|
Destination machine(s)
Memory
Quick Memory Transmission
|
|
|
|
|
|
|
|
|
|
|
Starts transmitting when |
||||
|
|
|
|
|
|
|
|
|
|
|
the first page is stored in |
||||
Document(s) |
the memory. |
||||||||||||||
|
|
|
|
|
|
|
|
|
|
|
|
|
|
|
|
|
|
|
|
|
|
|
|
|
|
|
|
|
|
|
|
|
|
|
|
|
|
|
|
|
|
|
|
|
|
|
|
|
|
|
|
|
|
|
|
|
|
|
|
|
|
|
|
|
|
|
|
|
|
|
|
|
|
|
|
|
|
|
|
|
|
|
|
|
|
|
|
|
|
|
|
|
|
|
|
|
|
|
|
|
|
|
|
|
|
|
|
|
|
|
|
|
|
|
|
|
|
|
|
|
|
|
|
|
|
|
|
|
|
|
|
|
|
|
|
|
|
|
|
|
|
|
|
|
|
|
|
|
|
|
|
|
|
|
|
|
|
|
|
|
|
|
|
|
|
|
|
|
|
|
|
|
|
|
|
|
|
|
|
|
|
|
|
|
|
|
|
|
|
|
|
|
|
|
|
|
|
|
|
|
|
|
|
|
|
|
|
|
|
|
|
|
|
|
|
|
|
|
|
|
|
|
|
|
|
|
|
|
|
|
|
|
|
|
|
|
|
|
|
|
|
|
|
|
|
|
|
|
|
|
|
|
|
|
|
|
|
|
|
|
|
|
|
|
|
|
|
|
|
|
|
|
|
|
|
|
|
|
|
|
|
|
|
|
|
|
|
|
|
|
|
|
|
|
|
|
|
|
|
|
|
|
|
|
|
|
|
|
|
|
|
|
|
|
|
|
|
|
|
Destination machine(s)
Memory
•If memory overflows while document(s) are being scanned for transmission to a single destination, the machine will operate in the following manner:
•If the Quick Memory Transmission feature is set to “2:Valid” in Fax Parameter No.82 (QUICK MEMORY XMT).
The document is transmitted up to the portion that was stored in memory.
•If the Quick Memory Transmission feature is set to “1:Invalid” in Fax Parameter No.82 (QUICK MEMORY XMT).
The document is transmitted up to the portion that was stored in memory, and switches to Direct transmission and transmits the remaining document(s) in the ADF during the same phone call.
•If the memory overflows while document(s) are being scanned for transmission to multiple destinations, a message appears asking whether to transmit the successfully stored documents in memory or to cancel the transmission. Select "Yes" to start transmitting or "No" to cancel. If no action is taken within 10 seconds, the machine will start transmitting the stored documents.
•The transmission of a document terminates if memory overflows when the first page is transmitted.
•The standard setting of Memory Transmission is "2:On" and it can be changed with Fax Parameter No.5 (MEMORY (HOME) ). (See page 153)
•Ordinary Memory Transmission is available when Fax Parameter No.82 (QUICK MEMORY XMT) is set to “1:Invalid”. (See page 156)
•Fax Parameter No.82 (QUICK MEMORY XMT) can be configured to start transmitting a document when the first page is stored. This mode is called "Quick Memory Transmission". The standard setting of Quick Memory transmission is "2:Valid". (See page 156)
•Your machine is preset to transmit all documents from memory.
12

Sending Documents
Sending Documents
1
2
Set document(s) face up.
Enter the Telephone Number by any combination of the following methods:
•Quick Name Search Dialing / Email Addressing (See page 15)
•One-Touch Dialing / Email Addressing (See page 16) (See Note 1)
•ABBR. Dialing / Email Addressing (See page 17) (See Note 1)
•Manual Number Dialing (See page 18)
•Directory Search Dialing / Email Addressing (See page 18)
•Redialing the Last Dialed Numbers (See page 19)
Ex: P (PANA:Quick Name Search Dialing)
ENTER STATION(S) THEN PRESS START 00%
PANA  5551234
3
4
If you wish to add other station(s),press 


 .
.
The document is stored into memory with a file number.
Then starts dialing the Telephone Number immediately after storing the first page.
The remaining page(s) continue to store into memory.
1 STN(S) ARE SET ADD MORE OR START
|
* STORE * |
NO.002 |
|
||
|
PAGES=001 05% |
|
|
|
|
|
|
|
|
* DIALING * |
NO.002 |
|
PANA |
|
|
|
|
NOTE
1.When Fax Parameter No.119 (QWERTY KEYBOARD) is set to "1:One-Touch". (See page 157)
2.If your machine sounds an alarm (pi-pi-pi) in Step 2 above, this indicates that the Dialer is Full. (More than 50 transmission job reservations have been already reserved)
Feature
Basic Facsimile
13
Sending Documents
To Stop the Transmission
1 |
To stop transmission when the Wait to Dial message displays on the |
right: |
2
3


4 or
or 


WAIT TO DIAL No.002 <01 >PANA
>PANA
COMMUNICATION STOP ? 1:YES 2:NO
PRINT COMM. JOURNAL? 1:YES 2:NO
14
Sending Documents
Quick Name Search Dialing / Email Addressing
Quick Name Search Dialing allows you to search and display the Telephone Number or the Email Address of stations programmed in the Address Book (up to 580 stations) using the QWERTY Keyboard.
ATTENTION
• Stations need to be registered in the Address Book in advance. (See page 137)
1
2
3
Set document(s) face up.
Enter the first letter of the name you wish to search repeatedly until it is shown on the LCD display.
Ex: PANASONIC
Press 


 to store documents into memory.
ENTER STATION(S) THEN PRESS START 00%
(Telephone Number)
PANA  4567
4567
PANASONIC  7890
7890
(Email Address)
PANA  abc@panasonic.com
PANASONIC  bcd@panasonic.com
|
* STORE * |
NO.001 |
|
||
|
PAGES=001 01% |
|
|
|
|
|
|
|
|
* DIALING * |
NO.002 |
5551234 |
|
|
|
|
|
NOTE
1. You can search for another name starting with the same character by scrolling with the Cursor Keys ( 

 /
/ 

 ).
).
Feature
Basic Facsimile
15
Sending Documents
One-Touch Dialing / Email Addressing
When Fax Parameter No.119 (QWERTY KEYBOARD) is set to "1:One-Touch". (See page 157)
One-Touch Dialing allows you to display the Telephone Number or the Email Address of stations programmed as One-Touch Dialing Number using the One-Touch Key (QWERTY Keyboard).
You can program 2 stations for every One-Touch Key (QWERTY Keyboard) (a total of 80 stations) by switching from the Upper Side to the Lower Side.
ATTENTION
• Stations need to be registered in the Address Book in advance. (See page 139)
1
2
To change the One-Touch button to the Lower side < >, press


 .
.
Press the One-Touch Number using the QWERTY Keyboard.
Ex: S (13)
(Telephone Number)
<13 >PANA
>PANA  1234
1234
Lower Indicator is OFF. or
<13 >SONIC
  7890
7890
Lower Indicator turns ON.
(Email Address)
<13 >PANA
>PANA  abc@panasonic.com
Lower Indicator is OFF. or
<13 >SONIC
  bcd@panasonic.com
Lower Indicator turns ON.
16

Sending Documents
ABBR. Dialing / Email Addressing
When Fax Parameter No.119 (QWERTY KEYBOARD) is set to "1:One-Touch". (See page 157)
ABBR. Dialing allows you to display the Telephone Number or the Email Address of stations programmed as ABBR. Dialing Number (up to 500 stations) using the Number Pad.
ATTENTION
• Stations need to be registered in the Address Book in advance. (See page 140)
1
2 |
Enter the ABBR. Number using the Number Pad. (001-500) |
(Telephone Number) |
||
Ex: 022 |
|
|
|
|
|
[022]PANA |
|||
|
|
|||
|
|
5553456 |
||
(Email Address)
[022]PANA

 abc@panasonic.com
Feature
Basic Facsimile
17
Sending Documents
Manual Number Dialing (Up to 50 Stations)
Manual Number Dialing allows you to enter the Telephone Number.
1 |
Enter the Telephone Number using the Number Pad (up to 36 digits). |
|
|
|
|
|
TEL. NO. |
|
|
||
|
Ex: 5551234 |
|
|
||
|
5551234 |
|
|
||
|
|
|
|||
|
|
|
|
|
|
Directory Search Dialing / Email Addressing
Directory Search Dialing / Email Addressing allows you to search and display the Telephone Number or the Email Address of stations programmed in the Address Book using the QWERTY Keyboard.
ATTENTION
• Stations need to be registered in the Address Book in advance. (See page 137)
1
2
3
To switch to Directory Search Dialing, press 

 or
or 

 .
.
Enter the first letter(s) of the name you wish to search.
Ex: PANA
Press 

 or
or 

 .
.
ENTER LETTER(S)
(Telephone Number)
PANA 1  1234
1234
(Email Address)
PANA 1  abc@panasonic.com
PANA 1  1234
1234
PANA 2  336
336
PORT  456
456
18

Sending Documents
Redialing the Last Dialed Number
Last dialed numbers (up to 5 numbers) will be recorded and can be used for redialing.
1 |
|
|
TEL. NO. |
|
|
|
|
|
|
|
45678 |
2 |
Press |
or . |
TEL. NO. |
|
|||
|
|
|
45678 |
TEL. NO.  336
336
TEL. NO.  111222
Direct Transmission Reservation (Priority Transmission
Reservation)
If you are in a rush to send an urgent document, however there are many files in the memory, use Direct Transmission Reservation to send. The urgent document(s) will be sent immediately after the current communication is finished.
If your machine's memory is full, use Direct Transmission. You cannot send document(s) to multiple stations in this case.
1 |
|
ENTER STATION(S) |
|
Set document(s) face up. |
THEN PRESS START 00% |
||
|
|
||
2 |
|
FUNCTION |
(1-9) |
|
|
||
|
|
ENTER NO. OR |
|
3 |
|
MEMORY XMT=ON |
|
|
|
|
|
|
|
1:OFF 2:ON |
|
4 |
|
ENTER STATION |
|
|
|
|
|
|
|
THEN PRESS START 00% |
|
Feature
Basic Facsimile
Continued on the next page... |
19 |
Sending Documents
5 |
Enter the Telephone Number by any combination of the following |
|
methods: |
||
• |
Quick Name Search Dialing / Email Addressing (See page |
|
|
|
15) |
|
• |
One-Touch Dialing / Email Addressing (See page 16) (See |
|
|
Note1) |
|
• |
ABBR. Dialing / Email Addressing (See page 17) (See |
|
|
Note1) |
|
• |
Manual Number Dialing (See page 18) |
|
• |
Directory Search Dialing / Email Addressing (See page 18) |
|
• |
Redialing the Last Dialed Numbers (See page 19) |
Ex: P (PANA:Quick Name Search Dialing)
PANA  5551234
6
You can reserve to send the urgent document(s) to a single station only.
Canceling the Direct Transmission Reservation
1 |
DIRECT XMT RESERVED |
|
|
|
PANA |
2 |
CANCEL XMT RESERVE ? |
|
|
|
1:YES 2:NO |
3


4After the transmission stops, remove the document(s) from the ADF.
NOTE
1. When Fax Parameter No.119 (QWERTY KEYBOARD) is set to "1:One-Touch". (See page 157)
20
Sending Documents
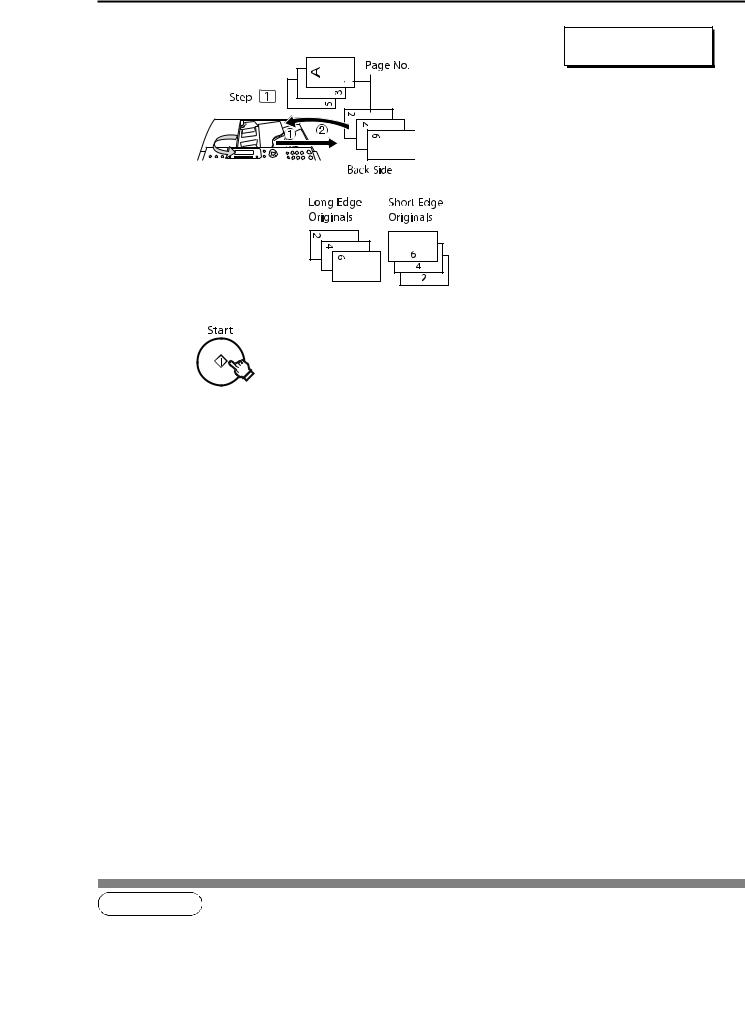
Duplex Sending
2-Sided documents can be sent in page orders
<Originals> <Received>
1/2
3/4
1
2
3
4
5
1 2
3 4
Set document(s) face up.
To select Duplex, press 


 .
.
Press |
|
|
or |
|
, then press |
|
. |
|||
|
|
|
|
|
|
|
|
|
|
|
Enter the Telephone Number. (See pages 15-19)
Ex: P (PANA:Quick Name Search Dialing)
BINDING: LONG EDGE PRESS < >, THEN SET
ENTER STATION(S) THEN PRESS START 00%
PANA  335
335
INSERT SECOND SIDE ORIENTATION AS IS
Feature
Basic Facsimile
Continued on the next page... |
21 |
Sending Documents
6
7
Place the Back side of the document(s) of Step 1 in the order and direction of ejection.
Even Number Pages
Set documents on ADF.
PRESS START TO CONTINUE
NOTE
1.If the page count for the Back side does not match the page count for the Front side (i.e. page double-fed) of the 2- Sided originals, a "SIDE 1&2 PAGE COUNTS DO NOT MATCH!" and "RESCAN ORIGINALS START WITH 1ST SIDE" will be displayed and all scanned data will be cancelled. If this occurs, restart from Step 1.
22
Sending Documents
On-Hook Dialing
Press 


 to obtain a dial tone. This feature is called “On-Hook Dialing”.
To monitor the status of a remote station, follow the steps below.
ATTENTION
•This function is available when Fax Parameter No.137 (RE-ENTER D. DIAL) is set to “1:Invalid”. (See page 159)
1 |
Set document(s) face up. |
2 |
* MONITOR * |
|
You will hear the dial tone through the monitor speaker.
3 |
Enter the Telephone Number using the Number Pad (up to 36 digits). |
|
|
|
|
||
|
* DIALING * |
||||||
|
Ex: 5551234 |
|
|
||||
|
|
|
5551234 |
|
|
||
|
|
|
|
|
|||
4 |
Your machine starts to dial the Telephone Number. |
|
|
|
|
||
|
|
|
|
||||
When you hear a beep, press |
|
|
|
|
|
|
|
|
. |
|
|
|
|
||
|
|
|
|
|
|||
Feature
Basic Facsimile
23
Sending Documents
Off-Hook Dialing (Voice Mode Transmission)
If you wish to send documents after talking with the other party first, use Voice Mode Transmission. Your machine requires the optional Handset Kit or an external telephone.
1
2
3
4
5
Set document(s) face up.
Lift the handset
Enter the Telephone Number using the Number Pad (up to 36 digits).
Ex: 5551234
Your machine starts to dial the Telephone Number.
When you hear the voice of the other party, tell the other party to receive a document.
When you hear a beep, press 


 .
.
Hang up the handset.
* DIALING * 5551234
NOTE
1. Off-Hook Dialing is not available with the second telephone line (Line-2).
24
Sending Documents
Job Build
The Job Build setting enables you to scan sets of documents that exceed the maximum capacity of the ADF. Special documents (thin paper, etc.) can be fed from the ADF one by one for Memory transmission. This function is available when Fax Parameter No.133 (JOB BUILD) is set to ”2:On”. (See page 158)
ATTENTION
•This function is available when Fax Parameter No.5 (MEMORY (HOME) ) is set to “2:On”. (See page 153)
•Fax Parameter No.82 (QUICK MEMORY XMT) is not available for this function.
•Up to 255 pages can be stored. When the number of pages exceeds 255, the memory overfull message will be displayed. Select “Yes” to start transmitting, or “No” to cancel.
If no action is taken within 5 seconds, the machine will start transmitting the stored documents.
1
2
3
1
100
Documents:100 sheets<first scan>
|
|
101 |
|
|
First and second scanned data |
|
|
|
|
||
|
|
|
|
||
|
|
|
|
is combined into one job |
|
|
|
|
|
|
|
|
|
150 |
|
||
Documents:Remaining 50 sheets<second scan>
Set document(s) face up.
Ex: 100 sheets
Enter the Telephone Number. (See Pages 15-19)
Ex: P (PANA:Quick Name Search Dialing)
1
150
150 sheets are sent at
one time (up to 255 sheets)
PANA  335
335
ANOTHER ORIGINAL? 1:YES 2:NO
•If you place the documents within 5 seconds after the first scan, the next scan will start without displaying any notice.
NOTE
1.Job Build features are not available if the Duplex sending is selected.
2.If you do not place the next documents within 5 minutes in Step 3, your machine will send the documents already scanned automatically.
3.Up to 100 pages can be scanned at one time. A maximum of 255 pages can be stored for each job. 255 pages can be stored only when memory overflow does not occur while storing documents into memory.
Feature
Basic Facsimile
Continued on the next page... |
25 |

Sending Documents
4
5
6
Set document(s) face up.
Ex: You can place the remaining 50 sheets on the ADF.
If it has taken you more than 5 seconds to set the document after Step 3, press  .
.
If you have not set the document when you pressed  in Step 5 and 5 seconds has already passed, set the document, then
press 


 .
.
If you place the documents within 5 seconds after the second scan, the next scan will start without displaying any notice.
PRESS START TO CONTINUE
26

Preventing Accidental Transmission to Wrong Destinations
The machine has the following functions to prevent you from sending the document(s) to the wrong destinations. You can restrict dialing the Telephone Number manually, and restrict sending the documents to multiple destinations. You can also re-enter the Telephone Number and confirm the destination before starting transmission.
Restricting Direct Dialing
This function enables you to restrict all manual input of the destination.
ATTENTION
•This function is available when Fax Parameter No.136 (RESTRICT D. DIAL) is set to “2:Valid”. (See page 158) You cannot dial the Telephone Number manually even if you are using an external telephone. Also, you cannot use Redial / Pause key.
•When “Waiting to Redial” is shown on the LCD display, you can start to redial after pushing the Redial / Pause key.
Restricting Multiple Destinations
Your machine has a function which enables you to send the same documents to multiple destinations using Manual Number Dialing and Auto Dialers. When you send documents to a single destination only, change the setting of Fax Parameter No.117 (MULTI STATION) to “1:Invalid”. (See page 157)
This function prevents you from sending the documents to multiple destinations by mistake.
NOTE
1.When Fax Parameter No.117 (MULTI STATION) is set to “1:Invalid”, you cannot send the documents to multiple destinations, Group Dialing is not available and Program Dial of multiple destinations is available.
Feature
Basic Facsimile
27

Preventing Accidental Transmission to Wrong Destinations
Re-entering Dialing
This function enables you to re-enter the Telephone Number when specifying the destination for Manual Number Dialing. Transmission takes place only when the second telephone number corresponds with the first one. Follow the procedure below.
ATTENTION
•This function is available when the setting of Fax Parameter No.137 (RE-ENTER D. DIAL) is set to “2:Valid”. (See page 159)
1
2
3
4
5
Set document(s) face up.
Enter the Telephone Number using the Number Pad.
Ex: 336
Enter the Telephone Number using the Number Pad again.
Ex: 336
Transmission takes place only when the entered destinations matches.
•When the numbers do not correspond, operate again from entering the first telephone number.
TEL. NO.  336
336
RE-ENTER TEL. NO.
RE-ENTER TEL. NO.  336
336
NOTE
1.When using an external telephone, the screen that appears when re-entering the Telephone Number does not appear.
2.When Fax Parameter No.136 (RESTRICT D. DIAL) is set to “2:Valid”, the screen that appears when re-entering the Telephone Number does not appear.
28
Preventing Accidental Transmission to Wrong Destinations
Confirming Destination
This function enables you to confirm the destination before starting transmission. Follow the procedure below.
ATTENTION
•This function is available when Fax Parameter No.125 (CONFIRM STATIONS) is set to “2:Valid”. (See page 157)
1 |
|
|
|
|
|
Set document(s) face up. |
|
|
|
|
|
||
|
|
|
|
|
||
|
|
|
|
|
||
|
|
|
|
|
||
|
|
|
|
|
||
|
|
|
|
|
||
|
|
|
|
|
||
2 |
|
|
|
|||
|
|
|
|
|
||
Enter the Telephone Number. (See pages 15-19) |
||||||
Ex: P (PANA:Quick Name Search Dialing) |
||||||
3
4Press 

 or
or 

 to select confirm stations.
5If you wish to add or delete stations, press 


 .
.
6
PANA  335
335
CONFIRM STN WITH < > THEN PRESS START
PANA  335
335
1 STN(S) ARE SET ADD MORE OR START
The document is stored into memory with a file number, then the
Telephone Number is dialed in sequence.
NOTE
1. If you added or deleted the station(s) during confirming the station, you need to confirm the station again.
Feature
Basic Facsimile
29
Receiving Documents
Automatic Reception
The machine receives documents automatically. The machine answers all incoming calls (including voice calls).
ATTENTION
•This mode is recommended when the telephone line is used only for fax. Set Fax Parameter No.17 (RECEIVE MODE) to “2:Auto”. (See page 154)
•When an incoming call is received, the machine starts receiving the document automatically.
Transmit
Documents are received
automatically.
Receive
Manual Reception
When your telephone rings, lift the handset of the optional Handset Kit or an external telephone. If you hear a beep from the telephone, it means someone wants to initiate a fax call.
Or, if the caller answers and says he/she wants to initiate a fax call, press 


 and then hang up the handset.
Transmit
Receive
To receive documents manually, change Fax Parameter No.17 (RECEIVE MODE) to “1:Manual” (See page 154).
1
2
Rings
 Lift the handset
* RINGING * MANUAL RCV
30
Loading...