


Operating Instructions
DVD Recorder
Model No. DMR-EX77EB
DMR-EX87EB
Quick Start Guide P8 – 13
The illustrations in these Operating Instructions show images of the silver model of DMR-EX77.
Dear customer
Thank you for purchasing this product.
For optimum performance and safety, please read these instructions carefully.
Before connecting, operating or adjusting this product, please read the instructions completely. Please keep this manual for future reference.
Note: “EB” on the packaging indicates the United Kingdom.
Trademark of the DVB Digital Video Broadcasting Project (1991 to 1996) [EX77] Declaration of Conformity No. 4526, 22th January 2007
[EX87] Declaration of Conformity No. 4525, 22th January 2007
Notice for DVB functions
This DVD Recorder is for viewing and recording free to view channels only, not Pay TV or encrypted channels.
This unit does not have an analogue broadcast tuner.
Any functions related to DVB (Digital Video Broadcasting) will work in areas where DVB-T (MPEG2) digital terrestrial broadcasting is received. Consult your local Panasonic dealer with coverage areas.
This unit has the capability for DVB specifi cations. But future DVB services cannot be guaranteed.
Instructions/notes regarding DVD-Audio are applicable to the DMR-EX87 model only.
Region number supported by this unit
Region numbers are allocated to DVD recorders and DVD-Video according to where they are sold.
The region number of this unit is “2”.
The unit will play DVDs marked with labels containing “2” or “ALL”.
Example:
2 ALL 235
Web Site: http://www.panasonic-europe.com
|
|
|
RQT8866-B |
|
|
EB |
|
|
Features
Receive Freeview using an integrated (Digital Video Broadcasting) tuner
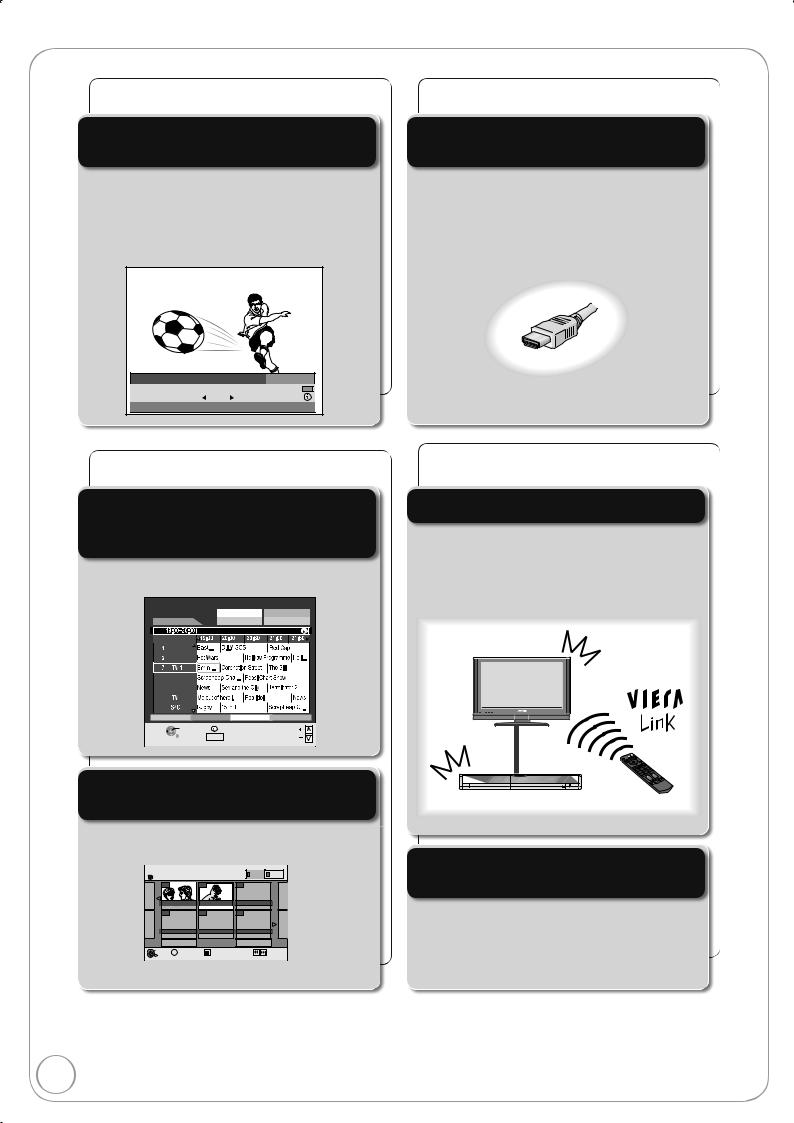
You can easily find programmes you want to watch and set them for timer recording.
You can easily select and play recorded programmes.
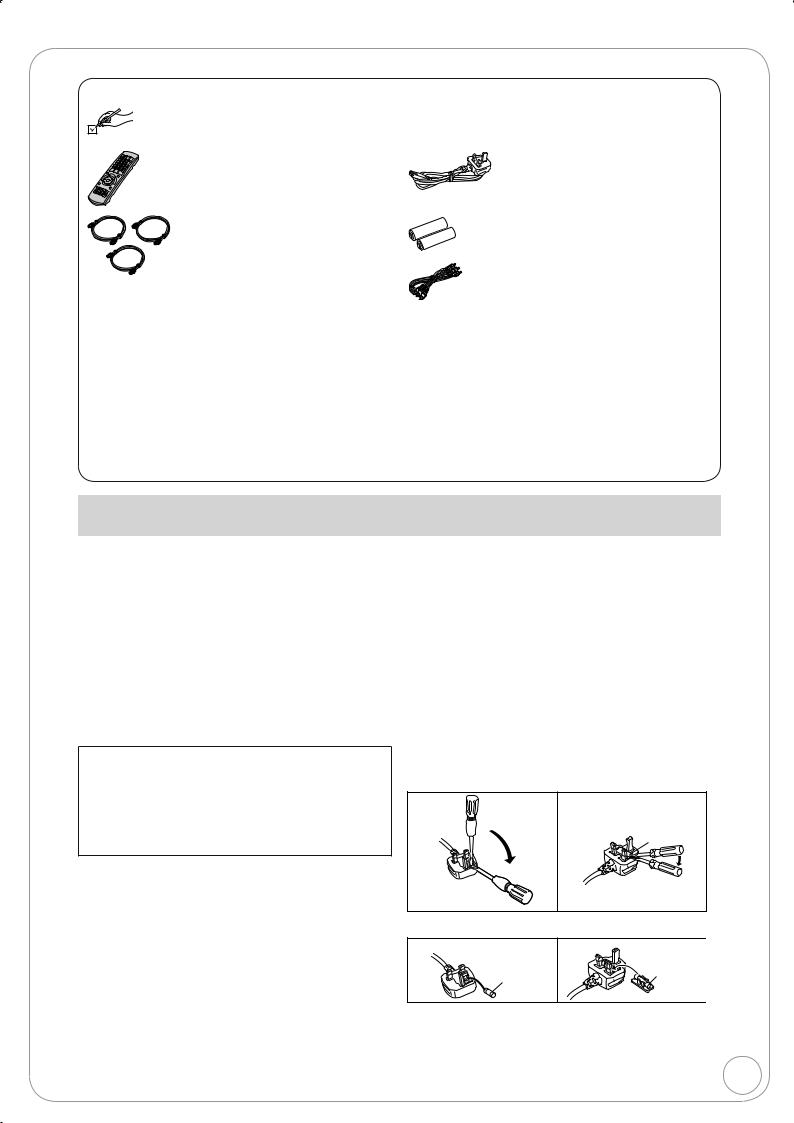
Just one cord and simple connection with HDMI terminal
Linked operations with the TV
Linked timer recordings with external equipment
RQT8866
Accessories
Please check and identify the supplied accessories. Use numbers indicated in parentheses when asking for replacement parts.
(Product numbers correct as of March 2007. These may be subject to change.)
1 Remote control (N2QAYB000127) |
1 AC mains lead (K2CT3CA00004) |
|
For use with this unit only. Do not use it |
|
with other equipment. Also, do not use |
|
cords for other equipment with this unit. |
2 RF coaxial cables (black) (K1TWACC00001)
1 RF coaxial cables (grey) (K1TWACA00001)
Sales and Support Information
Customer Care Centre
For customers within the UK: 0844 844 3852
For customers within the Republic of Ireland: 01 289 8333
Visit our website for product information
E-mail: customer.care@panasonic.co.uk
Direct Sales at Panasonic UK
Order accessory and consumable items for your product with ease and confidence by phoning our Customer Care Centre Monday–Thursday 9:00am–5:30pm, Friday 9:30am–5:30pm (Excluding public holidays).
2 Batteries for remote control (R6 Size)
1 Audio/video cable (K2KA6BA00003)
Or go on line through our Internet Accessory ordering application at www.panasonic.co.uk.
Most major credit and debit cards accepted.
All enquiries transactions and distribution facilities are provided directly by Panasonic UK Ltd.
It couldn’t be simpler!
Also available through our Internet is direct shopping for a wide range of finished products, take a browse on our website for further details.
Interested in purchasing an extended guarantee? Please call 0870 240 6284 or visit our website www.panasonic.co.uk/guarantee.
Caution for AC Mains Lead
For your safety, please read the following text carefully.
This appliance is supplied with a moulded three pin mains plug for your safety and convenience.
A 5-ampere fuse is fi tted in this plug.
Should the fuse need to be replaced please ensure that the replacement fuse has a rating of 5-ampere and that it is approved by ASTA or BSI to BS1362.
Check for the ASTA mark or the BSI mark on the body of the fuse.
If the plug contains a removable fuse cover you must ensure that it is refi tted when the fuse is replaced.
If you lose the fuse cover the plug must not be used until a replacement cover is obtained.
A replacement fuse cover can be purchased from your local dealer.
CAUTION!
IF THE FITTED MOULDED PLUG IS UNSUITABLE FOR THE SOCKET OUTLET IN YOUR HOME THEN THE FUSE SHOULD BE REMOVED AND THE PLUG CUT OFF AND DISPOSED OF SAFELY.
THERE IS A DANGER OF SEVERE ELECTRICAL SHOCK IF THE CUT OFF PLUG IS INSERTED INTO ANY 13AMPERE SOCKET.
If a new plug is to be fi tted please observe the wiring code as stated below.
If in any doubt please consult a qualifi ed electrician.
IMPORTANT
The wires in this mains lead are coloured in accordance with the following code:
Blue: Neutral, Brown: Live.
As these colours may not correspond with the coloured markings identifying the terminals in your plug, proceed as follows:
The wire which is coloured Blue must be connected to the terminal which is marked with the letter N or coloured Black or Blue.
The wire which is coloured Brown must be connected to the terminal which is marked with the letter L or coloured Brown or Red.
WARNING: DO NOT CONNECT EITHER WIRE TO THE EARTH TERMINAL WHICH IS MARKED WITH THE LETTER E, BY THE EARTH SYMBOL OR
COLOURED GREEN OR GREEN/YELLOW.
THIS PLUG IS NOT WATERPROOF—KEEP DRY.
Before use
Remove the connector cover.
How to replace the fuse
The location of the fuse differ according to the type of AC mains plug (fi gures A and B). Confi rm the AC mains plug fi tted and follow the instructions below.
Illustrations may differ from actual AC mains plug.
1. Open the fuse cover with a screwdriver.
Figure A |
Figure B |
Fuse cover
2. Replace the fuse and close or attach the fuse cover.
Figure A |
Figure B |
Fuse Fuse (5 ampere) (5 ampere)
3
RQT8866

Table of Contents
Getting Started |
|
Features ................................................................................... |
2 |
Accessories .............................................................................. |
3 |
Sales and Support Information................................................. |
3 |
Caution for AC Mains Lead....................................................... |
3 |
HDD (Hard disk drive) handling care........................................ |
6 |
Remote Control Information ..................................................... |
7 |
Unit Care .................................................................................. |
7 |
Quick Start Guide |
|
Location of Parts/Controls ..................................................................................................................................................... |
8 |
Remote Control................................................................................................................................................................ |
8 |
Main Unit.......................................................................................................................................................................... |
8 |
The Unit’s Display ............................................................................................................................................................ |
9 |
Rear Panel ....................................................................................................................................................................... |
9 |
Basic Connection................................................................................................................................................................. |
10 |
Connecting to a Television only...................................................................................................................................... |
10 |
Adding a Satellite Receiver: Connecting to a Television and a Satellite Receiver ......................................................... |
11 |
Setting the Channels and Clock .......................................................................................................................................... |
12 |
Clock Setting .................................................................................................................................................................. |
13 |
Basic Operations |
|
Watching Television ................................................................ |
14 |
Watching Satellite Programmes................................................... |
14 |
Playback ................................................................................. |
15 |
Playing Discs ............................................................................... |
15 |
Recording Television Programmes ........................................ |
16 |
Timer Recording..................................................................... |
17 |
Deleting Titles......................................................................... |
18 |
Delete Navigator .......................................................................... |
18 |
Deleting Titles During Playback ................................................... |
18 |
Playing Still Pictures (JPEG) .................................................. |
34 |
Playing MP3s.......................................................................... |
37 |
Information Messages ............................................................ |
38 |
Digital Channel Information ......................................................... |
38 |
Status Messages ......................................................................... |
39 |
New Service Message ................................................................. |
39 |
FUNCTION MENU Window............................................... |
39 |
Linked Operations with the TV (VIERA Link “HDAVI |
|
Control™”/Q Link) ............................................................. |
40 |
Easy control only with VIERA remote control ........................ |
41 |
Advanced Features |
|
Important Notes for Recording ............................................... |
19 |
Advanced Recording .............................................................. |
20 |
Recording Modes and Durations ................................................. |
20 |
When the format confi rmation screen is displayed ...................... |
21 |
When removing a Recorded or Copied Disc................................ |
21 |
Specifying the Recording Time .................................................... |
21 |
Direct TV Recording..................................................................... |
21 |
Flexible Recording ....................................................................... |
22 |
Playing while you are recording ................................................... |
22 |
Recording from a Satellite Receiver ....................................... |
23 |
Manual Recording........................................................................ |
23 |
Linked timer recordings with external equipment (SKY Digital |
|
STB/satellite receiver)—EXT LINK ......................................... |
23 |
Recording from an External Device........................................ |
24 |
Recording from a VCR, etc .......................................................... |
24 |
Recording from a DV Camcorder................................................. |
25 |
Advanced Timer Recording .................................................... |
26 |
Manual timer recordings .............................................................. |
26 |
To cancel a timer recording in progress ....................................... |
27 |
To deactivate timer programme |
|
(e.g. to interrupt a daily or weekly timer programming)........... |
27 |
Notes on timer recording ............................................................. |
27 |
Check, Change, or Delete Programmes ...................................... |
28 |
Relief Recording .......................................................................... |
29 |
Auto Renewal Recording ............................................................. |
29 |
Making timer recordings on the television ................................... |
29 |
TV Guide........................................................................... |
30 |
Using the TV Guide................................................................ |
30 |
Selecting the programme from the desired programme type or |
|
category............................................................................ |
31 |
Advanced Playback ................................................................ |
32 |
Selecting Titles to Play................................................................. |
32 |
Search ......................................................................................... |
32 |
Skip.............................................................................................. |
32 |
Quick View (Play 1.3)................................................................ |
32 |
Direct Play.................................................................................... |
33 |
Slow-motion Play ......................................................................... |
33 |
Frame-by-Frame Viewing ............................................................. |
33 |
Time Slip...................................................................................... |
33 |
Manual Skip ................................................................................. |
33 |
Create Chapters .......................................................................... |
33 |
Advanced Editing |
|
Entering Text........................................................................... |
42 |
Titles—Editing......................................................................... |
42 |
Accessing the Title View .............................................................. |
42 |
Title Operations............................................................................ |
43 |
Chapters—Creating, Editing ................................................... |
45 |
Accessing the Chapter View ........................................................ |
45 |
Chapter Operations...................................................................... |
45 |
Creating, Editing and Playing Playlists ................................... |
46 |
Accessing the Playlist View.......................................................... |
46 |
Creating Playlists ......................................................................... |
46 |
Editing Playlists/Chapters ............................................................ |
46 |
Still Pictures—Editing ............................................................. |
48 |
Accessing the Album/Picture View............................................... |
48 |
Album/Picture Operations ............................................................ |
48 |
Delete Navigator .......................................................................... |
49 |
Copying titles or playlists................................................... |
50 |
Copy ...................................................................................... |
52 |
Copying using the copying list—Advanced Copy................... |
53 |
Copying a fi nalised DVD-R, DVD-R DL, |
|
DVD-RW (DVD-Video format), +R and +R DL.................. |
55 |
Copying SD Video from an SD Card...................................... |
55 |
Copying Still Pictures.............................................................. |
56 |
Copying using the copying list ..................................................... |
56 |
Copying all the still pictures on a card—Copy All Pictures........... |
57 |
Setting Menus |
|
Setting On-Screen Display ..................................................... |
58 |
Accessing the On-Screen Display.............................................. |
58 |
HDD, DVD and Card Management......................................... |
60 |
Accessing the Management Menus............................................. |
60 |
Setup Menu ............................................................................ |
62 |
Accessing the Setup Menu .......................................................... |
62 |
Channel Settings .................................................................... |
62 |
Playback/Recording Settings.................................................. |
64 |
Picture Settings ...................................................................... |
64 |
Sound Settings ....................................................................... |
65 |
Display and Connection Settings............................................ |
66 |
System Settings...................................................................... |
68 |
RQT8866

Other Settings |
|
Other Settings......................................................................... |
69 |
Child Lock .................................................................................... |
69 |
Using the Unit’s Remote Control to Operate the TV .................... |
69 |
Reference |
|
Additional Connections........................................................... |
70 |
Adding a VCR: Connecting to a Television and a Video Cassette |
|
Recorder ................................................................................. |
70 |
Using an Audio/Video Cable (included) ....................................... |
71 |
Using an S Video Cable (S Video Cable not included) ................ |
71 |
Using Component Video Cables (Component Video Cables not |
|
included) ................................................................................. |
71 |
Using an Audio Cable for Better Sound ....................................... |
72 |
Using an Optical Digital Audio Cable for Better Sound (Optical |
|
Digital Audio Cable not included)............................................ |
72 |
Connecting with an HDMI (High Defi nition Multimedia Interface) |
|
Terminal .................................................................................. |
73 |
HDD, Disc and Card Handling ................................................ |
74 |
Usable Discs for Recording and Playback ................................... |
74 |
Play-only Discs ............................................................................ |
75 |
Discs that Cannot be Played........................................................ |
75 |
Types of disc or title recorded on HDD for the type of connected |
|
TV ........................................................................................... |
75 |
Cards Usable on this Unit ............................................................ |
76 |
Suitable SD Cards ....................................................................... |
76 |
MP3s and Still Pictures (JPEG).............................................. |
77 |
MP3 File Information.................................................................... |
77 |
Still Picture (JPEG) Information ................................................... |
77 |
Media Handling (Disc/SD Card) ............................................. |
78 |
Inserting Discs ............................................................................. |
78 |
Inserting/Removing the SD Card ................................................. |
78 |
Disc and Card Care ..................................................................... |
78 |
Troubleshooting Guide ...................................................... |
79 |
When Other Panasonic Products Respond to this Remote |
|
Control .................................................................................... |
79 |
To Reset This Unit........................................................................ |
79 |
General Issues: Power ................................................................. |
80 |
General Issues: Displays ............................................................. |
80 |
General Issues: Operation ........................................................... |
81 |
General Issues: TV Guide............................................................ |
82 |
General Issues: DVB-T ................................................................ |
82 |
General Issues: VIERA Link......................................................... |
83 |
Playback Issues: Picture .............................................................. |
84 |
Playback Issues: Sound............................................................... |
85 |
Playback Issues: Operation ......................................................... |
86 |
Recording Issues: Recording/Timer Recording/ |
|
Copying/External input............................................................ |
87 |
Editing Issues: HDD, DVD & SD .................................................. |
89 |
Editing Issues: Still Pictures......................................................... |
90 |
Frequently Asked Questions ............................................. |
91 |
Setup ........................................................................................... |
91 |
Discs ............................................................................................ |
91 |
Recording .................................................................................... |
92 |
TV Guide...................................................................................... |
92 |
DVB-T .......................................................................................... |
92 |
Messages ............................................................................... |
93 |
On the Unit’s Display.................................................................... |
93 |
On the TV..................................................................................... |
94 |
Glossary ................................................................................. |
96 |
Safety precautions.................................................................. |
97 |
Specifi cations ......................................................................... |
98 |
Index.......................................................................... |
Back cover |
|
P8 – 13 |
|
|
Quick Start Guide |
|
|
Basic Operations |
|
|
Advanced Features |
|
|
Advanced Editing |
|
About descriptions in these operating instructions |
Setting Menus |
|
|
||
These operating instructions are applicable to models DMR-EX77 |
|
|
and DMR-EX87. Unless otherwise indicated, illustrations in these |
|
|
operating instructions are of DMR-EX77. |
Settings |
|
[EX77] : indicates features applicable to DMR-EX77 only. |
||
|
||
[EX87] : indicates features applicable to DMR-EX87 only. |
|
|
Instructions/notes regarding DVD-Audio are applicable to the |
Other |
|
Pages to be referred to are indicated as “¼ ”. |
||
DMR-EX87 model only. |
|
|
|
Reference |
RQT8866
HDD (Hard disk drive) handling care
The HDD is a high precision recording instrument and because of its long recording capability and high speed operation it is a very special device that is easily susceptible to damage.
As a basic rule, save important content to a disc as backup.
The HDD is a device that is not built to withstand vibration/shock or dust
Depending on the setup environment and handling of the HDD some content may become damaged and play and recording may no longer be possible. Especially during operation, do not subject the unit to any vibration, shock, or remove the AC mains lead from the household mains socket. In the event of a power failure during recording or play, the content may be damaged.
The HDD is a temporary storage device
The HDD is not an everlasting storage device for recorded content. Use the HDD as a temporary storage place for one-off viewing, editing, or saving recorded content to a disc.
Immediately save (backup) all content as soon as you feel there may be a problem with the HDD
If there is an irregularity within the HDD, repetitive strange sounds or problems with picture (block noise, etc.) may result. Using the HDD in this condition may worsen the problem and in the worst case the HDD may no longer be usable. As soon as you notice this type of problem, copy all content to disc and request service. Recorded content (data) on a HDD that has become unusable is unrecoverable.
When the HDD has been automatically entered energy save mode (¼ below), or the unit is turned on or off, there may be an unexpected sound. This does not indicate a problem with this unit.
Setup precautions
Do not place in an enclosed area where the rear cooling fan and the cooling vents on the side are covered up.
Place the unit on a surface that is flat and not subject to vibration or impact.
Do not place on anything that generates
heat like a video cassette recorder, etc. |
|
DO NOT |
|
|
|
|
|
Do not place in an area often subject to |
|
|
|
temperature changes. |
|
|
|
|
This unit |
|
|
Place in an area where condensation does |
|
|
|
|
|
|
|
|
VCR |
|
|
not occur. Condensation is a phenomenon |
|
|
|
where moisture forms on a cold surface |
|
|
|
|
|
|
|
when there is an extreme change in |
|
|
|
temperature. Condensation may cause internal damage to the unit.
Conditions where condensation may occur
–When there is an extreme change in temperature (moving from a very hot location to a very cold location, or vice versa, or when
subjected to an air conditioner or when cooled air directly impacts the unit). When the HDD (warms during operation) is subjected to cold air, condensation may form on the inside of the HDD and may cause damage to the HDD heads, etc.
–When there is high humidity or a lot of steam in the room.
–During the rainy season.
In the above situation, without turning the unit on, let the unit adjust to the room temperature and wait 2–3 hours until condensation is gone.
Cigarette smoke etc. causes malfunction or breakdown
The unit may breakdown if cigarette smoke or bug spray/vapor, etc. gets inside the unit.
While operating
Do not move the unit or subject to vibration or impact. (The HDD may become damaged.)
Do not remove the AC mains lead from the household mains socket, or fl ip the power breaker switch.
While the unit is on, the HDD is rotating at high speed. Sound or movement due to rotation is normal.
When moving the unit
Turn the unit off. (Wait until “BYE” disappears from the display.)Remove the AC mains lead from the household mains socket.
Move only after the unit has come to a complete stop (approx. 2 minutes) in order to avoid subjecting to vibration and shock. (Even after turning the unit off, the HDD continues operating for a short time.)
HDD recording time remaining
This unit records using a VBR (Variable bit rate) data compression system to vary recorded data segments to match video data segments which may cause differences in the displayed amount of time and space remaining for recording.
If the remaining amount of time is insuffi cient, delete any unwanted titles to create enough space before you start recording. (Deleting a playlist will not increase the amount of time.)
The HDD automatically enters energy save mode
The HDD has been automatically entered energy save mode. (The HDD continues to rotate at high speed while the unit is on. In order to extend the life of the HDD, the HDD will be entered energy save mode if no operation has been performed for 30 minutes while there is no disc on the disc tray.)
While in energy save mode play or recording may not start right away because the HDD takes time to be re-activated.
When not using the unit, we recommend removing the disc in the tray in order to set the HDD to the energy save mode.
Indemnity concerning recorded content
Panasonic does not accept any responsibility for damages directly or indirectly due to any type of problems that result in loss of recording or edited content (data), and does not guarantee any content if recording or editing does not work properly. Likewise, the above also applies in a case where any type of repair is made to the unit (including any other non-HDD related component).
6
RQT8866
Remote Control Information
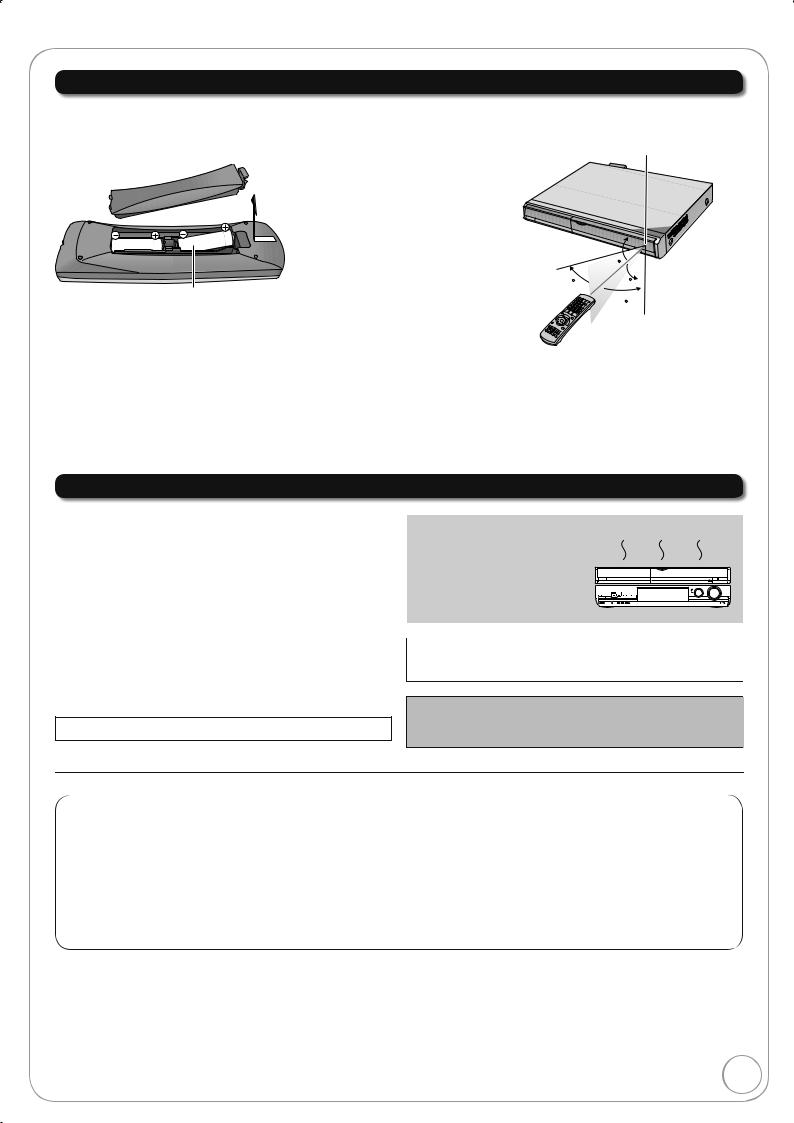
About batteries
Insert so the poles ( and ) match those in the remote control.
When closing the lid, insert it from the (minus) side.
Do not use rechargeable type batteries.
Using the remote control
Aim at the sensor, avoiding obstacles, up to a maximum range of 7 m directly in front of the unit.
20
30  20
20
R6/LR6, AA
30
Do not mix old and new batteries.
Do not use different types at the same time.
Do not heat or expose to fl ame.
Do not take apart or short circuit.
Do not attempt to recharge alkaline or manganese batteries.
Do not use batteries if the covering has been peeled off.
Mishandling of batteries can cause electrolyte leakage which can damage items the fl uid contacts and may cause a fi re.
Remove if the remote control is not going to be used for a long period of time. Store in a cool, dark place.
Unit Care
The precision parts in this unit are readily affected by the environment, especially temperature, humidity, and dust. Cigarette smoke also can cause malfunction or breakdown.
To clean this unit, wipe with a soft, dry cloth.
Never use alcohol, paint thinner or benzine to clean this unit.
Before using chemically treated cloth, carefully read the instructions that came with the cloth.
Observe the following points to ensure continued listening and viewing pleasure.
Dust and dirt may adhere to the unit’s lens over time, making it impossible to record or play discs.
Use the DVD lens cleaner about once every year, depending on frequency of use and the operating environment. Carefully read the lens cleaner’s instructions before use.
DVD lens cleaner: RP-CL720E
DO NOT
Do not place the unit on amplifiers or equipment
that may become hot.
The heat can damage the unit.
Select a position with good ventilation when installing the unit. Do not block the cooling fan on the rear of the unit.
The manufacturer accepts no responsibility and offers no compensation for loss of recorded or edited material due to a problem with the unit or recordable media, and accepts no responsibility and offers no compensation for any subsequent damage caused by such loss.
Examples of causes of such losses are
A disc recorded and edited with this unit is played in a DVD Recorder or computer disc drive manufactured by another company.
A disc used as described above and then played again in this unit.
A disc recorded and edited with a DVD Recorder or computer disc drive manufactured by another company is played in this unit.
RQT8866
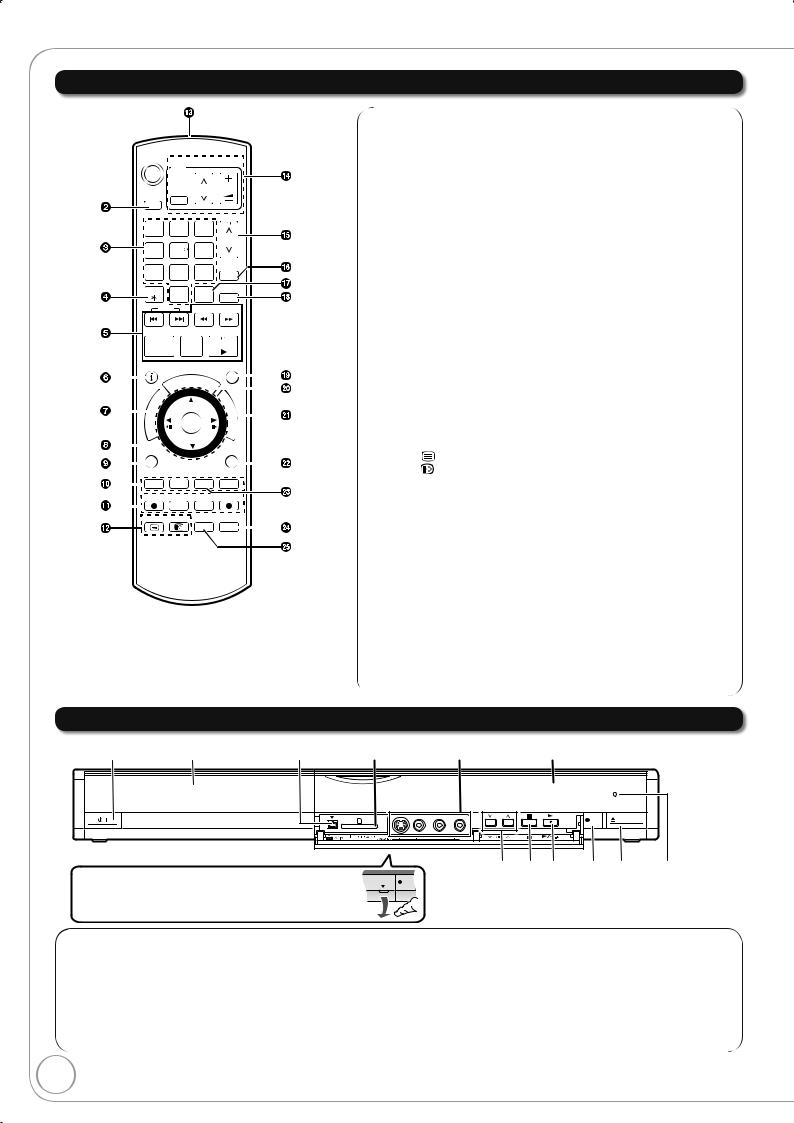
Location of Parts/Controls
Remote Control
DVD


DRIVE
SELECT
PAGE
CH
PROG/CHECK
|
|
|
|
|
EXIT |
||
|
STATUS |
||||||
|
|
|
GUIDE |
|
|
|
|
|
|
|
|
|
|
||
|
|
|
|
|
|
||
|
|
I |
I |
||||
|
|
||||||
|
|
V |
O |
|
|||
|
|
A |
N |
||||
|
|
N |
|||||
|
|
T |
M |
||||
|
|
C |
|||||
|
|
R |
E |
||||
|
E |
N |
|||||
|
|
D |
|||||
|
|
I |
|
|
|
||
|
|
|
|
|
|
||
OPTION |
RETURN |
||||||
|
|
|
|
CREATE |
|
|
|
|
|
|
|
|
|
|
|
|
|
|
|
CHAPTER |
|
|
|
|
|
|
|
DISPLAY |
TIME SLIP |
||
|
|
|
|
||||
|
|
|
|
||||
|
|
|
|
|
|
|
|
]: Show subtitles............................................................... |
(¼ 38) |
Transmission window |
(¼ 69) |
TV operations .......................................................... |
|
Channel select/Change pages in the |
(¼ 16, 30) |
TV Guide list...................................................... |
|
Show timer recording list ......................................... |
(¼ 26) |
Input select (Tuner, AV1, AV2, AV3, DV) ..... |
(¼ 14, 23, 24) |
Skip approx. 30 seconds forward ............................ |
(¼ 33) |
Exit the menu screen |
(¼ 14, 17, 30) |
Show the TV Guide screen.......................... |
|
Show FUNCTION MENU window ........................... |
(¼ 39) |
Return to previous screen |
(¼ 33) |
Create chapters....................................................... |
|
Skip the specifi ed time ............................................ |
(¼ 33) |
Show on-screen display .......................................... |
(¼ 58) |
Menu for disc playback and switching DVB multi audio etc.
Main Unit
|
Disc tray |
|
|
|
The unit’s display |
REC |
OPEN/CLOSE |
Opening the front panel
Place your fi nger on the protruding section below the and press down to fl ip open the front panel.
REC |
Remote control signal sensor
8
RQT8866
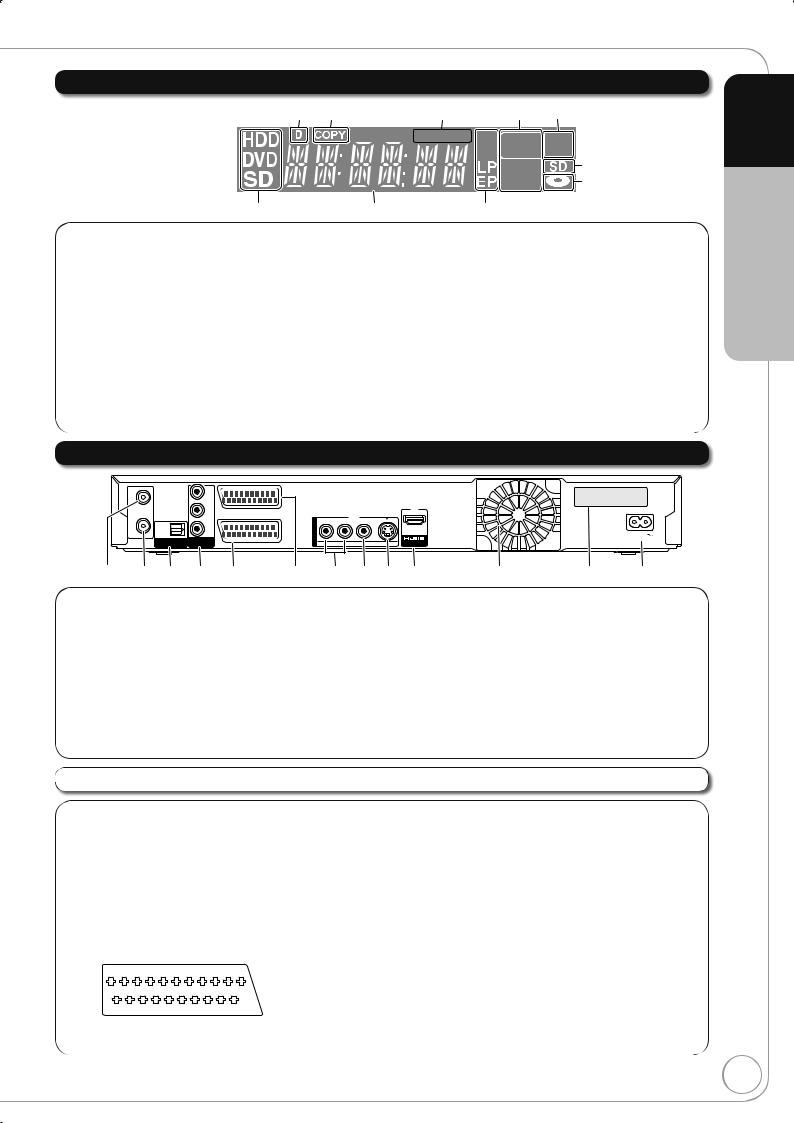
The Unit’s Display
1 2
8 9
Digital broadcast indicator
Lights when the unit is receiving digital broadcast or TV Guide data.
Copying indicator
Linked timer recordings with external equipment
indicator........................................................ |
(¼ 23) |
Recording/Playback indicator |
|
Timer recording indicator.............................. |
(¼ 17) |
On:
When a Timer recording programme is registered
Flashes:
The Timer recording indicator fl ashes when the unit cannot go to Timer recording standby.
3 4 5

 REC
REC
PLAY |
6 |
|
7 |
||
|
||
: |
|
SD Card slot indicatorDisc indicator
This indicator lights up when a disc that is supported by this unit is inserted.
Drive HDD, DVD or SD indicatorMain display section
Current time/playback counter, various messages.
Recording mode indicator
Rear Panel
RF |
|
Y |
|
|
DMR-EX77EB-S |
IN |
|
|
|
||
|
|
PB |
|
|
SER NO. VQ7AA01002 R |
|
|
|
|
|
|
|
|
|
AV1 |
|
|
|
|
|
(TV) |
|
|
OUT |
OPTICAL |
PR |
|
OUT |
|
RF |
|
|
AC IN |
||
|
DIGITAL AUDIO OUT |
COMPONENT |
|
|
|
|
|
|
R-AUDIO-L VIDEO S VIDEO AV OUT |
||
|
(PCM/BITSTREAM) |
VIDEO OUT |
AV2 (EXT) |
|
1 2 3 4 5 6 7 8 9 : ; < =
Aerial input terminal ......................... |
(¼ 10, 11, 70) |
Aerial output terminal ....................... |
(¼ 10, 11, 70) |
Digital audio output terminal......................... |
(¼ 72) |
COMPONENT VIDEO OUT (PROGRESSIVE/ |
|
INTERLACE) terminals ................................ |
(¼ 71) |
Y = Luminance signal (brightness), PB = Chrominance signal (colour difference), PR = Chrominance signal (colour difference)
AV2 (EXT) 21-pin Scart terminal ............ |
(¼ 11, 70) |
Connection of an external unit |
|
AV1 (TV) 21-pin Scart terminal..... |
(¼ 10, 11, 70) |
TV set connection |
|
AUDIO output terminals .................. |
(¼ 71, 72) |
Video output terminal ............................ |
(¼ 71) |
S VIDEO output terminal ....................... |
(¼ 71) |
HDMI AV OUT terminal ......................... |
(¼ 73) |
Digital audio and video output terminal
Cooling fanSerial number
AC IN~ = Power supply
Connection for the AC mains lead
The 21-pin Scart terminal transmits both input and output signals for picture and sound. TVs equipped with the same type of terminal can be connected here.
This type of terminal is also called Peritel, Euro Connector and Euro AV.
When the unit is connected to a Q Linkcompatible TV with a fully wired 21-pin Scart cable, you can use convenient functions of Q Link.
1 3 5 7 9 11 13 15 17 19
21
2 4 6 8 10 12 14 16 18 20
AV1 Scart terminal (TV) |
AV2 Scart terminal (EXT) |
||
1 |
Audio output CH2 (R) |
1 |
Audio output CH2 (R) |
2 |
Audio input CH2 (R) |
2 |
Audio input CH2 (R) |
3 |
Audio output CH1 (L) |
3 |
Audio output CH1 (L) |
4 |
Audio ground |
4 |
Audio ground |
5 |
Blue ground |
5 |
Blue ground |
6 |
Audio input CH1 (L) |
6 |
Audio input CH1 (L) |
7 |
Blue output |
7 |
Blue input |
8 |
Switching voltage output |
8 |
Switching voltage input |
9 |
Green ground |
9 |
Green ground |
10 |
Q Link control signal |
10 |
Reserved |
11 |
Green output |
11 |
Green input |
12 |
Reserved |
12 |
Reserved |
13 |
Red ground |
13 |
Red ground |
14 |
Blanking ground |
14 |
Blanking ground |
15 |
Red output/chrominance output |
15 |
Red input/chrominance input |
16 |
Blanking output |
16 |
Blanking input |
17 |
Video output ground |
17 |
Video output ground |
18 |
Video input ground |
18 |
Video input ground |
19 |
Video output/luminance output |
19 |
Video output |
20 |
Video input |
20 |
Video input/luminance input |
21 |
Ground |
21 |
Ground |
Quick Start Guide STEP 1
RQT8866
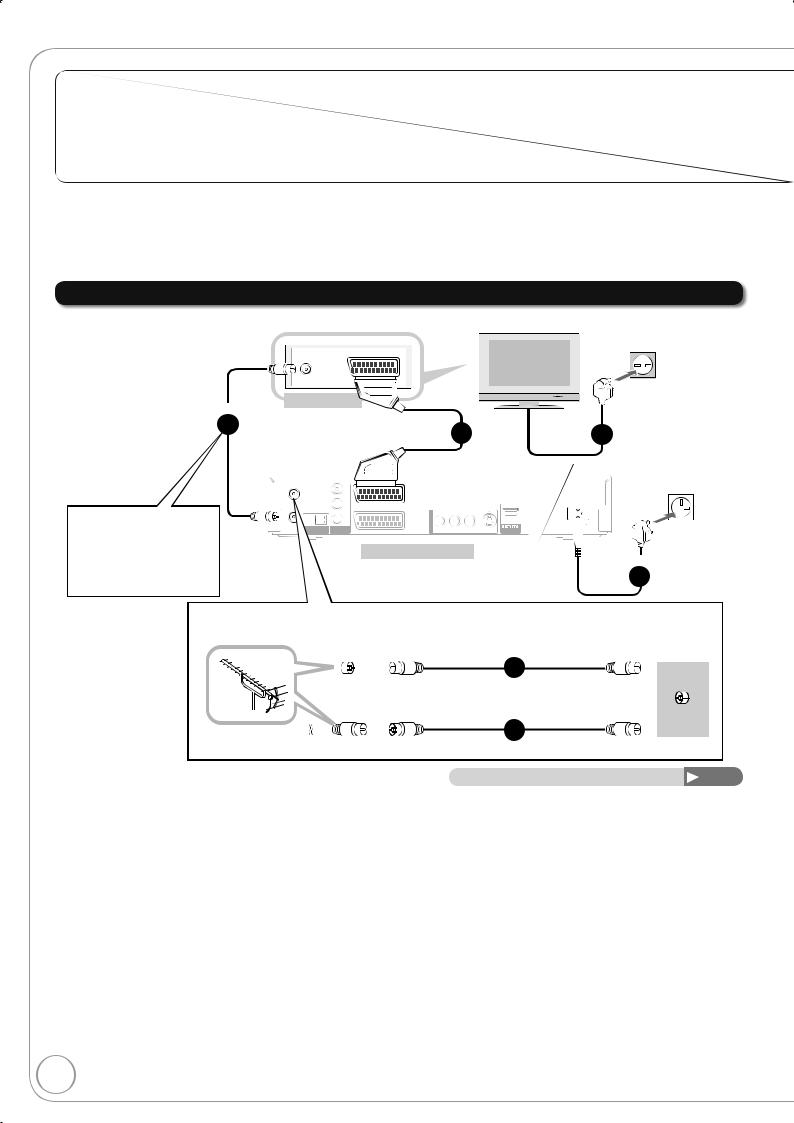
Basic Connection
Use of the supplied RF coaxial cable
To prevent interference patterns from appearing on your TV, use only the supplied RF coaxial cables when you connect this unit to your TV and aerial outlet or aerial cable and Satellite receiver.
Keep the RF coaxial cables as far away as possible from other cables.
Do not roll up the RF coaxial cables.
Before connection, turn off the mains for all connected equipment and read the appropriate operating instructions.
Be sure to read the Caution for AC Mains Lead on page 3.
Connecting to a Television only
The RF coaxial cable cannot be used for showing pictures from the unit. The unit must be connected using another method, e.g. 21-pin Scart cable to show pictures from the unit on the television set.
To household
mains socket
AV IN
RF IN
Rear of TV
Step |
|
|
|
|
|
|
|
|
|
|
|
|
|
|
|
|
||
|
|
|
|
|
|
|
|
|
|
|
|
|
|
|
|
|||
2 |
|
|
|
|
|
Step |
|
|
|
|
|
|
|
|
Step |
|
||
|
|
|
|
|
|
|
|
|
|
|
|
|
|
|
|
|
|
|
3 |
|
4 |
|
|
|
|||||||||||||
|
|
|
|
|
|
|
||||||||||||
|
|
|
|
|
|
|
|
|
|
|
|
|
|
|
|
To household |
||
|
|
IN |
|
Y |
|
|
|
|
|
|
|
|
mains socket |
|||||
|
|
RF |
|
|
|
|
|
|
|
|
|
|
|
|
|
|
|
|
|
|
|
|
|
|
|
|
|
|
|
|
|
|
|
|
|
|
|
|
|
|
|
|
|
|
|
|
|
|
|
|
|
|
|
|
|
|
|
|
|
|
|
|
|
|
|
|
|
|
|
|
|
|
|
|
|
|
|
|
|
|
|
|
|
|
|
|
|
|
|
|
|
|
|
|
|
|
|
|
|
|
|
|
|
|
|
|
|
|
|
|
|
|
|
|
|
|
|
|
|
|
|
|
|
|
|
|
|
|
|
|
|
|
|
|
|
|
|
|
|
|
|
|
|
|
|
|
|
|
|
|
|
|
|
|
|
|
|
|
|
|
|
|
|
|
|
|
|
|
|
|
Step
4
Use one of the RF coaxial cable (black or grey) to connect this unit’s RF IN terminal to your aerial socket or aerial cable.
To the aerial |
|
|
|
RF coaxial cable (included, grey) |
|||||
|
|
|
|
|
|
|
|
|
Step |
|
|
|
|
|
|
|
|
|
1 |
|
|
|
|
|
|
|
|
|
|
|
|
|
|
|
|
|
|
|
or |
|
|
|
|
|
|
||||
|
|
|
|
|
|
|
|
|
RF coaxial cable (included, black) |
|
|
|
|
|
|
|
|
|
Step |
|
|
|
|
|
|
|
|
|
1 |
|
|
|
|
|
|
|
|
|
|
To this unit
RF
IN
Connections other than the 21-pin Scart cable |
71–73 |
RF coaxial cable (included) from the aerial socket or aerial cable to the “RF IN” on the unit.RF coaxial cable (included, black) from the “RF OUT” on the unit to the “RF IN” on the TV.21-pin Scart cable from the “AV1 (TV)” on the unit to the “AV IN” on the TV.
AC mains lead (included) from the “AC IN~” on the unit and the TV to a household mains socket.
After completing the above connections, proceed to the TV Tuning (¼ 12).
10
RQT8866
Using a fully wired 21-pin Scart cable
–You can use a variety of Q Link functions by connecting the unit to a Q Link compatible television (¼ 40).
–You can enjoy high-quality viewing by connecting the unit to an RGB compatible television.
“AV1 Output” in the Setup menu is set to “RGB 1 (without component)” or RGB 2 (without component)” (¼ 67)
–“AV2 Input” settings in the Setup menu (¼ 67)
Before connection, turn off the mains for all connected equipment and read the appropriate operating instructions.
Be sure to read the Caution for AC Mains Lead on page 3.
Adding a Satellite Receiver: Connecting to a Television and a Satellite Receiver
The RF coaxial cable cannot be used for showing pictures from the unit. The unit must be connected using another method, e.g. 21-pin Scart
cable to show pictures from the unit on the television set.
Step
3
To the aerial
Step
2
Step
1
AV IN
RF IN
Rear of TV
RF
IN Y
PB
AV1
(TV)
PR
OMPONENT |
|
VIDEO OUT |
) |
unit
AV OUT
RF IN |
RF OUT |
Rear of satellite receiver
To household mains socket
Step
4 |
Step |
|
6 |
||
|
To household mains socket
OUT |
|
AC IN |
|
R-AUDIO-L |
VIDEO |
AV OUT |
|
Step
Step
5
6
To household mains socket
satellite antenna
Step
6
Connections other than the 21-pin Scart cable |
71–73 |
RF coaxial cable from the aerial to the “RF IN” on the satellite receiver.
RF coaxial cable (included, black) from the “RF OUT” on the satellite receiver to the “RF IN” on the unit.
RF coaxial cable (included, black) from the “RF OUT” on the unit to the “RF IN” on the TV.21-pin Scart cable from the “AV1 (TV)” on the unit to the “AV IN” on the TV.
21-pin Scart cable from the “AV OUT” on the satellite receiver to the “AV2 (EXT)” on the unit.AC mains lead (included) from the “AC IN~” on the unit, the TV and the satellite receiver to a
household mains socket.
After completing the above connections, proceed to the TV Tuning (¼ 12).
Quick Start Guide STEP 2
RQT8866
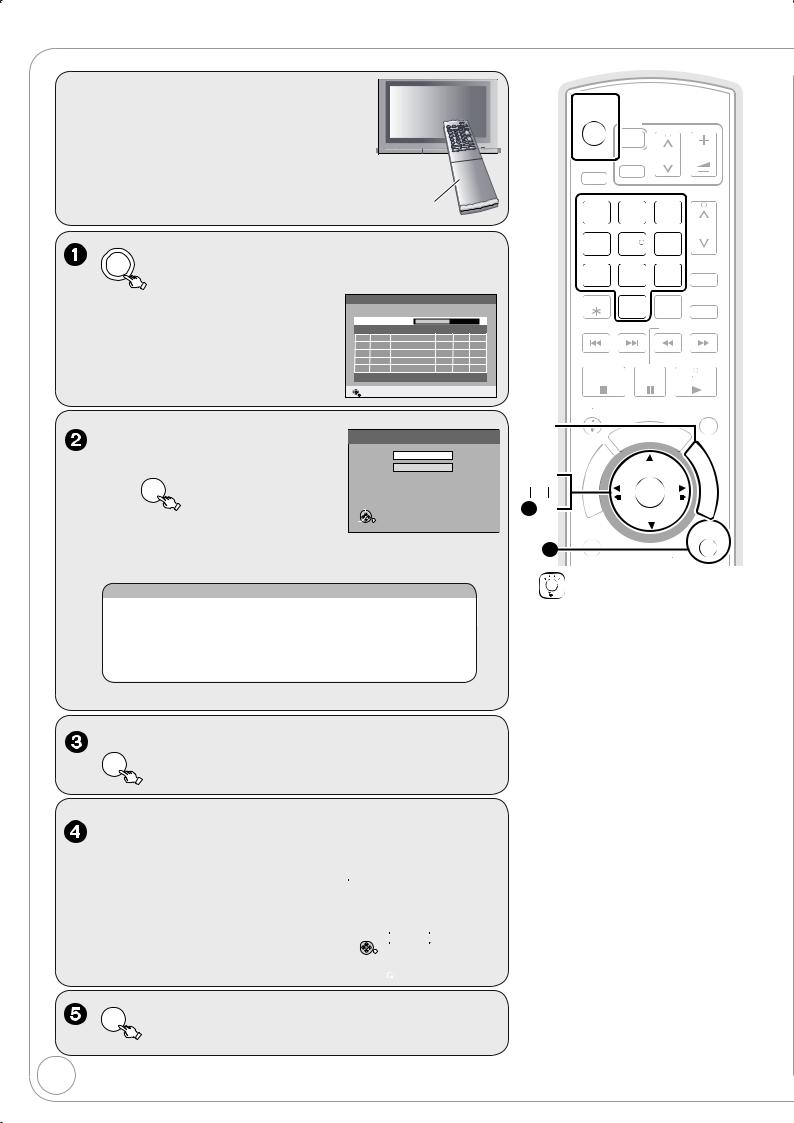
Setting the Channels and Clock
Preparation: |
|
Turn on the mains for the television |
|
(and connected equipment) and select |
|
the appropriate AV input to suit the |
|
connections to this unit. |
|
These are the first settings you make upon |
|
buying the unit. You don’t need to make |
|
these settings again. |
TV’s remote control |
DVD
to turn the unit on.
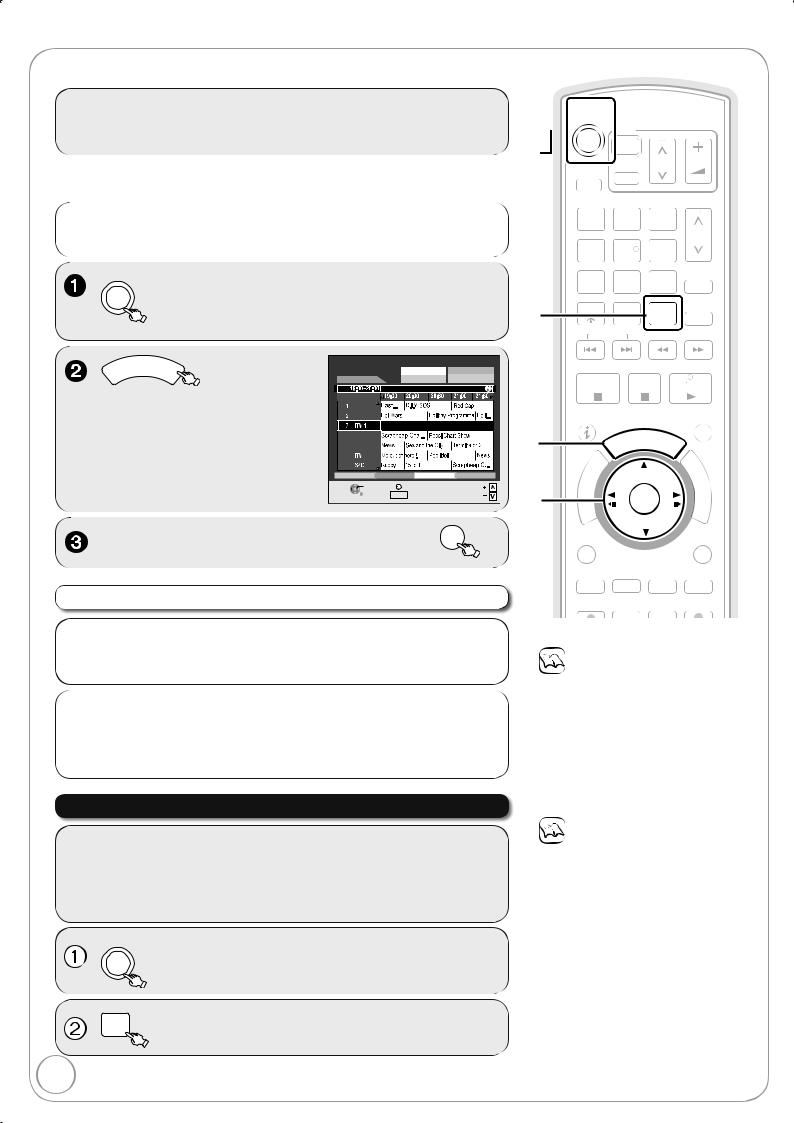
DVB Auto-Setup starts. The unit will search |
|
DVB Auto-Setup |
|
|
||
|
|
|
|
|
|
|
for the terrestrial digital channels. This takes |
Prog. Channel |
Service Name |
Net ID TS ID |
Quality |
||
|
Please wait! |
Ch 21 |
|
|
68 |
|
about 5 minutes. |
2 |
23 |
BBC |
12302 |
12289 |
9 |
|
1 |
23 |
BBC ONE |
12302 |
12289 |
9 |
– TV channels are sorted and stored in |
|
|
|
|
|
|
channel numbers order sent by the |
RETURN: to cancel |
|
|
|
||
broadcasters and cannot be changed. |
RETURN |
|
|
|
|
|
|
|
|
|
|
|
|
Power Save Function:, to select “On” or “Off” then OK
|
SELECT |
|
Off: With Quick Start |
|
|
|
|
–Set to “On” to reduce power |
OK |
|
function and AV2 loop-through |
|
RETURN |
in standby. |
|
|
|
||
consumption in standby mode. |
|
|
|
–Refer to the following chart for the Power Save function features when the unit is turned off.
Power Save |
On |
Off |
|
Power consumption |
Approx. 2 W |
[EX77] Approx. 16 W |
|
[EX87] Approx. 17 W |
|||
|
|
||
Watching the picture from the |
|
|
|
satellite receiver connected |
Can not do |
Can do |
|
to the AV2 input terminal |
|
|
|
Startup time |
Not quick |
Quick* |
|
|
|
|
*e.g., TV Guide is displayed within 1 second after [GUIDE] is pressed.
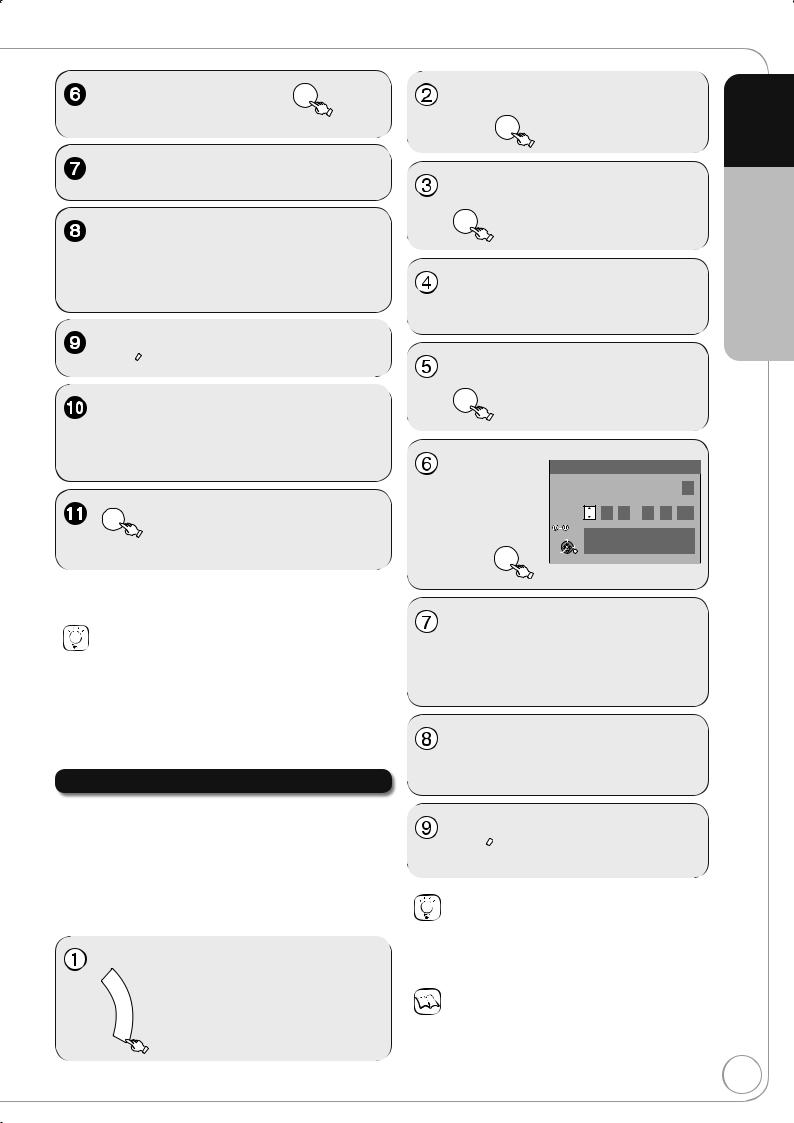
When setup has completed, the confi rmation screen appears.
OK
The Owner ID settings screen appears.
and press the numbered buttons to enter your choice of a 4-digit PIN number.
|
|
|
Owner ID |
|
|
|
|
|
|
Make a note of the PIN number (don’t |
|
PIN number |
|
|
|
Name |
|
||
forget), as it is not possible to return to |
|
House No. |
|
|
|
Postcode |
|
||
the factory preset. |
RETURN |
|
||
|
|
|
|
|
|
|
|
RETURN : leave |
|
OK |
to store the PIN number. |
|
12

 TV
TV
CH VOL
SELECT AV
PAGE
CH

 ROG/CHECK
MANUAL SKIP
 SKIP
SKIP  SLOW/SEARCH
STOP |
PAUSE |
PLAY/x1.3 |
STATUS |
EXIT |
|
|
T |
O |
R |
|
|
|
||
|
|
|
|
|
|
A |
|
|
|
|
IG |
|
|
|
V |
|
|
|
|
A |
|
|
|
|
|
N |
|
|
|
|
T |
|
|
|
|
C |
|
|
|
|
E |
|
|
|
10 |
R |
|
|
|
I |
|
|
|
|
D |
|
|
||
|
|
|
|
|
OPTION
11
CREATE
Tips
To abort Auto-Setup
Press [RETURN].
If the unit displays “No stations found !”
Press [ ] to select “No” and press [OK]. Go to step . After you have performed steps - , turn off the unit and confi rm the cable or aerial input is connected to
the RF IN terminal. Restart the AutoSetup again (¼ 63).
If the clock setting menu appears or
the clock is not correct, set the clock manually (¼ 13).
Restarting the Auto-Setup (¼ 63)
When turning on the Power Save function, if the unit is turned off, unit’s display is also turned off.
To correct the PIN number
1.Press [ , ] to select the digit.
2.Press the numbered buttons to enter the digit.
RQT8866
The cursor moves to “Name”.
 to store the name.
Quick Start Guide STEP 3
The Owner ID settings screen disappears.
Auto setup for your unit is complete. You can now make your favourite channels and store them in the required order in the profiles. (¼ 62)
Tips
To correct the character
1.Press [ , ] to select the character.
2.Press [ , ] to correct the character.
To display the Owner ID information on TV
Press and hold [ ] on the main unit for more than 5 seconds. The PIN number is not displayed.
After 30 seconds this menu automatically disappears.
Clock Setting
This unit usually obtains time and date information from digital broadcasts and automatically corrects the time several times a day.
However, if the clock is not set correctly, adjust the clock.
In the case of a power failure, the clock setting remains in memory for approximately 60 minutes.
Clock
Automatic Off
Time |
Date |
15 : |
45 |
: |
39 |
1 |
/ |
8 |
/ |
2007 |
Number
CHANGE |
Please set clock manually. |
SELECT |
OK: store RETURN: leave |
OK |
|
RETURN |
|
 to confi rm new date and time and to initiate the clock.
Tips
To return to the previous screen
Press [RETURN].
To exit the screen
Press [EXIT].
Notes
If a TV station transmits a time setting signal, and when “Automatic” in the Clock setting menu is set to “On”, the automatic time correction function checks the time and if necessary it is adjusted several times every day.
RQT8866
Watching Television
Refer to “TV Guide” (¼ 30) for detail information.
This DVD recorder has a tuner which allows it to directly receive and record terrestrial digital channels.
to turn the unit on.
 TV
TV
|
|
|
|
|
|
|
|
|
|
|
|
|
|
|
|
|
|
|
|
|
|
|
|
|
|
|
|
|
|
|
|
|
|
|
VOL |
|
|
|
|
|
|
|||||||||||
|
|
|
|
|
|
|
|
|
|
|
|
|
|
|
|
|
|
|
|
|
|
|
|
|
|
CH |
||||||||||||||||||||||||||
|
|
|
|
|
|
|
|
|
|
|
|
|
|
|
|
|
|
|
|
|
|
|
|
|
|
|
|
|
|
|
||||||||||||||||||||||
|
|
|
|
|
|
|
|
|
|
|
|
|
|
|
|
|
|
|
|
|
|
|
|
|
|
|
|
|
|
|
|
|
|
|
|
|
|
|
|
|
|
|
|
|
|
|||||||
|
|
|
|
|
|
|
|
|
|
|
|
|
|
|
|
|
|
|
|
|
|
|
|
|
|
|
|
|
|
|
|
|
|
|
|
|
|
|
|
|
|
|
|
|
||||||||
|
|
SELECT |
|
|
AV |
|
|
|
|
|
|
|
|
|
|
|
|
|
|
|
|
|
|
|
|
|
|
|
|
|
|
|
|
|
|
|
|
|
|
|
||||||||||||
|
|
|
|
|
|
|
|
|
|
|
|
|
|
|
|
|
|
|
|
|
|
|
|
|
|
|
|
|
|
|
|
|
|
|
|
|
|
|
|
|
|
PAGE |
|
|
|
|
|
|
|
|
||
|
|
|
|
|
|
|
|
|
|
|
|
|
|
|
|
|
|
|
|
|
|
|
|
|
|
|
|
|
|
|
|
|
|
|
|
|
|
|
|
|
|
|||||||||||
|
|
|
|
|
|
|
|
|
|
|
|
|
|
|
|
|
|
|
|
|
|
|
|
|
|
|
|
|
|
|
|
|
|
|
|
|
|
|
|
|
|
|
||||||||||
|
|
|
|
|
|
|
3 |
|
|
|
|
|
|
|
|
|
|
|
|
|
|
|
|
|
|
|
|
|||||||||||||||||||||||||
|
|
|
|
|
|
2 |
|
|
|
|
|
|
|
|
|
|
|
|
|
|
|
|
|
|
|
|
|
|
|
|||||||||||||||||||||||
1 |
|
|
|
|
|
|
|
|
|
|
|
|
|
|
|
|
|
|
|
|
|
|
|
|
|
|
|
|
|
|
|
|
||||||||||||||||||||
|
|
|
|
|
|
|
|
|
|
|
|
|
|
|
|
|
|
|
|
|
|
|
|
|
|
|
|
|
|
|
|
|
|
|
|
|
|
|
|
|
|
|
|
|
|
|
|
|
|
|
|
|
|
|
|
|
|
|
|
|
|
|
|
|
|
|
|
|
|
|
|
|
|
|
|
|
|
|
|
|
|
|
|
|
|
CH |
|||||||||||||||||||
|
|
|
|
|
|
|
|
|
|
|
|
|
|
|
|
|
|
|
|
|
|
|
|
|
|
|
|
|
|
|
|
|
|
|
|
|
|
|
|
|
|
|
|
|
|
|||||||
|
|
|
|
|
6 |
|
|
|
|
|
|
|
|
|
|
|
|
|
|
|
|
|
|
|
|
|||||||||||||||||||||||||||
4 |
|
|
|
|
|
|
5 |
|
|
|
|
|
|
|
|
|
|
|
|
|
|
|
|
|
|
|
|
|
|
|
|
|
|
|||||||||||||||||||
|
|
|
|
|
|
|
|
|
|
|
|
|
|
|
|
|
|
|
|
|
|
|
|
|
|
|
|
|
|
|
|
|
|
|
|
|
|
|
|
|||||||||||||
|
|
|
|
|
|
|
|
|
|
|
|
|
|
|
|
|
|
|
|
|
|
|
|
|
|
|
|
|
|
|
|
|
|
|
|
|
PROG/CHECK |
|||||||||||||||
|
|
|
|
|
|
|
|
|
|
|
|
|
|
|
|
|
|
|
|
|
|
|
|
|
|
|
|
|
|
|
|
|
|
|||||||||||||||||||
|
|
|
|
9 |
||||||||||||||||||||||||||||||||||||||||||||||||
|
|
|
|
8 |
|
|
|
|
|
|
||||||||||||||||||||||||||||||||||||||||||
7 |
|
|
|
|
|
|
|
|
|
|
|
|
|
|||||||||||||||||||||||||||||||||||||||
|
|
|
|
|
|
|
|
|
|
|
|
|
|
|
|
|
|
|
|
|
|
|
||||||||||||||||||||||||||||||
|
|
|
|
|
|
|
|
|
|
|
|
|
|
|
|
|
|
|
|
|
|
|
|
|
|
|||||||||||||||||||||||||||
|
|
|
|
|
|
|
|
|
|
|
|
|
|
|
|
|
|
|
|
|
|
|
|
|
|
|
|
|
|
|
|
|
|
|
|
|
|
|
|
|
|
|
|
|||||||||
|
|
|
|
|
|
|
|
|
|
|
|
|
|
|
|
|
|
|
|
|
|
|
|
|
|
|
|
|
|
|
|
|
MANUAL SKIP |
|||||||||||||||||||
|
|
DELETE |
|
|
|
|
0 |
|
|
|
|
|
|
|
|
|
|
|
|
|||||||||||||||||||||||||||||||||
|
|
|
|
|
|
|
|
|
|
|
|
|
|
|
|
|
|
|
|
|
|
|
|
|
|
|
|
|
|
|
|
|
|
|||||||||||||||||||
|
|
|
|
|
|
|
|
|
|
|
|
|
|
|
|
|
|
|
|
|
|
|
|
|
|
|
|
|
|
|
|
|
|
|
|
|
|
|
|
|
|
|
|
|||||||||
|
|
|
|
|
|
|
|
|
|
|
|
|
|
|
|
|
|
|
|
|
|
|
|
|
|
|
|
|
|
|
|
|
|
|
|
|
|
|
|
|
|
|
|
|
|
|
|
|
|
|
|
|
SKIP |
|
|
|
|
|
|
|
|
|
|
|
|
|
SLOW/SEARCH |
|
|
|
|
|
|
|
|
|
|
||||||||||||||||||||||||||||
STOP |
PAUSE |
PLAY/x1.3 |
–The TV Guide list appears.
|
|
|
|
|
|
STATUS |
|
|
EXIT |
|
|
|
|
|
|
|
|
|
|
|
|
|
O |
R |
F |
|
|
T |
|
U |
|
|
|
|
|
||
|
|
|
|
C |
|
|
A |
|
|
N |
|
|
|
|
T |
||
|
IG |
|
|
|
I |
|
V |
|
|
|
O |
|
A |
|
|
|
N |
|
N |
|
|
|
|
E |
|
|
|
|
|
|
T |
|
|
|
M |
|
C |
|
|
|
|
|
|
|
|
|
E |
|
R |
|
|
|
N |
|
I |
|
|
|
U |
|
D |
|
|
|
|
OPTION |
|
|
|
|
CREATE |
|
|
|
|
RETURN |
||||
|
|
|
|
|
|
|
|
|
||||||
|
|
|
|
|
|
|
|
|
||||||
|
|
|
|
|
CHAPTER |
|||||||||
|
|
|
|
|
|
|
|
|
|
|
|
|
|
|
REC |
REC MODE |
DIRECT TV REC |
||||||||||||
EXT LINK |
|
|||||||||||||
Notes
The TV Guide list is not displayed immediately after purchasing this unit.
Some of the programmes allow this unit to show Digital TEXT (MHEG) and subtitles (¼ 38).
You can select audio from multiple channels when the unit receives multichannel broadcast (¼ 59, DVB Multi Audio).
Watching Satellite Programmes
Notes
When turning off the Power Save function, you can watch the Satellite Programme without turning the unit on (¼ 68).
When the Power Save function is set to on, if the unit is turned off, you cannot watch the Satellite Programme. Turn the unit on.
to turn the unit on.
to select the “AV2”.
RQT8866
Playback
Refer to “Advanced Playback” (¼ 32–33) for detail information.
Instructions/notes regarding DVD-Audio are applicable to the DMR-EX87 model only.
Playing Discs
[HDD] [RAM] [-R] [-R]DL] [-RW‹V›] [+R] [+R]DL] [+RW] [DVD-V] [DVD-A] [-RW‹VR›] [VCD] [CD]
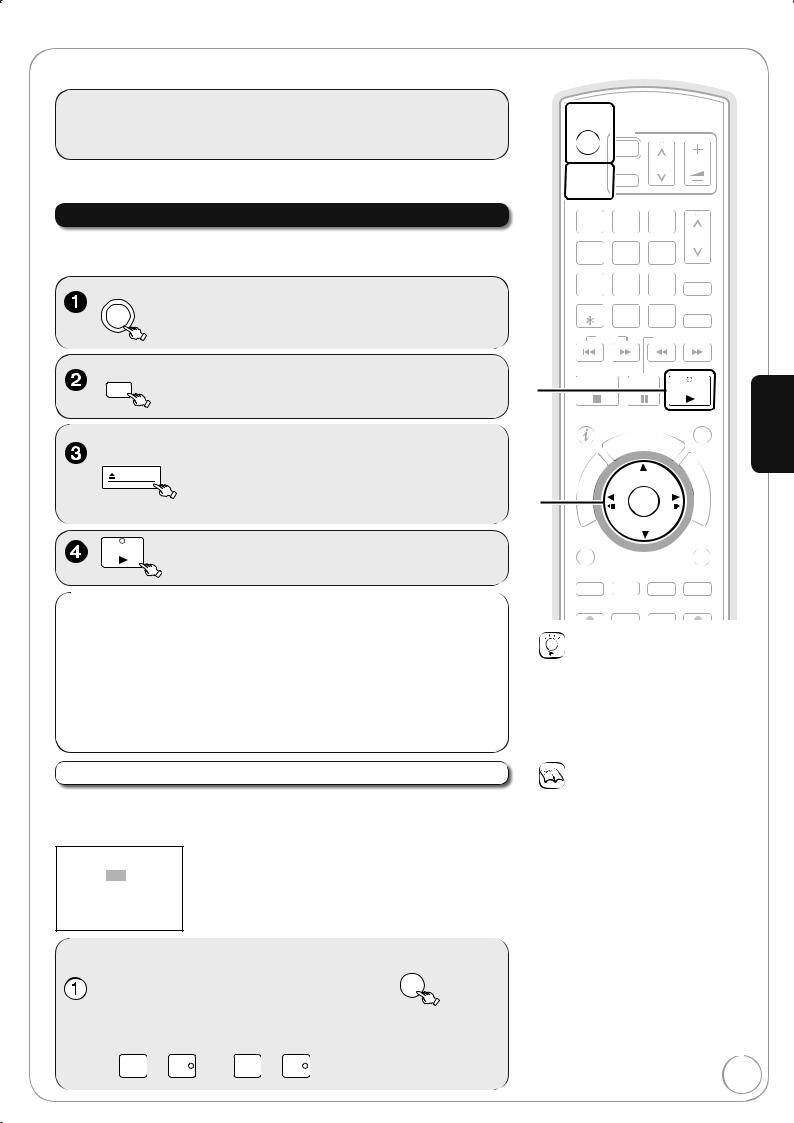
to turn the unit on.
to select the HDD or DVD drive.
to open the tray (Button located on front of the unit).
–Insert a disc (¼ 78).

 TV
TV
CH VOL

 AV
AV
PAG E
2 3
CH
4 5 6
6
7 8 9 PROG/CHECK
DELETE |
|
|
|
|
|
|
|
|
|
MANUAL SKIP |
|
|||
|
|
0 |
|
|
INPUT |
|||||||||
|
|
|
|
|
|
|||||||||
|
|
|
|
|
||||||||||
|
|
|
|
|
|
|
|
|
|
|||||
|
|
SELECT |
|
|
|
|||||||||
|
|
|
|
|
|
|
|
|
|
|
|
|
|
|
|
|
SKIP |
|
|
SLOW/SEARC |
H |
|
|
||||||
|
STO P |
PAUSE |
|
STATUS |
|
|
|
|
|
|
|
|
EXIT |
|
|
|
|
|
|
I |
|
|
|
|
|
|
|
|
G |
U |
D |
E |
|
|
|
|
|
|
|
|
|
|
|
|
||
|
|
|
|
|
|
|
|
|
|
|
|
|
T |
O |
R |
U |
|
|
|
|
C |
|
|
A |
|
|
N |
|
|
|
|
T |
||
|
IG |
|
|
|
I |
|
V |
|
|
|
O |
|
A |
|
|
|
N |
|
N |
|
|
|
|
E |
|
|
|
|
|
|
T |
|
|
|
M |
|
C |
|
|
|
|
|
R |
|
|
|
E |
|
D |
|
|
N |
|
|
I |
|
|
|
U |
|
|
|
|
|
|
OPTION |
|
|
|
|
|
CREATE |
|
|
|
|
|
RETURN |
||||
|
|
|
|
|
|
|
|
|
|
|
||||||
|
|
|
|
|
|
|
|
|
|
|
||||||
|
|
|
|
|
|
|
|
|
||||||||
|
|
|
|
|
|
CHAPTER |
||||||||||
|
|
|
|
|
|
|
|
|
|
|
|
|
|
|
|
|
REC |
REC MODE |
DIRECT TV REC |
||||||||||||||
EXT LINK |
|
|||||||||||||||
Tips
Icons such as “ [RAM] ” indicate usable discs. Refer to pages 74 and 75.
To return to the menu screen
[DVD-V] [DVD-A] Press [DIRECT NAVIGATOR]. [VCD] Press [RETURN].
Basic Operations
[DVD-V] [DVD-A] [VCD]
Generally, menu screens that appear on the TV may be navigated as follows: e. g.,
DVDTOPMENU
 Play
Play
Chapter List
Audio Tracks
Subtitles
Trailer
Notes
[HDD] [RAM] [-R] [-R]DL] [-RW‹V›] [+R] [+R]DL] [+RW] [-RW‹VR›]
Playback starts from the most recent recording.
[DVD-V] [DVD-A] [VCD] [CD]
Playback starts from the beginning of the disc.
Depending on the disc type, playing may automatically start without pressing [ PLAY].
The unit takes some time to read the disc before play starts.
Discs continue to rotate while menus are displayed. Press [ STOP] when you fi nish to preserve the unit’s motor and your television screen.
If “ ” appears on the TV, the operation is prohibited by the unit or disc.
RQT8866
Recording Television Programmes
Refer to “Important Notes for Recording” (¼ 19) and “Advanced Recording” (¼ 20 to 22) for detail information on recording.
[HDD] [RAM] [-R] [-RW‹V›] [+R] [+RW]
Preparation:
Turn on the television and select the appropriate video input to suit the connections to this unit.
[RAM] If the disc is protected, release protection (¼ 60).
DVD
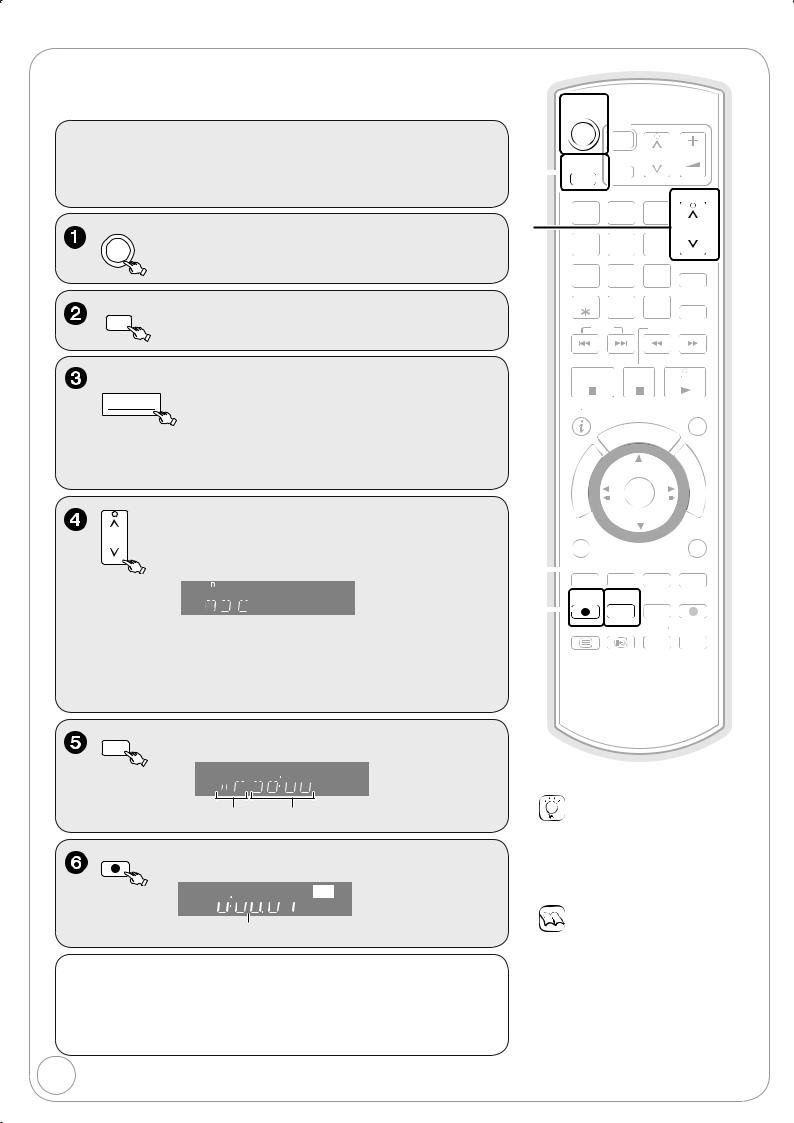
to turn the unit on.
DRIVE
SELECT
to select the HDD or DVD drive.
If you selected the DVD drive
 OPEN/CLOSE to open the tray (Button located on front of the unit).
–Insert a disc with enough remaining blank space and press [ OPEN/CLOSE] again to close the tray.
–When the format confi rmation screen is displayed (¼ 21).
PAGE
to select desired channel.
CH


 REC
REC
–To select with the numbered buttons (¼ 14).
–When no channel setting is performed on the unit and broadcast is recorded directly from the satellite receiver, select a channel on the connected equipment and press [INPUT SELECT] to select “AV2”.
REC MODE
to select the recording mode.


 REC
REC
Recording mode (¼ 20) Remaining time
REC
to start recording.


 REC
REC
Elapsed recording time
Pausing Recording |
Stopping Recording |
Press [ PAUSE]. |
Press [ STOP]. |
–Press again to restart recording. (The title is not divided.)
16
|
|
|
|
|
|
|
|
|
|||||
TV |
|||||||||||||
|
|
|
|
|
|
|
|||||||
|
|
|
|
|
|
|
|||||||
|
|||||||||||||
|
|
|
|
|
|
|
|
|
|
|
|
||
|
|
|
|
|
|
|
|
|
|
|
|||
|
|
|
|
|
|
|
|
|
VOL |
|
|
||
|
|
|
|
|
|
|
|
|
|
||||
|
|
AV |
CH |
||||||||||
|
|
|
|
|
|
|
|
||||||
|
|
|
|
|
|
|
|
|
|||||
|
|
|
|
|
|
|
|||||||
1 2 3
4 5 6
6
7 8 9 PROG/CHECK
DELETE |
|
|
|
|
|
|
|
|
|
MANUAL SKIP |
|
|||||
|
0 |
|
|
|
INPUT |
|||||||||||
|
|
|
|
|
|
|||||||||||
|
|
|
|
|
||||||||||||
|
|
|
|
|
|
|
|
|
|
|
|
|
||||
|
|
|
|
|
SELECT |
|
|
|
||||||||
|
|
|
|
|
|
|
|
|
|
|
|
|
|
|
|
|
SKIP |
|
|
|
|
|
|
SLOW/SEARCH |
|
|
|
||||||
STOP |
PAUSE |
PLAY/x1.3 |
STATUS |
EXIT |
GUIDE
|
|
|
R |
F |
|
T |
O |
U |
|
|
N |
|||
|
|
|||
|
|
C |
||
A |
|
|
T |
|
IG |
|
|
|
I |
V |
|
|
|
O |
A |
|
|
|
N |
N |
|
|
|
|
T |
|
|
OK |
M |
C |
|
|
||
E |
|
|
|
E |
R |
|
|
|
|
|
|
|
N |
|
I |
|
|
|
|
D |
|
|
U |
|
|
|
|
|
|
|
|
|
OPTION |
|
|
|
|
|
|
|
RETURN |
||||||||||||
|
|
|
|
|
|
|
|
|
|
|
|
|
CREATE |
|
|
|
|
|
|
||||
|
|
|
|
|
|
|
|
|
|
|
|
|
|
|
|
|
|
||||||
|
|
|
|
|
|
|
|
|
|
|
CHAPTER |
|
|
|
|
||||||||
|
|
|
|
|
|
|
|
|
|
|
|
|
|
|
|||||||||
|
|
|
|
|
|
|
|
|
|
|
|
|
|
|
|
|
|
|
|
|
|||
|
|
|
|
|
|
|
|
|
|
|
|
|
|
|
|
|
|
|
|
|
|
||
|
|
|
|
|
|
|
|
|
|
|
|
|
DIRECT TV REC |
||||||||||
|
|
|
|
|
|
|
|
|
|
|
|
EXT LINK |
|
||||||||||
|
|
|
|
|
|
|
|
|
|
|
|
|
|
|
|
|
|
|
|
|
|
||
|
|
|
|
|
|
|
|
|
|
|
|
|
|
|
|
|
|
|
|
|
|
||
|
|
|
|
|
|
|
|
|
|
|
|
|
|
|
|
|
|
|
|
|
|
|
|
|
|
|
|
|
|
|
|
|
|
|
|
|
DISPLAY |
|
|
|
|
TIME SLIP |
|
|
|||
Tips
Icons such as “ [RAM] ” indicate usable discs. Refer to pages 74 and 75.
[-RW‹V›] [+R] [+RW]
To use a new disc, formatting is necessary.
Notes
[-R] [-RW‹V›] [+R] [+RW]
It takes about 30 seconds for the unit to complete recording management information after recording fi nishes.
You cannot change the channel or recording mode during recording.
This unit cannot record NTSC signals to discs that already have PAL signal recordings. (However, both types of programmes can be recorded onto the HDD.)
RQT8866
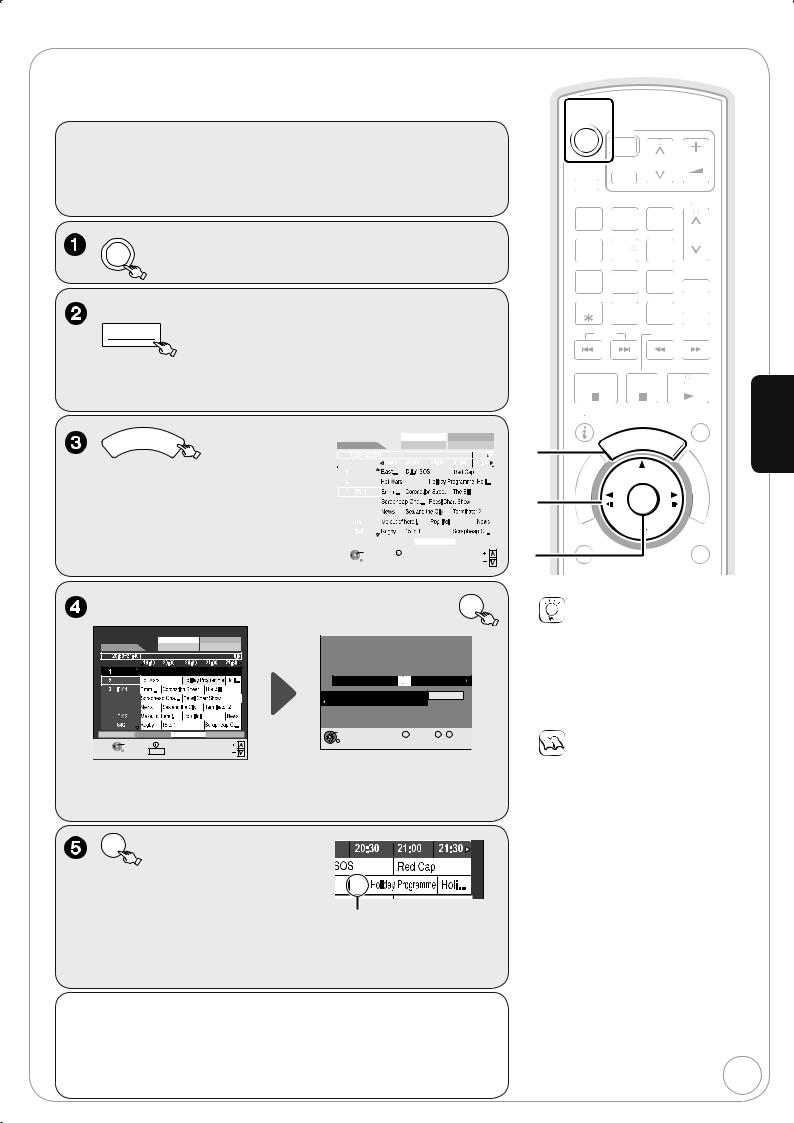
Timer Recording
Refer to “TV Guide” (¼ 30) and “Advanced Timer Recording” (¼ 26) for detail information on TV Guide.
[HDD] [RAM] [-R] [-RW‹V›] [+R] [+RW]
Preparation:
Turn on the television and select the appropriate video input to suit the connections to this unit.
[RAM] If the disc is protected, release protection (¼ 60).
Confirm that the clock on the unit’s display is set to the correct time.
DVD
to turn the unit on.
When you want to record to disc,
 OPEN/CLOSE to open the tray (Button located on front of the unit).
–Insert a disc with enough remaining blank space and press [ OPEN/CLOSE] again to close the tray.
–When the format confi rmation screen is displayed (¼ 21).
GUIDE
– The TV Guide list appears.
TV Guide: Landscape |
|
|
|
Wed 13/01/07 19:45 |
||||||||
|
|
|
|
|
|
Prog. Type |
|
Category |
||||
|
Wed 13th |
|
All Types |
All Services |
||||||||
|
|
|
Emmerdale: In today’s show we will... |
|||||||||
|
|
Time: |
|
|
|
|
|
|
|
|
|
|
|
|
BBC 1 |
|
|
|
|
|
|
|
|
|
|
|
|
BBC 2 |
|
|
|
|
|
|
|
|
|
|
|
|
|
|
|
|
|
|
|
|
|
|
|
|
10 |
Channel 4 |
|
|
|
|
|
|
|
|
|
|
|
31 |
Channel 5 |
|
|
|
|
|
|
|
|
|
|
|
45 |
2 |
|
|
|
|
|
|
|
|
|
|
|
70 |
|
|
|
|
|
|
|
|
|
|
|
|
|
|
+24 Hr |
|
|
Prog. Type |
|
Category |
||||
SELECT |
VIEW |
info |
|
Page |
|
|||||||
|
|
RETURN |
Guide |
Change Display Mode |
Page |
|
||||||
|
|
|
|
|
|
|
|
|
|
|
|
|
, , to select the future programme, then OK
TV Guide: Landscape |
Wed 13/01/07 19:45 |
|
|
|
|
|
|
|
|||||
|
|
Prog. Type |
|
Category |
|
Timer |
Remain |
HDD |
30:24 SP |
DVD |
1:58 SP |
||
Wed 13th |
|
All Types |
|
All Services |
|
Recording |
|
|
19:45:00 |
13/ 1 WED |
|||
|
Holiday Programme |
|
|
|
|
|
|
|
|
|
|
||
Time: |
|
|
|
|
|
|
|
|
|
|
HDD |
Mode |
STTL |
BBC 1 |
|
|
|
|
|
|
|
Name |
Date |
Start |
Stop DVD |
||
|
BBC 2 |
|
|
|
|
3 BBC |
13/ 1 WED |
20:30 |
21:40 |
HDD |
SP |
|
|
OFF |
10 |
Channel 4 |
|
|
|
|
All Services : BBC 2 |
|
|
Programme Name |
|||||
|
|
|
|
Holiday Programme |
|
|
|
|
|
|
||||
31 |
Channel 5 |
|
|
|
|
|
|
|
|
|
|
|||
|
|
|
|
Press OK to store the programme. |
|
|
|
|||||||
45 |
|
|
|
|
|
|
|
|
||||||
|
|
|
|
|
|
|
|
|
|
|
|
|
|
|
70 |
|
|
|
|
|
|
|
|
|
|
|
|
|
|
-24 Hr |
+24 Hr |
|
Prog. Type |
Category |
OK |
|
|
DELETE |
0 |
-- |
9 |
Number |
||
|
|
|
|
|||||||||||
SELECT |
TIMER REC |
info |
Page |
RETURN |
|
|
|
|
|
|
|
|
||
|
|
|
|
|
|
|
|
|
||||||
|
RETURN |
Guide |
Change Display Mode |
Page |
|
|
|
|
|
|
|
|
|
|
Confirm the programme (start and end time) by using a TV magazine,
etc. and make corrections if necessary using [ , , , ] (¼ 26, step ).
|
OK |
|
|
– The settings are stored and the |
|
|
timer programme is on. |
|
|
– The timer icon is displayed. |
Timer icon |
|
|
–“ ” lights on the unit’s display to
indicate timer recording standby has been activated.
–Repeat steps – to programme other recordings.
–Press [ /l] to turn the unit off.
To cancel a timer recording programming
1. Press [ , , , ] to select |
2. Press [ ] to select “Yes” and |
the programme (the timer icon is |
press [OK]. |
displayed) and press [OK]. |
– The timer icon disappears. |
– Confi rmation screen appears. |
|
|
|
|
|
|
|
|
|
|
|
|
|
|
|
|
|
|
|
|
|
|
|
|
|
|
|
|
|
|
|
|
|
|
|
|
|
|
|
|
|||||||||||||||||||
TV |
|
|
|
|
|
|
|
|
|
|
|
|
|
|
|
|
|
|
|
|
|
|
|
|
|
|
|
|
|
|
|
|
|
||||||||||||||||||||||||
|
|
|
|
|
|
|
|
|
|
|
|
|
|
|
|
|
|
|
|
|
|
|
|
|
|
|
|
|
|
|
|
|
|
|
|
||||||||||||||||||||||
|
|
|
|
|
|
|
|
|
|
|
|
|
|
|
|
|
|
|
|
|
|
|
|
|
|
|
|
|
|
|
|
|
|
|
|
|
|
|
|
|
|||||||||||||||||
|
|
|
|
|
|
|
|
|
|
|
|
|
|
|
|
|
|
|
|
|
|
|
|
|
|
|
|
|
|
|
|
|
|
|
|
||||||||||||||||||||||
|
|
|
|
|
|
|
|
|
|
|
|
|
|
|
|
|
|
|
|
|
|
|
|
|
|
|
|
|
|
|
|
|
|
||||||||||||||||||||||||
|
|
|
|
|
|
|
|
|
|
|
|
|
|
|
|
|
|
|
|
|
|
|
|
|
|
|
|
|
|
|
|
|
|
|
|
|
|
|
|
|
|
|
|
|
|
|
|
|
|
|
|
||||||
|
|
|
|
|
|
|
|
|
|
|
|
|
|
|
|
|
|
|
|
|
|
|
|
|
|
|
|
|
|
|
|
|
|
|
|
|
|
|
|
|
|
|
|
VOL |
|
|
|
|
|
|
|
|
|
||||
|
|
|
|
|
|
|
|
|
|
|
|
|
|
|
|
|
|
|
|
|
|
|
|
|
|
|
|
|
|
|
|
|
|
|
|
|
|
|
|
||||||||||||||||||
|
|
|
|
|
|
|
|
|
|
|
|
|
|
|
|
|
|
|
|
|
|
|
|
|
|
|
|
|
|
CH |
|||||||||||||||||||||||||||
|
|
|
DRIVE |
|
|
|
|
|
|
|
|
|
|
|
|
|
|
|
|
|
|
|
|
|
|
|
|
|
|||||||||||||||||||||||||||||
|
|
|
|
|
|
|
|
|
|
|
|
|
|
|
|
|
|
|
|
|
|
|
|
|
|
|
|
|
|
|
|
|
|
|
|
|
|
|
|
|
|
|
|
|
|
|
|
|
|
||||||||
|
|
|
|
|
|
|
|
|
|
|
|
|
|
|
|
|
|
|
|
|
|
|
|
|
|
|
|
|
|
|
|
|
|
|
|
|
|
|
|
|
|
|
|
|
|
|
|
|
|
|
|||||||
|
|
|
SELECT |
|
|
|
|
AV |
|
|
|
|
|
|
|
|
|
|
|
|
|
|
|
|
|
|
|
|
|
|
|
|
|
|
|
|
|
|
|
|
|
|
|
|
|
|
|||||||||||
|
|
|
|
|
|
|
|
|
|
|
|
|
|
|
|
|
|
|
|
|
|
|
|
|
|
|
|
|
|
|
|
|
|
|
|
|
|
|
|
|
PAGE |
|
|
|
|
|
|
|
|
||||||||
|
|
|
|
|
|
|
|
|
|
|
|
|
|
|
|
|
|
|
|
|
|
|
|
|
|
|
|
|
|
|
|
|
|
|
|
|
|
|
|
|
|
|
|
|
|
|
|
|
|
|
|
|
|
|
|||
|
|
|
|
|
|
|
|
|
|
|
|
|
|
|
|
|
|
|
|
|
|
|
|
|
|
|
|
|
|
|
|
|
|
|
|
|
|
|
|
|
|
|
|
|
|
|
|||||||||||
|
|
|
|
|
|
|
|
|
|
|
|
|
|
|
|
|
|
|
|
|
|
|
|
|
|
|
|
|
|
|
|
|
|
|
|
|
|
|
|
|
|
|
|
|
|
||||||||||||
|
|
|
|
|
3 |
|
|
|
|
|
|
|
|
|
|
|
|
|
|
|
|
|
|
|
|
|
|||||||||||||||||||||||||||||||
|
|
|
|
|
2 |
|
|
|
|
|
|
|
|
|
|
|
|
|
|
|
|
|
|
|
|
|
|
|
|||||||||||||||||||||||||||||
1 |
|
|
|
|
|
|
|
|
|
|
|
|
|
|
|
|
|
|
|
|
|
|
|
|
|
|
|
|
|
|
|
|
|
||||||||||||||||||||||||
|
|
|
|
|
|
|
|
|
|
|
|
|
|
|
|
|
|
|
|
|
|
|
|
|
|
|
|
|
|
|
|
|
|
|
|
|
|
|
|
|
|
|
|
|
|
|
|
|
|
|
|
|
|
|
|
|
|
|
|
|
|
|
|
|
|
|
|
|
|
|
|
|
|
|
|
|
|
|
|
|
|
|
|
|
|
|
|
|
|
|
|
|
|
|
|
CH |
|||||||||||||||||||
|
|
|
|
|
|
|
|
|
|
|
|
|
|
|
|
|
|
|
|
|
|
|
|
|
|
|
|
|
|
|
|
|
|
|
|
|
|
|
|
|
|
|
|
|
|
|
|
|
|
||||||||
|
|
|
|
6 |
|
|
|
|
|
|
|
|
|
|
|
|
|
|
|
|
|
|
|
|
|
||||||||||||||||||||||||||||||||
4 |
|
|
|
|
|
|
|
5 |
|
|
|
|
|
|
|
|
|
|
|
|
|
|
|
|
|
|
|
|
|
|
|
|
|
|
|
|
|||||||||||||||||||||
|
|
|
|
|
|
|
|
|
|
|
|
|
|
|
|
|
|
|
|
|
|
|
|
|
|
|
|
|
|
|
|
|
|
|
|
|
|
|
|
|
|
|
|
||||||||||||||
|
|
|
|
|
|
|
|
|
|
|
|
|
|
|
|
|
|
|
|
|
|
|
|
|
|
|
|
|
|
|
|
|
|
|
|
|
|
|
|
|
|
PROG/CHECK |
|||||||||||||||
|
|
|
|
|
|
|
|
|
|
|
|
|
|
|
|
|
|
|
|
|
|
|
|
|
|
|
|
|
|
|
|
|
|
|
|
|
|
||||||||||||||||||||
|
|
|
9 |
|
|||||||||||||||||||||||||||||||||||||||||||||||||||||
|
|
|
8 |
|
|
|
|
|
|
|
|||||||||||||||||||||||||||||||||||||||||||||||
7 |
|
|
|
|
|
|
|
|
|
|
|
|
|
|
|
||||||||||||||||||||||||||||||||||||||||||
|
|
|
|
|
|
|
|
|
|
|
|
|
|
|
|
|
|
|
|
|
|
|
|
|
|||||||||||||||||||||||||||||||||
|
|
|
|
|
|
|
|
|
|
|
|
|
|
|
|
|
|
|
|
|
|
|
|
|
|
|
|
||||||||||||||||||||||||||||||
|
|
|
|
|
|
|
|
|
|
|
|
|
|
|
|
|
|
|
|
|
|
|
|
|
|
|
|
|
|
|
|
|
|
|
|
|
|
|
|
||||||||||||||||||
|
|
|
|
|
|
|
|
|
|
|
|
|
|
|
|
|
|
|
|
|
|
|
|
|
|
|
|
|
|
|
|
|
|
|
|
|
MANUAL SKIP |
||||||||||||||||||||
|
|
|
DELETE |
|
|
|
0 |
|
|
|
INPUT |
|
|||||||||||||||||||||||||||||||||||||||||||||
|
|
|
|
|
|
|
|
|
|
|
|
|
|
|
|
|
|
|
|
||||||||||||||||||||||||||||||||||||||
|
|
|
|
|
|
|
|
|
|
|
|||||||||||||||||||||||||||||||||||||||||||||||
|
|
|
|
|
|
|
|
|
|
|
|
|
|
|
|
|
|
|
|
|
|
|
|
|
|
|
|
|
|
|
|
|
|
|
|
|
|
|
|
|
|
|
|
|
|
|
|
|
|
||||||||
|
|
|
|
|
|
|
|
|
|
|
|
|
|
|
SELECT |
|
|
|
|
|
|
|
|
|
|
|
|
|
|
|
|
|
|
|
|
|
|||||||||||||||||||||
|
|
|
|
|
|
|
|
|
|
|
|
|
|
|
|
|
|
|
|
|
|
|
|
|
|
|
|
|
|
|
|
|
|
|
|
|
|
|
|
|
|
|
|
|
|
|
|
|
|
|
|
|
|
|
|
|
|
SKIP |
|
|
|
|
|
|
|
|
|
|
|
|
|
|
|
|
|
|
SLOW/SEARCH |
|
|
|
|
|
|
|
|
|
|
||||||||||||||||||||||||||||
|
STOP |
PAUSE |
PLAY/x1.3 |
Operations |
|||
|
|
||||||
|
STATUS |
|
EXIT |
Basic |
|||
|
|
|
|
|
|
U |
|
|
|
|
|
|
|
|
|
|
|
T |
O |
R |
|
|
|
|
|
|
|
C |
|
||
|
A |
|
|
|
N |
|
|
|
|
|
|
T |
|
||
|
IG |
|
|
|
|
I |
|
|
V |
|
|
|
|
O |
|
|
A |
|
|
|
|
N |
|
|
N |
|
|
|
|
|
|
R |
|
|
|
|
E |
|
|
|
T |
|
|
|
|
M |
|
|
C |
|
|
|
|
|
|
|
E |
|
|
|
|
N |
|
|
|
|
|
|
|
|
|
|
I |
|
|
|
|
U |
|
|
D |
|
|
|
|
|
|
OPTION |
RETURN |
CREATE
CHAPTER
Tips
Icons such as “ [RAM] ” indicate usable discs. Refer to pages 74 and 75.
[-RW‹V›] [+R] [+RW]
To use a new disc, formatting is necessary.
To check programmes (¼ 28)
Notes
The TV Guide list is not displayed immediately after purchasing this unit.
The TV Guide system will not work if the clock is not set correctly.
If “NTSC” has been selected for “TV System” (¼ 67), the TV Guide system cannot be used.
When programmes are recorded from the TV Guide, the name of the selected programme is transferred automatically for the recording.
17
RQT8866

Deleting Titles
Delete Navigator
[HDD] [RAM] [-R] [-R]DL] [-RW‹V›] [+R] [+R]DL] [+RW]
to select the HDD or DVD drive.
DVD
TV
CH VOL
 AV
AV
PAGE
1 2 3
CH
4 5 6
6
7 8 9 PROG/CHECK
0 |
INPUT MANUAL SKIP |
SELECT |
SLOW/SEARCH
[HDD] [RAM] When the Album View screen is displayed, press the “Red” button to switch to the Title View screen.
STOP |
PAUSE |
PLAY/x1.3 |
|
|
|
|
|
|
|
|
|
|
|
|
|
|
|
|
|
STATUS |
|
|
|
EXIT |
|
|
|
|
|
|
|
|
|
|
|
|
|
|
G |
U |
I |
D |
E |
|
|
|
|
|
|
|
|
|
|
|
|
|
|
|
|
|
|
|
||||
|
|
|
|
|
|
|
|
|
|
|
|
|
|
|
|
|
|
|
||
|
|
|
|
|
|
|
|
|
|
|
|
|
|
|
|
|
||||
|
|
|
|
|
|
|
|
|
|
|
|
|
|
|
|
|
|
|
||
|
|
|
|
|
|
|
|
|
|
O |
R |
|
|
|
|
|
|
|
|
|
|
|
|
|
|
|
|
|
|
T |
|
||||||||||
|
|
|
|
|
|
|
|
|
|
|
|
|
|
|
|
|
|
|
||
|
|
|
|
|
|
|
|
|
|
|
|
|
|
|
|
|
|
|
||
|
|
|
|
|
|
|
|
|
|
|
|
|
|
|
|
|
|
|
|
|
|
|
|
|
|
|
|
|
|
|
|
|
|
|
|
|
|
|
|
|
|
|
|
|
|
|
|
|
|
A |
|
|
|
|
|
|
|
|
|
|
|
|
|
|
|
|
|
IG |
|
|
|
|
|
|
|
|
|
|
|
|
|
||
|
|
A |
|
|
|
|
|
|
|
|
|
|
|
|
|
|||||
|
|
|
|
V |
|
|
|
|
|
|
|
|
|
|
|
|
|
|||
|
|
|
|
N |
|
|
|
|
|
|
|
|
|
|
|
|
|
|||
|
|
|
|
|
|
|
|
|
|
|
|
|
|
|
|
|
||||
|
|
|
|
|
|
|
|
|
|
|
|
|
|
|
|
|
|
|
|
|
|
|
|
|
T |
|
|
|
|
|
|
|
|
|
|
|
|
||||
|
|
|
|
C |
|
|
|
|
|
|
|
|
|
|
|
|
|
|||
|
E |
|
R |
|
I |
|
D |
|
|
|
|
|
OPTION |
|
|
|
|
CREATE |
|
|
|
|
RETURN |
|||||
|
|
|
|
|
|
|
|
|
|
|
|
||||||||
|
|
|
|
|
|
|
|
|
|
|
|||||||||
|
|
|
|
|
|
|
|
|
|
|
|
|
|
||||||
|
|
|
|
|
|
|
|
|
|
CHAPTER |
|||||||||
|
|
|
|
|
|
|
|
|
|
|
|
|
|
|
|
|
|
|
|
|
|
|
|
|
|
|
|
|
|
|
|
|
|
|
|
|
|
|
|
REC |
REC MODE |
DIRECT TV REC |
|||||||||||||||||
EXT LINK |
|
||||||||||||||||||
Notes
You cannot delete while recording or copying.
[+R] [+R]DL] [+RW] Even if you have set protection on other equipment, such titles are deleted.
Tips
To return to the previous screen
Press [RETURN].
To view other pages
Press [ , , , ] to select “Previous” or “Next”, then press [OK].You can also press [ , ] to view other pages.
Multiple deleting
Select with [ , , , ], then press [ PAUSE]. (Repeat.)A check mark appears. Press [ PAUSE] again to cancel.
Deleting Titles During Playback
[HDD] [RAM] [-R] [-R]DL] [-RW‹V›] [+R] [+R]DL] [+RW]
Tips
Icons such as “ [RAM] ” indicate usable discs. Refer to pages 74 and 75.
[HDD] [RAM] Deleting an item increases the available disc space by the amount of space taken by the item deleted.
[-R] [-R]DL] [+R] [+R]DL] Available disc space does not increase after deletion.
[-RW‹V›] [+RW] Available disc space increases when you delete the last title (the recording space may increase slightly when other titles are deleted).
RQT8866

Important Notes for Recording
Selecting audio for recording
Broadcast in multi-channel sound: |
Hello |
Hola |
Hallo |
You can select audio language when received |
|
|
|
audio in multi-channel broadcast (“Multi- |
|
|
Select the audio that you want |
Audio” appears at the bottom of digital channel |
|
|
to record in “DVB Multi Audio” in |
information display). |
. |
|
the on-screen display (¼ 59). |
However, audio cannot be switched after recording. |
|
|
|
|
|
|
About the aspect when recording a programme
[HDD] [RAM] [-R] [-RW‹V›]
The original aspect used for the source programme will also be used with the recording.
However, in the following case, programme will be recorded in 4:3.
[-R] [-RW‹V›]
Programme recorded using “EP” or “FR (recordings 5 hours or longer)” recording modes will be recorded in 4:3 aspect.
[+R] [+RW]
Recorded in 4:3 aspect
Copy-once |
It is not possible to record digital broadcasts that allow “One time only recording” onto DVD-R, DVD-RW, |
|||
+R, +RW or 8 cm DVD-RAM discs. Use the HDD or CPRM (¼ 96) compatible DVD-RAM. |
||||
recording |
[RAM] CPRM compatible discs only |
[-R] [-RW‹V›] [+R] [+RW] |
||
|
||||
|
12cm |
|
|
|
|
[HDD] |
|
|
–— |
|
|
|||
|
|
|
|
|
( : Can do, : Cannot do)
“One time only recording” titles can only be transferred from the HDD to CPRM compatible DVD-RAM (They are deleted from the HDD). They cannot be copied.
Even when copying to videotape the title may not be copied correctly because of the copy guard.
You cannot copy a playlist created from “One time only recording” titles.
Playing |
[-R] [-R]DL] [-RW‹V›] [+R] [+R]DL] |
|
|
the disc on |
The disc must be finalised after recording or copying (¼ 61). |
other DVD |
It is necessary to fi nalise DVD-R, etc. on this unit after recording or copying titles to them. You can then |
play them as a commercially sold DVD-Video. However, the discs become play-only and you can no |
|
players |
longer record or copy. |
|
You can record and copy again if you format DVD-RW. |
|
Record to DVD-R, etc. |
|
Play on other DVD equipment |
|
Finalise |
|
[+RW] |
|
We recommend you to create the menu before playing a +RW disc on other equipment (¼ 61). |
Recording to |
You cannot directly record to a DVD-R DL and +R DL disc on this unit. |
Record to the HDD and then copy to the disc. |
|
DVD-R DL |
|
and +R DL |
|
Advanced Features Basic Operations
It is not possible to record to both HDD (Hard Disk Drive) and DVD drive simultaneously.
19
RQT8866

Advanced Recording
Recording Modes and Durations
Recording Mode
|
|
|
|
|
|
|
|
|
|
|
|
|
|
|
|
|
|
|
|
|
|
|
|
|
8 hours |
|
|
Approximately |
|
8 hours |
8 hours |
14 hours |
9 hours with video |
||
maximum |
|||||
maximum maximum |
maximum |
20 minutes |
quality equivalent |
||
for one side |
|||||
|
|
|
to LP mode. |
||
|
|
|
|
1 It is not possible to record or play continuously from one side of a double sided disc to the other.
2 When “Recording time in EP mode” has been set to “EP (6Hours)” in the Setup menu (¼ 64).
The sound quality is better when using “EP (6Hours)” than when using “EP (8Hours)”.
3 You cannot record directly to DVD-R DL and +R DL discs with this unit. The table shows the recording time when copying.
[+R]DL] You cannot copy in “EP” or “FR (recordings 5 hours or longer)” mode.
4 When recording to the HDD in “EP” or “FR (recordings 5 hours or longer)” mode , you cannot perform high-speed copy to +R, +R DL or +RW discs.
|
|
|
|
|
|
|
|
|
quality |
|
XP |
|
|||||
|
|
|
|
|
|
|
|
|
|
SP |
|
|
|
|
|
||
|
|
|
||||||
|
|
|
|
|
|
|
|
|
Picture |
|
LP |
|
|||||
|
|
|
|
|
|
|
|
|
|
EP (6Hours) 2 |
|
|
|
||||
|
|
|
|
|||||
|
|
|
|
|
|
|||
|
|
EP (8Hours) |
|
|||||
|
|
|
|
|
|
|
|
|
|
|
|
|
|
|
|
|
|
|
|
Recording time |
||||||
Notes
This unit uses variable bit rate (VBR) recording which varies the amount of data recorded to suit the picture quality, so actual
recording times and remaining recording times shown by the unit will be different. ([-R]DL] [+R]DL] The difference will be especially noticeable.)
Use a disc enough remaining blank space.
When recording to DVD-RAM using EP (8Hours) mode, play may not be possible on DVD players, even if they are compatible with
DVD-RAM. In this case use EP (6Hours) mode.
Tips
Maximum number of titles to a disc [HDD] 500 titles on HDD
[RAM] [-R] [-R]DL] [-RW‹V›] 99 titles on a disc [+R] [+R]DL] [+RW] 49 titles on a disc
FR (Flexible recording mode)
Using “Flexible Recording” is convenient in these kinds of situations:
[RAM] [-R] [-RW‹V›] [+R] [+RW]
−When the amount of free space on the disc makes selecting an appropriate recording mode diffi cult
−When you want to record a long programme with the best picture quality possible
[HDD]
−When you want to record a title to HDD so that it can then be copied to fi t one 4.7 GB disc perfectly
You do not need to edit the recorded title, or change the
recording mode when copying, to fi t the disc space
e.g., Recording a 90 minutes programme to 4.7 GB DVD-RAM disc:
− If you select XP mode, the programme will not fi t on one disc.
|
A second disc is necessary for |
|
30 minutes of the programme. |
4.7 GB |
4.7 GB |
DVD-RAM |
DVD-RAM |
− If you select SP mode, the programme will fi t on one disc.
4.7 GB |
However there will be 30 minutes |
DVD-RAM |
remaining disc space. |
|
−If you select “Flexible Recording” the programme will fi t on one disc perfectly.
4.7 GB
DVD-RAM
You can set FR mode when programming timer recordings and fl exible recording (¼ 22).
20
RQT8866
When the format confirmation screen is displayed
Formatting is the process of making media such as DVDRAM recordable on recording equipment.
Specifying the Recording Time
[HDD] [RAM] [-R] [-RW‹V›] [+R] [+RW]
This function allows specifying the length of recording time up to 4 hours.
[RAM] [-RW‹V›] [+R] [+R[DL] [+RW]
The following screen may appear when inserting a new disc or a disc that has been recorded on another equipment.
Only format the disc if you intend to use it for recording.
SELECT |
|
OK |
RETURN |
Tips
Refer to “Formatting Discs or Cards” (¼ 60) for more detail of formatting.
When removing a Recorded or Copied Disc
[-R] [-R]DL] [-RW‹V›] [+R] [+R]DL]
After recording or copying, |
|
|
Finalise |
|
|
|
|
|
|
if you press [ OPEN/ |
|
Finallse the disc so that it can be played |
||
|
on other DVD players. |
|||
CLOSE] to eject the disc, |
|
Note : Recording or Editing is not possible |
||
|
afer finallsing. This may take up to min. |
|||
the following screen may |
|
|
Press the REC button to start finallse. |
|
appear. |
|
|
Press the OPEN/CLOSE button to exit. |
|
|
|
This disc cannot be played on other |
|
|
|
|
|
DVD players without finallsing. |
|
|
|
|
|
|
Finalising
DVD-R, etc. recorded or copied on this unit cannot be played on other players immediately after recording or copying. Using the Finalise feature allows you to play these discs on other players.
(However, once the disc is fi nalised you will no longer be able to record or copy onto the disc.)

 repeatedly until the desired time is reached.
−The recording time and the unit’s display changes as follows:
Counter (Cancel) OFF 0:30 OFF 1:00
|
|
OFF 4:00 |
OFF 1:30 |
OFF 3:00 OFF 2:00
Notes
This function does not work during timer recording or Flexible Recording.
Recording stops and the set time is cleared if you press [ STOP].
The unit turns off automatically after recording fi nished.
Direct TV Recording
[HDD] [RAM] [-R] [-RW‹V›] [+R] [+RW]
This function allows you to immediately start recording the programme that you are viewing on the TV without having to change the channels on this unit.
You can use the function when you connect the unit to a Q Link compatible TV using the 21-pin Scart cable.
to select the HDD or DVD  drive.
−If you selected the DVD drive, insert a disc (¼ 78).
Press and hold for about 1  second.
Tips
To stop recording
Press [ STOP].
to eject the disc without  fi nalising.
Notes
You cannot stop fi nalising once you have started it.
Tips
If you want to provide the disc with a name or set play menu select, select “Disc Name” (¼ 60), “Auto-Play Select” (¼ 61) or “Top Menu” (¼ 61) in “DVD Management” before fi nalising.
Refer to “Finalising” (¼ 61) for more detail of fi nalising.
Notes
When Digital TEXT (MHEG) (¼ 38) is displayed, Direct TV recording is unavailable.
When the unit is connected to a Panasonic TV, if you switch TV channels while using Direct TV recording, the Direct TV recording stops.
When “EXT-L” lights on the unit’s display (¼ 23), Direct TV recording is unavailable.
When the TV is in the HDMI input mode, this function is not available. Switch to other mode except for the HDMI input mode and use Direct TV Recording.
However this function does not work if you select the TV channels on this unit.
Advanced Features
RQT8866
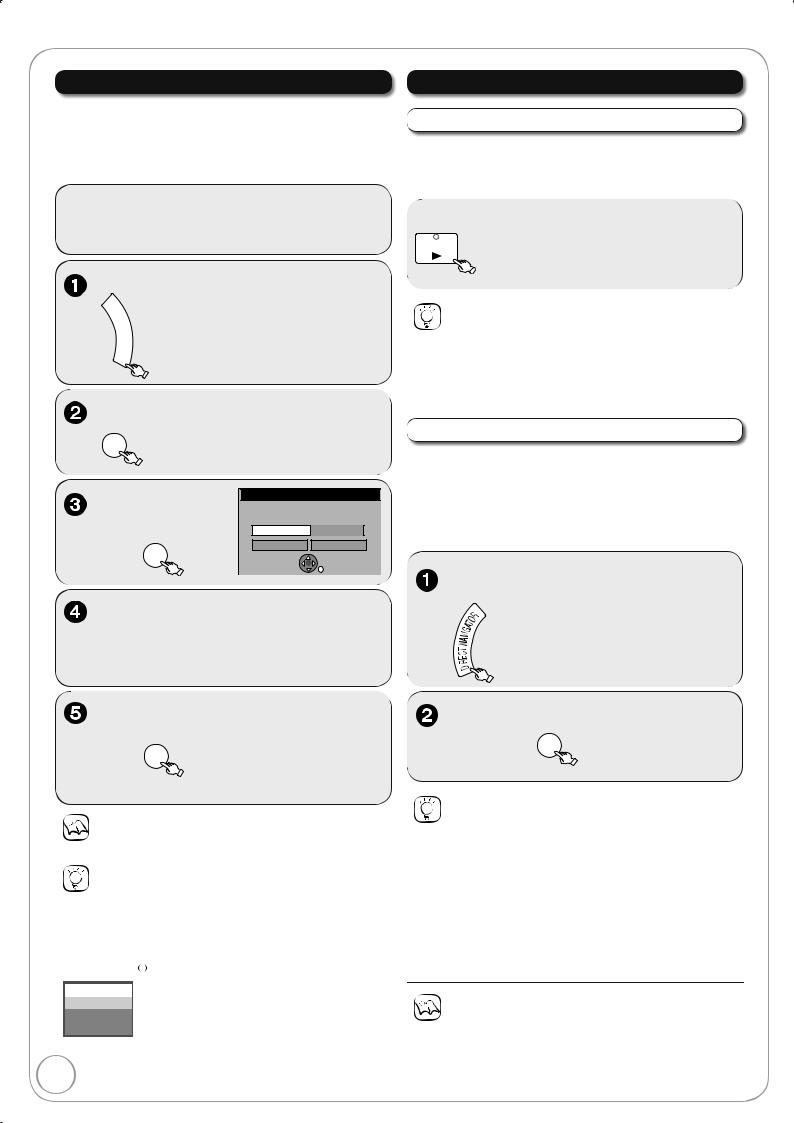
Advanced Recording
Flexible Recording |
Playing while you are recording |
[HDD] [RAM] [-R] [-RW‹V›] [+R] [+RW]
The unit sets the best possible picture quality that fi ts the programme within the remaining disc space.
The recording mode becomes FR mode. Refer to “FR (Flexible Recording)” (¼ 20).
[HDD] [RAM]
Allows playback from the beginning of the title you are recording.
−Recording starts.
Notes
You cannot record more than 8 hours.
Tips
To exit the screen
Press [EXIT].
To stop recording partway
Press [ STOP].
To show the remaining recording time
Press [STATUS ] to show the remaining recording time.
HDD
REC 0:59  Remaining time
1 DVB
BBC ONE Wales
Tips
To stop play
Press [ STOP] once.
To stop recording
Press [ STOP] at least 2 seconds after chasing playback stops.
[HDD] [RAM]
Allows playback of a previous title, while recording something else.
You can also change the drive and play while recording. Press [DRIVE SELECT].
Tips
To stop play
Press [ STOP].
To exit the DIRECT NAVIGATOR screen
Press [DIRECT NAVIGATOR].
To stop recording
After play stops
1.Press [DIRECT NAVIGATOR] to exit the screen.
2.If the recording is on the other drive
Press [DRIVE SELECT] to select the recording drive.
3.Press [ STOP].
Notes
During playing while you are recording, you cannot edit or delete titles.
RQT8866
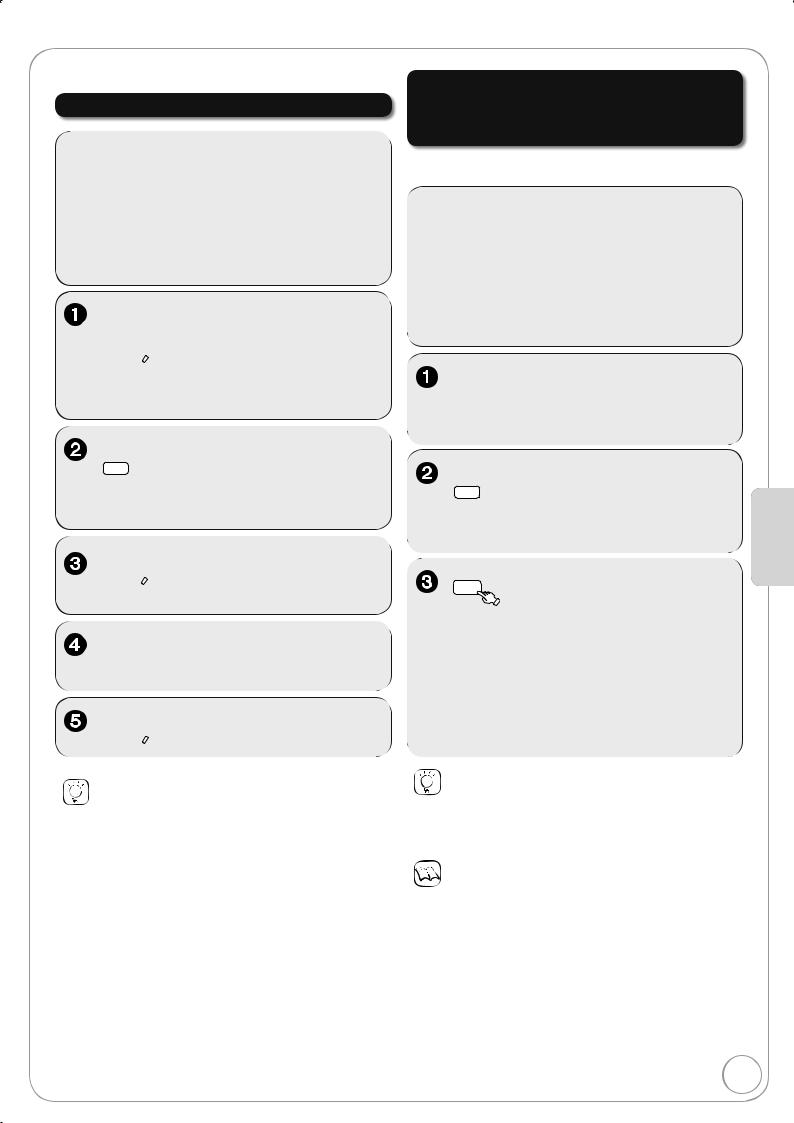
Recording from a Satellite Receiver
[HDD] [RAM] [-R] [-RW‹V›] [+R] [+RW]
Manual Recording
Linked timer recordings with external equipment (SKY Digital STB/satellite receiver) — EXT LINK
To record programmes from a SKY Digital STB/satellite receiver using timer programming
 to select “AV2” for the satellite receiver you have connected.
to select the HDD or DVD  drive.
−If you selected the DVD drive, insert a disc (¼ 78).
to select the HDD or DVD  drive.
−If you selected the DVD drive, insert a disc (¼ 78).
 to select the recording mode.
 to start recording.
Tips
To skip unwanted parts
Press [ PAUSE] to pause recording. (Press again to restart recording.)
To stop recording
Press [ STOP].
−The unit turns off and “EXT-L” lights on the unit’s display to indicate timer recording standby has been activated.
−While the unit is in EXT LINK standby mode or recording, most operations on this unit are prohibited ([ OPEN/CLOSE], [ /l] etc.).
When you operate, press [EXT LINK] to cancel EXT LINK standby mode or recording (The unit turns on and “EXT-L” disappears.).
Tips
To cancel the external control
Press [EXT LINK] to stop recording or to cancel linked timer recording standby (The unit turns on and ‘‘EXT-L” disappears.).
Manual timer recordings (¼ 26)
Notes
In order to prevent accidental operation, press [EXT LINK] to cancel the setting after recording is fi nished.
This function does not work with some equipment. Refer to the equipment’s operating instructions.
The beginnings of recordings may not be recorded correctly in some cases.
When “Ext Link” is set to “Ext Link 2”, this function does not work if the input signal is NTSC system.
Programmes are recorded as one title on this unit when the end time of the earlier timer recording and the start time of the later
timer recording are close to each other.
[HDD] [RAM] To divide the titles, go to “Divide Title” (¼ 44).
While the unit is in EXT LINK standby mode or recording, video
picture is from the AV2 input terminal irrespective of “AV1 Output” setting (¼ 67).
Advanced Features
RQT8866
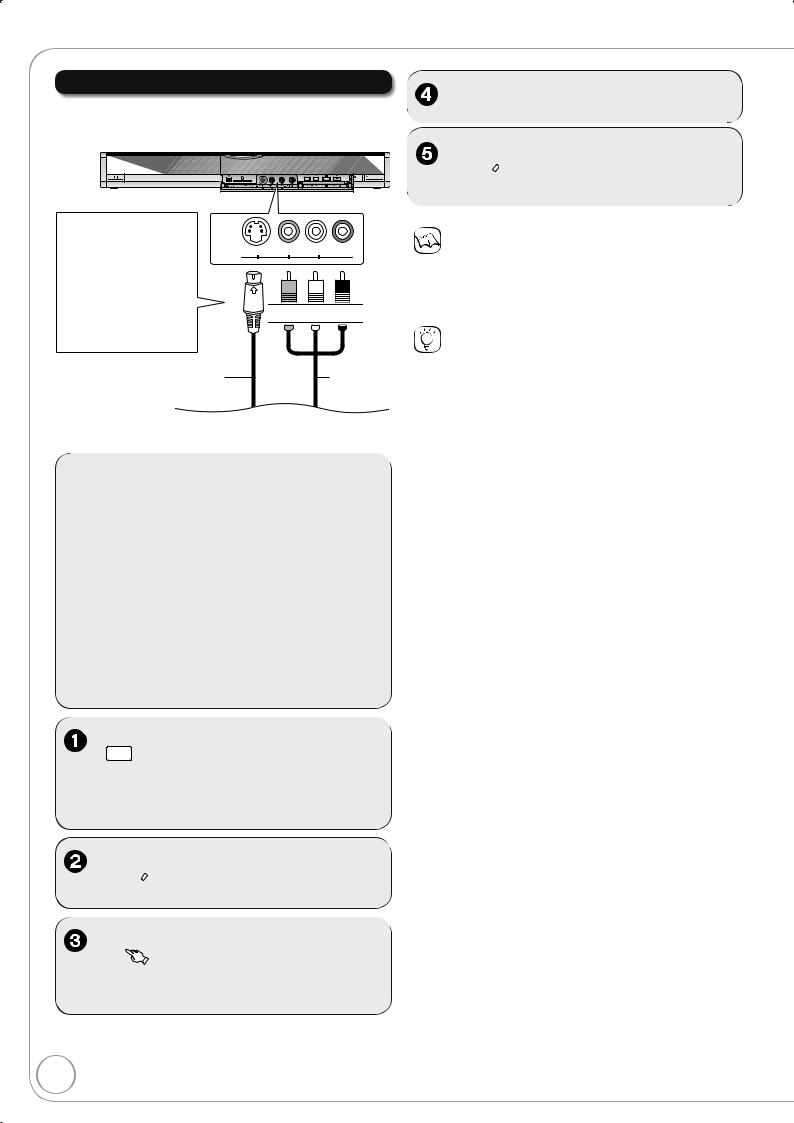
Recording from an External Device
Recording from a VCR, etc.
Connect cables while both the unit and the external device are turned off.
Front of the unit
REC |
OPEN/CLOSE |
 at the point you want to start recording to the disc.
You can get a
sharper, clearer AV3 IN picture by connecting
with an S Video cable instead of the yellow video cable.
S Video cable
|
|
|
VIDEO L/MONO - AUDIO- R |
S VIDEO |
|||
 Yellow White Red
Audio/ video cable
Notes
When timer recording starts while recording from an external device, timer recording takes priority and recording from the external device stops.
Tips
You can also connect to the AV2 on the rear.
If the audio output of the external device is monaural, connect to L/MONO on the AV3 input terminals at the front.
[HDD] [RAM] [-R] [-RW‹V›] [+R] [+RW]
to select the HDD or DVD  drive.
−If you selected the DVD drive, insert a disc (¼ 78).
 to select the recording mode (¼ 20).
 to select the input where your external device is connected.
– Front panel inputs are AV3.
24
RQT8866
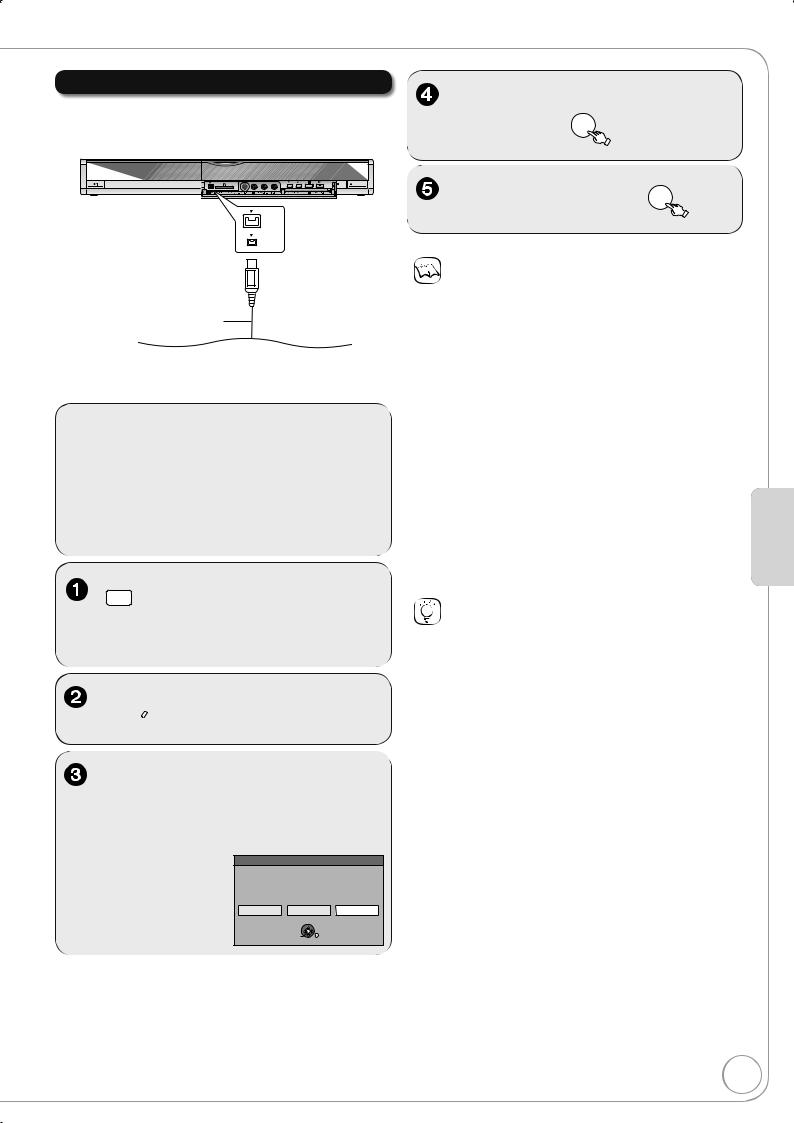
Recording from a DV Camcorder
Connect the cable while both the unit and the external device are turned off.
Front of the unit
REC |
OPEN/CLOSE |
DV IN
4-pin DV Cable
[HDD] [RAM] [-R] [-RW‹V›] [+R] [+RW]
to select the HDD or DVD  drive.
−If you selected the DVD drive, insert a disc (¼ 78).
 to select the recording mode (¼ 20).
“DV Auto Rec” screen may appear.
Notes
When timer recording starts while recording from an external device, timer recording takes priority and recording from the external device stops.
If the desired audio is not recorded, select the kind of audio for “Audio Mode for DV Input” in the Setup menu (¼ 65).
[HDD] [RAM] Programmes are recorded as a single item; breaks in the images create chapters and playlists are created automatically.
If you use video camcorders from other manufacturers, these are not guaranteed to work.
It is not possible to operate the unit from the connected DV equipment.
The DV equipment name may not be shown correctly.
Date and time information is not recorded, even if displayed on the camcorder.
The DV IN terminal is not meant to be connected to a computer.
This unit uses a 4-pin “DV IN” connector;
Your DV camcorder may use a 4-pin or 6-pin external connector. Please consult your DV camcorder’s manufacturer to confi rm correct external connection.
You cannot record and play simultaneously.
Tips
When recording finishes
The confi rmation screen appears.
Press [OK] to fi nish DV camcorder recording.
To stop recording
Press [ STOP].
The confi rmation screen appears. Press [OK].
If the DV camcorder recording function does not work properly, check the connections and DV equipment settings, and turn the unit off and back on. If that does not work, follow the instructions on page 24.
Advanced Features
When “DV Auto Rec” screen does not appear
Perform steps – (¼ above).
1.With the unit stopped Press [FUNCTION MENU].
2.Press [ , ] to select “To Others”, then press [OK].
3.Press [ , ] to select “DV Auto Rec”, then press [OK].
You can proceed to step (¼ right).
RQT8866
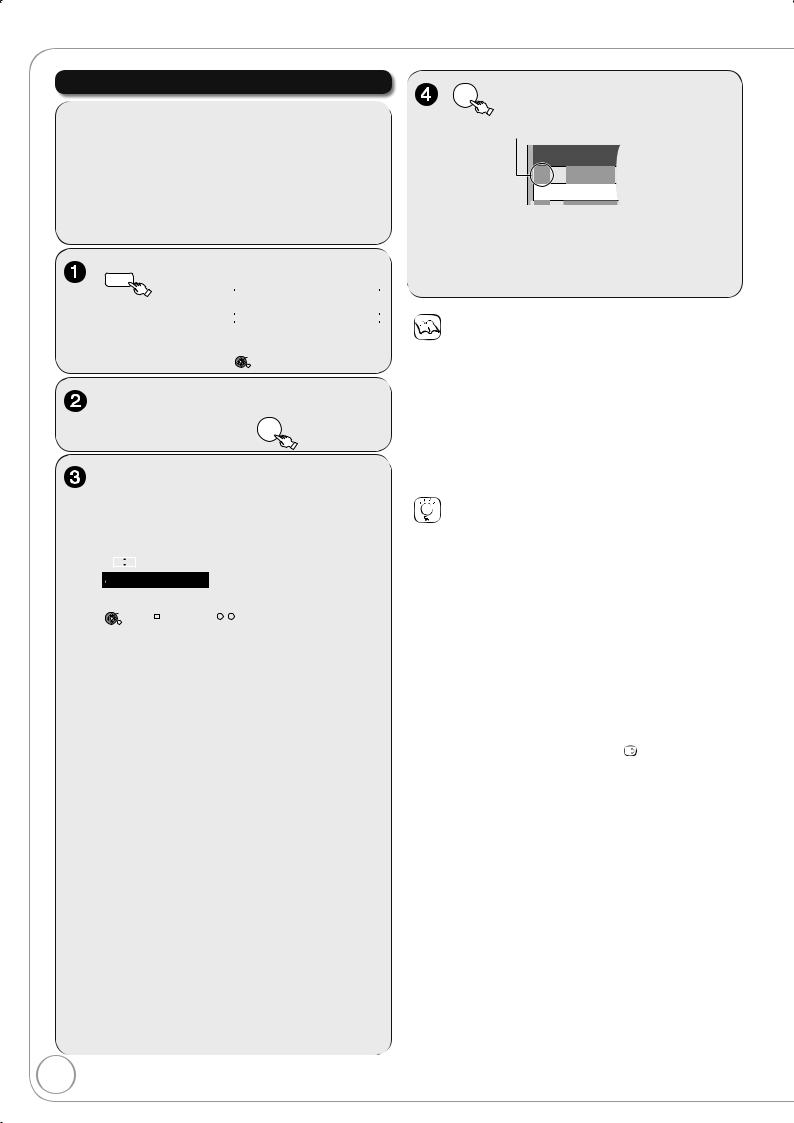
Advanced Timer Recording
Manual timer recordings
|
|
|
|
|
|
|
|
|
|
|
|
|
|
|
|
|
|
|
|
|
|
|
|
|
|
|
|
|
|
|
|
|
|
|
|
|
|
|
|
|
|
|
|
|
|
|
|
|
|
|
|
|
|
|
|
|
|
|
|
|
|
|
|
|
|
|
|
|
|
|
|
|
|
|
|
|
|
|
|
|
|
|
|
|
|
|
|
|
|
|
|
|
|
|
|
|
|
|
|
|
|
|
|
|
|
|
|
|
|
|
|
|
|
|
|
|
|
|
|
|
|
|
|
|
|
|
|
|
|
|
|
|
|
|
|
|
|
|
|
|
|
|
|
|
|
|
|
|
|
|
|
|
|
|
|
|
|
|
|
|
|
|
|
|
|
|
|
|
|
|
|
|
|
|
|
|
|
|
|
|
|
|
|
|
|
|
|
|
|
|
|
|
|
|
|
|
|
|
|
|
|
|
|
|
|
|
|
|
|
|
|
|
|
|
|
|
|
|
|
|
|
|
|
|
|
|
|
|
|
|
|
|
|
|
|
|
|
|
|
|
|
|
|
|
|
|
|
|
|
|
|
|
|
|
|
|
|
|
|
|
|
|
|
|
|
|
|
|
|
|
|
|
|
|
|
|
|
|
|
|
|
|
|
|
|
|
|
|
|
|
|
|
|
|
|
|
|
|
|
|
|
|
|
|
|
|
|
|
|
|
|
|
|
|
|
|
|
|
|
|
|
|
|
|
|
|
|
|
|
|
|
|
|
|
|
|
|
|
|
Name: |
|
|
|
|
– TV Station Name/External Input |
|||||||||||
|
|
|
|
|
|
When recording satellite |
||||||||||
|
|
|
|
|
|
programmes, select “AV2”. |
||||||||||
|
|
|
|
|
|
You can press the “Blue” button to |
||||||||||
|
|
|
|
|
|
change the category |
||||||||||
|
|
|
|
|
|
[e.g., Free TV, Radio, Registered |
||||||||||
|
|
|
|
|
|
Profiles (¼ 62, Edit Profiles)] |
||||||||||
Date: |
|
|
|
|
– You can set a daily or weekly |
|||||||||||
|
|
|
|
|
|
programme (¼ right, Tips). |
||||||||||
Start (start time)/Stop (end time):
|
– Hold button to change in 30-minute |
|
increments or decrements. |
Drive: |
– HDD or DVD |
|
When the recording drive is “DVD” and |
|
there is not enough remaining space, |
|
recording automatically switches to |
|
the “HDD” (¼ 29, Relief Recording). |
Mode: |
– Recording mode (¼ 20) |
STTL [Subtitles (¼ 38)]: |
|
|
– ON/OFF |
RENEW |
– Auto Renewal Recording (¼ 29) |
([HDD]) |
ON/OFF |
Programme Name:
Press [OK] (¼ 42, Entering Text).
26
–“ ” lights on the unit’s display to indicate timer recording standby has been activated.
–Repeat steps – to programme other recordings.
–Press [ DVD] to turn the unit off.
Notes
“ ” on the unit’s display fl ashes when the unit cannot go to timer recording standby.
If two timer recording times overlap, the fi rst recording always has priority. The second recording will start only after the fi rst recording has fi nished.
Recorded subtitles cannot be deleted later.
A Timer Recording will not start while a disc is being formatted, deleted or fi nalised. The recording begins afterwards.
When “Name” is set in AV1, AV2 or AV3, STTL setting is unavailable.
Tips
To exit the timer recording list
Press [PROG/CHECK].
“Date” Setting
Each press of [ ] changes items in the order below. (Each press of [ ] changes items in the reverse order.)
Current date One month later
minus one day
|
|
|
SAT |
|
SUN-SAT |
|
|
|
--- |
|
MON-SAT |
|
|
|
SUN |
|
MON-FRI |
Weekly timer |
Daily timer |
|
You can also use the numbered buttons to enter “Name”, “Date”, “Start”, and “Stop”.
You can also press [DRIVE SELECT] to switch the drive, [REC
MODE] to switch “Mode” and press [STTL  ] to switch “STTL”.
RQT8866
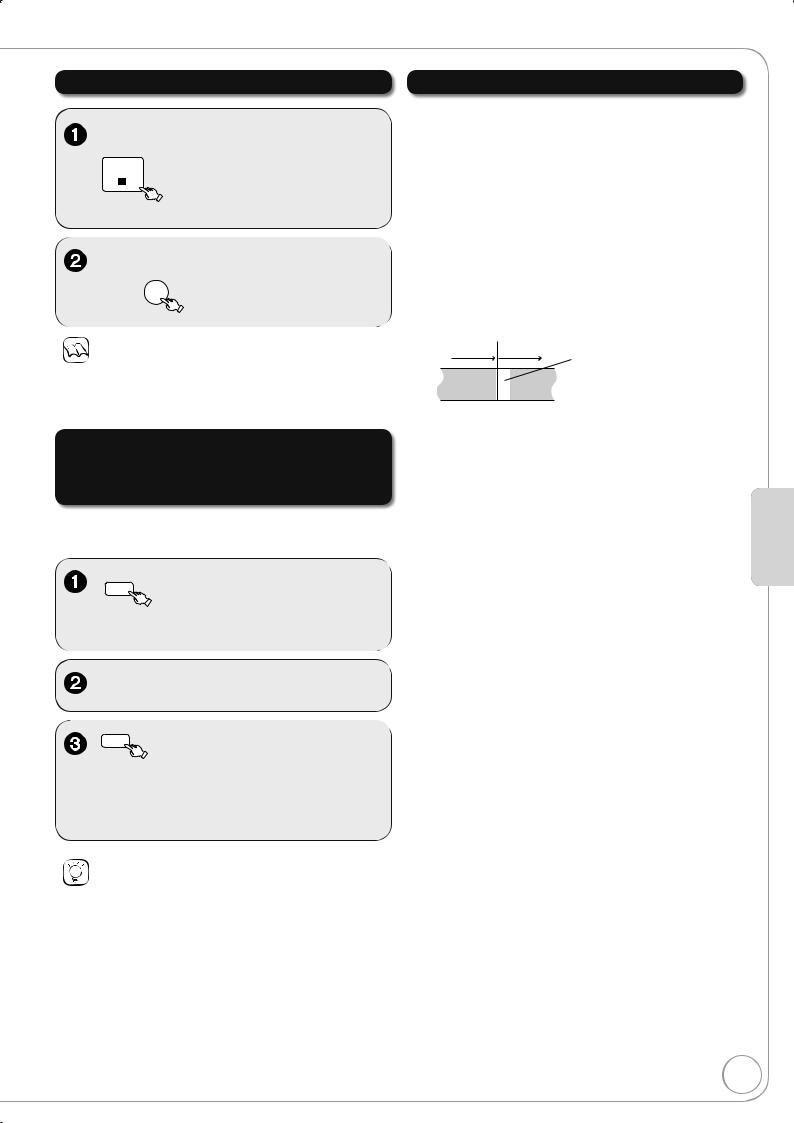
To cancel a timer recording in progress
– Confi rmation screen appears.
Notes
Recording stops and the timer programme is deleted. (Daily and weekly timer programmes remain and timer recording will start as programmed.)
Notes on timer recording
Timer recordings are activated regardless of whether the unit is turned on/off.
Timer recordings begin when the set time is reached even when playing.
Timer recordings do not begin while editing or copying in normal speed mode (¼ 50).
If the unit is turned on when timer recording begins, it remains turned on after recording fi nishes. It does not turn off automatically. You can turn the unit off during timer recording.
If the unit is not put in the timer recording standby mode at the
last 10 minutes before the programmed timer recording starting time, the “ ” fl ashes on the unit’s display.
When you programme successive timer recordings to start immediately one after the other, the unit cannot record the part at the beginning of the later programmes.
Programme |
Programme |
Not recorded |
|
|
|
Recorded |
Recorded |
|
To deactivate timer programme
(e.g. to interrupt a daily or weekly timer programming)
The timer recording list can be viewed even when the unit is off.
–See “Tips” (¼ 28) for explanation of icons displayed.
(Red)
–“ ” (¼ 28) disappears from the timer recording list.
–Press the “Red” button again to activate timer programme.
Tips
You can deactivate the timer programme in the following procedure as well.
Perform steps - (¼ above)
1.Press [OPTION]
2.Press [ , ] to select “Timer Off”, then press [OK].
Advanced Features
RQT8866

Advanced Timer Recording
Check, Change, or Delete Programmes
The timer recording list can be viewed even when the unit is off.
–See “Tips” (¼ right) for explanation of icons displayed.
Tips
You can enter up to 32 programmes a month in advance.
|
Timer |
Remain |
HDD |
30:24 SP |
DVD |
1:58 SP |
|
|
Recording |
|
|
|
12:56:00 |
15/ 7. TUE |
|
|
No. Name |
Date |
Start |
HDD |
Mode |
Drive |
|
|
Stop DVD |
STTL space |
|
||||
New Timer Programme
|
Notes
Recording may fail if there are changes to the station’s programming.
“ ” disappears from the unit’s display when no timer programme is set or when all timer programmes are deactivated.
Timer Recording screen icons
: Timer programme is active.: Currently recording
: Programmes are overlapped. Recording of the programme with the later start time starts when the earlier programme fi nishes recording.
: You stopped a weekly or daily timer recording. The icon disappears when the next timer recording starts.
: The disc was full. (not enough space)

 : The TV programme may not be recorded due to copy-protect.
: Recording stopped (Dirty disc, etc.)

 : Timer programmes set to Auto Renewal Recording (¼ 29).
:Titles that have been rerouted to the HDD (Displayed while recording.)
HDD Recording drive is set to HDD
DVD Recording drive is set to DVD
Drive space
OK: Recordable
¼ (Date):For recordings made daily or weekly, the display will show until when recordings can be made (up to one month ahead from the present time) based on the time remaining on the disc.
!: It may not be possible to record because:
–there is no more space left.
–the number of possible titles has reached its maximum.
Relief: Timer programmes that will be relief recorded to the HDD.
You can also delete a programme with the following steps
1.Press [ , ] to select the programme and press [OPTION].
2.Press [ , ] to select “Delete” and press [OK].
To exit the timer recording list
Press [PROG/CHECK].
Programmes that failed to record are deleted from the timer recording list at 4 a.m. two days later.
28
RQT8866
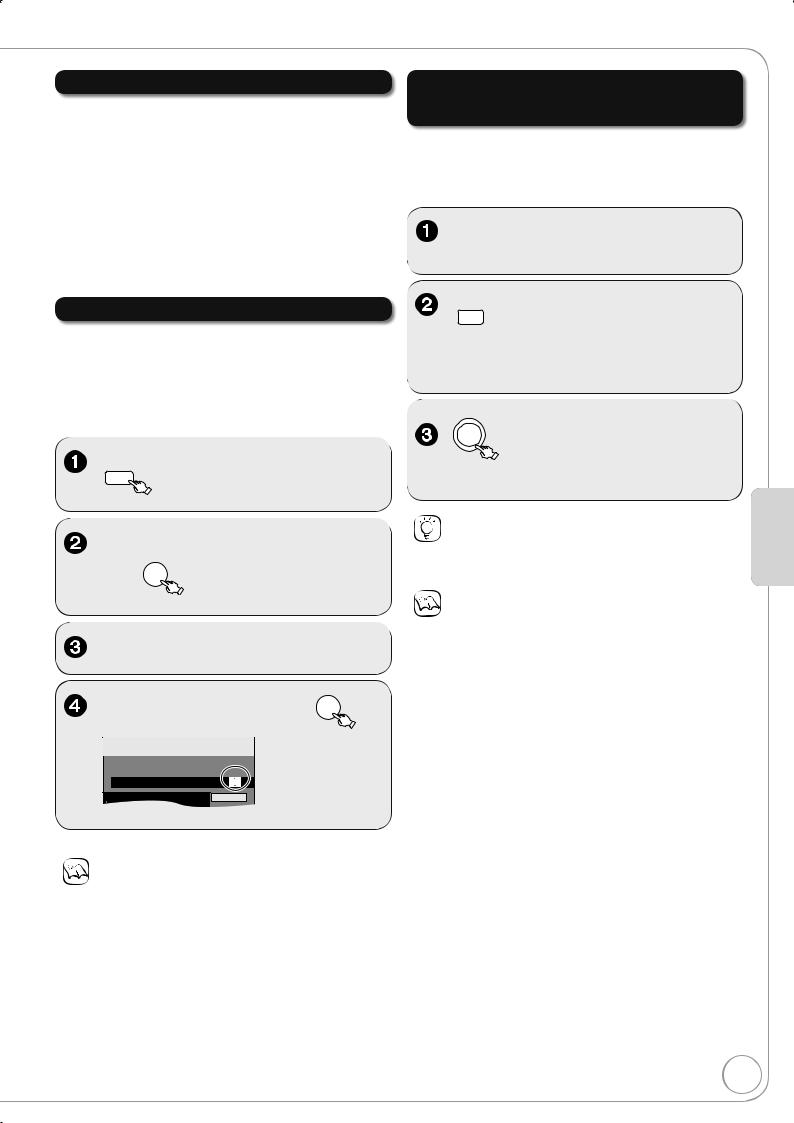
Relief Recording
When the recording drive is “DVD” and there is not enough remaining blank space, recording automatically switches to the “HDD”. If there is no disc in the tray or the disc cannot be recorded on or when timer recording starts while copying, the recording drive will be altered to the HDD.
The Direct Navigator shows which programmes were relief-recorded (“  ” is displayed.) (¼ 32).
If the time remaining on the HDD is insufficient, as much of the programme as possible will be recorded onto the HDD.
Making timer recordings on the television
To make a timer recording with your television, connect to a television with a Q Link function (¼ 40) that you can use for setting timer recordings using a fully wired 21-pin Scart cable (¼ 10,11).
Auto Renewal Recording
[HDD]
If you record a programme onto HDD repeatedly everyday or every week using timer recording, the unit will record the new programme over the old one.
This function can be used only when weekly recording or daily recording is selected.
Notes
If a programme set for Auto Renewal Recording is protected or while play back is taking place from the HDD, or while copying, the programme will not be overwritten. Instead the programme set for recording will be saved as a separate programme, and this programme will be the one to be overwritten when the next Auto Renewal Recording takes place.
Playlists made from programmes that were set for Auto Renewal Recording are deleted along with auto renewal.
When there is not enough space on the HDD, the programme may not be recorded completely.
to select the HDD or DVD  drive.
−If you selected the DVD drive, insert a disc (¼ 78).
to turn the unit off.
–The start and end of recording is controlled by TV.
Tips
To stop recording
Press [ STOP].
Notes
When this unit is in EXT LINK standby (“EXT-L” on the unit’s display lights), recording from TV does not start.
Programmes are recorded as one title on this unit when the end time of the earlier timer recording and the start time of the later timer recording are close to each other.
[HDD] [RAM] To divide the titles, go to “Divide Title” (¼ 44).
Advanced Features
RQT8866
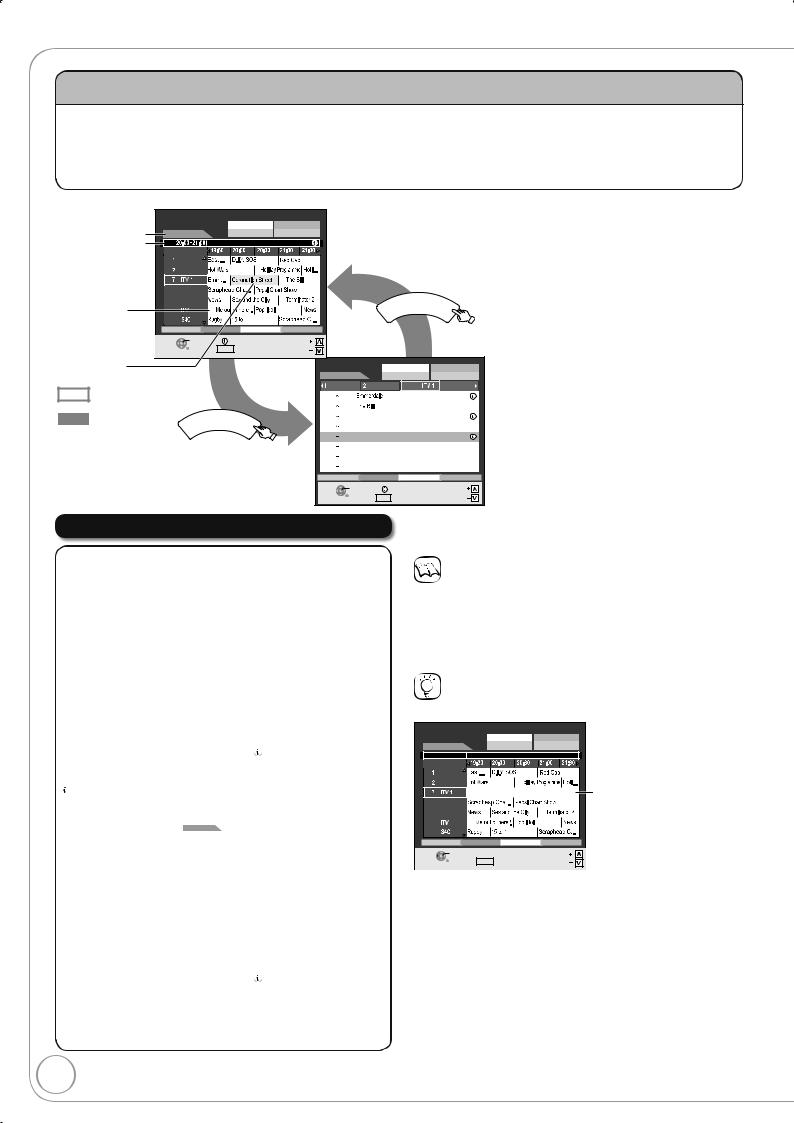
TV Guide
Landscape view
|
TV Guide: Landscape |
|
Wed 13/01/07 19:45 |
|
|
|
|
|
||||
Broadcast date |
|
|
|
|
Prog. Type |
Category |
|
|
|
|
|
|
Wed 13th |
|
|
All Types |
All Services |
|
|
|
|
|
|||
Broadcast time |
|
Time: |
Coronation Street |
|
|
|
|
|
|
|
||
|
|
|
|
|
|
|
|
|
|
|
||
|
|
|
|
|
|
|
|
|
|
|
|
|
|
|
BBC 1 |
|
|
|
|
|
|
|
|
|
|
|
|
BBC 2 |
|
|
|
|
|
|
|
|
|
|
|
|
|
|
|
|
|
|
|
|
|
|
|
|
10 |
Channel 4 |
|
|
|
|
|
|
|
|
|
|
|
31 |
Channel 5 |
|
|
|
|
|
|
|
I |
|
|
|
|
|
|
|
|
|
|
|
|
|
|
|
Timer icon |
45 |
2 |
|
|
|
|
|
|
|
GU DE |
|
|
|
|
|
|
|
|
|
|
|
||||
(¼ 17) |
70 |
|
|
|
|
|
|
|
|
|
|
|
-24 Hr |
+24 Hr |
Prog. Type |
|
Category |
|
|
|
|
|
|||
|
|
|
|
|
|
|
||||||
|
SELECT |
TIMER REC |
info |
|
Page |
|
|
|
|
|
||
|
|
RETURN |
Guide |
Change Display Mode |
Page |
|
|
|
|
|
||
Selected |
|
|
|
|
|
|
TV Guide: Portrait |
Wed 13/01/07 19:45 |
||||
|
|
|
|
|
|
|
|
|
Prog. Type |
Category |
||
programme |
|
|
|
|
|
|
Wed 13th |
|
All Types |
All Services |
||
current |
|
|
|
|
|
|
|
BBC 1 |
BBC 2 |
7 |
|
10 Channel 4 |
|
|
|
|
|
|
19:30 20:00 |
|
|
|
|
||
programme |
|
|
|
|
|
21:00 22:00 |
|
|
|
|
||
future |
|
GUIDE |
|
|
16:00 |
17:45 |
Terminator |
|
|
|
||
|
|
|
20:10 |
21:40 |
Predator |
|
|
|
||||
programme |
|
|
|
|
|
|
|
|
||||
|
|
|
|
|
00:15 02:30 |
James Bond-Goldringer |
|
|
||||
|
|
|
|
|
|
|
|
|
||||
|
|
|
|
|
|
|
19:30 21:00 Scream |
|
|
|
||
|
|
|
|
|
|
|
22:00 23:50 |
American Pie |
|
|
|
|
|
|
|
|
|
|
|
23:50 02:00 |
High Noon |
|
|
|
|
|
|
|
|
|
|
|
-24 Hr |
+24 Hr |
Prog. Type |
|
Category |
|
|
|
|
|
|
|
|
SELECT |
TIMER REC |
info |
|
Page |
|
|
|
|
|
|
|
|
|
RETURN Guide Change Display Mode |
Page |
|||
Landscape view:
TV Guide offers detailed information such as what programme is broadcast on what channel and what time as if you see a TV programme magazine, which is convenient to check the status of Timer recording.
Portrait view:
This is convenient to narrow down channels to search for the programme you want to watch.
To switch between Landscape view and Portrait view
Press [GUIDE].
Portrait view
Using the TV Guide
|
|
|
|
|
|
|
|
|
|
|
|
|
|
|
|
|
|
|
|
|
|
|
|
|
|
|
|
|
|
|
|
|
|
|
|
|
] |
|
|
|
|
|
|
|
To return to the |
Press [RETURN]. |
|||
previous screen |
|
|
|
|
|
|
|
|
|
To exit the screen |
Press [EXIT]. |
|||
|
|
|
|
|
|
|
|
|
|
Notes
The receipt of the TV Guide system data is only possible via the aerial input of this unit. The receipt of the TV Guide data via externally connected satellite receivers is not possible.
The TV Guide system setup will not work if the clock is not set correctly.
Tips
When the unit displays “No Data” or the empty TV Guide list:
TV Guide: Landscape |
Wed 13/01/07 19:45 |
|||||
|
|
|
|
Prog. Type |
|
Category |
Wed 13th |
|
|
All Types |
All Services |
||
|
Time: |
|
|
|
|
|
|
BBC 1 |
|
|
|
|
|
|
BBC 2 |
|
|
|
|
The “empty” fi eld |
|
|
|
|
|
|
|
10 |
Channel 4 |
|
|
|
|
|
31 |
Channel 5 |
|
|
|
|
|
45 |
2 |
|
|
|
|
|
70 |
|
|
|
|
|
|
-24 Hr |
|
+24 Hr |
Prog. Type |
|
Category |
|
SELECT |
VIEW |
|
|
|
|
Page |
|
RETURN |
Guide |
Change Display Mode |
Page |
||
Some digital broadcast may not send programme information. Set the timer recording manually (¼ 26, Manual timer recordings).
30
RQT8866
 Loading...