

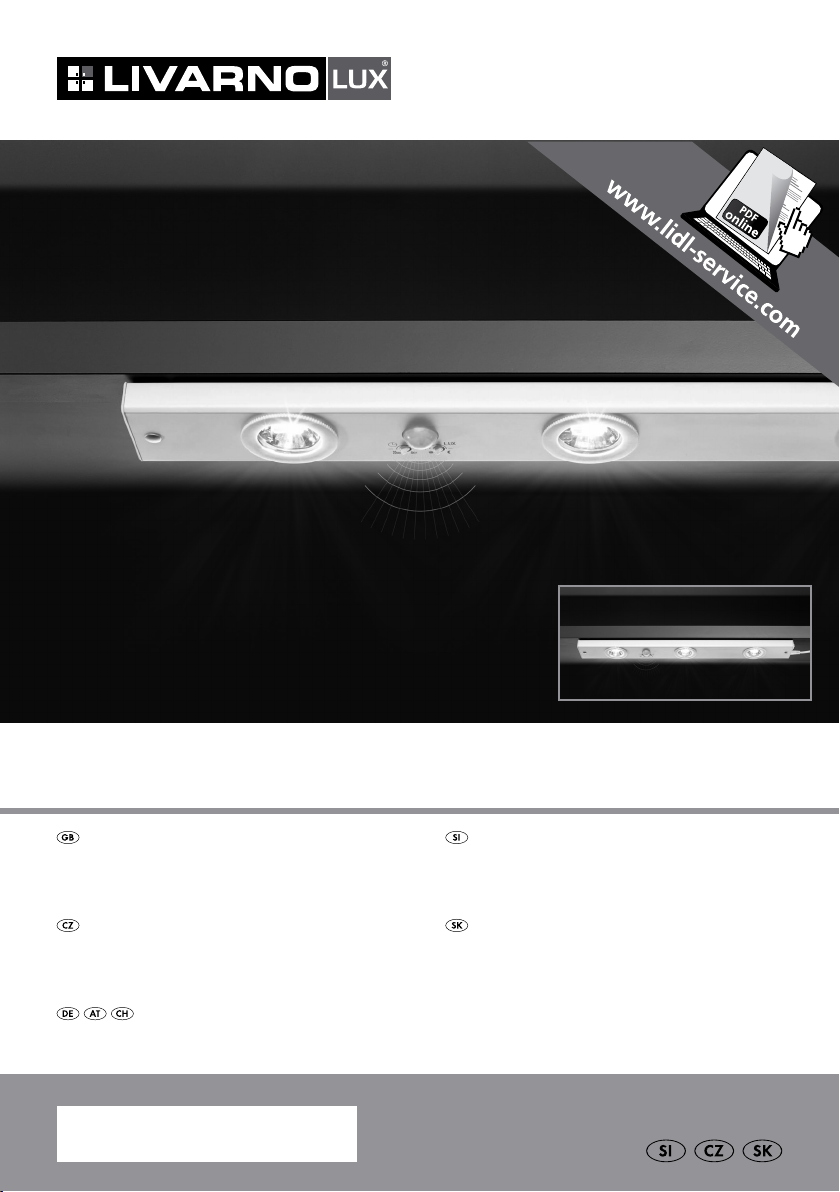
Halogen Under-CUpboard ligHt
Halogen Under CUpboard ligHt
Operation and Safety Notes
Halogenové osvětlení
pod skříňkU
Pokyny pro obsluhu a bezpečnostní pokyny
Halogen-UnterbaUleUCHte
Bedienungs- und Sicherheitshinweise
IAN 87954
Halogenska svetilka
za montažo pod regal
Navodila za upravljanje in varnostna opozorila
Halogénov á lampa
Pokyny pre obsluhu a bezpečnostné pokyny
4

Before reading, unfold the page containing the illustrations and familiarise yourself with all functions of the
device.
Pred branjem odprite stran s slikami in se nato seznanite z vsemi funkcijami naprave.
Před čtením si otevřete stranu s obrázky a potom se seznamte se všemi funkcemi přístroje.
Pred čítaním si odklopte stranu s obrázkami a potom sa oboznámte so všetkými funkciami prístroja.
Klappen Sie vor dem Lesen die Seite mit den Abbildungen aus und machen Sie sich anschließend mit allen
Funktionen des Gerätes vertraut.
GB Operation and Safety Notes Page 5
SI Navodila za upravljanje in varnostna opozorila Stran 11
CZ Pokyny pro obsluhu a bezpečnostní pokyny Strana 19
SK Pokyny pre obsluhu a bezpečnostné pokyny Strana 25
DE / AT / CH Bedienungs- und Sicherheitshinweise Seite 33
A
B
12
9 11 1210
1
13
2
3
13
4
6
5678
11
c
6 12 8
145

Table of contents
Introduction
Proper use ............................................................................................................................................ Page 6
Included items .....................................................................................................................................Page 6
Description of parts and features ....................................................................................................... Page 6
Technical data ..................................................................................................................................... Page 6
Safety
Safety advice ....................................................................................................................................... Page 7
Preparation
Required tools and materials .............................................................................................................. Page 8
Preparation for use
Installing the light ................................................................................................................................Page 8
Connecting more than one under-unit light together ........................................................................Page 8
Operation
Switching the light on / off .................................................................................................................. Page 9
Adjusting the motion sensor................................................................................................................Page 9
Replacing a bulb ................................................................................................................................. Page 9
Maintenance and cleaning ............................................................................................... Page 10
Disposal ............................................................................................................................................ Page 10
Information
Guarantee ........................................................................................................................................... Page 10
Manufacturer / Service .......................................................................................................................Page 10
Declaration of Conformity .................................................................................................................. Page 10
5 GB
Introduction
Halogen Under-Cupboard Light
Q
Introduction
We congratulate you on the purchase of
your new device. You have chosen a
quality product. Please read carefully
and completely through these operating instructions.
Fold out the page with the illustrations. These instructions form part of the product and contain important
information about bringing the product into use and
its handling. Always observe all the safety advice.
Check that the correct mains voltage is available
and that all the parts have been properly assembled before bringing into use. Should you have any
questions or be uncertain as to how to operate the
device, please get in touch with your dealer or service point. Please keep these instructions in a safe
place and hand them on to a third party if necessary.
Q
Proper use
This light is suitable only for interior use, in dry and
enclosed spaces. The light should be positioned
within reach so that the switch can be operated
conveniently. The light can be fitted to all normally
inflammable surfaces. Any use other than that
described above or modification to the lamp is not
permitted and may lead to damage to people or
property. Moreover, there is the risk of injury or loss
of life and that the lamp may develop technical
faults such as short circuit or fire or give an electric
shock. This lamp is intended for use only in a domestic
environment.
Q
Included items
Check that all the items and accessories are present
and that the lamp is in perfect condition immediately
after unpacking.
1 Halogen under-unit light, Model 3005 / 034L or
3005 / 036L
4 Halogen bulbs, G4, 12 V, 20 W
1 Mains lead
6 GB
high
1 Connection lead
2 Dowels (for countersunk head screws)
2 Countersunk head screws (for wood)
2 Countersunk head screws (for masonry)
2 Caps
1 Instructions for use
Q
Description of parts
and features
1
Dowel
2
Halogen under-unit light
3
Screw
4
Cap
5
Mains lead
6
Light connector socket
7
Motion sensor
8
Connection socket
9
Time control TIME
10
Day / night control LUX
11
Cover
12
Toggle switch
13
Bulb
14
Connection cable
Q
Technical data
Operating voltage,
primary: 230 V~ 50 Hz
Operating voltage,
secondary: 12 V
Dimensions: 60 x 7 x 2.5 cm (L x W x H)
Protection class: II /
Protection class: IP20 (suitable for an indoor
Bulbs: Halogen bulbs, G4, 12 V,
Rated power: 3 x 20 W
Motion sensor
Light on time
(adjustable): approx. 20 s – approx.
Detection range: approx. 1.5–3m (varies
Twilight sensor: Yes
, 3 x 20 W
environment only)
20 W
6 min.
by
installation)
Safety
Q
Safety
Safety advice
The right to claim under the guarantee shall be
rendered invalid in respect of damage caused by
the non-observance of these operating instructions.
No liability is accepted for consequent damage.
No liability is accepted for damage to property
or persons caused by improper handling or nonobservance of the safety advice.
To avoid danger to life
from electric shock
J Before connecting the device to the mains
supply, always check the light, mains lead and
connection lead for damage. Never use your
light if you discover that it is damaged in any way.
CAUTION! A damaged mains lead or con-
nection lead presents a serious danger to life
from electric shock.
J Before assembly, ensure that the mains voltage
available corresponds to the operating voltage
necessary of the light (230 V~).
J Never let the lamp come into contact with
water or other liquids.
J Never open or insert anything into electrical
fittings or equipment. Doing this sort of thing can
lead to a serious danger to life from electric
shock.
J Touch only the insulated part of the plug when
connecting to or disconnecting from the mains
supply.
J If the external flexible cable of this lamp is
damaged, it may only be replaced by a special
cable or a cable that is only available from the
manufacturer or his service representative.
J Connect the under-unit light to the mains supply
using the original mains lead only.
J Connect this light only to other original under-
unit lights of the same type (Model 3005 / 034L
or 3005 / 036L). Use only the supplied original connection lead to make this connection.
J Use only one mains socket for any series of
connected under-unit lights. Ensure that no more
than 3 under-unit lights of the same type are
connected together in series. Failure to observe
this advice could lead to overloading of the
connectors and leads.
J First ensure that all the under-unit lights are
connected by connection leads before you
insert the mains lead into the mains socket.
J Do not attach the light to damp or conductive
substrates.
To avoid danger of fire
and injury
J RISK OF INJURY! Check every bulb and
lampshade for damage immediately upon
unpacking. Do not operate the light with a
defective bulb or glass cover. If they are,
contact the service point for a replacement.
J RISK OF INJURY FROM BURNS! Ensure
the lamp has been switched off and allowed to
cool before you touch it. In this way you will
avoid the danger of burns. Light bulbs develop
a great deal of heat.
J Do not touch bulb components or bulbs as they
can reach temperatures > 350 °C during
operation.
J Allow the light to cool down completely before
replacing a defective bulb.
J Replace defective bulbs immediately. Before
replacing the bulb always remove the mains
plug from the socket.
J Do not operate this light with a dimmer or an
electronic switch. It is not suitable for this mode
of operation.
J
FIRE HAZARD! Fit the light so that
it is at least 0.2 m away from the
0.2 m
material illuminated. Fire can result
from the development of too much heat.
J Never leave the light operating unattended.
J Do not allow any objects to cover the light. Fire
can result from the development of too much heat.
J Do not allow the lamp or the packaging mate-
rials to lie around unattended. Plastic film or
7 GB

Safety / Preparation / Preparation for use
bags, Styrofoam etc. can turn into dangerous
toys for children.
J
Use only halogen bulbs with lamp
covers or in low-voltage systems.
J Only use the included parts, using other parts
will void the warranty.
J Do not look directly into the light source (light
bulb, LED etc.).
For your safety
J Use only 12 volt halogen bulbs type G4 with
a maximum rated power of 20 watts.
J Fit the light in such a way to ensure it is
protected from damp and dirt.
J Make careful preparations for the assembly
and take sufficient time. Clearly lay out all
components and any additional tools or materials
that might be required so that they are readily
to hand.
J Remain alert at all times and always watch
what you are doing. Always proceed with
caution and do not assemble the lamp if you
cannot concentrate or feel unwell.
J Never touch halogen bulbs with your bare
hands, otherwise damage to the bulbs may
occur. If you find you have touched a bulb with
your bare hands, wipe the halogen bulb clean
using alcohol and a fluff-free cloth.
Q
Preparation
Q
Required tools and materials
- Spirit level
- Cable detector
- Measuring tape
Q
Preparation for use
Q
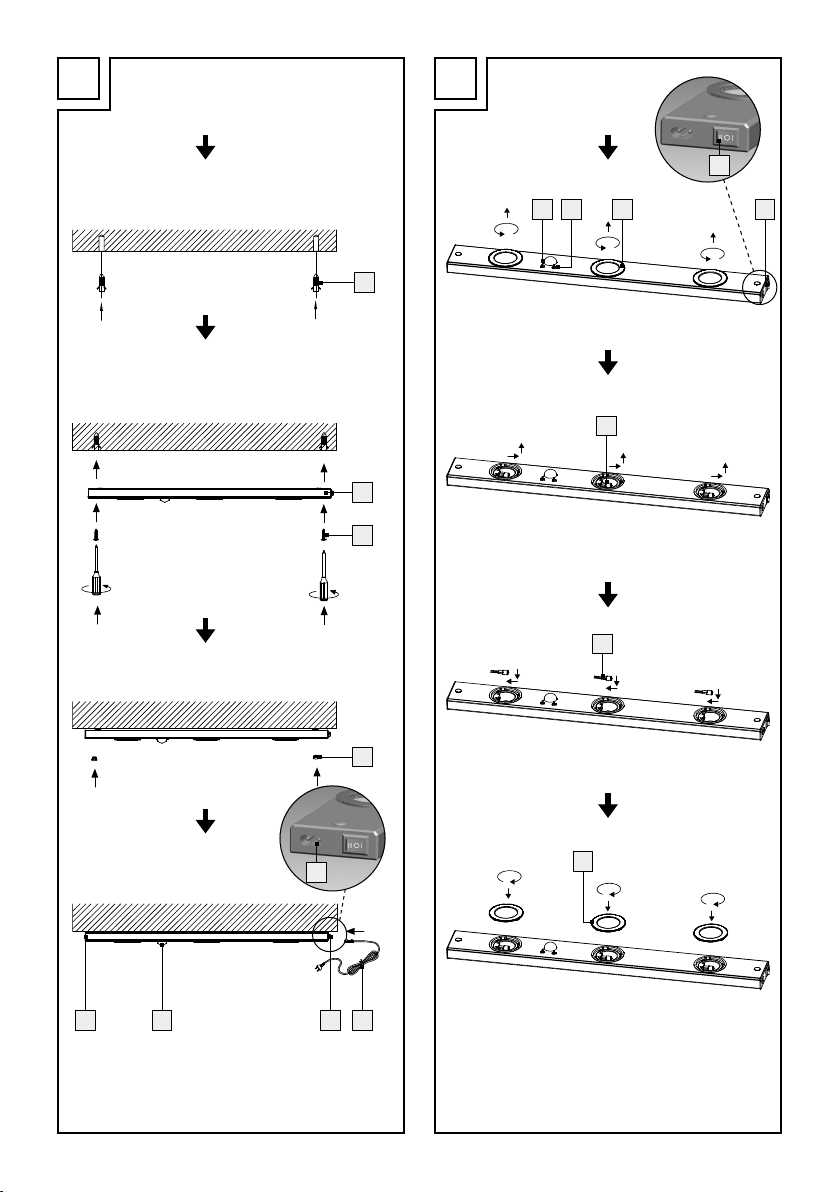
Installing the light
Note: The product includes two different types of
screw. Use the countersunk head screw (length:
15 mm) for mounting on to wood. Use the countersunk
head screws (length: 25 mm) and the dowels
1
for mounting on to a solid masonry wall.
1. Measure up the wall or mounting surface
before drilling the holes. Use a spirit level to
improve accuracy.
2. Mark the two mounting holes at a distance of
570 mm apart.
Steps 3 and 4 apply only to mounting on
to solid masonry:
3. Now drill the fixing holes (approx. ø 5 mm,
depth approx. 30 mm). Make sure that you do
not damage any electrical cables during this
operation.
4. Insert the supplied dowels
1
into the drilled
holes.
5. Fix the under-unit light
2
in place with the
screws 3 (see Fig. A).
6. Place the caps
7. Insert the connector plug of the mains lead
into the light connector socket
8. Insert the mains plug of the mains lead
4
on the screw heads.
6
5
.
5
into
the mains socket.
The tools and materials mentioned are not included
in the delivery. The details and values given are
non-binding and for guidance only. The nature of
the material depends on the individual circumstances
on site.
- Pencil / Marking tool
- Screwdriver
- Electric drill
- Drill
8 GB
Your light is now ready for operation.
Q
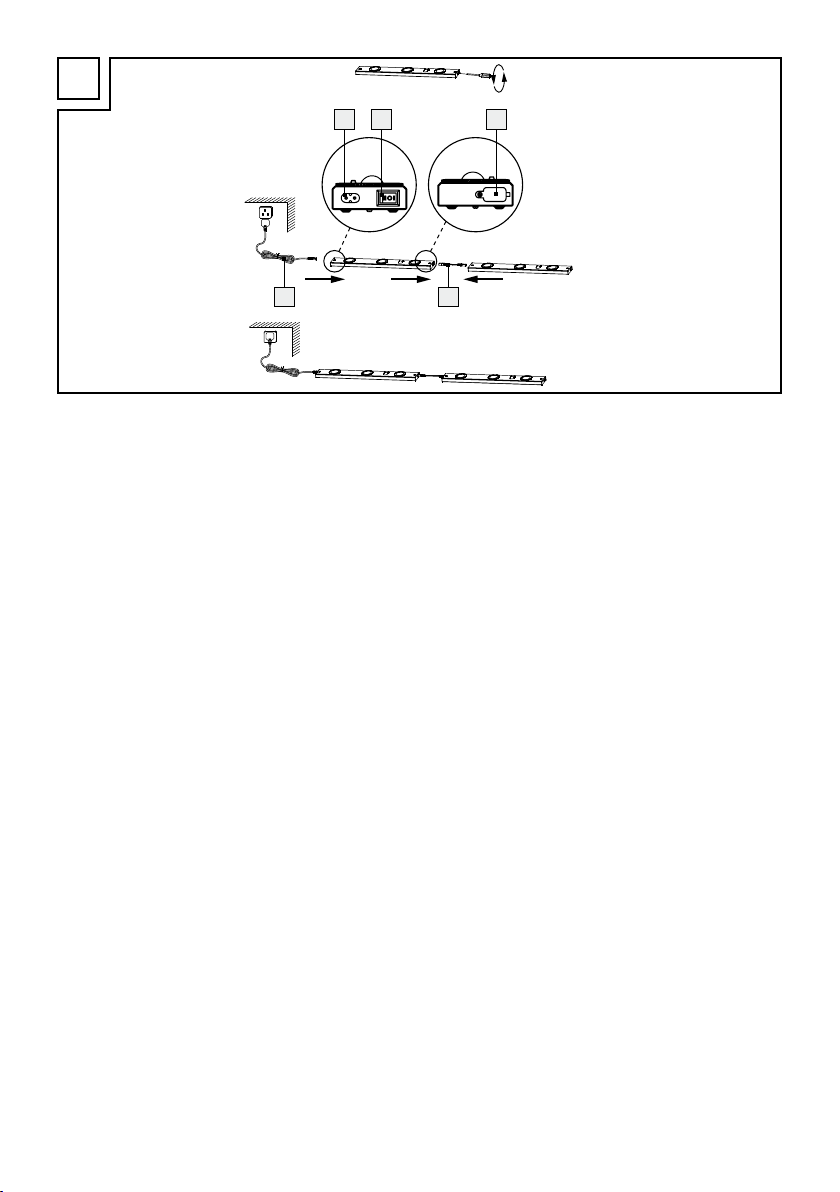
Connecting more than one
under-unit light together
CAUTION! First ensure that all the under-unit lights
are connected by connection cable
insert the mains plug of the mains lead
14
before you
5
into

Preparation for use / Operation
the mains socket, otherwise damage to the product
may occur.
Note: Ensure that no more than 3 under-unit lights
of the same type are connected together in series.
Note: If you install and connect the lights in series
(max. 3 No.), they function independently of one
another.
j Install up to three lights of the same type close to
one another. Follow steps 1 to 6 of the section
on “Installing the light”.
Note: Ensure that the distance between the
lights is not greater than 20 cm.
j Remove the protective cap from the connection
8
socket
by screwing out the screws anticlock-
wise using a Phillips screwdriver.
j Plug the connection cable
tion socket
8
of the light.
j Plug the other end of the connection cable
into the light connector socket
14
into the connec-
6
of the other
14
light.
j Insert the connector plug of the mains lead
into the light connector socket
6
of the outer
5
right light.
j Insert the mains plug
5
into the mains socket.
Your lights are now ready for operation.
Q
Adjusting the motion sensor
Note: The motion sensor is fitted with a twilight
sensor. You can set the sensitivity of the twilight
sensor with the day / night control LUX
10
lighting period with the time control TIME
Setting the light sensitivity:
j Turn the day / night control LUX
10
anticlock-
wise to increase the light sensitivity (motion
7
sensor
j Turn the day / night control LUX
reacts at a darker stage of twilight).
10
clockwise
to reduce the light sensitivity (motion sensor
reacts at lighter stage of twilight).
Setting the lighting period:
j Turn the time control TIME
9
anticlockwise to
shorten the lighting period (min. 20 s).
j Turn the time control TIME
9
clockwise to
lengthen the lighting period (max. 6 Min.).
Note: The motion sensor
7
of the under-unit light
reacts to heat. As the room temperature rises the
sensitivity of the motion sensor reduces (takes longer
to react).
Q
Replacing a bulb
and the
9
.
7
Q
Operation
Q
Switching the light on / off
Note: The under-unit light can be operated with a
toggle switch
12
as well as a motion sensor 7.
The toggle switch has the following
functions:
- Toggle switch in position 0: Light and motion
sensor are switched off.
- Toggle switch in position 1: Light switched on,
motion sensor deactivated.
- Toggle switch in position 2: Motion sensor
activated. The light only is only switched on
by the motion sensor.
RISK OF ELECTRIC SHOCK!
To replace the bulb
13
, first of all disconnect the
light from the mains circuit. Pull the mains plug of
the mains lead
5
out of the mains socket.
CAUTION! RISK OF BURNS! Let the bulbs
13
cool down fully before you replace them.
j Turn the cover
j Draw the defective bulb
11
anticlockwise and take it off.
13
in the direction of
the arrow out of the fitting socket (see Fig. B).
Note: Use only a halogen bulb type G4
12 volt with a maximum rated power of 20 W.
Note: Use a soft, fluff-free cloth when you are
replacing a bulb
13
. Never touch the bulb 13
with your bare hands.
j Insert a new bulb
j Put the cover
13
into the fitting socket.
11
back in place and turn it
clockwise to tighten it.
9 GB
Operation / Maintenance and cleaning / Disposal / Information
CAUTION! First ensure that all the under-unit
lights are connected by connection leads
before you insert the plug of the mains lead
14
5
into the mains socket, otherwise damage to the
product may occur.
j Insert the mains plug of the mains lead
5
into
the mains socket.
Q
Maintenance and cleaning
CAUTION! RISK OF ELECTRIC SHOCK!
Pull the mains plug of the mains lead
5
out of the
mains socket.
CAUTION! RISK OF ELECTRIC SHOCK!
For electrical safety reasons, never clean the light
with water or other fluids nor immerse it in water.
J Do not use solvents such as petrol and the like,
as they could damage the light.
j Allow the light to cool completely.
j Use a dry, fluff-free cloth for cleaning.
Q
Disposal
The packaging and ancillary packing consist entirely
of environmentally-friendly materials. They can be
disposed of at your local recycling facility.
Q
Information
Q
Guarantee
You receive a 36 month warranty on this product,
valid from the date of purchase. The device has
been carefully produced under strict quality control.
Within the warranty period we shall rectify without
charge all material and manufacturing defects. In
the event of a defect arising during the warranty
period, please send the device to the listed Service
Centre address, making reference to the following
article number: 3005 / 034L or 3005 / 036L.
Wear parts (such as bulbs) and damage caused by
improper handling, non-observance of the operating
instructions or unauthorised interference are excluded
from the warranty. The performance of services
under the warranty does not extend or renew the
warranty period.
Q
Manufacturer / Service
Briloner Leuchten GmbH
Im Kissen 2, 59929 Brilon, Germany
Tel.: +49 (0) 29 61 / 97 12 - 0
Fax: +49 (0) 29 61 / 97 12 - 1 99
E-mail: Info@briloner.de
www.briloner.de
The symbol of the wheelie bin with the
line through it means that, in the European
Union, the product has to be disposed
of in a separate refuse collection. This applies to the
product and to all components bearing this symbol.
Products marked in this way may not be disposed
of along with normal domestic waste but have to
be handed in at a recycling collection point for
electrical and electronic appliances. Recycling
helps to reduce the consumption of raw materials
and to ease the burden on the environment.
10 GB
IAN 87954
For all inquiries about your product, please have
your receipt and product number (e.g. IAN 12345)
ready as your proof of purchase.
Q
Declaration of Conformity
This product fulfils the requirements of the applicable
European and national directives (Electromagnetic
Compatibility 2004 / 108 / EC, Low Voltage Directive
2006 / 95 / EC), Ecodesign directive 2009 / 125 / EC
RoHS directive 2011 / 65 / EU).
Conformity has been demonstrated. The relevant
declarations and documents are held by the manufacturer.
,

Kazalo
Uvod
Pravilna uporaba ............................................................................................................................... Stran 12
Vsebina dobave ................................................................................................................................. Stran 12
Opis delov .......................................................................................................................................... Stran 12
Tehnični podatki ................................................................................................................................. Stran 12
Varnost
Varnostna opozorila .......................................................................................................................... Stran 13
Priprava
Potrebno orodje in material ............................................................................................................... Stran 14
Začetek uporabe
Montaža svetilke ................................................................................................................................ Stran 14
Medsebojno povezovanje več svetilk .............................................................................................. Stran 14
Uporaba
Vklop / izklop svetilke ........................................................................................................................ Stran 15
Nastavljanje senzorja gibanja .......................................................................................................... Stran 15
Menjavanje žarnice ........................................................................................................................... Stran 15
Vzdrževanje in čiščenje ...................................................................................................... Stran 16
Odstranjevanje ......................................................................................................................... Stran 16
Informacije
Garancija ........................................................................................................................................... Stran 16
Izdelovalec / Servis ............................................................................................................................ Stran 16
Izjava o skladnosti ............................................................................................................................. Stran 16
11 SI
Uvod
Halogenska svetilka
za montažo pod regal
Q
Uvod
Iskrene čestitke ob nakupu vaše nove
naprave. Odločili ste se za zelo kakovo-
sten izdelek.Prosimo vas, da natančno in
v celoti preberete navodila za uporabo izdelka.
Odprite stran s slikami. Navodila so sestavni del
izdelka in vsebujejo pomembna navodila za njegovo
uporabo in ravnanje z njim. Vedno upoštevajte vsa
varnostna navodila. Pred pričetkom uporabe se
prepričajte, če je omrežna napetost ustrezna in če
so vsi deli pravilno montirani. Če bi imeli glede
uporabe izdelka kakršnokoli vprašanje, se obrnite
na svojega prodajalca ali na pooblaščen servis.
Navodila skrbno shranite in jih vedno izročite morebitni tretji osebi skupaj z izdelkom.
Q
Pravilna uporaba
Svetilka je primerna izključno za uporabo v notranjih, suhih in zaprtih prostorih. Zaradi prižiganja in
ugašanja stikala, mora biti svetlika nameščena v
dosegu rok. Drugačna uporaba od zgoraj opisane ali
spreminjanje izdelka ni dovoljeno in lahko povzroči
škodo. Poleg tega tako dejanje lahko predstavlja
življenjske nevarnosti in poškodbe, kot tudi tehnične
okvare delovanja (npr. kratki stik, požar, električni
udar). Izdelek je namenjen le za uporabo v zasebnih
gospodinjstvih.
Q
Vsebina dobave
Takoj ko izdelek vzamete iz ovojnine, preverite, če
ste prejeli vse sestavne dele in se prepričajte, če so
vsi deli nepoškodovani.
1 halogenska podgradna svetilka, model
3005 / 034L ali 3005 / 036L
4 halogenske žarnice, G4, 12 V, 20 W
1 omrežna napeljava
1 povezovalni kabel
2 zatiča (za vijaka z ugreznjeno glavo)
2 vijaka z ugreznjeno glavo (za les)
2 vijaka z ugreznjeno glavo (za zid)
2 pokrivna profila
1 navodilo za uporabo
Q
Opis delov
1
zatič
2
halogenska podgradna svetilka
3
vijak
4
pokrivni profil
5
priključna napeljava
6
vtičnica svetilke
7
senzor gibanja
8
povezovalna vtičnica
9
časovni regulator TIME
10
regulator za dan / noč LUX
11
pokrov
12
prevesno stikalo
13
žarnica
14
povezovalni kabel
Q
Tehnični podatki
Obratovalna napetost,
primarno: 230 V~ 50 Hz
Obratovalna napetost,
sekundarno: 12 V
, 3 x 20 W
Dimenzije: 60 x 7 x 2,5 cm
(D x Š x V)
Zaščitni razred: II /
Vrsta zaščite: IP20 (primerno samo
za notranje prostore)
Žarnica: halogenska žarnica,
G4, 12 V, 20 W
Nazivna moč: 3 x 20 W
Senzor gibanja
Trajanje svetenja
(nastavljivo): pribl. 20 Sek. – pribl.
6 min.
Območje zaznavanja: pribl. 1,5–3 m
(odvisno
od montaže)
Senzor za mrak: na razpolago
12 SI
Varnost
Q
Varnost
Varnostna opozorila
V primeru škode, ki bi nastala zaradi neupoštevanja
navodil za uporabo, garancijski zahtevek ni mogoč.
Za posredno škodo ne prevzemamo odgovornosti!
Za materialno škodo ali za poškodbe oseb, ki bi jih
povzročila nepravilna uporaba ali neupoštevanje
varnostnih opozoril, ne prevzemamo odgovornosti!
Preprečite življenjsko nevarnost
zaradi električnega udara
J Pred vsako priključitvijo na omrežje svetilko,
omrežno napeljavo ter po potrebi tudi povezovalni kabel prekontrolirajte, ali kažejo kakšne
znake poškodb. Svetilke nikoli ne uporabljajte,
če ste odkrili kakršnekoli poškodbe.
POZOR! Poškodovana omrežna napeljava
in povezovalni kabel predstavljata življenjsko
nevarnost zaradi udara električnega toka.
J Pred montažo se prepričajte, da je omrežna
napetost enaka določeni obratovalni napetosti
svetilke (230 V~).
J Na vsak način preprečite stik svetilke z vodo
ali drugimi tekočinami.
J Nikoli ne odpirajte nobenega dela električne
opreme in vanj nikoli ne vtikajte nobenih predmetov. Tovrstni posegi predstavljajo življenjsko
nevarnost zaradi električnega udara.
J Pri priklapljanju in odklapljanju električnega
toka se dotikajte le izoliranega območja
električnega stikala!
J Če je zunanji gibljivi kabel te luči poškodovan,
ga lahko nadomestite le s specialnim kablom
ali s kablom, ki ga lahko naročite izključno
preko proizvajalca ali servisnega zastopnika.
J Podgradno svetilko priključite samo z originalno
omrežno napeljavo na omrežni tok.
J Med seboj povežite samo originalne podgradne
svetilke istega tipa (model 3005 / 034L ali
3005 / 036L). V ta namen uporabljajte samo
zraven dobavljeni originalni povezovalni kabel.
J Med seboj povezane podgradne svetilke pri-
ključite samo v vtičnico. Pazite na to, da preko
ene vtičnice skupaj priključite samo maksimalno
3 podgradne svetilke istega tipa. V nasprotnem
primeru lahko pride do preobremenitve priključkov in napeljav.
J Pazite na to, da morajo biti s pomočjo povezo-
valnega kabla med seboj najprej zvezane vse
podgradne svetilke, preden omrežno napeljavo
priključite v vtičnico.
J Svetilke ne montirajte na vlažne ali prevodne
podlage.
Preprečite nevarnost
požara in poškodb
J NEVARNOST POŠKODB! Takoj, ko izdelek
vzamete iz ovojnine, vse svetilke in steklene
nastavke preglejte in se prepričajte, da niso
poškodovani. Svetilke nikoli ne uporabljajte z
defektnim svetilnim sredstvom in / ali poškodovanim steklom svetilke. V tem primeru se obrnite
na servis in se dogovorite za nadomestne dele.
J NEVARNOST OPEKLIN! Preprečite nastanek
opeklin, tako da se vedno prepričate, da je svetilka izklopljena in ohlajena, preden se je dotaknete. Svetilno sredstvo lahko sprošča visoko
vročino.
J Deli svetilke in svetilno sredstvo lahko med
obratovanjem dosežejo temperaturo do
> 350 °C in se jih zaradi tega ne sme dotikati.
J Pred menjanjem defektnega svetilnega sredstva
pustite, da se svetilka popolnoma ohladi.
J Defektno svetilno sredstvo takoj zamenjajte z
novim. Pred menjanjem svetilnega sredstva
vedno najprej potegnite električni vtič iz vtičnice.
J Te svetilke ne uporabljajte za zatemnilna in
elektronska stikala. Svetilka za to ni primerna.
J
NEVARNOST POŽARA! Svetilko
montirajte na mesto, ki je od osve-
0,2 m
tljevanih materialov oddaljeno
najmanj 0,2 m. Prekomerno segrevanje lahko
povzroči požar.
J Svetilke med obratovanjem ne pustite nenadzo-
rovane.
13 SI

Varnost / Priprava / Začetek uporabe
J Svetilke ne prekrivajte s predmeti. Prekomerno
segrevanje lahko vodi do povzročitve požara.
J Svetilke ali ovojnine ne pustite ležati naokoli.
Plastične folije in vrečke, plastični deli itd. bi
lahko otrokom postali nevarna igrača.
J
Uporabljajte samo halogenske žar-
nice s pokrivno ploščo ali nizkovoltne
halogenske žarnice.
J Uporabljati je dovoljeno izključno priložene posa-
mezne dele, saj v nasprotnem primeru izgubite
pravico do zahtevkov iz naslova garancije.
J Ne glejte neposredno v vir svetlobe (sijalka,
LED lučka itd.).
Tako ravnate pravilno
J Uporabljajte samo 12 voltne halogenske žarnice
tipa G4 in največjo jakostjo 20 vatov.
J Svetilko montirajte tako, da je zaščitena pred
vlago in umazanijo.
J Na montažo se skrbno pripravite in vzemite si
dovolj časa. Vnaprej si pripravite vse posamezne
sestavne dele in poleg tega tudi potrebno orodje
ali material, tako da je vse pregledno in na
dosegu.
J Ves čas bodite pozorni! Pazite na to, kar delate
in ves čas postopajte razumno. Svetilke v nobenem primeru ne montirajte, če niste zbrani ali
se ne počutite dobro.
J Halogenskih žarnic se nikoli ne dotikajte z golimi
rokami. V nasprotnem primeru lahko pride do
poškodb žarnice. Halogensko žarnico obrišite
z alkoholom in krpo, ki ne pušča kosmov, če
ste se jo dotaknili z golimi rokami.
- Vrtalni stroj
- Vrtalnik
- Vodna tehtnica
- Naprava za iskanje napeljav
- Merilni trak
Q
Začetek uporabe
Q
Montaža svetilke
Opozorilo: V obsegu dobave sta vsebovana dva
različna tipa vijakov. Vijaka z ugreznjeno glavo
(dolžina: 15 mm) uporabite za montažo na les.
Vijaka z ugreznjeno glavo (dolžina: 25 mm) in zatiča
1
uporabite za montažo na zid.
1. Izmerite steno oz. montažno površino za name-
stitev vrtin. Za natančno poravnavo uporabite
vodno tehtnico.
2. Označite razdaljo 570 mm med obema luknjama
za pritrditev.
Delovna koraka 3 in 4 veljata samo pri
montaži na zid:
3. Zdaj izvrtajte luknji za pritrditev (ø pribl. 5 mm,
globina pribl. 30 mm). Zagotovite, da se pri
montaži napeljava v steni ne poškoduje.
4. V izvrtani luknji vstavite priložena zatiča
1
.
5. Podgradno svetilko fiksirajte s pomočjo vijakov
3
(glejte sl. A).
6. Na glavi vijakov nataknite pokrivna profila
7. Priključek omrežne napeljave
vtičnico svetilke
6
.
8. Električni vtič omrežne napeljave
5
vtaknite v
5
4
vtaknite v
vtičnico.
.
Q
Priprava
Q
Potrebno orodje in material
Navedeno orodje in material nista priložena izdelku.
Gre za neobvezujoča priporočila in vrednosti za
orientacijo. Kakovost materiala je odvisna od posameznih danosti na kraju samem.
- Svinčnik / orodje za označevanje
- Izvijač
14 SI
Vaša svetilka je zdaj pripravljena za uporabo.
Q
Medsebojno povezovanje
več svetilk
POZOR! Pazite na to, da morajo biti s pomočjo
povezovalnega kabla
ne vse podgradne svetilke, preden omrežno nape-
5
ljavo
priključite v vtičnico. V nasprotnem primeru
lahko pride do poškodb izdelka.
14
med seboj najprej zveza-

Začetek uporabe / Uporaba
Opozorilo: Pazite na to, da preko ene vtičnice
skupaj priključite samo maksimalno 3 podgradne
svetilke istega tipa.
Opozorilo: Če svetilke montirate v vrsto (največ
3 komade), delujejo neodvisno druga od druge.
j Skupaj montirajte do tri svetilke istega tipa. V ta
namen upoštevajte delovne korake 1 – 6 poglavja
„Montaža svetilke“.
Opozorilo: Pazite na to, da razdalja med
svetilkami ni večja od 20 cm.
j Odstranite zaščitni pokrov povezovalne vtičnice
8
, tako da vijak s pomočjo križnega izvijača
odvijete ven v smeri proti urnemu kazalcu.
j Povezovalni kabel
vtičnico
8
j Drug priključek povezovalnega kabla
knite v vtičnico
j Priključek omrežne napeljave
vtičnico
6
j Električni vtič omrežne napeljave
14
vtaknite v povezovalno
svetilke.
6
druge svetilke.
5
vtaknite v
zunanje, desne svetilke.
14
5
vtaknite v
vta-
vtičnico.
Vaša svetilka je zdaj pripravljena na uporabo.
Q
Uporaba
Q
Vklop / izklop svetilke
Opozorilo: Podgradna svetilka je opremljena
tako s prevesnim stikalom
gibanja
7
.
12
kot tudi s senzorjem
Q
Nastavljanje senzorja gibanja
Opozorilo: Senzor gibanja je opremljen s senzor-
jem za mrak. Občutljivost senzorja za mrak lahko
nastavljate preko regulatorja za dan / noč LUX
10
in trajanje svetenja preko časovnega regulatorja
9
TIME
.
Nastavljanje svetlobne občutljivosti:
j Regulator za dan / noč LUX
10
zavrtite v
nasprotno smer urnega kazalca, da zvečate
svetlobno občutljivost (senzor gibanja reagira
7
pri
rahlem mraku).
j Regulator za dan / noč LUX
10
zavrtite v smer
urnega kazalca, da zmanjšate svetlobno občutljivost (senzor gibanja reagira pri
7
močnejšem
mraku).
Nastavljanje trajanja svetenja:
j Časovni regulator TIME
9
zavrtite v nasprotno
smer urnega kazalca, da trajanje svetenja
podgradne svetilke skrajšate (min. 20 sek.).
j Časovni regulator TIME
9
zavrtite v smer
urnega kazalca, da trajanje svetenja podgradne
svetilke podaljšate (max. 6 min.).
Opozorilo: Senzor gibanja
7
podgradne svetilke
reagira na toploto. Pri višji temperaturi prostora se
občutljivost senzorja gibanja zmanjša (se kasneje
sproži).
Q
Menjavanje žarnice
Prevesno stikalo razpolaga z naslednjimi
funkcijami:
- Prevesno stikalo v poziciji 0: svetilka in senzor
gibanja sta izklopljena.
- Prevesno stikalo v poziciji 1: svetilka je vklopljena, senzor gibanja ni aktiven.
- Prevesno stikalo v poziciji 2: senzor gibanja je
aktiven. Svetilka se zdaj vklaplja samo preko
senzorja gibanja.
NEVARNOST UDARA
ELEKTRIČNEGA TOKA! Za menjavanje žarnice
13
svetilko najprej ločite od električnega omrežja.
Električni vtič
5
potegnite ven iz vtičnice.
POZOR! NEVARNOST OPEKLIN! Žarnico
13
pustite, da se popolnoma ohladi, preden jo
zamenjate.
j Pokrov
11
odvijte v smeri proti urnemu kazalcu
in ga snemite.
j Defektno žarnico
13
potegnite v smeri puščice
ven iz okova (glejte sl. B).
Opozorilo: Uporabljajte samo 12 voltne halo-
15 SI

Uporaba / Vzdrževanje in čiščenje / Odstranjevanje / Informacije
genske žarnice tipa G4 z največjo jakostjo 20 W.
Opozorilo: Za vstavljanje žarnice
13
upora-
bljajte mehko krpo, ki ne pušča kosmov. Žarnice
13
nikoli ne prijemajte z golimi rokami.
j V okov vtaknite novo žarnico
j Pokrov
11
zopet nataknite in ga privijte v smeri
13
.
urnega kazalca.
POZOR! Pazite na to, da morajo biti s pomočjo
povezovalnega kabla med seboj najprej zvezane vse podgradne svetilke, preden omrežno
napeljavo
5
priključite v vtičnico. V nasprotnem
primeru lahko pride do poškodb izdelka.
j Električni vtič omrežne napeljave
5
vtaknite v
vtičnico.
Q
Vzdrževanje in čiščenje
POZOR! NEVARNOST UDARA ELEKTRIČ-
NEGA TOKA! Električni vtič
5
potegnite ven iz
vtičnice.
POZOR! NEVARNOST UDARA ELEKTRIČ-
NEGA TOKA! Iz električno varnostnih razlogov
se svetilke nikoli ne sme čistiti z vodo ali drugimi
tekočinami ali je celo potapljati v vodo.
J Ne uporabljajte topil, bencina ipd. Pri tem bi
se svetilka poškodovala.
j Pustite svetilko, da se popolnoma ohladi.
j Za čiščenje uporabljajte samo suho krpo, ki
ne pušča kosmov.
Q
Odstranjevanje
Q
Informacije
Q
Garancija
Za to napravo dobite 36 mesecev garancije od
datuma nakupa. Naprava je bila skrbno izdelana
in vestno testirana. V času garancije brezplačno
popravimo vse napake v materialu ali izdelavi. Če
bi se v času garancije kljub temu pokazale okvare,
napravo pošljite na navedeni naslov servisa z
navedbo naslednje številke artikla: 3005 / 034L ali
3005 / 036L.
Iz garancije je izključena škoda, ki je posledica
neustrezne uporabe, neupoštevanja navodila za
uporabo ali posegov v napravo s strani nepooblaščenih oseb, ter deli, ki se hitro obrabijo (npr. žarnice).
V primeru uveljavljanja garancije se čas garancije
niti ne podaljša niti ne obnovi.
Q
Izdelovalec / Servis
Briloner Leuchten GmbH
Im Kissen 2, 59929 Brilon, Nemčija
Tel.: +49 (0) 29 61 / 97 12 - 0
Faks: +49 (0) 29 61 / 97 12 - 199
E-mail: Info@briloner.de
www.briloner.de
IAN 87954
Prosimo, da za vsa vprašanja pripravite blagajniški
prejemek in številko izdelka (npr. IAN 12345) kot
dokazilo o nakupu.
Embalaža in embalažni material sestojita izključno
iz okolju prijaznih materialov. Lahko ju odvržete v
krajevne zbiralnike za recikliranje.
Simbol prečrtanega smetnjaka na kolesih
pomeni, da je treba izdelek v Evropski uniji
odstraniti z ločenim zbiranjem odpadkov.
To velja tako za izdelek kot tudi vse dele opreme,
označene s tem znakom. Označenih izdelkov se ne
sme odstraniti z normalnimi hišnimi odpadki, temveč
jih je treba oddati na sprejemnih mestih za recikliranje
električnih in elektronskih naprav. Recikliranje pomaga
zmanjšati porabo surovin in razbremenjuje okolje.
16 SI
Q
Izjava o skladnosti
Ta izdelek zadošča zahtevam veljavnih evropskih in
nacionalnih direktiv (Elektromagnetna združljivost
2004 / 108 / EC, Direktiva o nizkonapetostni opremi
2006 / 95 / EC), Direktiva 2009 / 125 / ES o okoljsko
primerni zasnovi, Direktiva RoHS 2011 / 65 / EU).
Skladnost je bila dokazana. Ustrezne izjave in dokumenti so shranjeni pri izdelovalcu.

Briloner Leuchten GmbH
Im Kissen 2, 59929 Brilon, Nemčija
+49 (0) 29 61 / 97 12 - 0
Garancijski list
Garancijski list
1. S tem garancijskim listom jamčimo Briloner
Leuchten GmbH, da bo izdelek v garancijskem
roku ob normalni in pravilni uporabi brezhibno
deloval in se zavezujemo, da bomo ob izpolnjenih spodaj navedenih pogojih odpravili morebitne pomanjkljivosti in okvare zaradi napak v
materialu ali izdelavi oz. po svoji presoji izdelek zamenjali ali vrnili kupnino.
2. Garancija je veljavna na ozemlju Republike
Slovenije.
3. Garancijski rok za proizvod je 3 leta od dneva
nabave.
4. Kupec je dolžan okvaro javiti pooblaščenemu
servisu oz. se informirati o nadaljnjih postopkih
na zgoraj navedeni telefonski številki. Svetujemo
vam, da pred tem natančno preberete navodila
o sestavi in uporabi izdelka.
5. Kupec je dolžan pooblaščenemu servisu pre-
dložiti garancijski list in račun, kot potrdilo in
dokazilo o nakupu.
6.
V primeru, da proizvod popravlja nepooblaščen
servis ali oseba, kupec ne more uveljavljati zahtevkov iz te garancije.
7. Vzroki za okvaro oz. nedelovanje izdelka morajo biti lastnosti stvari same, in ne vzroki, ki so
zunaj proizvajalčeve oz. prodajalčeve sfere.
Kupec ne more uveljavljati zahtevkov iz te garancije, če se ni držal priloženih navodil za sestavo
in uporabo izdelka ali, če je izdelek kakorkoli
spremenjen ali nepravilno vzdrževan.
8. Jamčimo servisiranje in rezervne dele za minimalno dobo, ki je zahtevana s strani zakonodaje.
9. Obrabni deli oz. potrošni material so izvzeti iz
garancije.
10. Vsi potrebni podatki za uveljavljanje garancije
se nahajajo na dveh ločenih dokumentih (garancijski list, račun).
11. Ta garancija proizvajalca ne izključuje pravic
potrošnika, ki izhajajo iz odgovornosti prodajalca za napake na blagu.
i
Prodajalec:
Lidl d.o.o.k.d., Pod lipami 1, SI-1218 Komenda
17 SI

18

Seznam obsahu
Úvod
Použití ke stanovenému účelu..........................................................................................................Strana 20
Rozsah dodávky ..............................................................................................................................Strana 20
Popis dílů .......................................................................................................................................... Strana 20
Technické údaje ............................................................................................................................... Strana 20
Bezpečnost
Bezpečnostní pokyny ....................................................................................................................... Strana 21
Příprava
Potřebné nástroje a materiál ........................................................................................................... Strana 22
Uvedení do provozu
Montáž svítidla .................................................................................................................................Strana 22
Spojení několika svítidel spolu ........................................................................................................ Strana 22
Použití
Zapínání / vypínání svítidla ..............................................................................................................Strana 23
Seřízení senzoru pohybu ................................................................................................................. Strana 23
Výměna svíticího prostředku ............................................................................................................ Strana 23
Údržba a čištění ...................................................................................................................... Strana 24
Zlikvidování ...............................................................................................................................Strana 24
Informace
Záruka ..............................................................................................................................................Strana 24
Výrobce / Servis ............................................................................................................................... Strana 24
Evropské prohlášení o shodě .......................................................................................................... Strana 24
19 CZ

Úvod
Halogenové osvětlení pod skříňku
Q
Úvod
Blahopřejeme vám ke koupi nového výrob-
ku. Rozhodli jste se pro kvalitní produkt.
Přečtěte si laskavě kompletně a pečlivě
tento návod k obsluze. Rozevřete stránku s obrázky.
Tento návod patří k tomuto výrobku a obsahuje důležitá upozornění k uvedení zařízení do provozu a
k zacházení s ním. Řiďte se vždy bezpečnostními
pokyny. Před uvedením do provozu přezkoušejte,
je-li k dispozici správné napětí a jsou-li všechny díly
namontované. V případě, že máte dotazy nebo si
nejste jisti se zacházením se zařízením, spojte se
laskavě se svým prodejcem nebo místem servisu.
Návod pečlivě uschovejte a předejte jej případně
třetímu.
Q
Použití ke stanovenému účelu
Svítidlo je výhradně určeno pro provoz ve vnitřní
oblasti, v suchých a uzavřených místnostech. Kvůli
obsluze spínače by se mělo světlo umístit voblasti
rukou. Svítidlo lze upevnit na všech normálních nehořlavých povrchových plochách. Jiné než předtím
popsané použití nebo změna výrobku nejsou povoleny a vedou k poškození. Kromě toho mohou být
následkem další nebezpečí a poranění, jakož i
technické chybné funkce (např. zkrat nebo požár,
úraz elektrickým proudem). Tento přístroj se hodí
jen pro použití v soukromých domácnostech.
Q
Rozsah dodávky
2 šrouby se zapuštěnou hlavou (pro dřevo)
2 šrouby se zapuštěnou hlavou (pro zdivo)
2 krytky
1 návod k obsluze
Q
Popis dílů
1
Hmoždík
2
Halogenové svítidlo pro spodní montáž
3
Šroub
4
Krytka
5
Síťový kabel
6
Zásuvka svítidla
7
Senzor pohybu
8
Propojovací zásuvka
9
Regulátor času TIME
10
Regulátor pro den / noc LUX
11
Kryt
12
Klopný spínač
13
Svíticí prostředek
14
Spojovací kabel
Q
Technické údaje
Provozní napětí, primární: 230 V~ 50 Hz
Provozní napětí, sekundární: 12 V
, 3 x 20 W
Rozměry: 60 x 7 x 2,5 cm
(D x Š x V)
Ochranná třída: II /
Druh kryti: IP20 (hodí se jen
pro vnitřní oblast)
Svíticí prostředek: Halogenový svíticí
prostředek, G4,
12 V, 20 W
Jmenovité napětí: 3 x 20 W
Bezprostředně po vybavení vždy zkontrolujte úplnost
rozsahu dodávky a bezvadný stav přístroje.
1 halogenové svítidlo pro spodní montáž,
model 3005 / 034L nebo 3005 / 036L
4 halogenové svítidlo, G4, 12 V, 20 W
1 síťový kabel
1 spojovací kabel
2 hmoždíky (pro šrouby se zapuštěnou hlavou)
20 CZ
Senzor pohybu
Doba svícení (nastavitelná): cca 20 vteřin – cca
6 minut
Dosah: cca 1,5–3 m (podle
montáže)
Senzor stmívání: je k dispozici

Bezpečnost
Q
Bezpečnost
Bezpečnostní pokyny
U škod způsobených nedodržováním tohoto návodu
k obsluze zaniká nárok na záruku. Za následovné
škody se nepřevezme záruka! U věcných škod nebo
poškození osob, které byly způsobeny neodborným
zacházením nebo nedbáním bezpečnostních pokynů,
se nepřevezme záruka!
Zabraňte ohrožení života
v důsledku úrazu elektrickým
proudem
J Před každým připojením svítidla k síti přezkoušejte
síťový kabel, jakož i spojovací kabel vzhledem
k případným poškozením. Nikdy nepoužívejte
svítidlo, zjistili-li jste nějaká poškození.
POZOR! Poškozené síťové kabely a spojovací
kabely představují nebezpečí ohrožení života
úrazem elektrickým proudem.
J Před montáží se ujistěte, že dané síťové napětí
souhlasí s potřebným provozním napětím svítidla
(230 V~).
J Bezpodmínečně se vyhněte dotyku svítidla s
vodou nebo jinými kapalinami.
J Nikdy neotvírejte některý z elektrických pro-
vozních prostředků, nebo do nich nestrkejte
nějaké předměty. Takové zásahy znamenají
ohrožení života v důsledku úrazu elektrickým
proudem.
J Při připojení nebo odpojení napájecího zdroje se
dotýkejte jen izolované oblasti síťové zástrčky!
J Je-li vnější pružný vodič tohoto svítidla poškozen,
smí se jen nahradit speciálním vodičem nebo
vodičem, který lze obdržet u výrobce nebo jeho
servisního zástupce.
J Svítidlo pro spodní montáž připojte k proudové
síti jen originálním síťovým kabelem.
J Spojte spolu jen originální svítidla pro spodní
montáž stejného typu (model 3005 / 034L nebo
3005 / 036L). K tomu použijte jen dodaný originální spojovací kabel.
J Spolu spojená svítidla pro spodní montáž při-
pojte jen k jedné zásuvce. Dbejte na to, abyste
jen maximálně 3 svítidla pro spodní montáž
stejného typu zapojili prostřednictvím jedné
zástrčky. Jinak může dojít k přetížení přípojek
a vodičů.
J Mějte na paměti, že nejprve všechna svítidla
pro spodní montáž musí být spojena prostřednictvím spojovacího kabelu, předtím než síťový
kabel zastrčíte do zásuvky.
J Svítidlo nemontujte na vlhké nebo vodivé
podklady.
Vyhněte se nebezpečí
požáru a poranění
J NEBEZPEČÍ PORANĚNÍ! Okamžitě po
vybalení přezkoušejte každý svíticí prostředek
a sklo lampy vzhledem k poškozením. Světlo
nemontujte se závadnými svíticími prostředky
a / nebo se závadným sklem světla. V tomto
případě se pro nasazení spojte s místem servisu.
J NEBEZPEČÍ POPÁLENÍ! Abyste se vyhnuli
popálením, ujistěte se, že je svítidlo vypnuté a
ochlazené, předtím než se jej dotknete. Svíticí
prostředky vyvíjejí silné teplo.
J Díly světla a svíticí prostředky mohou během
provozu dosáhnout teplot > 350 °C a proto se
jich nesmí dotýkat.
J Před nahrazením defektního svíticího prostředku
nechejte světlo úplně vychladnout.
J Defektní svíticí prostředky okamžitě nahraďte
novými. Před výměnou svítícího prostředku
odstraňte zástrčku ze zásuvky.
J Toto světlo nepoužívejte pro tlumicí systémy a
elektrické spínače. Ktomu se nehodí.
J
NEBEZPEČÍ POŽÁRU! Svítidlo
namontujte v odstupu aspoň 0,2 m k
0,2 m
ozařovaným materiálům. Nadměrné
vyvinutí tepla může vést k vyvinutí požáru.
J Světlo nenechejte v provozu bez dozoru.
J Světlo nezakrývejte předměty. Nadměrné
vyvinutí tepla může vést k vyvinutí požáru.
J Svítidlo a obalový materiál nenechejte jen tak se
povalovat. Plastové fólie / pytlíky, umělohmotné
díly atd. by mohly být pro děti nebezpečnou
hračkou.
21 CZ

Bezpečnost / Příprava / Uvedení do provozu
J Použijte halogenové svíticí prostředky
s krycím kotoučem nebo v nízkonapěťové technice.
J Používat se smí výhradně dodané náhradní
díly, v opačném případě zaniká záruka.
J Nedívejte se přímo do zdroje světla (osvětlova-
cí prostředek LED, atd.).
Tak se budete chovat správně
J Použijte jen jeden halogenový svíticí prostředek
12 V typu G4 a s maximálním výkonem 20 W.
J Svítidlo namontujte tak, aby bylo chráněné
před vlhkostí a znečištěním.
J Montáž pečlivě připravte a věnujte jí dostateč-
nou časovou dobu. Položte předtím všechny
jednotlivé díly a přídavné nástroje nebo materiál
přehledně a připraveny k uchopení.
J Buďte vždy pozorní! Dbejte vždy na to, co
činíte a postupujte vždy s rozumem. Nikdy
nepoužívejte svítidla, nejste-li soustředěný nebo
dokonce necítíte-li se dobře.
J Nedotýkejte se nikdy halogenových svíticích
prostředků holýma rukama. Jinak může dojít k
poškození halogenového svíticího prostředku.
Otřete halogenový svíticí prostředek alkoholem
a tkaninou bez nitek v případě, že jste se ho
dotkli holýma rukama.
Q
Uvedení do provozu
Q
Montáž svítidla
Upozornění: V rozsahu dodávky jsou zahrnuty
dva různé typy šroubů. Šrouby se zapuštěnou hlavou
(délka: 15 mm) použijte pro montáž do dřeva.
Šrouby se zapuštěnou hlavou (délka: 25 mm) a
hmoždíky
1
pro montáž v pevném zdivě.
1. Proměřte stěnu, popř. montážní plochu pro
vývrty. K přesnému seřízení použijte vodováhu.
2. Označte odstup 570 mm pro obě upevňovací
díry.
Pracovní kroky 3. a 4. Platí jen pro montáž
v pevném zdivě:
3. Nyní vyvrtejte upevňovací díry (ø cca. 5 mm,
hloubka cca. 30 mm). Zajistěte, aby se žádný
přívodní vodič nepoškodil.
4. Zaveďte připojené hmoždíky
5. Zafixujte svítidlo pro spodní montáž šrouby
1
do vrtacích děr.
3
(viz obr. A).
6. Nastrčte krytky
7. Zastrčte přípojku síťového kabelu
svítidla
8. Zastrčte síťovou zástrčku síťového kabelu
4
na hlavy šroubů.
5
do zástrčky
6
.
5
do
zásuvky.
Vaše svítidlo je nyní připraveno k provozu.
Q
Příprava
Q
Potřebné nástroje a materiál
Vyjmenované nástroje a materiály nejsou zahrnuty
v rozsahu dodávky. Jedná se přitom o nezávazné
údaje a hodnoty k orientaci. Vlastnost materiálu se
řídí podle individuálních vlastností na místě.
- tužka / nástroj k označení
- šroubovák
- vrtačka
- vrták
- vodováha
- hledač vodičů
- měřící pásmo
22 CZ
Q
Spojení několika svítidel spolu
POZOR! Mějte na paměti, že nejprve všechna
svítidla pro spodní montáž musí být spojena spojovacím kabelem
5
do zásuvky. Jinak může dojít k poškozením výrobku.
14
, předtím než zastrčíte síťový kabel
Upozornění: Dbejte na to, abyste jen maximálně
3 svítidla pro spodní montáž stejného typu zapojili
prostřednictvím jedné zásuvky.
Upozornění: Zapojíte-li svítidla v jedné řadě
(max. 3 kusy) fungují nezávisle na sobě.
j Namontujte až tři svítidla stejného typu vedle
sebe. Sledujte k tomu pracovní kroky 1. – 6. kapitoly „Montáž svítidla“.

Uvedení do provozu / Použití
Upozornění: Dbejte na to, aby mezi jednotli-
vými svítidly nebyla větší vzdálenost než 20 cm.
j Krytku spojovací zásuvky
8
odstraníte tím, že
šroub vyšroubujete prostřednictvím šroubováku
na šrouby s křížovou drážkou proti směru pohybu
hodinových ručiček.
j Zastrčte spojovací kabel
8
suvky
svítidla.
14
do spojovací zá-
j Zastrčte druhou přípojku spojovacího kabelu
14
do zásuvky svítidla 6 jiného svítidla.
j Zastrčte přípojku síťového kabelu
6
svítidla
vnějšího, pravého svítidla.
j Zastrčte síťovou zástrčku síťového kabelu
5
do zásuvky
5
do zásuvky.
Vaše svítidla jsou nyní připravena k provozu.
Q
Použití
Q
Zapínání / vypínání svítidla
Upozornění: Svítidlo pro spodní montáž je
vybaveno jak klopným spínačem
pohybu
7
.
12
, tak i senzorem
Klopný spínač disponuje následujícími
funkcemi:
- Klopný spínač v poloze 0: Svítidlo a senzor
pohybu jsou vypnuté.
- Klopný spínač v poloze 1: Svítidlo je vypnuté,
senzor pohybu není aktivní.
- Klopný spínač v poloze 2: Senzor pohybu je
aktivní. Svítidlo se zapíná jen prostřednictvím
senzoru pohybu.
Q
Seřízení senzoru pohybu
Upozornění: Senzor pohybu je vybaven senzorem
stmívání. Citlivost senzoru stmívání můžete nastavit
prostřednictvím regulátoru pro den / noc LUX
dobu svícení prostřednictvím regulátoru času TIME
10
a
9
Nastavení fotocitlivosti:
j Otočte regulátorem pro den / noc LUX
10
proti
směru pohybu hodinových ručiček, abyste foto-
citlivost zvýšili (senzor pohybu 7 reaguje při
slabším stmívání).
j Otočte regulátorem pro den / noc LUX
ve směru pohybu hodinových ručiček, abyste
fotocitlivost snížili (senzor pohybu
7
při přibývajícím stmívání).
Nastavení doby svícení:
j Otočte regulátorem času TIME
9
proti směru
pohybu hodinových ručiček, abyste dobu svícení
svítidla pro spodní montáž zkrátili (min. 20 vteřin).
j Otočte regulátorem času TIME
9
ve směru
pohybu hodinových ručiček, abyste dobu svícení
svítidla pro spodní montáž prodloužili (max.
6 minut).
Upozornění: Regulátor pohybu
7
svítidla pro
spodní montáž reaguje na teplo. Při přibývající teplotě prostoru se snižuje fotocitlivost senzoru pohybu
(reaguje později).
Q
Výměna svíticího prostředku
NEBEZPEČÍ ÚRAZU ELEK-
TRICKÝM PROUDEM! Při výměně svíticího
prostředku
13
odpojte nejprve svítidlo od proudové
sítě. Vytáhněte síťovou zástrčku síťového kabelu
ze zásuvky.
POZOR! NEBEZPEČÍ POPÁLENÍ! Nechejte
svíticí prostředek
13
úplně ochladnout, předtím než
jej vyměníte.
j Uvolněte kryt
11
otočením proti směru pohybu
hodinových ručiček a odejměte jej.
j Vytáhněte defektní svíticí prostředek
13
směru šipky z objímky (viz obr. B).
Upozornění: Použijte jen halogenové svíticí
prostředky typu G4, 12 V s maximálním výkonem 20 W.
Upozornění: Použijte k vložení svíticího pro-
13
středku
neuchopte svíticí prostředek
.
j Zastrčte nový svíticí prostředek
j Kryt
měkkou tkaninu bez nitek. Nikdy
13
holýma rukama.
13
do objímky.
11
znovu nasaďte a utáhněte jej ve směru
pohybu hodinových ručiček.
10
reaguje
ve
5
23 CZ

Použití / Údržba a čištění / Zlikvidování / Informace
POZOR! Mějte na paměti, že nejprve všechna
svítidla pro spodní montáž musí být spojena
spojovacím kabelem, předtím než zastrčíte síťový
5
kabel
zením výrobku.
j Zastrčte síťovou zástrčku síťového kabelu
do zásuvky.
Q
Údržba a čištění
POZOR! NEBEZPEČÍ ÚRAZU ELEKTRIC-
KÝM PROUDEM! Vytáhněte síťovou zástrčku
síťového kabelu
POZOR! NEBEZPEČÍ ÚRAZU ELEKTRIC-
KÝM PROUDEM! Z důvodů elektrické bezpečnosti se svítidlo nikdy nesmí čistit vodou nebo jinými
kapalinami nebo dokonce ponořit do vody.
J Nepoužívejte rozpouštědla, benzin apod. Tím
by svítidlo utrpělo škodu.
j Nechejte svítidlo úplně ochladnout.
j Použijte k čištění jen suchou tkaninu bez nitek.
Q
Zlikvidování
Obal a obalový materiál se skládají výhradně z
ekologicky vhodných materiálů. Lze je zlikvidovat
i v místních recyklačních nádobách.
odděleného odpadu. Toto platí pro výrobek a pro
všechny s tímto symbolem označené díly příslušenství.
Označené výrobky se nesmí zlikvidovat v běžném
domácím odpadu, nýbrž se musí odevzdat na místě
sběru pro recyklaci elektrických a elektronických
zařízení. Recyklace pomůže zredukovat spotřebu
surovin a odlehčit životní prostředí.
do zásuvky. Jinak může dojít k poško-
5
5
ze zásuvky.
Symbol přeškrtnuté nádoby na odpad
na kolečkách znamená, že výrobek musí
být v Evropské Unii přiveden do sběrny
Q
Informace
Q
Záruka
K okamžiku koupě obdržíte na toto zařízení záruku
po dobu 36 měsíců. Zařízení bylo svědomitě
vyrobeno a podrobeno přesné kontrole jakosti.
Během záruční doby odstraníme bezplatně všechny
chyby materiálu a výrobce. V případě, že se však
během záruční doby vyskytnou nedostatky, zašlete
laskavě zařízení na uvedenou adresu servisu při
udání následujícího čísla sort. položky: 3005 / 034L
nebo 3005 / 036L.
Ze záruky vyloučeny škody vzhledem k neodbornému
zacházení, nedbání na návod k obsluze nebo zásahu neautorizovanou osobou, jakož i poškození
rychleopotřebitelných dílů (např. svíticí prostředky).
Záručním výkonem se záruční doba ani neprodlouží
ani neobnoví.
Q
Výrobce / Servis
Briloner Leuchten GmbH
Im Kissen 2, 59929 Brilon, Německo
Tel.: +49 (0) 29 61 / 97 12 - 0
Fax: +49 (0) 29 61 / 97 12 - 199
E-mail: Info@briloner.de
www.briloner.de
IAN 87954
Pro všechny Vaše požadavky si připravte pokladní
stvrzenku a číslo výrobku (např. IAN 12345) jako
doklad o zakoupení.
Q
Evropské prohlášení o shodě
Tento výrobek splňuje požadavky platných evropských
a národních směrnic (Elektromagnetická kompatibilita
2004 / 108 / EC a směrnice o bezpečnosti elektrického zařízení nízkého napětí 2006 / 95 / EC), Směrnice ekologického designu 2009 / 125 / EG, směrnice RoHS 2011 / 65 / EU). Shoda byla dokázána.
Příslušné vysvětlivky a podklady jsou deponovány
u výrobce.
24 CZ

Obsah
Úvod
Použitie k určenému účelu ............................................................................................................... Strana 26
Rozsah dodávky ..............................................................................................................................Strana 26
Opis dielov ....................................................................................................................................... Strana 26
Technické údaje ............................................................................................................................... Strana 26
Bezpečnosť
Bezpečnostné pokyny ......................................................................................................................Strana 27
Príprava
Potrebné náradie a materiál ...........................................................................................................Strana 28
Uvedenie do prevádzky
Montáž svietidla...............................................................................................................................Strana 28
Vzájomné prepojenie viacerých svietidiel ...................................................................................... Strana 29
Použitie
Zapnutie / vypnutie svietidla ............................................................................................................ Strana 29
Nastavenie senzora pohybu ........................................................................................................... Strana 29
Výmena svetelného zdroja .............................................................................................................. Strana 29
Údržba a čistenie ................................................................................................................... Strana 30
Likvidácia ..................................................................................................................................... Strana 30
Informácie
Záruka ..............................................................................................................................................Strana 30
Vyhlásenie výrobcu / Servis .............................................................................................................Strana 30
Prehlásenie o zhode ........................................................................................................................ Strana 31
25 SK

Úvod
Halogénová lampa
Q
Úvod
Blahoželáme vám ku kúpe nového výrob-
ku. Rozhodli ste sa pre veľmi kvalitný
výrobok. Prosím prečítajte si dôkladne a
pozorne tento návod na obsluhu. Otvorte si prosím
stranu z obrázkami. Tento návod patrí k tomuto výrobku a obsahuje dôležité pokyny pre uvedenie do
prevádzky a manipuláciu. Dodržiavajte vždy všetky
bezpečnostné pokyny. Pred uvedením do prevádzky
prekontrolujte, či je k dispozícii správne napätie a
či sú všetky diely správne namontované. Ak by ste
mali otázky, alebo ste si neboli istý, čo sa týka manipulácie s prístrojom, spojte sa prosím so svojím
obchodníkom alebo servisným strediskom svojej
krajiny. Tento návod starostlivo uschovajte a prípadne ho postúpte tretej osobe.
Q
Použitie k určenému účelu
Svietidlo je určené výhradne na prevádzku v interiéri,
v suchých a uzatvorených priestoroch. Kvôli ovládaniu
pomocou spínača by sa svietidlo malo namontovať
v dosahu rúk. Svietidlo môže byť upevnené na všetky
normálne horľavé povrchy. Iné použitie ako bolo
predtým popísané, alebo zmena prístroja nie je
prípustná a vedie k poškodeniu. To môže mať za
následok ďalšie život ohrozujúce nebezpečenstvá
a zranenia ako aj technicky chybné funkcie (napr.
skrat, požiar, úder elektrickým prúdom). Tento prístroj
je určený len na použitie v súkromných domácnostiach.
Q
Rozsah dodávky
1 spojovací kábel
2 hmoždinky (pre zápustné skrutky)
2 zápustné skrutky (do dreva)
2 zápustné skrutky (do muriva)
2 krytky
1 návod na obsluhu
Q
Opis dielov
1
hmoždinka
2
halogénové podhľadové svietidlo
3
skrutka
4
krytka
5
sieťový kábel
6
zásuvka svietidla
7
senzor pohybu
8
spojovacia zásuvka
9
časový regulátor TIME
10
denný / nočný regulátor LUX
11
kryt
12
kolískový spínač
13
svetelný zdroj
14
spojovací kábel
Q
Technické údaje
Prevádzkové napätie
primárne: 230 V~ 50 Hz
Prevádzkové napätie
sekundárne: 12 V
, 3 x 20 W
Rozmery: 60 x 7 x 2,5 cm (d x š x v)
Trieda ochrany: II /
Krytie: IP20 (vhodné len do
vnútorných priestorov)
Svetelný zdroj: halogénový svetelný zdroj,
G4, 12 V, 20 W
Menovitý výkon: 3 x 20 W
Bezprostredne po vybalení skontrolujte, či je
dodávka úplná ako aj, či je kompletný prístroj.
1 halogénové podhľadové svietidlo, model
3005 / 034L alebo 3005 / 036L
4 halogénové svetelné zdroje, G4, 12 V, 20 W
1 sieťový kábel
26 SK
Senzor pohybu
Doba svietenia
(nastaviteľná): cca. 20 sek. – cca. 6 min.
Oblasť snímania: cca. 1,5–3 m (podľa
montáže)
Súmrakový senzor: k dispozícii

Bezpečnosť
Q
Bezpečnosť
Bezpečnostné pokyny
Pri škodách, ktoré budú zapríčinené nedodržiavaním
tohto návodu na obsluhu, zaniká nárok na záruku!
Pri následných škodách nepreberáme záruku! Pri
vecných škodách alebo zraneniach osôb, ktoré
boli zapríčinené neodbornou manipuláciou alebo
nedodržiavaním bezpečnostných pokynov, nepreberáme žiadnu záruku!
Vyhnite sa ohrozeniu života
úderom elektrického prúdu
J Pred každým zapojením do siete skontrolujte,
či svietidlo, sieťový kábel, poprípade spojovací
kábel nie sú poškodené. Ak zistíte akékoľvek
poškodenia, svietidlo za žiadnych okolností
nepoužívajte.
POZOR! Poškodené sieťové káble a spojovacie
káble predstavuje nebezpečenstvo ohrozenia
života v dôsledku zásahu elektrickým prúdom.
J Pred montážou sa uistite, že sa existujúce sieťové
napätie zhoduje s potrebným prevádzkovým
napätím lampy (230 V~).
J Bezpodmienečne zabráňte kontaktu svietidla s
vodou alebo inými tekutinami.
J Nikdy neotvárajte elektrické prevádzkové
prostriedky, alebo do neho nestrkajte dajaké
predmety. Takéto zásahy znamenajú ohrozenie
života úderom elektrického prúdu.
J Pri pripájaní alebo odpájaní zo sieťového prúdu
sa dotýkajte len izolovanej oblasti elektrickej
zástrčky!
J Ak je vonkajšie ohybné vedenie tohto svietidla
poškodené, smie sa nahradiť len špeciálnym
vedením alebo takým vedením, ktoré je dostupné
len u výrobcu alebo jeho servisného zástupcu.
J Podhľadové svietidlo zapájajte do sieťového
prúdu len prostredníctvom originálneho sieťového kábla.
J Vzájomne prepájajte len originálne podhľadové
svietidlá rovnakého typu (model 3005 / 034L
alebo 3005 / 036L). Na tento účel používajte
len dodané originálne spojovacie káble.
J Vzájomne prepojené podhľadové svietidlá
zapájajte len do jednej zásuvky. Dbajte na to,
aby ste do jednej zásuvky zapojili maximálne
3 podhľadové svietidlá rovnakého typu. Inak
môže dôjsť k preťaženiu prípojok a káblov.
J Dbajte na to, aby boli všetky podhľadové svie-
tidlá prepojené pomocou spojovacieho kábla,
skôr ako sieťový kábel zapojíte do zásuvky.
J Svietidlo nemontujte na vlhkých alebo vodivých
podkladoch.
Vyhnite sa nebezpečenstvu
požiaru a poranení
J NEBEZPEČENSTVO PORANENIA!
Bezprostredne po vybalení prekontrolujte
poškodenia každej žiarovky a lampového
skla. Svietidlo nikdy neprevádzkujte schybnou
žiarovkou a / alebo lampovým sklom. Svietidlo
nikdy nemontujte s chybnými žiarovkami a / alebo
lampovým sklom. Spojte sa v tomto prípade
kvôli výmene so servisným strediskom.
J NEBEZPEČENSTVO POPÁLENIA! Zabez-
pečte, aby bolo svietidlo vypnuté a vychladené,
predtým ako sa ho dotknete, aby ste zabránili
popáleniam. Žiarovky sa zohrievajú na vysokú
teplotu.
J Časti svietidla a žiarovky môžu počas prevádzky
dosiahnuť teploty > 350 °C, a preto sa ich
nesmiete dotýkať.
J Pred výmenou chybnej žiarovky nechajte
svietidlo úplne vychladnúť.
J Chybné žiarovky ihneď vymeňte za nové. Pred
výmenou žiarovky vždy najskôr vytiahnite
zástrčku zo zásuvky.
J Toto svietidlo nepoužívajte pre stmievače a
elektronické spínače. Nie je na to vhodné.
J
NEBEZPEČENSTVO POŽIARU!
Svietidlo namontujte vo vzdialenosti
0,2 m
najmenej 0,2 m od ožarovaných
materiálov. Nadmerná tvorba tepla môže viesť
k vzniku požiaru.
J Svietidlo vprevádzke nenechávajte bez dozoru.
27 SK

Bezpečnosť / Príprava / Uvedenie do prevádzky
J Svietidlo nikdy nezakrývajte predmetmi. Nad-
merná tvorba tepla môže viesť kvzniku požiaru.
J Nikdy nenechajte ležať svietidlo alebo obalový
materiál bez dozoru. Plastové fólie / vrecká,
plastové diely, atď. by pre deti mohli byť
nebezpečnou hračkou.
J
Používajte len halogénové svetelné
zdroje s krytom alebo nízkym
napätím.
J Používajte výhradne dodané jednotlivé diely,
pretože v opačnom prípade zanikajú všetky
garančné nároky.
J Nepozerajte sa priamo do svetelného zdroja
(osvetľovací prostriedok LED, atď.).
Takto je to správne
J Používajte len 12 V halogénový svetelný zdroj
typu G4 s maximálnym výkonom 20 W.
J Svietidlo namontujte tak, aby bolo chránené
pred vlhkom a znečistením.
J Montáž si starostlivo pripravte a doprajte si
dostatok času. Dopredu si pripravte všetky
jednotlivé diely a dodatočne potrebné náradie
alebo materiál prehľadne a na dosah ruky.
J Vždy buďte pozorný! Dávajte vždy pozor na to,
čo robíte a vždy postupujte s rozumom. Svietidlo
v žiadnom prípade nemontujte vtedy, keď nie
ste koncentrovaný, alebo sa necítite dobre.
J Halogénového svetelného zdroja sa nikdy
nedotýkajte holými rukami. Inak môže dôjsť k
poškodeniam svetelného zdroja. Halogénový
svetelný zdroj utrite alkoholom a handrou, ktorá
nepúšťa vlákna, ak ste sa ho napriek tomu
dotkli holými rukami.
Q
Príprava
- ceruzka / značkovací nástroj
- skrutkovač
- vŕtačka
- vrták
- vodováha
- detektor rozvodov
- meracie pásmo
Q
Uvedenie do prevádzky
Q
Montáž svietidla
Upozornenie: V rozsahu dodávky sú zahrnuté
dva rozdielne typy skrutiek. Zápustné skrutky (dĺžka:
15 mm) použite pri montáži do dreva. Zápustné
skrutky (dĺžka: 25 mm a hmoždinky
1
použite pri
montáži do pevného muriva.
1. Odmerajte stenu, resp. montážnu plochu pre
stanovenie otvorov na vŕtanie. Na presné
vyrovnanie použite vodováhu.
2. Označte vzdialenosť 570 mm pre oba upevňovacie otvory.
Pracovné kroky 3. a 4. platia len pri
montáži do pevného muriva:
3. Teraz vyvŕtajte upevňovacie otvory (ø cca 5 mm,
hĺbka cca 30 mm). Zabezpečte, aby sa nepoškodilo prívodné vedenie.
4. Vložte priložené hmoždinky
1
do vyvŕtaných
otvorov.
5. Podhľadové svietidlo pripevnite pomocou
skrutiek
6. Nasuňte krytky
7. Prípojku sieťového kábla
svietidla
8. Sieťovú zástrčku sieťového kábla
3
(pozri obr. A).
4
na hlavy skrutiek.
6
.
5
zasuňte do zásuvky
5
zapojte
do zásuvky.
Q
Potrebné náradie a materiál
Menovaný materiál a nástroje nie sú súčasťou
dodávky. Jedná sa pritom o nezáväzné údaje a
hodnoty pre orientáciu. Charakter materiálu sa
riadi podľa individuálnych daností na mieste.
28 SK
Vaše svietidlo je teraz pripravené na prevádzku.

Uvedenie do prevádzky / Použitie
Q
Vzájomné prepojenie
viacerých svietidiel
POZOR! Dbajte na to, aby boli všetky podhľadové
svietidlá prepojené pomocou spojovacieho kábla
14
, skôr ako sieťový kábel 5 zapojíte do zásuvky.
Inak môže dôjsť k poškodeniam výrobku.
Upozornenie: Dbajte na to, aby ste do jednej
zásuvky zapojili maximálne 3 podhľadové svietidlá
rovnakého typu.
Upozornenie: Ak svietidlá namontujete v jednom
rade (max. 3 kusy), fungujú nezávisle od seba.
j Súbežne namontujte maximálne tri svietidlá
rovnakého typu. Riaďte sa pritom pracovnými
krokmi 1. – 6. z kapitoly „Montáž svietidla“.
Upozornenie: Dbajte na to, aby vzdialenosť
medzi svietidlami nebola väčšia ako 20 cm.
j Odstráňte ochranný kryt spojovacej zásuvky
8
vytočením skrutky pomocou krížového
skrutkovača proti smeru hodinových ručičiek.
j Spojovací kábel
8
suvky
j Druhú prípojku spojovacieho kábla
do zásuvky
j Prípojku sieťového kábla
6
vonkajšieho, pravého svietidla.
j Sieťovú zástrčku sieťového kábla
do zásuvky.
Vaše svietidlá sú teraz pripravené na prevádzku.
Q
Použitie
Q
Zapnutie / vypnutie svietidla
14
svietidla.
6
druhého svietidla.
zapojte do spojovacej zá-
14
zapojte
5
zapojte do zásuvky
5
zapojte
- Kolískový spínač v polohe 2: Senzor pohybu je
aktívny. Svietidlo sa zapne len prostredníctvom
senzora pohybu.
Q
Nastavenie senzora pohybu
Upozornenie: Senzor pohybu je vybavený
súmrakovým senzorom. Citlivosť súmrakového senzora môžete nastaviť pomocou denného / nočného
regulátora LUX
časového regulátora TIME
10
a dobu svietenia pomocou
9
.
Nastavenie svetelnej citlivosti:
j Otočte denný / nočný regulátor LUX
10
proti
smeru hodinových ručičiek pre zvýšenie svetelnej
citlivosti (senzor pohybu
7
reaguje pri menšom
súmraku).
j Otočte denný / nočný regulátor LUX
10
v smere
hodinových ručičiek pre zníženie svetelnej citlivosti (senzor pohybu
7
reaguje pri narastajúcom
súmraku).
Nastavenie doby svietenia:
j Otočte časový regulátor TIME
9
proti smeru
hodinových ručičiek pre skrátenie doby svietenia
podhľadového svietidla (min. 20 sek.).
j Otočte časový regulátor TIME
9
v smere hodinových ručičiek pre predĺženie doby svietenia
podhľadového svietidla (max. 6 min.).
Upozornenie: Senzor pohybu
7
podhľadového
svietidla reaguje na teplo. Pri narastajúcej izbovej
teplote sa znižuje citlivosť senzora pohybu (aktivuje
sa neskôr).
Upozornenie: Podhľadové svietidlo je vybavené
kolískovým spínačom
7
bu
.
12
a taktiež senzorom pohy-
Kolískový spínač je vybavený nasledujúcimi funkciami:
- Kolískový spínač v polohe 0: Svietidlo a senzor
pohybu sú vypnuté.
- Kolískový spínač v polohe 1: Svietidlo je
zapnuté, senzor pohybu nie je aktívny.
Q
Výmena svetelného zdroja
NEBEZPEČENSTVO
ZÁSAHU ELEKTRICKÝM PRÚDOM! Pri výmene
svetelného zdroja
elektrickej siete. Sieťovú zástrčku sieťového kábla
13
najskôr odpojte svietidlo z
5
vytiahnite zo zásuvky.
29 SK

Použitie / Údržba a čistenie / Likvidácia / Informácie
POZOR! NEBEZPEČENSTVO POPÁLE-
NIA! Svetelné zdroje
13
nechajte úplne ochladiť,
skôr ako ich budete meniť.
j Uvoľnite kryt
11
otočením proti smeru hodino-
vých ručičiek a zložte ho.
j Vytiahnite chybný svetelný zdroj
13
v smere
šípky z objímky (pozri obr. B).
Upozornenie: Používajte len halogénové
svetelné zdroje typu G4, 12 V s maximálnym
výkonom 20 W.
Upozornenie: Pri vkladaní svetelného zdroja
13
použite jemnú handru, ktorá nepúšťa vlákna.
Svetelného zdroja
13
sa nikdy nedotýkajte
holými rukami.
j Nový svetelný zdroj
j Znovu nasaďte kryt
13
zasuňte do objímky.
11
a dotiahnite ho otočením
v smere hodinových ručičiek.
POZOR! Dbajte na to, aby boli všetky podhľa-
dové svietidlá prepojené pomocou spojovacieho
kábla, skôr ako sieťový kábel
5
zapojíte do
zásuvky. Inak môže dôjsť k poškodeniam výrobku.
j Sieťovú zástrčku sieťového kábla
5
zapojte
do zásuvky.
Q
Údržba a čistenie
POZOR! NEBEZPEČENSTVO ZÁSAHU
ELEKTRICKÝM PRÚDOM! Sieťovú zástrčku
sieťového kábla
5
vytiahnite zo zásuvky.
POZOR! NEBEZPEČENSTVO ZÁSAHU
ELEKTRICKÝM PRÚDOM! Z dôvodov elektrickej
bezpečnosti sa svietidlo nikdy nesmie čistiť vodou
alebo inými tekutinami a v žiadnom prípade sa
nesmie ponárať do vody.
Q
Likvidácia
Obal a obalový materiál pozostávajú výlučne z
ekologických materiálov. Môžu byť likvidované v
miestnych recyklačných kontajneroch.
Symbol prečiarknutej odpadovej nádoby
na kolieskach znamená, že v Európskej
únii tento výrobok podlieha separovanému
zberu odpadu. Platí to pre výrobok a pre všetky
súčasti príslušenstva označené týmto symbolom.
Označené výrobky sa nesmú likvidovať spoločne s
domovým odpadom, ale musia byť odovzdané na
miestach, kde sa recyklujú elektrické a elektronické
prístroje. Recyklácia pomáha znížiť spotrebu surovín,
a tým chrániť životné prostredie.
Q
Informácie
Q
Záruka
Na tento prístroj dostanete záruku 36 mesiacov od
dátumu kúpy. Prístroj bol starostlivo vyrobený a
podrobený dôkladnej kontrole kvality. V rámci
záručnej doby bezplatne opravíme všetky chyby
materiálu a výroby. Ak by sa počas záručnej doby
vyskytli ďalšie nedostatky, pošlite prístroj na uvedenú
adresu servisu a uveďte nasledujúce číslo výrobku:
3005 / 034L alebo 3005 / 036L.
Zo záruky sú vylúčené škody spôsobené neodbornou
manipuláciou, nedodržaním návodu na obsluhu
alebo zásahom neautorizovanej osoby, ako aj
diely podliehajúce opotrebeniu (napr. žiarovky).
Poskytnutím záruky sa záručná doba nepredlžuje
ani neobnovuje.
J Nepoužívajte žiadne rozpúšťadlá, benzín a
pod. Svietidlo by sa pritom poškodilo.
j Svietidlo nechajte úplne ochladiť.
j Na čistenie používajte iba suchú handru, ktorá
nepúšťa vlákna.
30 SK
Q
Vyhlásenie výrobcu / Servis
Briloner Leuchten GmbH
Im Kissen 2, 59929 Brilon, Nemecko
Tel.: +49 (0) 29 61 / 97 12 - 0
Fax: +49 (0) 29 61 / 97 12 - 199
E-mail: Info@briloner.de
www.briloner.de
IAN 87954

Pre všetky otázky majte pripravený pokladničný
doklad a číslo výrobku (napr. IAN 12345) ako
dôkaz o kúpe.
Q
Prehlásenie o zhode
Tento výrobok spĺňa požiadavky platných európskych
a národných smerníc (smernica o elektromagnetickej
kompatibilite 2004 / 108 / EC, smernica týkajúca
sa el. zariadení určených na používanie vrámci
určitých limitov napätia 2006 / 95 / EC), Smernica
o ekodizajne 2009 / 125 / ES, Smernica RoHS
2011 / 65 / EU). Zhoda bola preukázaná. Príslušné vysvetlenia a podklady sú uložené u výrobcu.
Informácie
31 SK

32

Inhaltsverzeichnis
Einleitung
Bestimmungsgemäße Verwendung .................................................................................................... Seite 34
Lieferumfang ........................................................................................................................................ Seite 34
Teilebeschreibung ............................................................................................................................... Seite 34
Technische Daten ................................................................................................................................ Seite 34
Sicherheit
Sicherheitshinweise ............................................................................................................................. Seite 35
Vorbereitung
Benötigtes Werkzeug und Material ................................................................................................... Seite 36
Inbetriebnahme
Leuchte montieren ...............................................................................................................................Seite 36
Mehrere Leuchten miteinander verbinden ......................................................................................... Seite 37
Gebrauch
Leuchte ein- / ausschalten ...................................................................................................................Seite 37
Bewegungssensor justieren ................................................................................................................Seite 37
Leuchtmittel auswechseln .................................................................................................................... Seite 38
Wartung und Reinigung ..................................................................................................... Seite 38
Entsorgung ..................................................................................................................................... Seite 38
Informationen
Garantie ..............................................................................................................................................Seite 38
Hersteller / Service .............................................................................................................................. Seite 39
Konformitätserklärung ......................................................................................................................... Seite 39
33 DE/AT/CH

Einleitung
Halogen-Unterbauleuchte
Q
Einleitung
Wir beglückwünschen Sie zum Kauf Ihres
neuen Gerätes. Sie haben Sich damit für
ein hochwertiges Produkt entschieden.
Bitte lesen Sie diese Bedienungsanleitung vollständig
und sorgfältig durch. Klappen Sie die Seite mit den
Abbildungen aus. Diese Anleitung gehört zu diesem
Produkt und enthält wichtige Hinweise zur Inbetriebnahme und Handhabung. Beachten Sie immer alle
Sicherheitshinweise. Prüfen Sie vor der Inbetrieb
nahme,
ob die korrekte Spannung vorhanden ist und ob alle
Teile richtig montiert sind. Sollten Sie Fragen haben
oder unsicher in Bezug auf die Handhabung des
Gerätes sein, setzen Sie sich bitte mit Ihrem Händler
oder der Servicestelle in Verbindung. Bewahren Sie
diese Anleitung bitte sorgfältig auf und geben Sie sie
ggf. an Dritte weiter.
Q
Bestimmungsgemäße
Verwendung
Diese Leuchte ist ausschließlich für den Betrieb im
Innenbereich, in trockenen und geschlossenen
Räumen geeignet. Wegen der Schalterbedienung
sollte die Leuchte im Handbereich angebracht
werden. Die Leuchte kann auf allen normal entflammbaren Oberflächen befestigt werden. Eine
andere Verwendung als zuvor beschrieben oder
eine Veränderung des Gerätes ist nicht zulässig
und führt zur Beschädigung. Darüber hinaus können
weitere lebensgefährliche Gefahren und Verletzungen
sowie technische Fehlfunktionen (z. B. Kurzschluss,
Brand, elektrischer Schlag) die Folge sein. Dieses
Gerät ist nur für den Einsatz in privaten Haushalten
vorgesehen.
Q
Lieferumfang
Kontrollieren Sie unmittelbar nach dem Auspacken
immer den Lieferumfang auf Vollständigkeit sowie
den einwandfreien Zustand des Gerätes.
34 DE/AT/CH
1 Halogen-Unterbauleuchte, Modell 3005 / 034L
oder 3005 / 036L
4 Halogenleuchtmittel, G4, 12 V, 20 W
1 Netzleitung
1 Verbindungskabel
2 Dübel (für Senkkopfschrauben)
2 Senkkopfschrauben (für Holz)
2 Senkkopfschrauben (für Mauerwerk)
2 Abdeckkappen
1 Bedienungsanleitung
Q
Teilebeschreibung
1
Dübel
2
Halogen-Unterbauleuchte
3
Schraube
4
Abdeckkappe
5
Netzleitung
6
Leuchtensteckdose
7
Bewegungssensor
8
Verbindungssteckdose
9
Zeitregler TIME
10
Tag / Nachtregler LUX
11
Abdeckung
12
Kippschalter
13
Leuchtmittel
14
Verbindungskabel
Q
Technische Daten
Betriebsspannung primär:
Betriebsspannung sekundär:
230 V~ 50 Hz
12 V , 3 x 20 W
Abmessungen: 60 x 7 x 2,5 cm
(L x B x H)
Schutzklasse: II /
Schutzart: IP20 (nur für den
Innenbereich geeignet)
Leuchtmittel: Halogenleuchtmittel,
G4, 12 V, 20 W
Nennleistung: 3 x 20 W
Bewegungssensor
Leuchtdauer (einstellbar): ca. 20 s – ca. 6 Min.
Erfassungsbereich:
ca. 1,5–3 m
(je nach Montage)
Dämmerungssensor: vorhanden

Q
Sicherheit
Sicherheitshinweise
Bei Schäden, die durch Nichtbeachtung dieser
Bedienungsanleitung verursacht werden, erlischt
der Garantieanspruch! Für Folgeschäden wird keine
Haftung übernommen! Bei Sach- oder Personenschäden, die durch unsachgemäße Handhabung oder
Nichtbeachtung der Sicherheitshinweise verursacht
werden, wird keine Haftung übernommen!
Vermeiden Sie Lebensgefahr
durch elektrischen Schlag
Überprüfen Sie vor jedem Netzanschluss die
Leuchte, die Netzleitung sowie ggf. das Verbindungskabel auf etwaige Beschädigungen.
Benutzen Sie Ihre Leuchte niemals, wenn Sie
irgendwelche Beschädigungen feststellen.
VORSICHT! Beschädigte Netzleitungen und
Verbindungskabel bedeuten Lebensgefahr durch
elektrischen Schlag.
Vergewissern Sie sich vor der Montage, dass die
vorhandene Netzspannung mit der benötigten
Betriebsspannung der Leuchte übereinstimmt
(230 V~).
Vermeiden Sie unbedingt die Berührung der
Leuchte mit Wasser oder anderen Flüssigkeiten.
Öffnen Sie niemals eines der elektrischen
Betriebsmittel (z.B. Schalter, Fassung o.ä.) oder
stecken irgendwelche Gegenstände in dieselben.
Derartige Eingriffe bedeuten Lebensgefahr durch
elektrischen Schlag.
Fassen Sie nur den isolierten Bereich des
Netzsteckers beim Anschluss oder Trennen
vom Netzstrom an!
Wenn die äußere flexible Leitung dieser Leuchte
beschädigt ist, darf sie nur durch eine spezielle
Leitung oder durch eine Leitung ersetzt werden,
die ausschließlich über den Hersteller oder
seinen Servicevertreter erhältlich ist.
Schließen Sie die Unterbauleuchte nur mit der
original Netzleitung an den Netzstrom an.
Sicherheit
Verbinden Sie nur original Unterbauleuchten
des gleichen Typs (Modell 3005 / 034L oder
3005 / 036L) miteinander. Verwenden Sie
dazu nur die mitgelieferten original Verbindungskabel.
Schließen Sie miteinander verbundene Unter-
bauleuchten nur an eine Steckdose an. Achten
Sie darauf, dass Sie nur maximal 3 Unterbauleuchten des gleichen Typs über eine Steckdose
zusammenschalten. Andernfalls kann es zu
Überlastungen der Anschlüsse und Leitungen
kommen.
Achten Sie darauf, dass erst alle Unterbau-
leuchten mittels Verbindungskabel verbunden
sein müssen, bevor Sie die Netzleitung in die
Steckdose stecken.
Montieren Sie die Leuchte nicht auf feuchten
oder leitenden Untergründen.
Vermeiden Sie Brand- und
Verletzungsgefahr
VERLETZUNGSGEFAHR! Überprüfen Sie
unmittelbar nach dem Auspacken jedes Leuchtmittel und Lampenglas auf Beschädigungen.
Betreiben Sie die Leuchte nicht mit defektem
Leuchtmittel und / oder Lampenglas. Setzen Sie
sich in diesem Fall für Ersatz mit der Servicestelle
in Verbindung.
VERBRENNUNGSGEFAHR! Stellen Sie
sicher, dass die Leuchte ausgeschaltet und
abgekühlt ist, bevor Sie diese berühren, um
Verbrennungen zu vermeiden. Leuchtmittel
entwickeln eine starke Hitze.
Leuchtenteile und Leuchtmittel können während
des Betriebs Temperaturen von > 350 °C erreichen
und dürfen daher nicht berührt werden.
Lassen Sie die Leuchte vor dem Ersetzen eines
defekten Leuchtmittels vollständig abkühlen.
Ersetzen Sie defekte Leuchtmittel sofort durch
neue. Entfernen Sie vor dem Leuchtmittelwechsel
immer zuerst den Stecker aus der Steckdose.
Verwenden Sie diese Leuchte nicht für Dimmer
und elektronische Schalter. Sie ist dafür nicht
geeignet.
35 DE/AT/CH

Sicherheit / Vorbereitung / Inbetriebnahme
BRANDGEFAHR! Montieren Sie
die Leuchte mit einer Entfernung von
0,2 m
mindestens 0,2 m zu angestrahlten
Materialien. Eine übermäßige Wärmeentwicklung
kann zu Brandentwicklung führen.
Lassen Sie die Leuchte im Betrieb nicht unbe-
aufsichtigt.
Decken Sie die Leuchte nicht mit Gegenständen
ab. Eine übermäßige Wärmeentwicklung kann
zu Brandentwicklung führen.
Lassen Sie die Leuchte oder Verpackungsmaterial
nicht achtlos liegen. Plastikfolien / -tüten, Kunststoffteile, etc. könnten für Kinder zu einem
gefährlichen Spielzeug werden.
Verwenden Sie nur Halogenleucht-
mittel mit Abdeckscheibe oder in
Niedervolttechnik.
Es dürfen ausschließlich mitgelieferte Einzelteile
verwendet werden, da sonst jegliche Gewährleistungsanprüche erlöschen.
Nicht direkt in die Lichtquelle (Leuchtmittel, LED
etc.) hineinschauen.
So verhalten Sie sich richtig
Verwenden Sie nur ein 12 Volt Halogenleucht-
mittel vom Typ G4 und mit einer Höchstleistung
von 20 Watt.
Montieren Sie die Leuchte so, dass sie vor
Feuchtigkeit und Verschmutzung geschützt ist.
Bereiten Sie die Montage sorgfältig vor und
nehmen Sie sich ausreichend Zeit. Legen Sie
alle Einzelteile und zusätzlich benötigtes
Werkzeug oder Material vorher übersichtlich
und griffbereit zurecht.
Seien Sie stets aufmerksam! Achten Sie immer
darauf, was Sie tun und gehen Sie stets mit
Vernunft vor. Montieren Sie die Leuchte in
keinem Fall, wenn Sie unkonzentriert sind oder
sich unwohl fühlen.
Berühren Sie Halogenleuchtmittel nie mit bloßen
Händen. Andernfalls kann es zu Beschädigungen
des Leuchtmittels kommen. Wischen Sie das
Halogenleuchtmittel mit Alkohol und einem
fusselfreien Tuch ab, falls sie es doch mit bloßen
Händen berührt haben.
Q
Vorbereitung
Q
Benötigtes Werkzeug
und Material
Die genannten Werkzeuge und Materialien sind
nicht im Lieferumfang enthalten. Es handelt sich
hierbei um unverbindliche Angaben und Werte
zur Orientierung. Die Beschaffenheit des Materials
richtet sich nach den individuellen Gegebenheiten
vor Ort.
- Bleistift / Markierwerkzeug
- Schraubendreher
- Bohrmaschine
- Bohrer
- Wasserwaage
- Leitungssucher
- Maßband
Q
Inbetriebnahme
Q
Leuchte montieren
Hinweis:
Schraubentypen enthalten. Verwenden Sie die
Senkkopfschrauben (Länge: 15 mm) für die Montage
auf Holz. Verwenden Sie die Senkkopfschrauben
(Länge: 25 mm) und die Dübel
in festem Mauerwerk.
1. Vermessen Sie die Wand bzw. Montagefläche
2. Markieren Sie den Abstand von 570 mm für
Arbeitsschritte 3. und 4. gelten nur bei der
Montage in festem Mauerwerk:
3. Bohren Sie nun die Befestigungslöcher (ø ca.
4. Führen Sie die beigefügten Dübel
5. Fixieren Sie die Unterbauleuchte
Im Lieferumfang sind zwei unterschiedliche
1
für die Montage
für die Bohrungen. Verwenden Sie zur genauen
Ausrichtung eine Wasserwaage.
die beiden Befestigungslöcher.
5 mm, Tiefe ca. 30 mm). Stellen Sie sicher, dass
Sie keine Zuleitung beschädigen.
1
in die
Bohrlöcher ein.
2
mittels der
Schrauben 3 (siehe Abb. A).
36 DE/AT/CH

Inbetriebnahme / Gebrauch
6. Stecken Sie die Abdeckkappen 4 auf die
Schraubenköpfe.
7. Stecken Sie den Anschluss der Netzleitung
in die Leuchtensteckdose
6
.
8. Stecken Sie den Netzstecker der Netzleitung
5
5
in die Steckdose.
Ihre Leuchte ist nun betriebsbereit.
Q
Mehrere Leuchten
miteinander verbinden
VORSICHT! Achten Sie darauf, dass erst alle
Unterbauleuchten mittels Verbindungskabel
den sein müssen, bevor Sie die Netzleitung
die Steckdose stecken. Andernfalls kann es zu
Beschädigungen des Produkts kommen.
Hinweis: Achten Sie darauf, dass Sie nur maximal
3 Unterbauleuchten des gleichen Typs über eine
Steckdose zusammenschalten.
Hinweis: Wenn Sie die Leuchten in einer Reihe
montieren (max. 3 Stück) funktionieren sie unabhängig voneinander.
Montieren Sie bis zu drei Leuchten des gleichen
Typs nebeneinander. Befolgen Sie dazu die
Arbeitsschritte 1. – 6. des Kapitels „Leuchte
montieren“.
Hinweis: Achten Sie darauf, dass der Abstand
zwischen den Leuchten nicht größer als 20 cm ist.
Entfernen Sie die Schutzkappe der Verbindungs-
steckdose
8
, indem Sie die Schraube mittels
Kreuzschraubendreher gegen den Uhrzeigersinn
herausdrehen.
Stecken Sie das Verbindungskabel
Verbindungssteckdose
8
der Leuchte.
Stecken Sie den zweiten Anschluss des Verbin-
dungskabels
14
in die Leuchtensteckdose
der anderen Leuchte.
Stecken Sie den Anschluss der Netzleitung 5
in die Leuchtensteckdose
6
rechten Leuchte.
Stecken Sie den Netzstecker der Netzleitung 5
in die Steckdose.
Ihre Leuchten sind nun betriebsbereit.
14
ver
5
14
in die
der äußeren,
bun-
in
6
Q
Gebrauch
Q
Leuchte ein- / ausschalten
Hinweis: Die Unterbauleuchte ist sowohl mit einem
Kippschalter
sensor
12
als auch mit einem Bewegungs-
7
ausgestattet.
Der Kippschalter verfügt über folgende
Funktionen:
- Kippschalter auf Position 0: Leuchte und
Bewegungssensor sind ausgeschaltet.
- Kippschalter auf Position 1: Leuchte eingeschaltet, Bewegungssensor inaktiv.
- Kippschalter auf Position 2: Bewegungssensor
aktiv. Die Leuchte schaltet sich nur über den
Bewegungssensor ein.
Q
Bewegungssensor justieren
Hinweis: Der Bewegungssensor ist mit einem
Dämmungsensor ausgestattet. Sie können die
Empfindlichkeit des Dämmerungssensors über den
Tag- / Nachtregler LUX
über den Zeitregler TIME
10
und die Leuchtdauer
9
einstellen.
Lichtempfindlichkeit einstellen:
Drehen Sie den Tag- / Nachtregler LUX 10
gegen den Uhrzeigersinn, um die Lichtempfindlichkeit zu erhöhen (Bewegungssensor
reagiert bei geringer Dämmerung).
Drehen Sie den Tag- / Nachtregler LUX 10 im
Uhrzeigersinn, um die Lichtempfindlichkeit zu
reduzieren (Bewegungssensor
7
reagiert bei
zunehmender Dämmerung).
Leuchtdauer einstellen:
Drehen Sie den Zeitregler TIME 9 gegen
den Uhrzeigersinn, um die Leuchtdauer der
Unterbauleuchte zu verkürzen (min. 20 s).
Drehen Sie den Zeitregler TIME 9 im Uhrzeiger-
sinn, um die Leuchtdauer der Unterbauleuchte
zu verlängern (max. 6 Min.).
Hinweis: Der Bewegungssensor
7
der Unter-
bauleuchte reagiert auf Wärme. Bei zunehmender
7
37 DE/AT/CH

Gebrauch / Wartung und Reinigung / Entsorgung / Informationen
Raumtemperatur verringert sich die Empfindlichkeit
des Bewegungssensors (wird später ausgelöst).
Q
Leuchtmittel auswechseln
STROMSCHLAGGEFAHR!
Trennen Sie zum Auswechseln des Leuchtmittels
13
die Leuchte zuerst vom Stromnetz. Ziehen Sie den
Netzstecker der Netzleitung
5
aus der Steckdose.
VORSICHT! VERBRENNUNGSGEFAHR!
Lassen Sie die Leuchtmittel
13
vollständig abkühlen,
bevor Sie diese wechseln.
Drehen Sie die Abdeckung 11 gegen den
Uhrzeigersinn los und nehmen Sie diese ab.
Ziehen Sie das defekte Leuchtmittel 13 in
Pfeilrichtung aus der Fassung (siehe Abb. B).
Hinweis: Verwenden Sie nur Halogenleucht-
mittel des Typs G4, 12 Volt mit einer Höchstleistung von 20 W.
Hinweis: Verwenden Sie zum Einsetzen des
Leuchtmittels
Fassen Sie das Leuchtmittel
13
ein weiches, fusselfreies Tuch.
13
niemals mit
bloßen Händen an.
Stecken Sie ein neues Leuchtmittel 13 in die
Fassung.
Setzen Sie die Abdeckung 11 wieder auf und
drehen Sie diese im Uhrzeigersinn fest.
VORSICHT! Achten Sie darauf, dass erst alle
Unterbauleuchten mittels Verbindungskabel
14
verbunden sein müssen, bevor Sie die Netzlei-
5
tung
in die Steckdose stecken. Andernfalls
kann es zu Beschädigungen des Produkts kommen.
Stecken Sie den Netzstecker der Netzleitung 5
in die Steckdose.
Q
Wartung und Reinigung
VORSICHT! STROMSCHLAGGEFAHR!
Ziehen Sie den Netzstecker der Netzleitung
5
aus der Steckdose.
VORSICHT! STROMSCHLAGGEFAHR!
Aus Gründen der elektrischen Sicherheit darf die
Leuchte niemals mit Wasser oder anderen Flüssigkeiten
gereinigt oder gar in Wasser getaucht werden.
Benutzen Sie keine Lösungsmittel, Benzin o.ä.
Die Leuchte würde hierbei Schaden nehmen.
Lassen Sie die Leuchte vollständig abkühlen.
Verwenden Sie zur Reinigung nur ein trockenes,
fusselfreies Tuch.
Q
Entsorgung
Die Verpackung und das Verpackungsmaterial
bestehen ausschließlich aus umweltfreundlichen
Materialien. Sie können in den örtlichen Recyclingbehältern entsorgt werden.
Das Symbol der durchgestrichenen Abfalltonne auf Rädern bedeutet, dass das
Produkt in der Europäischen Union einer
getrennten Müllsammlung zugeführt werden muss.
Dies gilt für das Produkt und alle mit diesem Symbol
gekennzeichneten Zubehörteile. Gekennzeichnete
Produkte dürfen nicht über den normalen Hausmüll
entsorgt werden, sondern müssen an einer Annahmestelle für das Recycling von elektrischen und
elektronischen Geräten abgegeben werden.
Recycling hilft, den Verbrauch von Rohstoffen zu
reduzieren und die Umwelt zu entlasten.
Q
Informationen
Q
Garantie
Sie erhalten zum Zeitpunkt des Kaufs auf dieses
Gerät 36 Monate Garantie. Das Gerät wurde
sorgfältig produziert und einer genauen Qualitätskontrolle unterzogen. Innerhalb der Garantiezeit
beheben wir kostenlos alle Material- oder Herstellerfehler. Sollten sich dennoch während der Garantiezeit Mängel herausstellen, senden Sie das Gerät
bitte an die aufgeführte Service-Adresse unter
Angabe folgender Artikel-Nummer: 3005 / 034L
oder 3005 / 036L.
Von der Garantie ausgeschlossen sind Schäden durch
nicht sachgemäße Handhabung, Nichtbeachtung
der Bedienungsanleitung oder Eingriff durch nicht
autorisierte Personen sowie Verschleißteile (wie z.B.
38 DE/AT/CH

Leuchtmittel). Durch die Garantieleistung wird die
Garantiezeit weder verlängert noch erneuert.
Q
Hersteller / Service
Briloner Leuchten GmbH
Im Kissen 2, D-59929 Brilon, Deutschland
Tel.: 02961/ 9712-0
Fax: 02961 / 9712-199
E-Mail: Info@briloner.de
www.briloner.de
IAN 87954
Bitte halten Sie für alle Anfragen den Kassenbon
und die Artikelnummer (z. B. IAN 12345) als
Nachweis für den Kauf bereit.
Q
Konformitätserklärung
Dieses Produkt erfüllt die Anforderungen der geltenden europäischen und nationalen Richtlinien
(Elektromagnetische Verträglichkeit 2004 / 108 / EG,
Niederspannungsrichtlinie 2006 / 95 / EG, Ökodesign Richtlinie 2009 / 125 / EG, RoHS-Richtlinie
2011 / 65 / EU).
Die Konformität wurde nachgewiesen. Entspre
Erklärungen und Unterlagen sind beim Hersteller
hinterlegt.
chende
Informationen
39 DE/AT/CH

40

BRILONER LEUCHTEN GMBH
Im Kissen 2
59929 Brilon (Germany)
© by ORFGEN Marketing
Last Information Update · Stanje informacij
Stav informací · Stav informácií · Stand
der Informationen: 03 / 2013 · Ident.-No.:
3005 / 034L / 3005 / 036L032013-SI/CZ/SK
IAN 87954
4
 Loading...