

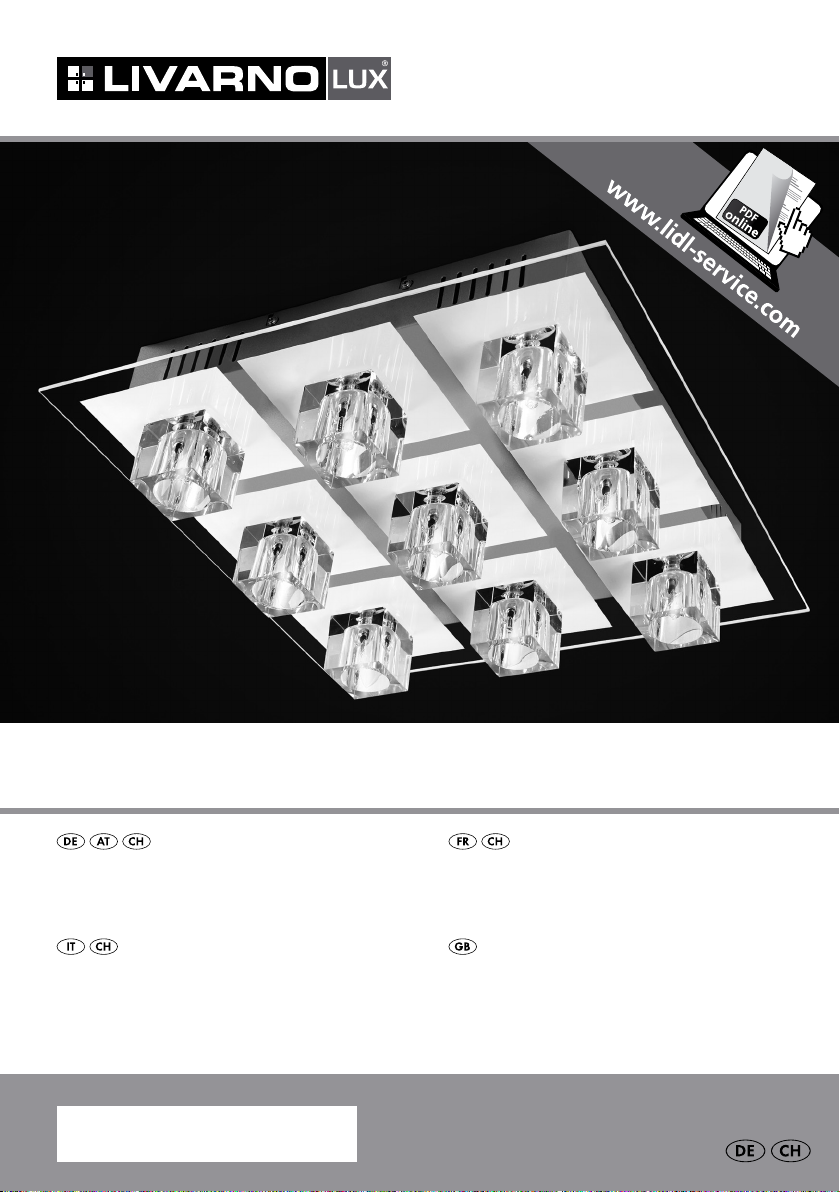
FARBWECHSEL-DECKENLEUCHTE
FARBWECHSEL-DECKENLEUCHTE
Bedienungs- und Sicherheitshinweise
BASE DA SOFFITTO CON
FARETTI MUL TICOLORE
Indicazioni per l’uso e per la sicurezza
IAN 101262
PLAFONNIER À VARIATION
DE COULEUR
Instructions d‘utilisation et consignes de sécurité
COLOUR-CHANGE CEILING LIGHT
Operation and Safety Notes
Klappen Sie vor dem Lesen die Seite mit den Abbildungen aus und machen Sie sich anschließend mit allen
Funktionen des Gerätes vertraut.
Avant de lire le mode d‘emploi, ouvrez la page contenant les illustrations et familiarisez-vous ensuite avec
toutes les fonctions de l‘appareil.
Prima di leggere aprire la pagina con le immagini e prendere confidenza con le diverse funzioni
dell’apparecchio.
Before reading, unfold the page containing the illustrations and familiarise yourself with all functions of the
device.
DE / AT / CH Bedienungs- und Sicherheitshinweise Seite 5
FR / CH Instructions d‘utilisation et consignes de sécurité Page 13
IT / CH Indicazioni per l’uso e per la sicurezza Pagina 21
GB Operation and Safety Notes Page 29
14 15
1213
1
2 3 4
5
11
7
8
9
10
6
19181716


Inhaltsverzeichnis
Einleitung
Bestimmungsgemäße Verwendung .................................................................................................... Seite 6
Lieferumfang ........................................................................................................................................ Seite 6
Teilebeschreibung ............................................................................................................................... Seite 6
Technische Daten ................................................................................................................................ Seite 6
Sicherheit
Sicherheitshinweise ............................................................................................................................. Seite 7
Vorbereitung
Benötigtes Werkzeug und Material ................................................................................................... Seite 8
Vor der Installation .............................................................................................................................. Seite 8
Montage
Leuchte montieren ...............................................................................................................................Seite 8
Inbetriebnahme
Batterien einsetzen / wechseln (Fernbedienung)...............................................................................Seite 9
Wandhalterung (Fernbedienung) montieren ..................................................................................... Seite 9
Leuchte ein- / ausschalten ...................................................................................................................Seite 9
Funktionen der Fernbedienung ........................................................................................................... Seite 9
Leuchtmittel wechseln .......................................................................................................................... Seite 10
Reinigung ........................................................................................................................................ Seite 10
Entsorgung ..................................................................................................................................... Seite 10
Garantie / Service
Garantieerklärung ............................................................................................................................... Seite 11
Serviceadresse ....................................................................................................................................Seite 11
Konformitätserklärung ......................................................................................................................... Seite 11
Hersteller .............................................................................................................................................. Seite 11
5 DE/AT/CH
Einleitung
Farbwechsel-Deckenleuchte
Einleitung
Wir beglückwünschen Sie zum Kauf Ihres
neuen Gerätes. Sie haben sich damit für
ein hochwertiges Produkt entschieden.
Die Bedienungsanleitung ist Bestandteil dieses Produkts. Sie enthält wichtige Hinweise für Sicherheit,
Gebrauch und Entsorgung. Machen Sie sich vor
der Benutzung des Produkts mit allen Bedien- und
Sicherheitshinweisen vertraut. Benutzen Sie das
Produkt nur wie beschrieben und für die angegebenen Einsatzbereiche. Händigen Sie alle Unterlagen
bei Weitergabe des Produkts an Dritte mit aus.
Prüfen Sie vor der Inbetriebnahme, ob die korrekte
Spannung vorhanden ist und ob alle Teile richtig
montiert sind.
Bestimmungsgemäße
Verwendung
Diese Leuchte ist ausschließlich für den Betrieb im
Innenbereich, in trockenen und geschlossenen
Räumen geeignet. Die Leuchte kann auf allen normal entflammbaren Oberflächen befestigt werden.
Dieses Gerät ist nur für den Einsatz in privaten
Haushalten vorgesehen (LED-Farbwechsel – keine
Raumbeleuchtung).
Lieferumfang
Kontrollieren Sie unmittelbar nach dem Auspacken
immer den Lieferumfang auf Vollständigkeit sowie
den einwandfreien Zustand des Gerätes.
1 Farbwechsel-Deckenleuchte, Modell 3571-096L
9 Halogen-Leuchtmittel, G4, 14 W
1 Fernbedienung
1 Batterie, 23 A, 12 V
4 Schrauben (Deckenbefestigung)
4 Dübel
1 Werkzeug
2 Schrauben (Wandhalterung)
2 Dübel (Wandhalterung)
6 DE/AT/CH
1 Wandhalterung (Fernbedienung)
9 Leuchtengläser
1 Bedienungsanleitung
Teilebeschreibung
1
Montagewinkel
2
Anschlussgehäuse
3
Dübel
4
Schrauben (Anschlussgehäuse)
5
Schrauben (Montagewinkel)
6
Leuchtengläser
7
Kunststoffring
8
Mutter
9
Werkzeug
10
Leuchtmittel
11
Leuchtmittelfassung
12
Kunststoffgehäuse
13
Schutzschlauch
14
Netzanschlusskabel (extern)
15
Lüsterklemme
16
Fernbedienung
17
Schrauben (Wandhalterung)
18
Wandhalterung (Fernbedienung)
19
Dübel (Wandhalterung)
Technische Daten
Deckenleuchte:
Betriebsspannung: 230–240 V∼, 50 Hz
Halogen-Leuchtmittel: 12 V∼, 14 W, G4
LED-Leuchtmittel: LED 54 x 0,06 W,
farbig
Nennleistung
maximal: 9 x max. 14 W
Schutzklasse: II /
Schutzart: IP 20
Fernbedienung Empfängereinheit:
Nennspannung: 220–240 V∼, 50 / 60 Hz
Max. Auslastung: 250 W
Frequenz: 433,92 MHz
Fernbedienung Sendereinheit:
Betriebsspannung: 12 V
Frequenz: 433,92 MHz
, 5 mA
Sicherheit
Montieren Sie die Leuchte nicht auf feuchten
oder leitenden Untergründen.
Sicherheitshinweise
Bei Schäden, die durch Nichtbeachtung dieser
Bedienungsanleitung verursacht werden, erlischt
der Garantieanspruch! Für Folgeschäden wird keine
Haftung übernommen! Bei Sach- oder Personenschäden, die durch unsachgemäße Handhabung
oder Nichtbeachtung der Sicherheitshinweise
verursacht werden, wird keine Haftung übernommen!
LEBENS- UND UNFALLGEFAHR
FÜR KLEINKINDER UND KINDER! Lassen Sie Kinder niemals
unbeaufsichtigt mit dem Verpackungsmaterial.
Es besteht Erstickungsgefahr durch Verpackungsmaterial. Kinder unterschätzen häufig die Gefahren. Halten Sie Kinder stets vom Produkt fern.
Vermeiden Sie Lebensgefahr
durch elektrischen Schlag
Schutzklasse II / . Diese Leuchte ist besonders
isoliert und darf nicht an einen Schutzleiter
angeschlossen werden.
Lassen Sie die Elektroinstallation durch einen
ausgebildeten Elektriker oder eine für Elektroinstallationen eingewiesene Person durchführen.
Bei Sach- oder Personenschäden, die durch
unsachgemäße Handhabung oder Nichtbeachtung der Sicherheitshinweise verursacht
werden, wird keine Haftung übernommen!
Benutzen Sie Ihre Leuchte niemals, wenn Sie
irgendwelche Beschädigungen feststellen.
Entfernen Sie vor der Montage die Sicherung
oder schalten Sie den Leitungsschutzschalter
im Sicherungskasten aus (0-Stellung).
Vermeiden Sie unbedingt die Berührung der
Leuchte mit Wasser oder anderen Flüssigkeiten.
Vergewissern Sie sich vor der Montage, dass
vorhandene Netzspannung mit der benötigten
Betriebsspannung der Leuchte übereinstimmt
(230–240 V∼).
Stellen Sie sicher, dass bei der Montage keine
Leitungen beschädigt werden.
die
Vermeiden Sie Brand- und
Verletzungsgefahr
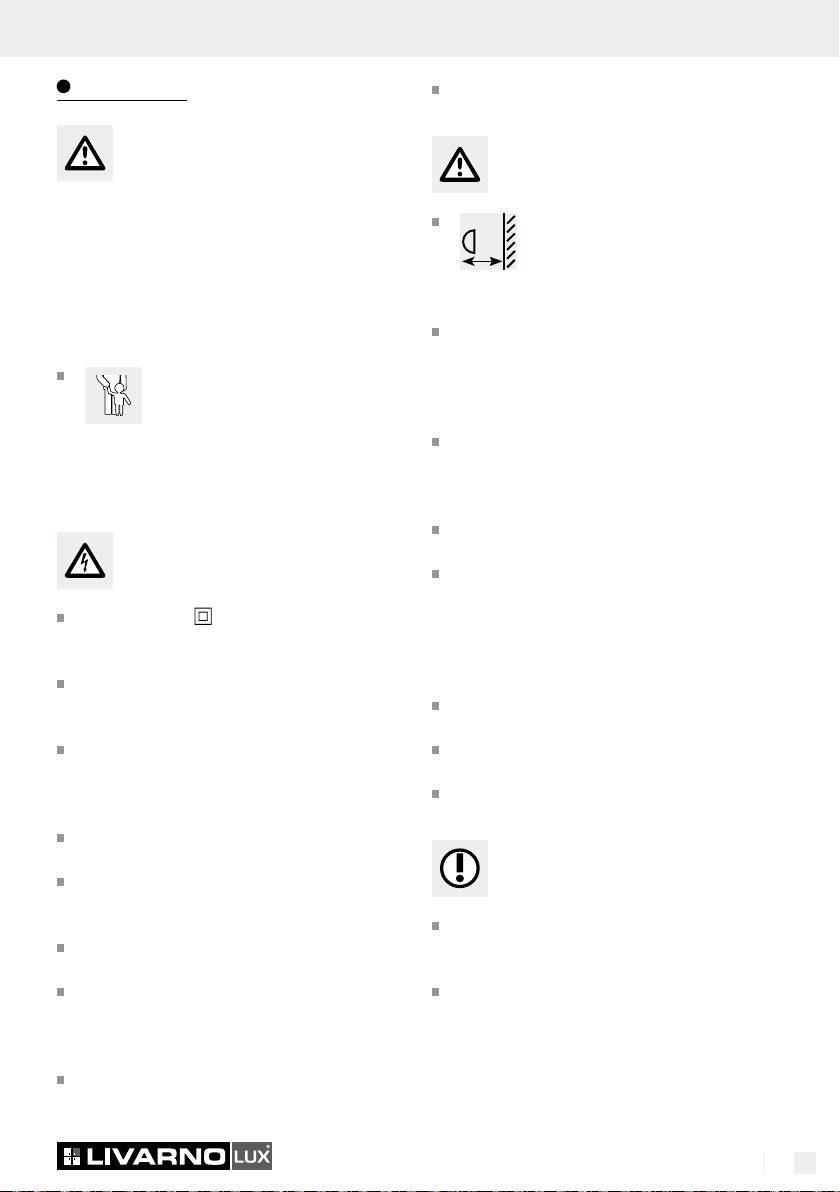
Montieren Sie die Leuchte mit einer
0,3 m
Entfernung von mindestens 0,3 m zu
angestrahlten Materialien. Eine übermäßige Wärmeentwicklung kann zu Brandentwicklung führen.
Stellen Sie sicher, dass die Leuchte ausgeschal-
tet und abgekühlt ist, bevor Sie diese berühren,
um Verbrennungen zu vermeiden. Leuchtmittel
entwickeln im Bereich des Lampenkopfes eine
starke Hitze.
Achtung! Leuchtenteile und Leuchtmittel könn
während des Betriebs Temperaturen von > 90 °C
erreichen und dürfen daher während des Betr
nicht berührt werden.
Lassen Sie die Leuchte vor dem Ersetzen eines
defekten Leuchtmittels vollständig auskühlen.
Ersetzen Sie defekte Leuchtmittel sofort durch
neue. Verwenden Sie nur Leuchtmittel wie im
Kapitel „Technische Daten“ angegeben. Entfernen Sie vor dem Leuchtmittelwechsel immer
zuerst die Sicherung oder schalten Sie den
Leitungsschutzschalter aus.
Die LED-Leuchtmittel sind fest verbaut und
können nicht ausgetauscht werden.
Nicht direkt in die Lichtquelle (Leuchtmittel,
LED etc.) hineinschauen.
Die fest verbauten LED-Leuchtmittel sind nicht
geeignet für Dimmer und elektronische Schalter.
So verhalten Sie
sich richtig
Verwenden Sie nur 12 V∼ Halogen-Leuchtmittel
mit einem G4-Sockel und einer Höchstleistung
von 14 Watt.
Halogen-Lampen nicht mit bloßen Fingern
berühren. Sollte dieses doch geschehen, so
muss das Leuchtmittel mit Alkohol und einem
fusselfreien Tuch abgewischt werden.
en
iebs
7 DE/AT/CH
Sicherheit / Vorbereitung / Montage
Nur Halogenleuchtmittel mit Abdeck-
scheibe oder in Niederdrucktechnik
verwenden.
Montieren Sie die Leuchte so, dass sie vor
Feuchtigkeit und Verschmutzung geschützt ist.
Bereiten Sie die Montage sorgfältig vor und
nehmen Sie sich ausreichend Zeit. Legen Sie
alle Einzelteile und zusätzlich benötigtes Werkzeug oder Material vorher übersichtlich und
griffbereit zurecht.
Seien Sie stets aufmerksam! Achten Sie immer
darauf, was Sie tun und gehen Sie stets mit Vernunft vor. Montieren Sie die Leuchte in keinem
Fall, wenn Sie unkonzentriert sind oder sich unwohl fühlen.
Vorbereitung
Benötigtes Werkzeug
und Material
Die genannten Werkzeuge und Materialien sind nicht
im Lieferumfang enthalten. Es handelt sich hierbei
um unverbindliche Angaben und Werte zur Orientierung. Die Beschaffenheit des Materials richtet sich
nach den individuellen Gegebenheiten vor Ort.
- Bleistift / Markierwerkzeug
- Spannungsprüfer
- Schraubendreher
- Bohrmaschine
- Bohrer (ca. 0,6 cm)
- Seitenschneider
- Leiter
Vor der Installation
Wichtig: Der elektrische Anschluss muss durch
einen ausgebildeten Elektriker oder eine für Elektroinstallationen eingewiesene Person erfolgen.
Diese muss Kenntnis über die Eigenschaften der
Leuchte und Anschlussbestimmungen haben.
Machen Sie sich vor der Installation mit allen
Anweisungen und Abbildungen in dieser Anleitung sowie mit der Leuchte selbst vertraut.
8 DE/AT/CH
Stellen Sie vor der Installation sicher, dass an
der Leitung, an der die Leuchte angeschlossen
werden soll, keine Spannung vorliegt. Entfernen Sie hierfür die Sicherung oder schalten Sie
den Leitungsschutzschalter im Sicherungskasten
aus (0-Stellung).
Überprüfen Sie die Spannungsfreiheit mittels
Spannungsprüfer.
Montage
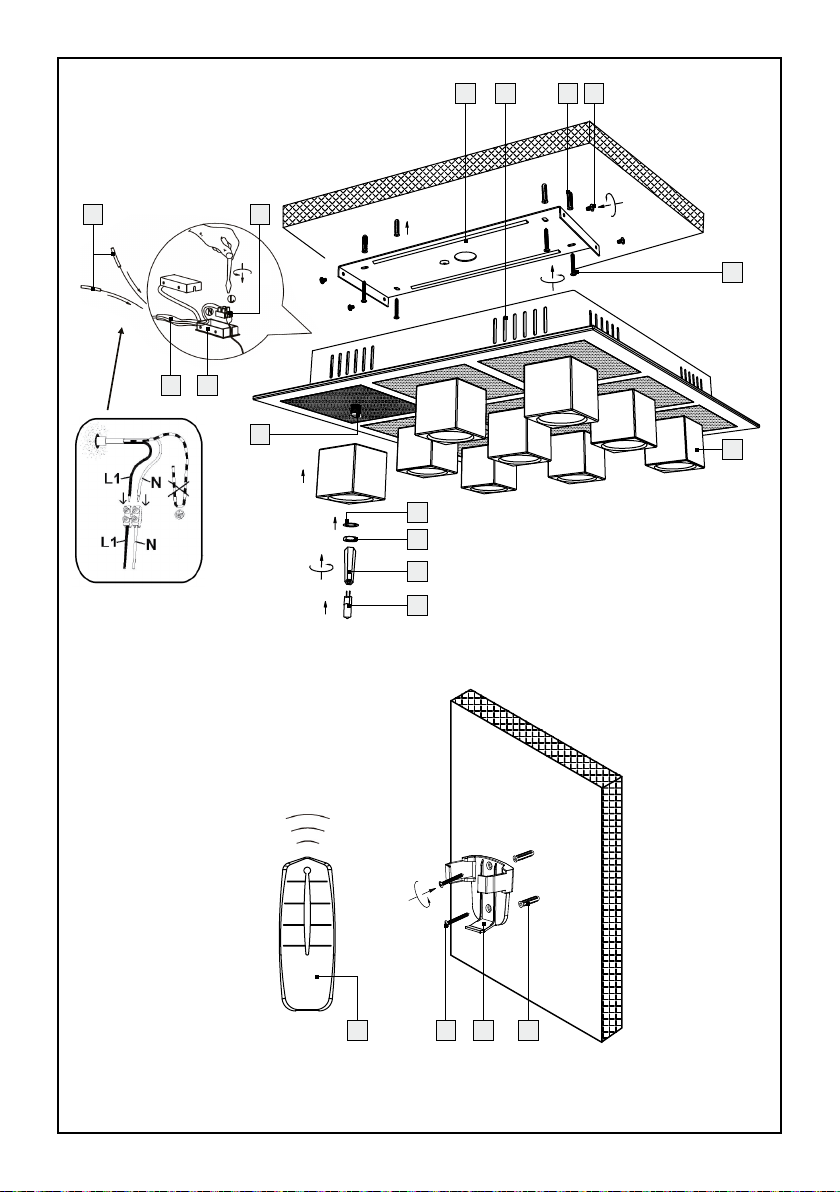
Leuchte montieren
Entfernen Sie vor der Montage die Sicherung
oder schalten Sie den Leitungsschutzschalter im
Sicherungskasten aus (0-Stellung).
Entfernen Sie die seitlich am Anschlussgehäuse
2
sichtbaren Schrauben 4 und nehmen Sie
den Montagewinkel
Markieren Sie die Bohrlöcher mit Hilfe der im
Montagewinkel
henen Langlöcher.
Bohren Sie nun die Befestigungslöcher
(ca. 6 mm, Tiefe ca. 35 mm). Stellen Sie sicher,
dass Sie die Zuleitung nicht beschädigen.
Führen Sie die Dübel 3 in die Bohrlöcher ein.
Befestigen Sie den Montagewinkel
mitgelieferten Schrauben
Öffnen Sie das Kunststoffgehäuse 12. Führen
Sie anschließend das Netzanschlusskabel
14
(extern)
befestigten Schutzschlauch
nun das Anschlusskabel der Leuchte mittels
Lüsterklemme
(extern)
einzelnen Leiter des Netzanschlusskabels
(extern)
stromführender Leiter, schwarz oder braun =
Symbol L, Neutralleiter, blau = Symbol N).
Schließen Sie das Kunststoffgehäuse 12.
Verschrauben Sie nun die Leuchte mittels der
Schrauben
Lösen Sie die Muttern 8 und Kunststoffringe 7
von den Leuchtmittelfassungen
Setzen Sie auf jede Leuchtmittelfassung 11 ein
Leuchtenglas
durch den am Kunststoffgehäuse 12
14
. Achten Sie darauf, dass Sie die
14
jeweils richtig anschließen:
4
1
auf der Rückseite ab.
1
für die Schrauben vorgese-
1
mit den
5
.
13
. Verbinden Sie
15
mit dem Netzanschlusskabel
mit dem Montagewinkel 1.
11
.
6
.

Befestigen Sie die Leuchtengläser 6 mit den
Kunststoffringen
Hilfe des Werkzeuges.
Benutzen Sie zum Einsetzen der Leuchtmittel 10
ein sauberes, fusselfreies Tuch.
Stecken Sie die Leuchtmittel 10 vorsichtig in
die Fassung.
Überprüfen Sie den richtigen Sitz.
Setzen Sie die Sicherung wieder ein oder schal-
ten Sie den Leitungsschutzschalter wieder an.
Ihre Leuchte ist nun betriebsbereit.
7
und den Muttern 8 mit
Inbetriebnahme
Batterien einsetzen /
wechseln (Fernbedienung)
Öffnen Sie das Batteriefach auf der Rückseite
der Fernbedienung
Entnehmen Sie ggf. die verbrauchte Batterie.
Setzen Sie eine neue Batterie in das Batterie-
fach ein. Verwenden Sie nur Batterien vom
Typ 23 A, 12 V
Hinweis: Achten Sie dabei auf die korrekte
Polarität. Diese wird auf dem Batteriefachdeckel
angezeigt.
Schließen Sie das Batteriefach der Fernbedie-
16
nung
.
16
.
.
Leuchte ein- / ausschalten
Sie haben die Möglichkeit, die Leuchte über einen
herkömmlichen Wandschalter oder über die mitgelieferte Fernbedienung ein- bzw. auszuschalten.
Leuchte mittels Fernbedienung ein- /
ausschalten:
– Der Wandschalter befindet sich in der Grund-
stellung (AUS).
Betätigen Sie den Wandschalter (EIN).
Drücken Sie die ON-Taste der Fernbedienung 16,
um die Leuchte einzuschalten (Halogen-Leuchtmittel und LED).
Drücken Sie die OFF-Taste der Fernbedienung 16,
um die Leuchte komplett auszuschalten.
Leuchte mittels Wandschalter ein- /
ausschalten
Der Wandschalter befindet sich in der Grund-
stellung (AUS).
Betätigen Sie den Wandschalter (EIN). Die
Halogen-Leuchtmittel sind an.
Betätigen Sie den Wandschalter in einem Zeit-
fenster von ca. 1 Sekunde durch wiederholtes
Aus- und Einschalten. Die verschiedenen, möglichen Schaltstellungen werden durchgeschaltet
(Halogen-Leuchtmittel und LED).
Die Leuchte kann über den Wandschalter oder
die Fernbedienung
16
ausgeschaltet werden.
Wandhalterung
(Fernbedienung) montieren
Halten Sie die Wandhalterung 18 an die ge-
wünschte Stelle an der Wand und markieren
Sie die Bohrlöcher.
Bohren Sie nun die Befestigungslöcher.
Führen Sie die Dübel 19 in die Bohrlöcher ein.
Befestigen Sie die Wandhalterung 18 mit den
mitgelieferten Schrauben
Ziehen Sie die Schrauben fest an, sodass die
Wandhalterung
die Schrauben
Platzieren Sie die Fernbedienung 16 in der
Wandhalterung
18
17
18
17
.
fixiert ist. Schrauben Sie
nicht zu fest an.
.
Funktionen der Fernbedienung
ON / OFF Halogen-Leuchtmittel und LED an
bzw. aus
Color Changing bzw. Color Selection
beenden
Color
Changing langsamer Farbwechsel LED:
1 x Drücken = Drehrichtung links
2 x Drücken = Drehrichtung rechts
schneller Farbwechsel LED:
3 x Drücken = Drehrichtung links
4 x Drücken = Drehrichtung rechts
5 x Drücken = fließender
Farbwechsel LED
9 DE/AT/CH
Inbetriebnahme / Reinigung / Entsorgung
Lamp Halogen-Leuchtmittel an bzw. aus
Color
Selection 1 x Drücken: LED blau
2 x Drücken: LED grün
3 x Drücken: LED rot
4 x Drücken: LED grün / blau
5 x Drücken: LED grün / rot
6 x Drücken: LED rot / blau
7 x Drücken: LED grün / rot / blau
Fehlerbehebung:
Sollte die Fernbedienung
der Leuchte einmal nicht reagieren, betätigen Sie
zunächst den Wandschalter, um die Leuchte auszuschalten. Anschließend warten Sie ca. 15–20 Sekunden und betätigen dann erneut den Wandschalter.
Sollte die Fernbedienung
ten der Leuchte immer noch nicht reagieren, überprüfen Sie bitte die Batterien der Fernbedienung
16
nach dem Einschalten
16
nach erneutem Einschal-
16
Leuchtmittel wechseln
VORSICHT! STROMSCHLAGGEFAHR!
Trennen Sie zum Auswechseln von Leuchtmit-
teln die Leuchte zuerst vom Stromnetz. Entfer-
nen Sie hierfür die Sicherung oder schalten Sie
den Leitungsschutzschalter im Sicherungskasten
aus (0-Stellung).
VORSICHT! VERBRENNUNGSGEFAHR!
Lassen Sie die Leuchte vollständig abkühlen.
Wechseln Sie das Leuchtmittel 10 nur dann
aus, wenn es vollständig abgekühlt ist.
Ziehen Sie das defekte Leuchtmittel 10 vorsich-
tig aus der Fassung.
Benutzen Sie zum Auswechseln ein sauberes,
fusselfreies Tuch.
Verwenden Sie nur 12 V∼ Halogen-Leuchtmittel
mit höchstens 14 Watt und G4-Sockel.
Stecken Sie das neue Leuchtmittel 10 vorsichtig
in die Fassung. Überprüfen Sie den richtigen Sitz.
Setzen Sie die Sicherung wieder ein oder schal-
ten Sie den Leitungsschutzschalter wieder ein.
Reinigung
VORSICHT! STROMSCHLAGGEFAHR!
Trennen Sie zur Reinigung die Leuchte zuerst
vom Stromnetz. Entfernen Sie hierfür die Sicherung oder schalten Sie den Leitungsschutzschalter im Sicherungskasten aus (0-Stellung).
Verwenden Sie zur Reinigung nur ein trockenes,
fusselfreies Tuch. Benutzen Sie keine Lösungsmittel, Benzin o.ä. Die Leuchte würde hierbei
Schaden nehmen.
Lassen Sie die Leuchte vollständig abkühlen.
Die Pflege von Leuchten beschränkt sich auf die
Oberflächen. Dabei darf keine Feuchtigkeit in
Anschlussräume oder an Netzspannung füh-
rende Teile gelangen.
Entsorgung
.
Die Verpackung und das Verpackungsmaterial bestehen ausschließlich aus
umweltfreundlichen Materialien. Sie können in den örtlichen Recyclingbehältern
entsorgt werden.
Das Symbol der durchgestrichenen Abfalltonne auf Rädern bedeutet, dass das
Produkt in der Europäischen Union einer
getrennten Müllsammlung zugeführt werden muss.
Dies gilt für das Produkt und alle mit diesem Symbol
gekennzeichneten Zubehörteile. Gekennzeichnete
Produkte dürfen nicht über den normalen Hausmüll
entsorgt werden, sondern müssen an einer Annahmestelle für das Recycling von elektrischen und elektronischen Geräten abgegeben werden. Recycling
hilft, den Verbrauch von Rohstoffen zu reduzieren
und die Umwelt zu entlasten.
Batterien dürfen nicht im Hausmüll entsorgt werden!
Geben Sie die Batterien und / oder das Gerät über
die angebotenen Sammeleinrichtungen zurück.
10 DE/AT/CH
Garantie / Service
Hersteller
Garantieerklärung
3 Jahre Garantie ab Kaufdatum auf dieses Gerät,
gilt nur gegenüber dem Ersteinkäufer, nicht übertragbar. Bitte Kassenbon als Nachweis aufbewahren. Die Garantieleistung gilt nur für Material- oder
Fabrikationsfehler, nicht aber für Verschleißteile
oder für Beschädigungen durch unsachgemäßen
Gebrauch. Die Garantie erlischt bei Fremdeingriff.
Ihre gesetzlichen Rechte werden durch diese Garantie nicht eingeschränkt. Im Garantiefall mit der
Servicestelle telefonisch in Verbindung setzen. Nur
so kann eine kostenlose Einsendung Ihres Geräts
gewährleistet werden.
Serviceadresse
Briloner Leuchten GmbH
Im Kissen 2, 59929 Brilon, Deutschland
Tel.: 0 29 61 / 97 12–0
Fax: 0 29 61 / 97 12–199
E-Mail: Info@briloner.de
www.briloner.der
IAN 101262
Briloner Leuchten GmbH
Im Kissen 2
59929 Brilon
Deutschland
Bitte halten Sie für alle Anfragen den Kassenbon
und die Artikelnummer (z. B. IAN 12345) als
Nachweis für den Kauf bereit.
Konformitätserklärung
Dieses Produkt erfüllt die Anforderungen der
geltenden europäischen und nationalen Richtlinien
(Elektromagnetische Verträglichkeit 2004 / 108 /EC,
Niederspannungsrichtlinie 2006 / 95 / EC, Ökodesign Richtlinie 2009 / 125 / EG, RoHS-Richtlinie
2011 / 65 / EU, R&TTE Richtlinie 1999 / 5 / EG).
Die Konformität wurde nachgewiesen. Entsprechende
Erklärungen und Unterlagen sind beim Hersteller
hinterlegt.
11 DE/AT/CH

12

Table des matières
Introduction
Utilisation conforme ............................................................................................................................Page 14
Contenu de la livraison ....................................................................................................................... Page 14
Descriptif des pièces ........................................................................................................................... Page 14
Caractéristiques techniques ................................................................................................................ Page 14
Sécurité
Indications de sécurité ........................................................................................................................Page 15
Préparation
Outils et matériel nécessaires ............................................................................................................. Page 16
Avant l'installation ............................................................................................................................... Page 16
Montage
Montage de la lampe ......................................................................................................................... Page 16
Mise en marche
Mise en place / remplacement des piles (télécommande) ............................................................... Page 17
Monter la fixation murale (télécommande) ....................................................................................... Page 17
Allumer / éteindre la lampe ................................................................................................................ Page 17
Fonctions de la télécommande ..........................................................................................................Page 17
Remplacement de l'ampoule .............................................................................................................. Page 18
Nettoyage ......................................................................................................................................Page 18
Mise au rebut ............................................................................................................................... Page 18
Garantie / Service
Déclaration de garantie .....................................................................................................................Page 18
Adresse du service après-vente .......................................................................................................... Page 19
Déclaration de conformité .................................................................................................................. Page 19
Fabricant .............................................................................................................................................. Page 19
13 FR/CH

Plafonnier à variation de couleur
Introduction
1 attache murale (télécommande)
9 verres de lampes
1 mode d'emploi
Félicitations pour l'achat de votre nouvel
appareil. Vous avez opté pour un pro-
duit de grande qualité. La notice d'utilisation fait partie intégrante de celui-ci. Elle contient
des indications importantes pour votre sécurité,
l‘utilisation du produit et le traitement des déchets.
Avant d'utiliser le produit, veuillez prendre connaissance de toutes les indications d’utilisation et de
sécurité. Utilisez ce produit en vous conformant
uniquement à ces instructions et dans les domaines
d’application spécifiés. Lorsque vous remettez l'appareil à d'autres utilisateurs, veuillez également leur
transmettre tous les documents liés à celui-ci. Avant
la mise en service, vérifiez si la tension est correcte
et si toutes les pièces sont correctement montées.
Utilisation conforme
Cette lampe est exclusivement conçue pour un
usage intérieur, dans des locaux secs et fermés.
Cette lampe peut être fixée sur toutes les surfaces
normalement inflammables. Cet appareil est uniquement destiné à un usage domestique privé (Variateur de couleur LED – pas d'éclairage de pièce).
Contenu de la livraison
Contrôlez toujours immédiatement après le déballage du produit que le contenu de la livraison est
complet et que l’appareil se trouve en parfait état.
1 lampe plafonnier avec changement de couleur,
modèle 3571-096L
9 ampoules halogènes G4, 14 W
1 télécommande
1pile, 23 A, 12 V
4 vis (fixation au plafond)
4 chevilles
1 outil
2 vis (fixation murale)
2 cheville (fixation murale)
14 FR/CH
Descriptif des pièces
1
Équerre de montage
2
Boîtier de raccordement
3
Cheville
4
Vis (boîtier de raccordement)
5
Vis (équerre de montage)
6
Verre de lampe
7
Bague en plastique
8
Écrou
9
Outil
10
Ampoule
11
Monture de l'ampoule
12
Boîtier plastique
13
Gaine de protection
14
Câble d'alimentation électrique (externe)
15
Domino de raccordement
16
Télécommande
17
Vis (fixation murale)
18
Attache murale (télécommande)
19
Cheville (fixation murale)
Caractéristiques techniques
Plafonnier :
Tension de service: 230–240 V∼, 50 Hz
Ampoules halogènes : 12 V∼, 14 W, G4
Ampoule LED : 54 x 0,06 W LED de couleur
Puissance nominale
maximum : 9 x max. 14 W
Classe de protection : II /
Indice de protection: IP 20
Récepteur de télécommande :
Puissance nominale : 220–240 V∼, 50 / 60 Hz
Charge max.: 250 W
Fréquence : 433,92 MHz
Émetteur de télécommande :
Tension de
fonctionnement : 12 V
Fréquence : 433,92 MHz
, 5 mA

SécuritéIntroduction
Sécurité
Indications de sécurité
Les droits de recours en garantie sont annulés en
cas de dommages résultant du non-respect du
présent mode d’emploi ! Le fabricant décline toute
responsabilité pour les dommages consécutifs ! De
même, toute responsabilité est déclinée pour les
dommages matériels ou corporels causés par une
manipulation incorrecte ou par le non-respect des
consignes de sécurité !
DANGER DE MORT ET D’ACCI-
DENT POUR LES ENFANTS EN
BAS ÂGE ET LES ENFANTS ! Ne
laissez jamais les enfants jouer sans surveillance avec l’emballage. Ils peuvent s'étouffer
avec les emballages. Les enfants sous-estiment
souvent le danger. Toujours tenir l'appareil à
l'écart des enfants.
Prévention de risques mortels
par électrocution
Classe de protection II / . Ce luminaire est
isolé de manière spécifique et ne doit pas être
connecté à un conducteur de protection.
L'installation électrique doit être effectuée par
un électricien ou par une personne dûment
formée à cet effet.
De même, toute responsabilité est déclinée
pour les dommages matériels ou corporels
causés par une manipulation incorrecte ou le
non-respect des consignes de sécurité !
N’utilisez jamais votre lampe si vous constatez
le moindre endommagement.
Avant le montage, retirez le fusible ou coupez
le disjoncteur de la boîte à fusibles (position 0).
Évitez impérativement tout contact de la lampe
avec de l'eau ou d'autres liquides.
Avant d'effectuer le montage, assurez vous que
la tension secteur corresponde à la tension de
fonctionnement de la lampe requise
(230–240 V ∼).
Assurez-vous lors du montage qu'aucun câble
ne soit endommagé.
Ne montez pas la lampe sur des surfaces de
support humides ou conductrices.
Afin d'éviter toute brûlure, assurez-vous que la
Attention ! L'ampoule et des éléments de la
Laissez complètement refroidir la lampe avant
Remplacez immédiatement toute ampoule dé-
Les LED sont fixes et ne peuvent pas être
Ne regardez jamais directement dans la
Les ampoules LED fixes ne sont pas appropriées
N'utilisez que des lampes halogènes de 12 V
Ne pas toucher les lampes halogènes à main
Prévention de risque
d'incendies et de blessures
La lampe doit être montée à une dis-
0,3 m
tance d’au moins 0,3 m des objets
illuminés. Un dégagement de chaleur
excessif peut provoquer un incendie.
lampe soit éteinte et refroidie avant de la prendre
en main. L'ampoule dégage une forte chaleur
au niveau du logement de la lampe.
lampe peuvent atteindre des températures
> 90 °C lorsque la lampe est allumée ; il faut
alors éviter tout contact.
de remplacer une ampoule défectueuse.
fectueuse par une ampoule neuve. Utilisez uniquement les ampoules spécifiées au chapitre
« Caractéristiques techniques ». Avant de remplacer l'ampoule, retirez toujours pour commencer
le fusible ou coupez le disjoncteur de la boîte
à fusible.
remplacées.
source lumineuse (ampoule, LED, etc.).
aux variateurs ou aux commutateurs électroniques.
Pour travailler en
toute sécurité
avec un culot G4 et une puissance maximale
de 14 watts.
nue. Si cela devait toutefois se produire, l'ampoule devrait alors être essuyée avec de l'alcool
et un chiffon non pelucheux.
15 FR/CH

Utilisez uniquement des ampoules ha-
logènes avec une vitre de recouvrement ou une technique basse tension.
Montez la lampe de telle sorte qu'elle soit
protégée de l'humidité et des salissures.
Préparez soigneusement le montage et effec-
tuez-le sans précipitation. Préparez toutes les
pièces détachées et l'outillage ou le matériel
requis et posez-les à portée de main.
Soyez toujours vigilant ! Faites toujours attention
à ce que vous faites et agissez raisonnablement.
N'effectuez jamais le montage de la lampe si
vous n'êtes pas concentré ou si vous vous sentez mal.
Préparation
Outils et matériel nécessaires
Les outils et matériels indiqués ne sont pas inclus
dans le contenu de la livraison. Il s'agit là de données et de valeurs indicatives vous permettant de
vous orienter. Les caractéristiques du matériel
dépendent des conditions spécifiques sur place.
- Crayon / outil marqueur
- Détecteur de tension
- Tournevis
- Perceuse
- Foret (env. 0,6 cm)
- Pince coupante diagonale
- Escabeau
Avant l'installation
Important : Le raccordement électrique doit être
effectué par un électricien qualifié ou toute personne
dûment formée à cet effet. Celle-ci doit connaître les
caractéristiques des lampes et des conditions de
raccordement.
Avant l'installation, familiarisez-vous avec l'en-
semble des instructions et des illustrations du présent mode d'emploi et avec la lampe elle-même.
Avant l'installation, vérifiez l'absence de tension
au niveau du câble auquel doit être raccordé la
16 FR/CH
lampe. Pour ce faire, retirez le fusible ou coupez
le disjoncteur de la boîte à fusible (position 0).
Vérifiez l'absence de tension à l'aide d'un
détecteur de tension.
Montage
Montage de la lampe
Avant le montage, retirez le fusible ou coupez
le disjoncteur de la boîte à fusibles (position 0).
Retirez les vis visibles 4 sur le côté du boîtier
de raccordement
montage
Marquez les trous de perçage à l'aide des
trous oblongs prévus pour les vis, dans
l'équerre de montage
Maintenant, percez les trous de fixation
(env. 6 mm, profondeur env. 35 mm). Assurezvous de ne pas endommager l'alimentation.
Insérer les chevilles 3 dans les trous de per-
çage. Fixez l'équerre de montage
vis fournies
Ouvrez le boîtier plastique 12. Passez ensuite
le câble d'alimentation (externe)
de protection
Reliez maintenant le câble d'alimentation de la
lampe au câble d'alimentation (externe)
l'aide du domino
câble d'alimentation électrique (externe) 14
leur raccord respectif: fil conducteur, noir ou
brun = symbole L, fil neutre, bleu = symbole N).
Refermez le boîtier plastique 12.
À l'aide des vis 4, fixez la lampe sur l'équerre
de montage
Retirez les écrous 8 et les bagues de plastique
7
des montures d'ampoule 11.
Posez sur chaque monture d'ampoule 11 un
verre de lampe
Fixez les verres de lampe 6 avec les bagues
de plastique
l'outil fourni.
Pour la mise en place de l'ampoule 10, utilisez
un chiffon propre ne peluchant pas.
Enfichez avec précaution l'ampoule 10 dans la
douille.
Contrôlez la position de montage.
2
ainsi que l'équerre de
1
sur la face arrière.
1
.
5
.
14
13
fixée sur le boîtier plastique 12.
15
. Veillez à ce que les fils du
1
.
6
.
7
et les écrous 8 au moyen de
1
avec les
par la gaine
14
aient
à

Montage / Mise en marcheSécurité / Préparation / Montage
Remettez le fusible en place ou remettez en
route le disjoncteur.
Votre lampe est alors prête à l'emploi.
Mise en marche
Mise en place / remplacement
des piles (télécommande)
Ouvrez le compartiment à piles au dos de la
télécommande
Le cas échéant, retirez la pile usagée.
Insérez une pile neuve dans le compartiment à
piles. Utilisez uniquement des piles de type
23 A, 12 V
Remarque: Ce faisant, veillez à respecter la
polarité. Celle-ci est indiquée sur le couvercle
de compartiment à pile.
Refermez le compartiment à piles de la télé-
commande
16
.
.
16
.
Monter la fixation murale
(télécommande)
Activation / désactivation de la lampe au
moyen de la télécommande:
– L'interrupteur mural se trouve en position de
base (ARRÊT).
Actionnez l'interrupteur mural (MARCHE).
Appuyez sur la touche ON de la télécom-
16
mande
halogène et LED).
Appuyez sur la touche OFF de la télécom-
mande
lampe.
Allumer / éteindre la lampe au moyen
d'un interrupteur mural
L'interrupteur mural se trouve en position de
base (ARRÊT).
Actionnez l'interrupteur mural (MARCHE).
Les ampoules halogènes sont allumées.
Actionnez à plusieurs reprises l'interrupteur mu-
ral en position éteinte et allumée en observant
1 seconde d'intervalle. Les différentes positions
d'allumage disponibles sont actionnées
(ampoules halogènes et LED).
Die Leuchte kann über den Wandschalter oder
die Fernbedienung
pour allumer la lampe (ampoule
16
pour éteindre complètement la
16
ausgeschaltet werden.
Placez la fixation murale 18 à l'emplacement
souhaité sur le mur et marquez le trou de
perçage.
Percez alors les trous de fixation.
Insérer les chevilles 19 dans les trous de perçage.
Fixez l'attache murale 18 avec les vis incluses
dans la livraison
Serrez les vis de sorte que l'attache murale 18
soit fixée. Ne serrez pas trop fort les vis
Placez la télécommande 16 dans l'attache
18
murale
17
.
17
.
Allumer / éteindre la lampe
La lampe peut être allumée et éteinte au moyen
d'un interrupteur mural conventionnel ou de la
télécommande fournie.
Fonctions de la télécommande
ON / OFF Ampoules halogènes et LED en
marche ou arrêt
Désactiver les fonctions de Color
changing ou de Color selection
Color
Changing changement de couleur LED lent :
.
Appuyer 1 x = sens de rotation
vers la gauche
Appuyer 2 x = sens de rotation
vers la gauche vers la droite
changement de couleur LED rapide :
Appuyer 3 x = sens de rotation
vers la gauche
Appuyer 4 x = sens de rotation
vers la droite
Appuyer 5 x = changement de
couleur LED
17 FR/CH

Lampe Éteindre ou allumer les ampoules
halogènes
Color
Selection Appuyer 1 x : LED bleue
Appuyer 2 x : LED verte
Appuyer 3 x : LED rouge
Appuyer 4 x : LED verte / bleue
Appuyer 5 x : LED verte / rouge
Appuyer 6 x : LED rouge / bleue
Appuyer 7 x : LED verte / rouge /
bleue
Résolution des problèmes :
Si la télécommande
tion de la lampe, il convient d'actionner l'interrupteur
mural pour éteindre la lampe. Patientez ensuite
env. 15–20secondes et actionnez de nouveau
l'interrupteur mural.
Si la télécommande
une nouvelle activation de la lampe, vérifiez les
piles de la télécommande
16
ne réagit pas après l'activa-
16
ne réagit toujours pas après
16
.
Remplacement de l'ampoule
ATTENTION ! RISQUE D’ÉLECTROCU-
TION ! Pour procéder au remplacement des
ampoules, coupez tout d'abord l'alimentation
secteur de la lampe. Pour ce faire, retirez le
fusible ou coupez le disjoncteur de la boîte à
fusible (position 0).
ATTENTION ! RISQUE DE BRÛLURES!
Laissez la lampe refroidir complètement.
Remplacez uniquement l'ampoule 10 lorsque
celle-ci est complètement refroidie.
Retirer l’ampoule défectueuse 10 de la douille
avec précaution.
Pour le remplacement de l'ampoule, utilisez un
chiffon propre, non pelucheux.
Utilisez uniquement des ampoules 12 V∼ et
14 watts maximum avec un culot G4.
Enfichez avec précaution l'ampoule neuve 10
dans la douille. Contrôlez la bonne fixation.
Remettez le fusible en place ou remettez en
route le disjoncteur.
18 FR/CH
Nettoyage
ATTENTION ! RISQUE D’ÉLECTROCU-
TION ! Pour procéder au nettoyage, coupez
tout d'abord l'alimentation secteur de la lampe.
Pour ce faire, retirez le fusible ou coupez le
disjoncteur de la boîte à fusible (position 0).
Pour procéder au nettoyage, utilisez uniquement
un chiffon sec et non pelucheux. N'utilisez ni
solvant, ni benzine ou autres produits similaires
qui endommageraient la lampe.
Laissez refroidir complètement la lampe.
La maintenance des lampes se limite à leur
surface. Aucune humidité ne peut ainsi pénétrer
dans les logements de raccordement ou dans
les éléments conducteurs de la tension réseau.
Mise au rebut
L'emballage et le matériel d’emballage se
composent exclusivement de matériaux
non polluants. Ils peuvent être éliminés
dans les conteneurs de recyclage locaux.
Le symbole de poubelle rayée sur roues
signifie que dans l'Union Européenne,
ce produit doit être mis au rebut séparément. Cela vaut pour le produit ainsi que pour tous
les accessoires caractérisés par ce symbole. Les
produits ainsi désignés ne doivent pas être mis au
rebut dans les ordures ménagères, mais dans un
centre de collecte pour le recyclage des appareils
électriques et électroniques. Le recyclage permet
de réduire la consommation des matières premières et de préserver l’environnement.
Ne pas jeter les piles dans les ordures ménagères !
Les piles et / ou l’appareil doivent être retournées
dans les centres de collecte disponibles.
Garantie / Service
Déclaration de garantie
Indépendamment de la garantie commerciale souscrite, le vendeur reste tenu des défauts de conformité

Garantie / ServiceMise en marche / Nettoyage / Mise au rebut / Garantie / Service
du bien et des vices rédhibitoires dans les conditions
prévues aux articles L211-4 et suivants du Code de
la consommation et aux articles 1641 et suivants
du Code Civil.
Ce produit bénéficie d'une garantie de 3ans à
compter de la date d'achat, valable uniquement
pour le premier acheteur, non transmissible.
Conservez le ticket de caisse en tant que justificatif.
La garantie couvre uniquement les défauts matériels ou de fabrication, et exclut l'usure des pièces
ou les dommages résultant d'une utilisation inappropriée. La garantie est annulée en cas d‘intervention externe. Cette garantie ne constitue pas une
restriction de vos droits légaux. Veuillez contacter
le S.A.V. par téléphone pour toute
réclamation. Il est autrement impossible d'assurer
l'envoi gratuit de votre appareil.
Adresse du service après-vente
Briloner Leuchten GmbH
Im Kissen2, 59929Brilon, Allemagne
Tél. : +49 (0) 29 61 / 97 12–0
Fax : +49 (0) 29 61 / 97 12–199
Courriel : Info@briloner.de
www.briloner.de
Fabricant
Briloner Leuchten GmbH
Im Kissen2
59929Brilon
Allemagne
IAN 101262
Veuillez conserver le ticket de caisse et la référence
de l’article (par ex. IAN 12345) à titre de preuves
d’achat pour toute demande.
Déclaration de conformité
Ce produit remplit les critères des réglementations
européennes et nationales en vigueur (compatibilité
électromagnétique 2004 / 108 / CE, directive
lignes basse tension 2006 / 95 / CE, directive
éco-conception 2009 / 125 / CE, directive RoHS
2011 / 65 / UE, directive R&TTE 1999 / 5 / CE).
La conformité a été attestée. Les déclarations et
documents correspondants sont en possession du
fabricant.
19 FR/CH

20

Indice
Introduzione
Utilizzo secondo la destinazione d’uso ......................................................................................... Pagina 22
Contenuto della confezione ........................................................................................................... Pagina 22
Descrizione dei componenti ........................................................................................................... Pagina 22
Dati tecnici ....................................................................................................................................... Pagina 22
Sicurezza
Indicazioni per la sicurezza ........................................................................................................... Pagina 23
Preparazione
Attrezzi e materiali necessari ......................................................................................................... Pagina 24
Prima dell'installazione ................................................................................................................... Pagina 24
Montaggio
Montaggio della lampada ............................................................................................................. Pagina 24
Avvio
Inserimento / sostituzione delle batterie (telecomando) ............................................................... Pagina 25
Montaggio del supporto a parete (telecomando)........................................................................ Pagina 25
Accensione / Spegnimento della lampada ................................................................................... Pagina 25
Funzioni del telecomando .............................................................................................................. Pagina 25
Sostituzione della lampadina ......................................................................................................... Pagina 26
Pulizia ............................................................................................................................................. Pagina 26
Smaltimento .............................................................................................................................. Pagina 26
Garanzia / Servizio di assistenza clienti
Dichiarazione di garanzia ............................................................................................................. Pagina 27
Indirizzo servizio clienti .................................................................................................................. Pagina 27
Dichiarazione di conformità ........................................................................................................... Pagina 27
Produttore ........................................................................................................................................ Pagina 27
21 IT/CH

Base da soffitto con
faretti multicolore
Introduzione
Ci congratuliamo con Voi per l'acquisto
del Vostro nuovo apparecchio. Acqui-
stando questo articolo avete scelto un
prodotto di alta qualità. Il manuale di istruzioni è
parte integrante di questo prodotto. Esse contengono
importanti avvertenze sulla sicurezza, l‘utilizzo e lo
smaltimento del prodotto. Prima dell'uso leggere
attentamente tutte le istruzioni e le avvertenze di
sicurezza allegate al prodotto. Utilizzare l‘apparecchio solo come descritto e per gli ambiti di funzione indicati. In caso di cessione del prodotto a
terzi, consegnare anche tutta la documentazione.
Controllare, prima della messa in funzione, se la
tensione di rete è corretta e se tutti i componenti
sono stati montati correttamente.
Utilizzo secondo la
destinazione d’uso
Questa lampada è destinata esclusivamente all’utilizzo in ambienti interni, asciutti e chiusi. La lampada
può essere fissata su tutte le superfici caratterizzate
da un grado normale di infiammabilità. Questo prodotto è destinato esclusivamente all'utilizzo domestico
(LED multicolore – nessuna illuminazione per stanze).
Contenuto della confezione
Dopo il disimballaggio, controllare subito l'integrità
e le condizioni perfette dei componenti.
1 supporto a parete (telecomando)
9 plafoniere
1 manuale di istruzioni
Descrizione dei componenti
1
Angolare di montaggio
2
Alloggiamento del connettore
3
Tassello
4
Viti (alloggiamento di raccordo)
5
Viti (angolare di montaggio)
6
Plafoniere
7
Anello in plastica
8
Dado
9
Attrezzo
10
Lampadina
11
Portalampadina
12
Alloggiamento in plastica
13
Guaina di protezione
14
Cavo di alimentazione di rete (esterno)
15
Morsetto
16
Telecomando
17
Viti (supporto a parete)
18
Supporto a parete (telecomando)
19
Tasselli (supporto a parete)
Dati tecnici
Lampada da soffitto:
Tensione d'esercizio: 230–240 V∼, 50 Hz
Lampadina alogena: 12 V∼, 14 W, G4
Lampadina a LED: LED 54 x 0,06 W, colorati
Potenza nominale
massima: 9 x max 14 W
Classe di protezione: II /
Tipo di protezione: IP20
1
lampada da soffitto multicolore, modello 3571-096L
9 lampadine alogene, G4, 14 W
1 telecomando
1 batteria, 23 A, 12 V
4 viti (fissaggio a soffitto)
4 tasselli
1 attrezzo
2 viti (supporto a parete)
2 tasselli (supporto a parete)
22 IT/CH
Unità di ricezione del telecomando:
Tensione nominale: 220–240 V∼, 50 / 60 Hz
Carica max.: 250 W
Frequenza: 433,92 MHz
Unità di trasmissione del telecomando:
Tensione di
funzionamento: 12 V
, 5 mA
Frequenza: 433,92 MHz

SicurezzaIntroduzione
Sicurezza
Indicazioni per
la sicurezza
In caso di danni derivati dall'inosservanza delle
istruzioni contenute in questo manuale d'uso, il diritto di garanzia decade! Si esclude ogni garanzia
per danni conseguenti! Nel caso di danni a cose e
persone causati dalla scorretta manipolazione o
dall’inosservanza delle avvertenze di sicurezza
non ci assumiamo alcuna responsabilità!
PERICOLO DI MORTE E DI IN-
CIDENTE PER INFANTI E BAMBINI! Non lasciare mai i bambini
incustoditi in prossimità del materiale d'imballaggio. Sussiste il rischio di soffocamento a
causa di tale materiale. Spesso i bambini sottovalutano i pericoli. Tenere i bambini sempre a
dovuta distanza dal prodotto.
Evitate il pericolo di vita
causato da scosse elettriche
Classe di protezione II / . Questa lampada è
particolarmente isolata e non può essere collegata ad un conduttore di protezione.
Far eseguire l'installazione elettrica soltanto da
un elettricista esperto o da una persona competente in materia.
Nel caso di danni a cose e persone causati
dalla scorretta manipolazione o dall'inosservanza delle avvertenze di sicurezza, non ci
assumiamo alcuna responsabilità!
Non utilizzate mai la lampada se danneggiata.
Prima di eseguire il montaggio, rimuovere il fu-
sibile oppure disattivare l’interruttore di sicu-
rezza nella scatola dei fusibili (posizione 0).
Evitare il contatto della lampada con acqua o
altri liquidi.
Assicurarsi, prima del montaggio, che la
tensione di rete esistente corrisponda alla
tensione d'esercizio della lampada (230–240 V∼).
Si assicuri che durante il montaggio non
vengano danneggiati i tubi.
Non montare la lampada su sottofondi umidi o
conduttori di elettricità.
Per evitare ustioni, assicurarsi prima di toccare
Attenzione! Non toccare mai le parti della
Fare raffreddare completamente la lampada
Sostituire immediatamente le lampadine difet-
I LED sono montati in maniera fissa e non
Non rivolgere lo sguardo direttamente alla
Le lampadine a LED premontate non sono ido-
Utilizzare solamente lampadine alogene da
Non toccare le lampade alogene a mani
Utilizzare solamente lampadine
Montare la lampada in modo tale che sia
Preparare con cura il montaggio e prendersi
Evitate situazioni pericolose che
possano causare incendi o lesioni
Montare la lampada a una distanza
0,3 m
di almeno 0,3 m dai materiali illuminati. Un eccessivo riscaldamento della
lampada può provocare un incendio.
la lampada che questa sia spenta e si sia raffreddata. Le lampadine generano un surriscaldamento della zona superiore della lampada.
lampada e delle lampadine durante il funzionamento in quanto queste possono raggiungere
temperature > 90°C.
prima di sostituire la lampadina.
tose con lampadine nuove. Utilizzare solamente
le lampadine riportate nella sezione "Dati
Tecnici". Prima di sostituire la lampadina,
rimuovere il fusibile o disattivare l'interruttore di
sicurezza della lampada.
possono essere sostituiti.
fonte luminosa (lampadina, LED ecc.).
nee all'uso con reostati o interruttori elettronici.
Come comportarsi
correttamente
12 V∼ con uno zoccolo G4 e una potenza
massima di 14 Watt.
nude. Se ciò dovesse accadere, pulire la lampadina con alcol e con un panno privo di peli.
alogene con disco di copertura o
con sistemi a bassa pressione.
protetta da umidità, vento e sporcizia.
tutto il tempo necessario. Disporre a portata di
mano tutti i componenti ed eventuali attrezzi o
materiali necessari.
23 IT/CH

Lavorare sempre con la massima attenzione!
Tenere sempre conto di quello che si fa e
procedere sempre con testa. Non montare la
lampada, nel caso in cui non si sia concentrati
oppure non ci si senta bene.
Preparazione
Attrezzi e materiali necessari
Gli attrezzi e materiali indicati non sono inclusi
nella confezione. Si tratta in questo caso di dati e
valori non vincolanti, forniti a titolo orientativo. Le
caratteristiche dei materiali dipendono dalle condizioni individuali in loco.
- Matita / strumento di marcatura
- Indicatore di tensione
- Cacciavite
- Trapano
- Trapano (ca. 0,6 cm)
- Tronchese laterale
- Conduttore
Prima dell'installazione
Importante: il collegamento elettrico deve
essere eseguito da un elettricista qualificato o da
una persona competente in materia. Quest'ultimo
deve conoscere le caratteristiche della lampada e
le modalità di collegamento.
Leggere le istruzioni e osservare le illustrazioni
attentamente, nonché familiarizzare con la
lampada, prima di installarla.
Prima dell'installazione, assicurarsi che non ci
sia tensione nel cavo di alimentazione di rete
al quale deve essere collegata la lampada.
Rimuovere perciò il fusibile oppure disattivare
l'interruttore di sicurezza nella scatola dei
fusibili (posizione 0).
Verificare l'assenza di tensione con un rileva-
tore di tensione.
Montaggio
Montaggio della lampada
Prima di eseguire il montaggio, rimuovere il
fusibile oppure disattivare l’interruttore di sicurezza nella scatola dei fusibili (posizione 0).
Rimuovere le viti 4 visibili lateralmente sull'al-
loggiamento di raccordo
lare di montaggio
Contrassegnare i fori da eseguire con l'aiuto
delle fessure previste per le viti nell'angolare di
montaggio
1
.
Eseguire dunque i fori di fissaggio (ca. 6 mm,
profondità ca. 35 mm). Assicurarsi di non
danneggiare il cavo di alimentazione di rete.
Inserire i tasselli 3 nei fori. Fissare l'angolare
di montaggio
1
con le viti fornite 5.
Aprire l'alloggiamento in plastica 12. Far pas-
sare infine il cavo di alimentazione (esterno)
attraverso l'apposito foro
mento in plastica
alimentazione della lampada per mezzo del
morsetto
rete (esterno)
15
con il cavo di alimentazione di
14
. Fare attenzione a collegare
correttamente i singoli conduttori del cavo di
collegamento di rete (esterno)
di elettricità, nero o marrone = simbolo L,
conduttore neutro, blu = simbolo N, conduttore
di protezione, verde-giallo = simbolo N).
Chiudere l'alloggiamento in plastica 12.
Avvitare ora la lampada con le viti 4
all'angolare di montaggio
Allentare i dadi 8 e gli anelli in plastica 7
dai portalampadina
Posizionare un vetro 6 su ogni portalampa-
11
dina
.
Fissare i vetri delle lampade 6 con gli anelli
in plastica
7
e i dadi 8 aiutandosi con
l'attrezzo.
Per inserire le lampadine 10 utilizzare un
panno pulito e privo di peli.
Infilare con premura la lampadina 10 nella presa.
Controllate che siano correttamente in sede.
Reinserire il fusibile oppure attivare nuovamente
l'interruttore di sicurezza nella scatola dei fusibili.
2
e staccare l'ango-
1
dal retro.
13
dell'alloggia-
12
. Collegare ora il cavo di
14
: conduttore
1
.
11
.
14
24 IT/CH

Montaggio / AvvioSicurezza / Preparazione / Montaggio
La lampada acquistata è ora pronta per essere
utilizzata.
Avvio
Inserimento / sostituzione
delle batterie (telecomando)
Aprire il vano portabatterie sul retro del
telecomando
Rimuovere la batteria se eventualmente fosse
scarica.
Inserire una nuova batteria nel vano portabat-
terie. Utilizzare esclusivamente batterie di tipo
23 A, 12 V
Nota: Assicurarsi che la polarità sia corretta.
Questa è indicata sul coperchio del vano portabatterie.
Chiudere il vano portabatterie del teleco-
mando
16
.
.
16
.
Montaggio del supporto a
parete (telecomando)
Appoggiare il supporto a parete 18 nella
posizione desiderata sul muro e marcare i fori
da eseguire.
Realizzare ora con il trapano i fori di fissaggio.
Inserire i tasselli 19 nei fori di fissaggio.
Fissare il supporto a parete 18 con le viti in
dotazione
Stringere le viti in modo che il supporto a pa-
rete
troppo saldamente.
Inserire il telecomando 16 nel supporto a
parete
17
.
18
sia ben fissato. Non avvitare le viti 17
18
.
Accensione / Spegnimento
della lampada
Vi è la possibilità di accendere o spegnere la lampada operando su un interruttore a parete tradizionale oppure attraverso il telecomando allegato.
Accensione / spegnimento attraverso
il telecomando:
– L'interruttore a parete si trova sulla posizione di
base (OFF).
Premere l’interruttore a parete (ON).
Premere il tasto ON del telecomando 16 per
accendere la lampada (lampadine alogene e
LED).
Premere il tasto OFF del telecomando 16 per
spegnere completamente la lampada.
Accensione / spegnimento della lampada
tramite interruttore a parete:
L'interruttore a parete si trova sulla posizione di
base (OFF).
Premere l’interruttore a parete (ON).
Le lampadine alogene si accendono.
Azionare l'interruttore a parete nell'arco di un
secondo accendendo e spegnendo ripetuta-
mente. Le diverse impostazioni di accensione
possibili vengono attivate (lampadine alogene
e LED).
La lampada può essere spenta dall'interruttore
a parete o con il telecomando
16
.
Funzioni del telecomando
ON/OFF Accensione o spegnimento delle
lampadine alogene o LED
Terminare Color Changing o Color
Selection
Color
Changing cambio colore lento dei LED:
premendo x 1 = direzione del
giro verso sinistra
premendo x 2 = direzione giro
verso destra
cambio colore rapido dei LED:
premendo x 3 = direzione giro
verso sinistra
premendo x 4 = direzione giro
verso destra
premendo x 5 = cambio colore
fluido dei LED
Lamp Accensione o spegnimento delle
lampadine alogene
25 IT/CH

Color
Selection premendo x 1: LED blu
premendo x 2: LED verde
premendo per 3: LED rosso
premendo x 4: LED verde / blu
premendo x 5: LED verde / rosso
premendo x 6: LED rosso / blu
premendo x 7: LED verde /
rosso / blu
Risoluzione problemi:
Se il telecomando
aver accesso la lampada, premere l'interruttore a parete per spegnerla. Attendere infine ca. 15–20 secondi e azionare nuovamente l'interruttore a parete.
Se dopo aver fatto ciò il telecomando
dovesse ancora reagire, controllare le batterie del
telecomando
16
non dovesse più reagire dopo
16
.
16
non
Sostituzione della lampadina
ATTENZIONE! PERICOLO DI SCOSSA
ELETTRICA! Prima di sostituire la lampadina,
staccare la lampada dall’alimentazione elettrica. Rimuovere perciò il fusibile oppure disattivare l'interruttore di sicurezza nella scatola dei
fusibili (posizione 0).
ATTENZIONE! PERICOLO DI USTIONI!
Lasciare raffreddare completamente la lampada.
Sostituire la lampadina 10 solamente quando
essa è completamente raffreddata.
Estrarre con attenzione la lampadina
difettosa
Per effettuare la sostituzione utilizzare un
panno pulito e privo di peli.
Utilizzare solo lampadine alogene da 12 V∼
con massimo 14 Watt e zoccolo G4.
Infilare con premura la nuova lampadina 10
nel portalampadina. Controllare che sia correttamente in sede.
Reinserire il fusibile oppure attivare nuovamente
l'interruttore di sicurezza nella scatola dei
fusibili.
10
verso l’alto dal portalampada.
Pulizia
ATTENZIONE! PERICOLO DI SCOSSA
ELETTRICA! Prima di ogni intervento di puli-
zia, staccare la lampada dall’alimentazione
elettrica. Rimuovere perciò il fusibile oppure
disattivare l'interruttore di sicurezza nella
scatola dei fusibili (posizione 0).
Utilizzare solo un panno asciutto e privo di peli
per la pulizia. Non utilizzare solventi, benzina
o altre sostanze simili, altrimenti la lampada
potrebbe danneggiarsi.
Fare raffreddare completamente la lampada.
La cura della lampada si limita allo strato
superiore. Bisogna perciò evitare che qualsiasi
liquido penetri nei componenti interni o in
quelli conduttori di corrente.
Smaltimento
La confezione e il materiale da imballaggio sono composti esclusivamente da
materiale ecologico. Essi possono essere
smaltiti nei contenitori di riciclaggio locali.
Il simbolo del bidone della spazzatura
su ruote barrato indica che nell’Unione
Europea il prodotto deve essere smaltito
attraverso una raccolta differenziata di rifiuti. Ciò
vale per il prodotto, nonché per tutti i componenti
contrassegnati con questo simbolo. I prodotti contrassegnati in questo modo non devono essere
smaltiti attraverso la normale raccolta di rifiuti
domestici, ma consegnati in un punto di raccolta
speciale per il riciclaggio di apparecchi elettrici ed
elettronici. Il riciclaggio aiuta a ridurre il consumo
di materie prime e a non contaminare l’ambiente
naturale.
Non gettare le batterie nella spazzatura domestica!
Smaltire le batterie e / o l’apparecchio presso i punti
di raccolta indicati.
26 IT/CH

Garanzia / Servizio di assistenza clientiAvvio / Pulizia / Smaltimento
Garanzia / Servizio di
assistenza clienti
Dichiarazione di garanzia
La garanzia ha una durata di 3 anni dalla data di
acquisto dell'apparecchio e vale solo per l'acquirente, non può essere ceduta a terzi. Si prega di
conservare la ricevuta d'acquisto a dimostrazione
dell'avvenuto pagamento. La garanzia vale soltanto
per difetti di fabbricazione o del materiale. Non è
invece valida in caso di componenti logorati o
danni causati da un uso improprio del prodotto. La
garanzia decade in caso di intervento sul prodotto
da parte di terzi. Questa garanzia non costituisce
alcun limite ai diritti legali del consumatore. In caso
di necessità di interventi di riparazione nel periodo
di garanzia, mettersi in contatto telefonicamente con
il centro di assistenza. Solo in questo modo si può
garantire la spedizione gratuita dell’apparecchio.
Indirizzo servizio clienti
Briloner Leuchten GmbH
Im Kissen 2, 59929 Brilon, Germania
Tel.: +49 (0) 29 61 / 97 12–0
Fax: +49 (0) 29 61 / 97 12–199
E-Mail: Info@briloner.de
www.briloner.de
documentazione in merito sono depositate presso il
produttore.
Produttore
Briloner Leuchten GmbH
Im Kissen 2
59929 Brilon
Germania
IAN 101262
Per tutte le richieste si prega di conservare lo scontrino ed il codice dell' articolo (p.e. IAN 12345) a
prova dell'avvenuto acquisto.
Dichiarazione di conformità
Questo prodotto è conforme ai requisiti di cui alle
direttive europee e nazionali (compatibilità elettromagnetica CE 2004 / 108 , direttiva sulla bassa
tensione CE 2006 / 95 , Direttiva Eco-design
2009 / 125 / EC, Direttiva RoHS 2011 / 65 / EU,
Direttiva R&TTE CE 1999/5). La conformità è stata
comprovata. Le relative dichiarazioni e la
27 IT/CH

28

Table of contents
Introduction
Intended use ........................................................................................................................................ Page 30
Scope of delivery ................................................................................................................................ Page 30
Parts description .................................................................................................................................. Page 30
Technical Data ....................................................................................................................................Page 30
Safety
Safety notices ...................................................................................................................................... Page 31
Preparation
Required tools and material ............................................................................................................... Page 32
Prior to installation ............................................................................................................................... Page 32
Installation
Mounting the light ............................................................................................................................... Page 32
Start-up
Inserting / replacing batteries (remote control) ................................................................................. Page 33
Installing the wall bracket (remote control) ....................................................................................... Page 33
Switching the luminaire on / off .......................................................................................................... Page 33
Remote control functions ..................................................................................................................... Page 33
Changing the bulb .............................................................................................................................. Page 34
Cleaning ...........................................................................................................................................Page 34
Disposal ............................................................................................................................................ Page 34
Warranty / Service centre
Warranty Declaration ......................................................................................................................... Page 34
Service address ................................................................................................................................... Page 34
Declaration of conformity ................................................................................................................... Page 35
Manufacturer ....................................................................................................................................... Page 35
29 GB

Colour-change ceiling light
Introduction
Congratulations on your new product.
You have selected a high quality product.
The instructions for use are a part of the
product. They contain important information about
safety, use and disposal. Before using the product,
please familiarise yourself with all the operating and
safety instructions. Only use the product as described
and for the indicated purpose. When passing this
product on to others, please be sure to include all
its documentation. Before using this product for the
first time verify the correct voltage and that all parts
are properly installed.
Intended use
This light is only suitable for indoor use in dry and
enclosed spaces. The light can be fastened to any
normally inflammable surface. This product is only
intended for private household use (LED colour
change – not room lighting).
Scope of delivery
Check immediately after unpacking that the parts
are complete and that the product is in proper
condition.
1 Colour changing ceiling light, model 3571-096L
9 Halogen light bulb, G4, 14 W
1 Remote control unit
1 Battery, 23 A, 12 V
4 Screws (ceiling bracket)
4 Rawlplugs
1 Tool
2 Screws (wall bracket)
2 Rawlplugs (wall bracket)
1 Wall bracket (remote control)
9 Lamp shades
1 Set of instructions for use
Parts description
1
Mounting bracket
2
Connection housing
3
Rawlplug
4
Screws (connection housing)
5
Screws (mounting bracket)
6
Lamp shades
7
Plastic ring
8
Nut
9
Tool
10
Light bulb
11
Bulb socket
12
Plastic housing
13
Protective tube
14
Mains connection cable (external)
15
Terminal block
16
Remote control unit
17
Screws (wall bracket)
18
Wall bracket (remote control)
19
Rawlplug (wall bracket)
Technical Data
Ceiling light:
Operating voltage: 230–240 V∼, 50 Hz
Halogen light bulb: 12 V∼, 14 W, G4
LED light bulb: LED 54 x 0.06 W,
coloured
Rated power
maximal: 9 x max. 14 W
Protection class: II /
Protection class: IP 20
Remote control receiver:
Rated voltage: 220–240 V∼, 50 / 60 Hz
Max. load capacity: 250 W
Frequency: 433.92 MHz
Remote control transmitter:
Operating voltage: 12 V
Frequency: 433.92 MHz
, 5 mA
30 GB

SafetyIntroduction
Safety
Safety notices
Damage due to failure to comply with these operating instructions will invalidate the guarantee! We
assume no liability for consequential damage! We
assume no liability for material damage or personal
injury due to improper handling or failure to comply
with the safety instructions!
DANGER TO LIFE AND
ACCIDENT HAZARD FOR
TODDLERS AND SMALL CHIL-
DREN! Never leave children unattended with
the packaging material. The packaging material represents a danger of suffocation. Children
frequently underestimate the dangers. Please
keep children away from the product at all times.
Avoid the risk of fatal injury
from electric shock
Protection class II / . This light is specially in-
sulated and must not be connected to an earth
conductor.
Ensure that a qualified electrician, or a person
trained to carry out electrical installations, performs the electrical installation.
We assume no liability for material damage or
personal injury due to improper handling or
failure to comply with the safety instructions!
Never use the light if any defects have been
identified.
Prior to installation, remove the fuse or switch
off the circuit breaker (0 setting) in the fuse box.
Ensure that the light does not come into contact
with water or other liquids under any circumstances.
Before assembly, ensure that the available
mains voltage corresponds to the operating
voltage necessary for the light (230–240 V∼).
Ensure that no cables are damaged when in-
stalling.
Do not install the lamp on damp if conductive
surfaces.
Prevent fire and
injury hazards
of too much heat.
To prevent burns, ensure that the light is switched
off and has cooled down before touching it.
Lamps develop a lot of heat in the area of the
lamp head.
Attention! Do not touch bulb components or
bulbs during operation as they can reach temperatures > 90 °C.
Allow the light to cool down completely before
replacing a defective bulb.
Replace defective bulbs with new ones immedi-
ately. Use only those bulbs as stated in the
chapter on “Technical Data”. Before changing
bulbs, always first remove the fuse or switch off
the circuit breaker.
The LED light bulbs are permanently fitted and
are not replaceable.
Do not look directly into the light source (light
bulb, LED etc.).
The permanently fitted LED light bulbs are not
suitable for dimmer or electronic switches.
Only uses 12 V∼ halogen light bulbs with a
G4 socket and a maximum output of 14 Watt.
Do not touch the halogen lamps with bare hands.
If this accidentally occurs, the light bulb must
be wiped with alcohol and a lint-free cloth.
Only use halogen light bulbs with
Mount the light so that it is protected from
moisture and dirt.
Carefully prepare for assembly and allow your-
self adequate time. Organise all parts and any
necessary additional tools or materials before
starting so they are easy to reach.
Always be attentive! Always pay attention to
what you are doing and proceed with caution
Install the light so that it is at least
0.3 m
0.3 m from any illuminated materials.
Fire can result from the development
Safe working
cover glass or low-pressure
technology.
31 GB

at all times. Never install the light if you are having difficulty concentrating or do not feel well.
Installation
Mounting the light
Preparation
Required tools and material
The tools and materials specified are not included.
This information and these values are non-binding
and are only provided as a reference. The nature
of the material is determined by the individual local
conditions.
- Pencil / making tool
- Voltage tester
- Screwdriver
- Electric drill
- Bit (approx. 0.6 cm)
- Side cutting pliers
- Ladder
Prior to installation
Important: The electrical connection must be
established by a trained electrician or a person
trained to perform electrical connections. This person must be familiar with the properties of the light
and the connection regulations.
Familiarise yourself with all the instructions and
diagrams in this manual, as well as with the
light itself, before you install it.
Before installation ensure that the circuit, to
which the light will be connected, is not energised. To do so, remove the fuse or switch off
the circuit breaker in the fuse box (0 position).
Use the voltage tester to verify the de-ener-
gised status.
Prior to installation, remove the fuse or switch
off the circuit breaker (0 setting) in the fuse box.
Remove the screws 4 visible at the side of the
1
at the back.
2
and remove the mount-
connection housing
ing bracket
Use the slotted holes intended for the mounting
bracket
1
to mark the bores.
Now drill the fixing holes (approx. 6 mm, depth
approx. 35 mm). Ensure that you do not damage the supply line.
Insert the rawlplugs 3 into the holes. Fasten
the mounting bracket
5
screws
.
1
with the provided
Open the plastic housing 12. Then feed the
mains connection cable (external)
14
through
the protective tube 13 on the plastic housing 12.
Now connect the connection cable of the light
to the mains connection cable (external)
ing the terminal block
15
. Be sure to correctly
14
connect the individual wires of the mains connection cable (external)
14
: live wire, black or
brown = symbol L, neutral wire, blue = symbol N)
Close the plastic housing 12.
Use the screws 4 to fasten the luminaire to
the mounting bracket
1
.
Remove the nuts 8 and plastic rings 7 from
the lamp bulb sockets
11
.
Attach a lamp shade 6 onto each bulb
11
socket
.
Secure the lamp shades 6 with the plastic
7
rings
and the nuts 8 using the tool.
Use a clean, lint-free cloth when inserting the
light bulb
10
.
Carefully insert the light bulb 10 into the socket.
Check for correct fitting.
Reinsert the fuse or switch the circuit breaker
back on.
us-
.
32 GB
Your light is now ready to use.

Start-upSafety / Preparation / Installation
Start-up
Inserting / replacing
batteries (remote control)
Open the battery compartment at the back of
the remote control
Remove the spent battery, if necessary.
Insert a new battery into the battery compart-
ment. Only use type 23 A, 12 V
Note: Be sure to correctly insert the batteries
(polarity). This is indicated on the battery cover.
Close the battery compartment of the remote
16
control
16
.
batteries.
.
Installing the wall bracket
(remote control)
Hold the wall bracket 18 in the desired location
on the wall and mark the drill holes.
Now drill the mounting holes.
Insert the rawlplugs 19 into the drill holes.
Secure the wall bracket 18 using the included
17
screws
Tighten the screws to secure the wall bracket 18.
Do not overtighten the screws
Place the remote control 16 into the wall
bracket
.
17
.
18
.
Switching the luminaire on / off
You have the possibility of operating the luminaire
from an ordinary wall switch or switching it on and
off using the supplied remote control unit.
Switching the luminaire on / off using the
remote control unit:
– The wall switch is in the basic position (OFF).
Activate the wall switch (ON).
Press the ON button on the remote control 16 to
switch the light on (halogen light bulb and LED).
Push the OFF button on the remote control 16 to
switch the light completely off.
Switching the light on / off with the wall
switch
The wall switch is in the basic position (OFF).
Activate the wall switch (ON). The halogen
light bulbs are on.
Activate the wall switch within approx. 1 second
by repeatedly pushing off and on. This will
switch through the various switch positions
(halogen light bulbs and LED).
The light can be switched off with the wall switch
or the remote control
16
.
Remote control functions
ON / OFF Halogen light bulb and LED on or off
End colour change / colour selection
Colour
Changing slow colour change LED:
Press 1 x = rotate left
Press 2 x = rotate right
rapid colour change LED:
Press 3 x = rotate left
Press 4 x = rotate right
Press 5 x = flowing colour
change LED
Lamp Halogen light bulb on or off
Colour
Selection Press 1 x: blue LED
Press 2 x: green LED
Press 3 x: red LED
Press 4 x: green / blue LED
Press 5 x: green / red LED
Press 6 x: red / blue LED
Press 7 x: green / red / blue LED
Troubleshooting:
If the remote control
switching the light on, first press the wall switch to
switch the light off. Then wait approx. 15–20 seconds and activate the wall switch again.
If after switching on the luminaire again via the
remote control unit
respond, check the batteries in the remote control
16
unit
.
16
does not respond after
16
the luminaire still does not
33 GB

Changing the bulb
CAUTION! RISK OF ELECTRIC SHOCK!
To replace the bulb, first disconnect the light
from the mains circuit. To do so, remove the
fuse or switch off the circuit breaker in the fuse
box (0 position).
CAUTION! DANGER OF BURN INJURIES!
Allow the light to cool completely.
Replace the bulb 10 only after it has fully cooled.
Carefully pull the defective light bulb 10 out of
the socket.
Use a clean, lint-free cloth to replace a bulb.
Only use max. 14 Watt, 12 V∼ halogen light
bulbs with a G4 socket.
Now carefully insert the new light bulb 10 into
the socket. Check for correct seating.
Reinsert the fuse or switch the circuit breaker
back on.
Cleaning
CAUTION! RISK OF ELECTRIC SHOCK!
Disconnect the light from the mains circuit
before cleaning. To do so, remove the fuse or
switch off the circuit breaker in the fuse box
(0 position).
Only clean with a dry, lint-free cloth. Do not
use solvents, spirit or similar substances. They
could damage the light.
Allow the light to cool off completely.
The care of lights is limited to the surfaces.
Never allow moisture to enter terminal
compartments or conductive components.
The symbol of the wheelie bin with the
line through it means that, in the European
Union, the product has to be disposed
of in a separate refuse collection. This applies to the
product and to all components bearing this symbol.
Do not dispose of products bearing this symbol in
your normal household waste, but instead they must
be taken for recycling to a collection site for electrical and electronic appliances.
Recycling helps to reduce the consumption of raw
materials and protects the environment.
Batteries must not be disposed of as household
refuse! Advice is available from your local council.
Return the batteries and / or the device through the
appropriate collection facilities.
Warranty / Service centre
Warranty Declaration
This product has a 3 year guarantee from the date
of purchase extended only to the original buyer,
not transferable. Please keep your receipt as proof
of purchase. The guarantee applies to material or
manufacturing defects only. It does not cover wear
items or damage caused by improper use. Any
modifications will void the guarantee. This warranty
does not limit your legal rights. Please phone the
service centre for guarantee claims. This is the only
way to return your product free of charge.
Service address
Disposal
34 GB
The package and packaging materials
consist entirely of environmentally friendly
materials. They can be disposed of at
your local recycling facility.
Briloner Leuchten GmbH
Im Kissen 2, 59929 Brilon, Germany
Tel.: +49 (0) 29 61 / 97 12–0
Fax: +49 (0) 29 61 / 97 12–199
E-Mail: Info@briloner.de
www.briloner.de
IAN 101262
Please have your receipt and the article number
(e.g. IAN 12345) ready as your proof of purchase
when enquiring about your product.

Declaration of conformity
This product fulfils the requirements of the
applicable European and national directives (Electromagnetic Compatibility 2004/108/EC, Low
Voltage Directive 2006/95/EC, Ecodesign Directive 2009/125/EC, RoHS Directive 2011/65/EU,
R&TTE Directive 1999 / 5 / EC). Conformity has
been demonstrated. The relevant declarations and
documents are held by the manufacturer.
Manufacturer
Briloner Leuchten GmbH
Im Kissen 2
59929 Brilon
Germany
Warranty / Service centreStart-up / Cleaning / Disposal / Warranty / Service centre
35 GB

36

BRILONER LEUCHTEN GMBH
Im Kissen 2
59929 Brilon (Germany)
Stand der Informationen · Version des
informations · Versione delle informazioni
Last Information Update: 07 / 2014
Ident.-No.: 3571-096L072014-1
IAN 101262
1
 Loading...