


ERS 8600
Avaya ERS 8600, ERS 5500, ERS 5600, ERS 8300, ERS 4500 Technical Configuration Manual
...
Switch User Authentication using
Identity Engines Ignition Server
Technical Configuration Guide
Avaya Data Solutions
Document Date: July 2010
Document Number: NN48500-589
Document Version: 1.1
Identity Engines Ignition Server
Ethernet Routing Switch
8600, 8300, 1600, 5500, 5600, 4500, 2500
Engineering

2
avaya.com
© 2010 Avaya Inc.
All Rights Reserved.
Notices
While reasonable efforts have been made to ensure that the information in this document is complete and accurate at the time of printing,
Avaya assumes no liability for any errors. Avaya reserves the right to make changes and corrections to the information in this document
without the obligation to notify any person or organization of such changes.
Documentation disclaimer
Avaya shall not be responsible for any modifications, additions, or deletions to the original published version of this documentation unless
such modifications, additions, or deletions were performed by Avaya. End User agree to indemnify and hold harmless Avaya, Avaya’s
agents, servants and employees against all claims, lawsuits, demands and judgments arising out of, or in connection with, subsequent
modifications, additions or deletions to this documentation, to the extent made by End User.
Link disclaimer
Avaya is not responsible for the contents or reliability of any linked Web sites referenced within this site or documentation(s) provided by
Avaya. Avaya is not responsible for the accuracy of any information, statement or content provided on these sites and does not necessarily
endorse the products, services, or information described or offered within them. Avaya does not guarantee that these links will work all the
time and has no control over the availability of the linked pages.
Warranty
Avaya provides a limited warranty on this product. Refer to your sales agreement to establish the terms of the limited warranty. In addition,
Avaya’s standard warranty language, as well as information regarding support for this product, while under warranty, is available to Avaya
customers and other parties through the Avaya Support Web site: http://www.avaya.com/support
Please note that if you acquired the product from an authorized reseller, the warranty is provided to you by said reseller and not by Avaya.
Licenses
THE SOFTWARE LICENSE TERMS AVAILABLE ON THE AVAYA WEBSITE, HTTP://SUPPORT.AVAYA.COM/LICENSEINFO/ ARE
APPLICABLE TO ANYONE WHO DOWNLOADS, USES AND/OR INSTALLS AVAYA SOFTWARE, PURCHASED FROM AVAYA INC.,
ANY AVAYA AFFILIATE, OR AN AUTHORIZED AVAYA RESELLER (AS APPLICABLE) UNDER A COMMERCIAL AGREEMENT WITH
AVAYA OR AN AUTHORIZED AVAYA RESELLER. UNLESS OTHERWISE AGREED TO BY AVAYA IN WRITING, AVAYA DOES NOT
EXTEND THIS LICENSE IF THE SOFTWARE WAS OBTAINED FROM ANYONE OTHER THAN AVAYA, AN AVAYA AFFILIATE OR AN
AVAYA AUTHORIZED RESELLER, AND AVAYA RESERVES THE RIGHT TO TAKE LEGAL ACTION AGAINST YOU AND ANYONE ELSE
USING OR SELLING THE SOFTWARE WITHOUT A LICENSE. BY INSTALLING, DOWNLOADING OR USING THE SOFTWARE, OR
AUTHORIZING OTHERS TO DO SO, YOU, ON BEHALF OF YOURSELF AND THE ENTITY FOR WHOM YOU ARE INSTALLING,
DOWNLOADING OR USING THE SOFTWARE (HEREINAFTER REFERRED TO INTERCHANGEABLY AS "YOU" AND "END USER"),
AGREE TO THESE TERMS AND CONDITIONS AND CREATE A BINDING CONTRACT BETWEEN YOU AND AVAYA INC. OR THE
APPLICABLE AVAYA AFFILIATE ("AVAYA").
Copyright
Except where expressly stated otherwise, no use should be made of the Documentation(s) and Product(s) provided by Avaya. All content in
this documentation(s) and the product(s) provided by Avaya including the selection, arrangement and design of the content is owned either
by Avaya or its licensors and is protected by copyright and other intellectual property laws including the sui generis rights relating to the
protection of databases. You may not modify, copy, reproduce, republish, upload, post, transmit or distribute in any way any content, in
whole or in part, including any code and software. Unauthorized reproduction, transmission, dissemination, storage, and or use without the
express written consent of Avaya can be a criminal, as well as a civil offense under the applicable law.
Third Party Components
Certain software programs or portions thereof included in the Product may contain software distributed under third party agreements ("Third
Party Components"), which may contain terms that expand or limit rights to use certain portions of the Product ("Third Party Terms").
Information regarding distributed Linux OS source code (for those Products that have distributed the Linux OS source code), and identifying
the copyright holders of the Third Party Components and the Third Party Terms that apply to them is available on the Avaya Support Web
site: http://support.avaya.com/Copyright.
Trademarks
The trademarks, logos and service marks ("Marks") displayed in this site, the documentation(s) and product(s) provided by Avaya are the
registered or unregistered Marks of Avaya, its affiliates, or other third parties. Users are not permitted to use such Marks without prior written
consent from Avaya or such third party which may own the Mark. Nothing contained in this site, the documentation(s) and product(s) should
be construed as granting, by implication, estoppel, or otherwise, any license or right in and to the Marks without the express written
permission of Avaya or the applicable third party. Avaya is a registered trademark of Avaya Inc. All non-Avaya trademarks are the property of
their respective owners.
Downloading documents
For the most current versions of documentation, see the Avaya Support. Web site: http://www.avaya.com/support.
Contact Avaya Support
Avaya provides a telephone number for you to use to report problems or to ask questions about your product. The support telephone number
is 1-800-242-2121 in the United States. For additional support telephone numbers, see the Avaya Web site: http:// www.avaya.com/support.
Switch User Authentication using Identity Engines Ignition Server Technical Configuration Guide
3
avaya.com
No
Date
Version
Revised by
Remarks
1
10/09/2009
1.0
JVE
Initial Release
Abstract
Revision Control
Switch User Authentication using Identity Engines Ignition Server Technical Configuration Guide

4
avaya.com
Table of Contents
Document Updates ..................................................................................................................................... 5
Conventions ................................................................................................................................................ 5
1. Overview: RADIUS User Authentication using Identify Engines .................................................... 6
1.1 RADIUS Support on Avaya Switches ........................................................................................... 6
1.2 User Authentication using ERS1600, ERS8300, or ERS8600 ..................................................... 6
1.3 User Authentication using ERS5600, ERS5500, ERS4500, or ERS2500 .................................... 7
2. ERS8600 Switch Configuration Example .......................................................................................... 8
2.1 Part 1: Basic AAA Configuation .................................................................................................... 8
2.2 Part 2: ERS8600 Configuration with Specific Commands Disabled ........................................... 38
3. ERS5600 Switch Configuration Example ........................................................................................ 47
3.1 ERS5600 Configuration .............................................................................................................. 47
3.2 IDE Setup .................................................................................................................................... 48
3.3 Verification ................................................................................................................................... 68
4. Software Baseline .............................................................................................................................. 72
5. Reference Documentation ................................................................................................................ 72
6. Customer service ............................................................................................................................... 73
6.1 Getting technical documentation ................................................................................................. 73
6.2 Getting product training ............................................................................................................... 73
6.3 Getting help from a distributor or reseller .................................................................................... 73
6.4 Getting technical support from the Avaya Web site .................................................................... 73
Switch User Authentication using Identity Engines Ignition Server Technical Configuration Guide

5
avaya.com
Tip – Highlights a configuration or technical tip.
Note – Highlights important information to the reader.
Warning – Highlights important information about an action that may result in equipment
damage, configuration or data loss.
Bold text indicates emphasis.
Italic text in a Courier New font indicates text the user must enter or select in a menu item, button
or command:
ERS5520-48T# show running-config
Output examples from Avaya devices are displayed in a Lucinda Console font:
ERS5520-48T# show running-config
! Embedded ASCII Configuration Generator Script
! Model = Ethernet Routing Switch 5520-24T-PWR
! Software version = v5.0.0.011
enable
configure terminal
Document Updates
July 2010
Conventions
This section describes the text, image, and command conventions used in this document.
Symbols:
Text:
Switch User Authentication using Identity Engines Ignition Server Technical Configuration Guide
6
avaya.com
RADIUS
authentication
802.1x
(EAP)
RADIUS
authentication
RADIUS
accounting
802.1x
(EAP)
RADIUS
accounting
RADIUS
accounting for CLI
commands
RADIUS
user
access
profile
RADIUS
SNMP
accounting
ERS 8600
Yes
Yes
Yes
Yes
Yes
Yes
Yes
ERS 8300
Yes
Yes
Yes
Yes
Yes
Yes
No
ERS 1600
Yes
Yes
Yes
Yes
Yes
Yes
No
ES 460/470
Yes
Yes
No
No
No
No
No
ERS 2500
Yes
Yes
No
Yes
No
No
No
ERS 4500
Yes
Yes
No
Yes
No
No
No
ERS 5500
Yes
Yes
No
Yes
No
No
No
ERS 5600
Yes
Yes
No
Yes
No
No
No
Access Level
VSA Attribute 26 – Vendor Identifier 1584
Type 192 value
None-Access
0
Read-Only-Access
1
Layer 1-Read-Write-Access
2
Layer 2-Read-Write-Access
3
Layer 3-Read-Write-Access
4
1. Overview: RADIUS User Authentication
using Identify Engines
This document provides the framework for implementing user Authentication, Authorization, and
Accounting for Avaya switches.
1.1 RADIUS Support on Avaya Switches
1.2 User Authentication using ERS1600, ERS8300, or
ERS8600
The ERS1600, ERS8300, and ERS8600 each support six different user access levels. The access level
is determined by the RADIUS attribute value sent back to the switch. The switch uses RADIUS VendorSpecific Attributes (IETF Attribute 26) to support its own extended attributes. Vendor identifier 1584 (Bay
Networks) attribute type 192 is used where the value is a number from 0 to 6. The following chart displays
the RADIUS attribute values and corresponding access level.
Switch User Authentication using Identity Engines Ignition Server Technical Configuration Guide

7
avaya.com
Read-Write-Access
5
Read-Write-All-Access
6
In addition, on the ERS8600 only, via vendor identifier 1584 attribute type 194, if is set to a value of 0, you
can enter a list of CLI commands not allowed for a user. The CLI command is entered using the RADIUS
string value configured via RADIUS vendor identifier 1584 attribute type 195.
1.3 User Authentication using ERS5600, ERS5500,
ERS4500, or ERS2500
The ERS5600, ERS5500, ERS4500, and ERS2500 each support two different user access levels which
are read-only or read-write. RADIUS attribute type 6, Service-Type, is used to determine the access level.
The following displays the complete list of RADIUS attribute values for the RADIUS Service-Type attribute
where value 6 (Administrative) is used for read-write access and value 7 (NAS Prompt) is used for readonly access
Sub-registry: Values for RADIUS Attribute 6, Service-Type
Reference: [RFC2865][RFC3575]
Registration Procedures: IETF Consensus
Registry:
Value Description Reference
----- ------------------------------- --------1 Login
2 Framed
3 Callback Login
4 Callback Framed
5 Outbound
6 Administrative
7 NAS Prompt
8 Authenticate Only
9 Callback NAS Prompt
10 Call Check
11 Callback Administrative
12 Voice [Chiba]
13 Fax [Chiba]
14 Modem Relay [Chiba]
15 IAPP-Register [IEEE 802.11f][Kerry]
16 IAPP-AP-Check [IEEE 802.11f][Kerry]
17 Authorize Only [RFC3576]
18 Framed-Management [RFC5607]
Switch User Authentication using Identity Engines Ignition Server Technical Configuration Guide
8
avaya.com
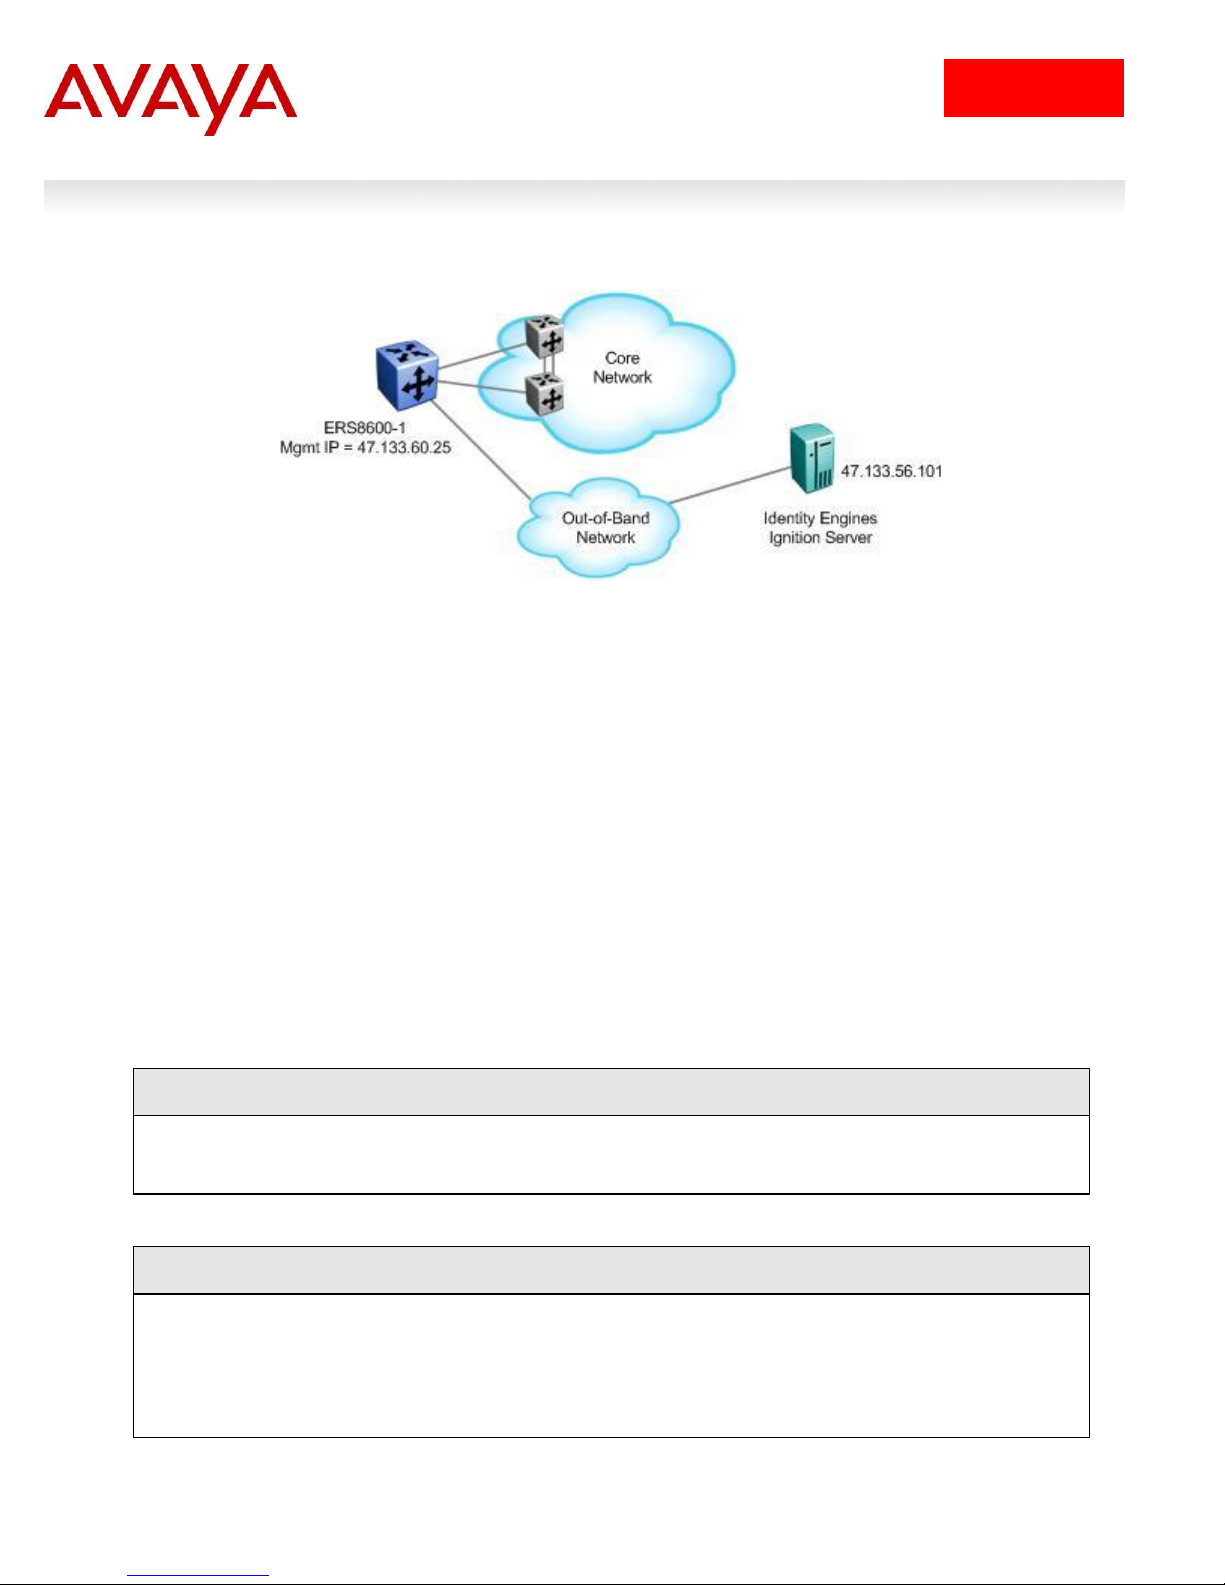
ERS8600-1 Step 1 – Add out-of-band IP address and route
ERS-8606:5# config bootconfig net mgmt ip 47.133.60.25/24
ERS-8606:5# config bootconfig net mgmt route add 47.0.0.0/8 47.133.60.1
ERS8600-1 Step 1 – Add RADIUS server, enable RADIUS, and enable RADIUS accounting
ERS-8606:5# config radius server create 47.133.56.101 secret nortel priority 1
ERS-8606:5# config radius enable true
ERS-8606:5# config radius acct-enable true
ERS-8606:5# config radius acct-include-cli-commands true
2. ERS8600 Switch Configuration Example
For this configuration example, we will enable RADIUS user authentication on ERS8600-1 using the outof-band management port. We will configure the Identity Engines RADIUS server with the following three
users:
User name with read-only access: 8600ro
User name with read-write access: 8600rw
User name with read-write-all access: 8600rwa
For this example, we will break down the configuration into two parts. In part one, we will simply add AAA
services for the three users shown above. Part two is a continuation of part one with the addition of
showing how to restrict certain CLI commands. In part two, we will pick the read-write user and deny
access to QoS and filter configuration for this user.
2.1 Part 1: Basic AAA Configuation
2.1.1 ERS8600 Configuration
Assuming we are using the out-of-band management port.
2.1.1.1 Add out-of-band IP address
2.1.1.2 Enable RADIUS
Switch User Authentication using Identity Engines Ignition Server Technical Configuration Guide
9
avaya.com
When configuring the RADIUS server on the ERS8600, you can configure the switch
with a RADIUS source-IP address which in turn will be the IP address used for RADIUS
requests. The RADIUS source-IP address must be a circuit-less IP address (CLIP) or
otherwise known as a loopback address. If you do not enable a RADIUS source-IP
address, by default, the ERS8600 uses the IP address of the outgoing interface as the
source IP address for RADIUS. Unfortunately, although you can create and enable a
RADIUS source-IP when using the out-of-band management port, this feature is not
supported on the out-of-band management port. Hence, if you have two CP cards, you
will have to configure two RADIUS Authenticators on the RADIUS server.
Step 1 – Verify that RADIUS has been enabled globally
ERS-8606:5# show radius info
Result:
Sub-Context: clear config dump monitor mplsping mplstrace peer show switchover
test trace
Current Context:
acct-attribute-value : 193
acct-enable : true
acct-include-cli-commands : true
access-priority-attribute : 192
auth-info-attr-value : 91
command-access-attribute : 194
cli-commands-attribute : 195
cli-cmd-count : 40
cli-profile-enable : false
enable : true
igap-passwd-attr : standard
igap-timeout-log-fsize : 512
maxserver : 10
mcast-addr-attr-value : 90
sourceip-flag : false
2.1.2 ERS 8600 Switch: Verify Operations
2.1.2.1 Verify RADIUS Global Settings
Switch User Authentication using Identity Engines Ignition Server Technical Configuration Guide
10
avaya.com
Option
Verify
Acct-enable
acct-include-cli-
commands
Verify that the CLI accounting is set to true globally
enable
Verify that enable is set to true globally telling us that RADIUS is enabled
Access Level
Attribute Value
User Name
None-Access
0 Read-Only-Access
1
8600ro
L1-Read-Write-Access
2 L2-Read-Write-Access
3
L3-Read-Write-Access
4
Read-Write-Access
5
8600rw
Read-Write-All-Access
6
8600rwa
Via 8600-1, verify the following information:
2.1.3 IDE Setup
2.1.3.1 Configure an Outbound Attribute on Ignition Server for VLAN
The following chart displays the outbound attribute values required by the ERS8600 for each access level
for RADIUS vendor identifier 1584 (Bay Networks) attribute type 192. For this example, we will configure
IDE with attribute values of 1, 5, and 6.
Switch User Authentication using Identity Engines Ignition Server Technical Configuration Guide
11
avaya.com
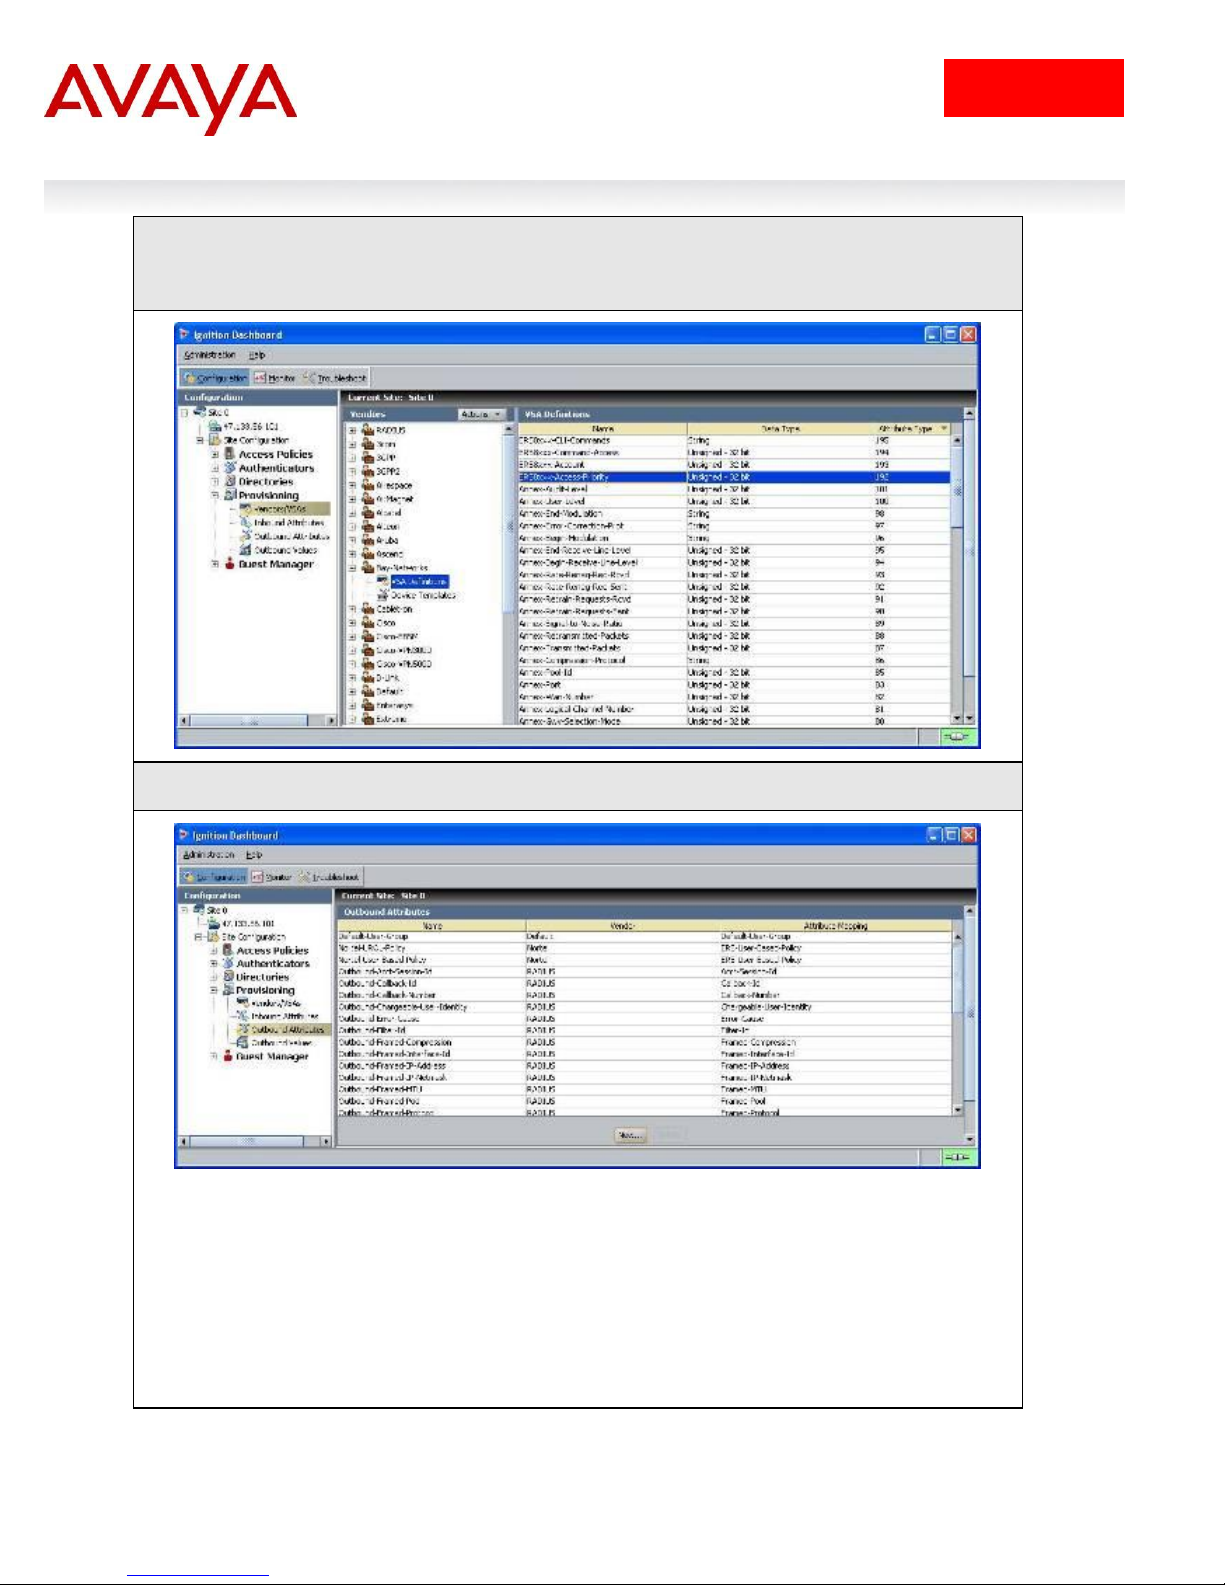
IDE Step 1 – IDE already has the vendor specific attributes defined (Bay Networks vendor
code 1584 using attribute type 192) for the ERS8600 which can be viewed by going to Site
Configuration -> Provisioning -> Vendors/VSAs -> Bay-Networks -> VSA Definitions.
IDE Step 2 – Go to Site Configuration -> Provisioning -> Outbound Attributes -> New
Switch User Authentication using Identity Engines Ignition Server Technical Configuration Guide
12
avaya.com
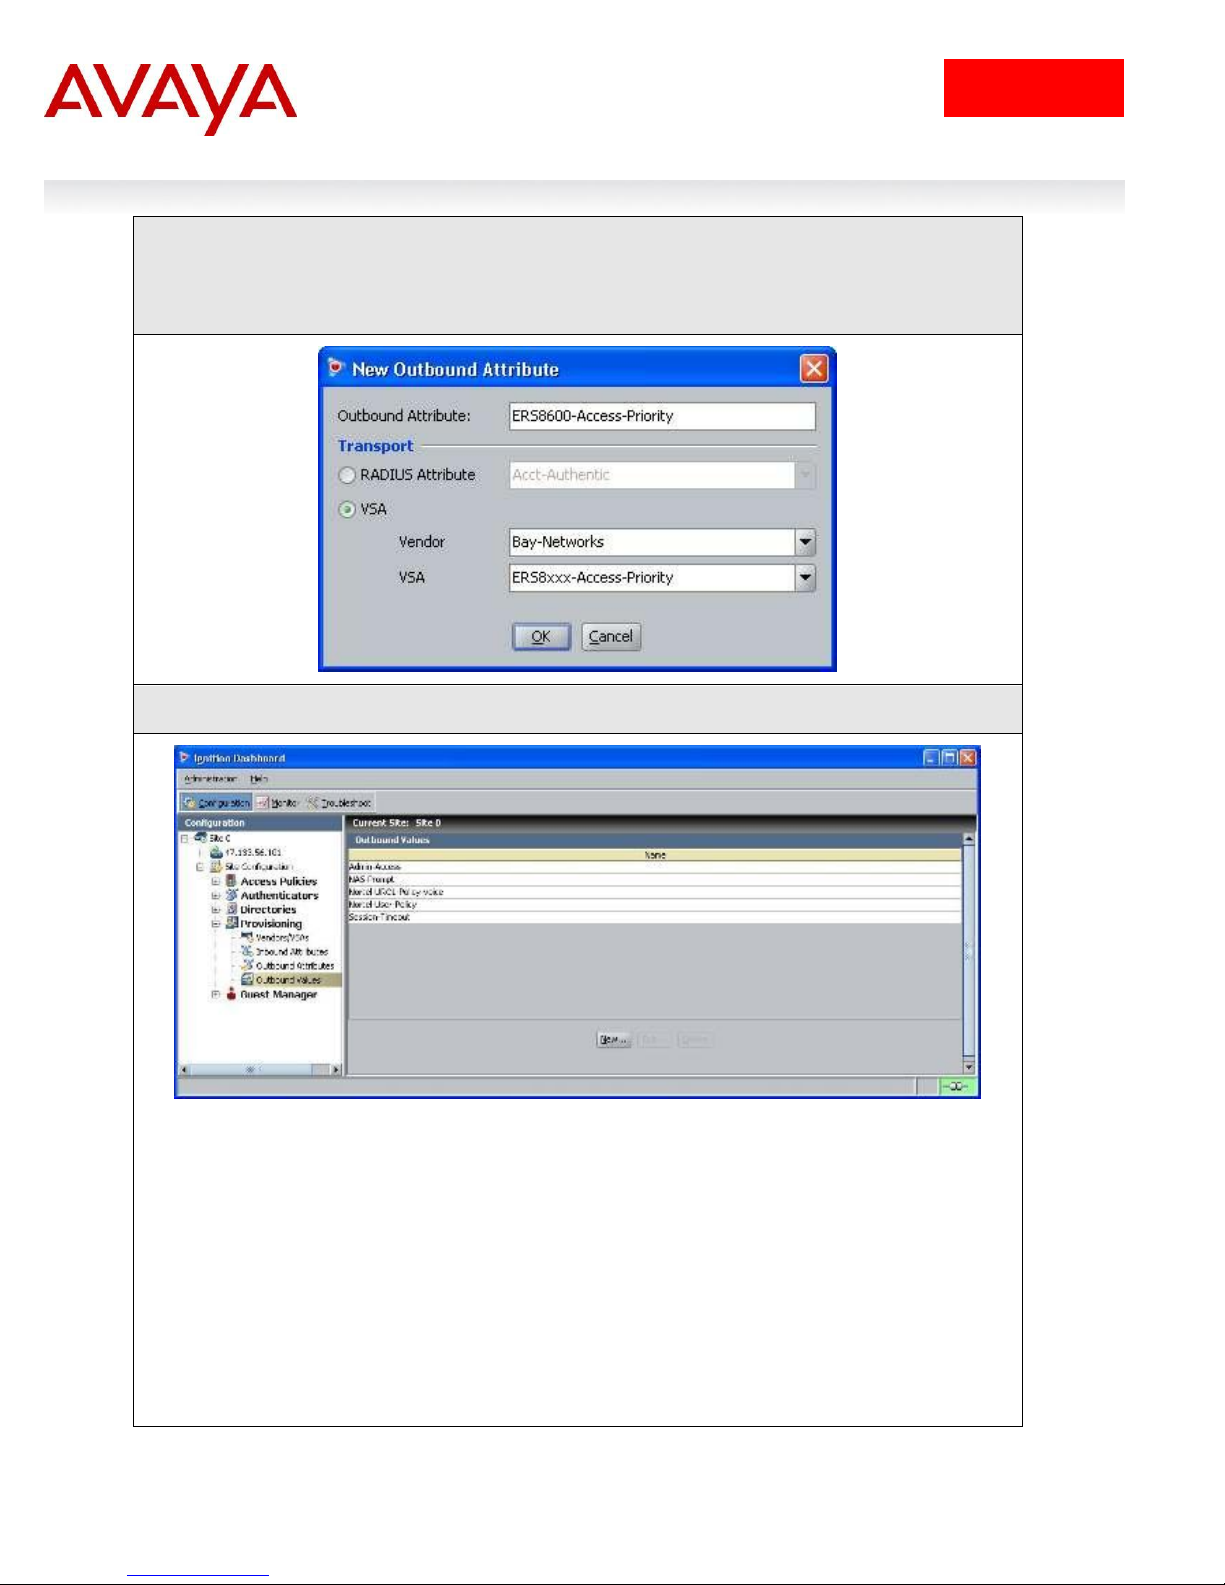
IDE Step 3 – Via the Outbound Attribute window, type in a name for the attribute to be used
for access priority (i.e. ERS8600-Access-Priority as used in this example), click the VSA
radio button, select Bay-Networks via Vendor and ERS8xxx-Access-Priority via VSA. Click
on OK when done
IDE Step 4 – Go to Site Configuration -> Provisioning -> Outbound Values -> New
Switch User Authentication using Identity Engines Ignition Server Technical Configuration Guide
13
avaya.com
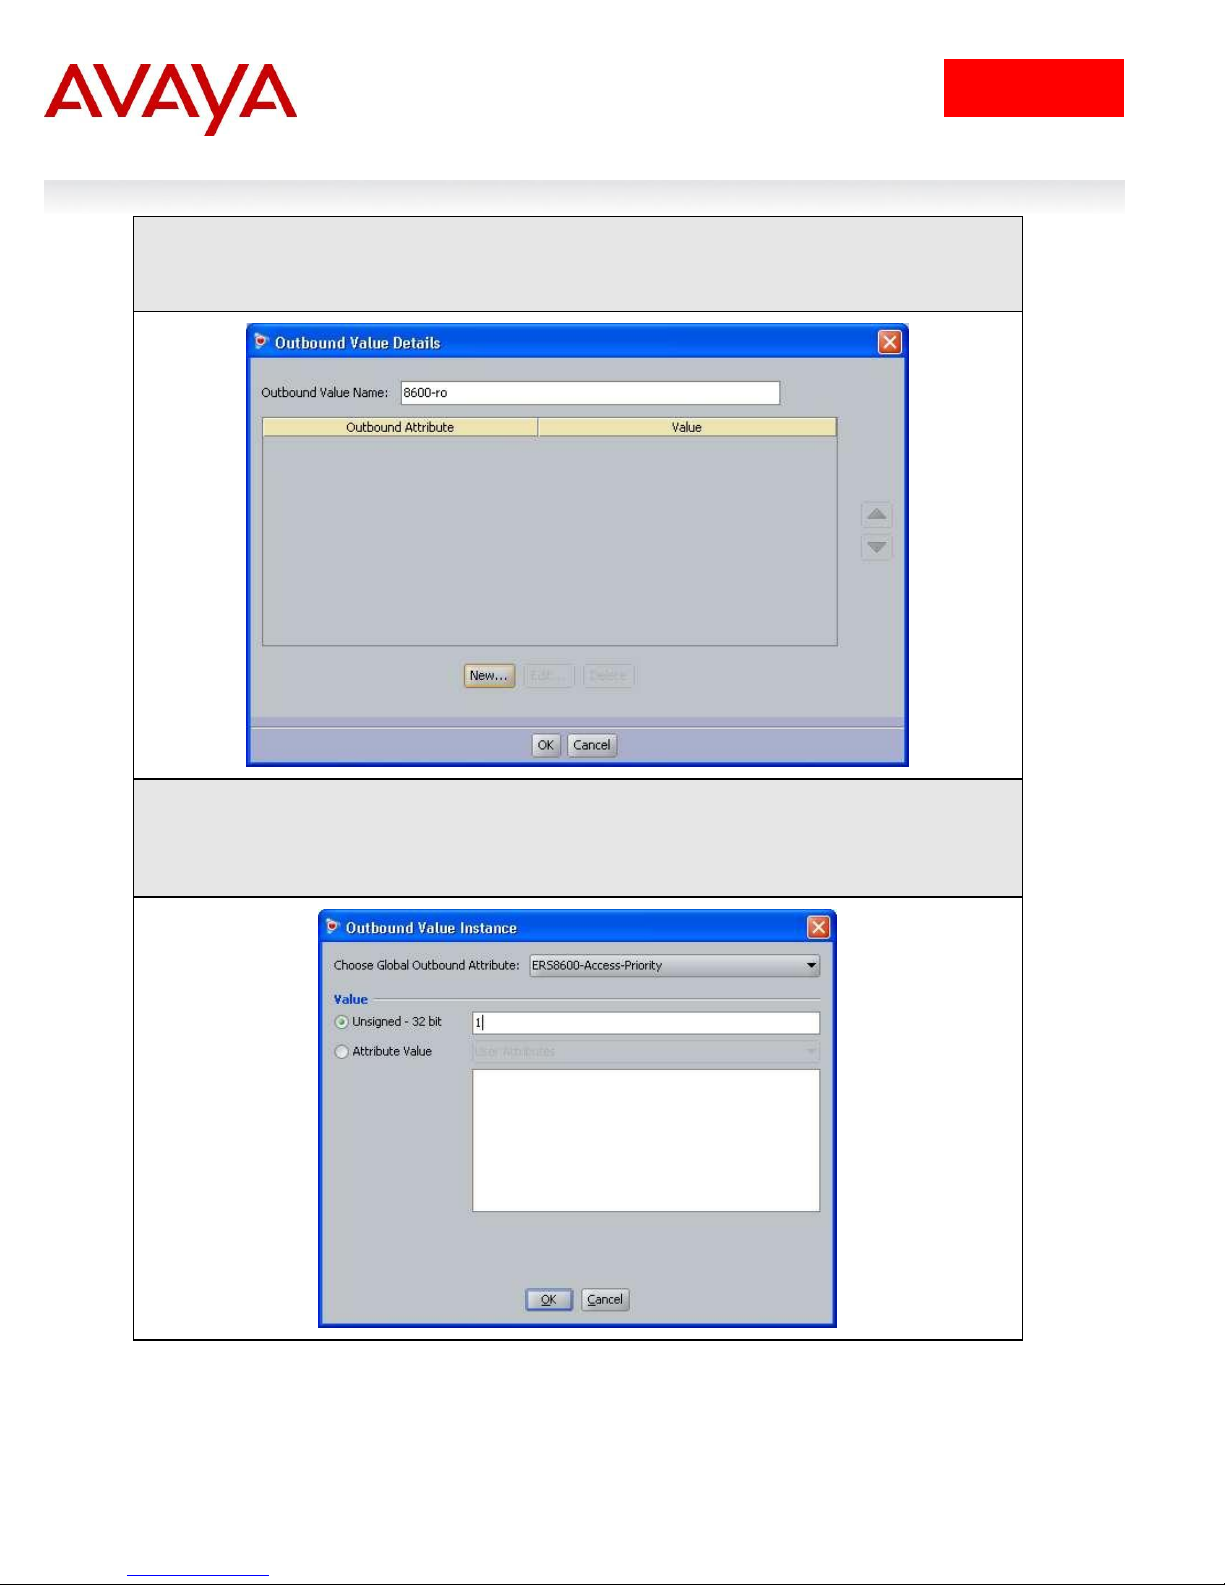
IDE Step 5 – Using the Outbound Attribute created in Step 3, we will first add an attribute
value of 1 for read-only-access. Start by entering a name via the Outbound Value Name:
window (i.e. 8600-ro as used in this example) and click on New
IDE Step 6 – Select the Outbound Attributes name created in Step 3 (i.e. ERS8600-AccessPriority as used in this example) via the Choose Global Outbound Attribute: pull down
menu. In the Value Unsigned – 32 bit window, enter 1 (i.e. value of 1 signifies read-onlyaccess). Click on OK twice when done.
Switch User Authentication using Identity Engines Ignition Server Technical Configuration Guide

14
avaya.com
IDE Step 7 – Go to Site Configuration -> Provisioning -> Outbound Values -> New again to
create the outbound attribute for read-write-access. Using the Outbound Attribute created
in Step 3, we will add an attribute value of 5 for read-write-access. Start by entering a name
via the Outbound Value Name: window (i.e. 8600-rw as used in this example) and click on
New
IDE Step 8 –Select the Outbound Attributes name created in Step 3 (i.e. ERS8600-AccessPriority as used in this example) via the Choose Global Outbound Attribute: pull down
menu. In the Value Unsigned – 32 bit window, enter 5 (i.e. value of 5 signifies read-writeaccess). Click on OK twice when done.
Switch User Authentication using Identity Engines Ignition Server Technical Configuration Guide
15
avaya.com
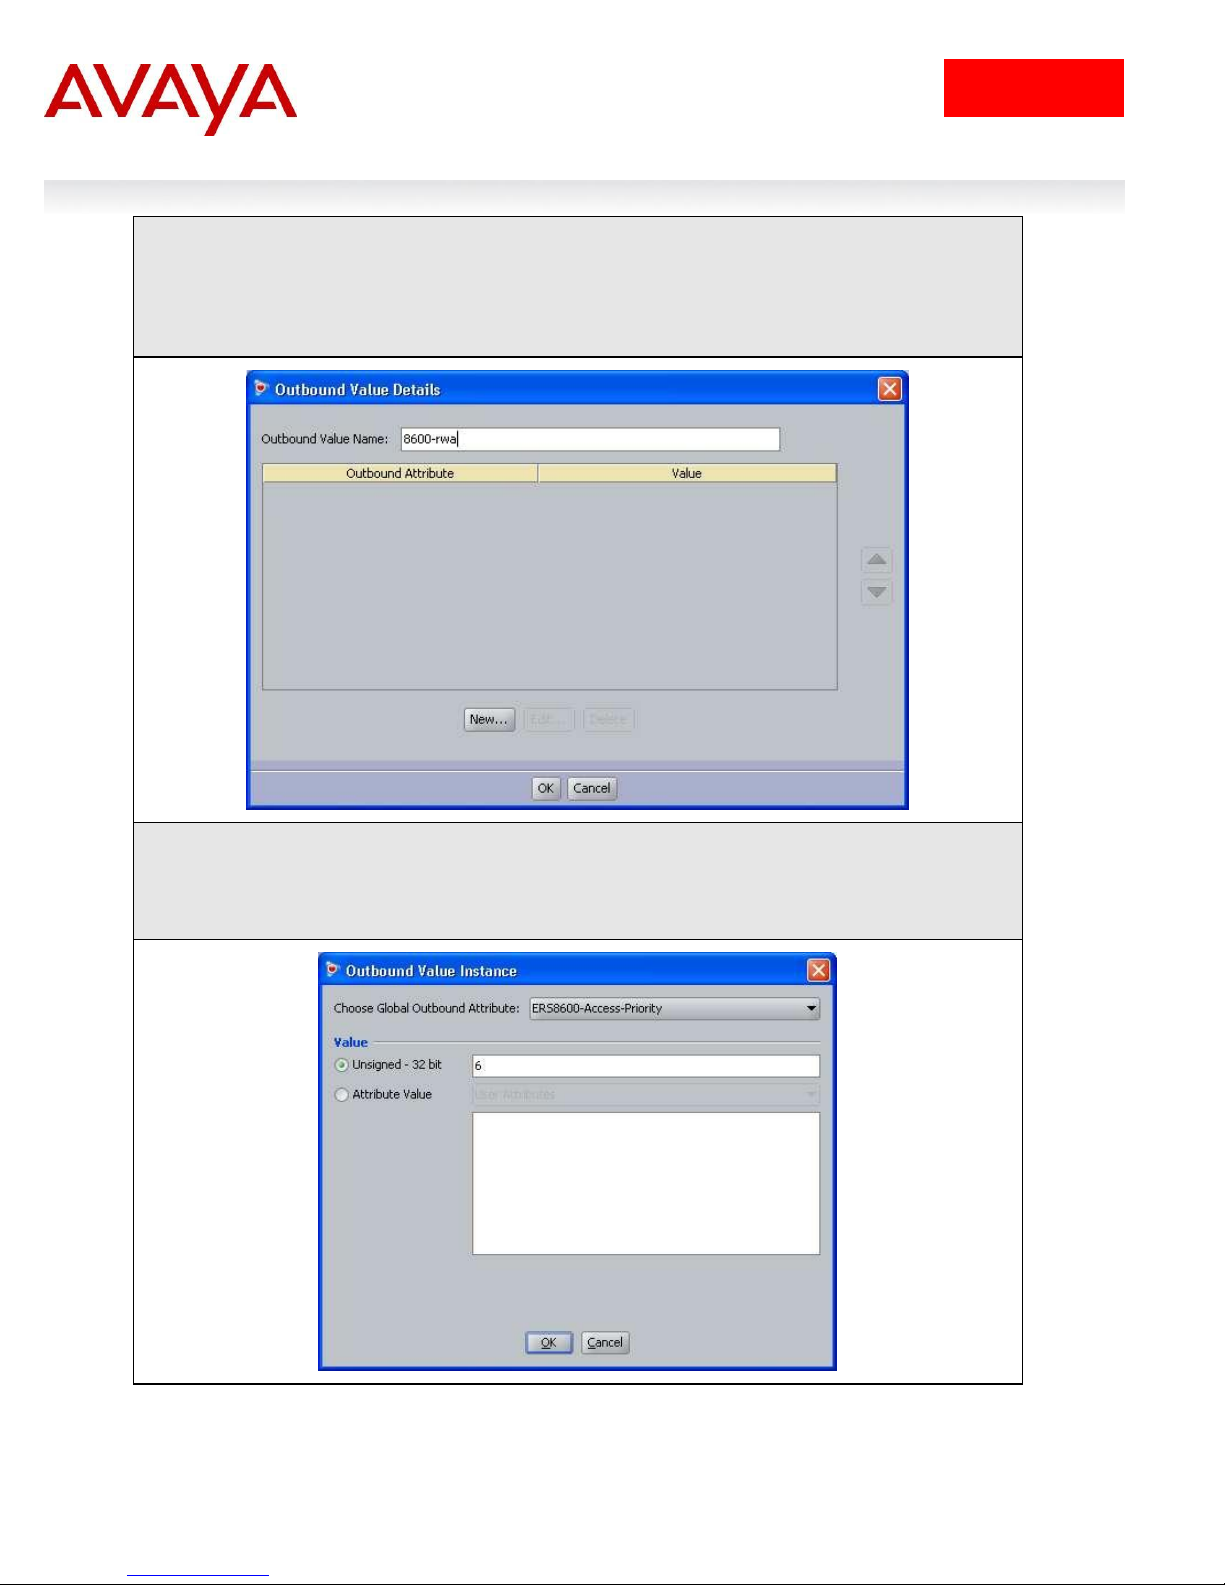
IDE Step 9 – Go to Site Configuration -> Provisioning -> Outbound Values -> New again to
create the outbound attribute for read-write-all-access. Using the Outbound Attribute
created in Step 3, we will add an attribute value of 6 for read-write-all-access. Start by
entering a name via the Outbound Value Name: window (i.e. 8600-rwa as used in this
example) and click on New
IDE Step 10 –Select the Outbound Attributes name created in Step 3 (i.e. ERS8600-AccessPriority as used in this example) via the Choose Global Outbound Attribute: pull down
menu. In the Value Unsigned – 32 bit window, enter 6 (i.e. value of 6 signifies read-write-allaccess). Click on OK twice when done.
Switch User Authentication using Identity Engines Ignition Server Technical Configuration Guide
16
avaya.com
User Name
Access Level
8600ro
Read-Only-Access
8600rw
Read-Write-Access
8600rwa
Read-Write-All-Access
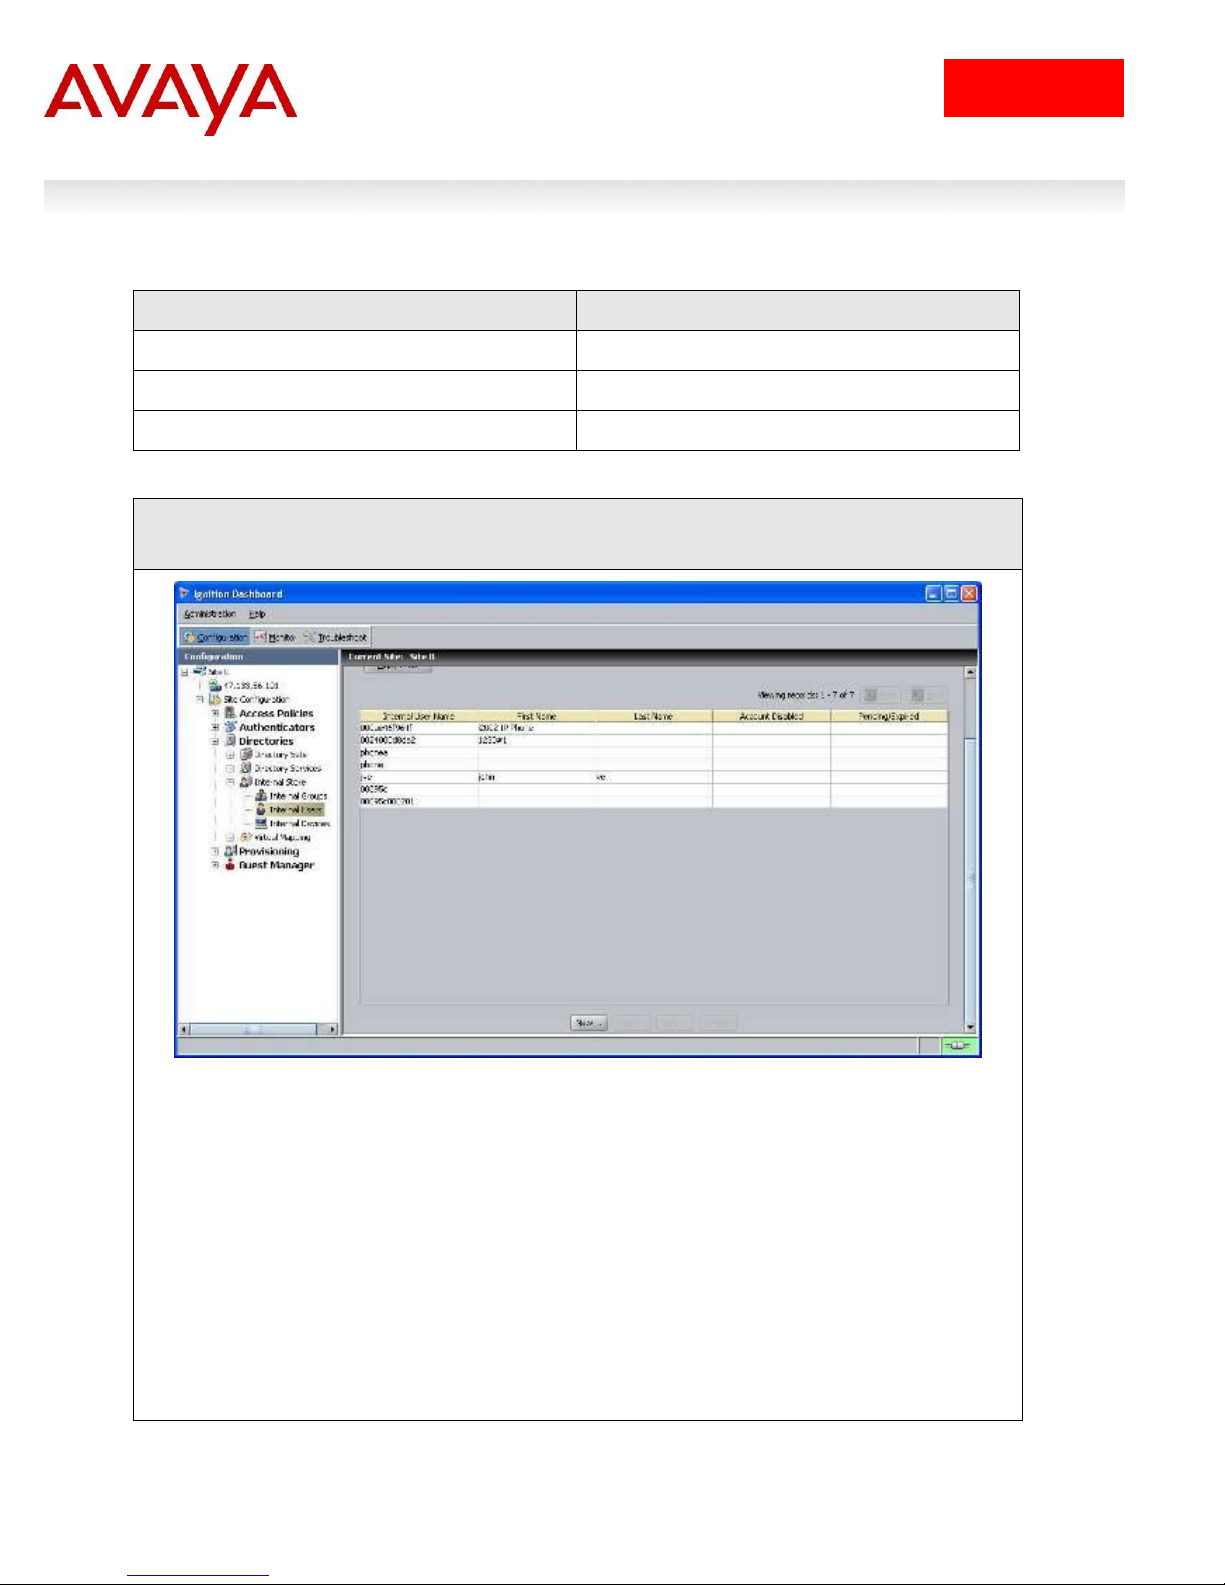
IDE Step 1 – Start by going to Site Configuration -> Directories -> Internal Store -> Internal
Users and click on New
2.1.3.2 Add Users
For this configuration example, we will add the following users.
Switch User Authentication using Identity Engines Ignition Server Technical Configuration Guide
17
avaya.com
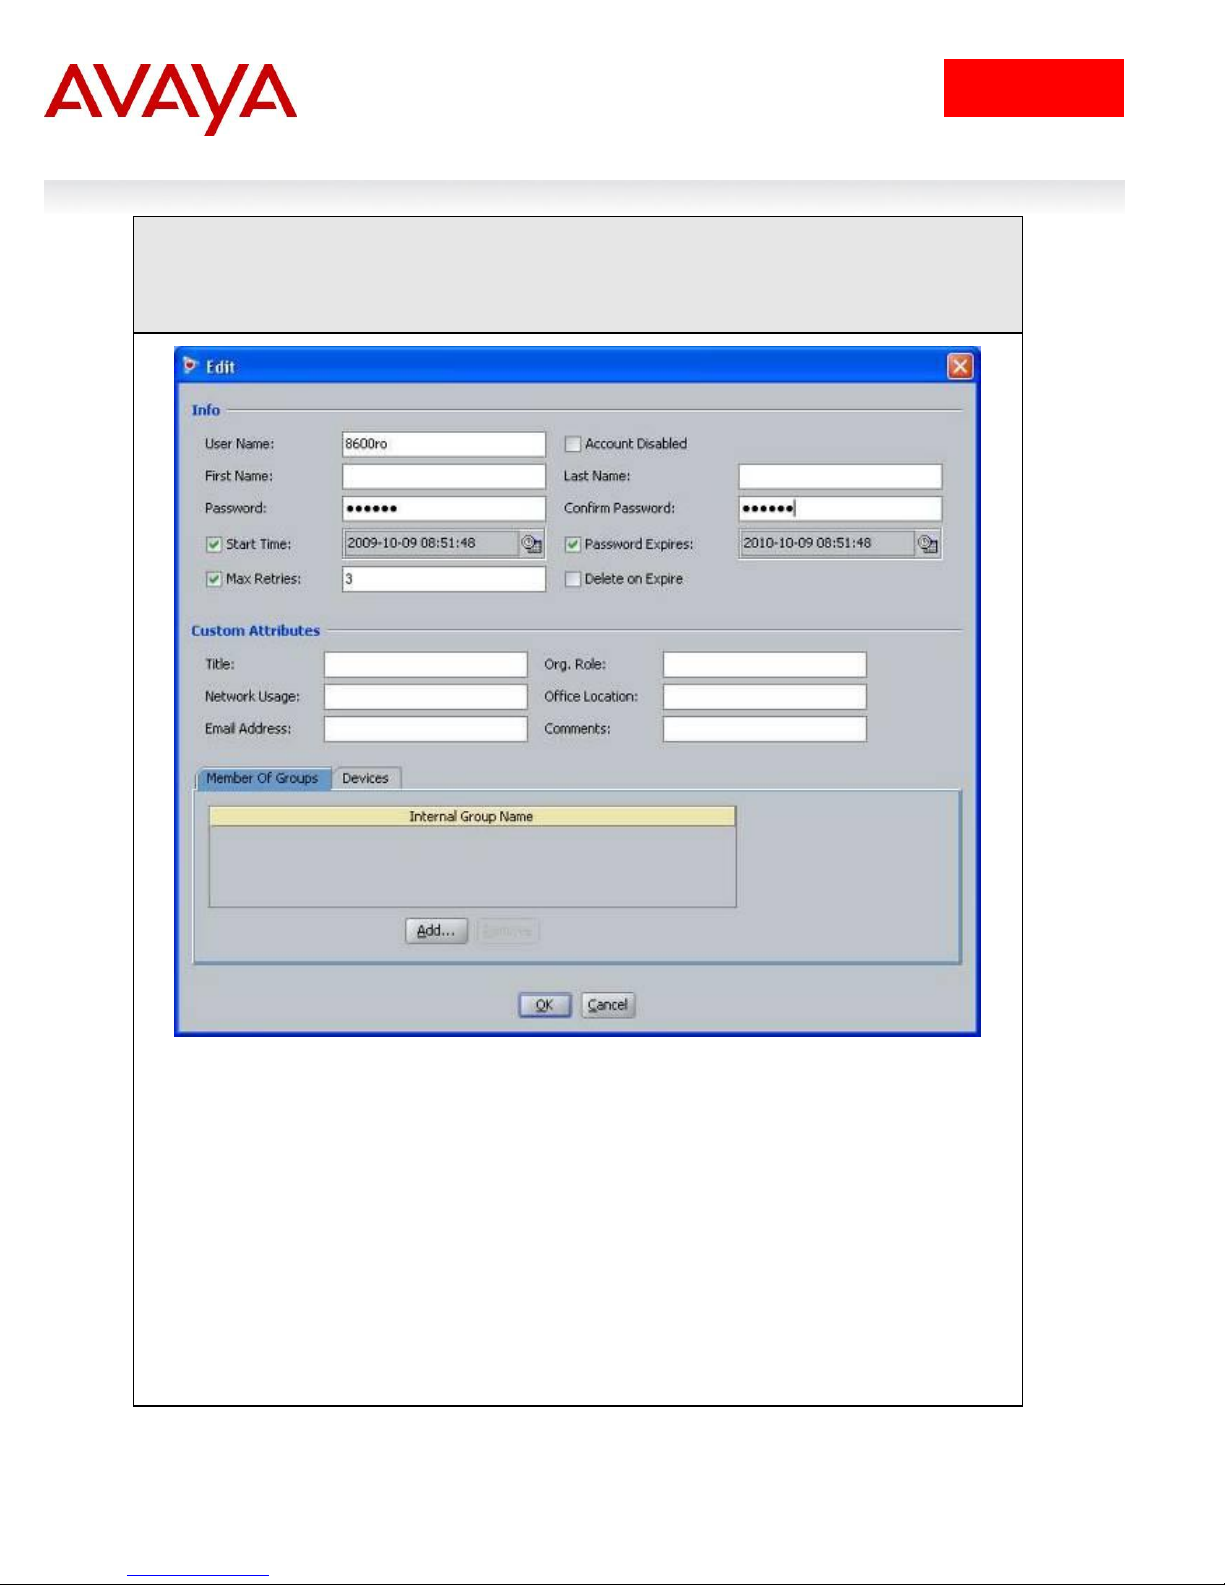
IDE Step 2 – Enter the user name for read-only-access via User Name: (i.e. 8600ro as used
in this example) and enter the password for this user via Password and Confirm Password.
Click on OK when done. If you wish, you can also change the expiry date via Password
Expires if you do not wish to use the default setting of one year
Switch User Authentication using Identity Engines Ignition Server Technical Configuration Guide

18
avaya.com
IDE Step 3 – Repeat step 2 again by clicking on New to add the read-write-access user.
Enter the user name for read-write-access via User Name: (i.e. 8600rw as used in this
example) and enter the password for this user via Password and Confirm Password. Click
on OK when done. If you wish, you can also change the expiry date via Password Expires
if you do not wish to use the default setting of one year
Switch User Authentication using Identity Engines Ignition Server Technical Configuration Guide
19
avaya.com
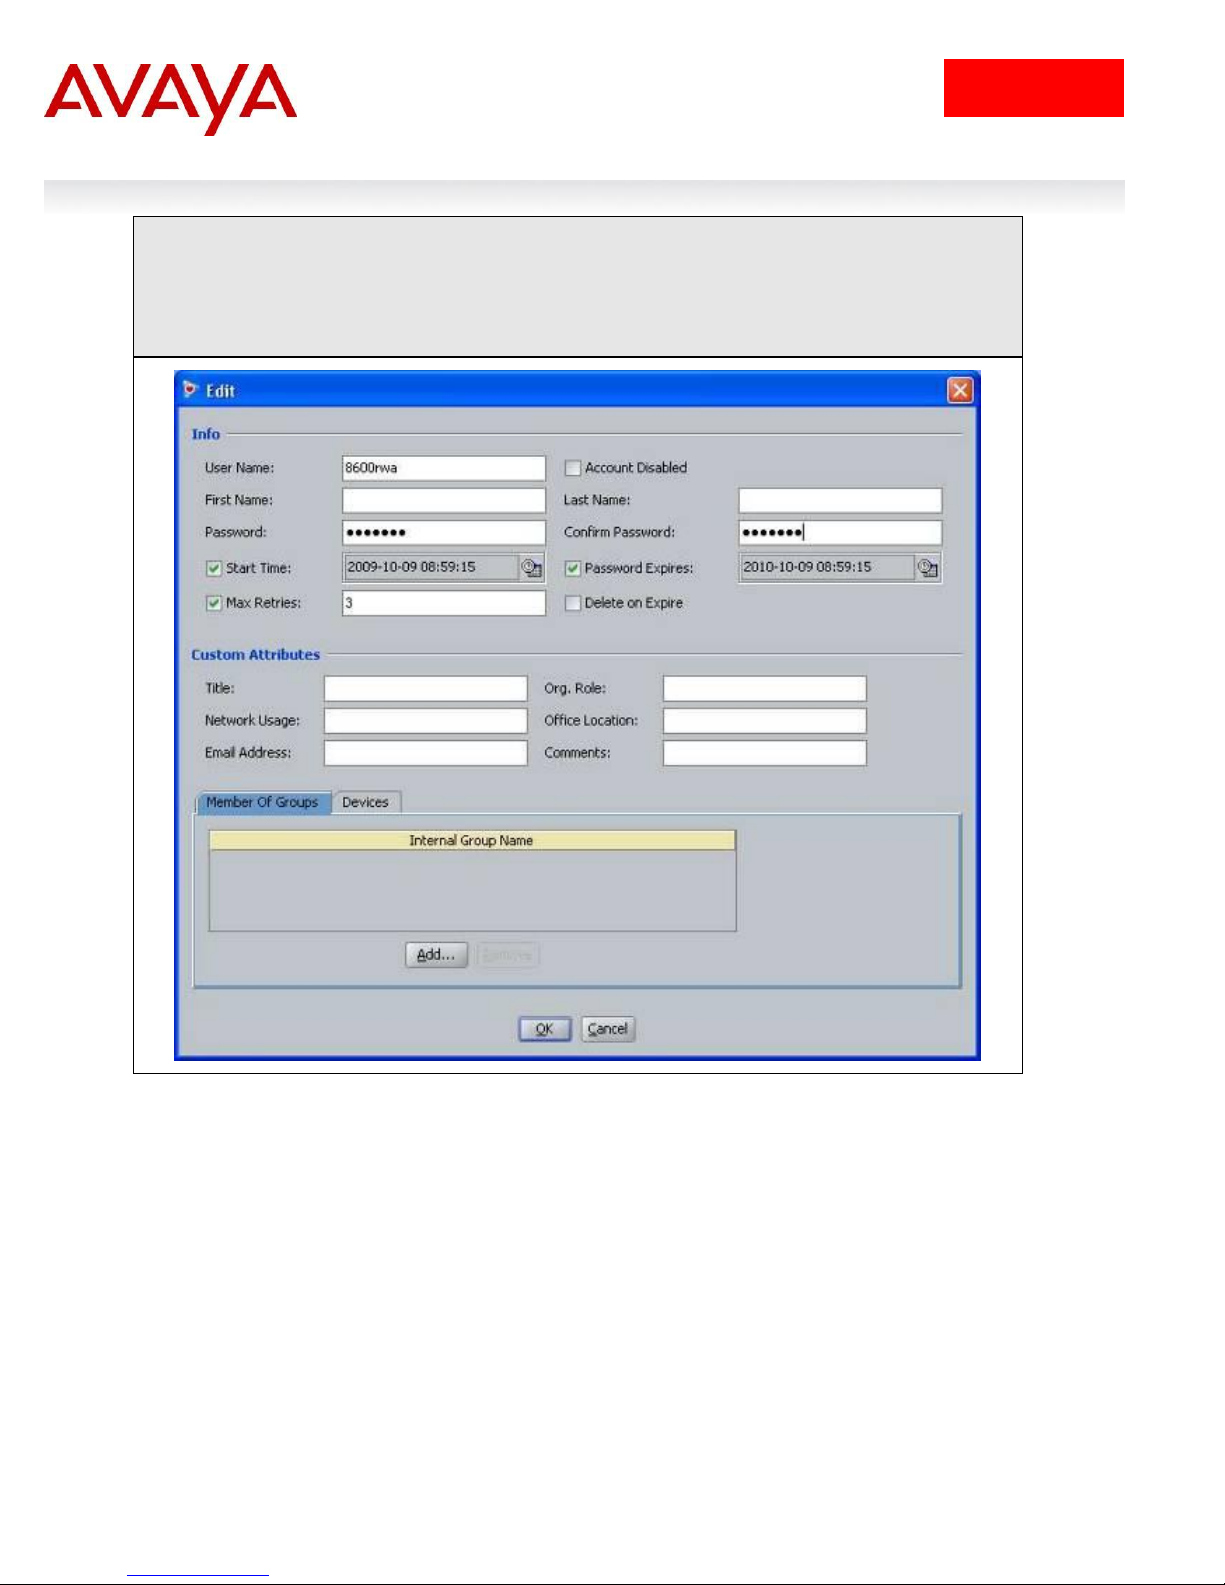
IDE Step 4 – Repeat step 2 for the final time by clicking on New to add the read-write-allaccess user. Enter the user name for read-write-all-access via User Name: (i.e. 8600rwa as
used in this example) and enter the password for this user via Password and Confirm
Password. Click on OK when done. If you wish, you can also change the expiry date via
Password Expires if you do not wish to use the default setting of one year
Switch User Authentication using Identity Engines Ignition Server Technical Configuration Guide
20
avaya.com
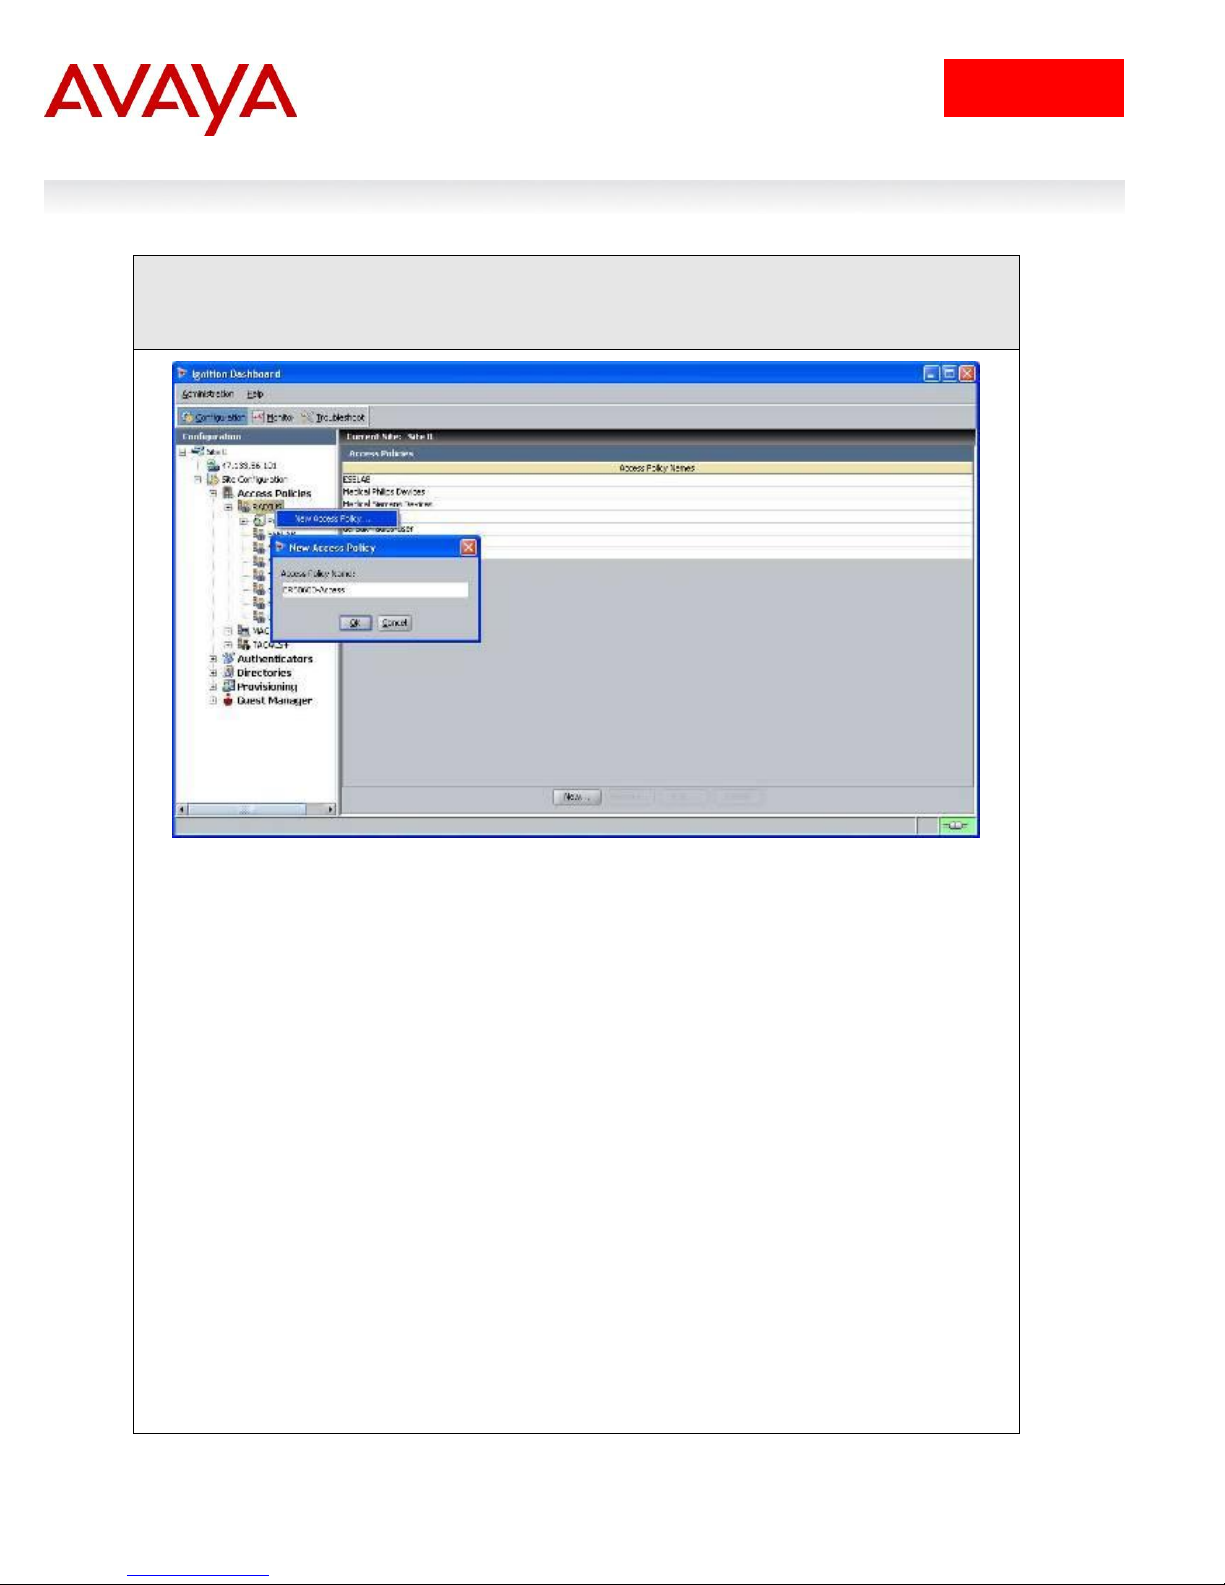
IDE Step 1 – Go to Site Configuration -> Access Policies -> RADIUS. Right-click RADIUS
and select New Access Policy. Enter a policy name (i.e. ERS8600-Access as used in this
example) and click on OK when done
2.1.3.3 Add an Access Policy
Switch User Authentication using Identity Engines Ignition Server Technical Configuration Guide
21
avaya.com
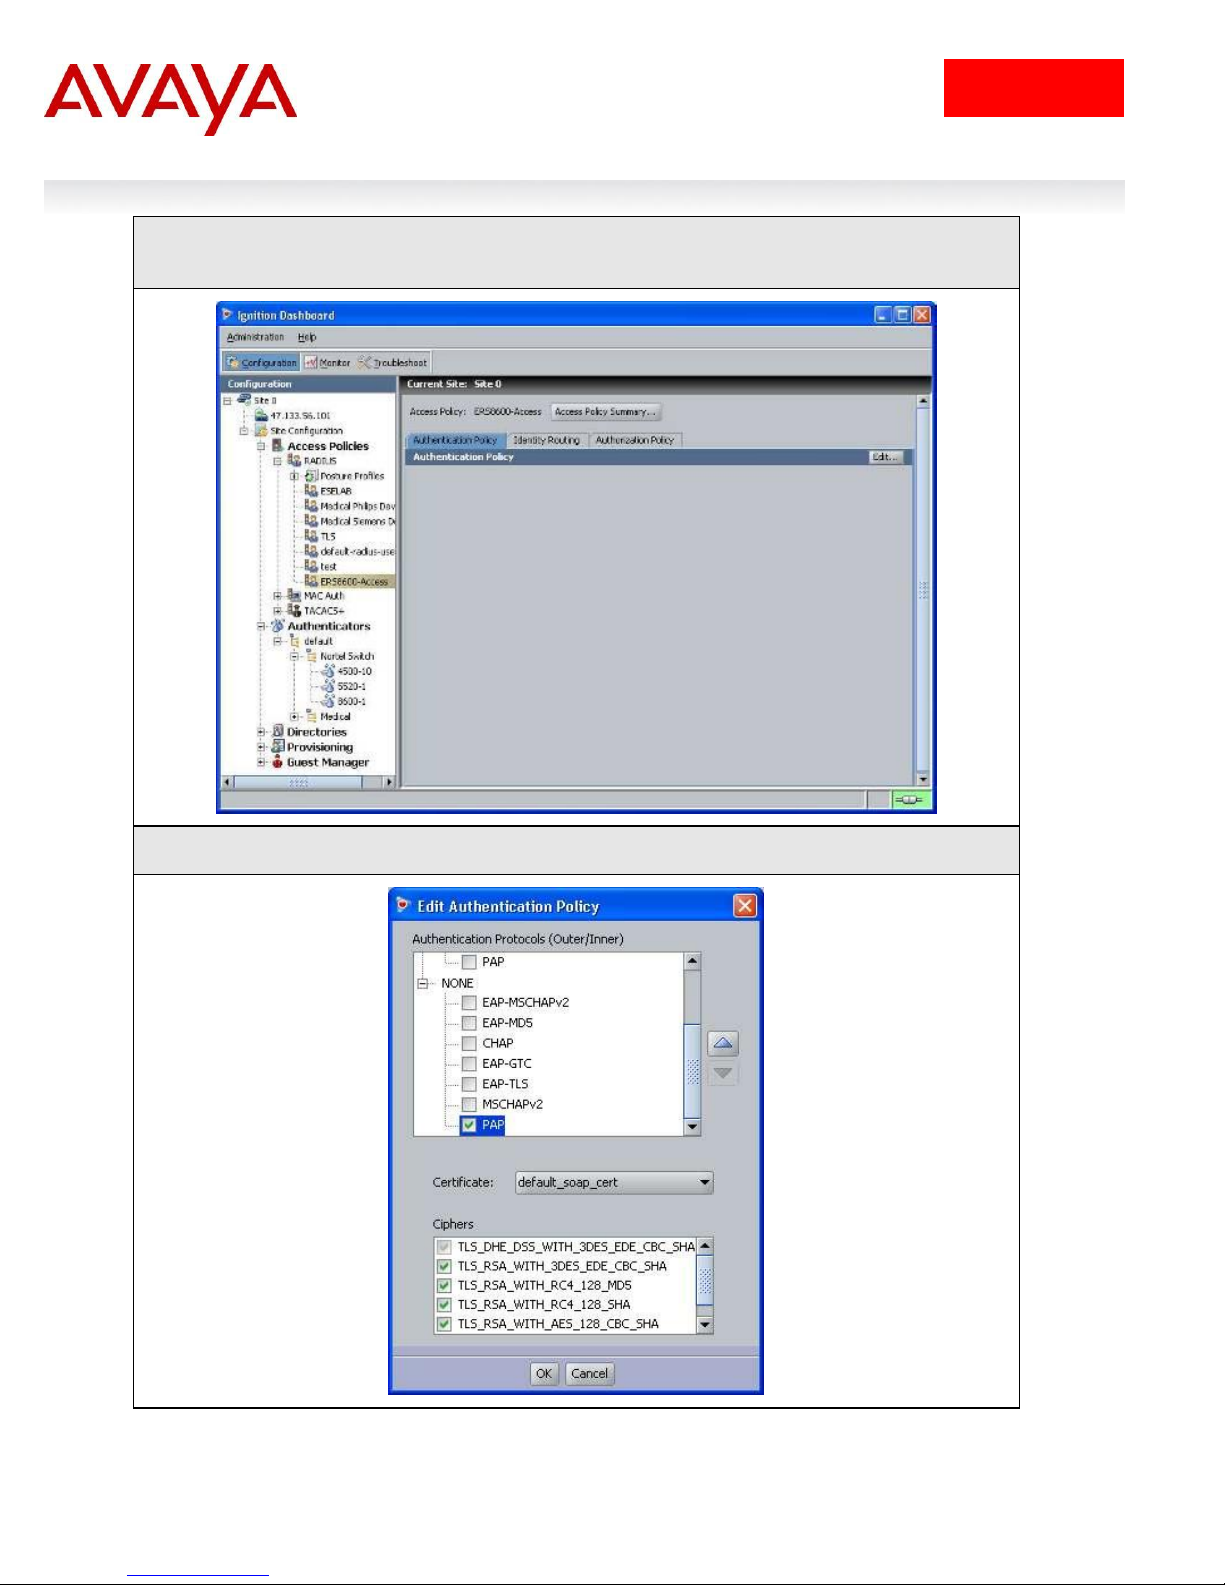
IDE Step 2 – Click on the policy we just created, i.e. ERS8600-Access, and click on Edit via
the Authentication Policy tab
IDE Step 3 – Under Edit Authentication Policy window, select NONE -> PAP
Switch User Authentication using Identity Engines Ignition Server Technical Configuration Guide
22
avaya.com
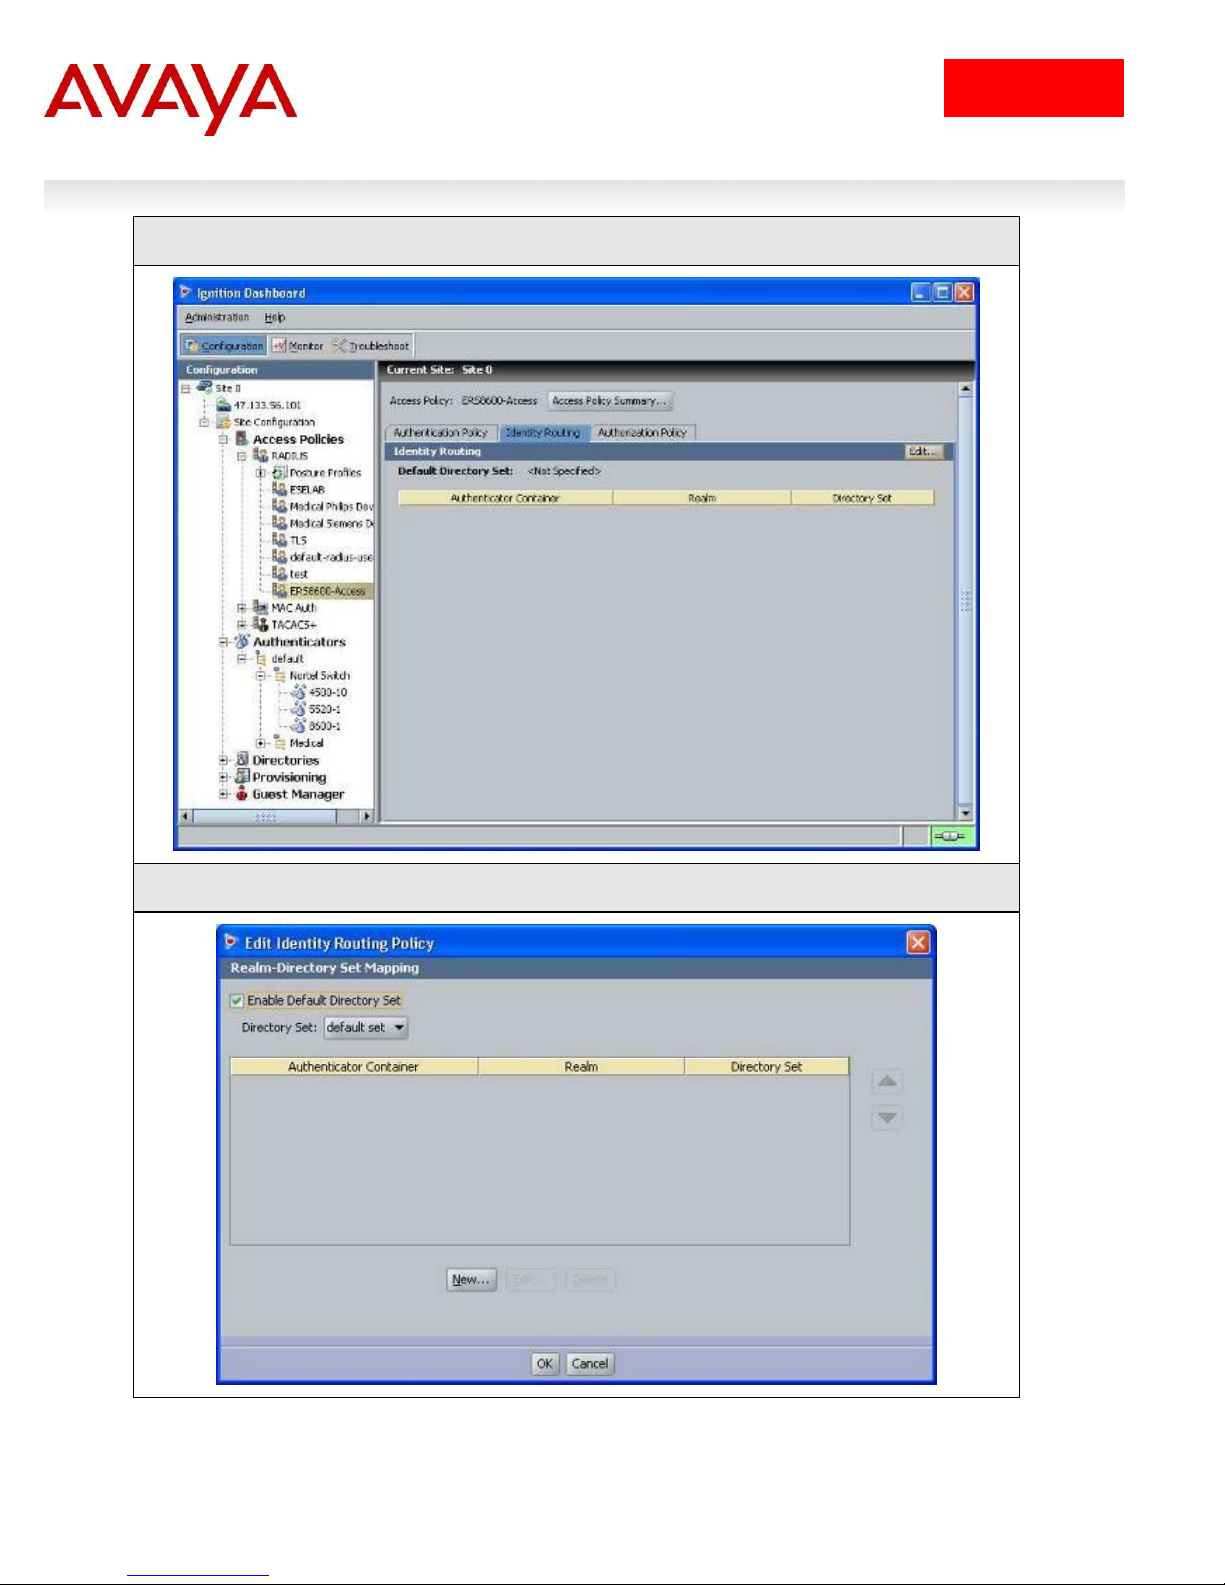
IDE Step 4 – Go to the Identity Routing tab and click on Edit
IDE Step 5 – Check off the Enable Default Directory Set and click on OK when done.
Switch User Authentication using Identity Engines Ignition Server Technical Configuration Guide
 Loading...