


 Loading...
Part No. P0994824 03
Interactive Voice Response
Installation and Configuration
Guide

2
Interactive Voice Response
Installation and Configuration Guide
Copyright © 2002 Nortel Networks
All rights reserved. 2002.
The information in this document is subject to change without notice. The statements, configurations, technical data, and recommendations in this document are believed to be accurate and reliable, but are presented without express or implied warranty. Users must take full responsibility for their applications of any products specified in this document. The information in this document is proprietary to Nortel Networks NA Inc.
The software described in this document is furnished under a license agreement and may be used only in accordance with the terms of that license. The software license agreement is included in this document.
Trademarks
NORTEL NETWORKS is a trademark of Nortel Networks.
Microsoft, MS, MS-DOS, Windows, and Windows NT are registered trademarks of Microsoft Corporation.
All other trademarks and registered trademarks are the property of their respective owners.
P0994824 03

Contents 3
Contents
Chapter 1
About Interactive Voice Response . . . . . . . . . . . . . . . . . . . . . . . . . . . . . . . . . 5
What you need to know . . . . . . . . . . . . . . . . . . . . . . . . . . . . . . . . . . . . . . . . . . . . . . . . . 5 Hardware and software requirements . . . . . . . . . . . . . . . . . . . . . . . . . . . . . . . . . . . . . . 5 Interactive Voice Response capacities . . . . . . . . . . . . . . . . . . . . . . . . . . . . . . . . . . . . . 6 How to get help . . . . . . . . . . . . . . . . . . . . . . . . . . . . . . . . . . . . . . . . . . . . . . . . . . . . . . . 7
Chapter 2
Installing Interactive Voice Response . . . . . . . . . . . . . . . . . . . . . . . . . . . . . . 9
Overview of installing Interactive Voice Response . . . . . . . . . . . . . . . . . . . . . . . . . . . |
. 9 |
Enabling the Interactive Voice Response software authorization code . . . . . . . . . . . . |
11 |
Making Interactive Voice Response an automatic service . . . . . . . . . . . . . . . . . . . . . . |
13 |
Administering several Interactive Voice Response systems . . . . . . . . . . . . . . . . . . . . |
14 |
About Installing PeriView . . . . . . . . . . . . . . . . . . . . . . . . . . . . . . . . . . . . . . . . . . . . . . . |
15 |
Before you install PeriView . . . . . . . . . . . . . . . . . . . . . . . . . . . . . . . . . . . . . . . . . . |
15 |
To install PeriView . . . . . . . . . . . . . . . . . . . . . . . . . . . . . . . . . . . . . . . . . . . . . . . . . |
16 |
Adjusting the number of voice ports . . . . . . . . . . . . . . . . . . . . . . . . . . . . . . . . . . . . . . |
25 |
Uploading Interactive Voice Response prompts . . . . . . . . . . . . . . . . . . . . . . . . . . . . . |
27 |
Installing the client database software . . . . . . . . . . . . . . . . . . . . . . . . . . . . . . . . . . . . . |
28 |
Databases supported on Business Communications Manager 3.0 . . . . . . . . . . . |
29 |
Configuring host access . . . . . . . . . . . . . . . . . . . . . . . . . . . . . . . . . . . . . . . . . . . . . . . |
29 |
Using PeriView to load and configure scripts . . . . . . . . . . . . . . . . . . . . . . . . . . . . . . . |
30 |
Dialing the Interactive Voice Response extension . . . . . . . . . . . . . . . . . . . . . . . . . . . . |
35 |
Assigning lines to Interactive Voice Response . . . . . . . . . . . . . . . . . . . . . . . . . . . . . . |
36 |
Viewing or changing the system fax name . . . . . . . . . . . . . . . . . . . . . . . . . . . . . . . . . |
38 |
Chapter 3
Administering Interactive Voice Response . . . . . . . . . . . . . . . . . . . . . . . . . 39
Stopping, starting or restarting Interactive Voice Response service . . . . . . . . . . . . . . 40 Changing how Interactive Voice Response service operates after a reboot . . . . . . . . 41 Backing up and restoring Interactive Voice Response . . . . . . . . . . . . . . . . . . . . . . . . 42 Creating Interactive Voice Response logs . . . . . . . . . . . . . . . . . . . . . . . . . . . . . . . . . . 43 Uninstalling PeriView . . . . . . . . . . . . . . . . . . . . . . . . . . . . . . . . . . . . . . . . . . . . . . . . . . 46
Considerations for uninstalling PeriView . . . . . . . . . . . . . . . . . . . . . . . . . . . . . . . . 46 Uninstalling the patch bundle . . . . . . . . . . . . . . . . . . . . . . . . . . . . . . . . . . . . . . . . 46 Uninstalling packages using PERIinstaller . . . . . . . . . . . . . . . . . . . . . . . . . . . . . . 46 Removing additional files and directories . . . . . . . . . . . . . . . . . . . . . . . . . . . . . . . 47 Removing the environment variables . . . . . . . . . . . . . . . . . . . . . . . . . . . . . . . . . . 48 Removing Interactive Voice Response, XVision and JRE . . . . . . . . . . . . . . . . . . . 49
Creating reports . . . . . . . . . . . . . . . . . . . . . . . . . . . . . . . . . . . . . . . . . . . . . . . . . . . . . . 49
Chapter 4
Troubleshooting. . . . . . . . . . . . . . . . . . . . . . . . . . . . . . . . . . . . . . . . . . . . . . . 51
Index . . . . . . . . . . . . . . . . . . . . . . . . . . . . . . . . . . . . . . . . . . . . . . . . . . . . . . . . 55
Interactive Voice Response Installation and Configuration Guide

4 Contents
P0994824 03

5
Chapter 1
About Interactive Voice Response
This guide leads a system administrator through installing and configuring Interactive Voice Response on a Business Communications Manager 3.0 system.
Interactive Voice Response is an automated telephony application that prompts callers with a combination of recorded menus and prompts, and real-time data from databases. Users enter digits from their touch tone key pad that directs the Interactive Voice Response application to access databases and play information back to the caller.
Interactive Voice Response is a call-handling system that frees up employees to perform their jobs, and agents to make sales, rather than answer frequently asked questions. Interactive Voice Response, can distribute calls, make announcements, and give callers access to relevant information from dynamic databases 24 hours a day, 7 days a week.
This chapter contains
•What you need to know
•Hardware and software requirements
•Interactive Voice Response capacities
•How to get help
What you need to know
To install Interactive Voice Response you must know:
•how to log on to Unified Manager and use the Unified Manager interface.
Refer to the Business Communications Manager 3.0 Programming Operations Guide for more information.
•how to log on to CallPilot Manager and use the CallPilot Manager interface. Refer to the CallPilot Manager Set Up and Operation Guide for more information.
•how to use PeriView. Refer to your PeriView system documentation for more information.
•how to create shared network folders. Refer to your Windows documentation for more information.
Hardware and software requirements
To install PeriView you must have a computer that runs Windows NT with Service Pack 6.
Interactive Voice Response Installation and Configuration Guide

6 Chapter 1 About Interactive Voice Response
Interactive Voice Response capacities
Maximum simultaneous calls |
24 |
(24 voice ports) |
|
|
|
Maximum voice ports |
32 |
|
|
|
|
Maximum voice ports that can be allocated to |
16 |
|
voicemail |
|
|
|
|
|
Maximum Interactive Voice Response fax calls |
2 |
|
|
|
|
Maximum fax ports |
2 |
|
|
|
|
Recording time available on Business |
|
|
Communications Manager 3.0 for all |
20 |
Gb disk: 325 hours |
applications (Interactive Voice Response, |
|
|
CallPilot and Call Center) |
|
|
|
|
|
There are other restrictions that can alter the real number of Voice Ports available on a Business Communications Manager 3.0. For more information, refer to the Business Communications Manager 3.0 Programming Operations Guide, Chapter 15, Configuring the MSC Resources. Voice Ports cannot be shared between voicemail, Call Center and Interactive Voice Response.
P0994824 03

Chapter 1 About Interactive Voice Response 7
How to get help
USA and Canada
Authorized Distributors - Technical Support
Telephone:
1-800-4NORTEL (1-800-466-7835)
If you already have a PIN Code, you can enter Express Routing Code (ERC) 196#.
If you do not yet have a PIN Code, or for general questions and first line support, you can enter ERC 338#.
Website:
http://www.nortelnetworks.com/support
email:
naitas@nortelnetworks.com
Presales Support (CSAN)
Telephone:
1-800-4NORTEL (1-800-466-7835) Use Express Routing Code (ERC) 1063#
EMEA (Europe, Middle East, Africa)
Technical Support
Telephone:
00800 800 89009
Fax:
44-191-555-7980
email:
emeahelp@nortelnetworks.com
CALA (Caribbean & Latin America)
Technical Support
Telephone: 1-954-858-7777
email:
csrmgmt@nortelnetworks.com
APAC (Asia Pacific)
Technical Support
Telephone:
+61 388664627
Fax:
+61 388664644
email: asia_support@nortelnetworks.com
Interactive Voice Response Installation and Configuration Guide

8 Chapter 1 About Interactive Voice Response
P0994824 03

9
Chapter 2
Installing Interactive Voice Response
This chapter contains:
•Overview of installing Interactive Voice Response
•Enabling the Interactive Voice Response software authorization code
•Making Interactive Voice Response an automatic service
•Administering several Interactive Voice Response systems
•About Installing PeriView
•Before you install PeriView
•To install PeriView
•Adjusting the number of voice ports
•Uploading Interactive Voice Response prompts
•Installing the client database software
•Databases supported on Business Communications Manager 3.0
•Configuring host access
•Using PeriView to load and configure scripts
•Dialing the Interactive Voice Response extension
•Assigning lines to Interactive Voice Response
Overview of installing Interactive Voice Response
To install Interactive Voice Response you:
1Enable the Interactive Voice Response software authorization code.
Refer to “Enabling the Interactive Voice Response software authorization code” on page 11.
2Make Interactive Voice Response an automatic service.
Refer to “Making Interactive Voice Response an automatic service” on page 13.
3If you are going to use Interactive Voice Response in a multi-node environment, refer to “Administering several Interactive Voice Response systems” on page 14.
4Install PeriView on a Windows NT client PC. Refer to “About Installing PeriView” on page 15.
5Assign Voice Ports to Interactive Voice Response.
Refer to “Adjusting the number of voice ports” on page 25.
6Upload the Interactive Voice Response prompts to Business Communications Manager 3.0. Refer to “Uploading Interactive Voice Response prompts” on page 27.
Interactive Voice Response Installation and Configuration Guide

10 Chapter 2 Installing Interactive Voice Response
7Install the Client Database software using the appropriate method if your Interactive Voice Response scripts use database access. Refer to “Installing the client database software” on page 28.
8Configure host access if your Interactive Voice Response scripts use host access. Refer to “Configuring host access” on page 29.
9Use PeriView’s Application Manager to load and configure the scripts.
Refer to “Using PeriView to load and configure scripts” on page 30 and see the PeriView User’s Guide for more details.
10Verify Interactive Voice Response is working by dialing the Interactive Voice Response extension.
Refer to “Dialing the Interactive Voice Response extension” on page 35.
11Using CallPilot Manager, assign the lines you want the Interactive Voice Response scripts to answer. Refer to “Assigning lines to Interactive Voice Response” on page 36.
12Back up Interactive Voice Response.
Refer to “Backing up and restoring Interactive Voice Response” on page 42.
P0994824 03
Chapter 2 Installing Interactive Voice Response 11
Enabling the Interactive Voice Response software authorization code
You enable Interactive Voice Response by enabling the Interactive Voice Response software authorization code on the Business Communications Manager 3.0 Unified Manager.
To enable a software authorization code
1Point your web browser to the URL http://<xxxx>:6800
where <xxxx> is the domain name or IP address of Business Communications Manager 3.0. The Business Communications Manager 3.0 Unified Manager screen appears.
2Click the Configure button. The Login screen appears.
3In the User ID box type your user ID. The default user ID is supervisor.
4In the Password box type your password. The default password is visor.
5Click the Login button.
The Unified Manager screen appears.
6Click the System key.
7Click the Licensing heading.
The Licensing Setting screen appears.
8On the Configuration menu click Add a Keycode. The Applied Keycodes screen appears.
Interactive Voice Response Installation and Configuration Guide

12 Chapter 2 Installing Interactive Voice Response
9In the Keycode box type the number of the Interactive Voice Response software authorization code.
10Click the Save button.
A message appears that says you must reboot. Do not reboot your system at this time.
11Go to “Making Interactive Voice Response an automatic service” on page 13.
P0994824 03

Chapter 2 Installing Interactive Voice Response 13
Making Interactive Voice Response an automatic service
1On Unified Manager, click the Diagnostics key.
2Click the Service Manager heading. The Services List screen appears.
3In the Display Name column select Nortel Networks IVR.
4On the Configuration menu click Modify Service. The Services List dialog box appears.
5From the Startup list box select Automatic.
6Click the Save button.
7Log off and reboot the system. Interactive Voice Response will start automatically after you reboot.
Interactive Voice Response Installation and Configuration Guide
14 Chapter 2 Installing Interactive Voice Response
Administering several Interactive Voice Response systems
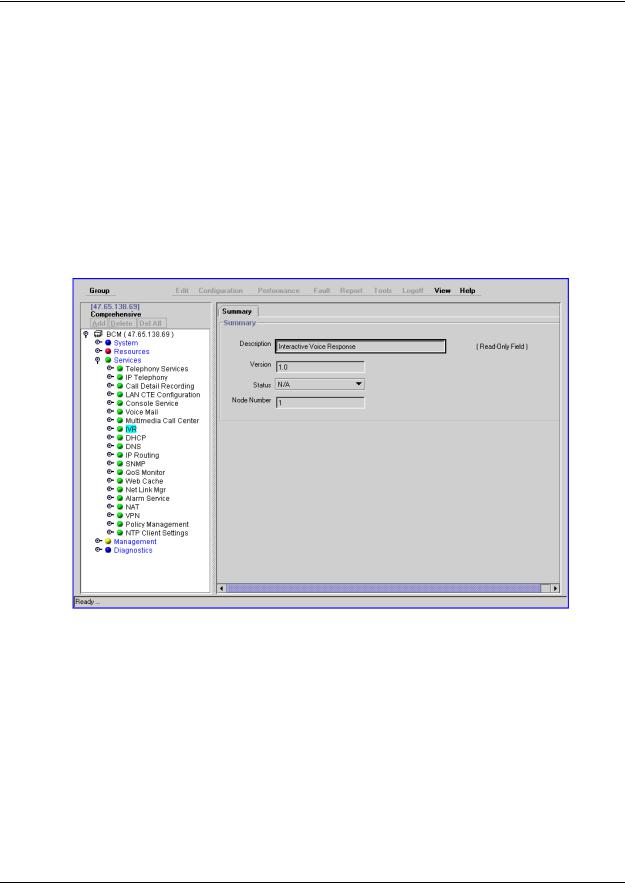
If you want to use PeriView to administer several Interactive Voice Response systems on different Business Communications Managers, you must assign a different node number to each Interactive Voice Response system.
To change the node number
1Log on to Unified Manager.
2Click the Services key.
3Click the IVR heading.
The Summary page displays the version, status of the service and the server number. The node number is 1 by default. The node number can be between 1 and 5000.
4Press the Tab key to exit from this box.
A message appears that says that the Interactive Voice Response service will be temporarily stopped.
5Click the OK button.
6You must next install PeriView. Go to “About Installing PeriView” on page 15.
P0994824 03

Chapter 2 Installing Interactive Voice Response 15
About Installing PeriView
PeriView is the Interactive Voice Response administrative client. You use PeriView to administer Interactive Voice Response scripts on Business Communications Manager 3.0. Before you can use PeriView, you must install it on a client computer.
Before you install PeriView
•Make sure you install PeriView on a Windows NT PC. PeriView can be installed on Windows NT only.
•Make sure you have administrative privileges so that you can install services and update environment settings.
•Remove any versions of Perl currently installed on the workstation. PeriView uses a version of Perl specifically designed to work with PeriView. You must remove any other versions of Perl due to potential incompatibility with PeriView.
•Quit all active applications and Nortel Networks or Periphonics services.
•If Windows NT Service Pack 6A is already installed on your system and you are running the Windows Desktop Update option (Active Desktop), deactivate this option. See the Windows NT online help for instructions. Active Desktop affects color renditions in PeriView.
Interactive Voice Response Installation and Configuration Guide
16 Chapter 2 Installing Interactive Voice Response
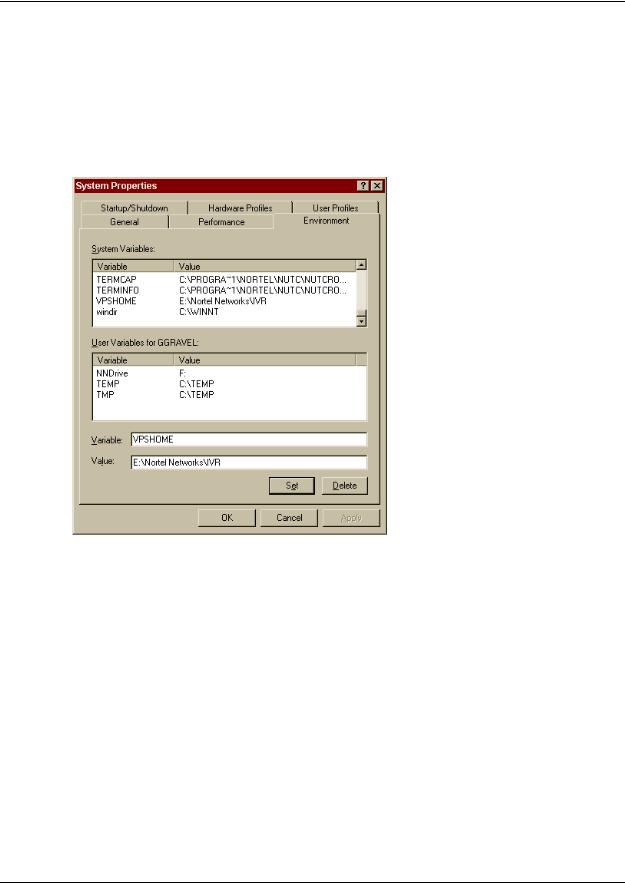
To install PeriView
1.Set up the environment variables
1Click the Windows Start button, point to Settings, point to Control Panel and click System. The System Properties page appears.
2Click the Environment tab.
3In the System Variables list, select any variable.
The information for the variable is displayed in the Variable and Value boxes.
4Delete the information the Variable box, and type VPSHOME.
5Delete the information in the Value box, and type the path where you want the PeriView software to be installed.
6Click the Set button.
The Apply button becomes available.
7Click the Apply button.
8In the System Variables list, select any variable.
The information for the variable is displayed in the Variable and Value boxes.
9Delete the information the Variable box, and type ASEHOME.
10Delete the information in the Value box, and type %VPSHOME%\PERIase.
11Click the Set button.
The Apply button becomes available.
P0994824 03

Chapter 2 Installing Interactive Voice Response 17
12Click the Apply button.
13In the System Variables list, select any variable.
The information for the variable is displayed in the Variable and Value boxes.
14Delete the information the Variable box, and type PERL5LIB.
15Delete the information in the Value box and type %VPSHOME%\bin.
16Click the Set button.
The Apply button becomes available.
17Click the Apply button.
18In the System Variables list, select any variable.
The information for the variable is displayed in the Variable and Value boxes.
19Delete the information the Variable box, and type MAX_REAL_VPS_NUM.
20Delete the information in the Value box and type 5000.
21Click the Set button.
The Apply button becomes available.
22Click the Apply button.
23In the System Variables list select the PATH system variable.
The information for the variable is displayed in the Variable and Value boxes.
24Put your cursor in the Variable box and go to the end of the text string.
25Make sure the text string ends with a semicolon. It you do not see a semicolon, type one.
26After the semicolon, type %VPSHOME%\bin.
27Click the Set button.
28Click the Apply button.
29Reboot the computer.
Interactive Voice Response Installation and Configuration Guide
Loading...