


 Loading...
Using Avaya 9621G/9641G/9641GS IP Deskphones H.323
Release 6.6
November 2014
Avaya - Proprietary. Use pursuant to the terms of your signed agreement or Avaya policy. DRAFT—November 13, 2014—5:00 AM (UTC)

1 |
© 2014 Avaya Inc. |
71 |
Avaya grants you a license within the scope of the license types |
|
2 |
All Rights Reserved. |
72 |
described below, with the exception of Heritage Nortel Software, for |
|
73 |
which the scope of the license is detailed below. Where the order |
|||
|
|
|||
3 |
Notice |
74 |
documentation does not expressly identify a license type, the |
|
4 |
While reasonable efforts have been made to ensure that the |
75 |
applicable license will be a Designated System License. The |
|
76 |
applicable number of licenses and units of capacity for which the |
|||
5 |
information in this document is complete and accurate at the time of |
|||
77 |
license is granted will be one (1), unless a different number of |
|||
6 |
printing, Avaya assumes no liability for any errors. Avaya reserves |
|||
78 |
licenses or units of capacity is specified in the documentation or other |
|||
7 |
the right to make changes and corrections to the information in this |
|||
79 |
materials available to you. “Software” means Avaya’s computer |
|||
8 |
document without the obligation to notify any person or organization |
|||
80 |
programs in object code, provided by Avaya or an Avaya Channel |
|||
9 |
of such changes. |
|||
81 |
Partner, whether as stand-alone products, pre-installed , or remotely |
|||
10 |
Note |
82 |
accessed on hardware products, and any upgrades, updates, bug |
|
11 |
Using a cell, mobile, or GSM phone, or a two-way radio in close |
83 |
fixes, or modified versions thereto. “Designated Processor” means a |
|
84 |
single stand-alone computing device. “Server” means a Designated |
|||
12 |
proximity to an Avaya IP telephone might cause interference. |
85 |
Processor that hosts a software application to be accessed by |
|
13 |
Documentation disclaimer |
86 |
multiple users. “Instance” means a single copy of the Software |
|
14 |
“Documentation” means information published by Avaya in varying |
87 |
executing at a particular time: (i) on one physical machine; or (ii) on |
|
88 |
one deployed software virtual machine (“VM”) or similar deployment. |
|||
15 |
mediums which may include product information, operating |
|
License types |
|
16 |
instructions and performance specifications that Avaya may generally 89 |
|||
17 |
make available to users of its products and Hosted Services. |
90 |
Designated System(s) License (DS). End User may install and use |
|
18 |
Documentation does not include marketing materials. Avaya shall not 91 |
each copy or an Instance of the Software only on a number of |
||
19 |
be responsible for any modifications, additions, or deletions to the |
92 |
Designated Processors up to the number indicated in the order. |
|
20 |
original published version of documentation unless such |
93 |
Avaya may require the Designated Processor(s) to be identified in |
|
21 |
modifications, additions, or deletions were performed by Avaya. End |
94 |
the order by type, serial number, feature key, Instance, location or |
|
22 |
User agrees to indemnify and hold harmless Avaya, Avaya's agents, |
95 |
other specific designation, or to be provided by End User to Avaya |
|
23 |
servants and employees against all claims, lawsuits, demands and |
96 |
through electronic means established by Avaya specifically for this |
|
24 |
judgments arising out of, or in connection with, subsequent |
97 |
purpose. |
|
25 |
modifications, additions or deletions to this documentation, to the |
98 |
Shrinkwrap License (SR). You may install and use the Software in |
|
26 |
extent made by End User. |
|||
27 |
Link disclaimer |
99 |
accordance with the terms and conditions of the applicable license |
|
100 |
agreements, such as “shrinkwrap” or “clickthrough” license |
|||
28 |
Avaya is not responsible for the contents or reliability of any linked |
101 |
accompanying or applicable to the Software (“Shrinkwrap License”). |
|
29 |
websites referenced within this site or documentation provided by |
102 |
Copyright |
|
30 |
Avaya. Avaya is not responsible for the accuracy of any information, |
|||
31 |
statement or content provided on these sites and does not |
103 |
Except where expressly stated otherwise, no use should be made of |
|
32 |
necessarily endorse the products, services, or information described 104 |
materials on this site, the Documentation, Software, Hosted Service, |
||
33 |
or offered within them. Avaya does not guarantee that these links will105 |
or hardware provided by Avaya. All content on this site, the |
||
34 |
work all the time and has no control over the availability of the linked 106 |
documentation, Hosted Service, and the Product provided by Avaya |
||
35 |
pages. |
107 |
including the selection, arrangement and design of the content is |
|
36 |
Warranty |
108 |
owned either by Avaya or its licensors and is protected by copyright |
|
109 |
and other intellectual property laws including the sui generis rights |
|||
37 |
Avaya provides a limited warranty on Avaya hardware and software. 110 |
relating to the protection of databases. You may not modify, copy, |
||
38 |
Refer to your sales agreement to establish the terms of the limited |
111 |
reproduce, republish, upload, post, transmit or distribute in any way |
|
39 |
|
112 |
any content, in whole or in part, including any code and software |
|
warranty. In addition, Avaya’s standard warranty language, as well as |
unless expressly authorized by Avaya. Unauthorized reproduction, |
|||
40 |
information regarding support for this product while under warranty is113 |
|||
41 |
available to Avaya customers and other parties through the Avaya |
114 |
transmission, dissemination, storage, and or use without the express |
|
42 |
Support website: http://support.avaya.com or such successor site as 115 |
written consent of Avaya can be a criminal, as well as a civil offense |
||
43 |
designated by Avaya. Please note that if you acquired the product(s) 116 |
under the applicable law. |
||
44 |
from an authorized Avaya Channel Partner outside of the United |
117 |
Third Party Components |
|
45 |
States and Canada, the warranty is provided to you by said Avaya |
118 |
“Third Party Components” mean certain software programs or |
|
46 |
Channel Partner and not by Avaya. |
|||
47 |
Licenses |
119 |
portions thereof included in the Software or Hosted Service may |
|
120 |
contain software (including open source software) distributed under |
|||
48 |
THE SOFTWARE LICENSE TERMS AVAILABLE ON THE AVAYA |
121 |
third party agreements (“Third Party Components”), which contain |
|
49 |
WEBSITE, HTTP://SUPPORT.AVAYA.COM/LICENSEINFO OR |
122 |
terms regarding the rights to use certain portions of the Software |
|
50 |
SUCH SUCCESSOR SITE AS DESIGNATED BY AVAYA, ARE |
123 |
(“Third Party Terms”). As required, information regarding distributed |
|
51 |
APPLICABLE TO ANYONE WHO DOWNLOADS, USES AND/OR |
124 |
Linux OS source code (for those Products that have distributed Linux |
|
52 |
INSTALLS AVAYA SOFTWARE, PURCHASED FROM AVAYA INC.,125 |
OS source code) and identifying the copyright holders of the Third |
||
53 |
ANY AVAYA AFFILIATE, OR AN AVAYA CHANNEL PARTNER (AS 126 |
Party Components and the Third Party Terms that apply is available |
||
54 |
APPLICABLE) UNDER A COMMERCIAL AGREEMENT WITH |
127 |
in the Documentation or on Avaya’s website at: http:// |
|
55 |
AVAYA OR AN AVAYA CHANNEL PARTNER. UNLESS |
128 |
support.avaya.com/Copyright or such successor site as designated |
|
56 |
OTHERWISE AGREED TO BY AVAYA IN WRITING, AVAYA DOES129 |
by Avaya. You agree to the Third Party Terms for any such Third |
||
57 |
NOT EXTEND THIS LICENSE IF THE SOFTWARE WAS |
130 |
Party Components |
|
58 |
OBTAINED FROM ANYONE OTHER THAN AVAYA, AN AVAYA |
131 |
Preventing Toll Fraud |
|
59 |
AFFILIATE OR AN AVAYA CHANNEL PARTNER; AVAYA |
|
“Toll Fraud” is the unauthorized use of your telecommunications |
|
60 |
RESERVES THE RIGHT TO TAKE LEGAL ACTION AGAINST YOU132 |
|||
61 |
AND ANYONE ELSE USING OR SELLING THE SOFTWARE |
133 |
system by an unauthorized party (for example, a person who is not a |
|
62 |
WITHOUT A LICENSE. BY INSTALLING, DOWNLOADING OR |
134 |
corporate employee, agent, subcontractor, or is not working on your |
|
63 |
USING THE SOFTWARE, OR AUTHORIZING OTHERS TO DO SO,135 |
company's behalf). Be aware that there can be a risk of Toll Fraud |
||
64 |
YOU, ON BEHALF OF YOURSELF AND THE ENTITY FOR WHOM 136 |
associated with your system and that, if Toll Fraud occurs, it can |
||
65 |
YOU ARE INSTALLING, DOWNLOADING OR USING THE |
137 |
result in substantial additional charges for your telecommunications |
|
66 |
SOFTWARE (HEREINAFTER REFERRED TO |
138 |
services. |
|
67 |
INTERCHANGEABLY AS “YOU” AND “END USER”), AGREE TO |
139 |
Avaya Toll Fraud intervention |
|
68 |
THESE TERMS AND CONDITIONS AND CREATE A BINDING |
|||
|
If you suspect that you are being victimized by Toll Fraud and you |
|||
69 |
CONTRACT BETWEEN YOU AND AVAYA INC. OR THE |
140 |
||
70 |
APPLICABLE AVAYA AFFILIATE (“AVAYA”). |
141 |
need technical assistance or support, call Technical Service Center |
|
|
|
142 |
Toll Fraud Intervention Hotline at +1-800-643-2353 for the United |
|
|
|
143 |
States and Canada. For additional support telephone numbers, see |
|

1 the Avaya Support website: http://support.avaya.com or such 2 successor site as designated by Avaya. Suspected security
3 vulnerabilities with Avaya products should be reported to Avaya by
4 sending mail to: securityalerts@avaya.com.
5 Trademarks
6 All non-Avaya trademarks are the property of their respective owners.
7 Linux® is the registered trademark of Linus Torvalds in the U.S. and 8 other countries.
9 Downloading Documentation
10For the most current versions of Documentation, see the Avaya
11Support website: http://support.avaya.com, or such successor site as
12designated by Avaya.
13Contact Avaya Support
14See the Avaya Support website: http://support.avaya.com for Product 59
15 |
or Hosted Service notices and articles, or to report a problem with |
60 |
VCCI-Class B statement: |
|
16 |
your Avaya Product or Hosted Service. For a list of support telephone |
61 |
This is a Class B product based on the standard of the VCCI Council. |
|
17 |
numbers and contact addresses, go to the Avaya Support website: |
62 |
If this is used near a radio or television receiver in a domestic |
|
18 |
http://support.avaya.com (or such successor site as designated by |
|||
63 |
environment, it may cause radio interference. Install and use the |
|||
19 |
Avaya), scroll to the bottom of the page, and select Contact Avaya |
|||
64 |
equipment according to the instruction manual. |
20Support.
21Federal Communications Commission (FCC) Interference
22Statement
23This equipment has been tested and found to comply with the limits
24for a Class B digital device, pursuant to Part 15 of the FCC rules.
25These limits are designed to provide reasonable protection against
26harmful interference in a residential installation. This equipment
27generates, uses, and can radiate radio frequency energy and, if not
28installed and used in accordance with the instructions, may cause
29harmful interference to radio communications. However, there is no
30guarantee that interference will not occur in a particular installation. If
31this equipment does cause harmful interference to radio or television
32reception, which can be determined by turning the equipment off and
33on, the user is encouraged to try to correct the interference by one of
34the following measures:
35• Reorient or relocate the receiving antenna.
36• Increase the separation between the equipment and receiver.
37• Connect the equipment into an outlet on a circuit different from
38that to which the receiver is connected.
39• Consult the dealer or an experienced radio/TV technician for
40help.
41This device complies with Part 15 of the FCC Rules. Operation is
42subject to the following two conditions: (1) This device may not cause
43harmful interference, and (2) this device must accept any interference
44received, including interference that may cause undesired operation.
45FCC Caution: Any changes or modifications not expressly approved
46by the party responsible for compliance could void the user's
47authority to operate this equipment.
48FCC/Industry Canada Radiation Exposure Statement
49This device complies with the FCC's and Industry Canada's RF
50radiation exposure limits set forth for the general population
51(uncontrolled environment) and must not be co-located or operated in
52conjunction with any other antenna or transmitter.
53Warning
54The handset receiver contains magnetic devices that can attract
55small metallic objects. Care should be taken to avoid personal injury.
56Power over Ethernet (PoE) warning
57This equipment must be connected to PoE networks without routing
58to the outside plant.

Contents |
|
Chapter 1: Introduction............................................................................................................ |
8 |
Purpose.................................................................................................................................. |
8 |
Intended audience................................................................................................................... |
8 |
Related resources................................................................................................................... |
8 |
Documentation.................................................................................................................. |
8 |
Training............................................................................................................................ |
9 |
Avaya Mentor videos......................................................................................................... |
9 |
Support................................................................................................................................ |
10 |
Chapter 2: Setting up the deskphone................................................................................... |
11 |
Introduction to 9621G/9641G/9641GS deskphones.................................................................. |
11 |
Physical layout................................................................................................................ |
12 |
Adjustable stand and display screen................................................................................. |
14 |
Ringing on wireless headsets........................................................................................... |
14 |
About logging in and logging out....................................................................................... |
15 |
Chapter 3: Navigating the phone........................................................................................... |
17 |
Scrolling and navigation......................................................................................................... |
17 |
Icons.................................................................................................................................... |
17 |
The Home Screen................................................................................................................. |
21 |
Menu options........................................................................................................................ |
22 |
Using the On-screen keyboard............................................................................................... |
23 |
About Features .................................................................................................................... |
24 |
Using the Features menu....................................................................................................... |
25 |
CM administrable features..................................................................................................... |
25 |
Chapter 4: Administered options.......................................................................................... |
27 |
Administrative messages ...................................................................................................... |
27 |
Browser................................................................................................................................ |
27 |
Call Recording...................................................................................................................... |
27 |
Using USB flash drives with your phone.................................................................................. |
28 |
Adding contacts from an external file to your contacts list................................................... |
28 |
Overwriting contacts list with an external file...................................................................... |
29 |
Copying your contacts list to a USB flash drive.................................................................. |
29 |
Temporarily using a USB contacts list............................................................................... |
30 |
Using pictures from your USB device as a screensaver...................................................... |
30 |
Chapter 5: Call Handling........................................................................................................ |
32 |
Answering a call.................................................................................................................... |
32 |
Making a call......................................................................................................................... |
33 |
Making an emergency call................................................................................................ |
33 |
Clearing a number........................................................................................................... |
33 |
Redialing a number......................................................................................................... |
33 |
4 Using Avaya 9621G/9641G/9641GS IP Deskphones H.323 November 2014 Avaya - Proprietary. Use pursuant to the terms of your signed agreement or Avaya policy.
DRAFT—November 13, 2014—5:00 AM (UTC)

|
Contents |
Making a call using edit dialing......................................................................................... |
34 |
Calling a person from the contacts list............................................................................... |
34 |
Calling a person from the call history................................................................................. |
35 |
Calling a person from the directory.................................................................................... |
35 |
Making a call using a Click to dial link............................................................................... |
35 |
Muting a call......................................................................................................................... |
36 |
About forwarding calls........................................................................................................... |
36 |
Activating Send All Calls.................................................................................................. |
36 |
Activating call forwarding................................................................................................. |
37 |
Putting a call on hold............................................................................................................. |
37 |
Transferring a call.................................................................................................................. |
38 |
Chapter 6: Call History........................................................................................................... |
39 |
Call History........................................................................................................................... |
39 |
Viewing the call history.................................................................................................... |
39 |
Viewing call history details............................................................................................... |
40 |
Adding an entry from the call history to your contacts list.................................................... |
40 |
Removing an entry from call history.................................................................................. |
40 |
Clearing all call history entries.......................................................................................... |
41 |
Turning off call history...................................................................................................... |
41 |
Chapter 7: Contacts................................................................................................................ |
42 |
Using the contacts feature...................................................................................................... |
42 |
Searching for a contact.................................................................................................... |
42 |
Viewing contact details.................................................................................................... |
43 |
Adding a new contact...................................................................................................... |
43 |
Editing a contact.............................................................................................................. |
44 |
Setting up favorite contacts.............................................................................................. |
45 |
Changing the primary contact number............................................................................... |
45 |
Deleting a contact............................................................................................................ |
46 |
Chapter 8: Conferences......................................................................................................... |
47 |
Using the conference feature.................................................................................................. |
47 |
Setting up a conference call............................................................................................. |
47 |
Adding a person on hold to a conference call..................................................................... |
47 |
Putting a conference call on hold...................................................................................... |
48 |
Muting a person on a conference call................................................................................ |
48 |
Dropping a person from a conference call......................................................................... |
48 |
Chapter 9: Using bridged call appearances......................................................................... |
49 |
Using bridged call appearances.............................................................................................. |
49 |
Answering a call on a bridged line..................................................................................... |
49 |
Joining a call on a bridged line.......................................................................................... |
49 |
Making an outgoing call on a bridged line.......................................................................... |
50 |
Chapter 10: Using Voicemail................................................................................................. |
51 |
Receiving your messages...................................................................................................... |
51 |
Logging into your voice mail............................................................................................. |
51 |
November 2014 Using Avaya 9621G/9641G/9641GS IP Deskphones H.323 5 Avaya - Proprietary. Use pursuant to the terms of your signed agreement or Avaya policy.
DRAFT—November 13, 2014—5:00 AM (UTC)

Contents
Chapter 11: Customizing your phone................................................................................... |
52 |
Settings menu....................................................................................................................... |
52 |
Call Settings......................................................................................................................... |
53 |
Displaying the Phone screen on dialing............................................................................. |
53 |
Displaying the Phone screen on receiving a call................................................................. |
53 |
Setting Go To Phone Screen on Answer........................................................................... |
54 |
Setting dialing options...................................................................................................... |
54 |
Displaying call timers....................................................................................................... |
55 |
Setting redial options....................................................................................................... |
55 |
Configuring visual alerts................................................................................................... |
56 |
Setting the audio path...................................................................................................... |
56 |
Setting Headset Signaling ............................................................................................... |
57 |
Setting contact names to display during calls..................................................................... |
57 |
Application Settings............................................................................................................... |
58 |
Activating call log history.................................................................................................. |
58 |
Activating call log for bridged calls.................................................................................... |
58 |
Personalizing labels......................................................................................................... |
59 |
Restoring default button labels......................................................................................... |
59 |
Screen & Sound Options........................................................................................................ |
60 |
Adjusting the brightness or contrast ofthe display............................................................... |
60 |
Setting the text size......................................................................................................... |
60 |
Turning button click sounds on and off.............................................................................. |
61 |
Setting the Home screen to display when the phone is idle................................................. |
61 |
Turning error tones on or off............................................................................................. |
62 |
Setting a ring tone for your deskphone.............................................................................. |
62 |
Setting the Quick Touch panel.......................................................................................... |
62 |
Advanced Options................................................................................................................. |
63 |
Turning automatic gain control on or off............................................................................. |
63 |
Enabling Bluetooth.......................................................................................................... |
63 |
Selecting handset audio equalization................................................................................ |
64 |
Avaya Home Screen Applications........................................................................................... |
64 |
Adding World Clock locations........................................................................................... |
65 |
Viewing World Clock details............................................................................................. |
66 |
Using the Weather application.......................................................................................... |
66 |
Using the Calculator........................................................................................................ |
68 |
Activating EC500 for simultaneous ringing on multiple phones.................................................. |
68 |
Setting up a Bluetooth® headset............................................................................................. |
69 |
Pairing a Bluetooth® headset with your phone................................................................... |
69 |
Operating a Bluetooth® headset....................................................................................... |
70 |
Enabling and disabling the call timer....................................................................................... |
71 |
Chapter 12: Carrying out maintenance tasks....................................................................... |
72 |
Backing up and restoring your data files.................................................................................. |
72 |
Cleaning the screen............................................................................................................... |
72 |
6 Using Avaya 9621G/9641G/9641GS IP Deskphones H.323 November 2014 Avaya - Proprietary. Use pursuant to the terms of your signed agreement or Avaya policy.
DRAFT—November 13, 2014—5:00 AM (UTC)

Contents
Network information............................................................................................................... |
73 |
November 2014 Using Avaya 9621G/9641G/9641GS IP Deskphones H.323 7 Avaya - Proprietary. Use pursuant to the terms of your signed agreement or Avaya policy.
DRAFT—November 13, 2014—5:00 AM (UTC)

1 Chapter 1: Introduction
2 Purpose
3This document describes how to use product features and capabilities.
4 Intended audience
5This document is intended for people who want to learn how to use product features and
6capabilities.
7 Related resources
8
9 Documentation
10 See the following related documents at http://support.avaya.com.
11 |
Document |
13 |
Title |
14 |
Use this document to: |
15 |
Audience |
12 |
number |
|
|
|
|
|
|
16 |
Implementing |
|
|
|
|
|
|
|
|
|
|
|
|
|
|
17 |
16–603603 |
18 |
Installing and Maintaining |
22 |
Refer to tasks related to installing |
24 |
Administrators |
|
|
19 |
Avaya IP Deskphones |
23 |
and upgrading the deskphone. |
|
|
|
|
20 |
9608/9608G/9611G/9621G/ |
|
|
|
|
|
|
21 |
9641G/9641GS H.323 |
|
|
|
|
25 |
Using |
|
|
|
|
|
|
|
|
|
|
|
|
|
|
26 |
16–603594 |
27 |
Using Avaya IP Deskphone |
29 |
Refer to tasks related to using the |
31 |
End users and |
|
|
28 |
9621G/9641G/9641GS H.323 30 |
deskphone. |
32 |
administrators |
|
|
|
|
|
|
|
|
|
33 |
16-603593 |
34 |
Using Avaya IP Deskphone |
36 |
Refer to tasks related to using the |
38 |
End users and |
|
|
35 |
9608/9608G/9611G H.323 |
37 |
deskphone. |
39 |
administrators |
|
|
|
|
|
|
|
|
40 |
16-603613 |
41 |
Using Avaya IP Deskphone |
45 |
Refer to tasks related to using the |
47 |
Call center agents |
|
|
42 |
9608/9608G/9611G/9621G/ |
46 |
deskphone in a call center. |
|
|
8 Using Avaya 9621G/9641G/9641GS IP Deskphones H.323 November 2014 Avaya - Proprietary. Use pursuant to the terms of your signed agreement or Avaya policy.
DRAFT—November 13, 2014—5:00 AM (UTC)

|
|
|
|
|
|
Related resources |
|
|
|
|
|
|
|
|
|
1 |
9641G/9641GS in the Call |
|
|
|
|
|
2 |
Center H.323 |
|
|
|
|
|
|
|
|
|
|
3 |
Administering |
|
|
|
|
|
|
|
|
|
|
|
|
4 |
16-300698 |
5 |
Administering Avaya IP |
9 |
Refer to performing administrative 11 |
Administrators |
|
|
6 |
Deskphone 9608/9608G/ |
10 |
tasks related to the deskphone. |
|
|
|
7 |
9611G/9621G/9641G/9641GS |
|
|
|
|
|
8 |
H.323 |
|
|
|
|
|
|
|
|
|
|
12
13Training
14The following courses are available on the Avaya Learning website at www.avaya-learning.com.
15After logging in to the website, enter the course code or the course title in the Search field and click
16Go to search for the course.
17 |
Course code |
18 |
Course title |
19 |
ACIS-6006 |
20 |
ACIS - Avaya Communication Manager (5.2.1) |
|
|
|
|
21 |
APSS-1300 |
22 |
APSS - Avaya Networking |
|
|
|
|
23
24 Avaya Mentor videos
25Avaya Mentor videos provide technical content on how to install, configure, and troubleshoot Avaya
26products.
27About this task
28Videos are available on the Avaya Support website, listed under the video document type, and on
29the Avaya-run channel on YouTube.
30Procedure
31• To find videos on the Avaya Support website, go to http://support.avaya.com, select the
32product name, and select the videos checkbox to see a list of available videos.
33• To find the Avaya Mentor videos on YouTube, go to http://www.youtube.com/AvayaMentor and
34perform one of the following actions:
35- Enter a key word or key words in the Search Channel to search for a specific product or
36 topic.
37 |
- Scroll down Playlists, and click the name of a topic to see the available list of videos posted |
|
38 |
on the site. |
|
39 |
40 |
Note: |
|
41 |
Videos are not available for all products. |
November 2014 Using Avaya 9621G/9641G/9641GS IP Deskphones H.323 9 Avaya - Proprietary. Use pursuant to the terms of your signed agreement or Avaya policy.
DRAFT—November 13, 2014—5:00 AM (UTC)

Introduction
1 Support
2Visit the Avaya Support website at http://support.avaya.com for the most up-to-date documentation,
3product notices, and knowledge articles. You can also search for release notes, downloads, and
4
5
6
resolutions to issues. Use the online service request system to create a service request. Chat with live agents to get answers to questions, or request an agent to connect you to a support team if an issue requires additional expertise.
10 Using Avaya 9621G/9641G/9641GS IP Deskphones H.323 November 2014 Avaya - Proprietary. Use pursuant to the terms of your signed agreement or Avaya policy.
DRAFT—November 13, 2014—5:00 AM (UTC)
1 Chapter 2: Setting up the deskphone
2 Introduction to 9621G/9641G/9641GS deskphones
3Your deskphone provides many features that include:
4
5
6
7
•Viewing and managing your calls, call logs, and contacts list
•Customizing your deskphone
•Accessing your voice mail
•Using integrated WML browser
8 You can also attach up to three button modules to your deskphone to expand the available number
9of call appearances and features. Multiple button modules must all be the same type and same
10model. The 9621G model does not provide a port for button module attachment.
11The letter G in a deskphone model name indicates the presence of a built-in Gigabit Ethernet
12adapter that increases the transmission speed of data.
13The 9621G, 9641G, and 9641GS deskphones provide a color LCD display. 9621G deskphones
14have a smaller display area than 9641G deskphones, and do not have a USB interface. 9641GS
15deskphones have a slightly larger display area than the 9641G, and use capacitive touch screen.
16Unless specifically stated in this guide, the three models are essentially the same in terms of
17features and functionality.
18Your administrator might not have configured all functions and features described in this user guide.
November 2014 Using Avaya 9621G/9641G/9641GS IP Deskphones H.323 11 Avaya - Proprietary. Use pursuant to the terms of your signed agreement or Avaya policy.
DRAFT—November 13, 2014—5:00 AM (UTC)

Setting up the deskphone
1
2 Physical layout
3
4The following table provides descriptions of the deskphone buttons and features.
5 |
Callout |
7 |
Name |
8 |
Icon if |
10 |
Description |
6 |
Number |
|
|
9 |
applicable |
|
|
11 |
1 |
12 |
USB port |
13 |
N/A |
14 |
You can use a USB device such as a memory stick, thumb |
|
|
|
|
|
|
15 |
drive, or flash drive to transfer contacts between your |
|
|
|
|
|
|
16 |
phone and an external data source. The USB option is |
|
|
|
|
|
|
17 |
available only if the administrator has configured the |
|
|
|
|
|
|
18 |
feature for your extension. See Importing and Exporting |
|
|
|
|
|
|
19 |
Contacts using USB Devices on page 28 for more |
|
|
|
|
|
|
20 |
information. You can use the USB port for login and as a |
|
|
|
|
|
|
21 |
picture source for screensaver.You can also recharge |
|
|
|
|
|
|
22 |
some battery-powered devices by connecting the device to |
|
|
|
|
|
|
23 |
the USB port.The 9621G does not have a USB port. |
24 |
2 |
25 |
Message |
28 |
N/A |
29 |
An illuminated red light in the upper-right corner of your |
|
|
26 |
waiting |
|
|
30 |
deskphone indicates that you have a voice mail. If you |
|
|
27 |
indicator |
|
|
31 |
enabled Visual Alerting on your phone, this light flashes |
|
|
|
|
|
|
32 |
when you receive an incoming call. In addition to the |
|
|
|
|
|
|
33 |
message waiting indicator, the deskphone lights the |
|
|
|
|
|
|
34 |
Message button when you have voice mail. |
35 |
3 |
36 |
Phone |
38 |
N/A |
39 |
The first line shows status information such as the time |
|
|
37 |
display |
|
|
40 |
and date, primary extension, error indications, and missed |
12 Using Avaya 9621G/9641G/9641GS IP Deskphones H.323 November 2014 Avaya - Proprietary. Use pursuant to the terms of your signed agreement or Avaya policy.
DRAFT—November 13, 2014—5:00 AM (UTC)

|
|
|
|
|
|
|
|
Introduction to 9621G/9641G/9641GS deskphones |
|
|
|
|
|
|
|
|
|
4 |
Callout |
6 |
Name |
7 |
Icon if |
9 |
Description |
|
5 |
Number |
|
|
8 |
applicable |
|
|
|
|
|
|
|
|
|
1 |
calls. The second line, called the Status Line, provides |
|
|
|
|
|
|
|
2 |
information, such as when you can use the right or left |
|
|
|
|
|
|
|
3 |
navigation arrows to view other screens or menus. The |
|
|
|
|
|
|
|
10 |
Status Line also provides messages related to the current |
|
|
|
|
|
|
|
11 |
application or the actions that you must perform on a |
|
|
|
|
|
|
|
12 |
screen. Call appearances appear below the Status Line. |
|
|
|
|
|
|
|
13 |
The number of call appearances available to make or |
|
|
|
|
|
|
|
14 |
receive calls depend on how your administrator |
|
|
|
|
|
|
|
15 |
administers the system. The number of lines available on |
|
|
|
|
|
|
|
16 |
touchscreen deskphones depend on how your |
|
|
|
|
|
|
|
17 |
administrator administers the Quick Touch Panel (QTP). |
|
|
|
|
|
|
|
18 |
For more information, see Setting the Quick Touch |
|
|
|
|
|
|
|
19 |
panel on page 62. Touch the line to start or answer a |
|
|
|
|
|
|
|
20 |
call. The last display line shows the QTP that displays the |
|
|
|
|
|
|
|
21 |
options that your administrator has administered for the |
|
|
|
|
|
|
|
22 |
extension such as EC500, Call Forwarding, or Extended |
|
|
|
|
|
|
|
23 |
Call Forwarding. |
|
|
|
|
|
|
|
|
||
24 |
4 |
25 |
Features and29 |
N/A |
30 |
On touchscreen deskphones, call-related icons on the lines |
||
|
|
26 |
call |
|
|
31 |
show the lines that are in use or available for calls. Touch |
|
|
|
27 |
appearance |
|
|
32 |
the line that you want to use. Lines also indicate if the |
|
|
|
28 |
lines |
|
|
33 |
system has enabled or disabled a feature in the Feature |
|
|
|
|
|
|
|
34 |
view. |
|
|
|
|
|
|
|
|
||
35 |
5 |
36 |
Quick Touch38 |
N/A |
39 |
The QTP displays the options that your administrator |
||
|
|
37 |
Panel (QTP) |
|
|
40 |
administers for the extension such as EC500, Call |
|
|
|
|
|
|
|
41 |
Forwarding, or Extended Call Forwarding. |
|
|
|
|
|
|
|
|
|
|
42 |
6 |
43 |
Phone |
44 |
|
45 |
The Phone button displays the Phone screen when you |
|
|
|
|
|
|
46 |
press the button. During a call, you can gain access to the |
||
|
|
|
|
|
|
|||
|
|
|
|
|
|
47 |
following options from the Phone screen: |
|
|
|
|
|
|
|
48 |
• Hold |
|
|
|
|
|
|
|
49 |
• Conference |
|
|
|
|
|
|
|
50 |
• |
Transfer |
|
|
|
|
|
|
51 |
• |
Drop call |
|
|
|
|
|
|
|
|
|
52 |
7 |
53 |
Message |
54 |
|
55 |
When you press Message, you are connected directly to |
|
|
|
|
|
|
56 |
your voice mail system. The deskphone lights this button |
||
|
|
|
|
|
|
|||
|
|
|
|
|
|
57 |
when you have voice mail messages waiting. |
|
|
|
|
|
|
|
|
|
|
58 |
8 |
59 |
Contacts |
|
|
61 |
When you press Contacts, the Phone screen displays the |
|
|
|
|
|
60 |
|
62 |
entries in your contact list. |
|
63 |
9 |
64 |
Home |
65 |
|
66 |
When you press Home, you gain access to the Home |
|
|
|
|
|
|
67 |
screen to configure options and settings, access the |
||
|
|
|
|
|
|
68 |
browser and or any applications available to you, log out, |
|
|
|
|
|
|
|
69 |
or view network information. |
|
|
|
|
|
|
|
|
|
|
70 |
10 |
71 |
History |
72 |
|
73 |
When you press History, the Phone screen displays the |
|
|
|
|
|
|
74 |
history of your outgoing, incoming, and missed calls. The |
||
|
|
|
|
|
|
75 |
icon on the History the deskphone lights the button when |
|
November 2014 Using Avaya 9621G/9641G/9641GS IP Deskphones H.323 13 Avaya - Proprietary. Use pursuant to the terms of your signed agreement or Avaya policy.
DRAFT—November 13, 2014—5:00 AM (UTC)
Setting up the deskphone |
|
|
|
|
|||
|
|
|
|
|
|
|
|
3 |
Callout |
5 |
Name |
6 |
Icon if |
8 |
Description |
4 |
Number |
|
|
7 |
applicable |
|
|
|
|
|
|
|
|
1 |
you have missed calls. The top line shows the Missed Call |
|
|
|
|
|
|
2 |
icon and the number of calls that you have missed. |
9 |
11 |
10 |
Volume |
|
|
12 |
If you press + or - on the Volume button on an active call, |
|
|
|
|
11 |
|
13 |
the phone increases or decreases the volume of your |
|
|
|
|
|
|
14 |
handset, headset, or speaker accordingly. When you are |
|
|
|
|
|
|
15 |
not on an active call, pressing these buttons adjusts the |
|
|
|
|
|
|
16 |
ringer volume. |
|
|
|
|
|
|
|
|
17 |
12 |
18 |
Mute |
19 |
|
20 |
Press the Mute button to mute a call in progress. To take a |
|
|
|
|
|
21 |
call off mute, press Mute again. |
|
|
|
|
|
|
|
||
22 |
13 |
23 |
Speaker |
24 |
|
25 |
Press the Speaker button to use the speakerphone. To |
|
|
|
|
|
26 |
take a call off speakerphone, lift the handset or press the |
|
|
|
|
|
|
|
27 |
Headset button. |
28 |
14 |
29 |
Headset |
30 |
|
31 |
Press the Headset button to use the headset if connected. |
|
|
|
|
|
|
|
|
|
|
|
|
|
|
|
|
32 |
15 |
33 |
Forward |
34 |
|
35 |
Press Forward to display the Forwarding menu. |
|
|
|
|
|
|
|
|
|
|
|
|
|
|
|
|
36
37 Adjustable stand and display screen
38You can adjust the display screen as required. To move the display screen, gently pull from the top
39of the display screen towards you even as you hear clicking sound. Each click indicates a locking
40position. You can push the screen back to return to the original flat position. Gently pull the display
41screen towards you and push to return the display screen to the original flat position.
42You can place the phone on the stand in a flat position or at an angle. To place the phone vertically
43for wall mounting, reverse the tab located under the switchhook in the top ear piece pocket and
44ensure that the handset is in the correct position. You need a small screwdriver to lift the tab and
45reinsert back the reversed tab.
46
47 Ringing on wireless headsets
48For an incoming call, you can set the ringing tone on the wireless headset instead of the speaker of
49the deskphone.
50  51 Note:
52This feature is available only if your administrator has configured the feature for your deskphone.
53When you go off-hook with the headset or change from a non-headset device to the headset, phone
54activates the wireless headset. When you go on-hook with an activated headset or change from
55wireless headset device to non-headset, the phone deactivates the wireless headset.
56When an incoming call arrives:
57• If the deskphone is in an idle mode, you hear a ringing tone in the wireless headset.
14 Using Avaya 9621G/9641G/9641GS IP Deskphones H.323 November 2014 Avaya - Proprietary. Use pursuant to the terms of your signed agreement or Avaya policy.
DRAFT—November 13, 2014—5:00 AM (UTC)

Introduction to 9621G/9641G/9641GS deskphones
1• If the phone is already in a headset call, you hear a short beep in the wireless headset.
2
3 About logging in and logging out
4If you share a deskphone with other users, you must log in and log out to maintain your preferences,
5call information, and options. Log out to prevent unauthorized use of your deskphone during your
6absence.
7  8 Note:
9 Depending on how the administrator has configured your phone, for example, whether History
10backup is enabled or disabled, the phone might lose some information when you log your
11extension out.
12Your administrator might provide you with a USB device with a preprogrammed extension and
13password, or may provide you with a PC-based tool for transferring this information on a USB
14device. This device enables you to use the USB device to log in to the administered extension and
15password automatically, from any deskphone in your system. Contact your administrator for more
16information. If you log in with the USB Login option, the only way to log out is by removing the USB
17device from the phone connection.
18  19 Note:
20When you use the USB Login, the only Contacts you can see are the Contacts on the USB
21device. See Using USB Flash Drives with your phone on page 28 for more information.
22  23 Note:
24Depending on how the administrator has configured your deskphone, your deskphone might
25display a Log-Off softkey in an idle state. You can use the Log-Off softkey to log out of the
26deskphone.
27 Logging in to your deskphone
28About this task
29Log in from the initial screen when it prompts you for your extension.
30When you log in to the deskphone, the deskphone downloads the call log database. The database
31contains all the calls that you received when you were logged out. The deskphone adds these call
32logs in the Call History list as missed calls.
33Procedure
341. Enter your extension.
352. Tap Enter.
363. Enter your password.
374. Tap Enter.
November 2014 Using Avaya 9621G/9641G/9641GS IP Deskphones H.323 15 Avaya - Proprietary. Use pursuant to the terms of your signed agreement or Avaya policy.
DRAFT—November 13, 2014—5:00 AM (UTC)

Setting up the deskphone
15. If your administrator configured the system to allow visiting user privileges the deskphone
2
3
4
prompts for Login Mode. Tap the Login Mode that indicates whether you are a visiting user (Visiting User) or not (Default).
6. Tap Enter.
5 Logging out of your deskphone
6About this task
7 Even if you are logged out, the system still logs all calls to a database. The deskphone downloads 8 the database when you log in to the deskphone again.
9Procedure
101. Press Home.
112. Tap Settings.
123. Press Log Out to choose Log Out.
13Logging in as a guest user
14About this task
15Log in to another touch-based phone as a guest to retain the features and functionality of your own
16phone. For example, if you are temporarily using the office telephone of a visitor and want to use
17your Contacts list. If you want to use this feature, the deskphone must be on-hook. The phone must
18be on-hook for you to be able to select this feature.
19  20 Note:
21The guest user login option is available on your deskphone only if the administrator has
22configured the feature.
23Procedure
241. Press Home
252. Tap Settings.
263. Select Guest Login.
274. Enter your extension number.
285. Tap Enter.
296. Tap Password.
307. Enter your password.
318. Tap Enter.
329. Tap the left or right arrow to select the duration from 1 to 12 hours for using this phone.
33
34
You can log out as a guest at any time despite the duration you select. 10. Tap Enter.
16 Using Avaya 9621G/9641G/9641GS IP Deskphones H.323 November 2014 Avaya - Proprietary. Use pursuant to the terms of your signed agreement or Avaya policy.
DRAFT—November 13, 2014—5:00 AM (UTC)

1 Chapter 3: Navigating the phone
2 Scrolling and navigation
3Use the up and down arrow buttons on the right side of the screen to scroll up or down the list.
4 Tap and hold the appropriate scroll icons on the touchscreen to scroll through a page at a time in
5the direction you choose. Repeat the same action to activate the scrolling auto repeat feature.
6To change between call appearances and features, tap Features or Calls on the touchscreen.
7 When you tap the details button, a blue, right-facing arrow, you can view more information about the 8 item. For example, if you tap the arrow to the right of a contact name, the deskphone displays a
9screen with the numbers that you have stored for that person.
10You can tap a line or softkey or tap the on-screen softkey labels. Softkey labels change according to
11the context. For example, you can tap a contact to make a call to that person and tap a line on the
12Phone screen to answer an incoming call, to go off hook, to make a call, or to resume a call on hold.
13You can also gain access to the Phone screen or the Home screen anytime by pressing the
14appropriate buttons on the deskphone.
15Icons
16The icons in the following table indicate the state of a call, navigation choices, Call History types,
17Contact phone types, feature status, or the status of an attached or paired device.
18Depending on their purpose, some icons appear on the top line, for example, to notify you that a
19headset is active or that you have missed calls in the Call History. Other icons display on call
20appearance lines to show call states. Icons also appear on application screens like the Contacts or
21Call History listsIcons also appear on application screens like the Contacts or Call History lists, or
22World Clock and Weather. Home screen icons are touch-based to let you initiate actions like
23changing phone settings, accessing the Web browser, or accessing Avaya applications like the
24Calculator, World Clock, and Weather. Your administrator might make other, optional Home screen
25icons available to you that do not appear in this table. Such icons represent optional applications for
26which your administrator can provide information.
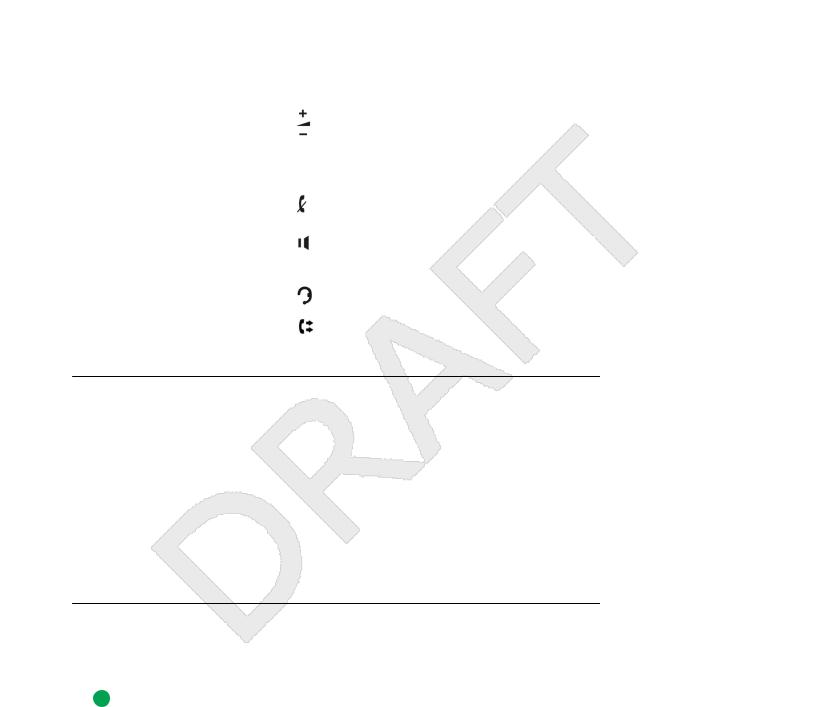
27 |
Icon |
28 |
Description |
|
|
30 |
Indicates an incoming call. |
29 |
|
|
|
|
|
|
|
November 2014 Using Avaya 9621G/9641G/9641GS IP Deskphones H.323 17 Avaya - Proprietary. Use pursuant to the terms of your signed agreement or Avaya policy.
DRAFT—November 13, 2014—5:00 AM (UTC)

Navigating the phone |
|
|
|
|
|
|
|
2 |
Icon |
3 |
Description |
|
|
4 |
Indicates a call appearance line that is not currently in use. |
1 |
|
|
|
|
|
|
|
|
|
6 |
Indicates that a call is active. |
5 |
|
|
|
|
|
|
|
|
|
8 |
Indicates that you have placed this call on hold. |
7 |
|
|
|
|
|
|
|
9 |
|
10 |
Indicates that your calls are being forwarded. |
|
|
|
|
|
|
|
|
|
|
12 |
Indicates that a bridged call appearance is in use. |
11 |
|
|
|
|
|
|
|
|
|
14 |
Indicates that the EC500 feature is activated. |
13 |
|
|
|
|
|
|
|
|
|
16 |
Indicates that a conference call is active. |
15 |
|
|
|
|
|
|
|
|
|
18 |
Indicates that you have placed a conference call on hold. |
17 |
|
|
|
|
|
|
|
|
|
20 |
Indicates that the speakerphone volume is being adjusted. |
19 |
|
|
|
|
|
|
|
|
|
22 |
Indicates that the headset volume is being adjusted. |
21 |
|
|
|
|
|
|
|
|
|
24 |
Indicates that more related information is available or additional |
23 |
|
25 |
screens can be accessed. |
|
|
|
|
26 |
|
27 |
Indicates that the call in progress is muted. |
|
|
|
|
|
|
|
|
28 |
|
29 |
Indicates that the ringer volume is off. To reinstate volume, press |
|
30 |
+ on the Volume button. |
|
|
|
||
|
|
31 |
To turn off the ringer press the Volume button until the volume |
|
|
32 |
turns off. |
33 |
|
34 |
Indicates that the call is using a wideband codec for quality voice |
|
35 |
calls. |
|
|
|
||
|
|
|
|
36 |
|
37 |
Indicates a low network performance or presence of local network |
|
38 |
issues that might result in lower call quality. |
|
|
|
||
|
|
|
|
|
|
40 |
Indicates an energy-saving measure. This icon may also appears |
39 |
|
41 |
on the Settings menu. Pressing this softkey turns the display |
|
|
42 |
backlight off. When the backlight is off, any activity on your |
|
|
43 |
telephone turns it back on. This icon is configured by your |
|
|
44 |
administrator on one of the softkeys. |
|
|
|
|
45 |
|
46 |
Indicates that your phone is in an “Unnamed Registration” state, |
|
47 |
caused by not entering an extension within 60 seconds of being |
|
|
|
||
|
|
48 |
prompted for one or not entering a password. In this situation, |
|
|
49 |
your phone may register with its call server but will show only one |
|
|
50 |
call appearance, no features, and will allow only outgoing calls. To |
18 Using Avaya 9621G/9641G/9641GS IP Deskphones H.323 November 2014 Avaya - Proprietary. Use pursuant to the terms of your signed agreement or Avaya policy.
DRAFT—November 13, 2014—5:00 AM (UTC)

|
|
|
Icons |
|
|
|
|
3 |
Icon |
4 |
Description |
|
|
1 |
switch from the unnamed registration state, login with a valid |
|
|
2 |
extension and password. |
|
|
6 |
Indicates that this team member is available. Your system |
5 |
|
7 |
administrator sets up teams as applicable. |
|
|
|
|
|
|
|
|
|
|
9 |
This Team icon indicates that this team member is having calls |
8 |
|
10 |
forwarded. |
|
|
|
|
|
|
|
|
|
|
12 |
This Team icon indicates that this team member is busy on a call |
11 |
|
13 |
and not available. |
|
|
|
|
|
|
|
|
|
|
15 |
This Team icon indicates that this team member is busy and is |
14 |
|
16 |
forwarding all calls. |
|
|
|
|
|
|
|
|
|
|
18 |
This Team icon indicates that the team member is busy and a has |
17 |
|
19 |
an incoming call ringing. |
|
|
|
|
|
|
|
|
|
|
21 |
This Team icon indicates that the team member is busy and is |
20 |
|
22 |
having more incoming calls ringing. |
|
|
|
|
|
|
|
|
|
|
24 |
This Team icon indicates that a team member is calling. |
23 |
|
|
|
|
|
|
|
|
|
26 |
The Home screen icon that indicates the general phone number |
25 |
|
27 |
for a favorite Contact. |
|
|
|
|
|
|
29 |
The Home screen icon that indicates the home phone number for |
28 |
|
30 |
a favorite Contact. |
|
|
|
|
|
|
32 |
The Home screen icon that indicates the work phone number for a |
31 |
|
33 |
favorite Contact. |
|
|
|
|
|
|
35 |
The Home screen icon that indicates the mobile phone number for |
34 |
|
36 |
a favorite Contact. |
|
|
|
|
|
|
38 |
Indicates Call History for all calls. |
37 |
|
|
|
|
|
|
|
|
|
40 |
Indicates Call History for Missed calls. |
39 |
|
|
|
|
|
|
|
|
|
42 |
Indicates Call History for Outgoing calls. |
41 |
|
|
|
|
|
|
|
|
|
44 |
Indicates the Call History for Answered calls. |
43 |
|
|
|
|
|
|
|
|
|
46 |
Indicates the General telephone number for a contact. |
45 |
|
|
|
|
|
|
|
|
|
48 |
Indicates the Home telephone number for a contact. |
47 |
|
|
|
|
|
|
|
|
|
50 |
Indicates the Mobile telephone number for a contact. |
49 |
|
|
|
|
|
|
|
November 2014 Using Avaya 9621G/9641G/9641GS IP Deskphones H.323 19 Avaya - Proprietary. Use pursuant to the terms of your signed agreement or Avaya policy.
DRAFT—November 13, 2014—5:00 AM (UTC)

Navigating the phone |
|
|
|
|
|
|
|
2 |
Icon |
3 |
Description |
|
|
4 |
Indicates the Work telephone number for a contact. |
1 |
|
|
|
|
|
|
|
|
|
6 |
Indicates the Favorite contact. |
5 |
|
|
|
|
|
|
|
|
|
8 |
Indicates that the Contact-Favorite Feature is on. |
7 |
|
|
|
|
|
|
|
|
|
10 |
Indicates that the Contact-Favorite Feature is off. |
9 |
|
|
|
|
|
|
|
|
|
12 |
Indicates that the phone is paired with and able to communicate |
11 |
|
13 |
with a Bluetooth® headset. |
|
|
15 |
Indicates the Home screen WML Browser application if available. |
14 |
|
|
|
|
|
|
|
|
|
17 |
Indicates the Home screen (telephone) Settings menu. |
16 |
|
|
|
|
|
|
|
|
|
19 |
Indicates the My Pictures application where you can display |
18 |
|
20 |
pictures from the USB folder. |
|
|
|
|
|
|
22 |
Indicates the VPN settings menu. |
21 |
|
|
|
|
|
|
|
|
|
24 |
Indicates the icon for viewing the About Avaya IP Deskphone |
23 |
|
25 |
screen. |
|
|
|
|
|
|
27 |
Indicates the Home screen Calculator application. |
26 |
|
|
|
|
|
|
|
|
|
29 |
Indicates the Home screen World Clock application. |
28 |
|
|
|
|
|
|
|
|
|
31 |
Indicates the Home screen Weather application. |
30 |
|
|
|
|
|
|
|
32 |
|
33 |
Indicates that the weather is clear and fair. |
|
|
|
|
|
|
|
|
34 |
|
35 |
Indicates that the weather is partly cloudy. |
|
|
|
|
|
|
|
|
36 |
|
37 |
Indicates that the weather is cloudy. |
|
|
|
|
|
|
|
|
38 |
|
39 |
Indicates that the weather is a light rain. |
|
|
|
|
|
|
|
|
40 |
|
41 |
Indicates that the weather is rainy. |
|
|
|
|
|
|
|
|
42 |
|
43 |
Indicates that the weather is snowy. |
|
|
|
|
|
|
|
|
44 |
|
45 |
Indicates that the weather is icy. |
|
|
|
|
|
|
|
|
46 |
|
47 |
Indicates that there is an ongoing thunderstorm. |
|
|
|
|
|
|
|
|
48 |
|
49 |
Indicates that the weather is windy. |
|
|
|
|
|
|
|
|
20 Using Avaya 9621G/9641G/9641GS IP Deskphones H.323 November 2014 Avaya - Proprietary. Use pursuant to the terms of your signed agreement or Avaya policy.
DRAFT—November 13, 2014—5:00 AM (UTC)
|
|
|
The Home Screen |
|
|
|
|
2 |
Icon |
3 |
Description |
1 |
|
4 |
Indicates that there are severe storms. |
|
|
|
|
|
|
|
|
|
|
6 |
Indicates the main menu Touch Screen Cleaning option. |
5 |
|
|
|
|
|
|
|
|
|
8 |
Indicates the main menu Guest Login option. |
7 |
|
|
|
|
|
|
|
|
|
10 |
Indicates the main menu Log out option. |
9 |
|
|
|
|
|
|
|
|
|
12 |
Indicates the main menu Network info options. |
11 |
|
|
|
|
|
|
|
|
|
14 |
Indicates the Options & Settings Screen and Sounds Options |
13 |
|
15 |
menu. |
|
|
|
|
|
|
17 |
Indicates the Options & Settings Call Settings menu. |
16 |
|
|
|
|
|
|
|
|
|
19 |
Indicates the Options & Settings Application Settings menu. |
18 |
|
|
|
|
|
|
|
|
|
21 |
Indicates the Options & Settings Advanced Settings menu. |
20 |
|
|
|
|
|
|
|
22 The Home Screen
23The Home screen provides several user-friendly features. Using the icons on the Home screen, you
24can customize your phone, view settings, obtain information about the time and weather through
25Web-based applications, use a calculator, and use Favorite speed dial buttons. The options
26available on the Home screen depends on how the administrator has set up the system. You must
27press the Home button under display to gain access to the Home screen. The Home screen
28includes the following standard Avaya features:
29• Settings: Displays a menu that you can use to change your call settings, the language on the
30phone, the screen layout, or pair your phone with a Bluetooth headset, log in to the phone as a
31guest, clean your screen, log out your phone, and more.
32• World Clock: Shows the time and weather in different parts of the world.
33• Weather: Shows the current weather conditions in an area you choose and provides a weather
34forecast.
35• Calculator: Provides a simple, four-function calculator.
36• My Pictures: Using this feature you can use pictures from a USB device as the phone
37screensaver.Note: This feature is applicable only to the 9641 deskphone.
38• Web application: You can set up shortcuts to view 9 web applications or information pages
39using this feature.
November 2014 Using Avaya 9621G/9641G/9641GS IP Deskphones H.323 21 Avaya - Proprietary. Use pursuant to the terms of your signed agreement or Avaya policy.
DRAFT—November 13, 2014—5:00 AM (UTC)

Navigating the phone
1• Favorites Help: Using the help outlined here, you can add a person in your contacts list to
2your display as a quick dial number. Tap the number to make a call to that person.
3 You can also use Contacts to setup speed dial icons for up to 16 Favorite numbers on your Home 4 screen. Your administrator might make available other Web-based applications such as a corporate
5directory or support page. To invoke an application you see on the Home screen, tap the icon. If the
6number of lines in the list is greater than the number of lines in the Application area of the Home
7 screen, You can scroll to view the next line. Tap the scroll bar on the right side of the Home screen
8to view the next page.
9You can also administer up to 9 WML applications on home screen.
10  11 Note:
12The Settings options that appear depend on how the administrator configured your extension.
13Some options described in this guide might not be available to you.
14 Menu options
15The following image shows the menu options that are available to you to view the current settings
16and configure the required parameters on the Avaya 9621 and 9641 IP deskphones.
|
|
Home |
|
|
|
|
|
|
Page |
|
|
|
|
Settings |
Options |
Call |
|
|
Go to Phone |
|
& |
|
|
Screen On |
|||
Settings |
|
|
||||
|
Settings |
|
|
Calling |
||
|
|
|
|
|||
My |
Bluetooth |
Application |
|
|
Go To Phone |
|
Brightness |
History |
Screen On |
||||
Pictures |
Setup |
Settings |
||||
|
|
Ringing |
||||
|
|
|
|
|
||
|
Network |
Screen & |
|
Log |
Go To Phone |
|
Weather |
Sound |
Contrast |
Bridged |
Screen On |
||
Information |
||||||
|
Options |
|
Calls |
Answer |
||
|
|
|
||||
World |
VPN |
Advanced |
Personalized |
Personalized |
Display |
|
Clock |
Settings |
Options |
Ringing |
Button |
Call Timer |
|
|
|
|
|
Labels |
|
|
Favorites |
Logout |
|
Button |
Restore |
Redial |
|
Automatic |
Default |
|||||
Help |
|
Clicks |
|
|||
|
Gain |
Labels |
|
|||
|
|
|
|
|||
|
|
Control |
|
|
|
|
Browser |
Light |
|
Error |
|
Visual |
|
Off |
Headset |
Tones |
|
Alerting |
||
|
|
|||||
|
|
|
||||
|
|
Equalization |
|
|
|
|
|
Touch |
|
Phone |
|
Audio |
|
|
Screen |
|
|
|||
|
|
Screen |
|
Path |
||
|
Cleaning |
|
|
|||
|
|
Width |
|
|
||
|
|
|
|
|
About
Avaya IP
Pair Contacts
Deskphone
To Calls
17
18  19 Note:
20Bluetooth setup option is available only on the Avaya 9641 IP deskphone. Your deskphone
21might not display some options on your deskphone if your administrator has not configured the
22options for your extension.
22 Using Avaya 9621G/9641G/9641GS IP Deskphones H.323 November 2014 Avaya - Proprietary. Use pursuant to the terms of your signed agreement or Avaya policy.
DRAFT—November 13, 2014—5:00 AM (UTC)
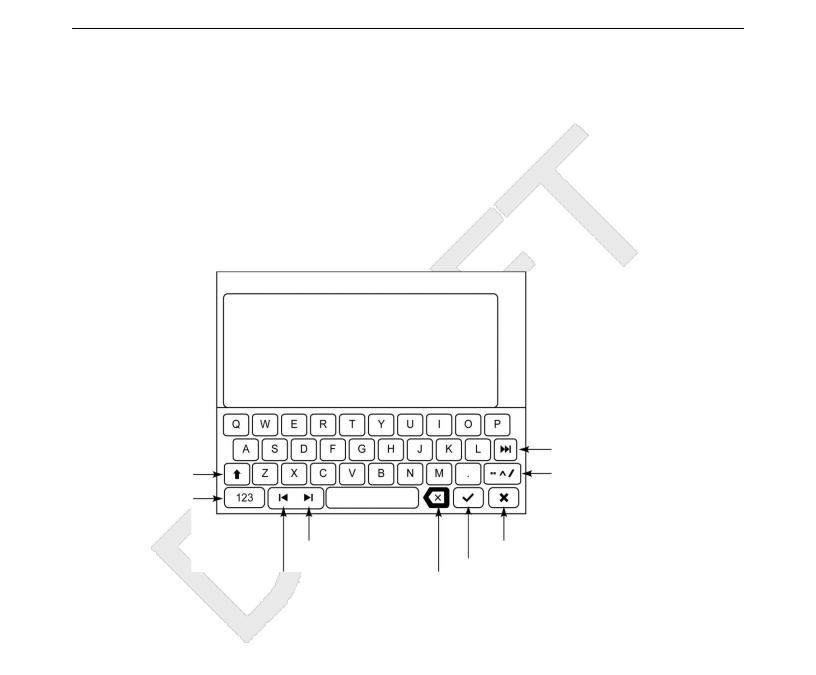
Using the On-screen keyboard
1 Using the On-screen keyboard
2 A keyboard appears on the screen when you add or edit a contact name or number, or when you
3personalize labels for your call appearances or features. You can switch between alphabetic and
4numeric keyboards, and you can use the keyboard to enter symbols and accented letters.
5The following diagrams help you to understand how to add or change names, telephone numbers,
6or labels. Tapping and holding the backspace button produces an automatic repeat action where the
7letters are cleared one by one moving backwards as long as you keep pressing the Backspace
8 button. Tap the Done check mark when you finish editing. Use the Cancel mark to discard any edits
9and return to the previous screen.
10 Figure 1: Text Entry Keyboard
Shift key
Switch to
Numeric Text
Entry Screen
|
Move cursor to right |
Cancel |
|
|
Save/Done/Next |
11 |
Move cursor to left |
Backspace |
Next field
Accent the next character
you press. Press this key, then the character you want to accent and select from a mini-keyboard
12 Figure 2: Numeric Entry Keyboard
November 2014 Using Avaya 9621G/9641G/9641GS IP Deskphones H.323 23 Avaya - Proprietary. Use pursuant to the terms of your signed agreement or Avaya policy.
DRAFT—November 13, 2014—5:00 AM (UTC)
Loading...