


 Loading...
FC1 / FC1 Ex connected to
Integral Enterprise / Integral 55
Benutzerhandbuch
User’s guide
Manuel utilisateur

FC1 / FC1 Ex
Copyright
© All rights reserved by Avaya GmbH & Co. KG, also for the case of trademark right notices. Every publication authority, such as copy and transmission rights, remains with us.
Version
V 1.2 (11/2002)
V 1.3 (02/2004)
V 1.4 (04/2004)
V 1.4a (04/2004, 07/2004)
V 1.5 (29.04.2004)
V 1.5a (29.04.2004, 07/2004)
V 1.6 (12.08.2004, 08/2004)
V 1.7 (25.08.2004, 08/2004)
V 1.7a (25.10.2004, 10/2004)
V 1.8 (23.09.2005, 09/2005)
V 1.9 (12.12.2005, 12/2005)
V 2.0 (11.07.2007, 07/2007)
V 2.1 (31.08.2008, 08/2008)
2
FC1 / FC1 Ex |
Table of Contents |
Table of Contents
Table of Contents . . . . . . . . . . . . . . . . . . . . . . . . . . . . . . . . . . . . . . . . . . . 3
Getting to know your handset Important information . . . . . . . . . . . 5
Overview . . . . . . . . . . . . . . . . . . . . . . . . . . . . . . . . . . . . . . . . . . . . . . . . . . . . . 9 Display . . . . . . . . . . . . . . . . . . . . . . . . . . . . . . . . . . . . . . . . . . . . . . . . . . . . . 12 Putting into operation . . . . . . . . . . . . . . . . . . . . . . . . . . . . . . . . . . . . . . . . . . 16 Basic rules of operation. . . . . . . . . . . . . . . . . . . . . . . . . . . . . . . . . . . . . . . . . 23
The functions . . . . . . . . . . . . . . . . . . . . . . . . . . . . . . . . . . . . . . . . . . . . . . |
27 |
Telephoning as usual . . . . . . . . . . . . . . . . . . . . . . . . . . . . . . . . . . . . . . . . . . |
27 |
Callback if busy . . . . . . . . . . . . . . . . . . . . . . . . . . . . . . . . . . . . . . . . . . . . . . |
30 |
Double Call . . . . . . . . . . . . . . . . . . . . . . . . . . . . . . . . . . . . . . . . . . . . . . . . . . |
32 |
Refer back call and call forwarding . . . . . . . . . . . . . . . . . . . . . . . . . . . . . . . |
34 |
Switching between lines (call partners). . . . . . . . . . . . . . . . . . . . . . . . . . . . . |
36 |
Conference . . . . . . . . . . . . . . . . . . . . . . . . . . . . . . . . . . . . . . . . . . . . . . . . . . |
37 |
Second Call . . . . . . . . . . . . . . . . . . . . . . . . . . . . . . . . . . . . . . . . . . . . . . . . . |
38 |
Code dialing . . . . . . . . . . . . . . . . . . . . . . . . . . . . . . . . . . . . . . . . . . . . . . . . . |
41 |
Local telephone directory . . . . . . . . . . . . . . . . . . . . . . . . . . . . . . . . . . . . . . . |
42 |
Central telephone directory . . . . . . . . . . . . . . . . . . . . . . . . . . . . . . . . . . . . . |
50 |
Call list . . . . . . . . . . . . . . . . . . . . . . . . . . . . . . . . . . . . . . . . . . . . . . . . . . . . . |
52 |
Message Waiting. . . . . . . . . . . . . . . . . . . . . . . . . . . . . . . . . . . . . . . . . . . . . . |
55 |
Call diversion. . . . . . . . . . . . . . . . . . . . . . . . . . . . . . . . . . . . . . . . . . . . . . . . . |
58 |
Call diversion when your handset is busy . . . . . . . . . . . . . . . . . . . . . . . . . . |
60 |
Call diversion when your handset cannot be reached . . . . . . . . . . . . . . . . . |
61 |
(Delayed) call transfer . . . . . . . . . . . . . . . . . . . . . . . . . . . . . . . . . . . . . . . . . |
63 |
Follow me (call diversion from) . . . . . . . . . . . . . . . . . . . . . . . . . . . . . . . . . . |
64 |
Pick-up . . . . . . . . . . . . . . . . . . . . . . . . . . . . . . . . . . . . . . . . . . . . . . . . . . . . . |
68 |
DTMF post-dialling (digits as tone signals) . . . . . . . . . . . . . . . . . . . . . . . . . |
70 |
Call charge display . . . . . . . . . . . . . . . . . . . . . . . . . . . . . . . . . . . . . . . . . . . . |
72 |
Changing call diversions by remote control . . . . . . . . . . . . . . . . . . . . . . . . . |
77 |
Telephoning with the system while away . . . . . . . . . . . . . . . . . . . . . . . . . . . |
79 |
3
Table of Contents |
FC1 / FC1 Ex |
Muting the microphone . . . . . . . . . . . . . . . . . . . . . . . . . . . . . . . . . . . . . . . . . 80 Hear conversation via speaker (Handsfree operation) . . . . . . . . . . . . . . . . . 81 Setting the handset . . . . . . . . . . . . . . . . . . . . . . . . . . . . . . . . . . . . . . . . . . . . 83 Emergency call . . . . . . . . . . . . . . . . . . . . . . . . . . . . . . . . . . . . . . . . . . . . . . . 93 Personal Identification Number (PIN). . . . . . . . . . . . . . . . . . . . . . . . . . . . . . . 95 Locking the handset . . . . . . . . . . . . . . . . . . . . . . . . . . . . . . . . . . . . . . . . . . . . 98 Language . . . . . . . . . . . . . . . . . . . . . . . . . . . . . . . . . . . . . . . . . . . . . . . . . . . 100 Messaging . . . . . . . . . . . . . . . . . . . . . . . . . . . . . . . . . . . . . . . . . . . . . . . . . . 101 Receiving a message . . . . . . . . . . . . . . . . . . . . . . . . . . . . . . . . . . . . . . . . . 102 Message list and call list . . . . . . . . . . . . . . . . . . . . . . . . . . . . . . . . . . . . . . . 104 Sending a message . . . . . . . . . . . . . . . . . . . . . . . . . . . . . . . . . . . . . . . . . . . 107 Using the handset in more than one system . . . . . . . . . . . . . . . . . . . . . . . . 113
Appendix . . . . . . . . . . . . . . . . . . . . . . . . . . . . . . . . . . . . . . . . . . . . . . . . . . 118 List of the message defined texts . . . . . . . . . . . . . . . . . . . . . . . . . . . . . . . . 118 Codes for your handset . . . . . . . . . . . . . . . . . . . . . . . . . . . . . . . . . . . . . . . . 119
Technical specifications and accessories for the explosion-proof handset
FC1 Ex . . . . . . . . . . . . . . . . . . . . . . . . . . . . . . . . . . . . . . . . . . . . . . . . . . . . . 123 Technical specifications and accessories for the handset FC1 . . . . . . . . . . 125 Table of characters . . . . . . . . . . . . . . . . . . . . . . . . . . . . . . . . . . . . . . . . . . . 127 Notes . . . . . . . . . . . . . . . . . . . . . . . . . . . . . . . . . . . . . . . . . . . . . . . . . . . . . . 128
Index. . . . . . . . . . . . . . . . . . . . . . . . . . . . . . . . . . . . . . . . . . . . . . . . . . . . . . 129
4

FC1 / FC1 Ex |
Getting to know your handset Important information |
Getting to know your handset Important information
Where you can use your handset
The handsets FC1 and FC1 Ex are suitable for use in the office, outdoors and in a dusty environment. The FC1 Ex is an explosion-proof version providing gas explosion and dust explosion protection for use in hazardous areas. The FC1 Ex must not be operated with any headset! Both handsets, FC1 and FC1 Ex, comply with protection class IP 65 and are dust-proof and protected against water jets.
You will find the safety instructions and some further information about handling an explosion-proof handset version in the "Quick Guide" delivered with the set.
Protecting against interference
Other electronic units usually are protected from high-frequency irradiation. However, a device of this kind which is insufficiently protected may lead to malfunctions.
ATTENTION
Never unscrew the handset housing!
The housing could be damaged as a result. It does not contain any components that you can repair. Furthermore, as a result of any unauthorized intervention, the Ex-certificate for operation of an FC1 Ex in hazardous areas will become void!
Where to install
Put your charger on a non-slip surface, especially if furniture is new or has been treated with care materials. Varnishes or care materials may contain substances that can soften the feet of the charger, and the softened feet may leave undesirable marks on the surface of the furniture. The Avaya GmbH & Co. KG is not liable for damage of this kind.
5
Getting to know your handset Important information |
FC1 / FC1 Ex |
Product package
Please check the contents of your FC1 / FC1 Ex product package immediately:
FC1 / FC1 Ex handset with "Hints On Operation". Ex factory, explosionproof units are equipped with a clip.
Changeable battery pack. Explosion-proof handsets have to be operated using an explosion-proof battery pack only! Explosion-proof units and components are bearing the Ex marking.
MEM-Card
System compliant charger for the rechargeable battery packs. However, for explosion-proof handsets and battery packs with Ex marking only the charger Tischladegerät FC1 S Ex with the appropriate plug-in power supply has to be used.
Plug-in power supply
Printed Short operating instructions
User manuals in various languages which include all the functions are available on the internet at support.avaya.com. (V 2.0 - 07/2007)
Putting the battery into operation
First, charge the battery to full capacity. Then, during the first week of operation, always return the handset to the charger cradle. New battery cells will in general reach full capacity only after several days of normal use. See also the information on page 20 about using the battery.
Only use batteries in an appropriate manner. The Avaya GmbH & Co. KG is not liable for damage which occurs due to inappropriate handling of the battery.
6

FC1 / FC1 Ex |
Getting to know your handset Important information |
Consumer information about disposal of wasted equipment
Electric and electronic equipment and components marked with a striked out dustbin may contain substances which are harmful to the environment or to your health. Thus, any equipment or component bearing such a mark must not be disposed of together with household waste! Take the hazardous waste materials to a municipal collection centre for hazardous waste or to your dealer where
they can be disposed of in an environmentally friendly mannor. Please dispose of discharged batteries only.
Authorisation and conformity
The Avaya GmbH & Co. KG declares that the products FC1 and FC1 Ex comply with the basic requirements and other relevant provisions of guideline 1999/5/EU (R&TTE).
These devices are suitable for connection to radio interfaces (DECT™) from Avaya telecommunications systems Integral Enterprise and Integral 33 / 55. They define and fulfil the basic requirements according EU guideline 1999/5/ EG (Radio and Telecommunication Terminal Equipment, R&TTE).
Due to their design these devices are not suitable for direct operation on interfaces to public telecommunications networks. In the unlikely event of any problems occurring during operation, please contact your dealer or the system admimistrator.
The declaration of conformity can be obtained using the following Internet address: www.avaya.de/gcm/emea/de/includedcontent/conformity.htm.
2007)
These devices operate in accordance with the DECT™ system with a frequency range of 1880 MHz to 1900 MHz.
NOTE
DECT™ is a registered trademark of ETSI.
7
Getting to know your handset Important information |
FC1 / FC1 Ex |
Retricted use of some functions
These instructions describe all handset functions which you can use with the latest system software. Some functions cannot be performed with older software. Please contact your dealer or system administrator for more detailed information.
8

FC1 / FC1 Ex |
Getting to know your handset Important information |
Overview
1 |
2 |
|
3 |
|
4 |
|
05341285701 |
5 |
NAME |
|
6 |
|
|
|
7 |
8 |
|
OK |
|
|
9 |
R |
|
|
10 |
11 |
1 |
2ABC |
3DEF |
|
|
4GHI |
5JKL |
6MNO |
12 |
|
7PQRS 8TUV 9WXYZ |
|
||
13 |
|
|
|
|
14 |
|
0 |
|
15 |
|
|
|
|
16 |
9
Getting to know your handset Important information |
FC1 / FC1 Ex |
Legend
No. |
Name |
Meaning |
1 |
Emergency call key |
Keep key depressed until a deep confir- |
|
|
mation tone sounds! |
|
|
|
2 |
Headset socket |
The handset FC1 Ex must not be used |
|
|
with any headset! |
|
|
|
3 |
Handset |
|
|
|
|
4 |
Display |
indicates call numbers and settings |
|
|
|
5 |
Handsfree loudspeaker |
on rear of casing |
|
|
|
6 |
LEFT SOFTKEY |
Functions depend on status (shown in |
|
|
display) and for switching OFF |
|
|
|
7 |
RIGHT SOFTKEY |
Functions depend on status (shown in |
|
|
display) and for switching ON |
|
|
|
8 |
SELECTOR key |
1st function: confirm settings (press |
|
|
upon the centre of the key) |
|
|
2nd function: arrow-up-down key to |
|
|
scroll in the menu or in the lists (press |
|
|
upon the upper or lower end of the key) |
|
|
|
9 |
R key |
1st function: Signal button for functions |
|
|
in a telephone system |
|
|
2nd function: handsfree operation |
|
|
|
10 |
HANDSET HOOK ON/OFF key |
corresponds to lifting and replacing the |
|
|
handset |
|
|
|
11 |
1 key |
1st function: digit and letters |
|
|
2nd function: mute |
|
|
|
12 |
Digit keys |
for digits and letters |
|
|
|
13 |
0 key |
1st function: digit and letters |
|
|
2nd function: telephone book, call list, |
|
|
message list |
|
|
|
14 |
STAR key |
1st function: ’star’ |
|
|
2nd function: switch over softkeys |
|
|
3rd function: ’shift’ (capitals, lower case |
|
|
letters) |
|
|
|
10
FC1 / FC1 Ex |
Getting to know your handset Important information |
Legend (cont.)
No. |
Name |
Meaning |
15 |
HASH key |
1st function: ’hash’ |
|
|
2nd function: redialling |
|
|
|
16 |
Microphone |
|
|
|
|
11
Getting to know your handset Important information |
FC1 / FC1 Ex |
Display
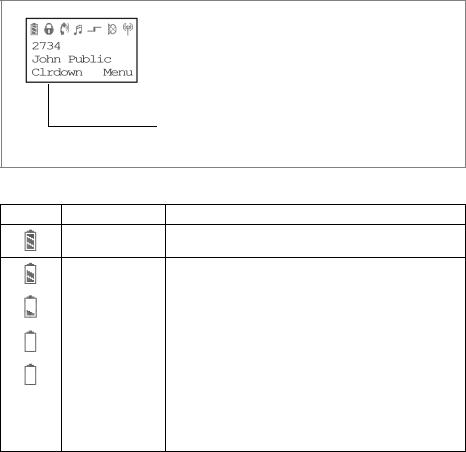
Text and symbols in the display facilitate operation of the handset. They guide you through the menus and provide information on the status of your handset.
The functions of the right and left softkeys change according to the current status. The functions are shown in the display directly above the softkeys.
The lines in the display
Symbol line indicates the status of the handset.
Two text lines, e.g. for call number and name. .
 Function of the right softkey, e.g. Menu.
Function of the left softkey, e.g. Clrdown.
Meaning of symbols
Symbol Name |
Meaning |
Battery full
Battery nearly full |
|
|
|
Battery nearly |
|
empty |
|
|
|
Battery empty |
|
|
|
Battery symbol |
Capacity for less than five minutes left. When you first |
flashing |
load a new battery, the handset does not ”know” its |
|
charging status. So the battery signal shows two bars |
|
only meaning battery is nearly charged. An appropriate |
|
battery signal will be shown after the battery pack in the |
|
handset once has been fully charged. See page 20. |
12

FC1 / FC1 Ex |
Getting to know your handset Important information |
Meaning of symbols (cont.)
Symbol |
Name |
Meaning |
|
Mute |
The microphone is off. Your call partner cannot hear |
|
|
you. |
|
|
|
|
No call signal |
The call signal has been set to mute. |
|
|
|
|
Lock |
The handset is locked. |
|
|
|
|
Handset |
The handset has a telephone connection. |
|
|
|
|
Multifrequency |
Each push of the button is transferred to the connection |
|
code |
subscriber (MFC post-dialling) as an (audible) DTMF |
|
|
tone. |
|
|
|
|
Headset |
You are making a call using the headset. The housing |
|
|
microphone and loudspeaker are automatically |
|
|
switched off. |
|
|
|
|
Special functions |
STAR button is pressed for a long period. |
|
activated |
Pressing a key for a long period: Keep key depressed |
|
|
until a deep confirmation tone sounds. |
|
|
|
|
Loudspeaker |
The loudspeaker for handsfree operation on the rear |
|
|
side of the housing is switched on. |
|
|
|
|
Within range of |
Your handset is within range of a base station. |
|
system |
You may make a call. |
|
|
|
|
Connection to |
Your handset has a radio connection. |
|
system |
|
|
|
|
13

Getting to know your handset Important information |
FC1 / FC1 Ex |
The display on your handset can show two text lines comprising up to 16 characters on each line. The layout of the display contents depends on the status of your handset.
|
|
In basic state |
|
|
|
|
|
The display shows the number and the first 16 letters |
7442 |
|
|
Smith |
|
of your name. |
|
Menu |
|
|
|
|
|
|
Name display |
|
|
|
2492 |
|
If you are calling a subscriber, the display shows the |
Miller |
|
subscriber’s call number and/or name. |
Clrdown |
Menu |
|
|
|
|
|
|
When making a call |
|
|
|
|
The display shows the number (and the last 16 numbers) |
|
0004434758739124 |
||
|
Free |
the name. |
|
|
|
Clrdown |
Menu |
|
|
|
When you are called |
|
|
|
|
|
The display shows the number (and the last 16 numbers) |
7442 |
|
|
Smith |
|
and, if available, the name. |
Clrdown |
Menu |
|
|
|
|
|
|
If a call has been diverted to you |
|
|
|
2942 |
|
The display shows the number and the call diversion. |
Miller |
–>6382 |
|
Clrdown |
Menu |
|
|
|
|
The display shows the current connection status. The following abbreviations are used:
Bus. |
Busy |
End |
End of connection |
Free |
The called number is free |
FM |
Follow-me is switched on |
Conf. |
Conference |
14
FC1 / FC1 Ex |
Getting to know your handset Important information |
LIST |
Unread entry in the call list |
No text message |
|
Unread text message waiting |
|
MW |
Not yet heard message waiting on a voice mail |
NR |
The called number cannot be reached |
CCBS |
Call back entered |
Conn. |
Connection |
Dial |
Dialing procedure |
15

Getting to know your handset Important information |
FC1 / FC1 Ex |
Putting into operation
If your handset is not yet mounted
If the handset is not completely assembled when you receive it, you must:
Insert the Mem-Card (see page 17),
Install the battery (see page 18) and
Remove the protective film from the display, if necessary.
Your service team must register the handset with your telephone system.
Your handset is then ready for operation.Now connect the charger (see page 19).
If your handset is already completely mounted
If the handset is already completely assembled and registered with your telephone system when you receive it, you need only connect the charger (see page 19).
MEM-Card
You can only use your handset to make and receive telephone calls if a MEMCard has been inserted. It saves important data for your handset, such as personal settings and your personal telephone book. If you switch handsets, you can use the MEM-Card to make and receive telephone calls immediately.
16
FC1 / FC1 Ex |
Getting to know your handset Important information |
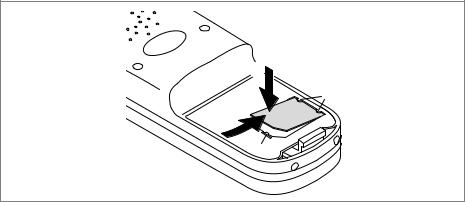
Inserting the MEM-Card
First use a finger to press the small MEM-Card out of the larger frame (see preceding illustration).
With the short edge at an angle under the holding crescents a, push the MEM-Card into the MEM-Card compartment (1). The golden contact surface of the MEM-Card must face downwards!
Press the MEM-Card downwards until the small tag b locks (2).
2
a
1
b
Taking out the MEM-Card
You only need to remove the MEM-Card if you intend to give the handset to someone else or you need the MEM-Card for a new handset.
When removing the MEM-card, do not use copped or sharp-edged tools. They might damage the MEM-card.
Remove the battery out of the handset (see page 18).
Press the small tag b upwards and lift the MEM-Card a bit at the same time.
Now remove the MEM-Card.
17

Getting to know your handset Important information |
FC1 / FC1 Ex |
Inserting the battery
For information about handling explosion-proof handset versions and for safety instructions when replacing the battery see the "Quick Guide" coming with the handset.
Push the battery into the housing (1).
FC1: Push the battery down on the lever side until you hear it lock (2).
FC1 Ex: Press the battery downwards on the screw side until it makes contact with the housing (2).
FC1 Ex: Fix the battery with the securing screw (2). Use a screw driver
Torx T 10. The maximum fastening torque of the screw is 60 Ncm. (V 1.9 - 12/
2005)
2
Removing the battery
For information about handling explosion-proof handset versions and for safety instructions when replacing the battery see the "Quick Guide" coming with the handset.
Place the handset with the display downwards on the table.
FC1: Keep the lever (2) pressed down (V 2.0 - 07/2007)
FC1 Ex: Unscrew the securing screw using a screw driver Torx T 10.
Lift up the battery at the lever / screw side and remove it.
18

FC1 / FC1 Ex |
Getting to know your handset Important information |
Placement of the charger
Place the charger on a stable, even surface, e.g. a table outside of hazardous areas. Choose a location that is protected from direct sunlight and dampness.
CAUTION
For charging explosion-proof handsets, e.g. type FC1 Ex, use the charger type FC1 S Ex only.
(V 1.7a - 10/2004)
Plug the plug-in mains unit into a socket.
Insert the small connecting cord plug into the back of the charging device.
The charger is ready for operation.
Charging the handset
Simply place the handset into the charger. You will hear an acknowledgement tone. The display light will switch on briefly. The handset remains switched on or off.
The battery symbol in the symbol row moves until the battery is completely charged.
When the batteries are being charged, they will become slightly warm. This is perfectly normal.
As soon as the battery is full, trickle charging starts. This is indicated by a blinking frame of the battery full symbol.
Charging the spare battery
Charging an FC1 battery using the Charger Plus
At the rear side of the Charger Plus a slot is provided for charging a spare battery. This slot is covered by a lid. Open the lid, insert the battery to be charged and gently press it against the charger’s housing. The contact ar-
19

Getting to know your handset Important information |
FC1 / FC1 Ex |
eas of the battery must get into electrical contact with the contact springs. Close the lid. As soon as the contact is established and charging starts, the front bottom LED of the table-top charger changes its colour from green to red.
Charging an explosion-proof battery using the Tischladegerät FC1 S Ex An open bay is provided on the back of the table-top charger Tischladegerät FC1 S Ex for charging an explosion-proof spare battery. Place the battery into the bay with the contacts facing downward and the securing screw bore facing outside and gently press it down against the contact springs. As soon as the contact is established and charging starts, the front bottom LED of the table-top charger changes its colour from green to red.
For more information about handling explosion-proof handset versions and for safety instructions when replacing the battery see the "Quick Guide" coming with the handset. (V 1.6 - 08/2004)
Information on using the battery
ATTENTION
Do not throw the battery into a fire as it might explode.
To avoid injury and fire damage, do not allow the contacts of the battery to come into contact with conductive objects or to be shortcircuited.
When you first load a new battery, the handset does not at first ”know” its charging status. So, for the time being, the battery signal shows two bars only meaning battery is nearly charged. An appropriate battery signal will be shown after the battery pack once has been completely charged in the handset!
Every time you insert a battery pack into your handset, you should charge the battery to full capacity for at least 14 hours. Use only system-compatible chargers for charging the batteries!
Read the hints about "Caring for NiCD and NiMH battey packs" in the Quick Guide. They contain information on how to obtain optimum service life from your battery pack.
20
FC1 / FC1 Ex |
Getting to know your handset Important information |
Harmful influences regarding the battery pack service life and beeing outside of the manufacturer’s control include:
Extremely low and high temperatures during storage and operation,
Permanent charging in the charger,
Deep discharge in the unit or while storing.
Do not leave the battery in direct sunlight. Proper care of the battery is rewarded with a long service life.
Headset (combined handset / headset)
CAUTION
Do not use a headset together with an explosion-proof handset version FC1 Ex! This is the reason why the „Headset socket” on page 10 is permanently sealed.
See also the "Quick Guide" coming with the handset for safety instructions.
A headset, however, is available to be used with the handset FC1 providing handsfree phone calls. Your handset automatically identifies a connected headset and then deactivates its internal microphone and earpeace. If required, you may additionally activate the feature "handsfree listening" via internal loudspeaker.
When a call arrives, the handset rings. When a headset is connected, incoming calls will be signalled by the headset only.
All other functions remain unaffected by a headset connected. Especially the temporary adjustment of the handset volume using the SELECTOR key on page 87.
Connecting the headset (not possible with FC1 Ex)
The connector socket is located on the top right hand side of the handset FC1. Carefully pull off the protective cap from the connector socket.
21

Getting to know your handset Important information |
FC1 / FC1 Ex |
Completely insert the headset plug into the connector socket until it audibly engages.
Do not use the headset, when the handset is placed in a charger. To make a call, take the handset out of the charger.
CAUTION
Prevent damage to your hearing. (V 2.0 - 07/2007)
If this headset from the FC1 accessory list is operated from other devices, very loud audio signals / signal events could lead to hearing damage (acoustic shock). Operate this headset from the FC1 accessory list together with the FC1 handset only. See the safety instructions in the "Quick Guide". If you use the headset for extended periods, you should set the volume to a moderate level. Over time, high volume levels can lead to hearing damage, too.
22

FC1 / FC1 Ex |
Getting to know your handset Important information |
Basic rules of operation
The operation of your handset includes several frequently recurring operating steps. Please familiarize yourself with these operating steps.
Switching on the handset
The handset is switched off. Press the RIGHT SOFTKEY for a long period.
Switching off the handset
The handset is in basic status. Press LEFT SOFTKEY for a long period.
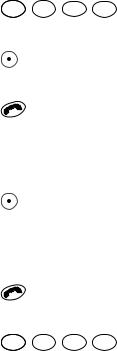
Left and right softkeys
The function of the softkeys changes according to the situation. The function always appears in the display above the softkey, e.g. Menu or Clrdown.
The RIGHT SOFTKEY is used for switching on or for calling up the menu.
The LEFT SOFTKEY is used for ending a menu option or cancelling.
If you press the LEFT SOFTKEY for a long period when in any of the menus, the handset will be returned to its basic status.
23

Getting to know your handset Important information |
FC1 / FC1 Ex |
Selector
OK
The SELECTOR concludes the setting procedure.
Doubly occupied keys
Some keys on your handset have two functions. The additional blue labels denote these keys. You must hold the key for longer if you want to trigger the second blue function. You will hear an acknowledgement tone.
Selecting a menu
Some functions and settings of your handset can be obtained via the display conten ts (menu). The menu is set out in such a way that most of the menu options lead to submenus.
Call up the menu using the RIGHT SOFTKEY.
OK OK
Press upon the upper or lower end (arrow) of the SELECTOR to scroll through the menus or through the call list or message list.
An exemple for a menu option is: System.
OK
Press upon the centre of the SELECTOR to select the desired menu option or list item.
NOTE
In the basic status, you can also call up the menu by pressing on the lower end (arrow down) of the selector.
24

FC1 / FC1 Ex |
Getting to know your handset Important information |
Returning to another menu level
The LEFT SOFTKEY enables you to move to the next menu level up or leave the menu.
Submenus
Submenus are operated in exactly the same way as the main menu.
Cancel
Press the LEFT SOFTKEY for a long period in order to reach basic status.
Entering characters for telephone directory entries
The digit keys may also be used to enter letters and characters, e.g. for names in your personal telephone directory. The letters are printed on the digit keys. Your handset will automatically switch to the input of letters and characters when this is required. The table of characters indicates which characters you may enter (see page 127).
NOTE
To switch between upper and lower case letters press the STAR key for a long period until a deep confirmation tone sounds.
Example: Entering the name “JOHN”:
5JKL
Press the JKL button once. J appears in the display. Wait briefly.
6MNO 6MNO 6MNO
Press the MNO button three times. JO appears in the display. Wait briefly.
25

Getting to know your handset Important information |
FC1 / FC1 Ex |
4GHI 4GHI
Press the GHI button twice. JOH appears in the display. Wait briefly.
6MNO 6MNO
Press the MNO button twice. JOHN appears in the display. Wait briefly.
Ending input
OK OK
Press the SELECTOR twice. The characters will be accepted.
Correcting characters
Press the LEFT SOFTKEY.
Deleting a line
Press LEFT SOFTKEY for a long period.
Inserting characters
OK OK
Move the cursor position to the left or right. New characters which you enter will be inserted in front of the cursor.
26
FC1 / FC1 Ex |
The functions |
The functions
Telephoning as usual
You may use your handset to telephone in the usual manner. Telephoning within the telephone system (internally): dial the internal call number required.
External Calls: dial the external line code (usually zero), followed by the call number of your call partner.
Calls, block dialling
1 2ABC 7PQRS 6MNO
Dial the desired number, e.g. 1 2 7 6.
Correct any typing mistakes if necessary.
Lift the handset.
Cancelling block dialling
Press for an extended period.
Making a call, conventional dialling
Lift the handset.
1 2ABC 7PQRS 6MNO
Dial the desired number, e.g. 1 2 7 6.
27

The functions |
FC1 / FC1 Ex |
Ending a call
Replace the handset.
Redialling
#

Press the HASH key for a long period.
Lift the handset.
Accepting a call
Your handset rings.
Lift the handset.
Switching off the ringing tone
Your handset rings.
R
Tone off. The call is still waiting.
28

FC1 / FC1 Ex |
The functions |
Rejecting a call
Your handset rings.
Press the LEFT SOFTKEY. The caller hears the busy tone.
Additional Hints
The number of the caller appears in the display. If the call is internal, the name will also be displayed.
Diverted call: If someone dials the number 5432 and reaches you by call diversion, the following will also appear in the display: ->5432
If when telephoning you arrive at the boundary of the radio range, you will hear the range warning tone (to deactivate see page 90).
The message “Lines busy” tells you that no line is free. Try again later.
When you receive a message, an existing call is temporarily interrupted. See Messaging section. (V 1.3 - 02/2004).
29

The functions |
FC1 / FC1 Ex |
Callback if busy
If the called internal subscriber is busy, you may activate a callback. As soon as the subscriber is free, your handset rings and you can allow yourself to be connected to the subscriber. This function must be enabled for your handset within the system. Your system administrator will inform you of the required code.
Activating a callback
The subscriber is busy.
 2ABC
2ABC
Enter the code for callback, e.g. STAR, 2. You will hear an acknowledgement tone.
Replace the handset. CCBS appears in the display.
NOTE
You may store up to three callbacks.
When the subscriber becomes free
Your handset will ring when the desired subscriber becomes free.
Lift the handset. The connection is made.
30
Loading...