


Partner 18
Avaya Partner 18, Partner 34D, Partner 3910, Partner MLS 12, Partner MLS 12D Connection Manual
...

AT&T
560-201-103
Issue 1
November 1993
PassageWay™ Solution
For PARTNER® Communications System
User’s Guide

Copyright © 1993 AT&T
All Rights Reserved
Printed in the USA
560-201-103
Issue 1
November 1993
NOTICE:
While reasonable effort was made to ensure that the information in this document
was complete and accurate at the time of printing, AT&T cannot assume
responsibility for any errors. Changes and/or corrections to the information
contained in this document may be incorporated into future issues. Check the
Readme file enclosed with the software to ensure you are aware of any last
minute modifications to this documentation.
FEDERAL COMMUNICATIONS COMMISSION (FCC) STATEMENT
This equipment has been tested and found to comply with the limits for a Class B
digital device, pursuant to Part 15 of the FCC rules. These limits are designed to
provide reasonable protection against harmful interference in a residential
installation. This equipment generates, uses, and can radiate radio frequency
energy and, if not installed and used in accordance with the instructions, may
cause harmful interference to radio communications. However, there is no
guarantee that interference will not occur in a particular installation. If this
equipment does cause harmful interference to radio or television reception, which
can be determined by turning the equipment off and on, the user is encouraged to
try to correct the interference by one or more of the following measures:
—
—
—
—
Reorient or relocate the receiving antenna.
Increase the separation between the equipment and the receiver.
Connect the equipment into an outlet on a circuit different from that to which the
equipment is connected.
Consult the dealer or an experienced radio/TV technician for help.

TRADEMARK NOTICE
PARTNER, MLS-34D, MLS-18D, MLS-12D, MLS-12, and MLS-6 are registered
trademarks of AT&T.
PassageWay is a trademark of AT&T.
Microsoft and MS-DOS are registered trademarks of Microsoft Corporation.
Windows is a trademark of Microsoft Corporation.
Hayes is a registered trademark of Hayes Microcomputer Products, Inc.
IBM and PS/2 are registered trademarks of International Business Machines
Corporation.
HP and LaserJet are registered trademarks of Hewlett-Packard Company.
SECURITY
As a customer of new telecommunications equipment, you should be aware of the
significant and growing problem of theft of long distance services by third parties,
known commonly as "toll fraud." It is particularly important that you understand
and take appropriate steps to deal with this crime because under applicable tariffs,
you will be responsible for payment of associated toll charges. AT&T can not be
responsible for such charges and will not make any allowance or give any credit
resulting from toll fraud.
Toll fraud can occur despite the preventive efforts of network providers and
equipment manufacturers. Toll fraud is a potential risk for every customer with
telecommunications equipment having one or more of the following features: (1)
remote access, (2) automated attendant, (3) voice mail, (4) remote administration
and maintenance, and (5) call forwarding (remote). This is not a product or design
defect but a risk associated with equipment having one or more of the features
described above. If your new telecommunications equipment possesses any of
these features, please consult the relevant portion of your documentation for
further details and specific procedures to reduce the risk of toll fraud or contact
your AT&T dealer for further details.

ORDERING INFORMATION
To order copies of this manual:
Contact: Your AT&T Account Team or your AT&T Authorized Dealer.
or
Call:
AT&T at 1-800-432-6600
or
Write:
AT&T Customer Information Center
P.O. Box 19901
Indianapolis, IN 46219
Order: Document No. 560-201-103

Contents
1
Introduction
1-1
■
What is PassageWay Solution?
1-1
■
User Responsibilities
1-3
■
Conventions Used in this Guide
1-3
■
Getting Help
1-4
2
Installing and Setting Up PassageWay Solution
■
Overview
■
PassageWay Components
■
PassageWay Requirements
■
lnstalling the PassageWay Adapter
2-1
2-1
2-2
2-5
■
Installing the PassageWay Software
■
Setting Up AT&TBuzz
Setting the Run Mode Option
No Matching Mode
Match to AT&TCall File Mode
Export via Paste Link DDE Mode
Setting User Options
2-7
2-11
2-25
2-28
2-28
2-30
2-32
2-36
i

Contents
3
Using AT&TBuzz
■
Overview
■
■
■
■
■
What is AT&TBuzz?
Using Caller ID Information
Running AT&TBuzz
Helpful Hints
Tasks
Accessing the Log Viewer
Answering a Call
ii
Changing the AT&TCall File Associated
with AT&TBuzz
Creating a New Card in the Associated
AT&TCall File
Exiting AT&TBuzz
Resetting the Size of the AT&TBuzz Window
Selecting a Call Record
Setting AT&TBuzz for Auto-Hold
Setting AT&TBuzz for Auto-Drop
Setting AT&TBuzz to Show the
Associated AT&TCall Card Automatically
Setting the AT&TBuzz Window to
Appear Automatically
Setting the Area Code
3-1
3-1
3-2
3-7
3-10
3-10
3-11
3-11
3-11
3-13
3-13
3-14
3-14
3-14
3-15
3-15
3-16
3-17
3-17

Contents
Setting the AT&TBuzz Window to Always
be on Top of Other Windows
3-18
Setting Automatic Inspect Mode
3-18
Setting the Run Mode for AT&TBuzz
3-19
Setting AT&TBuzz to Log Incoming Calls
3-20
Showing the Card of an Incoming Call
on Demand
3-21
Using the Timer
3-21
■
AT&TBuzz Menu Bar Options
3-23
4
Using AT&TCall
■
Overview
■
What Is AT&TCall?
■ Getting Started
■
Helpful Hints
■
Running AT&TCall
■ Tasks
File Tasks
Accessing the Log Viewer
Changing How Cards are Sorted in an AT&TCall File
Creating a File Template
Creating a New AT&TCall File
Dialing a Phone Number with the Dialpad
4-1
4-1
4-2
4-10
4-37
4-38
4-38
4-38
4-39
4-39
4-40
4-41
4-41
iii

Contents
Exiting AT&TCall
4-43
Exporting AT&TCall Information
4-44
Importing Files into AT&TCall
4-45
Opening an Existing AT&TCall File
4-48
Printing a Card List
4-49
Printing an AT&TCall File or Card
4-50
Protecting an AT&TCall File with a Password
4-53
Removing the Password from an AT&TCall File
4-54
Saving an AT&TCall File
4-55
Setting the Account Code Options
4-55
Setting the AT&TCall Window To Always
Be on Top of Other Windows
4-56
Setting the Dial Options
4-57
Specifying an AT&TCall File To Be Loaded Automatically
4-58
Card Tasks
4-60
Accessing the Notes Field
4-60
Changing the Field Labels in the Cards
4-60
Creating a New Card
4-61
Deleting a Card
4-61
Dialing a Phone Number from a Card
4-62
Editng an Existing Card
4-63
Entering Telephone Numbers in a Card
4-64
Hiding the Card Display
4-65
iv

Contents
Selecting a Card
Showing the Card Display
Using the Timer
Quick Dial Tasks
Accessing Information for a Quick Dial
Assigning a Phone Number to a Quick Dial
Changing the Number of Quick Dials Displayed
Changing the Setup of the Quick Dial Labels
Dialing a Phone Number from a Quick Dial
Erasing a Quick Dial
Re-Assigning an Existing Quick Dial
■ AT&TCall Menu Bar Options
4-65
4-65
4-65
4-66
4-66
4-67
4-69
4-69
4-70
4-71
4-71
4-73
5
Using AT&TSet
■ Overview
■ What Is AT&TSet?
System Administration Capabilities
■ Helpful Hints
■ Running AT&TSet
■ Extension Programming Tasks
Changing Button Labels
Converting a File to a Different Button
Configuration
5-1
5-1
5-2
5-7
5-8
5-9
5-12
5-12
5-13
v

Contents
Creating a New File
Exiting AT&TSet
Identifying How a Button is Programmed
Opening an Existing File
Printing Button Labels
Printing the Personal Speed Dial List
Printing the System Speed Dial List
Programming a Button
Programming the Extension Name
Programming the Personal Speed Dial List
Programming the System Speed Dial List
Programming Your Telephone
Reading the Current Programming
from your Telephone
Saving a File
Saving a New File
Modifying an Existing File and Saving It as a
Different File
Saving Changes to an Existing File
Selecting Buttons to be Programmed
to Your Telephone
5-14
5-15
5-15
5-17
5-17
5-18
5-19
5-21
5-23
5-24
5-26
5-28
5-30
5-33
5-33
5-34
5-35
5-35
vi

Contents
■
Centralized Telephone Programming
Tasks
5-36
Entering Centralized Telephone
Programming
5-36
Setting the Automatic Line Selection
5-41
Setting the Line Ringing Options
for Line Buttons
5-42
■
AT&TSet Menu Bar Options
5-44
6
Using Log Viewer
■ Overview
■ What Is Log Viewer?
■ Helpful Hints
■ Running Log Viewer
■ Tasks
Deleting Entries from the Call Log
Printing Log Entries
Setting the Log Viewer Preferences
Sorting Call Log Entries
Specifying the Calls to be Displayed
■ Log Viewer Menu Bar Options
6-1
6-1
6-2
6-5
6-5
6-6
6-6
6-8
6-8
6-10
6-12
6-14
vii

Contents
7
Using AT&TConnect
■
■
■
■
Overview
What Is AT&TConnect?
Running AT&TConnect
Tasks
Accessing the Events Log
Changing the COM Port
Specifying the Version of Your PARTNER
System
Changing the Labels of the Line Buttons
Programming a Caller ID Inspect Button
Testing the PassageWay Adapter
■ AT&TConnect Menu Bar Options
7-1
7-1
7-2
7-2
7-4
7-4
7-6
7-7
7-8
7-11
7-13
7-15
8 Using Autodialing Applications
with PassageWay Solution
8-1
■ Overview
8-1
■ Using Autodialing Applications
8-1
■
Setting Up PassageWay Solution
8-2
■ Setting Up Your Application
8-3
■ Helpful Hints
8-4
viii

Contents
9
Troubleshooting
■ Overview
■
Troubleshooting AT&TConnect
■
Troubleshooting AT&TCall
■ Troubleshooting AT&TSet
■
Troubleshooting AT&TBuzz
9-1
9-1
9-2
9-11
9-13
9-16
A
Appendix A: Menu Trees
A-1
B
Appendix B: PC Serial Ports
B-1
■
■
■
■
■
Overview
B-1
Background
Serial Ports Under Windows 3.1
Workarounds and Solutions to the
IRQ Conflict Problem
Selecting an Add-In Serial Port Card
B-2
B-6
B-7
B-10
ix

Contents
C
Appendix C: Running AT&TBuzz in Export via
Paste Link DDE Mode
C-1
Glossary
GL-1
Index
Index-i
x

Figures
2
Installing and Setting Up PassageWay Solution
2-1
2-1.
2-2.
2-3.
2-4.
2-5.
2-6.
2-7.
2-8.
2-9.
2-10.
2-11.
2-12.
2-13.
2-14.
2-15.
2-16.
2-17.
2-18.
2-19.
2-20.
2-21.
2-22.
2-23.
2-24.
PassageWay Solution Components
Components of the PassageWay Adapter
Connecting the Line Cord to the PassageWay Adapter
Connecting the Modular Phone Cord to the PassageWay
Adapter
AT&T PassageWay Setup Window
AT&T PassageWay Setup Dialog Box
Sample Installation Status Message Box
Setup Complete Message Box
COM Port Dialog Box
AT&TConnect Dialog Box
AT&TConnect Setup - System Configuration Dialog Box
AT&TConnect Setup - Caller ID Inspect Feature Dialog
Box When No Caller ID Inspect Button is Programmed
AT&TConnect Setup - Caller ID Inspect Feature Dialog
Box with Caller ID Inspect Button Programmed
AT&TConnect Setup - Line Labels Dialog Box
AT&TConnect Setup Dialog Box
AT&T PassageWay Window
AT&TBuzz Initialization Dialog Box
Run Mode Dialog Box
AT&TBuzz Running in No Matching Mode
2-3
2-4
2-8
2-10
2-12
2-13
2-14
2-14
2-15
2-15
2-16
2-18
2-19
2-20
2-21
2-23
2-26
2-27
2-29
Area Code Dialog Box
2-31
AT&TBuzz Running in Match to AT&TCall File Mode
2-32
AT&TBuzz Initialization Dialog Box
2-34
AT&TBuzz Information Dialog Box
2-34
AT&TBuzz Running in Export via Paste Link DDE Mode 2-35
xi

Figures
2-25.
Options Dialog Box when AT&TBuzz is Running in
Match to AT&TCall File Mode
2-38
2-26.
Options Dialog Box when AT&TBuzz is Running in
No Matching or Export via Paste Link DDE Modes
2-39
3
Using AT&TBuzz
3-1
3-1.
Sample AT&TBuzz Window
3-2
3-2.
Components of the AT&TBuzz Window
3-3
4
Using AT&TCall
4-1
4-1.
4-2.
4-3.
4-4.
4-5.
4-6.
4-7.
4-8.
4-9.
4-10.
4-11.
4-12.
4-13.
4-14.
4-15.
4-16.
Untitled AT&TCall Window
Components of an AT&TCall Window
Desktop with 10/20 Quick Dials and Card Shown
Desktop with 10/20 Quick Dials and Card Hidden
Desktop with 25/50 Quick Dials and Card Displayed
Desktop with 25/50 Quick Dials and Card Hidden
Untitled AT&TCall Window
Components of an AT&TCall Window
Card Display
Edit Card Window
Modified Card
New Card Window
New Card
Note Pad
Card with Notes Icon
Dialpad Window
4-3
4-4
4-6
4-7
4-8
4-9
4-11
4-12
4-15
4-16
4-17
4-19
4-20
4-22
4-23
4-26
xii

Figures
4-17.
4-18.
4-19.
4-20.
4-21.
4-22.
4-23.
4-24.
4-25.
4-26.
4-27.
4-28.
4-29.
4-30.
4-31.
4-32.
4-33.
4-34.
4-35.
4-36.
4-37.
4-38.
Dialpad Window
Edit Labels Dialog Box
Modified Card Labels
Create Quick Dial Dialog Box
Sort Dialog Box
Export Dialog Box
Import Dialog Box
AT&TCall Dialog Box
Print List Dialog Box
Printed Cards With and Without the Notes
Print Cards Dialog Box
Password Dialog Box
Confirm Password Dialog Box
Account Code Options Dialog Box
Dial Options Dialog Box
Sample File to be Loaded Automatically
Delete Card Dialog Box
Timer Window
Quick Dial Information Dialog Box
Create Quick Dial Dialog Box
Quick Dial Label Setup Dialog Box
Change Quick Dial Dialog Box
4-28
4-31
4-32
4-34
4-39
4-45
4-47
4-48
4-49
4-51
4-52
4-53
4-54
4-56
4-57
4-59
4-62
4-66
4-67
4-68
4-70
4-72
5
Using AT&TSet
5-1
5-1.
AT&TSet File for an MLS-18D Telephone
5-3
5-2.
Components of the AT&TSet Window
5-4
5-3.
AT&TSet Dialog Box
5-9
xiii

Figures
5-4.
5-5.
5-6.
5-7.
5-8.
5-9.
5-10.
5-11.
5-12.
5-13.
5-14.
5-15.
5-16.
5-17.
5-18.
5-19.
5-20.
Reading Telephone Dialog Box
Sample AT&TSet Window
Sample Change Button Label Dialog Box
Button Information Dialog Box
Print Speed Dial List Dialog Box
Extension Name Dialog Box
Personal Speed Dial List Dialog Box
System Speed Dial List Dialog Box
Write to Telephone Dialog Box
Sample Write to Telephone Status Dialog Box
Read from Telephone Dialog Box
Reading Telephone Status Dialog Box
Program Another Extension Dialog Box
Read from Telephone Dialog Box
Sample AT&TSet File for Another Extension
Automatic Line Selection Dialog Box
Line Ringing Options Dialog Box
5-10
5-11
5-12
5-16
5-20
5-24
5-25
5-27
5-29
5-30
5-31
5-32
5-38
5-39
5-40
5-42
5-43
6
Using Log Viewer
6-1
6-1. Log Viewer Window
6-3
6-2.
Sample PassageWay Log Viewer Dialog Box
6-6
6-3.
Sample PassageWay Log Viewer Dialog Box
6-7
6-4.
Preferences Dialog Box
6-9
6-5.
Filter/Sort Options Dialog Box
6-11
6-6.
Filter/Sort Options Dialog Box
6-13
xiv

Figures
7
Using AT&TConnect
7-1
7-1.
7-2.
7-3.
7-4.
7-3
7-5
7-6
7-7
7-9
7-10
7-12
7-13
7-5.
7-6.
7-7.
7-8.
AT&TConnect Window
Events Log Dialog Box
Sample COM Port Dialog Box
Sample AT&TConnect Setup - System Configuration
Dialog Box
Sample AT&TConnect Setup - Line Labels Dialog Box
Sample AT&TConnect Setup - Edit Line Label Dialog Box
Sarnple AT&TConnect Setup - Caller ID Inspect Feature
Dialog Box
AT&TConnect Adapter Test Dialog Box
9
Troubleshooting
9-1
9-1.
AT&TConnect - Communications Error Dialog Box
9-5
A
Appendix A: Menu Trees
A-1
A-1.
AT&TBuzz Menu Tree
A-2
A-2.
AT&TCall Menu Tree
A-3
A-3.
AT&TSet Menu Tree
A-4
A-4.
Log Viewer Menu Tree
A-5
A-5.
AT&TConnect Menu Tree
A-6
xv

xvi

Introduction
What is PassageWay Solution?
AT&T PassageWay™ Solution is a collection of software applications that runs
with Microsoft Windows™ operating system version 3.1 or later. These
applications provide you with an interface between your lBM
®
-compatible
personal computer and a PARTNER
®
Communications System via your system
or standard telephone. PassageWay Solution increases your
telecommunication capabilities by providing the following applications:
■
■
AT&TBuzz
AT&TBuzz is an application that notifies you of incoming calls and
enables you to view call origination information (referred to as Caller ID
in this document), if available. AT&TBuzz enables you to handle
incoming calls from your PC.
AT&TCall
AT&TCall is a card file application that enables you to maintain names,
addresses, telephone numbers, and other information you desire. With
AT&TCall, you can place calls directly from your PC.
1-1

Introduction
■
■
■
AT&TSet
AT&TSet is an extension programming application that enables you to
program user features and the personal speed dial list for your MLS34D
®
, MLS-18D®, or MLS-12D® telephone from your PC. With AT&TSet,
you can create and save multiple button programming files for your
telephone. You can also exchange these AT&TSet files with other
AT&TSet users. If you are the System Manager, you can use AT&TSet
to perform Centralized Telephone Programming from your PC for any
telephone type and to program the system speed dial list.
Log Viewer
Log Viewer is an application that enables you to access information
from the call log, which stores a record of calls you make using
AT&TCall and receive while AT&TBuzz is running.
AT&TConnect
AT&TConnect is the management software that provides the basis for
the other PassageWay software applications, and the diagnostic
features to troubleshoot these applications. AT&TCall, AT&TSet, and
AT&TBuzz require AT&TConnect to be running to connect these
applications with the PARTNER system, enabling you to fully use these
applications.
PassageWay Solution also provides the following features:
■
autodialing using the Hayes® command set, which is the same
command set used by most modems
■
the ability to use Dynamic Data Exchange (DDE) to link PassageWay
applications with other Windows applications
1-2

Introduction
User Responsibilities
Before using any of the PassageWay applications, you should be familiar with
basic Windows functions and procedures. If not, consult your Microsoft
Windows User's Guide.
You also may need to contact your PC vendor for information on configuring
your PC to meet PassageWay Solution requirements.
Conventions Used in this Guide
The following conventions are used in this guide:
■
■
■
■
■
■
Throughout this guide, telephones are grouped into two different
categories: system telephones and standard telephones. System
telephones refer to AT&T telephones specifically designed to work with
the PARTNER system. These include the MLS-34D, MLS-18D, MLS-
12D, MLS-12®, MLS-6®, and MLC-6 model telephones. Standard
telephones refer to industry-standard single-line rotary or touch-tone
telephones, including feature phones with built-in feature buttons and
lights.
Commands and text you should enter appear
in this style of
type.
Values, instructions, and prompts that appear on the screen are
in
this style of type.
Key names that are always located on the keyboard in the same place
appear in boxes, as in
[ ENTER
↵ ↵
].
Key combinations (holding down one key while pressing another key)
are connected with hyphens; for example:
[ SHIFT ]-[ TAB
➡❘
].
The terms option buttons and radio buttons refer to the same object.
1-3

Introduction
Getting Help
If you have questions about or problems with the PassageWay applications
that this user's guide does not resolve, call the AT&T National Service
Assistance Center at 1-800-628-2888 or your AT&T Authorized Dealer.
1-4

Installing and Setting Up
PassageWay Solution
Overview
This chapter provides the procedures for installing PassageWay Solution.
Installation of PassageWay Solution consists of the following steps:
1.
Installing the PassageWay adapter, which provides an interface between
your PC and telephone
2.
Installing the PassageWay software onto the hard disk of your PC
3.
Setting up AT&TBuzz
✏
Before installing PassageWay, make sure you have the PassageWay
components and an available serial (COM) port on your PC.
NOTE:
To use the Caller ID capabilities of PassageWay Solution, you must have a
PARTNER II Release 3.0 or later system that has lines subscribed to Caller ID
from your local telephone company. In addition, these lines must be plugged
into a PARTNER 206EC or 400EC module on your PARTNER system.
2-1

Installing and Setting Up PassageWay Solution
PassageWay Components
the PassageWay adapter
The PassageWay adapter provides an interface between your telephone
and an available serial (COM) port on your PC. The PassageWay
PassageWay consists of the following components:
■
■
■
■
■
adapter connects to the Line jack on your telephone.
software (one 3.5-inch, 1.44 MB, high-density diskette). However,
PassageWay Solution is also available on a 5.25-inch, 1.2 MB diskette.
To receive the software on a 5.25-inch diskette, complete the
registration card, specify that you want the software on a 5.25-inch
diskette, and return the registration card.
this user's manual and a quick reference
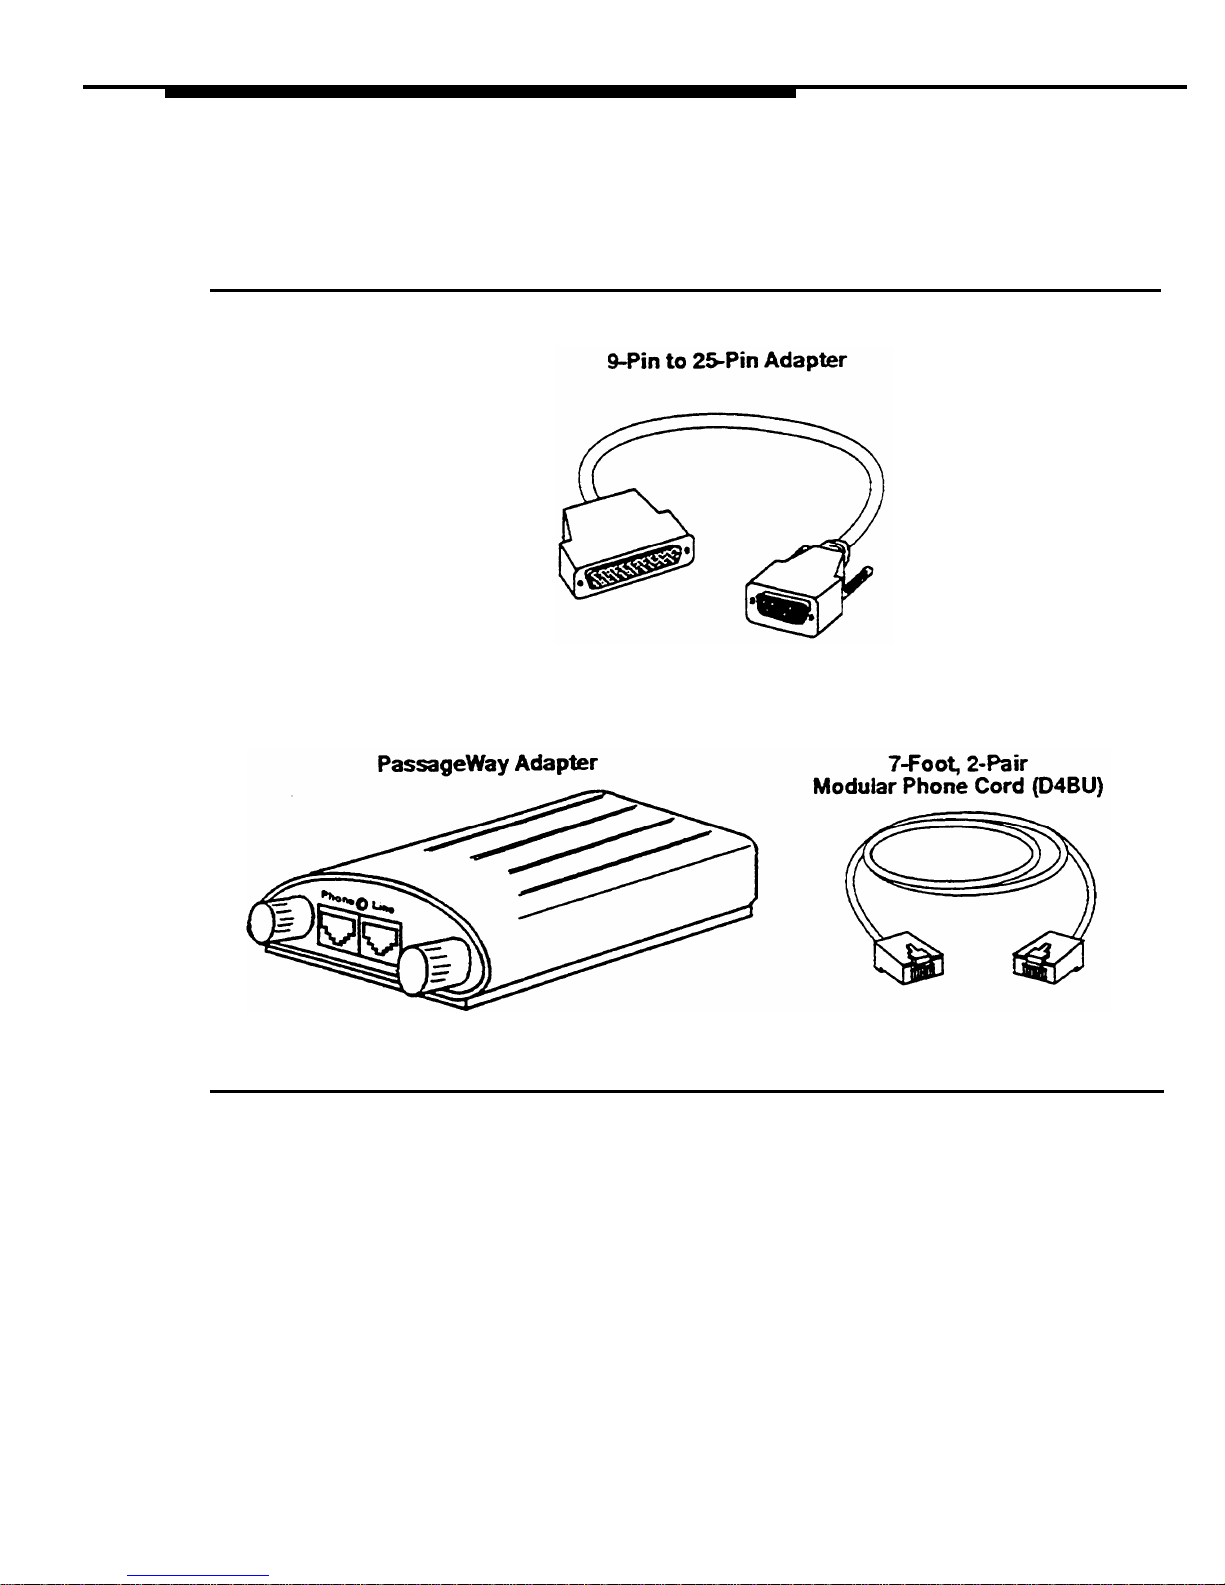
a 9-pin to 25-pin adapter for 9-pin serial ports
If your PC has a 9-pin serial port, connect the 9-pin to 25-pin adapter to
the serial port. The PassageWay adapter has a 25-pin connector.
a 7-foot, 2-pair, modular phone cord (D4BU)
This modular phone cord connects the PassageWay adapter to your
telephone.
Figure 2-1 shows the PassageWay Solution components.
2-2
Installing and Setting Up PassageWay Solution
Figure 2-1. PassageWay Solution Components
2-3
Installing and Setting Up PassageWay Solution
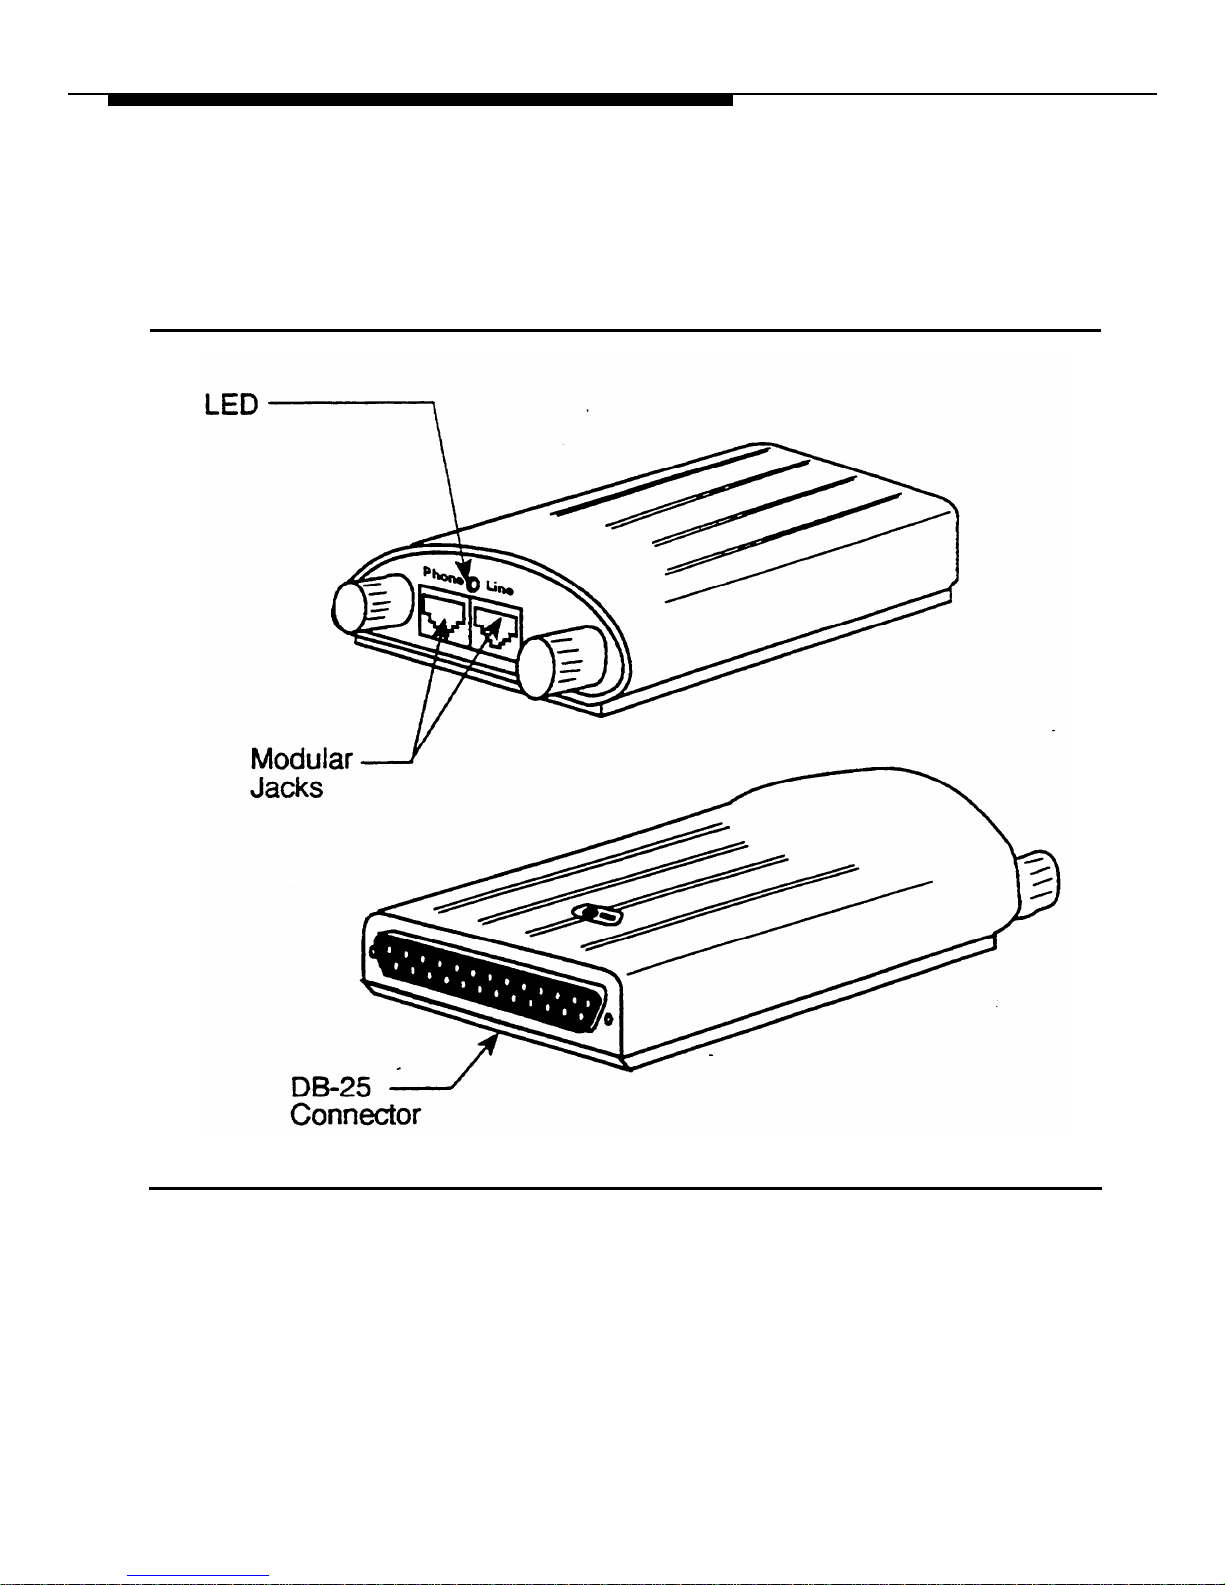
Figure 2-2 shows the components of the PassageWay adapter.
Figure 2-2.
Components of the PassageWay Adapter
2-4

Installing and Setting Up PassageWay Solution
PassageWay Requirements
To use the PassageWay applications, you must have the following
components:
■
■
■
an IBM-PC compatible or PS/2®-compatible PC with the following
hardware:
—
an 80286 or higher processor (an 80386 or higher model number
is recommended)
—
an available serial port
—
—
—
—
—
a minimum of 2 MB of RAM (4 MB is recommended)
a 3.5-inch, 1.44 MB, high-density drive
a hard disk with 2 MB of space available
a Windows-compatible color video monitor
a Windows-compatible pointing device (a mouse or trackball is
recommended)
Microsoft Windows 3.1 or later release running in standard or enhanced
mode
a system or standard telephone connected to a PARTNER system that
is configured and operating properly. The functionality of the
PassageWay applications depends on the type of telephone you are
using. Any differences in functionality are noted throughout this
document.
NOTE:
If all the serial ports in your PC are already in use, you may wish to purchase
✏
an additional serial port to use with PassageWay Solution. Consult Appendix B
for information on choosing a suitable serial port for PassageWay Solution.
2-5
 Loading...