


 Loading...
DocuPrint M355 df
User Guide

Apple, Bonjour, Macintosh, and Mac OS are trademarks of Apple Inc. in the United States and/or other countries.
Adobe, Acrobat, Photoshop, PostScript, and PostScript 3 are either registered trademarks or trademarks of Adobe Systems Incorporated in the United States and/or other countries.
PCL is a trademark of Hewlett-Packard Corporation in the United States and/or other countries.
Microsoft, Windows Vista, Windows, and Windows Server are trademarks of Microsoft Corporation in the United States and/or other countries.
Linux is a registered trademark of Linus Torvalds. Novell is a registered trademark and SUSE is a trademark of Novell, Inc. in the United States and other countries. Red Hat and Red Hat Enterprise Linux are registered trademarks of Red Hat, Inc. in the U.S. and other countries.
RSA, BSAFE are either registered trademarks or trademarks of EMC Corporation in the United States and/or other countries. Wi-Fi is a registered trademark of the Wi-Fi Alliance. WPA and WPA2 are trademarks of the Wi-Fi Alliance.
All product/brand names are trademarks or registered trademarks of the respective holders.
In this manual, safety instructions are preceded by the symbol  . Always read and follow the instructions before performing the required procedures.
The data saved in the hard disk of the machine may be lost if there is any problem in the hard disk. Fuji Xerox is not responsible for any direct and indirect damages arising from or caused by such data loss.
Fuji Xerox is not responsible for any breakdown of machines due to infection of computer virus or computer hacking.
IMPORTANT:
1.This manual is copyrighted with all rights reserved. Under the copyright laws, this manual may not be copied or modified in whole or part, without the written consent of the publisher.
2.Parts of this manual are subject to change without prior notice.
3.We welcome any comments on ambiguities, errors, omissions, or missing pages.
4.Never attempt any procedure on the machine that is not specifically described in this manual. Unauthorized operation can cause faults or accidents. Fuji Xerox is not liable for any problems resulting from unauthorized operation of the equipment.
An export of this product is strictly controlled in accordance with Laws concerning Foreign Exchange and Foreign Trade of Japan and/or the export control regulations of the United States.
XEROX, the sphere of connectivity design, and DocuPrint are trademarks or registered trademarks of Xerox Corporation in the U.S. or Fuji Xerox Co., Ltd.
DocuWorks is a trademark of Fuji Xerox Co., Ltd. All Xerox and Fuji Xerox product names are either registered trademarks or trademarks of Xerox Corporation or Fuji Xerox Co., Ltd.
2

Preface
Thank you for purchasing the DocuPrint M355 df.
This guide is intended for users who use the printer for the first time, and provides all the necessary operating information about the print, copy, scan, and fax functions.
Please read this guide to achieve the best performance from this printer.
This guide assumes you are familiar with computers and the basics of network operation and configuration. After reading this guide, keep it safe and handy for future reference.
WARNING:
This equipment will be inoperable when mains power fails.
Preface 3

4 Preface

Contents |
|
|
Preface |
........................................................................................................................................ |
3 |
Types of Manuals ...................................................................................................................... |
13 |
|
Using This Guide ....................................................................................................................... |
14 |
|
|
Organization.................................................................................................................. |
14 |
|
Conventions .................................................................................................................. |
14 |
Safety Notes .............................................................................................................................. |
15 |
|
|
Electrical Safety ............................................................................................................ |
16 |
|
Machine Installation ...................................................................................................... |
18 |
|
Operational Safety ........................................................................................................ |
20 |
|
Consumable.................................................................................................................. |
22 |
|
Warning and Caution Labels......................................................................................... |
23 |
Environment............................................................................................................................... |
24 |
|
Regulation.................................................................................................................................. |
25 |
|
|
Radio Frequency Emissions (Class B) ......................................................................... |
25 |
|
Fax Regulations ............................................................................................................ |
25 |
About License ............................................................................................................................ |
26 |
|
Illegal Copies and Printouts ....................................................................................................... |
27 |
|
Product Features ....................................................................................................................... |
28 |
|
1 |
Specifications ........................................................................... |
31 |
|
Copy Function .......................................................................................... |
32 |
|
Print Function ........................................................................................... |
34 |
|
Scan Function........................................................................................... |
35 |
|
Fax Function............................................................................................. |
37 |
|
Direct Fax Function .................................................................................. |
38 |
|
Duplex Automatic Document Feeder........................................................ |
39 |
|
Duplex Output Unit ................................................................................... |
40 |
2 |
Basic Operation........................................................................ |
41 |
|
Main Components .................................................................................... |
42 |
|
Front View ........................................................................................................ |
42 |
|
Rear View......................................................................................................... |
43 |
|
Duplex Automatic Document Feeder (DADF) .................................................. |
44 |
|
Operator Panel................................................................................................. |
45 |
|
Securing the Printer ......................................................................................... |
46 |
|
Installing Optional Accessories................................................................. |
47 |
|
Installing the Optional 512MB Memory ............................................................ |
47 |
|
Installing the Optional 250 Sheet Feeder......................................................... |
52 |
|
Installing the Optional Wireless Printer Adapter............................................... |
58 |
|
Turning on the Printer............................................................................... |
63 |
|
Printing a Panel Settings Page................................................................. |
64 |
|
Power Saver Mode ................................................................................... |
65 |
Contents 5

|
Exiting the Power Saver Mode......................................................................... |
65 |
3 |
Printer Management Software................................................. |
67 |
|
Print and Scan Drivers.............................................................................. |
68 |
|
CentreWare Internet Services .................................................................. |
69 |
|
Creating an Administrative Password .............................................................. |
69 |
|
SimpleMonitor (Windows Only) ................................................................ |
70 |
|
Address Book Editor................................................................................. |
71 |
|
Express Scan Manager ............................................................................ |
72 |
|
Setup Disk Creation Tool (Windows Only) ............................................... |
73 |
|
DocuWorks (Windows Only)..................................................................... |
74 |
4 |
Printer Connection and Software Installation ....................... |
75 |
|
Overview of Network Setup and Configuration......................................... |
76 |
|
Connecting Your Printer ........................................................................... |
77 |
|
Connecting Printer to Computer or Network .................................................... |
78 |
|
Setting the IP Address.............................................................................. |
81 |
|
TCP/IP and IP Addresses ................................................................................ |
81 |
|
Setting the Printer’s IP Address through the Driver CD Kit .............................. |
81 |
|
Dynamic Methods of Setting the Printer’s IP Address ..................................... |
82 |
|
Assigning an IP Address (for IPv4 Mode) ........................................................ |
83 |
|
Verifying the IP Settings................................................................................... |
84 |
|
Printing and Checking the System Settings Page............................................ |
84 |
|
Installing Print Driver on Computers Running Windows........................... |
85 |
|
Identifying Print Driver Pre-install Status (For Network Connection Setup) ..... |
85 |
|
Inserting the CD-ROM...................................................................................... |
86 |
|
USB Connection Setup .................................................................................... |
87 |
|
Network Connection Setup .............................................................................. |
89 |
|
Setting Up for Shared Printing ......................................................................... |
94 |
|
Point and Print ................................................................................................. |
96 |
|
Peer-to-Peer .................................................................................................... |
99 |
|
Installing Print Driver on Computers Running Mac OS X ....................... |
103 |
|
Installing Print Driver on Computers Running Linux (CUPS) ................. |
104 |
|
Installing the Print Driver ................................................................................ |
104 |
|
Setting Up the Queue..................................................................................... |
105 |
|
Setting the Default Queue.............................................................................. |
106 |
|
Specifying the Printing Options ...................................................................... |
107 |
|
Setting the Password for Authority as the Printer Administrator .................... |
108 |
|
Uninstalling the Print Driver............................................................................ |
108 |
|
Configuring Wireless Settings (Windows & Mac OS X).......................... |
110 |
5 |
Printing Basics ....................................................................... |
121 |
|
About Print Media ................................................................................... |
122 |
|
Print Media Usage Guidelines........................................................................ |
122 |
|
Print Media That Can Damage Your Printer .................................................. |
123 |
|
Print Media Storage Guidelines ..................................................................... |
123 |
6 Contents

|
Duplex Automatic Document Feeder (DADF) Guidelines .............................. |
124 |
|
Supported Print Media............................................................................ |
125 |
|
Usable Print Media......................................................................................... |
125 |
|
Standard Paper and Tested Paper ................................................................ |
128 |
|
Loading Print Media................................................................................ |
131 |
|
Capacity ......................................................................................................... |
131 |
|
Print Media Dimensions ................................................................................. |
131 |
|
Loading Print Media in the Standard 250 Sheet Tray and the Optional |
|
|
250 Sheet Feeder .................................................................................. |
132 |
|
Loading Print Media in the Bypass Tray......................................................... |
135 |
|
Setting Paper Sizes and Types .............................................................. |
141 |
|
Setting Paper Sizes........................................................................................ |
141 |
|
Setting Paper Types....................................................................................... |
141 |
|
Printing ................................................................................................... |
142 |
|
Sending a Job to Print.................................................................................... |
142 |
|
Canceling a Print Job ..................................................................................... |
143 |
|
Using the Stored Print Feature....................................................................... |
144 |
|
Direct Print Using the USB Storage Device ................................................... |
146 |
|
Printing PDF Files Using PDF Bridge (Windows Only) .................................. |
147 |
|
Duplex Printing............................................................................................... |
149 |
|
Selecting Printing Options.............................................................................. |
151 |
|
Printing Custom Size Paper ........................................................................... |
154 |
|
Auditron.......................................................................................................... |
157 |
|
Checking Status of Print Data ........................................................................ |
158 |
|
Printing a Report Page................................................................................... |
158 |
|
Printer Settings............................................................................................... |
159 |
|
Printing With Web Services on Devices (WSD) ..................................... |
160 |
|
Adding Roles of Print Services....................................................................... |
160 |
|
Printer Setup .................................................................................................. |
161 |
6 |
Copying ................................................................................... |
163 |
|
Loading Print Media for Copying ............................................................ |
164 |
|
Selecting Paper Tray .............................................................................. |
165 |
|
Preparing a Document............................................................................ |
166 |
|
Making Copies From the Document Glass............................................. |
167 |
|
Making Copies From the DADF.............................................................. |
169 |
|
Setting Copy Options.............................................................................. |
170 |
|
ID Card Copy ................................................................................................. |
170 |
|
Select Tray ..................................................................................................... |
171 |
|
Lighten/Darken............................................................................................... |
171 |
|
2-Sided........................................................................................................... |
172 |
|
Auto Exposure................................................................................................ |
172 |
|
Collated .......................................................................................................... |
173 |
|
Sharpness ...................................................................................................... |
173 |
|
Reduce/Enlarge ............................................................................................. |
174 |
|
Document Size............................................................................................... |
175 |
|
Document Type .............................................................................................. |
175 |
|
N-Up............................................................................................................... |
176 |
|
Margin Top/Bottom ......................................................................................... |
177 |
Contents 7

|
Margin Left/Right............................................................................................ |
177 |
|
Margin Middle................................................................................................. |
177 |
|
Changing the Default Settings................................................................ |
178 |
7 |
Scanning ................................................................................. |
179 |
|
Scanning Overview................................................................................. |
180 |
|
Scanning - With scan driver ........................................................................... |
180 |
|
Scanning - Without scan driver ...................................................................... |
180 |
|
Installing the Scan Driver........................................................................ |
181 |
|
For Windows .................................................................................................. |
181 |
|
For Mac OS X ................................................................................................ |
181 |
|
Scanning to a Computer......................................................................... |
182 |
|
Scanning From the Operator Panel - Scan to Application ............................. |
182 |
|
Scanning From the Operator Panel - WSD Scan........................................... |
183 |
|
Scanning Using the TWAIN Driver................................................................. |
184 |
|
Scanning Using the WIA Driver...................................................................... |
185 |
|
Using a Scanner on the Network............................................................ |
187 |
|
Overview ........................................................................................................ |
188 |
|
Setting a Login Name and a Password (SMB Only) ...................................... |
190 |
|
Creating a Shared Folder (SMB Only) ........................................................... |
192 |
|
Setting a Destination Using an Address Book ............................................... |
201 |
|
Sending the Scanned File on the Network..................................................... |
208 |
|
Scanning to a USB Storage Device........................................................ |
209 |
|
Types of a USB Storage Device .................................................................... |
209 |
|
Procedures..................................................................................................... |
209 |
|
Sending an E-Mail with the Scanned Image........................................... |
211 |
|
E-Mail Settings ............................................................................................... |
211 |
|
Registering a New E-Mail Address ................................................................ |
211 |
|
Sending an E-mail with the Scanned File ...................................................... |
213 |
|
Adjusting Scanning Options ................................................................... |
214 |
|
Adjusting the Default Scan Settings............................................................... |
214 |
|
Changing the Scan Settings for an Individual Job ......................................... |
216 |
|
Scanner Connection Tool ....................................................................... |
217 |
|
IP Address Settings........................................................................................ |
217 |
|
Password Settings ......................................................................................... |
218 |
8 |
Faxing...................................................................................... |
219 |
|
Connecting the Telephone Line.............................................................. |
220 |
|
Configuring Fax Initial Settings............................................................... |
221 |
|
Specifying the Fax Initial Settings Using the Easy Install Navi (Windows Only) .. |
221 |
|
Specifying the Fax Initial Settings From the Operator Panel ......................... |
222 |
|
Sending a Fax ........................................................................................ |
225 |
|
Loading an Original Document....................................................................... |
225 |
|
Adjusting the Document Resolution ............................................................... |
227 |
|
Adjusting the Document Contrast .................................................................. |
227 |
|
Inserting a Pause ........................................................................................... |
227 |
|
Sending a Fax From Memory......................................................................... |
228 |
|
Sending a Fax Manually................................................................................. |
229 |
8 Contents

|
Confirming Transmissions.............................................................................. |
230 |
|
Automatic Redialing ....................................................................................... |
230 |
|
Sending a Delayed Fax .......................................................................... |
231 |
|
Sending a Fax from the Driver (Direct Fax)............................................ |
232 |
|
Receiving a Fax...................................................................................... |
235 |
|
About Receiving Modes ................................................................................. |
235 |
|
Loading Paper for Receiving Faxes ............................................................... |
235 |
|
Receiving a Fax Automatically in the FAX Mode ........................................... |
235 |
|
Receiving a Fax Manually in the TEL Mode................................................... |
235 |
|
Receiving a Fax Automatically in the TEL/FAX Mode or Ans/FAX Mode....... |
236 |
|
Receiving a Fax Manually Using an External Telephone............................... |
236 |
|
Receiving Faxes Using the DRPD Mode ....................................................... |
236 |
|
Receiving Faxes in the Memory..................................................................... |
236 |
|
Polling Receive .............................................................................................. |
237 |
|
Automatic Dialing.................................................................................... |
238 |
|
Speed Dialing................................................................................................. |
238 |
|
Setting Speed Dial ......................................................................................... |
238 |
|
Sending a Fax Using Speed Dial ................................................................... |
239 |
|
Group Dialing ................................................................................................. |
240 |
|
Setting Group Dial.......................................................................................... |
240 |
|
Editing Group Dial .......................................................................................... |
240 |
|
Sending a Fax Using Group Dialing (Multi-address Transmission) ............... |
241 |
|
Printing a Fax Address Book List ................................................................... |
241 |
|
Address Book ......................................................................................... |
242 |
|
Other Ways to Fax.................................................................................. |
243 |
|
Using the Secure Receiving Mode................................................................. |
243 |
|
Using an Answering Machine......................................................................... |
244 |
|
Using a Computer Modem ............................................................................. |
244 |
|
Setting Sounds ....................................................................................... |
245 |
|
Speaker Volume............................................................................................. |
245 |
|
Ringer Volume ............................................................................................... |
245 |
|
Specifying the Fax Settings Options....................................................... |
246 |
|
Changing the Fax Settings Options ............................................................... |
246 |
|
Available Fax Settings Options ...................................................................... |
246 |
|
Changing Setting Options....................................................................... |
249 |
|
Printing a Report Page ........................................................................... |
250 |
9 |
Using the Operator Panel Menus and Keypad .................... |
251 |
|
Understanding the Printer Menus........................................................... |
252 |
|
Report / List.................................................................................................... |
252 |
|
Meter Readings.............................................................................................. |
254 |
|
Admin Menu ................................................................................................... |
254 |
|
Defaults Settings ............................................................................................ |
291 |
|
Tray Settings .................................................................................................. |
302 |
|
Panel Language ............................................................................................. |
307 |
|
Panel Lock Function ............................................................................... |
308 |
|
Enabling the Panel Lock ................................................................................ |
308 |
|
Disabling the Panel Lock................................................................................ |
308 |
Contents 9

|
Limiting Access to Copy, Fax, Scan, and Print from USB Operations |
... 309 |
|
Changing the Language ......................................................................... |
310 |
|
Setting the Power Saver Timer Option ................................................... |
311 |
|
About the Concurrent Jobs Feature ....................................................... |
312 |
|
Resetting to Factory Defaults ................................................................. |
313 |
|
Using the Number Pad to Enter Characters ........................................... |
314 |
|
Keypad Letters and Numbers ........................................................................ |
314 |
|
Changing Numbers or Names........................................................................ |
314 |
10 |
Troubleshooting ..................................................................... |
315 |
|
Clearing Jams......................................................................................... |
316 |
|
Avoiding Jams................................................................................................ |
316 |
|
Identifying the Location of Paper Jams .......................................................... |
317 |
|
Clearing Paper Jams From the DADF ........................................................... |
318 |
|
Clearing Paper Jams From the Bypass Tray ................................................. |
320 |
|
Clearing Paper Jams From the Standard 250 Sheet Tray ............................. |
323 |
|
Clearing Paper Jams From the Fusing Unit ................................................... |
326 |
|
Clearing Paper Jams From the Duplexer....................................................... |
330 |
|
Clearing Paper Jams From the Regi Roll....................................................... |
331 |
|
Clearing Paper Jams From the Optional 250 Sheet Feeder .......................... |
334 |
|
Jam Problems ................................................................................................ |
336 |
|
Basic Printer Problems ........................................................................... |
340 |
|
Display Problems.................................................................................... |
341 |
|
Printing Problems ................................................................................... |
342 |
|
Print Quality Problems............................................................................ |
344 |
|
The Output Is Too Light ................................................................................. |
345 |
|
Toner Smears or Print Comes Off.................................................................. |
346 |
|
Random Spots/Blurred Images ...................................................................... |
347 |
|
The Entire Output Is Blank ............................................................................. |
348 |
|
Streaks Appear on the Output........................................................................ |
349 |
|
Vertical Blanks ............................................................................................... |
350 |
|
Mottle ............................................................................................................. |
350 |
|
Ghosting......................................................................................................... |
351 |
|
Light-Induced Fatigue .................................................................................... |
351 |
|
Fog ................................................................................................................. |
352 |
|
Bead-Carry-Out (BCO)................................................................................... |
352 |
|
Jagged Characters......................................................................................... |
353 |
|
Banding .......................................................................................................... |
353 |
|
Auger Mark..................................................................................................... |
354 |
|
Wrinkled/Stained Paper ................................................................................. |
354 |
|
Damage on the Leading Edge of Paper......................................................... |
355 |
|
The Top and Side Margins Are Incorrect ....................................................... |
355 |
|
Protrudent/Bumpy Paper................................................................................ |
356 |
|
Images Are Skewed ....................................................................................... |
356 |
|
Noise ...................................................................................................... |
357 |
|
Copy Problem......................................................................................... |
358 |
|
Copy Quality Problems........................................................................... |
359 |
10 Contents
|
Fax Problems ......................................................................................... |
360 |
|
Scanning Problems ................................................................................ |
362 |
|
Problems With Installed Optional Accessories ....................................... |
364 |
|
Scan Driver/Printer Utility Problems ....................................................... |
365 |
|
Other Problems ...................................................................................... |
366 |
|
Understanding Printer Messages ........................................................... |
367 |
|
Contacting Service ................................................................................. |
372 |
|
Getting Help............................................................................................ |
373 |
|
LCD Panel Messages .................................................................................... |
373 |
|
SimpleMonitor Alerts ...................................................................................... |
373 |
|
Obtaining the Product Information ................................................................. |
373 |
|
Non-Genuine Mode ................................................................................ |
374 |
11 |
Maintenance............................................................................ |
375 |
|
Cleaning the Printer................................................................................ |
376 |
|
Cleaning the Scanner..................................................................................... |
376 |
|
Cleaning the DADF Feed Roller..................................................................... |
378 |
|
Cleaning Inside the Printer............................................................................. |
378 |
|
Replacing Consumables......................................................................... |
381 |
|
Replacing the Toner Cartridge ....................................................................... |
382 |
|
Replacing the Drum Cartridge........................................................................ |
385 |
|
Replacing the Fusing Unit, Transfer Unit and Retard Roll ............................. |
390 |
|
Ordering Supplies................................................................................... |
396 |
|
Consumables ................................................................................................. |
396 |
|
When to Order Supplies................................................................................. |
396 |
|
Recycling Supplies......................................................................................... |
396 |
|
Storing Print Media ................................................................................. |
397 |
|
Storing Consumables ............................................................................. |
398 |
|
Managing the Printer .............................................................................. |
399 |
|
Checking or Managing the Printer with CentreWare Internet Services .......... |
399 |
|
Checking Printer Status with SimpleMonitor (Windows Only)........................ |
399 |
|
Checking Printer Status Through E-mail........................................................ |
400 |
|
Conserving Supplies............................................................................... |
402 |
|
Checking Page Counts........................................................................... |
403 |
|
Moving the Printer .................................................................................. |
404 |
|
Removing Options .................................................................................. |
406 |
|
Removing the Optional 512MB Memory ........................................................ |
406 |
|
Removing the Optional 250 Sheet Feeder..................................................... |
408 |
|
Removing the Optional Wireless Printer Adapter........................................... |
411 |
Contacting Fuji Xerox ........................................................................................ |
413 |
|
|
Technical Support................................................................................... |
414 |
|
Online Services ...................................................................................... |
415 |
Index |
.................................................................................................................. |
417 |
Contents 11

12 Contents

Types of Manuals
Manuals included with the printer
The following manuals are provided with the DocuPrint M355 df.
Lifting Your Printer |
Describes how to lift and hold your printer. |
|
|
Safety Guide |
Describes the information you need to know before using the printer and to operate the |
|
printer safely. |
|
|
Setup Guide |
Provides step-by-step instructions on how to set up your printer. |
|
|
Operator Panel Guide |
Describes the icons assigned to the buttons or indicators on the operator panel. |
|
|
User Guide (this guide) |
Describes how to get ready to print and set various features. It also covers the operator |
|
panel menus, troubleshooting tips, and maintenance information. |
|
This guide is on the Driver CD Kit. |
|
|
Quick Reference Guide |
Describes how to operate the printer and the precautions that must be followed during |
|
operation. |
|
This guide is on the Driver CD Kit. |
|
|
PostScript User Guide |
Describes how to set up your printer as a PostScript® printer and the features that can |
|
be configured on your print driver. |
|
This guide is on the PostScript Driver Library CD. |
|
|
Manuals included with an optional accessory
The following manual is provided with the optional accessories (sold separately).
Installation Guide |
Optional accessories that require an installation at the customer's site are provided |
|
with an Installation Guide. |
|
|
Types of Manuals |
|
13 |
|

Using This Guide
This section includes:
•"Organization" on page 14
•"Conventions" on page 14
Organization
This guide is organized into the following chapters. The summary of each chapter is as follows:
1 Specifications |
Describes the printer specifications. |
|
|
2 Basic Operation |
Describes the main components of the printer, the Power Saver mode, |
|
and the preparation of the printer to use. |
|
|
3 Printer Management Software |
Describes the software available for the printer. |
|
|
4 Printer Connection and Software |
Describes the basic information about how to connect the printer to your |
Installation |
computer via the network or USB and how to install the print driver. |
|
|
5 Printing Basics |
Describes the supported paper, how to load paper, and how to print data |
|
using various print features. |
|
|
6 Copying |
Describes how to copy documents and the adjustment features. |
|
|
7 Scanning |
Describes how to install a scan driver, and how to set and use the Scan |
|
features. |
8 Faxing |
Describes how to set and use the Fax features. |
|
|
9 Using the Operator Panel Menus and |
Describes the setting items available on the operator panel, their setup |
Keypad |
procedures, and how to use the number pad. |
|
|
10Troubleshooting |
Describes the troubleshooting tips for printer problems such as paper |
|
jams. |
|
|
11 Maintenance |
Describes how to clean the printer, how to replace consumables, and how |
|
to see the printer status. |
12Contacting Fuji Xerox |
Describes support information. |
|
|
Conventions
1In this guide, personal computers and workstations are collectively called “computers”.
2The following terms are used throughout this guide:
IMPORTANT:
• Important information that must be read and followed.
NOTE:
• Additional information that merits emphasis.
See also:
• References within this guide.
3Orientation of documents or paper is described in this guide as follows:
 ,
,  , Long Edge Feed (LEF): Loading the document or paper in landscape orientation.
 ,
,  , Short Edge Feed (SEF): Loading the document or paper in portrait orientation.
LEF Orientation |
Paper feed direction |
SEF Orientation
Paper feed direction
14 |
|
Using This Guide |
|

Safety Notes
Before using this product, read “Safety Notes” carefully for safety use.
This product and recommended supplies have been tested and found to comply with strict safety requirements including safety agency approvals and compliance with environmental standards. Follow the following instructions for safety use.
WARNING:
•Any unauthorized alteration including an addition of new functions or connection to external devices may not be covered by the product warranty. Contact your local Fuji Xerox representative for more information.
Follow all warning instructions marked on this product. The warning marks stand for the followings:
Used for item that if not followed strictly, can lead death or severe or fatal injuries and the possibility to do it is comparatively high.
Used for items that if not followed strictly, can lead to severe or fatal injuries.
Used for items that if not followed strictly, can cause injuries to user or damages to machine.
 : A symbol for items to pay attention to when handling machine.
Follow instructions carefully to use machine safely.
Static |
Caution Flammable Explodable Electric |
Heated |
Moving |
Pinched |
Sensitive |
shock |
surface |
object |
fingers |
: A symbol for prohibited items. Follow instructions carefully to avoid any dangerous acts.
Prohibited No fire Do not touch Do not use in |
Do not tear |
Keep away |
Never touch |
bathroom |
down |
from wet |
with wet hand |
: A symbol for items that must be performed. Follow instructions carefully to carry out these essential tasks.
Instructions |
Unplug |
Ground/ |
|
|
Earth |
|
|
|
Safety Notes |
|
15 |
|

Electrical Safety
 WARNING
This product shall be operated by the power source as indicated on the product's data plate. Consult your local power company to check if your power source meets the requirements.
WARNING:
• Connect this product to a protective earth circuit.
This product is supplied with a plug that has a protective earth pin. The plug fits only into an earthed electrical outlet. This is a safety feature. If the plug doesn't fit to the outlet, contact an electrician to replace the outlet to avoid risk of electric shock. Never use an earthed adapter plug to connect the product to the electrical outlet that has no earth connection terminal.
Improper connection of a grounding conductor may cause electric shock.
Plug the power cord directly into a grounded electrical outlet. To prevent overheat and a fire accident, do not use an extension cord, a multi-plug adaptor or a multiple connector. Consult your local Fuji Xerox representative to check if an outlet is grounded.
Connect this product to a branch circuit or an outlet that has larger capacity than the rated ampere and voltage of this product. See the data plate on the rear panel of this product for its rated ampere and voltage.
Never touch the power cord with wet hands. It may cause electric shock.
Do not put an object on the power cord.
Always keep the plug connection free of dust. The dusty and damp environment may bring about minute electric current in a connector. It may generate heat and eventually cause a fire accident.
To avoid the risk of electric shock and a fire accident, only use the power cord supplied with this product or the ones designated by Fuji Xerox.
The power cord is exclusive use for this product. Do not use it for any other product.
Do not damage or alter the power cord. Damage and alteration may generate heat and eventually cause electric shock or a fire accident.
If the power cord is damaged or insulated wires are exposed, contact your local Fuji Xerox representative for its replacement. Do not use a damaged or uninsulated cord to avoid the risk of electric shock and a fire accident.
 CAUTION
When cleaning this product, always switch off and unplug it. Access to a live machine interior may cause electric shock.
Do not unplug or re-plug this product with the switch on. Plugging and unplugging a live connector may deform the plug and generate heat, and eventually cause a fire accident.
Hold the plug not the cord when unplugging this product, or it may damage the cord and cause electric shock or a fire accident.
16 |
|
Safety Notes |
|

Switch off and unplug the product when it (i.e., fax function) is not used over weekends or long holidays. Please note that it cannot receive fax message during switch-off.
Once a month, switch off this product and check if
•the power cord is plugged firmly into an electrical outlet;
•the plug is not excessively heated, rusted or bent;
•the plug and electrical outlet are free of dust; and
•the power cord is not cracked or worn down.
Once you notice any unusual condition, switch off and unplug this product first and contact your local Fuji Xerox representative.
Safety Notes |
|
17 |
|

Machine Installation
 WARNING
Do not locate this product where people might step on or trip over the power cord. Friction or excessive pressure may generate heat and eventually cause electric shock or a fire accident.
 CAUTION
Never locate this product in the following places:
•Near radiators or any other heat sources
•Near volatile flammable materials such as curtains
•In the hot, humid, dusty or poorly ventilated environment
•In the place receiving direct sunlight
•Near cookers or humidifiers
Never put this product close to fire such as candles and cigarettes. Otherwise, it may cause a fire accident.
This product weighs 18.1 Kg (the main unit with consumables). When moving it, always carry it by a team of two or more persons to avoid mishandling or injury.
When lifting this product, use the handholds on both sides of the product with two people. Never lift it by gripping any other areas. It will prevent you from dropping the product and getting back ache or injuries.
Locate this product on a level and sturdy surface that can withstand a weight of 20.7 Kg. Otherwise, if tilted, the product may fall over and cause injuries.
18 |
|
Safety Notes |
|

Locate this product in a well-ventilated area. Do not obstruct ventilation openings of the product.
Keep the minimum clearance as follows for ventilation and an access to the power plug. Unplug the product if an abnormal condition is noted.
110 mm
400 mm
930 mm
430 mm
100 mm |
|
|
600 mm |
426 mm |
400 mm |
400 mm
903 mm 110 mm
503 mm
|
|
|
|
|
|
|
|
|
600 mm |
|
|
426 mm |
|
|
|
400 mm |
|
|
|
|||||||
Do not incline the product at more than 10 degree angle. Otherwise, it may fall over and cause injuries.
Right |
Left |
Right |
Left |
|
10° |
10° |
|
Front |
Back |
Front |
Back |
|
10° |
10° |
|
To bundle wires and cables, always use the cable ties and spiral tubes that Fuji Xerox supplies. Otherwise, it may cause some defects.
Others
To keep this product in a good performance and condition, always use it in the following environment:
•Temperature: 10 - 32 °C
•Humidity: 10 - 85%
When the product is left in a chilly room and the room is rapidly warmed up by heater, dew condensation may form inside the product and cause a partial deletion on printing.
Safety Notes |
|
19 |
|

Operational Safety
 WARNING
The operator's product maintenance procedures are described in the customer documentation supplied with this product. Do not carry out any other maintenance procedures not described in the documentation.
This product features safety design not to allow operators access to hazard areas. The hazard areas are isolated from operators by covers or protectors which require a tool to remove. To prevent electric shock and injuries, never remove those covers and protectors.
To avoid the risk of electric shock and a fire accident, switch off and unplug the product promptly in the following conditions, then contact your local Fuji Xerox representative.
•The product emits smoke or its surface is unusually hot.
•The product emits unusual noise or odor.
•The power cord is cracked or worn down.
•A circuit breaker, fuse or any other safety device becomes activated.
•Any liquid is spilled into the product.
•The product is soaked in water.
•Any part of the product is damaged.
Do not insert any object into slots or openings of this product.
Do not put any of the followings on the product:
•Liquid container such as flower vases or coffee cups
•Metal parts such as staples or clips
•Heavy objects
If liquid is spilled over or metal parts are slipped into the product, it may cause electric shock or a fire accident.
Do not use conductive paper such as origami paper, carbonic paper or conductively-coated paper. When paper jam occurs, it may cause short-circuit and eventually a fire accident.
When cleaning this product, use the designated cleaning materials exclusive to it. Other cleaning materials may result in poor performance of the product. Never use aerosol cleaners to avoid catching fire and explosion.
If you cannot remove the paper jam by doing the procedures in the manual, do not try to forcibly remove the jam. Doing so may cause injuries. Contact your local Fuji Xerox representative.
Never play the CD-ROM supplied with the product on an audio player. Always use a CD-ROM player. Otherwise, large sound may damage audio players or your ears.
Laser Safety
CAUTION:
•Any operations or adjustments not stated in the operation manual may cause hazardous light exposure and eventually burn injuries or loss of eyesight.
This product has been tested and found to comply with the Class 1 Laser Equipment requirements defined by the international standard IEC60825 and has no light exposure hazard. The product has no hazardous light emission as it features light protection components and covers to shut in all light beam during operation and maintenance.
20 |
|
Safety Notes |
|
 CAUTION
Always follow all warning instructions marked on or supplied with this product.
To avoid the risk of burn injuries and electric shock, never touch the area with the "High
Temperature" or "High Voltage" marks on.
Keep electrical and mechanical safety interlocks active. Keep the safety interlocks away from magnetic materials. Magnetic materials may accidentally activate the product and cause injuries or electric shock.
Do not attempt to remove a paper deeply jammed inside the product, particularly a paper wrapped around the fusing unit or the heat roller. Otherwise, it may cause injuries or burns. Switch off the product immediately and contact your local Fuji Xerox representative.
Do not apply excessive force to hold thick document on the document glass. It may break the glass and cause injuries.
Ventilate well during extended operation or mass copying. It may affect the office air environment due to odor such as ozone in a poorly ventilated room. Provide proper ventilation to ensure the comfortable and safe environment.
Safety Notes |
|
21 |
|

Consumable
 WARNING
Store all consumables in accordance with the instructions given on its package or container.
Use a broom or a wet cloth to wipe off spilled toner. Never use a vacuum cleaner for the spills. It may catch fire by electric sparks inside the vacuum cleaner and cause explosion. If you spill a large volume of toner, contact your local Fuji Xerox representative.
Never throw a toner cartridge into an open flame. Remaining toner in the cartridge may catch fire and cause burn injuries or explosion.
If you have a used toner cartridge no longer needed, contact your local Fuji Xerox representative for its disposal.
Fusing Unit Safety
Do not remove the Fusing Unit. If you cannot remove the paper jam by doing the procedures in the manual, do not try to forcibly remove the jam. Doing so may cause injuries. Contact your local Fuji Xerox representative.
 CAUTION
Keep a drum cartridge and a toner cartridge out of the reach of children. If a child accidentally swallows toner, spit it out, rinse mouth with water, drink water and consult a physician immediately.
When replacing a drum cartridge and a toner cartridge, be careful not to spill the toner. In case of any toner spills, avoid contact with clothes, skin, eyes and mouth as well as inhalation.
If toner spills onto your skin or clothing, wash it off with soap and water.
If you get toner particles in your eyes, wash it out with plenty of water for at least 15 minutes until irritation is gone. Consult a physician if necessary.
If you inhale toner particles, move to a fresh air location and rinse your mouth with water.
If you swallow toner, spit it out, rinse your mouth with water, drink plenty of water and consult a physician immediately.
Fusing Unit Safety
When removing the Fusing Unit, always switch off first and wait for 40 minutes until it cools off.
22 |
|
Safety Notes |
|

Warning and Caution Labels
Be sure to follow the warning and caution labels placed on the machine. Do not touch areas with labels indicating high voltage or temperature. This can cause an electric shock or burn.
CAUTION:
•Always follow all warning instructions marked on or supplied with this product. To avoid the risk of burn injuries and electric shock, never touch the area with the "High Temperature" or "High Voltage" marks on.
|
|
|
|
|
|
|
|
|
|
|
|
|
|
|
|
|
|
|
|
|
|
|
|
|
|
|
|
|
|
|
|
|
|
Safety Notes |
|
23 |
|
|
|
|
|
|
|
|
|
|
|
|
|
|
|
|
|
|
|
|
|
|
|
|
|
|
|
|
|
|
|
|
|
|
|
||
|
|
|
|
|
|
|
|
|
|
|
|
|
|
|
|
|
|
|
|
|
|
|
|
|
|
|
|
|
|
|
|
|
|
|
||
|
|
|
|
|
|
|
|
|
|
|
|
|
|
|
|
|
|
|
|
|
|
|
|
|
|
|
|
|
|
|
|
|
|
|
||
|
|
|
|
|
|
|
|
|
|
|
|
|
|
|
|
|
|
|
|
|
|
|
|
|
|
|
|
|
|
|
|
|
|
|
||
|
|
|
|
|
|
|
|
|
|
|
|
|
|
|
|
|
|
|
|
|
|
|
|
|
|
|
|
|
|
|
|
|
|
|
||
|
|
|
|
|
|
|
|
|
|
|
|
|
|
|
|
|
|
|
|
|
|
|
|
|
|
|
|
|
|
|
|
|
|
|
||
|
|
|
|
|
|
|
|
|
|
|
|
|
|
|
|
|
|
|
|
|
|
|
|
|
|
|
|
|
|
|
|
|
|
|
||
|
|
|
|
|
|
|
|
|
|
|
|
|
|
|
|
|
|
|
|
|
|
|
|
|
|
|
|
|
|
|
|
|
|
|
||
|
|
|
|
|
|
|
|
|
|
|
|
|
|
|
|
|
|
|
|
|
|
|
|
|
|
|
|
|
|
|
|
|
|
|
||
|
|
|
|
|
|
|
|
|
|
|
|
|
|
|
|
|
|
|
|
|
|
|
|
|
|
|
|
|
|
|
|
|
|
|
||
|
|
|
|
|
|
|
|
|
|
|
|
|
|
|
|
|
|
|
|
|
|
|
|
|
|
|
|
|
|
|
|
|
|
|
||
|
|
|
|
|
|
|
|
|
|
|
|
|
|
|
|
|
|
|
|
|
|
|
|
|
|
|
|
|
|
|
|
|
|
|
||
|
|
|
|
|
|
|
|
|
|
|
|
|
|
|
|
|
|
|
|
|
|
|
|
|
|
|
|
|
|
|
|
|
|
|
||
|
|
|
|
|
|
|
|
|
|
|
|
|
|
|
|
|
|
|
|
|
|
|
|
|
|
|
|
|
|
|
|
|
|
|
||
|
|
|
|
|
|
|
|
|
|
|
|
|
|
|
|
|
|
|
|
|
|
|
|
|
|
|
|
|
|
|
|
|
|
|
||
|
|
|
|
|
|
|
|
|
|
|
|
|
|
|
|
|
|
|
|
|
|
|
|
|
|
|
|
|
|
|
|
|
|
|
||
|
|
|
|
|
|
|
|
|
|
|
|
|
|
|
|
|
|
|
|
|
|
|
|
|
|
|
|
|
|
|
|
|
|
|
||
|
|
|
|
|
|
|
|
|
|
|
|
|
|
|
|
|
|
|
|
|
|
|
|
|
|
|
|
|
|
|
|
|
|
|
||
|
|
|
|
|
|
|
|
|
|
|
|
|
|
|
|
|
|
|
|
|
|
|
|
|
|
|
|
|
|
|
|
|
|
|
||
|
|
|
|
|
|
|
|
|
|
|
|
|
|
|
|
|
|
|
|
|
|
|
|
|
|
|
|
|
|
|
|
|
|
|
||
|
|
|
|
|
|
|
|
|
|
|
|
|
|
|
|
|
|
|
|
|
|
|
|
|
|
|
|
|
|
|
|
|
|
|
||
|
|
|
|
|
|
|
|
|
|
|
|
|
|
|
|
|
|
|
|
|
|
|
|
|
|
|
|
|
|
|
|
|
|
|
||
|
|
|
|
|
|
|
|
|
|
|
|
|
|
|
|
|
|
|
|
|
|
|
|
|
|
|
|
|
|
|
|
|
|
|
||
|
|
|
|
|
|
|
|
|
|
|
|
|
|
|
|
|
|
|
|
|
|
|
|
|
|
|
|
|
|
|
|
|
|
|
||
|
|
|
|
|
|
|
|
|
|
|
|
|
|
|
|
|
|
|
|
|
|
|
|
|
|
|
|
|
|
|
|
|
|
|
||
|
|
|
|
|
|
|
|
|
|
|
|
|
|
|
|
|
|
|
|
|
|
|
|
|
|
|
|
|
|
|
|
|
|
|
||
|
|
|
|
|
|
|
|
|
|
|
|
|
|
|
|
|
|
|
|
|
|
|
|
|
|
|
|
|
|
|
|
|
|
|
||
|
|
|
|
|
|
|
|
|
|
|
|
|
|
|
|
|
|
|
|
|
|
|
|
|
|
|
|
|
|
|
|
|
|
|
||
|
|
|
|
|
|
|
|
|
|
|
|
|
|
|
|
|
|
|
|
|
|
|
|
|
|
|
|
|
|
|
|
|
|
|
||
|
|
|
|
|
|
|
|
|
|
|
|
|
|
|
|
|
|
|
|
|
|
|
|
|
|
|
|
|
|
|
|
|
|
|
||
|
|
|
|
|
|
|
|
|
|
|
|
|
|
|
|
|
|
|
|
|
|
|
|
|
|
|
|
|
|
|
|
|
|
|
||
|
|
|
|
|
|
|
|
|
|
|
|
|
|
|
|
|
|
|
|
|
|
|
|
|
|
|
|
|
|
|
|
|
|
|
||
|
|
|
|
|
|
|
|
|
|
|
|
|
|
|
|
|
|
|
|
|
|
|
|
|
|
|
|
|
|
|
|
|
|
|
||
|
|
|
|
|
|
|
|
|
|
|
|
|
|
|
|
|
|
|
|
|
|
|
|
|
|
|
|
|
|
|
|
|
|
|
||
|
|
|
|
|
|
|
|
|
|
|
|
|
|
|
|
|
|
|
|
|
|
|
|
|
|
|
|
|
|
|
|
|
|
|
||
|
|
|
|
|
|
|
|
|
|
|
|
|
|
|
|
|
|
|
|
|
|
|
|
|
|
|
|
|
|
|
|
|
|
|
||
|
|
|
|
|
|
|
|
|
|
|
|
|
|
|
|
|
|
|
|
|
|
|
|
|
|
|
|
|
|
|
|
|
|
|
||
|
|
|
|
|
|
|
|
|
|
|
|
|
|
|
|
|
|
|
|
|
|
|
|
|
|
|
|
|
|
|
|
|
|
|
||
|
|
|
|
|
|
|
|
|
|
|
|
|
|
|
|
|
|
|
|
|
|
|
|
|
|
|
|
|
|
|
|
|
|
|
||
|
|
|
|
|
|
|
|
|
|
|
|
|
|
|
|
|
|
|
|
|
|
|
|
|
|
|
|
|
|
|
|
|
|
|
||
|
|
|
|
|
|
|
|
|
|
|
|
|
|
|
|
|
|
|
|
|
|
|
|
|
|
|
|
|
|
|

Environment
•For environmental protection and efficient use of resources, Fuji Xerox reuses returned toner cartridges and drums (photoreceptors) to make recycle parts, recycle materials or energy recovery.
•Proper disposal is required for toner cartridges and drums (photoreceptors) no longer needed. Do not open toner cartridges and drums (photoreceptors). Return them to your local Fuji Xerox representative.
24 Environment

Regulation
Radio Frequency Emissions (Class B)
This product has been tested and found to comply with the limits for a Class B digital device, pursuant to the International Standard for Electromagnetic Interference (CISPR Publ. 22) and Radiocommunications Act 1992 in Australia/New Zealand.
These limits are designed to provide reasonable protection against harmful interference in a residential installation. This product generates, uses and can radiate radio frequency energy and, if not installed and used in accordance with the instructions, may cause harmful interference to radio communications. However, there is no guarantee that interference will not occur in a particular installation. If this product does cause harmful interference to radio or television reception, which can be determined by turning this product off and on, the user is encouraged to try to correct the interference by one or more of the following measures:
–Reorient or relocate the receiving antenna.
–Increase the separation between this product and the receiver.
–Connect this product into an outlet on a circuit different from that to which the receiver is connected.
–Consult the dealer or an experienced radio/TV technician for help.
Changes and modifications to this product not specifically approved by Fuji Xerox may void the user’s authority to operate this product.
Fax Regulations
General warning
The grant of a Telepermit for any item of terminal equipment indicates only that Telecom has accepted that the item complies with minimum conditions for connection to its network. It indicates no endorsement of the product by Telecom, nor does it provide any sort of warranty. Above all, it provides no assurance that any item will work correctly in all respects with another item of Telepermitted equipment of a different make or model, nor does it imply that any product is compatible with all of Telecom’s network services Warnings taken from Specification text
Compliance testing (Functional tests)
"This equipment is not capable, under all operating conditions, of correct operation at the higher speeds for which it is designed. Telecom will accept no responsibility should difficulties arise in such circumstances"
Off-hook line impedance
"This equipment does not fully meet Telecom's impedance requirements. Performance limitations may occur when used in conjunction with some parts of the network. Telecom will accept no responsibility should difficulties arise in such circumstances"
General requirements (automatic dialling devices)
User Instructions (automatic call set-up)
"This equipment shall not be set up to make automatic calls to the Telecom ‘111’ Emergency Service"
User instructions
If a charge for local calls is unacceptable, the ‘Dial’ button should NOT be used for local calls. Only the 7-digits of the local number should be dialled from your telephone. DO NOT dial the area code digit or the ‘0’ prefix
Regulation 25

About License
RSA BSAFE
This product includes RSA BSAFE® Cryptographic software from EMC Corporation.
DES
This product includes software developed by Eric Young. (eay@mincom.oz.au)
AES
Copyright© 2003, Dr BrianGladman, Worcester, UK. All rights reserved. This product uses published AES software provided by Dr Brian Gladmanunder BSD licensing terms.
TIFF(libtiff)
LibTIFFCopyright© 1988-1997 SamLeffler
Copyright© 1991-1997 Silicon Graphics, Inc.
ICC Profile (Little cms)
LittlecmsCopyright© 1998-2004 Marti Maria
JPEG
Our printer software uses some of the codes defined by the Independent JPEG Group.
26 |
|
About License |
|

Illegal Copies and Printouts
Copying or printing certain documents may be illegal in your country. Penalties of fines or imprisonment may be imposed on those found guilty. The following are examples of items that may be illegal to copy or print in your country.
•Currency
•Banknotes and checks
•Bank and government bonds and securities
•Passports and identification cards
•Copyright material or trademarks without the consent of the owner
•Postage stamps and other negotiable instruments
This list is not inclusive and no liability is assumed for either its completeness or accuracy. In case of doubt, contact your legal counsel.
Illegal Copies and Printouts |
|
27 |
|
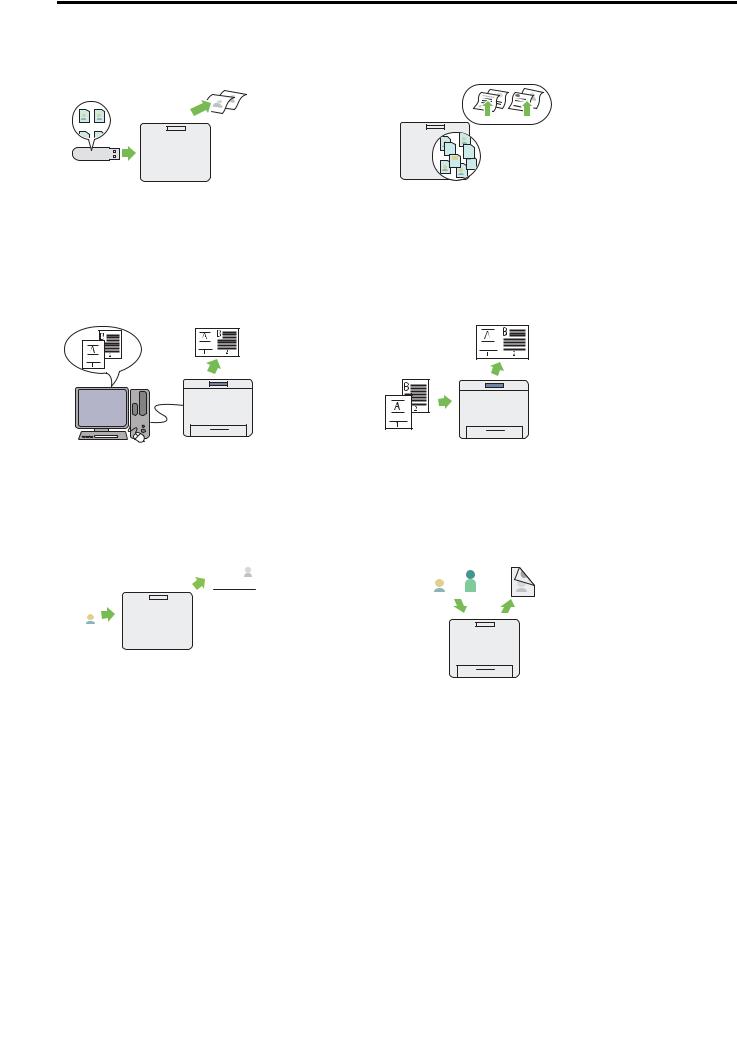
Product Features
This section describes the product features and indicates their links.
USB Direct Print |
|
|
|
|
Stored Print |
|
|
|
|
|
|
|
|
|
|
|
|
|
|
|
|
|
|||||||||||||
|
|
|
|
|
|
|
|
|
|
|
|
|
|
|
|
|
|
|
|
|
|
|
|
|
|
|
|
|
|
|
|
|
|
|
|
|
|
|
|
|
|
|
|
|
|
|
|
|
|
|
|
|
|
|
|
|
|
|
|
|
|
|
|
|
|
|
|
|
|
|
|
|
|
|
|
|
|
|
|
|
|
|
|
|
|
|
|
|
|
|
|
|
|
|
|
|
|
|
|
|
|
|
|
|
|
|
|
|
|
|
|
|
|
|
|
|
|
|
|
|
|
|
|
|
|
|
|
|
|
|
|
|
|
|
|
|
|
|
|
|
|
|
|
|
|
|
|
|
|
|
|
|
|
|
|
|
|
|
|
|
|
|
|
|
|
|
|
|
|
|
|
|
|
|
|
|
|
|
|
|
|
|
|
|
|
|
|
|
|
|
|
|
|
|
|
|
|
|
|
|
|
|
|
|
|
|
|
|
|
|
|
|
|
|
|
|
|
|
|
|
|
|
|
|
|
|
|
|
|
|
|
|
|
|
|
|
|
|
|
|
|
|
|
|
|
|
|
|
|
|
|
The Print From USB Memory feature allows you to print directly from your USB storage device without requiring you to start your computer and an application.
For more information, see "Direct Print Using the USB Storage Device" on page 146.
Multiple-Up Print
The Pages Per Sheet (N-Up) feature allows you to print multiple pages on a single sheet of paper. This feature helps reduce the paper consumption.
For more information, see the print driver's help.
The Stored Print feature allows you to temporarily store your print data in the printer memory and output it later. You can effectively manage your time when you print confidential data or large-volume data at off-peak hours.
For more information, see "Using the Stored Print Feature" on page 144.
2-in-1 Copy
You can copy two original pages onto one sheet of paper by selecting N-Up on the operator panel when you make a copy. This feature helps save paper.
For more information, see "N-Up" on page 176.
ID Card Copy |
|
|
|
|
|
Duplex Copy |
||||||||||||||||
|
|
|
|
|
|
|
|
|
|
|
|
|
|
|
|
|
|
|
|
|
|
|
|
|
|
|
|
|
|
|
|
|
|
|
|
|
|
|
|
|
|
|
|
|
|
|
|
|
|
|
|
|
|
|
|
|
|
|
|
|
|
|
|
|
|
|
|
|
|
|
|
|
|
|
|
|
|
|
|
|
|
|
|
|
|
|
|
|
|
|
|
|
|
|
|
|
|
|
|
|
|
|
|
|
|
|
|
|
|
|
|
|
|
|
|
|
|
|
|
|
|
|
|
|
|
|
|
|
|
|
|
|
|
|
|
|
|
|
|
|
|
|
|
|
|
|
|
|
|
|
|
|
|
|
|
|
|
|
|
|
|
|
|
|
|
|
|
|
|
|
|
|
|
|
|
|
|
|
|
|
|
|
|
|
|
|
|
|
|
|
|
|
|
|
|
|
|
|
|
|
|
|
|
|
|
|
|
|
|
|
|
|
|
|
|
|
|
|
|
|
|
|
|
|
|
|
|
|
|
|
|
|
|
|
|
|
|
|
|
|
|
|
|
|
|
|
|
|
|
|
|
|
|
|
|
|
|
|
|
|
|
|
|
|
|
|
|
|
|
|
|
|
|
|
|
You can copy both sides of an ID card on one side of a single sheet of paper in its original size by selecting ID Card Copy on the operator panel. This feature helps to show both sides of an ID card in one page in its original size.
For more information, see "ID Card Copy" on page 170.
You can copy documents on both sides of a sheet of paper by selecting 2 Sided on the operator panel when you make a copy. This feature helps save paper.
For more information, see "2-Sided" on page 172.
28 |
|
Product Features |
|

Scan to E-mail |
|
Scan to SMB/FTP Server |
||||||||||||
|
|
|
|
|
|
|
|
|
|
|
|
|
|
|
|
|
|
|
|
|
|
|
|
|
|
|
|
|
|
|
|
|
|
|
|
|
|
|
|
|
|
|
|
|
|
|
|
|
|
|
|
|
|
|
|
|
|
|
|
|
|
|
|
|
|
|
|
|
|
|
|
|
|
|
When you want to send scanned data by e-mail, use the E-mail feature. You can directly send the data scanned as an e-mail attachment. You can choose destination e-mail addresses from the address book on the printer or server. Or, you can enter the address from the printer's operator panel using the number pad.
For more information, see "Sending an E-Mail with the Scanned Image" on page 211.
You can transfer data scanned to a computer or a server via SMB or FTP without service software. Although prior registration of the destination FTP server or computer on the address book is required, it helps save your time.
For more information, see "Using a Scanner on the Network" on page 187.
Scan to USB Storage Device |
Scan From Document Glass |
|||||||||||||||
|
|
|
|
|
|
|
|
|
|
|
|
|
|
|
|
|
|
|
|
|
|
|
|
|
|
|
|
|
|
|
|
|
|
|
|
|
|
|
|
|
|
|
|
|
|
|
|
|
|
|
|
|
|
|
|
|
|
|
|
|
|
|
|
|
|
|
|
|
|
|
|
|
|
|
|
|
|
|
|
|
|
|
|
|
|
|
|
|
|
|
|
|
|
|
|
|
|
|
|
|
|
You don't need a computer to connect your USB storage device to save the scanned data. Insert your USB storage device in the port on the printer, and save the scanned data directly to your USB storage device.
For more information, see "Scanning to a USB Storage Device" on page 209.
You can scan the pages of a book or a brochure from the document glass. When you scan documents using the document glass, place them face down.
For more information, see "Making Copies From the Document Glass" on page 167.
Scan From DADF |
Direct Fax from Computer |
||||||||||
|
|
|
|
|
|
|
|
|
|
|
|
|
|
|
|
|
|
|
|
|
|
|
|
|
|
|
|
|
|
|
|
|
|
|
|
|
|
|
|
|
|
|
|
|
|
|
|
|
|
|
|
|
|
|
|
|
|
|
|
You can scan pieces of unbound paper using the duplex automatic document feeder (DADF). When you scan documents using the DADF, load them face up.
For more information, see "Making Copies From the DADF" on page 169.
You can directly send faxes from your computer using the fax driver. You can specify the fax settings like the normal fax. Also, you can specify the recipient's fax number using the number pad, or the address book.
For more information, see "Sending a Fax from the Driver (Direct Fax)" on page 232.
Product Features |
|
29 |
|

Address Book
Address Book simplifies the recipient specification. You can use the address book on the printer as well as on the server. Select the desired address or fax number from the address book when using the E-mail or Scan to Network feature, or sending faxes.
For more information, see "Address Book Editor" on page 71.
30 |
|
Product Features |
|
Loading...