


Version 1.0 February 2013 702P00984
Xerox® Color C75 Press
User Guide
©2012 Xerox Corporation. All rights reserved. Xerox® and Xerox and Design® are trademarks of Xerox Corporation in the United States and/or other countries.
FreeFlow®, SquareFold®, Xerox prInteract™, MeterAssistant®, SuppliesAssistant®, CentreWare®, Scan to PC Desktop®, and Xerox Extensible Interface Platform®, are trademarks of Xerox Corporation in the United States and/or other countries. Product status, build status, and/or specifications are subject to change without notice.
Microsoft, Windows, Windows XP, Windows Vista, Internet Explorer, and Word are registered trademarks of Microsoft Corporation in the United States and/or other countries.
Adobe, the Adobe logo, Acrobat, the Acrobat logo, Acrobat Reader, Distiller, Adobe PDF logo, Adobe PDF JobReady, Illustrator, InDesign, and Photoshop are registered trademarks of Adobe Systems, Inc. PostScript is an Adobe registered trademark used with the Adobe PostScript Interpreter, the Adobe page description language, and other Adobe products. This product is not endorsed or sponsored by Adobe Systems, publisher of Adobe Photoshop.
Fiery® and PrintMe® are registered trademarks of Electronics For Imaging, Inc. GBC® and AdvancedPunch™ are trademarks or registered trademarks of General Binding Corporation.
BR4003
Table of Contents
1 Product overview........................................................................................ |
1-1 |
Machine components......................................................................................................... |
1-1 |
Bypass (Tray 5)........................................................................................................ |
1-2 |
Document feeder.................................................................................................... |
1-3 |
User Interface (UI)................................................................................................. |
1-4 |
Print server overview........................................................................................................... |
1-5 |
Power on/off........................................................................................................................... |
1-5 |
Two power switches............................................................................................... |
1-5 |
Power on..................................................................................................................... |
1-6 |
Power off.................................................................................................................... |
1-6 |
Energy Saver.......................................................................................................................... |
1-6 |
Exiting the Energy Saver mode......................................................................... |
1-7 |
Locating the machine serial number........................................................................... |
1-7 |
Feeding and finishing devices......................................................................................... |
1-7 |
High Capacity Feeder (Tray 6), 1-tray............................................................. |
1-8 |
Oversized High Capacity Feeder, 1 or 2-trays.............................................. |
1-8 |
Advanced Finisher.................................................................................................. |
1-9 |
Professional Finisher with Booklet Maker................................................... |
1-10 |
Interface Module................................................................................................. |
1-10 |
GBC®AdvancedPunch™.................................................................................... |
1-11 |
High Capacity Stacker ....................................................................................... |
1-11 |
Standard/Booklet Maker Finisher.................................................................. |
1-12 |
SquareFold® Trimmer Module....................................................................... |
1-13 |
2 Where to find help.................................................................................... |
2-1 |
Help on the World Wide Web.......................................................................................... |
2-1 |
Print server customer documentation......................................................................... |
2-1 |
3 Submitting a print job............................................................................. |
3-1 |
Printing from your computer........................................................................................... |
3-1 |
Printing from the Xerox FreeFlow Print Server.......................................................... |
3-1 |
Printing from the Xerox EX Print Server, Powered by EFI..................................... |
3-2 |
4 Paper and other media........................................................................... |
4-1 |
Loading media in trays 1, 2, and 3................................................................................ |
4-1 |
Loading paper in trays 1, 2, and 3................................................................... |
4-1 |
Loading tab stock in trays 1, 2, and 3............................................................. |
4-2 |
Loading transparencies in trays 1, 2, and 3................................................. |
4-3 |
Xerox® Color C75 Press |
i |
User Guide |
|
Table of Contents |
|
Loading pre-drilled stock in trays 1, 2, and 3............................................... |
4-4 |
Loading media in the Bypass tray................................................................................. |
4-5 |
Loading paper in the Bypass tray (Tray 5).................................................... |
4-5 |
Loading tab stock in the Bypass tray (Tray 5)............................................. |
4-6 |
Loading transparencies in the Bypass tray (Tray 5).................................. |
4-7 |
Loading pre-drilled stock in the Bypass tray (Tray 5)............................... |
4-9 |
Loading media in optional feeding devices............................................................ |
4-10 |
Loading post-process media in optional finishing devices............................... |
4-10 |
Loading tab stock with the GBC AdvancedPunch................................... |
4-10 |
5 Copy................................................................................................................ |
5-1 |
Basic copy using the document feeder....................................................................... |
5-1 |
Basic copy using the document glass.......................................................................... |
5-2 |
Copy tab.................................................................................................................................. |
5-3 |
Reduce/Enlarge........................................................................................................ |
5-3 |
Reduce/Enlarge More options.............................................................. |
5-4 |
Paper Supply............................................................................................................. |
5-4 |
Output Color............................................................................................................. |
5-5 |
Copy Output............................................................................................................. |
5-5 |
2 Sided Copying...................................................................................................... |
5-6 |
Original Type............................................................................................................ |
5-7 |
Lighten/Darken........................................................................................................ |
5-8 |
Image Quality tab............................................................................................................... |
5-8 |
Image Options......................................................................................................... |
5-8 |
Image Enhancement............................................................................................ |
5-9 |
Color Effects.............................................................................................................. |
5-9 |
Color Balance......................................................................................................... |
5-10 |
Color Shift............................................................................................................... |
5-10 |
Layout Adjustment tab................................................................................................... |
5-10 |
Book Copying......................................................................................................... |
5-11 |
2 Sided Book Copying........................................................................................ |
5-12 |
Original Size........................................................................................................... |
5-12 |
Edge Erase............................................................................................................... |
5-12 |
Image Shift............................................................................................................ |
5-13 |
Image Rotation..................................................................................................... |
5-13 |
Invert Image.......................................................................................................... |
5-14 |
Original Orientation............................................................................................ |
5-15 |
Output Format tab............................................................................................................ |
5-16 |
Booklet Creation................................................................................................... |
5-16 |
Covers....................................................................................................................... |
5-18 |
Transparency Options........................................................................................ |
5-22 |
ii |
Xerox® Color C75 Press |
|
User Guide |
|
Table of Contents |
Page Layout........................................................................................................... |
5-22 |
Poster........................................................................................................................ |
5-24 |
Annotations............................................................................................................ |
5-24 |
Watermark.............................................................................................................. |
5-25 |
Tab Margin Shift................................................................................................... |
5-25 |
Face Up/Down Output....................................................................................... |
5-26 |
Folding (optional)................................................................................................ |
5-26 |
ID Card Copy......................................................................................................... |
5-28 |
Job Assembly tab.............................................................................................................. |
5-29 |
Build Job.................................................................................................................. |
5-29 |
Sample Job............................................................................................................. |
5-30 |
Combine Original Sets........................................................................................ |
5-30 |
Delete Outside/Delete Inside.......................................................................... |
5-31 |
6 Scan................................................................................................................ |
6-1 |
Basic scanning procedure................................................................................................. |
6-1 |
Scan options........................................................................................................................... |
6-2 |
Basic scan options.................................................................................................. |
6-2 |
Additional scan options....................................................................................... |
6-3 |
Advanced Settings.................................................................................... |
6-4 |
Layout Adjustment................................................................................... |
6-5 |
Filing Options.............................................................................................. |
6-7 |
E-mail Options............................................................................................ |
6-8 |
E-mail..................................................................................................................................... |
6-11 |
E-mail components............................................................................................. |
6-11 |
Scanning to an e-mail address....................................................................... |
6-12 |
Network Scanning............................................................................................................. |
6-13 |
Network scanning components...................................................................... |
6-13 |
Network Scanning procedure.......................................................................... |
6-14 |
Scan to PC............................................................................................................................ |
6-16 |
Scan to PC components.................................................................................... |
6-16 |
Using the Scan to PC feature.......................................................................... |
6-16 |
Store to Folder.................................................................................................................... |
6-17 |
Store to Folder components............................................................................ |
6-17 |
Save using the USB Memory Device (optional).................................................... |
6-18 |
Store to USB Components................................................................................ |
6-18 |
Store to USB procedure..................................................................................... |
6-19 |
Web Services for Devices (WSD).................................................................................. |
6-19 |
Store to WSD component................................................................................. |
6-19 |
Store to WSD procedure.................................................................................... |
6-19 |
Xerox® Color C75 Press |
iii |
User Guide |
|
Table of Contents
7 Job Status..................................................................................................... |
7-1 |
Job Status overview............................................................................................................. |
7-1 |
Active Jobs tab...................................................................................................................... |
7-1 |
Completed Jobs tab............................................................................................................ |
7-1 |
8 Machine Status.......................................................................................... |
8-1 |
Machine Status..................................................................................................................... |
8-1 |
Machine Information tab................................................................................................. |
8-1 |
Faults tab................................................................................................................................. |
8-3 |
Supplies tab............................................................................................................................ |
8-3 |
Billing Information tab...................................................................................................... |
8-3 |
Accessing Billing Information............................................................................ |
8-3 |
Billing meters/usage counters........................................................................... |
8-4 |
Usage Counters.......................................................................................... |
8-4 |
User Account Billing Information....................................................... |
8-5 |
Tools tab.................................................................................................................................. |
8-5 |
Changing the paper tray attributes................................................................ |
8-6 |
Gloss mode................................................................................................................ |
8-6 |
9 Maintenance............................................................................................... |
9-1 |
Cleaning the machine ....................................................................................................... |
9-1 |
Cleaning the exterior............................................................................................. |
9-2 |
Cleaning the document cover and glass....................................................... |
9-2 |
Cleaning the document feeder rollers............................................................ |
9-5 |
Replacing consumable supplies...................................................................................... |
9-6 |
Ordering supplies.................................................................................................... |
9-6 |
Checking the status of CRUs.............................................................................. |
9-7 |
Replacing a toner cartridge................................................................................ |
9-8 |
Replacing the toner waste bottle.................................................................. |
9-10 |
Replacing a drum cartridge.............................................................................. |
9-11 |
Replacing the fuser.............................................................................................. |
9-17 |
10 Problem solving..................................................................................... |
10-1 |
Paper jams............................................................................................................................ |
10-1 |
Document feeder jams...................................................................................... |
10-1 |
Document jams under the document feeder belt.................................. |
10-4 |
Lower left cover jams.......................................................................................... |
10-6 |
Main unit jams...................................................................................................... |
10-7 |
Paper jams in Trays 1-3..................................................................................... |
10-9 |
Paper jams in the Bypass (Tray 5).............................................................. |
10-11 |
Envelope jams in the Bypass tray.................................................. |
10-12 |
iv |
Xerox® Color C75 Press |
|
User Guide |
Table of Contents |
|
Inverter jams (bottom right cover)............................................................ |
10-12 |
Fault Codes........................................................................................................................ |
10-14 |
General problems............................................................................................................ |
10-29 |
Other faults....................................................................................................................... |
10-31 |
Image quality................................................................................................................... |
10-31 |
Hints and tips................................................................................................................... |
10-37 |
Fuser hints and tips........................................................................................... |
10-37 |
Extending fuser life.............................................................................. |
10-37 |
Preventing fuser jams......................................................................... |
10-37 |
Preventing fuser damage.................................................................. |
10-38 |
Fuser width switch information...................................................... |
10-39 |
Miscellaneous hints and tips......................................................................... |
10-41 |
11 Specifications........................................................................................ |
11-1 |
Print engine specifications............................................................................................. |
11-1 |
Additional optional accessories................................................................................... |
11-2 |
12 High Capacity Feeder (1-tray HCF/Tray 6)................................. |
12-1 |
HCF (Tray 6) overview...................................................................................................... |
12-1 |
Loading paper in the HCF (Tray 6)............................................................................. |
12-1 |
Problem solving.................................................................................................................. |
12-3 |
Clearing paper jams in Tray 6 (1-Tray HCF).............................................. |
12-3 |
HCF (Tray 6) and lower left cover jams....................................................... |
12-4 |
HCF (1 Tray) fault codes.................................................................................... |
12-6 |
13 Oversized High Capacity Feeder (OHCF), 1 or 2 trays |
|
(Trays 6/7)................................................................................................ |
13-1 |
Loading media in the 1 or 2-Tray OHCF.................................................................. |
13-2 |
Loading paper in the OHCF (1 or 2 Trays)................................................. |
13-2 |
Loading tabs in the OHCF (1 or 2 Trays).................................................... |
13-2 |
Loading transparencies in the OHCF (1 or 2 Trays)............................... |
13-3 |
Loading pre-drilled stock into the OHCF (1 or 2 Trays) for 1-sided |
|
print jobs........................................................................................................... |
13-4 |
Loading pre-drilled stock into the OHCF (1 or 2 Trays) for 2-sided |
|
print jobs........................................................................................................... |
13-5 |
Skew adjustment levers.................................................................................................. |
13-7 |
Maintenance....................................................................................................................... |
13-8 |
Replacing the OHCF feed rolls........................................................................ |
13-8 |
Replacing the (OHCF) Bypass Tray feed rolls......................................... |
13-11 |
OHCF problem solving.................................................................................................. |
13-13 |
Clearing OHCF jams......................................................................................... |
13-13 |
Paper jams inside the OHCF trays................................................. |
13-14 |
Xerox® Color C75 Press |
v |
User Guide |
|
Table of Contents |
|
OHCF paper jams at lever 1a and knob 1c................................ |
13-15 |
OHCF paper jams at lever 1b and knob 1c................................ |
13-16 |
OHCF paper jams at lever 1d and knob 1c................................ |
13-17 |
OHCF fault codes............................................................................................... |
13-19 |
OHCF (Trays 6/7) specifications............................................................................... |
13-27 |
14 Advanced/Professional Finishers................................................... |
14-1 |
Advanced Finisher............................................................................................................. |
14-1 |
Professional Finisher with Booklet Maker................................................................ |
14-2 |
Loading Staples for the Advanced/Professional Finishers................................ |
14-2 |
Staple Jam............................................................................................................................ |
14-3 |
Ordering Supplies.............................................................................................................. |
14-3 |
Finishing problems............................................................................................................ |
14-4 |
15 Interface Module.................................................................................. |
15-1 |
Overview................................................................................................................................ |
15-1 |
Control panel......................................................................................................... |
15-2 |
Paper path.............................................................................................................. |
15-3 |
Paper curl settings on the Interface Module.......................................................... |
15-3 |
Preset decurler settings..................................................................................... |
15-3 |
Manual decurler buttons................................................................................... |
15-4 |
Problem solving.................................................................................................................. |
15-4 |
Clearing jams......................................................................................................... |
15-4 |
Paper jams at lever 1a.......................................................................... |
15-4 |
Paper jams at lever 2a.......................................................................... |
15-6 |
Paper jams at lever 2b.......................................................................... |
15-7 |
Fault codes.............................................................................................................. |
15-8 |
16 High Capacity Stacker (HCS)........................................................... |
16-1 |
Overview................................................................................................................................ |
16-1 |
Identifying the components........................................................................... |
16-2 |
Control panel......................................................................................................... |
16-3 |
HCS top tray........................................................................................................... |
16-3 |
Unloading the Stacker Tray........................................................................................... |
16-4 |
Problem solving.................................................................................................................. |
16-5 |
Jam clearance........................................................................................................ |
16-5 |
HCS entrance jams (E1, E2, and E3)............................................... |
16-5 |
HCS transport jams (E4, E5, and E6)............................................... |
16-6 |
HCS top tray jam (E7)........................................................................... |
16-8 |
HCS exit jam (E8).................................................................................... |
16-9 |
Hints and tips for using the HCS................................................................. |
16-10 |
Loss of power...................................................................................................... |
16-10 |
vi |
Xerox® Color C75 Press |
|
User Guide |
|
Table of Contents |
Fault codes........................................................................................................... |
16-11 |
Specifications................................................................................................................... |
16-26 |
17 Standard/Booklet Maker Finisher.................................................. |
17-1 |
Manual decurling feature on the finisher................................................................ |
17-3 |
Folding feature................................................................................................................... |
17-4 |
Fold types................................................................................................................ |
17-4 |
Loading paper/tabs in Tray 8/T1 (Post-Process Inserter).................................. |
17-6 |
Maintenance....................................................................................................................... |
17-7 |
Standard/Booklet Maker consumable supplies........................................ |
17-7 |
Replace the standard staple cartridge........................................................ |
17-8 |
Replace the booklet staple cartridge............................................................ |
17-9 |
Replacing the Staple Waste Container on the finisher...................... |
17-11 |
Empty the Punch Waste Container............................................................ |
17-13 |
Finisher problem solving.............................................................................................. |
17-14 |
Paper jams in Tray 8/T1 (Post-Process Inserter)................................... |
17-15 |
Paper jams at lever 1a and knob 1c.......................................................... |
17-16 |
Paper jams at lever 1d..................................................................................... |
17-17 |
Paper jams at lever 1b..................................................................................... |
17-18 |
Paper jams at lever 3b and 3d..................................................................... |
17-19 |
Paper jams at lever 3e and knob 3c........................................................... |
17-21 |
Paper jams at lever 3g and knob 3f........................................................... |
17-22 |
Paper jams at lever 4b and knob 3a.......................................................... |
17-23 |
Paper jams at lever 2a and knob 3a.......................................................... |
17-24 |
Paper jams at lever 2b and knob 2c.......................................................... |
17-25 |
Paper jams at 2c, 2e, 2f, and 2d.................................................................. |
17-27 |
Paper jams at 2d and lever 2g..................................................................... |
17-28 |
Paper jams at unit 4 and knob 4a.............................................................. |
17-29 |
Paper jams at finisher top tray.................................................................... |
17-31 |
Paper jams at finisher stacker tray............................................................. |
17-32 |
Paper jams at the optional booklet maker tray.................................... |
17-33 |
Stapler faults....................................................................................................... |
17-34 |
Staple jams in the standard staple cartridge........................... |
17-35 |
Staple jams in the booklet maker cartridge.............................. |
17-36 |
Reinserting the standard staple cartridge............................................... |
17-38 |
Fault codes........................................................................................................... |
17-40 |
Specifications................................................................................................................... |
17-52 |
Standard/Booklet Maker Finisher............................................................... |
17-52 |
Optional C/Z Folder.......................................................................................... |
17-55 |
Xerox® Color C75 Press |
vii |
User Guide |
|
Table of Contents
18 SquareFold Trimmer Module........................................................... |
18-1 |
Overview................................................................................................................................ |
18-1 |
Identifying the components......................................................................................... |
18-2 |
Main components................................................................................................ |
18-2 |
Paper path.............................................................................................................. |
18-3 |
Control panel......................................................................................................... |
18-4 |
Square Fold feature.......................................................................................................... |
18-5 |
Square fold options............................................................................................. |
18-5 |
Accessing the Square Fold options............................................................... |
18-7 |
Accessing the Square Fold options for network print |
|
jobs......................................................................................................... |
18-7 |
Accessing the Square Fold options for copy jobs....................... |
18-7 |
Trimmer feature................................................................................................................. |
18-8 |
Trimmer options................................................................................................... |
18-8 |
Trim guidelines...................................................................................................... |
18-9 |
Accessing the Trimmer options................................................................... |
18-11 |
Accessing the Trimmer options for network print |
|
jobs...................................................................................................... |
18-11 |
Accessing the Trimmer options for copy jobs........................... |
18-11 |
Hints and tips................................................................................................................... |
18-12 |
Printing full-page images on booklets...................................................... |
18-12 |
Follow these tips................................................................................................ |
18-13 |
Problem solving............................................................................................................... |
18-13 |
Jam clearance..................................................................................................... |
18-13 |
Clearing jams......................................................................................... |
18-14 |
Clearing E1/E2 jams............................................................................ |
18-14 |
Clearing E3 jams.................................................................................. |
18-16 |
Fault codes........................................................................................................... |
18-17 |
Technical data.................................................................................................................. |
18-27 |
Specifications...................................................................................................... |
18-27 |
viii |
Xerox® Color C75 Press |
|
User Guide |
1
Product overview
This machine is a full color/black and white copier and network printer that operates at a speed of 75 copies/prints per minute.
Machine components
1 Optional feeding device
Shown is the optional 2-tray Oversized High Capacity Feeder (OHCF). Other optional feeding devices are available.
2 User Interface (UI)
The User Interface (UI) consists of the touch screen and control panel with the buttons and keypad.
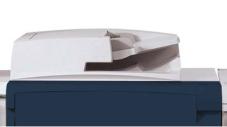
3 Duplex Automatic Document Feeder (DADF)
Automatically feeds 1- and 2-sided original documents. A maximum of 250 two-sided documents can be scanned at one time.
Xerox® Color C75 Press |
1-1 |
User Guide |
|

Product overview
4 Toner cover
Open this cover to access and replace the toner/dry ink cartridges.
5 Front door/cover
Open this door/cover to clear paper jams and to replace various Customer Replaceable Units (CRUs).
6 Paper Trays 1, 2, and 3
Trays 1, 2, and 3 are identical. The trays accommodate a variety of sizes and weights; refer to the Specifications chapter for detailed information. All stock types can be used except for envelopes, and stock can be loaded either in the Long Edge Feed (LEF) or Short Edge Feed (SEF) direction.
7 Interface Module
The Interface Module is required with many of the optional finishing devices. It serves as a communication device between the print engine and any attached finishing devices.
8 Optional finishing device
Shown is the optional Booklet Maker Finisher with the optional C/Z Folder. The Booklet Maker Finisher requires the Interface Module. Other optional finishing devices are available.
Bypass (Tray 5)
The Bypass tray, also called Tray 5 or Multisheet Inserter, accommodates all types of stock in various size and weight ranges. The tray holds a maximum of 250 sheets of 20 lb./75 gsm plain paper.
The Bypass tray is a paper tray on the left-hand side of the machine. It can be folded away when not in use. When the tray is in use and it is lowered, the tray can be extended to support long length stock.
Note
The mounting location for the Bypass tray varies when optional feeding devices are added to the machine configuration.
1-2 |
Xerox® Color C75 Press |
|
User Guide |
Product overview
Document feeder
Tips for using the Duplex Automatic Document Feeder (DADF):
•A maximum of 250 documents can be scanned at one time by using the document feeder.
•Mixed-size original documents can be used; however, the top left corners of the original documents must be aligned in the document handler.
•Remove any staples and paper clips from the documents before loading them in the document feeder.
•For best output, ensure that the documents are in good condition.
Xerox® Color C75 Press |
1-3 |
User Guide |
|

Product overview
User Interface (UI)
1.Touch screen
2.Services Home
3.Services
4.Job Status
5.Machine Status
6.Log In/Out
7.Energy Saver
8.Clear All
9.Stop
10.Start
11.Interrupt
12.Keypad
13.Language
14.Help
1-4 |
Xerox® Color C75 Press |
|
User Guide |

Product overview
Print server overview
One of the following print servers may be available and used with your machine:
•Xerox® FreeFlow® Print Server
•Xerox® EX Print Server, Powered by Fiery®
•Xerox® Integrated Fiery® Color Server
Note
For detailed information on your specific print server, refer to the customer documentation that was delivered with it.
Power on/off
Two power switches
The machine has two power switches:
1.Power switch: Use this switch to turn on or turn off the machine.
2.Main power switch: This switch is located behind the front door/cover. It is used mainly by the Xerox Service Representative when servicing the machine. In rare problem solving cases, you may be directed to power off the machine with this switch.
Xerox® Color C75 Press |
1-5 |
User Guide |
|

Product overview
Important
Always power off the Power Switch first and then power off the Main Power Switch.
Power on
After turning the power on, the machine takes approximately 3 minutes to warm up before you can start making copies.
1.Open the cover.
2.Press the power switch to the On position.
The Please wait... message indicates that the machine is warming up. The machine cannot be used while it is warming up.
Power off
1.Press the power switch to the Off position.
2.Verify that the UI display is turned off completely, before turning on the machine again.
Energy Saver
Note
The terms Power Saver and Energy Saver are used synonymously.
The Energy Saver feature has two modes:
•Low Power: After remaining inactive for a preset time period, the machine enters the Low Power mode.
•Sleep Mode: After entering Low Power and remaining inactive for another preset time period, the machine enters the Sleep mode.
1-6 |
Xerox® Color C75 Press |
|
User Guide |
Product overview
Here are two examples:
•If the Low Power Mode is set to 15 minutes and Sleep Mode is set to 60 minutes, Sleep Mode activates after 60 minutes of total inactivity and not 60 minutes after the Low Power Mode begins.
•If the Low Power Mode is set to 15 minutes and the Sleep mode is set to 20 minutes, the Sleep Mode activates 5 minutes after the Low Power Mode begins.
Note
To manually enter power saver, press the Energy Saver button on the UI.
When logged on as administrator, the time periods for both Low Power and Sleep Mode may be set from Tools > System Settings > Common Service Settings > Energy Saver Settings.
Exiting the Energy Saver mode
1.Press the Energy Saver button, or
2.Send a print job to the machine or make copies at the machine.
Locating the machine serial number
The machine serial number can be accessed from either the machine UI or by locating it on the inside of the machine.
1.Press the Machine Status button on the UI.
2.Ensure that the Machine Information tab is displayed. The machine serial number is found here.
3.The machine serial number can also be found on the serial number plate inside the front door/cover of the machine.
Feeding and finishing devices
Available with your machine is a variety of optional feeding and finishing devices. These devices are briefly discussed on the following pages along with where to find specific information on each device.
Xerox® Color C75 Press |
1-7 |
User Guide |
|

Product overview
High Capacity Feeder (Tray 6), 1-tray
The 1-tray High Capacity Feeder (HCF), otherwise known as Tray 6, provides a 2,000-sheet, letter-size (8.5 x 11 in./A4) paper source.
Note
Only letter-size (8.5 x 11 in.)/A4 paper, Long Edge Feed (LEF) can be used in this tray.
Oversized High Capacity Feeder, 1 or 2-trays
The Oversized High Capacity Feeder (OHCF) is available in a 1-tray or 2-tray option. The OHCF feeds a variety of stock sizes, including standard and oversized stock up to 13 x 19.2 in./330.2 x 488 mm. Each tray holds 2,000 sheets.
1-8 |
Xerox® Color C75 Press |
|
User Guide |

Product overview
1 |
2-tray OHCF (with Bypass) |
2 |
1-tray OHCF (with Bypass and storage cabinet above the tray) |
Advanced Finisher
The Advanced Finisher provides a wide range of finishing options, including offset stacking, stapling, and hole punching.
Xerox® Color C75 Press |
1-9 |
User Guide |
|

Product overview
Professional Finisher with Booklet Maker
The Professional Finisher is equipped with a Booklet Maker and provides a wide range of finishing options.
Interface Module
The Interface Module is required with MANY of the finishing devices. The Interface Module provides communication and a paper path between the print engine and any attached finishing device or devices.
1-10 |
Xerox® Color C75 Press |
|
User Guide |
Product overview
GBC®AdvancedPunch™
The GBC AdvancedPunch may be attached to a variety of optional finishing accessories.
The GBC AdvancedPunch provides another level of finishing options to your output by allowing you to punch holes in 8.5 x 11 in./A4 documents, which support a variety of binding styles. Punch types include 19-hole to a maximum of 32-Hole for 8.5 x 11 in. media. A4 media supports punch types 21-hole to a maximum of 47-hole.
Note
The GBC AdvancedPunch is shown here with the required Interface Module and with the optional Booklet Maker Finisher and the optional C/Z Folder.
Information on this accessory can be downloaded from www.xerox.com to download the latest version of the desired user guide by entering the product name in the Search field and then selecting the User Documentation link.
High Capacity Stacker
The High Capacity Stacker (HCS) is an optional finishing device that provides stacking and offsetting capabilities for output to a Stacker Tray.
Xerox® Color C75 Press |
1-11 |
User Guide |
|

Product overview
Standard/Booklet Maker Finisher
The Standard and Booklet Maker Finishers provide a wide range of finishing/folding options. You can enhance the finishing options by adding the optional C/Z Folder to either finisher.
Standard Finisher with optional C/Z Folder
Booklet Maker Finisher with optional C/Z Folder
Note
Both the Standard Finisher and the Booklet Maker Finisher are shown here with the required Interface Module.
1-12 |
Xerox® Color C75 Press |
|
User Guide |

Product overview
SquareFold® Trimmer Module
The SquareFold Trimmer Module is an optional finishing device that is used in conjunction with the Booklet Maker Finisher.
Note
The SquareFold Trimmer Module is shown here with the required Booklet Maker Finisher (also known as Light Production C Finisher with optional Booklet Maker).
Xerox® Color C75 Press |
1-13 |
User Guide |
|
Product overview
1-14 |
Xerox® Color C75 Press |
|
User Guide |
2
Where to find help
Help on the World Wide Web
Xerox on the World Wide Web: For system support, user help, customer documentation, and service support, go to www.xerox.com and click the Contact Us link for specific contact information/telephone numbers in your area.
Note
You can get the latest customer documentation updates for your product by going to www.xerox.com. Be sure to periodically check this website for the latest information on your product.
It may be helpful to know your machine serial number before calling for support. The machine serial number is shown on the Machine Information tab: Machine Status > Machine Information.
Print server customer documentation
Supporting customer documentation for your print server is on a CD/DVD and is shipped with the print server. You or your System Administrator should print these documents, after the installation is complete.
Xerox® Color C75 Press |
2-1 |
User Guide |
|
Where to find help
2-2 |
Xerox® Color C75 Press |
|
User Guide |
3
Submitting a print job
These exercises require the PDF files for the User Guide and System Administration Guide. If you do not have an electronic copy of these PDFs, download them from www.xerox.com.
The exercises instruct you on how to print one of the customer documentation guides (User Guide or System Administration Guide).
Printing from your computer
1.From your computer open one of the PDFs files in Adobe® Acrobat Reader.
2.Select File > Print.
3.Select the desired printer and print queue.
4.Select the Properties button for that machine.
5.Select the desired output options such as quantity, 1- or 2-sided printing.
6.Select OK to close the Properties window.
7.Select OK to send the job to the printer.
Printing from the Xerox FreeFlow Print Server
1.Copy the customer documentation PDF files onto a storage device such as a flash drive or CD/DVD.
2.Connect your storage device to the print server.
3.From the FreeFlow Printer Server, select Services > Print from File.
4.Select Browse.
5.Browse to your storage device containing the PDF files.
6.Select and highlight one of the PDF files (User Guide, System Administration Guide).
Xerox® Color C75 Press |
3-1 |
User Guide |
|
Submitting a print job
7.Select OK.
8.Select the desired print queue.
9.Select the desired output options such as quantity, 1- or 2-sided printing.
10. Select Print.
The job is sent to the desired queue and either held or immediately printed.
11. Select Close.
Printing from the Xerox EX Print Server, Powered by EFI
1.Copy the customer documentation PDF files onto a storage device such as a flash drive or CD/DVD.
2.Connect your storage device to the print server.
3.From the Xerox EX Printer Server, select File > Import Job.
4.Select the desired queue such as Print or Hold.
5.Select Add.
6.Browse to your storage device containing the PDF files.
7.Select and highlight one of the PDF files (User Guide, System Administration Guide).
8.Select Open.
9.Select Import.
The job is sent to the selected queue or to the printer for immediate printing.
3-2 |
Xerox® Color C75 Press |
|
User Guide |

4
Paper and other media
Loading media in trays 1, 2, and 3
Trays 1, 2, and 3 are identical. Each tray has a capacity of 550 sheets of 20 lb./75 gsm paper. Stock can be LEF or SEF, landscape or portrait.
Loading paper in trays 1, 2, and 3
Note
A paper jam may occur if a tray is opened while it is being used to feed stock.
1.Select the appropriate paper stock for your print job.
2.Pull out the tray slowly until it stops.
3.Open the ream of paper with the seam side facing up.
4.Fan the sheets before loading them into the tray.
5.Load and align the edge of the paper against the left edge of the tray.
Paper can be loaded either in the LEF/portrait or SEF/landscape direction.
6.Adjust the paper guides by pressing in the guide release and carefully moving the Edge Guide until it lightly touches the edge of the material in the tray.
Do not load materials above the MAX line located on the rear Edge Guide.
Xerox® Color C75 Press |
4-1 |
User Guide |
|

Paper and other media
7.Gently push in the tray until it comes to a stop.
If enabled by your System Administrator, the Paper Tray settings screen may be displayed on the UI.
8.If changes have been made to the paper tray, select the Change Settings button; otherwise, proceed to the next step.
a)Make the desired selections for Paper Type/Paper Weight, Paper Size, and Paper Color.
b)If necessary, make the desired changes to paper curl and alignment adjustment.
Note
Refer to the System Administration Guide for detailed information on the paper curl and alignment adjustment options.
c)Select Save until you are returned to the tray settings window.
9.Select Confirm to close the window.
Loading tab stock in trays 1, 2, and 3
1.Select the appropriate paper stock for your print job.
2.Pull out the tray slowly until it stops.
3.Fan the tab paper before loading into the tray.
4.Load and align the edge of the tab paper against the right edge of the tray with the side to be copied or printed on facing down.
Note
Tab stock can be loaded either LEF or SEF (portrait or landscape).
5.Adjust the paper guides by pressing in the guide release and carefully moving the Edge Guide until it lightly touches the edge of the material in the tray.
Do not load materials above the MAX line located on the rear Edge Guide.
6.Gently push in the tray until it comes to a stop.
If enabled by your System Administrator, the Paper Tray settings screen may be displayed on the UI.
7.If changes have been made to the paper tray, select the Change Settings button; otherwise, proceed to the next step.
a)Make the desired selections for Paper Type/Paper Weight, Paper Size, and Paper Color.
4-2 |
Xerox® Color C75 Press |
|
User Guide |
 Loading...