


 Loading...
DocuPrint 240A/340A
Network Print Environment
User Guide

Novell, NetWare, NDS are registered trademarks of Novell, Inc., in the United States and other countries.
AppleTalk, EtherTalk, and Macintosh are trademarks of Apple Computer, Inc., registered in the U.S. and other countries.
Microsoft, Windows, Windows NT, and Windows Server are either registered trademarks or trademarks of Microsoft Corporation in the United States and/or other countries.
Adobe, Acrobat, PostScript are trademarks of Adobe Systems Incorporated.
UNIX is a registered trademark of The Open Group in the United States and other countries. Solaris, SunOS, NIS (Network Information Services) are trademarks or registered trademarks of Sun Microsystems, Inc. in the United States and other countries.
All product/brand names are trademarks or registered trademarks of the respective holders. Permission has been obtained from Microsoft Corporation for use of software screen shots.
Important
c This manual is copyrighted with all rights reserved. Under the copyright laws, this manual may not be copied or modified in whole or part, without the written consent of the publisher.
d Parts of this manual are subject to change without prior notice.
e We welcome any comments on ambiguities, errors, omissions, or missing pages.
Xerox, The Document Company and the stylized X are registered trademarks of Xerox Corporation.
All Xerox and Fuji Xerox product names are either registered trademarks or trademarks of Xerox Corporation and Fuji Xerox Co., Ltd.
Preface
Thank you for choosing this printer.
This User Guide provides all the necessary information about installing and operating this printer on the network.
Please read this guide in detail to ensure full and efficient use of this product on a network and keep it handy for a quick reference should you encounter any difficulties when using the machine.
The illustrations used in this guide are based on DocuPrint 340A.
Preface 3

Types of Manuals
Manuals Bundled With the Machine & Their Contents
Setup and Quick Reference Guide |
Explains how to install this printer, load paper, and troubleshoot of |
|
this printer. |
|
|
The Online Help for the |
Explains how to set the items and features of CentreWare Internet |
CentreWare Internet Services |
Services. |
|
|
The Online Help for the printer |
Explains how to set the items and features of the printer driver. |
driver |
|
|
|
User Guide (PDF) |
Explains printer settings, and describes control panel menu items |
|
and daily care in detail. |
|
This PDF file is included in the CD-ROM bundled with this printer. |
|
|
Network Print Environment User |
Explains how to set the printer for the network environment to use |
Guide (PDF) |
this printer as a network printer. |
|
This PDF file is included in the CD-ROM bundled with this printer. |
|
|
HP-GL, HP-GL/2 Emulation |
Explains how to set the emulation mode for HP-GL and HP-GL/2. |
Settings Guide (PDF) |
This PDF file is included in the CD-ROM bundled with this printer. |
|
|
Manuals Bundled With Optional Accessories |
|
|
|
User Guide (PostScript® Software |
Explains how to set the printer as a PostScript printer and the items |
Kit) (PDF) |
that can be set in the printer driver. |
|
This PDF file is included in the CD-ROM bundled with the |
|
PostScript software kit. |
|
|
Installation Guide |
Explains how to install each optional accessory. |
|
|
Note
• Adobe® Acrobat® Reader needs to be installed to display PDF files.
4 Types of Manuals
Contents
Preface.............................................................................................................. |
|
3 |
|
Types of Manuals.............................................................................................. |
4 |
||
Contents............................................................................................................ |
|
5 |
|
Using This Guide .............................................................................................. |
8 |
||
1 |
Overview .................................................................................................. |
10 |
|
|
1.1 |
Supported Environment......................................................................................... |
10 |
2 Printing Using TCP/IP Direct Print Utility.................................................. |
11 |
||
|
2.1 |
Installation Procedure for Printing Using TCP/IP Direct Print Utility ...................... |
11 |
|
|
System Configuration ............................................................................................ |
11 |
|
|
Target Computers .................................................................................................. |
11 |
|
|
Set Up Procedure .................................................................................................. |
12 |
|
2.2 |
Setting Up the Computer ....................................................................................... |
12 |
|
|
Overview ................................................................................................................ |
12 |
|
|
Installing the Printer Driver .................................................................................... |
13 |
|
|
Installing TCP/IP Direct Print Utility ....................................................................... |
13 |
|
|
Setting Up the Port ................................................................................................ |
15 |
3 Printing Through LPD or Port9100 ........................................................... |
18 |
||
|
3.1 |
Installation Procedure for Printing Through LPD or Port9100 ............................... |
18 |
|
|
System Configuration ............................................................................................ |
18 |
|
|
Target Computers .................................................................................................. |
18 |
|
|
Set Up Procedure .................................................................................................. |
19 |
|
3.2 |
Setting Up the Computer ....................................................................................... |
19 |
|
|
Installing the Printer Driver (Windows NT 4.0) ...................................................... |
19 |
|
|
Installing the Printer Driver (Windows 2000/Windows XP/Windows Server |
|
|
|
2003) ..................................................................................................................... |
20 |
|
|
Setting Up the Port9100 Port ................................................................................. |
21 |
|
|
Creating a Shared Printer ...................................................................................... |
23 |
4 |
Internet Printing ........................................................................................ |
24 |
|
|
4.1 |
Installation Procedure for Internet Printing ............................................................ |
24 |
|
|
System Configuration ............................................................................................ |
24 |
|
|
Target Computers .................................................................................................. |
24 |
|
|
Set Up Procedure .................................................................................................. |
25 |
|
4.2 |
Installing the Printer Driver .................................................................................... |
25 |
|
|
Installation Procedure (Windows 2000/Windows XP/Windows Server 2003) ....... |
25 |
|
|
Installation Procedure (Windows Me) .................................................................... |
26 |
5 |
Printing Through SMB .............................................................................. |
27 |
|
|
5.1 |
Installation Procedure for Printing through SMB ................................................... |
27 |
|
|
System Configuration ............................................................................................ |
27 |
|
|
Target Computers .................................................................................................. |
27 |
|
|
Set Up Procedure .................................................................................................. |
28 |
|
5.2 |
Setting/Changing SMB Using the [config.txt] File.................................................. |
28 |
|
5.3 |
Auto Driver Downloading....................................................................................... |
32 |
|
|
Preparation for Auto Driver Downloading .............................................................. |
32 |
|
|
Auto Downloading of Printer Driver ....................................................................... |
33 |
6 |
Printing Through NetWare........................................................................ |
34 |
|
|
6.1 |
Installation Procedure for Printing Through NetWare............................................ |
34 |
|
|
System Configuration ............................................................................................ |
34 |
Contents 5
|
|
Target Computers .................................................................................................. |
34 |
|
|
IPX/SPX Frame Types .......................................................................................... |
35 |
|
|
Set Up Procedure .................................................................................................. |
35 |
|
6.2 |
Installing the Printer Driver .................................................................................... |
36 |
7 |
Printing From UNIX .................................................................................. |
38 |
|
|
7.1 |
For Printing From UNIX ......................................................................................... |
38 |
|
|
System Configuration ............................................................................................ |
38 |
|
|
Target Computers .................................................................................................. |
38 |
|
|
Interface ................................................................................................................. |
38 |
|
|
Set Up Procedure .................................................................................................. |
39 |
|
7.2 |
Setting Up the Workstation.................................................................................... |
39 |
|
|
Before Setup .......................................................................................................... |
39 |
|
|
Print Language/Mode ............................................................................................ |
40 |
|
|
Examples of Settings for SunOS 4.1.4 .................................................................. |
41 |
|
|
Examples of Settings for Solaris 2.X ..................................................................... |
42 |
|
|
Examples of Settings for HP-UX 11.0 ................................................................... |
42 |
|
7.3 |
Printing (SunOS) ................................................................................................... |
43 |
|
|
Print (lpr) ................................................................................................................ |
43 |
|
|
Delete (lprm) .......................................................................................................... |
44 |
|
|
Inquiry (lpq) ............................................................................................................ |
45 |
|
7.4 |
Printing (HP-UX/Solaris)........................................................................................ |
47 |
|
|
Print (lp) ................................................................................................................. |
47 |
|
|
Delete (Cancel) ...................................................................................................... |
48 |
|
|
Inquiry (lpstat) ........................................................................................................ |
49 |
|
7.5 |
-C Option (lpr Command) ...................................................................................... |
50 |
|
|
Function ................................................................................................................. |
50 |
|
|
Printing .................................................................................................................. |
53 |
8 Printing From a Macintosh Computer....................................................... |
54 |
||
|
8.1 |
Printing From a Macintosh Computer.................................................................... |
54 |
|
|
System Configuration ............................................................................................ |
54 |
|
|
Target Computers .................................................................................................. |
54 |
|
|
Set Up Procedure .................................................................................................. |
54 |
9 |
Network Utility Software ........................................................................... |
55 |
|
|
9.1 |
IP Address Setting Tool......................................................................................... |
55 |
|
|
How to Start the IP Address Setting Tool .............................................................. |
55 |
|
9.2 |
NetWare Setup Wizard.......................................................................................... |
56 |
|
|
How to Start the NetWare Setup Wizard ............................................................... |
56 |
10 |
Precautions and Limitations ..................................................................... |
57 |
|
|
10.1 |
On Using TCP/IP ................................................................................................... |
57 |
|
|
Setting Up .............................................................................................................. |
57 |
|
|
Switching the Power On/Off .................................................................................. |
58 |
|
|
Printing From Windows ......................................................................................... |
58 |
|
|
Printing From UNIX ............................................................................................... |
59 |
|
10.2 |
On Using SMB....................................................................................................... |
60 |
|
|
Setting Up .............................................................................................................. |
60 |
|
|
Switching the Power On/Off .................................................................................. |
60 |
|
|
Printing .................................................................................................................. |
61 |
|
10.3 |
On Using NetWare ................................................................................................ |
62 |
|
|
Setting Up the Printer ............................................................................................ |
62 |
|
|
Setting Up the Server ............................................................................................ |
63 |
|
|
Printing .................................................................................................................. |
63 |
|
|
About Printing Control ........................................................................................... |
64 |
6 Contents
11 Troubleshooting........................................................................................ |
65 |
|
11.1 |
Using TCP/IP......................................................................................................... |
65 |
|
When Using Windows 95/Windows 98/Windows Me ............................................ |
65 |
|
When Using Windows NT 4.0/Windows 2000/Windows XP/Windows Server |
|
|
2003 ....................................................................................................................... |
66 |
|
When Using UNIX ................................................................................................. |
67 |
11.2 |
Using SMB............................................................................................................. |
68 |
|
The Printer Is Not Found ....................................................................................... |
68 |
|
The Printer Is Not Printing ..................................................................................... |
68 |
|
Cannot Delete Documents From the Printer Window ............................................ |
69 |
|
Cannot Perform Auto Driver Downloading ............................................................ |
69 |
11.3 |
Using NetWare ...................................................................................................... |
70 |
|
The Printer Is Not Printing ..................................................................................... |
70 |
|
When “Please reboot printer” Appears .................................................................. |
72 |
|
Unable to Obtain Desired Print Results ................................................................. |
72 |
|
No Notification ....................................................................................................... |
72 |
11.4 |
Using EtherTalk ..................................................................................................... |
73 |
Index ............................................................................................................... |
|
76 |
Contents 7

Using This Guide
Prerequisite Knowledge
Read this guide in detail before using this printer. If you are not familiar with the machine to which the printer is to be connected or the basic operations or concepts of the software, read the relevant manuals first.
Machines and software to which the printer is to be connected refer to personal computers, workstations, networks, and the respective operating systems and applications on which these machines run.
Organization
The following is a summary of each chapter.
1.Overview
This chapter contains information on using the printer as a network printer.
2.Printing Using TCP/IP Direct Print Utility
This chapter explains the installation procedure for printing from a Windows 95/Windows 98/Windows Me computer using TCP/IP Direct Print Utility.
3.Printing Through LPD or Port9100
This chapter explains the installation procedure for printing from a Windows NT 4.0/ Windows 2000/Windows XP/Windows Server 2003 computer through LPD or Port9100. This chapter also explains the installation procedure for printing from another Windows computer by creating a shared printer on a Windows NT 4.0/Windows 2000/Windows XP/ Windows Server 2003 computer.
4.Internet Printing
This chapter explains the installation procedure for printing using the Internet Printing Protocol (IPP).
5.Printing Through SMB
This chapter explains the installation procedure for connecting a printer to the Windows network through SMB.
6.Printing Through NetWare
This chapter explains the installation procedure for connecting a printer to the NetWare network.
7.Printing From UNIX
This chapter explains the procedure for printing from a UNIX computer.
8.Printing From a Macintosh Computer
This chapter explains the procedure for printing from a Macintosh computer.
9.Network Utility Software
This chapter explains instructions on how to use the Network Utility Software.
10. Precautions and Limitations
This chapter explains the operational precautions and limitations under each network environment.
8 Using This Guide

11. Troubleshooting
This chapter explains instructions on how to solve a problem under each network environment.
Conventions
1.In this guide, “computer” refers to both the personal computer and workstation.
2.The following icons are used in this guide:
Important |
Indicates important information which you should read. |
Note |
Indicates additional information on operations or features. |
Refer to |
Indicates reference sources. |
3.The following conventions are used in this guide:
Refer to “xxx” : The cross-reference is within this guide.
Refer to xxx |
: |
The cross-reference is not within this guide. |
|
[ |
] |
: |
Indicates items displayed on the computer and the printer control |
|
|
|
panel. Also indicates the title of printed reports/lists from the printer. |
<> : Indicates items such as hard buttons and indicators on the keyboard
and printer.
Using This Guide |
9 |

1 Overview
1.1Supported Environment
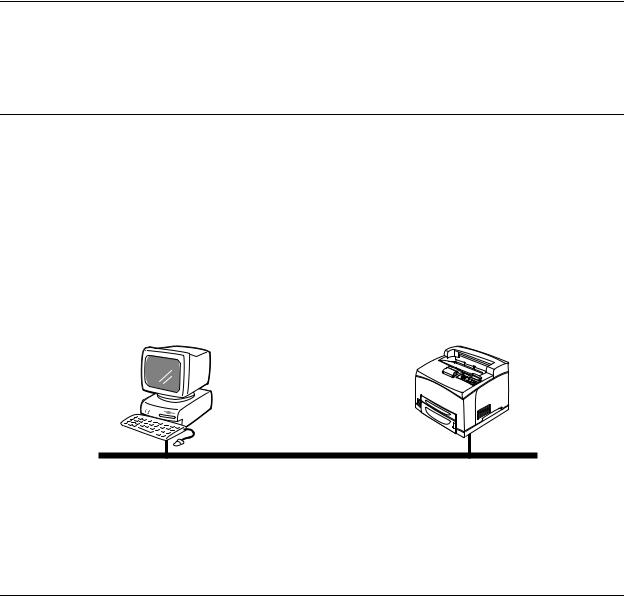
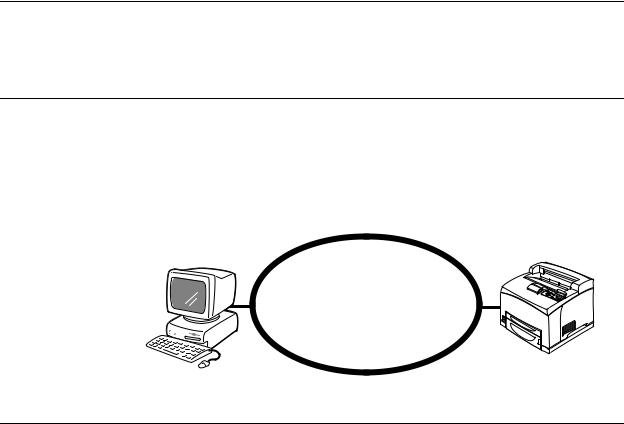
This printer can be connected to a network through the Ethernet interface.
The printer supports multiple protocols. As a result, one printer can be shared even from different network environments.
Supported OS and Environment
Connection |
|
|
|
|
Network |
|
|
|
|||
|
|
|
|
|
|
|
|
|
|
|
|
|
Port |
|
LPD |
NetWare |
|
SMB*1 |
IPP*2 |
Port |
EtherTalk |
||
|
|
|
9100 |
||||||||
|
|
|
|
|
|
|
|
|
|
|
|
|
|
|
|
|
|
|
|
|
|
|
|
|
Protocol |
|
TCP/IP |
TCP/IP |
IPX/SPX |
Net |
|
TCP/IP |
TCP/IP |
TCP/IP |
Apple |
|
|
BEUI |
|
Talk |
|||||||
|
|
|
|
|
|
|
|
|
|
||
|
|
|
|
|
|
|
|
|
|
|
|
|
|
|
|
|
|
|
|
|
|
|
|
|
Windows 95 |
|
{*3 |
{ |
{ |
{ |
|
{ |
|
{*3 |
|
|
Windows 98 |
|
{*3 |
{ |
{ |
{ |
|
{ |
|
{*3 |
|
|
Windows |
|
{*3 |
{ |
{ |
{ |
|
{ |
{ |
{*3 |
|
|
Me |
|
|
|
|
|
|
|
|
|
|
|
|
|
|
|
|
|
|
|
|
|
|
|
Windows |
|
{ |
{ |
{ |
{ |
|
{ |
|
|
|
|
NT 4.0 |
|
|
|
|
|
|
|
|
|
|
|
|
|
|
|
|
|
|
|
|
|
|
OS |
Windows |
|
{ |
{ |
{ |
{ |
|
{ |
{ |
{ |
|
2000 |
|
|
|
|
|
|
|
|
|
|
|
|
|
|
|
|
|
|
|
|
|
|
|
|
|
|
|
|
|
|
|
|
|
|
|
|
Windows |
|
{ |
{ |
{ |
|
|
{ |
{ |
{ |
|
|
XP |
|
|
|
|
|
|
|
|
|
|
|
|
|
|
|
|
|
|
|
|
|
|
|
Windows |
|
{ |
{ |
{ |
|
|
{ |
{ |
{ |
|
|
Server 2003 |
|
|
|
|
|
|
|
|
|
|
|
|
|
|
|
|
|
|
|
|
|
|
|
UNIX |
|
{*4 |
|
|
|
|
|
|
|
|
|
Macintosh |
|
{*5 |
|
|
|
|
|
|
|
{*5 |
*1: Used when printing via Windows network.
*2: Used when printing via Internet. For Windows Me, install the IPP port.
*3: When using Windows 95/98/Me, use TCP/IP Direct Print Utility (Utility software is supported by Fuji Xerox).
*4: PostScript software kit (optional) and UNIX Filter are required to print PostScript data. UNIX Filter is compatible with the OSs in Solaris, HP-UX and Linux (Redhat, SuSE).
*5: PostScript software kit (optional) is required and the LPD port is supported with Mac OS X only.
Important
•The NetWare, IPP, and EtherTalk port settings in this printer are disabled by default. To use these ports, enable the settings on the control panel.
10 1 Overview
2Printing Using TCP/IP Direct Print Utility
2.1Installation Procedure for Printing Using TCP/IP Direct Print Utility
TCP/IP Direct Print Utility is a software developed by our company which allows print data to be sent directly from Windows® 95/Windows® 98/Windows® Me computer to a printer on the same network without going through the server.
This section explains the installation procedure for printing from a Windows 95/Windows 98/ Windows Me computer using TCP/IP Direct Print Utility.
System Configuration
To use TCP/IP Direct Print Utility, install the software on Windows 95/Windows 98/Windows Me.
And you will need to set up the IP address on the printer and the computer.
Windows 95/Windows98/
Windows Me
LPD or Port9100 (TCP/IP)
Note
•The TCP/IP protocol is used for printing using TCP/IP Direct Print Utility. When the TCP/IP protocol is used, the printer can limit print instructions by IP addresses. For details, refer to the Online Help for CentreWare Internet Services.
Target Computers
TCP/IP Direct Print Utility can be installed in the following computers:
Connection |
|
OS |
Service/Client |
Protocol |
|
|
|
|
|
|
|
|
|
|
LPD port |
|
Windows 95 |
- |
TCP/IP |
Port9100 port |
|
Windows 98 |
|
|
|
|
Windows Me |
|
|
|
|
|
|
|
Note
•Before installing TCP/IP Direct Print Utility, check that the TCP/IP protocol is installed in the computer. If the protocol is not installed, refer to the Windows 95/Windows 98/Windows Me/Windows Server 2003 manual for installation instructions.
•TCP/IP Direct Print Utility may not work normally if the printer has characters other than ASCII ones. Set the computer name using ASCII characters (one uppercase alphabet, numeral, hyphen (-), or underscore (_)).
2.1 Installation Procedure for Printing Using TCP/IP Direct Print Utility |
11 |
Set Up Procedure
The setting procedure is as follows:
1.Setting up the printer
Set the IP address on the printer control panel.
Use the printer control panel or CentreWare Internet Services to set the following ports to [Enable].
•Printing through LPD: LPD port (default: [Enable])
•Printing through Port9100: Port9100 port (default: [Enable])
Note
•Before activating the LPD or Port9100 port, set the IP address of the printer.
For details on how to set the IP address and the port, refer to the Setup and Quick Reference Guide.
•CentreWare Internet Services allows more detailed settings. For details, refer to the Online Help for CentreWare Internet Services.
2.Setting up the computer
Install TCP/IP Direct Print Utility and the printer driver for Windows 95/Windows 98/ Windows Me.
Refer to
• “2.2 Setting Up the Computer” (P. 12)
2.2Setting Up the Computer
This section explains necessary settings on the Windows 95/Windows 98/Windows Me computer.
Overview
Set up the computer according to the following procedure:
Installing the printer driver
Installing the printer driver as the local printer.
Select LPT1 as the printing port.
Refer to
• “Installing the Printer Driver” (P. 13)
Checking the TCP/IP protocol
Before installing TCP/IP Direct Print Utillity, check that the TCP/IP protocol is installed in the computer.
Installing TCP/IP Direct Print Utility
Refer to
• “Installing TCP/IP Direct Print Utility” (P. 13)
12 2 Printing Using TCP/IP Direct Print Utility
Installing the Printer Driver
The procedure is as follows:
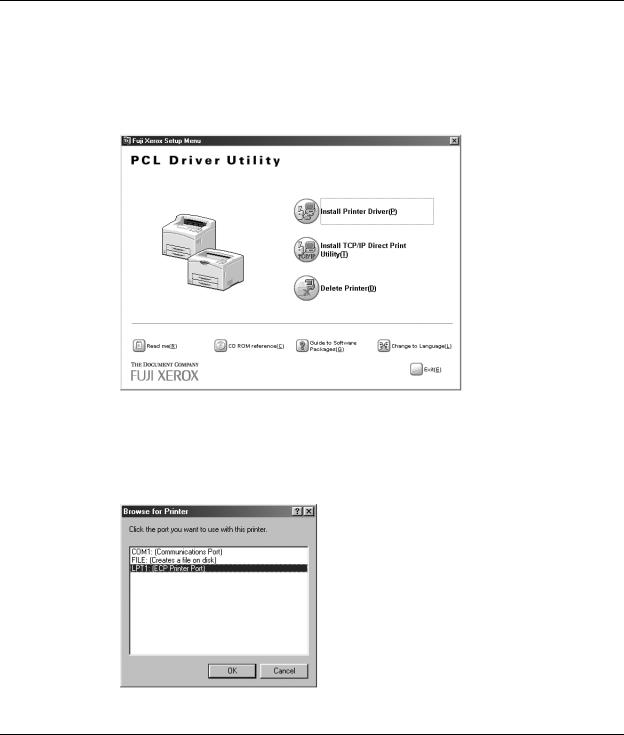
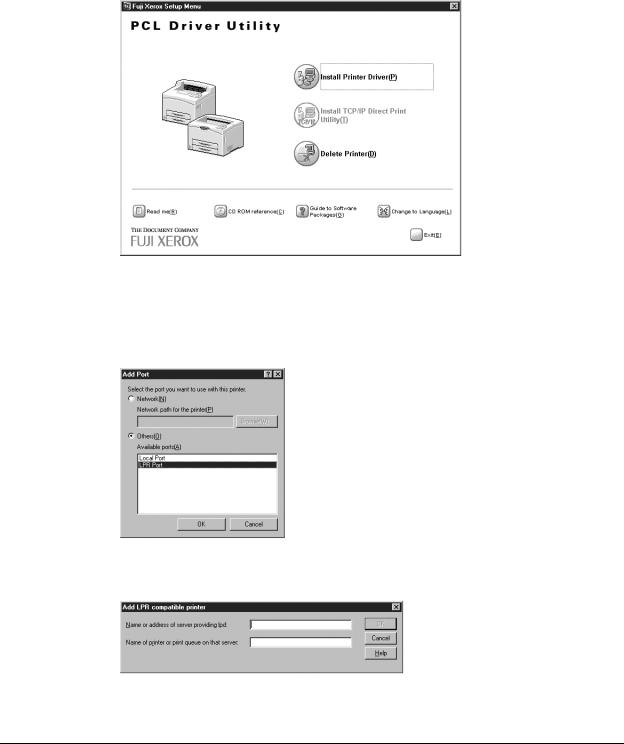
1.Insert the Software Pack CD-ROM into the CD-ROM drive. The [Fuji Xerox Setup Menu] dialog box appears automatically.
2.Click [Install Printer Driver].
3.Follow the displayed screens to continue with the installation.
To set the [Port] for output destination, select [Others], and click [Browse] on the [Printer Driver Installation] dialog box.
On the displayed dialog box, select [LPT1], and then click [OK].
Installing TCP/IP Direct Print Utility
The procedure is as follows:
1.Insert the Software Pack CD-ROM into the CD-ROM drive. The [Fuji Xerox Setup Menu] dialog box appears automatically.
2.2 Setting Up the Computer |
13 |

2.Click [Install TCP/IP Direct Print Utility].
Important
•If you are prompted to install TCP/IP protocol when [Install TCP/IP Direct Print Utility] is clicked, click [OK] to stop the operation, and after you have installed TCP/IP protocol to your computer, carry out the installation again.
3.Click [Next].
4.Check the path under [Destination Folder], and click [Next] if it is all right. The installation of TCP/IP Direct Print Utility begins.
14 2 Printing Using TCP/IP Direct Print Utility
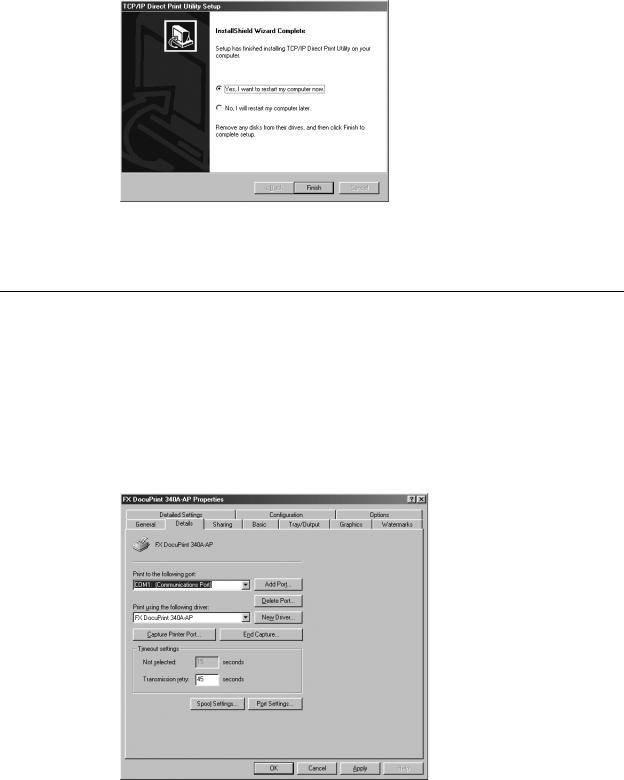
5.When the installation is completed, the following dialog box is displayed. Remove the CD-ROM from the CD-ROM drive. Select [Yes, I want to restart my computer now], and then click [Finish].
Note
• The settings will not take effect if you do not restart the system.
Setting Up the Port
The following procedure explains how to do the settings, using Windows 98 as an example.
1.After starting up your computer, run Windows 98. Click [Start], select [Settings] and then [Printers].
The [Printers] window is displayed.
2.Click the icon of this printer, and then select [Properties] from the [File] menu. The [Properties] dialog box is displayed.
3.Click [Add Port] in the [Details] tab.
2.2 Setting Up the Computer |
15 |
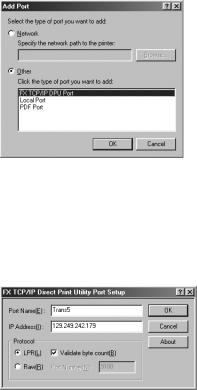
4.Select [Other], and click [FX TCP/IP DPU Port] from [Click the type of port you want to add].
5.Click [OK].
The [FX TCP/IP Direct Print Utility Port Setup] dialog box is displayed.
6.Enter the appropriate value for each item, and click [OK].
Example: For port name, “Trans5” and IP address, “129.249.242.179”.
Port Name |
Enter a name of your choice to identify the printer. |
|
|
Important |
|
|
• When you are adding multiple TCP/IP Direct Print Utility ports, do |
|
|
not use port names as in the following. |
|
|
There is no difference between using uppercase or lowercase |
|
|
characters. Example of port names that cannot be used (current |
|
|
port name is “printer”): |
|
|
• |
Adding characters at the end of the current port name. |
|
|
Example: “printer1”, “printer-01” and so forth. |
|
• |
Deleting some characters from the current port name. |
|
|
Example: “prin”, “print” and so forth. |
|
|
|
IP Address |
Enter the IP address of the printer. If the Domain Name System (DNS) |
|
|
has been installed, the printer host name can be entered. |
|
|
|
|
Protocol |
Select the protocol to be used for data transfer. |
|
|
LPR: The LPD protocol is used for printing. |
|
|
Raw: Port9100 protocol is used for printing. You can specify a port |
|
|
number at the destination in [Port Number]. |
|
|
|
|
Note
•If you do not know the IP address of the printer, check with your network administrator, or print out the [System Settings List]. Refer to the Setup and Quick Reference Guide.
Refer to
• For each setting item: Online Help for the TCP/IP Direct Print Utility
16 2 Printing Using TCP/IP Direct Print Utility
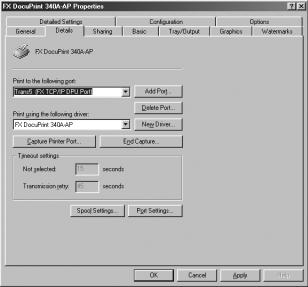
7.On the [Details] tab of the [Properties] dialog box, check that “(FX TCP/IP DPU Port)” appears in [Print to the following port] together with the port name entered in step 6.
8.Click [OK] on the [Properties] dialog box.
2.2 Setting Up the Computer |
17 |
3 Printing Through LPD or Port9100
3.1Installation Procedure for Printing Through LPD or Port9100
This section explains the installation procedure for printing from a Windows NT® 4.0/ Windows® 2000/Windows® XP/Windows Server™ 2003 computer through LPD or Port9100.
System Configuration
As the printer supports the LPD and Port9100 protocol, you can print directly from Windows NT 4.0/Windows 2000/Windows XP/Windows Server 2003 computer through the OS standard LPR port (standard TCP/IP port for Windows 2000/Windows XP/Windows Server 2003).
The transport protocol for LPD and Port9100 can be TCP/IP.
You will need to set up the IP address on the printer and the Windows NT 4.0/Windows 2000/Windows XP/Windows Server 2003 computer. And once the printer registered on the Windows NT 4.0/Windows 2000/Windows XP/Windows Server 2003 computer is shared, you can also print from Windows 95/Windows 98/Windows Me computers through this printer.
Windows NT 4.0/Windows 2000/Windows XP/
Windows Server 2003
LPD or Port9100 (TCP/IP)
Note
•Only Windows 2000/Windows XP/Windows Server 2003 support printing through Port 9100.
•When the TCP/IP protocol is used, the printer can limit print instructions by IP addresses. For details, refer to the Online Help for CentreWare Internet Services.
Target Computers
The following computers support printing through LPD or Port9100:
Connection |
|
OS |
Service/Client |
Protocol |
|
|
|
|
|
|
|
|
|
|
LPD port |
|
Windows NT 4.0 |
Microsoft TCP/IP Printing |
TCP/IP |
|
|
|
|
|
LPD port |
|
Windows 2000 |
- |
Internet protocol (TCP/IP) |
Port9100 port |
|
Windows XP |
|
|
|
|
Windows Server |
|
|
|
|
2003 |
|
|
|
|
|
|
|
18 3 Printing Through LPD or Port9100

Set Up Procedure
The setting procedure is as follows:
1.Setting up the printer
Set the IP address on the printer control panel.
Use the printer control panel or CentreWare Internet Services to set the following ports to [Enable].
•Printing through LPD: LPD port (default: [Enable])
•Printing through Port9100: Port9100 port (default: [Enable])
Note
•Before activating the LPD or Port9100 port, set the IP address of the printer.
For details on how to set the IP address and the port, refer to the Setup and Quick Reference Guide.
•CentreWare Internet Services allows more detailed settings. For details, refer to the Online Help for CentreWare Internet Services.
2.Setting up the computer
Install the printer driver for Windows NT 4.0/Windows 2000/Windows XP/Windows Server 2003.
If necessary, set sharing.
Refer to
• “3.2 Setting Up the Computer” (P. 19)
3.2Setting Up the Computer
This section explains the procedure for installing the printer driver in a Windows NT 4.0/ Windows 2000/Windows XP/Windows Server 2003 computer and also the setup procedure for creating a shared printer and printing from the Windows 95/Windows 98/Windows Me computer.
Installing the Printer Driver (Windows NT 4.0)
The procedure is as follows:
Note
•Before installing the printer driver, check that the TCP/IP protocol and Microsoft TCP/IP Printing are installed in the Windows NT4.0 computer. If the protocol and utility are not installed, install them by referencing the Windows NT 4.0 manual.
1.Insert the Software Pack CD-ROM into the CD-ROM drive. The [Fuji Xerox Setup Menu] dialog box appears automatically.
3.2 Setting Up the Computer |
19 |
2.Click [Install Printer Driver].
3.Follow the displayed screens to continue with the installation.
To set the [Port] for output destination, click [Add Port] on the [Printer Driver Installation] dialog box, and then proceed as follows using the [Add Port] dialog box.
(1) Select [Others] and click [LPR Port] from [Available ports].
(2)Click [OK].
(3)On the displayed dialog box, enter the items at each text box, and then click [OK].
Installing the Printer Driver (Windows 2000/Windows XP/Windows Server 2003)
The procedure is as follows:
Note
•Before installing the printer driver, check that the Internet protocol (TCP/IP) is installed in the Windows 2000/Windows XP/Windows Server 2003 computer. If the protocol is not installed, install it by referencing the Windows 2000/Windows XP/Windows Server 2003 manual.
1.Insert the Software Pack CD-ROM into the CD-ROM drive. The [Fuji Xerox Setup Menu] dialog box appears automatically.
20 3 Printing Through LPD or Port9100
2.Click [Install Printer Driver].
3.Follow the displayed screens to continue with the installation.
To set the [Port] for output destination, click [Add Port] on the [Printer Driver Installation] dialog box, and then proceed as follows using the [Add Port] dialog box.
(1) Select [Others] and click [Standard TCP/IP Port] from [Available ports].
(2)Click [OK]. The [Add Standard TCP/IP Printer Port Wizard] is displayed.
(3)Follow the displayed screens to set the port.
Setting Up the Port9100 Port
When using the Port9100 port, after installing the printer driver, set the port for Port9100. The following procedure explains how to do the settings, using Windows XP as an example.
1.Click [Start], and then [Printers and Faxes].
2.Click the icon of this printer, and then select [Properties] from the [File] menu.
3.2 Setting Up the Computer |
21 |
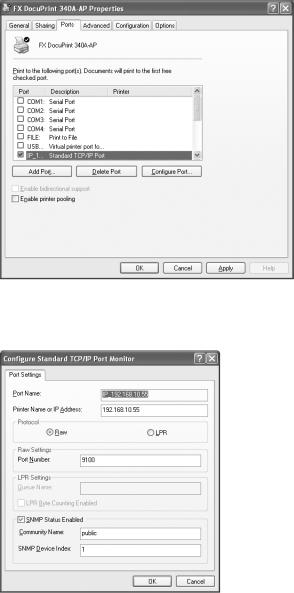
3.Click the [Ports] tab, then click [Configure Port].
4.Click [Raw] on the [Protocol], and confirm that the port number on the [Raw Settings] is correct.
5.Click [OK].
6.On the [Properties] dialog box, click [OK].
22 3 Printing Through LPD or Port9100

Creating a Shared Printer
Create a shared printer as required.
Settings of Windows NT 4.0/Windows 2000/Windows XP/Windows Server 2003
The following procedure explains how to do the settings, using Windows XP as an example.
1.Click [Start], and then select [Printers and Faxes]. The [Printers and Faxes] window appears.
2.Click the icon of a printer to set, and then select [Sharing] from the right-click menu. Then the [Properties] dialog box is displayed.
3.Click [Share this printer] and enter a share name.
4.Click [Additional Drivers] and select a substitute driver to install, and then click [OK].
5.When installing a substitute driver, an input screen is displayed for the printer driver file location. Insert the attached CD-ROM and specify the appropriate folder.
Settings of Windows 95/Windows 98/Windows Me
1.Click [Start], and then select [Settings], followed by [Printers]. The [Printers] window appears.
2.Double-click [Add Printer].
The [Add Printer Wizard] dialog box appears.
3.Install the printer driver according to the on-screen instructions.
Select [Network Printer] for the printer connection, then specify the shared printer created on Windows NT 4.0/Windows 2000/Windows XP/Windows Server 2003 in the previous section.
3.2 Setting Up the Computer |
23 |
4 Internet Printing
4.1Installation Procedure for Internet Printing
This section explains the installation procedure for printing using the Internet Printing Protocol (IPP).
System Configuration
The printer supports Internet Printing Protocol (IPP). As Windows 2000/Windows XP/ Windows Server 2003/Windows Me is installed with the client software needed to output to IPP printer, you can specify the printer to support IPP using the [Add Printer Wizard]. Using IPP, you can print to a remote printer through the Internet or intranet.
The transport protocol for IPP can be TCP/IP.
IPP client
(Windows Me/Windows 2000/Windows XP/ Windows Server 2003)
Internet
Target Computers
The following computers support Internet printing:
Connection |
|
OS |
Service/Client |
Protocol |
|
|
|
|
|
|
|
|
|
|
IPP (TCP/IP) |
|
Windows 2000 |
IPP port monitor |
Internet protocol (TCP/IP) |
|
|
Windows XP |
|
|
|
|
Windows Server 2003 |
|
|
|
|
|
|
|
|
|
Windows Me |
IPP port monitor |
TCP/IP protocol |
|
|
|
|
|
Important
•For Internet printing from a Windows Me computer, the IPP port should be installed. For the IPP port installation method, refer to the Windows Me manual.
24 4 Internet Printing
Loading...