


 Loading...
One Touch 4.6 October 2010 05-0809-000
Xerox DocuMate 3220
User Guide
Design © 2010 Xerox Corporation. All rights reserved. XEROX®, XEROX and Design® and DocuMate® are registered trademarks of Xerox Corporation in the United States and/or other countries.
Content © 2010 Visioneer, Inc. All rights reserved. The Visioneer brand name and OneTouch® logo are registered trademarks of Visioneer, Inc.
Copyright protection claimed includes all forms of matters of copyrightable materials and information now allowed by statutory or judicial law or hereinafter granted, including without limitation, material generated from the software programs which are displayed on the screen such as styles, templates, icons, screen displays, looks, etc.
Reproduction, adaptation, or translation without prior written permission is prohibited, except as allowed under the copyright laws.
The PaperPort® and OmniPage® brand name and logo are registered trademarks of Nuance Communications, Inc.
The NewSoft Presto!® BizCard® name and logo are registered trademarks of NewSoft Technology Corporation in the United States and/or other countries.
Kofax® and Virtual ReScan® are registered trademarks, and VRS™ is a trademark of Kofax Image Products, Inc.
Adobe®, Adobe® Acrobat®, Adobe® Reader®, and the Adobe® PDF logo are registered trademarks of Adobe Systems Incorporated in the United States and/or other countries. The Adobe PDF logo will appear in this product’s software, and full access to Adobe software features is only available if an Adobe product is installed on your computer.
Microsoft is a U.S. registered trademark of Microsoft Corporation. Windows™ is a trademark and SharePoint® is a registered trademark of Microsoft Corporation.
ZyINDEX is a registered trademark of ZyLAB International, Inc. ZyINDEX toolkit portions, Copyright © 1990-1998, ZyLAB International, Inc.
Document Version: 05-0809-000 (October 2010).
All Rights Reserved. All other products mentioned herein may be trademarks of their respective companies.
Information is subject to change without notice and does not represent a commitment on the part of Visioneer. The software described is furnished under a licensing agreement. The software may be used or copied only in accordance with the terms of such an agreement. It is against the law to copy the software on any medium except as specifically allowed in the licensing agreement. No part of this document may be reproduced or transmitted in any form or by any means, electronic or mechanical, including photocopying, recording, or information storage and retrieval systems, or translated to another language, for any purpose other than the licensee's personal use and as specifically allowed in the licensing agreement, without the express written permission of Visioneer.
Restricted Rights Legend
Use, duplication, or disclosure is subject to restrictions as set forth in contract subdivision (c)(1)(ii) of the Rights in Technical Data and Computer Software Clause 52.227-FAR14. Material scanned by this product may be protected by governmental laws and other regulations, such as copyright laws. The customer is solely responsible for complying with all such laws and regulations.
Changes are periodically made to this document. Changes, technical inaccuracies, and typographic errors will be corrected in subsequent editions.
Table of Contents
Welcome
|
What’s in the Box . . . . . . . . . . . . . . . . . . . . . . . . . . . . . . . . . . . . . . . . . . . . . . . . . . . . . . . . . . . . . . . . . . . . . . . |
. .8 |
|
System Requirements . . . . . . . . . . . . . . . . . . . . . . . . . . . . . . . . . . . . . . . . . . . . . . . . . . . . . . . . . . . . . . . . . . . . |
.9 |
|
Documentation . . . . . . . . . . . . . . . . . . . . . . . . . . . . . . . . . . . . . . . . . . . . . . . . . . . . . . . . . . . . . . . . . . . . . . . . . |
10 |
|
The Xerox DocuMate 3220 Scanner . . . . . . . . . . . . . . . . . . . . . . . . . . . . . . . . . . . . . . . . . . . . . . . . . . . . . . |
11 |
1 |
Scanner Setup |
|
|
Unpack and Assemble the Scanner . . . . . . . . . . . . . . . . . . . . . . . . . . . . . . . . . . . . . . . . . . . . . . . . . . . . . . . |
14 |
|
Connect the Scanner Power Cord . . . . . . . . . . . . . . . . . . . . . . . . . . . . . . . . . . . . . . . . . . . . . . . . . . . . . . . . |
16 |
2 |
Installation |
|
|
Before You Begin . . . . . . . . . . . . . . . . . . . . . . . . . . . . . . . . . . . . . . . . . . . . . . . . . . . . . . . . . . . . . . . . . . . . . . . |
18 |
|
Install the Software and Connect the Scanner . . . . . . . . . . . . . . . . . . . . . . . . . . . . . . . . . . . . . . . . . . . . |
19 |
|
Installing the Scanner Driver . . . . . . . . . . . . . . . . . . . . . . . . . . . . . . . . . . . . . . . . . . . . . . . . . . . . . . . |
21 |
|
Connect the USB Cable and Turn on the Power . . . . . . . . . . . . . . . . . . . . . . . . . . . . . . . . . . . . . . |
23 |
|
Installing One Touch . . . . . . . . . . . . . . . . . . . . . . . . . . . . . . . . . . . . . . . . . . . . . . . . . . . . . . . . . . . . . . . |
25 |
|
Register Your Scanner . . . . . . . . . . . . . . . . . . . . . . . . . . . . . . . . . . . . . . . . . . . . . . . . . . . . . . . . . . . . . . . . . . . |
26 |
|
Installing Additional Applications . . . . . . . . . . . . . . . . . . . . . . . . . . . . . . . . . . . . . . . . . . . . . . . . . . . . . . . . |
27 |
|
View the User Guides . . . . . . . . . . . . . . . . . . . . . . . . . . . . . . . . . . . . . . . . . . . . . . . . . . . . . . . . . . . . . . . . . . . . |
28 |
3 |
Loading Documents to Scan |
|
|
Scanning from the Automatic Document Feeder (ADF) . . . . . . . . . . . . . . . . . . . . . . . . . . . . . . . . . . . . |
32 |
|
Scanning from the Flatbed Glass . . . . . . . . . . . . . . . . . . . . . . . . . . . . . . . . . . . . . . . . . . . . . . . . . . . . . . . . . |
34 |
|
Scanning Interfaces . . . . . . . . . . . . . . . . . . . . . . . . . . . . . . . . . . . . . . . . . . . . . . . . . . . . . . . . . . . . . . . . . . . . . |
35 |
4Scanning and Configuring One Touch
Default One Touch Settings . . . . . . . . . . . . . . . . . . . . . . . . . . . . . . . . . . . . . . . . . . . . . . . . . . . . . . . . . . . . . |
39 |
Scan from the One Touch Button Panel . . . . . . . . . . . . . . . . . . . . . . . . . . . . . . . . . . . . . . . . . . . . . . . . . . . |
40 |
Features of the One Touch Button Panel . . . . . . . . . . . . . . . . . . . . . . . . . . . . . . . . . . . . . . . . . . . . |
40 |
Changing the Button Settings . . . . . . . . . . . . . . . . . . . . . . . . . . . . . . . . . . . . . . . . . . . . . . . . . . . . . . . . . . . |
42 |
Selecting Options for One Touch . . . . . . . . . . . . . . . . . . . . . . . . . . . . . . . . . . . . . . . . . . . . . . . . . . . . . . . . . |
44 |
Scan Configurations . . . . . . . . . . . . . . . . . . . . . . . . . . . . . . . . . . . . . . . . . . . . . . . . . . . . . . . . . . . . . . . . . . . . . |
47 |
Scan Settings Tab . . . . . . . . . . . . . . . . . . . . . . . . . . . . . . . . . . . . . . . . . . . . . . . . . . . . . . . . . . . . . . . . . |
48 |
Page Settings tab . . . . . . . . . . . . . . . . . . . . . . . . . . . . . . . . . . . . . . . . . . . . . . . . . . . . . . . . . . . . . . . . . . |
49 |
Advanced Settings tab . . . . . . . . . . . . . . . . . . . . . . . . . . . . . . . . . . . . . . . . . . . . . . . . . . . . . . . . . . . . . |
51 |
Redaction Settings Tab . . . . . . . . . . . . . . . . . . . . . . . . . . . . . . . . . . . . . . . . . . . . . . . . . . . . . . . . . . . . |
52 |
File Formats . . . . . . . . . . . . . . . . . . . . . . . . . . . . . . . . . . . . . . . . . . . . . . . . . . . . . . . . . . . . . . . . . . . . . . . . . . . . |
55 |
Create Single Image Files . . . . . . . . . . . . . . . . . . . . . . . . . . . . . . . . . . . . . . . . . . . . . . . . . . . . . . . . . . |
55 |
Image Formats . . . . . . . . . . . . . . . . . . . . . . . . . . . . . . . . . . . . . . . . . . . . . . . . . . . . . . . . . . . . . . . . . . . . |
56 |
Xerox DocuMate 3220 |
3 |
User’s Guide |
|
Text Formats . . . . . . . . . . . . . . . . . . . . . . . . . . . . . . . . . . . . . . . . . . . . . . . . . . . . . . . . . . . . . . . . . . . . . . 58 Configure Before Scan . . . . . . . . . . . . . . . . . . . . . . . . . . . . . . . . . . . . . . . . . . . . . . . . . . . . . . . . . . . . . . . . . . 60 To Scan Using Configure Before Scan . . . . . . . . . . . . . . . . . . . . . . . . . . . . . . . . . . . . . . . . . . . . . . . 60 Open Scanned Document(s) . . . . . . . . . . . . . . . . . . . . . . . . . . . . . . . . . . . . . . . . . . . . . . . . . . . . . . . . . . . . . 62 Transfer to Storage . . . . . . . . . . . . . . . . . . . . . . . . . . . . . . . . . . . . . . . . . . . . . . . . . . . . . . . . . . . . . . . . . . . . . 63 Setting the Folder and Options from One Touch . . . . . . . . . . . . . . . . . . . . . . . . . . . . . . . . . . . . . 63 Setting the Folder from Windows . . . . . . . . . . . . . . . . . . . . . . . . . . . . . . . . . . . . . . . . . . . . . . . . . . . 64 Scanning to Multiple Folders . . . . . . . . . . . . . . . . . . . . . . . . . . . . . . . . . . . . . . . . . . . . . . . . . . . . . . . 65 Burn to CD-ROM . . . . . . . . . . . . . . . . . . . . . . . . . . . . . . . . . . . . . . . . . . . . . . . . . . . . . . . . . . . . . . . . . . . . . . . . 69 Printer or Fax . . . . . . . . . . . . . . . . . . . . . . . . . . . . . . . . . . . . . . . . . . . . . . . . . . . . . . . . . . . . . . . . . . . . . . . . . . . 71 PaperPort . . . . . . . . . . . . . . . . . . . . . . . . . . . . . . . . . . . . . . . . . . . . . . . . . . . . . . . . . . . . . . . . . . . . . . . . . . . . . . 73 SharePoint . . . . . . . . . . . . . . . . . . . . . . . . . . . . . . . . . . . . . . . . . . . . . . . . . . . . . . . . . . . . . . . . . . . . . . . . . . . . . 75 SharePoint Link Log Viewer . . . . . . . . . . . . . . . . . . . . . . . . . . . . . . . . . . . . . . . . . . . . . . . . . . . . . . . . . 76 FTP Transfer . . . . . . . . . . . . . . . . . . . . . . . . . . . . . . . . . . . . . . . . . . . . . . . . . . . . . . . . . . . . . . . . . . . . . . . . . . . . 78 FTP Link Log Viewer . . . . . . . . . . . . . . . . . . . . . . . . . . . . . . . . . . . . . . . . . . . . . . . . . . . . . . . . . . . . . . . . 79
SMTP . . . . . . . . . . . . . . . . . . . . . . . . . . . . . . . . . . . . . . . . . . . . . . . . . . . . . . . . . . . . . . . . . . . . . . . . . . . . . . . . . . 81 SMTP Link Log Viewer . . . . . . . . . . . . . . . . . . . . . . . . . . . . . . . . . . . . . . . . . . . . . . . . . . . . . . . . . . . . . . 82 Email Applications . . . . . . . . . . . . . . . . . . . . . . . . . . . . . . . . . . . . . . . . . . . . . . . . . . . . . . . . . . . . . . . . . . . . . . 84 Email Properties . . . . . . . . . . . . . . . . . . . . . . . . . . . . . . . . . . . . . . . . . . . . . . . . . . . . . . . . . . . . . . . . . . . 85 Text Editors . . . . . . . . . . . . . . . . . . . . . . . . . . . . . . . . . . . . . . . . . . . . . . . . . . . . . . . . . . . . . . . . . . . . . . . . . . . . . 86 Text Documents Properties . . . . . . . . . . . . . . . . . . . . . . . . . . . . . . . . . . . . . . . . . . . . . . . . . . . . . . . . . 87 Adding Text Editor Applications to One Touch . . . . . . . . . . . . . . . . . . . . . . . . . . . . . . . . . . . . . . . 88 Creating an HTML Web Page from Your Scanned Documents . . . . . . . . . . . . . . . . . . . . . . . . 90
Still Image Client . . . . . . . . . . . . . . . . . . . . . . . . . . . . . . . . . . . . . . . . . . . . . . . . . . . . . . . . . . . . . . . . . . . . . . . 91 Image Editors . . . . . . . . . . . . . . . . . . . . . . . . . . . . . . . . . . . . . . . . . . . . . . . . . . . . . . . . . . . . . . . . . . . . . . . . . . 93 Image Documents Properties . . . . . . . . . . . . . . . . . . . . . . . . . . . . . . . . . . . . . . . . . . . . . . . . . . . . . . . 94 Adding Image Editor Applications to One Touch . . . . . . . . . . . . . . . . . . . . . . . . . . . . . . . . . . . . . 95 PDF Applications . . . . . . . . . . . . . . . . . . . . . . . . . . . . . . . . . . . . . . . . . . . . . . . . . . . . . . . . . . . . . . . . . . . . . . . . 96
Send to Application . . . . . . . . . . . . . . . . . . . . . . . . . . . . . . . . . . . . . . . . . . . . . . . . . . . . . . . . . . . . . . . . . . . . . 99 Scanning to Multiple Destinations . . . . . . . . . . . . . . . . . . . . . . . . . . . . . . . . . . . . . . . . . . . . . . . . . . . . . . 102 Scanning with Job Separation . . . . . . . . . . . . . . . . . . . . . . . . . . . . . . . . . . . . . . . . . . . . . . . . . . . . . . . . . . 105 Scanning with Optical Character Recognition (OCR) . . . . . . . . . . . . . . . . . . . . . . . . . . . . . . . . . . . . . . 108 Text Formats . . . . . . . . . . . . . . . . . . . . . . . . . . . . . . . . . . . . . . . . . . . . . . . . . . . . . . . . . . . . . . . . . . . . . 109 Selecting One Touch OmniPage OCR Options . . . . . . . . . . . . . . . . . . . . . . . . . . . . . . . . . . . . . . . . . . . . 112 The OCR Tab . . . . . . . . . . . . . . . . . . . . . . . . . . . . . . . . . . . . . . . . . . . . . . . . . . . . . . . . . . . . . . . . . . . . . 113 Creating Your Own Dictionaries . . . . . . . . . . . . . . . . . . . . . . . . . . . . . . . . . . . . . . . . . . . . . . . . . . . . 114 Editing User Dictionaries . . . . . . . . . . . . . . . . . . . . . . . . . . . . . . . . . . . . . . . . . . . . . . . . . . . . . . . . . . 116 The Format Tab . . . . . . . . . . . . . . . . . . . . . . . . . . . . . . . . . . . . . . . . . . . . . . . . . . . . . . . . . . . . . . . . . . 118
One Touch with Kofax VRS Technology . . . . . . . . . . . . . . . . . . . . . . . . . . . . . . . . . . . . . . . . . . . . . . . . . . 121 The Kofax VRS Settings . . . . . . . . . . . . . . . . . . . . . . . . . . . . . . . . . . . . . . . . . . . . . . . . . . . . . . . . . . . 121
4Xerox DocuMate 3220 User’s Guide
Table of Contents
The Professional Features . . . . . . . . . . . . . . . . . . . . . . . . . . . . . . . . . . . . . . . . . . . . . . . . . . . . . . . . . 123
Changing the Hardware Settings . . . . . . . . . . . . . . . . . . . . . . . . . . . . . . . . . . . . . . . . . . . . . . . . . . . . . . . . 125
5Scanning from TWAIN
Accessing the TWAIN Interface . . . . . . . . . . . . . . . . . . . . . . . . . . . . . . . . . . . . . . . . . . . . . . . . . . . . . . . . . 128 The Two TWAIN Interface Options . . . . . . . . . . . . . . . . . . . . . . . . . . . . . . . . . . . . . . . . . . . . . . . . . . . . . . 129 Scanning from the Basic Interface . . . . . . . . . . . . . . . . . . . . . . . . . . . . . . . . . . . . . . . . . . . . . . . . . . . . . . 130 Scanning Part of an Image . . . . . . . . . . . . . . . . . . . . . . . . . . . . . . . . . . . . . . . . . . . . . . . . . . . . . . . . 131 Scanning from the TWAIN Advanced Interface . . . . . . . . . . . . . . . . . . . . . . . . . . . . . . . . . . . . . . . . . . 133 The Ruler Units . . . . . . . . . . . . . . . . . . . . . . . . . . . . . . . . . . . . . . . . . . . . . . . . . . . . . . . . . . . . . . . . . . . 134 The Scan Info Box . . . . . . . . . . . . . . . . . . . . . . . . . . . . . . . . . . . . . . . . . . . . . . . . . . . . . . . . . . . . . . . . 135 Creating a New Advanced Interface Profile . . . . . . . . . . . . . . . . . . . . . . . . . . . . . . . . . . . . . . . . . 135
Adjusting the Image with the Advanced Interface . . . . . . . . . . . . . . . . . . . . . . . . . . . . . . . . . . . . . . . 136 Adjusting the Resolution . . . . . . . . . . . . . . . . . . . . . . . . . . . . . . . . . . . . . . . . . . . . . . . . . . . . . . . . . . 137 Adjusting the Brightness and Contrast . . . . . . . . . . . . . . . . . . . . . . . . . . . . . . . . . . . . . . . . . . . . . 138 Adjusting Gamma, Saturation, and Color Hue . . . . . . . . . . . . . . . . . . . . . . . . . . . . . . . . . . . . . . 139 Adjusting Input Size . . . . . . . . . . . . . . . . . . . . . . . . . . . . . . . . . . . . . . . . . . . . . . . . . . . . . . . . . . . . . . 140 Manually set the image size . . . . . . . . . . . . . . . . . . . . . . . . . . . . . . . . . . . . . . . . . . . . . . . . . . . . . . . 141
6 |
Scanning from WIA |
|
|
Scan using WIA from Microsoft Paint . . . . . . . . . . . . . . . . . . . . . . . . . . . . . . . . . . . . . . . . . . . . . . . . . . . |
144 |
|
Fine Tuning Your Scans . . . . . . . . . . . . . . . . . . . . . . . . . . . . . . . . . . . . . . . . . . . . . . . . . . . . . . . . . . . . . . . . . |
146 |
7 |
Maintenance |
|
|
Safety Precautions . . . . . . . . . . . . . . . . . . . . . . . . . . . . . . . . . . . . . . . . . . . . . . . . . . . . . . . . . . . . . . . . . . . . . |
148 |
|
Clearing Paper Jams . . . . . . . . . . . . . . . . . . . . . . . . . . . . . . . . . . . . . . . . . . . . . . . . . . . . . . . . . . . . . . . . . . . |
149 |
|
Cleaning the Scanner . . . . . . . . . . . . . . . . . . . . . . . . . . . . . . . . . . . . . . . . . . . . . . . . . . . . . . . . . . . . . . . . . . |
151 |
|
Cleaning the Automatic Document Feeder . . . . . . . . . . . . . . . . . . . . . . . . . . . . . . . . . . . . . . . . . |
151 |
|
Cleaning the Scanner Glass . . . . . . . . . . . . . . . . . . . . . . . . . . . . . . . . . . . . . . . . . . . . . . . . . . . . . . . . |
153 |
|
Replacing the ADF Pad Assembly . . . . . . . . . . . . . . . . . . . . . . . . . . . . . . . . . . . . . . . . . . . . . . . . . . . . . . . |
154 |
|
Replacing the Roller Assembly . . . . . . . . . . . . . . . . . . . . . . . . . . . . . . . . . . . . . . . . . . . . . . . . . . . . . . . . . . |
155 |
|
Troubleshooting . . . . . . . . . . . . . . . . . . . . . . . . . . . . . . . . . . . . . . . . . . . . . . . . . . . . . . . . . . . . . . . . . . . . . . . |
158 |
|
Error Light Troubleshooting Codes . . . . . . . . . . . . . . . . . . . . . . . . . . . . . . . . . . . . . . . . . . . . . . . . . |
159 |
|
Uninstalling Your Scanner . . . . . . . . . . . . . . . . . . . . . . . . . . . . . . . . . . . . . . . . . . . . . . . . . . . . . . . . . . . . . . |
161 |
|
Xerox DocuMate 3220 Scanner Specifications . . . . . . . . . . . . . . . . . . . . . . . . . . . . . . . . . . . . . . . . . . . |
162 |
|
Xerox DocuMate 3220 Parts List . . . . . . . . . . . . . . . . . . . . . . . . . . . . . . . . . . . . . . . . . . . . . . . . . . . . . . . . |
163 |
A |
Appendix |
|
|
Safety Introduction . . . . . . . . . . . . . . . . . . . . . . . . . . . . . . . . . . . . . . . . . . . . . . . . . . . . . . . . . . . . . . . . . . . . |
166 |
|
EMC . . . . . . . . . . . . . . . . . . . . . . . . . . . . . . . . . . . . . . . . . . . . . . . . . . . . . . . . . . . . . . . . . . . . . . . . . . . . . . . . . . |
167 |
|
Operational Safety Information . . . . . . . . . . . . . . . . . . . . . . . . . . . . . . . . . . . . . . . . . . . . . . . . . . . . . . . . |
168 |
|
Electrical Information . . . . . . . . . . . . . . . . . . . . . . . . . . . . . . . . . . . . . . . . . . . . . . . . . . . . . . . . . . . . . . . . . . |
169 |
|
Warning - Electrical Safety Information . . . . . . . . . . . . . . . . . . . . . . . . . . . . . . . . . . . . . . . . . . . . |
169 |
Xerox DocuMate 3220 |
5 |
User’s Guide |
|
Electrical Supply . . . . . . . . . . . . . . . . . . . . . . . . . . . . . . . . . . . . . . . . . . . . . . . . . . . . . . . . . . . . . . . . . . 169 Disconnect Device . . . . . . . . . . . . . . . . . . . . . . . . . . . . . . . . . . . . . . . . . . . . . . . . . . . . . . . . . . . . . . . . 169 Emergency Power Off . . . . . . . . . . . . . . . . . . . . . . . . . . . . . . . . . . . . . . . . . . . . . . . . . . . . . . . . . . . . . . . . . . 170 Maintenance Information . . . . . . . . . . . . . . . . . . . . . . . . . . . . . . . . . . . . . . . . . . . . . . . . . . . . . . . . . . . . . . 171 Product Safety Certification . . . . . . . . . . . . . . . . . . . . . . . . . . . . . . . . . . . . . . . . . . . . . . . . . . . . . . . . . . . . 172 Regulatory Information . . . . . . . . . . . . . . . . . . . . . . . . . . . . . . . . . . . . . . . . . . . . . . . . . . . . . . . . . . . . . . . . 173 Certifications in Europe . . . . . . . . . . . . . . . . . . . . . . . . . . . . . . . . . . . . . . . . . . . . . . . . . . . . . . . . . . . 173 Compliance Information . . . . . . . . . . . . . . . . . . . . . . . . . . . . . . . . . . . . . . . . . . . . . . . . . . . . . . . . . . . . . . . 174 Product Recycling & Disposal: USA & Canada . . . . . . . . . . . . . . . . . . . . . . . . . . . . . . . . . . . . . . . 174 European Union . . . . . . . . . . . . . . . . . . . . . . . . . . . . . . . . . . . . . . . . . . . . . . . . . . . . . . . . . . . . . . . . . . 174 Energy Star for the USA . . . . . . . . . . . . . . . . . . . . . . . . . . . . . . . . . . . . . . . . . . . . . . . . . . . . . . . . . . . 175 Illegal Copies . . . . . . . . . . . . . . . . . . . . . . . . . . . . . . . . . . . . . . . . . . . . . . . . . . . . . . . . . . . . . . . . . . . . . . . . . . 176 USA . . . . . . . . . . . . . . . . . . . . . . . . . . . . . . . . . . . . . . . . . . . . . . . . . . . . . . . . . . . . . . . . . . . . . . . . . . . . . . 176 Canada . . . . . . . . . . . . . . . . . . . . . . . . . . . . . . . . . . . . . . . . . . . . . . . . . . . . . . . . . . . . . . . . . . . . . . . . . . 177 Other Countries . . . . . . . . . . . . . . . . . . . . . . . . . . . . . . . . . . . . . . . . . . . . . . . . . . . . . . . . . . . . . . . . . . . 178 EH&S Contact Information . . . . . . . . . . . . . . . . . . . . . . . . . . . . . . . . . . . . . . . . . . . . . . . . . . . . . . . . . . . . . 179
Index
6Xerox DocuMate 3220 User’s Guide
Welcome
This chapter includes:
•What’s in the Box on page 8
•System Requirements on page 9
•Documentation on page 10
•The Xerox DocuMate 3220 Scanner on page 11
Your new Xerox scanner can quickly scan stacks of documents with the Automatic Document Feeder (ADF), or single items on the Flatbed glass.
Xerox DocuMate 3220 |
7 |
User’s Guide |
|
Welcome
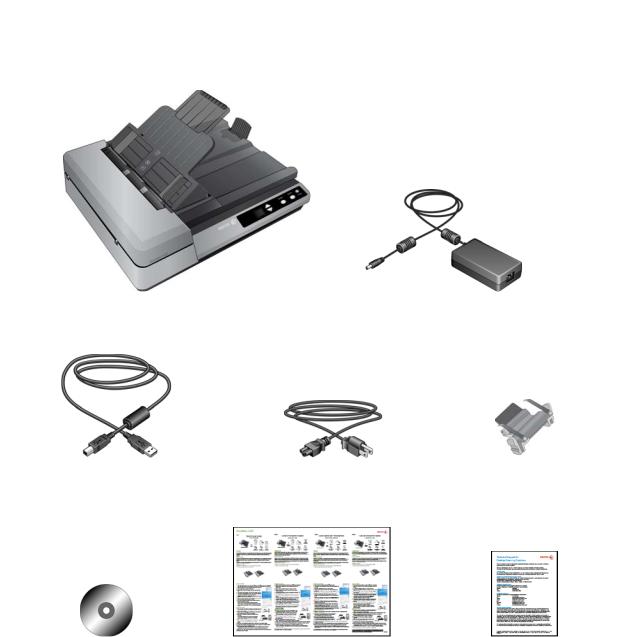
What’s in the Box
Before proceeding, check the contents of the box. If items are missing or damaged, contact the dealer where you purchased the scanner.
Xerox DocuMate 3220 Scanner |
Power Supply |
USB Cable |
Power Cord |
Replacement |
|
|
ADF Pad |
Windows™ |
Quick Install Guide |
Technical |
Installation Disc |
|
Support Card |
8Xerox DocuMate 3220 User’s Guide

Welcome
System Requirements
IBM-compatible Pentium 4 PC, or AMD equivalent with:
•A DVD-ROM drive
•An available Universal Serial Bus (USB) port
•Microsoft® Windows® operating system: 32-bit Windows XP (Service Pack 1 and 2), 32-bit or 64bit Windows Vista, or 32-bit or 64-bit Windows 7
The scanner is compatible with Service Pack 3 for Windows XP and Service Pack 1 for Windows Vista.
•Windows XP: Minimum of 512 megabytes (MB) of internal memory (RAM) Windows Vista and 7: Minimum of 1 gigabyte (GB) of internal memory (RAM)
•350 MB minimum of free hard disk space
A VGA or SVGA Monitor
The recommended settings for your monitor are:
•Color quality of 16-bit or 32-bit
•Resolution set to at least 800 x 600 pixels
Refer to your Windows documentation for instructions on setting the color quality and resolution for the monitor.
Xerox DocuMate 3220 |
9 |
User’s Guide |
|

Welcome
Documentation
The following documentation is provided with your scanner:
•Quick Install Guide—Abbreviated installation instructions.
•Scanner User’s Guide—On the Installation Disc; contains detailed installation, scanning, configuration, and maintenance information.
•Scanner Readme—On the Installation Disc; contains the latest information about your scanner and software installation.
•PaperPort User’s Guide—On the Installation Disc; contains detailed feature and configuration information for the PaperPort software.
•OmniPage User’s Guide—On the Installation Disc; contains detailed feature and configuration information for the OmniPage software.
•Online Help—For the scanner configuration, TWAIN and WIA interfaces.
10Xerox DocuMate 3220 User’s Guide
Welcome
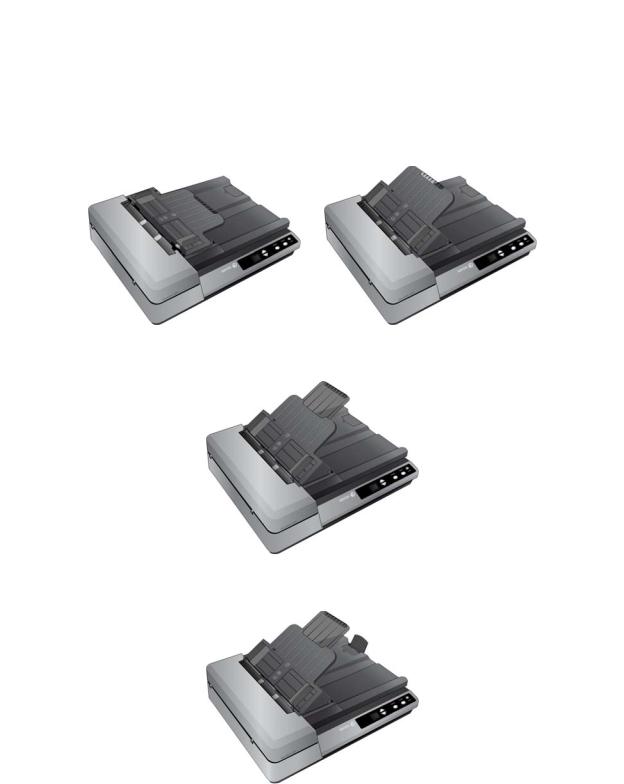
The Xerox DocuMate 3220 Scanner
|
|
|
|
1 |
7 |
|
|
|
2 |
|
6 |
|
|
|
3 |
4 |
5 |
|
|
8 9
1 |
2 |
3 |
4 |
5 |
Input Tray |
Paper Guides |
ADF Cover |
Scanner Lid |
Control Panel |
6 |
7 |
8 |
9 |
|
Output Tray |
Paper Stop |
Power Jack |
USB Port |
|
Input Tray—Holds documents in the Automatic Document Feeder (ADF) for scanning. Extends to support various paper sizes.
Paper Guides—Adjust to support various document widths.
ADF Cover—Pull to open the Automatic Document Feeder.
Scanner Lid—Lift lid to place an item on the flatbed glass for scanning.
Control Panel—One Touch scanning controls and status light.
•LED Number—Shows the current scan setting for the Scan button.
•Destination Selector buttons—Selects the scan setting for the Simplex and Duplex buttons. Press the Up or Down Destination Selectors to cycle through the scan settings to select the one you want.
•Simplex button—Press to scan single-sided documents.
•Duplex button—Press to scan double-sided documents.
•Power switch—Press to turn the scanner power on or off
Output Tray—Holds documents after being scanned through the Automatic Document Feeder.
Paper Stop—Holds documents in the output tray. Adjusts to support various document lengths.
Power Jack—Connects the power cord to the scanner.
Universal Serial Bus (USB) Port—Connects the scanner to the computer.
Xerox DocuMate 3220 |
11 |
User’s Guide |
|
Welcome
12Xerox DocuMate 3220 User’s Guide
Scanner Setup |
1 |
This chapter includes:
•Unpack and Assemble the Scanner on page 14
•Connect the Scanner Power Cord on page 16
Xerox DocuMate 3220 |
13 |
User’s Guide |
|
Unpack and Assemble the Scanner
1.Remove all shipping tape from the top and bottom of the scanner.
2.Lift the input tray up from the scanner body.
The support tabs, on the input tray platform, will click in place when the tray is in the correct position.
3.Pull out the input tray extension.
4.Lift up the paper stop on the back of the scanner.
14Xerox DocuMate 3220 User’s Guide
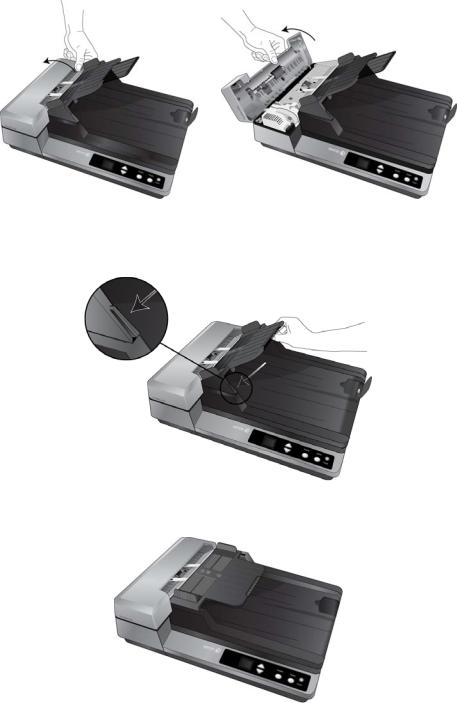
5.Open the ADF cover and carefully remove any foam particles that may have gotten inside the Automatic Document Feeder, then close the cover.
To lower the input tray:
1.Press in the support tabs, on each side of the input tray platform, to unlock the platform.
2.Lower the tray to the scanner body.
Xerox DocuMate 3220 |
15 |
User’s Guide |
|

Connect the Scanner Power Cord
1.Plug the power supply into the power port on the scanner.
NOTE: Only use the power supply (HEG42-240100-7L made by HiTron or DA-24C24 made by APD) included with your scanner. Connecting any other type of power supply may damage your scanner, and will void its warranty.
2.Plug the power cord into the power supply and into a wall outlet.
16Xerox DocuMate 3220 User’s Guide
Installation |
2 |
This chapter includes:
•Before You Begin on page 18
•Install the Software and Connect the Scanner on page 19
•Register Your Scanner on page 26
•Installing Additional Applications on page 27
•View the User Guides on page 28
Xerox DocuMate 3220 |
17 |
User’s Guide |
|

Before You Begin
Please make sure of the following before you begin installation:
•The information in this guide may cover software not provided with the scanner you purchased. Please disregard any information about the software not applicable to your scanner. Visit our web site at www.xeroxscanners.com for the latest software updates for your Xerox scanner.
•If your computer has AntiVirus or AntiSpyware software running, you may encounter alerts or messages during installation asking you to allow the installation to proceed. Although the messages will differ based on the software your computer is running, in each case you should allow the installation to proceed if that option is available. Alternatively, you can turn off the AntiVirus or AntiSpyware software before installing your scanner, but if you do, make sure to turn it back on again when installation is finished.
•If you already have a scanner connected to your computer, it is recommended that you remove that scanner’s driver program prior to installing your Xerox scanner. You can remove these programs from the Windows Control Panel. Please refer to the user manual provided with your other scanner hardware for instructions about removing the driver and software for that unit.
•If your computer is running Windows Vista, you may see the Vista User Account Control screen asking you to confirm system changes. Click the Continue button to allow the installation to proceed.
18Xerox DocuMate 3220 User’s Guide
Install the Software and Connect the Scanner
The installation disc contains the necessary driver, and scanning software, to use your Xerox scanner.
To install the software:
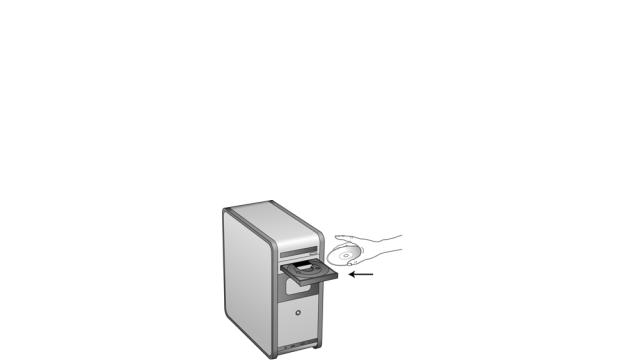
1.Start Microsoft Windows and make sure that no other applications are running.
2.Insert the installation disc into your computer’s DVD-ROM drive. The disc automatically starts.
3.The Select Language window opens. Click the drop-down menu arrow and select the language to use. Click OK.
4.The disc’s Main Menu window opens.
NOTE: If the disc does not start, check the following:
•Make sure the disc drive’s door is completely shut.
•Make sure the disc was inserted in the drive in the proper direction (label side up). To launch the disc manually:
•Open the Windows options for your computer’s disc drives.
•Double-click the icon for your DVD-ROM drive.
•The Installation menu for the disc should now open.
If the menu does not open:
•From the list of files on the disc, double-click the file named frontend.exe.
NOTE: The Scanner Readme file has late-breaking news about your scanner. The readme file is in HTML format and will open in any standard browser.
Xerox DocuMate 3220 |
19 |
User’s Guide |
|

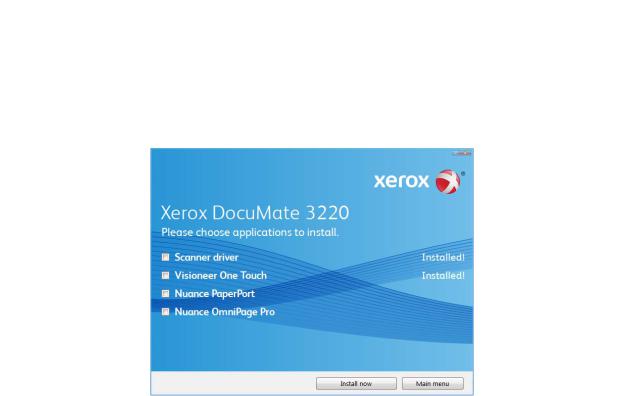
5.On the Main Menu, select Install Products.
6.Make sure the boxes for Scanner Driver and Visioneer One Touch are selected, as well as any other applications you want to install.
NOTE: The software provided with your scanner may differ slightly from the list shown in the window.
7.Click Install Now.
20Xerox DocuMate 3220 User’s Guide
Installing the Scanner Driver
The scanner driver installation will start first.
1.The Welcome to the Xerox DocuMate Setup Wizard opens.
2.Click Next.
3.On the Xerox License Agreement window, read the license agreement. If you accept the terms, select I Agree then click Next.
If you choose not to accept the license agreement, the installation will terminate and the scanner driver will not be installed.
4.The next window lists the choices of the drivers that you can install for your scanner.
5.Select the option that you want then click on Next.
•Full Install (TWAIN and Windows Driver)—This is the recommended installation. It installs all of the scanner drivers.
Xerox DocuMate 3220 |
21 |
User’s Guide |
|
•TWAIN only—The TWAIN driver is installed and you can scan from TWAIN scanning applications, and from One Touch when the application is installed.
•Windows Driver Only—The Windows Driver is installed and you can scan from One Touch only when the application is installed.
NOTE: If you are using Windows version XP or later, the Microsoft Windows Image Acquisition (WIA) driver is always installed regardless of your selection in this window, and you can scan using the WIA interface from scanning applications that access this driver.
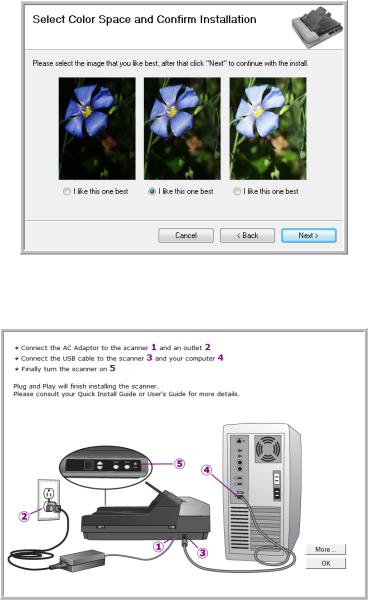
6.A window opens with image quality samples asking you to select an image for your Color Space setting. Select the option that looks best to you and click Next.
7.STOP when you see the “Complete the installation by connecting your hardware” window. Do NOT click OK yet. Leave the window open and proceed to the next section.
NOTE: If you do not see this on-screen diagram for connecting the scanner, stop and follow the instructions below.
22Xerox DocuMate 3220 User’s Guide
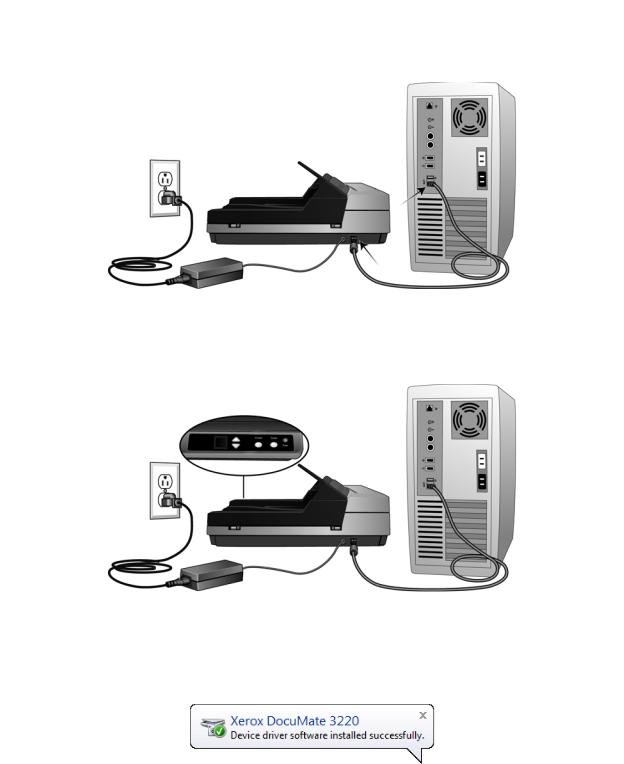
Connect the USB Cable and Turn on the Power
1.Remove any tape from the USB cable.
2.Plug the USB cable into the USB port on the scanner then into a USB port on the computer.
If the plug does not attach easily, make sure that you are plugging it in correctly. Do not force the plug into either connection.
3.Press the Power button on the control panel.
The status light comes on and flashes indicating that the scanner is receiving power.
Your computer recognizes that a scanner has been plugged into the USB port and automatically loads the appropriate software to run the scanner. If your computer is running Windows version XP or later, you will see a message similar to the one below.
Xerox DocuMate 3220 |
23 |
User’s Guide |
|
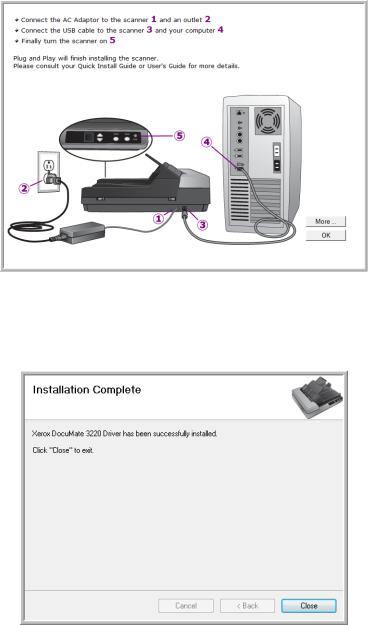
4.When you’re certain that the software has completely loaded, return to the “Complete the installation by connecting your hardware” window.
To see a quick overview about accessing and navigating the One Touch Button Panel, click More.
5.Click OK to complete the installation process.
6.Click Close on the Installation Complete window to close and exit the driver installer.
24Xerox DocuMate 3220 User’s Guide
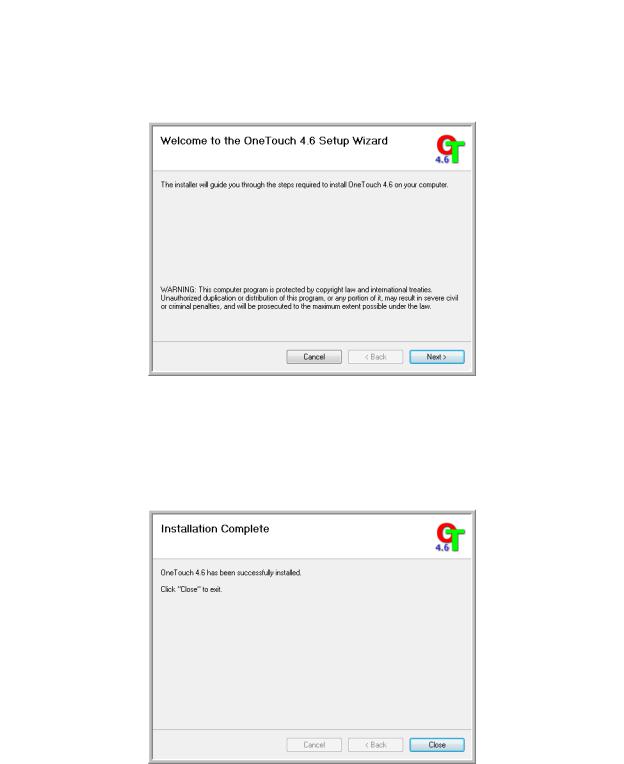
Installing One Touch
The One Touch software installation will start automatically after you click Close on the driver Installation Complete window. One Touch is the software needed for the buttons on the scanner to work.
1.Click Next on the Welcome to the One Touch Setup Wizard.
2.On the Visioneer License Agreement window, read the license agreement. If you accept the terms, select I Agree then click Next.
If you choose not to accept the license agreement, the installation will terminate and One Touch will not be installed.
3.Click Close on the Installation Complete window to close and exit the software installer.
If you selected other software to install from the DVD the installation for that software will automatically start after you click Close on the Installation Complete window. Follow the instructions on-screen to install each application you selected.
Xerox DocuMate 3220 |
25 |
User’s Guide |
|

Register Your Scanner
Registering your scanner is important as it provides you with access to our free telephone support service. Registration also gives you free access to software updates for your scanner.
To register your scanner:
You will need an active internet connection to register your scanner. If you do not have internet access you can contact our customer service department to register the scanner. Please refer to the Technical Support Card, that you received with the scanner, for our customer service contact information.
1.Open an Internet Explorer window, or any other internet browser you have installed on your computer.
2.In the web address field type www.xeroxscanners.com.
3.Press Enter on your computer’s keyboard or click the option on screen to go to the web address.
4.When the Xerox scanners web page loads click on Register Your Product.
5.Fill in the registration form, all required fields have an asterisk (*).
NOTE: A valid email address is required for registration.
6.You will be asked to enter the serial number for the scanner, it is located on the back or underside of the scanner.
The Serial Number
7.After filling in the form, click on Submit Your Registration to complete the registration.
26Xerox DocuMate 3220 User’s Guide
Installing Additional Applications
Your scanner includes free, additional applications as described in the table below.
1.Return to the disc’s Main Menu and click Install Products.
2.Select the additional applications you want to install, then click Install Now.
3.Follow the instructions on the screen to install each of the additional applications.
Software |
About the Software |
|
|
Adobe® Reader® |
Adobe Reader is a stand-alone application that you use to open, view, search, and |
|
print PDF files. This application is located on the disc in the User Guides section. |
|
|
Nuance PaperPort |
PaperPort is a document management software application. The PaperPort |
|
scanning features allow you to insert new pages into an existing file and name your |
|
file immediately after scanning. From within the PaperPort desktop you can sort |
|
your documents and move them between folders as you would through the |
|
Windows My Documents folder. You can reorder the pages in a PDF file, and unstack |
|
a document so all the pages are resaved as individual files. PaperPort also has some |
|
basic image editing options in the PaperPort PageView, such as; adding notes to |
|
image files, modifying image colors, and touch up the image using the erase and/or |
|
auto-correct options. |
|
|
Nuance |
OmniPage Pro provides precision OCR analysis, advanced layout detection, and |
OmniPage® Pro |
Logical Form Recognition™ (LFR) technology. Advanced security features quickly |
|
turn office documents and forms into over 30 different PC applications for editing, |
|
searching and sharing. Custom workflows handle large volumes of documents, and |
|
you can use its tools to print to PDF. |
|
|
Xerox DocuMate 3220 |
27 |
User’s Guide |
|
View the User Guides
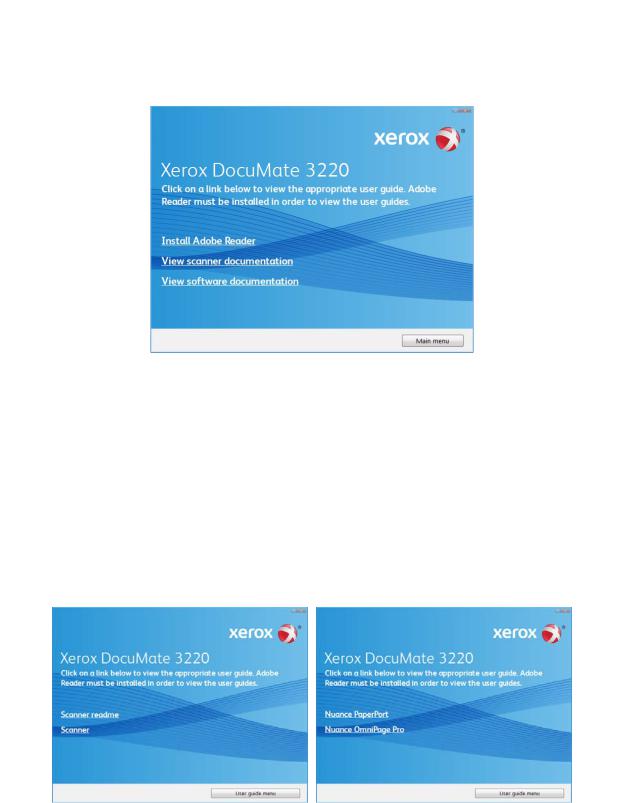
1.Return to the disc’s Main Menu and click on User Guides.
The User Guides are in Adobe® PDF format. If you need to, click Install Adobe Reader to install it now. Follow the instructions on the installation windows.
If your computer already has Adobe Reader installed, please do not select it unless the version provided on the installation DVD is a newer version than the one currently installed on your computer.
2.Click on View scanner documentation to access the scanner user guide and scanner readme.
Click on View software documentation to access the user guides for the software applications provided with the scanner. For instance, the Nuance OmniPage user guide is in this section.
From either of these user guide windows, click on the User guide menu button to return to the main user guide window, then select the other documentation section to view the user guides.
Scanner documentation window |
Software documentation window |
28Xerox DocuMate 3220 User’s Guide
3.Click the name of a User Guide you want to view and it will open in Adobe Reader. Use the Adobe Save command to save that User Guide on your computer.
4.When you’re finished, click Main Menu to return to the Main Menu window and click Exit.
5.Remove the installation disc and store it in a safe place.
That’s it! Installation is finished and your Xerox DocuMate 3220 is ready to scan.
Xerox DocuMate 3220 |
29 |
User’s Guide |
|
30Xerox DocuMate 3220 User’s Guide
Loading...