


 Loading...
Phaser® 7500
Color Printer
Phaser® 7500
User Guide
English |
|
|
|
|
|
|
|
|
|
|
|
|
|
|
|
|
|
Français |
Guide d'utilisation |
Nederlands |
Gebruikershandleiding |
Magyar |
Felhasználói útmutató |
|||
|
|
|
|
|
|
|
|
|
Italiano |
Guida dell'utente |
Svenska |
Användarhandbok |
Русский |
Руководство пользователя |
|||
|
|
|
|
|
|
|
|
|
Deutsch |
Benutzerhandbuch |
Dansk |
Betjeningsvejledning |
Türkçe |
Kullanıcı Kılavuzu |
|||
|
|
|
|
|
|
|
|
|
Español |
Guía del usuario |
Čeština |
Uživatelská příručka |
Ελληνικά |
Εγχειρίδιο χρήστη |
|||
|
|
|
|
|
|
|
|
|
Português |
Guia do usuário |
Polski |
Przewodnik użytkownika |
|
|
|
||

Copyright © 2009 Xerox Corporation. All Rights Reserved. Unpublished rights reserved under the copyright laws of the United States. Contents of this publication may not be reproduced in any form without permission of
Xerox Corporation.
Copyright protection claimed includes all forms of matters of copyrightable materials and information now allowed by statutory or judicial law or hereinafter granted, including without limitation, material generated from the software programs which are displayed on the screen such as styles, templates, icons, screen displays, looks, etc.
Xerox®, CentreWare®, Phaser®, PrintingScout®, and Walk-Up® are trademarks of Xerox Corporation in the United States and/or other countries.
Adobe Reader®, Adobe Type Manager®, ATM™, Flash®, Macromedia®, Photoshop®, and PostScript® are trademarks of Adobe Systems Incorporated in the United States and/or other countries.
Apple®, AppleTalk®, Bonjour®, EtherTalk®, Macintosh®, Mac OS®, and TrueType® are trademarks of Apple Computer, Inc. in the United States and/or other countries.
HP-GL®, HP-UX®, and PCL® are trademarks of Hewlett-Packard Corporation in the United States and/or other countries.
IBM® and AIX® are trademarks of International Business Machines Corporation in the United States and/or other countries.
Microsoft®, Windows Vista®, Windows®, and Windows Server® are trademarks of Microsoft Corporation in the United States and/or other countries.
Novell®, NetWare®, NDPS®, NDS®, Novell Directory Services®, IPX™, and Novell Distributed Print Services™are trademarks of Novell, Incorporated in the United States and/or other countries.
SGI® IRIX® is a trademark of Silicon Graphics, Inc.
SunSM, Sun Microsystems™, and Solaris™ are trademarks of Sun Microsystems, Incorporated in the United States and/ or other countries.
UNIX® is a trademark in the United States and other countries, licensed exclusively through X/ Open Company Limited.
As an ENERGY STAR® partner, Xerox Corporation has determined that this product meets the ENERGY STAR guidelines for energy efficiency. The ENERGY STAR name and logo are registered U.S. marks.
Contents
1Safety
Electrical Safety . . . . . . . . . . . . . . . . . . . . . . . . . . . . . . . . . . . . . . . . . . . . . . . . . . . . . . . . . . . . . . . . . . . . 10
Power Cord . . . . . . . . . . . . . . . . . . . . . . . . . . . . . . . . . . . . . . . . . . . . . . . . . . . . . . . . . . . . . . . . . . . . . 10
Operational Safety . . . . . . . . . . . . . . . . . . . . . . . . . . . . . . . . . . . . . . . . . . . . . . . . . . . . . . . . . . . . . . . . . 11
Printer Location. . . . . . . . . . . . . . . . . . . . . . . . . . . . . . . . . . . . . . . . . . . . . . . . . . . . . . . . . . . . . . . . . 11
Operational Guidelines . . . . . . . . . . . . . . . . . . . . . . . . . . . . . . . . . . . . . . . . . . . . . . . . . . . . . . . . . . 11
Printer Supplies . . . . . . . . . . . . . . . . . . . . . . . . . . . . . . . . . . . . . . . . . . . . . . . . . . . . . . . . . . . . . . . . . 11
Maintenance Safety . . . . . . . . . . . . . . . . . . . . . . . . . . . . . . . . . . . . . . . . . . . . . . . . . . . . . . . . . . . . . . . . 12
Printer Symbols. . . . . . . . . . . . . . . . . . . . . . . . . . . . . . . . . . . . . . . . . . . . . . . . . . . . . . . . . . . . . . . . . . . . . 13
2Features
Parts of the Printer . . . . . . . . . . . . . . . . . . . . . . . . . . . . . . . . . . . . . . . . . . . . . . . . . . . . . . . . . . . . . . . . . 16
Front View . . . . . . . . . . . . . . . . . . . . . . . . . . . . . . . . . . . . . . . . . . . . . . . . . . . . . . . . . . . . . . . . . . . . . 16
Rear View . . . . . . . . . . . . . . . . . . . . . . . . . . . . . . . . . . . . . . . . . . . . . . . . . . . . . . . . . . . . . . . . . . . . . . 17
Internal Components . . . . . . . . . . . . . . . . . . . . . . . . . . . . . . . . . . . . . . . . . . . . . . . . . . . . . . . . . . . 17
Printer Configurations . . . . . . . . . . . . . . . . . . . . . . . . . . . . . . . . . . . . . . . . . . . . . . . . . . . . . . . . . . . . . . 18
Standard Features . . . . . . . . . . . . . . . . . . . . . . . . . . . . . . . . . . . . . . . . . . . . . . . . . . . . . . . . . . . . . . 18
Available Configurations . . . . . . . . . . . . . . . . . . . . . . . . . . . . . . . . . . . . . . . . . . . . . . . . . . . . . . . . 18
Options . . . . . . . . . . . . . . . . . . . . . . . . . . . . . . . . . . . . . . . . . . . . . . . . . . . . . . . . . . . . . . . . . . . . . . . . 19
Control Panel. . . . . . . . . . . . . . . . . . . . . . . . . . . . . . . . . . . . . . . . . . . . . . . . . . . . . . . . . . . . . . . . . . . . . . . 20
Control Panel Layout. . . . . . . . . . . . . . . . . . . . . . . . . . . . . . . . . . . . . . . . . . . . . . . . . . . . . . . . . . . . 20
Information Pages . . . . . . . . . . . . . . . . . . . . . . . . . . . . . . . . . . . . . . . . . . . . . . . . . . . . . . . . . . . . . . 21
More Information . . . . . . . . . . . . . . . . . . . . . . . . . . . . . . . . . . . . . . . . . . . . . . . . . . . . . . . . . . . . . . . . . . 22
Xerox Support Centre . . . . . . . . . . . . . . . . . . . . . . . . . . . . . . . . . . . . . . . . . . . . . . . . . . . . . . . . . . . 23
3Network Basics
Overview of Network Setup and Configuration . . . . . . . . . . . . . . . . . . . . . . . . . . . . . . . . . . . . . . . 26
Choosing a Connection Method . . . . . . . . . . . . . . . . . . . . . . . . . . . . . . . . . . . . . . . . . . . . . . . . . . . . . 27
Connecting via Ethernet (Recommended) . . . . . . . . . . . . . . . . . . . . . . . . . . . . . . . . . . . . . . . . 27
Connecting via USB . . . . . . . . . . . . . . . . . . . . . . . . . . . . . . . . . . . . . . . . . . . . . . . . . . . . . . . . . . . . . 28
Configuring the Network Address . . . . . . . . . . . . . . . . . . . . . . . . . . . . . . . . . . . . . . . . . . . . . . . . . . . . 29
TCP/IP and IP Addresses . . . . . . . . . . . . . . . . . . . . . . . . . . . . . . . . . . . . . . . . . . . . . . . . . . . . . . . . 29
Automatically Setting the Printer’s IP Address . . . . . . . . . . . . . . . . . . . . . . . . . . . . . . . . . . . . 30
Dynamic Methods of Setting the Printer’s IP Address. . . . . . . . . . . . . . . . . . . . . . . . . . . . . . 30
Manually Setting the Printer’s IP Address . . . . . . . . . . . . . . . . . . . . . . . . . . . . . . . . . . . . . . . . . 31
Printer Management Software . . . . . . . . . . . . . . . . . . . . . . . . . . . . . . . . . . . . . . . . . . . . . . . . . . . . . . 33
CentreWare Internet Services . . . . . . . . . . . . . . . . . . . . . . . . . . . . . . . . . . . . . . . . . . . . . . . . . . . 33
CentreWare Web . . . . . . . . . . . . . . . . . . . . . . . . . . . . . . . . . . . . . . . . . . . . . . . . . . . . . . . . . . . . . . . 34
Available Printer Drivers. . . . . . . . . . . . . . . . . . . . . . . . . . . . . . . . . . . . . . . . . . . . . . . . . . . . . . . . . . . . . 35
Phaser 7500 Color Printer |
3 |
User Guide |
|
Contents
Windows 2000 or Later . . . . . . . . . . . . . . . . . . . . . . . . . . . . . . . . . . . . . . . . . . . . . . . . . . . . . . . . . . . . . 36 Preliminary Steps . . . . . . . . . . . . . . . . . . . . . . . . . . . . . . . . . . . . . . . . . . . . . . . . . . . . . . . . . . . . . . . 36 Quick CD-ROM Install Steps . . . . . . . . . . . . . . . . . . . . . . . . . . . . . . . . . . . . . . . . . . . . . . . . . . . . . 36 Other Methods of Installation . . . . . . . . . . . . . . . . . . . . . . . . . . . . . . . . . . . . . . . . . . . . . . . . . . . 37 Windows 64-Bit Server to 32-Bit Client Installation. . . . . . . . . . . . . . . . . . . . . . . . . . . . . . . . 39 Windows 2000 or Later Troubleshooting . . . . . . . . . . . . . . . . . . . . . . . . . . . . . . . . . . . . . . . . . 40
Macintosh OS X, Version 10.3 and Higher . . . . . . . . . . . . . . . . . . . . . . . . . . . . . . . . . . . . . . . . . . . . 42 Macintosh OS X, Version 10.3. . . . . . . . . . . . . . . . . . . . . . . . . . . . . . . . . . . . . . . . . . . . . . . . . . . . 42 Macintosh OS X, Version 10.4 and Higher . . . . . . . . . . . . . . . . . . . . . . . . . . . . . . . . . . . . . . . . 43 Macintosh Troubleshooting (Mac OS X, Version 10.3 and Higher) . . . . . . . . . . . . . . . . . . 44 UNIX (Linux) . . . . . . . . . . . . . . . . . . . . . . . . . . . . . . . . . . . . . . . . . . . . . . . . . . . . . . . . . . . . . . . . . . . . . . . 45 Quick Install Steps . . . . . . . . . . . . . . . . . . . . . . . . . . . . . . . . . . . . . . . . . . . . . . . . . . . . . . . . . . . . . . 45 IPv6 . . . . . . . . . . . . . . . . . . . . . . . . . . . . . . . . . . . . . . . . . . . . . . . . . . . . . . . . . . . . . . . . . . . . . . . . . . . . . . . 47 Enabling IPv6 . . . . . . . . . . . . . . . . . . . . . . . . . . . . . . . . . . . . . . . . . . . . . . . . . . . . . . . . . . . . . . . . . . 47 Setting the Interface ID . . . . . . . . . . . . . . . . . . . . . . . . . . . . . . . . . . . . . . . . . . . . . . . . . . . . . . . . . 48 Automatic Address Assignment . . . . . . . . . . . . . . . . . . . . . . . . . . . . . . . . . . . . . . . . . . . . . . . . . . 49 DHCPv6 . . . . . . . . . . . . . . . . . . . . . . . . . . . . . . . . . . . . . . . . . . . . . . . . . . . . . . . . . . . . . . . . . . . . . . . . 49 Manual Address Assignment . . . . . . . . . . . . . . . . . . . . . . . . . . . . . . . . . . . . . . . . . . . . . . . . . . . . 50 Address Precedence. . . . . . . . . . . . . . . . . . . . . . . . . . . . . . . . . . . . . . . . . . . . . . . . . . . . . . . . . . . . . 51
4Printing
Printing Overview . . . . . . . . . . . . . . . . . . . . . . . . . . . . . . . . . . . . . . . . . . . . . . . . . . . . . . . . . . . . . . . . . . . 54 Supported Media . . . . . . . . . . . . . . . . . . . . . . . . . . . . . . . . . . . . . . . . . . . . . . . . . . . . . . . . . . . . . . . . . . . 55 Recommended Media. . . . . . . . . . . . . . . . . . . . . . . . . . . . . . . . . . . . . . . . . . . . . . . . . . . . . . . . . . . 55 General Media Loading Guidelines . . . . . . . . . . . . . . . . . . . . . . . . . . . . . . . . . . . . . . . . . . . . . . . 55 Media That Can Damage Your Printer. . . . . . . . . . . . . . . . . . . . . . . . . . . . . . . . . . . . . . . . . . . . 56 Paper Storage Guidelines. . . . . . . . . . . . . . . . . . . . . . . . . . . . . . . . . . . . . . . . . . . . . . . . . . . . . . . . 56 Loading Media . . . . . . . . . . . . . . . . . . . . . . . . . . . . . . . . . . . . . . . . . . . . . . . . . . . . . . . . . . . . . . . . . . . . . 57 Loading Paper in Tray 1 (MPT). . . . . . . . . . . . . . . . . . . . . . . . . . . . . . . . . . . . . . . . . . . . . . . . . . . 57 Using Manual Feed in Tray 1 (MPT) . . . . . . . . . . . . . . . . . . . . . . . . . . . . . . . . . . . . . . . . . . . . . . 62 Loading Paper in Trays 2–5. . . . . . . . . . . . . . . . . . . . . . . . . . . . . . . . . . . . . . . . . . . . . . . . . . . . . . 62 Printing on Special Media . . . . . . . . . . . . . . . . . . . . . . . . . . . . . . . . . . . . . . . . . . . . . . . . . . . . . . . . . . . 69 Printing on Transparencies . . . . . . . . . . . . . . . . . . . . . . . . . . . . . . . . . . . . . . . . . . . . . . . . . . . . . . 69 Printing on Envelopes . . . . . . . . . . . . . . . . . . . . . . . . . . . . . . . . . . . . . . . . . . . . . . . . . . . . . . . . . . . 70 Printing on Labels. . . . . . . . . . . . . . . . . . . . . . . . . . . . . . . . . . . . . . . . . . . . . . . . . . . . . . . . . . . . . . . 70 Printing on Glossy Paper . . . . . . . . . . . . . . . . . . . . . . . . . . . . . . . . . . . . . . . . . . . . . . . . . . . . . . . . 71 Using Custom Paper Types . . . . . . . . . . . . . . . . . . . . . . . . . . . . . . . . . . . . . . . . . . . . . . . . . . . . . . 72 Using Custom Size Paper . . . . . . . . . . . . . . . . . . . . . . . . . . . . . . . . . . . . . . . . . . . . . . . . . . . . . . . . 73 Selecting Printing Options. . . . . . . . . . . . . . . . . . . . . . . . . . . . . . . . . . . . . . . . . . . . . . . . . . . . . . . . . . . 75 Printing Options for Windows. . . . . . . . . . . . . . . . . . . . . . . . . . . . . . . . . . . . . . . . . . . . . . . . . . . . 75 Setting Default Printing Options for Windows . . . . . . . . . . . . . . . . . . . . . . . . . . . . . . . . . . . . 75 Selecting Printing Options for an Individual Job in Windows . . . . . . . . . . . . . . . . . . . . . . . 76 Saving a Set of Commonly Used Printing Options in Windows . . . . . . . . . . . . . . . . . . . . . 76 Printing Options for Macintosh . . . . . . . . . . . . . . . . . . . . . . . . . . . . . . . . . . . . . . . . . . . . . . . . . . 77 Selecting Options for an Individual Job for Macintosh. . . . . . . . . . . . . . . . . . . . . . . . . . . . . 77 Saving a Set of Commonly Used Printing Options for Macintosh . . . . . . . . . . . . . . . . . . . 77
4Phaser 7500 Color Printer User Guide
Contents
Printing on Both Sides of the Paper . . . . . . . . . . . . . . . . . . . . . . . . . . . . . . . . . . . . . . . . . . . . . . . . . . 78 2-Sided Printing Guidelines . . . . . . . . . . . . . . . . . . . . . . . . . . . . . . . . . . . . . . . . . . . . . . . . . . . . . . 78 Printing a 2-Sided Document . . . . . . . . . . . . . . . . . . . . . . . . . . . . . . . . . . . . . . . . . . . . . . . . . . . . 79 Page Layout Options . . . . . . . . . . . . . . . . . . . . . . . . . . . . . . . . . . . . . . . . . . . . . . . . . . . . . . . . . . . . 80 Selecting Paper Type to Use. . . . . . . . . . . . . . . . . . . . . . . . . . . . . . . . . . . . . . . . . . . . . . . . . . . . . . . . . 81 Selecting Paper Type to Use for a Supported Driver . . . . . . . . . . . . . . . . . . . . . . . . . . . . . . . 81 Printing Multiple Pages to a Single Sheet (N-Up). . . . . . . . . . . . . . . . . . . . . . . . . . . . . . . . . . . . . . 82 Printing N-Up Using a supported Driver . . . . . . . . . . . . . . . . . . . . . . . . . . . . . . . . . . . . . . . . . . 82 Printing Booklets . . . . . . . . . . . . . . . . . . . . . . . . . . . . . . . . . . . . . . . . . . . . . . . . . . . . . . . . . . . . . . . . . . . 83 Selecting Booklet Printing in a Supported Driver . . . . . . . . . . . . . . . . . . . . . . . . . . . . . . . . . . 83 Using Color Corrections . . . . . . . . . . . . . . . . . . . . . . . . . . . . . . . . . . . . . . . . . . . . . . . . . . . . . . . . . . . . . 85 Color by Words . . . . . . . . . . . . . . . . . . . . . . . . . . . . . . . . . . . . . . . . . . . . . . . . . . . . . . . . . . . . . . . . . 85 Selecting Color Correction in a Supported Driver . . . . . . . . . . . . . . . . . . . . . . . . . . . . . . . . . . 86 Making Color Adjustments in a Supported Driver . . . . . . . . . . . . . . . . . . . . . . . . . . . . . . . . . 86 Making Custom Color Adjustments . . . . . . . . . . . . . . . . . . . . . . . . . . . . . . . . . . . . . . . . . . . . . . 87 Adjusting the Automatic Color Correction in a Supported Driver . . . . . . . . . . . . . . . . . . . 87 Printing in Black and White. . . . . . . . . . . . . . . . . . . . . . . . . . . . . . . . . . . . . . . . . . . . . . . . . . . . . . . . . . 88 Printing Black and White Using a Supported Driver. . . . . . . . . . . . . . . . . . . . . . . . . . . . . . . . 88 Printing Separators . . . . . . . . . . . . . . . . . . . . . . . . . . . . . . . . . . . . . . . . . . . . . . . . . . . . . . . . . . . . . . . . . 89 Printing Insert Pages in a Supported Driver . . . . . . . . . . . . . . . . . . . . . . . . . . . . . . . . . . . . . . . 89 Printing Cover Pages . . . . . . . . . . . . . . . . . . . . . . . . . . . . . . . . . . . . . . . . . . . . . . . . . . . . . . . . . . . . . . . . 90 Printing Cover Pages in a Supported Driver . . . . . . . . . . . . . . . . . . . . . . . . . . . . . . . . . . . . . . . 91 Printing Watermarks . . . . . . . . . . . . . . . . . . . . . . . . . . . . . . . . . . . . . . . . . . . . . . . . . . . . . . . . . . . . . . . . 92 Selecting, Creating, and Editing Watermarks in a Supported Driver. . . . . . . . . . . . . . . . . 92 Printing Mirror Images . . . . . . . . . . . . . . . . . . . . . . . . . . . . . . . . . . . . . . . . . . . . . . . . . . . . . . . . . . . . . . 93 Selecting Mirror Image in a Supported Driver . . . . . . . . . . . . . . . . . . . . . . . . . . . . . . . . . . . . . 93 Printing Special Job Types. . . . . . . . . . . . . . . . . . . . . . . . . . . . . . . . . . . . . . . . . . . . . . . . . . . . . . . . . . . 94 Sending Personal, Personal Saved, Secure, Proof, or Saved Print Jobs . . . . . . . . . . . . . . . 94 Sending Print With Jobs . . . . . . . . . . . . . . . . . . . . . . . . . . . . . . . . . . . . . . . . . . . . . . . . . . . . . . . . . 95 Printing or Deleting Secure Print Jobs . . . . . . . . . . . . . . . . . . . . . . . . . . . . . . . . . . . . . . . . . . . . 95 Printing or Deleting Personal Print Jobs. . . . . . . . . . . . . . . . . . . . . . . . . . . . . . . . . . . . . . . . . . . 96 Printing or Deleting Proof and Saved Print Jobs . . . . . . . . . . . . . . . . . . . . . . . . . . . . . . . . . . . 96 Printing or Deleting Personal Saved Jobs . . . . . . . . . . . . . . . . . . . . . . . . . . . . . . . . . . . . . . . . . 96
5Maintenance
Maintenance and Cleaning . . . . . . . . . . . . . . . . . . . . . . . . . . . . . . . . . . . . . . . . . . . . . . . . . . . . . . . . . 98
General Precautions . . . . . . . . . . . . . . . . . . . . . . . . . . . . . . . . . . . . . . . . . . . . . . . . . . . . . . . . . . . . 98
Locating the Serial Number. . . . . . . . . . . . . . . . . . . . . . . . . . . . . . . . . . . . . . . . . . . . . . . . . . . . . . 98
Billing Meters. . . . . . . . . . . . . . . . . . . . . . . . . . . . . . . . . . . . . . . . . . . . . . . . . . . . . . . . . . . . . . . . . . . 99
Cleaning the Printer . . . . . . . . . . . . . . . . . . . . . . . . . . . . . . . . . . . . . . . . . . . . . . . . . . . . . . . . . . . . . . . 100
Cleaning the Exterior. . . . . . . . . . . . . . . . . . . . . . . . . . . . . . . . . . . . . . . . . . . . . . . . . . . . . . . . . . . 100
Cleaning the LEDs . . . . . . . . . . . . . . . . . . . . . . . . . . . . . . . . . . . . . . . . . . . . . . . . . . . . . . . . . . . . . 100
Phaser 7500 Color Printer |
5 |
User Guide |
|
Contents
Ordering Supplies. . . . . . . . . . . . . . . . . . . . . . . . . . . . . . . . . . . . . . . . . . . . . . . . . . . . . . . . . . . . . . . . . . 103 Consumables . . . . . . . . . . . . . . . . . . . . . . . . . . . . . . . . . . . . . . . . . . . . . . . . . . . . . . . . . . . . . . . . . . 103 Routine Maintenance Items . . . . . . . . . . . . . . . . . . . . . . . . . . . . . . . . . . . . . . . . . . . . . . . . . . . . 103 Customer Replaceable Parts . . . . . . . . . . . . . . . . . . . . . . . . . . . . . . . . . . . . . . . . . . . . . . . . . . . . 104 When to Order Supplies . . . . . . . . . . . . . . . . . . . . . . . . . . . . . . . . . . . . . . . . . . . . . . . . . . . . . . . . 104 Recycling Supplies . . . . . . . . . . . . . . . . . . . . . . . . . . . . . . . . . . . . . . . . . . . . . . . . . . . . . . . . . . . . . 104
Moving the Printer. . . . . . . . . . . . . . . . . . . . . . . . . . . . . . . . . . . . . . . . . . . . . . . . . . . . . . . . . . . . . . . . . 105
6Troubleshooting
General Troubleshooting . . . . . . . . . . . . . . . . . . . . . . . . . . . . . . . . . . . . . . . . . . . . . . . . . . . . . . . . . . . 108 Printer Does Not Turn On. . . . . . . . . . . . . . . . . . . . . . . . . . . . . . . . . . . . . . . . . . . . . . . . . . . . . . . 108 Printing Takes Too Long. . . . . . . . . . . . . . . . . . . . . . . . . . . . . . . . . . . . . . . . . . . . . . . . . . . . . . . . 109 Printer Resets or Turns Off Frequently . . . . . . . . . . . . . . . . . . . . . . . . . . . . . . . . . . . . . . . . . . . 109 Printer Is Making Unusual Noises . . . . . . . . . . . . . . . . . . . . . . . . . . . . . . . . . . . . . . . . . . . . . . . 110 The Date and Time Are Incorrect . . . . . . . . . . . . . . . . . . . . . . . . . . . . . . . . . . . . . . . . . . . . . . . 110 Duplex Problems. . . . . . . . . . . . . . . . . . . . . . . . . . . . . . . . . . . . . . . . . . . . . . . . . . . . . . . . . . . . . . . 110 Front Door Will Not Close . . . . . . . . . . . . . . . . . . . . . . . . . . . . . . . . . . . . . . . . . . . . . . . . . . . . . . 110
Paper Feed Problems . . . . . . . . . . . . . . . . . . . . . . . . . . . . . . . . . . . . . . . . . . . . . . . . . . . . . . . . . . . . . . 111 Clearing Paper Jams . . . . . . . . . . . . . . . . . . . . . . . . . . . . . . . . . . . . . . . . . . . . . . . . . . . . . . . . . . . 111 Minimizing Paper Jams. . . . . . . . . . . . . . . . . . . . . . . . . . . . . . . . . . . . . . . . . . . . . . . . . . . . . . . . . 128 Troubleshooting Paper Feed Problems . . . . . . . . . . . . . . . . . . . . . . . . . . . . . . . . . . . . . . . . . . 129 Print-Quality Problems . . . . . . . . . . . . . . . . . . . . . . . . . . . . . . . . . . . . . . . . . . . . . . . . . . . . . . . . . . . . . 131 Using Built-in Troubleshooting Tools . . . . . . . . . . . . . . . . . . . . . . . . . . . . . . . . . . . . . . . . . . . . 131 Troubleshooting Print-Quality Problems . . . . . . . . . . . . . . . . . . . . . . . . . . . . . . . . . . . . . . . . . 133 Getting Help . . . . . . . . . . . . . . . . . . . . . . . . . . . . . . . . . . . . . . . . . . . . . . . . . . . . . . . . . . . . . . . . . . . . . . 143 Control Panel Messages . . . . . . . . . . . . . . . . . . . . . . . . . . . . . . . . . . . . . . . . . . . . . . . . . . . . . . . . 143 Online Support Assistant . . . . . . . . . . . . . . . . . . . . . . . . . . . . . . . . . . . . . . . . . . . . . . . . . . . . . . . 143 PhaserSMART Technical Support . . . . . . . . . . . . . . . . . . . . . . . . . . . . . . . . . . . . . . . . . . . . . . . 144 Helpful Websites. . . . . . . . . . . . . . . . . . . . . . . . . . . . . . . . . . . . . . . . . . . . . . . . . . . . . . . . . . . . . . . 144
APrinter Specifications
Physical Specifications . . . . . . . . . . . . . . . . . . . . . . . . . . . . . . . . . . . . . . . . . . . . . . . . . . . . . . . . . . . . . 146
Base Unit . . . . . . . . . . . . . . . . . . . . . . . . . . . . . . . . . . . . . . . . . . . . . . . . . . . . . . . . . . . . . . . . . . . . . 146
Optional Trays 3, 4, and 5 . . . . . . . . . . . . . . . . . . . . . . . . . . . . . . . . . . . . . . . . . . . . . . . . . . . . . . 146
Clearance Requirements . . . . . . . . . . . . . . . . . . . . . . . . . . . . . . . . . . . . . . . . . . . . . . . . . . . . . . . 146
Environmental Specifications. . . . . . . . . . . . . . . . . . . . . . . . . . . . . . . . . . . . . . . . . . . . . . . . . . . . . . . 147
Temperature . . . . . . . . . . . . . . . . . . . . . . . . . . . . . . . . . . . . . . . . . . . . . . . . . . . . . . . . . . . . . . . . . . 147
Relative Humidity. . . . . . . . . . . . . . . . . . . . . . . . . . . . . . . . . . . . . . . . . . . . . . . . . . . . . . . . . . . . . . 147
Electrical Specifications . . . . . . . . . . . . . . . . . . . . . . . . . . . . . . . . . . . . . . . . . . . . . . . . . . . . . . . . . . . . 148
Performance Specifications . . . . . . . . . . . . . . . . . . . . . . . . . . . . . . . . . . . . . . . . . . . . . . . . . . . . . . . . 149
Resolution. . . . . . . . . . . . . . . . . . . . . . . . . . . . . . . . . . . . . . . . . . . . . . . . . . . . . . . . . . . . . . . . . . . . . 149
Print Speed . . . . . . . . . . . . . . . . . . . . . . . . . . . . . . . . . . . . . . . . . . . . . . . . . . . . . . . . . . . . . . . . . . . . 149
Controller Specifications . . . . . . . . . . . . . . . . . . . . . . . . . . . . . . . . . . . . . . . . . . . . . . . . . . . . . . . . . . . 150
Memory. . . . . . . . . . . . . . . . . . . . . . . . . . . . . . . . . . . . . . . . . . . . . . . . . . . . . . . . . . . . . . . . . . . . . . . 150
Interfaces . . . . . . . . . . . . . . . . . . . . . . . . . . . . . . . . . . . . . . . . . . . . . . . . . . . . . . . . . . . . . . . . . . . . . 150
6Phaser 7500 Color Printer User Guide
Contents
BRegulatory Information
Basic Regulations. . . . . . . . . . . . . . . . . . . . . . . . . . . . . . . . . . . . . . . . . . . . . . . . . . . . . . . . . . . . . . . . . . 152
United States (FCC Regulations) . . . . . . . . . . . . . . . . . . . . . . . . . . . . . . . . . . . . . . . . . . . . . . . . 152
Canada (Regulations) . . . . . . . . . . . . . . . . . . . . . . . . . . . . . . . . . . . . . . . . . . . . . . . . . . . . . . . . . . 152
European Union . . . . . . . . . . . . . . . . . . . . . . . . . . . . . . . . . . . . . . . . . . . . . . . . . . . . . . . . . . . . . . . 152
Ozone Release . . . . . . . . . . . . . . . . . . . . . . . . . . . . . . . . . . . . . . . . . . . . . . . . . . . . . . . . . . . . . . . . . 153
Material Safety Data Sheets . . . . . . . . . . . . . . . . . . . . . . . . . . . . . . . . . . . . . . . . . . . . . . . . . . . . . . . 154
CRecycling and Disposal
Guidelines and Information . . . . . . . . . . . . . . . . . . . . . . . . . . . . . . . . . . . . . . . . . . . . . . . . . . . . . . . . 156
All Countries. . . . . . . . . . . . . . . . . . . . . . . . . . . . . . . . . . . . . . . . . . . . . . . . . . . . . . . . . . . . . . . . . . . 156
North America. . . . . . . . . . . . . . . . . . . . . . . . . . . . . . . . . . . . . . . . . . . . . . . . . . . . . . . . . . . . . . . . . 156
European Union . . . . . . . . . . . . . . . . . . . . . . . . . . . . . . . . . . . . . . . . . . . . . . . . . . . . . . . . . . . . . . . 156
Other Countries. . . . . . . . . . . . . . . . . . . . . . . . . . . . . . . . . . . . . . . . . . . . . . . . . . . . . . . . . . . . . . . . 158
Index
Phaser 7500 Color Printer |
7 |
User Guide |
|
Contents
8Phaser 7500 Color Printer User Guide
Safety |
1 |
This chapter includes:
•Electrical Safety on page 10
•Operational Safety on page 11
•Maintenance Safety on page 12
•Printer Symbols on page 13
Your printer and the recommended supplies have been designed and tested to meet strict safety requirements. Attention to the following information ensures the continued safe operation of your printer.
Phaser 7500 Color Printer |
9 |
User Guide |
|
Safety
Electrical Safety
Warning: Do not push objects (including paper clips or staples) into slots or openings on the printer. Making contact with a voltage point or shorting out a part could result in fire or electrical shock.
Warning: Do not remove the covers or guards that are fastened with screws unless you are installing optional equipment and are specifically instructed to do so. Power should be OFF when performing these installations. Disconnect the power cord when removing covers and guards for installing optional equipment. Except for user-installable options, there are no parts that you can maintain or service behind these covers.
The following are hazards to your safety:
•The power cord is damaged or frayed.
•Liquid is spilled into the printer.
•The printer is exposed to water.
If any of these conditions occur, do the following:
1.Turn off the printer immediately.
2.Disconnect the power cord from the electrical outlet.
3.Call an authorized service representative.
Power Cord
•Use the power cord supplied with your printer.
•Plug the power cord directly into a properly grounded electrical outlet. Make sure each end of the cord is securely connected. If you do not know if an outlet is grounded, ask an electrician to check the outlet.
•Do not use a ground adapter plug to connect the printer to an electrical outlet that does not have a ground connection terminal.
Warning: Avoid the potential of electrical shock by ensuring that the printer is properly grounded. Electrical printers may be hazardous if misused.
•Do not use an extension cord, power strip, or surge protector.
•Verify that the printer is plugged into an outlet that is capable of providing the correct voltage and power. Review the printer’s electrical specification with an electrician if necessary.
•Do not place the printer in an area where people might step on the power cord.
•Do not place objects on the power cord.
The power cord is attached to the printer as a plug-in device on the back of the printer. If it is necessary to disconnect all electrical power from the printer, disconnect the power cord from the electrical outlet.
10Phaser 7500 Color Printer User Guide
Safety
Operational Safety
Your printer and supplies were designed and tested to meet strict safety requirements. These include safety agency examination, approval, and compliance with established environmental standards.
Your attention to the following safety guidelines helps to ensure the continued, safe operation of your printer.
Printer Location
•Do not block or cover the slots or openings on the printer. These openings are provided for ventilation and to prevent overheating of the printer.
•Place the printer in an area where there is adequate space for operation and servicing.
•Place the printer in a dust-free area.
•Do not store or operate the printer in an extremely hot, cold, or humid environment. For optimum performance environmental specifications, see Environmental Specifications on page 147.
•Place the printer on a level, solid non-vibrating surface with adequate strength to hold the weight of the printer. The base printer weight without any packaging materials is approximately 66 kg (145.2 lb.).
•Do not place the printer near a heat source.
•Do not place the printer in direct sunlight to avoid exposure to light-sensitive components.
•Do not place the printer where it is directly exposed to the cold air flow from an air conditioning unit.
Operational Guidelines
•Do not open the paper source tray that you selected in either the printer driver or control panel.
•Do not open the doors when the printer is printing.
•Do not move the printer when it is printing.
•Keep hands, hair, neckties, etc., away from the exit and feed roller.
Printer Supplies
•Use the supplies specifically designed for your printer. The use of unsuitable materials may cause poor performance and a possible safety hazard.
•Follow all warnings and instructions marked on, or supplied with, the printer, options, and supplies.
Caution: Use of non-Xerox supplies is not recommended. The Xerox Warranty, Service Agreements, and Total Satisfaction Guarantee do not cover damage, malfunction, or degradation of performance caused by use of non-Xerox supplies, or the use of Xerox supplies not specified for this printer. The Total Satisfaction Guarantee is available in the United States and Canada. Coverage may vary outside these areas; please contact your local representative for details.
Phaser 7500 Color Printer |
11 |
User Guide |
|
Safety
Maintenance Safety
•Do not attempt any maintenance procedure that is not specifically described in the documentation supplied with your printer.
•Do not use aerosol cleaners. Clean the printer with a dry lint-free cloth only.
•Do not burn any consumables or routine maintenance items. For information on Xerox supplies recycling programs, go to www.xerox.com/gwa.
12Phaser 7500 Color Printer User Guide

Safety
Printer Symbols
Symbol |
Description |
|
|
|
Warning or Caution: |
|
Ignoring this warning could cause serious injury or even death. |
|
Ignoring this caution could cause injury or damage to the property. |
|
|
|
Hot surface on or in the printer. Use caution to avoid personal injury. |
Caution: Electrostatic sensitive devices
Verify that you are properly grounded before making contact with the printer.
Ignoring this caution could cause damage to the property.
Do not touch components with this symbol as personal injury could result.
Do not burn the item.
It may take 40 minutes for the fuser to cool down.
Phaser 7500 Color Printer |
13 |
User Guide |
|
Safety
14Phaser 7500 Color Printer User Guide
Features |
2 |
This chapter includes:
•Parts of the Printer on page 16
•Printer Configurations on page 18
•Control Panel on page 20
•More Information on page 22
Phaser 7500 Color Printer |
15 |
User Guide |
|

Features
Parts of the Printer
This section includes:
•Front View on page 16
•Rear View on page 17
•Internal Components on page 17
Front View
1 |
2 |
7 |
3 |
8 |
4 |
|
5 |
9 |
6 |
|
|
10 |
|
|
7500-028 |
1.Top output tray
2.Power switch
3.Control panel
4.Front door
5.Tray 2
6.Tray 3, 4, & 5 (option)
7.Door A
8.Door B
9.Tray 1 (MPT)
10.Door C
16Phaser 7500 Color Printer User Guide

Rear View
1
2
3
1.Configuration card
2.USB connection
Internal Components
8
7
1.Imaging unit cover lever
2.Toner cartridges
3.Belt cleaner
4.Waste cartridge
Features
4
7500-026
3.Ethernet connection
4.Power cord connector
12
3 |
4 |
5 |
6
7500-027
5.Imaging unit cover
6.Imaging units
7.Transfer roller
8.Fuser
Phaser 7500 Color Printer |
17 |
User Guide |
|
Features
Printer Configurations
•Standard Features on page 18
•Available Configurations on page 18
•Options on page 19
Standard Features
The Phaser 7500 Color Printer has many features to meet your printing needs:
•Maximum print speed of 35 pages per minute (ppm) for monochrome printing and 35 ppm for color printing (on letter-size plain paper)
•1 GHz processor
•1200 x 600 dpi (Standard Mode), 1200 x 1200 dpi (Enhanced Mode), and 1200 x 1200 dpi (Photo Mode)
•Tray 1 (MPT) that holds up to 100 sheets
•Tray 2 that holds up to 500 sheets
•512 MB RAM memory, expandable to 2 GB
•PostScript and PCL fonts
•USB and Ethernet 10/100/1000Base-TX connections
•Up to 12 x 18 inch paper (SRA3)
•Up to 280 gsm paper weight
•RAM collation
Available Configurations
The Phaser 7500 printer is available in four configurations.
Features |
Configurations |
|
|
|
|
|
|
|
|
|
7500N |
7500DN |
7500DT |
7500DX |
|
|
|
|
|
Duplex Unit |
Optional |
Yes |
Yes |
Yes |
|
|
|
|
|
500-Sheet Feeder |
Optional |
Optional |
Yes |
No |
|
|
|
|
|
1500-Sheet Feeder |
Optional |
Optional |
Optional |
Yes |
|
|
|
|
|
Productivity kit (hard drive) |
Optional |
Optional |
Optional |
Yes |
|
|
|
|
|
Note: The printer supports either the optional 500-Sheet Feeder or the 1500-Sheet Feeder but not both at the same time.
18Phaser 7500 Color Printer User Guide
Features
Options
The following options are available for the Phaser 7500 printer:
•Duplex Unit: A duplex unit can be added to the printer to provide automatic 2-sided printing. The duplex unit comes standard on the Phaser 7500DN, 7500DT, and 7500DX.
•500-Sheet Feeder: Provides Tray 3 for extra paper input capacity.
•1500-Sheet Feeder: Provides Tray 3, 4, and 5 for extra input capacity.
•Productivity kit: Includes an internal hard drive and supports disk collation. Use to enable printing features:
•Personal Print Jobs
•Personal Saved Print Jobs
•Secure Print Jobs
•Proof Print Jobs
•Saved Print Jobs
•Print With Jobs
•Wireless Network Adapter: Enables the printer to connect to a wireless network.
•Stand: Provides storage space for supplies. Has casters and extensions to place the printer and control panel at a convenient height.
For more information on options, go to www.xerox.com/office/7500supplies.
Phaser 7500 Color Printer |
19 |
User Guide |
|
Features
Control Panel
This section includes:
•Control Panel Layout on page 20
•Information Pages on page 21
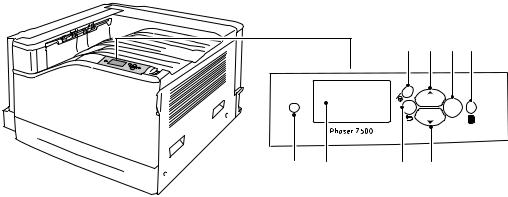
Control Panel Layout
|
|
|
|
|
3 |
5 |
7 |
8 |
|
|
|
|
C |
|
|
|
|
|
|
|
|
|
|
|
OK |
? |
|
|
|
1 |
2 |
4 |
6 |
|
|
|
|
|
|
|
|
|
|
7500-029 |
1. |
Indicator Light |
5. |
Up Arrow button |
|
|
|
|
|
|
Blinks when the printer is receiving and printing |
|
Scrolls upward through the menus. |
|||||
|
a job. |
6. |
Down Arrow button |
|
|
|
|
|
2. |
Graphic display |
|
Scrolls downward through the menus. |
|||||
|
Indicates status messages and menus. |
7. |
OK button |
|
|
|
|
|
3. |
Cancel button |
|
Selects the current setting. |
|
|
|||
|
Cancels the current printing job. |
8. |
Help (?) button |
|
|
|
|
|
4. |
Back button |
|
Displays a help message with information about |
|||||
|
Returns to the previous menu item. |
|
the printer, such as printer status, error |
|||||
|
|
|
messages, and maintenance information. |
|||||
20Phaser 7500 Color Printer User Guide
Features
Information Pages
Your printer has a set of printable information pages. The information pages provide reference information about your printer and its current configuration.
To print an information page:
1.On the control panel, press the Down Arrow button to select Information > Information Pages.
2.Select the information page and press the OK button.
Note: Information pages can also be printed from CentreWare Internet Services (CentreWare IS).
Menu Map
The Menu Map information page shows you how to navigate to each of the printer’s functions. It is useful for getting to know the capabilities and setting names of your printer.
Configuration Page
The Configuration Page lists information about the current configuration of your printer, and is useful for network analysis and general troubleshooting.
Phaser 7500 Color Printer |
21 |
User Guide |
|
Features
More Information
The following links provide more information about your printer and its capabilities.
Information |
Source |
|
|
Installation Guide |
Packaged with printer |
|
|
Quick Use Guide |
Packaged with printer |
|
|
User Guide (PDF) |
Software and Documentation CD-ROM |
|
www.xerox.com/office/7500docs |
|
|
Quick Start Tutorials |
www.xerox.com/office/7500docs |
|
|
Video Tutorials |
www.xerox.com/office/7500docs |
|
|
Recommended Media List |
www.xerox.com/paper (United States) |
|
www.xerox.com/europaper (Europe) |
|
|
Printer Management Tools |
www.xerox.com/office/7500drivers |
|
|
Online Support Assistant |
www.xerox.com/office/7500support |
|
|
PhaserSMART |
www.phasersmart.com |
|
|
Technical Support |
www.xerox.com/office/7500support |
|
|
Information about menus or error messages |
Control panel Help button |
|
|
Information pages |
Print from the control panel |
|
|
System Administrator Guide |
www.xerox.com/office/7500docs |
|
|
22Phaser 7500 Color Printer User Guide
Features
Xerox Support Centre
The Xerox Support Centre provides access to the following information:
•User manuals and video tutorials
•Solutions to troubleshooting problems
•Printer and supplies status
•Supplies ordering and recycling
•Answers to frequently asked questions
•Default printer driver settings
Xerox Support Centre is available for systems with Windows 2000 and newer or Mac OS X, version 10.4 and newer. You can install the Xerox Support Centre utility from the Xerox Drivers and Downloads website at www.xerox.com/office/7500drivers.
To start the Xerox Support Centre utility:
1.Windows: Double-click the Xerox Support Centre icon on your desktop.
Macintosh: Click the Xerox Support Centre icon in the dock.
2.Select your printer from the Select Printer drop-down list.
See also:
Using the Xerox Support Centre tutorial at www.xerox.com/office/7500docs
Note: You must have an Internet connection to view manuals and videos on the website.
Phaser 7500 Color Printer |
23 |
User Guide |
|
Features
24Phaser 7500 Color Printer User Guide
Network Basics |
3 |
This chapter includes:
•Overview of Network Setup and Configuration on page 26
•Choosing a Connection Method on page 27
•Configuring the Network Address on page 29
•Printer Management Software on page 33
•Available Printer Drivers on page 35
•Windows 2000 or Later on page 36
•Macintosh OS X, Version 10.3 and Higher on page 42
•UNIX (Linux) on page 45
•IPv6 on page 47
This chapter provides basic information about setting up and connecting to your printer.
Note: For information about setting up and connecting to your printer on an IPv6 network, see IPv6 on page 47.
Phaser 7500 Color Printer |
25 |
User Guide |
|
Network Basics
Overview of Network Setup and Configuration
To set up and configure the network:
1.Connect the printer to the network using the recommended hardware and cables.
2.Turn on the printer and the computer.
3.Print the Configuration page and keep it for referencing network settings.
4.Install the driver software on the computer from the Software and Documentation CD-ROM. For information on driver installation, see the section in this chapter for the specific operating system you are using.
5.Configure the printer’s TCP/IP address, which is required to identify the printer on the network.
•Windows operating systems: Run the Installer on the Software and Documentation CD-ROM to automatically set the printer’s IP address if the printer is connected to an established TCP/IP network. You can also manually set the printer’s IP address on the control panel.
•Macintosh systems: Manually set the printer’s TCP/IP address on the control panel.
6.Print a Configuration page to verify the new settings.
Note: If the Software and Documentation CD-ROM is not available, you can download the latest driver from www.xerox.com/office/7500drivers.
26Phaser 7500 Color Printer User Guide
Network Basics
Choosing a Connection Method
Connect the printer via Ethernet or USB. A USB connection is a direct connection and is not used for networking. An Ethernet connection is used for networking. Hardware and cabling requirements vary for the different connection methods. Cabling and hardware are generally not included with your printer and must be purchased separately. This section includes:
•Connecting via Ethernet (Recommended) on page 27
•Connecting via USB on page 28
Connecting via Ethernet (Recommended)
Ethernet can be used for one or more computers. It supports many printers and systems on an Ethernet network. An Ethernet connection is recommended because it is faster than a USB connection. It also allows you direct access to CentreWare Internet Services, which enables you to manage, configure, and monitor network printers from your computer.
Network Connection
Depending on your particular setup, the following hardware and cabling is required for Ethernet.
•If you are connecting to one computer, an Ethernet RJ-45 crossover cable is required.
•If you are connecting to one or more computers with an Ethernet hub, or cable or DSL router, two or more twisted-pair (category 5/RJ-45) cables are required. (One cable for each device.)
If you are connecting to one or more computers with a hub, connect the computer to the hub with one cable, and then connect the printer to the hub with the second cable. Connect to any port on the hub except the uplink port.
See also:
Configuring the Network Address on page 29
Available Printer Drivers on page 35
Phaser 7500 Color Printer |
27 |
User Guide |
|
Network Basics
Connecting via USB
If you are connecting to one computer, a USB connection offers fast data speeds. However, a USB connection is not as fast as an Ethernet connection. To use USB, PC users must have Windows 2000/XP/Server 2003 or newer. Macintosh users must use Mac OS X, version 10.3 and higher.
USB Connection
A USB connection requires a standard A/B USB cable. This cable is not included with your printer and must be purchased separately. Verify that you are using the correct USB (1.x or 2.0) cable for your connection.
1.Connect one end of the USB cable to the printer and turn it on.
2.Connect the other end of the USB cable to the computer.
See also:
Available Printer Drivers on page 35
28Phaser 7500 Color Printer User Guide
Network Basics
Configuring the Network Address
This section includes:
•TCP/IP and IP Addresses on page 29
•Automatically Setting the Printer’s IP Address on page 30
•Dynamic Methods of Setting the Printer’s IP Address on page 30
•Manually Setting the Printer’s IP Address on page 31
TCP/IP and IP Addresses
If your computer is on a large network, contact your network administrator for the appropriate TCP/IP addresses and additional configuration information.
If you are creating your own small Local Area Network or connecting the printer directly to your computer using Ethernet, follow the procedure for automatically setting the printer’s Internet Protocol (IP) address.
PCs and printers primarily use TCP/IP protocols to communicate over an Ethernet network. With TCP/IP protocols, each printer and computer must have a unique IP address. It is important that the addresses are similar, but not the same; only the last digit needs to be different. For example, your printer can have the address 192.168.1.2 while your computer has the address 192.168.1.3. Another device can have the address 192.168.1.4.
Generally, Macintosh computers use either TCP/IP or the EtherTalk protocol to talk to a networked printer. For Mac OS X systems, TCP/IP is preferred. Unlike TCP/IP, however, EtherTalk does not require printers or computers to have IP addresses.
Many networks have a Dynamic Host Configuration Protocol (DHCP) server. A DHCP server automatically programs an IP address into every PC and printer on the network that is configured to use DHCP. A DHCP server is built into most cable and DSL routers. If you use a cable or DSL router, see your router’s documentation for information on IP addressing.
See also:
Online Support Assistant at www.xerox.com/office/7500support
IPv6 on page 47
Phaser 7500 Color Printer |
29 |
User Guide |
|
Network Basics
Automatically Setting the Printer’s IP Address
If the printer is connected to a small established TCP/IP network without a DHCP server, use the installer on the Software and Documentation CD-ROM to detect or assign an IP address to your printer. For further instructions, insert the Software and Documentation CD-ROM into your computer’s CD-ROM drive. After the Xerox Installer launches, follow the prompts for installation.
Note: For the automatic installer to function, the printer must be connected to an established TCP/IP network.
Dynamic Methods of Setting the Printer’s IP Address
There are two protocols available for dynamically setting the printer’s IP address:
•DHCP (enabled by default on all Phaser printers)
•AutoIP
You can turn on/off both protocols using the control panel, or use CentreWare IS to turn on/off DHCP.
Note: You can view the printer’s IP address at any time. On the control panel, select Information, press the OK button, select Printer Identification, then press the OK button.
Using the Control Panel
To turn on/off either the DHCP or AutoIP protocol:
1.On the control panel, select Printer Setup > Connection Setup > Network Setup > TCP/IPv4 Setup, then press the OK button.
2.Select DHCP/BOOTP or AutoIP.
3.Press the OK button to turn the selection On or Off.
Using CentreWare IS
To turn on/off the DHCP protocol:
1.Launch your Web browser.
2.Enter the printer’s IP address in the browser’s Address field.
3.Select Properties.
4.Select the Protocols folder on the left navigation panel.
5.Select TCP/IP.
6.Click the TCP/IP (v4) button.
7.In the BOOTP/DHCP Settings section, set the BOOTP/DHCP option to On or Off.
8.In the TCP/IP Settings section, enter the static IP address which may be different than the DHCP or auto IP address listed. Check that the Network Mask and Router/Gateway address are correct for your network.
9.Click the Save Changes button.
30Phaser 7500 Color Printer User Guide
Loading...