


 Loading...
October 2014
Xerox® Color C60/C70 Printer
Simple Image Quality Adjustment Tool
Installation and Adjustments Guide
©2014 Xerox Corporation. All rights reserved. Xerox® and Xerox and Design® are trademarks of Xerox Corporation in the United States and/or other countries. BR10941
Freeflow® is a trademark of Xerox Corporation in the United States and/or other countries. Product status, build status, and/or specifications are subject to change without notice.
Microsoft, Windows®, Windows® XP, Windows® Vista, Internet Explorer, and Word are registered trademarks of Microsoft Corporation in the United States and/or other countries.
Fiery® and PrintMe® are registered trademarks of Electronics For Imaging, Inc. GBC® and AdvancedPunch™ are trademarks or registered trademarks of General Binding Corporation.
Document Version: 1.1 (October 2014)
1-2 Simple Image Quality Adjustment Tool
Installation and Adjustments Guide
Table of Contents
1 Simple Image Quality Adjustment (SIQA) Tool Overview ................. |
1-1 |
When to Use the SIQA Tool..................................................................................................................... |
1-1 |
Adjustment Procedure Definitions ....................................................................................................... |
1-1 |
Auto Alignment Adjustment........................................................................................................... |
1-1 |
Density Uniformity Adjustment.................................................................................................... |
1-1 |
Image Orientation Definitions............................................................................................................... |
1-2 |
2 SIQA Software Installation............................................................................... |
2-1 |
System Requirements................................................................................................................................. |
2-1 |
Installing the SIQA Tool Software on a PC ...................................................................................... |
2-2 |
Printing the SIQA Black Paper Image File ........................................................................................ |
2-7 |
Setting Up Communication between the SIQA Application and the Print Engine....... |
2-8 |
Setting Up and Running SIQA Software on a Third-Party PC Through DMP |
|
Controller.................................................................................................................................................. |
2-8 |
Setting Up and Running SIQA Software on an EX Print Server.................................... |
2-10 |
Setting Up and Running SIQA Software on a PC via an EX Print Server or |
|
Integrated Fiery Color Server ....................................................................................................... |
2-13 |
Setting Up and Running SIQA Software on a PC when a FreeFlow Print Server is |
|
Installed .................................................................................................................................................. |
2-16 |
3 |
Accessing C60/C70 SIQA Through EFI (Bustle and Standalone) |
...3-1 |
|
System Requirements................................................................................................................................. |
3-1 |
|
Procedure.......................................................................................................................................................... |
3-1 |
4 |
Accessing C60/C70 SIQA Through FFPS (Bustle)................................... |
4-1 |
|
System Requirements................................................................................................................................. |
4-1 |
|
Procedure.......................................................................................................................................................... |
4-1 |
5 |
Auto Alignment Adjustment ............................................................................ |
5-1 |
|
Performing Auto Alignment Adjustment .......................................................................................... |
5-1 |
|
Assigning a Type to a Paper Tray ....................................................................................................... |
5-18 |
|
Modifying a Type........................................................................................................................................ |
5-21 |
|
Deleting a Type ........................................................................................................................................... |
5-23 |
6 |
Density Uniformity Adjustment ..................................................................... |
6-1 |
7 |
Uninstalling the SIQA Tool ............................................................................... |
7-1 |
Simple Image Quality Adjustment Tool |
iii |
|
Installation and Adjustments Guide |
|
|
Table of Contents |
|
Uninstalling the SIQA Tool Using Windows® Vista/7 ................................................................. |
7-1 |
Uninstalling the SIQA Tool Using Windows® 8.1.......................................................................... |
7-5 |
8 Troubleshooting ..................................................................................................... |
8-1 |
If the Connection Between SIQA and the Machine is Lost...................................................... |
8-1 |
If the Connection Between SIQA and the Machine is Unsuccessful ................................... |
8-2 |
If the Adjustment Values are not Saved to the Machine.......................................................... |
8-5 |
If SIQA Cannot Make the Adjustments............................................................................................. |
8-6 |
ivSimple Image Quality Adjustment Tool Installation and Adjustments Guide
Simple Image Quality
Adjustment (SIQA) Tool
Overview
When to Use the SIQA Tool
Use the SIQA Tool in the following instances:
•When image alignment on duplex output requires correction
•When within page image density requires uniformity adjustment
Adjustment Procedure Definitions
Auto Alignment Adjustment
The Auto Alignment Adjustment procedure allows for correction of image placement between side 1 and side 2 images in duplex output. You can store up to 20 alignment adjustment profiles (Types) for use across all input trays. You can assign a different Type to each of the input trays, if desired.
Density Uniformity Adjustment
The Density Uniformity Adjustment procedure allows for uniform ink coverage between the inboard and outboard (see note below) sides of the printed output. Unlike Auto Alignment Adjustment, the profile you select applies to all input trays.
Simple Image Quality Adjustment Tool |
1-1 |
Installation and Adjustments Guide |
|

SIQA Software Installation
Image Orientation Definitions
Inboard and outboard are as follows:
–On the machine, inboard refers to the rear of the machine (the side farthest from you as you are using the machine) and outboard refers to the front (the side nearest you).
–On the printed output, as you hold the sheet with the top facing up, inboard refers to the left side of the sheet and outboard refers to the right side. The short black line indicates the top of the sheet.
Top (Lead Edge)
Inboard |
Outboard |
1-2 |
Simple Image Quality Adjustment Tool |
|
Installation and Adjustments Guide |
SIQA Software Installation
Important
The SIQA software must be installed before the Auto Alignment Adjustment and Density Uniformity Adjustment procedures can be performed.
The SIQA software installation process consists of the following:
•Installing the SIQA software on a PC
•Setting up communication between the SIQA software application and the print engine
This varies depending on the print server attached to your machine and whether or not a third-party PC is being used. For more information, refer to Setting Up Communication between the SIQA Application and the Print Engine on page 2-8.
System Requirements
The following requirements must be met before installing the SIQA software:
•A client PC with one of the following supported operating systems: Windows® Vista SP2, Windows® 7 SP1, or Windows® 8.1
The SIQA software must be installed on a separate Windows-based PC for the following:
–Xerox® standalone printer
–Xerox® EX Print Server, powered by Fiery® (standalone)
–Integrated Fiery® Color Server
•SIQA software media
–The SIQA software either on a USB drive or a DVD
–The SIQA Black Page PDF files, which reside either on the USB drive or the DVD
Note
The Power Save Mode timer should be set to a minimum of 60 minutes so the machine will not enter Sleep Mode during this procedure.
Simple Image Quality Adjustment Tool |
2-1 |
Installation and Adjustments Guide |
|

SIQA Software Installation
Installing the SIQA Tool Software on a PC
1.Connect the USB drive or insert the DVD into the target PC.
2.On the removable media, locate the file SIQA_ENG_v0104.zip or download it from www.xerox.com.
3.Copy the .zip file to PC or server desktop.
4.Open the.zip file and extract (copy) the PDF files to the folder location of your choice. Note
It is recommended that you create a new folder for the extracted files.
5.In the folder containing the extracted files, locate and double-click on the setup.exe file. Note
If prompted to allow the program to make changes to the computer, select Yes. The screen below may display. If it does, select Next to continue.
2-2 |
Simple Image Quality Adjustment Tool |
|
Installation and Adjustments Guide |

SIQA Software Installation
6.Click Next to accept the default destination directory.
7.At the License Agreement screen, select I accept the License Agreement(s). radio button, and then select Next.
Simple Image Quality Adjustment Tool |
2-3 |
Installation and Adjustments Guide |
|

SIQA Software Installation
The Start Installation window displays.
8.Click Next to continue.
A window displays the progress of the installation.
2-4 |
Simple Image Quality Adjustment Tool |
|
Installation and Adjustments Guide |
SIQA Software Installation
9.At the Installation Complete window, select Next.
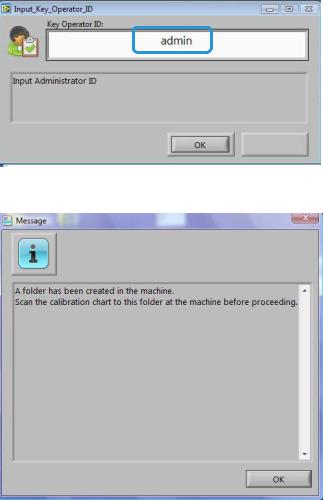
10. At the Message window, select OK.
Simple Image Quality Adjustment Tool |
2-5 |
Installation and Adjustments Guide |
|
SIQA Software Installation
11.If prompted to restart the computer to complete installation, select Restart. Otherwise, go to step 13.
12.If you restarted the PC, enter a username and password, if required.
13.Create a shortcut to the SIQA Tool on the PC desktop:
a.Windows® Vista/7
i)From the Start menu, select All Programs > Simple Image Quality Adjustment > SIQA.
ii)Drag the SIQA icon to the desktop to create the shortcut.
b.Windows® 8.1
i)Press the Windows key  and the Q key simultaneously.
ii)Type SIQA in the search box.
iii)Select the SIQA file from the results and select Open file location from the options at the bottom of the screen.
iv)Right-click on the file and select Send to > Desktop (create shortcut).
2-6 |
Simple Image Quality Adjustment Tool |
|
Installation and Adjustments Guide |
SIQA Software Installation
Printing the SIQA Black Paper Image
File
The SIQA Black Paper image files must be printed before using the Auto Alignment Adjustment procedure. These files are located on the CD-ROM or DVD-ROM or you may download them from www.xerox.com.
1.Open the PDF file SIQA Black Paper for Adjustment A3.pdf or SIQA Black Paper for Adjustment Tabloid.pdf.
2.Using duplex mode, print the image onto A3 or tabloid (11”x17”) paper with a media weight of 105 gsm or 163 gsm.
The printed output appears as follows: Tabloid (11”x17”)
Side 1 |
Side 2 |
A3
Side 1 |
Side 2 |
Simple Image Quality Adjustment Tool |
2-7 |
Installation and Adjustments Guide |
|

SIQA Software Installation
Setting Up Communication between the SIQA Application and the Print Engine
Setting up communication between the SIQA software application and the print engine varies depending on the print server that is attached to the machine and whether or not a third-party PC is being used. The procedures provided here include how to set up and run the SIQA software on the following:
•Third-party PC through DMP Controller
•EX Print Server (Fiery standalone)
Requires keyboard, monitor and mouse options.
•Third-party PC via an EX Print Server or an Integrated Fiery Color Server
•Third -party PC when a FreeFlow Print Server is installed Note
For more information on connectivity, refer to Troubleshooting on page 8-1.
Setting Up and Running SIQA Software on a Third-Party PC Through DMP Controller
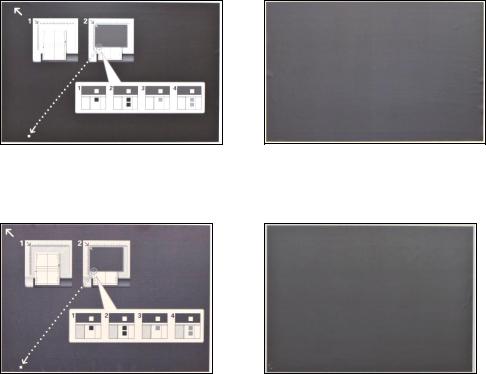
1.At the print engine UI record the machine’s IP address by selecting Machine Status > Device Information.
2.From the PC desktop, double-click the SIQA icon.
The Input_Communication_Parameters window displays.
3.If necessary, enter the printer IP address, and then select OK.
2-8 |
Simple Image Quality Adjustment Tool |
|
Installation and Adjustments Guide |
SIQA Software Installation
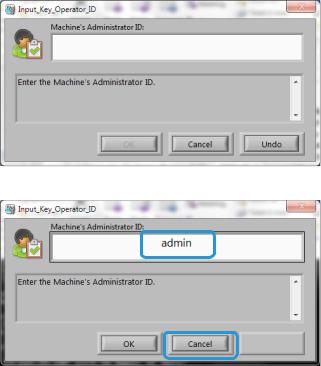
The Input_Key_Operator_ID window displays.
4.Enter admin as the key operator ID and select OK.
Simple Image Quality Adjustment Tool |
2-9 |
Installation and Adjustments Guide |
|
SIQA Software Installation
Setting Up and Running SIQA Software on an EX Print Server
1.Ensure that the cross-over Ethernet cable is installed and connected between the EX Print Server and the print engine.
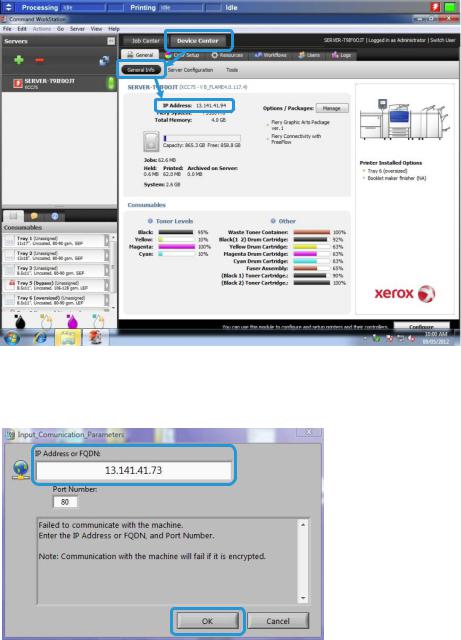
2.From the EX Print Server locate the printer IP address by selecting Command Workstation > Device Center > General Info.
3.Record the print server IP address.
4.From the print server desktop, double-click the SIQA icon. The Input_Communication_Parameters window displays.
5.If necessary, enter the printer IP address, and then select OK.
2-10 |
Simple Image Quality Adjustment Tool |
|
Installation and Adjustments Guide |

SIQA Software Installation
The Input_Key_Operator_ID window displays.
6.Enter admin as the key operator ID and select OK.
The window below displays indicating that the connection between the SIQA Tool and the machine was successful and that a folder has been created on the print engine hard drive.
Note
To confirm the folder creation, go to the printer and select Send from Folder on the home screen and select <folder 190>. The newly-created folder name is SYSTEM-IQ-AUTO. If the folder does not exist in Send from Folder, repeat steps 4 through 6 above.
Simple Image Quality Adjustment Tool |
2-11 |
Installation and Adjustments Guide |
|

SIQA Software Installation
Note
If the Tool displays the message: “Failed to communicate with the machine. Do you want to try again?” click No and follow the instructions in If the Connection Between SIQA and the Machine is on page 8-1.
7.Select OK.
The main SIQA window displays. The Auto Alignment Adjustment and/or Density Uniformity Adjustment procedures are now available. Use the down arrow in the Image Quality Adjustment box to select a procedure.
2-12 |
Simple Image Quality Adjustment Tool |
|
Installation and Adjustments Guide |

SIQA Software Installation
Setting Up and Running SIQA Software on a PC via an EX Print
Server or Integrated Fiery Color Server
1.Ensure that the cross-over Ethernet cable is installed and connected between the print server and the print engine.
2.From the print server, access and record the IP address of the EFI server.
3.From the PC desktop, double-click the SIQA icon.
The Input_Communication_Parameters window displays.
4.Enter the printer IP address and select OK.
The Input_Key_Operator_ID window displays.
Simple Image Quality Adjustment Tool |
2-13 |
Installation and Adjustments Guide |
|
SIQA Software Installation
5.If necessary, enter admin as the key operator ID, and then select OK.
The window below displays indicating that the connection between the SIQA Tool and the machine was successful and that a folder has been created on the print engine hard drive.
Note
To confirm the folder creation, go to the printer and select Send from Folder on the home screen and select <folder 190>. The newly-created folder name is SYSTEM-IQ-AUTO. If the folder does not exist in Send from Folder, repeat steps 3 through 5 above.
Note
If the Tool displays the message: “Failed to communicate with the machine. Do you want to try again?” click No and follow the instructions in If the Connection Between SIQA and the Machine is Unsuccessful on page 8-1.
2-14 |
Simple Image Quality Adjustment Tool |
|
Installation and Adjustments Guide |
SIQA Software Installation
6.Select OK.
The main SIQA window displays. The Auto Alignment Adjustment and/or Density Uniformity Adjustment procedures are now available. Use the down arrow in the Image Quality Adjustment box to select a procedure.
Simple Image Quality Adjustment Tool |
2-15 |
Installation and Adjustments Guide |
|

SIQA Software Installation
Setting Up and Running SIQA Software on a PC when a
FreeFlow Print Server is Installed
1.Ensure that the hub is installed and that the three Ethernet cables are connected to the following:
–One cable from the wall drop to the hub
–One cable from the hub to the FreeFlow Print Server
–One cable from the hub to the print engine
2.At the print engine UI record the machine’s IP address by selecting Machine Status > Machine Information.
3.From the PC desktop, double-click the SIQA icon.
The Input_Communication_Parameters window displays.
4.Enter the printer IP address and select OK.
5.If necessary, enter admin as the key operator ID, and then select OK.
2-16 |
Simple Image Quality Adjustment Tool |
|
Installation and Adjustments Guide |

SIQA Software Installation
The window below displays indicating that the connection between the SIQA Tool and the machine was successful and that a folder has been created on the print engine hard drive.
Note
To confirm the folder creation, go to the printer and select Send from Folder on the home screen and select <folder 190>. The newly-created folder name is SYSTEM-IQ-AUTO. If the folder does not exist in Send from Folder, repeat steps 3 through 5 above.
Note
If the Tool displays the message: “Failed to communicate with the machine. Do you want to try again?” click No and follow the instructions in If the Connection Between SIQA and the Machine is Unsuccessful on page 8-1.
Simple Image Quality Adjustment Tool |
2-17 |
Installation and Adjustments Guide |
|

SIQA Software Installation
6.Select OK.
The main SIQA window displays. The Auto Alignment Adjustment and/or Density Uniformity Adjustment procedures are now available. Use the down arrow in the Image Quality Adjustment box to select a procedure.
2-18 |
Simple Image Quality Adjustment Tool |
|
Installation and Adjustments Guide |

Accessing C60/C70 SIQA
Through EFI (Bustle and
Standalone)
Once the SIQA Tool has been installed on a client PC, you can access the C60/C70 through EFI Bustle or EFI Standalone with via the bustle or standalone IP address.
System Requirements
A client PC with one of the following supported operating systems:
•Windows® Vista SP2
•Windows® 7 SP1
•Windows® 8.1
Procedure
1.Install the SIQA Tool. Refer to Installing the SIQA Tool Software on a PC on page 2-2.
2.Obtain the IP address from the EFI (Bustle or Standalone) from the EX-I Fiery Color Server configuration sheet.
3.Launch the SIQA tool.
4.Enter the IP address, and then select OK.
Simple Image Quality Adjustment Tool |
3-1 |
Installation and Adjustments Guide |
|
Accessing C60/C70 SIQA Through EFI (Bustle and Standalone)
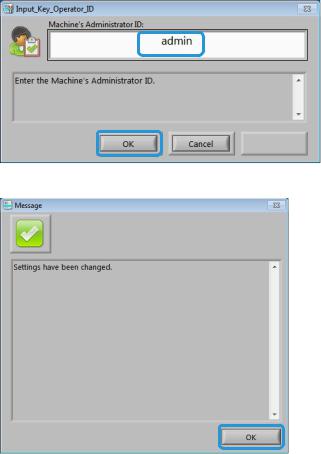
5.Enter admin as the Machine Administrator’s ID, and select OK.
6.Click OK at the Message screen.
3-2 |
Simple Image Quality Adjustment Tool |
|
Installation and Adjustments Guide |
Loading...