


 Loading...
USER’S GUIDE
Model: BLINK1-R, BLINK1-S BLINK1-W, BLINK1-B
Wi-Fi® Video Baby Monitor Camera
The features described in this user’s guide are subject to modifications without prior notice.
|
|
|
|
|
|
|
|
|
|
|
|
|
|
|
|
|
|
|
|
|
|
|
|
|
|
|
|
NK1_USA_V3_2013_04_18.indd 1 |
|
18/4/13 2:08 PM |
||||
Welcome...
to your new Motorola Baby Monitor Camera!
Thank you for purchasing the BLINK1 Wi-Fi® Video Baby Monitor Camera. Now you can see and hear your baby sleep in its room or you can monitor your older children in their playroom. You can set up the camera only from your iPhone®/iPad® or devices for Android™ and view the camera video from your PC or Notebook, as well as devices for Android™ or iPhone®/iPad®.
Please keep your original dated sales receipt for your records. For warranty service of your Motorola product, you will need to provide a copy of your dated sales receipt to confirm warranty status. Registration is not required for warranty coverage.
For product related questions, please call:
US and Canada 1-888-331-3383
This User’s Guide has all the information you need to get the most out of your product.
Please read the Safety Instructions on page 5 - 6 before you install the unit.
Inside the Box
•1 x Wi-Fi® Camera Unit (in either red, silver, white or black)
•1 x Power Adapter
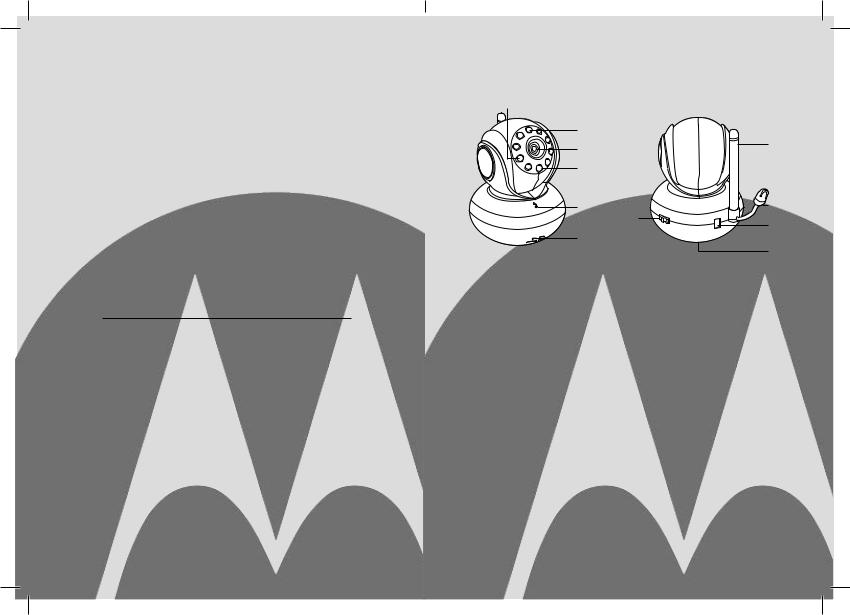
Overview of your Camera
1
2 |
|
3 |
8 |
|
|
4 |
|
5 |
7 |
9 |
|
10 |
|
6 |
|
|
|
11 |
|
|
|
|
1. Photo Sensor |
6. |
Speaker |
(for night mode detection) |
7. |
ON/OFF Switch |
2.Infrared LEDs (for night vision) 8. Antenna
3. |
Camera Lens |
9. |
Temperature Sensor |
4. |
Power/Status LED |
10. |
Power Adapter Connector |
5. |
Microphone |
11. |
Reset Button |
Important guidelines for installing your Wi-Fi® Camera Unit
•Use of other 2.4GHz products, such as other wireless networks, Bluetooth® systems or microwave ovens may cause interference with this product. Keep the Wi-Fi® Camera Unit away from these types of products, or turn them off if they appear to be causing interference.
•Always ensure that you have a good Wi-Fi® connection available.
BLINK1_USA_V3_2013_04_18.indd 2-3 |
|
18/4/13 2:08 PM |
|
||
|
|
|
created by: Pro. Q.C. Systems Design Limited
Table of Contents
1. |
Safety Instructions .......................................................................... |
5 |
|
2. |
System Requirements..................................................................... |
7 |
|
3. |
Getting started - Connecting Devices ........................................... |
8 |
|
|
3.1 |
Setup .......................................................................................... |
8 |
|
3.2 User Account and Camera Setup: |
|
|
|
|
Working with devices for Android™......................................... |
9 |
|
3.3 User Account and Camera Setup: |
|
|
|
|
Working with iPhone®/iPad®................................................... |
13 |
4. |
Camera ........................................................................................... |
19 |
|
|
4.1 |
Connecting the Camera to Power.......................................... |
19 |
|
4.2 |
Camera Functions: |
|
|
|
Working with PC/Notebook.................................................... |
19 |
|
4.3 |
Viewing another Camera: |
|
|
|
Working with PC/Notebook.................................................... |
21 |
|
4.4 |
Camera Functions: |
|
|
|
Working with devices for Android™....................................... |
22 |
|
4.5 Adding another Camera: |
|
|
|
|
Working with devices for Android™....................................... |
25 |
|
4.6 |
Camera Functions: |
|
|
|
Working with iPhone®/iPad®................................................... |
28 |
|
4.7 Adding another Camera: |
|
|
|
|
Working with iPhone®/iPad®................................................... |
31 |
5. |
Procedure for resetting the Camera ............................................ |
31 |
|
6. |
Help................................................................................................. |
32 |
|
7. |
General Information ...................................................................... |
42 |
|
8. |
Technical Specifications............................................................... |
49 |
|
4 |
Table of Contents |
1. Safety Instructions |
ENGLISH |
|
|
WARNING: |
|
STRANGULATION HAZARD - Keep the unit and |
|
|
|
adapter cord more than 3 feet from the crib and |
|
out of baby’s reach. |
|
NEVER place Wi-Fi® camera or cords within the crib.
Secure the cord more than 3 feet away from baby’s reach. Never use extension cords with AC Adapters. Only use the AC Adapters provided.
Wi-Fi® CAMERA UNIT SET UP & USE:
•Determine a location for the Wi-Fi® Camera Unit that will provide the best view of your baby in the crib.
•Place the Wi-Fi® &DPHUD 8QLW RQ D IODW VXUIDFH VXFK DV Ddresser, bureau, or shelf, or wall-mount it using the keyhole slot in the base.
•Do not place the Wi-Fi®camera or cords in the crib or within reach of the baby (the unit and cords should be more than 3 feet away).
•Secure the cord to the wall to keep cord away from the baby’s reach.
WARNING
This Wi-Fi® Camera Unit is compliant with all relevant
described in the User’s Guide, safe to use. Therefore, always read the instructions in this User’s Guide carefully before using the device.
Safety Instructions |
5 |
BLINK1_USA_V3_2013_04_18.indd 4-5 |
|
18/4/13 2:08 PM |
|
||
|
|
|

created by: Pro. Q.C. Systems Design Limited
•Adult assembly is required. Keep small parts away from children when assembling.
•This product is not a toy. Do not allow children to play with it.
•This Wi-Fi® Camera Unit is not a substitute for responsible adult supervision.
•Keep this user’s guide for future reference.
•Do not place the Wi-Fi® Camera Unit or cables in the crib or within reach of the baby (the unit should be at least 3 feet away).
•Keep the cords out of reach of children.
•Do not cover the Wi-Fi® Camera Unit with a towel or blanket.
•Test the Wi-Fi® Camera Unit and all its functions so that you are familiar with it prior to use.
•Do not use the Wi-Fi® Camera Unit near water.
•Do not install the Wi-Fi® Camera Unit near a heat source.
•Only use the power adapter provided. Do not use other power adapters as this may damage the device.
•Never use extension cords with power adapters.
•Do not touch the plug contacts with sharp or metal objects.
6 |
Safety Instructions |
2. System Requirements
Web Portal
•Windows® system XP SP3 or above
•Mac OS® version 10.7 or above
•Internet Explorer® version 8.0 or above
•Firefox® version 11.0 or above
•Chrome™ version 18.0 or above
•Safari® version 5.1 or above
•Java™ version 7 or above
Android™ System
•Version 2.3.6 or above iPhone®/iPad® iOS
•Version 4.3 or above
System Requirements
ENGLISH
7
BLINK1_USA_V3_2013_04_18.indd 6-7 |
|
18/4/13 2:08 PM |
|
||
|
|
|

created by: Pro. Q.C. Systems Design Limited
3. Getting started - Connecting Devices
How does it work?
Access your
camera locally View your camera from any device remotely
•The Monitor Everywhere Server keeps track of the cameras.
•When a user wants to access the camera, the server authenticates the user and permits the user access to the camera.
3.1 Setup
Connect the Camera to the power adapter and plug it into a power socket. Wait until the camera LED changes to fast
blinking, which means that camera is in reset/setup state and camera is ready for ‘Camera Setup’ registration. The Camera must be within range of the Wi-Fi® router with which you want it to link.
Status of LED Indication:
- Reset / Setup state: |
fast blinking |
- Unconnect state: |
slow blinking |
- Connect state: |
always on |
8 |
Getting started |
3.2 User Account and Camera Setup: |
ENGLISH |
|
Working with devices for Android™ |
||
|
||
• Download and install the application “Monitor Everywhere” |
|
|
from the Google Play™ Store. Note: If you can’t find the |
|
|
|
||
application, then use your device browser to go to |
|
|
www.monitoreverywhere.com for advice on how to install. |
|
|
• Turn on the Wi-Fi® of your device for Android™ and select |
|
|
your wireless network. |
|
|
• Switch on the camera (see 5. Procedure for resetting the |
|
|
Camera). |
|
|
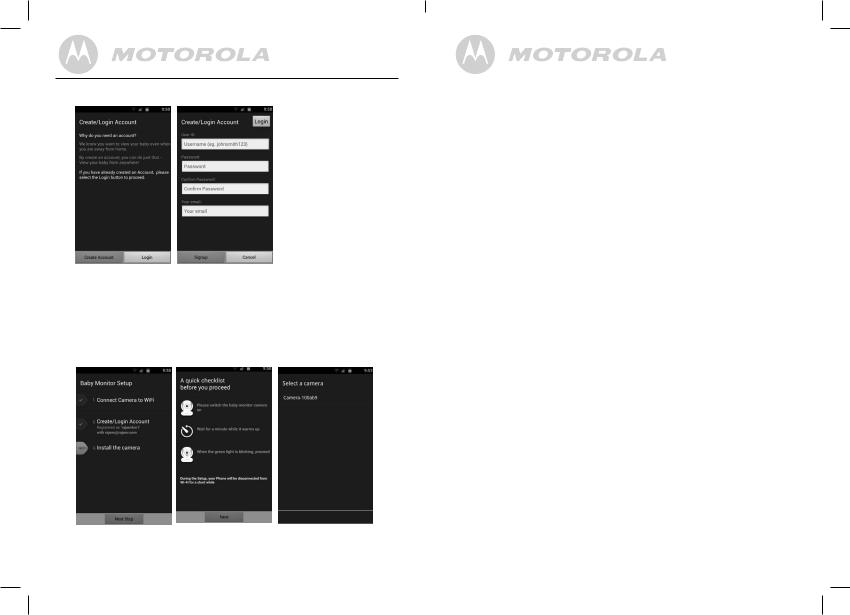
• Run the “Monitor Everywhere” application. After initialization, |
|
|
the Baby Monitor Setup wizard appears. |
|
|
• Select CREATE ACCOUNT. |
|
•Select GET STARTED.
•Follow the on-screen instructions and select the camera and the Wi-Fi® connection that your camera can use. If necessary enter a password.
•Tap CONNECT TO Wi-Fi.
Getting started: Working with devices for Android™ |
9 |
BLINK1_USA_V3_2013_04_18.indd 8-9 |
|
18/4/13 2:08 PM |
|
||
|
|
|
created by: Pro. Q.C. Systems Design Limited
•Tap NEXT STEP.
•Select CREATE ACCOUNT.
•Enter a user name, a password, an e-mail address and select SIGN UP.
•Agree with the terms of use and select I AGREE.
•Tap NEXT STEP.
• Follow the on screen checklist to ensure that your camera |
ENGLISH |
|
|
is power connected and tap NEXT. |
|
• Select the camera from the list. |
|
If you cannot find the camera ID on the list, please reset the |
|
|
|
camera with the following procedure: |
|
1.Switch the ON/OFF switch to ON.
2.Press and hold the RESET button on the underside of the camera for 5 seconds, until you hear a beep sound.
3.Release the RESET button and wait for the camera to complete the internal reset procedure.
4.After about 60 seconds you will hear two short beeps and the green LED starts blinking.
•Wait for up to five minutes. If the connection process takes longer, tap CANCEL and try again.
•Ensure that you have a good Wi-Fi network connection.
10 |
Getting started: Working with devices for Android™ |
Getting started: Working with devices for Android™ |
11 |
BLINK1_USA_V3_2013_04_18.indd 10-11 |
|
18/4/13 2:08 PM |
|
||
|
|
|
Limited |
|
|
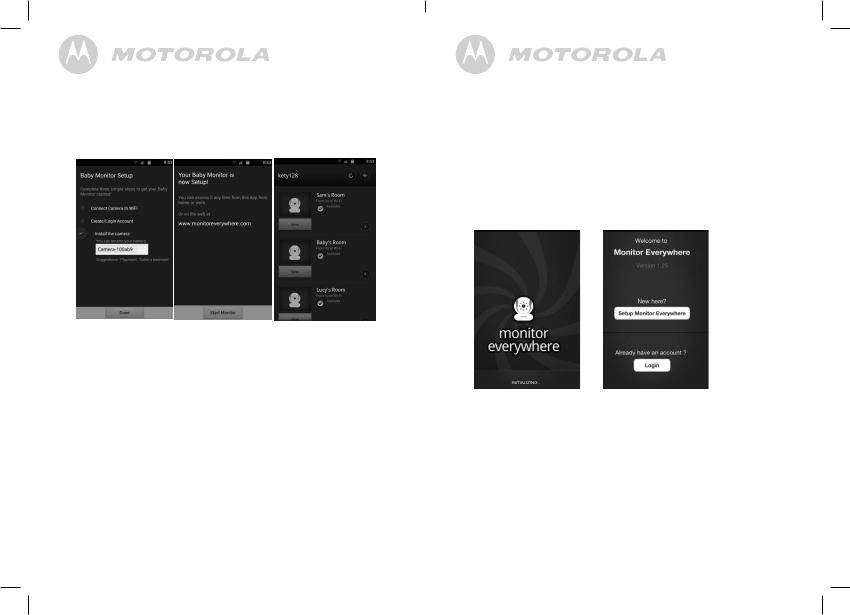
• Once your camera is installed, you can rename it. |
||
Design |
||
• Tap DONE. |
||
SystemsQ.C.Pro. |
• Tap START MONITOR to show the camera view. |
|
• Tap VIEW to show the camera view and the controls. |
||
|
||
created by: |
|
Note:
The Camera SSID is printed on the label on the bottom of the Camera, for example: ID: Camera-1006fa
On your devices for Android™ you will see: Camera-1006fa.
3.3 User Account and Camera Setup: |
ENGLISH |
Working with iPhone®/iPad® |
|
• Install the application “Monitor Everywhere” from the |
|
App StoreSM. Note: If you can’t find the application, then use |
|
|
|
your device browser to go to www.monitoreverywhere.com |
|
for advice on how to install. |
|
• Run the “Monitor Everywhere” application and follow the |
|
screen number sequence: |
|
S1 |
S2 |
•Select Setup Monitor Everywhere (pictures S1, 2).
12 |
Getting started: Working with devices for Android™ |
Getting started: Working with iPhone®/iPad® |
13 |
BLINK1_USA_V3_2013_04_18.indd 12-13 |
|
18/4/13 2:08 PM |
|
||
|
|
|

created by: Pro. Q.C. Systems Design Limited
S3
•Tap Continue (picture S3).
•Switch on the camera (see 5. Procedure for resetting the Camera) and follow the on-screen instructions.
S4
•Tap Continue (picture S4).
14 |
Getting started: Working with iPhone®/iPad® |
ENGLISH
S5 |
S6 |
•On your iPhone® or iPad®, under Settings select Wi-Fi, then select the camera from the network list and wait until it is connected (pictures S5, 6).
•Run the “Monitor Everywhere’ app again.
Note: The Camera SSID is printed on the label on the bottom of the Camera, for example: ID: Camera-1006fa. On your iPhone®/iPad®, you will see: Camera-1006fa.
S7 S8
Getting started: Working with iPhone®/iPad® |
15 |
BLINK1_USA_V3_2013_04_18.indd 14-15 |
|
18/4/13 2:08 PM |
|
||
|
|
|
Loading...