


Motorola C6
Digital Cordless Phone
For C601, C602, C603 and C604
Warning
Charge the handset for 24 hours before use.

Welcome...
to your new Motorola C6 Digital Cordless Phone!
•All handsets are fully cordless for locating anywhere within range.
•50 Name and Number phonebook.
•Speakerphone for hands-free conversations.
•Caller ID shows you who’s calling and see details of the last 40 callers in a Calls list.*
•Redial up to 10 of the last numbers called.
•Register up to 5 handsets to a single base and register each handset with up to 4 different bases.
•Make internal calls and transfer external calls between handsets.
•Choose from 10 different ringer melodies for internal and external calls as well as numbers stored in the phonebook.
*You must subscribe to your network provider’s Caller ID or Call Waiting service for these features to work. A subscription fee may be payable.
Please note that this equipment is not designed for making emergency telephone calls when the power fails. Alternative arrangements should be made for access to emergency services.
Need help?
If you have any problems setting up or using your C6, please contact Customer Services on
(65) 68412668.
Email: support@alcom.com.sg
Alternatively, you may find the answer in the ‘Help’ section at the back of this guide.

This User Guide provides you with all the information you need to get the most from your phone.
Before you make your first call, you need to set up your phone. Follow the simple instructions in ‘Getting Started’, on the next few pages.
IMPORTANT
Only use the telephone line cord supplied.
This equipment is not designed for making emergency telephone calls when the power fails. Alternative arrangements should be made for access to emergency services.
Got everything?
•C6 handset
•C6 base
•User guide
•2 x AAA NiMH rechargeable batteries
•Power adaptor for the base
•Telephone line cord
If you have purchased a C6 multiple pack you will also have the following additional items:
•C6 handset & charger
•2 x AAA NiMH rechargeable batteries
•Power adaptor for the charger

1. |
Getting started ................................................ |
6 |
||
2. Getting to know your phone .......................... |
9 |
|||
3. |
Using the phone............................................ |
13 |
||
|
3.1 |
Switch the handset on / off ................................ |
13 |
|
|
3.2 |
Calls................................................................... |
|
13 |
|
|
3.2.1 |
Make a call ............................................ |
13 |
|
|
3.2.2 |
Preparatory dialling ............................... |
13 |
|
|
3.2.3 |
End a call .............................................. |
13 |
|
|
3.2.4 |
Receive a call ........................................ |
13 |
|
3.3 |
Adjust the earpiece volume ............................... |
13 |
|
|
3.4 |
Secrecy.............................................................. |
13 |
|
|
3.5 |
Intercom............................................................. |
14 |
|
|
|
3.5.1 Make an internal call ............................. |
14 |
|
|
|
3.5.2 Receive an internal call ......................... |
14 |
|
|
|
3.5.3 |
Transfer a call ....................................... |
14 |
|
|
3.5.4 |
3-way conference call ........................... |
14 |
|
3.6 |
Hands-free speakerphone ................................. |
15 |
|
|
|
3.6.1 Make a hands-free call .......................... |
15 |
|
|
|
3.6.2 Answer a call hands-free ...................... |
15 |
|
|
|
3.6.3 Switch to hands-free during a call ......... |
15 |
|
|
3.7 |
Redial ................................................................ |
|
15 |
|
|
3.7.1 View or dial an entry ............................. |
15 |
|
|
|
3.7.2 Copy a Redial list number to |
|
|
|
|
|
the phonebook ...................................... |
15 |
|
|
3.7.3 |
Delete an entry ...................................... |
16 |
|
|
3.7.4 Delete the entire Redial list ................... |
16 |
|
|
3.8 |
Lock/unlock the keypad...................................... |
16 |
|
3.9 |
Paging/Find handset .......................................... |
16 |
4. |
Phonebook.................................................... |
17 |
|
|
4.1 |
Store a name and number.................................. |
17 |
|
4.2 |
View or dial an entry........................................... |
17 |
|
4.3 |
Edit a name and number .................................... |
18 |
|
4.4 |
Delete an entry ................................................... |
18 |
5. |
Handset settings .......................................... |
19 |
|
|
5.1 |
Handset ringer volume ....................................... |
19 |
|
5.2 |
Handset ringer melody ....................................... |
19 |
|
5.3 |
Auto answer ....................................................... |
19 |
|
5.4 |
Handset name .................................................... |
19 |
|
5.5 |
Language ........................................................... |
20 |
|
5.6 |
Key beep ............................................................ |
20 |
|
5.7 |
Battery low warning beep ................................... |
20 |
|
5.8 |
Out of range warning beep................................. |
20 |
|
5.9 |
Keypad lock using the menu .............................. |
21 |
6. |
Base settings ................................................ |
21 |
|
|
6.1 |
Base ringer volume ............................................ |
21 |
|
6.2 |
Base ringer melody ............................................ |
21 |
|
6.3 |
Change base PIN code ...................................... |
22 |
|
6.4 |
Dial mode ........................................................... |
22 |
|
6.5 |
Recall mode ....................................................... |
22 |
|
6.6 |
Restore default settings...................................... |
22 |
|
6.7 |
Emergency default ............................................. |
23 |
4

|
6.8 |
Eco mode ........................................................... |
23 |
|
6.9 |
Default settings .................................................. |
24 |
7. |
Clock & alarm............................................... |
24 |
|
|
7.1 |
Set the date........................................................ |
24 |
|
7.2 |
Set the time ........................................................ |
24 |
|
7.3 |
Set alarm............................................................ |
25 |
|
7.4 |
Switch off alarm ring........................................... |
25 |
8. Caller ID and the Calls list........................... |
25 |
||
|
8.1 |
Caller ID ............................................................. |
25 |
|
8.2 |
Calls list.............................................................. |
26 |
|
|
8.2.1 View the Calls list .................................. |
26 |
|
|
8.2.2 Dial a number in the Calls list ................ |
26 |
|
|
8.2.3 Modify and dial a number in the |
|
|
|
Calls list ................................................. |
26 |
|
|
8.2.4 Copy a Calls list number to |
|
|
|
the phonebook ....................................... |
27 |
|
|
8.2.5 Delete an entry ...................................... |
27 |
|
|
8.2.6 Delete the entire Calls list ...................... |
27 |
9. |
Using additional handsets .......................... |
28 |
|
|
9.1 |
Registering an additional handset...................... |
28 |
|
9.2 |
Register a different make of handset to |
|
|
|
your C6 base...................................................... |
29 |
|
9.3 |
Select a base ..................................................... |
29 |
|
9.4 |
De-register a handset......................................... |
29 |
10. |
Help................................................................ |
30 |
11. |
General information ..................................... |
31 |
5
1. Getting started
WARNING
Do not place your C6 in the bathroom or other humid areas.
Location
You need to place your C6 base within 2 metres of the mains power and telephone wall sockets so that the cables will reach. The socket-outlet shall be installed near the equipment and shall be easily accessible.
Make sure that it is at least 1 metre away from other electrical appliances to avoid interference. Your C6 works by sending radio signals between the handset and base. The strength of the signal depends on where you place the base. Placing it as high as possible ensures the best signal.
HANDSET RANGE
The unit has a range of up to 300 metres outdoors when there is a clear line of sight between the base and handset. Any obstruction between the base and handset will reduce the range significantly. With the base indoors and the handset either indoors or outdoors, the range will normally be up to 50 metres. Thick concrete walls can severely affect the range.
SIGNAL STRENGTH
The  icon on your handset indicates that you are within range of the base. When out of range of the base, the
  icon flashes. If you are on a call, you will hear a warning beep.
6
The line will hang up if the handset moves out of range of the base. Move closer to the base. The handset will automatically reconnect to the base.
Setting up
IMPORTANT
The base station must be plugged into the mains power at all times. Do not connect the telephone line cord into the wall socket until the handset is fully charged. Use only the power adaptor and telephone line cord supplied with the product.
WHICH POWER ADAPTOR?
The power adaptor with a clear connecter is for the base unit and the power adaptor with a red colour connecter is for the charger unit (for multi-pack only).
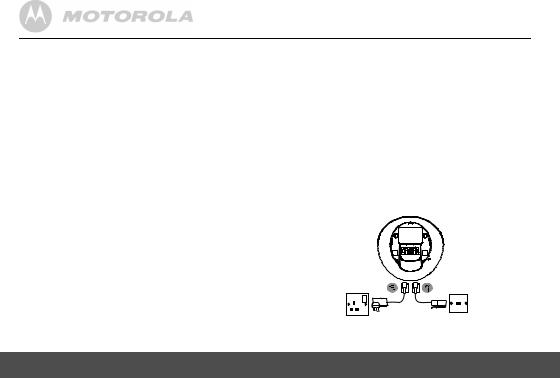
Connecting the base
1.Plug the telephone line cord into the socket marked
 on the underside of the base.
Getting started

2.Plug the power adaptor with clear connecter into the socket marked  on the underside of the base and plug the other end into the mains power wall socket. Switch on the mains power.
Installing and charging the handset
Remove the battery cover from the back of the handset and insert the 2 x AAA NiMH rechargeble batteries supplied. Please note the ’+’ and ’-’ markings inside the battery compartment and insert in the correct direction.
3.Slide the battery cover back into place.
4.If you are charging the batteries for the first time, place the handset on the base to charge for at least 24 hours continuously.
5.When the handset is fully charged,  icon will appear steadily on the display. Plug the other end of the telephone line cord (make sure that one end is already plugged into the base) into the telephone wall socket.
Connecting the handset and charger (for multi-pack only)
If you have purchased a multiple pack, you will need to carry out this process for all the handsets and chargers.
1.Plug the power adaptor with red connecter into the socket marked  on the underside of the charger and plug the other end into the mains power wall socket.
2.Remove the battery cover from the back of the handset and insert the 2 x AAA NiMH rechargeble batteries supplied. Please note the ’+’ and ’-’ markings inside the battery compartment and insert in the correct direction.
3.Slide the battery cover back into place.
4.If you are charging the batteries for the first time, place the handset on the charger to charge for at least 24 hours continuously.
5.When the handset is fully charged,  icon will appear steadily on the display.
The display will show the time and handset number (e.g. 2) to indicate that it is registered to the base.
IMPORTANT
Warning! Use only the approved rechargeable Ni-MH battery cells (2 x AAA Ni-MH 550mA rechargeable batteries) supplied with your C6.
Getting started |
7 |
|
|

BATTERY LOW WARNING
If  icon flashes on the display and you hear a warning beep every minute during a call, you will need to recharge the handset before you can use it again.
When charging,  icon will scroll on the display.
BATTERY PERFORMANCE
In ideal conditions, fully charged batteries should give up to 12 hours talk time and up to 250 hours standby time on a single charge*.
Note that new batteries do not reach their full capacity until they have been put to normal use for several days.
To keep your batteries in the best condition, leave the handset off the base for a few hours at a time.
Running the batteries right down at least once a week will help them last as long as possible.
The charge capacity of rechargeable batteries will reduce with time as they wear out, giving the handset less talk/ standby time. Eventually they will need to be replaced.
After charging your handset for the first time, subsequent charging time is about 6–8 hours a day. Batteries and handset may become warm during charging. This is normal.
* All talk and standby times are approximate and depend on features selected and usage pattern.
Date and time
If you have subscribed to Caller ID Service, the date and time is set automatically for all handsets when you receive your first call.
If you do not have Caller ID service, you can set the date and time manually.
Set the date manually
1.Press m, scroll dto DATE-TIME and press m. The display shows DATE SET.
2.Press mto select.
3.Enter the date (e.g. 12--08 for 12th of August) and press mto confirm.
Set the time manually
1.Press m, scroll dto DATE-TIME and press m.
2.Scroll dto CLOCK SET and pressm.
3.Enter the time in 24 hour format (e.g. 18--30 for 6:30pm) and press mto confirm.
Your C6 is now ready for use.
8 |
Getting started |
|
|

2. Getting to know your phone
Overview of your handset
A
B
A Earpiece
BDisplay
See page 10 for an overview of the display icons.
CSecrecy / Clear / Back
During a call, press to switch Secrecy on/off, page 13.
In menu mode, press to return to previous menu or press and hold to return to standby.
In editing mode, press to delete characters and digits. When viewing the redial/calls list, press to delete the displayed entry or press and hold to delete all entries.
DMenu / OK
Press to open the Menu, page 11.
Press to select menu options and to confirm a displayed option.
E |
Redial / Up |
C |
In standby mode, press to open the redial list, page 15. |
D |
During a call, press to increase earpiece volume, page 13. |
|
|
E |
When the phone is ringing, press to increase the handset |
F |
ringer volume, page 19. |
G |
Press to scroll through the menu options, redial list, calls list |
|
|
H |
and phonebook entries. |
IF Calls list / Down
In standby mode, press to open the calls list, page 26. During a call, press to decrease earpiece volume, page 13. When the phone is ringing, press to decrease the handset ringer volume, page 19.
J Press to scroll through the menu options, redial list, calls list and phonebook entries.
K |
G |
Phonebook / Exit |
L |
|
In standby mode, press to open the phonebook menu, page 17. |
|
|
When viewing the redial/calls list or when editing, press to |
|
|
exit and return to standby. |
Getting to know your phone |
|
9 |

HHands-free
During a call, press to switch hands-free on and off, page 15.
ITalk / End call
Press to make, receive and end calls, page 13.
J* / Keypad lock
Press and hold to lock the keypad, page 16.
To unlock, press any key and follow the on screen instructions.
KIntercom
Used to make internal calls and transfer calls to other C6 handsets registered to the base, page 14.
LRecall / Power on/off
Use with switchboard/PABX services and some network services.
Press and hold to switch the handset on/off, page 13.
Handset LCD Display
Eco mode |
|
|
|
|
|
Battery |
Circle |
|
|
|
|
status |
|
|
|
|
|
|||
around |
|
|
|
|
Scrolls |
|
appears |
|
|
|
|
when |
|
when Eco |
|
|
|
|
charging |
|
mode is ON |
|
|
|
|
|
|
|
|
|
|
Time or Handset name |
||
In standby mode, press and hold 0to switch handset idle screen between handset name or time.
10
Display icons
Flashes to indicate an incoming external call
External call in progress
Flashes to indicate an incoming internal call
Internal call in progress
3-way call in progress or transfer an external call to another C6 handset registered to the base
Eco mode is ON
Flashes to indicate new voicemail messages received Off when you have no voicemail messages
Indicates signal strength
Flashes when handset is not registered to the base or if you go out of range
Hands-free mode is ON
Menu is opened
Phonebook is opened
Flashes to indicate new calls list entries received*
Answered call (when viewing the Calls list)*
Unanswered call (when viewing the Calls list)*
Getting to know your phone
Keypad is locked
Displayed number is longer than 12 digits
The approximate power levels of your battery are indicated as follows:
Battery is fully charged
Battery is partially charged
Battery is running low
Flashes when battery is almost fully discharged
* For this feature to work, you must subscribe to Caller ID Service from your network operator. A subscription fee may be payable.
Overview of the base
A
APaging Key
In standby mode, press to ring the handset(s), page 16. Press and hold to enter registration mode when registering handsets, page 28.
Navigating the menus
Your C6 has an easy to use menu system.
Each menu has a list of options, which you can see on the menu map on the following page.
When the handset is switched on and in standby:
1.Press mto open the main menu.
2.Then use uor dbuttons to scroll through the available options.
3.Press mto select an option.
To return to the previous menu level, press n.
To exit the menu and return to standby, press and hold n.
NOTE
If no buttons are pressed for 30 seconds, the handset returns to standby automatically.
Getting to know your phone |
11 |
|
|

Menu map
PHONEBOOK |
|
SETUP |
|
HANDSET |
|
DATE - TIME |
|
REGISTER |
ADD ENTRY |
|
BASE VOLUME |
|
BEEP |
|
DATE SET |
|
SELECT BASE |
MODIFY ENTRY |
|
BASE MELODY |
|
INT RING VOL |
|
CLOCK SET |
|
REG BASE |
DELETE ENTRY |
|
DEL HANDSET |
|
EXT RING VOL |
|
ALARM SET |
|
|
|
|
PIN CODE |
|
INT MELODY |
|
|
|
|
|
|
DIAL MODE |
|
EXT MELODY |
|
|
|
|
|
|
RECALL |
|
AUTO ANSWER |
|
|
|
|
|
|
DEFAULT |
|
NAME |
|
|
|
|
|
|
ECO MODE |
|
LANGUAGE |
|
|
|
|
|
|
|
|
KEYLOCK ? |
|
|
|
|
12 |
Getting to know your phone |
|
|
 Loading...