


Operating instructions
Oven |
H 350-2 B |
To prevent accidents and machine damage, read these instructions before installation or use.
UV
M.-Nr. 05 808 660

Contents
IMPORTANT SAFETY INSTRUCTIONS
Guide to the oven
Accessories . . . . . . . . . . . . . . . . . . . . . . . . . . . . . . . . . . . . . . . . . . . . . . . . . . . . . . . 9 Roasting pan and Anti-splash tray . . . . . . . . . . . . . . . . . . . . . . . . . . . . . . . . . . . 9 Wire rack. . . . . . . . . . . . . . . . . . . . . . . . . . . . . . . . . . . . . . . . . . . . . . . . . . . . . . . 9 Baking Trays . . . . . . . . . . . . . . . . . . . . . . . . . . . . . . . . . . . . . . . . . . . . . . . . . . . . 9 Grease filter . . . . . . . . . . . . . . . . . . . . . . . . . . . . . . . . . . . . . . . . . . . . . . . . . . . 10 Roast probe . . . . . . . . . . . . . . . . . . . . . . . . . . . . . . . . . . . . . . . . . . . . . . . . . . . 10
Controls . . . . . . . . . . . . . . . . . . . . . . . . . . . . . . . . . . . . . . . . . . . . . . . . . . . . . . . . . 11 Energy-Conservation feature . . . . . . . . . . . . . . . . . . . . . . . . . . . . . . . . . . . . . . . . . 12
Before using for the first time
Using the oven
Interrupting cooking / turning off the oven. . . . . . . . . . . . . . . . . . . . . . . . . . . . . . . 14 Adjusting the default temperature . . . . . . . . . . . . . . . . . . . . . . . . . . . . . . . . . . . . . 15 Entering a cooking time . . . . . . . . . . . . . . . . . . . . . . . . . . . . . . . . . . . . . . . . . . . . . 16 Checking, changing and deleting a cooking time. . . . . . . . . . . . . . . . . . . . . . . . . 16 Rapid heat . . . . . . . . . . . . . . . . . . . . . . . . . . . . . . . . . . . . . . . . . . . . . . . . . . . . . . . 17
To turn off "rapid heat". . . . . . . . . . . . . . . . . . . . . . . . . . . . . . . . . . . . . . . . . . . . 17 Customizing a temperature setting . . . . . . . . . . . . . . . . . . . . . . . . . . . . . . . . . . . . 18
Setting the timer
Guide to the programs
Baking
Roasting
Roasting tips . . . . . . . . . . . . . . . . . . . . . . . . . . . . . . . . . . . . . . . . . . . . . . . . . . . . . 26
Using the roast probe
Roasting Recommendations
Broiling
Broiling tips . . . . . . . . . . . . . . . . . . . . . . . . . . . . . . . . . . . . . . . . . . . . . . . . . . . . . . 33
Broiling Recommendations
Defrost
Defrosting tips . . . . . . . . . . . . . . . . . . . . . . . . . . . . . . . . . . . . . . . . . . . . . . . . . . . . 35
2
Contents
Cleaning and care
PerfectClean . . . . . . . . . . . . . . . . . . . . . . . . . . . . . . . . . . . . . . . . . . . . . . . . . . . . . 37 Catalytic liners . . . . . . . . . . . . . . . . . . . . . . . . . . . . . . . . . . . . . . . . . . . . . . . . . . . . 38 Removing the oven door. . . . . . . . . . . . . . . . . . . . . . . . . . . . . . . . . . . . . . . . . . 40 Removing the runners. . . . . . . . . . . . . . . . . . . . . . . . . . . . . . . . . . . . . . . . . . . . 41 Removing the back panel. . . . . . . . . . . . . . . . . . . . . . . . . . . . . . . . . . . . . . . . . 41 Lowering the upper heating element . . . . . . . . . . . . . . . . . . . . . . . . . . . . . . . . 42 Removing the safety guard. . . . . . . . . . . . . . . . . . . . . . . . . . . . . . . . . . . . . . . . 42
Changing the light bulb
Turning additional features on or off
Frequently asked questions
After sales service Optional accessories Installation instructions Caring for the environment
Disposal of the packing materials . . . . . . . . . . . . . . . . . . . . . . . . . . . . . . . . . . . . . 52 Disposal of an old appliance . . . . . . . . . . . . . . . . . . . . . . . . . . . . . . . . . . . . . . . . . 52
Electrical connection
Installing the oven
3

IMPORTANT SAFETY INSTRUCTIONS
This appliance is intended for residential use only.
Only use the appliance for its intended purpose. The manufacturer cannot be held responsible for damages caused by improper use of this oven.
This appliance complies with current safety requirements. Improper use of the appliance can lead to personal injury and material damage.
Read all instructions before installing or using the oven for the first time.
Keep these operating instructions in a safe place and pass them on to any future user.
Installation
Before installation, make sure that the voltage and frequency listed on
the data plate correspond with the household electrical supply. This data must correspond to prevent injury and machine damage. Consult a qualified electrician if in doubt.
Be certain your appliance is properly installed and grounded by
a qualified technician.
To guarantee the electrical safety of this appliance, continuity must exist between the appliance and an effective grounding system. It is imperative that this basic safety requirement be met. If there is any doubt, have the electrical system of the house checked by a qualified electrician.
The manufacturer cannot be held responsible for damages caused by the lack, or inadequacy, of an effective grounding system or the failure to adhere to national and local electrical codes.
The oven should not be operated until it has been properly installed
within cabinetry.
Installation, maintenance and repair work should be performed
by an authorized service technician. Work by unqualified persons could be dangerous and may void the warranty.
Before installation or service, disconnect the power supply to the
work area by "tripping" the circuit breaker, or shutting off the main power.
4

IMPORTANT SAFETY INSTRUCTIONS
Oven use
,WARNING: Ovens can produce high temperatures that can cause burns.
Prevent children from touching the appliance when in use.
Use heat-resistant pot holders when placing items in the oven,
turning them, or removing them from the oven. The upper heating element and oven racks can become very hot and cause burns.
To prevent burns, always place oven racks at their desired height
while the oven is cool.
Always open the door carefully. Allow hot air or steam to escape
before placing or removing food.
To prevent burns, allow the heating element to cool before cleaning by
hand.
Only clean parts listed in this manual.
Caution: Heating elements may be hot even though they are not
glowing. During and after use, do not let clothing or other flammable materials come in contact with heating elements or interior surfaces of the oven until they have had sufficient time to cool. External parts of the oven such as the door glass, vents, and control panel may also become hot.
The door gasket is essential for a good seal. Care should be taken
not to rub, damage or move the gasket. The door gasket should only be cleaned with a solution of warm water and soap.
Do not block oven vents.
Do not let metal objects (aluminum foil, metal pans) or the roast probe
come in contact with the heating element.
Do not slide pots or pans on the oven floor. This could scratch and
damage the surface.
Do not lean, sit, or place heavy items on the open oven door. The
door can support a maximum weight of 33 lbs (15 kg).
5

IMPORTANT SAFETY INSTRUCTIONS
Do not heat unopened containers of food in the oven, pressure may build up and cause them to explode.
Never add water to food on a hot tray or pan, or directly onto food in
a hot oven. The steam created could cause serious burns or scalds and the sudden change in temperature can damage the enamel.
This oven must only be used for cooking. Do not use it as a dryer,
kiln, dehumidifier, etc. Fumes or vapors given off by glues, plastics or other non-food items could ignite and cause property damage or injury.
Cover all cooked food that is left in the oven to be kept warm. This will
prevent moisture from condensing on the interior of the oven. Long-term or excessive condensation could damage the oven.
Only use the Miele roast probe supplied with the oven. Contact Miele if you need to purchase a new
probe.
Remove the roast probe from the oven when not using it. High
broiling temperatures may damage the probe.
Never use aluminum foil to line the oven floor. Do not place pots, pans
or baking sheets directly on the oven floor when using "Surround", "Bottom Heat" or "Intensive". This could crack the enamel on the oven floor.
Never store flammable liquids and materials in, above or under an
oven, or near cooking surfaces.
6

IMPORTANT SAFETY INSTRUCTIONS
General notes
Do not use a steam cleaner to clean the oven. Steam could penetrate electrical components and
cause a short circuit.
Children should not be left alone or unattended in an area where an
oven is in use. Never allow children to sit or stand on any part of the oven. Caution: Do not store items of interest to children in cabinets above an oven. Children climbing on the oven to reach these items may be injured.
Do not leave the oven unattended when cooking with oils or fats, they
can be a fire hazard if overheated.
Do not use water on grease fires! Smother the fire with a properly
rated dry chemical or foam fire extinguisher.
Be aware of loose fitting or hanging garments while operating the oven.
Do not use the oven to heat the room.
Make certain that the power cords of small appliances do not come in
contact with or get caught in the oven door.
Use only dry, heat resistant potholders. Moist or damp potholders used on hot surfaces may
result in steam burns. Do not let potholders come in contact with oils. Do not substitute towels or other bulky items for potholders.
Disposal of an old oven
When discarding an old oven, disconnect it from the power
supply and cut off the power cord. Remove the door to prevent a trapping hazard.
7

Guide to the oven
|
|
|
|
|
|
|
|
|
|
|
|
|
|
|
|
|
|
|
|
|
|
|
|
|
|
|
|
|
|
|
|
|
gRoast probe socket |
||
aProgram selector |
|||||
bOven display |
hNon-tip, five level runners |
||||
cOven push buttons |
iDoor contact switch* |
||||
d+/– adjust buttons |
jOven door |
||||
eUpper heating element and |
|
|
|
||
safety guard |
*This switch shuts off the heating |
||||
|
|
|
|||
fConvection fan |
element and convection fan when the |
||||
|
|
|
door is opened during use. |
||
8
Guide to the oven
Accessories
Roasting pan and Anti-splash tray
The roasting pan is ideal for catching drippings from meat or poultry roasted or broiled directly on the rack.
It can also be used as a baking tray.
The anti-splash tray may be placed in the roasting pan to reduce splattering of drippings from meat or poultry.
The roasting pan and anti-splash tray are coated with PerfectClean enamel and can be easily cleaned with a sponge and dish soap.
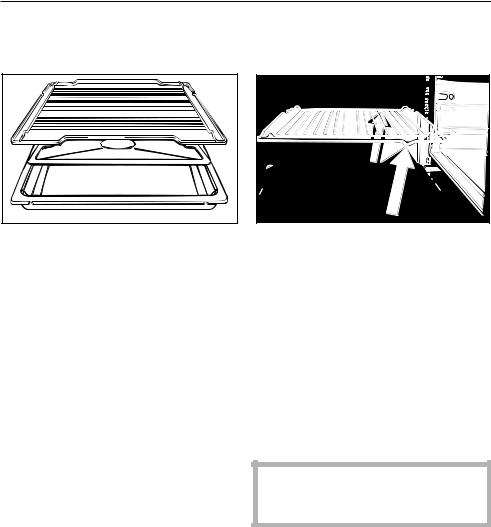
Wire rack
Baking Trays
The oven comes equipped with two baking trays. These trays are to be placed in the runners on either side of the oven rather than on the wire rack itself.
Non-tip safety notches
The wire rack, roasting pan and baking trays are equipped with non-tip safety notches (see arrows) which prevent them from being pulled out completely while the oven is in use.
When inserting a rack, pan or tray always check that the safety notches are at the rear of the oven.
Once inserted into the oven these pieces can only be removed by raising the piece upwards and then pulling it out.
9

Guide to the oven
Grease filter |
Roast probe |
||||
|
|
|
|
|
|
|
|
|
|
|
|
|
|
|
|
|
|
|
|
|
|
|
|
|
|
|
|
|
|
The filter helps to keep the oven fan clean from moisture and grease.
When roasting or broiling, insert the grease filter in front of the fan opening.
The roast probe monitors the core temperature of meat and poultry during the roasting function.
The long pointed end of the probe is inserted into the thickest portion of the meat while the short end of the probe is inserted into the roast probe socket.
10
Guide to the oven
Controls
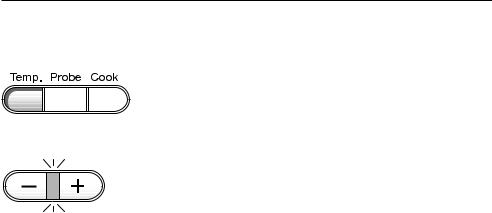
The oven controls consist of the program selector and push buttons.
The program selector can be turned either way.
Each push button has a matching symbol in the oven display.
Button |
controls: |
symbol |
|
|
|
Temp. |
oven temperature |
p |
|
settings |
|
Probe |
core temperature |
e |
|
settings |
|
Cook |
cooking timer |
g |
|
|
|
All temperature and time selections are made by using the "+" or "–" buttons. To make changes one digit at a time make short pushes on the button. For rapid advancement hold the button in.
–oven temperatures are in 10°F/5°C increments
–core temperatures are in 2°F/1°C increments
–timer in 1 minute increments
While the light between the "+" and "–" buttons is on, times and temperatures can be entered or changed.
When the light goes out your entry is accepted.
11

Guide to the oven
Child Safety Lock |
Energy-Conservation feature |
|||||||||||||||
|
|
|
|
|
|
|
|
|
|
|
|
|
|
|
|
|
|
|
|
|
|
|
|
|
|
|
|
|
|
|
|
|
|
|
|
|
|
|
|
|
|
|
|
|
|
|
|
|
|
|
|
|
|
|
|
|
|
|
|
|
|
|
|
|
|
|
|
|
|
|
|
|
|
|
|
|
|
|
|
|
|
|
|
|
The child safety lock can be activated to prevent children from operating the oven.
To activate the Child Safety Lock:
^Make sure the program selector is in the "0" (OFF) position.
^Press the "Temp." button until the key symbol appears in the display.
Once this symbol appears, the oven is locked.
To deactivate the Child Safety Lock:
^Press the "Temp." button until the key symbol in the display disappears.
When using the "Cook" button or the roasting probe, the residual heat of the oven is automatically used to finish the cooking process and conserve energy.
Shortly before the end of the cooking process, the oven shuts off the heat. The letters "EC" will appear in the display.
The cooling fan will continue to run in "EC", as well as the convection fan if a "fan" function was chosen.
12

Before using for the first time
Heat the oven
New ovens may have a slight odor during the first few uses. To eliminate the odor quickly, the oven should be operated at a high temperature for 2 hours.
Make sure the room is well ventilated during this process.
^Before heating the oven remove all accessories, labels and protective plastic films.
^Use a soft cloth or sponge to wipe out the oven interior using a solution of warm water and a non-abrasive detergent. Dry the interior with a soft cloth.
^Turn the program selector to "Convection".
^Set the temperature to 480°F (250°C), using the "+" button while the indicator light between the "+" and "-" buttons is lit.
^Set the timer by pressing the "Cook" button.
"0:00" will appear in the display and the "+/-" indicator will light.
^While the light between the "+/-" buttons is lit, enter 2 hours using the "+" button.
The oven will begin to heat as soon as the indicator light between the "+/-" buttons goes out.
13

Using the oven
aTurn the program selector to the desired program.
At the end of the cooking time:
A tone sounds for 5 seconds and the "g" symbol flashes.
To turn off the tone and the flashing symbol:
–press the "Cook" button.
–turn the program selector to "0".
The default oven temperature, will appear in the display and the indicator between the "+/–" buttons will light.
The oven will start to heat as soon as the indicator between the "+/–" buttons goes out.
bAdjust the default temperature if needed.
cAllow the oven to preheat if necessary.
The rising oven temperature can be monitored in the display.
dPlace food in the oven.
eEnter the cooking time.
Interrupting cooking / turning off the oven
^ Turn the program selector to "0".
The oven will turn off, and all programs will be canceled.
Exceptions:
If the roast probe is inserted in its socket, the "e" symbol will remain lit.
14
Using the oven
Adjusting the default temperature
^Press the "Temp." button.
^Using the "+/–" buttons enter the desired temperature.
The default temperature of each program, can be adjusted within the range shown below:
Convection |
90-480°F (30-250°C) |
|
|
Auto Roast |
210-440°F (100-230°C) |
|
|
Top Heat |
90-480°F (30-250°C) |
|
|
Surround |
90-510°F (30-280°C) |
|
|
Bottom Heat |
210-480°F (100-250°C) |
|
|
Defrost |
90-120°F (30-50°C) |
|
|
Intensive |
120-480°F (50-250°C) |
|
|
Fan Broil |
120-470°F (50-260°C) |
|
|
Broil |
390-570°F (200-300°C) |
|
|
Maxi Broil |
390-570°F (200-300°C) |
|
|
15

Using the oven
Entering a cooking time
When a cooking time is entered the oven will turn off automatically at the end of the elapsed time.
^ Press the "Cook" button.
"0:00" will appear in the display and the "+/–" indicator will light.
^While the light between the "+/–" buttons is lit, enter the cooking time using the "+" button. A time from one minute to 23 hours 59 minutes can be entered.
The cooking process will begin as soon as the indicator light between the "+/–" buttons goes out.
This function is not available when using the roast probe.
Checking, changing and deleting a cooking time
To check a cooking time
^ Press the "Cook" button.
The remaining cooking time will appear in the display.
To change a cooking time
^Press the "Cook" button.
^Use the "+" or "–" buttons to enter the new time.
When the indicator between the "+/–" buttons goes out, the new time has been entered.
To delete a cooking time
^Press the "Cook" button.
^Use the "–" button to set the cooking time to "0:00".
During a power failure, all entries will be canceled.
16

Using the oven
Rapid heat
The rapid heat feature activates the heating elements at maximum power to heat the oven quickly. With the "Convection", "Auto Roast" and "Surround" programs, the "Rapid heat" feature will activate automatically if the selected temperature is:
–at least 280°F (140°C) in "Convection" or "Auto Roast".
or
– at least 300°F (150°C) in "Surround".
The rotating "F" ("C") beside the temperature display indicates that "rapid heat" is on.
As soon as the desired temperature has been reached, the additional heating elements used during "rapid heat" will turn off.
To turn off "rapid heat"
For some dishes it may be desirable to turn off "rapid heat" (cookies, small cakes).
^Select the oven program and temperature.
As soon as the actual temperature appears in the display, "rapid heat" can be turned off.
^Press the "–" button and hold until the "F" ("C") in the display stops rotating.
Once the program selector has been turned to "0", "Rapid heat" will be available for the next use.
17
 Loading...