


 Loading...
Operating and Installation Instructions
Oven
To prevent accidents and machine damage, read these instructions before installation or use.
en-US, CA |
M.-Nr. 11 060 701 |

Contents |
|
IMPORTANT SAFETY INSTRUCTIONS ................................................................ |
8 |
Guide to the oven ................................................................................................ |
18 |
Control panel ....................................................................................................... |
19 |
Sensor buttons ...................................................................................................... |
20 |
M Touch display .................................................................................................... |
21 |
Symbols............................................................................................................ |
22 |
Using the appliance............................................................................................... |
23 |
Features................................................................................................................ |
25 |
Model numbers .................................................................................................... |
25 |
Data plate ............................................................................................................. |
25 |
Items included ....................................................................................................... |
25 |
Standard and optional accessories....................................................................... |
25 |
Shelf runners .................................................................................................... |
25 |
Universal tray and wire oven rack with anti-tip safety notches........................ |
26 |
FlexiClips with wire rack HFCBBR 30-2........................................................... |
27 |
Oven controls ....................................................................................................... |
30 |
Oven safety features ............................................................................................. |
31 |
System lock ................................................................................................. |
31 |
Sensor lock for the oven .................................................................................. |
31 |
Safety shut-off.................................................................................................. |
31 |
Cooling fan ....................................................................................................... |
31 |
Vented oven door ............................................................................................. |
31 |
Safety Door Lock for Self Clean ....................................................................... |
31 |
PerfectClean surfaces ........................................................................................... |
32 |
Self Clean ready accessories ................................................................................ |
32 |
Before first use .................................................................................................... |
33 |
Standard settings .................................................................................................. |
33 |
Heating up the oven for the first time and rinsing the steam injection system ..... |
35 |
Settings ................................................................................................................ |
36 |
Accessing the “Settings” menu............................................................................. |
36 |
Changing and saving settings.......................................................................... |
36 |
Settings overview .................................................................................................. |
37 |
Language ........................................................................................................... |
39 |
Time of day............................................................................................................ |
39 |
Display.............................................................................................................. |
39 |
Clock type ........................................................................................................ |
39 |
Clock format..................................................................................................... |
39 |
Set .................................................................................................................... |
39 |
Synchronize...................................................................................................... |
39 |
2

|
Contents |
Date ....................................................................................................................... |
40 |
Lighting.................................................................................................................. |
40 |
Start screen ........................................................................................................... |
40 |
Brightness ............................................................................................................. |
40 |
Volume................................................................................................................... |
41 |
Buzzer tones..................................................................................................... |
41 |
Keypad tone ..................................................................................................... |
41 |
Welcome melody.............................................................................................. |
41 |
Units of measurement ........................................................................................... |
41 |
Weight .............................................................................................................. |
41 |
Temperature ..................................................................................................... |
41 |
Cooling fan ............................................................................................................ |
42 |
Recommended temperatures................................................................................ |
42 |
Self Clean .............................................................................................................. |
43 |
Safety .................................................................................................................... |
43 |
System lock ................................................................................................. |
43 |
Sensor lock ...................................................................................................... |
44 |
Catalyzer................................................................................................................ |
44 |
Voltage................................................................................................................... |
45 |
Sensor group......................................................................................................... |
45 |
Calibrate temperature............................................................................................ |
45 |
Showroom program............................................................................................... |
46 |
Demo mode...................................................................................................... |
46 |
Factory default settings......................................................................................... |
46 |
MyMiele ................................................................................................................ |
47 |
To add an entry...................................................................................................... |
47 |
Editing MyMiele..................................................................................................... |
47 |
Deleting entries................................................................................................. |
47 |
Sorting entries .................................................................................................. |
47 |
Alarm + Timer ...................................................................................................... |
48 |
Using the alarm ................................................................................................. |
48 |
Setting the alarm .............................................................................................. |
48 |
Changing an alarm ........................................................................................... |
48 |
Deleting an alarm ............................................................................................. |
48 |
Using the Timer ................................................................................................. |
49 |
Setting the timer............................................................................................... |
49 |
Changing the timer........................................................................................... |
50 |
Deleting the timer ............................................................................................. |
50 |
Guide to the modes............................................................................................. |
51 |
3

Contents |
|
Operating the oven.............................................................................................. |
54 |
Energy saving tips ................................................................................................. |
54 |
Quick Guide........................................................................................................... |
55 |
Cooling fan ........................................................................................................... |
55 |
Additional functions ............................................................................................ |
56 |
Changing the temperature..................................................................................... |
57 |
Rapid heat-up........................................................................................................ |
57 |
Rapid PreHeat .................................................................................................. |
58 |
Using the Crisp function (moisture reduction)....................................................... |
58 |
Changing the operating mode............................................................................... |
59 |
Setting additional durations .................................................................................. |
60 |
Turning off automatically .................................................................................. |
60 |
Turning on and off automatically ...................................................................... |
61 |
Sequence of a cooking program that turns on and off automatically .............. |
61 |
Changing set durations .................................................................................... |
62 |
Canceling cooking............................................................................................ |
62 |
Moisture Plus ................................................................................................ |
63 |
Cooking with the Moisture Plus function........................................................ |
64 |
Setting the temperature.................................................................................... |
64 |
Setting the number of steam bursts................................................................. |
64 |
Timing the bursts of steam............................................................................... |
64 |
Changing the type of heating ........................................................................... |
64 |
Injecting bursts of steam.................................................................................. |
65 |
Automatic burst of steam ................................................................................. |
65 |
1, 2, or 3 bursts of steam ................................................................................. |
65 |
Evaporating residual moisture............................................................................... |
66 |
Starting residual water evaporation immediately ............................................. |
66 |
Skipping residual moisture evaporation ........................................................... |
67 |
Gourmet Center................................................................................................... |
68 |
List of food types................................................................................................... |
68 |
MasterChef +......................................................................................................... |
68 |
Using MasterChef and MasterChef + programs ................................................... |
68 |
Notes on using these programs ....................................................................... |
69 |
Search ................................................................................................................... |
70 |
4

|
Contents |
MasterChef + Recipes........................................................................................... |
70 |
Baguette +........................................................................................................ |
71 |
Banana Bread + ............................................................................................... |
72 |
Brioche + .......................................................................................................... |
73 |
Ciabatta +......................................................................................................... |
74 |
Cinnamon Raisin Bread + ................................................................................ |
75 |
French Bread +................................................................................................. |
76 |
Italian Bread + .................................................................................................. |
77 |
Jalapeño Cheese Bread +................................................................................ |
78 |
Multigrain Bread + ............................................................................................ |
79 |
Rolls + .............................................................................................................. |
80 |
Rye Bread +...................................................................................................... |
81 |
San Francisco Sourdough +............................................................................. |
82 |
Walnut Bread +................................................................................................. |
83 |
White Bread +................................................................................................... |
84 |
Whole Grain Bread + ........................................................................................ |
85 |
Mini Cheesecake +........................................................................................... |
86 |
Mini Chocolate Cakes + ................................................................................... |
87 |
Turnovers +....................................................................................................... |
88 |
Branzino + ........................................................................................................ |
90 |
Cod Fillet + ....................................................................................................... |
91 |
Halibut + ........................................................................................................... |
92 |
Red Snapper + ................................................................................................. |
93 |
Sea Bass + ....................................................................................................... |
94 |
Trout + .............................................................................................................. |
95 |
Whole Salmon Fillet + ...................................................................................... |
96 |
Beef Tenderloin + ............................................................................................. |
97 |
Bison Rib Roast + ............................................................................................ |
98 |
Bison Short Ribs + ........................................................................................... |
99 |
Lamb Crown Roast + ..................................................................................... |
100 |
Lamb Shanks + .............................................................................................. |
101 |
Veal Rib Roast +............................................................................................. |
102 |
Venison Rib Roast +....................................................................................... |
103 |
Chicken + ....................................................................................................... |
104 |
Duck + ............................................................................................................ |
105 |
Turkey +.......................................................................................................... |
106 |
Coquilles St. Jacques + ................................................................................. |
107 |
Lobster Tails + ................................................................................................ |
108 |
Oysters Rockefeller + ..................................................................................... |
109 |
Favorites............................................................................................................. |
110 |
Creating a Favorite .............................................................................................. |
110 |
Starting a Favorite ............................................................................................... |
111 |
5

Contents |
|
Changing Favorites.............................................................................................. |
111 |
Changing cooking stages............................................................................... |
111 |
Changing the name ........................................................................................ |
112 |
Deleting a Favorite............................................................................................... |
112 |
Bake.................................................................................................................... |
113 |
Roast .................................................................................................................. |
115 |
Roast probe......................................................................................................... |
116 |
How it works................................................................................................... |
116 |
When to use the roast probe.......................................................................... |
117 |
Important notes regarding the roast probe .................................................... |
117 |
Using the roast probe..................................................................................... |
119 |
Time-left display............................................................................................. |
119 |
Residual heat utilization ................................................................................. |
120 |
Slow Roasting.................................................................................................... |
121 |
Using “Slow Roasting” special mode ................................................................. |
122 |
Adjusting the Slow Roasting temperature........................................................... |
123 |
Broil..................................................................................................................... |
124 |
Special Modes ................................................................................................... |
126 |
Defrost................................................................................................................. |
127 |
Dehydrate ............................................................................................................ |
127 |
Reheat ................................................................................................................. |
128 |
Warm-up Cookware ............................................................................................ |
129 |
Proof.................................................................................................................... |
129 |
Pizza .................................................................................................................... |
129 |
Sabbath Program ................................................................................................ |
130 |
Gentle Bake......................................................................................................... |
131 |
Canning ............................................................................................................... |
132 |
Frozen food.......................................................................................................... |
133 |
Cleaning and care ............................................................................................. |
134 |
Unsuitable cleaning agents ................................................................................. |
134 |
Tips...................................................................................................................... |
135 |
Normal soiling...................................................................................................... |
135 |
Wireless Roast Probe ..................................................................................... |
135 |
Stubborn soiling .................................................................................................. |
136 |
Cleaning the oven interior with Self Clean .................................................... |
137 |
Preparing for the Self Clean program............................................................. |
137 |
Starting the Self Clean program ..................................................................... |
138 |
Starting the Self Clean program ..................................................................... |
138 |
6

|
Contents |
Delaying the start of the Self Clean program |
................................................. 138 |
At the end of the Self Clean program............................................................. |
139 |
If the Self Clean program is cancelled............................................................ |
140 |
Door removal....................................................................................................... |
141 |
Reinstalling the door ........................................................................................... |
142 |
Runner removal ................................................................................................... |
143 |
Frequently Asked Questions ............................................................................ |
144 |
Technical Service............................................................................................... |
150 |
Contact in case of fault ....................................................................................... |
150 |
Warranty .............................................................................................................. |
150 |
Caring for the environment .............................................................................. |
151 |
Plumbing ............................................................................................................ |
152 |
Notes on connecting to the water supply ........................................................... |
152 |
Attaching the stainless steel hose to the oven.................................................... |
153 |
Connecting to the water supply .......................................................................... |
153 |
Electrical connection ........................................................................................ |
154 |
Installation diagrams......................................................................................... |
155 |
Appliance and cut-out dimensions ..................................................................... |
155 |
Undercounter installation ............................................................................... |
155 |
Installation in a tall cabinet............................................................................. |
156 |
Installing the oven ............................................................................................. |
157 |
Copyright and licenses ..................................................................................... |
158 |
7

IMPORTANT SAFETY INSTRUCTIONS
When using the appliance, follow basic safety precautions, including the following:
Read all instructions before installation and use of the oven to prevent accidents and machine damage.
This appliance complies with current safety requirements. Improper use of the appliance can lead to personal injury and material damage.
Read all instructions before installing or using the oven for the first time. Only use the appliance for its intended purpose.
Keep these operating instructions in a safe place and pass them on to any future user.
Appropriate use
This appliance is intended for residential use only. Use only as described in these operating instructions.
This appliance is not intended for outdoor use.
Only use this oven for residential cooking, and the purposes described in this manual.
Other uses are not permitted and can be dangerous.
Risk of Fire! Do not use this oven to store or dry flammable materials.
Persons who lack physical, sensory or mental abilities, or experience with the appliance should not use it without supervision or instruction by a responsible person.
Safety with children
Children should not be left alone or unattended in an area where an oven is in use. Never allow children to operate, sit or stand on any part of the oven. Caution: Do not store items of interest to children in cabinets above an oven. Children climbing on the oven to reach these items could be injured.
8

IMPORTANT SAFETY INSTRUCTIONS
Burn Hazard - Do not allow children to use the oven. Failure to do so can result in severe burns or serious injury.
Danger of suffocation! Ensure that any plastic wrappings, bags, etc. are disposed of safely and kept out of the reach of children.
Danger of burns. The oven gets hot at the oven door glass, the vapor vent, the handle and the operating controls. Do not allow children to touch or play in, on or near the oven.
Danger of burns.
Children's skin is more sensitive to high temperatures than that of adults. The oven becomes hotter during self-cleaning than it does in normal use. Do not let children touch the oven while the Self Clean program is running.
Technical safety
This appliance must be installed and connected in compliance with the installation instructions.
Unauthorized installation, maintenance, and repairs can cause considerable danger for the user. Installation, maintenance, and repairs must only be carried out by a Miele authorized technician.
Changes or modifications not expressly approved by Miele may void the user's authority to operate the oven.
Maintenance by the user: Never repair or replace any part of the appliance unless the instructions specifically recommend doing so. Service work should only be performed by a qualified technician.
Before installing the oven, check for externally visible damage. Do not operate a damaged appliance.
Reliable and safe operation of the oven can only be guaranteed if it is connected to the power supply.
9

IMPORTANT SAFETY INSTRUCTIONS
To guarantee the electrical safety of this appliance, continuity must exist between the appliance and an effective grounding system. This appliance must be grounded. Connect only to properly grounded outlet. See “Electrical connection - GROUNDING INSTRUCTIONS”. It is imperative that this basic safety requirement be met. If there is any doubt, have the electrical system of the house checked by a qualified electrician.
Proper installation: Make sure that your appliance has been installed correctly and that it has been grounded by a qualified technician.
Before installation, make sure that the voltage and frequency listed on the data plate correspond with the household electrical supply. This data must correspond to prevent injury and machine damage. Consult a qualified electrician if in doubt.
Before installation or service, disconnect the power supply to the work area by
–removing the fuse,
–“tripping” the circuit breaker, or
–unplugging the unit. Pull the plug not the cord.
Extension cords do not guarantee the required safety of the appliance (e.g. danger of overheating). Do not use an extension cord to connect this appliance to electricity.
The oven is not to be operated until it has been properly installed within cabinetry.
Danger of electric shock!
Under no circumstances open the outer casing of the appliance.
This appliance must not be used in a non-stationary location (e.g. on a ship).
10
IMPORTANT SAFETY INSTRUCTIONS
Do not repair or replace any part of the appliance unless specifically recommended in the operating instructions. All other servicing should be referred to a qualified technician.
Defective components should be replaced by Miele original parts only. Only with these parts can safety of the appliance be assured as intended by the manufacturer.
In order for the oven to function correctly, it requires an adequate supply of cool air. Ensure that the air flow is not impaired (e.g. insulation in the cabinetry). Also be sure that the cool air supply is not heated by other sources nearby.
If the oven is installed behind a cabinet door, do not close the door while the oven is in operation. Heat and moisture can build up behind the closed door and cause damage to the oven, cabinetry and flooring. Do not close the door until the oven has completely cooled down.
The water intake valve must be installed in an area accessible after installation.
The protective sleeve of the water intake hose must not be damaged or become kinked. This will cause it to leak.
The integrated Waterproof System offers protection from water damage, provided the following conditions are met:
–The oven is properly installed (electric and water).
–A damaged appliance is dangerous. Contact Miele for repair immediately.
–The water supply has been turned off when the appliance is not going to be used for a longer period of time (e.g. vacation).
Water containing lime or minerals as well as water from reverse osmosis units may damage the oven. The water from your water supply should therefore be filtered and free of lime and minerals.
11

IMPORTANT SAFETY INSTRUCTIONS
Correct use
The oven becomes very hot while in use. Use caution to ensure that you are not burned on the heating elements or interior surfaces of the oven. Use pot holders when placing food in the oven, adjusting the racks, etc. in a hot oven.
Caution: Heating elements may be hot even though they are not glowing. Interior surfaces of an oven become hot enough to cause burns. External parts of the oven such as the door glass, vents, and the control panel can become hot. During and after use, do not touch, or let clothing or other flammable materials come into contact with heating elements or interior surfaces of the oven until they have had sufficient time to cool.
Do not let food sit in the oven for an extended period of time before or after cooking. Doing so can result in food poisoning or sickness.
It is important that the heat is evenly distributed throughout the food being cooked. This can be achieved by stirring and/or turning the food.
Use only dry, heat-resistant potholders. Moist or damp potholders used on hot surfaces may result in steam burns. Do not let potholders come in contact with oil or grease. Do not substitute dish towels or other bulky items for potholders. Do not let potholders touch hot heating elements.
Loose fitting or hanging garments present a fire hazard. Wear proper apparel while operating the appliance.
Do not heat unopened containers of food in the oven, pressure may cause the containers to burst and result in injury.
Never pour cold water onto hot surfaces in a hot oven.
The steam created could cause serious burns or scalding and the sudden change in temperature can damage the enamel in the oven.
12

IMPORTANT SAFETY INSTRUCTIONS
During cooking processes using moisture and during the residual moisture evaporation process steam is produced which can cause serious injury by scalding. Do not open the door while a burst of steam is being released or during the evaporation process.
To prevent burns, always place oven racks at their desired height while the oven is cool. If the rack must be moved while the oven is hot, do not let pot holders touch hot heating elements.
Open the door carefully to allow hot air or steam to escape before placing or removing food.
To prevent burns, allow the heating elements to cool before cleaning by hand.
Do not leave the oven door open unnecessarily as someone may trip over it or be injured by it.
Never leave the appliance unattended when cooking with oil or fat. They can ignite if overheated. Do not use water on grease fires.Turn off the oven immediately and suffocate the flames by keeping the oven door closed.
Smother the fire or flames, or use a dry chemical extinguishing agent or foam fire extinguisher.
Never store flammable liquids and materials in, above or under an oven, or near cooking surfaces.
Do not use the oven to heat the room. The high temperatures radiated could cause objects near the oven to catch fire.
WARNING
NEVER use this appliance as a space heater to heat or warm the room. Doing so may result in carbon monoxide poisoning and overheating of the oven.
WARNING
NEVER use this appliance as storage space. Doing so may result in carbon monoxide poisoning and overheating of the oven.
13

IMPORTANT SAFETY INSTRUCTIONS
WARNING
NEVER cover any slots, holes or passages in the oven bottom or cover an entire rack with materials such as aluminum foil. Doing so blocks air flow through the oven and may cause carbon monoxide poisoning. Aluminum foil linings may also trap heat, causing a fire hazard.
Broiling food for an excessively long time can cause it to dry out and may result in the food catching fire.
Do not exceed recommended broiling times.
Some foods dry out very quickly and can be ignited by high broiling temperatures. Do not use broiling modes for crisping rolls or bread, or to dry flowers or herbs. Instead use the Convection Bake
or Surround modes.
Use caution when using alcohol in your recipes. Alcohol evaporates at high temperatures but may, in rare circumstances, combust on the hot heating elements.
Plastic containers, which are not heat-resistant, melt and may ignite at high temperatures and can damage the oven. Use only plastic containers that are indicated by the manufacturer as being suitable for use in ovens.
When residual heat is used to keep food warm, the high level of humidity and condensation can cause damage in the oven. The control panel, countertop or cabinetry may also be damaged.
Do not switch the oven off completely while food is inside it, but select the lowest possible temperature for the oven mode you are using. This will ensure the fan will automatically continue to run.
It is recommended to cover all cooked food that is left in the oven to be kept warm. This will prevent moisture from condensing on the interior of the oven.
To avoid damage, do not place aluminum foil, pots, pans or baking sheets directly on the oven floor. This can cause a build up of heat that will damage the oven floor.
14

IMPORTANT SAFETY INSTRUCTIONS
Do not slide pots or pans on the oven floor. This could scratch and damage the surface.
The door can support a maximum weight of 33 lbs (15 kg). Do not sit on or lean against an open door, and do not place heavy objects on it. Also make sure that nothing can get trapped between the door and the oven cavity. The oven could get damaged.
This oven must only be used for cooking food. Fumes, vapors or heat given off by glues, plastics or flammable liquids and materials could be hazardous. Do not use it as a dryer, kiln, dehumidifier, etc.
Do not obstruct the flow of combustion and ventilation air.
Do not let metal objects (aluminum foil, pans) come in contact with the heating element.
Make certain that the power cords of small appliances do not come in contact with or get caught in the oven door.
When baking frozen pizzas or pies, place them on the wire rack lined with parchment paper. Do not use the baking tray or the roasting pan for frozen foods with a large surface area. The tray or pan could become warped and difficult to remove from the oven when hot. Frozen foods like french fries, chicken nuggets, etc. can be baked on the baking tray.
The wireless roast probe antenna on the top right of the oven interior is at risk of damage when sliding in accessories. When sliding in accessories, take care not to bang them against the wireless roast probe.
The wireless roast probe antenna on the top right of the oven interior is at risk of damage when sliding the FlexiClips with wire rack in at level 6. Only use the FlexiClips with wire rack at levels 1 to 5.
15

IMPORTANT SAFETY INSTRUCTIONS
Cleaning and maintenance
Do not use a steam cleaner to clean this oven.
Steam could penetrate electrical components and cause a short
circuit.
Only clean parts listed in these Operating and Installation Instructions.
Scratches on the door glass can cause the glass to break.
Do not use abrasive cleaners, hard sponges, brushes or sharp metal
tools to clean the door glass.
The shelf runners can be removed for cleaning purposes (see “Cleaning and care”). Ensure they are correctly fitted after cleaning and never operate the oven without the shelf runners inserted.
There is a seal around the oven interior which seals the inside of the door. Take care not to rub, damage or move the gasket. Do not clean the door gasket - the door gasket is essential for a good seal.
Do not use a protective coating to line the oven and do not use commercial oven cleaner unless certified for use in a self-cleaning oven.
Debris should be removed before running the Self Clean program. If not removed this debris can smoke causing the self-cleaning program to turn itself off.
Accessories
Use only genuine original Miele parts. If parts or accessories from other manufacturers are used, the warranty will become void.
Only use the Miele roast probe supplied with this oven. If it is faulty, it must only be replaced with a Miele genuine roast probe.
The plastic on the roast probe can melt at very high temperatures. Do not use the roast probe when using the broil functions (exception: Convection Broil ). Do not store the roast probe in the oven if it is not in use.
16

IMPORTANT SAFETY INSTRUCTIONS
This oven complies with Industry Canada licence-exempt RSS standard(s) and part 15 of the FCC Rules. Operation is subject to the following two conditions: (1) This device may not cause harmful interference, and (2) this device must accept any interference received, including interference that may cause undesired operation.
The high temperatures used during self-cleaning will damage accessories that are not designed for cleaning in the Self Clean program. Please remove these accessories from the oven before starting the Self Clean program. This also applies to accessories purchased separately (see “Cleaning and care”).
Preparing your appliance for an extended vacation
If you elect to turn off the water to your home for an extended period of time, please note that this may not be enough to reduce the risk of a leak. To be completely safe, you must turn off the water supply to each individual appliance.
SAVE THESE INSTRUCTIONS AND REVIEW THEM PERIODICALLY
17
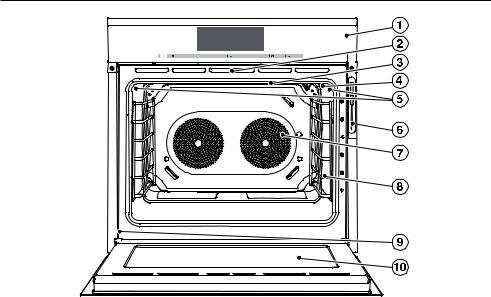
Guide to the oven
a Control panel
b Door with contact switch* and lock for Self Clean program
c Browning/Broiling element
d Wireless roast probe antenna
e Oven interior lighting
f Wireless roast probe
g TwinPower convection fan with heating element
h Side runners with 6 shelf levels
i Data plate
j Door
*This switch ensures that the heating elements and the convection fans turn off when the door is opened during use.
18
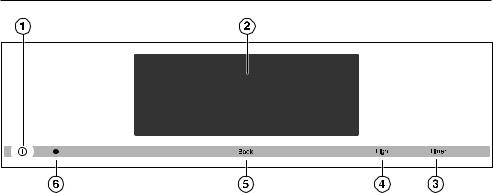
Control panel
a On/Off button
Turns the oven on and off
bDisplay
Displays the time of day and information on operation
c“Timer” sensor button To set the timer
d“Light” sensor button
To turn the oven cavity lighting on and off
e“Back” sensor button
To go back one step at a time
fOptical interface
(for service technician use only)
19

Control panel
Sensor buttons
The sensors react to touch. Each touch is confirmed with an audible tone. This tone can be turned off (see “Settings – Volume - Keypad tone”).
Sensor |
Function |
Notes |
button |
|
|
Timer |
For activating and |
If a menu appears in the display or if cooking is in |
|
deactivating timer / |
progress, you can enter a timer duration (e.g. when |
|
alarm |
boiling eggs on the cooktop) or an alarm time, i.e. |
|
|
a specific time, at any point (see “Alarm + Timer”). |
|
|
If the display is turned off, the “Timer” button will |
|
|
not react until the oven is turned on. |
|
|
|
Light |
For turning the |
If a menu appears in the display or if a cooking |
|
oven cavity lighting |
procedure is in progress, tapping the “Light” |
|
on and off |
button will turn the oven cavity light on or off. |
|
|
If the display is turned off, the “Light” button will |
|
|
not react until the oven is turned on. |
|
|
The oven cavity lighting turns off after 15 seconds |
|
|
during cooking or remains constantly turned on, |
|
|
depending on the setting selected. |
|
|
|
Back |
To go back a step |
|
|
|
|
20
Control panel
M Touch display
The touch screen can be scratched by hard objects, e.g. pens and pencils. Only touch the display with your fingers.
Touching the display with your finger emits a small electrical charge, which in turn triggers an electrical pulse that is detected by the surface of the touch display.
The display is divided into three sections:
Main Menu |
12:00 |
Operating |
Gourmet Center Special |
MyMiele |
Fa |
Modes |
Modes |
|
|
The top line shows what menu level you are currently in. Options within a menu are separated by a vertical line. If there is not enough space to show the whole path, additional options are indicated by … . The Time of Day, Alarm and Timer are shown in the top right-hand corner of the display.
The middle row shows the current menu and options. You can scroll to the right or left by swiping your finger across the display.
The and arrows at the bottom of the screen are used for scrolling to the left or right. The number of small squares between the arrows indicates the number of pages available and your position within the current menu.
21

Control panel
Symbols
The following symbols may appear in the display:
Symbol |
Description |
|
Some settings, e.g. display brightness and buzzer volume, are |
|
selected using a bar chart. |
|
This symbol indicates that there is additional information and |
|
advice about using the oven. Select OK to access the |
|
information. |
|
The system lock or sensor lock is active (see “Settings – Safety”). |
|
The oven cannot be used. |
|
Alarm |
|
Timer |
|
Core temperature when using the roast probe |
22

Control panel
Using the appliance
Whenever you touch a possible option the relevant field will light up orange.
To select or open a menu
Touch the desired field to select it.
Scrolling
You can scroll left or right.
Swipe the screen, i.e., place your finger on the touch display and move it in the desired direction.
Or: touch the and arrows with your finger to scroll left or right.
Exiting a menu
Touch “Back”, select an option in the menu path at the top of the screen, or touch … .
Depending on the current menu, this will take you back one level or return you to the Main Menu.
Help function
With some functions and options Help appears.
Select the function.
Helpful information will then appear in text and pictures.
23
Control panel
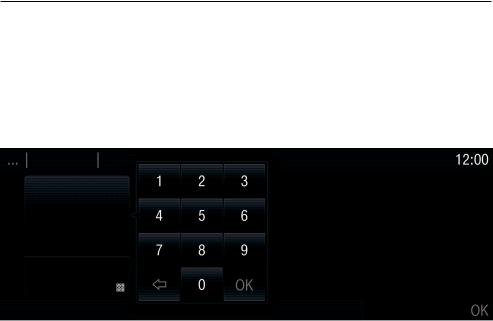
Entering numbers
You can enter numbers by scrolling through and touching the roller, or by using the numeric keypad.
To enter numbers using the roller:
Swipe the roller up or down to select the desired number.
To enter numbers using the numeric keypad:
Touch in the bottom right of the input field. The numeric keypad appears.
Touch the required numbers.
Once you have entered an accepted value, the OK field will light up green. Use the arrow to delete the last entered number.
Touch OK.
Entering letters
Names are entered using a keyboard. It is best to select short, concise names.
Select the required letters or characters.
Touch Save.
24

Features
Model numbers
A list of the ovens described in these operating instructions can be found on the back page.
Data plate
The data plate located on the front frame of the oven is visible when the door is open.
Printed on the data plate are the model number, serial number and the connection data (voltage/frequency/ maximum rated load) of the oven.
Have this information available when contacting Miele Technical Service.
Items included
The following items are included with this appliance:
–the Operating and Installation Instructions,
–screws for securing your appliance into the cabinetry, and
–various accessories.
Standard and optional
accessories
Accessories vary depending on model. All ovens are supplied with shelf runners, a universal tray and a wire oven rack. Depending on the model, your oven may also come with the additional accessories listed.
All accessories and cleaning and care products in these instructions are designed to be used with Miele ovens.
These can be ordered from the Miele web store, Miele Technical Service, or from your Miele dealer.
When ordering, please have ready the model number of your oven and of the desired accessories.
Shelf runners
The shelf runners are located on the right and left-hand sides of the oven with the levels for inserting accessories.
The shelf level numbers are indicated on the front of the oven frame.
Each level consists of a strut on which you can place the wire oven rack, for example.
The runners can be removed. See “Cleaning and Care”.
25

Features
Universal tray and wire oven rack with anti-tip safety notches
The wireless roast probe antenna on the top right of the oven interior is at risk of damage when sliding in accessories.
When sliding in accessories, take care not to bang them against the wireless roast probe.
Universal tray HUBB 30-1:
Wire oven rack HBBR 30-2:
Safety notches are located on the short edges of the wire oven rack. These prevent the wire oven rack from being fully pulled out of the side runners when they only need to be pulled partially out.
Always slide the wire oven rack into the rails on the shelf runner with the catches facing down.
When using the universal tray, place it directly on the wire oven rack.
You can also place the universal tray
directly on the FlexiClips with wire rack.
26
|
Features |
FlexiClips with wire rack |
|
HFCBBR 30-2 |
|
The wireless roast probe antenna on |
|
the top right of the oven interior is at |
|
risk of damage when sliding the |
|
FlexiClips with wire rack in at level 6. |
Insert the FlexiClips with wire rack |
Only use the FlexiClips with wire rack |
|
at levels 1 to 5. |
onto the level (1.) and slide it along |
|
the struts of the level (2.) until it clicks |
|
into place. |
The FlexiClips with wire rack can be pulled completely out of the oven. This allows you to see the food easily.
The FlexiClips with wire rack are pushed onto the rails of a level and then locked into place.
The FlexiClips can support a maximum load of 33 lb (15 kg).
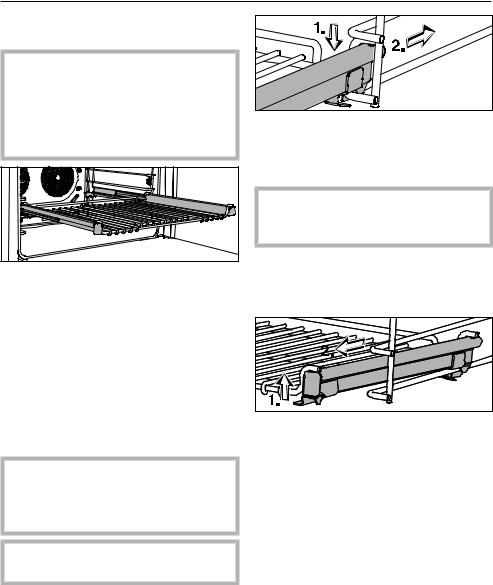
Installing and removing the FlexiClips with wire rack
Danger of burning!
The heater elements must be turned off. Make sure the oven has cooled down.
When installing the FlexiClips, do not extend them.
Hold the FlexiClips with wire rack with both hands and position it in front of the desired level.
If the FlexiClips with wire rack jams when sliding it onto the level, pull it out using some force and reinsert.
To remove the FlexiClips with wire rack:
Push the FlexiClips with wire rack in all the way.
Using both hands lift the front of the FlexiClips with wire rack on both sides (1.) and pull it out of the level (2.).
Using the universal tray
When using the universal tray, place it directly on the FlexiClips with wire rack.
27
Features
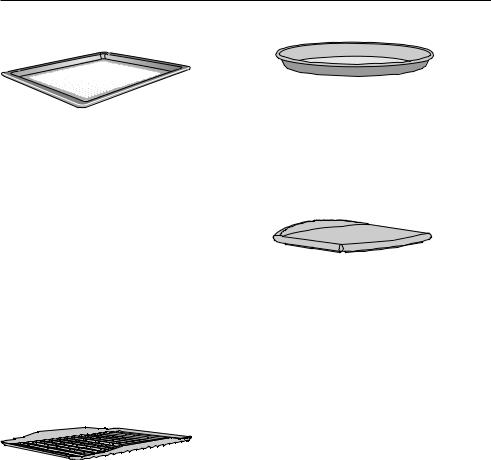
Perforated Gourmet baking tray HBBL 71
The perforated Gourmet baking tray has been specially developed for the preparation of baked goods made from fresh yeast and quark doughs.
The tiny perforations assist in browning the underside of baked goods.
The tray can also be used for dehydrating or drying food.
Round baking form HBF 27-1
This circular form is suitable for cooking fresh or frozen pizzas, flat cakes, tarts and baked goods.
The surface has been treated with PerfectClean enamel.
Gourmet Baking Stone HBS 60
The enameled surface has been treated with PerfectClean.
The round perforated baking tray HBFP 27-1 can be used for the same things.
The perforated baking tray can be placed on the rack.
Grilling and Roasting insert
HGBB 30-1
The grilling and roasting insert is placed in the universal tray.
The drippings from the meat or poultry are collected under the insert reducing spattering in the oven. The drippings can then be used for gravy and sauces.
The surface has been treated with PerfectClean enamel for easy cleaning.
The baking stone is ideal for baking dishes with a crisp bottom such as pizza and bread.
The baking stone is made from a heat retaining stone and is glazed. Place the stone directly on the wire rack.
A wooden peel is supplied with it for placing food on and off the stone.
28
Features
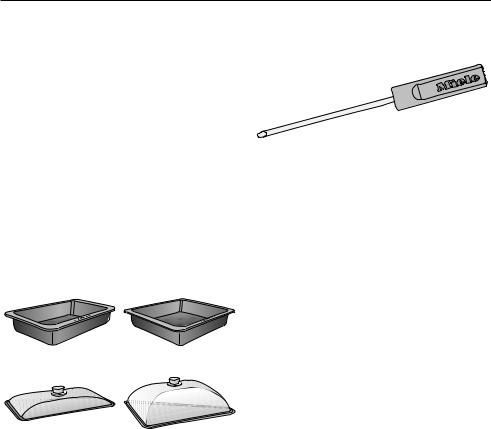
HUB Gourmet casserole dishes HBD casserole dish lids
Miele Gourmet casserole dishes can be placed directly on the wire oven rack. The surface of the casserole dishes has a non-stick coating.
Gourmet casserole dishes are available in different depths. The width and the height are the same.
Suitable lids are available separately. Please quote the model number when ordering.
Depth: |
Depth: |
8 1/2" (22 cm) |
13 3/4" (35 cm) |
HUB 62-22 * |
HUB 62-35 * |
HBD 60-22 |
HBD 60-35 |
* Suitable for use on induction cooktops
Roast probe
(Wireless Precision Probe)
The wireless roast probe allows you to accurately monitor the food's internal temperature during the cooking process (see “Roast - Roast probe”). The roast probe is stored in a storage sleeve in the front frame when not in use.
29

Features
Opener
The opener allows you to open the cover of the oven light.
Miele Oven Cleaner
Miele oven cleaner is suitable for removing stubborn soiling. It is not necessary to preheat the oven before use.
Oven controls
The oven controls allow you to use the various cooking modes to bake, roast and broil.
It also allows you to access:
–the time of day display,
–a timer,
–a timer to automatically turn cooking programs on and off,
–Moisture Plus cooking,
–the MasterChef programs,
–the MasterChef + programs,
–the creating of a Favorite program,
–settings that can be customized.
30
Loading...