


 Loading...
Operating and installation instructions
Oven
To prevent the risk of accidents or damage to the appliance, it is essential to read these instructions before it is installed and used for the first time.
en-AU, NZ |
M.-Nr. 10 187 370 |

Contents |
|
Warning and Safety instructions.......................................................................... |
7 |
Caring for the environment ................................................................................ |
19 |
Oven overview ..................................................................................................... |
20 |
Controls................................................................................................................ |
21 |
On/Off sensor ................................................................................................... |
22 |
Sensors controls ................................................................................................... |
22 |
Touch display ........................................................................................................ |
23 |
Main menu........................................................................................................ |
24 |
Symbols............................................................................................................ |
24 |
Operating principles .............................................................................................. |
25 |
Features................................................................................................................ |
27 |
Model numbers .................................................................................................... |
27 |
Data plate ............................................................................................................. |
27 |
Items supplied with delivery.................................................................................. |
27 |
Standard and optional accessories....................................................................... |
27 |
Shelf runners .................................................................................................... |
28 |
Baking tray, universal tray and rack with non-tip safety notches..................... |
28 |
FlexiClip telescopic runners HFC 72 ................................................................ |
29 |
Oven controls ........................................................................................................ |
34 |
Oven safety features ............................................................................................. |
34 |
System lock ................................................................................................. |
34 |
Sensor lock for the oven .................................................................................. |
34 |
Safety switch-off .............................................................................................. |
34 |
Cooling fan ....................................................................................................... |
35 |
Vented oven door ............................................................................................. |
35 |
Door lock for Pyrolytic cleaning ....................................................................... |
35 |
PerfectClean treated surfaces .............................................................................. |
35 |
Pyrolytic accessories............................................................................................. |
36 |
Using for the first time ........................................................................................ |
37 |
General settings .................................................................................................... |
37 |
Heating up the oven for the first time and rinsing the steam injection system ..... |
39 |
Settings ................................................................................................................ |
41 |
Calling up the "Settings" menu ............................................................................. |
41 |
Changing and saving settings.......................................................................... |
41 |
Settings overview .................................................................................................. |
42 |
Language ........................................................................................................... |
43 |
Time of day............................................................................................................ |
43 |
Display.............................................................................................................. |
43 |
2

|
Contents |
Clock display.................................................................................................... |
43 |
Clock format..................................................................................................... |
43 |
Setting .............................................................................................................. |
43 |
Synchronise...................................................................................................... |
43 |
Date ....................................................................................................................... |
44 |
Lighting.................................................................................................................. |
44 |
Start screen ........................................................................................................... |
44 |
Brightness ............................................................................................................. |
44 |
Volume................................................................................................................... |
45 |
Buzzer tones..................................................................................................... |
45 |
Keypad tone ..................................................................................................... |
45 |
Welcome melody.............................................................................................. |
45 |
Units ...................................................................................................................... |
45 |
Weight .............................................................................................................. |
45 |
Temperature ..................................................................................................... |
45 |
Cooling fan run-on ................................................................................................ |
46 |
Recommended temperatures................................................................................ |
46 |
Pyrolytic cleaning .................................................................................................. |
46 |
Safety .................................................................................................................... |
47 |
System lock ................................................................................................. |
47 |
Sensor lock ...................................................................................................... |
47 |
Catalyser ............................................................................................................... |
48 |
Showroom programme.......................................................................................... |
48 |
Demo mode...................................................................................................... |
48 |
Factory default settings......................................................................................... |
48 |
MyMiele ................................................................................................................ |
49 |
Adding an entry ..................................................................................................... |
49 |
Editing MyMiele..................................................................................................... |
50 |
Deleting entries................................................................................................. |
50 |
Sorting entries .................................................................................................. |
50 |
Minute minder + Alarm ....................................................................................... |
51 |
Using the alarm ................................................................................................. |
51 |
Setting the alarm .............................................................................................. |
51 |
Changing an alarm ........................................................................................... |
51 |
Deleting an alarm ............................................................................................. |
51 |
Using the minute minder ................................................................................... |
52 |
Setting the minute minder ................................................................................ |
52 |
Changing the time set for the minute minder................................................... |
53 |
Cancelling the time set for the minute minder ................................................. |
53 |
Overview of functions ......................................................................................... |
54 |
3

Contents |
|
Tips on saving energy ......................................................................................... |
56 |
Operation.............................................................................................................. |
58 |
Basic operation ..................................................................................................... |
58 |
Cooling fan ............................................................................................................ |
58 |
Using the oven - further functions..................................................................... |
59 |
Changing the temperature..................................................................................... |
60 |
Rapid Heat-up....................................................................................................... |
60 |
Rapid Heat-up.................................................................................................. |
61 |
Pre-heating the oven ........................................................................................ |
61 |
Using the Crisp function (moisture reduction)....................................................... |
62 |
Changing the oven function .................................................................................. |
62 |
Setting durations ................................................................................................... |
63 |
Switching off automatically .............................................................................. |
63 |
Switching on and off automatically .................................................................. |
64 |
Sequence of a programme that switches on and off automatically................. |
64 |
Changing an entered cooking time .................................................................. |
65 |
Cancelling cooking........................................................................................... |
65 |
Moisture Plus ................................................................................................ |
66 |
Cooking with the Moisture Plus function........................................................ |
67 |
Setting the temperature.................................................................................... |
67 |
Setting the number of bursts of steam............................................................. |
67 |
When to add the bursts of steam..................................................................... |
68 |
Preparing and starting the water intake process.............................................. |
68 |
Changing the type of heating ........................................................................... |
69 |
Injecting bursts of steam.................................................................................. |
70 |
Automatic burst of steam ................................................................................. |
70 |
1, 2 or 3 bursts of steam .................................................................................. |
70 |
Evaporating residual moisture............................................................................... |
71 |
Starting residual moisture evaporation immediately ........................................ |
72 |
Skipping residual moisture evaporation ........................................................... |
72 |
Automatic programmes ...................................................................................... |
73 |
List of food types................................................................................................... |
73 |
Using Automatic programmes............................................................................... |
73 |
Notes on use .................................................................................................... |
74 |
Search ................................................................................................................... |
75 |
User programmes................................................................................................ |
76 |
Creating a User programme .................................................................................. |
76 |
Starting a User programme ................................................................................... |
77 |
4

|
Contents |
Changing User programmes ................................................................................. |
78 |
Changing cooking stages................................................................................. |
78 |
Changing a name ............................................................................................. |
78 |
Deleting User programmes ................................................................................... |
79 |
Baking................................................................................................................... |
80 |
Notes on using the baking charts ......................................................................... |
81 |
Baking charts ........................................................................................................ |
82 |
Creamed mixture.............................................................................................. |
82 |
Rubbed in mixture ............................................................................................ |
84 |
Yeast mixtures and quark dough...................................................................... |
86 |
Whisked mixture............................................................................................... |
88 |
Choux pastry, puff pastry, meringue................................................................ |
89 |
Roasting ............................................................................................................... |
90 |
Notes on using the roasting charts ....................................................................... |
91 |
Roasting charts ..................................................................................................... |
92 |
Beef, veal.......................................................................................................... |
92 |
Pork .................................................................................................................. |
93 |
Lamb, game ..................................................................................................... |
94 |
Poultry, fish....................................................................................................... |
95 |
Food probe ............................................................................................................ |
96 |
How it works..................................................................................................... |
96 |
When the food probe can be used................................................................... |
97 |
Important notes about using the food probe ................................................... |
97 |
Using the food probe ....................................................................................... |
99 |
Time remaining display .................................................................................. |
100 |
Using residual heat......................................................................................... |
100 |
Low temperature cooking ................................................................................ |
101 |
Using the "Low temperature cooking" special application ................................. |
102 |
Low temperature cooking - setting the temperature manually............................ |
103 |
Grilling ................................................................................................................ |
104 |
Notes on the grilling chart ................................................................................... |
106 |
Fan Grill ......................................................................................................... |
107 |
Grill ............................................................................................................... |
109 |
Special applications .......................................................................................... |
110 |
Defrost................................................................................................................. |
111 |
Drying .................................................................................................................. |
112 |
Reheat ................................................................................................................. |
113 |
Heat crockery ...................................................................................................... |
113 |
Prove yeast dough .............................................................................................. |
114 |
5

Contents |
|
Pizza .................................................................................................................... |
114 |
Sabbath programme ........................................................................................... |
115 |
Gentle Bake......................................................................................................... |
116 |
Bottling ................................................................................................................ |
117 |
Frozen food/Ready meals.................................................................................... |
118 |
Cleaning and care ............................................................................................. |
119 |
Unsuitable cleaning agents ................................................................................. |
119 |
Useful tips ........................................................................................................... |
120 |
Normal soiling...................................................................................................... |
120 |
Food probe ..................................................................................................... |
120 |
Stubborn soiling (excluding the FlexiClip telescopic runners)............................. |
121 |
Pyrolytic cleaning of the oven interior .......................................................... |
122 |
Setting up for the Pyrolytic cleaning programme........................................... |
122 |
Starting the Pyrolytic cleaning programme .................................................... |
123 |
Starting the Pyrolytic cleaning programme .................................................... |
123 |
Delaying the start time of the Pyrolytic cleaning programme ........................ |
123 |
At the end of the Pyrolytic cleaning programme ............................................ |
124 |
The Pyrolytic cleaning programme is cancelled............................................. |
125 |
Removing the door.............................................................................................. |
126 |
Dismantling the door ...................................................................................... |
127 |
Fitting the door .................................................................................................... |
131 |
Removing the shelf runners with FlexiClip telescopic runners............................ |
132 |
Lowering the top heat/grill element..................................................................... |
133 |
Descaling the steam injection system ............................................................ |
134 |
Descaling process sequence ......................................................................... |
134 |
Preparing the descaling process.................................................................... |
135 |
Starting the descaling process....................................................................... |
135 |
Problem solving guide ...................................................................................... |
139 |
After sales service and warranty ..................................................................... |
145 |
Electrical connection ........................................................................................ |
146 |
Building-in diagrams ......................................................................................... |
147 |
Appliance dimensions and unit cut-out .............................................................. |
147 |
Installation in a base unit................................................................................ |
147 |
Installation in a tall unit................................................................................... |
148 |
Front dimensions................................................................................................. |
149 |
Installing the oven ............................................................................................. |
150 |
Copyright and licences ..................................................................................... |
151 |
6

Warning and Safety instructions
This appliance conforms to current safety requirements. Inappropriate use can, however, lead to personal injury and damage to property.
To avoid the risk of accidents and damage to the appliance, please read these instructions carefully before using it for the first time. They contain important notes on installation, safety, use and maintenance. Miele cannot be held liable for non-compliance with these instructions. Keep these instructions in a safe place and ensure that new users are familiar with the contents. Pass them on to any future owner.
7

Warning and Safety instructions
Correct application
This oven is designed for domestic use and for use in similar environments by guests in hotel or motel rooms, bed & breakfasts and other typical living quarters. This does not include common/ shared facilities or commercial facilities within hotels, motels or bed & breakfasts.
The oven is not suitable for outdoor use.
The oven is intended only to cook, bake, roast, grill, defrost, bottle, dry fruit etc.
Any other usage is at the owner's risk.
This oven is not intended for use by persons (including children) with reduced physical, sensory or mental capabilities, or lack of experience and knowledge, unless they are supervised whilst using it or have been given instruction concerning its use by a person responsible for their safety.
They must be able to recognise the dangers of misuse.
This oven is supplied with a special lamp to cope with particular conditions (e.g. temperature, moisture, chemical resistance, abrasion resistance and vibration). This special lamp must only be used for the purpose for which it is intended. It is not suitable for room lighting.
8

Warning and Safety instructions
Safety with children
Young children must not be allowed to use this appliance.
Older children may only use the appliance when its operation has been clearly explained to them and they are able to use it safely, recognising the dangers of misuse.
Cleaning work may only be carried out by older children under the supervision of an adult.
Children should be supervised near the appliance. Ensure that they do not play with the appliance.
Danger of suffocation! Children may be able to wrap themselves in packing material or pull it over their heads with the risk of suffocation. Keep children away from any packing material.
9

Warning and Safety instructions
Danger of burning! Children's skin is far more sensitive to high temperatures than that of adults. Great care should be taken to ensure that children do not touch the appliance when it is being used. External parts of the oven such as the door glass, control panel and the vents become quite hot.
Danger of burning!
Children's skin is far more sensitive to high temperatures than that of adults. The oven becomes hotter during the Pyrolytic cleaning programme than it does in normal use. Do not let children touch the oven while the Pyrolytic cleaning programme is running.
Danger of injury! The maximum load capacity for the door is 15 kg. Children can hurt themselves on an open door.
Ensure that children do not sit on or swing on the door.
10
Warning and Safety instructions
Technical safety
Repairs and other work by unqualified persons could be dangerous. Installation, maintenance work and repairs to electrical appliances must only be carried out by a Miele approved service technician.
A damaged appliance is dangerous. Check it for any visible damage. Never install or attempt to use a damaged appliance.
Reliable and safe operation of this oven can only be assured if it has been connected to the mains electricity supply.
The electrical safety of this appliance can only be guaranteed when continuity is complete between it and an effective earthing system. It is most important that this basic safety requirement is present and tested regularly and, where there is any doubt, the household wiring system should be inspected by a qualified electrician.
Before connecting the appliance to the mains supply, make sure that the rating on the data plate (voltage and frequency) corresponds to that of the household supply.
This data must correspond in order to avoid risk of damage to the appliance. Consult a qualified electrician if in any doubt.
Do not connect the appliance to the mains electricity supply by a multi-socket unit or an extension lead. These do not guarantee the required safety of the appliance (e.g. danger of overheating).
For safety reasons, this appliance may only be used when it has been built in.
11

Warning and Safety instructions
This oven must not be installed and operated in mobile installations (e.g. on a ship).
Tampering with electrical connections or components and mechanical parts is highly dangerous to the user and can cause operational faults.
Do not open the outer casing of the appliance.
The manufacturer's warranty will be invalidated if the appliance is not repaired by a Miele approved service technician.
Faulty components must only be replaced by genuine Miele spare parts. The manufacturer can only guarantee the safety of the appliance when Miele replacement parts are used.
If the oven is delivered without a mains connection cable, or if the mains connection cable is damaged, it must only be replaced by a Miele approved service technician (see "Electrical connection") in order to avoid a hazard.
During installation, maintenance and repair work, the appliance must be disconnected from the mains electricity supply, e.g. if the oven lighting is faulty (see "Problem solving guide").It is only completely isolated from the electricity supply when:
–it is switched off at the mains circuit breaker, or
–it is switched off at the wall socket and the plug is withdrawn from the socket. Do not pull the mains connection cable but the mains plug to disconnect your appliance from the mains electricity supply.
12

Warning and Safety instructions
For the oven to function correctly, it requires a sufficient intake of cool air. Ensure the intake of cool air to the oven is not impaired (e.g. due to the installation of insulation material inside the housing unit).
Furthermore, the incoming cool air must not be excessively heated by other heat sources (e.g. fuel furnaces).
If the oven is installed behind a furniture door, do not close the door while the oven is in operation. Heat and moisture would build up behind a closed furniture door, potentially causing damage to the oven, the furniture unit and the flooring. Wait until the oven has cooled down completely before closing the furniture door.
13

Warning and Safety instructions
Correct use
Danger of burning!
The oven becomes hot when in use.
Exercise care when handling food and trays so as not to burn yourself on heating elements, the walls of the oven, shelf runners, trays and hot food itself.
Use oven gloves when placing food in the oven, turning or removing it and when adjusting oven shelves etc. in a hot oven.
Do not use the oven to heat up the room.
Due to the high temperatures radiated, objects left near the appliance could catch fire.
Never leave the appliance unattended when cooking with oil or fat. They can ignite if overheated.
Do not use water on grease fires. Turn off the oven immediately and suffocate the flames by keeping the oven door closed.
Make sure that you keep to the recommended grilling times when using grilling functions.
Excessively long grilling times can lead to food drying out and burning or could even cause the food to catch fire.
Some foods dry out very quickly and can be ignited by high grilling temperatures.
Do not use grilling functions for crisping rolls or bread or to dry flowers or herbs. Instead use Fan Plus or Conventional Heat .
If using alcohol in your recipes, please be aware that high temperatures can cause the alcohol to vaporise and even to ignite on the hot heating elements.
When residual heat is used to keep food warm, the high level of humidity and condensation can cause corrosion in the oven. The control panel, worktop or furniture unit may also be damaged.
Do not switch the oven off completely while food is inside it, but select the lowest possible temperature for the oven function you are using. This will ensure the fan will automatically continue to run.
14

Warning and Safety instructions
Food which is stored in the oven or left in it to be kept warm can dry out and the moisture released can lead to corrosion damage in the oven.
Always cover food that is left in the oven to keep warm.
A build-up of heat can cause the enamel on the floor of the oven to crack or shatter.
Do not line the floor of the oven with anything, e.g. aluminium foil. If you wish to place dishes on the floor of the oven during cooking, or place crockery on the floor of the oven to heat it up, you can do so, but only with the Fan Plus or Gentle Bake function.
Rapid Heat-up must be switched off.
The enamelling on the oven floor can become damaged by items being pushed around on it.
If using the oven to store pots and pans, ensure that you avoid pushing them around on the oven floor.
Never pour cold water onto hot surfaces in a hot oven.
The steam created could cause serious burns or scalding and the sudden change in temperature can damage the enamel in the oven.
During cooking processes using moisture and during the residual moisture evaporation process steam is produced which can cause serious injury by scalding. Do not open the door whilst a burst of steam is being released or during the evaporation process.
It is important that the heat is allowed to spread evenly throughout the food being cooked.
This can be achieved by stirring or turning the food.
Plastic containers, which are not heat-resistant, melt and may ignite at high temperatures and can damage the oven.
Use only plastic containers that are indicated by the manufacturer as being suitable for use in ovens.
15

Warning and Safety instructions
Do not use the appliance to heat up or bottle food in sealed jars and tins.
Pressure will build up inside them and they can explode causing damage to the appliance, as well as the risk of injury and scalding.
Do not leave the oven door open unnecessarily as someone may trip over it or be injured by it.
The oven door can support a maximum load of 15 kg. Do not lean or sit on an open oven door, or place heavy items on it. Also make sure that nothing can get trapped between the door and the oven cavity. This could damage the oven.
16

Warning and Safety instructions
Cleaning and care
Do not use a steam cleaning appliance to clean this oven. Pressurised steam could reach the electrical components and cause a short circuit.
Scratches on the door glass can result in the glass breaking.
Do not use abrasive cleaners, hard sponges, brushes or sharp metal
tools to clean the door glass.
The shelf runners can be removed for cleaning (see "Cleaning and care").
Ensure that they are replaced correctly and do not use the oven without them fitted.
Coarse soiling should be removed before running the Pyrolytic cleaning programme. If not removed, coarse soiling can smoke and cause the Pyrolytic cleaning programme to switch itself off.
In areas which may be subject to infestation by cockroaches or other vermin, pay particular attention to keeping the appliance and its surroundings clean at all times. Any damage caused by cockroaches or other vermin will not be covered by the warranty.
17

Warning and Safety instructions
Accessories
Use only genuine original Miele spare parts. If spare parts or accessories from other manufacturers are used, the warranty will be invalidated, and Miele cannot accept liability.
If you have a Miele HUB 5000-M/HUB 5001-M/HUB 5000-XL/ HUB 5001-XL (if available) oven dish, do not place it on shelf level 1. This would damage the floor of the oven. The very small gap between the bottom of the dish and the oven floor would cause a build-up of heat and could cause the enamel to crack or chip.
Do not place Miele oven dishes on the top rail of shelf level 1 as they will not be secured in this position by the anti-tip safety notches on the sides of the dishes.
Instead, use shelf level 2 for these oven dishes.
Only use the Miele food probe supplied with this oven. If it is faulty, it must only be replaced with a suitable original Miele food probe.
The plastic on the food probe can melt at very high temperatures. Do not use the food probe when grilling (Exception: Fan Grill ). If you are not using the food probe, do not store it in the oven.
The high temperatures used during the Pyrolytic cleaning programme will damage accessories that are not designed for cleaning in the Pyrolytic programme. Please remove these accessories from the oven interior before starting the Pyrolytic cleaning programme. This also applies to non-pyrolytic accessories purchased separately to the oven (see "Cleaning and care").
18

Caring for the environment
Disposal of the packing
material
The transport and protective packaging has been selected from materials which are environmentally friendly for disposal, and can normally be recycled.
Recycling the packaging reduces the use of raw materials in the manufacturing process and also reduces the amount of waste in landfill sites. Ensure that any plastic wrappings, bags etc. are disposed of safely and kept out of the reach of babies and young children. Danger of suffocation.
Disposing of your old
appliance
Electrical and electronic appliances often contain valuable materials. They also contain specific materials, compounds and components, which were essential for their correct function and safety. These could be hazardous to human health and to the environment if disposed of with your domestic waste or if handled incorrectly. Please do not, therefore, dispose of your old appliance with your household waste.
Please dispose of it at your local community waste collection / recycling centre for electrical and electronic appliances. You are also responsible for deleting any personal data that may be stored on the appliance prior to disposal. Please ensure that your old appliance poses no risk to children while being stored prior to disposal.
19

Oven overview
a Oven controls
b Door lock for Pyrolytic cleaning
c Top heat / grill element with wireless food probe antenna
d Steam inlet openings
e Water intake pipe for the steam injection system
f Wireless food probe holder
g Air inlet for the fan with ring heating element behind it
h Shelf runners with 5 shelf levels
i Oven floor with bottom heat element underneath it
j Front frame with data plate
k Door
20
Controls
a Recessed On/Off sensor
For switching the appliance on and off
bDisplay
Displays time of day and information for operation
csensor
For setting the minute minder
dsensor
For switching the oven interior lighting on and off
esensor
To go back one step at a time
fOptical interface
(for service technician use only)
21

Controls
On/Off sensor
The On/Off sensor is recessed and reacts to touch.
It is used for switching the oven on and off.
Sensors controls
The sensors react to touch. Each touch is confirmed with a keypad tone. This keypad tone can be switched off (see "Settings – Volume – Keypad tone").
Sensor |
Function |
Notes |
|
For activating and |
If a list of options is visible in the display or if a |
|
deactivating |
cooking process is running, you can enter a |
|
minute minder / |
minute minder duration (e.g. when boiling eggs on |
|
alarm |
the cooktop) or an alarm, i.e. a specific time, at |
|
|
any point (see "Minute minder + Alarm"). |
|
|
If the display is dark, this sensor will not react until |
|
|
the oven is switched on. |
|
|
|
|
For switching the |
If a menu is visible in the display or if a cooking |
|
oven interior |
process is running, touching will switch the |
|
lighting on and off |
oven interior lighting on or off. |
|
|
If the display is dark, this sensor will not react until |
|
|
the oven is switched on. |
|
|
The oven interior lighting switches off after |
|
|
15 seconds during a cooking process or remains |
|
|
constantly switched on, depending on the setting |
|
|
selected. |
|
|
|
|
To go back a step |
|
|
|
|
22
Controls
Touch display
The display can be scratched by pointed or sharp objects, e.g. pens. Only touch the touch display with your fingertips.
Touching the display with your finger creates a tiny charge which releases an electrical impulse. This impulse is recognised by the touch display.
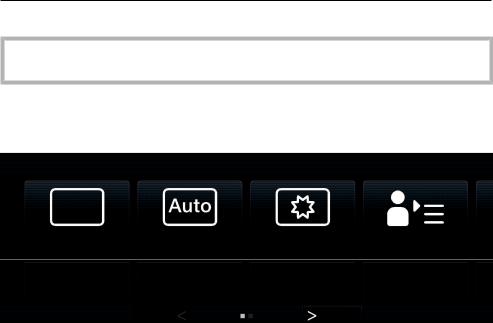
The touch display is divided into three sections:
Main menu |
12:00 |
Oven functions |
Automatic |
Special |
MyMiele |
Us |
|
programmes |
applications |
|
pr |
The menu path appears at the top left and shows you which menu or submenu you are in. Options within a menu are separated by a vertical line. If there is not enough space to show the whole menu path, additional options are indicated by … .
The time of day, alarm and minute minder are shown in the top right-hand corner of the display.
The middle section shows the current menu and options. You can scroll to the right or left by swiping your finger across the display.
The and arrow sensors at the bottom of the screen are used for scrolling to the left or right. The number of small squares between the arrows indicates the number of pages available and your position within the current menu.
23

Controls
Main menu
Oven functions
Automatic programmes
Special applications
MyMiele
User programmes
Settings
Maintenance
Symbols
The following symbols may appear in the display:
Symbol |
Meaning |
|
Some settings, e.g. display brightness and buzzer volume, are |
|
selected using a bar chart. |
|
This symbol indicates that there is additional information and |
|
advice about using the oven. Select OK to access the |
|
information. |
|
The system lock or sensor lock is active (see "Settings - Safety"). |
|
The oven cannot be used. |
|
Alarm |
|
Minute minder |
|
Core temperature when using the food probe |
… |
This indicates that there are more options available, which are |
|
not visible because there is not enough space in the display. |
24

Controls
Operating principles
Each time you touch a possible option the relevant field lights up orange.
Selecting or calling up a menu
Touch the field you want to select it.
Scrolling through menus
You can scroll left or right.
Swipe the screen, i.e. place your finger on the Touch display and swipe it in the direction you want.
Or: Using your finger, touch the arrows and to scroll left or right.
Exiting a menu
Touch , or touch an option in the menu path at the top of the screen, or touch
… .
Depending on which menu you are in, this will take you back a level or back to the main menu.
Help function
The Help field appears with some functions and options.
Touch the field.
Helpful information will then appear in text and pictures.
25

Controls
Entering numbers
You can enter numbers by scrolling through and touching the roller, or by using the numerical keypad.
To enter numbers using the roller:
Swipe the roller up or down to select the number you want.
To enter numbers using the numerical keypad:
Touch in the bottom right of the input field. The numerical keypad appears.
Touch the required numbers.
Once you have entered a valid value, the OK sensor will light up green. The last figure entered can be deleted by using the arrow.
Touch OK.
Entering letters
You can enter short names for your own user programmes using a keyboard.
Touch the required letters or characters.
Touch Save.
26

Features
Model numbers
A list of the ovens described in these operating instructions can be found on the back page.
Data plate
The data plate located on the front frame of the oven is visible when the door is open.
On the data plate are printed the model number, serial number and the connection data (voltage/frequency/ maximum rated load).
Have this information available if you need to contact Miele so that any issues can be rectified as quickly as possible.
Items supplied with delivery
The oven is supplied with:
–the operating and installation instructions for using the oven functions,
–a recipe booklet for Moisture
Plus and Automatic programmes,
–screws for fixing the oven to the housing unit,
–descaling tablets and a plastic tube with suction cup for descaling,
–various accessories.
Standard and optional
accessories
Depending on model!
All ovens are supplied with shelf runners, a universal tray and baking and roasting rack (rack for short). Depending on the model, Miele ovens may be supplied with the accessories listed below.
All accessories and cleaning and care products in these instructions are designed to be used with Miele ovens.
These are available to order via the Miele Webshop or directly from Miele (see end of this booklet for contact details).
Please state the model number of your oven and that of any accessories you wish to purchase.
27
Features
Shelf runners
Shelf runners for accessories (trays, racks, FlexiClip telescopic runners etc.) are fitted on either side of the oven cavity for shelf levels .
The shelf level numbers are indicated on the front of the oven frame.
Each shelf level has two rails, one above the other:
The accessories (e.g. the rack) are pushed into the oven between the two rails.
FlexiClip telescopic runners (depending on model) are fitted on the lower rail.
The shelf runners can be removed for cleaning (see "Cleaning and care").
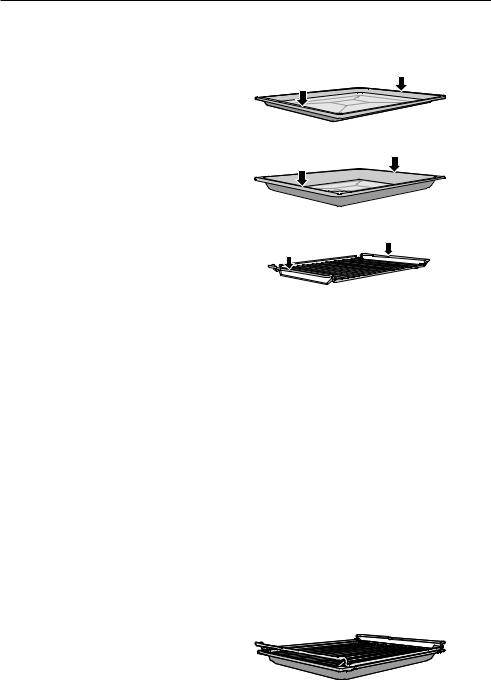
Baking tray, universal tray and rack with non-tip safety notches
Baking tray HBB 71:
Universal tray HUBB 71:
Rack HBBR 72:
Insert these accessories into the shelf runners between the two rails of a shelf level.
Always place the rack with the loading surface in the lower position and the non-tip safety notches towards the back.
Non-tip safety notches are located on accessories to prevent the trays being pulled out completely when you only wish to pull them out partially. They also prevent trays from tipping.
–The non-tip safety notches are located in the middle of the short sides of the baking tray and universal tray.
–The non-tip safety notches are located towards the back of the short sides of the rack.
28
Features
If you are using the universal tray with the rack on top, insert the tray between the rails of a shelf runner and the rack will sit on top of it.
FlexiClip telescopic runners HFC 72
The FlexiClip telescopic runners can be attached to any shelf level.
Push the FlexiClip telescopic runners right into the oven before placing accessories on them.
The accessories will then automatically sit securely in between the stoppers at either end of each runner and be prevented from sliding off.
The FlexiClip runners can support a maximum load of 15 kg.
29

Features
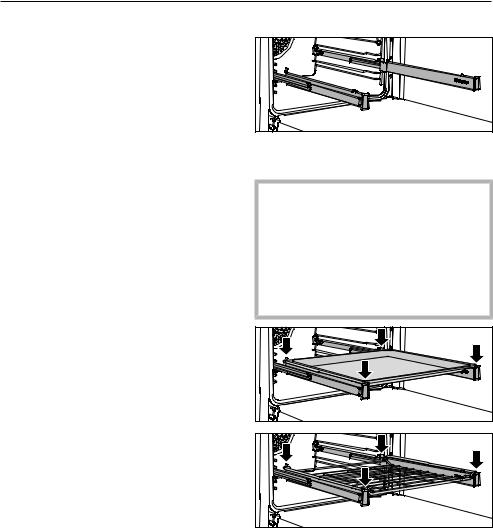
Fitting and removing the FlexiClip telescopic runners
Danger of burning! Make sure the oven heating
elements are switched off and the oven interior is cool.
The FlexiClip telescopic runners are fitted in between the two rails that make up a shelf level.
The telescopic runner with the Miele logo must be fitted on the right.
When fitting or removing the telescopic runners, do not extend them.
Hook the FlexiClip telescopic runner onto the bottom rail of a shelf level at the front (1.) and push it along the rail into the oven interior (2.).
Then secure the telescopic runner to the bottom of the two rails as illustrated (3).
If the telescopic runners are difficult to pull out after fitting, you may need to pull firmly on them once to release them.
To remove a FlexiClip telescopic runner:
Push the FlexiClip telescopic runner all the way in.
Remove the FlexiClip telescopic runner by raising it at the front (1) then pulling it forwards along the rail and out (2).
30
Loading...