


 Loading...
User’s Guide: Network Fax Functions

Table of contents
1Internet Fax Function
2Preparation for Internet Fax (For Administrators)
2.1 |
Preparation flow.............................................................................................................................. |
2-2 |
2.2 |
Operations required to use this function...................................................................................... |
2-3 |
|
Checking a LAN cable for connection ................................................................................................ |
2-3 |
|
Checking the network settings ........................................................................................................... |
2-3 |
|
Configuring the Internet fax environment ........................................................................................... |
2-3 |
|
Registering sender information........................................................................................................... |
2-3 |
|
Setting the date and time for the machine.......................................................................................... |
2-3 |
2.3 |
Option settings ................................................................................................................................ |
2-4 |
|
Registering a frequently used destination .......................................................................................... |
2-4 |
|
Registering a subject and text of the successfully received E-mail message .................................... |
2-4 |
|
Using SMTP authentication ................................................................................................................ |
2-4 |
|
Using POP before SMTP authentication............................................................................................. |
2-4 |
|
Using an SSL/TLS communication..................................................................................................... |
2-4 |
|
Checking fax reception ....................................................................................................................... |
2-4 |
3How to Send
3.1 |
Sending (basic operation flow) ...................................................................................................... |
3-2 |
3.2 |
Recalling a program for sending ................................................................................................... |
3-5 |
|
Program .............................................................................................................................................. |
3-5 |
|
Registering a program ........................................................................................................................ |
3-5 |
|
Recalling a program for sending......................................................................................................... |
3-6 |
3.3 |
Specifying a destination ................................................................................................................. |
3-8 |
|
Selecting a destination from Favorites ............................................................................................... |
3-8 |
|
Selecting a destination from Address Book ....................................................................................... |
3-8 |
|
Directly entering data.......................................................................................................................... |
3-9 |
|
Selecting a destination from the history ............................................................................................. |
3-9 |
3.4 |
Option settings for fax TX ............................................................................................................ |
3-11 |
3.4.1 |
Basic option settings ........................................................................................................................ |
3-11 |
|
Specifying the size of the original to be scanned ([Scan Size]) ........................................................ |
3-11 |
|
Specifying the resolution to scan the original ([Resolution]) ............................................................. |
3-11 |
|
Scanning both sides of an original ([Simplex/Duplex]) ..................................................................... |
3-11 |
|
Changing the file name ([File Name/Subject Name/Other]) .............................................................. |
3-11 |
3.4.2 |
Specifying the method to scan the original ...................................................................................... |
3-12 |
|
Scanning a long original ([Long Original]) ......................................................................................... |
3-12 |
|
Specifying a binding position ([Binding Position])............................................................................. |
3-12 |
|
Scanning a number of originals in several batches ([Separate Scan]).............................................. |
3-12 |
3.4.3 |
Adjusting quality/density................................................................................................................... |
3-13 |
|
Selecting the appropriate image quality level for the contents of the original ([Original Type])........ |
3-13 |
|
Adjusting the density of the original to be scanned ([Density])......................................................... |
3-13 |
|
Adjusting the background density of the original to be scanned |
|
|
([Background Removal]).................................................................................................................... |
3-13 |
|
Erasing text or shadows in the margins of an original ([Frame Erase]) ............................................. |
3-13 |
|
Sharpening the border between texts ([Sharpness])......................................................................... |
3-13 |
3.4.4 |
Viewing the current settings.............................................................................................................. |
3-14 |
4 |
How to Receive a Fax |
|
|
Receiving a fax automatically ............................................................................................................. |
4-2 |
|
Receiving a fax manually .................................................................................................................... |
4-2 |
[Network Fax Functions] |
Contents-1 |

5Receiving Options
5.1 |
Adding the received date and time for printing ([Footer Position])............................................ |
5-2 |
|
Reception information......................................................................................................................... |
5-2 |
|
Operations required to use this function (for administrators) ............................................................. |
5-2 |
5.2 |
Forwarding a received fax to another destination (Forward TX)................................................ |
5-3 |
|
Forward TX.......................................................................................................................................... |
5-3 |
|
Operations required to use this function (for administrators) ............................................................. |
5-3 |
5.3 |
Saving a received fax to memory without printing (Memory RX) ............................................... |
5-4 |
|
Memory RX ......................................................................................................................................... |
5-4 |
|
Operations required to use this function (for administrators) ............................................................. |
5-4 |
|
Printing or deleting a received fax ...................................................................................................... |
5-4 |
|
Downloading a received fax................................................................................................................ |
5-4 |
5.4 |
Stopping fax printing at night (Night RX) ...................................................................................... |
5-6 |
|
Night RX.............................................................................................................................................. |
5-6 |
|
Operations required to use this function (for administrators) ............................................................. |
5-6 |
5.5 |
Printing a fax on both sides ([Duplex Print (RX)])......................................................................... |
5-7 |
|
Duplex Print (RX)................................................................................................................................. |
5-7 |
|
Operations required to use this function (for administrators) ............................................................. |
5-7 |
5.6 |
Configuring the fax print settings (for administrators)................................................................ |
5-8 |
|
Default print settings........................................................................................................................... |
5-8 |
|
Fixing the print paper size ([Print Paper Size]) .................................................................................... |
5-8 |
|
Fixing the print paper tray ([Tray Selection for RX Print]).................................................................... |
5-8 |
|
Splitting a custom size (portrait) fax for printing ([Print Separate Fax Pages]) ................................... |
5-8 |
6Printing a Fax Report
7Registering Frequently Used Destinations (Address Book)
7.1 |
Address Book .................................................................................................................................. |
7-2 |
7.2 |
Registering an Internet fax destination......................................................................................... |
7-3 |
7.2.1 |
Registering a destination in Utility ...................................................................................................... |
7-3 |
7.2.2 |
Registering a destination from the main screen in Fax mode ............................................................ |
7-3 |
7.3 |
Registering directly entered destinations in Address Book ....................................................... |
7-4 |
8Index
[Network Fax Functions] |
Contents-2 |

1
Internet Fax Function

1
1Internet Fax Function
Internet fax is a function used to send and receive faxes via the intranet and Internet.
The same network as the one used by the computers is used to transmit faxes. Therefore, you can send and receive faxes to/from distant locations without having to worry about high communication costs or sending a large number of pages.
The following describes the precautions for using the Internet Fax.
-To use the Internet fax function, optional units must be installed except in certain regions.
-For bizhub C3850: The optional Fax Kit FK-512 and Mount Kit MK-738 are required, excluding models used in North America.
-For bizhub C3350: The optional Fax Kit FK-512 and Mount Kit MK-738 are required.
-Internet faxes are sent or received via E-mail. Prepare a dedicated Internet fax E-mail address for this machine.
-Connect this machine to a network that is capable of sending and receiving E-mail massages.
-A file may be damaged depending on network conditions. Be sure to check that the file(s) is not damaged.
-Even if "----" is displayed in the result column of the TX result screen or Activity Report, an E-mail may not reach the receiver side due to a problem on the Internet route."----" indicates that normal communication has been established up to the server.
-You cannot transfer an original that exceeds the A4 or letter width (216 mm / 8.5 inches).
-If color or gray scale data is received, they will be discarded.
[Network Fax Functions] |
1-2 |

2Preparation for Internet Fax (For Administrators)
2.1 |
|
|
|
|
Preparation flow |
2 |
||||||||||||||||||||||||||||||||||||||||||||||||||||||||||||||||||||||||||||||||||||||||||||||||
|
|
|
|
|
|
|
|
|
|
|
|
|
|
|
|
|
|
|
|
|
|
|
|
|
|
|
|
|
|
|
|
|
|
|
|
|
|
|
|
|
|
|
|
|
|
|
|
|
|
|
|
|
|
|
|
|
|
|
|
|
|
|
|
|
|
|
|
|
|
|
|
|
|
|
|
|
|
|
|
|
|
|
|
|
|
|
|
|
|
|
|
|
|
|
|
|
|
|
|
|
|
|
|
|
|
|
|
|
|
|
|
|
|
|
|
|
|
|
|
|
|
|
|
|
|
|
|
|
|
|
|
|
|
|
|
|
|
|
|
|
|
|
|
|
|
|
|
|
|
|
|
|
|
|
|
|
|
|
|
|
|
|
|
|
|
|
|
|
|
|
|
|
|
|
|
|
|
|
|
|
|
|
|
|
|
|
|
|
|
|
|
|
|
|
|
|
|
|
|
|
|
|
|
|
|
|
|
|
|
|
|
|
|
|
|
|
|
|
|
|
|
|
|
|
|
|
|
|
|
|
|
|
|
|
|
|
|
|
|
|
|
|
|
|
|
|
|
|
|
|
|
|
|
|
|
|
|
|
|
|
|
|
|
|
|
|
|
|
|
|
|
|
|
|
|
|
|
|
|
|
|
|
|
|
|
|
|
|
|
|
|
|
|
|
|
|
|
|
|
|
|
|
|
|
|
|
|
|
2Preparation for Internet Fax (For Administrators)
2.1Preparation flow
Connecting this machine to the network
Checking a LAN cable for connection
Checking the network settings
% Check that an IP address is assigned to this machine.
Setting up the environment to send and receive Internet fax
Configuring the Internet fax environment
%Enable the Internet fax function. In addition, specify the information of this machine and settings required to send and receive E-mail.
Registering sender information
%Register the machine name, company name, etc. to be printed on faxes.
Setting the date and time for the machine
%Set the date and time on this machine to be printed on sent and received faxes.
Configuring the machine to suit your environment
Registering a frequently used destination
%This will save you from having to enter a destination each time you send data.
Registering a subject and text of the successfully received E-mail message
%Registering a subject and text of an E-mail message will save you the trouble of entering this information each time you send a fax.
Using SMTP authentication
%This machine supports SMTP authentication. If SMTP authentication is installed in your environment, configure its setting.
Using POP before SMTP authentication
%This machine supports POP before SMTP authentication. If POP before SMTP authentication is installed in your environment, configure its setting.
Using an SSL/TLS communication
%This machine supports SMTP over SSL and Start TLS. If a communication with an E-mail server is encrypted using SSL in your environment, configure its setting.
Checking fax reception
%You can check that the fax has been received via the message received from the recipient machine. (In normal circumstances, you can use this function by default.)
Preparation finished
[Network Fax Functions] |
2-2 |

2.2 |
Operations required to use this function |
2 |
|
|
|
2.2Operations required to use this function
Checking a LAN cable for connection
Check that a LAN cable connected to the network is connected to the LAN port of this machine.
Checking the network settings
Print out the Configuration Page, then check that an IP address is assigned to this machine.
To print out the Configuration Page, select [Utility] - [User Settings] - [Printer Settings] - [Print Reports] - [Configuration Page].
dReference
If no IP address is assigned to this machine, you will need to configure the network. For details, refer to Chapter 4 "Initial Settings of This Machine" in [Quick Start Guide].
Configuring the Internet fax environment
Enable the Internet fax function. In addition, specify the information of this machine and settings required to send and receive E-mail.
For details on the setting procedure, refer to Chapter 2 "Configuring the Operating Environment of This Machine" in [User's Guide: Applied Functions].
Registering sender information
Register the machine name, company name, etc. to be printed on faxes.
To configure settings: [Utility] - [Administrator Settings] - [Fax Settings] - [Header Information] - [Sender]
Setting the date and time for the machine
Set the date and time on this machine to be printed on sent and received faxes.
To configure settings: [Utility] - [Administrator Settings] - [System Settings] - [Date & Time Settings]
dReference
If an NTP (Network Time Protocol) server is used to set the time, the date and time on this machine can be adjusted automatically. For details, refer to Chapter 1 "Using Web Connection" in [User's Guide: Applied Functions].
[Network Fax Functions] |
2-3 |

2.3 |
Option settings |
2 |
|
|
|
2.3Option settings
Registering a frequently used destination
Registering a frequently used E-mail address to this machine as a destination will save you from having to enter it each time you send an e-mail.
For details on how to register it, refer to page 7-2.
Registering a subject and text of the successfully received E-mail message
When the recipient machine receives an Internet fax, the fax is printed, then the document that notifies the successful reception of the E-mail message (successful reception E-mail) is printed. This document contains the subject and text that are specified when the fax is sent from this machine.
Pre-register multiple preset text for the subject and fixed message text of an E-mail; you can use them depending on destinations.
For details on the registration procedure, refer to Chapter 1 "Using Web Connection" in [User's Guide: Applied Functions].
Using SMTP authentication
This machine supports SMTP authentication. If SMTP authentication is installed in your environment, configure its setting.
For details on the setting procedure, refer to Chapter 2 "Configuring the Operating Environment of This Machine" in [User's Guide: Applied Functions].
Using POP before SMTP authentication
This machine supports POP before SMTP authentication. If POP before SMTP authentication is installed in your environment, configure its setting.
For details on the setting procedure, refer to Chapter 2 "Configuring the Operating Environment of This Machine" in [User's Guide: Applied Functions].
Using an SSL/TLS communication
This machine supports SMTP over SSL and Start TLS. If a communication with an E-mail server is encrypted using SSL in your environment, configure its setting.
The method of configuring the setting is explained using Web Connection. For details, refer to Chapter 2 "Configuring the Operating Environment of This Machine" in [User's Guide: Applied Functions].
Checking fax reception
Configure the settings for requesting or responding to the result of sent and received Internet faxes, and the setting regarding the exchange of capability information between machines. (In normal circumstances, you can use this function by default.)
For details on the setting procedure, refer to Chapter 2 "Configuring the Operating Environment of This Machine" in [User's Guide: Applied Functions].
[Network Fax Functions] |
2-4 |

3 How to Send
3.1 |
|
|
|
|
Sending (basic operation flow) |
3 |
||||||||||||||||||||||||||||||||||||||||||||||||||||||||||||||||||||||||||||||||||||||||||||||||
|
|
|
|
|
|
|
|
|
|
|
|
|
|
|
|
|
|
|
|
|
|
|
|
|
|
|
|
|
|
|
|
|
|
|
|
|
|
|
|
|
|
|
|
|
|
|
|
|
|
|
|
|
|
|
|
|
|
|
|
|
|
|
|
|
|
|
|
|
|
|
|
|
|
|
|
|
|
|
|
|
|
|
|
|
|
|
|
|
|
|
|
|
|
|
|
|
|
|
|
|
|
|
|
|
|
|
|
|
|
|
|
|
|
|
|
|
|
|
|
|
|
|
|
|
|
|
|
|
|
|
|
|
|
|
|
|
|
|
|
|
|
|
|
|
|
|
|
|
|
|
|
|
|
|
|
|
|
|
|
|
|
|
|
|
|
|
|
|
|
|
|
|
|
|
|
|
|
|
|
|
|
|
|
|
|
|
|
|
|
|
|
|
|
|
|
|
|
|
|
|
|
|
|
|
|
|
|
|
|
|
|
|
|
|
|
|
|
|
|
|
|
|
|
|
|
|
|
|
|
|
|
|
|
|
|
|
|
|
|
|
|
|
|
|
|
|
|
|
|
|
|
|
|
|
|
|
|
|
|
|
|
|
|
|
|
|
|
|
|
|
|
|
|
|
|
|
|
|
|
|
|
|
|
|
|
|
|
|
|
|
|
|
|
|
|
|
|
|
|
|
|
|
|
|
|
|
|
|
3How to Send
3.1Sending (basic operation flow)
1 Load the original.
2Tap [Fax].
3Specify the destination E-mail address.
%For details on how to specify a destination, refer to page 3-8.
%Fax broadcasting can be performed by specifying multiple destinations.
[Network Fax Functions] |
3-2 |
3.1 |
Sending (basic operation flow) |
3 |
|
|
|
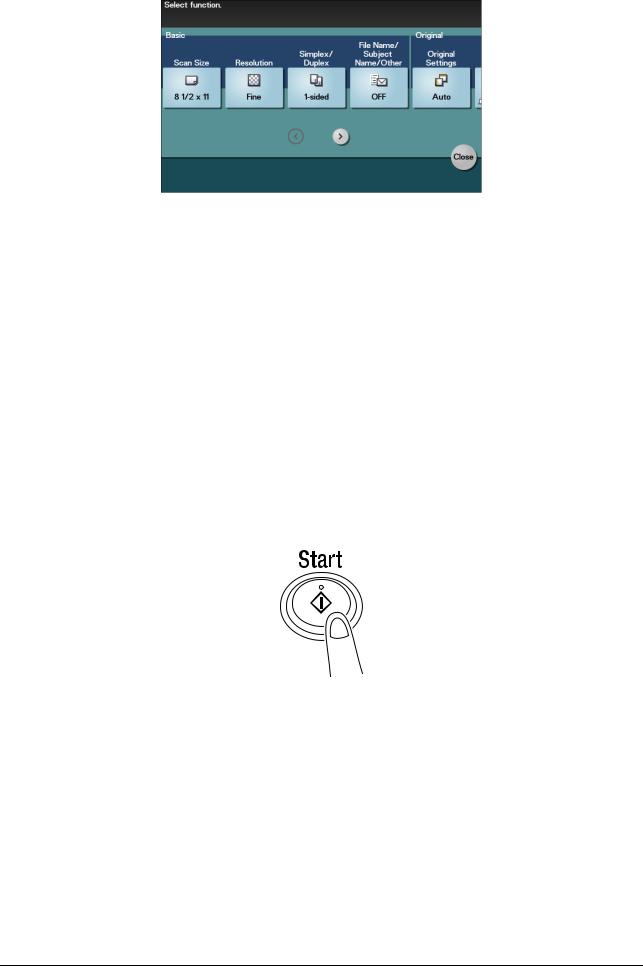
4Tap [Application], then configure fax option settings.
%Specify the original size before scanning the original. For details on how to specify the original size, refer to page 3-11.
%You cannot transfer an original that exceeds the A4 or letter width (216 mm / 8.5 inches).
%For details on configuring option settings, refer to the respective columns of the following table.
Purpose |
Reference |
|
|
To configure basic options such as original size and resolution |
page 3-11 |
|
|
To specify the method to scan the original |
page 3-12 |
|
|
To adjust the image quality or density depending on the contents of the original |
page 3-13 |
|
|
5Press the Start key.
%Tap [Check Settings] before sending data, and check the specified destination and settings if necessary.
%To redo operations for specifying destinations or option settings, press the Reset key.
%If you press the Stop key while scanning the original, scanning stops. To cancel scanning the original, delete inactive jobs from the Job screen.
Sending starts.
 Tips
Tips
-When an Internet fax is sent, the TX result report is printed. With the TX result report, you can check for successful fax transmission.
-When the recipient machine receives an Internet fax, an MDN message that provides notification of successful reception is printed on this machine. You can check whether or not the fax has been successfully received by reading the MDN message.
 Related setting
-You can change the defaults of fax sending options to suit your environment.
To configure settings: [Utility] - [User Settings] - [Scan/Fax Settings] - [Default Fax Settings]
[Network Fax Functions] |
3-3 |

3.1 |
Sending (basic operation flow) |
3 |
|
|
|
-If necessary, you can change the default of the Fax screen.
To configure settings: [Utility] - [User Settings] - [Custom Display Settings] - [Scan/Fax Settings] - [Fax Default Tab] (default: [Favorites]).
[Network Fax Functions] |
3-4 |
Loading...