


 Loading...
User’s Guide [Copy Operations]

Introduction
Introduction
Thank you for choosing this machine.
This User’s Guide contains details on the operation of the various functions of the bizhub 362, 282 and 222, precautions on its use, and basic troubleshooting procedures. In order to ensure that this machine is used correctly and efficiently, carefully read this User’s Guide before using the machine. After reading the User’s Guide, store it in the designated holder so that it can easily be referred to when questions or problems arise during operation.
Views of the actual equipment may be slightly different from the illustrations used in this User’s Guide.
Energy Star®
As an ENERGY STAR® Partner, we have determined that this machine meets the ENERGY STAR® Guidelines for energy efficiency.
What is an ENERGY STAR® Product?
An ENERGY STAR® product has a special feature that allows it to automatically switch to a “low-power mode” after a period of inactivity. An ENERGY STAR® product uses energy more efficiently, saves you money on utility bills and helps protect the environment.
362/282/222 |
x-1 |

Introduction
Trademarks and registered trademarks
KONICA MINOLTA, KONICA MINOLTA Logo, and The essentials of imaging are registered trademarks or trademarks of KONICA MINOLTA HOLDINGS, INC.
PageScope and bizhub are registered trademarks or trademarks of KONICA MINOLTA BUSINESS TECHNOLOGIES, INC.
Netscape Communications, the Netscape Communications logo, Netscape Navigator, Netscape Communicator, and Netscape are trademarks of Netscape Communications Corporation.
Compact-VJE
Copyright 1986-2003 VACS Corp.
RC4® is a registered trademark or trademark of RSA Security Inc. in the United States and/or other countries.
RSA® is a registered trademark or trademark of RSA Security Inc. RSA BSAFE® is a registered trademark or trademark of RSA Security Inc. in the United States and/or other countries.
License information
This product includes RSA BSAFE Cryptographic software from RSA Security Inc.
OpenSSL Statement
OpenSSL License
Copyright © 1998-2000 The OpenSSL Project. All rights reserved. Redistribution and use in source and binary forms, with or without modification, are permitted provided that the following conditions are met:
1.Redistributions of source code must retain the above copyright notice, this list of conditions and the following disclaimer.
2.Redistributions in binary form must reproduce the above copyright notice, this list of conditions and the following disclaimer in the documentation and/or other materials provided with the distribution.
3.All advertising materials mentioning features or use of this software must display the following acknowledgment:
“This product includes software developed by the OpenSSL Project for use in the OpenSSL Toolkit. (http://www.openssl.org/)”
x-2 |
362/282/222 |

Introduction
4.The names “OpenSSL Toolkit” and “OpenSSL Project” must not be used to endorse or promote products derived from this software without prior written permission. For written permission, please contact opensslcore@openssl.org.
5.Products derived from this software may not be called “OpenSSL” nor may “OpenSSL” appear in their names without prior written permission of the OpenSSL Project.
6.Redistributions of any form whatsoever must retain the following acknowledgment:
“This product includes software developed by the OpenSSL Project for use in the OpenSSL Toolkit (http://www.openssl.org/)”
THIS SOFTWARE IS PROVIDED BY THE OpenSSL PROJECT “AS IS” AND ANY EXPRESSED OR IMPLIED WARRANTIES, INCLUDING, BUT NOT LIMITED TO, THE IMPLIED WARRANTIES OF MERCHANTABILITY AND FITNESS FOR A PARTICULAR PURPOSE ARE DISCLAIMED. IN NO EVENT SHALL THE OpenSSL PROJECT OR ITS CONTRIBUTORS BE LIABLE FOR ANY DIRECT, INDIRECT, INCIDENTAL, SPECIAL, EXEMPLARY, OR CONSEQENTIAL DAMAGES (INCLUDING, BUT NOT LIMITED TO, PROCUREMENT OF SUBSTITUTE GOODS OR SERVICES; LOSS OF USE, DATA, OR PROFITS; OR BUSINESS INTERRUPTION) HOWEVER CAUSED AND ON ANY THEORY OF LIABILITY, WHETHER IN CONTRACT, STRICT LIABILITY, OR TORT (INCLUDING NEGLIGENCE OR OTHERWISE) ARISING IN ANY WAY OUT OF THE USE OF THIS SOFTWARE, EVEN IF ADVISED OF THE POSSIBILITY OF SUCH DAMAGE.
This product includes cryptographic software written by Eric Young (eay@cryptsoft.com). This product includes software written by Tim Hudson (tjh@cryptsoft.com).
Original SSLeay License
Copyright © 1995-1998 Eric Young (eay@cryptsoft.com) All rights reserved. This package is an SSL implementation written by Eric Young (eay@cryptsoft.com).
The implementation was written so as to conform with Netscapes SSL. This library is free for commercial and non-commercial use as long as the following conditions are aheared to. The following conditions apply to all code found in this distribution, be it the RC4, RSA, Ihash, DES, etc., code; not just the SSL code.
The SSL documentation included with this distribution is covered by the same copyright terms except that the holder is Tim Hudson (tjh@cryptsoft.com).
Copyright remains Eric Young’s, and as such any Copyright notices in the code are not to be removed. If this package is used in a product, Eric Young should be given attribution as the author of the parts of the library used. This can be in the form of a textual message at program startup or in documentation (online or textual) provided with the package.
362/282/222 |
x-3 |

Introduction
Redistribution and use in source and binary forms, with or without modification, are permitted provided that the following conditions are met:
1.Redistributions of source code must retain the copyright notice, this list of conditions and the following disclaimer.
2.Redistributions in binary form must reproduce the above copyright notice, this list of conditions and the following disclaimer in the documentation and/or other materials provided with the distribution.
3.All advertising materials mentioning features or use of this software must display the following acknowledgement:
“This product includes cryptographic software written by Eric Young (eay@cryptsoft.com)”
The word ‘cryptographic’ can be left out if the rouines from the library being used are not cryptographic related.
4.If you include any Windows specific code (or a derivative thereof) from the apps directory (application code) you must include an acknowledgement:
“This product includes software written by Tin Hudson (tjh@cryptsoft.com)”
THIS SOFTWARE IS PROVIDED BY ERIC YOUNG “AS IS” AND ANY EXPRESS OR IMPLIED WARRANTIES, INCLUDING, BUT NOT LIMITED TO, THE IMPLIED WARRANTIES OF MERCHANTABILITY AND FITNESS FOR A PARTICULAR PURPOSE ARE DISCLAIMED. IN NO EVENT SHALL THE AUTHOR OR CONTRIBUTORS BE LIABLE FOR ANY DIRECT, INDIRECT, INCIDENTAL, SPECIAL, EXEMPLARY, OR CONSEQUENTIAL DAMAGES (INCLUDING, BUT NOT LIMITED TO, PROCUREMENT OF SUBSTITUTE GOODS OR SERVICES; LOSS OF USE, DATA, OR PROFITS; OR BUSINESS INTERRUPTION) HOWEVER CAUSED AND ON ANY THEORY OF LIABILITY, WHETHER IN CONTRACT, STRICT LIABILITY, OR TORT (INCLUDING NEGLIGENCE OR OTHERWISE) ARISING IN ANY WAY OUT OF THE USE OF THIS SOFTWARE, EVEN IF ADVISED OF THE POSSIBILITY OF SUCH DAMAGE.
The licence and distribution terms for any publically available version or derivative of this code cannot be changed. i.e. this code cannot simply be copied and put under another distribution licence [including the GNU Public Licence.]
All other product names mentioned are trademarks or registered trademarks of their respective companies
x-4 |
362/282/222 |

Introduction
Contents
Introduction
Energy Star® ..................................................................................... |
x-1 |
What is an ENERGY STAR® Product? ............................................ |
x-1 |
Trademarks and registered trademarks ......................................... |
x-2 |
Contents ............................................................................................ |
x-5 |
Available features ........................................................................... |
x-16 |
Automatically selecting the paper ................................................. |
x-16 |
Adjusting copies to the size of the paper ..................................... |
x-16 |
Specifying separate horizontal and vertical zoom ratios .............. |
x-16 |
Scanning the document in separate batches ............................... |
x-16 |
Sorting copies ............................................................................... |
x-16 |
Stapling copies ............................................................................. |
x-17 |
Punching holes in copies .............................................................. |
x-17 |
Center binding ............................................................................... |
x-17 |
Copying multiple document pages onto a single page ................ |
x-18 |
Copying a document containing pages of various sizes .............. |
x-18 |
Adjusting copies according to the image quality of the original ... |
x-18 |
Adding a cover page ..................................................................... |
x-18 |
Adding insertions, such as colored paper, within copies ............. |
x-19 |
Inserting paper (interleaves) between copies of overhead |
|
projector transparencies ............................................................... |
x-19 |
Adding a binding margin to copies ............................................... |
x-19 |
Erasing sections of copies ............................................................ |
x-20 |
Repeating copy images ................................................................ |
x-20 |
Separately copying a page spread ............................................... |
x-20 |
Copying with a layout of a book or magazine ............................... |
x-20 |
Printing distribution numbers and stamps .................................... |
x-21 |
Printing copies overlapping a different image .............................. |
x-21 |
Copying with black and white reversed ........................................ |
x-21 |
Checking copy jobs ...................................................................... |
x-21 |
Programming copy settings .......................................................... |
x-21 |
Checking the copy settings .......................................................... |
x-21 |
Enlarging the size of text in touch panel screens ......................... |
x-22 |
Interrupting a copy job .................................................................. |
x-22 |
Printing a proof copy ..................................................................... |
x-22 |
Saving copy documents ............................................................... |
x-22 |
Explanation of manual conventions .............................................. |
x-23 |
User’s Guides .................................................................................. |
x-25 |
User’s Guide [Copy Operations] (this manual) .............................. |
x-25 |
User’s Guide [Network Scanner Operations] ................................ |
x-25 |
User’s Guide [Box Operations] ..................................................... |
x-25 |
|
|
362/282/222 |
x-5 |

|
|
|
|
Introduction |
|
|
|
|
|
|
|
|
User’s Guide [Print Operations] .................................................... |
x-25 |
|
|
|
Quick Guide [Print Operations] ..................................................... |
x-25 |
|
|
|
User’s Guide [Advanced Scan Operations] .................................. |
x-25 |
|
|
|
User’s Guide [Facsimile Operations] ............................................ |
x-26 |
|
|
|
User’s Guide [Fax Driver Operations] ........................................... |
x-26 |
|
|
|
Descriptions and symbols for documents and paper .................. |
x-27 |
|
|
|
“Width” and “Length” ................................................................... |
x-27 |
|
|
|
Paper orientation .......................................................................... |
x-27 |
|
|
|
Legal restrictions on copying ......................................................... |
x-29 |
|
1 Installation and operation precautions |
|
||
1.1 |
Safety information ............................................................................. |
1-2 |
||
|
|
|
Warning and precaution symbols ................................................... |
1-2 |
|
|
|
Meaning of symbols ........................................................................ |
1-2 |
1.2 |
USER INSTRUCTIONS ...................................................................... |
1-9 |
||
|
|
|
FCC PART 15 - RADIO FREQUENCY DEVICES |
|
|
|
|
(For U.S.A. Users) ........................................................................... |
1-9 |
|
|
|
INTERFERENCE-CAUSING EQUIPMENT STANDARD |
|
|
|
|
(ICES-003 ISSUE 4) (For Canada Users) ........................................ |
1-9 |
|
|
|
For users in countries subject to Class B regulations .................... |
1-9 |
|
|
|
For users in countries not subject to Class B regulations |
..............1-9 |
1.3 |
Laser safety ...................................................................................... |
1-10 |
||
|
|
|
Internal laser radiation .................................................................. |
1-10 |
|
|
|
CDRH regulation ........................................................................... |
1-11 |
|
|
|
For European users ....................................................................... |
1-11 |
|
|
|
For Denmark users ....................................................................... |
1-11 |
|
|
|
For Finland, Sweden users ........................................................... |
1-12 |
|
|
|
For Norway users .......................................................................... |
1-12 |
|
|
|
Laser safety label .......................................................................... |
1-13 |
|
|
|
Ozone release ............................................................................... |
1-13 |
|
|
|
Acoustic noise (For European users only) .................................... |
1-14 |
|
|
|
Notification for US only ................................................................. |
1-14 |
|
|
|
Recycling batteries (For Taiwan Users Only) ................................ |
1-14 |
|
|
|
For EU member states only .......................................................... |
1-14 |
|
|
|
For EU member states only .......................................................... |
1-15 |
|
|
1.4 Caution notations and labels .......................................................... |
1-16 |
|
1.5 |
Space requirements ........................................................................ |
1-17 |
||
1.6 |
Operation precautions .................................................................... |
1-18 |
||
|
|
|
Power source ................................................................................ |
1-18 |
|
|
|
Operating environment ................................................................. |
1-18 |
|
|
|
Storage of copies .......................................................................... |
1-18 |
|
|
|
|
|
|
x-6 |
|
362/282/222 |
|

Introduction
2 |
Before making copies |
|
|
|
2.1 |
Part names and their functions ....................................................... |
2-2 |
|
|
Options ........................................................................................... |
2-2 |
|
|
Outside of machine ........................................................................ |
2-5 |
|
|
Inside/back of main unit ................................................................. |
2-7 |
|
|
Reverse Automatic Document Feeder DF-620 .............................. |
2-9 |
|
|
Paper Feed Cabinet PC-108/PC-206/PC-407 ............................. |
2-10 |
|
|
Saddle Stitcher SD-507/Mailbin Kit MT-502 ................................ |
2-11 |
|
|
Finisher FS-530/Output Tray OT-602/Punch Unit PU-501 .......... |
2-12 |
|
|
Control panel ................................................................................ |
2-14 |
|
|
Basic settings screen (Basics screen) ......................................... |
2-17 |
|
|
Icons that appear in the screen ................................................... |
2-18 |
|
|
Enlarging the touch panel screens ............................................... |
2-19 |
|
2.2 |
Adjusting the angle of the control panel ...................................... |
2-20 |
|
|
To adjust the angle of the control panel ...................................... |
2-20 |
|
2.3 |
Turning on the main power and the auxiliary power ................... |
2-22 |
|
|
To turn on the machine ................................................................ |
2-22 |
|
|
To scan during warm-up .............................................................. |
2-24 |
|
|
To turn off the machine ................................................................ |
2-26 |
|
|
Automatically returning to the default settings |
|
|
|
(Automatic panel reset) ................................................................ |
2-27 |
|
|
Automatically returning to the screen given priority .................... |
2-27 |
|
|
Automatically conserving energy (Low Power mode) .................. |
2-28 |
|
|
Automatically conserving energy (Sleep mode) ........................... |
2-28 |
|
|
Darkening the touch panel (LCD Back-Light Off) ........................ |
2-29 |
|
|
Controlling machine use with user authentication |
|
|
|
(machine authentication) .............................................................. |
2-30 |
|
|
Controlling machine use with user authentication |
|
|
|
(external server authentication) .................................................... |
2-33 |
|
|
Limiting user access with account track ...................................... |
2-37 |
|
|
Controlling machine use with user authentication |
|
|
|
(external server authentication) and account track ...................... |
2-40 |
|
|
Controlling machine use with user authentication |
|
|
|
(machine authentication) and account track ................................ |
2-45 |
|
|
Controlling machine use with user authentication |
|
|
|
(machine authentication) and account track synchronized ......... |
2-50 |
|
2.4 |
Loading paper into the 1st or 2nd tray ......................................... |
2-54 |
|
|
To load paper (1st or 2nd tray) ..................................................... |
2-54 |
|
2.5 |
Loading paper into the LCT ........................................................... |
2-57 |
|
|
To load paper (LCT) ..................................................................... |
2-57 |
|
2.6 |
Loading paper into the bypass tray .............................................. |
2-60 |
|
|
To load paper (bypass tray) ......................................................... |
2-60 |
|
|
|
|
362/282/222 |
|
x-7 |
|

Introduction
3 |
Basic copy operation |
|
|
|
3.1 |
General copy operation .................................................................... |
3-2 |
|
|
To make a copy .............................................................................. |
3-2 |
|
3.2 |
Operations that cannot be combined .............................................. |
3-5 |
|
|
Operations where the setting specified last is given priority .......... |
3-5 |
|
|
Operations where the setting specified first is given priority .......... |
3-7 |
|
3.3 |
Feeding the document ...................................................................... |
3-8 |
|
|
To load the document into the ADF ................................................ |
3-8 |
|
|
To place the document on the original glass ................................ |
3-10 |
|
|
Scanning a document in separate batches |
|
|
|
(“Separate Scan” setting) .............................................................. |
3-12 |
|
|
Scanning a multi-page document from the original glass ............ |
3-14 |
|
3.4 |
Specifying document settings ........................................................ |
3-16 |
|
|
Copying documents of mixed sizes (“Mixed Original” setting) ..... |
3-16 |
|
|
To copy documents with the “Mixed Original” setting ................. |
3-16 |
|
|
Selecting the document orientation |
|
|
|
(Original Direction settings) ........................................................... |
3-19 |
|
|
To select an Original Direction setting .......................................... |
3-20 |
|
|
Selecting the position of the binding margin (Margin settings) .... |
3-21 |
|
|
To select a Margin setting ............................................................ |
3-23 |
|
3.5 |
Selecting a Paper setting ................................................................ |
3-24 |
|
|
Automatically selecting the paper size |
|
|
|
(“Auto Paper Select” setting) ........................................................ |
3-24 |
|
|
Manually selecting the desired paper size .................................... |
3-25 |
|
3.6 |
Specifying a Zoom setting .............................................................. |
3-27 |
|
|
Automatically selecting the zoom ratio (“Auto Zoom” setting) ..... |
3-27 |
|
|
Specifying the same zoom ratio as the document |
|
|
|
(“×1.0” setting) .............................................................................. |
3-29 |
|
|
Slightly reducing the copy (“Minimal” setting) .............................. |
3-30 |
|
|
Finely adjusting the zoom ratio ..................................................... |
3-31 |
|
|
Selecting a preset zoom ratio (Enlarge and Reduce settings) ...... |
3-32 |
|
|
Typing in the zoom ratio ............................................................... |
3-33 |
|
|
Specifying separate horizontal and vertical zoom ratios |
|
|
|
(Individual Zoom settings) ............................................................. |
3-34 |
|
|
Selecting a stored zoom ratio ....................................................... |
3-36 |
|
|
Storing the desired zoom ratio ..................................................... |
3-37 |
3.7Selecting single-/double-sided settings for originals and
|
copies ............................................................................................... |
3-39 |
|
To select single-sided copies ....................................................... |
3-40 |
|
To select double-sided copies ..................................................... |
3-41 |
3.8 |
Specifying document quality/density settings .............................. |
3-43 |
|
Specifying a document quality setting .......................................... |
3-44 |
|
|
|
x-8 |
|
362/282/222 |

Introduction
|
Adjusting the Copy Density (Density settings) ............................. |
3-45 |
3.9 |
Selecting a Combine Originals setting ......................................... |
3-46 |
|
Copying multiple document pages onto a single page |
|
|
(combined copy settings) ............................................................. |
3-49 |
3.10 Selecting finishing for copies ........................................................ |
3-50 |
|
|
Separating copies by sets (“Sort” setting) ................................... |
3-53 |
|
Separating copies by pages (“Group” setting) ............................ |
3-54 |
|
Stapling copies (staple settings) .................................................. |
3-55 |
|
To bind copies with staples ......................................................... |
3-56 |
|
Punching holes in copies (punch settings) .................................. |
3-57 |
|
To punch holes in copies ............................................................. |
3-57 |
|
Binding copies at the center ........................................................ |
3-59 |
|
To bind copies at the center ........................................................ |
3-59 |
3.11Scanning the next document during printing
|
|
(reserving a copy job) ..................................................................... |
3-61 |
|
|
To reserve a copy job .................................................................. |
3-61 |
|
3.12 |
Stopping/deleting a job .................................................................. |
3-63 |
|
|
To stop/delete a copy job ............................................................ |
3-63 |
4 |
Additional copy operations |
|
|
|
4.1 |
Checking the copy settings (Mode Check) .................................... |
4-2 |
|
|
To check the settings ..................................................................... |
4-2 |
|
|
To change the settings ................................................................... |
4-4 |
|
4.2 |
Printing a sample to check the settings (Proof Copy) .................. |
4-5 |
|
|
To make test prints ........................................................................ |
4-5 |
|
4.3 |
Interrupting a copy job (Interrupt mode) ........................................ |
4-7 |
|
|
To interrupt a copy job ................................................................... |
4-7 |
|
4.4 |
Registering copy programs (Mode Memory) ................................. |
4-8 |
|
|
To register a copy program ............................................................ |
4-8 |
|
|
To recall a copy program ............................................................. |
4-10 |
|
|
To checking the copy settings ..................................................... |
4-11 |
|
|
To delete a registered copy program ........................................... |
4-12 |
|
4.5 |
Specifying control panel settings (Accessibility mode) .............. |
4-14 |
|
|
To display the Accessibility Settings screen ................................ |
4-14 |
|
|
To set the “Screen Mode” function .............................................. |
4-15 |
|
|
To set the “Key Speed Settings” function ................................... |
4-16 |
|
|
To set the “Extend Auto Reset” function ..................................... |
4-17 |
|
|
To set the “Notification Screen” function .................................... |
4-18 |
|
|
To set the “Sound Setting” function ............................................ |
4-19 |
|
|
To set the “Key Sound Tones” function ....................................... |
4-20 |
|
|
|
|
362/282/222 |
|
x-9 |
|
|
|
|
|
Introduction |
|
|
|
|
|
4.6 |
Job List screens .............................................................................. |
4-21 |
||
|
|
|
Jobs .............................................................................................. |
4-21 |
|
|
|
Multi-job feature ............................................................................ |
4-21 |
|
|
|
Job List screens ............................................................................ |
4-21 |
4.7 |
Performing operations on jobs ...................................................... |
4-23 |
||
|
|
|
To check a job being performed ................................................... |
4-23 |
|
|
|
To check the printing order ........................................................... |
4-24 |
|
|
|
To delete a job .............................................................................. |
4-25 |
5 Troubleshooting
5.1When the message “Malfunction detected.” appears
|
(Call technical representative) .......................................................... |
5-2 |
|
To correct the error ......................................................................... |
5-3 |
5.2 |
When the message “Misfeed detected.” appears .......................... |
5-4 |
|
Location of paper misfeed .............................................................. |
5-4 |
|
Paper misfeed indications .............................................................. |
5-5 |
|
To clear a paper misfeed in the ADF .............................................. |
5-6 |
|
To clear a paper misfeed in the fusing unit ..................................... |
5-8 |
|
To clear a paper misfeed in the automatic duplex unit ................. |
5-12 |
|
To clear a paper misfeed in the bypass tray ................................. |
5-13 |
|
To clear a paper misfeed in the 1st or 2nd tray ............................ |
5-15 |
|
To clear a paper misfeed in the 3rd or 4th tray ............................. |
5-17 |
|
To clear a paper misfeed in the LCT ............................................. |
5-18 |
|
To clear a paper misfeed in the finisher ........................................ |
5-19 |
|
To clear a paper misfeed in the mailbin kit ................................... |
5-22 |
|
To clear a paper misfeed in the saddle stitcher ............................ |
5-24 |
5.3 |
When the message “Replenish paper.” appears .......................... |
5-26 |
|
To replenish paper ........................................................................ |
5-26 |
5.4When the message “... Not enough remaining memory.”
|
appears ............................................................................................. |
5-27 |
5.5 |
When the message “Please exchange toner.” appears .............. |
5-28 |
5.6 |
When the message “Stapler empty.” appears .............................. |
5-29 |
5.7 |
Basic troubleshooting ..................................................................... |
5-30 |
5.8 |
Main messages and their remedies ............................................... |
5-34 |
6 Specifications
6.1 |
Specifications .................................................................................... |
6-2 |
|
Copier ............................................................................................. |
6-2 |
|
Automatic Duplex Unit .................................................................... |
6-4 |
|
Reverse Automatic Document Feeder DF-620 ............................... |
6-4 |
|
Paper Feed Cabinet PC-108 ........................................................... |
6-5 |
|
|
|
x-10 |
|
362/282/222 |

Introduction
|
|
Paper Feed Cabinet PC-206 .......................................................... |
6-6 |
|
|
Paper Feed Cabinet PC-407 .......................................................... |
6-6 |
|
|
Finisher FS-530 .............................................................................. |
6-7 |
|
|
Punch Unit PU-501 ........................................................................ |
6-8 |
|
|
Saddle Stitcher SD-507 ................................................................. |
6-8 |
|
|
Output Tray OT-602 ....................................................................... |
6-8 |
|
|
Mailbin Kit MT-502 ......................................................................... |
6-9 |
|
|
Job Separator JS-502 .................................................................... |
6-9 |
7 |
Copy paper/original documents |
|
|
|
7.1 |
Copy paper ........................................................................................ |
7-2 |
|
|
Possible paper sizes ...................................................................... |
7-2 |
|
|
Paper types and paper capacities ................................................. |
7-4 |
|
|
Special paper ................................................................................. |
7-5 |
|
|
Precautions for paper .................................................................... |
7-6 |
|
|
Paper storage ................................................................................. |
7-6 |
|
|
Automatic paper-tray-switching feature ........................................ |
7-7 |
|
|
Order for selecting the paper trays ................................................ |
7-7 |
|
7.2 |
Specifying paper settings for the bypass tray ............................... |
7-8 |
|
|
To specify the paper size (Change Setting) ................................... |
7-8 |
|
|
To specify a non-standard paper size (Custom Size settings) .... |
7-10 |
|
|
To store a non-standard paper size (Custom Size settings) ........ |
7-12 |
|
|
To specify a setting for special paper (Change Setting) .............. |
7-15 |
|
7.3 |
Original documents ........................................................................ |
7-17 |
|
|
Documents that can be loaded Into the ADF ............................... |
7-17 |
|
|
Precautions for loading documents Into the ADF ........................ |
7-18 |
|
|
Documents that can be placed on the original glass ................... |
7-19 |
|
|
Precautions for positioning documents on the original glass ...... |
7-19 |
8 |
Application functions |
|
|
|
8.1 |
Adding cover pages (“Cover Mode” function) ............................... |
8-2 |
|
|
To copy using the “Cover Mode” function ..................................... |
8-3 |
|
8.2 |
Inserting cover pages (“Insert Sheet” function) ............................ |
8-5 |
|
|
To copy using the “Insert Sheet” function ..................................... |
8-6 |
8.3Inserting paper between overhead projector transparencies
|
(“OHP Interleave” function) ............................................................. |
8-8 |
|
To copy using the “OHP Interleave” function ................................ |
8-8 |
8.4 |
Adding filing margins to copies (“Page Margin” function) ......... |
8-11 |
|
To copy using the “Page Margin” function .................................. |
8-11 |
362/282/222 |
x-11 |

Introduction
8.5Erasing unwanted areas of copies
|
(“Edge/Frame Erase” function) ...................................................... |
8-13 |
|
To copy using the “Edge/Frame Erase” function ......................... |
8-13 |
8.6 |
Tiling copy images (“Image Repeat” function) ............................. |
8-15 |
|
To copy using the “Image Repeat” function ................................. |
8-15 |
8.7Producing separate copies of each page in a page spread
|
(“Book Copy” function) ................................................................... |
8-18 |
|
To copy using the “Book Copy” function ..................................... |
8-19 |
8.8 |
Creating booklet copies (“Booklet” function) ............................... |
8-22 |
|
To copy using the “Booklet” function ........................................... |
8-23 |
8.9 |
Printing additional information on copies |
|
|
(Image Settings functions) .............................................................. |
8-24 |
|
To print the distribution number (“Set Numbering” function) ....... |
8-24 |
|
To print preset text at the center of the copy image |
|
|
(“Stamp” function) ......................................................................... |
8-26 |
8.10Printing copies overlapping a different image
(“Image Overlay” function) ............................................................. |
8-28 |
To store an overlay image (Store Overlay) .................................... |
8-28 |
To recall an overlay image ............................................................ |
8-31 |
To check the overlay image .......................................................... |
8-33 |
8.11Copying with light and dark coloring inversed
(“B/W Reverse” setting) .................................................................. |
8-35 |
To copy using the “B/W Reverse” setting .................................... |
8-35 |
8.12 Separate scan .................................................................................. |
8-36 |
To scan documents continuously ................................................. |
8-36 |
9Replacing toner bottles and staples and emptying punch waste containers
9.1 |
Replacing the toner bottle ................................................................ |
9-2 |
|
To replace the toner bottle ............................................................. |
9-4 |
9.2 |
Replacing the staple cartridge ......................................................... |
9-7 |
|
To replace the staple cartridge in finisher ....................................... |
9-7 |
|
To replace the staple cartridge in saddle stitcher ......................... |
9-10 |
9.3 |
Clearing a staple jam ...................................................................... |
9-14 |
|
To clear jammed staples in finisher .............................................. |
9-15 |
|
To clear jammed staples in the saddle stitcher ............................ |
9-19 |
9.4 |
Emptying the waste containers ...................................................... |
9-24 |
|
To empty the hole-punch waste container ................................... |
9-24 |
x-12 |
362/282/222 |

Introduction
10 Care of the machine
10.1 Cleaning ........................................................................................... |
10-2 |
Housing ........................................................................................ |
10-2 |
Original glass ................................................................................ |
10-3 |
Control panel ................................................................................ |
10-4 |
Document pad ............................................................................. |
10-5 |
Left partition glass ........................................................................ |
10-5 |
10.2 Viewing counters (Total Counter) ................................................. |
10-6 |
To view the contents .................................................................... |
10-6 |
10.3When the message “Preventative Maintenance is required.”
appears ............................................................................................ |
10-7 |
11 Utility mode
11.1 Overview of Utility mode parameters ........................................... |
11-2 |
List of registration information and parameters ........................... |
11-2 |
11.2 Specifying User’s Choice settings ................................................ |
11-9 |
To specify User’s Choice settings ............................................... |
11-9 |
Mixed Original Detection ............................................................ |
11-10 |
Language Selection ................................................................... |
11-10 |
Measurement Unit Setting ......................................................... |
11-11 |
Machine Authentication PW Change ......................................... |
11-11 |
Default Setting Simplex/Duplex ................................................. |
11-11 |
Auto Paper/Auto Zoom .............................................................. |
11-11 |
Priority Tray ................................................................................ |
11-12 |
Special Paper Setting ................................................................ |
11-12 |
Zoom Ratio for Combine/Booklets ............................................ |
11-12 |
Low Power Mode ....................................................................... |
11-13 |
Sleep Mode ................................................................................ |
11-13 |
LCD Back-Light OFF .................................................................. |
11-13 |
Auto Reset ................................................................................. |
11-13 |
Auto Reset when Account is changed ....................................... |
11-14 |
4in1 Copy Order ......................................................................... |
11-14 |
Default Quality/Density Modes .................................................. |
11-14 |
Default Copy Output Levels ....................................................... |
11-14 |
Print Density ............................................................................... |
11-15 |
Default Finishing Mode .............................................................. |
11-15 |
Sort/Non-Sort Auto Change ...................................................... |
11-15 |
Output Tray Settings .................................................................. |
11-16 |
Auto Paper Select for Small Orig. .............................................. |
11-16 |
Crease/Center Staple ................................................................. |
11-17 |
Default Screen ............................................................................ |
11-17 |
Default Device ............................................................................ |
11-18 |
Image Quality (ADF) ................................................................... |
11-18 |
|
|
362/282/222 |
x-13 |

|
|
|
|
|
Introduction |
|
|
|
|
|
|
|
|
11.3 Specifying User Management settings ....................................... |
|
11-19 |
|
|
|
|
To specify user management settings ........................................ |
|
11-19 |
|
|
|
Tone volume parameters ............................................................ |
|
11-20 |
|
|
|
Panel Cleaning ............................................................................ |
|
11-20 |
|
|
|
Toner Supply ............................................................................... |
|
11-20 |
|
|
11.4 Displaying the Administrator Management screen .................... |
|
11-21 |
|
|
|
|
To display the Administrator Management screen ..................... |
|
11-21 |
11.5 |
Specifying Initial Settings ............................................................. |
|
11-23 |
||
|
|
|
To specify initial settings ............................................................. |
|
11-23 |
|
|
|
Date & Time Setting .................................................................... |
|
11-24 |
11.6 |
Specifying Administrator settings ................................................ |
|
11-25 |
||
|
|
|
To specify administrator settings ................................................ |
|
11-25 |
|
|
|
Administrator Code Input ............................................................ |
|
11-26 |
|
|
|
Max. Copy Sets .......................................................................... |
|
11-26 |
|
|
|
Disable Sleep Mode .................................................................... |
|
11-26 |
|
|
11.7 Specifying the account/authentication settings |
|
|
|
|
|
|
(User Authentication ON/OFF parameters) ................................. |
|
11-27 |
|
|
|
To specify the account/authentication settings .......................... |
|
11-27 |
|
|
|
User Authentication ON/OFF ...................................................... |
|
11-29 |
|
|
|
Allow Print without Authentication .............................................. |
|
11-29 |
|
|
11.8 Specifying account data settings ................................................ |
|
11-31 |
|
|
|
|
To display the desired account ................................................... |
|
11-31 |
|
|
|
To register an account ................................................................ |
|
11-32 |
|
|
|
To manage an account ............................................................... |
|
11-34 |
|
|
|
To delete an account .................................................................. |
|
11-36 |
|
|
|
Allowing printing without authentication ..................................... |
|
11-37 |
|
|
11.9 Specifying user authentication settings ...................................... |
|
11-38 |
|
|
|
|
To display the User Authentication screen ................................. |
|
11-38 |
|
|
|
To register a user with external server authentication ................ |
|
11-40 |
|
|
|
To register a user with machine authentication .......................... |
|
11-42 |
|
|
|
To manage a user for machine authentication ........................... |
|
11-46 |
|
|
|
To delete a user for machine authentication .............................. |
|
11-48 |
|
|
11.10 Specifying software switch settings (machine functions) |
.........11-50 |
||
|
|
|
To specify a software switch setting .......................................... |
|
11-51 |
|
|
|
Specifying permissions for copy functions (mode 307) .............. |
|
11-53 |
|
|
|
Specifying the enlarged display method (mode 311) ................. |
|
11-53 |
|
|
|
Specifying that the “Auto Paper Select” setting and the |
|
|
|
|
|
“Auto Zoom” setting can be selected at the same time |
|
|
|
|
|
(mode 403) .................................................................................. |
|
11-54 |
|
|
|
Specifying the measurement units (mode 426) .......................... |
|
11-55 |
|
|
|
Specifying settings when copying is finished using the ADF |
||
|
|
|
(mode 429) .................................................................................. |
|
11-55 |
|
|
|
|
||
|
x-14 |
|
362/282/222 |
||

Introduction
Specifying the pressing of the [Access] key when logging off |
|
(mode 438) ................................................................................. |
11-56 |
Specifying use of registered user authentication information |
|
to log on to the LDAP server (mode 466) ................................... |
11-56 |
Specifying whether to enable access locks and password |
|
rules, and specifying the method for deleting image data |
|
(mode 469) ................................................................................. |
11-57 |
Specifying the setting for displaying a list of users in the User |
|
Authentication screen (mode 471) ............................................. |
11-59 |
Specifying the deleting method for [Del.] in input screens |
|
(mode 478) ................................................................................. |
11-59 |
Specifying settings for limiting user authentication to only Scan |
|
functions (mode 479) ................................................................. |
11-60 |
11.11 Specifying security settings (Security Setting parameters) ..... |
11-62 |
Before specifying the “Enhance Security” parameter ................ |
11-62 |
Parameters that are changed when “Enhance Security” is |
|
set .............................................................................................. |
11-63 |
Specifying the “Enhance Security” parameter ........................... |
11-64 |
Canceling an access lock (“Unlock” parameter) ........................ |
11-66 |
To cancel an access lock ........................................................... |
11-66 |
11.12 Managing the memory (Memory Management parameters) .... |
11-68 |
To erase all data from the internal memory ............................... |
11-68 |
11.13 Password rules ............................................................................. |
11-70 |
12 Appendix
12.1 |
Entering text .................................................................................... |
12-2 |
|
To type text .................................................................................. |
12-2 |
|
List of available characters .......................................................... |
12-3 |
12.2 |
Glossary ........................................................................................... |
12-4 |
12.3 |
Index ................................................................................................ |
12-7 |
362/282/222 |
x-15 |

Introduction
Available features
Automatically selecting the paper
The most appropriate paper size can automatically be selected based on the size of the loaded document and the specified zoom ratio.
For details, refer to page 3-24.
Adjusting copies to the size of the paper
The most appropriate zoom ratio can automatically be selected based on the size of the loaded document and the specified paper size.
For details, refer to page 3-27.
Specifying separate horizontal and vertical zoom ratios
By specifying separate horizontal and vertical zoom ratios, copies of the document can be resized as desired.
For details, refer to page 3-34.
|
|
|
|
|
|
|
|
|
|
|
|
|
|
|
|
|
|
|
|
|
|
|
ABC |
|
|
ABC |
|
|
ABC |
|||
|
|
|
|
|
|
|
|
|
|
|
|
|
|
|
|
|
|
|
|
|
|
Scanning the document in separate batches
A document with a large number of pages can be divided and scanned together in separate batches. Double-sided copies can be produced by using the original glass, or the document pages can be loaded alternately onto the original glass and into the ADF, and then all pages can be printed together as a single job.
For details, refer to page 3-12 and page 3-14.
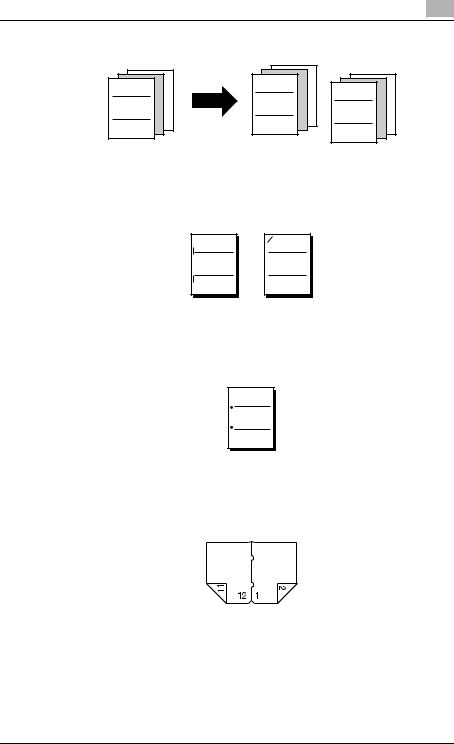
Sorting copies
A method for sorting the copies can be selected.
x-16 |
362/282/222 |
Introduction
For details, refer to page 3-53 and page 3-54.
ABC
Stapling copies
Copies can be stapled together. For details, refer to page 3-55.
ABC
Punching holes in copies
ABC ABC
ABC |
Holes for filing can be punched in the copies.
For details, refer to page 3-57.
ABC
Center binding
Copies can be folded at their center and bound with staples.
For details, refer to page 3-59.
362/282/222 |
x-17 |
Introduction
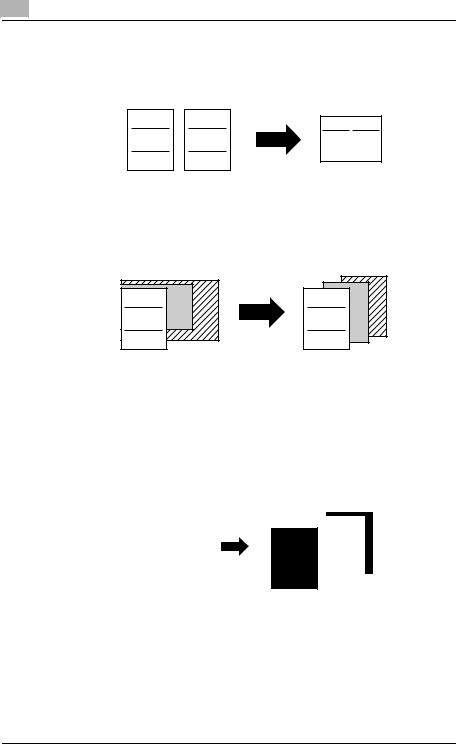
Copying multiple document pages onto a single page
Multiple pages of the document can be printed together on a single copy.
For details, refer to page 3-46.
ABC DEF
ABC DEF
Copying a document containing pages of various sizes
A document with pages of various sizes can be scanned and copied together.
For details, refer to page 3-16.
ABC |
ABC |
Adjusting copies according to the image quality of the original
The copies can be adjusted according to the image quality of the document. For details, refer to page 3-43.
Adding a cover page
Cover pages can be added to copies.
For details, refer to page 8-2.
|
|
|
|
|
|
|
|
|
|
|
|
|
|
|
|
|
|
|
|
|
|
|
|
|
|
|
|
|
|
|
|
|
|
|
|
|
|
|
|
|
|
|
|
|
|
|
|
|
|
|
|
COVER |
|
|
|
|
|
|
|
|
||
|
|
ABC |
|
|
|
ABC |
|
|
|
|||||||||||
|
|
|
|
|
|
|
|
|
|
|
||||||||||
|
|
|
|
|
|
|
|
|
|
|
|
|
|
|
|
|
|
|
|
|
|
|
|
|
|
|
|
|
|
|
|
|
|
|
|
|
|
|
|
|
|
|
|
|
|
|
|
|
|
|
|
|
|
|
|
|
|
|
|
|
|
|
|
|
|
|
|
|
|
|
|
|
|
|
|
|
|
|
|
|
|
|
|
x-18 |
362/282/222 |
Introduction
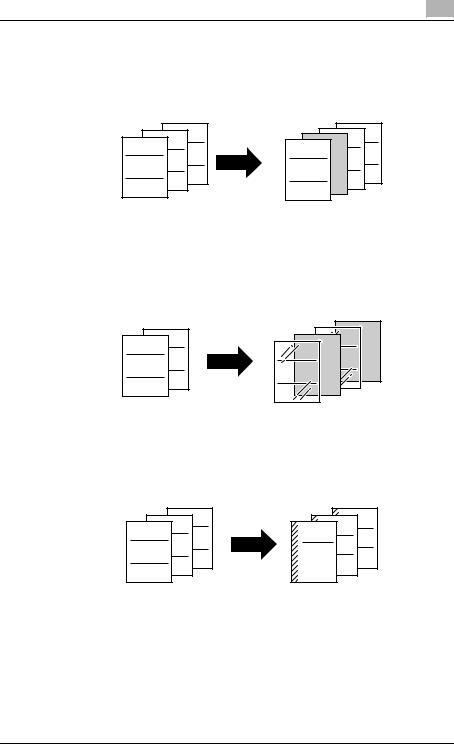
Adding insertions, such as colored paper, within copies
Different paper (such as colored paper) can be inserted at specified locations in the copies.
For details, refer to page 8-5.
GHI |
GHI |
DEF |
DEF |
ABC |
ABC |
Inserting paper (interleaves) between copies of overhead projector transparencies
After each overhead projector transparency copy is printed, a page can be added to the stack as an interleaf.
For details, refer to page 8-8.
DEF |
DEF |
ABC |
ABC |
|
Adding a binding margin to copies
Copies can be printed with a filing margin so they can easily be stored in filing binders.
For details, refer to page 8-11.
GHI |
GHI |
DEF |
DEF |
ABC |
ABC |
362/282/222 |
x-19 |
Introduction
Erasing sections of copies
Areas, such as the shadows of punched holes and transmission information in received faxes, can be erased in copies.
For details, refer to page 8-13.
ABC |
ABC |
Repeating copy images
A document image can be repeatedly printed on a single sheet of paper.
For details, refer to page 8-15.
Separately copying a page spread
A page spread, such as in an open book or catalog, can be copied onto separate pages.
For details, refer to page 8-18.
ABC DEF
Copying with a layout of a book or magazine
Copies can be made with the pages arranged in the layout for a book or magazine.
For details, refer to page 8-22.
|
2 |
11 |
12 |
1 |
|
|
|
|
|
|
11
12 1
2
x-20 |
362/282/222 |
Introduction
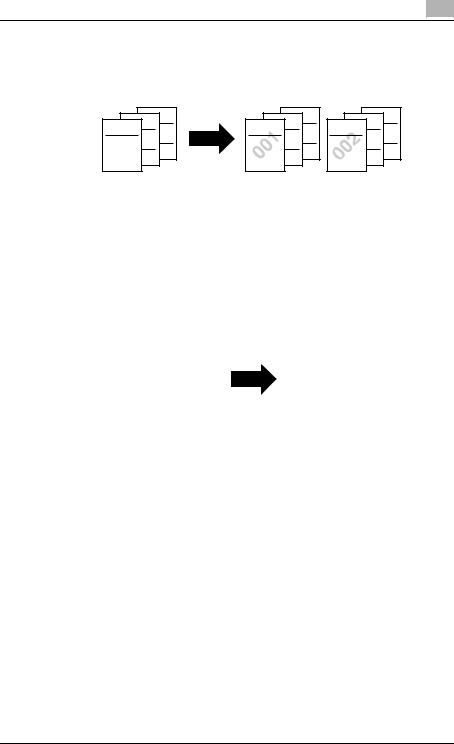
Printing distribution numbers and stamps
Each copy set can be printed with distribution numbers or preset stamps.
For details, refer to page 8-24.
GHI |
GHI |
GHI |
DEF |
DEF |
DEF |
ABC |
ABC |
ABC |
Printing copies overlapping a different image
Previously stored images can be printed overlapping copies.
For details, refer to page 8-28.
Copying with black and white reversed
A document can be copied with the blackand white-colored areas of images inversed.
For details, refer to page 8-35.
|
|
|
|
|
|
ABC |
|
ABC |
|
|
|
|
|
|
Checking copy jobs
The status of queued jobs can be checked.
For details, refer to page 4-21.
Programming copy settings
Frequently used copy settings can be programmed and recalled to be used with other copy jobs.
For details, refer to page 4-8.
Checking the copy settings
Screens showing the current copy settings can be displayed. From these screens, the copy settings can also be changed.
For details, refer to page 4-2.
362/282/222 |
x-21 |

Introduction
Enlarging the size of text in touch panel screens
The text and buttons in the touch panel can be displayed in a larger size that is easier to read, allowing basic copy operations to be easily performed.
For details, refer to page 2-19.
Interrupting a copy job
The copy job being printed can be interrupted in order for a different copy job to be printed.
For details, refer to page 4-7.
Printing a proof copy
Before printing a large number of copies, a single proof copy can be printed so that it can be checked.
For details, refer to page 4-5.
Saving copy documents
If the optional hard disk drive is installed, the contents of documents can be saved in boxes.
For details, refer to the User’s Guide [Box Operations].
x-22 |
362/282/222 |

Introduction
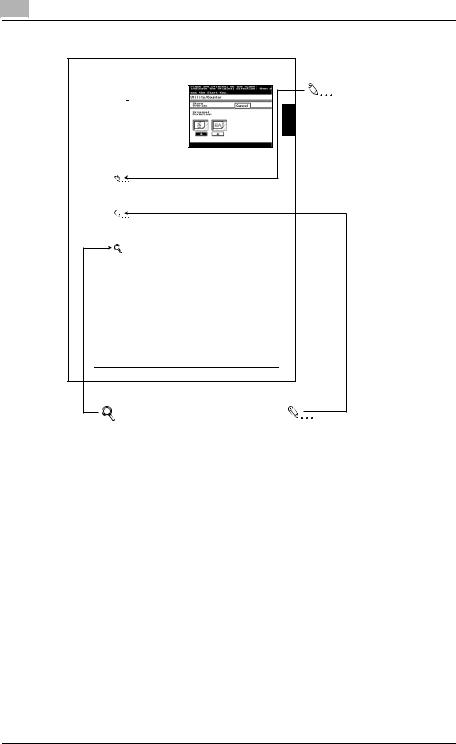
Explanation of manual conventions
Text that appears in this manner describes the function limitations and options required to use certain functions.
[ ]
Names highlighted as shown above indicate keys on the control panel, buttons in the touch panel, and the power switches.
Touch panel screens are shown to check the actual display.
Text that appears in this manner describes supplemental information, such as precautions, references and actions, relating to steps.
Text that appears in this manner provides answers to problems and questions that may occur during operation.
Titles indicate the contents of the section.
8 |
Auxiliary functions |
|
8.10Printing copies overlapping a different image ( Image Overlay
 function)
Images previously stored on the hard disk can be printed overlapping copies.
|
8 |
|
|
|
To store an overlay image (Store Overlay) |
|||
|
|
|
|
|||||
|
Chapter |
|
|
|
||||
|
|
|
|
|
504 is installed. |
|||
|
|
|
|
|
|
The Image Overlay function is available only if optional hard disk HD- |
||
|
|
|
|
|
1 Position the overlay document to be stored on the hard disk. |
|||
|
functions |
|||||||
|
2 |
Press the [Utility/Coun- |
|
|
||||
|
|
|
|
|
|
ter] key, and then touch |
|
|
|
|
|
|
|
|
[User Setting]. |
|
|
|
Auxiliary |
|
|
|
|
|
|
|
|
|
|
|
|
The User Setting screen |
|
|
|
|
|
|
|
|
|
appears. |
|
|
|
|
|
|
|
|
|
|
|
|
|
|
|
|
|
|
|
|
 CAUTION
Handling toner and toner bottles
Do not throw toner or the toner bottle into a fire.
Toner expelled from the fire may cause burns.
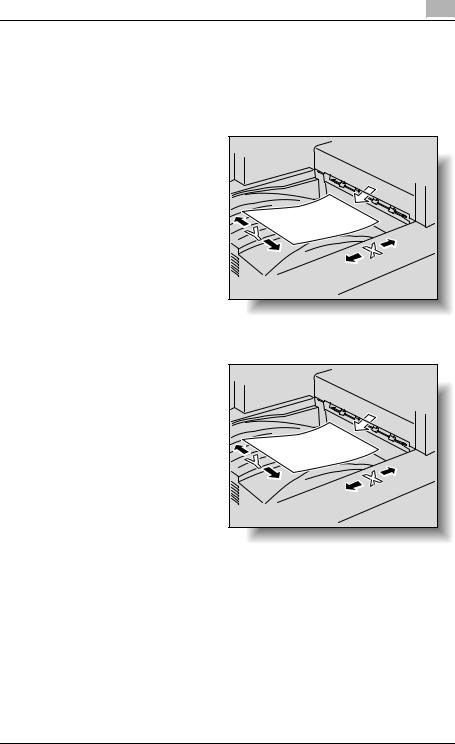
3Select the size of the area to be scanned.
To cancel changes to the settings, touch [Cancel].
? What do the Book Erase settings do?
 If a Book Erase setting is selected, the dark shadows around the docu-
ment or along the center of the document can be erased.
4 Touch [Enter].
8-30
 WARNING , CAUTION
Text highlighted in this manner indicates precautions to ensure safe use of this machine. “Warning” indicates instructions that, when not observed, may result in fatal or critical injuries. “Caution” indicates instructions that, when not observed, may result in serious injuries or property damage.
(The page shown above is an example only.)
362/282/222 |
x-23 |
Introduction
Auxiliary functions |
8 |
|
|
5Select the document orientation.
To cancel changes to the settings, touch [Cancel].
6Press the [Start] key.
The document is scanned, and the overlay image is stored.
Reminder
Be sure to use toner bottles of the specified model, otherwise the machine may be damaged.
Note
The size of the scanned area appears on the button where the image is stored.
Detail
For details on replacing the toner bottle, refer to To replace the toner bottle on page 9-4.
8-31
Auxiliary functions Chapter 8
Reminder
Text highlighted in this manner indicates operation precautions. Carefully read and observe this type of information.
Detail
Text highlighted in this manner provides more detailed information concerning operating procedures or references to sections containing additional information. If necessary, refer to the indicated sections.
(The page shown above is an example only.)
Note
Text highlighted in this manner contains references and supplemental information concerning operating procedures and other descriptions. We recommend that this information be read carefully.
x-24 |
362/282/222 |

Introduction
User’s Guides
The following User’s Guides have been prepared for this machine.
User’s Guide [Copy Operations] (this manual)
This manual contains details on basic operations and the operating procedures for the various copy functions.
-Refer to this User’s Guide for details on operating procedures for copy functions, including precautions on installation/use, turning the machine on/off, loading paper, and troubleshooting operations such as clearing paper misfeeds.
User’s Guide [Network Scanner Operations]
This manual contains details on specifying network functions for standard equipment and on operations for scanning functions.
-Refer to this User’s Guide for details on operating procedures for network functions and for using the Scan to E-Mail, Scan to FTP, Scan to SMB and Internet fax operations.
User’s Guide [Box Operations]
This manual contains details on operating procedures for using the Box functions.
-Refer to this User’s Guide for details on printing a proof copy or a locked job and on functions that use the optional hard disk drive, such as routing and saving documents in boxes.
User’s Guide [Print Operations]
This manual contains details on operating procedures using the standard built-in printer controller.
-For details on the printing functions, refer to the User’s Guide (PDF file) on the Driver CD-ROM.
Quick Guide [Print Operations]
This manual contains details on operating procedures using the standard built-in printer controller.
-Refer to this Quick Guide for basic operating procedures on the printing functions.
User’s Guide [Advanced Scan Operations]
This manual contains details on the operating procedures for the functions that can be used when the optional scanner unit is installed.
-Refer to this User’s Guide for details on using the IP address faxing, IP Relay and Scan to PC operations and on using IP Scanner.
362/282/222 |
x-25 |

Introduction
User’s Guide [Facsimile Operations]
This manual contains details on operating procedures for using the Fax functions.
-Refer to this User’s Guide for details on operating procedures for the Fax functions when the fax kit is installed.
User’s Guide [Fax Driver Operations]
This manual contains function details on the fax driver, which is used to send faxes directly from a computer.
-Refer to the User’s Guide (PDF file) on the Driver CD-ROM for details on procedures for performing PC-FAX operations.
x-26 |
362/282/222 |
Introduction
Descriptions and symbols for documents and paper
The use of words and symbols in this manual are explained below.
“Width” and “Length”
Whenever paper dimensions are mentioned in this manual, the first value always refers to the width of the paper (shown as “Y” in the illustration) and the second to the length (shown as “X”).
Paper orientation
Lengthwise (w)
If the width (Y) of the paper is shorter than the length (X), the paper has a vertical or portrait orientation, indicated by w.
362/282/222 |
x-27 |

Introduction
Crosswise (v)
If the width (Y) of the paper is longer than the length (X), the paper has a horizontal or landscape orientation, indicated by v.
x-28 |
362/282/222 |

Introduction
Legal restrictions on copying
Certain types of documents must never be copied with the purpose or intent to pass copies of such documents off as the originals.
The following is not a complete list, but is meant to be used as a guide to responsible copying.
<Financial instruments>
-Personal checks
-Traveler’s checks
-Money orders
-Certificates of deposit
-Bonds or other certificates of indebtedness
-Stock certificates
<Legal documents>
-Food stamps
-Postage stamps (canceled or uncanceled)
-Checks or drafts drawn by government agencies
-Internal revenue stamps (canceled or uncanceled)
-Passports
-Immigration papers
-Motor vehicle licenses and titles
-House and property titles and deeds
<General>
-Identification cards, badges, or insignias
-Copyrighted works without permission of the copyright owner
In addition, it is prohibited under any circumstances to copy domestic or foreign currencies, or works of art without permission of the copyright owner.
When in doubt about the nature of a document, consult with legal counsel.
362/282/222 |
x-29 |
Loading...