

Page 1

Quick Guide [Print Operations]
INDEX
1. Overview
2. Installing the printer driver
3. Setting up network printing
4. Various printing methods
5. Various settings
6. Troubleshooting
7. Appendix
Page 2

Welcome
Welcome
Thank you for choosing this machine.
The bizhub 362, 282, and 222 are equipped with an integrated printer controller that allows you to print directly from a personal computer.
This Quick Guide describes the printing functions, operations, usage, and
safety precautions of the printer controller. In order to ensure that this machine is used efficiently, carefully read this manual before using the machine.
In order to ensure that this machine is used safely, carefully read “Installation
and Operation Precautions” in the User’s Guide [Copy Operations] before
using the machine.
The illustrations used in this Quick Guide may differ from the actual model.
Energy Star
®
As an ENERGY STAR® Partner, we have determined that this machine meets
the ENERGY STAR
What is an ENERGY STAR
An ENERGY STAR
ically switch to a “low-power mode” after a period of inactivity. An ENERGY
STAR® product uses energy more efficiently, saves you money on utility bills
and helps protect the environment.
Trademarks and Copyright
- KONICA MINOLTA, the KONICA MINOLTA logo, and The essentials of
imaging are registered trademarks of KONICA MINOLTA HOLDINGS,
INC.
- PageScope and bizhub are registered trademarks of KONICA MINOLTA
BUSINESS TECHNOLOGIES.
362/282/222 x-1
®
Guidelines for energy efficiency.
®
Product?
®
product has a special feature that allows it to automat-
Page 3
Welcome
- Netscape Communications, the Netscape Communications logo, Net-
scape Navigator, Netscape Communicator, and Netscape are trademarks of Netscape Communications Corporation.
- Novell and Novell NetWare are registered trademarks of Novell, Inc.
- Microsoft, Windows, and Windows NT are registered trademarks of Mi-
crosoft Corporation.
- IBM is a registered trademark of International Business Machines, Inc.
- Apple, Macintosh, and Mac are registered trademarks of Apple Compu-
ter, Inc.
- Adobe, the Adobe logo, Acrobat, the Acrobat logo, PostScript, and the
PostScript logo are either registered trademarks or trademarks of Adobe
Systems Incorporated.
- Ethernet is a registered trademark of Xerox Corporation.
- PCL is a registered trademark of Hewlett-Packard Company Limited.
- All other product and brand names are trademarks or registered trade-
marks of their respective companies or organizations.
- Compact-VJE
Copyright 1986-2003 VACS Corp.
®
- RC4
is a registered trademark or trademark of RSA Security Inc. in the
United States and/or other countries.
- RSA® is a registered trademark or trademark of RSA Security Inc. RSA
BSAFE
®
is a registered trademark or trademark of RSA Security Inc. in
the United States and/or other countries.
License information
This product includes RSA BSAFE Cryptographic software
from RSA Security Inc.
x-2 362/282/222
Page 4

Welcome
OpenSSL Statement
OpenSSL License
Copyright © 1998-2000 The OpenSSL Project. All rights reserved.
Redistribution and use in source and binary forms, with or without modification, are permitted provided that the following conditions are met:
1. Redistributions of source code must retain the above copyright notice,
this list of conditions and the following disclaimer.
2. Redistributions in binary form must reproduce the above copyright notice, this list of conditions and the following disclaimer in the documentation and/or other materials provided with the distribution.
3. All advertising materials mentioning features or use of this software must
display the following acknowledgment:
“This product includes software developed by the OpenSSL Project for
use in the OpenSSL Toolkit. (http://www.openssl.org/)”
4. The names “OpenSSL Toolkit” and “OpenSSL Project” must not be used
to endorse or promote products derived from this software without prior
written permission. For written permission, please contact openssl[email protected].
5. Products derived from this software may not be called “OpenSSL” nor
may “OpenSSL” appear in their names without prior written permission
of the OpenSSL Project.
6. Redistributions of any form whatsoever must retain the following acknowledgment:
“This product includes software developed by the OpenSSL Project for
use in the OpenSSL Toolkit (http://www.openssl.org/)”
THIS SOFTWARE IS PROVIDED BY THE OpenSSL PROJECT “AS IS” AND
ANY EXPRESSED OR IMPLIED WARRANTIES, INCLUDING, BUT NOT LIMITED TO, THE IMPLIED WARRANTIES OF MERCHANTABILITY AND FITNESS FOR A PARTICULAR PURPOSE ARE DISCLAIMED. IN NO EVENT
SHALL THE OpenSSL PROJECT OR ITS CONTRIBUTORS BE LIABLE FOR
ANY DIRECT, INDIRECT, INCIDENTAL, SPECIAL, EXEMPLARY, OR CONSEQENTIAL DAMAGES (INCLUDING, BUT NOT LIMITED TO, PROCUREMENT OF SUBSTITUTE GOODS OR SERVICES; LOSS OF USE, DATA, OR
PROFITS; OR BUSINESS INTERRUPTION) HOWEVER CAUSED AND ON
ANY THEORY OF LIABILITY, WHETHER IN CONTRACT, STRICT LIABILITY,
OR TORT (INCLUDING NEGLIGENCE OR OTHERWISE) ARISING IN ANY
WAY OUT OF THE USE OF THIS SOFTWARE, EVEN IF ADVISED OF THE
POSSIBILITY OF SUCH DAMAGE.
This product includes cryptographic software written by Eric Young
([email protected]). This product includes software written by Tim Hudson
([email protected]).
362/282/222 x-3
Page 5

Welcome
Original SSLeay License
Copyright © 1995-1998 Eric Young ([email protected]) All rights reserved.
This package is an SSL implementation written by Eric Young
([email protected]).
The implementation was written so as to conform with Netscapes SSL.
This library is free for commercial and non-commercial use as long as the following conditions are aheared to. The following conditions apply to all code
found in this distribution, be it the RC4, RSA, Ihash, DES, etc., code; not just
the SSL code.
The SSL documentation included with this distribution is covered by the
same copyright terms except that the holder is Tim Hudson
([email protected]).
Copyright remains Eric Young’s, and as such any Copyright notices in the
code are not to be removed. If this package is used in a product, Eric Young
should be given attribution as the author of the parts of the library used. This
can be in the form of a textual message at program startup or in documentation (online or textual) provided with the package.
Redistribution and use in source and binary forms, with or without modification, are permitted provided that the following conditions are met:
1. Redistributions of source code must retain the copyright notice, this list
of conditions and the following disclaimer.
2. Redistributions in binary form must reproduce the above copyright notice, this list of conditions and the following disclaimer in the documentation and/or other materials provided with the distribution.
3. All advertising materials mentioning features or use of this software must
display the following acknowledgement:
“This product includes cryptographic software written by Eric Young
([email protected])”
The word ‘cryptographic’ can be left out if the rouines from the library being used are not cryptographic related.
4. If you include any Windows specific code (or a derivative thereof) from
the apps directory (application code) you must include an acknowledgement:
“This product includes software written by Tin Hudson
([email protected])”
THIS SOFTWARE IS PROVIDED BY ERIC YOUNG “AS IS” AND ANY EXPRESS OR IMPLIED WARRANTIES, INCLUDING, BUT NOT LIMITED TO,
THE IMPLIED WARRANTIES OF MERCHANTABILITY AND FITNESS FOR A
PARTICULAR PURPOSE ARE DISCLAIMED. IN NO EVENT SHALL THE AUTHOR OR CONTRIBUTORS BE LIABLE FOR ANY DIRECT, INDIRECT, INCIDENTAL, SPECIAL, EXEMPLARY, OR CONSEQUENTIAL DAMAGES
(INCLUDING, BUT NOT LIMITED TO, PROCUREMENT OF SUBSTITUTE
GOODS OR SERVICES; LOSS OF USE, DATA, OR PROFITS; OR BUSINESS
INTERRUPTION) HOWEVER CAUSED AND ON ANY THEORY OF LIABILITY, WHETHER IN CONTRACT, STRICT LIABILITY, OR TORT (INCLUDING
x-4 362/282/222
Page 6

Welcome
NEGLIGENCE OR OTHERWISE) ARISING IN ANY WAY OUT OF THE USE
OF THIS SOFTWARE, EVEN IF ADVISED OF THE POSSIBILITY OF SUCH
DAMAGE.
The licence and distribution terms for any publically available version or derivative of this code cannot be changed. i.e. this code cannot simply be copied and put under another distribution licence [including the GNU Public
Licence.]
All other product names mentioned are trademarks or registered trademarks
of their respective companies
Kerberos
Copyright © 1985-2005 by the Massachusetts Institute of Technology. All
rights reserved.
permission notice
WITHIN THAT CONSTRAINT, permission to use, copy, modify, and distribute this software and its documentation for any purpose and without fee is
hereby granted, provided that the above copyright notice appear in all copies
and that both that copyright notice and this permission notice appear in supporting documentation, and that the name of M.I.T. not be used in advertising or publicity pertaining to distribution of the software without specific,
written prior permission. Furthermore if you modify this software you must label your software as modified software and not distribute it in such a fashion
that it might be confused with the original MIT software.
M.I.T. makes no representations about the suitability of this software for any
purpose. It is provided “as is” without express or implied warranty.
THIS SOFTWARE IS PROVIDED “AS IS” AND WITHOUT ANY EXPRESS OR
IMPLIED WARRANTIES, INCLUDING, WITHOUT LIMITATION, THE IMPLIED
WARRANTIES OF MERCHANTIBILITY AND FITNESS FOR A PARTICULAR
PURPOSE.
THIS SOFTWARE IS NOT ORIGINAL MIT SOFTWARE, MODIFIED BY KONICA MINOLTA BUSINESS TECHNOLOGIES, INC.
Copyright
© 2008 KONICA MINOLTA BUSINESS TECHNOLOGIES, INC. All Rights Reserved.
Note
- This Quick Guide may not be reproduced in part or in full without permis-
sion.
- Konica Minolta Business Technologies, Inc. will not be held liable for any
incidents caused by using this printing system or Quick Guide.
- Information included in this Quick Guide is subject to change without no-
tice.
362/282/222 x-5
Page 7

Welcome
- Konica Minolta Business Technologies, Inc. maintains the copyright of
the printer drivers.
x-6 362/282/222
Page 8

Welcome
SOFTWARE LICENSE AGREEMENT
This package contains the following materials provided by Konica Minolta
Business Technologies, Inc. (KMBT): software included as part of the printing
system (“Printing Software”), the digitally-encoded machine-readable outline
data encoded in the special format and in the encrypted form (“Font Programs”), other software which runs on a computer system for use in conjunction with the Printing Software (“Host Software”), and related explanatory
written materials (“Documentation”). The term “Software” shall be used to
describe Printing Software, Font Programs and/or Host Software and also include any upgrades, modified versions, additions, and copies of the Software.
The Software is being licensed to you under the terms of this Agreement.
KMBT grants to you a non-exclusive sublicense to use the Software and
Documentation, provided that you agree to the following:
1. You may use the Software and accompanying Font Programs for imaging
to the licensed output de-vice(s), solely for your own internal business
purposes.
2. In addition to the license for Font Programs set forth in Section 1 above,
you may use Roman Font Programs to reproduce weights, styles, and
versions of letters, numerals, characters and symbols (“Typefaces”) on
the display or monitor for your own internal business purposes.
3. You may make one backup copy of the Host Software, provided your
backup copy is not installed or used on any computer. Notwithstanding
the above restrictions, you may install the on any number of computers
solely for use with one or more printing systems running the Printing Software.
4. You may assign its rights under this Agreement to an assignee of all of
Licensee’s right and interest to such Software and Documentation (“Assignee”) provided you transfer to Assignee all copies of such Software
and Documentation Assignee agrees to be bound by all of the terms and
conditions of this Agreement.
5. You agree not to modify, adapt or translate the Software and Documentation.
6. You agree that you will not attempt to alter, disassemble, decrypt, reverse engineer or decompile the Software.
7. Title to and ownership of the Software and Documentation and any reproductions thereof shall remain with KMBT and its licensor.
8. Trademarks shall be used in accordance with accepted trademark practice, including identification of the trademark owner’s name. Trademarks
can only be used to identify printed output produced by the Software.
Such use of any trademark does not give you any rights of ownership in
that trademark.
362/282/222 x-7
Page 9

Welcome
9. You may not rent, lease, sublicense, lend or transfer versions or copies
of the Software Licensee does not use, or Software contained on any unused media, except as part of the permanent transfer of all Software and
Documentation as described above.
10. IN NO EVENT WILL KMBT OR ITS LICENSOR BE LIABLE TO YOU FOR
ANY CONSEQUENTIAL, INCIDENTAL INDIRECT, PUNITIVE OR SPECIAL DAMAGES, INCLUDING ANY LOST PROFITS OR LOST SAVING,
EVEN IF KMBT HAS BEEN ADVISED OF THE POSSIBILITY OF SUCH
DAMAGES, OR FOR ANY CLAIM BY ANY THIRD PARTY. KMBT OR ITS
LICENSOR DISCLAIMS ALL WARRANTIES WITH REGARD TO THE
SOFTWARE, EXPRESS OR IMPLIED, INCLUDING, WITHOUT LIMITATION IMPLIED WARRANTIES OF MERCHANTABILITY, FITNESS FOR A
PARTICULAR PURPOSE, TITLE AND NON-INFRINGEMENT OF THIRD
PARTY RIGHTS. SOME STATES OR JURISDICTIONS DO NOT ALLOW
THE EXCLUSION OR LIMITATION OF INCIDENTIAL, CONSEQUENTIAL
OR SPECIAL DAMAGES, SO THE ABOVE LIMITATIONS MAY NOT APPLY TO YOU.
11. Notice to Government End Users: The Software is a “commercial item,”
as that term is defined at 48 C.F.R.2.101, consisting of “commercial computer software” and “commercial computer software documentation,” as
such terms are used in 48 C.F.R. 12.212. Consistent with 48 C.F.R.
12.212 and 48 C.F.R. 227.7202-1 through 227.7202-4, all U.S. Government End Users acquire the Software with only those rights set forth
herein.
12. You agree that you will not export the Software in any form in violation of
any applicable laws and regulations regarding export control of any
countries.
x-8 362/282/222
Page 10

Welcome
Contents
Welcome
Energy Star® ..................................................................................... x-1
What is an ENERGY STAR
Kerberos ..........................................................................................x-5
SOFTWARE LICENSE AGREEMENT ............................................... x-7
Contents ............................................................................................ x-9
About this Quick Guide .................................................................. x-12
362/282/222 User’s Guides ..........................................................x-12
Notations .......................................................................................x-12
Screen images in this Quick Guide ...............................................x-13
Using this Quick Guide .................................................................x-13
®
Product? ............................................x-1
1 Overview
1.1 Printer controller ............................................................................... 1-1
Role of the printer controller .......................................................... 1-1
Available printer controller functions ............................................. 1-1
Machine modes .............................................................................. 1-2
Printing flow ................................................................................... 1-3
1.2 Operating environment .................................................................... 1-4
Connectable computers and operating systems ........................... 1-4
Connectable interfaces .................................................................. 1-5
Connection diagram ....................................................................... 1-6
1.3 Setting up the system ...................................................................... 1-7
To set up the printing system ........................................................ 1-7
2 Installing the printer driver
2.1 Printer drivers and supported operating systems ......................... 2-1
2.2 When used with Windows ................................................................ 2-3
Automatic installation using the installer ........................................ 2-5
To install the printer driver ............................................................. 2-6
Installing the printer driver using Plug and Play ............................. 2-8
For Windows 2000 ......................................................................... 2-8
For Windows XP/Server 2003 ........................................................ 2-9
For Windows Vista/Server 2008 ................................................... 2-10
Uninstalling the printer driver ....................................................... 2-11
2.3 When used with Macintosh ........................................................... 2-14
Installing the printer driver ........................................................... 2-14
For Mac OS X ............................................................................... 2-14
362/282/222 x-9
Page 11

Selecting a printer .........................................................................2-16
For Mac OS X 10.2/10.3 ...............................................................2-16
For Mac OS X 10.4/10.5 ...............................................................2-17
For Mac OS 9.2 .............................................................................2-19
Uninstalling the printer driver ........................................................2-21
For Mac OS X ...............................................................................2-21
For Mac OS 9.2 .............................................................................2-22
3 Setting up network printing
3.1 Overview of network functions ........................................................3-1
Network functions ...........................................................................3-1
Features of the network functions ..................................................3-2
Network connection methods that can be selected in each
Windows operating system ............................................................3-3
Network printing from a Windows operating system .....................3-3
3.2 Accessing PageScope Web Connection .........................................3-5
To access PageScope Web Connection ........................................3-5
4 Various printing methods
4.1 Printing operations ............................................................................4-1
For Windows ...................................................................................4-1
Test printing ....................................................................................4-2
For Macintosh .................................................................................4-3
For Mac OS X .................................................................................4-3
For Mac OS 9.2 ...............................................................................4-4
4.2 Setting the printing functions ...........................................................4-6
Function list .....................................................................................4-6
Function overview ...........................................................................4-8
Orientation ......................................................................................4-8
Original Size and Output Size .........................................................4-9
Zoom (enlargement and reduction) ...............................................4-10
Input tray (paper source) ...............................................................4-11
Paper Type ....................................................................................4-12
Print type (duplex printing/booklet printing) .................................4-13
Printing multiple pages on one page ............................................4-14
Stapling and hole punching ..........................................................4-15
Output Method (job management) ................................................4-16
Sorting (Collate) and classifying (Offset) .......................................4-17
Skip Blank Pages (saving paper) ..................................................4-18
Front Cover Page, Back Cover Page, and Transparency
Interleave ......................................................................................4-19
Per Page Setting ...........................................................................4-19
Overlay ..........................................................................................4-20
Welcome
x-10 362/282/222
Page 12

Welcome
Watermark .................................................................................... 4-21
Use Printer Fonts (substitute fonts) ............................................. 4-22
User Authentication ...................................................................... 4-22
Account Track .............................................................................. 4-23
For Windows ................................................................................ 4-23
For Macintosh .............................................................................. 4-26
5 Various settings
5.1 Printing a test print ........................................................................... 5-1
Printer settings ............................................................................... 5-1
To display the Printer Setting screen ............................................. 5-1
6 Troubleshooting
6.1 Unable to print .................................................................................. 6-1
6.2 Unable to specify desired settings or unable to print as
specified ............................................................................................ 6-4
7 Appendix
7.1 Specifications ................................................................................... 7-1
7.2 Configuration page ........................................................................... 7-3
7.3 Font list .............................................................................................. 7-4
PCL font list .................................................................................... 7-4
PS font list ...................................................................................... 7-5
PCL demo page ............................................................................. 7-6
362/282/222 x-11
Page 13

About this Quick Guide
This Quick Guide contains information for using the printing functions of the
Konica Minolta printer controller. For details on the copy functions, scanning
functions, box functions, fax functions, and printing functions, refer to the respective User’s Guide.
This Quick Guide is aimed at users who already have the basic knowledge of
computer and copier operations. For Windows or Macintosh operating system and application operations, refer to the operation manual of the respective product.
362/282/222 User’s Guides
The User’s Guides for this machine are divided by function and consist of the
following:
User’s Guide Description
Print Operations
Quick Guide
Print Operations Read this guide when using this machine as a printer.
Copy Operations Read this guide when you want to learn about the basic oper-
Network Scanner Operations Read this guide when using this machine as a scanner.
Box Operations Read this guide when using this machine’s box functions.
Facsimile Operations Read this guide when using the optional fax functions.
Advanced Scan Operations Read this guide when using the optional scanner unit func-
Fax Driver Operations Read this guide when the optional fax kit is installed to use the
Welcome
This Quick Guide. Read this guide when using this machine as
a printer.
ations and copy operations of this machine.
tions.
fax driver functions for sending faxes directly from the computer.
Notations
Product name Description
KONICA MINOLTA 362/282/222
This machine
Integrated network controller Printer controller
Printer controller, including this machine,
and printing system
Microsoft Windows Windows
This machine, copier, or printer
Printing system
x-12 362/282/222
Page 14
Welcome
Screen images in this Quick Guide
Unless stated otherwise, the printer driver functions are described using the
printer driver for Windows XP.
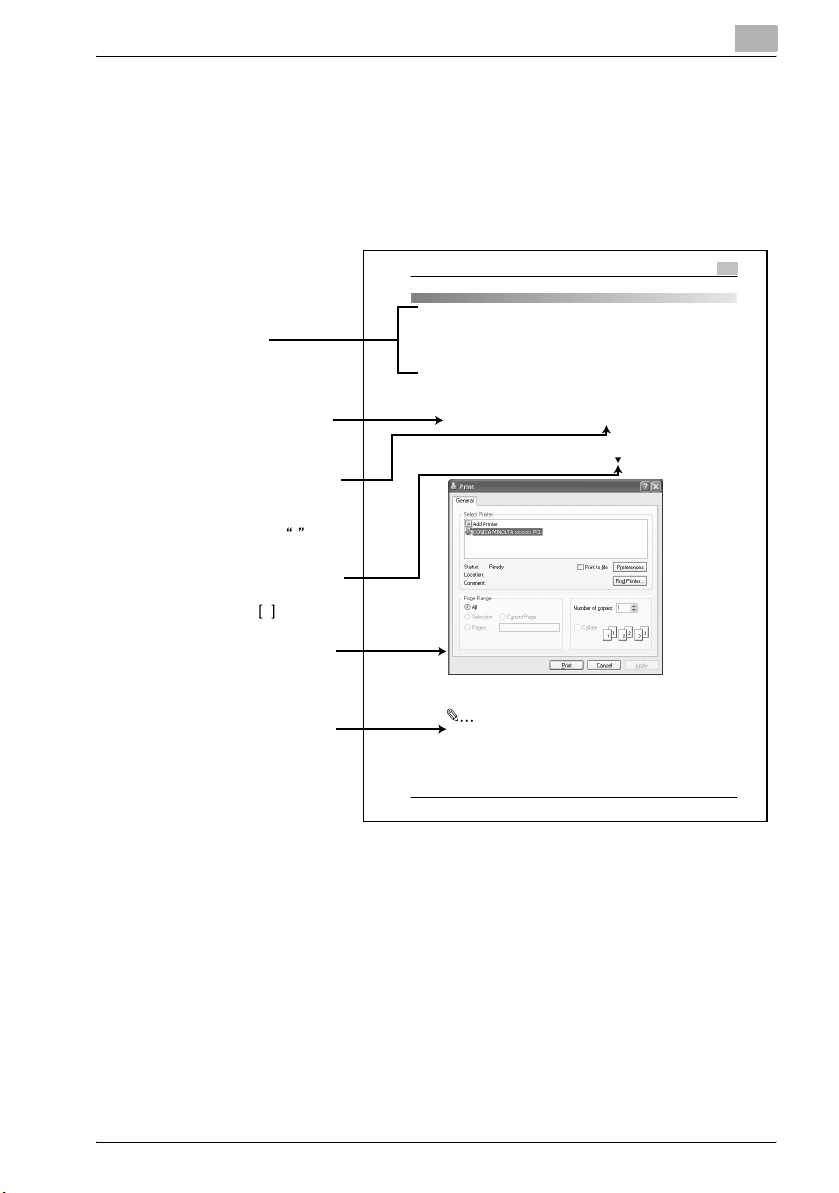
Using this Quick Guide
Subject titles
Explains the operation
procedure.
Windows, dialog boxes,
icons, and function names
displayed on the screen
are enclosed in .
Button names displayed
on the screen are
enclosed in .
Contents displayed on
a screen.
Additional explanation
of the text is given.
Various Printing Methods
4 Various Printing Methods
4.1 Printing Operations
For Windows
Data can be printed from an application.
Print jobs are specified from the application software.
1 Open the dat a in the application, “File”, and then cl ick “Print”.
2 Check th at the printer name has been selected.
If the printer is not selected, click the [
3 Specify the page range and the number of copies to print.
Note
The Print dialog box differs d epending on the application.
4
] and select the printer.
4-1
362/282/222 x-13
Page 15

Welcome
x-14 362/282/222
Page 16
Overview
1Overview
1.1 Printer controller
The printer controller is a device for performing printing functions and network printing functions with this machine.
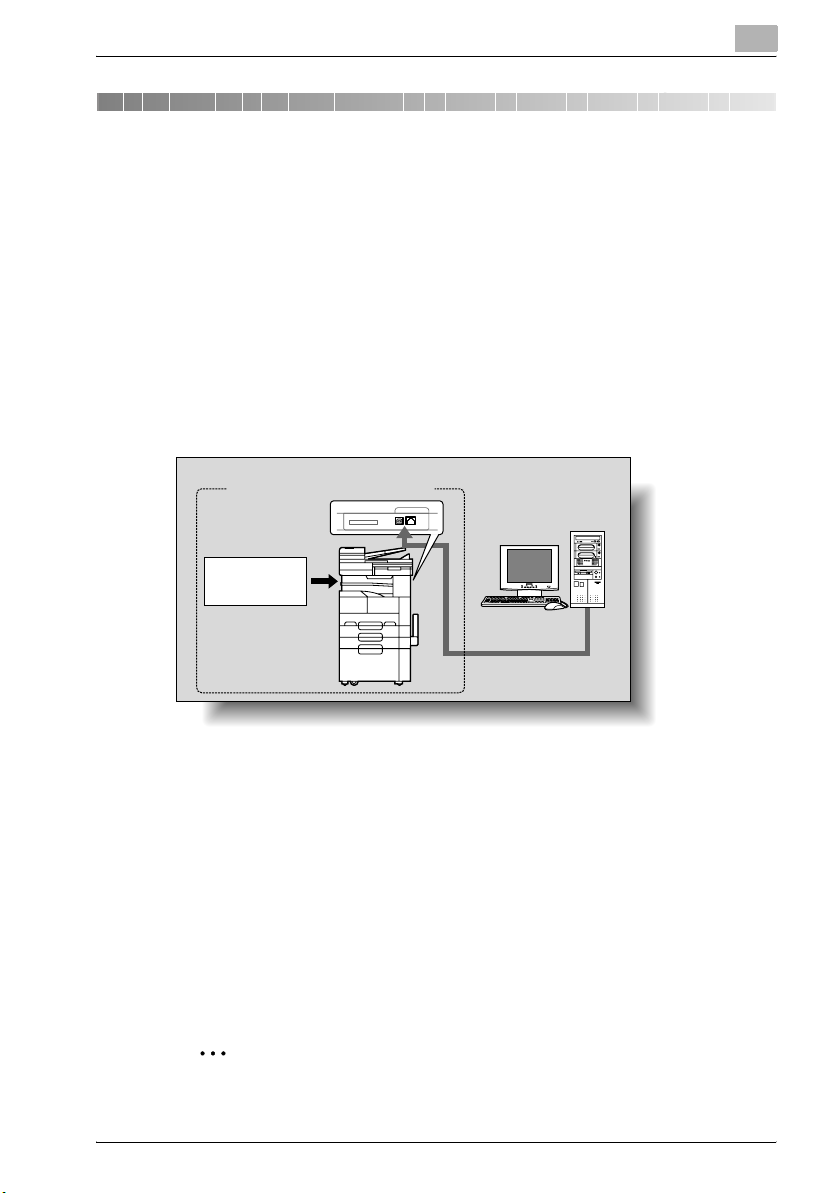
Role of the printer controller
The printer controller is built into the machine.
You can print from applications on the computer connected to the printing
system. When using this machine as a network printer, you can print from
applications on the computer.
Printing system
Machine
Printer
controller
1
Computer
Available printer controller functions
The printer controller provides the following functions.
- Printing from a computer (using a printer driver)
- Support of network protocols including TCP/IP, NetBEUI, IPX/SPX, and
AppleTalk
- Direct printing over a network using Windows (SMB), LPR, and IPP print-
ing
- Access to settings for this machine and the printer controller from a client
computer over the network (using a Web browser)
- Control of the number of pages printed (“User Authentication” and “Ac-
count Track” function, excluding external server authentication)
2
Note
Only the PCL printer driver can be used with Windows printing.
362/282/222 1-1
Page 17
1
Accessibility
Access
ABC DEF
JKLGHI MNO
TUVPQRS WXYZ
Interrupt
Reset
Copy
Fax/ScanExtra ScanUser Box
Mode Memory
Mode Check
Main Power
Stop
Power
Proof Copy
Start
Utility/
Counter
Enlarge Display
Contrast
Overview
Machine modes
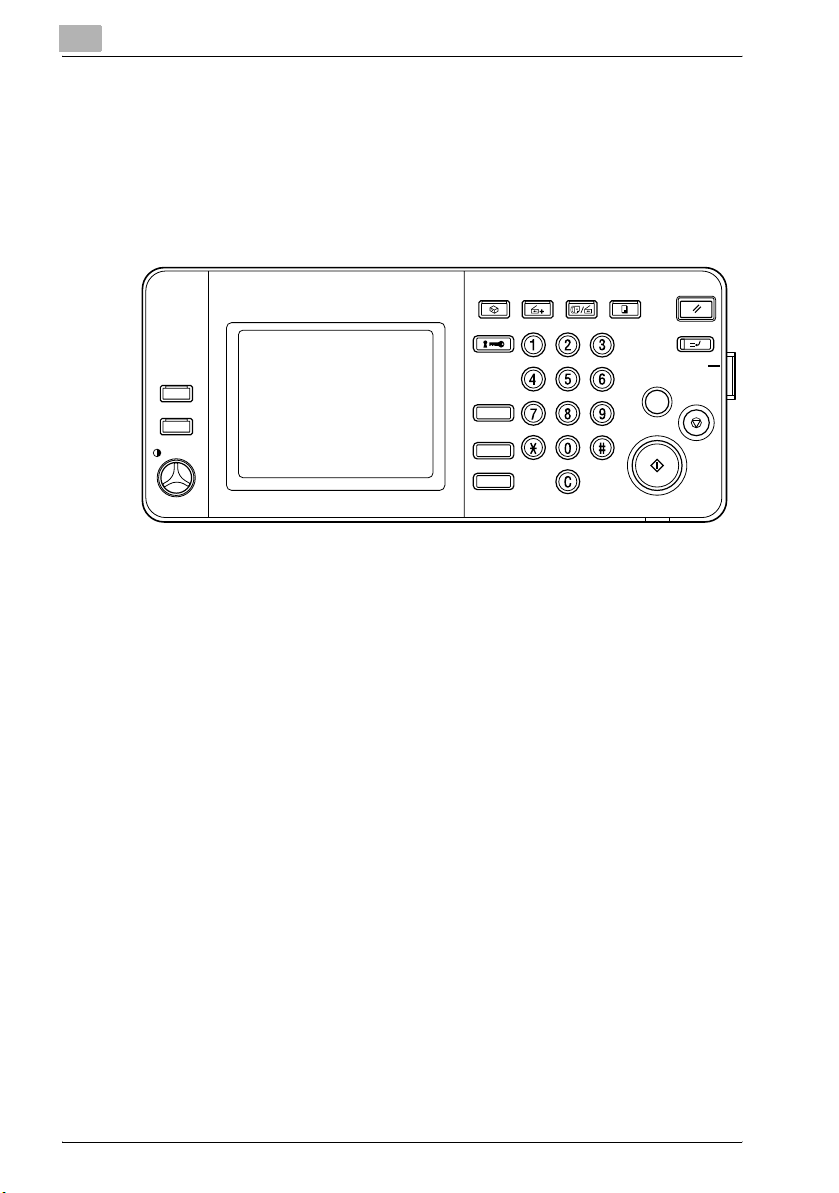
The printer driver settings are mainly set using a computer, however, the font
list can be printed, and the printer controller settings and default print settings can be set using the control panel of this machine. In addition, fax and
scanning operations can be used by switching the mode.
To switch between modes, press the mode keys on the control panel.
Main Power
[Copy]
Switches to the copy mode.
[Fax/Scan]
Switches to the fax/scan mode.
To use the fax function, optional fax kit is required.
[Extra Scan]
Switches to the extra scan mode.
To use the extra scan function, optional fax kit or scanner unit is required.
[User Box]
Switches to the box mode.
!
Detail
You can use this machine as a printer in all modes.
Change the default print settings in the Utility mode.
1-2 362/282/222
Page 18

Overview
Printing flow
When using this printing system as a printer, the flow of the main process is
described below.
Print commands transmitted from the application are received by the printer
driver.
Data is transmitted to this machine over a parallel interface (IEEE 1284) when
this machine is used as a local printer, over a USB interface when this machine is used as a USB printer, or over an Ethernet interface (TCP/IP, IPX/
SPX, or AppleTalk) when this machine is used as a network printer. The printer controller then performs image rasterization (development of output characters and images to bitmap data). Finally, this data is printed from this
machine.
2
Note
To connect the parallel interface, the optional local interface kit is required.
Computer
Used as a local
printer
Application
Used as a USB
printer
Application
Used as a network
printer
Application
1
Printer driver
Parallel interface
(IEEE 1284)
Print
Printer driver
USB
Machine
Printer controller
PS/PCL processing (rasterizing)
Printer driver
Ethernet (TCP/IP, IPX/
SPX, or AppleTalk)
When a print job is received during copying, the data is stored in the memory
of this machine. When copying is complete, the print job is automatically
printed.
362/282/222 1-3
Page 19

1
1.2 Operating environment
The system requirements for using this printing system and the interfaces
used for connection are explained below.
Connectable computers and operating systems
Check that the computer being connected meets the following conditions.
Windows
Item Operating environment
Operating system Windows NT 4.0 (Service Pack 6a or later), Windows 2000 Pro-
Processor Pentium or higher
Memory Capacity recommended for the operating system
Drive CD-ROM
Web browser
(when using PageScope
Web Connection)
fessional (Service Pack 4 or later), Windows XP Home Edition/
Professional (Service Pack 2 or later), Windows XP Professional
x64 Edition, Windows Vista Home Basic/Home Premium/Ultimate/Business/Enterprise, Windows Vista Home Basic/Home
Premium/Ultimate/Business/Enterprise x64 Edition, Windows
Server 2003 Standard Edition, Windows Server 2003 x64 Edition,
Windows Server 2008 Standard/Enterprise, or
Windows Server 2008 Standard/Enterprise x64 Edition
With sufficient memory resources in the operating system and
application being used
Windows NT 4.0
• Microsoft Internet Explorer 4 or later recommended
• Netscape Navigator 4.73 or 7.0
Windows 2000
• Microsoft Internet Explorer 5 or later recommended
• Netscape Navigator 7.0
Windows XP/Server 2003
• Microsoft Internet Explorer 6 or later recommended
• Netscape Navigator 7.0
Windows Vista/Server 2008
• Microsoft Internet Explorer 7 or later
• Netscape Navigator 7.0
*If using Microsoft Internet Explorer 5.5, use Service Pack 1 or
later.
Overview
Macintosh
Item Operating environment
Operating system Mac OS 9.2, Mac OS X 10.2, Mac OS X 10.3, Mac OS X 10.4, or
Processor PowerPC, Intel Processor (Intel Processor for Mac OS X 10.4/
Memory Capacity recommended for the operating system
Drive CD-ROM
Mac OS X 10.5
10.5)
1-4 362/282/222
Page 20

Overview
1
Item Operating environment
Web browser
(when using PageScope
Web Connection)
Connectable interfaces
The various interfaces that can be used to connect this printing system to a
computer are described below.
Ethernet interface
Connect when using this printing system as a network printer.
Supports 10Base-T and 100Base-TX standards. In addition, the Ethernet interface supports the TCP/IP (LDP/LPR), IPX/SPX (NetWare), and AppleTalk
(EtherTalk) protocols.
Parallel interface (optional)
Connect when using this printing system as a local printer.
A computer running Windows and an IEEE 1284 parallel cable are required
for connection. Use a parallel cable that uses a terminal with an Amphenol
36-pin male connector.
The parallel interface supports the compatible, nibble, and ECP modes.
Netscape Navigator 7.0
USB interface
Connect when using this printing system as a network printer.
The USB interface can be connected to a computer running Windows 2000/
XP/Vista/Server 2003/Server 2008. A USB cable is required for connection.
Use a type A (4 pin, male) or type B (4 pin, male) USB cable. A USB cable
measuring 3 meters or less is recommended.
2
Note
The USB interface cannot be connected to computers running Windows
NT 4.0 or Mac OS 9/OS X.
362/282/222 1-5
Page 21
1
TEL PORT 1
LINE PORT 1
TEL PORT 2
LINE PORT 2
Overview
Connection diagram
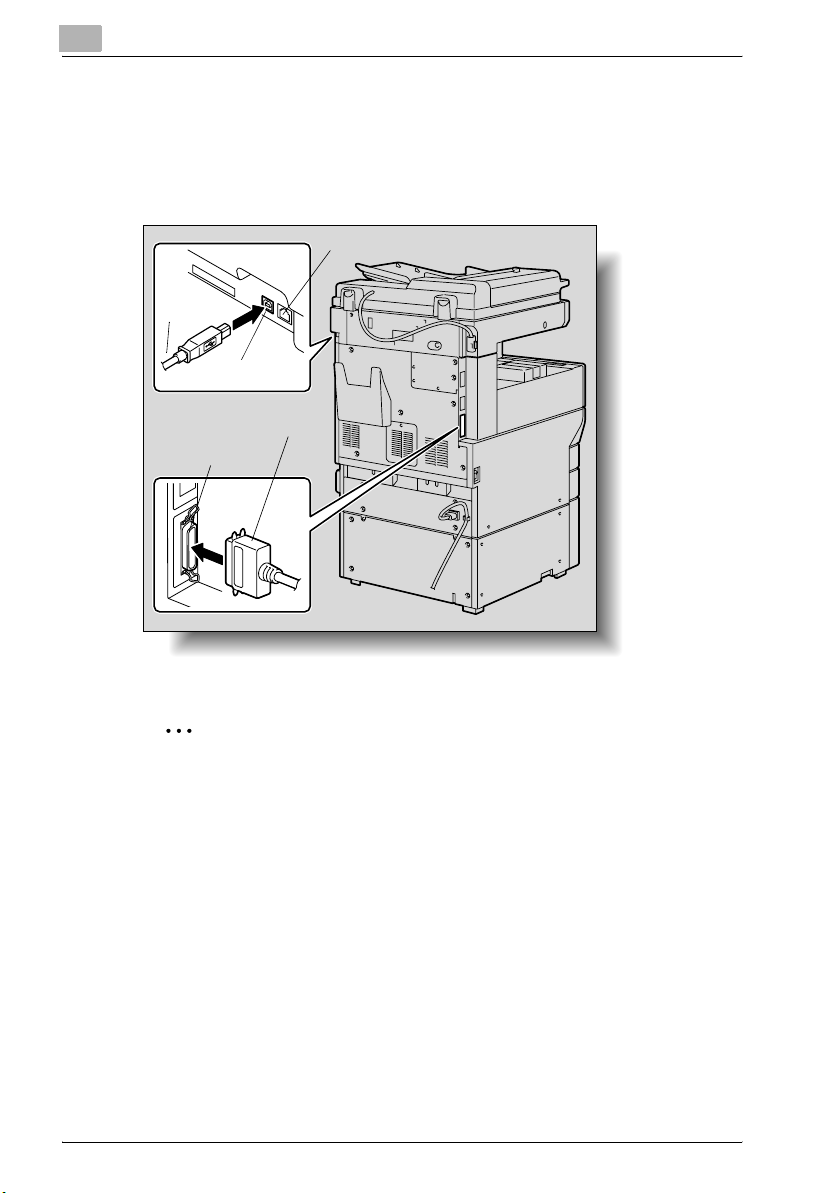
The printer cables can be connected to each port at the back of this machine.
Machine (rear view)
Ethernet (10Base-T or 100Base-TX)
USB
cable
USB port
Parallel cable
Parallel port
2
Note
To connect this machine to a computer using a parallel connection, optional local interface kit is required.
1-6 362/282/222
Page 22

Overview
1.3 Setting up the system
In order to use this printing system, it must first be set up.
Setup consists of connecting this machine to a computer and installing the
printer driver onto the computer being used.
To set up the printing system
Setup the printing system as described below.
1 Connect this machine to a computer. (Refer to “Connectable interfac-
es” on page 1-5.)
2 Install the printer driver. (Refer to “Installing the printer driver” on
page 2-1.)
3 When using a network connection, set up the network. (Refer to “Set-
ting up network printing” on page 3-1.)
4 Check the setup by printing a test page. (Refer to “Test printing” on
page 4-2.)
5 Install the screen fonts.
– The Driver CD-ROM Vol.1 PCL Driver and Driver CD-ROM Vol.2
PS,Macintosh Driver contain the Latin TrueType fonts as the screen
fonts.
– Install the screen fronts after adding the operating system standard
fonts.
– For details, refer to Help of the operating system.
– The screen fonts are located in the “Screenfont” or “Screenfonts”
folder on the CD-ROM.
– To install the Macintosh fonts, install the fonts after decompressing
them.
Installation of the printer driver may differ depending on the connection
method used with this machine in addition to the operating system of the
computer and the type of printer driver being used.
1
362/282/222 1-7
Page 23

1
Overview
!
Detail
For details on connecting this machine to a computer, refer to “Connectable interfaces” on page 1-5.
2
Note
To update an existing printer driver, delete the existing printer driver first.
For details, refer to “Uninstalling the printer driver” on page 2-11 and
page 2-21.
If using the optional parallel interface, set the interface time settings and
mode (Compatible, Nibble, or ECP) as necessary with the PageScope
Web Connection and on the control panel. For details, refer to “Print tab
- Local I/F” of the User’s Guide [Print Operations].
1-8 362/282/222
Page 24

Installing the printer driver
2 Installing the printer driver
2.1 Printer drivers and supported operating systems
In order to use this printing system, the printer driver must be installed. The
printer driver is a program that controls the processing of data for output. Install the printer driver onto the computer from the provided CD-ROM.
The printer drivers included on the CD and the supported computer operating systems are listed below. Install the required printer driver.
2
Printer driver Page description
Konica Minolta PCL
driver
Konica Minolta PCL
driver (VXL) for Windows Vista/Sever 2008
Konica Minolta PostScript driver
Konica Minolta PostScript driver (VPS) for
Windows Vista/
Sever 2008
PostScript PPD
driver
* The Driver CD-ROM Vol.1 PCL Driver contains the PCL printer driver, and the Driver CD-ROM
Vol.2 PS,Macintosh Driver contains the PostScript drivers.
language
PCL Windows NT 4.0 (Service Pack 6a or later),
PostScript 3
emulation
Supported operating systems
Windows 2000 Professional (Service Pack 4 or
later), Windows XP Home Edition/Professional
(Service Pack 2 or later) and Windows Server
2003
Windows Vista Home Basic/Home Premium/
Ultimate/Business/Enterprise, Windows Vista
Home Basic/Home Premium/Ultimate/Business/Enterprise x64 Edition, Windows Server
2008 Standard/Enterprise, Windows Server
2008 Standard/Enterprise x64 Edition
Windows 2000 Professional (Service Pack 4 or
later),
Windows XP Home Edition/Professional
(Service Pack 2 or later), Windows XP Professional x64, Windows Server 2003 and Windows Server 2003 x64
Windows Vista Home Basic/Home Premium/
Ultimate/Business/Enterprise, Windows Vista
Home Basic/Home Premium/Ultimate/Business/Enterprise x64 Edition, Windows Server
2008 Standard/Enterprise, Windows Server
2008 Standard/Enterprise x64 Edition
Mac OS 9.2 or later,
Mac OS X 10.2, Mac OS X 10.3, Mac OS X
10.4, and Mac OS X 10.5
362/282/222 2-1
Page 25

2
Installing the printer driver
2
Note
When the PS driver for an operating system with a different number of
bits is installed as an additional driver on Windows Server 2008, the setup
information file for the operating system compatible with the number of
bits for the driver is needed. For details, refer to "Installing an additional
PS driver that uses a different number of bits onto Windows Server 2008"
of the User’s Guide [Print Operations].
For details on the fax driver, refer to the User’s Guide [Fax Driver Operations].
2-2 362/282/222
Page 26

Installing the printer driver
2.2 When used with Windows
The installation procedure for the Windows printer driver differs depending
on how this machine is connected to the computer and depending on which
printer driver is used. The installation method also differs depending on the
version of Windows that you are using. Refer to the table below for the appropriate procedure for installing the printer driver on your computer.
2
Printer driver Connection
Konica Minolta
PCL driver
Konica Minolta
PostScript driver
method
All connection
methods
Network connection
Parallel connection “Installing the printer driver using Plug and Play” on
USB connection “Installing the printer driver using Plug and Play” on
Refer to
“Automatic installation using the installer” on
page 2-5
“For Windows 2000/NT 4.0” of the User’s Guide
[Print Operations].
“For Windows XP/Server 2003” of the User’s Guide
[Print Operations].
“For Windows Vista/Server 2008” of the User’s
Guide [Print Operations].
page 2-8
“For Windows 2000” on page 2-8
“For Windows XP/Server 2003” on page 2-9
“For Windows Vista/Server 2008” on page 2-10
“For Windows 2000/NT 4.0” of the User’s Guide
[Print Operations].
“For Windows XP/Server 2003” of the User’s Guide
[Print Operations].
“For Windows Vista/Server 2008” of the User’s
Guide [Print Operations].
page 2-8
“For Windows 2000” on page 2-8
“For Windows XP/Server 2003” on page 2-9
“For Windows Vista/Server 2008” on page 2-10
362/282/222 2-3
Page 27

2
Installing the printer driver
2
Note
For details on installing the printer driver in a network environment, refer
to “Setting up network printing” on page 3-1. Because it is necessary to
specify other network settings in advance when installing the printer driver using a network connection, install it using a local connection at this
time.
To install the printer driver under Windows XP, Windows Vista, Windows
Server 2008, Windows Server 2003, Windows 2000, or Windows NT 4.0,
log on using a user name that is authorized by the administrator.
The printer driver can be installed using the Add Printer Wizard, however,
if used, the Plug and Play screen will appear each time the computer is
started.
For details on the fax driver, refer to the User’s Guide [Fax Driver Operations].
To connect this machine to a computer using a parallel connection, the
optional local interface kit is required.
2-4 362/282/222
Page 28

Installing the printer driver
Automatic installation using the installer
With the installer, this machine is detected to determine whether it is connected by USB or is on the same TCP/IP network as the computer, and then
the required printer is automatically installed. You can also manually specify
the printer driver to be installed.
2
Note
Since this machine is automatically detected with a network connection,
be sure to set the IP address of this machine before connecting it. For details on specifying the settings, refer to “Setting the IP address for this
machine” of the User’s Guide [Print Operations].
When installing on Windows NT 4.0, 2000, XP, Vista, Server 2003, or
Server 2008, administrator permissions are required.
If the wizard starts up in order to add new hardware with a USB or parallel
connection, click [Cancel].
For IPP printing, the printer driver can be installed when the IPP printing
settings are specified. For further details on IPP printing, refer to “IPP
printing (Windows 2000/XP/Vista/Server 2003/Server 2008)” of the User’
s Guide [Print Operations].
2
Installer operating environment
Item Operating environment
Operating system Windows NT 4.0 (Service Pack 6a or later), Windows 2000 Pro-
Processor Pentium 300 MHz or higher recommended
Memory 64 MB or more (128 MB or more recommended)
* With Windows NT 4.0, in order to install a machine that is connected directly to a network using
the TCP/IP protocol, Microsoft TCP/IP Printing Service must first be installed on the computer
being used.
fessional (Service Pack 4 or later), Windows XP Home Edition/
Professional (Service Pack 2 or later), Windows XP Professional
x64 Edition, Windows Vista Home Basic/Home Premium/Ultimate/Business/Enterprise, Windows Vista Home Basic/Home
Premium/Ultimate/Business/Enterprise x64 Edition, Windows
Server 2003 Standard Edition, Windows Server 2003 x64 Edition,
Windows Server 2008 Standard/Enterprise, or
Windows Server 2008 Standard/Enterprise x64 Edition
362/282/222 2-5
Page 29
2
Installing the printer driver
To install the printer driver
1 Insert the Windows printer driver CD-ROM into the computer’s CD-
ROM drive.
– For the PCL driver or the PCL driver (VXL) for Windows Vista/Server
2008: Driver CD-ROM Vol.1 PCL Driver
Check that the CD-ROM installer starts up, and then proceed to
step 2.
– For the PS driver or the PS driver (VPS) for Windows Vista/Server
2008: Driver CD-ROM Vol.2 PS,Macintosh Driver
Check that the installer starts up, and then proceed to step 2.
– If the installer does not start up, double-click the following file on
the CD-ROM, and then proceed to step 3.
For Windows NT 4.0/2000/XP/Server 2003: “Driver\Setup.exe”
For Windows Vista/Server 2008: “Driver_Vista\Setup.exe”
(“Setup64.exe” with a 64-bit operating system)
2 Click “Printer Install”, and then select the operating system to be in-
stalled on.
– If the “User Account Control” window appears when installing on
Windows Vista/Server 2008, click the [Allow] button or the [Continue] button.
The installation of the printer driver starts.
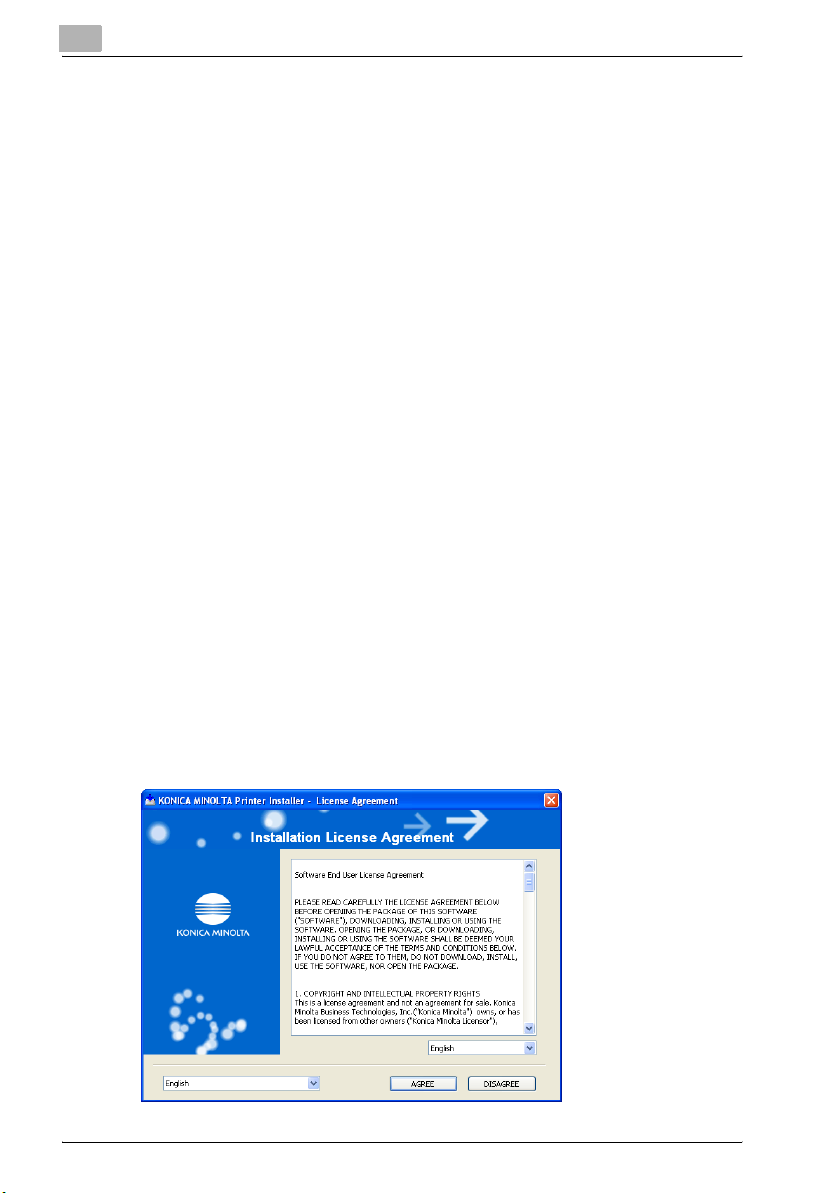
3 Click the [AGREE] button if you agree with all terms and conditions of
the license agreement.
– If you do not agree with the terms and conditions of the license
agreement, the software cannot be installed.
– You can change the display language of the installer box in the low-
er-left corner.
2-6 362/282/222
Page 30
Installing the printer driver
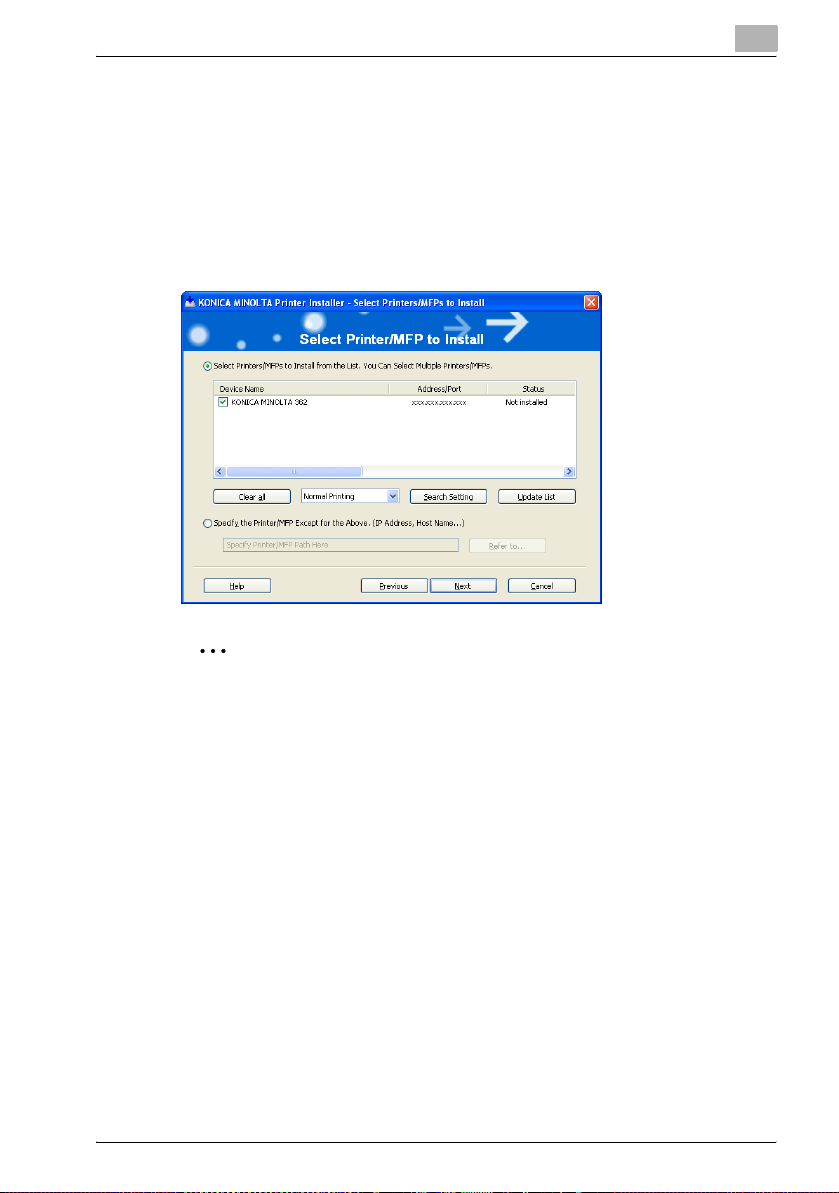
4 When the setup selection dialog box appears, click the [Install Printers/
MFPs] button, and then click the [Next] button.
The connected printers and copiers are detected.
5 Select this machine and proceed with the installation.
Follow the on-screen instructions to complete the installation.
– As the printing method, instead of “Normal Printing” (Port 9100,
USB or parallel), “Internet Printing” (IPP) can be selected.
2
2
Note
If the connection of this machine cannot be recognized or for parallel
connections, the machine will not be listed. When this occurs, select
“Specify the Printer/MFP Except for the Above. (IP Address, Host
Name...)”, and then select the print from the box
With Windows 2000, XP or Server 2003, if the Windows logo testing or
digital signature warning message appears, click the [Continue] or [Yes]
button.
With Windows Vista or Server 2008, if the publisher verification message
from Windows Security Center appears, click “Install this driver software
anyway”.
362/282/222 2-7
Page 31

2
Installing the printer driver
Installing the printer driver using Plug and Play
For Windows 2000
1 After using a parallel cable or a USB cable to connect this machine to
a computer, turn the main power of this machine on.
– Do not disconnect or connect the cable while the computer is start-
ing up.
2 Start the computer.
The Found New Hardware Wizard starts up.
3 Insert the Windows printer driver CD-ROM into the computer’s CD-
ROM drive.
– Konica Minolta PCL driver: Driver CD-ROM Vol.1 PCL Driver
– Konica Minolta PostScript driver: Driver CD-ROM Vol.2 PS,Macin-
tosh Driver
4 Select “Search for a suitable driver for my device (recommended)”, and
then click the [Next] button.
5 Select “Specify a location”, and then click the [Next] button.
6 Specify the folder on the CD-ROM that contains the printer driver for
the operating system that you are using, and then click the [OK] button.
Printer drivers that can be selected:
– Konica Minolta PCL driver: Driver CD-ROM Vol.1 PCL Driver “Driv-
er\Driver\PCL\Language folder\Win2000_XP” folder
– Konica Minolta PostScript driver: Driver CD-ROM Vol.2 PS,Macin-
tosh Driver “Driver\Driver\PS\Language folder\Win2000_XP” folder
7 Click the [OK] button, and then follow the on-screen instructions.
8 Click the [Finish] button.
9 When installation is complete, make sure that the icon of the installed
printer appears in the Printers window.
10 Remove the CD-ROM from the CD-ROM drive.
This completes the printer driver installation.
2-8 362/282/222
Page 32

Installing the printer driver
For Windows XP/Server 2003
1 After using a parallel cable or a USB cable to connect this machine to
a computer, turn the main power of this machine on.
– Do not disconnect or connect the cable while the computer is start-
ing up.
2 Start the computer.
The Found New Hardware Wizard starts up.
3 Insert the Windows printer driver CD-ROM into the computer’s CD-
ROM drive.
– Konica Minolta PCL driver: Driver CD-ROM Vol.1 PCL Driver
– Konica Minolta PostScript driver: Driver CD-ROM Vol.2 PS,Macin-
tosh Driver
4 Select “Install from a list or specific location (Advanced)”, and then
click the [Next] button.
5 Under “Search for the best driver in these locations”, select “Include
this location in the search”, and then click the [Browse] button.
6 Specify the folder on the CD-ROM that contains the printer driver for
the operating system that you are using, and then click the [OK] button.
– Konica Minolta PCL driver: Driver CD-ROM Vol.1 PCL Driver “Driv-
er\Driver\PCL\Language folder\Win2000_XP” folder
– Konica Minolta PostScript driver: Driver CD-ROM Vol.2 PS,Macin-
tosh Driver “Driver\Driver\PS\Language folder\Win2000_XP (for a
64-bit operating system, “WinXP_x64”)” folder
2
7 Click the [Next] button, and then follow the on-screen instructions.
– When the Digital Signature dialog box appears, click the [Continue]
button.
8 Click the [Finish] button.
9 When installation is complete, make sure that the icon of the installed
printer appears in the Printers and Faxes window.
10 Remove the CD-ROM from the CD-ROM drive.
This completes the printer driver installation.
362/282/222 2-9
Page 33

2
Installing the printer driver
For Windows Vista/Server 2008
1 After using a parallel cable or a USB cable to connect this machine to
a computer, turn the main power of this machine on.
– Do not disconnect or connect the cable while the computer is start-
ing up.
2 Start the computer.
The Found New Hardware dialog box appears.
– If the Found New Hardware Wizard dialog box does not appear,
turn off this machine, then on again.
– When turning off the power, then on again, wait at least 10 seconds
before turning it on again. Otherwise, this machine may not function
properly.
3 Click “Locate and install driver software (recommended)”.
The dialog box prompting you to insert the disk appears.
– If the disk is not available, click “I don't have the disk. Show me oth-
er options”. In the next window, select “Browse my computer for
driver software (advanced)”, and then specify the desired printer
driver folder.
Konica Minolta PCL driver (VXL): “Driver_Vista\Driver\PCL\Language folder\Win_x86 (for a 64-bit operating system, “Win_x64”)”
folder on the Driver CD-ROM Vol.1 PCL Driver
Konica Minolta PostScript driver (VPS): “Driver_Vista\Driver\PS\Language folder\Win_x86 (for a 64-bit operating system,
“Win_x64”)” folder on the Driver CD-ROM Vol.2 PS,Macintosh Driver
4 Insert the printer driver CD-ROM into the computer's CD-ROM drive.
– Konica Minolta PCL driver (VXL): Driver CD-ROM Vol.1 PCL Driver
– Konica Minolta PostScript driver (VPS): Driver CD-ROM Vol.2
PS,Macintosh Driver
The information on the disk is retrieved. A list of software supporting
this machine appears.
5 Specify the name of the desired printer driver, and then click the [Next]
button.
– Printer drivers that can be selected:
Windows Vista/Server 2008: Konica Minolta PCL driver (VXL), Konica Minolta PostScript driver (VPS)
2-10 362/282/222
Page 34

Installing the printer driver
6 Follow the on-screen instructions.
– If the “User Account Control” window appears, click the [Continue]
button.
– If the dialog box of Windows Security appears, click “Install this
driver software anyway”.
7 When the installation is completed, click the [Close] button.
8 When the installation is completed, make sure that the icon of the in-
stalled printer appears in the Printers window.
9 Remove the CD-ROM from the CD-ROM drive.
This completes the printer driver installation.
Uninstalling the printer driver
If it becomes necessary to delete the printer driver, for example, when you
want to reinstall the printer driver, follow the procedure below to delete the
driver.
1 For Windows 2000/NT 4.0, click the [Start] button, point to “Settings”,
and then click “Printers”.
For Windows XP/Server 2003, click the [Start] button, and then click
“Printers and Faxes”.
For Windows Vista/Server 2008, click the [Start] button, and then click
“Control panel”, “Hardware and Sound”, and “Printers”.
– If “Printers and Faxes” does not appear in the Start menu in Win-
dows XP/Server 2003, open the Control Panel from the Start menu,
select “Printers and Other Hardware”, and then select “Printers and
Faxes”.
For Windows Vista/Server 2008, if the control panel is in the classic
view, double-click “Printers”.
2
2 In the Printers window (for Windows XP/Server 2003, Printers and Fax-
es window), select the icon of the printer that you want to delete.
3 Press the [Delete] key on the computer keyboard to delete the printer
driver.
362/282/222 2-11
Page 35

2
Installing the printer driver
4 Follow the on-screen instructions.
– When the printer driver has been deleted, the printer icon will dis-
appear from the Printers window (for Windows XP/Server 2003,
Printers and Faxes window).
For Windows NT 4.0, this completes the uninstallation procedure. Continue with step 11.
For Windows 2000/XP/Vista/Server 2003/Server 2008, delete the driver from the server properties.
5 Open “Server Properties”.
– For Windows 2000/XP/Server 2003, click the “File” menu, and then
click “Server Properties”.
– For Windows Vista/Server 2008, right-click space in the Printers
window and click “Run as administrator”, then click “Server Properties”.
6 Click the Drivers tab.
7 Select the printer driver to be deleted from the “Installed printer drivers”
list, and then click the [Remove] button.
– For Windows 2000/XP/Server 2003, continue with step 9.
– For Windows Vista/Server 2008, continue with step 8.
8 Select “Remove driver and driver package” on the deletion confirma-
tion screen and then click the [OK] button.
9 Click the [Yes] button on the deletion confirmation screen.
– For Windows Vista/Server 2008, when the deletion confirmation
screen is additionally displayed, click the [Delete] button.
10 Close the Print Server Properties dialog box and Printers window (for
Windows XP/Server 2003, “Printers and Faxes” window).
2-12 362/282/222
Page 36

Installing the printer driver
11 Restart the computer.
This completes the uninstallation procedure.
2
Note
Be sure to restart the computer.
Even if the printer driver is deleted using the method described above,
the model information file will remain in the computer for Windows 2000/
XP/Server 2003. Therefore, the driver may not be able to be overwritten
when reinstalling the same version of the printer driver. When installing
the same version of the printer driver, be sure to also delete the files described below.
Check the “C:\WINDOWS\system32\spool\drivers\w32x86” folder and
delete the folder of the corresponding model if it is available. If the Konica
Minolta PCL driver and Konica Minolta PostScript driver are both installed, the model information of both drivers is deleted. If one driver is
remaining, do not delete it.
Delete the “oem*.inf” and “oem*.PNF” files in the “C:\WINDOWS\inf”
folder. (The asterisk (*) in the file name displays a number, and the
number varies according to the environment of the computer.)
Before deleting the files, open the INF file, check that the model name is
described in the last several lines, and then check that the file of the corresponding model is available.
The PNF file is the same number as the INF file.
2
In Windows Vista/Server 2008, when you have deleted a file using “Remove driver and driver package”, this operation is not required.
362/282/222 2-13
Page 37

2
2.3 When used with Macintosh
Installation procedure of the Macintosh printer driver differs depending on
the Mac OS version and printer driver being used. Refer to the table below
for the appropriate procedure for installing the printer driver on your Macintosh computer.
Mac OS Printer driver Refer to
Mac OS X 10.2,
Mac OS X 10.3,
Mac OS X 10.4,
and Mac OS X 10.5
Mac OS 9.2 or later PostScript PPD “For Mac OS 9.2” on page 2-19
Installing the printer driver
For Mac OS X
1 Turn the Macintosh computer on.
2 Insert the Macintosh printer Driver CD-ROM Vol.2 PS,Macintosh Driver
into the Macintosh computer’s CD-ROM drive.
– Quit all running applications that may have started when the Mac-
intosh computer was turned on.
PostScript PPD “Installing the printer driver” on page 2-14
Installing the printer driver
“Selecting a printer” on page 2-16
3 Open the “OS10_2_x”, “OS10_3_x” or “OS10_5_x” folder from “Driv-
er”, which is located in a language folder on the CD-ROM.
4 Select the Mac OS version being used, and then copy the drive file onto
the desktop.
Mac OS X 10.2: KONICAMINOLTA_362_102.pkg
Mac OS X 10.3: KONICAMINOLTA_362_103.pkg
Mac OS X 10.4: KONICAMINOLTA_362_103.pkg
The Mac OS X 10.5 offers different driver files according to how the
machine is used. Select the appropriate file according to your use environment.
Mac OS X 10.5:
If you mainly use A4 size for printing
In “A4” folder: KONICAMINOLTA_362_105.pkg
If you mainly use Letter (8 1/2x11) size for printing
In “Letter” folder: KONICAMINOLTA_362_105.pkg
2-14 362/282/222
Page 38
Installing the printer driver
5 Double-click the file copied onto the desktop.
– Enter the requested administrator’s name and password.
– For the administrator’s name and password, ask your network ad-
ministrator.
– To quite the installation, click the [Cancel] button.
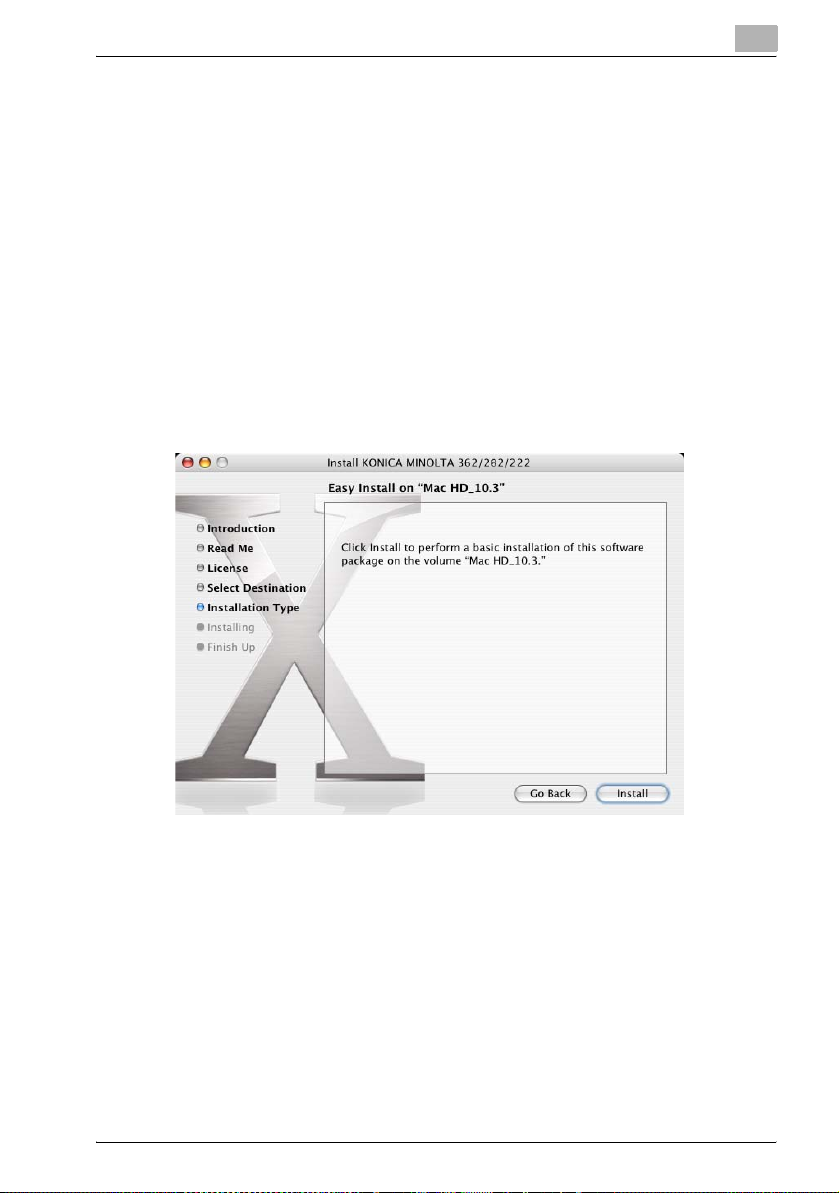
6 Click the [Continue] button and follow the on-screen instructions until
the Installation dialog box appears.
7 On the Easy Install dialog box, click the [Install] button.
– For Mac OS X 10.2/10.3/10.4/10.5, the [Install] button may appear
as the [Upgrade] button at the second and subsequent installation
of the printer driver.
The printer driver is installed onto the Macintosh computer. When in-
stallation is complete, a message appears.
2
8 Click the [Close] button.
This completes the printer driver installation.
Next, select the printer.
362/282/222 2-15
Page 39

2
Installing the printer driver
Selecting a printer
For Mac OS X 10.2/10.3
After connecting this machine to a Macintosh computer, it can be used as a
printer by selecting it in Print Center or Printer Setup Utility as the printer to
be used.
1 Open Print Center or Printer Setup Utility, located in “Applications”−
“Utilities” of “Hard Disk”.
2 When the Add Printer dialog box appears, click the [Add] button. When
the printer list appears, click the [Add] button.
– If usable printers have already been set up, the Add Printer dialog
box does not appear.
3 Select the applicable connection method and printer name.
– You can check the printer name from AppleTalk Configuration in
PageScope Web Connection. For details, refer to “Printing with
Macintosh” of the User’s Guide [Print Operations].
– When specifying “IPP” for the protocol in IP Printer, the text box for
entering the queue name appears. For Mac OS X 10.3, leave the
queue name text box empty.
The following procedure is an example of when AppleTalk was selected by the connection method.
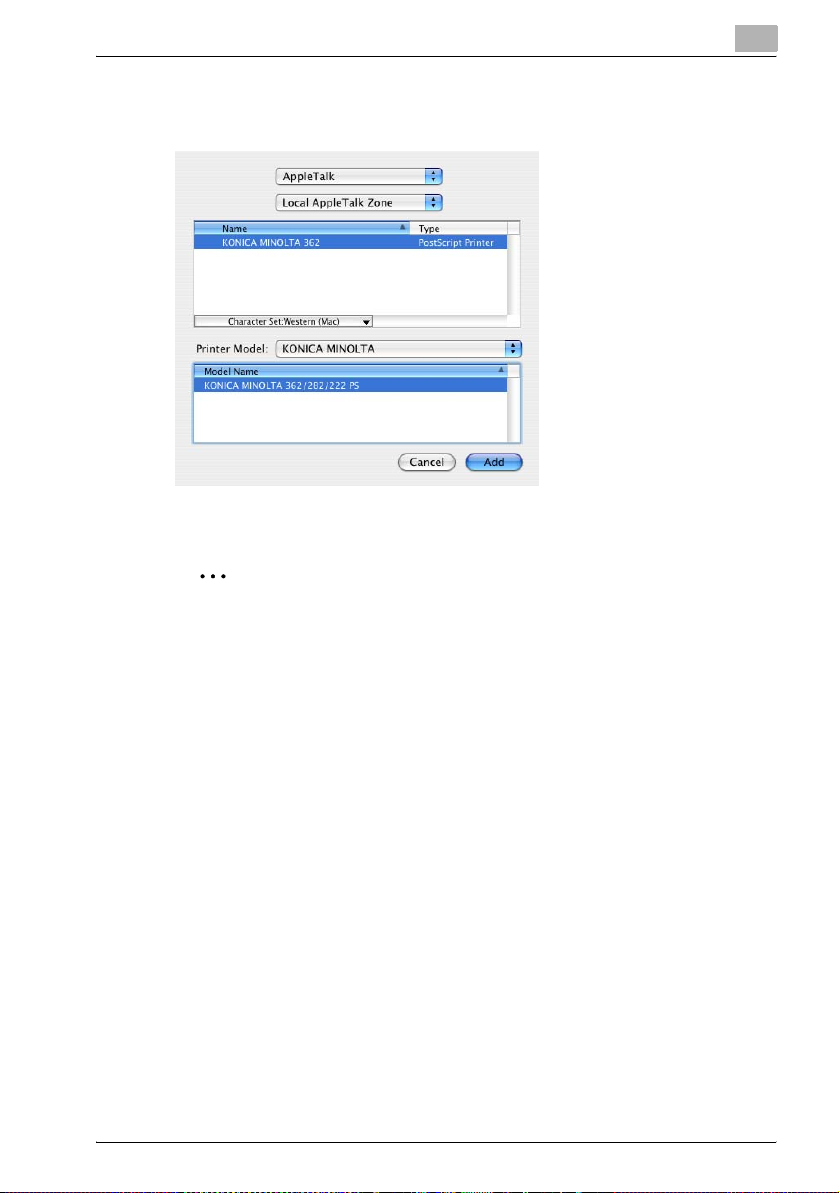
4 Select “KONICA MINOLTA” from the “Printer Model” drop-down list.
2-16 362/282/222
Page 40
Installing the printer driver
5 Select “KONICA MINOLTA 362/282/222 PS”, and then click the [Add]
button.
The selected printer is registered in the printer list.
2
Note
If connecting using AppleTalk, the AppleTalk settings on this machine
must be specified. For specifying the AppleTalk settings, refer to “Printing with Macintosh” of the User’s Guide [Print Operations].
2
For Mac OS X 10.4/10.5
After connecting this machine to a Macintosh computer, it can be used as a
printer by selecting it in Print & Fax as the printer to be used.
1 On the Apple menu, select “System Preferences”.
2 Click the “Print & Fax” icon.
3 On the “Print & Fax” screen, click the [+] button.
4 Click the [Default] button.
The connected printers are detected.
– If the printer cannot be detected, turn it off, then on again.
When turning the machine off, then on again, wait about 10 sec-
onds after turning the machine off before turning it on again. The
machine may not operate correctly if it is turned on immediately af-
ter being turned off.
362/282/222 2-17
Page 41
2
Installing the printer driver
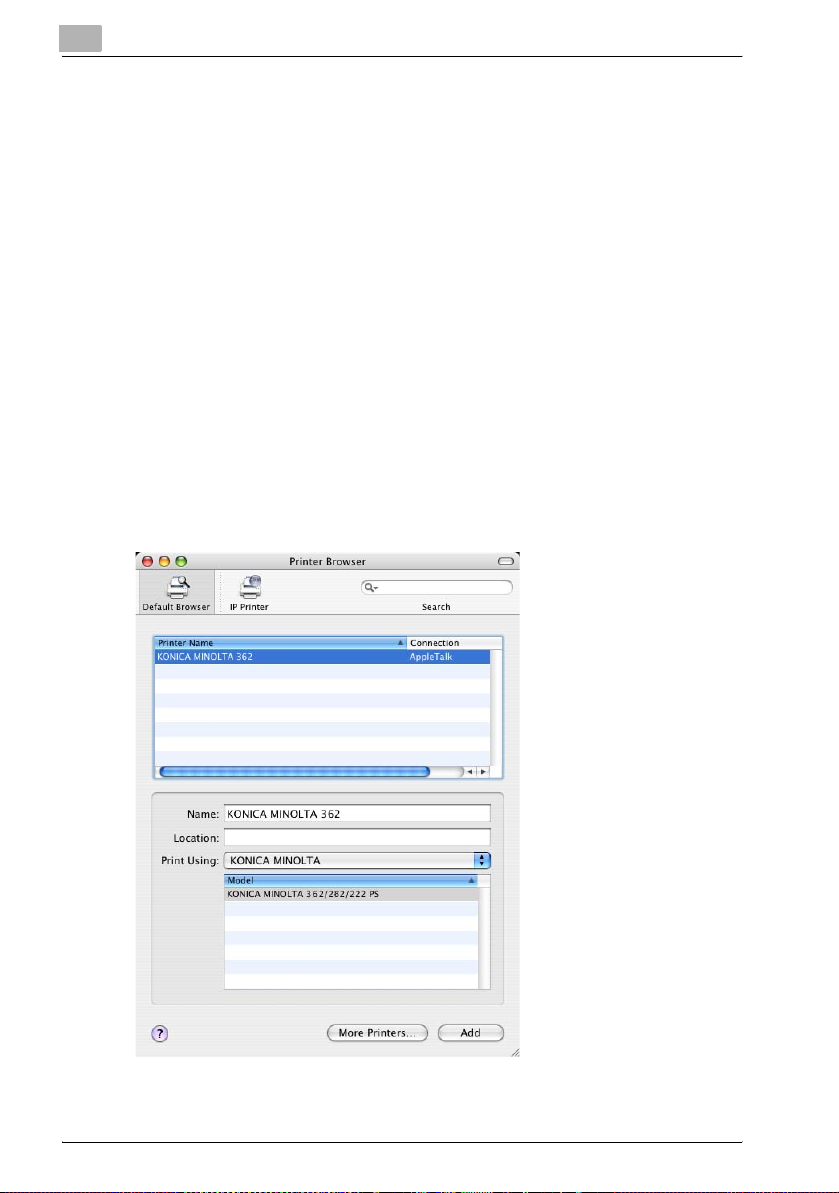
5 Below “Printer Name”, select the model name of the printer connected
with AppleTalk.
– The printer driver compatible with the selected printer is automati-
cally selected.
– If the printer driver was selected, continue with step 7.
– If the printer driver was not correctly selected, continue with step 6.
– The printer name can be viewed in the AppleTalk Configuration
page of PageScope Web Connection. For details, refer to “Printing
with Macintosh” of the User's Guide [Print Operations].
– If “IPP” was selected as the IP print protocol, a text box for entering
a queue name appears. With Mac OS X 10.4 or 10.5, type in “ipp”
as the queue name.
6 Manually select the printer driver.
– For Mac OS X 10.5, select “Select a driver to use...” beside “Print
Using”, and then select from the list the printer driver for the desired
model name.
– For Mac OS X 10.4, select “KONICA MINOLTA.” beside “Print Us-
ing”, and then select from the list the printer driver for the desired
model name.
2-18 362/282/222
Page 42

Installing the printer driver
7 Click the [Add] button.
If the selected printer is registered in Print & Fax, this completes the
procedure.
– If the “Installable Options” page appears, the settings for options
can be changed. For details, refer to “Specifying options” of the User's Guide [Print Operations].
– With Mac OS X 10.4, the printer can also be added by clicking the
[Add] button in the Printer Setup Utility window.
2
Note
If connecting using AppleTalk, the AppleTalk settings on this machine
must be specified. For specifying the AppleTalk settings, refer to “Printing with Macintosh” of the User’s Guide [Print Operations].
For Mac OS 9.2
After connecting this machine, it can be used as a printer by selecting “PostScript printer” under “Chooser” and by specifying the printer description
(PPD) File.
First, copy the printer description (PPD) file onto the Macintosh computer.
1 Insert the Macintosh printer Driver CD-ROM Vol.2 PS,Macintosh Driver
into the Macintosh computer’s CD-ROM drive.
2
2 Open a language folder from “OS 9_x” folder, which is located in “Driv-
er” folder on the CD-ROM.
3 Select the PPD file “KONICAMINOLTA362UVxxx.ppd”, and then copy
it into the “Printer Descriptions” folder in “System Folder”−“Exten-
sions” of “Hard Disk”.
– Next, select a printer.
The printer driver can use a standard Macintosh LaserWriter.
4 On the Apple menu, click “Chooser”.
5 Make sure that “AppleTalk” is set to “Active”, and then click the [Laser-
Writer] icon.
6 From the “Select a PostScript Printer” list, click the applicable printer
for the printing system, and then click the [Create] button.
– You can check the printer name from AppleTalk in PageScope Web
Connection.
For details, refer to “Printing with Macintosh” in User’s Guide [Print
Operations].
362/282/222 2-19
Page 43
2
Installing the printer driver
– If a different PPD file has already been selected, click the [Setup]
button in step 6, and then click the [Select PPD] button from the
screen that is already displayed.
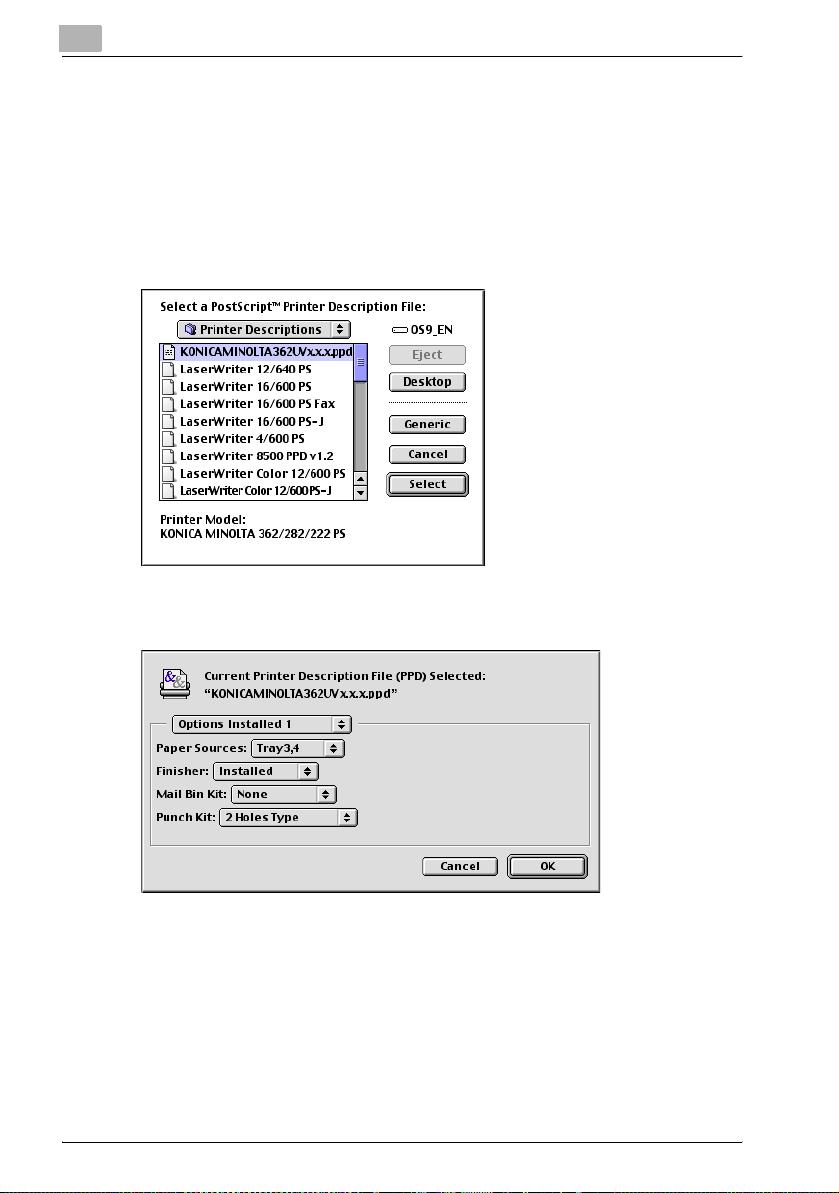
The PostScript printer description (PPD) file selection screen appears.
7 Select the applicable PPD file, and then click the [Select] button or
[Open] button.
The setting screen for adding Options appears.
8 Select the options that are installed on this machine from “Options In-
stalled 1” and “Options Installed 2”.
9 Click the [OK] button.
The Chooser window appears again.
10 Close the Chooser window.
2-20 362/282/222
Page 44

Installing the printer driver
Uninstalling the printer driver
If it becomes necessary to delete the printer driver, for example, when you
want to reinstall the printer driver, follow the procedure below to delete the
driver.
2
Note
Quit all running applications that may have started when the Macintosh
computer was turned on.
For Mac OS X
1 Open the “Print & Fax”, “Printer Setup Utility” or “Print Center” screen.
– For Mac OS X 10.3/10.4/10.5, open the “Print & Fax” screen from
“System Preferences” of the “Apple” menu.
– For Mac OS X 10.2/10.3/10.4, open the “Printer Setup Utility” or
“Print Center” screen located in “Applications”−“Utilities” of “Hard
Disk”.
2 Select the name of the printer to be deleted and click the [-] button or
the [Delete] button.
The selected printer is deleted.
2
3 Close the “Print & Fax”, “Printer Setup Utility” or “Printer Center”
screen.
4 Drag the following file, which is located in “Library”−“Printers”−
“PPDs”−“Contents”−“Resources”−“en.lproj” (“Library”−“Printers”−
“PPDs”−“Contents”−“Resources” for Mac OS X 10.5) of “Hard Disk”,
to the “Trash” icon.
– “KONICA MINOLTA 362.gz”
5 Delete the unnecessary files from “Library”−“Printers”.
– For Mac OS X 10.3/10.4, drag the “pstokm362” folder, which is lo-
cated in “Library”−“Printers”−“KONICAMINOLTA”−“filter”, and the
following folders, which are located in “Library”−“Printers”−
“KONICAMINOLTA”−“PDEs”, to the “Trash” icon.
KONICAMINOLTA362 Finishing.plugin
KONICAMINOLTA362 ImageLayout.plugin
KONICAMINOLTA362 Security.plugin
KONICAMINOLTA362 Setup.plugin
362/282/222 2-21
Page 45

2
Installing the printer driver
– For Mac OS X 10.2, drag the following folders, which are located in
“Library”−“Printers”−“PPD Plugins”, to the “Trash” icon.
KONICAMINOLTA362 Finishing.plugin
KONICAMINOLTA362 ImageLayout.plugin
KONICAMINOLTA362 Security.plugin
KONICAMINOLTA362 Setup.plugin
And then, enter “/usr” in “Move to”−“Move to folder”, move it to the
“/usr” folder, and then drag the “pstokm362” folder, which is locat-
ed in “libexec”−“cups”−“filter”, to the “Trash” icon.
– For Mac OS X 10.5, drag the “362” folder, which is located in
“Library”−“Printers”−“KONICAMINOLTA”, to the “Trash” icon.
6 Restart the Macintosh computer.
This completes the uninstallation procedure.
For Mac OS 9.2
1 Drag PPD file “KONICAMINOLTA362UVxxx.ppd”, which is located in
“System Folder”−“Extensions”−“Printer Descriptions” of “Hard Disk”,
to the “Trash” icon.
The related printer driver files are deleted.
2 Restart the Macintosh computer.
This completes the uninstallation procedure.
2-22 362/282/222
Page 46
Setting up network printing
3 Setting up network printing
3.1 Overview of network functions
Network functions
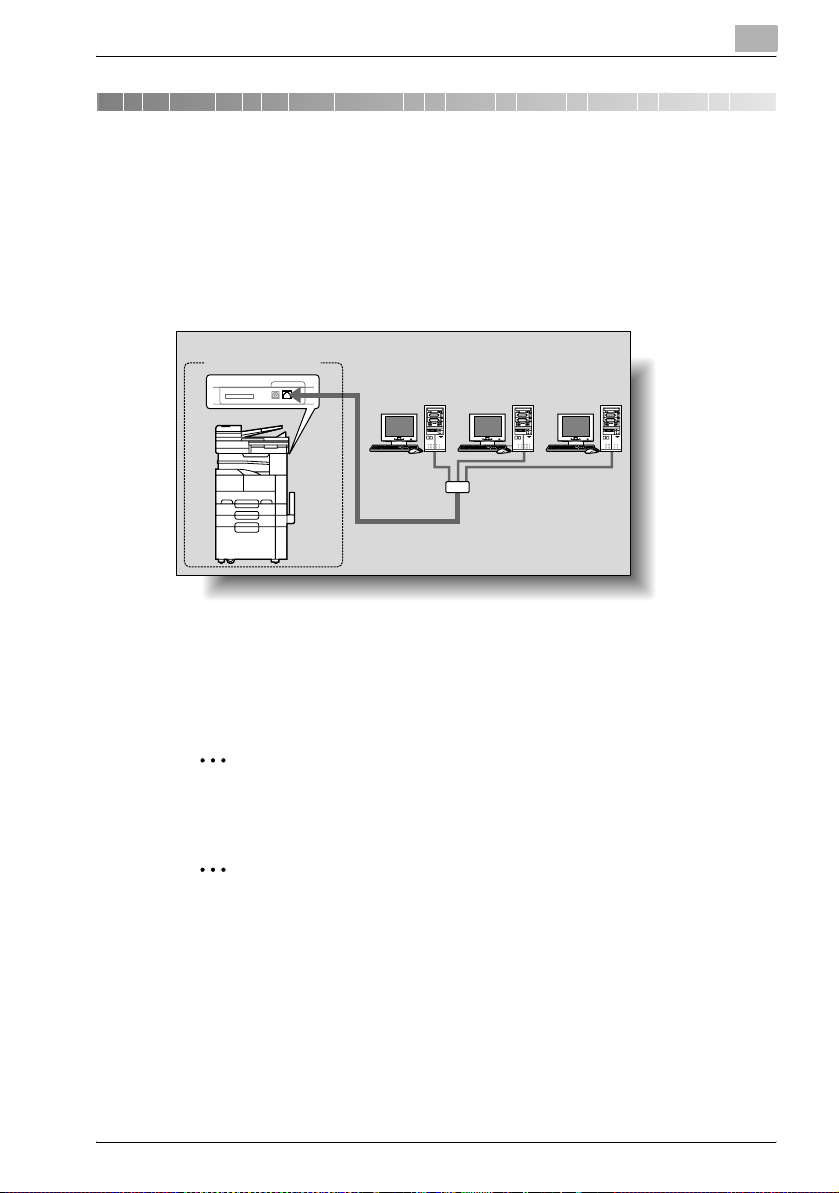
By connecting this machine to a network through the Ethernet port, this
printing system can be used as a network printer.
Printing system
Network
Ethernet
Hub
Machine
3
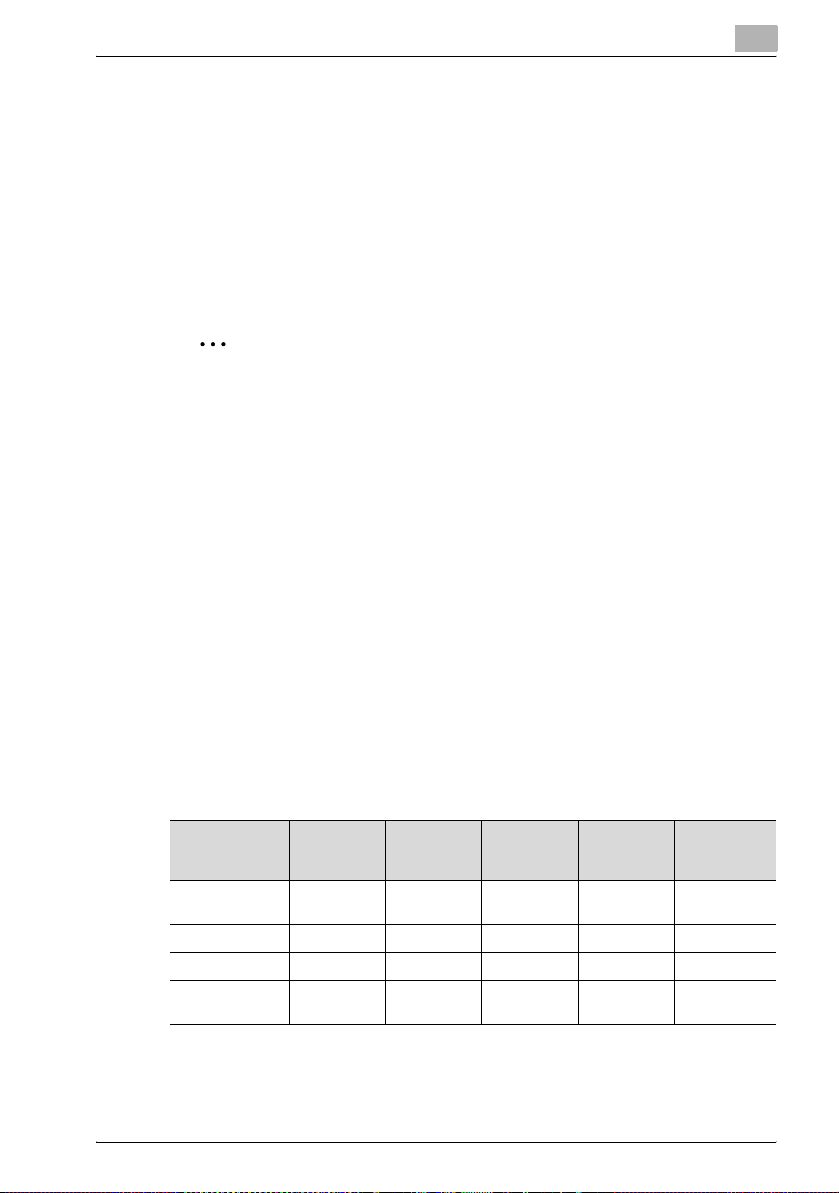
This printing system supports 10Base-T and 100Base-TX standards. In addition, the Ethernet interface supports the TCP/IP (LDP/LPR, IPP, Windows
printing), NetBEUI (Windows printing), IPX/SPX (NetWare), and AppleTalk
(EtherTalk) protocols.
2
Note
Only the PCL printer driver can be used with Windows printing.
2
Note
When setting up the network, the administrator password is required to
enter Administrator mode.
Ask the administrator of this machine for the administrator password.
362/282/222 3-1
Page 47

3
Setting up network printing
Features of the network functions
This printing system is equipped with the following network functions to flexibly support various network environments.
- Automatic selection of 10Base-T or 100Base-TX (Fast Ethernet)
- Supports multiple network protocols including TCP/IP, NetBEUI, IPX/
SPX, and AppleTalk (EtherTalk)
- Supports LPD/LPR over TCP/IP from Windows NT 4.0, Windows 2000,
Windows XP, Windows Vista, Windows Server 2003 or Windows Server
2008
- Supports Novell NetWare Pserver and Rprinter (Nprinter)
- Supports the Novell NetWare print server functions and supports both
bindery mode and Novell Directory Service (NDS)
- Acquires IP address automatically through DHCP
With Windows printing
Windows printing is a printing method that does not require a dedicated print
server on computers.
2
Note
Only the PCL printer driver can be used with Windows printing.
With LPR (Windows NT 4.0/2000/XP/Vista/Server 2003/Server 2008)
You can print with LPD/LPR using Windows NT 4.0, Windows 2000, Windows XP, Windows Vista, Windows Server 2003, or Windows Server 2008.
!
Detail
LPR (Line Printer Request): This print request system can be used under
Windows NT 4.0, Windows 2000, Windows XP, Windows Vista, Windows
Server 2003, or Windows Server 2008. The queue name is input as
“Print”.
Port 9100 (Windows 2000/XP/Vista/Server 2003/Server 2008):
You can print (Raw print) using Port 9100 under Windows 2000, Windows
XP, Windows Vista, Windows Server 2003, or Windows Server 2008.
3-2 362/282/222
Page 48
Setting up network printing
With NetWare
The Novell NetWare 4.x—6 print server functions are supported.
You can connect this printing system to a network using Novell NetWare
4.x—6 as the network operating system and send print jobs from the client
to the print server (network controller). The three modes supported are as follows:
- Nprinter
- Pserver
- NDS/NDPS
2
Note
For details on the NetWare functions, refer to the NetWare operation
manual.
With Macintosh
You can print from your Macintosh computer using LPR or AppleTalk.
You can connect this printing system to a print server in an AppleTalk environment and send print jobs from the Macintosh computer to this machine.
Network connection methods that can be selected in each Windows operating system
This chapter describes the settings that must be specified for network printing.
Setting procedures differ depending on the method of networking printing
used (Windows, LPR, or IPP printing). Select the best method of network
printing for your Windows environment.
3
Network printing from a Windows operating system
Protocol
used
Windows printing
LPR printing TCP/IP ooo o
IPP printing TCP/IP oo o
Port 9100 printing
TCP/IP,
NetBEUI
TCP/IP
Windows
2000
Windows
XP/Vista
Windows
NT 4.0
Windows
Server 2003/
Server 2008
+++ +
oo o
For details, refer to “Windows Printing” of the User’s Guide [Print Operations].
362/282/222 3-3
Page 49

3
Setting up network printing
2
Note
Before setting up network printing, install the printer driver. For details,
refer to “Installing the printer driver” on page 2-1.
To perform network printing, change the printer port for the installed
printer driver to one for a network connection, and then change the settings on this machine as necessary. For an IPP connection, it is necessary to install the printer driver first.
Only the PCL printer driver can be used with Windows printing. If network
printing with the PostScript printer driver, use LPR printing or Port 9100
printing.
Network printing in a NetWare environment
NetWare version Protocol used Emulation Service mode
NetWare 4.x IPX NDS/Bindery Pserver/Nprinter
NetWare 5.x/6 IPX NDS Pserver
TCP/IP NDPS(lpr)
3-4 362/282/222
Page 50

Setting up network printing
3.2 Accessing PageScope Web Connection
Setting the IP address for this machine enables you to access PageScope
Web Connection.
Use your Web browser to directly access PageScope Web Connection.
To access PageScope Web Connection
1 Start up the Web browser.
2 In the “Address” bar, enter the IP address for this machine as shown
below, and then press the [Enter] key.
– http://<IP_address_for_this_machine>/
Example: If the IP address for this machine is 192.168.1.20
http://192.168.1.20/
The initial page of PageScope Web Connection appears.
!
Detail
For further details on PageScope Web Connection, refer to “Using PageScope Web Connection” of the User’s Guide [Print Operations].
3
362/282/222 3-5
Page 51

3
Setting up network printing
3-6 362/282/222
Page 52
Various printing methods
4 Various printing methods
4.1 Printing operations
For Windows
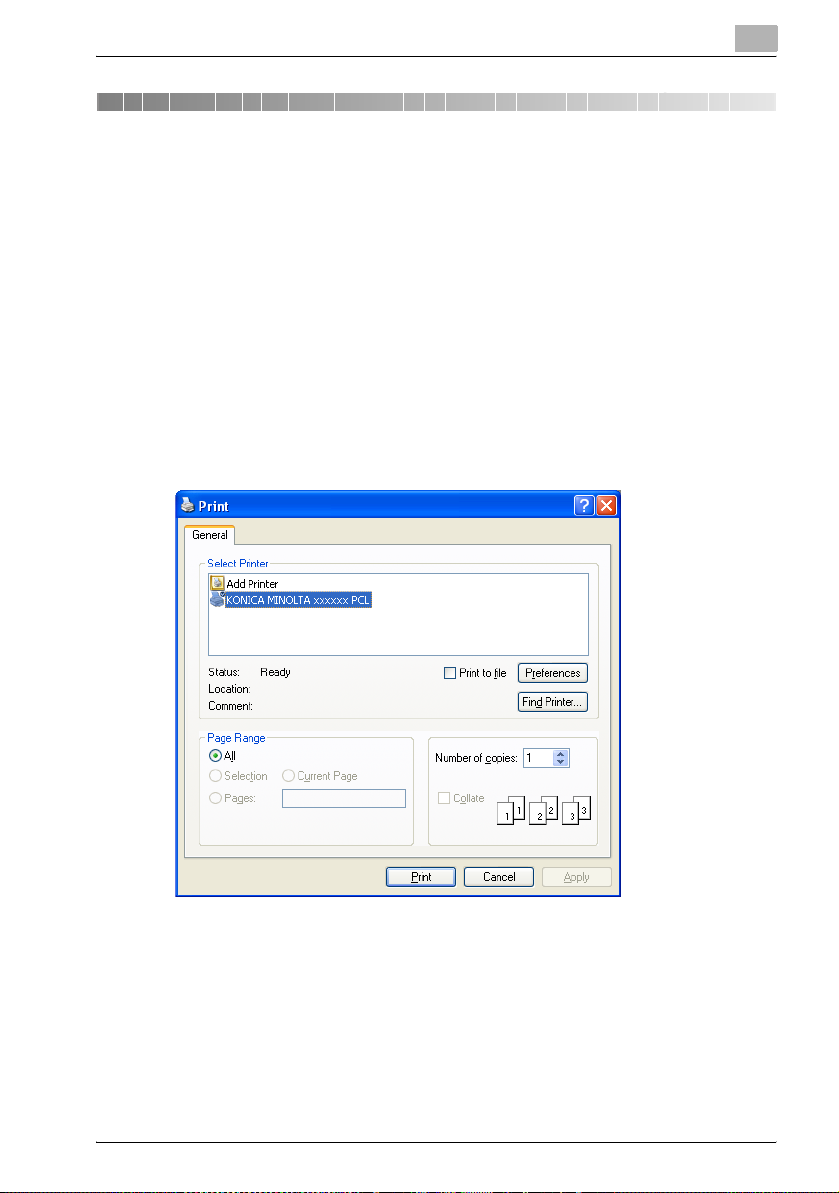
Printing is possible when the printer driver is installed and the network settings have been specified. Print jobs are specified from the application software.
1 Open the data in the application, click [File], then click “Print”.
2 Check that the printer name has been selected in Printer Name or Se-
lect Printer.
– If the printer is not selected, click to select the printer.
4
The Print dialog box differs depending on the application.
3 Specify the page range and the number of copies to print.
362/282/222 4-1
Page 53

4
Various printing methods
4 Click the [Preferences] button or the [Properties] button to change the
printer driver settings as necessary.
– By clicking the [Preferences] button or the [Properties] button on
the Print dialog box, you can specify the settings of each model on
the printer driver dialog box that appears. For details, refer to “Set-
ting up the PCL driver”, “Setting up the PostScript driver (Win-
dows)”, “Setting up the VXL/VPS driver (Windows Vista/Server
2008)” of the User’s Guide [Print Operations].
5 Click the [Print] button.
The Data indicator of this machine flashes.
2
Note
Changes made to the printer driver settings on the Print dialog box are
not saved. When the application is exited, the settings return to their default settings.
Do not the select the “Collate” check box on the Print dialog box.
Test printing
Printing is possible when the printer driver is installed and the network settings have been specified. To check that connection has been made properly, you can print the standard Windows test page.
Print a test page from the printer driver Properties dialog box.
1 For Windows 2000/NT 4.0, click the [Start] button, point to “Settings”,
and then click “Printers”.
For Windows XP/Server 2003, click the [Start] button, and then click
“Printers and Faxes”.
For Windows Vista/Server 2008, click the [Start] button, and then click
“Control panel”, “Hardware and Sound”, and “Printers”.
– If “Printers and Faxes” does not appear in the Start menu in Win-
dows XP/Server 2003, open the Control Panel from the Start menu,
select “Printers and Other Hardware”, and then select “Printers and
Faxes”.
For Windows Vista/Server 2008, if the control panel is in the classic
view, double-click “Printers”.
2 Right-click the icon of the installed printer, and then click “Properties”.
3 Click the General tab, and then click the [Print Test Page] button or the
[Print Test] button.
The test page is printed and the confirmation dialog box appears.
4-2 362/282/222
Page 54
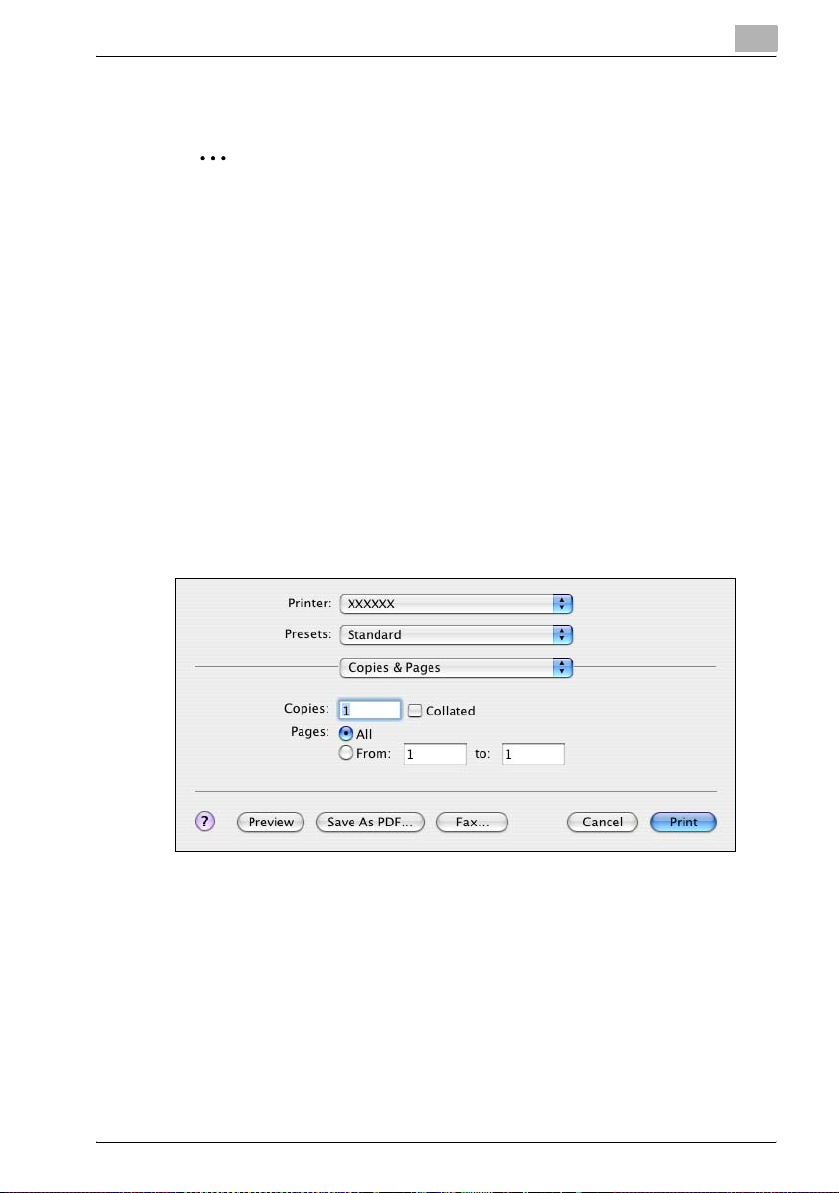
Various printing methods
4 Check the printout, and then click the [OK] button or the [Yes] button.
2
Note
If the test page is not printed properly, check that the printer driver has
been installed properly and that the network settings are complete.
For Macintosh
Printing is possible when the printer driver is installed and the network settings have been specified. Print jobs are specified from the application software.
For Mac OS X
1 Open the data in the application, choose [File], and then click “Print”.
– For Mac OS X 10.3.x, printing speed may be slower for some appli-
cations if you print by clicking “Print”. Always select “Print” from the
“File” menu to print data.
2 Check that the printer name has been selected.
4
3 Specify the print range and the number of copies to print, and then
click the [Print] button.
– The settings specified on this machine have precedence if multiple
copies are specified in “Default Set” of this machine.
The Data indicator of this machine flashes.
362/282/222 4-3
Page 55
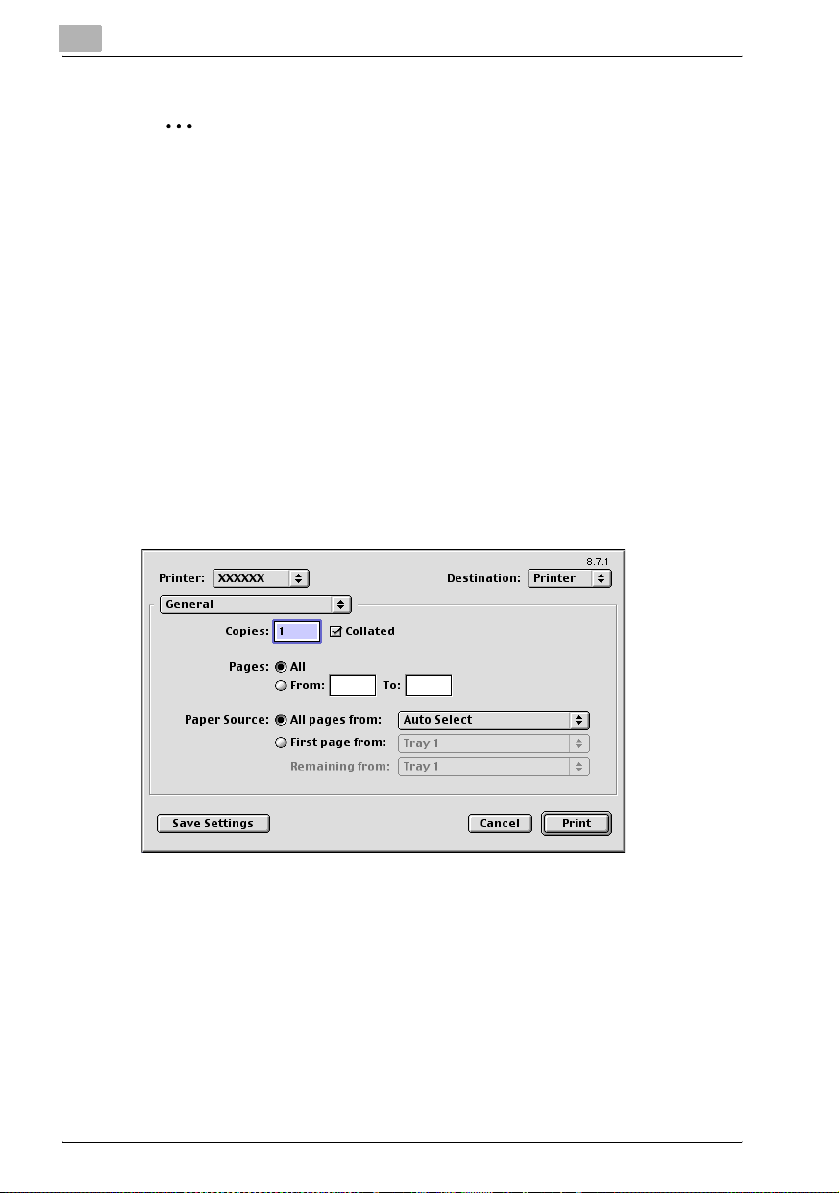
4
Various printing methods
2
Note
If the printer name does not appear in the list, select the printer in Print
Center, Print Setup Utility or Print & Fax. For details, refer to “Selecting a
printer” on page 2-16.
The Print dialog box differs depending on the application.
Do not the select the “Collated”check box on the Print dialog box.
For Mac OS X 10.2.x, printing speed may be slower if the data contains
colors.
For Mac OS 9.2
1 Open the data in the application, choose [File], and then click “Print”.
2 Check that the printer name has been selected.
3 Select “General”.
4 Specify the print range and the number of copies to print, and then
click the [Print] button.
– The settings specified on this machine have precedence if multiple
copies are specified in “Default Set” of this machine.
The Data indicator of this machine flashes.
4-4 362/282/222
Page 56

Various printing methods
2
Note
If the printer name does not appear in the list, select the printer in the
Chooser window. For details, refer to “Selecting a printer” on page 2-16.
The Print dialog box differs depending on the application.
The settings can be saved by clicking the [Save Settings] button.
4
362/282/222 4-5
Page 57
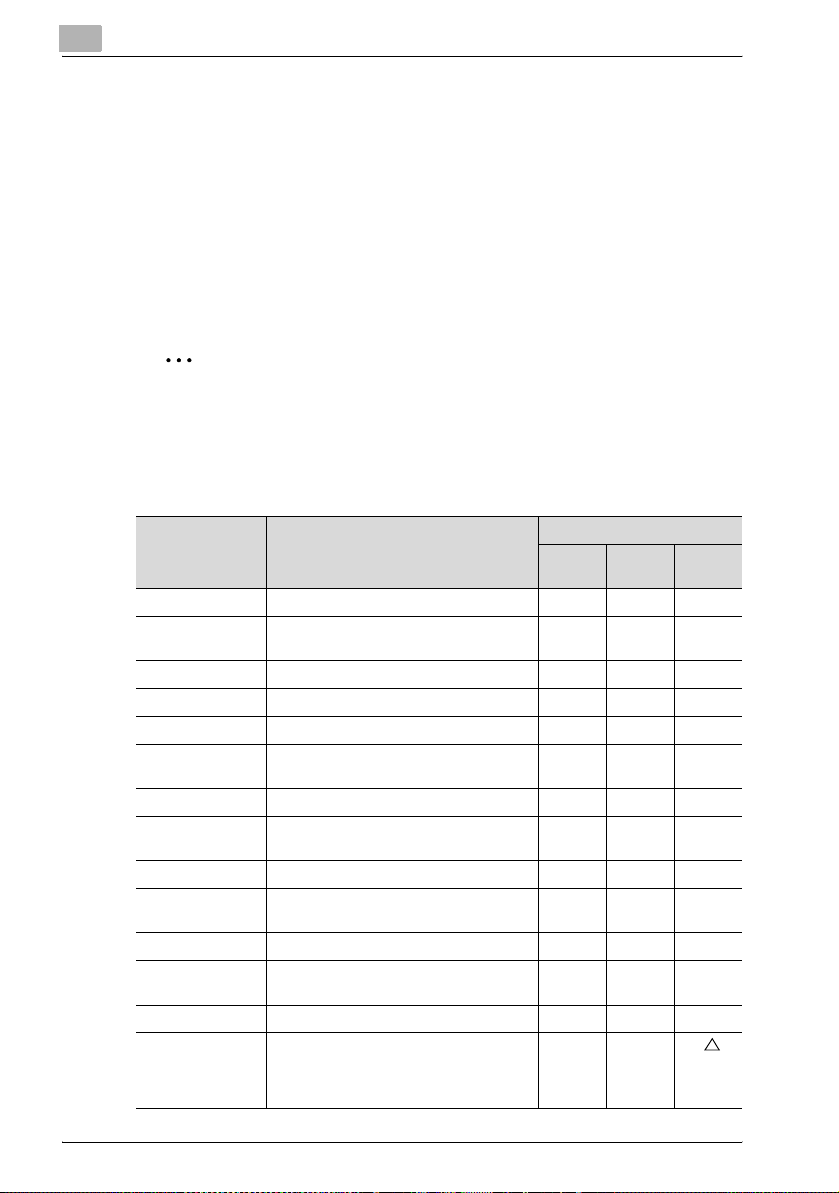
4
4.2 Setting the printing functions
The functions of this machine such as sorting and folding can be set when
printing from a computer. Depending on the operating system running on the
connected computer, the setting procedure of this machine’s functions may
differ.
Function list
The function list contains a summary of the main settings related to printing
and printer driver support.
2
Note
The function names in this list are based on those displayed by the PCL
printer driver in Windows XP. In addition, the items and setting values displayed may differ depending on whether the options are installed or the
settings are available.
Various printing methods
Function Overview
Orientation Selects the print orientation. ooo
Original Size Specifies the size of the original docu-
Output Size Specifies the output paper size. ooo
Zoom Prints enlarged or reduced. ooo
Paper Source Selects the paper source for printing. ooo
Paper Type Settings
Binding Position Selects the binding position. ooo
Print Type Selects the print type (simplex, duplex, or
Combination Prints multiple pages on one page. ooo
File Margin Sets margins for punch holes and sta-
Staple Staples documents. ooo
Center Staple and
Fold
Hole-Punch Punches holes in documents. ooo
Output Method
(Job Management)
ment.
Specifies the paper type of the paper
source.
booklet).
ples.
Folds the printouts in half and staples. ooo
For non-conventional printing, selects the
special output format for secured documents or saves data in a box.
Printer driver
PCL Post-
Script
oo
ooo
ooo
o
oo
PPD
(Mac
OS X
only)
4-6 362/282/222
Page 58
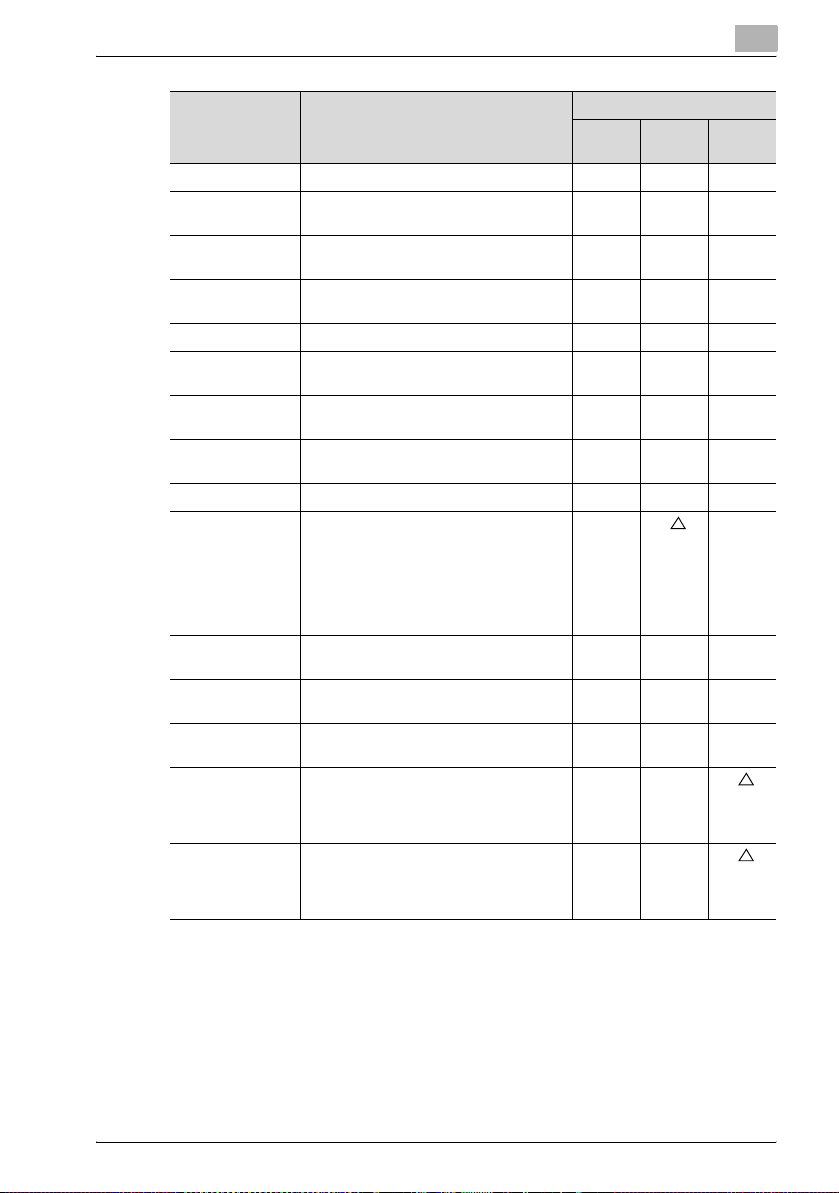
Various printing methods
4
Function Overview
Copies Specifies the number of copies to print. ooo
Output Tray Selects the tray where to output the print-
Collate Specifies whether to print multiple copies
Offset When printing multiple copies, shifts the
Skip Blank Pages Does not print blank pages in the data. o
Front Cover Page
(Front Cover)
Back Cover Page
(Back Cover)
Transparency Interleave
Per Page Setting Switches the paper and trays per page. o
Overlay Prints the original document on top of
Watermark Prints a watermark (text stamp) on the
Distribution
Number Stamping
Use Printer Fonts Specifies the replacement of TrueType
User Authentication
Account Track Tracks operations performed by each ac-
ed pages.
in sets.
output position of each set.
Attaches a front cover page. ooo
Attaches a back cover page. ooo
Inserts interleaves between overhead
projector transparencies.
form data that was created separately.
page being printed.
Prints the number of the copy. o
fonts with printer fonts.
Printing is performed after the registered
user name and password are entered.
count.
Printer driver
PCL Post-
Script
ooo
ooo
ooo
ooo
o
(Windows
Vista/
Server
2008
only)
oo
ooo
oo
oo
PPD
(Mac
OS X
only)
(Mac
OS X
only)
362/282/222 4-7
Page 59
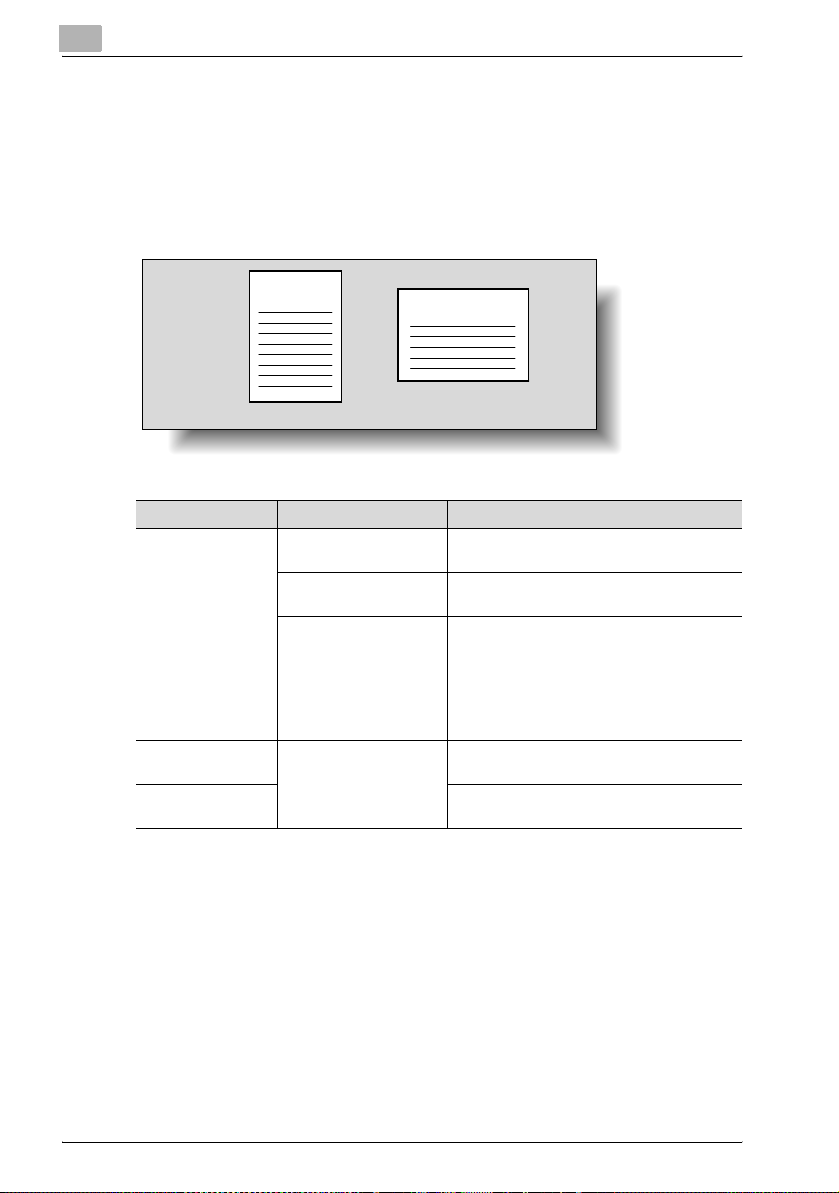
4
Various printing methods
Function overview
An overview of each function is summarized in this section.
Orientation
You can specify “Portrait” or “Landscape” as the orientation of the page being printed.
ABCD
Portrait
Operating system Printer driver Refer to
Windows Konica Minolta PCL “Specifying the Setup tab settings” of the Us-
Konica Minolta PostScript
Konica Minolta PCL driver (VXL) for Windows Vista/Server 2008
Konica Minolta PostScript driver (VPS) for
Windows Vista/Server
2008
Mac OS X PostScript PPD “Page Attributes (basic settings)” of the Us-
Mac OS 9.2 “Page Attributes (basic settings)” of the Us-
ABCDEF
Landscape
er’s Guide [Print Operations].
“Specifying the Setup tab settings” of the User’s Guide [Print Operations].
“Specifying the Basic tab settings” of the User’s Guide [Print Operations].
er’s Guide [Print Operations].
er’s Guide [Print Operations].
4-8 362/282/222
Page 60
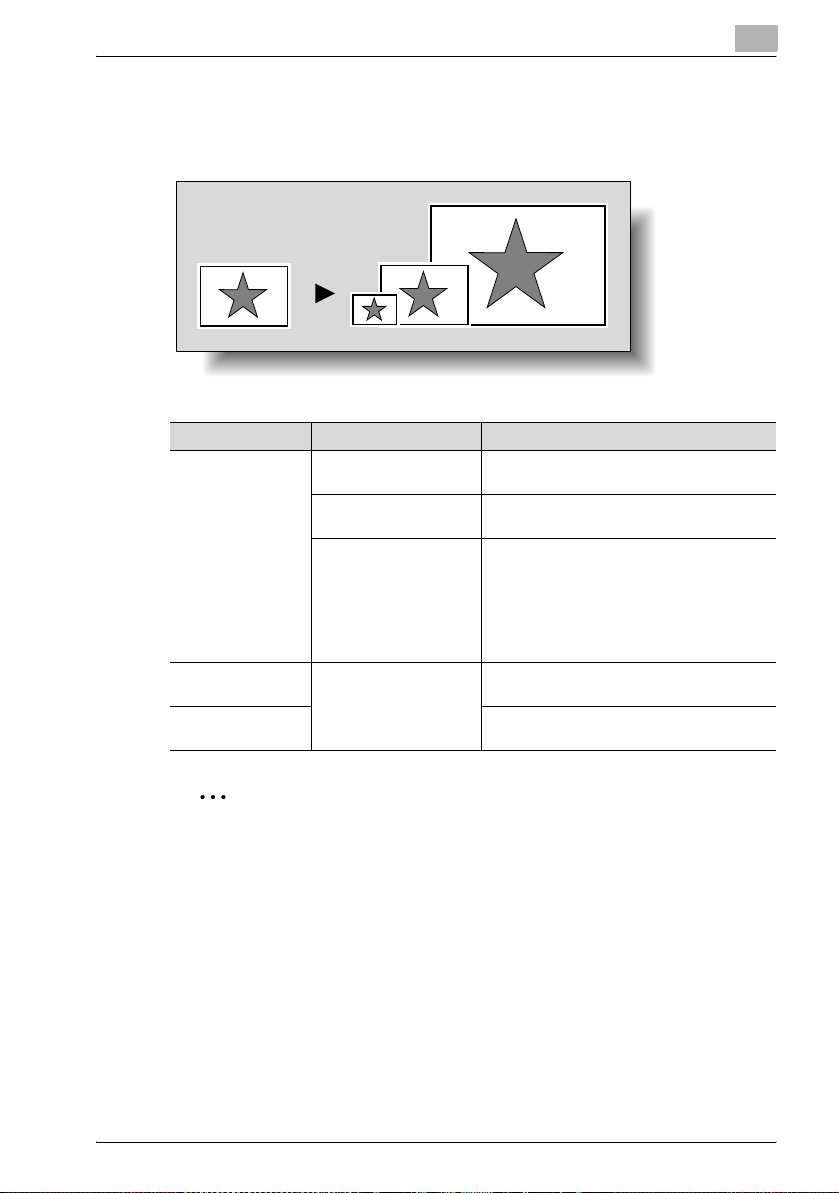
Various printing methods
Original Size and Output Size
You can specify the original document size and the output paper size. By
specifying each size, you can specify the enlargement and reduction ratio.
4
Original size
Operating system Printer driver Refer to
Windows Konica Minolta PCL “Specifying the Setup tab settings” of the Us-
Konica Minolta PostScript
Konica Minolta PCL driver (VXL) for Windows Vista/Server 2008
Konica Minolta PostScript driver (VPS) for
Windows Vista/Server
2008
Mac OS X PostScript PPD “Page Attributes (basic settings)” of the Us-
Mac OS 9.2 “Page Attributes (basic settings)” of the Us-
Output size
er’s Guide [Print Operations].
“Specifying the Setup tab settings” of the User’s Guide [Print Operations].
“Specifying the Basic tab settings” of the User’s Guide [Print Operations].
er’s Guide [Print Operations].
er’s Guide [Print Operations].
2
Note
Only the output paper sizes can be specified with the PostScript PPD
driver for Macintosh.
362/282/222 4-9
Page 61
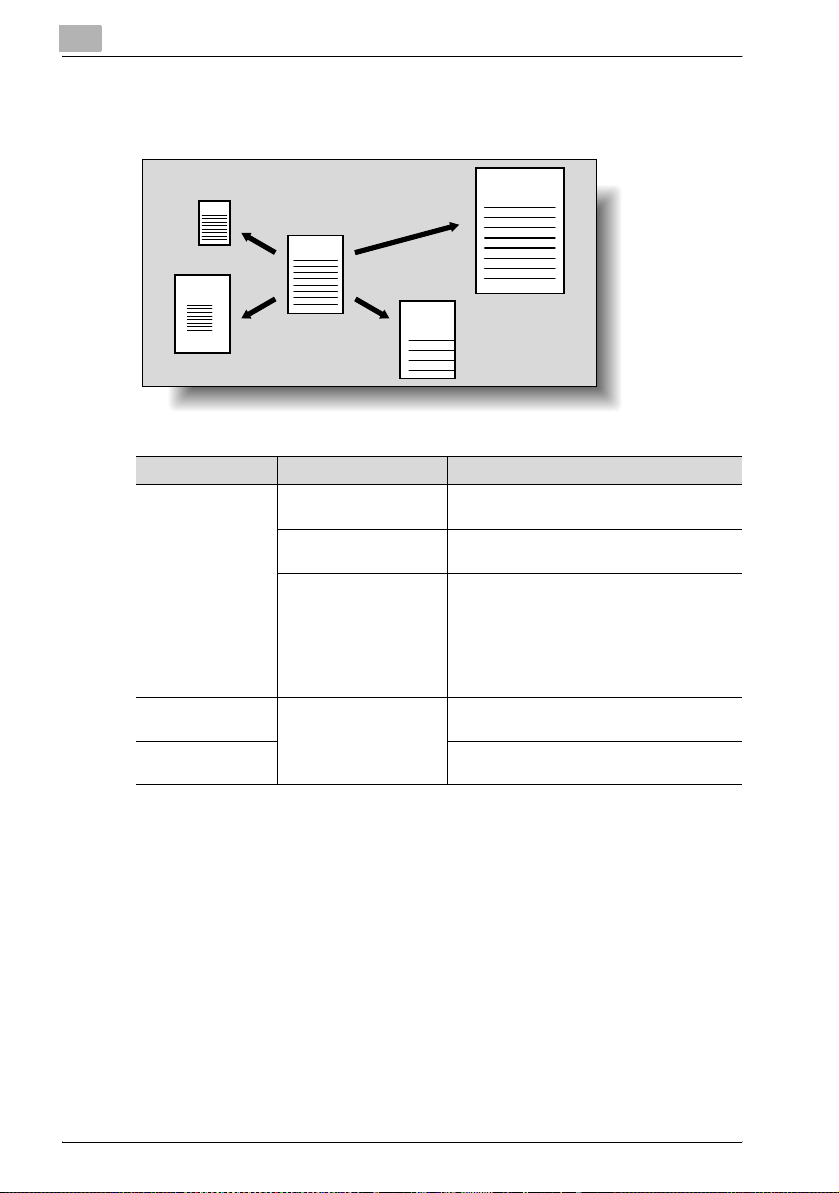
4
C
Various printing methods
Zoom (enlargement and reduction)
You can specify the enlargement or reduction ratio using numeric values.
ABCD
Original
Enlarged
ABCD
ABCD
ABCD
Reduced
Operating system Printer driver Refer to
Windows Konica Minolta PCL “Specifying the Setup tab settings” of the Us-
Konica Minolta PostScript
Konica Minolta PCL driver (VXL) for Windows Vista/Server 2008
Konica Minolta PostScript driver (VPS) for
Windows Vista/Server
2008
Mac OS X PostScript PPD “Page Attributes (basic settings)” of the Us-
Mac OS 9.2 “Page Attributes (basic settings)” of the Us-
AB
er’s Guide [Print Operations].
“Specifying the Setup tab settings” of the User’s Guide [Print Operations].
“Specifying the Basic tab settings” of the User’s Guide [Print Operations].
er’s Guide [Print Operations].
er’s Guide [Print Operations].
4-10 362/282/222
Page 62
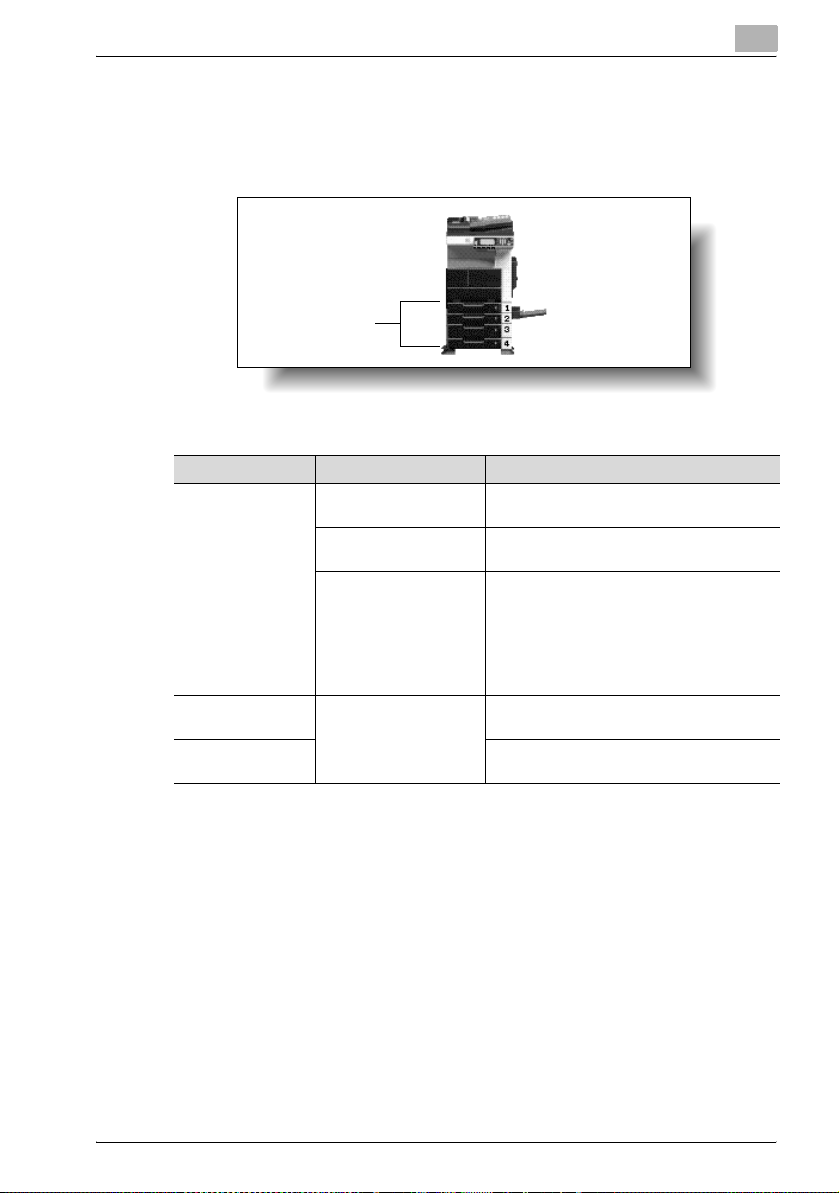
Various printing methods
Input tray (paper source)
You can select the input tray as the paper source for printing. When changing
the paper type, you can select an input tray according to the paper type.
Operating system Printer driver Refer to
Windows Konica Minolta PCL “Specifying the Setup tab settings” of the Us-
Mac OS X PostScript PPD “Paper Feed” of the User’s Guide [Print Op-
Mac OS 9.2 “General (basic settings)” of the User’s Guide
Tray
Konica Minolta PostScript
Konica Minolta PCL driver (VXL) for Windows Vista/Server 2008
Konica Minolta PostScript driver (VPS) for
Windows Vista/Server
2008
4
er’s Guide [Print Operations].
“Specifying the Setup tab settings” of the User’s Guide [Print Operations].
“Specifying the Basic tab settings” of the User’s Guide [Print Operations].
erations].
[Print Operations].
362/282/222 4-11
Page 63

4
Various printing methods
Paper Type
You can specify the paper type being printed.
Operating system Printer driver Refer to
Windows Konica Minolta PCL “Specifying the Setup tab settings” of the Us-
Konica Minolta PostScript
Konica Minolta PCL driver (VXL) for Windows Vista/Server 2008
Konica Minolta PostScript driver (VPS) for
Windows Vista/Server
2008
Macintosh OS X PostScript PPD “Setup” of the User's Guide [Print Opera-
Macintosh OS 9.2 “General (basic settings)” of the User's Guide
er’s Guide [Print Operations].
“Specifying the Setup tab settings” of the User’s Guide [Print Operations].
“Specifying the Basic tab settings” of the User’s Guide [Print Operations].
tions].
[Print Operations].
2
Note
With the Konica Minolta PCL driver for Windows, the paper type of the
paper tray can be specified.
4-12 362/282/222
Page 64
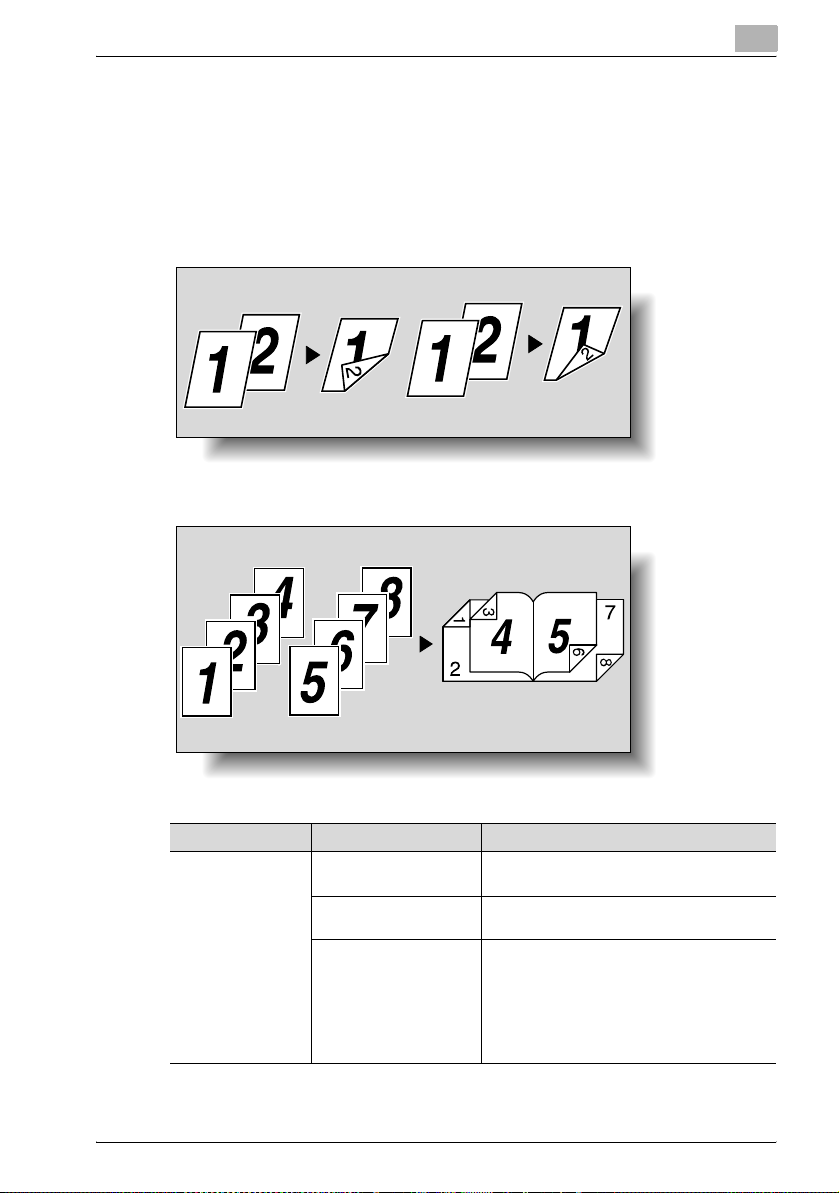
Various printing methods
Print type (duplex printing/booklet printing)
You can print onto both sides of a page or in a booklet format (two facing
pages or center binding). This comes in handy when you want to bind multiple-page documents.
The binding area can be specified by specifying the binding position.
Duplex printing
4
Print data Printout
Left binding
Print data
Top binding
Printout
Booklet printing
Print data Printout
Operating system Printer driver Refer to
Windows Konica Minolta PCL “Specifying the Setup tab settings” of the Us-
Konica Minolta PostScript
Konica Minolta PCL driver (VXL) for Windows Vista/Server 2008
Konica Minolta PostScript driver (VPS) for
Windows Vista/Server
2008
er’s Guide [Print Operations].
“Specifying the Layout tab settings” of the
User’s Guide [Print Operations].
“Specifying the Layout tab settings” of the
User’s Guide [Print Operations].
362/282/222 4-13
Page 65
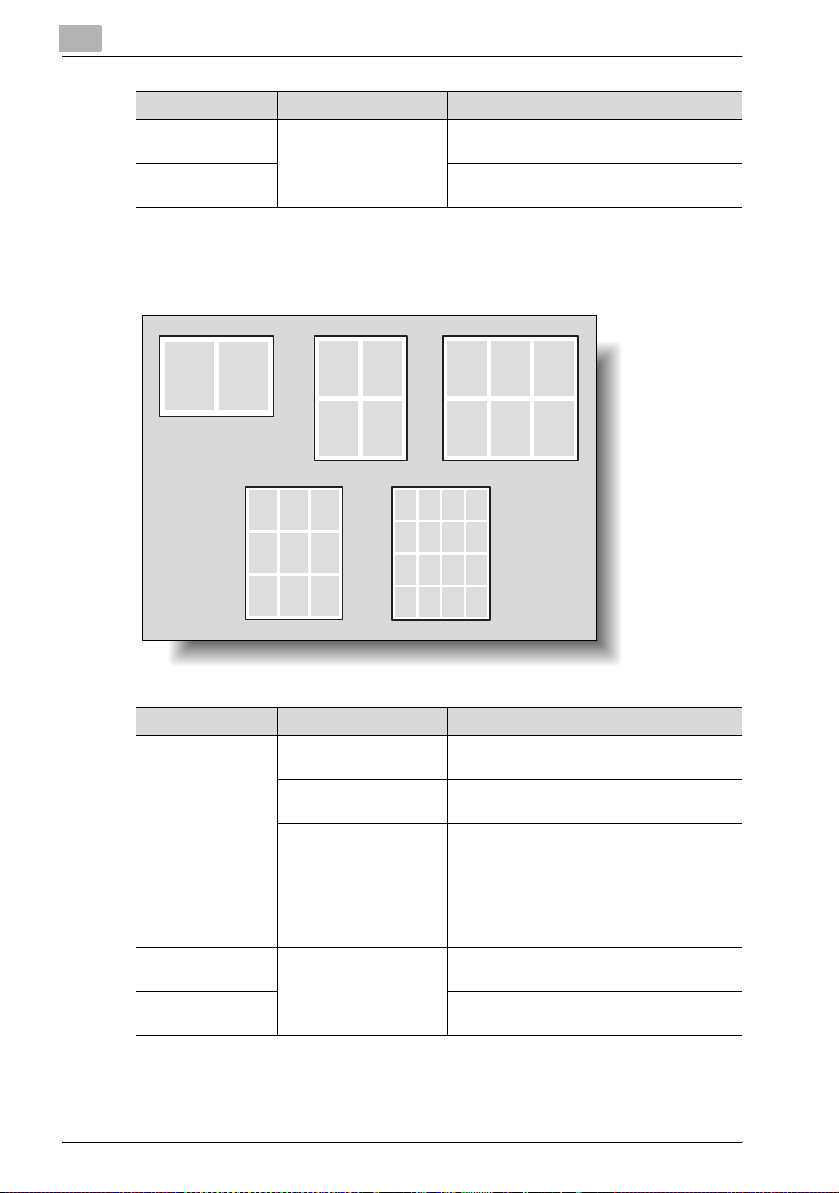
4
Various printing methods
Operating system Printer driver Refer to
Mac OS X PostScript PPD “Finishing” of the User’s Guide [Print Opera-
Mac OS 9.2 “Printer specific options (finishing options 1
tions].
to 3)” of the User’s Guide [Print Operations].
Printing multiple pages on one page
You can print multiple document pages on one page. This comes in handy
when you want to reduce the number of output pages.
12
2 up
12
34
4 up
12
4536
789
9 up
Operating system Printer driver Refer to
Windows Konica Minolta PCL “Specifying the Setup tab settings” of the Us-
Konica Minolta PostScript
Konica Minolta PCL driver (VXL) for Windows Vista/Server 2008
Konica Minolta PostScript driver (VPS) for
Windows Vista/Server
2008
Mac OS X PostScript PPD “Layout (printing multiple pages on one
Mac OS 9.2 “Layout (printing multiple pages on one
13 14 15 16
12
4536
6 up
12
5637
91011
4
8
12
16 up
er’s Guide [Print Operations].
“Specifying the Layout tab settings” of the
User’s Guide [Print Operations].
“Specifying the Layout tab settings” of the
User’s Guide [Print Operations].
page)” of the User’s Guide [Print Operations].
page)” of the User’s Guide [Print Operations].
4-14 362/282/222
Page 66
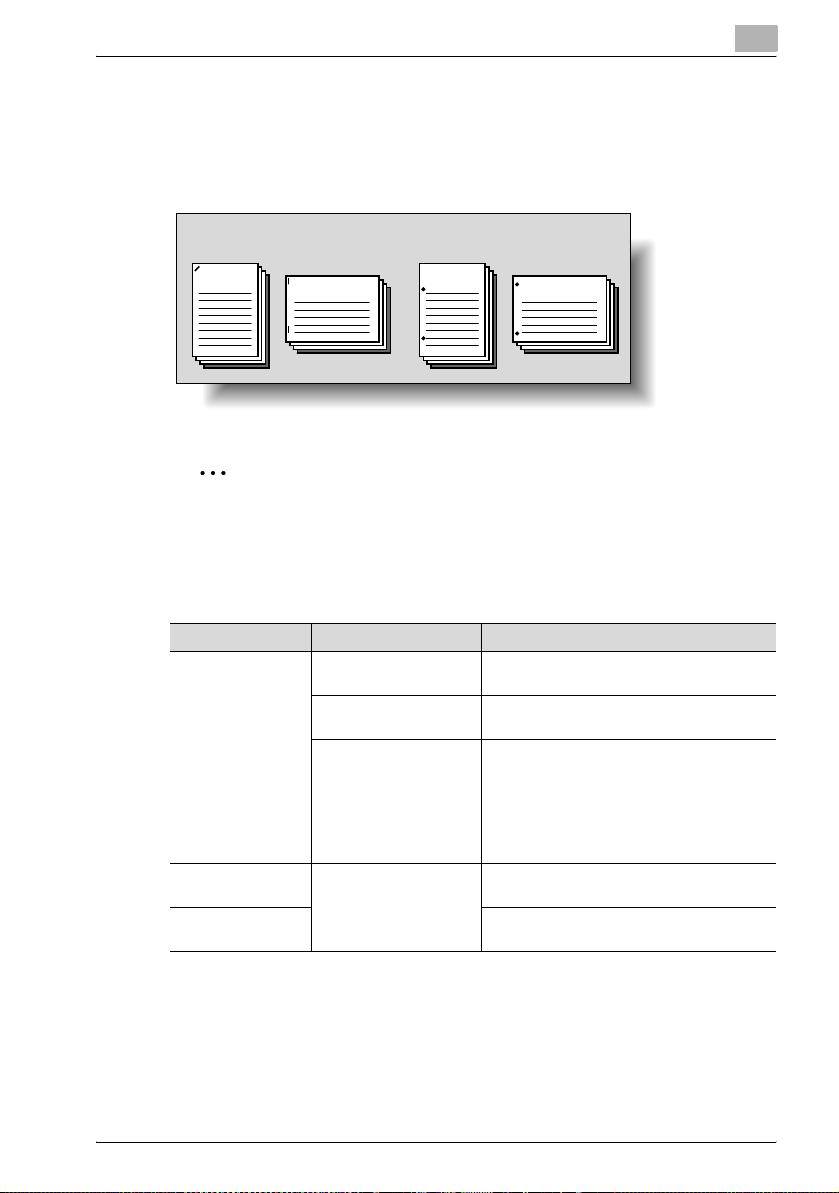
Various printing methods
Stapling and hole punching
Documents can be stapled together or holes punched into the document.
By specifying the file margin, you can specify the margin for stapling or hole
punching.
4
Stapling
ABCD
ABCDEF
Hole punching
ABCD
ABCDEF
2
Note
The staple function is available only when optional finisher is installed.
The hole punch function is available only when punch unit is installed on
optional finisher.
Operating system Printer driver Refer to
Windows Konica Minolta PCL “Specifying the Setup tab settings” of the Us-
Konica Minolta PostScript
Konica Minolta PCL driver (VXL) for Windows Vista/Server 2008
Konica Minolta PostScript driver (VPS) for
Windows Vista/Server
2008
Mac OS X PostScript PPD “Finishing” of the User’s Guide [Print Opera-
Mac OS 9.2 “Printer specific options (finishing options 1
er’s Guide [Print Operations].
“Specifying the Layout tab settings” of the
User’s Guide [Print Operations].
“Specifying the Finish tab settings” of the User’s Guide [Print Operations].
tions].
to 3)” of the User’s Guide [Print Operations].
362/282/222 4-15
Page 67

4
Various printing methods
Output Method (job management)
You can select “Secure Print”, which requires a password to print, or “Save
in User Box”, which saves documents in a document folder.
Operating system Printer driver Refer to
Windows Konica Minolta PCL “Specifying the Setup tab settings” of the Us-
Konica Minolta PostScript
Konica Minolta PCL driver (VXL) for Windows Vista/Server 2008
Konica Minolta PostScript driver (VPS) for
Windows Vista/Server
2008
Mac OS X PostScript PPD “Security” of the User’s Guide [Print Opera-
er’s Guide [Print Operations].
“Specifying the Setup tab settings” of the User’s Guide [Print Operations].
“Specifying the Basic tab settings” of the User’s Guide [Print Operations].
tions].
4-16 362/282/222
Page 68
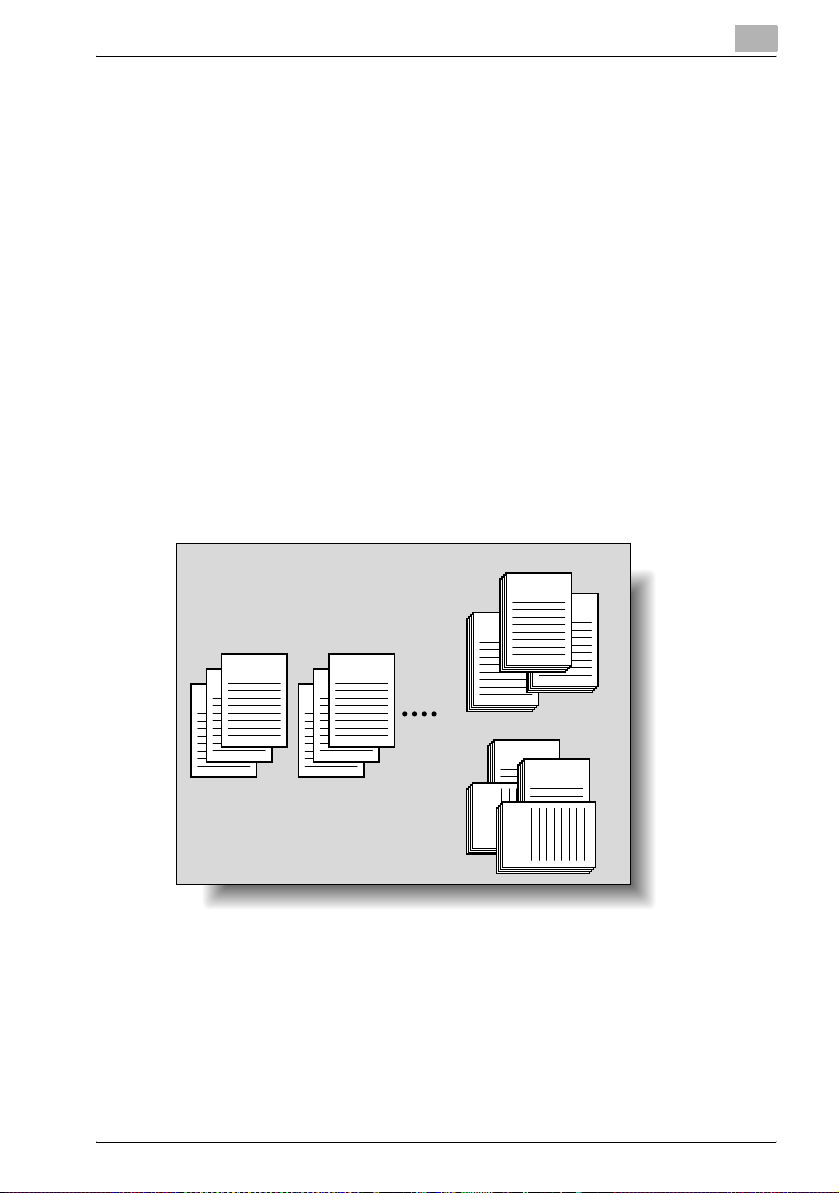
Various printing methods
Sorting (Collate) and classifying (Offset)
You can print the document sets the specified number of times or each page
the specified number of times.
By specifying offset, each copy can be output in sets.
!
Detail
The offset function consists of two types. When optional finisher is installed, the output position of each set is shifted and sorted. When the
finisher is not installed, crisscross sorting is performed when the following conditions are met.
Crisscross sorting conditions:
- When letter, executive, or 16K paper is used.
- When paper of the same size and type is loaded in both the [w] and
[v] directions.
-When all pages in the document are the same size.
-When stapling or hole punching setting have not been specified.
-When printing multiple pages (when not printing only one page).
Collate
4
Offset (shift)
ABCD
ABCD
ABCD
ABCD
ABCD
ABCD
1
2
3
362/282/222 4-17
ABCD
ABCD
ABCD
1
2
3
Offset (crisscross)
ABCD
ABCD
ABCD
ABCD
Page 69

4
Various printing methods
Operating system Printer driver Refer to
Windows Konica Minolta PCL “Specifying the Setup tab settings” of the Us-
Konica Minolta PostScript
Konica Minolta PCL driver (VXL) for Windows Vista/Server 2008
Konica Minolta PostScript driver (VPS) for
Windows Vista/Server
2008
Mac OS X PostScript PPD “Finishing” of the User’s Guide [Print Opera-
Mac OS 9.2 “General (basic settings)” and “Printer specif-
er’s Guide [Print Operations].
“Specifying the Setup tab settings” of the User’s Guide [Print Operations].
“Specifying the Basic tab settings” of the User’s Guide [Print Operations].
tions].
ic options (finishing options 1 to 3)” of the User’s Guide [Print Operations].
Skip Blank Pages (saving paper)
Does not print blank pages in the data.
Operating system Printer driver Refer to
Windows Konica Minolta PCL “Specifying the Setup tab settings” of the Us-
Konica Minolta PCL driver (VXL) for Windows Vista/Server 2008
er’s Guide [Print Operations].
“Specifying the Layout tab settings” of the
User’s Guide [Print Operations].
4-18 362/282/222
Page 70
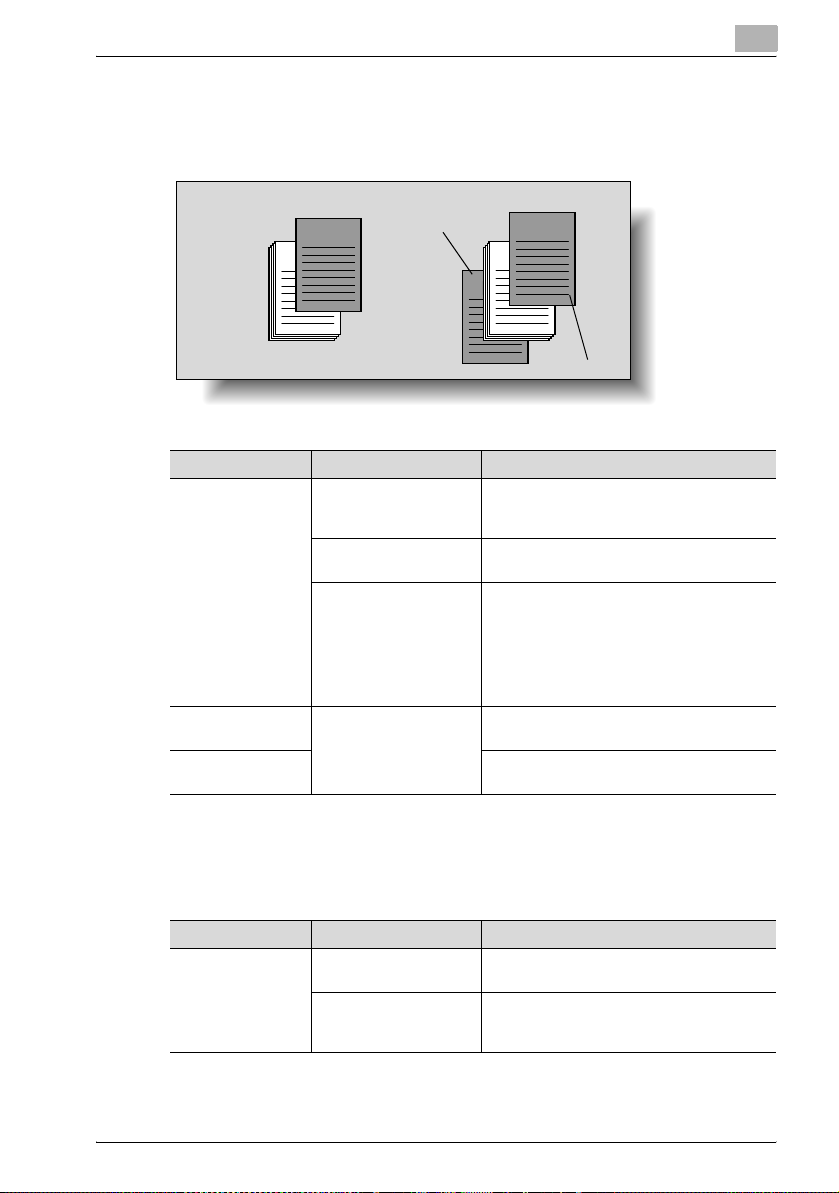
Various printing methods
Front Cover Page, Back Cover Page, and Transparency Interleave
A front cover and back cover can be added and interleaves can be inserted
between overhead projector transparencies.
4
Front cover
ABCD
ABCD
Back cover
ABCD
ABCD
ABCD
Front cover
Operating system Printer driver Refer to
Windows Konica Minolta PCL “Specifying the Per Page Setting tab set-
Konica Minolta PostScript
Konica Minolta PCL driver (VXL) for Windows Vista/Server 2008
Konica Minolta PostScript driver (VPS) for
Windows Vista/Server
2008
Mac OS X PostScript PPD “Setup” of the User’s Guide [Print Opera-
Mac OS 9.2 “Printer specific options (finishing options 1
tings” and “Specifying the Setup tab settings” of the User’s Guide [Print Operations].
“Specifying the Per Page Setting tab settings” of the User’s Guide [Print Operations].
“Specifying the Cover Mode tab settings” of
the User’s Guide [Print Operations].
tions].
to 3)” of the User’s Guide [Print Operations].
Per Page Setting
You can specify to have paper inserted between pages and specify simplex
printing or duplex printing and the paper for printing for each page.
Operating system Printer driver Refer to
Windows Konica Minolta PCL “Specifying the Per Page Setting tab set-
Konica Minolta PCL driver (VXL) for Windows Vista/Server 2008
tings” of the User’s Guide [Print Operations].
“Specifying the Cover Mode tab settings” of
the User’s Guide [Print Operations].
362/282/222 4-19
Page 71
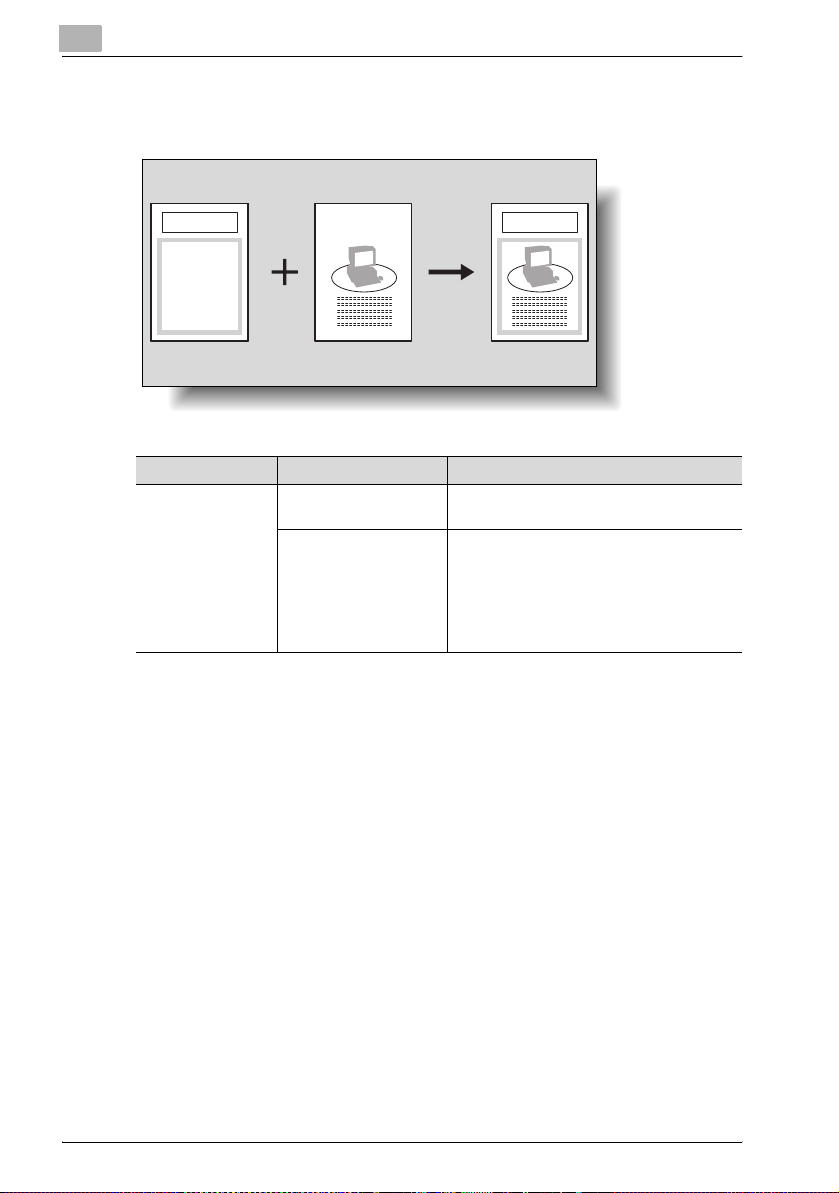
4
Various printing methods
Overlay
Prints the original document on top of form data that was created separately.
New Product New Product
Form data
Operating system Printer driver Refer to
Windows Konica Minolta PCL “Specifying the Overlay tab settings” of the
Created data
Konica Minolta PCL driver (VXL) for Windows Vista/Server 2008
Konica Minolta PostScript driver (VPS) for
Windows Vista/Server
2008
User’s Guide [Print Operations].
“Specifying the Stamp/Composition tab settings” of the User’s Guide [Print Operations].
4-20 362/282/222
Page 72
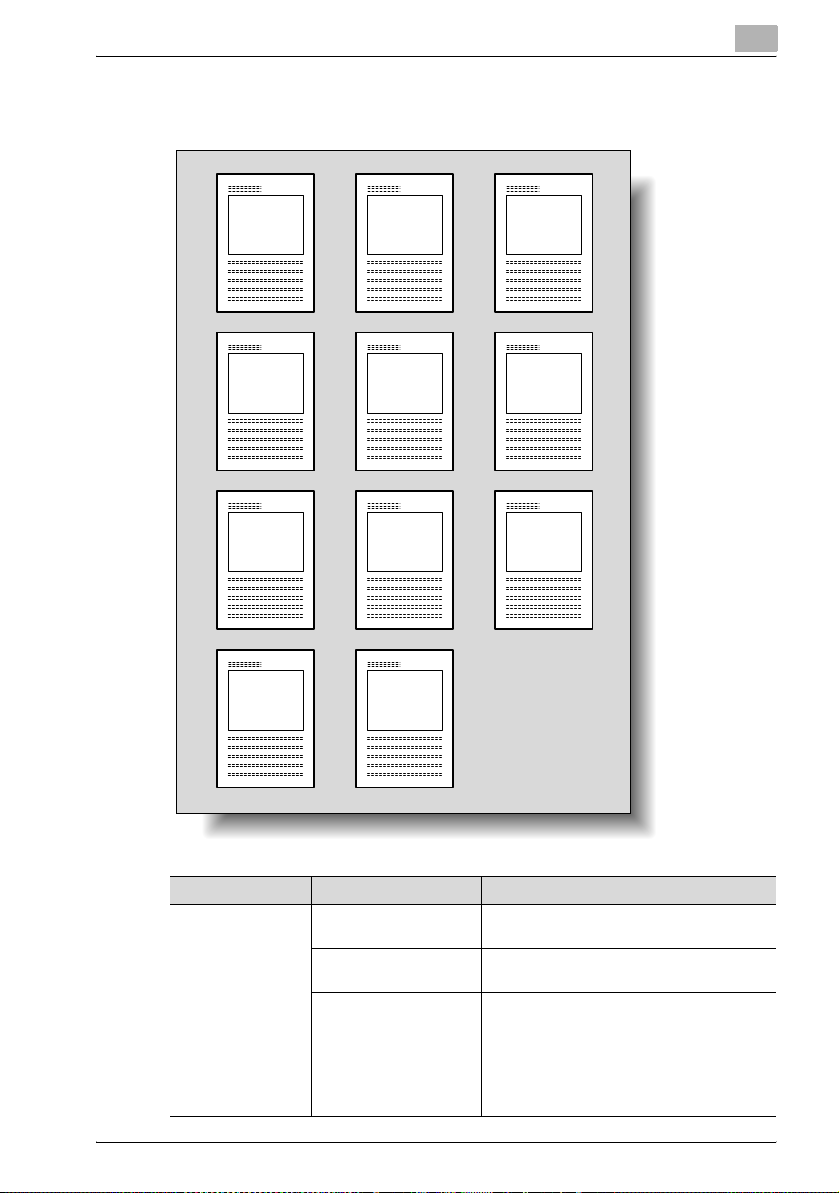
Various printing methods
Watermark
Prints a watermark (text stamp) on the page being printed.
4
URGENT
NO
URGENT
REPRODUCTION
IMPORTANT
DRAFT
CIRCULAR
TOP
CIRCULAR
SECRET
Proof
COPY
WITHDRAW
INTERNAL
USE
Confidential
Operating system Printer driver Refer to
Windows Konica Minolta PCL “Specifying the Watermark tab settings” of
Konica Minolta PostScript
Konica Minolta PCL driver (VXL) for Windows Vista/Server 2008
Konica Minolta PostScript driver (VPS) for
Windows Vista/Server
2008
362/282/222 4-21
the User’s Guide [Print Operations].
“Specifying the Watermark tab settings” of
the User’s Guide [Print Operations].
“Specifying the Stamp/Composition tab settings” of the User’s Guide [Print Operations].
Page 73

4
Various printing methods
Use Printer Fonts (substitute fonts)
Specifies the replacement of TrueType fonts with printer fonts.
Operating system Printer driver Refer to
Windows Konica Minolta PCL “Specifying the Font tab settings” of the Us-
Konica Minolta PostScript
Konica Minolta PCL driver (VXL) for Windows Vista/Server 2008
Konica Minolta PostScript driver (VPS) for
Windows Vista/Server
2008
Mac OS 9.2 PostScript PPD “PostScript Options” of the User’s Guide
er’s Guide [Print Operations].
“Specifying the Quality tab settings” of the
User’s Guide [Print Operations].
“Specifying the Quality tab settings” of the
User’s Guide [Print Operations].
[Print Operations].
User Authentication
When the user authentication settings have been applied on this machine,
you must enter the required user name and password.
Operating system Printer driver Refer to
Windows Konica Minolta PCL “Specifying the Setup tab settings” of the Us-
Konica Minolta PostScript
Konica Minolta PCL driver (VXL) for Windows Vista/Server 2008
Konica Minolta PostScript driver (VPS) for
Windows Vista/Server
2008
Mac OS X PostScript PPD “Security” of the User’s Guide [Print Opera-
er’s Guide [Print Operations].
“Specifying the Setup tab settings” of the User’s Guide [Print Operations].
“Specifying the Basic tab settings” of the User’s Guide [Print Operations].
tions].
4-22 362/282/222
Page 74

Various printing methods
Account Track
Specifies when this machine is operating in Account Track.
Operating system Printer driver Refer to
Windows Konica Minolta PCL “Specifying the Setup tab settings” of the Us-
Mac OS X PostScript PPD “Security” of the User’s Guide [Print Opera-
For Windows
The functions of this machine that can be used when printing can be specified in the printer driver setup dialog box, which can be displayed from the
Printers window (for Windows XP/Server 2003, Printers and Faxes window).
Settings specified in the printer driver setup dialog box displayed using the
procedure described below will be applied when printing from any application.
Konica Minolta PostScript
Konica Minolta PCL driver (VXL) for Windows Vista/Server 2008
Konica Minolta PostScript driver (VPS) for
Windows Vista/Server
2008
er’s Guide [Print Operations].
“Specifying the Setup tab settings” of the User’s Guide [Print Operations].
“Specifying the Basic tab settings” of the User’s Guide [Print Operations].
tions].
4
1 For Windows 2000/NT 4.0, click the [Start] button, point to “Settings”,
and then click “Printers”.
For Windows XP/Server 2003, click the [Start] button, and then click
“Printers and Faxes”.
For Windows Vista/Server 2008, click the [Start] button, and then click
“Control panel”, “Hardware and Sound”, and “Printers”.
– If “Printers and Faxes” does not appear in the Start menu in Win-
dows XP/Server 2003, open the Control Panel from the Start menu,
select “Printers and Other Hardware”, and then select “Printers and
Faxes”.
For Windows Vista/Server 2008, if the control panel is in the classic
view, double-click “Printers”.
2 For Windows 2000/XP/Vista/Server 2003/Server 2008, right-click the
icon of the installed printer, and then click “Printing Preferences”.
For Windows NT 4.0, right-click the icon of the installed printer, and
then click “Document Default”.
362/282/222 4-23
Page 75
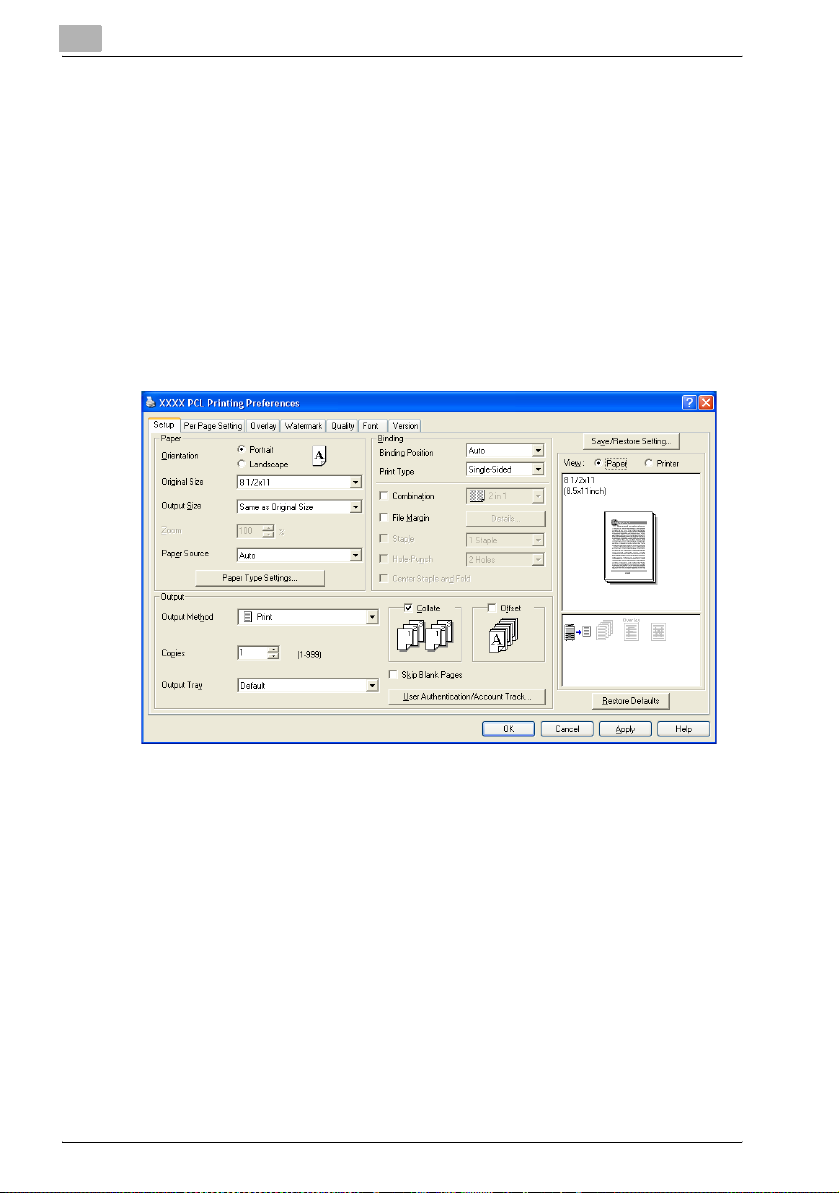
4
Various printing methods
The following printer driver setting dialog box appears. For the settings that
can be specified with each printer driver, refer to the following:
- Konica Minolta PCL driver: “Setting up the PCL driver” of the User’s
Guide [Print Operations]
- Konica Minolta PostScript driver: “Setting up the PostScript driver (Win-
dows)” of the User’s Guide [Print Operations]
- Konica Minolta PCL driver (VXL) for Windows Vista/Server 2008: “Setting
up the VXL/VPS driver (Windows Vista/Server 2008)” of the User’s Guide
[Print Operations]
- Konica Minolta PostScript driver (VPS) for Windows Vista/Server 2008:
“Setting up the VXL/VPS driver (Windows Vista/Server 2008)” of the User’s Guide [Print Operations]
PCL driver
4-24 362/282/222
Page 76
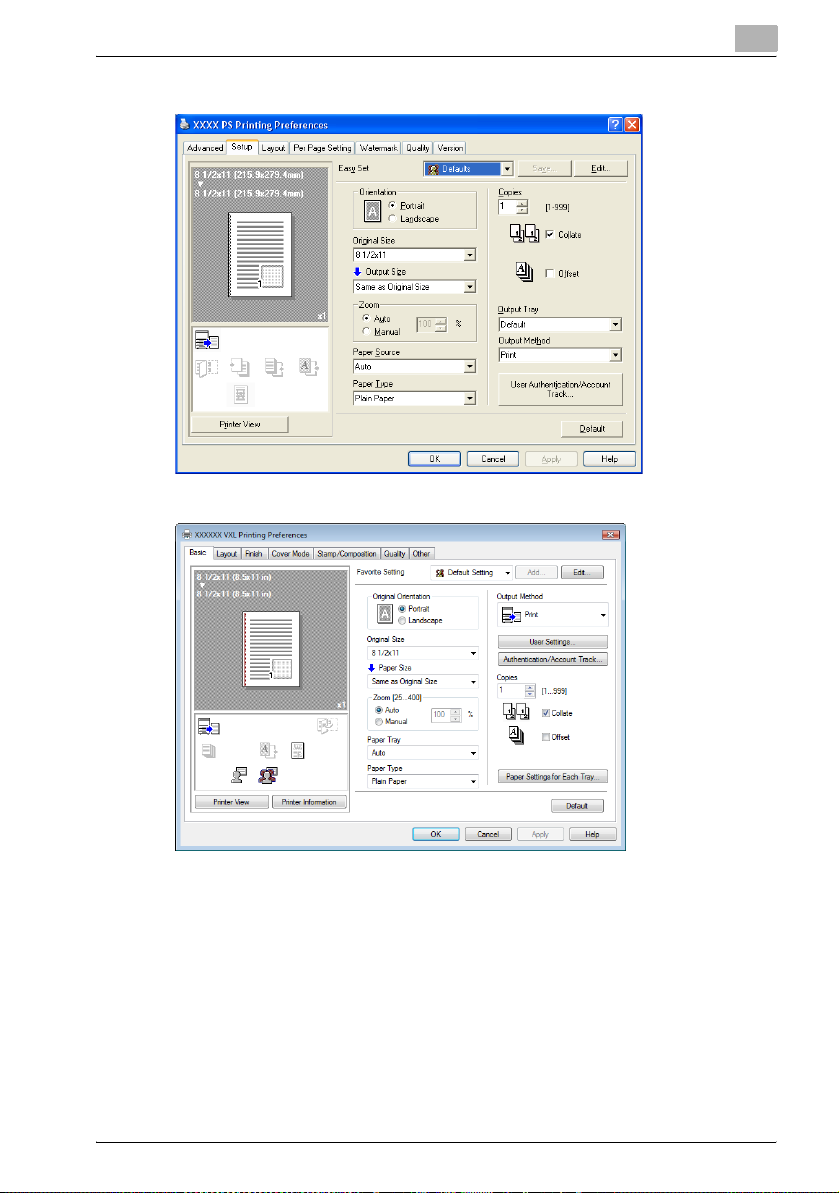
Various printing methods
PostScript driver
Konica Minolta PCL driver (VXL) for Windows Vista/Server 2008
4
362/282/222 4-25
Page 77
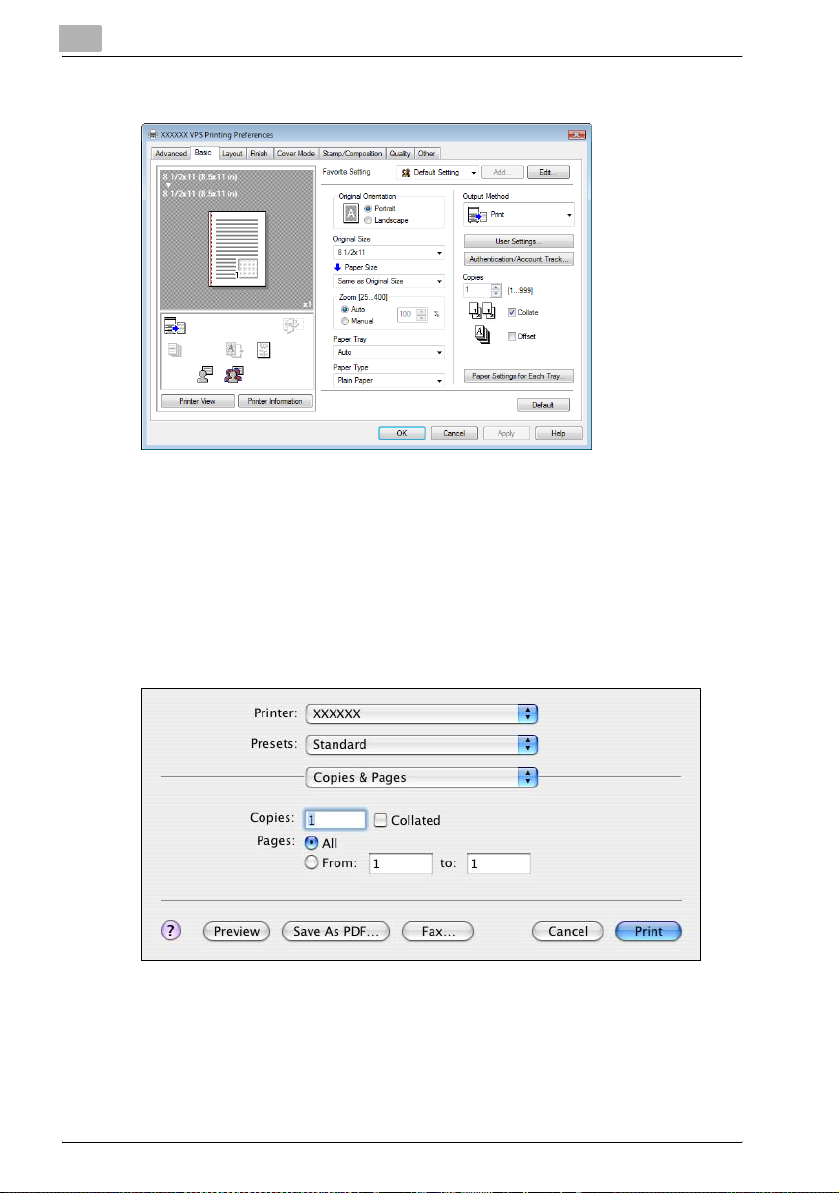
4
Various printing methods
Konica Minolta PostScript driver (VPS) for Windows Vista/Server 2008
For Macintosh
The functions of this machine that can be used when printing can be specified on the Print dialog box or the Page Setup dialog box.
The settings can only be applied while using the application. When the application is exited, the settings return to their default settings.
To display the Print dialog box
Open the data in the application, choose “File”, then click “Print”.
If the items do not appear with Mac OS X 10.5, click [,] to the right of “Printer”.
To display Page Setup dialog box
4-26 362/282/222
Page 78
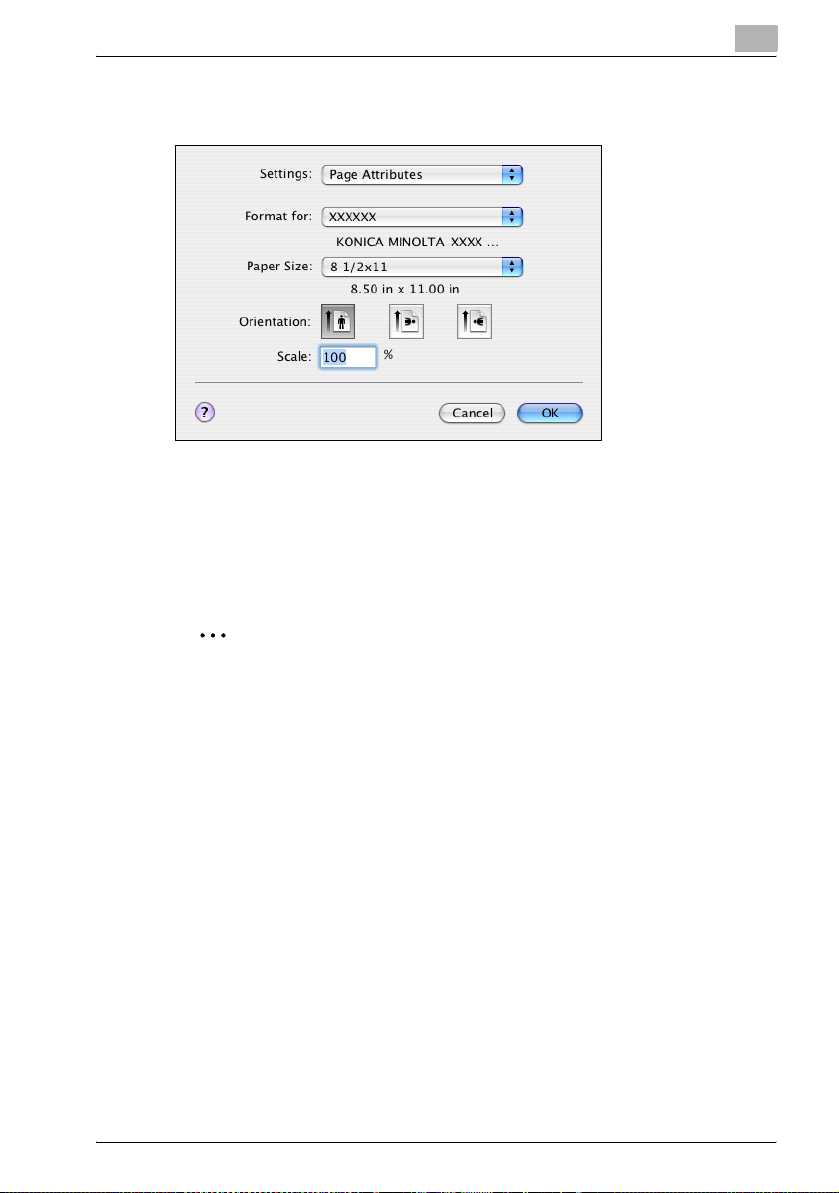
Various printing methods
Open the data in the application, choose “File”, and then click “Page Setup”
or “Paper Setup”.
For the settings that can be specified with each printer driver, refer to the following:
- OS X: “Setting up the PPD driver (Mac OS X)” of the User’s Guide [Print
Operations]
- OS 9.2: “Setting up the PPD driver (Mac OS 9.2)” of the User’s Guide
[Print Operations]
4
2
Note
The contents of the Print dialog box and the Page Setup dialog box may
differ.
Depending on the application, the Page Setup dialog box can be displayed by selecting “Paper Setup”—“Options” from the “File” menu.
362/282/222 4-27
Page 79

4
Various printing methods
4-28 362/282/222
Page 80
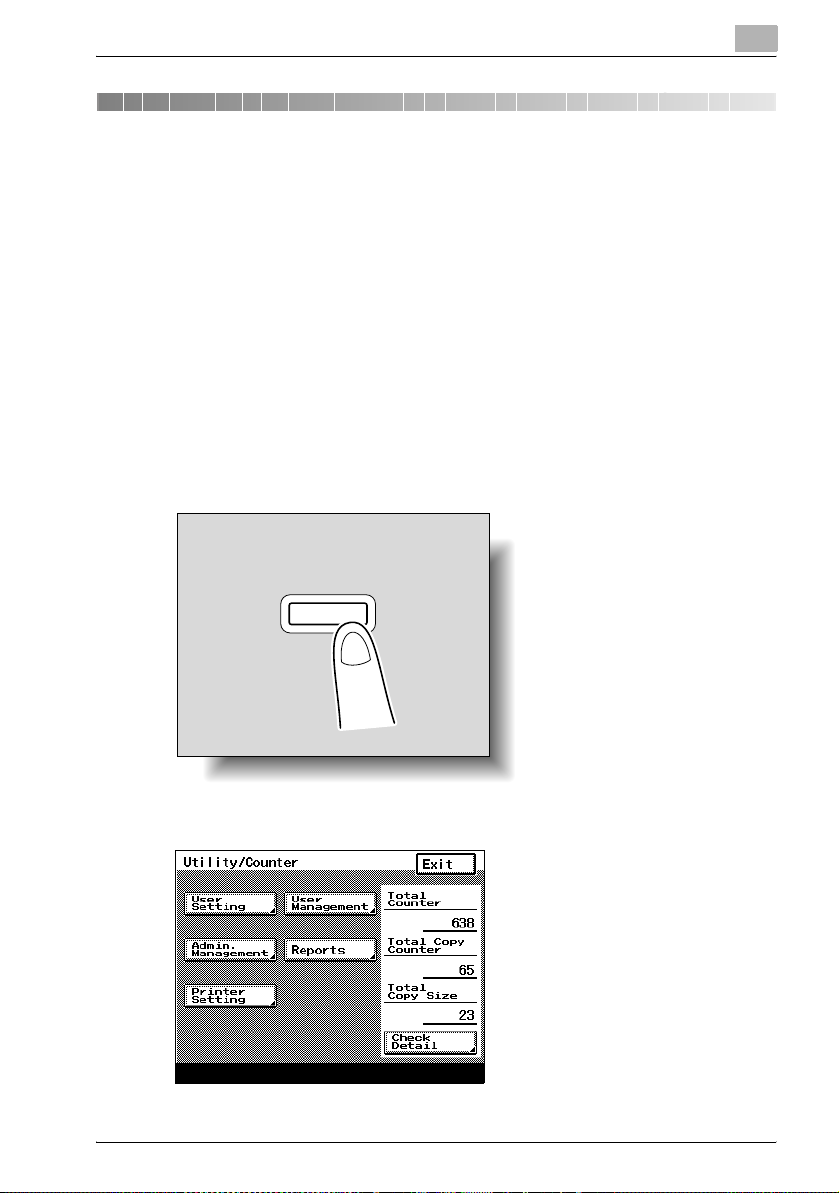
Various settings
Utility/
Counter
5 Various settings
5.1 Printing a test print
You can print the following four types of reports from the control panel of this
machine. The report output method here is explained in the PCL font list.
- Check Job Details: Outputs a list of this machine’s settings.
- PCL Demo Page: Outputs a test page.
- PCL Font List: Outputs the PCL font list.
- PS Font List: Outputs the PS font list.
Printer settings
To display the Printer Setting screen
1 Press the [Utility/Counter] key.
5
2 Touch [Printer Setting].
362/282/222 5-1
Page 81
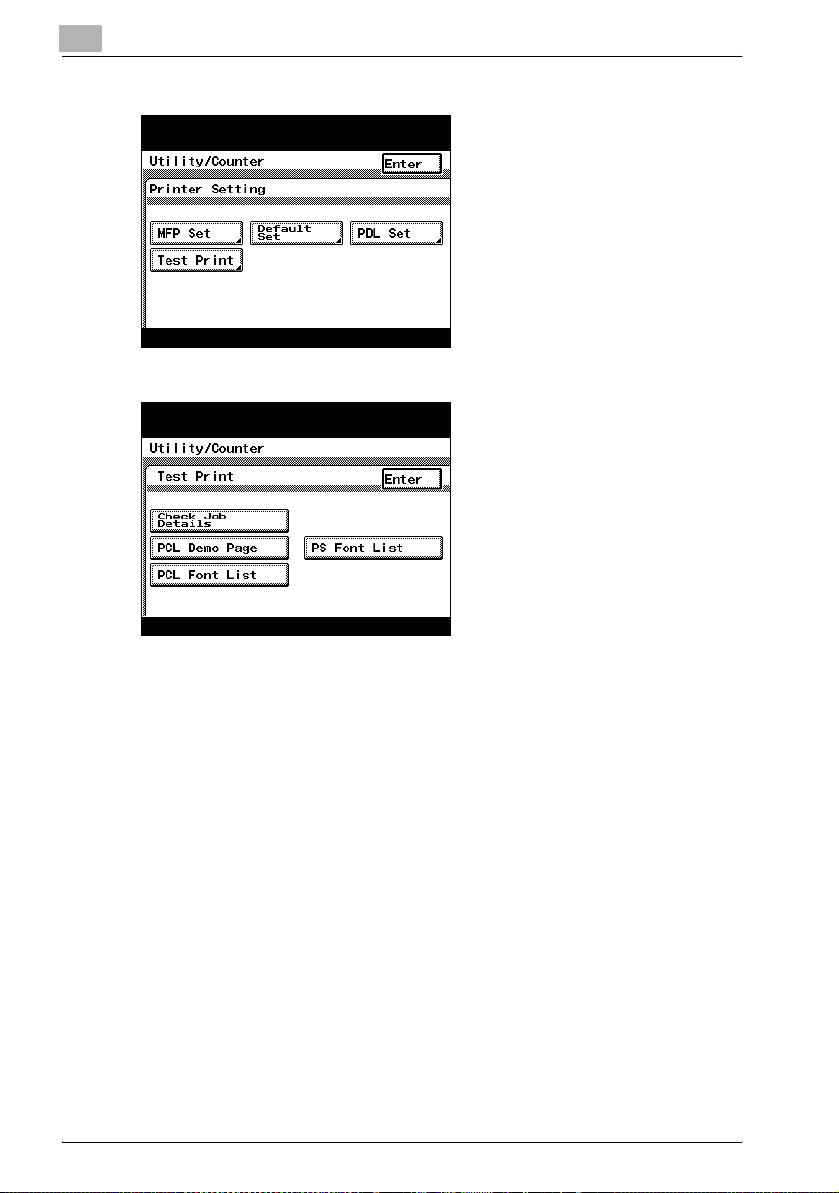
5
Various settings
3 Touch [Test Print].
4 Touch the button for the desired setting, and then touch [Enter].
5-2 362/282/222
Page 82

Troubleshooting
6 Troubleshooting
6.1 Unable to print
This chapter explains the troubleshooting procedures for possible malfunctions.
Perform the troubleshooting procedures described below if this machine
does not print after you have sent a print job.
Symptom Probable cause Action
The message “No printers
are connected” or “Print
error” appears.
A postscript error appears.
The printer driver selected for
printing is not compatible with
the printer controller.
The network cable, parallel cable, or USB cable is disconnected.
An error has occurred in this machine.
Available memory space is not
sufficient.
Available computer memory
space is not sufficient.
There is an error in the application software settings.
The file printing settings are incorrect.
Check the printer name selected.
Check that the cable is connected properly.
Check this machine’s control
panel.
Perform a test print to check
whether printing is possible.
Perform a test print to check
whether printing is possible.
Refer to the user’s manual of the
application software to check
the settings.
Change the settings and try to
print again.
6
362/282/222 6-1
Page 83

6
Symptom Probable cause Action
The machine does not
start printing although the
print job was completed
on the computer.
The printer driver selected for
printing is not compatible with
the printer controller.
The network cable, parallel cable, or USB cable is disconnected.
An error has occurred in this machine.
A print job is queued in this machine, delaying printing.
“Save in User Box” was selected for the print job.
“Secure Print” was selected for
the print job.
If the account track settings
have been applied, an unregistered account name (or password) may have been entered.
If the authentication settings
have been applied, an unregistered user name (or password)
may have been entered.
Available computer memory
space is not sufficient.
The connection of this machine
to the network is not yet established (while connecting to a
network).
The Enhance Security mode
may be enabled on this machine.
A password rule may be enabled on this machine.
Available memory space is not
sufficient.
Check the printer name selected.
Check that the cable is connected properly.
Check this machine’s control
panel.
Check the job order on the Active Jobs list of the machine’s
control panel.
Check if the print job is stored
on the Box screen of this machine’s control panel.
Check if the print job is held on
the Secure Print screen of this
machine’s control panel.
Enter the correct account name
(or password).
Enter the correct user name (or
password).
Perform a test print to check
whether printing is possible.
Consult with the network administrator.
Specify the authentication settings in the Enhance Security
mode. For details, consult with
the network administrator.
Enter the password that meets
the password rule.
Add memory.
Troubleshooting
6-2 362/282/222
Page 84

Troubleshooting
2
Note
Up to 29 document print jobs (including “Proof Print” and “Secured
Print”) can be stored in the memory of this machine. If more than 29 jobs
are stored, new jobs cannot be received. Check whether there are print
jobs remaining in “Proof Print” and “Secured Print” in Box mode on this
machine’s control panel. If jobs are remaining, print or delete the stored
jobs.
If the problem persists after all of these procedures have been performed,
read the User’s Guide [Copy Operations].
6
362/282/222 6-3
Page 85

6
Troubleshooting
6.2 Unable to specify desired settings or unable to print as specified
Perform these troubleshooting procedures if you cannot specify the desired
settings in the printer driver, or if the print results do not represent the settings that have been specified.
2
Note
Some of the printer driver functions cannot be combined with other functions.
Symptom Probable cause Action
A printer driver setting
cannot be selected.
The “Conflicts” message
with “Unable to Select” or
“Function Canceled” appears.
Printing is not performed
as specified.
The watermark cannot be
printed.
The staple function cannot be specified.
Stapling cannot be performed.
Some functions cannot be combined.
An incorrect combination of
functions has been specified.
Incorrect settings are specified. Check each setting in the printer
A combination of functions, although possible in the printer
driver, is not possible with this
machine.
The paper size, orientation, and
other settings specified in the
application have priority over
those specified in the printer
driver.
The watermark is not correctly
set.
The watermark density is set to
a level that is too low.
Watermarks cannot be printed
in graphics applications.
Stapling is not possible if “Paper
Type” is set to “Thick” or
“Transparency”.
The staple function requires optional finisher.
If there are a large number of
pages to be printed, stapling
cannot be performed.
Stapling is not possible if the
document contains pages of different sizes.
Do not try to select settings that
are not available.
Check the settings and specify
the functions correctly.
driver.
Enter the correct settings in the
application.
Check the watermark settings.
Check the density settings.
No watermark can be printed in
this case.
Check each setting in the printer
driver.
Install the required optional finisher and enable it using the
printer driver.
Print by specify the number of
pages per set for the number of
pages that can be stapled.
Check the document.
6-4 362/282/222
Page 86

Troubleshooting
Symptom Probable cause Action
The stapling position is
not as expected.
The hole punch function
cannot be specified.
The pages are not
punched.
The hole punch position is
not as expected.
The form is not printed
properly.
The image is not printed
properly.
Paper is not fed from the
specified paper source.
The numbering func tion is
not performed.
Proof and Print is no be
performed.
The orientation setting is not
correct.
Hole punching cannot be specified if “Booklet”, “Transparency”, “Thick2”, “Thick3”, or
“Envelope” is selected.
For the hole punch function, the
punch unit must be installed on
optional finisher.
Printed pages may be fed out
without being punched if the paper is loaded into the paper
source with an incorrect orientation.
The orientation setting is not
correct.
Available computer memory
space is not sufficient.
Available computer memory
space is not sufficient.
Paper will not be fed from the
specified paper source if that
paper source is loaded with paper of a different size or orientation.
The “Collate” (for Windows) or
“Collated” (for Mac OS X) check
box is selected on the print setup dialog box.
Check the stapling position in
the printer driver setup dialog
box.
Check each setting in the printer
driver.
Install the required optional finisher and enable it using the
printer driver.
Check the orientation setting.
Check the punch position on the
Layout tab of the printer driver
setup dialog box.
Simplify the form to reduce the
data size.
Simplify the image to reduce the
data size.
Load the paper source with paper of the appropriate size and
orientation.
Clear the “Collate” (for Windows) or “Collated” (for Mac OS
X) check box.
6
362/282/222 6-5
Page 87

6
Troubleshooting
6-6 362/282/222
Page 88
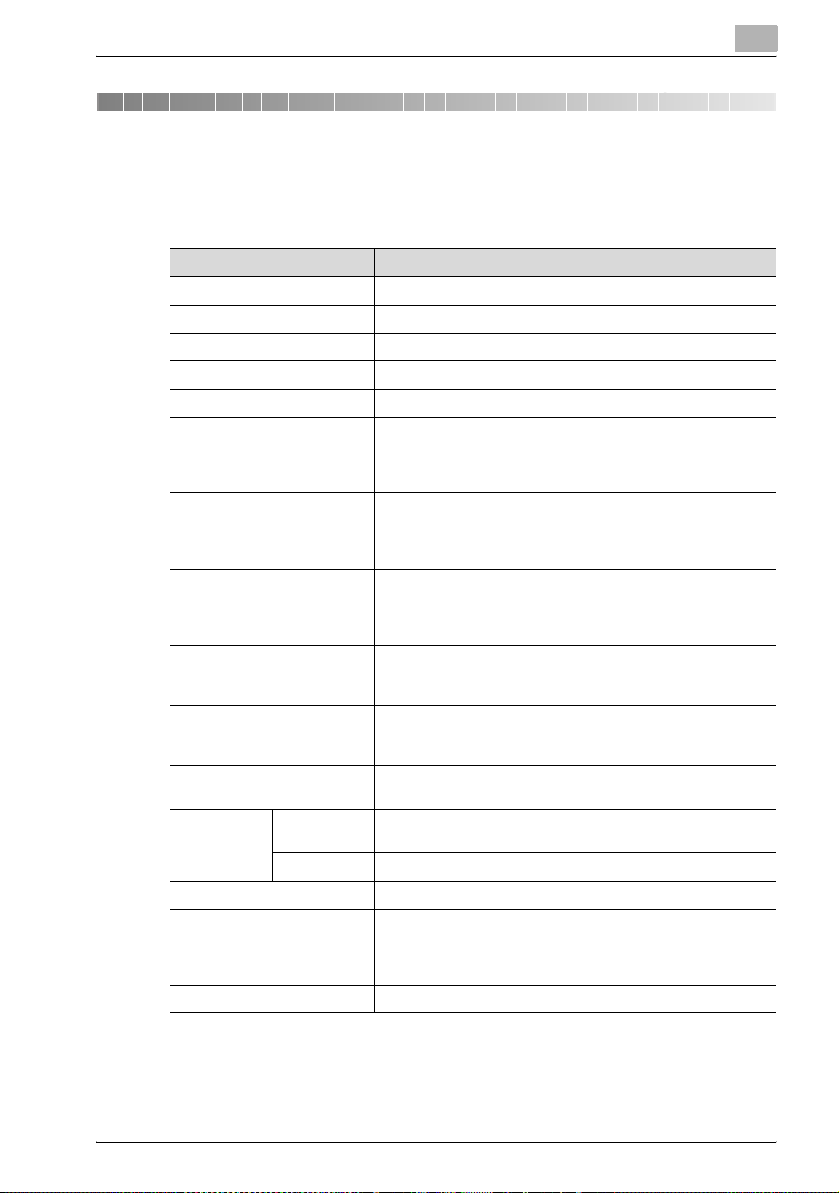
Appendix
7 Appendix
7.1 Specifications
Item Specifications
Model Built-in printer controller
Power supply Common with the main body
Processor RM5231
RAM 192 MB
Hard Disk 40 GB (optional)
Interface • Standard:
Frame type Ethernet 802.2
Supported protocols TCP/IP
Print speed 22 pages/minute (bizhub 222, Letter)
Printer language PCL5e emulation
Operating environment conditions
Resolution Data
Supported paper sizes Maximum standard size
Printer fonts PCL:
Compatible computers IBM PC or compatible, Macintosh (Power PC, Intel Processor)
processing
Printing 600 × 600 dpi
Ethernet (10Base-T or 100Base-TX), USB (1.1 or 2.0)
• Optional:
IEEE 1284
Ethernet 802.3
Ethernet II
Ethernet SNAP
IPX/SPX
NetBEUI
AppleTalk (EtherTalk)
28 pages/minute (bizhub 282, Letter)
36 pages/minute (bizhub 362, Letter)
PCL6 (XL 2.1) emulation
PostScript 3 emulation
Temperature 10 to 30°C
Humidity 15 to 85% RH
600 × 600 dpi
Latin 80 fonts,
Postscript 3 emulation:
Latin 136 fonts
7
362/282/222 7-1
Page 89

7
Item Specifications
Supported
operating
systems
Printer driver PCL6:
Utility PageScope Web Connection
Server Windows NT 4.0, Windows 2000 (Service Pack 4 or later), Win-
Client Windows 2000, Windows XP, Windows Vista, or Windows NT
dows Server 2003, or Windows Server 2008
4.0
Mac OS 9.2 or later, Mac OS X 10.2, Mac OS X 10.3, Mac OS
X 10.4, Mac OS X 10.5
• Windows 2000 (Service Pack 4 or later), Windows XP (Service Pack 2 or later), or Windows Server 2003 printer driver
• Windows NT 4.0 (Service Pack 6a) printer driver
• Windows Vista, Windows Vista x64 printer driver
• Windows Server 2008, Windows Server 2008 x64 printer
driver
PS3:
• Windows 2000, Windows XP (Home/Professional), Windows Server 2003 printer driver
• Windows XP Professional x64, Windows Server 2003 x64
printer driver
• Windows Vista, Windows Vista x64 printer driver
• Windows Server 2008, Windows Server 2008 x64 printer
driver
• Mac OS 9.2 PPD file
• Mac OS X 10.2 printer driver
• Mac OS X 10.3/10.4 printer driver
• Mac OS X 10.5 printer driver
Web browser:
Windows NT 4.0
Microsoft Internet Explorer 4 or later recommended
Netscape Navigator 4.73 or 7.0
Windows 2000
Microsoft Internet Explorer 5 or later recommended
Netscape Navigator 7.0
Windows XP/Server 2003
Microsoft Internet Explorer 6 or later recommended
Netscape Navigator 7.0
Windows Vista/Server 2008
Microsoft Internet Explorer 7 or later
Netscape Navigator 7.0
* If using Microsoft Internet Explorer 5.5, use Service Pack 1 or
later.
Appendix
7-2 362/282/222
Page 90
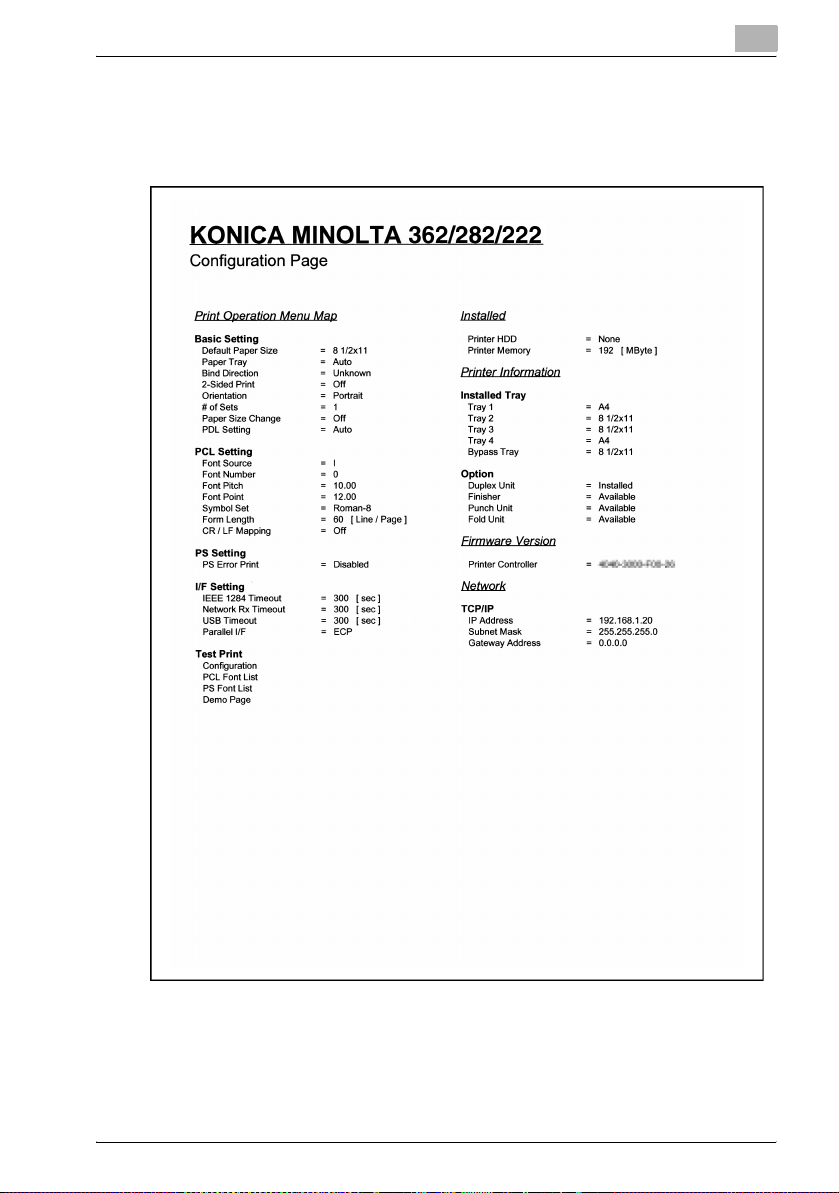
Appendix
7.2 Configuration page
7
362/282/222 7-3
Page 91
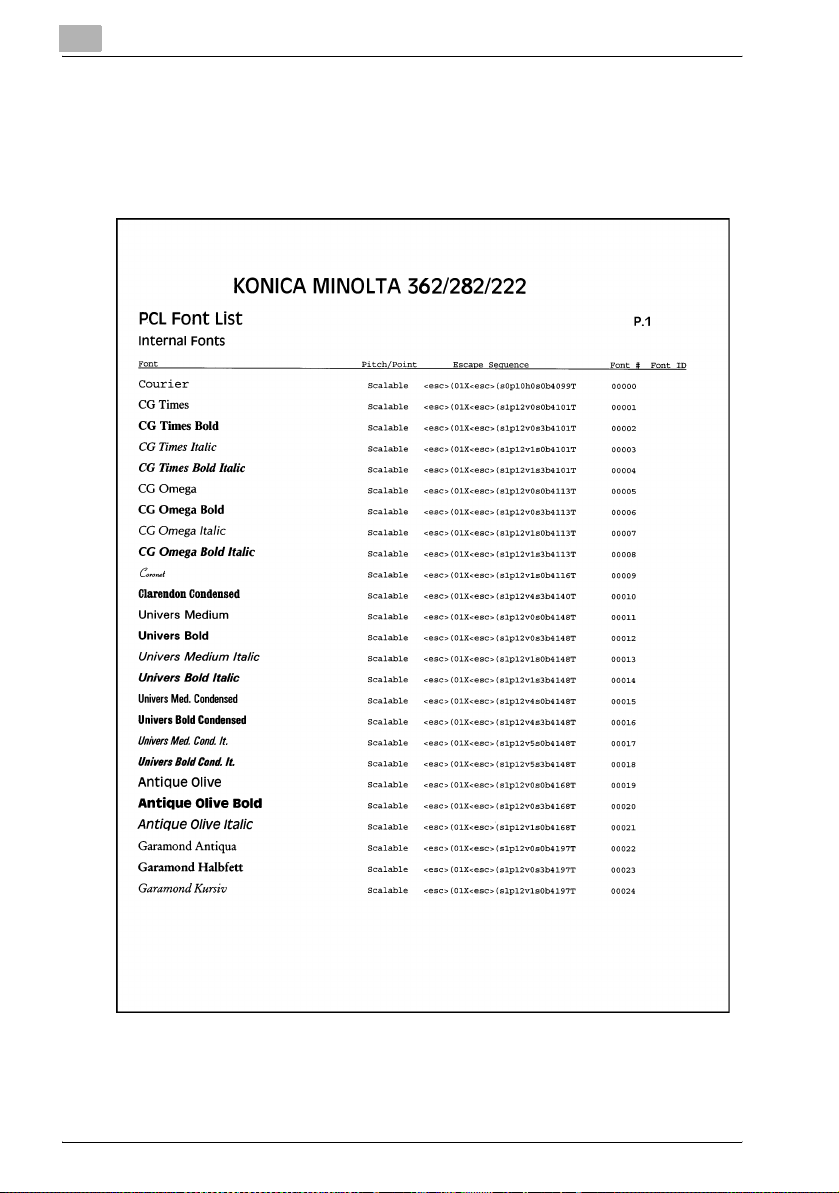
7
7.3 Font list
PCL font list
Appendix
7-4 362/282/222
Page 92
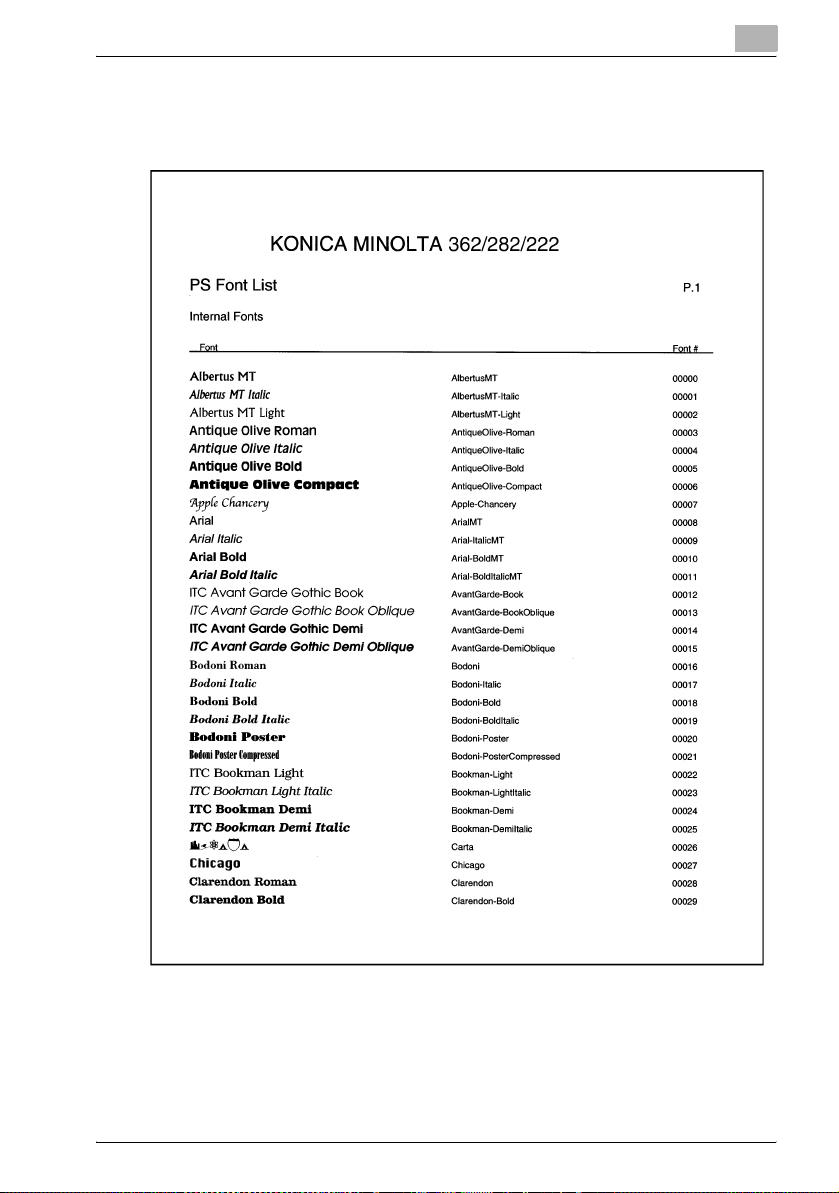
Appendix
7
PS font list
362/282/222 7-5
Page 93
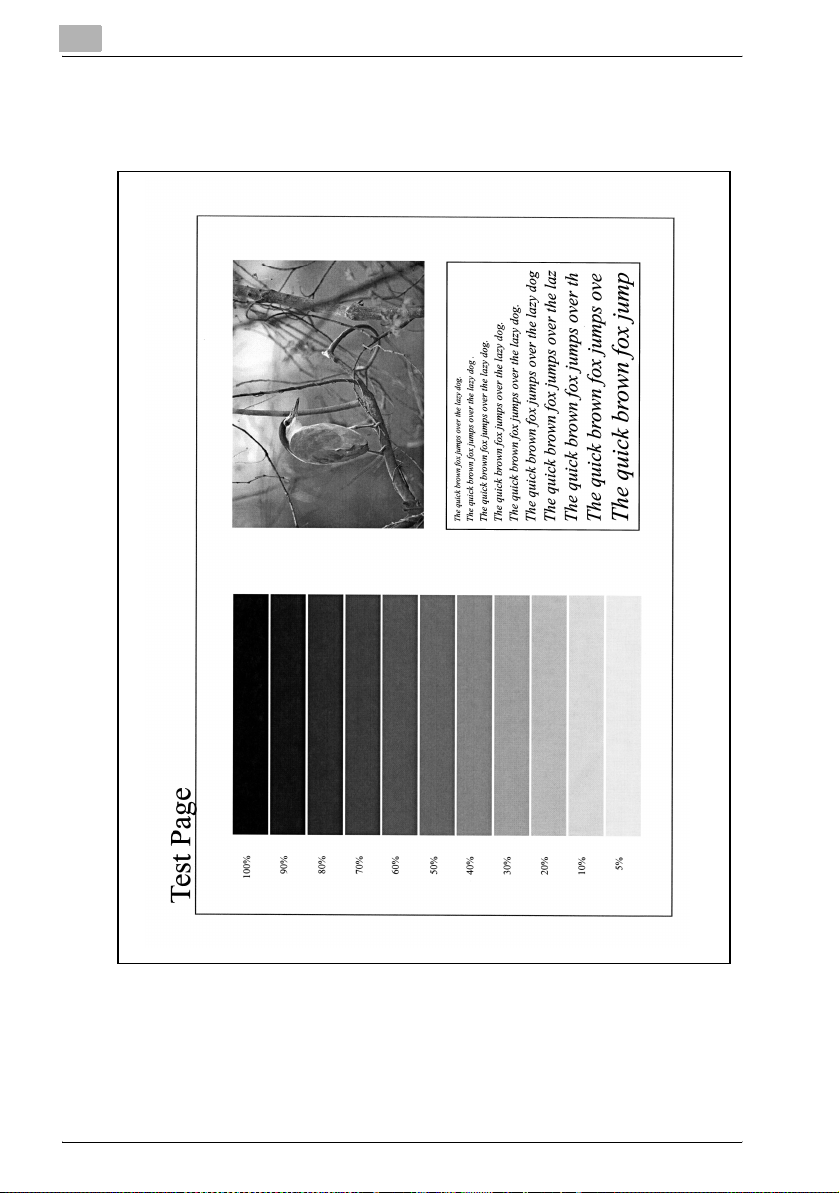
7
Appendix
PCL demo page
7-6 362/282/222
Page 94

http://konicaminolta.com
A11U-9564-11
2008
Copyright
Printed in China
2008.12
 Loading...