


7065
Table of contents
 Loading...
Konica Minolta 7065, 7060, 7033, 7040, 7150 Manual
...
KN-201
Network Interface Card
User's Guide
for the Network Administrator

Konica KN-201
© 1997 by Konica Business Machines U.S.A., Inc.
Printed in U.S.A.
Part Number: OP-01-KN201
Correspondence
Konica Business Machines U.S.A., Inc.
Digital Systems Solutions Group & New Product Development
500 Day Hill Road
Windsor, CT 06095
Acknowledgments
All brands and product names are trademarks or registered trademarks of their
respective companies.
Web Site Address on the Internet
To obtain additional product information, visit our Web site at: http://www.kbm.com
Disclaimer Notice
Konica Business Machines U.S.A., Inc. has made every effort to ensure that
information in this manual is complete and accurate. However, constant efforts are
also being made to improve and update the product. Therefore, Konica Business
Machines U.S.A., Inc. shall not be liable for errors in this manual or for any
consequential damages resulting from the use of this manual. Information contained
herein is subject to change without notice.

NON-EXCLUSIVE LICENSE AGREEMENT
READ THE TERMS AND CONDITIONS OF THIS
LICENSE AGREEMENT CAREFULLY .
BY USING THE PRODUCTS DESCRIBED IN THIS USER MANUAL
OR DOWNLOADING SOFTW ARE OR PRINTER DRIVERS T O YOUR
COMPUTER YOU AGREE TO BE BOUND BY THE TERMS OF THIS
LICENSE.
The computer programs embedded in the equipment, the accompanying printer drivers (the
“Software”) and user documentation are copyrighted and licensed (not sold) to you by Konica
Business Machines, U.S.A., Inc. (“KONICA or LICENSOR”), 500 Day Hill Road, Windsor,
Connecticut. This license agreement represents the entire agreement concerning the Software
between you and KONICA and it supersedes any prior proposal, representation, or understanding between the parties. KONICA reserves any rights not expressly granted to you.
1. LICENSE GRANT. You do not receive title to the Software or User Documentation. Licensor
grants to you, and you accept, a nonexclusive license to use the Software embedded in the
Equipment in machine-readable, object code form only (referred to as the “Computer Program”),
the accompanying User Documentation, and Printer Drivers furnished to you, (collectively the
“Licensed Articles”) only as authorized in this License Agreement. The Computer Program may
be used only on the Equipment in which it is embedded and may not be shared with or transferred to any other equipment. The Printer Drivers shall be used only with printer products
designed to work with the equipment containing the embedded Computer Program. You may
make a single archive copy of the Printer Drivers, provided that it includes all copyright notices,
markings and proprietary legends on the original, including the markings of any other company
contained therein. This archive copy may not be in use at any time and must remain in your
possession and control. You may not copy the drivers to a bulletin board or other similar system.
2. RESTRICTIONS. YOU MAY NOT ASSIGN, SUBLICENSE, MODIFY, ADAPT, TRANSFER,
PLEDGE, LEASE, RENT OR SHARE YOUR RIGHTS UNDER THIS LICENSE AGREEMENT. YOU MAY NOT REVERSE ASSEMBLE, REVERSE COMPILE, OR OTHERWISE TRANSLATE THE SOFTWARE OR PRINTER DRIVERS, OR USE ANY OTHER
METHOD TO DISCOVER THE PRINTER DRIVER’S OR SOFTWARE’S SOURCE
CODE. YOU MAY NOT CREATE DERIVATIVE WORKS BASED UPON THE SOFTW ARE OR ANY P AR T THEREOF. YOU MAY NOT COPY THE LICENSED ARTICLES
EXCEPT AS SPECIFICALLY PROVIDED IN THIS LICENSE AGREEMENT.
3. LICENSOR’S RIGHTS. You acknowledge and agree that the Licensed Articles are proprietary
products of Licensor or its suppliers and are protected under U.S. copyright law. You further
acknowledge and agree that all right, title and interest in and to the Licensed Articles, including
associated intellectual property rights, are and shall remain with Licensor or its supplier. Licensor’s
suppliers may protect their rights in the Licensed Articles in the event of a violation of this
License Agreement. This License Agreement does not convey to you an interest in or to the
Licensed Articles, but only a limited right of use revocable in accordance with the terms of this
License Agreement.
(continued on next page)

NON-EXCLUSIVE LICENSE AGREEMENT (continued)
4. LICENSE FEES. The license fees of $250.00 (included in the purchase price of the Equipment)
paid by you are paid in consideration of the licenses granted under this License Agreement.
5. TERMINATION. This License Agreement is effective upon the purchase and acceptance of the
Equipment by you or the downloading of any Software or Printer Driver from KONICA’ s W ebsite
or other authorized electronic medium and shall continue until terminated. This License Agreement will terminate upon your sale, transfer or disposal of the Equipment having the Software
embedded therein. Licensor may terminate this License Agreement upon the breach by you of
any term hereof. Upon such termination by Licensor, you agree to delete the Software and
Printer Drivers from the hard drive of the Equipment and destroy all copies of the Software and
Printer Drivers and User Documentation.
6. LIMITED WARRANTY. Licensor warrants, for your benefit alone, for a period of 90 days from
the date of commencement of this License Agreement (referred to as the “Warranty Period”) that
the Software and Printer Drivers shall operate substantially in accordance with the functional
specifications in the User Documentation. KONICA specifically does not warrant that the Software or Printer Drivers will operate uninterrupted or error-free. If during the Warranty Period, a
defect in the Software or Printer Drivers appears, you may contact the Licensor for either a
replacement or, if so elected by Licensor, refund of amounts paid by you under this License
Agreement. You agree that the foregoing constitutes your sole and exclusive remedy for breach
by Licensor of any warranties made under this Agreement. EXCEPT FOR THE W ARRANTIES
SET FORTH ABOVE, THE LICENSED ARTICLES, AND THE SOFTWARE CONTAINED
THEREIN, ARE LICENSED “AS IS,” AND LICENSOR DISCLAIMS ANY AND ALL OTHER
W ARRANTIES, WHETHER EXPRESS OR IMPLIED, INCLUDING, WITHOUT LIMIT A TION,
ANY IMPLIED WARRANTIES OF MERCHANTABILITY OR FITNESS FOR A PARTICULAR PURPOSE.
7. LIMITATION OF LIABILITY. Licensor’s cumulative liability to you or any other party for any
loss or damages resulting from any claims, demands, or actions arising out of or relating to this
Agreement shall not exceed $250.00. In no event shall Licensor be liable for any indirect,
incidental, consequential, special, or exemplary damages or lost profits, even if Licensor has
been advised of the possibility of such damages. SOME STATES DO NOT ALLOW THE
LIMITATION OR EXCLUSION OF LIABILITY FOR INCIDENT AL OR CONSEQUENTIAL
DAMAGES, SO THE ABOVE LIMITATION OR EXCLUSION MAY NOT APPL Y TO YOU.
8. GOVERNING LAW. This License Agreement shall be construed and governed in accordance
with the laws of the State of Connecticut. Should any term of this License Agreement be declared void or unenforceable by any court of competent jurisdiction, such declaration shall have
no effect on the remaining terms hereof.
9. COSTS OF LITIGATION. If any action is brought by either party to this License Agreement
against the other party regarding the subject matter hereof, the prevailing party shall be entitled
to recover, in addition to any other relief granted, reasonable attorney fees and expenses of
litigation.
10. NO WAIVER. The failure of any party to enforce any rights granted hereunder or to take
action against the another party in the event of any breach hereunder shall not be deemed a
waiver by that party as to subsequent enforcement of rights or subsequent actions in the event of
future breaches.
11. U.S. GOVERNMENT RESTRICTED RIGHTS. The Licensed Articles are provided with restricted
rights. Use, duplication, or disclosure by the government is subject to restrictions set forth in
subparagraph (c)(1)(ii) of the Rights in Technical Data and Computer Software clause at DFARS
252.277-7013, and paragraph (c)(1) and (2) of the Commercial Computer Software - Restricted
Rights clause at FAR 52.277-19. The manufacturer is: Konica Business Machines U.S.A., Inc.,
500 Day Hill Road, Windsor, Connecticut 06095.

Konica KN-201
FCC Regulations
The Konica KN-201 generates, uses, and can radiate radio frequency energy. If it is
not installed and used in accordance with the instruction manual, interference with
radio communications may result.
This equipment has been tested and found to comply with the limits for a Class A
computing device, pursuant to Subpart J, Part 15, of FCC rules, which are designed
to provide reasonable protection against interference from such equipment when it is
operating in a commercial environment.
Users operating this equipment in a residential area are likely to cause interference,
in which case they may be required to correct the interference at their own expense.
Canadian Department of Communications Regulations
Le présent appareil n'émet pas de bruits radioélectriques dépassant les limites
applicables aux de Class A prescrites dans le règlement sur la brouillage
radioélectrique édicté par Le Ministère des Communications du Canada.
This equipment does not exceed the Class A limits for radio noise emissions as set
out in the radio interference regulations of the Canadian Department of Communications.

Konica KN-201
Welcome to the User's Guide for the KN-201 Network Interface Card.
This manual is formatted to fit into the binder that is provided with your Konica
Print Controller.
The User's Guide provides instructions on installing network software Utilities on
network systems such as Novell NetWare; TCP/IP for the UNIX operating system;
Ethertalk; Banyan Vines; or a network system that combines any of these protocols.
Included are configuration procedures and instructions for setting up the your
KN-201 as a print server on a network.
Konica is committed to serving you in the best way possible. We welcome your
comments on this manual. Please use our correspondence address displayed on the
inside front cover.
Should you need assistance on technical matters not covered in this manual, please
phone the Konica Digital lab at 1(800)825-5664.
Konica - The Real Power of Digital Imaging

Contents
Section 1: Introduction
Features Of KN-201 .................................................................. 1-2
Benefits With Each Protocol ..................................................... 1-3
Configuration ............................................................................ 1-3
About Installation ...................................................................... 1-4
Troubleshooting Software For Workstations ............................ 1-4
What's In Your Package ............................................................. 1-4
Installation Requirements .......................................................... 1-5
Basic Specifications .................................................................. 1-6
Section 2: Installation
Network Protocols ..................................................................... 2-2
About The KN-201 Board .........................................................2-3
Connectors ................................................................................ 2-3
Hardware Installation ................................................................ 2-4
Configuring the Network Protocol ............................................ 2-5
Installing Konica Network Management Utility ....................... 2-6
Section 3: NetWare Configuration
NetWare Utilities Overview ...................................................... 3-2
How To Access The HTTP Server With An IP Browser .......... 3-5
Using Konica Network Management Utility ............................. 3-6
Overview ..................................................................... 3-6
Using MAP (Management Access Program) .............. 3-7
MAP Welcome Screen ................................................ 3-7
MAP Main Menu Screen ............................................ 3-8
Using Help Screens ..................................................... 3-9
Configure KN-201 For Use With Novell NetWare ................... 3-24
Overview .................................................................... 3-24
Configure Using NetWare 2.15 and 3.1x ...................................3-25
Setting Up Print Queues ..............................................3-25
Using PCONSOLE ..................................................... 3-26
Configure Using NetWar e 4.x NetWare Directory Services .... 3-36
Overview ..................................................................... 3-36
Using The Konica Network Management Utility ....... 3-38
NetWare Configuration Menu .................................... 3-40
Using the NWADMIN Utility ..................................... 3-43
Configure Using NetWare 4.x Bindery Emulation .................. 3-50
Overview .................................................................... 3-50
Using PCONSOLE ..................................................... 3-51
Primary File Server ....................................................................3-57
When To Define A Primary File Server ...................... 3-57
How To Define A Primary File Server ........................ 3-58

Contents
Section 4: AppleTalk Configuration and Administration
Overview .................................................................................. 4-2
Enabling The AppleTalk Protocol ............................................ 4-2
Configuration For AppleTalk ................................................... 4-2
Choosing The Printer .................................................................4-3
How To Access The AppleTalk Administration Program ........ 4-4
Configuring The KN-201 Print Server ..................................... 4-5
Error Log .................................................................... 4-6
Printer Setup ............................................................................. 4-7
Protocol Setup For TCP/IP Users .............................. 4-8
How To Access The HTTP Server With An IP Browser ......... 4-9
Control Options ........................................................................ 4-9
Section 5: Unix Printing Through TCP/IP
Overview ................................................................................... 5-2
Installation in a Windows Environment ...................... 5-3
Windows for Workgroups ......................................................... 5-3
Installing TCP/IP ........................................................ 5-4
Loading The lpr Spooler ............................................. 5-4
Setting Up The Konica Print Server ........................... 5-4
Assigning IP Address With BOOTP Lite ................... 5-5
Assigning IP Address With ARP ................................ 5-6
Creating An lpr Queue On The Workstation .............. 5-7
Microsoft Windows 95 ..............................................................5-8
Loading The lpr Spooler ............................................. 5-8
Setting Up The Konica Print Server ........................... 5-8
Assigning IP Address With ntBOOTP ....................... 5-9
Assigning IP Address With ARP ................................ 5-10
Setting Up lpr on the Workstation .............................. 5-10
Windows NT Instructions ......................................................... 5-1 1
Setting Up The Konica Print Server ........................... 5-11
Assigning IP Address With ntBOOTP ....................... 5-12
Assigning IP Address With ARP ................................ 5-13
Setting Up lpr On The Workstation ............................ 5-14
Dynamic Host Configuration Protocol ...................................... 5-15
FTP UNIX Printing .....................................................5-15
FTP Client ................................................................... 5-16
Printing Overview ..................................................................... 5-17
Configuring the IP Address On the KN-201 Print Server ........ 5-19
lpd UNIX Printing .................................................................... 5-25
Installing TCP/IP If Not Running lpd ....................................... 5-34

Contents
Section 6: Troubleshooting
Diagnosing Problems ................................................................ 6-2
LED Conditions (Green & Amber Indicator Lights) ................ 6-3
Status and Error Pages .............................................................. 6-4
How To Determine The Cause Of A Problem .......................... 6-6
Printer Basic Checklist .............................................................. 6-7
Network Connections ................................................................ 6-7
KN-201 Troubleshooting .......................................................... 6-8
Novell Protocol ......................................................................... 6-9
Novell File Server Checklist ..................................................... 6-10
If KN-201 Loses Its Novell File Server Connection ................. 6-10
KN-201 Workstation Checklist ................................................. 6-10
KN-201 Configuration Checklist .............................................. 6-1 1
Workstation To KN-201 Connection Checklist ........................ 6-12
AppleTalk Protocol ................................................................... 6-13
Printer Checklist ..........................................................6-13
Multiple Zones ............................................................ 6-13
UNIX (TCP/IP) ........................................................................ 6-14
Appendix
Cable Specifications .................................................................. A-2
Assigning Multiple File Servers ............................................... A-3
Jumper Settings ......................................................................... A-5
Windows 95 PeerToPeer Printing ............................................. A-11
Index

Section 1: KN-201 Introduction

KN-201 Introduction
Features of KN-201
q
High-speed parallel port
q Network operating systems (NOS) & Protocol support for:
Novell NetWare versions 2.15, 3.10; and 4.0 and above
(Bindery and Network Directory Services)
AppleTalk
TCP/IP-UNIX for SUN (Solaris 1.x, 2.x), BSD System V
Rel. 4, DEC ULTRIX 4.3 RISC, OSF1/ALPHA, HP/UX,
SCO UNIX and Windows NT systems
Banyan Vines (Vines 4.11 (5), 5.0 (5) (6), and Vines for
UNIX, Version 2).
q Flash read-only memory (ROM) for easily upgrading the KN-201
with new protocols and future product enhancements
q Ethernet interface connection - Thinnet (10Base2) and 10BaseT
q Unshielded Twisted Pair (UTP) and Shielded Twisted Pair (STP).
q Windows 95 PeerToPeer Printing allows Windows 95 workstations
to print to KN-201 printers. Refer to Appendix, Windows 95
PeerToPeer Printing, for details.
q The KN-201 is both flexible and easy to install.
Flexibility of the KN-201 is provided with automatic network
switching between network protocols. Print jobs can be sent from
each NOS that is KN-201 configured.
The KN-201 supports multiple active protocols. You can activate the
protocols and troubleshoot printing problems using the Konica Network
Management Utility or Apple Administration Program utilities.
Installation is easy because each network protocol requires a simple network
or Konica utility in order to configure the KN-201 printers for the NOS.
1-2 KN-201 Introduction

KN-201 Introduction
Benefits With Each Protocol
q
High performance - Send data as fast as your printer can receive it.
q Easy installation
q Full Print Server Support - Supports all print server features
defined for Novell NetWare and TCP/IP-UNIX.
q Put printers anywhere. Directly connect a printer anywhere on the
network. The KN-201 connects one printer.
Configuration
q
For Novell NetWare
Use NetWare’s PCONSOLE utility for NetWare versions 2.15,
3.10 and 4.x (Bindery Services); Konica Network Management
Utility or NWADMIN for NetWare 4.x (Directory Services).
q For TCP/IP
Use lpd to print directly from KN-201 without using KONICA
software on your host. If you require host-side printing with
broader filtering and banner options, then use KONICA’s install
script.
q For AppleTalk
The KN-201 is pre-configured. If you have different requirements
or wish to assign a different name to the printer, you can use
Konica’s AppleTalk Administration program to configure the
KN-201.
q For Banyan Vines
Use NIManage for Windows, a Banyan specific setup application
general protocol.
KN-201 Introduction 1-3

KN-201 Introduction
About Installation
q
For detailed hardware instructions, see Section 2.
For detailed configuration instructions, see Sections 3 and 4.
Troubleshooting Software for Workstations
q
Novell NetWare: The KN-201 Network Management Utility for
Windows lets you troubleshoot problems by sending test prints or
viewing status reports or error logs on the KN-201 print server;
check or modify any configuration option not directly tied to the
print server; and change the print server name and the password it
uses to login.
q TCP/IP: KONICA’s software provides error messages and a
status page to alert you to incorrectly entered data.
q AppleTalk: AppleTalk Administration Program provides
functions that let you reset the KN-201, view the KN-201
configuration or an error log, and change the printer setup.
KN-201 Network Management Utility for Macintosh lets you
troubleshoot problems
q Banyan Vines
What’s In Your Package
q
KN-201 Network Interface Card (board)
q Ethernet 10BaseT connector and Ribbon Cable
q Ethernet 10Base2 (Thinnet) connector and parallel port
q User's Guide (this manual)
q Three 3 1/2" diskettes, which contain the Konica Network
Management Utility for Windows program; the Apple
Administration program; and the TCP/IP installation script.
1-4 KN-201 Introduction

KN-201 Introduction
Installation Requirements
Version of Protocol or NOS
q
Novell NetWare Version 2.15, 3.1x, or 4.x
q UNIX/Windows/LAN Server systems supporting lpr over TCP/IP.
q Macintosh System 7
q DEC ULTRIX 4.3 or 4.4, DEC OSF/1 2.0 or 3.0, Solaris 1.1.3
or 2.3, (SUNOS 4.1.3 or 5.3), System V Release 4, HP-UX 9.01,
IBM AIX 3.2.5, or SCO UNIX 2 for KONICA TCP/IP
q Banyan Vines
Software
q
Novell NetWare printing requires NetWare Capture, NPRINT or
PCONSOLE (later than 1.0) utilities.
q The KN-201 Network Management Utility for Windows utility
requires Windows 3.1 or later; Windows for Workgroups 3.11;
Windows 95; or Windows NT 3.5 or later.
q The Apple Administration program utility.
q TCP/IP setup and maintenance requires the Konica Network
Management Utility.
Hardware
q
Support for 10 megabit Ethernet networks: 10Base2 (also known
as ThinWire or Thinnet); and 10BaseT cables and hardware.
q 3 1/2" diskette drive on the workstation to accept Windows,
Macintosh or UNIX utilities.
KN-201 Introduction 1-5

KN-201 Introduction
Basic Specifications
Ethernet Network Interface Controller/Internal Print Server
(NIC/IEEE 1284)
Firmware
Novell, TCP/IP, Apple, Banyan (HTTP/HTML)
Protocols
Novell: NetWare 2.15, 3.x, 4.x (NDS and Bindery based);
(IPX/SPX supports Windows compatible browser utility)
TCP/IP: ARP, RARP, BootP, ICMP, SNMP
Ethertalk: Transparent implementation Ver .1
Banyan Vines: VINES 4.11 (5), 5.0 (5), (6); Vines for UNIX ver.2
Administration & Management
HTTP server providing access to HTML pages over IP & IPX
Konica Network Management Utility for Windows via the MAP
(Management Access Program) Browser
Konica Network Management Utility for Macintosh
BootP Lite for Windows and NT
Printer Interface
IEEE 1284 via 26 pin Connector
Instruction Store Download:
Entire program can be updated from Windows program
operating through Novell network.
Compatible w/FTP transmission of properly formatted core image
operating through TCP/IP network supporting FTP.
Hardware
10BaseT and 10Base2
0.5 MB RAM (upgrade to 1 MB of RAM)
1 MB Flash Memory
Support Software
Management Access Program For Windows (MAP)
Konica Network Management Utility for Windows
(NetWare specific)
(Banyan specific)
BootP (Lite) and NTBootP (for Windows & NT)
Unix Host Based Software
1-6 KN-201 Introduction

Section 2: Installation

Installation
The KN-201 Ethernet Network Interface Card is a 5"x7" board that inserts
into a designated slot of your Konica print controller device.
Network Protocols
q Novell NetWare 2.15, 3.10, and later, or 4.x (Bindery and Network
Directory Services - NDS).
q TCP/IP-UNIX networks with lpd capabilities or systems compat-
ible with SUN (Solaris 1.x, 2.x), BSD System V Release 4,
OSF1/Alpha, DEC ULTRIX 4.3 RISC, HP/UX, and SCO UNIX .
Status Light Indicators
q Status light indicators display as green and amber LEDs on the
print controller to enable you to monitor the power-on status
and to diagnose problems.
q You can easily troubleshoot the conditions indicated by the lights.
See Section 6, Troubleshooting.
2-2 Installation
Installation
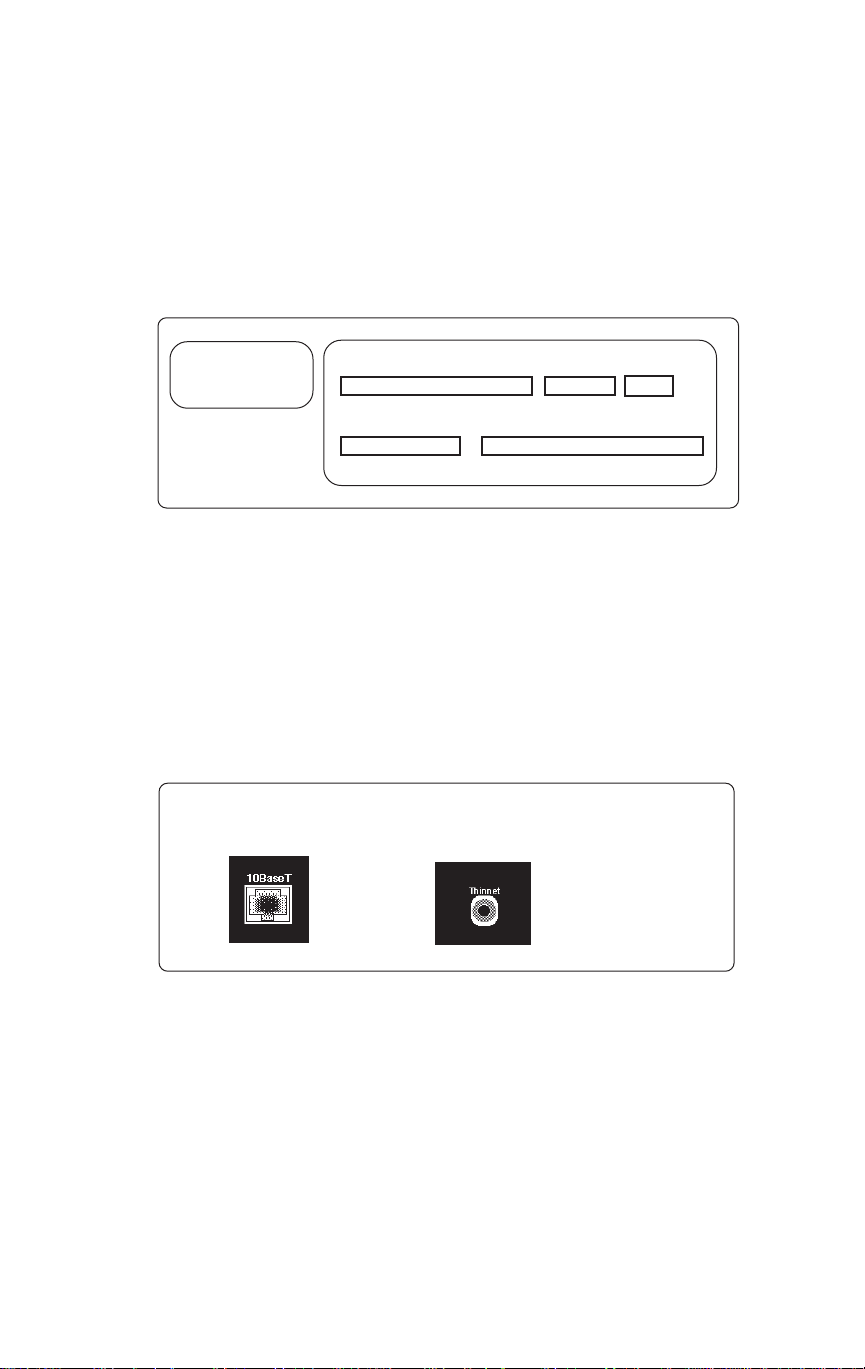
About the KN-201 Board
The two labels shown below are attached to the KN-201 board to identify
the model name, manufacture date code, serial number MAC address
number and initial firmware version.
PN:6097000
FO:024205
REV:A/2-PROTO
P/N: ROM: Code:
P C U A 9 5 0 - 7 7 2 0. 0 0 0 1 7
S/N: LAN Address:
9 9 0 4 6 1 0 0 - 4 0 - A F - 7 8 - E 7 - E 8
Made in the USA
Connectors
The Ethernet connectors are illustrated below.
q Ethernet 10BaseT uses a RJ45 cable to connect the KN-201 to the
network.
q Ethernet Thinnet 10Base 2 uses a BNC T-connector to connect to
the coaxial cable of the network.
10BaseT
Thinnet 10Base 2
Installation 2-3
Installation
Hardware Installation
DO NOT apply power to the KN-201 until all hardware installation and
software configuration steps are completed. Use the following steps to
connect the Konica printer controller to the KN-201 print server.
Connecting the Ethernet Network to the KN-201
Connect your Ethernet network by using either the 10BaseT Ethernet
interface or the Thinnet Ethernet interface.
Using the 10BaseT Ethernet Interface
This network connection uses a 4-wire RJ cable to plug into the RJ45
network connector located on the back panel of the print controller. Once
you make the connection, you are ready to configure the network protocol
(see instructions on the next page).
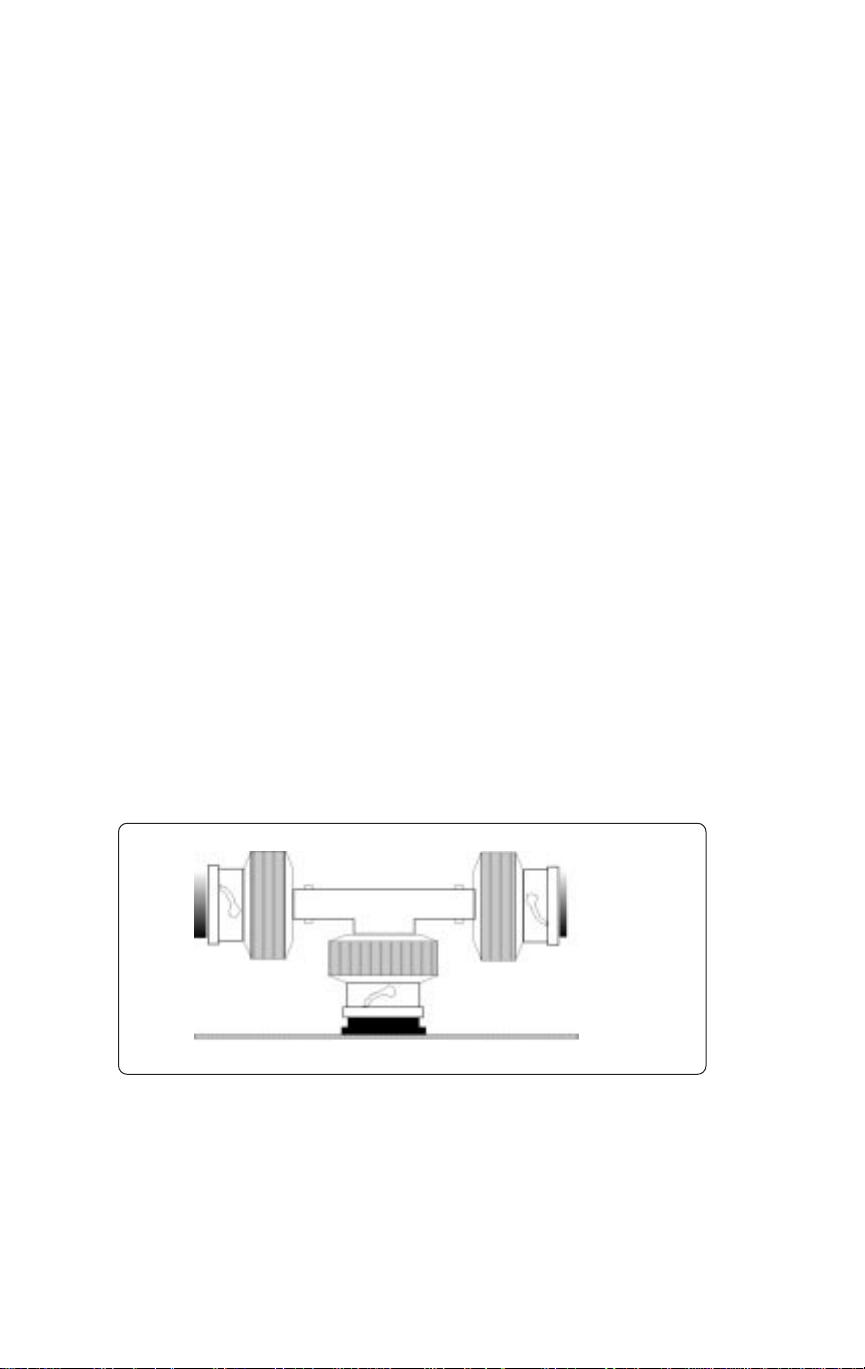
Using a Thinnet Ethernet Interface
The Thinnet Ethernet wires use a BNC T-connector (not included in your
package) to plug into the BNC port on the KN-201 (marked Thinnet). Thin
Ethernet cable is 1/4-inch coaxial cable (usually RG-58/U) that uses the
cylindrical BNC T-connector to attach to the BNC port.
The following illustration shows how the proper BNC connection looks.
BNC Connection
IMPORTANT: Use the T-Connector when making the BNC connection,
making sure the T-connector is dir ectly connected to the port marked
Thinnet; otherwise, the connection will not work.
2-4 Installation

Installation
Configuring the Network Protocol
After installation is completed, configure and activate your network protocol
to work with the KN-201.
• For NetWare configuration, refer to Section 3, NetWare
Configuration, which shows you how to use the Konica Printer
Management System with MAP (Management Access Program).
(See next page for Utility Installation instructions.)
• For AppleTalk configuration, refer to Section 4, which shows you
how to use the AppleTalk Configuration and Administration
Program.
• For TCP/IP configuration information, refer to Section 5, Unix
Printing Through TCP/IP.
Installation 2-5

Installation
Konica Network Management Utility
Installation Procedure
This Windows based utility can be installed on any workstation hard drive
or network drive. It is recommended that you install the utility program onto
an area of the file server restricted to users with Supervisor/Administrator
rights; however this is not a requirement.
When you install the Konica Network Management Utility diskette, the
MAP (Management Access Program) browser installs automatically.
1. Start Windows on your PC or workstation.
2. Insert the Konica Network Management Utility diskette in drive A: or B:
3. In the Windows Program Manager, select File.
4. Select RUN from the menu.
5. At RUN, type A:\SETUP.EXE or B:\SETUP.EXE and click OK.
6. Read the information screen and click on Continue.
7. Identify a path for the program.
The path default is C:\MAP
You can change the path or use the default. The installation begins.
8. When installation is completed, remove the diskette from the disk drive.
To use the Konica Network Management Utility, see information starting on
p. 3-6.
2-6 Installation

Section 3: NetWare Configuration

NetW are Configuration
NetW are Utilities Overview
This section provides information on the various NetWare utility programs
that are available to you, with emphasis on the Novell PCONSOLE utility
that is used to perform all KN-201 print server functions.
As an alternative to using PCONSOLE, the procedure using the NWADMIN
utility is provided for configuring NetWare 4.0x (NDS).
PCONSOLE is an integral part of the Konica Network Management Utility.
Separate procedures are provided to show how to configure the KN-201 for
the NetWare version you are using.
Before users of the Novell NetW are Network Operating System can print, the
KN-201 print server must be configured according to the instructions
included in this section.
Highlights of this section are outlined below.
q How to Access the HTTP Server with an IP browser other than MAP.
q Konica Management Access Program (MAP) is a Windows based
browser utility. The MAP utility allows you to access the KN-201 and can be
used to activate network protocols, configure the print server and printer
port, reset KN-201 from a remote location, and troubleshoot problems. Help
screen information is included to show you how to use the MAP Utility.
q Configure Using NetWare 2.15 and 3.1x describes how to use
PCONSOLE to configure and set up KN-201 printers for printing and to set
up the Notify option.
q Configure Using NetWare 4.0x Directory Services (NDS) describes how
to use the Konica Network Management Utility as well as the NW ADMIN
utility to configure and set up the KN-201 print Server for use with version
4.0x Directory Services.
q Configure Using NetWare 4.0x Bindery Emulation describes how to use
PCONSOLE to configure and set up the KN-201 Print Server for use with
V ersion 4.0x Bindery Services.
q Primary File Server explains how to define a Primary File Server and
gives you guidelines beforehand about the effect it has on your network
system.
3-2 NetWare Configuration

NetW are Configuration
NetW are Utilities Overview
The following is a list of Novell NetW are utilities.
PCONSOLE
• Use PCONSOLE to set up the KN-201 print server and set the print
queues. This utility helps you control network printing and allows
you to view information about network printing.
PRINTDEF
• Use to set up a database of printer definitions. Define device
drivers for network printers, plotters, and other devices. The
information defined with the utility is then used by CAPTURE,
NPRINT , PCONSOLE, and PRINTCON.
PRINTCON
• Use to define the preferred print options and set the options up as
standard configurations. PRINTCON serves as a database for
printing with CAPTURE, NPRINT, and PCONSOLE.
• The tasks include edit print job configurations, select default print
job configurations, and copy print job configurations from one user
to another.
CAPTURE
• Use to print screen displays, save data to a network file, and print
to a network printer from a non-network software application.
NPRINT
• Use to print files from outside an application to a network printer.
The files must be DOS text files, or files that are formatted by the
application for a specific printer type (for example, HP Laser).
NetWare Configuration 3-3

NetW are Configuration
NetW are Utilities Overview
Basic Steps for Making Changes T o KN-201
CHANGE REQUIRED ACTION STEP REQUIRED
To move the Konica printing
system to another location
on the same network . . .
To move the Konica printing
system from its current
network to a new network . . .
To attach new file servers to
KN-201 unit . . .
T o r emove a file server
attached to the KN-201. . .
To add new queues to the
KN-201 unit . . .
To remove queues from the
KN-201 unit . . .
T o change the KN-201 print
server name . . .
Relocate the printing system to the new
location and make hardware connections
explained in Section 2. You do not need
to configure with PCONSOLE.
Perform hardware installation and
software configuration procedures in
Sections 2, 3, 4, 5, and 6.
Use the PCONSOLE utility.
Use the PCONSOLE utility.
Use the PCONSOLE utility . See Print
Queue Functions in this Section.
Use the PCONSOLE utility . See Print
Queue Functions in this Section.
Use the Konica MAP utility that is on
your Konica Network Management
Utility diskette.
3-4 NetWare Configuration

NetW are Configuration
How T o Access The HTTP Server With An IP Browser
Use the following procedure to access the HTTP (HyperText Transfer
Protocol) with your favorite IP Browser, such as Netscape. This access
allows you to perform all print server functions.
Option: If you have the MAP (Konica Management Access Program)
browser, use instructions on p. 3-7. MAP gives you access to the Konica
Network Management Utility, which allows you to perform all print server
functions.
If you do not have the MAP Utility, perform the following steps:
1. Assign an IP address to the KN-201.
See instructions for Assigning IP Address , starting on p. 5-5.
2. Start the IP Browser you normally use.
3. When the browser is up and running, type http:// followed by the
IP address of the unit in the Location field at the top of the browser
screen, or by going to File at the menu bar and choosing Open
Location.
Example: For a unit with an IP address of 199.9.200.200, type:
http://199.9.200.200
At this point, the IP Browser works the same as the Konica MAP Utility (see
Main Menu screen on p. 3-8.
NetWare Configuration 3-5

NetW are Configuration
Using Konica Network Management Utility
Overview
The Konica Network Management Utility is a Windows based HyperText
Transfer Protocol (HTTP) utility that enables you to configure network
protocols for the KN-201 print server; remotely reset the KN-201 print server
to clear an error or to return the print server to factory settings; troubleshoot
problems; enable/disable the status sheet printout; and access contextsensitive Help.
While the Konica Network Management Utility can be accessed with any
browser, such as Netscape, you can also use the MAP (Konica Management
Access Program) browser to access and configure the KN-201. The MAP
browser automatically installs when you install the Konica Network Management Utility diskette.
If you have not already done so, install the Konica Network Management
Utility program using the installation procedure on p. 2-6.
NOTE: The Konica Network Management Utility CANNOT be installed from DOS.
3-6 NetWare Configuration

NetW are Configuration
Using Konica Network Management Utility
Using MAP (Management Access Program)
The MAP Welcome screen allows you to view and change Print Server
configuration settings. Simply click on the various function selections
displayed on the upper left screen, e.g., File, View , Go, Option, Help, Exit,
Direction Arrows, Home, and Printer; or, click the drop down arrow displayed at the far right of the Server bar to show a drop down list of active
KN-201 Print Server units.
After making a selection, the Main Menu screen displays to allow you to
select any function related to the KN-201 Print Server. The Main Menu
screen is displayed on the next page.
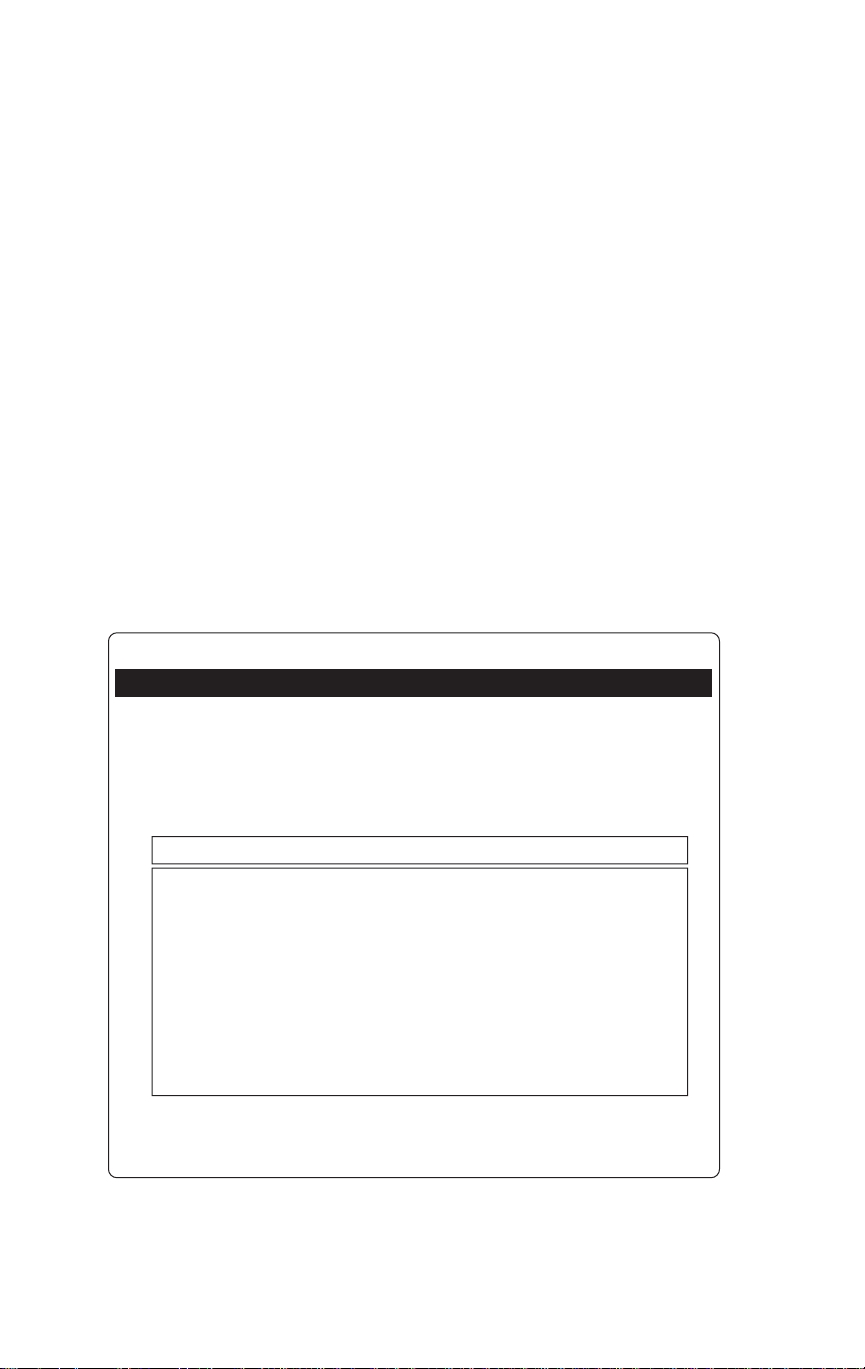
Management Access Program - Management Access Program Home Page
File
View
Go Options Help
Server
KN2-317483 Ver. 1.04 IP-301 Konica KN-201
KN2-317690 Ver. 1.05 IP-201M Konica KN-201
Welcome to the Print Server Management Access
Program
This program uses IPX/SPX to communicate with the Print Servers.
To select a unit, click on a Print Server Identification in the drop down Server list.
To get the Print Server name (if different from the default ID), highlight the Print Server Identification and then
To get the detailed information for all listed Print Servers, select "Show All" under the Options menu. If there are
For Help, press F1
NOTE: Menus and function items are explained in Using Help Screens, which starts on
p. 3-7.
select "Show Detail" under the Options menu.
many Print Servers, this operation may take some time to complete.
NUM
ò
NetWare Configuration 3-7
NetW are Configuration
Using Konica Network Management Utility
Using MAP (Management Access Program)
The MAP Main Menu allows you to access the Konica program and use the
functions relating to the System, the Protocols and Ports.
Simply click on the menu item you require, and the easy-to-use screens will
guide you through each procedure.
The bottom of your screen displays Home and Help. Clicking on Home gets
you back to the basic menu. Clicking on Help gets you to the Help screens
where you may select the topic of your choice.
To learn more about using the MAP Utility, see Using Help Scr eens which
begins on the next page.
To configure the KN-201 Print Server for use with NetWare, see Configur e
KN-201 for Use With Novell NetWare p. 3-24.
Management Access Program KN2_317483
Main Menu
Server KN2_317483
System Protocols Ports
Reset Setup NetWare Configure Port Settings
Factory Defaults Setup TCP/IP Test Printer
Unit Status Setup AppleTalk Configure Status Page
Network Address
Change Password Status Information
Home | Help | Unit Information
NOTE: you will be required to enter a password to perform most of the functions. The
default factory password is "SYSADM".
3-8 NetWare Configuration

NetW are Configuration
Using Konica Network Management Utility
Using Help Screens
System Functions
Reset
Factory Defaults
Unit Status
Novell NetW are
Banyan VINES
TCP/IP
AppleT alk
Serial Port Status
Network Address
Change Password
Protocols
Setup NetWare
Setup TCP/IP
Setup AppleT alk
Setup Banyan VINES
Ports
Configure Port Settings
T est Printer
Configure Status Page
Status Information
Parallel Port Settings
Serial Port Settings
NetWare Configuration 3-9
Loading...