


 Loading...
Multi-Protocol On-board Ethernet Multi-function Print Server
NETWORK
USER’S GUIDE
Please read this manual thoroughly before using this machine on your network. You can view this manual in PDF format from the CD/DVD-ROM at any time, please keep the CD/DVD-ROM in a convenient place for quick and easy reference at all times.
A32R-9562-00A

Definitions of notes
We use the following icon throughout this User’s Guide:
IMPORTANT |
IMPORTANT describes procedures you must follow or avoid to prevent possible |
|
|
machine problems or damage to other objects. |
|
Note |
Notes tell you how you should respond to a situation that may arise or give tips |
|
about how the operation works with other features. |
||
|
||
|
|
Trademarks
KONICA MINOLTA and the KONICA MINOLTA logo are trademarks or registered trademarks of KONICA MINOLTA HOLDINGS, INC.
bizhub and PageScope are trademarks or registered trademarks of KONICA MINOLTA BUSINESS TECHNOLOGIES, INC.
Microsoft, Windows, Windows Server and Internet Explorer are registered trademarks of Microsoft Corporation in the United States and/or other countries.
Windows Vista is either a registered trademark or a trademark of Microsoft Corporation in the United States and/or other countries.
Apple, Macintosh, Safari and TrueType are trademarks of Apple Inc., registered in the United States and other countries.
Linux is the registered trademark of Linus Torvalds in the U.S. and other countries.
UNIX is a registered trademark of The Open Group in the United States and other countries.
Adobe, Flash, Illustrator, PageMaker, Photoshop, PostScript and PostScript 3 are either registered trademarks or trademarks of Adobe Systems Incorporated in the United States and/or other countries.
BROADCOM, SecureEasySetup and the SecureEasySetup logo are trademarks or registered trademarks of Broadcom Corporation in the United States and/or other countries.
OpenLDAP is a registered trademark of the OpenLDAP Foundation.
Each company whose software title is mentioned in this manual has a Software License Agreement specific to its proprietary programs.
All other trademarks are the property of their respective owners.
i |

Compilation and publication notice
Under the supervision of KONICA MINOLTA BUSINESS TECHNOLOGIES, INC. this manual has been compiled and published, covering the latest product’s descriptions and specifications.
The contents of this manual and the specifications of this product are subject to change without notice.
KONICA MINOLTA reserves the right to make changes without notice in the specifications and materials contained herein and shall not be responsible for any damages (including consequential) caused by reliance on the materials presented, including but not limited to typographical and other errors relating to the publication.
©2010 KONICA MINOLTA BUSINESS TECHNOLOGIES, INC.
IMPORTANT NOTE
This product is approved for use in the country of purchase only.
Do not use this product outside the country of purchase as it may violate the power regulations of that country.
Windows® XP in this document represents Windows® XP Professional, Windows® XP Professional x64 Edition and Windows® XP Home Edition.
Windows Server® 2003 in this document represents Windows Server® 2003/2008 and Windows Server® 2003/2008 x64 Edition.
Windows Vista® in this document represents all editions of Windows Vista®.
Windows® 7 in this document represents all editions of Windows® 7.
ii |

Table of Contents |
|
|
1 |
Introduction |
1 |
|
Overview.................................................................................................................................................... |
1 |
|
Network features........................................................................................................................................ |
2 |
|
Network printing................................................................................................................................... |
2 |
|
Network scanning ................................................................................................................................ |
2 |
|
Network PC Fax .................................................................................................................................. |
2 |
|
Fax to Server ....................................................................................................................................... |
2 |
|
Management utilities............................................................................................................................ |
2 |
|
Internet fax/scan to E-mail server........................................................................................................ |
3 |
|
Types of network connections ................................................................................................................... |
4 |
|
Wired network connection example..................................................................................................... |
4 |
|
Protocols.................................................................................................................................................... |
6 |
|
TCP/IP protocols and functionalities.................................................................................................... |
6 |
|
Other protocol...................................................................................................................................... |
9 |
2 |
Configuring your machine for a network |
10 |
|
Overview.................................................................................................................................................. |
10 |
|
IP addresses, subnet masks and gateways ............................................................................................ |
10 |
|
IP address ......................................................................................................................................... |
10 |
|
Subnet mask...................................................................................................................................... |
11 |
|
Gateway (and router)......................................................................................................................... |
11 |
|
Step by step chart.................................................................................................................................... |
12 |
|
Setting the IP address and subnet mask ................................................................................................. |
12 |
|
Using the BRAdmin Light utility to configure your machine as a network printer .............................. |
12 |
|
Using the control panel to configure your machine for a network...................................................... |
14 |
|
Using other methods to configure your machine for a network ......................................................... |
14 |
|
Changing the print server settings ........................................................................................................... |
15 |
|
Using the BRAdmin Light utility to change the print server settings .................................................. |
15 |
|
Using the control panel to change the print server settings............................................................... |
15 |
|
Using Web Based Management (web browser) to change the print/scan server settings ................ |
16 |
|
Using Remote Setup to change the print server settings |
|
|
(Not available for Windows Server® 2003/2008)........................................................................... |
16 |
|
Using other methods to change print server settings ........................................................................ |
16 |
3 |
Control panel setup |
17 |
|
Network menu.......................................................................................................................................... |
17 |
|
TCP/IP ............................................................................................................................................... |
17 |
|
Ethernet ............................................................................................................................................ |
24 |
|
E-mail / IFAX ..................................................................................................................................... |
25 |
|
How to set a new default for Scan to E-mail (E-mail server) ............................................................. |
36 |
|
How to set a new default for Scan to FTP ......................................................................................... |
37 |
|
How to set a new default for Scan to Network................................................................................... |
38 |
|
Fax to Server ..................................................................................................................................... |
39 |
|
Time Zone ......................................................................................................................................... |
41 |
|
Restoring the network settings to factory default..................................................................................... |
42 |
|
Printing the Network Configuration List ................................................................................................... |
42 |
|
|
iii |

4 |
Network printing from Windows®: basic TCP/IP Peer-to-Peer printing |
43 |
|
Overview.................................................................................................................................................. |
43 |
|
Configuring the standard TCP/IP port...................................................................................................... |
44 |
|
Printer driver not yet installed ............................................................................................................ |
44 |
|
Printer driver already installed ........................................................................................................... |
45 |
|
Other sources of information ................................................................................................................... |
45 |
5 |
Internet printing for Windows® |
46 |
|
Overview.................................................................................................................................................. |
46 |
|
IPP printing for Windows® 2000/XP, Windows Vista®, Windows® 7 and |
|
|
Windows Server® 2003/2008 ............................................................................................................... |
46 |
|
Windows Vista®, Windows® 7 and Windows Server® 2008.............................................................. |
46 |
|
Windows® 2000/XP and Windows Server® 2003.............................................................................. |
48 |
|
Specifying a different URL................................................................................................................. |
50 |
|
Other sources of information ................................................................................................................... |
50 |
6 |
Network printing from Macintosh using the BR-Script 3 driver |
51 |
|
Overview.................................................................................................................................................. |
51 |
|
How to choose the BR-Script 3 printer driver (TCP/IP) ........................................................................... |
51 |
|
For Mac OS X 10.3.9 to 10.4.x users ................................................................................................ |
51 |
|
For Mac OS X 10.5.x and 10.6.x ....................................................................................................... |
53 |
|
Other sources of information ................................................................................................................... |
54 |
7 |
Web Based Management |
55 |
|
Overview.................................................................................................................................................. |
55 |
|
How to configure the machine settings using Web Based Management (web browser)......................... |
56 |
|
Password information .............................................................................................................................. |
57 |
|
Secure Function Lock 2.0 ........................................................................................................................ |
58 |
|
How to configure the Secure Function Lock 2.0 settings using Web Based Management |
|
|
(web browser)................................................................................................................................ |
59 |
|
Changing the Scan to FTP configuration using a web browser............................................................... |
62 |
|
Changing the Scan to Network configuration using a web browser ........................................................ |
64 |
|
Changing the LDAP configuration using a web browser ......................................................................... |
66 |
8 |
LDAP operation |
67 |
|
Overview.................................................................................................................................................. |
67 |
|
Changing the LDAP configuration using a Browser .......................................................................... |
67 |
|
LDAP operation using the control panel ............................................................................................ |
67 |
9 |
Internet fax and Scan to E-mail (E-mail server) |
68 |
|
Internet fax Overview............................................................................................................................... |
68 |
|
Getting connected ............................................................................................................................. |
68 |
|
Control panel key functions ............................................................................................................... |
69 |
|
Sending an Internet fax ..................................................................................................................... |
69 |
|
Manually entering text ....................................................................................................................... |
70 |
|
Receiving E-mail or Internet fax ........................................................................................................ |
70 |
|
Receiving an Internet fax to your computer....................................................................................... |
71 |
|
|
iv |

|
Forwarding received E-mail and fax messages................................................................................. |
71 |
|
Relay broadcasting............................................................................................................................ |
71 |
|
TX Verification Mail............................................................................................................................ |
74 |
|
Setup Mail TX .................................................................................................................................... |
74 |
|
Setup Mail RX.................................................................................................................................... |
74 |
|
Error mail ........................................................................................................................................... |
74 |
|
Important information on Internet fax................................................................................................. |
75 |
|
Scan to E-mail (E-mail server) overview.................................................................................................. |
76 |
|
How to operate Scan to E-mail (E-mail server) ................................................................................. |
76 |
|
Using One Touch or Speed Dial number........................................................................................... |
77 |
10 |
Security features |
78 |
|
Overview.................................................................................................................................................. |
78 |
|
Security terms.................................................................................................................................... |
78 |
|
Security protocols .............................................................................................................................. |
79 |
|
Security methods for E-mail notification ............................................................................................ |
79 |
|
Configuring the protocol settings ............................................................................................................. |
80 |
|
Managing your network printer securely.................................................................................................. |
81 |
|
Secure Management using Web Based Management (web browser) .............................................. |
81 |
|
Printing documents securely using IPPS................................................................................................. |
84 |
|
Specifying a different URL................................................................................................................. |
84 |
|
Using E-mail notification with user authentication ................................................................................... |
85 |
|
Creating and installing a certificate.......................................................................................................... |
87 |
|
Creating and installing a self-signed certificate ................................................................................. |
89 |
|
Creating CSR and installing a certificate ......................................................................................... |
102 |
|
Import and export the certificate and private key............................................................................. |
104 |
11 |
Troubleshooting |
105 |
|
Overview................................................................................................................................................ |
105 |
|
General problems .................................................................................................................................. |
105 |
|
Network print software installation problems ......................................................................................... |
106 |
|
Printing problems................................................................................................................................... |
108 |
|
Scanning and PC Fax problems ............................................................................................................ |
110 |
|
Protocol-specific troubleshooting........................................................................................................... |
112 |
|
Windows® 2000/XP, Windows Vista®, Windows® 7 and Windows Server® 2003/2008 IPP |
|
|
troubleshooting............................................................................................................................ |
112 |
|
Web Based Management (web browser) troubleshooting (TCP/IP)................................................ |
112 |
|
LDAP troubleshooting...................................................................................................................... |
112 |
A |
Appendix A |
113 |
|
Using services ....................................................................................................................................... |
113 |
|
Other ways to set the IP address (for advanced users and administrators) .......................................... |
113 |
|
Using DHCP to configure the IP address ........................................................................................ |
113 |
|
Using BOOTP to configure the IP address...................................................................................... |
114 |
|
Using RARP to configure the IP address ........................................................................................ |
115 |
|
Using APIPA to configure the IP address........................................................................................ |
115 |
|
Using ARP to configure the IP address ........................................................................................... |
116 |
|
Using the TELNET console to configure the IP address ................................................................. |
117 |
|
Installation when using web services (Windows Vista®/Windows® 7)................................................... |
118 |
|
Installation when using a Network Print Queue or Share (printer driver only) ....................................... |
119 |
v |

B |
Appendix B |
120 |
|
Print server specifications...................................................................................................................... |
120 |
|
Ethernet wired network.................................................................................................................... |
120 |
|
Function table and default factory settings ............................................................................................ |
121 |
|
bizhub 20 ......................................................................................................................................... |
121 |
|
Entering Text ......................................................................................................................................... |
125 |
C |
Appendix C |
127 |
|
Open Source Licensing Remarks .......................................................................................................... |
127 |
|
Part of the software embedded in this product is gSOAP software................................................. |
127 |
|
This product includes SNMP software from WestHawk Ltd. .......................................................... |
127 |
|
MIT Kerberos statements ................................................................................................................ |
128 |
|
Cyrus SASL statements .................................................................................................................. |
131 |
|
OpenSSL statements ...................................................................................................................... |
132 |
|
OpenLDAP Statements ................................................................................................................... |
134 |
D |
Index |
137 |
vi

1 Introduction
1
Overview
Your KONICA MINOLTA machine can be shared on a 10/100 MB wired Ethernet network using the internal network print server. The print server supports various functions and methods of connection depending on the operating system you are running on a network supporting TCP/IP. These functions include printing, scanning, PC Fax send, PC Fax receive, Remote Setup and Status Monitor. The following chart shows what network features and connections are supported by each operating system.
Operating Systems |
Windows® 2000/XP |
Windows Server® |
Mac OS X 10.3.9 or |
|
|
Windows® XP |
2003/2008 |
greater |
|
|
Windows Server® 2003 |
|
||
|
Professional x64 |
|
||
|
Edition |
x64 Edition |
|
|
|
Windows Vista® |
|
|
|
|
Windows® 7 |
|
|
|
10/100BASE-TX wired Ethernet |
r |
r |
r |
|
(TCP/IP) |
||||
|
|
|
||
Printing |
r |
r |
r |
|
BRAdmin Light |
r |
r |
r |
|
Web Based Management |
r |
r |
r |
|
(web browser) |
||||
|
|
|
||
Internet Printing (IPP) |
r |
r |
|
|
Scanning |
r |
|
r |
|
PC Fax Send |
r |
|
r |
|
PC Pax Receive |
r |
|
|
|
Remote Setup |
r |
|
r |
|
Status Monitor |
r |
|
r |
To use the KONICA MINOLTA machine through a network, you need to configure the print server, and set up the computers you use.
1 |

Introduction
Network features
1
Your KONICA MINOLTA machine has the following basic network features.
Network printing
The print server provides printing services for Windows® 2000/XP, Windows Vista®, Windows® 7 and
Windows Server® 2003/2008 supporting the TCP/IP protocols and Macintosh (Mac OS X 10.3.9 or greater) supporting TCP/IP.
Network scanning
You can scan documents over the network to your computer (See Network Scanning in the Software User’s Guide).
Network PC Fax
You can directly send a file from your computer as a PC Fax over your network (See PC-FAX Software for Windows® and Sending a Fax for Macintosh in the Software User’s Guide for a complete description). Windows® users can also PC Fax receive (See PC-FAX receiving in the Software User’s Guide).
Fax to Server
The Fax to Server feature allows the machine to scan documents and send them via a separate fax server. Unlike Internet fax or I-Fax, the Fax to Server feature utilizes a server to send the documents as fax data over phone or T-1 lines.
Management utilities
BRAdmin Light
BRAdmin Light is a utility for initial setup of KONICA MINOLTA network connected devices. This utility can search for KONICA MINOLTA products on your network, view the status and configure basic network
settings, such as IP address. The BRAdmin Light utility is available for Windows® 2000/XP, Windows Vista®, Windows® 7 and Windows Server® 2003/2008 and Mac OS X 10.3.9 or greater computers. For installing
BRAdmin Light on Windows®, please see the Quick Guide provided with the machine. For Macintosh users, BRAdmin Light will be installed automatically when you install the printer driver. If you have already installed the printer driver, you don’t have to install it again.
2 |

Introduction
Web Based Management (web browser)
The Web Based Management allows you to monitor KONICA MINOLTA printer’s status or change some of 1 its configuration settings using a web browser. 
 Note
Note
We recommend Microsoft® Internet Explorer® 6.0 (or greater) or Firefox 1.0 (or greater) for Windows® and Safari 1.3 (or greater) for Macintosh. Please also make sure that JavaScript and Cookies are always enabled in whichever browser you use. If a different web browser is used, make sure it is compatible with HTTP 1.0 and HTTP 1.1.
Remote Setup
The Remote Setup software allows you to configure network settings from a Windows® or Macintosh (Mac OS X 10.3.9 or greater) computer. (See Remote Setup in the Software User’s Guide.)
Internet fax/scan to E-mail server
The KONICA MINOLTA machine can be assigned an E-mail address allowing you to send, receive or forward documents over a Local Area Network or the Internet to PC’s or other Internet fax machines. Before using this function, you have to configure the necessary machine settings by using the machine’s control panel. (For details, see Internet fax and Scan to E-mail (E-mail server) on page 68.) You can also configure these settings using Web Based Management (web browser) see Web Based Management on page 55, or Remote
Setup see Using Remote Setup to change the print server settings (Not available for Windows Server® 2003/2008) on page 16.)
3 |
Introduction
Types of network connections
1
Wired network connection example
Generally there are two types of network connections: Peer-to-Peer and Network Shared environment.
Peer-to-Peer printing using TCP/IP
In a Peer-to-Peer environment, each computer directly sends and receives data to each device. There is no central server controlling file access or printer sharing.
WindowsR |
Windows R |
Windows R |
TCP/IP |
|
TCP/IP |
1Router
2Network printer (your machine)
In a smaller network of 2 or 3 computers, we recommend the Peer-to-Peer printing method as it is easier to configure than the Network Shared printing method described on the following page. See Network Shared printing on page 5.
Each computer must use the TCP/IP Protocol.
The KONICA MINOLTA machine needs to have an appropriate IP address configuration.
If you are using routers, the Gateway address must be configured on the computers and the KONICA MINOLTA machine.
The KONICA MINOLTA machine can also communicate with Macintosh (TCP/IP compatible operating systems).
4 |

Introduction
Network Shared printing
In a Network Shared environment, each computer sends data via a centrally controlled computer. This type |
1 |
|||||||||||||||||
of computer is often called a “Server” or a “Print Server”. Its job is to control the printing of all print jobs. |
|
|||||||||||||||||
|
|
|
|
|
|
|
|
|
|
|
|
|
|
|
|
|
|
|
|
|
|
|
|
|
|
|
|
|
|
|
|
|
|
|
|
|
|
|
|
|
|
|
|
|
|
|
|
|
|
|
|
|
|
|
|
|
|
|
|
|
|
|
|
|
|
|
|
|
|
|
|
|
|
|
|
|
|
|
|
|
|
|
|
|
|
|
|
|
|
|
|
|
|
|
|
|
|
|
|
|
|
|
|
|
|
|
|
|
|
|
|
|
|
|
|
|
|
|
|
|
|
|
|
|
|
|
|
|
|
|
|
|
|
|
|
|
|
|
|
|
|
|
|
|
|
|
|
|
|
|
|
|
|
|
|
|
|
|
|
|
|
|
|
|
|
|
|
|
|
|
|
|
|
|
|
|
|
|
|
|
|
|
|
|
|
|
|
|
|
|
|
|
|
|
|
|
|
|
|
|
|
|
|
|
|
|
|
|
|
|
|
|
|
|
|
|
|
|
|
|
|
|
|
|
|
|
|
1Client computer
2Also known as “Server” or “Print server”
3TCP/IP, USB or parallel (where available)
4Printer (your machine)
In a larger network, we recommend a Network Shared printing environment.
The “server” or the “print server” must use the TCP/IP print protocol.
The KONICA MINOLTA machine needs to have an appropriate IP address configuration unless the machine is connected via the USB or the parallel interface at the server.
5 |

Introduction
Protocols
1
TCP/IP protocols and functionalities
Protocols are the standardized sets of rules for transmitting data on a network. Protocols allow users to gain access to network connected resources.
The print server used on this KONICA MINOLTA product supports the TCP/IP (Transmission Control Protocol/Internet Protocol) protocol.
TCP/IP is the most popular set of protocols used for communication such as Internet and E-mail. This protocol can be used in almost all operating systems such as Windows®, Windows Server® and Macintosh.
The following TCP/IP protocols are available on this KONICA MINOLTA product.
 Note
Note
•You can configure the protocol settings by using the HTTP interface (web browser).
See How to configure the machine settings using Web Based Management (web browser) on page 56.
•For information about supported security protocols, see Security protocols on page 79.
DHCP/BOOTP/RARP
By using the DHCP/BOOTP/RARP protocols, the IP address can be automatically configured.
 Note
Note
To use the DHCP/BOOTP/RARP protocols, please contact your network administrator.
APIPA
If you do not assign an IP address manually (using the control panel of the machine or the BRAdmin software) or automatically (using a DHCP/BOOTP/RARP server), the Automatic Private IP Addressing (APIPA) protocol will automatically assign an IP address from the range 169.254.1.0 to 169.254.254.255.
ARP
Address Resolution Protocol performs mapping of an IP address to MAC address in a TCP/IP network.
DNS client
The KONICA MINOLTA print server supports the Domain Name System (DNS) client function. This function allows the print server to communicate with other devices by using its DNS name.
NetBIOS name resolution
Network Basic Input/Output System name resolution enables you to obtain the IP address of the other device using its NetBIOS name during the network connection.
6 |

Introduction
WINS
Windows Internet Name Service is an information providing service for the NetBIOS name resolution by |
1 |
consolidating an IP address and a NetBIOS name that is in the local network. |
|
LPR/LPD
Commonly used printing protocols on a TCP/IP network.
SMTP client
Simple Mail Transfer Protocol (SMTP) client is used to send E-mails via the Internet or Intranet.
Custom Raw Port (Default is Port 9100)
Another commonly used printing protocol on a TCP/IP network. It enables interactive data transmission.
IPP
The Internet Printing Protocol (IPP Version 1.0) allows you to print documents directly to any accessible printer via the internet.
 Note
Note
For the IPPS protocol, see Security protocols on page 79.
mDNS
mDNS allows the KONICA MINOLTA print server to automatically configure itself to work in a Mac OS X Simple Network Configured system. (Mac OS X 10.3.9 or greater).
TELNET
The KONICA MINOLTA print server supports TELNET server for command line configuration.
SNMP
The Simple Network Management Protocol (SNMP) is used to manage network devices including computers, routers and KONICA MINOLTA network ready machines. The KONICA MINOLTA print server supports SNMPv1, SNMPv2c and SNMPv3.
 Note
Note
For the SNMPv3 protocol, see Security protocols on page 79.
LLMNR
The Link-Local Multicast Name Resolution protocol (LLMNR) resolves the names of neighboring computers, if the network does not have a Domain Name System (DNS) server. The LLMNR Responder function works in both the IPv4 or IPv6 environment when using a computer that has the LLMNR Sender function such as
Windows Vista®.
7 |

Introduction
Web services
The Web Services protocol enables Windows Vista®/Windows® 7 users to install the KONICA MINOLTA |
1 |
printer driver by right clicking the machine icon from the Start / Network selection. |
|
See Installation when using web services (Windows Vista®/Windows® 7) on page 118.
The Web Services also lets you check the current status of the machine from your computer.
Web server (HTTP)
The KONICA MINOLTA print server is equipped with a built in web server that allows you to monitor its status or change some of its configuration settings using a web browser.
 Note
Note
•We recommend Microsoft® Internet Explorer® 6.0 (or greater) or Firefox 1.0 (or greater) for Windows® and Safari 1.3 (or greater) for Macintosh. Please also make sure that JavaScript and Cookies are always enabled in whichever browser you use. If a different web browser is used, make sure it is compatible with HTTP 1.0 and HTTP 1.1.
•For the HTTPS protocol, see Security protocols on page 79.
FTP
The File Transfer Protocol (FTP) allows the KONICA MINOLTA machine to scan black and white or color documents directly to an FTP server located locally on your network or on the internet.
SNTP
The Simple Network Time Protocol is used to synchronize computer clocks on a TCP/IP network. You can configure the SNTP settings using Web Based Management (web browser). (For the details, see Web Based Management on page 55.)
CIFS
The Common Internet File System is the standard way that computer users share files and printers in Windows®.
LDAP
The Lightweight Directory Access Protocol (LDAP) allows the KONICA MINOLTA machine to search for information such as fax numbers and E-mail addresses from an LDAP server.
IPv6
This machine is compatible with IPv6, the next generation internet protocol.
8 |

Introduction
Other protocol
1
LLTD
The Link Layer Topology Discovery protocol (LLTD) lets you locate the KONICA MINOLTA machine easily
on the Windows Vista® network map. Your KONICA MINOLTA machine will be shown with a distinctive icon and the node name. The default setting for this protocol is Off.
9 |

2 Configuring your machine for a network
Overview
2
Before using your KONICA MINOLTA machine in a network environment, you must install the KONICA MINOLTA software and also configure the appropriate TCP/IP network settings on the machine itself. In this chapter, you will learn the basic steps required to print over the network using TCP/IP protocol.
We recommend that you use the KONICA MINOLTA installer on the CD/DVD-ROM to install the KONICA MINOLTA software as this will guide you through the software and network installation. Please follow the instructions in the supplied Quick Guide.
 Note
Note
If you do not wish to, or are unable to use the KONICA MINOLTA installer or any of KONICA MINOLTA’s software tools, you can also use the machine’s control panel to change network settings.
For more information, see Control panel setup on page 17.
IP addresses, subnet masks and gateways
To use the machine in a networked TCP/IP environment, you need to configure the IP address and subnet mask. The IP address you assign to the print server must be on the same logical network as your host computers. If it is not, you must properly configure the subnet mask and the gateway address.
IP address
An IP address is a series of numbers that identifies each computer connected to a network. An IP address consists of four numbers separated by dots. Each number is between 0 and 255.
Example: In a small network, you would normally change the final number.
•192.168.1.1
•192.168.1.2
•192.168.1.3
10

Configuring your machine for a network
How the IP address is assigned to your print server:
If you have a DHCP/BOOTP/RARP server in your network the print server will automatically obtain its IP |
|
address from the DHCP server and register its name with any RFC 1001 and 1002-compliant dynamic name |
|
services. |
2 |
|
 Note
Note
On smaller networks, the DHCP server may also be the router.
For more information on DHCP, BOOTP and RARP, see:
Using DHCP to configure the IP address on page 113. Using BOOTP to configure the IP address on page 114. Using RARP to configure the IP address on page 115.
If you do not have a DHCP/BOOTP/RARP server, the Automatic Private IP Addressing (APIPA) protocol will automatically assign an IP address from the range 169.254.1.0 to 169.254.254.255. For more information on APIPA, see Using APIPA to configure the IP address on page 115.
Subnet mask
Subnet masks restrict network communication.
Example: Computer 1 can talk to Computer 2
•Computer 1
IP Address: 192.168. 1. 2 Subnet Mask: 255.255.255.000
•Computer 2
IP Address: 192.168. 1. 3 Subnet Mask: 255.255.255.000
 Note
Note
0 denotes that there is no limit to communication at this part of the address.
In the above example, we can communicate with anything that has an IP address that begins with 192.168.1.x. (where x.x. are numbers between 0 and 255.)
Gateway (and router)
A gateway is a network point that acts as an entrance to another network and sends data transmitted via the network to an exact destination. The router knows where to direct data that arrives at the gateway. If a destination is located on an external network, the router transmits data to the external network. If your network communicates with other networks, you may need to configure the Gateway IP address. If you do not know the Gateway IP address then contact your Network Administrator.
11

|
|
|
|
|
|
Configuring your machine for a network |
|
Step by step chart |
|
|
|
a Configure the TCP/IP settings. |
|
|
|
Configure the IP address |
i |
See page 12 |
2 |
|
|||
Configure the subnet mask |
i |
See page 12 |
|
Configure the gateway |
i |
See page 12 |
|
b Change the print server settings. |
|
|
|
Using the BRAdmin Light utility |
i |
See page 15 |
|
Using the control panel |
i |
See page 15 |
|
Using the Web Based Management (web browser) |
i |
See page 16 |
|
Using the Remote Setup |
i |
See page 16 |
|
Using other methods |
i |
See page 16 |
|
Setting the IP address and subnet mask
Using the BRAdmin Light utility to configure your machine as a network printer
BRAdmin Light
The BRAdmin Light utility is designed for initial setup of the KONICA MINOLTA network connected devices. It also can search for KONICA MINOLTA products in a TCP/IP environment, view the status and configure
basic network settings, such as IP address. The BRAdmin Light utility is available for Windows® 2000/XP, Windows Vista®, Windows® 7, Windows Server® 2003/2008 and Mac OS X 10.3.9 or greater.
How to configure your machine using the BRAdmin Light utility
 Note
Note
•Please use the BRAdmin Light utility that was supplied on the CD/DVD-ROM of your KONICA MINOLTA product.
•If you require more advanced printer management, use the PageScope Net Care Device Manager utility that is available as a download from http://pagescope.com/. This utility is only available for Windows® users.
•If you are using a firewall function of anti-spyware or antivirus applications, temporarily disable them. Once you are sure that you can print, configure the software settings following the instructions.
•Node name: Node name appears in the current BRAdmin Light window. The default node name of the print server in the machine is “KMNxxxxxxxxxxxx”. (“xxxxxxxxxxxx” is your machine’s MAC Address / Ethernet Address.)
•The default password for KONICA MINOLTA print servers is “access”.
12
Configuring your machine for a network
a Start the BRAdmin Light utility.
For Windows® 2000/XP, Windows Vista®, Windows® 7 and Windows Server® 2003/2008 users
Click Start / All Programs 1 / KONICA MINOLTA / BRAdmin Light / BRAdmin Light. |
2 |
1 Programs for Windows® 2000 users |
For Mac OS X 10.3.9 or greater users
Double-click Mac OS X or Macintosh HD (Startup Disk) / Library / Printers / KONICA MINOLTA / Utilities / BRAdmin Light.jar file.
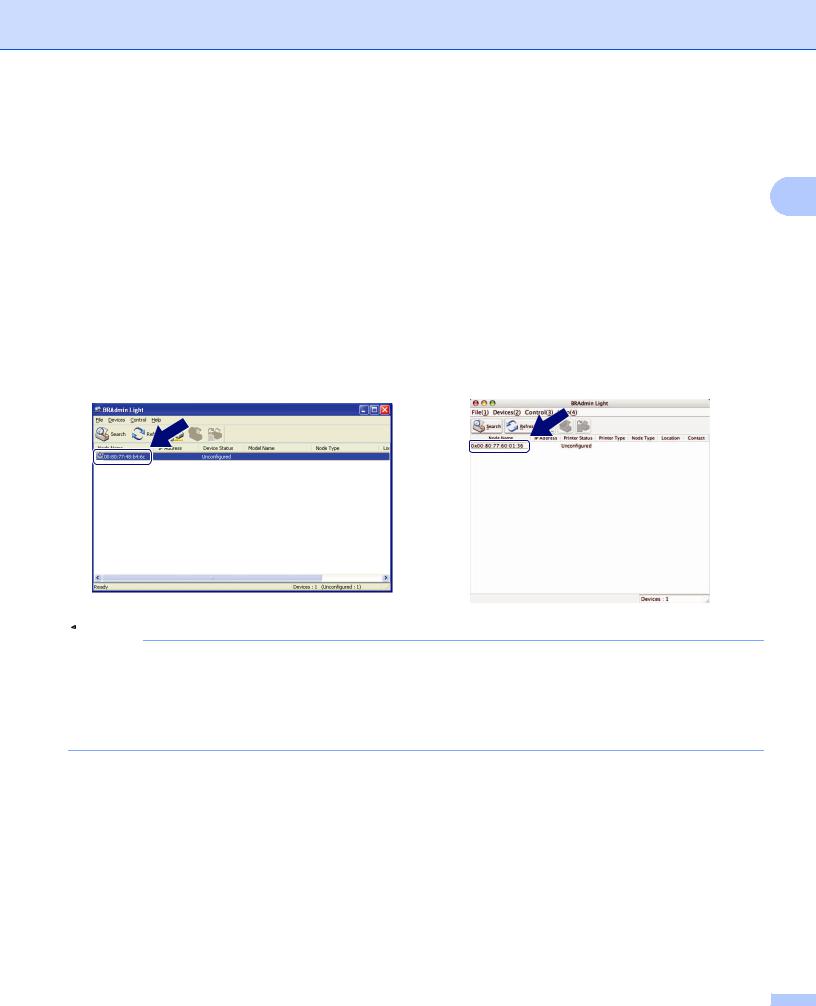
b BRAdmin Light will search for new devices automatically.
c Double-click the unconfigured device.
Windows® |
Macintosh |
 Note
Note
•If the print server is set to its factory default settings (if you do not use a DHCP/BOOTP/RARP server), the device will appear as Unconfigured in the BRAdmin Light utility screen.
•You can find the node name and MAC Address (Ethernet Address) by printing the Network Configuration List.
See Printing the Network Configuration List on page 42.
13
Configuring your machine for a network
d Choose STATIC from Boot Method (BOOT Method). Enter the IP Address, Subnet Mask and
Gateway (if needed) of your print server.
Windows® |
Macintosh |
2 |
|
|
e Click OK.
f With the correctly programmed IP address, you will see the KONICA MINOLTA print server in the device list.
Using the control panel to configure your machine for a network
You can configure your machine for a network using the control panel Network menu.
See Control panel setup on page 17.
Using other methods to configure your machine for a network
You can configure your machine for a network using other methods.
See Other ways to set the IP address (for advanced users and administrators) on page 113.
14

Configuring your machine for a network
Changing the print server settings
Using the BRAdmin Light utility to change the print server settings
2
a Start the BRAdmin Light utility.
For Windows® 2000/XP, Windows Vista®, Windows® 7 and Windows Server® 2003/2008 users Click Start / All Programs 1/ KONICA MINOLTA / BRAdmin Light / BRAdmin Light.
1 Programs for Windows® 2000 users
For Mac OS X 10.3.9 or greater users
Double-click Mac OS X or Macintosh HD (Startup Disk) / Library / Printers / KONICA MINOLTA / Utilities / BRAdmin Light.jar file.
b Choose the print server which you want to change the settings. c Choose Network Configuration from the Control menu.
d Enter a password. The default password is “access”. e You can now change the print server settings.
 Note
Note
If you want to change more advanced settings, use the PageScope Net Care Device Manager utility that is available as a download from http://pagescope.com/. (Windows® only)
Using the control panel to change the print server settings
You can configure and change the print server settings using the control panel Network menu. See Control panel setup on page 17.
15

Configuring your machine for a network
Using Web Based Management (web browser) to change the print/scan server settings
A standard web browser can be used to change your print server settings using the HTTP (Hyper Text  Transfer Protocol). (See How to configure the machine settings using Web Based Management (web 2 browser) on page 56.)
Using Remote Setup to change the print server settings (Not available for Windows Server® 2003/2008)
Remote Setup for Windows®
The Remote Setup application allows you to configure network settings from a Windows® application. When you access this application, the settings on your machine will be downloaded automatically to your PC and displayed on your PC screen. If you change the settings, you can upload them directly to the machine.
a Click the Start button, All Programs 1, KONICA MINOLTA, bizhub 20 LAN, then Remote Setup.
1 Programs for Windows® 2000 users
b c d
Enter a password. The default password is “access”.
Click TCP/IP.
You can now change the print server settings.
Remote Setup for Macintosh
The Remote Setup application allows you to configure bizhub 20 settings from a Macintosh application. When you access this application, the settings on your machine will be downloaded automatically to your Macintosh and displayed on your Macintosh screen. If you change the settings, you can upload them directly to the machine.
a Double click the Mac OS X or Macintosh HD (Startup Disk) icon on your desktop, Library, Printers,
KONICA MINOLTA, then Utilities.
b Double click the Remote Setup icon.
c Enter a password. The default password is “access”. d Click TCP/IP.
e You can now change the print server settings.
Using other methods to change print server settings
You can configure your network printer using other methods.
See Other ways to set the IP address (for advanced users and administrators) on page 113.
16

3 Control panel setup
Network menu
Before using your KONICA MINOLTA product in a network environment, you need to configure the correct |
3 |
TCP/IP settings. |
In this chapter, you will learn how to configure the network settings using the control panel, located on the front of the machine.
The Network menu selections of the control panel allow you to set up the KONICA MINOLTA machine for your network configuration. Press Menu, then press a or b to choose Network. Proceed to the menu selection you wish to configure. For additional information on the menu, see Function table and default factory settings on page 121.
Please note that the machine is supplied with the BRAdmin Light utility and Remote Setup applications, which also can be used to configure many aspects of the network. (See Changing the print server settings
on page 15.)
TCP/IP
If you connect the machine with an Ethernet cable to your network, use the Wired LAN menu selections. If you connect the machine to a wireless Ethernet network, use the WLAN menu selections.
This menu has ten sections: Boot Method, IP Address, Subnet Mask, Gateway, Node Name, WINS Config, WINS Server, DNS Server, APIPA and IPv6.
Boot Method
This selection controls how the machine obtains an IP address. The default setting is Auto.
 Note
Note
If you do not want your print server configured via DHCP, BOOTP or RARP, you must set the
Boot Method to Static so that the print server has a static IP address. This will prevent the print server from trying to obtain an IP address from any of these systems. To change the Boot Method, use the machine’s control panel, BRAdmin Light utility, Remote Setup or Web Based Management (web browser).
a b
Press Menu.
Press a or b to choose Network. Press OK.
c Press a or b to choose TCP/IP. Press OK.
d Press a or b to choose Boot Method. Press OK.
17

Control panel setup
e Press a or b to choose Auto 1, Static 2, RARP 3, BOOTP 4 or DHCP 5. Press OK.
If you chose Auto, RARP, BOOTP or DHCP, go to step f.
If you chose Static, go to step g.
f Enter how many times the machine tries to obtain the IP address. We recommend you to enter 3 or more. |
3 |
Press OK. |
g Press Stop/Exit.
1Auto mode
In this mode, the machine will scan the network for a DHCP server, if it can find one, and if the DHCP server is configured to allocate an IP address to the machine, then the IP address supplied by the DHCP server will be used. If no DHCP server is available, then the machine will scan for a BOOTP server. If a BOOTP server is available, and it is configured correctly, the machine will take its IP address from the BOOTP server. If a BOOTP server is not available, the machine will scan for a RARP server. If a RARP server also does not answer, the IP Address is set using the APIPA protocol. After the machine is initially powered ON, it may take a few minutes for the machine to scan the network for a server.
2Static mode
In this mode the machine’s IP address must be manually assigned. Once entered the IP address is locked to the assigned address.
3RARP mode
The KONICA MINOLTA print server’s IP address can be configured using the Reverse ARP (RARP) facility on your host computer. (For more information on RARP, see Using RARP to configure the IP address on page 115.)
4BOOTP mode
BOOTP is an alternative to RARP that has the advantage of allowing configuration of the subnet mask and gateway. (For more information on BOOTP, see Using BOOTP to configure the IP address on page 114.)
5DHCP mode
Dynamic Host Configuration Protocol (DHCP) is one of several automated mechanisms for IP address allocation. If you have a DHCP server in your network (typically a UNIX, Windows® 2000/XP, Windows Vista® network) the print server will automatically obtain its IP address from a DHCP server and register its name with any RFC 1001 and 1002 compliant dynamic name services.
 Note
Note
•If you do not want your print server configured via DHCP, BOOTP or RARP, you must set the BOOT Method to static so that the print server has a static IP address. This will prevent the print server from trying to obtain an IP address from any of these systems. To change the BOOT Method, use the machine’s control panel Network menu, BRAdmin Light, Remote Setup or Web Based Management (web browser).
•On smaller networks, the DHCP server may be the router.
18

Control panel setup
IP Address
This field displays the current IP address of the machine. If you have chosen a Boot Method of Static, enter |
|
the IP address that you wish to assign to the machine (check with your network administrator for the IP |
|
address to use). If you have chosen a method other than Static, the machine will attempt to determine its IP |
|
address using the DHCP or BOOTP protocols. The default IP address of your machine will probably be |
|
incompatible with the IP address numbering scheme of your network. We recommend that you contact your |
|
network administrator for an IP address for the network the unit will be connected on. |
3 |
a Press Menu.
b Press a or b to choose Network. Press OK.
c Press a or b to choose TCP/IP. Press OK.
d Press a or b to choose IP Address. Press OK.
e Enter the IP address using the dial pad. (To enter numbers and text, see Entering Text on page 125.) Press OK.
f Press Stop/Exit.
Subnet Mask
This field displays the current subnet mask used by the machine. If you are not using DHCP or BOOTP to obtain the subnet mask, enter the desired subnet mask. Check with your network administrator for the subnet mask to use.
a b
Press Menu.
Press a or b to choose Network. Press OK.
c Press a or b to choose TCP/IP. Press OK.
d Press a or b to choose Subnet Mask. Press OK.
e Enter the Subnet Mask address using the dial pad. (To enter numbers and text, see Entering Text on page 125.)
Press OK.
f Press Stop/Exit.
19

Control panel setup
Gateway
This field displays the current gateway or router address used by the machine. If you are not using DHCP or BOOTP to obtain the gateway or router address, enter the address you wish to assign. If you do not have a gateway or router, leave this field blank. Check with your network administrator if you are unsure.
a Press Menu. |
|
b Press a or b to choose Network. |
3 |
Press OK. |
|
c Press a or b to choose TCP/IP. Press OK.
d Press a or b to choose Gateway. Press OK.
e Enter the Gateway address using the dial pad. (To enter numbers and text, see Entering Text on page 125.)
Press OK.
f Press Stop/Exit.
Node Name
You can register the machine name on the Network. This name is often referred to as a NetBIOS name; it will be the name that is registered by the WINS server on your network. KONICA MINOLTA recommends the name “KMNxxxxxxxxxxxx”. (“xxxxxxxxxxxx” is your machine’s MAC Address / Ethernet Address.)
a Press Menu.
b Press a or b to choose Network. Press OK.
c Press a or b to choose TCP/IP. Press OK.
d Press a or b to choose Node Name. Press OK.
e f
g
Press 1 to choose Change.
Enter the Node Name using the dial pad. (To enter numbers and text, see Entering Text on page 125.) Press OK.
Press Stop/Exit.
20

WINS Config
This selection controls how the machine obtains the IP address of the WINS server.
a Press Menu.
b Press a or b to choose Network. Press OK.
c Press a or b to choose TCP/IP. Press OK.
d Press a or b to choose WINS Config. Press OK.
e Press a or b to choose Auto or Static. Press OK.
Control panel setup
3
f Press Stop/Exit.
Auto
Automatically uses a DHCP request to determine the IP addresses for the primary and secondary WINS servers. You must set the BOOT Method to Auto for this feature to work.
Static
Uses a specified IP address for the primary and secondary WINS servers.
WINS Server
Primary WINS Server IP Address
This field specifies the IP address of the primary WINS (Windows® Internet Name Service) server. If set to a
non-zero value, the machine will contact this server to register its name with the Windows® Internet Name Service.
Secondary WINS Server IP Address
This field specifies the IP address of the secondary WINS server. It is used as a backup to the Primary WINS server address. If the Primary server is unavailable, the machine still can register itself with a secondary
server. If set to a non-zero value, the machine will contact this server to register its name with the Windows® Internet Name Service. If you have a primary WINS server, but no secondary WINS server, simply leave this field blank.
a Press Menu.
b Press a or b to choose Network. Press OK.
c Press a or b to choose TCP/IP. Press OK.
21

|
|
Control panel setup |
|
d Press a or b to choose WINS Server. |
|
Press OK. |
|
e Press a or b to choose Primary or Secondary. |
|
Press OK. |
|
f Enter the WINS Server address using the dial pad. (To enter numbers and text, see Entering Text |
3 |
on page 125.) |
|
Press OK. |
|
g Press Stop/Exit.
DNS Server
Primary DNS Server IP Address
This field specifies the IP address of the primary DNS (Domain Name System) server.
Secondary DNS Server IP Address
This field specifies the IP address of the secondary DNS server. It is used as a backup to the Primary DNS server address. If the Primary server is unavailable, the machine will contact the Secondary DNS server. If you have a primary DNS server, but no secondary DNS server, simply leave this field blank.
a b
Press Menu.
Press a or b to choose Network. Press OK.
c Press a or b to choose TCP/IP. Press OK.
d Press a or b to choose DNS Server. Press OK.
e Press a or b to choose Primary or Secondary. Press OK.
f Enter the DNS Server address using the dial pad. (To enter numbers and text, see Entering Text on page 125.)
Press OK.
g Press Stop/Exit.
22

Control panel setup
APIPA
The setting of On will cause the print server to automatically allocate a Link-Local IP address in the range (169.254.1.0 - 169.254.254.255) when the print server cannot obtain an IP address through the Boot Method you have set. (See Boot Method on page 17.) Choosing Off means the IP address does not change, when the print server cannot obtain an IP address through the Boot Method you have set.
a Press Menu. |
3 |
b Press a or b to choose Network. Press OK.
c Press a or b to choose TCP/IP. Press OK.
d Press a or b to choose APIPA. Press OK.
e Press a or b to choose On or Off. Press OK.
f Press Stop/Exit.
IPv6
This machine is compatible with IPv6, the next generation internet protocol. If you want to use the IPv6 protocol, choose On. The default setting for IPv6 is Off.
a b
Press Menu.
Press a or b to choose Network. Press OK.
c Press a or b to choose TCP/IP. Press OK.
d Press a or b to choose IPv6. Press OK.
e Press a or b to choose On or Off. Press OK.
f Press Stop/Exit.
 Note
Note
If you set IPv6 to On, turn off the power switch and then turn it back on to enable this protocol.
23
Loading...