

Page 1
User’s Guide [Fax Driver Operations]
Page 2

Introduction
Introduction
Thank you for purchasing this machine.
If the optional fax kit is installed on this machine, faxes can be sent directly from Windows-compatible
computers.
This User’s Guide contains details of the fax driver functions that can be used to send faxes and descriptions
of their operations and precautions. In order to ensure that this machine is used efficiently, carefully read this
manual as needed.
In order to ensure that this machine is used safely, carefully read the Quick Guide [Copy/Print/Fax/Scan/Box
Operations] before using the machine.
For descriptions on trademarks and copyrights, refer to [Trademarks/Copyrights].
The illustrations used in this User’s Guide may differ from the actual model.
Fax Driver x-1
Page 3

Introduction
Contents
Introduction
Contents ..................................................................................................................................................................x-2
About this manual...................................................................................................................................................x-4
Contents ..................................................................................................................................................x-4
Product notation ......................................................................................................................................x-4
Screen images in this user’s guide ..........................................................................................................x-4
Explanation of manual conventions .........................................................................................................x-5
1 Overview
1.1 Image controller.................................................................................................................................... 1-2
1.1.1 Role of the image controller .....................................................................................................................1-2
1.1.2 Flow of the PC-FAX operation..................................................................................................................1-3
1.2 Operating environment ........................................................................................................................ 1-4
1.2.1 Compatible computers and operating systems .......................................................................................1-4
Windows ...................................................................................................................................................1-4
1.3 Setting up the system........................................................................................................................... 1-5
1.3.1 Network connection .................................................................................................................................1-5
1.3.2 Local connection ......................................................................................................................................1-5
2 Installing the fax driver
2.1 Connection and installation procedures ............................................................................................ 2-2
2.1.1 Windows 2000/XP/Server2003.................................................................................................................2-2
2.1.2 Windows Vista/7/Server 2008 ..................................................................................................................2-3
2.1.3 Windows NT4.0 ........................................................................................................................................2-3
2.2 Automatic installation using the installer........................................................................................... 2-4
2.2.1 Installer operating environment ................................................................................................................2-4
2.2.2 Settings of this machine ...........................................................................................................................2-4
2.2.3 To install the fax driver .............................................................................................................................2-4
2.3 Installing the fax driver using the Add Printer Wizard....................................................................... 2-7
2.3.1 Settings of this machine ...........................................................................................................................2-7
TCP/IP setting for this machine................................................................................................................2-7
Specifying the RAW port number for this machine ..................................................................................2-7
LPD setting for this machine ....................................................................................................................2-7
2.3.2 For Windows XP/Server 2003...................................................................................................................2-7
2.3.3 For Windows Vista/7/Server 2008..........................................................................................................2-10
2.3.4 For Windows 2000/NT 4.0......................................................................................................................2-12
2.4 Installing the fax driver using Plug and Play .................................................................................... 2-15
2.4.1 For Windows XP/Server 2003.................................................................................................................2-15
2.4.2 For Windows Vista/7/Server 2008..........................................................................................................2-16
Making the installed fax driver known to the computer .........................................................................2-16
Installing the fax driver when connecting the machine ..........................................................................2-16
Updating the driver after connecting this machine ................................................................................2-17
2.4.3 For Windows 2000..................................................................................................................................2-18
2.5 Uninstalling the fax driver .................................................................................................................. 2-19
2.5.1 Uninstallation by an uninstallation program ...........................................................................................2-19
2.5.2 Uninstallation by an installer...................................................................................................................2-19
2.5.3 Manual uninstallation..............................................................................................................................2-19
3 Setting up the fax driver (Windows)
3.1 Sending a fax......................................................................................................................................... 3-2
3.1.1 Fax operations..........................................................................................................................................3-2
Fax Driver x-2
Page 4

Introduction
3.1.2 Selecting a recipient from the phone book ..............................................................................................3-3
3.1.3 Specifying the transmission settings........................................................................................................3-5
3.1.4 Creating a fax cover sheet........................................................................................................................3-5
3.2 Settings.................................................................................................................................................. 3-8
3.2.1 Common settings .....................................................................................................................................3-8
3.2.2 FAX tab .....................................................................................................................................................3-9
3.2.3 Basic tab...................................................................................................................................................3-9
3.2.4 Layout tab.................................................................................................................................................3-9
3.2.5 Stamp/Composition tab ...........................................................................................................................3-9
3.2.6 Configure tab............................................................................................................................................3-9
3.2.7 Settings tab ............................................................................................................................................3-10
3.3 Specifying the FAX tab settings ........................................................................................................ 3-11
3.4 Specifying the Basic tab settings...................................................................................................... 3-12
3.4.1 Specifying a custom size........................................................................................................................3-12
3.4.2 Specifying the user authentication settings............................................................................................3-13
3.4.3 Specifying the account track settings ....................................................................................................3-14
3.5 Specifying the Layout tab settings.................................................................................................... 3-15
3.5.1 Printing multiple pages on one page (N in 1, Poster Mode)...................................................................3-15
3.6 Specifying the Stamp/Composition tab settings............................................................................. 3-16
3.6.1 Sending with an watermark ....................................................................................................................3-16
3.6.2 Editing a watermark................................................................................................................................3-16
3.7 Specifying the Configure tab settings .............................................................................................. 3-18
3.7.1 Selecting an option.................................................................................................................................3-18
3.7.2 Change Encrypt. Passphrase.................................................................................................................3-19
3.8 Using a phone book............................................................................................................................ 3-20
3.8.1 Adding a recipient to the phone book....................................................................................................3-20
3.8.2 Editing a phone book..............................................................................................................................3-22
3.9 Saving the driver settings .................................................................................................................. 3-24
3.9.1 Saving the driver settings .......................................................................................................................3-24
3.9.2 Recalling the settings .............................................................................................................................3-25
3.9.3 Editing the settings .................................................................................................................................3-25
3.9.4 Importing and exporting the driver settings ...........................................................................................3-26
4 Troubleshooting
4.1 Unable to Fax ........................................................................................................................................ 4-2
4.2 Unable to specify desired settings or unable to send as specified ................................................. 4-3
4.2.1 Error message ..........................................................................................................................................4-3
5 Appendix
5.1 Glossary................................................................................................................................................. 5-2
6Index
6.1 Index ...................................................................................................................................................... 6-2
Fax Driver x-3
Page 5
Introduction
About this manual
Contents
This manual consists of the following chapters.
Chapter 1 Overview
Chapter 2 Installing the fax driver
Chapter 3 Setting up the fax driver (Windows)
Chapter 4 Troubleshooting
Chapter 5 Appendix
Chapter 6 Index
Product notation
The Name and Product name Notation
bizhub 501/421/361, printer main body,
and this machine
Built-in network controller Network controller
Image controller, including this machine,
and printing system
Microsoft Windows Windows
Machine or printer
Printing system
Screen images in this user’s guide
Unless stated otherwise, the fax driver functions are described using the fax driver for Windows XP.
Fax Driver x-4
Page 6
Introduction
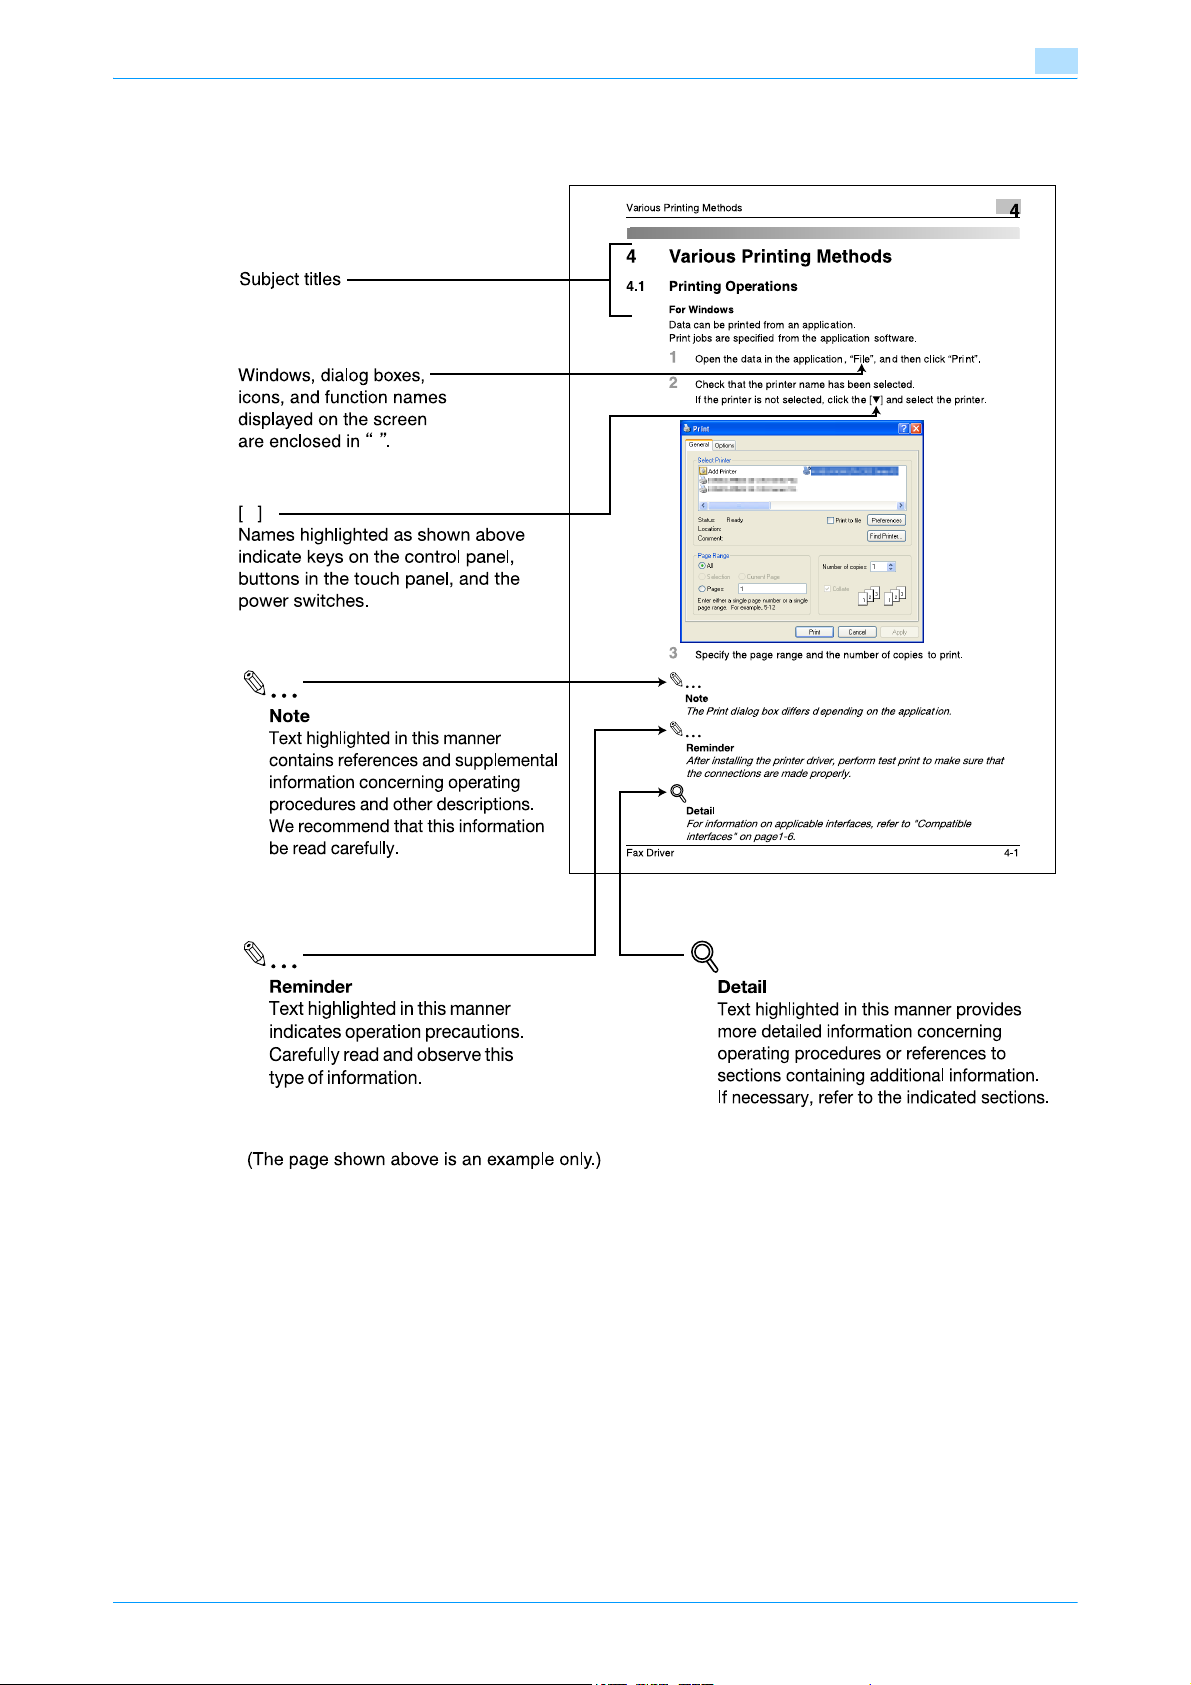
Explanation of manual conventions
Fax Driver x-5
Page 7

1
Overview
Page 8
Overview
1Overview
1.1 Image controller
The image controller is a device that allows this machine to be used as a printer. The printing functions
provided by the image controller can also be used to perform PC-FAX operations, which allow a fax to be
sent from a computer.
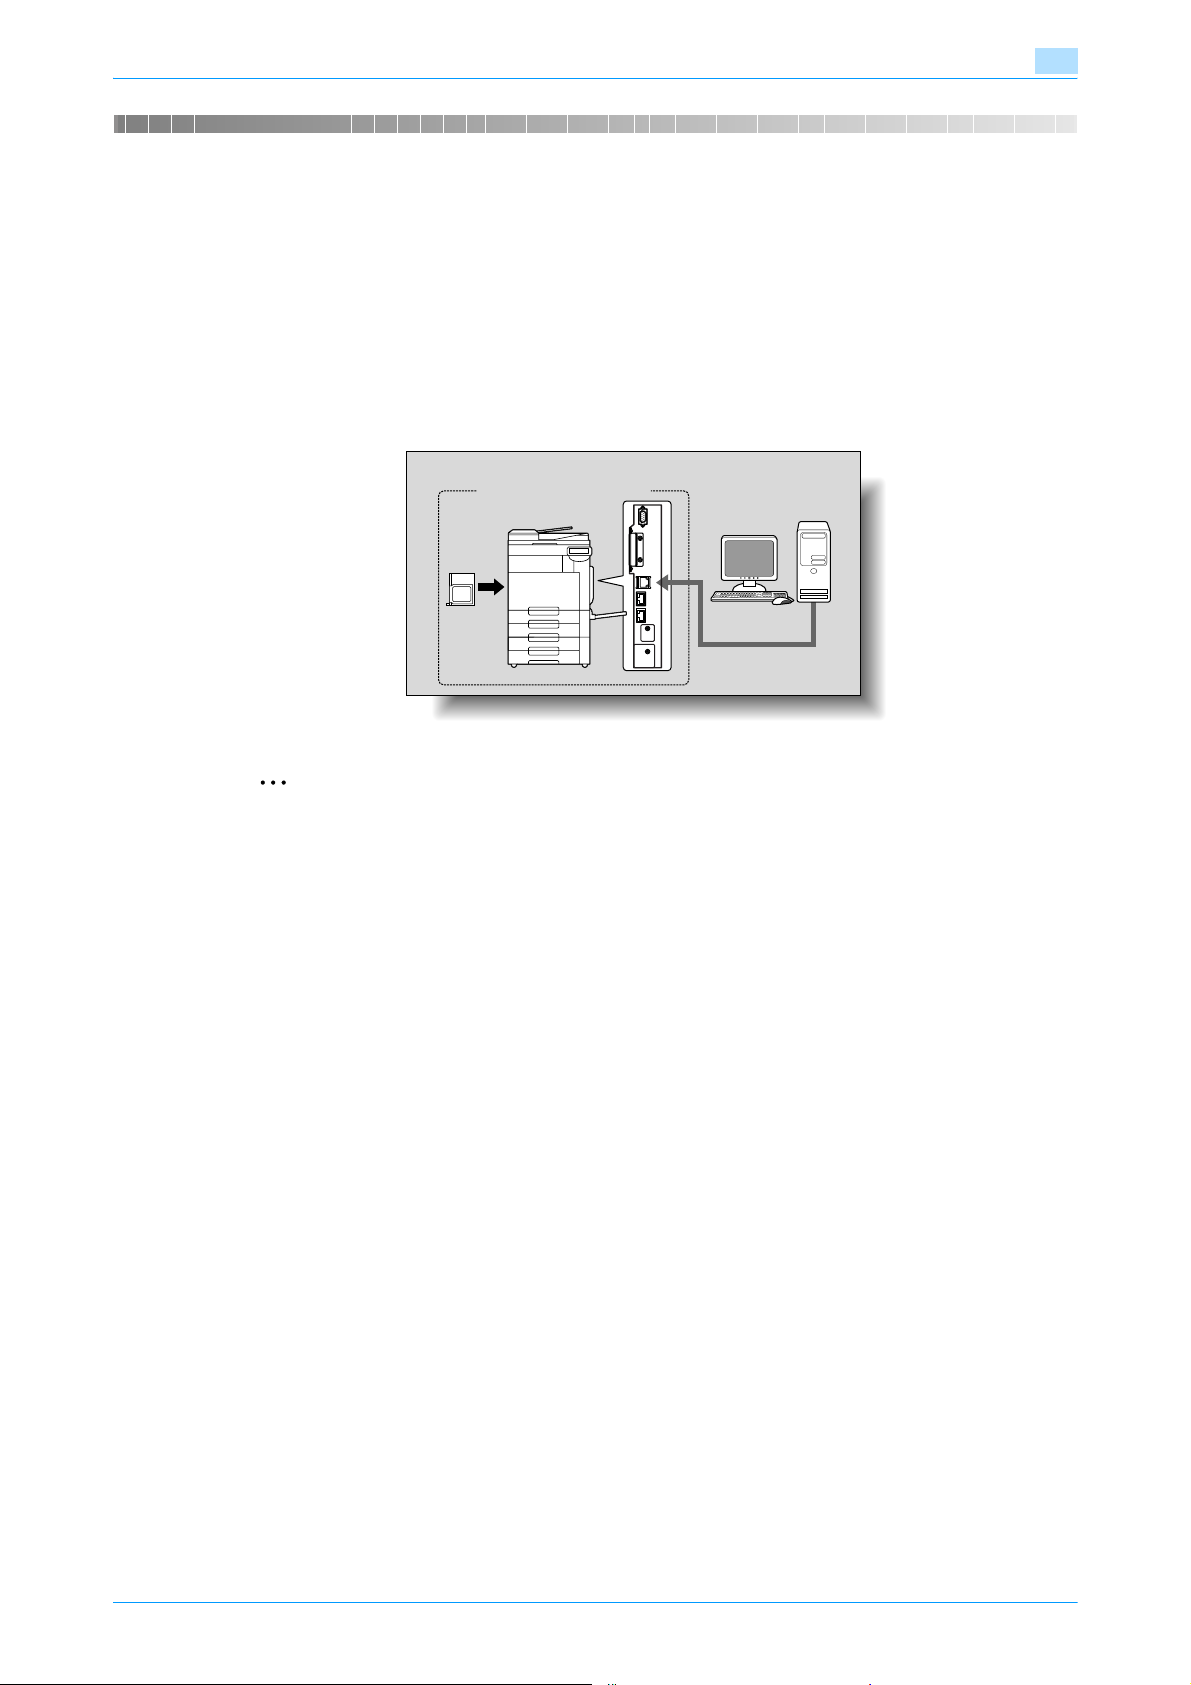
1.1.1 Role of the image controller
With the image controller installed optionally, you can print or fax from applications on the computer
connected to the printing system. Even when this machine is used as a network printer, you can print or send
faxes from applications on the computer.
1
Machine
Image
controller
Printing system
2
Note
To perform fax operations, optional fax kit is required.
Computer
Fax Driver 1-2
Page 9
Overview
1.1.2 Flow of the PC-FAX operation
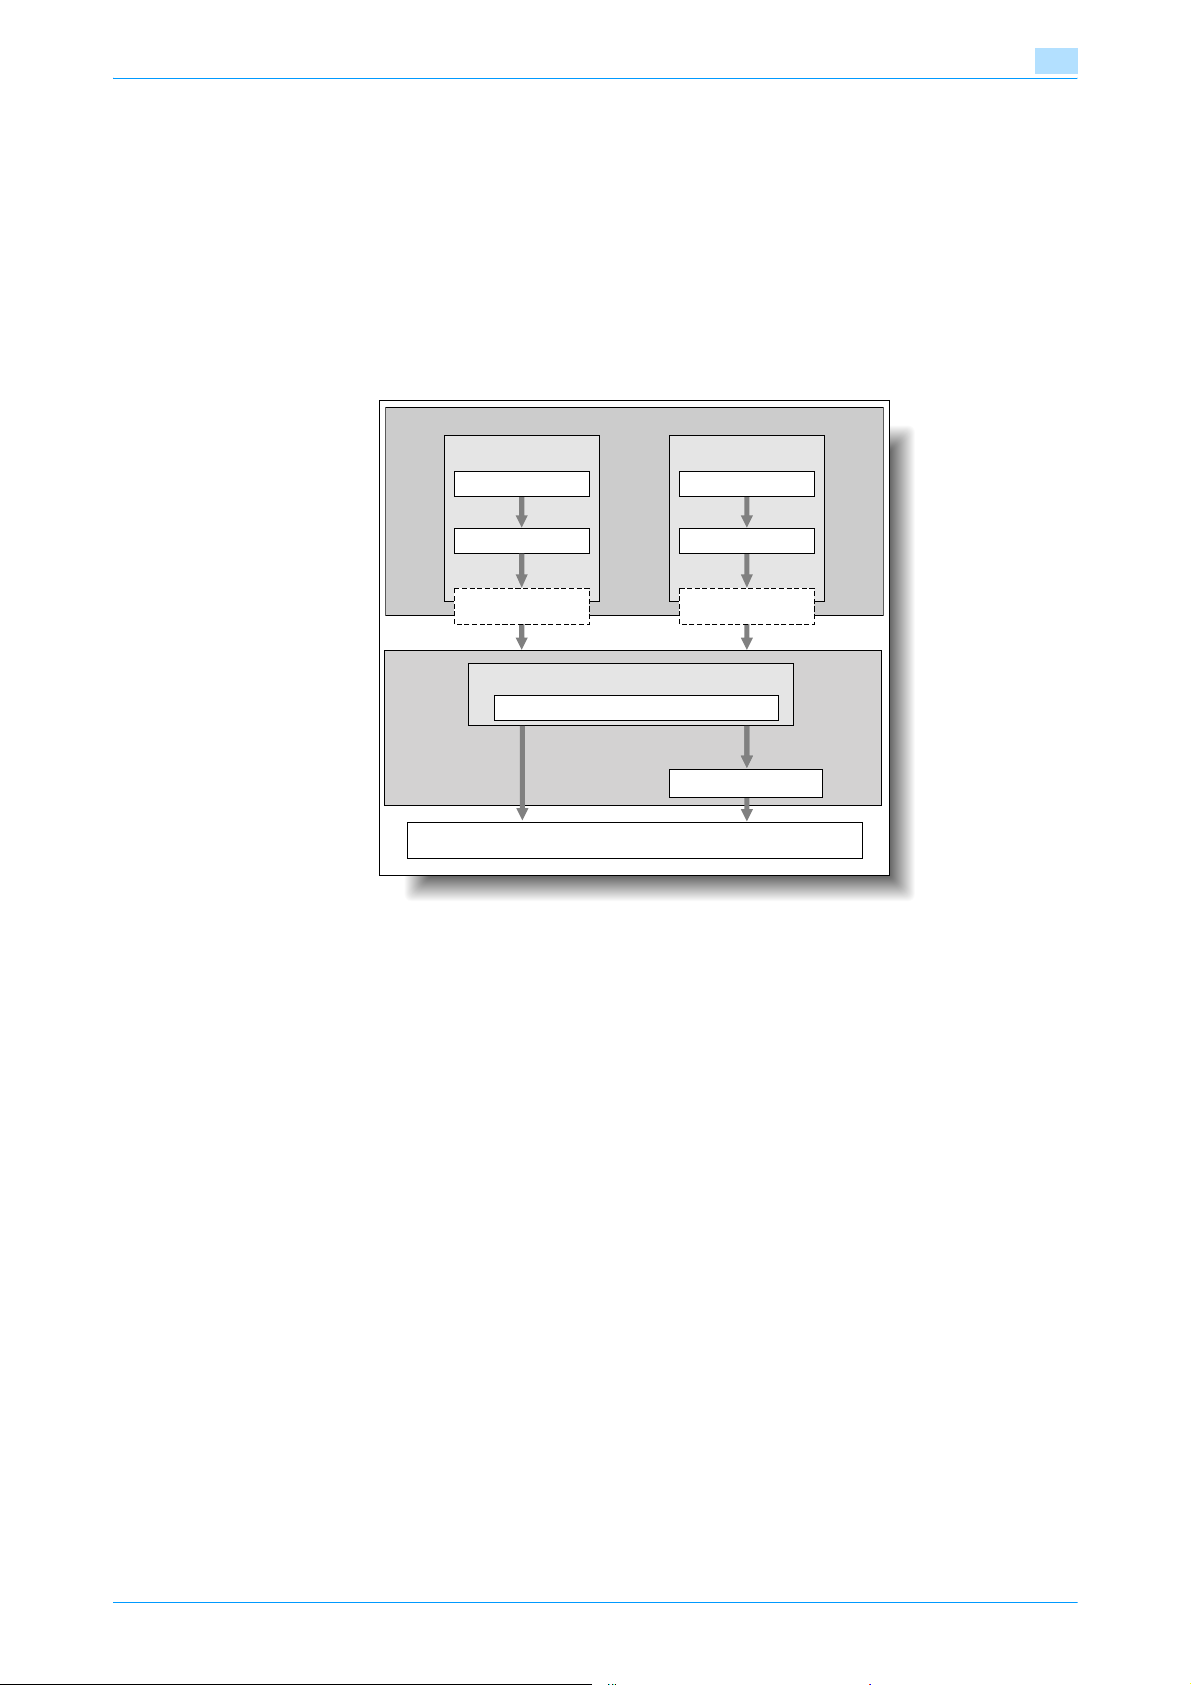
Conventionally, faxes are sent by loading an original into a fax machine and sending it.
With the fax driver, you can send a fax directly from your computer without using any paper (PC-FAX
transmission).
Transmission commands sent from the application are received by the fax driver.
Data is transferred to this machine through the USB interface (when using a USB connection) or through the
Ethernet (TCP/IP or IPX/SPX) (when using a network connection), and then the data is transferred from this
machine to the image controller. Image rasterization (bitmap data created from output text and images) is
performed by the image controller. This data is stored in the memory of this machine and transmitted like a
conventional fax job.
Used with a USB
connection
Application
1
Computer
Used with a network
connection
Application
Fax driver
USB
Image processing
PS/PCL processing (rasterizing)
Machine
Fax
Fax driver
Ethernet (TCP/IP,
IPX/SPX)
Hard Disk
Fax Driver 1-3
Page 10

Overview
1.2 Operating environment
The system requirements for using this printing system and the interfaces used for connection are explained
below.
1.2.1 Compatible computers and operating systems
Check that the computer being connected meets the following conditions.
Windows
Item Operating environment
Operating System 32bit editions
Windows NT4.0 (Service Pack 6a or later)
Windows 2000 Professional/Server (Service Pack 3 or later)
Windows XP Home/Professional (Service Pack 2 or later)
Windows Server 2003 Standard
Windows Vista <All versions>
Windows Server 2008 <All versions>
Windows 7 <All versions>
64bit editions
Windows XP Professional (Service Pack 2 or later)
Windows Server 2003
Windows Vista <All versions>
Windows Server 2008 <All versions>
Windows Server 2008 R2 <All versions>
Windows 7 <All versions>
Drive CD-ROM
1
2
Note
The use is unavailable with an OS (Mac OS and others) other than Windows.
Fax Driver 1-4
Page 11

Overview
1.3 Setting up the system
In order to use this printing system, it must first be set up.
Setup consists of connecting this machine to a computer and installing the fax driver onto the computer
being used.
!
Detail
This manual describes the setup method of network connection only for Port9100/IPP/IPPS that will be
installed by the installer, and LPR/Port9100 that will be installed by Add Printer Wizard printing.
For installation procedures via other network connections, refer to the User’s Guide [Print Operations
(IC-207)].
It is possible to use the point and print install. However, please note that the server does not support
any OS other than the Windows NT when the client employs the Windows NT.
1.3.1 Network connection
1 Connect this machine to a computer.
2 Make sure the computer is connected to the network.
3 Specify the IP address of the machine to connect it to the network.
1
4 Depending on the connection method and protocol, change the network settings of this machine.
– LPR: Enable LPD print on the LPD Setting screen.
– Port9100: Enable the RAW port number (9100 at default), on the TCP/IP setting screen.
– SMB: Specify "Print Setting" on the SMB Setting screen.
– IPP/IPPS: Enable IPP print on the IPP Setting screen.
5 Install the fax driver.
– Specify the network port of the fax driver according to the connection method and protocol.
1.3.2 Local connection
2
Note
When a connection is made with the USB port, the local interface kit is required.
1 Connect this machine to a computer
2 Install the fax driver.
!
Detail
For details on connecting this machine to a computer, refer to the"User’s Guide [Print Operations (IC-
207)]".
To update an existing fax driver, delete the existing fax driver first. For details, refer to "Uninstalling the
fax driver" on page 2-19.
Fax Driver 1-5
Page 12

2
Installing the fax driver
Page 13
Installing the fax driver
2 Installing the fax driver
2.1 Connection and installation procedures
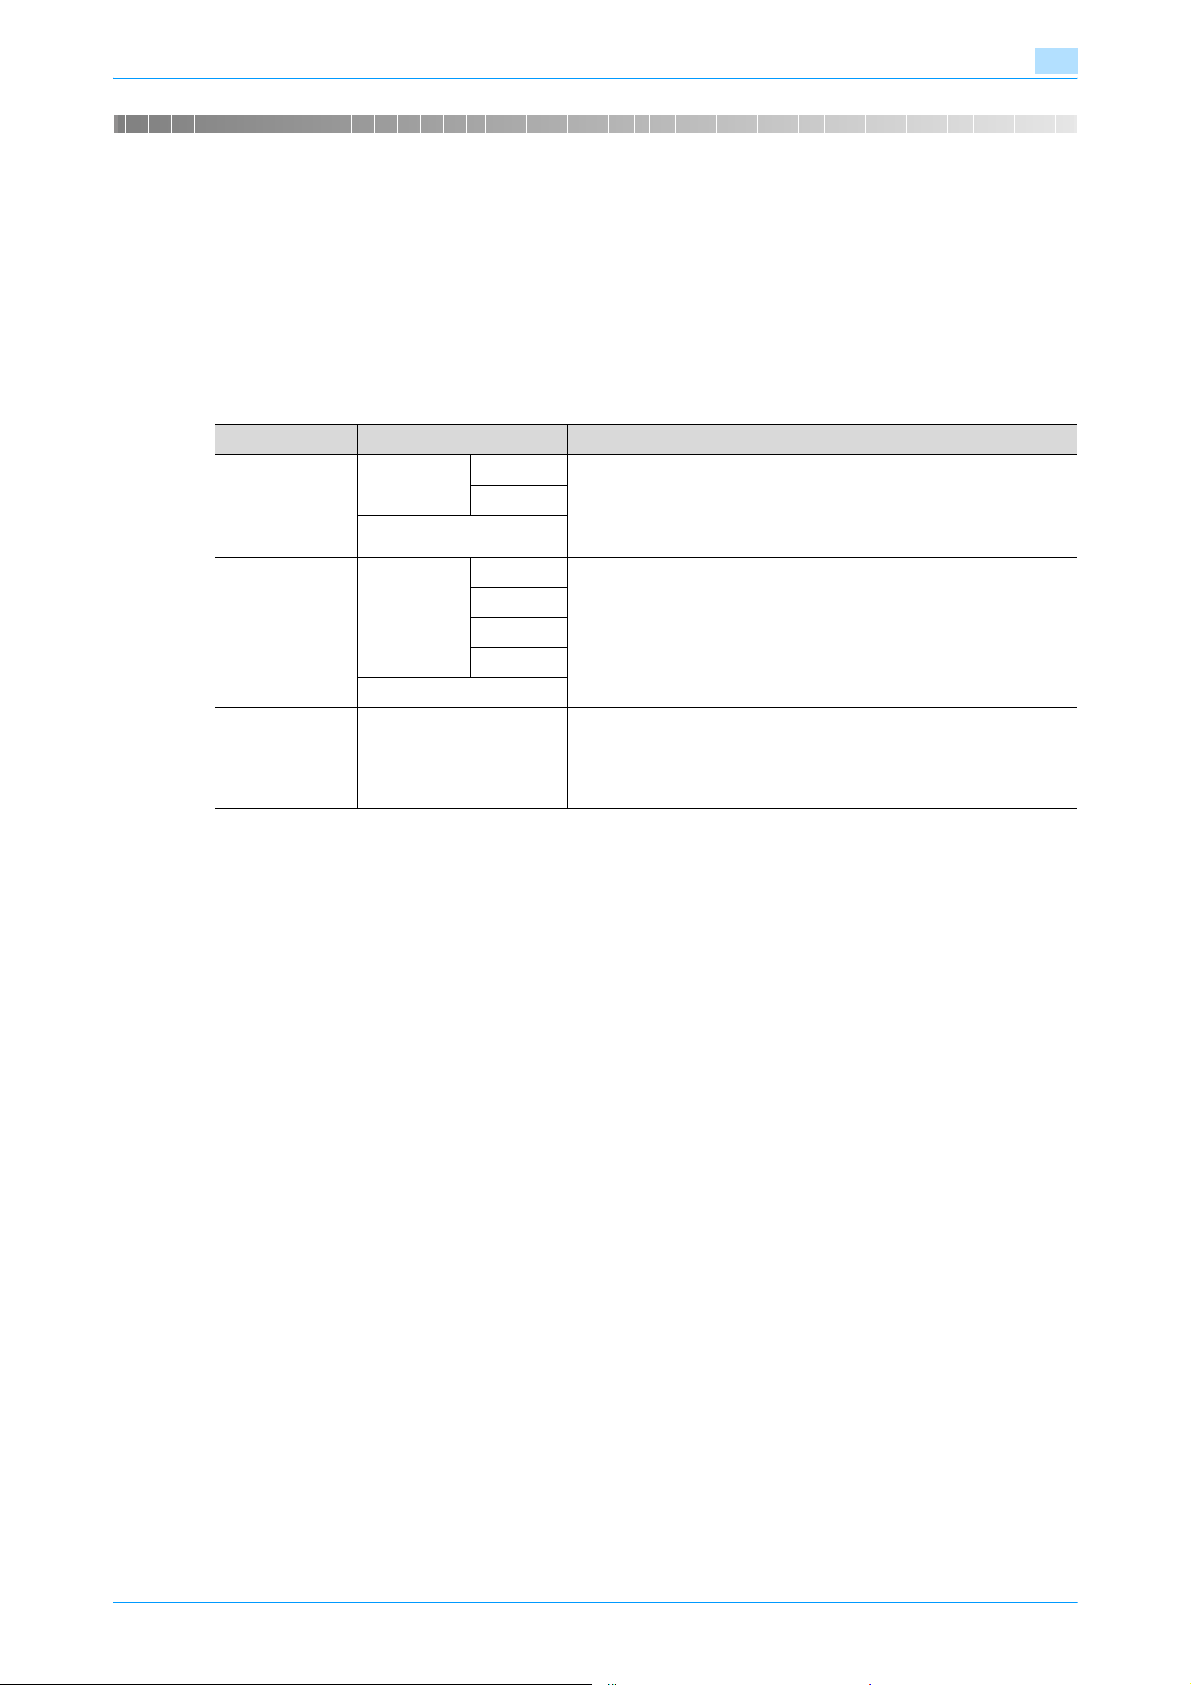
In order to use this printing system, the fax driver must be installed. The fax driver is a program that controls
the processing of data for output. Install the fax driver onto the computer from the provided CD-ROM.
The installation procedure for the Windows fax driver differs depending on which operating system is used
and how this machine is connected to the computer.
2.1.1 Windows 2000/XP/Server2003
Setup method Connection method Refer to
Connection
method that
can be set up
with an installer
Connection
method that
can be set up
with the Add
Printer Wizard
Connection
method that
can be set up
with Plug and
Play
Network
connection
USB
Network
connection
USB
USB "Installing the fax driver using Plug and Play" on page 2-15
Port9100 "Automatic installation using the installer" on page 2-4
IPP/IPPS
LPR "Installing the fax driver using the Add Printer Wizard" on
Port9100
SMB
IPP/IPPS
* Select the connection method in the course of installation.
Select "Normal Printing" for Port 9100 or USB connection, "Internet
Printing" for IPP connection, or "Secure Printing" for IPPS connection.
page 2-7
"For Windows XP/Server 2003" on page 2-7
"For Windows 2000/NT 4.0" on page 2-12
"For Windows XP/Server 2003" on page 2-15
2
!
Detail
Before using this machine in a network environment, the network settings must be specified for this
machine. For details, refer to the User's Guide [Network Administrator].
To install the printer driver under Windows 2000, XP, or Server 2003, log on as the Administrator.
This manual describes the setup method using the Add Printer Wizard only for the LPR/Port9100
printing. For installation procedures via other network connections (SMB and IPP/IPPS), refer to the
User’s Guide [Print Operations (IC-207)].
This manual describes the setup method of USB connection only using the Plug and Play.
Fax Driver 2-2
Page 14
Installing the fax driver
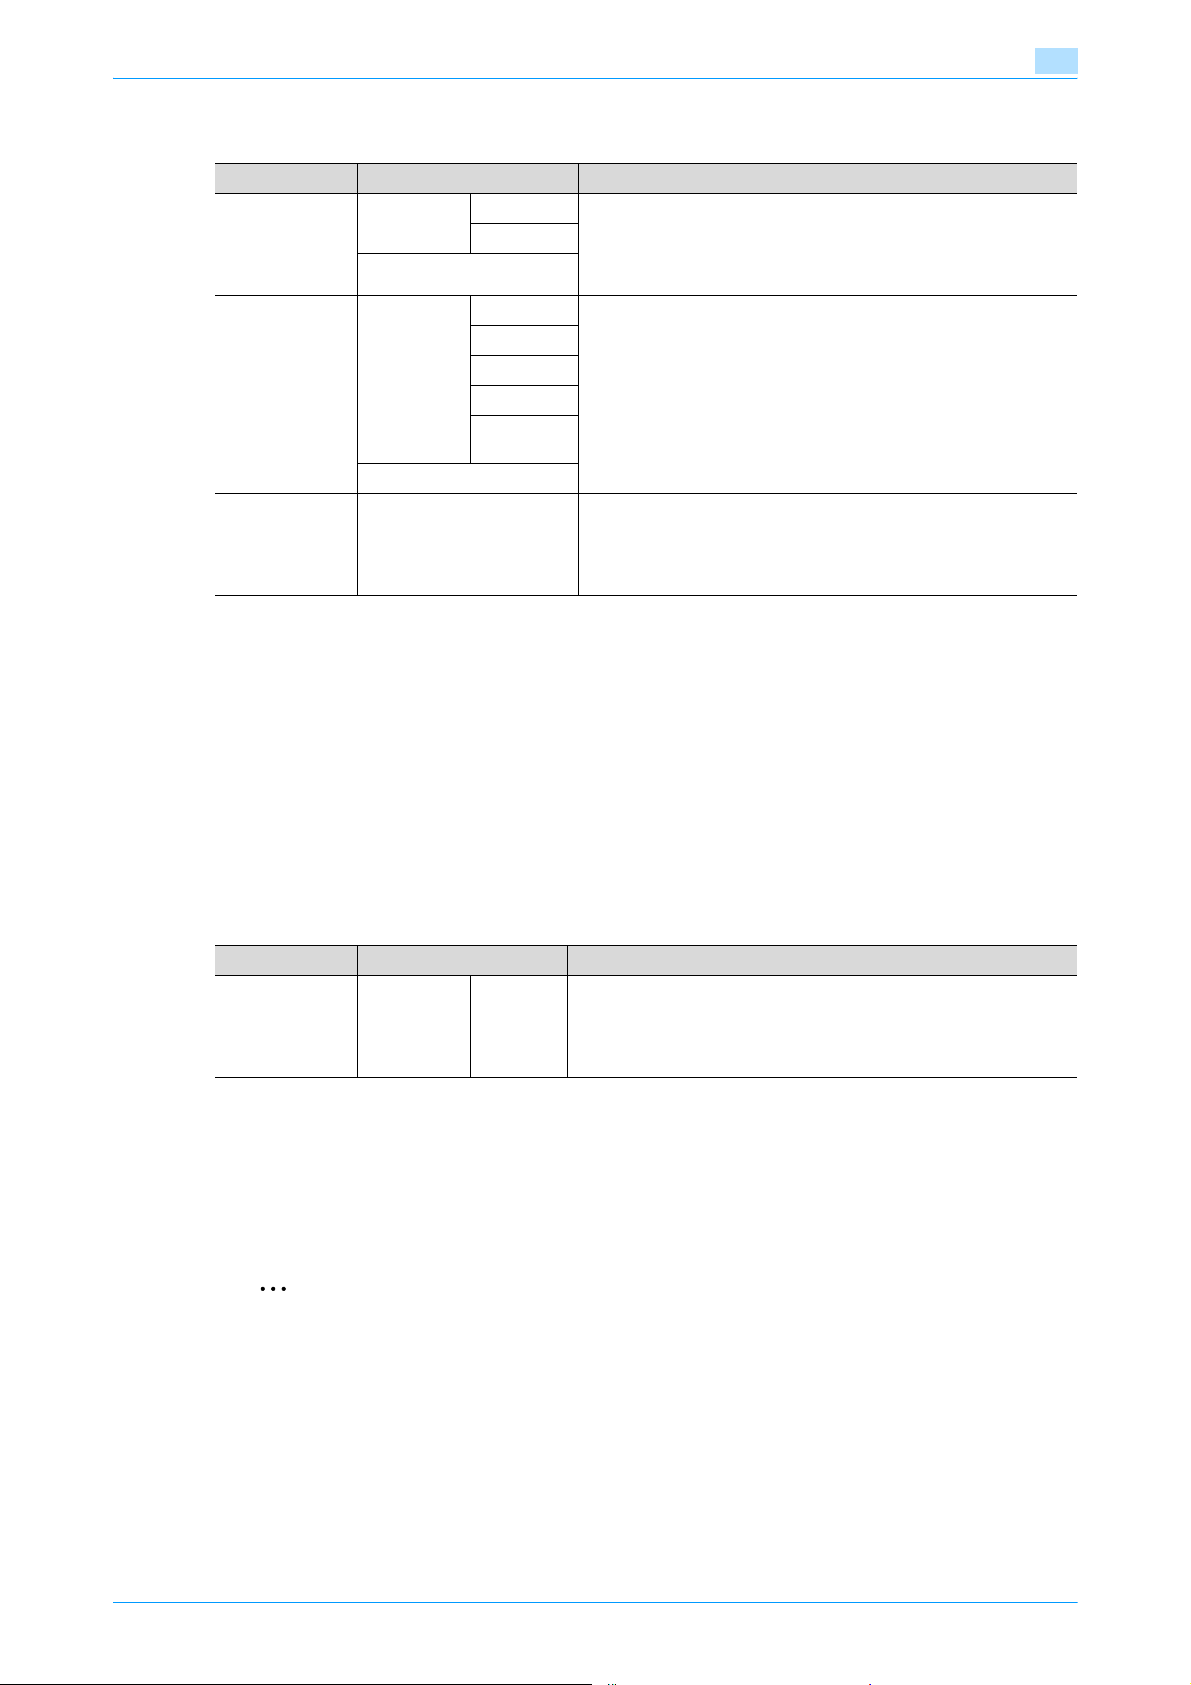
2.1.2 Windows Vista/7/Server 2008
Setup method Connection method Refer to
Connection
method that
can be set up
with an installer
Connection
method that
can be set up
with the Add
Printer Wizard
Connection
method that
can be set up
with Plug and
Play
Network
connection
USB
Network
connection
USB
USB "Installing the fax driver using Plug and Play" on page 2-15
Port9100 "Automatic installation using the installer" on page 2-4
IPP/IPPS
LPR "Installing the fax driver using the Add Printer Wizard" on
Port9100
SMB
IPP/IPPS
Web Service print
!
Detail
Before using this machine in a network environment, the network settings must be specified for this
machine. For details, refer to the User's Guide [Network Administrator].
2
* Select the connection method in the course of installation.
Select "Normal Printing" for Port 9100 or USB connection, "Internet
Printing" for IPP connection, or "Secure Printing" for IPPS connection.
page 2-7
"For Windows Vista/7/Server 2008" on page 2-10
"For Windows Vista/7/Server 2008" on page 2-16
To install the printer driver under Windows Vista/7/Server 2008, log on as the Administrator.
This manual describes the setup method using the Add Printer Wizard only for the LPR/Port9100
printing. For installation procedures via other network connections (SMB, IPP/IPPS and Web Service
print), refer to the User’s Guide [Print Operations (IC-207)].
This manual describes the setup method of USB connection only using the Plug and Play.
2.1.3 Windows NT4.0
Setup method Connection method Refer to
Connection
method that
can be set up
with the Add
Printer Wizard
!
Detail
Before using this machine in a network environment, the network settings must be specified for this
machine. For details, refer to the User's Guide [Network Administrator].
To install the printer driver under Windows NT 4.0, log on as the Administrator.
2
Note
For details on installing the fax driver in a network environment, refer to the User’s Guide [Network
Administrator].
Network
connection
LPR "Installing the fax driver using the Add Printer Wizard" on
page 2-7
"For Windows 2000/NT 4.0" on page 2-12
Fax Driver 2-3
Page 15

Installing the fax driver
2.2 Automatic installation using the installer
If this installer is used, this machine is automatically detected to determine whether it is connected by USB
or is on the same TCP/IP network as the computer, and the fax driver can be installed at the same time as
the necessary printer driver. The fax driver to be installed can also be manually specified.
2.2.1 Installer operating environment
2
Operating system 32bit editions
* With Windows NT 4.0, in order to install a machine that is connected directly to a network using the TCP/IP protocol,
Microsoft TCP/IP Printing Services must first be installed on the computer being used.
Windows NT4.0 (Service Pack 6a or later)*
Windows 2000 Professional/Server (Service Pack 3 or later)
Windows XP Home/Professional (Service Pack 2 or later)
Windows Server 2003 Standard
Windows Vista <All versions>
Windows Server 2008 <All versions>
Windows 7 <All versions>
64bit editions
Windows XP Professional (Service Pack 2 or later)
Windows Server 2003
Windows Vista <All versions>
Windows Server 2008 <All versions>
Windows Server 2008 R2 <All versions>
Windows 7 <All versions>
2.2.2 Settings of this machine
Specify the IP address of this machine.
2
Note
To allow this machine to be automatically detected when connected to a network, be sure to set the IP
address for this machine before starting installation. For details, refer to the User's Guide [Network
Administrator].
Depending on the connection method and protocol, change the network settings of this machine.
- Port9100: Enable the RAW port number (9100 at default), on the TCP/IP Setting screen.
- IPP/IPPS: Enable IPP print on the IPP Setting screen.
2
Note
For details on TCP/IP settings and IPP settings of this machine, refer to the User's Guide [Network
Administrator].
To use IPPS printing, the certificate must be registered to this machine. For details, refer to the User's
Guide [Network Administrator].
2.2.3 To install the fax driver
2
Reminder
When installing on Windows NT 4.0/2000/XP/Vista/7/Server 2003/Server 2008, administrator
permissions are required.
If the wizard starts up in order to add new hardware with a USB connection, click [Cancel].
If the User Account Control window appears when installing on Windows Vista/7/Server 2008, click the
[Allow] button or the [Continue] button.
1 Insert the printer driver CD-ROM into the computer’s CD-ROM drive.
– Check that the installer starts up, and then continue with step 2.
– If the installer does not start up, open the printer driver folder on the CD-ROM and double-click
"Setup.exe" for the 32bit editions OS and "Setup64.exe" for the 64bit editions OS, and then
proceed to Step 3.
Fax Driver 2-4
Page 16
Installing the fax driver
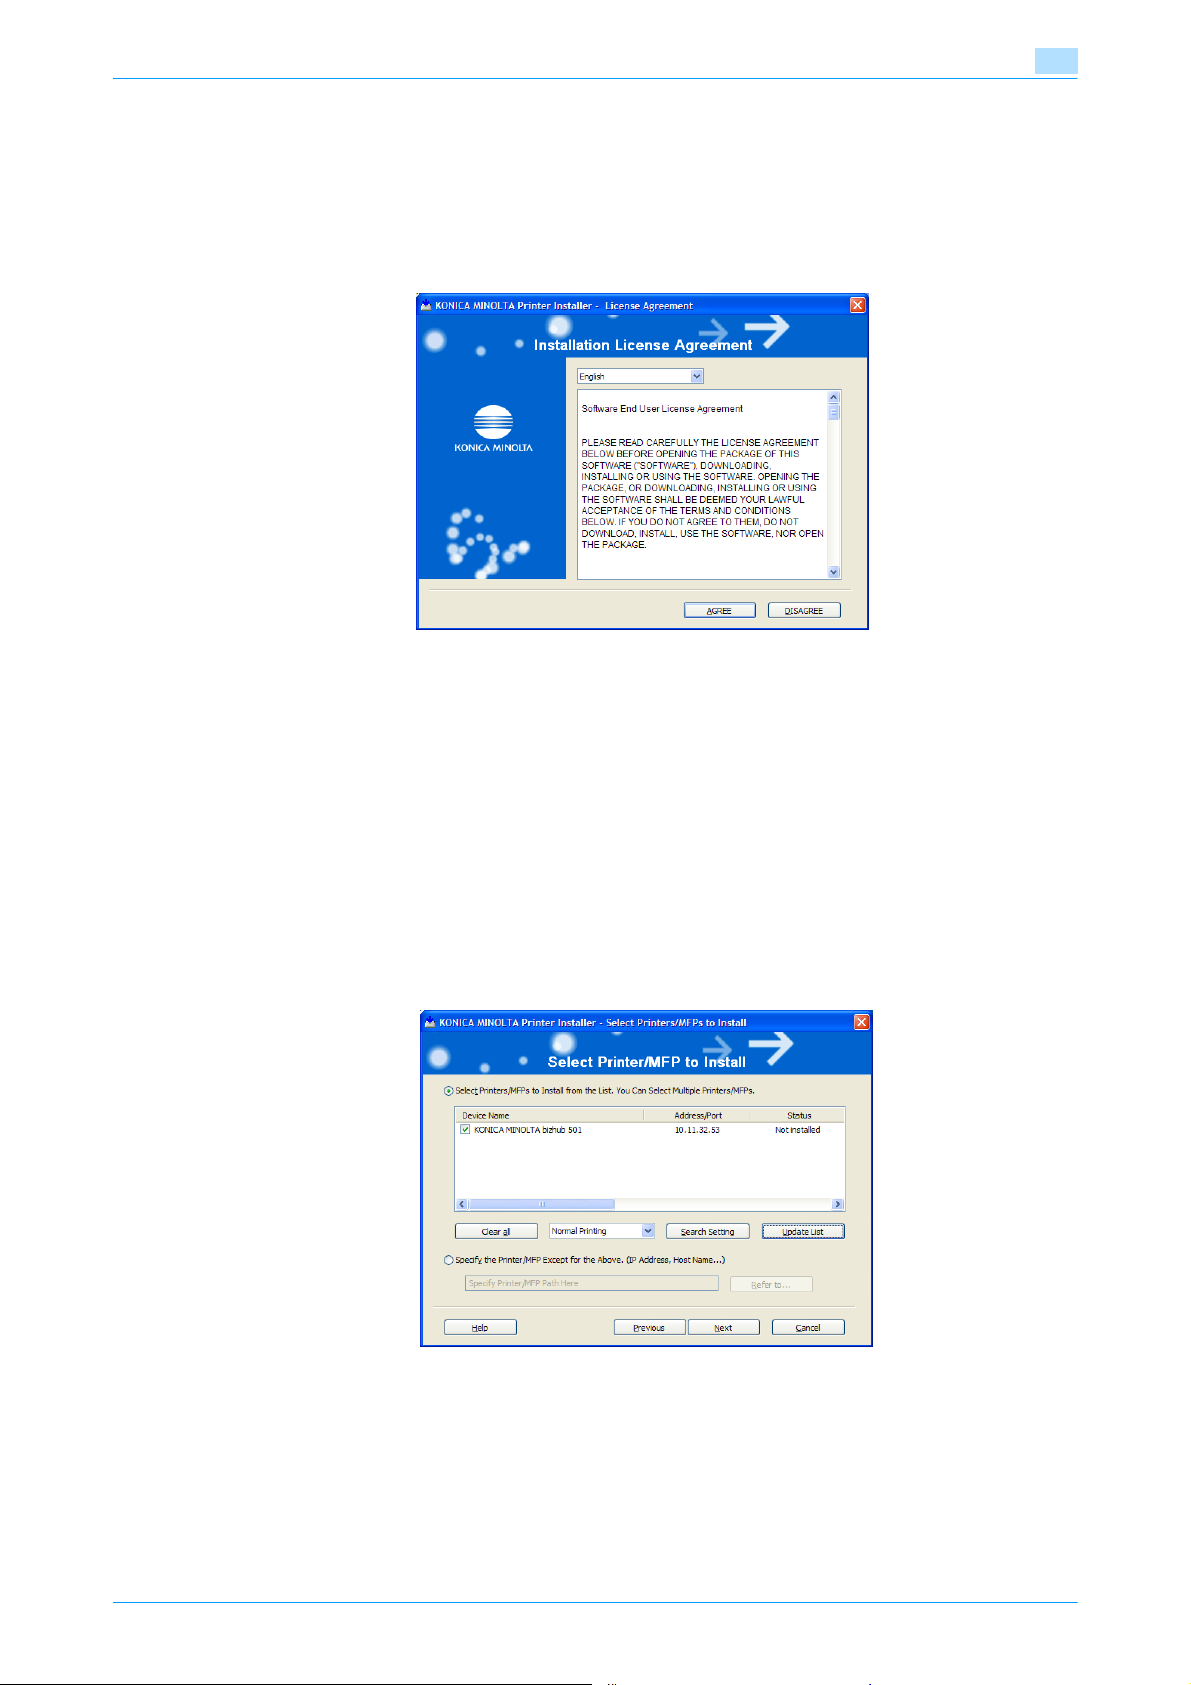
2 Click "Printer Install".
The installation of the printer driver starts.
3 Click the [AGREE] button if you agree with all terms and conditions of the license agreement.
– If you do not agree with the terms and conditions of the license agreement, the software cannot be
– You can change the display language of the installer using the drop-down list.
2
installed.
4 When the setup selection dialog box appears, click the [Install printers/MFPs] button, and then click the
[Next] button.
The connected printers and copiers are detected.
– If the printer is not detected, turn the main power off, then on again.
When the turning the power off, then on again, wait at least 10 seconds before turning the power
on again; otherwise, this machine may not function properly.
5 Select this machine, and then click the [Next] button.
– If the connection of this machine cannot be recognized, the machine will not be listed. When this
occurs, select "Specify the Printer/MFP Except for the Above. (IP Address, Host Name)", and then
specify this machine directly.
– In addition to "Normal Printing" (Port9100, USB), "Internet Printing" (IPP) or "Secure Printing" (IPPS)
can also be selected as the connecting method. Secure Print (IPPS) can be used when SSL is
enabled from Web Connection and IPP is enabled.
Fax Driver 2-5
Page 17
Installing the fax driver
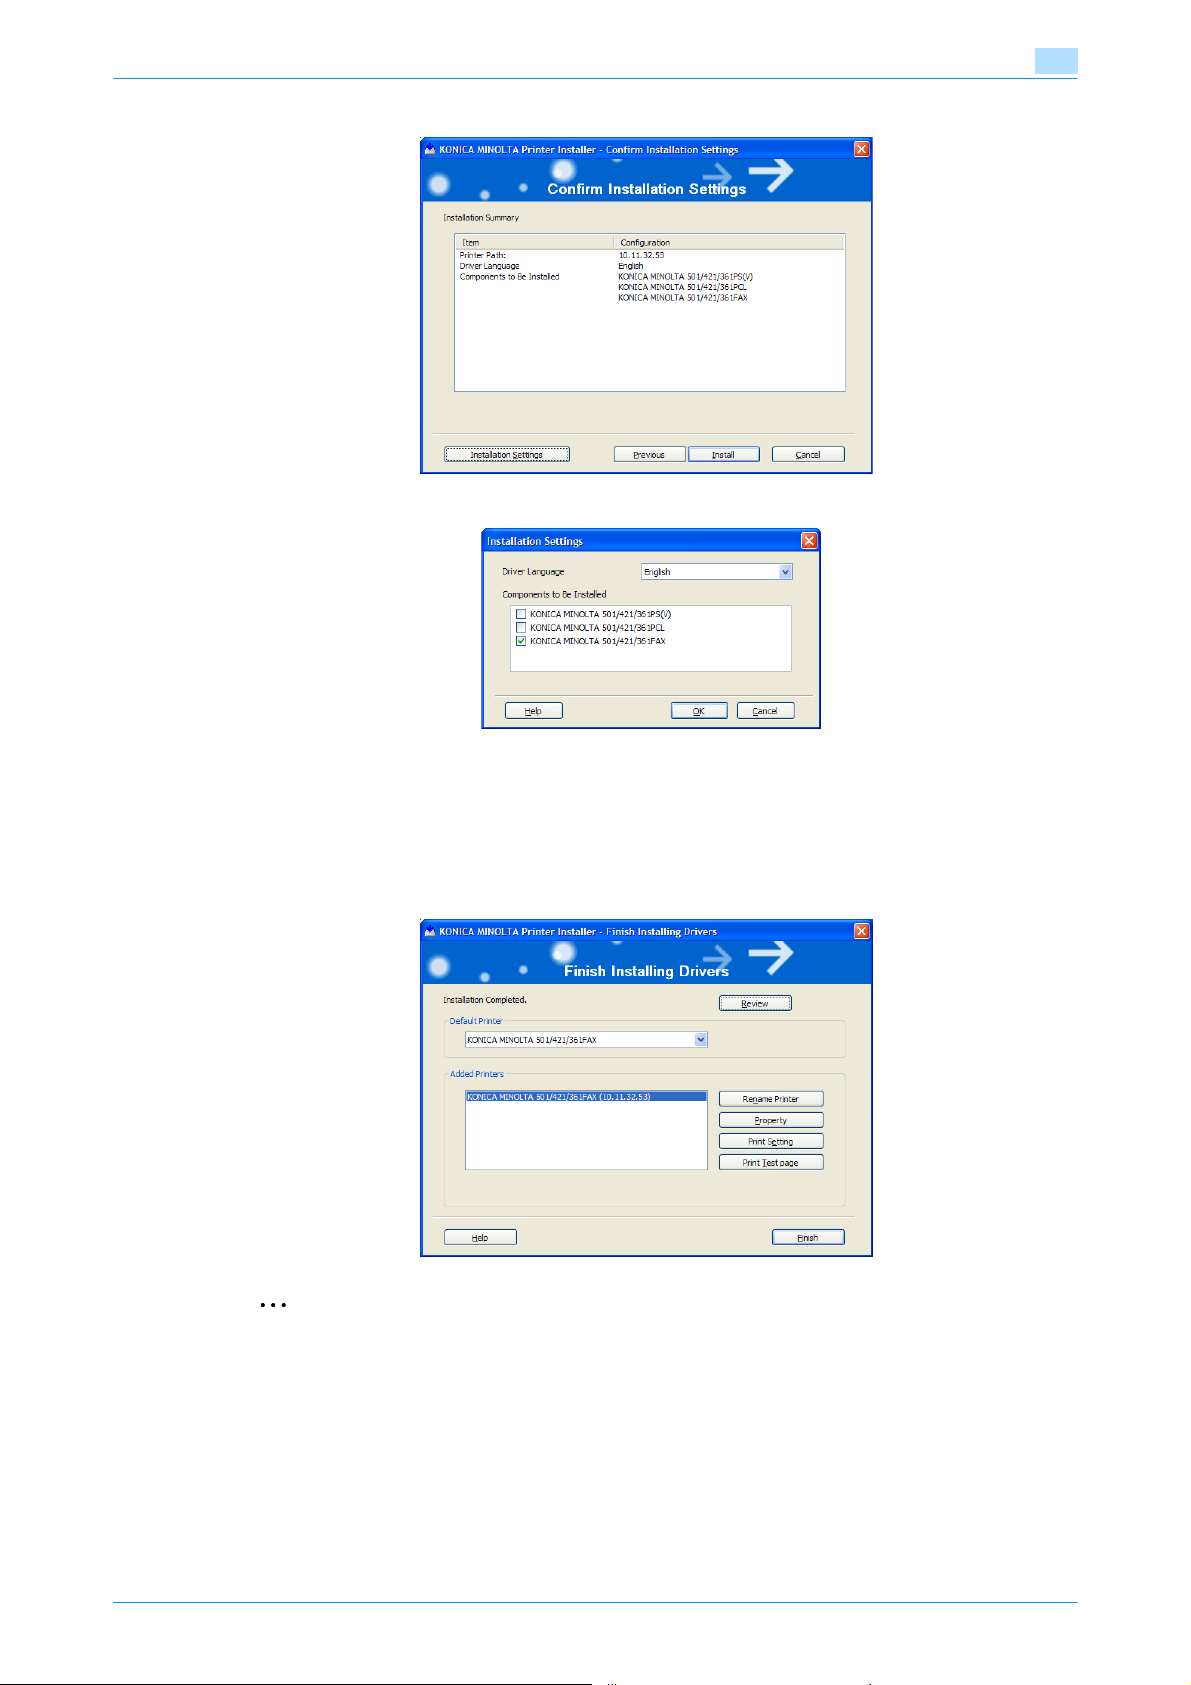
6 Click the [Installation Settings] button.
7 Select the fax driver as the component to be installed, and then click the [OK] button.
2
8 In the Confirm Installation Settings dialog box, click the [Install] button.
– If Windows logo test and digital signature warning messages appear, click the [Continue] or [Yes]
button.
9 In the Finish Installing Drivers dialog box, click the [Finish] button.
This completes the fax driver installation.
2
Note
In the Finish Installing Drivers dialog box, installation items can be confirmed and settings can be
changed.
[Review]: Check the installation settings.
[Rename Printer]: Change the printer name.
[Share Setting]: Specify shared settings of the printer.
[Property]: Specify the property settings of the fax driver. For details,refer to "Specifying the Configure
tab settings" on page 3-18.
[Print Setting]: Specify the functions of the fax driver. For details, refer to "Settings" on page 3-8.
[Print Test Page]: Perform test print.
Fax Driver 2-6
Page 18

Installing the fax driver
2.3 Installing the fax driver using the Add Printer Wizard
As an example, the following describes the installation procedure via a network connection (LPR/Port9100).
When using the LPR/Port9100 printing, specify the port during the printer driver installation process.
!
Detail
For installation procedures via other network connections (SMB, IPP/IPPS and Web Service print), refer
to the User’s Guide [Print Operations (IC-207)].
2.3.1 Settings of this machine
Before using this machine in a network environment, the network settings must be specified for this machine.
TCP/IP setting for this machine
Specify the IP address on TCP/IP Setting of this machine.
!
Detail
For details on specifying the IP address of this machine, refer to the User's Guide [Network
Administrator].
Specifying the RAW port number for this machine
To use Port9100 printing, enable the RAW port number (9100 at default), on the "TCP/IP Setting" for this
machine.
2
!
Detail
For details on specifying the RAW port number of this machine, refer to the User's Guide [Network
Administrator].
LPD setting for this machine
To use LPR printing, enable LPD print on "LPD Setting" of this machine.
!
Detail
For details on LPD setting of this machine, refer to the User's Guide [Network Administrator].
2.3.2 For Windows XP/Server 2003
2
Reminder
When installing on Windows XP/Server2003, administrator permissions are required.
1 Insert the printer driver CD-ROM into the computer’s CD-ROM drive.
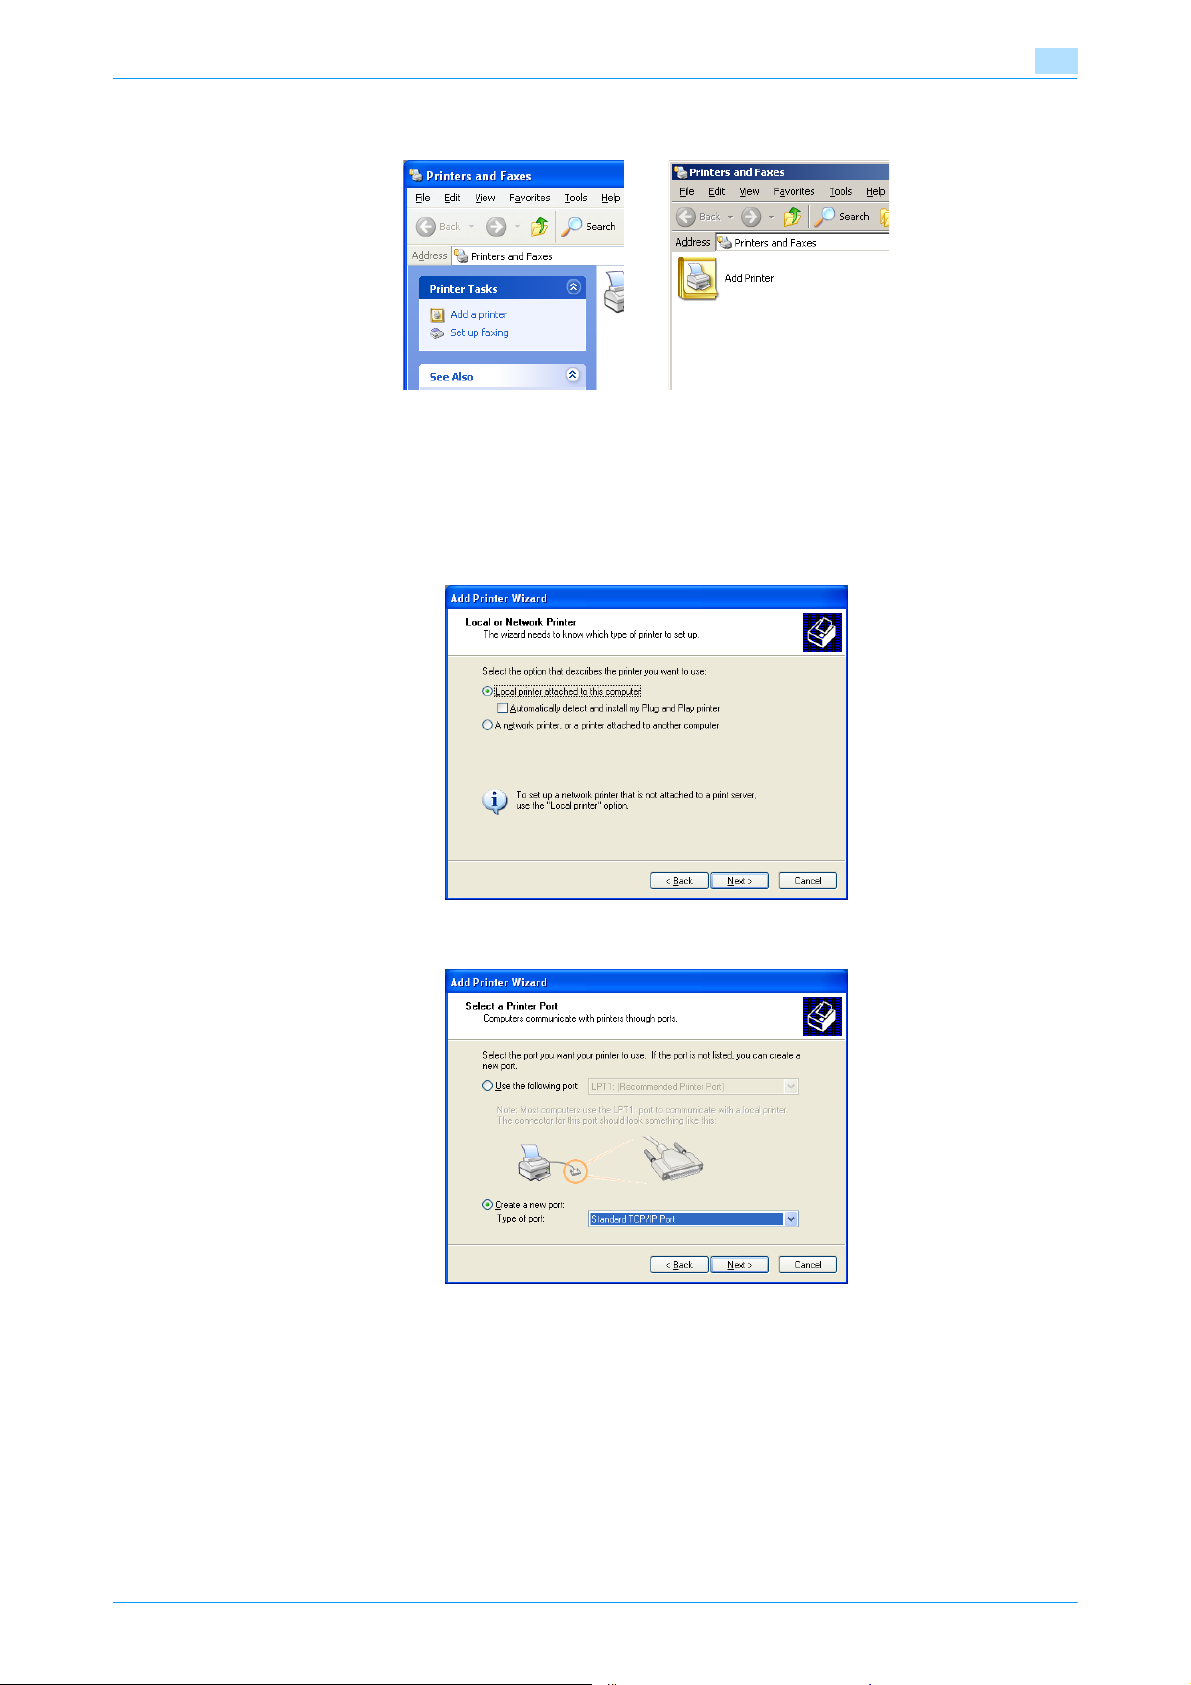
2 Click the [Start] button, and then click "Printers and Faxes".
– If "Printers and Faxes" does not appear in the Start menu, open the Control Panel from the Start
menu, select "Printers and Other Hardware", and then select "Printers and Faxes".
Fax Driver 2-7
Page 19
Installing the fax driver
3 For Windows XP, click "Add a printer" on the "Printer Tasks" menu.
For Windows Server 2003, double-click the "Add Printer" icon.
The Add Printer Wizard starts up.
4 Click the [Next] button.
5 Select "Local printer attached to this computer", and then click the [Next] button.
– Clear the "Automatically detect and install my Plug and Play printer" check box.
2
Windows XP Windows Server 2003
6 Click "Create a new port", and then select "Standard TCP/IP Port" for the type of port.
7 Click the [Next] button.
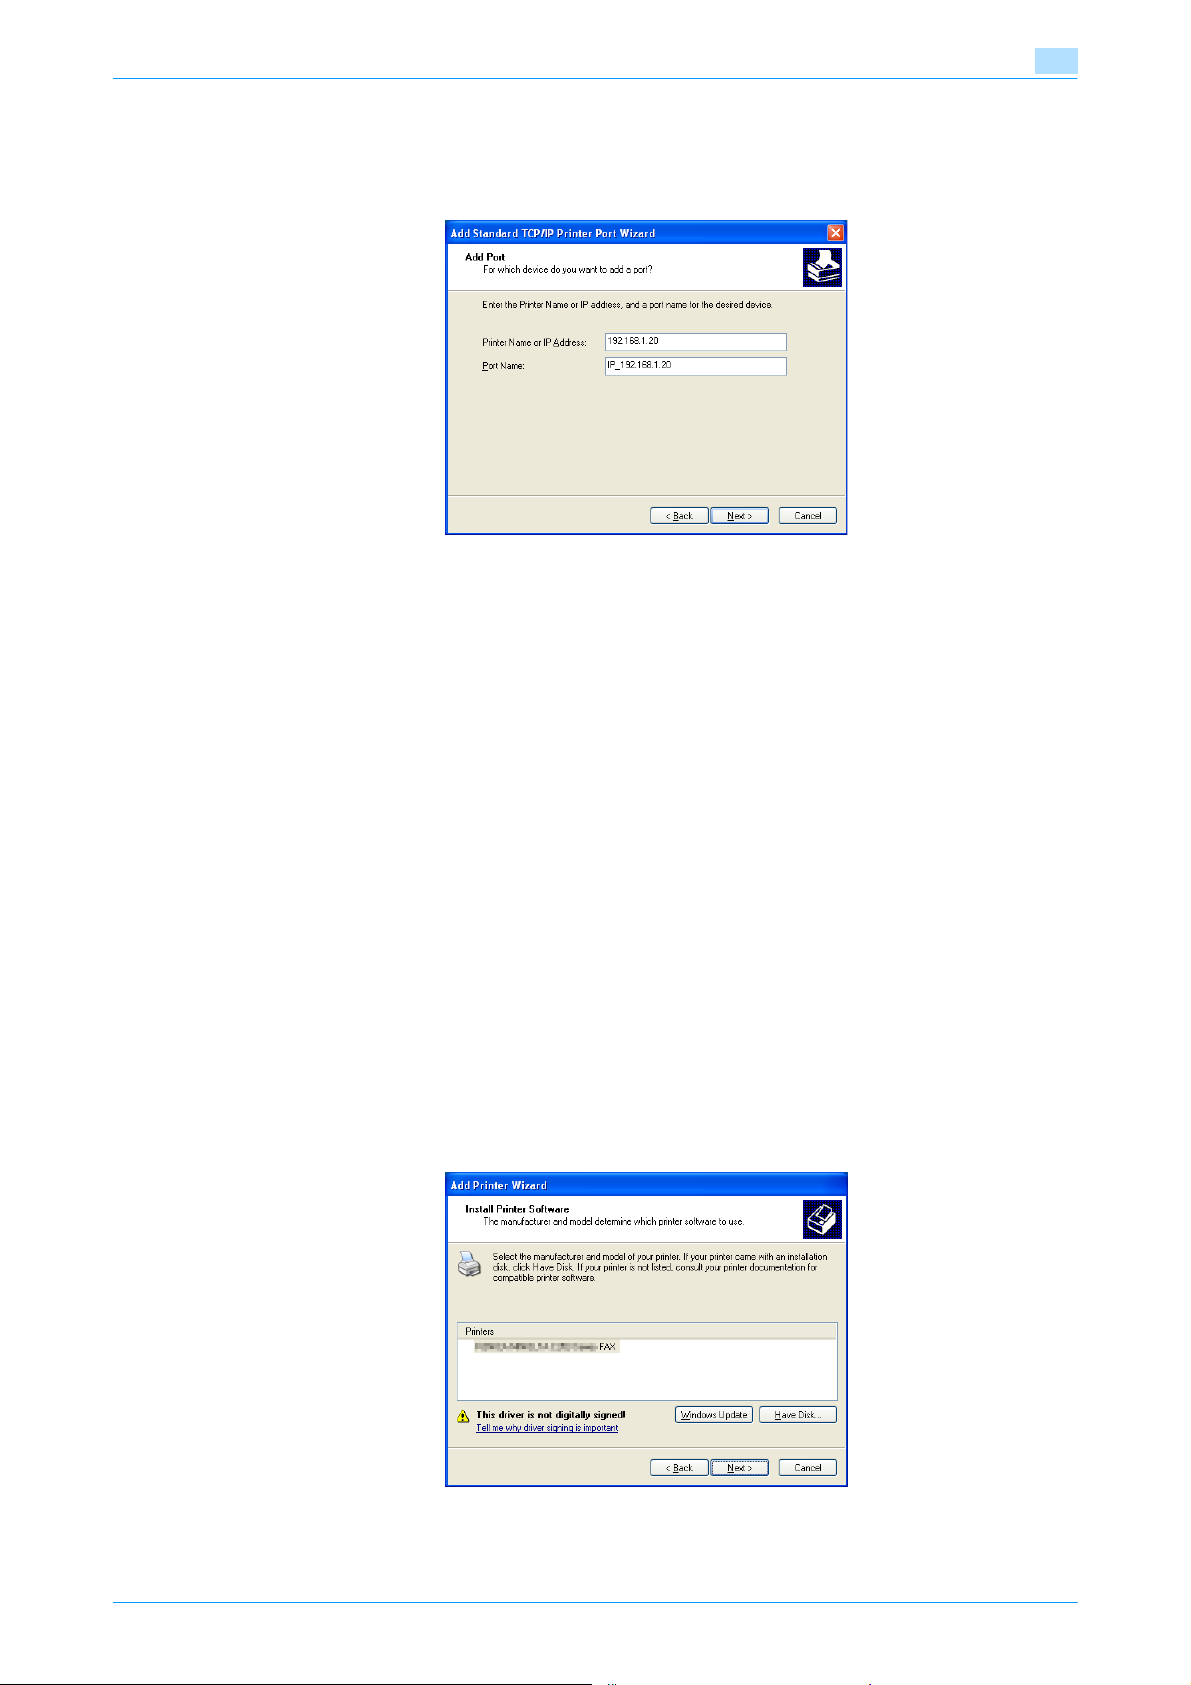
The Add Standard TCP/IP Printer Port Wizard starts.
8 Click the [Next] button.
Fax Driver 2-8
Page 20
Installing the fax driver
9 In the "Printer Name or IP Address" box, enter the IP address for this machine, and then click the [Next]
button.
– If the Additional Port Information Required dialog box appears, go to step 10.
– If the Finish screen appears, go to step 13.
10 Select "Custom", and then click the [Settings] button.
11 Change the settings according to the port, and then click the [OK] button.
– For an LPR connection, Select "LPR", and then enter "Print" in the "Queue name" box.
– For a Port9100 connection, select "RAW", and then enter the RAW port number (9100 at default) in
– The information entered here is case-sensitive.
2
the "Port Number" box.
12 Click the [Next] button.
13 Click the [Finish] button.
The Add Printer Wizard appears.
14 Click the [Have Disk] button.
15 Click the [Browse] button.
16 Specify the desired folder on the CD-ROM that contains the fax driver, and then click the [Open] button.
– Select the specified folder according to the printer driver to be used, the operating system, and the
language.
17 Click the [OK] button.
The "Printers" list appears.
18 Click the [Next] button.
Fax Driver 2-9
Page 21
Installing the fax driver
19 Follow the on-screen instructions.
– When the Windows logo test and Digital Signature dialog box appears, click the [Continue Anyway]
button.
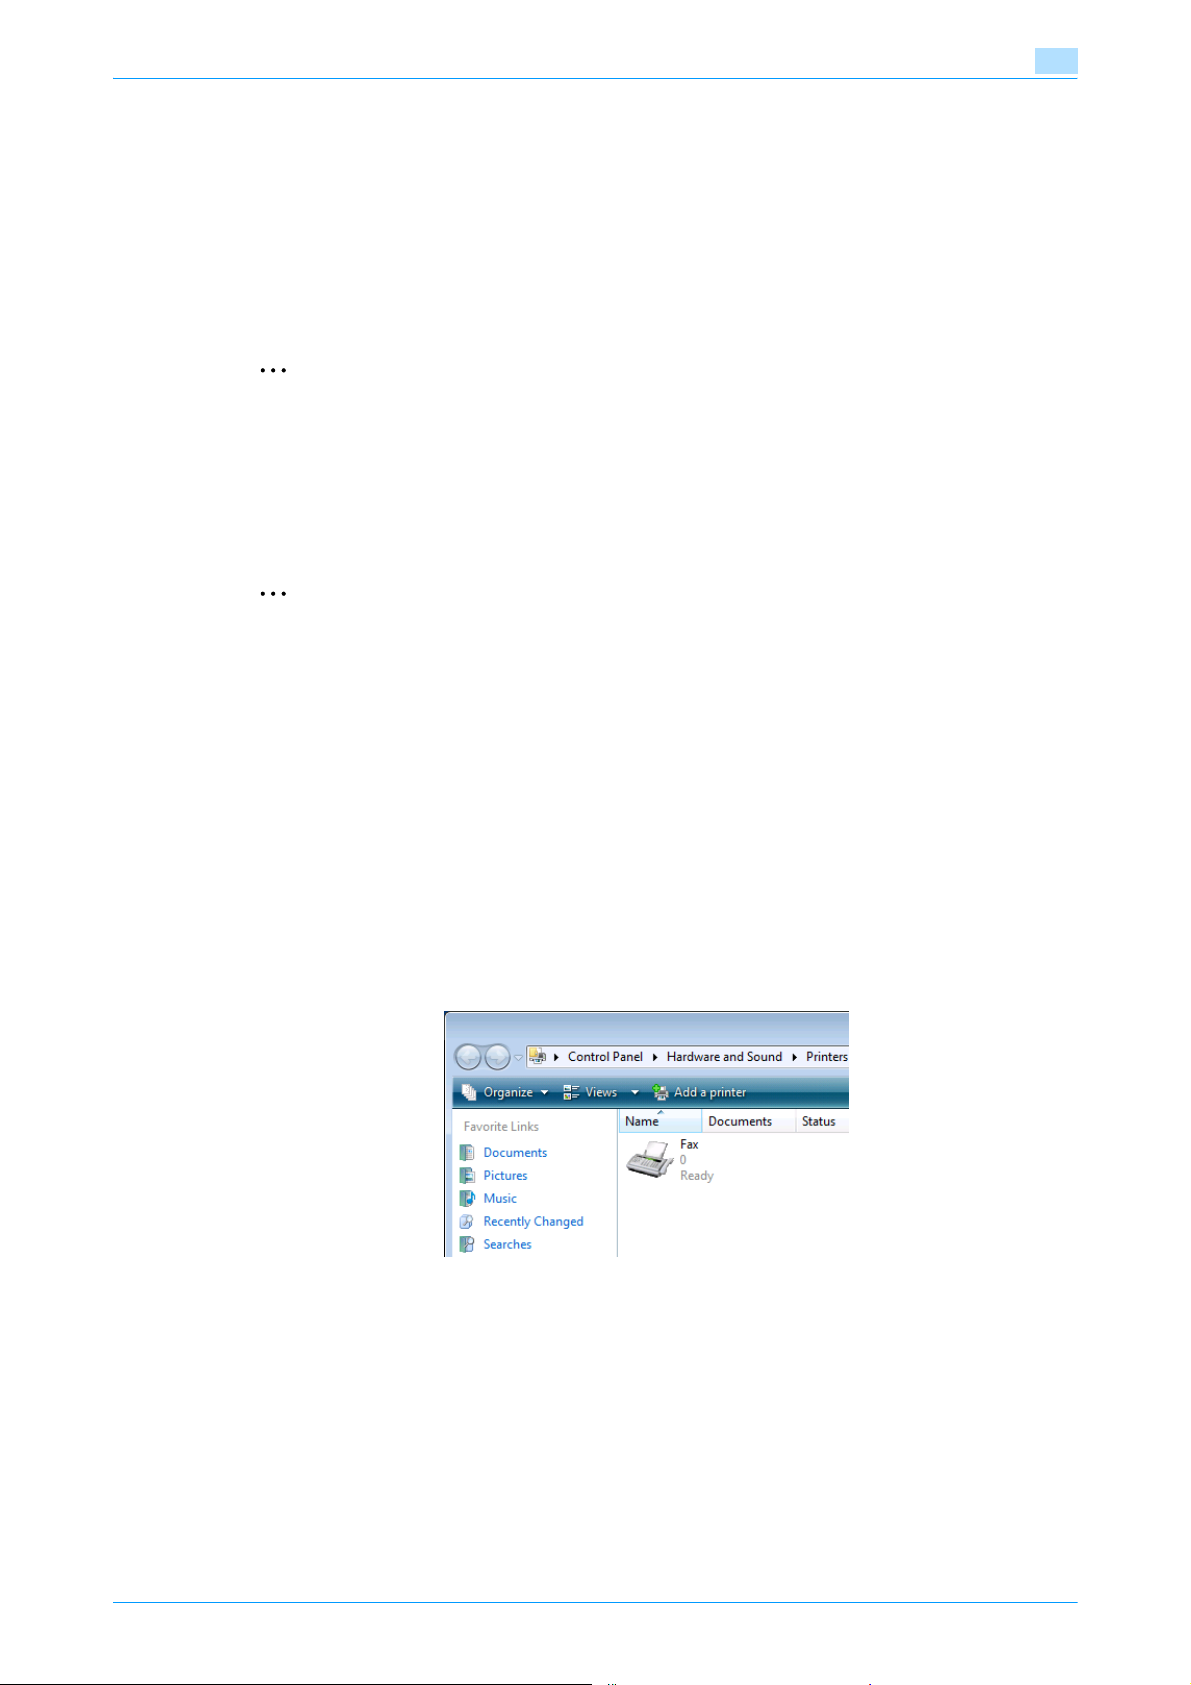
20 When installation is complete, make sure that the icon of the installed printer appears in the Printers
and Faxes window.
21 Remove the CD-ROM from the CD-ROM drive.
This completes the fax driver installation.
2
Note
If both of "RAW Port Number" and "LPD Setting" are enabled in the network settings of this machine,
check the available printer ports and change the settings if necessary. For details, refer to the User’s
Guide [Print Operations (IC-207)].
2.3.3 For Windows Vista/7/Server 2008
In Windows Vista/7/Server 2008, printers on the network can be located and installed.
2
Note
When installing Windows Vista/7/Server 2008, administrator permissions are required.
Printers will be found during installation. Connect this machine to the network, and then turn on the
power. For details on setting network, refer to the User’s Guide [Network Administrator].
2
1 Insert the printer driver CD-ROM into the computer’s CD-ROM drive.
2 Click the [Start] button, and then click "Control Panel".
3 From "Hardware and Sound", click "Printer".
– For Windows 7/Server 2008 R2, click "View devices and printers" in the "Hardware and Sound".
– If Control Panel is displayed with Classic View, double-click "Printers".
– For Windows 7/Server 2008 R2, double-click [Devices and Printers] if [Control Panel] is not
displayed in the Category view.
The Printers window appears.
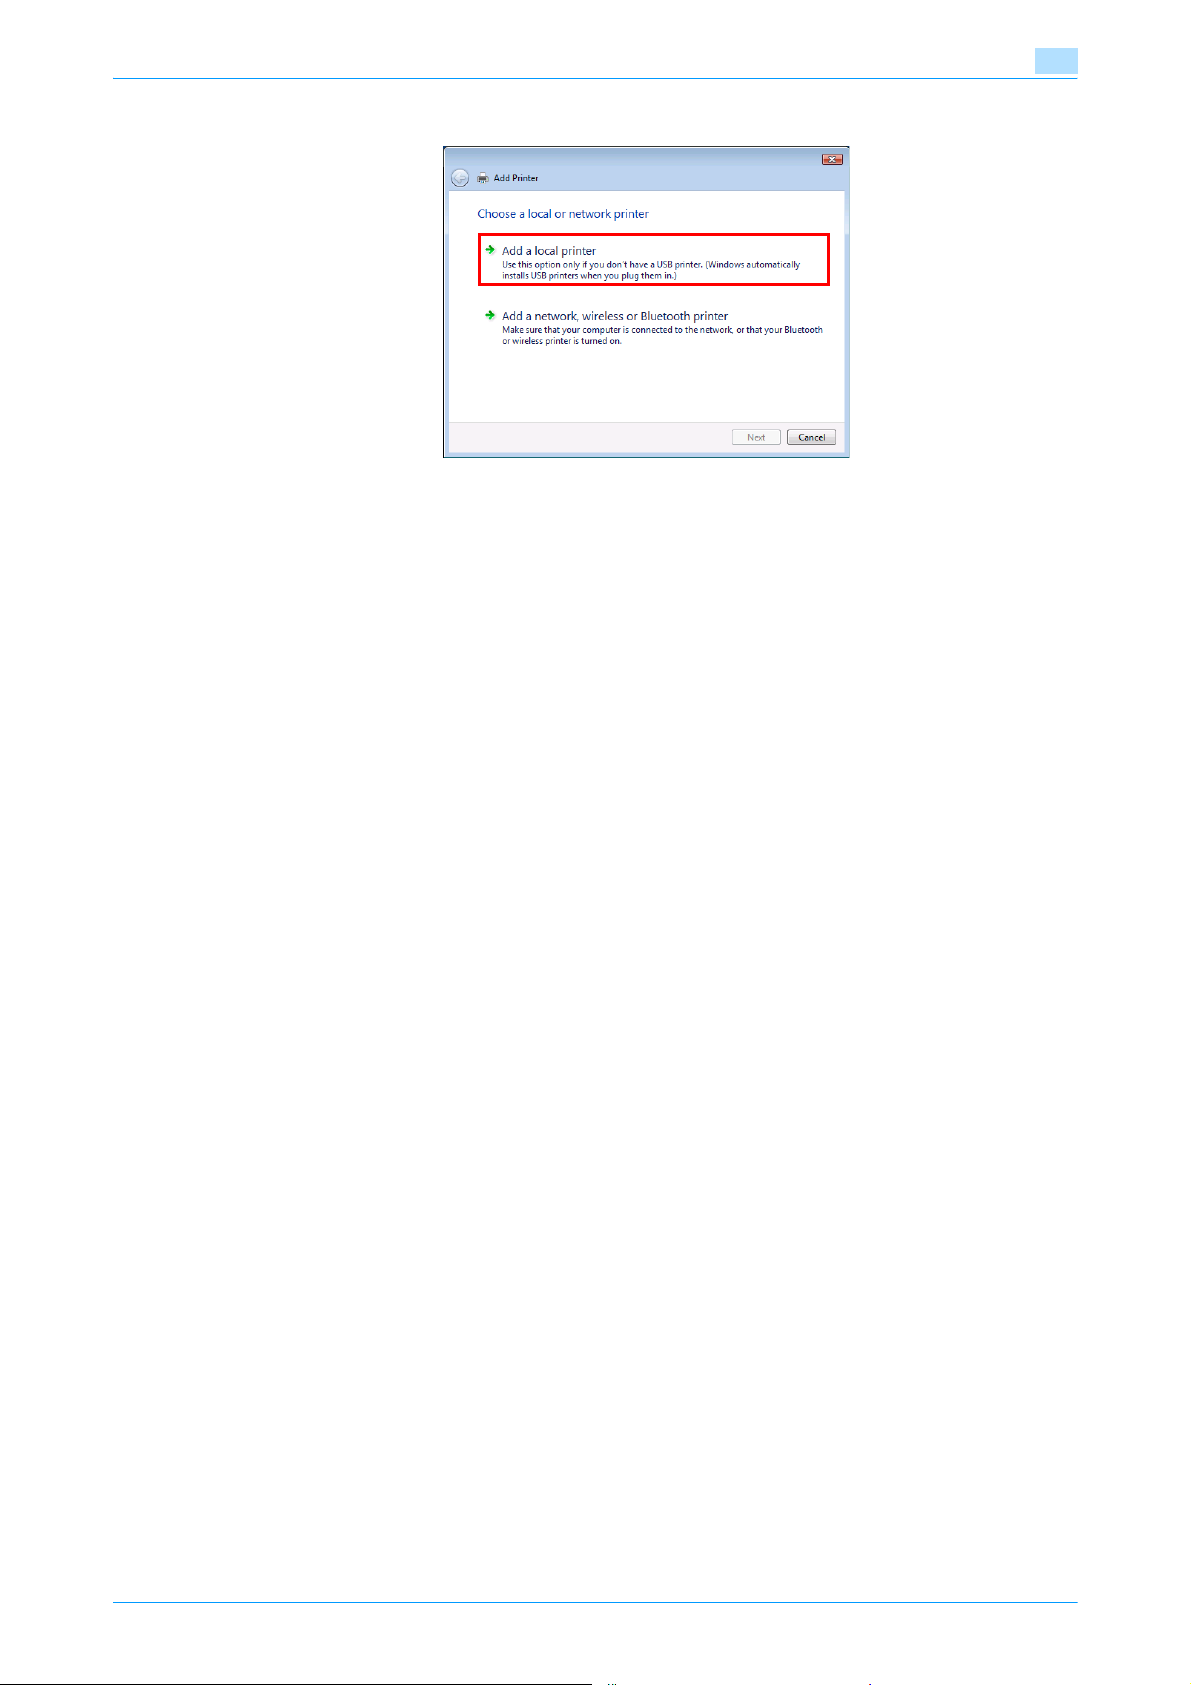
4 Click "Add a printer" from the toolbar.
The Add Printer window appears.
Fax Driver 2-10
Page 22
Installing the fax driver
5 Click "Add a local printer".
The Select a Printer Port dialog box appears.
6 Click "Create a new port", and select "Standard TCP/IP Port".
7 Click the [Next] button.
8 Select "TCP/IP Device", and then enter the IP address.
– When both LPR and Port9100 are enabled for this machine, the printer driver and the machine is
2
connected with LPR.
9 Click the [Next] button.
– If the Additional Port Information Required dialog box appears, go to step 10.
– If the "Install the printer driver" dialog box appears, go to step 13.
10 Select "Custom", and then click the [Settings] button.
11 Change the settings according to the port, and then click the [OK] button.
– For an LPR connection, select "LPR", and then enter "Print" in the "Queue name" box.
– For a Port9100 connection, select "RAW", and then enter the RAW port number (9100 at default) in
the "Port Number" box.
– The information entered here is case-sensitive.
12 Click the [Next] button.
The "Install the printer driver" dialog box appears.
13 Click the [Have Disk] button.
14 Click the [Browse] button.
15 Specify the desired folder on the CD-ROM that contains the fax driver, and then click the [Open] button.
– Select the specified folder according to the printer driver to be used, the operating system, and the
language.
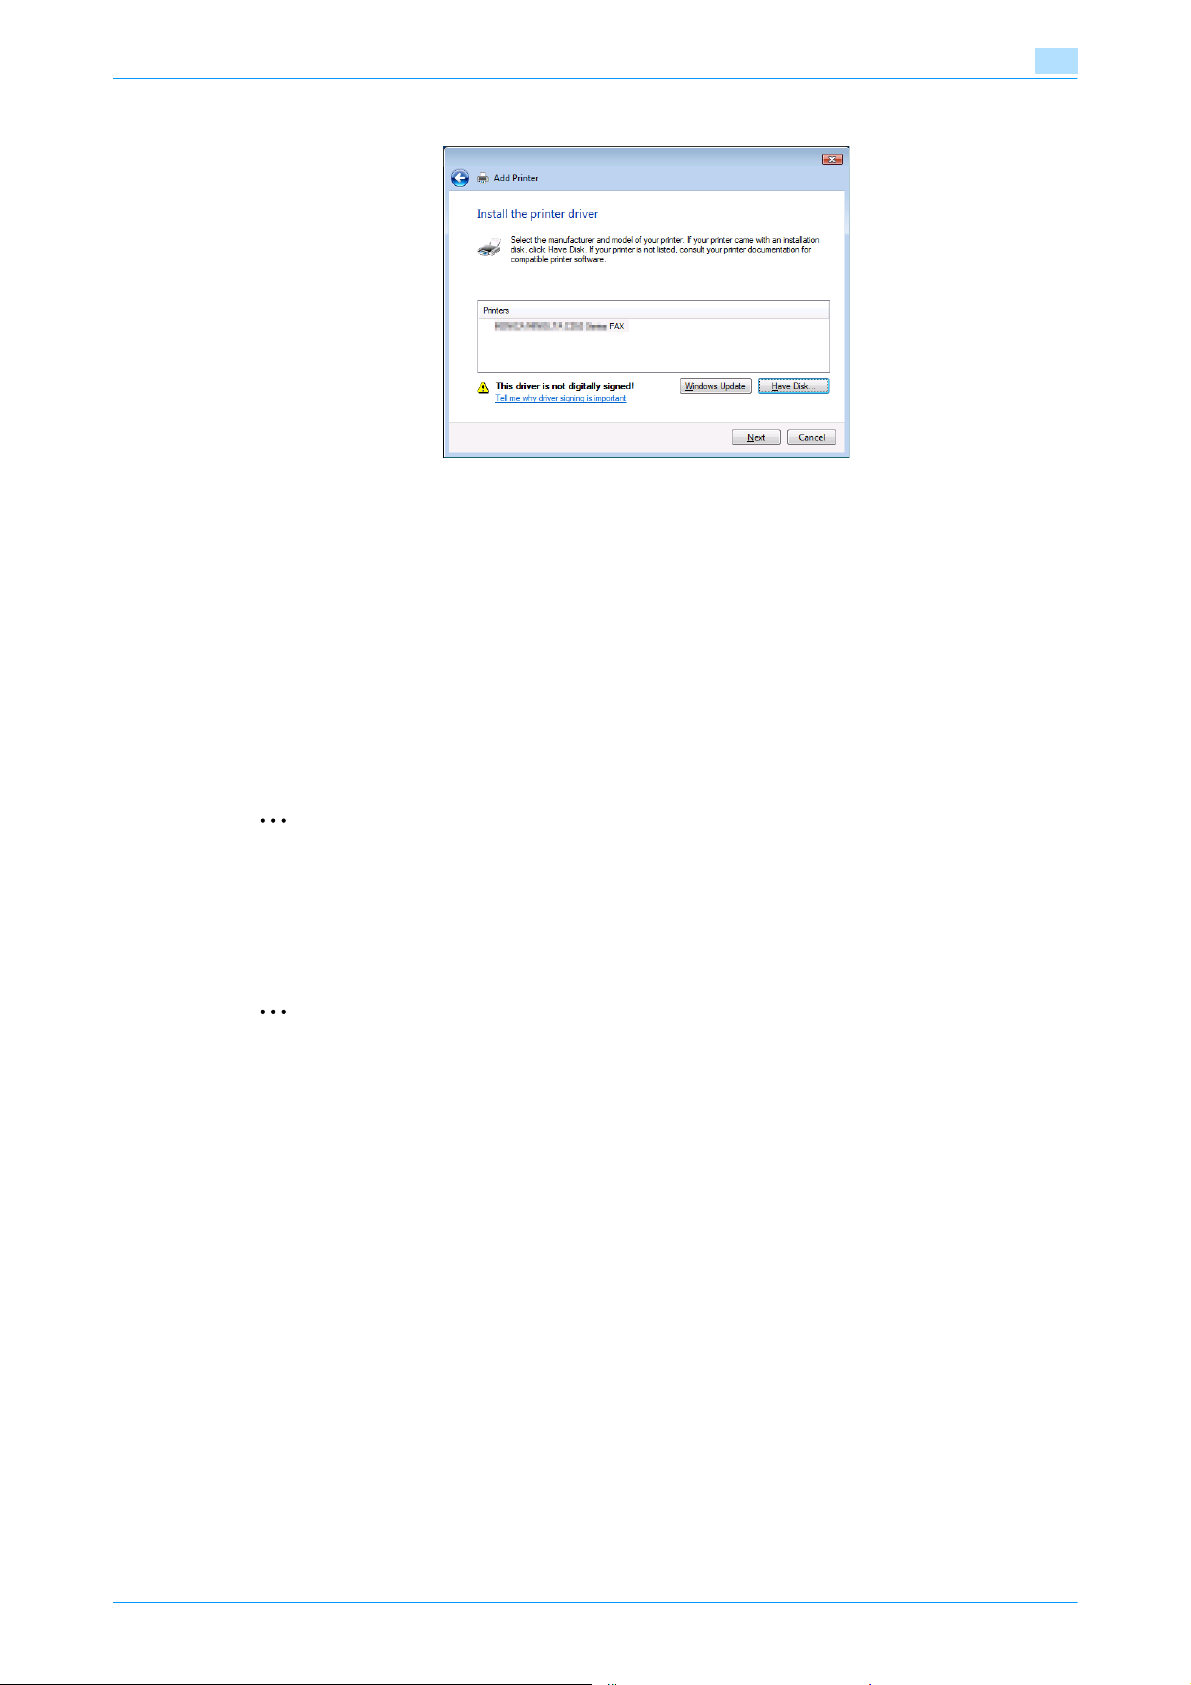
16 Click the [OK] button.
The "Printers" list appears.
Fax Driver 2-11
Page 23
Installing the fax driver
17 Click the [Next] button.
18 Follow the on-screen instructions.
– If the User Account Control window appears, click the [Continue] button.
– If the Verify the publisher dialog box of Windows Security appears, click "Install this driver software
19 Click the [Finish] button.
2
anyway".
20 When installation is completed, make sure that the icon of the installed printer appears in the Printers
and Faxes window.
21 Remove the CD-ROM from the CD-ROM drive.
This completes the fax driver installation.
2
Note
If both of "RAW Port Number" and "LPD Setting" are enabled in the network settings of this machine,
check the available printer ports and change the settings if necessary. For details, refer to the User’s
Guide [Print Operations (IC-207)].
2.3.4 For Windows 2000/NT 4.0
2
Reminder
When installing Windows NT/4.0, administrator permissions are required.
1 Insert the printer driver CD-ROM into the computer’s CD-ROM drive.
2 Click the [Start] button, point to "Settings", and then click "Printers".
3 Double-click the "Add Printer" icon.
The Add Printer Wizard starts up.
4 Follow the on-screen instructions.
Fax Driver 2-12
Page 24
Installing the fax driver
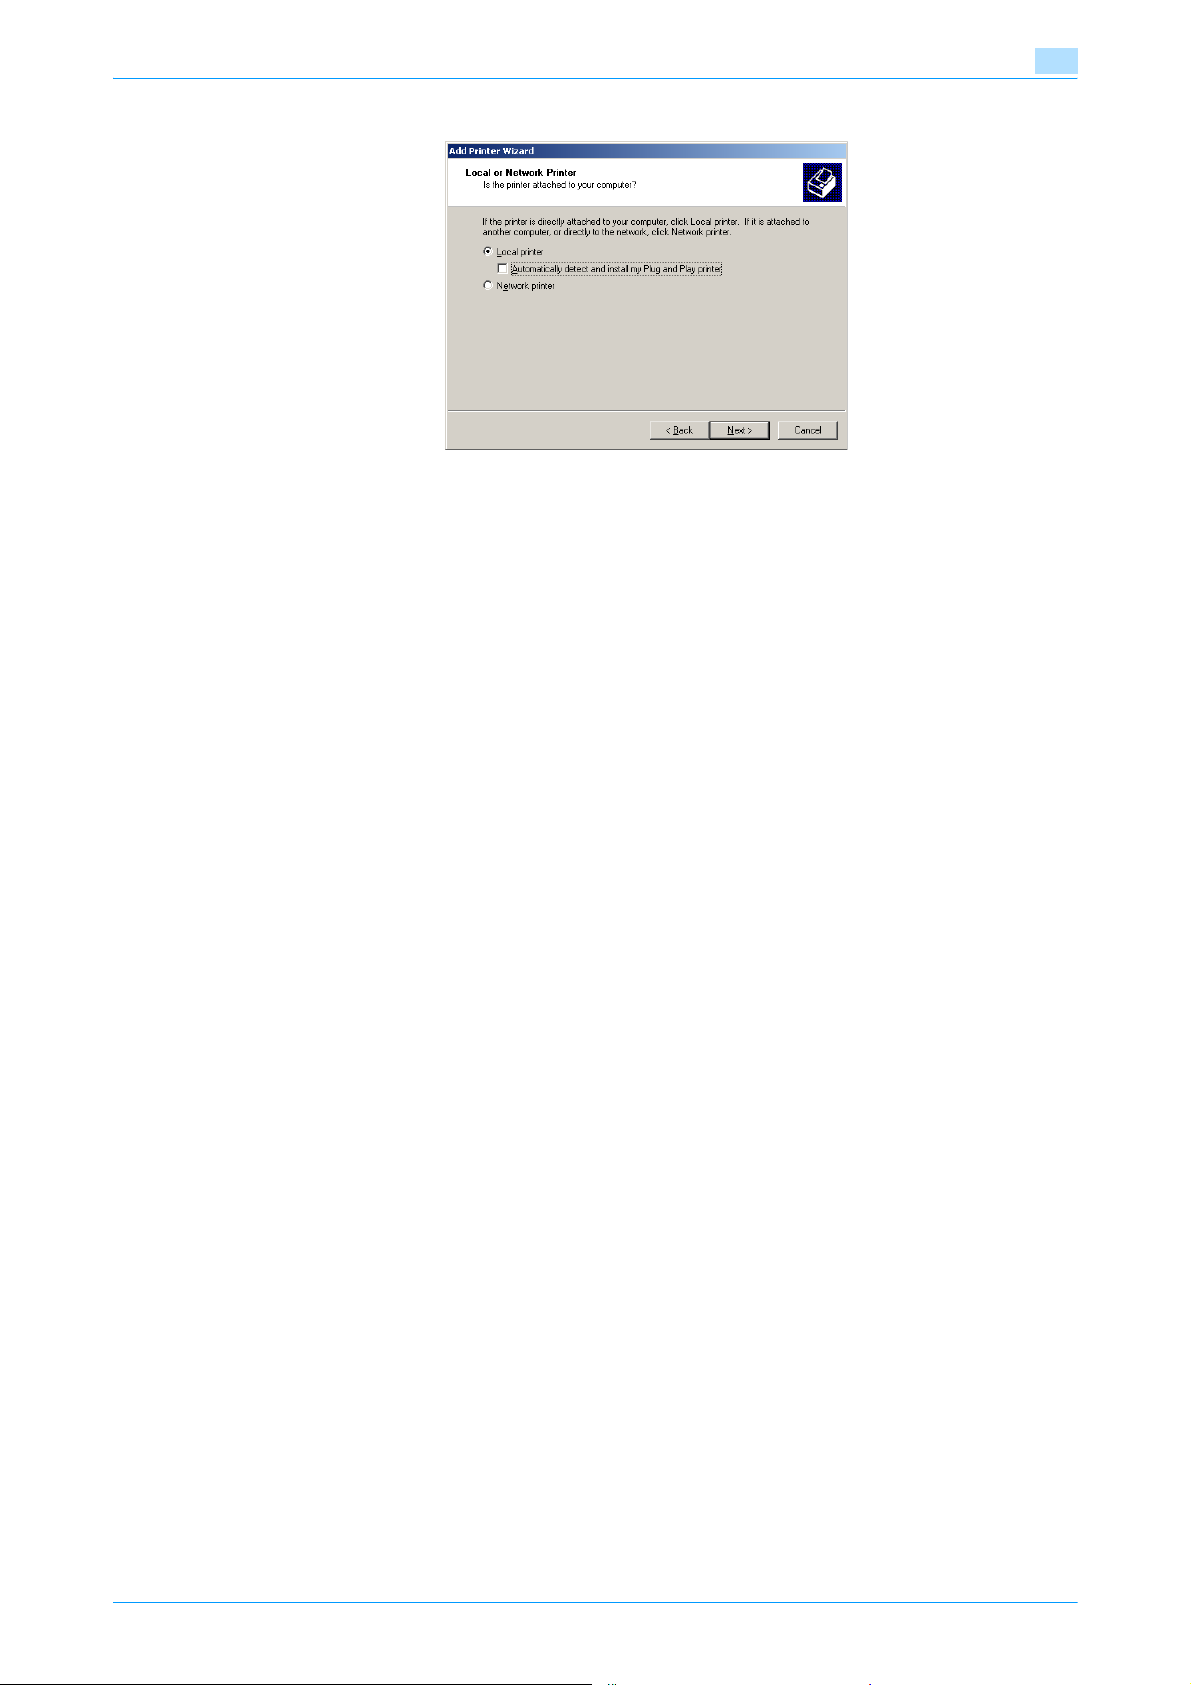
5 In the screen for selecting the printer connection, select "Local Printer".
6 Click the [Next] button.
A screen for specifying ports appears.
7 Click "Create a new port", and then select "Standard TCP/IP Port" for the type of port.
– For Windows NT 4.0, select "LPR Port" in the "Available Printer Ports" list, and then click the [New
2
Port] button. For details, refer to the User’s Guide [Print Operations (IC-207)].
8 Click the [Next] button.
The Add Standard TCP/IP Printer Port Wizard starts.
9 Click the [Next] button.
10 In the "Printer Name or IP Address" box, enter the IP address for this machine, and then click the [Next]
button.
– If the Additional Port Information Required dialog box appears, go to step 11.
– If the Finish screen appears, go to step 14.
11 Select "Custom", and then click the [Settings] button.
12 Change the settings according to the port, and then click the [OK] button.
– For an LPR connection, Select "LPR", and then enter "Print" in the "Queue name" box.
– For a Port9100 connection, select "RAW", and then enter the RAW port number (9100 at default) in
the "Port Number" box.
– The information entered here is case-sensitive.
13 Click the [Next] button.
14 Click the [Finish] button.
The Add Printer Wizard appears.
15 Click the [Have Disk] button.
16 Click the [Browse] button.
17 Specify the desired folder on the CD-ROM that contains the fax driver, and then click the [Open] button.
– Select the specified folder according to the printer driver to be used, the operating system, and the
language.
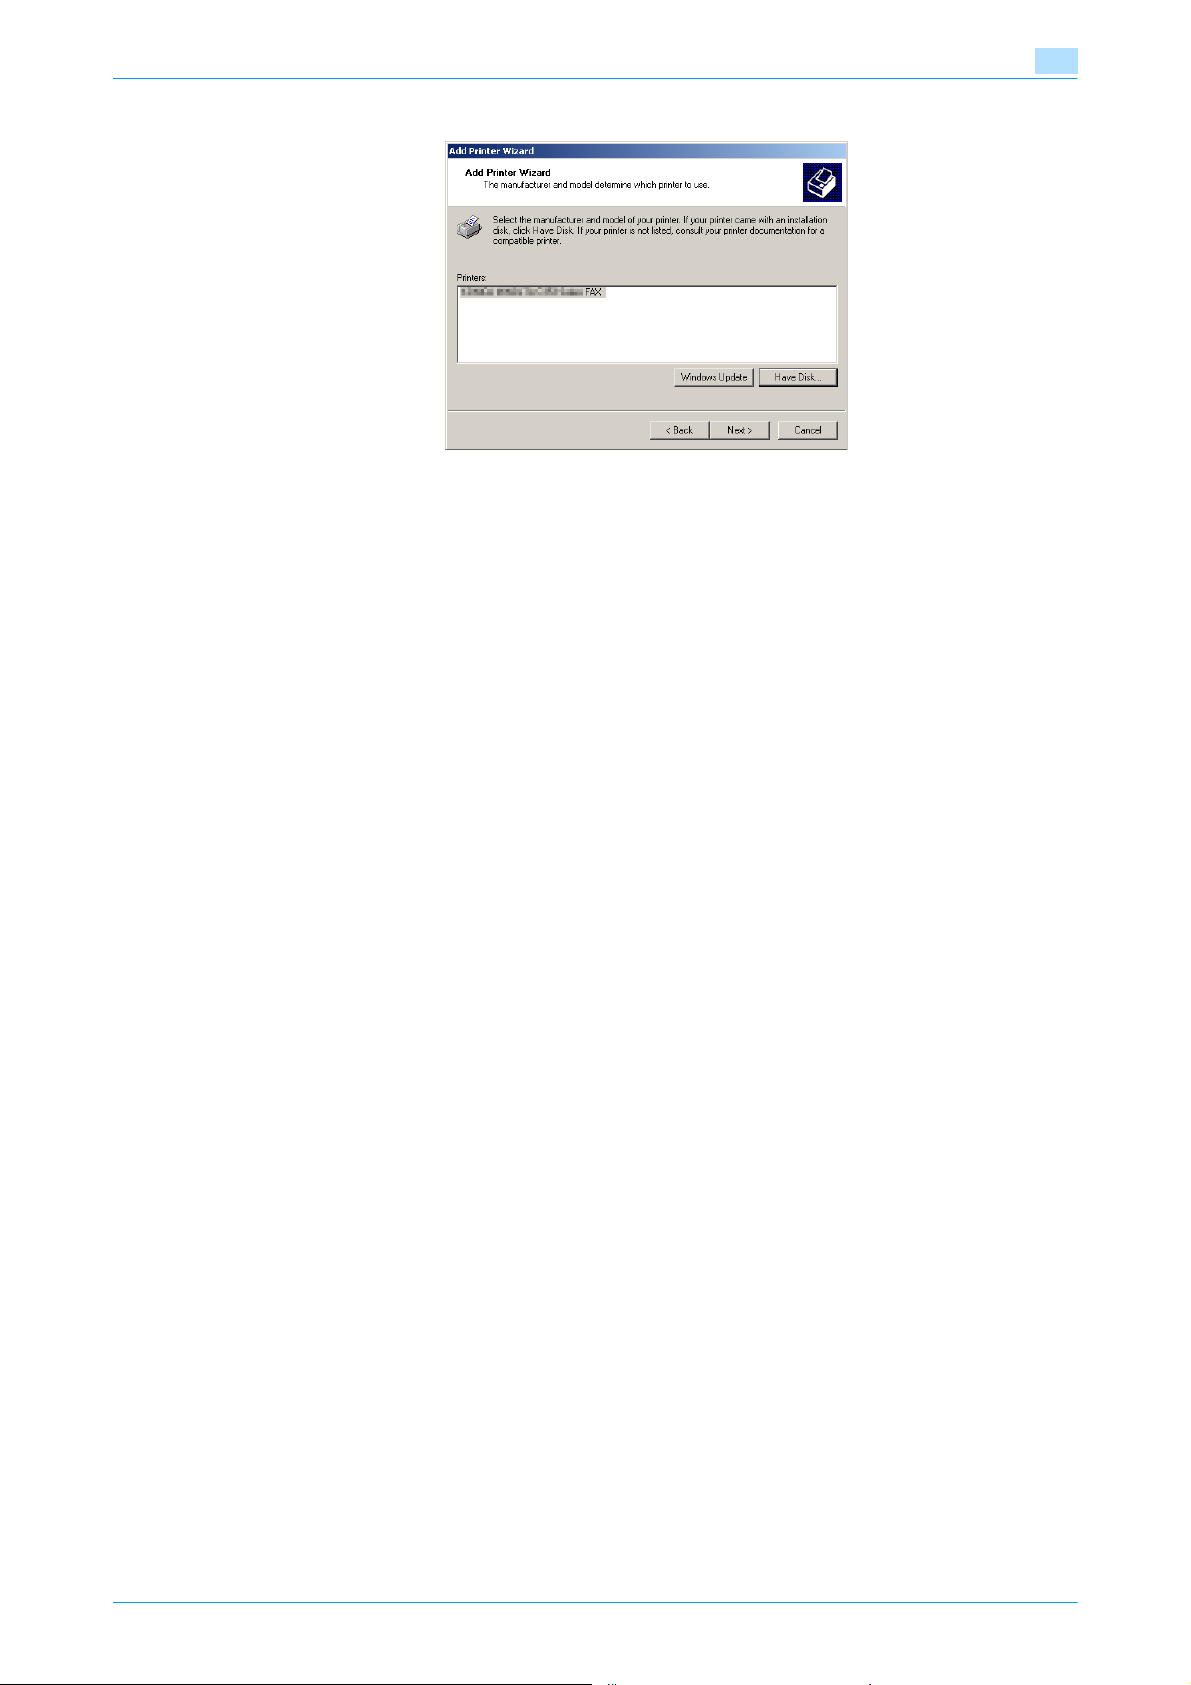
18 Click the [OK] button.
The "Printers" list appears.
Fax Driver 2-13
Page 25
Installing the fax driver
19 Click the [Next] button.
20 Follow the on-screen instructions.
– When the Digital Signature dialog box appears, click the [Yes] button.
21 When installation is complete, make sure that the icon of the installed printer appears in the Printers
window.
22 Remove the CD-ROM from the CD-ROM drive.
This completes the fax driver installation.
2
Fax Driver 2-14
Page 26

Installing the fax driver
2.4 Installing the fax driver using Plug and Play
2.4.1 For Windows XP/Server 2003
1 After using a USB cable to connect this machine to a computer, turn the computer on.
– Do not disconnect or connect the cable while the computer is starting up.
2 Insert the printer driver CD-ROM into the computer’s CD-ROM drive.
3 Turn the main power of this machine on.
The Found New Hardware Wizard dialog box appears.
– When a connection is made with the USB port, the local interface kit is required.
– If the Found New Hardware Wizard does not start up, turn the main power off, then on again.
– When turning the power off, then on again, wait at least 10 seconds before turning the power on
again; otherwise, this machine may not function properly.
4 Select "Install from a list or specific location (Advanced)", and then click the [Next] button.
– If the Windows connect to Windows Update dialog box appears, select "NO".
5 From "Search for the best driver in these locations", select "Include this location in the search", and
then click the [Browse] button.
6 Specify the desired folder on the CD-ROM that contains the fax driver, and then click the [Open] button.
– Select the specified folder according to the printer driver to be used, the operating system, and the
language.
2
7 Click the [Next] button, and then follow the on-screen instructions.
– When the Windows logo test and Digital Signature dialog box appears, click the [Continue Anyway]
or [YES] button.
8 Click the [Finish] button.
9 When installation is complete, make sure that the icon of the installed printer appears in the Printers
and Faxes window.
10 Remove the CD-ROM from the CD-ROM drive.
This completes the fax driver installation.
Fax Driver 2-15
Page 27

Installing the fax driver
2.4.2 For Windows Vista/7/Server 2008
Making the installed fax driver known to the computer
To connect this machine using the USB port in Windows Vista/Server 2008/7, install the fax driver before
making it known to the computer with plug and play.
0 When a connection is made with the USB port, the local interface kit is required.
1 Install the fax driver for this machine.
– Install the fax driver using the installer or Add Printer Wizard.
– To use the Add Printer Wizard, select the USB port to be connected in the [Use an existing port]
page. For details, refer to p. 2-7 or p. 2-15.
2 Connect this machine to the computer using a USB cable.
3 Turn on the main power of this machine.
– The fax driver for this machine is detected and the machine is ready to print.
– If no fax driver is detected, turn this machine off, then on again. In this case, turn off this machine,
and then wait approximately 10 seconds before turning it on again. If you turn this machine on
immediately after turning it off, it may not function correctly.
4 After finishing the installation, make sure that the icon for the installed printer is displayed in the
[Printers] or [Devices and Printers] window.
2
!
Detail
If the fax driver is not correctly installed, the driver must be updated using [Update Driver ...]. For details,
refer to p. 2-17.
Installing the fax driver when connecting the machine
In Windows Vista/Server 2008, the fax driver can be installed after you connect this machine.
0 In Windows 7/Server 2008 R2, a window for specifying an installation disk does not appear after the
machine is connected to the computer. Install the printer driver and connect the driver as described in
"Making the installed fax driver known to the computer".
1 Connect this machine to the computer using a USB cable, and then start the computer.
– When starting up the computer, do not plug in or unplug the cable.
2 Turn on the main power of this machine.
– The [Found New Hardware] dialog box appears.
– If the [Found New Hardware] dialog box does not appear, turn this machine off, then on again. In
this case, turn off this machine, and then wait approximately 10 seconds before turning it on again.
If you turn this machine on immediately after turning it off, it may not function correctly.
3 Click [Locate and install driver software (recommended)].
4 Click [Don’t search online].
– The dialog box requesting the disk (CD-ROM) appears.
– If you do not have the disk (CD-ROM), click [I don't have the disc, show me other options]. On the
next page, select [Browse my computer for driver software (advanced)], and then specify a desired
fax driver folder.
– Select a folder according to the printer driver, operating system, and language to be used.
5 Insert the printer driver CD-ROM into the CD-ROM drive of the computer.
The information on the disk is searched for, and then the list of the software supported by this machine
appears.
6 Select a desired fax driver name, and then click [Next].
7 Follow the instructions on the pages that follow.
– If the [User Account Control] window appears, click [Continue].
Fax Driver 2-16
Page 28

Installing the fax driver
– If the [Windows Security] window for verifying the publisher appears, click [Install this driver
8 When the installation completes, click [Close].
9 After finishing the installation, make sure that the icon for the installed printer is displayed in the
[Printers] window.
10 Remove the CD-ROM from the CD-ROM drive.
This completes the fax driver installation.
Updating the driver after connecting this machine
In Windows 7, if this machine is connected without first installing the fax driver, the driver will not be correctly
identified. If the fax driver is not correctly identified, the driver must be updated using [Update Driver ...].
1 Open the [Devices and Printers] window.
– Open the [Control Panel], select [Hardware and Sound], and then click [View devices and printers].
– When [Control Panel] is displayed in an icon view, double-click [Devices and Printers].
2 Right-click the device name of the machine that is under [Unspecified] and then click [Properties].
– If [Unknown Device] appears instead of the device name of the machine, right-click the device to
2
software anyway].
delete it, and then perform the method as described in "Making the installed fax driver known to the
computer".
3 In the [Hardware] tab, click [Properties].
4 In the [General] tab, click [Change Settings].
5 In the [Driver] tab, click [Update Driver ...].
6 In the page in which to select how to search the driver software, click [Browse my computer for driver
software].
7 Click [Browse...].
8 Select a desired fax driver folder on the CD-ROM, and then click [OK].
– Select a folder according to the printer driver, operating system, and language to be used.
9 Click [Next].
10 Follow the instructions on the pages that follow.
– If the [Windows Security] window for verifying the publisher appears, click [Install this driver
software anyway].
11 Click [Close].
12 After finishing the installation, make sure that the icon for the installed printer is displayed in the
[Devices and Printers] window.
13 Remove the CD-ROM from the CD-ROM drive.
This completes the update of the fax driver.
!
Detail
In Windows Vista/Server 2008, [Update Driver ...] is also available. In Windows Vista/Server 2008, you
can specify [Update Driver ...] by opening [Properties] for this machine that is listed in [Other devices]
under [Device Manager].
To select [Device Manager], right-click [Computer] and then click [Properties]. In the [Tasks] pane that
appears, select [Device Manager].
Fax Driver 2-17
Page 29

Installing the fax driver
2.4.3 For Windows 2000
2
Note
When a connection is made with the USB port, the local interface kit is required.
1 After using a USB cable to connect this machine to a computer, turn on the computer.
– Do not disconnect or connect the cable while the computer is starting up.
2 Insert the printer driver CD-ROM into the computer’s CD-ROM drive.
3 Turn the main power of this machine on.
The Found New Hardware Wizard starts up.
4 Select "Search for a suitable driver for my device (recommended)", and then click the [Next] button.
5 Select "Specify location", and then click the [Next] button.
6 Specify the desired folder on the CD-ROM that contains the fax driver, and then click the [Open] button.
– Select the specified folder according to the printer driver to be used, the operating system, and the
language.
2
7 Click the [OK] button, and then follow the on-screen instructions.
– If digital signature warning message appears, click [Yes].
8 Click the [Finish] button.
9 When installation is complete, make sure that the icon of the installed printer appears in the Printers
window.
10 Remove the CD-ROM from the CD-ROM drive.
This completes the fax driver installation.
Fax Driver 2-18
Page 30
Installing the fax driver
2.5 Uninstalling the fax driver
If it becomes necessary to delete the fax driver, for example, when you want to reinstall the fax driver, follow
the procedure below to delete the driver.
2.5.1 Uninstallation by an uninstallation program
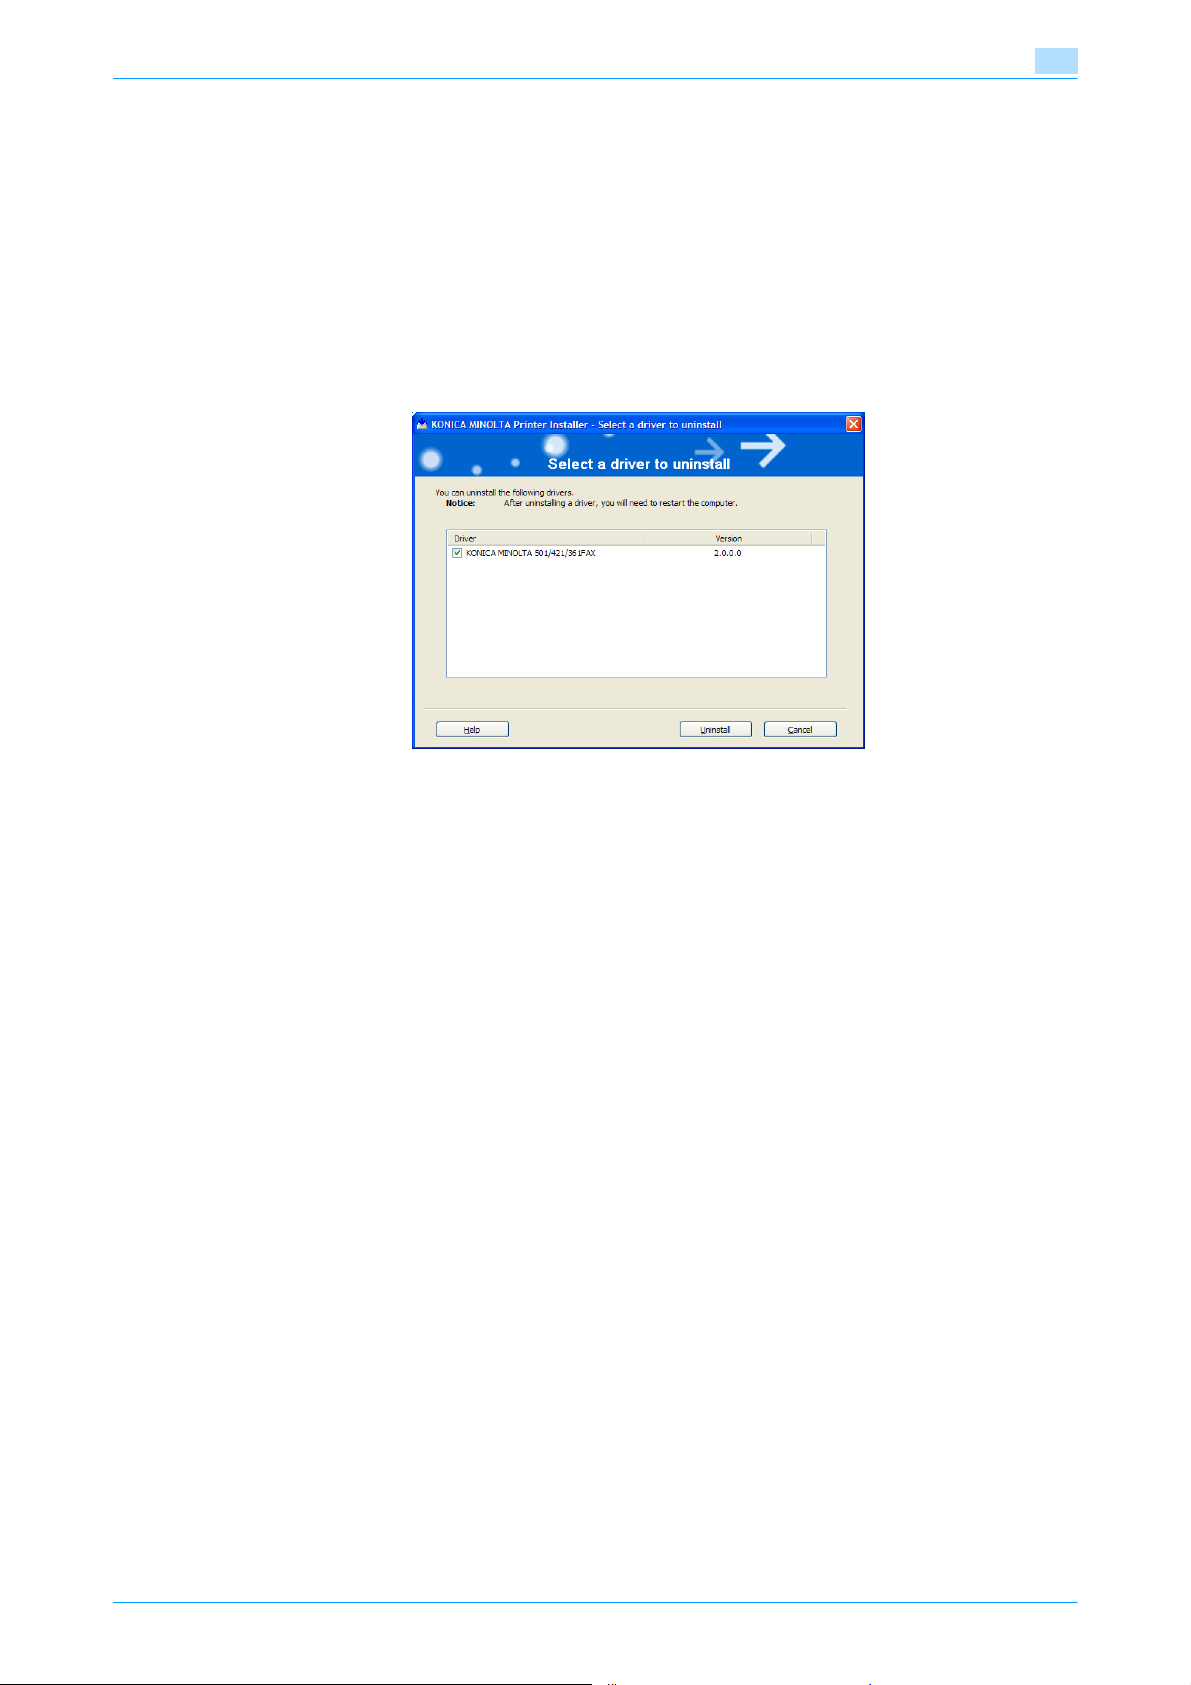
If the fax driver was installed with an installer, the delete function of the fax driver is included.
1 Click the [Start] button, point to "All Programs" (or "Programs"), then to "xxxxx <group name>", and
then click "xxxxx <model_name>"-"Uninstall Printer Driver".
2 Select the components to be deleted, and then click the [Uninstall] button. Follow the on-screen
instructions.
2
3 If the restart dialog box appears, click [OK] to restart the computer.
2.5.2 Uninstallation by an installer
If the fax driver was installed with an installer, it can be deleted by the installer.
1 Insert the printer driver CD-ROM into the CD-ROM drive of the computer.
– Check that the installer starts up, and then continue with step 2.
– If the installer does not start up, open the printer driver folder on the CD-ROM and double-click
"Setup.exe" for the 32bit editions OS and "Setup64.exe" for the 64bit editions OS, and then
proceed to Step 3.
2 Click "Printer Install".
The installer of the printer driver starts.
3 Click the [Agree] button on the installation license agreement screen.
4 In the setup selection dialog box, select "Uninstall Printer Driver", and then click the [Next] button.
5 Select the components to be deleted, and then click the [Delete] button.
– Follow the on-screen instructions.
6 If the restart screen appears, click the [OK] button to restart the computer.
2.5.3 Manual uninstallation
If the fax driver was not installed with an installer, the delete function of the fax driver is not included.
1 Open the Printers window (for Windows XP/Server 2003, Printers and Faxes window).
– For Windows 7/Server 2008 R2, Open the "Devices and Printers" window.
2 Select the icon of the printer that you want to delete.
3 Press the [Delete] key on the computer keyboard to delete the fax driver.
Fax Driver 2-19
Page 31

Installing the fax driver
– For Windows 7/Server 2008 R2, click [Remove device] on the toolbar.
4 Follow the on-screen instructions.
– When the fax driver has been deleted, the icon will disappear from the Printers window (for Windows
For Windows NT 4.0, this completes the uninstallation procedure.
For Windows 2000/XP/Vista/7/Sever 2003/Server 2008, delete the driver from the server properties.
5 Open "Server Properties".
– For Windows 2000/XP/Server 2003, click the [File] menu, and then click [Server Properties].
– For Windows Vista/Server 2008, right-click space in the Printers window and click "Run as
– For Windows 7/Server 2008 R2, click [Print server properties] in the Devices and Printers window.
– If the User Account Control window appears, click the [Continue] button.
6 Click the Driver tab.
7 Select the printer driver to be deleted from the "Installed printer drivers" list, and then click the [Remove]
button.
– For Windows 2000/XP/Server 2003, continue with step 9.
– For Windows Vista/7/Server 2008, continue with step 8.
8 Select "Remove driver and driver package." on the deletion confirmation screen, and then click the [OK]
button.
2
XP/Server 2003, Printers and Faxes window).
administrator", and then click "Server Properties".
9 In the Deletion Confirmation dialog box, click the [Yes] button.
– For Windows Vista/7/Server 2008, when the deletion confirmation screen is displayed, click the
[Delete] button.
10 Close the window, and then restart the computer.
– Be sure to restart the computer.
This completes the fax driver uninstallation procedure.
2
Note
Even if the fax driver is deleted using the method described above, the model information file will remain
in the computer. Therefore, the driver may not be able to be overwritten when reinstalling the same
version of the fax driver. When installing the same version of the fax driver, be sure to also delete the
files described below.
32bit:
Check the "C:\WINDOWS\system32\spool\drivers\w32x86" folder and delete the folder of the
corresponding model if it is available.
64bit:
Check the "C:\WINDOWS\system32\spool\drivers\x64" folder and delete the folder of the
corresponding model if it is available.
If the PCL driver and PostScript driver are installed, the model information of both drivers is deleted. If
one driver is remaining, do not delete it.
Delete the "oem*.inf" and "oem*.PNF" files in the "C:\WINDOWS\inf" folder. (The asterisk (*) in the file
name displays a number, and the number varies according to the environment of the computer.) Before
deleting the files, open the INF file, check that the model name is described in the last several lines, and
then check that the file of the corresponding model is available. The PNF file is the same number as the
INF file. When you have deleted a file using "Remove driver and driver package." in Windows
Vista/7/Server 2008, this operation is not required.
Fax Driver 2-20
Page 32

3
Setting up the fax driver
(Windows)
Page 33
Setting up the fax driver (Windows)
3 Setting up the fax driver (Windows)
3.1 Sending a fax
3.1.1 Fax operations
2
Reminder
To use the fax function, you must install the optional fax kit onto this machine. In addition, you must
enable the fax kit on the Configure tab after installation. For details, refer to "Specifying the Configure
tab settings" on page 3-18.
!
Detail
For details on the fax function of this machine, refer to the User’s Guide [Network Scan/Fax/Network
Fax Operations].
1 Create the data you want to send using any application.
2 From the [File] menu, select "Print".
3
3 From "Printer Name", select "FAX Driver".
4 Click the [Preferences] button or the [Properties] button to change the fax driver settings as necessary.
– By clicking the [Preferences] button or the [Properties] button in the Print dialog box, you can specify
the settings of each model in the FAX Printing Preferences dialog box that appears. For details, refer
to "Settings" on page 3-8.
5 Click the [Print] button.
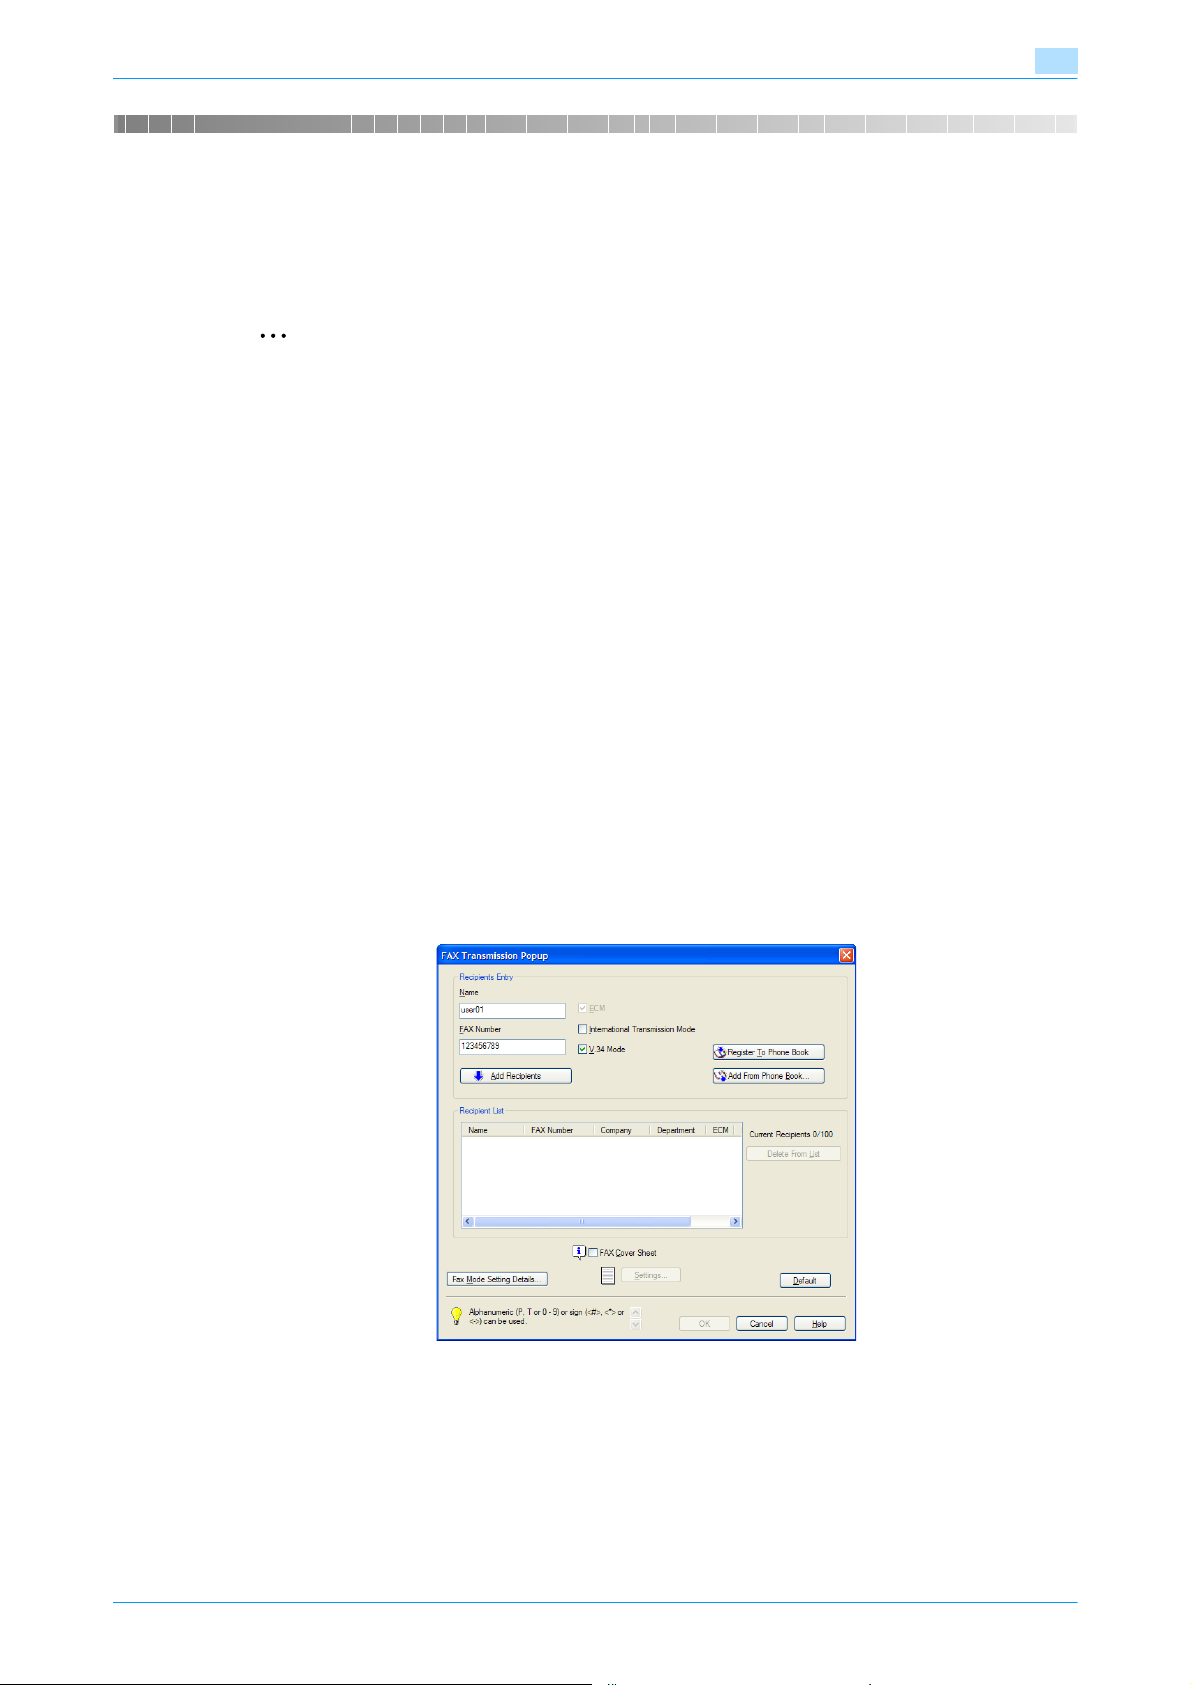
The FAX Transmission Popup dialog box appears.
6 Enter the recipient’s name and fax number in the "Name" and "FAX Number" text boxes.
– Up to 80 characters can be entered in the "Name" text box.
– Up to 38 characters (numbers 0 through 9, hyphens (-), #, *, P, and T) can be entered in the "FAX
Number" text box. To send a fax overseas, be sure to enter the country code first.
Fax Driver 3-2
Page 34
Setting up the fax driver (Windows)
– Change the transmission mode as necessary.
ECM: Specifies the ECM (Error Correction Mode). If the "V.34 Mode" check box is selected, the
"ECM" check box cannot be cleared.
International Transmission Mode: Slows the speed when sending faxes overseas. Select this check
box if errors occur when sending faxes overseas.
V.34 Mode: Specifies the Super G3 fax mode. For normal fax operations, leave this check box
selected. Clear it only if it is not possible to transmit in the recipient’s mode.
– The fax numbers that are registered in the phone book can be specified by clicking the [Add From
Phone Book] button. For details, refer to "Selecting a recipient from the phone book" on
page 3-3.
– The names and fax numbers that were entered can be added to the phone book’s "Simple Entry"
folder by clicking the [Register To Phone Book] button.
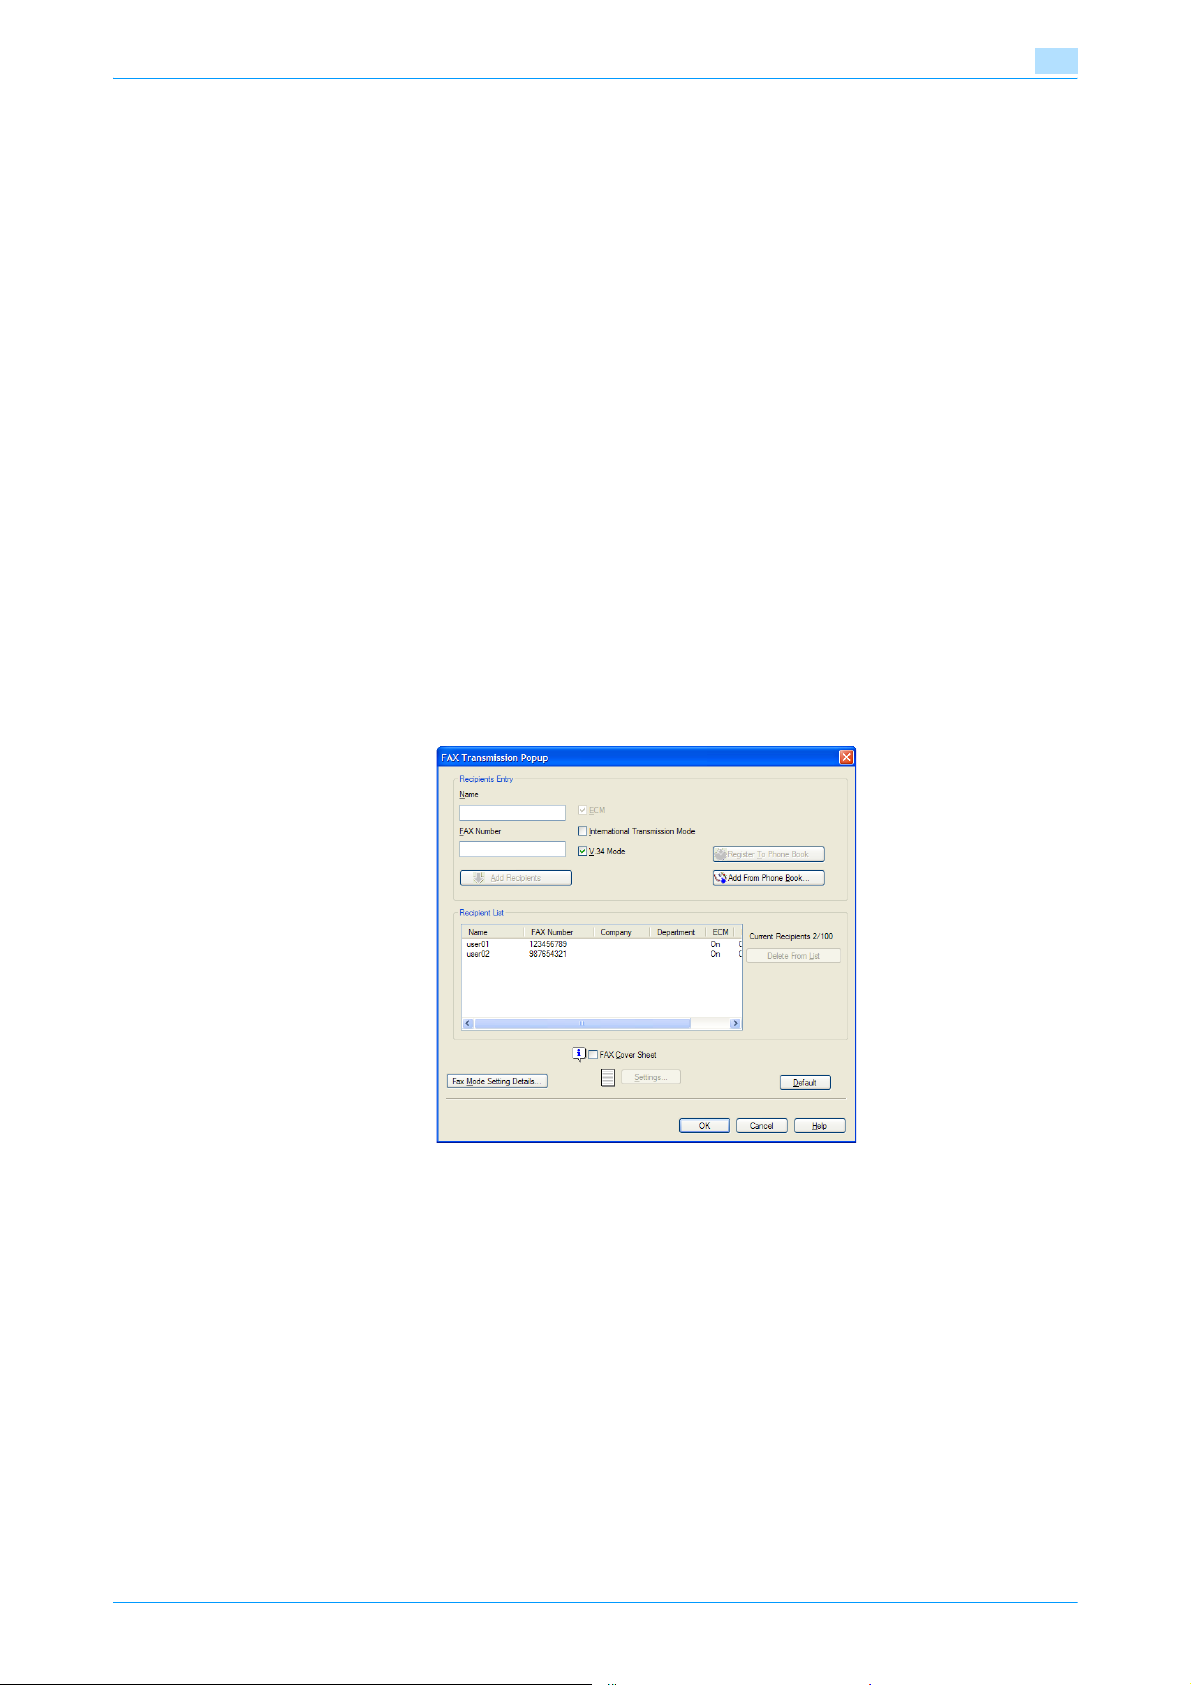
7 Click the [Add Recipients] button.
– To add multiple recipients, repeat steps 6 and 7. Up to 100 recipients can be added.
– To delete a recipient from the list, click the [Delete From List] button.
– Selecting [Confirm to Fax number] contained in the [Settings] tab allows you to recheck the input
information before registration. By doing like this, you can avoid sending out a mail to a wrong
address. For details of the [Settings] tab, see "Settings tab" on page 3-10.
8 If necessary, click the [Fax Mode Setting Details] button to specify the fax mode setting details, or select
the "FAX Cover Sheet" check box to create a fax cover sheet.
– For details, refer to "Specifying the transmission settings" on page 3-5, or "Creating a fax cover
sheet" on page 3-5.
3
9 Click the [OK] button.
The fax data is sent via this machine.
3.1.2 Selecting a recipient from the phone book
!
Detail
To use the phone book, the names and fax numbers of the recipients must be added to the phone book
first. For details, refer to "Adding a recipient to the phone book" on page 3-20.
1 When sending a fax, click the [Add From Phone Book] button in the FAX Transmission Popup dialog
box.
– To open the FAX Transmission Popup dialog box, follow steps 1 to 5 under "Fax operations". For
details, refer to "Fax operations" on page 3-2.
Fax Driver 3-3
Page 35
Setting up the fax driver (Windows)
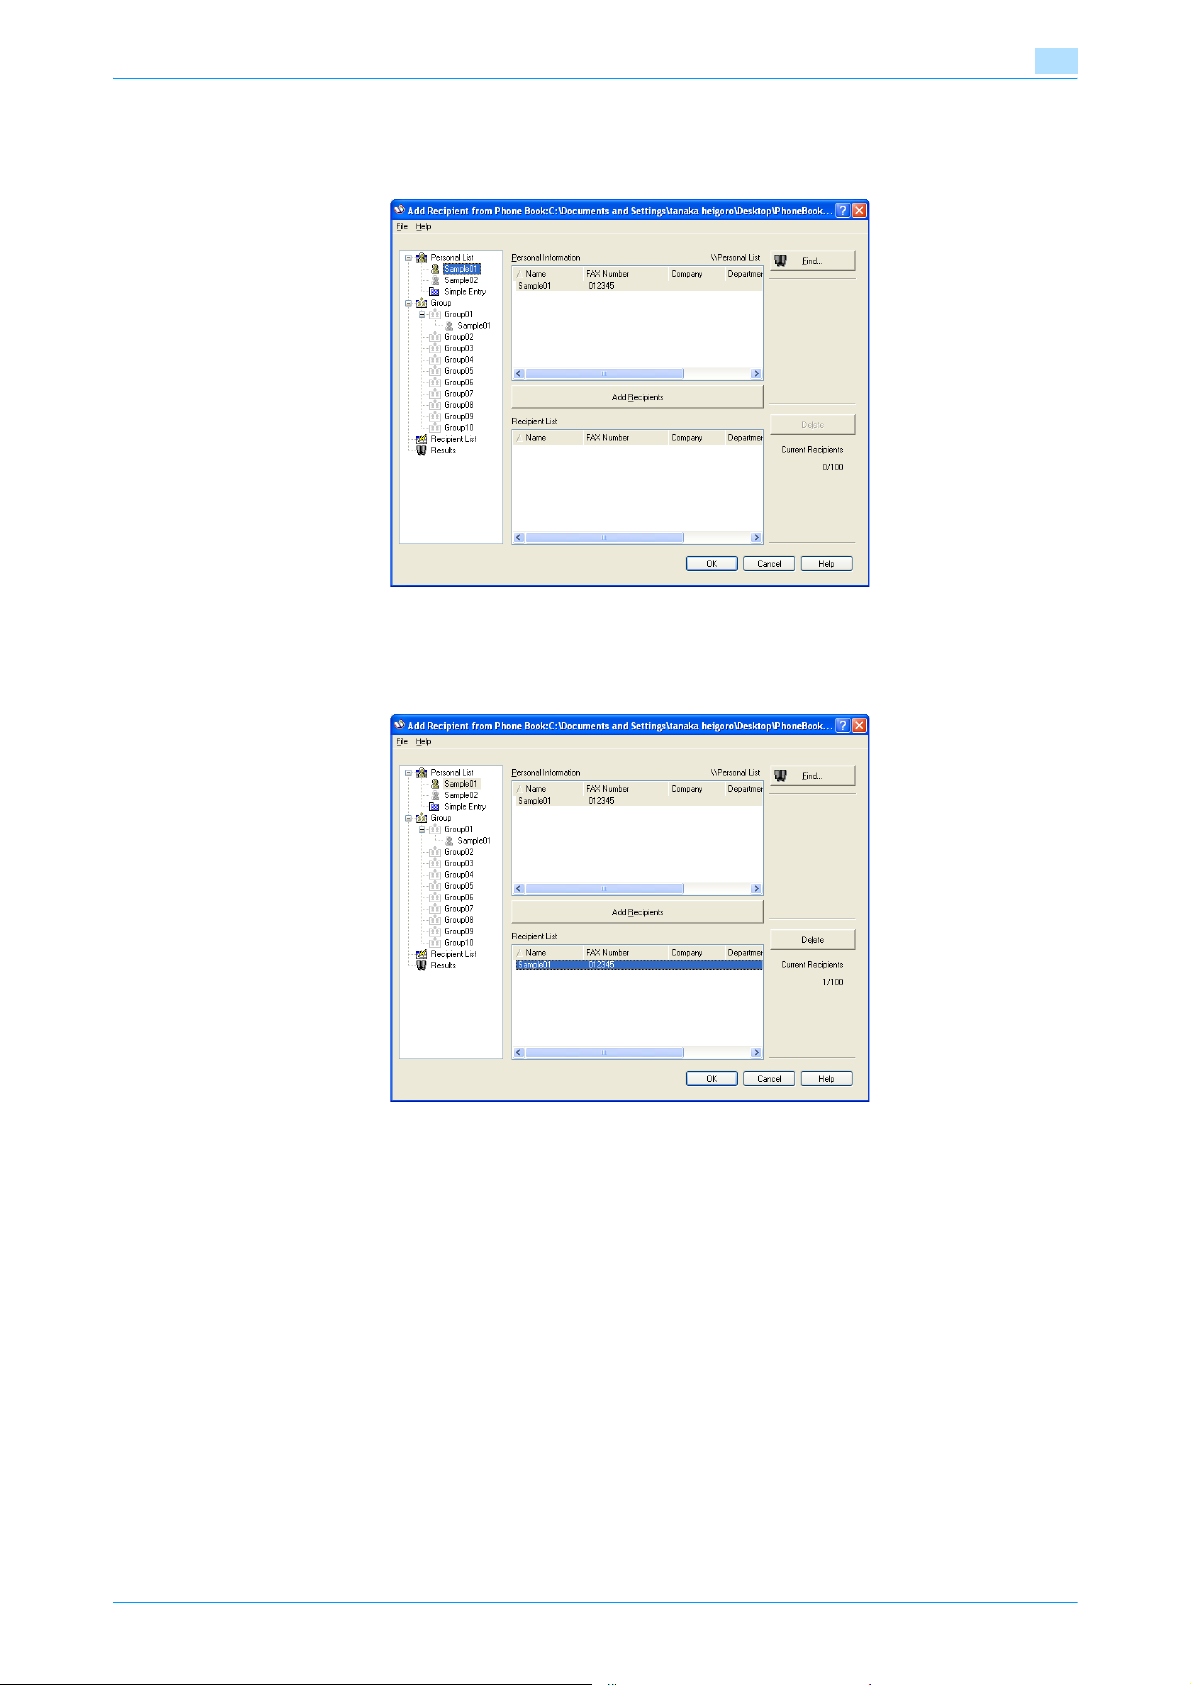
2 Select "Personal List" or "Group" from the list on the left side of the dialog box to display the desired
recipient in "Personal Information".
– Click the [Find] button to specify the conditions to search for a recipient.
3 Select the name of the recipient you want to send a fax to, and then click the [Add Recipients] button.
– Multiple recipients can be added in the same way. Up to 100 recipients can be added.
– To delete a recipient, click the [Delete] button.
3
– If recipients have been added to a group, all the members of the group can be added to "Recipient
List" (group transmission) by selecting a group name, then clicking the [Add Recipients] button.
4 Click the [OK] button.
The names that were specified are added to "Recipient List" and the FAX Transmission Popup dialog
box appears again.
Fax Driver 3-4
Page 36
Setting up the fax driver (Windows)
3.1.3 Specifying the transmission settings
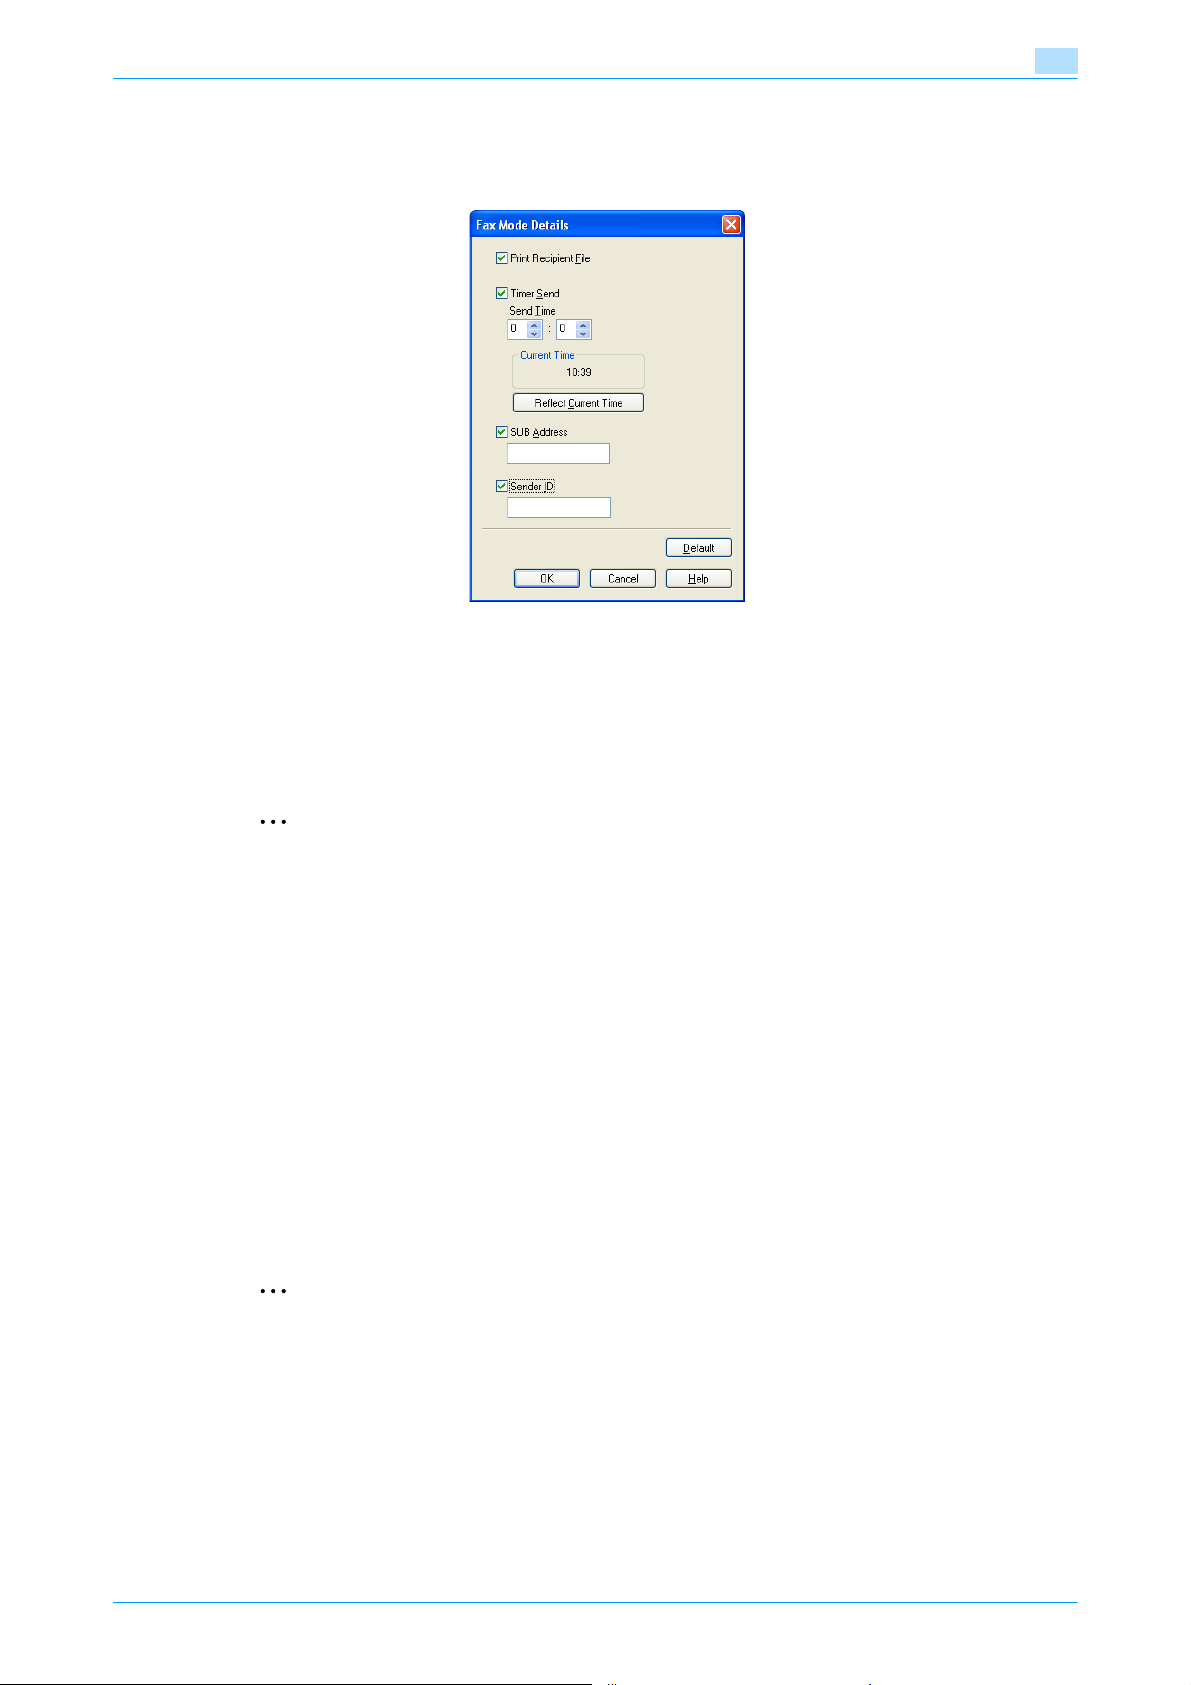
When sending a fax, you can specify the transmission settings in the Fax Mode Details dialog box that
appears when the [Fax Mode Setting Details] button is clicked in the FAX Transmission Popup dialog box.
3
Print Recipient File: Prints the document after a fax was sent.
Timer Send: Sets the transmission time. By clicking the [Reflect Current Time] button, the current time set on
the computer is displayed in the "Send Time" boxes.
SUB Address: Specifies the sub address for sending confidential faxes using F-codes.
Sender ID: Specifies the sender ID for sending confidential faxes using F-codes.
2
Note
When using Timer Send, check that the time set on the computer is synchronized with the time on this
machine. If the transmission time is earlier than the current time of this machine, the fax is sent the next
day.
If sending confidential faxes using F-codes to another fax model, enter the sub address and sender ID
in the "SUB Address" and the "Sender ID" text boxes. Up to 20 characters (numbers 0 through 9) can
be entered in the "Sub Address" text box. Up to 20 characters (numbers 0 through 9, #, and *) can be
entered in the "Sender ID" text box. For the details on the sub address and the sender ID, refer to the
User’s Guide [Network Scan/Fax/Network Fax Operations].
3.1.4 Creating a fax cover sheet
When sending a fax, you can attach a cover sheet to the fax message by selecting the "FAX Cover Sheet"
check box in the FAX Transmission Popup dialog box. You can edit the cover sheets from the FAX Cover
Sheet Settings dialog box that appears by clicking the [Settings] button in the Fax Transmission Popup dialog
box.
In the FAX Cover Sheet Settings dialog box, you can change the settings on the Basic, Recipient, Sender, or
Image tab by switching between each screen.
2
Note
For Windows Vista/7/Server 2008 64bit editions, the "FAX Cover Sheet" check box cannot be selected
from the FAX Transmission Popup dialog box. It must be specified in the Print settings for the fax driver
in advance. In addition, "FAX Cover Sheet" cannot be selected with any of the following functions at
the same time.
- [User Authentication]
- [Account Track]
- [Verify Authentication settings before printing]
- [Popup Authentication Dialog when printing]
1 Select the "FAX Cover Sheet" check box in the FAX Transmission Popup dialog box.
Fax Driver 3-5
Page 37
Setting up the fax driver (Windows)
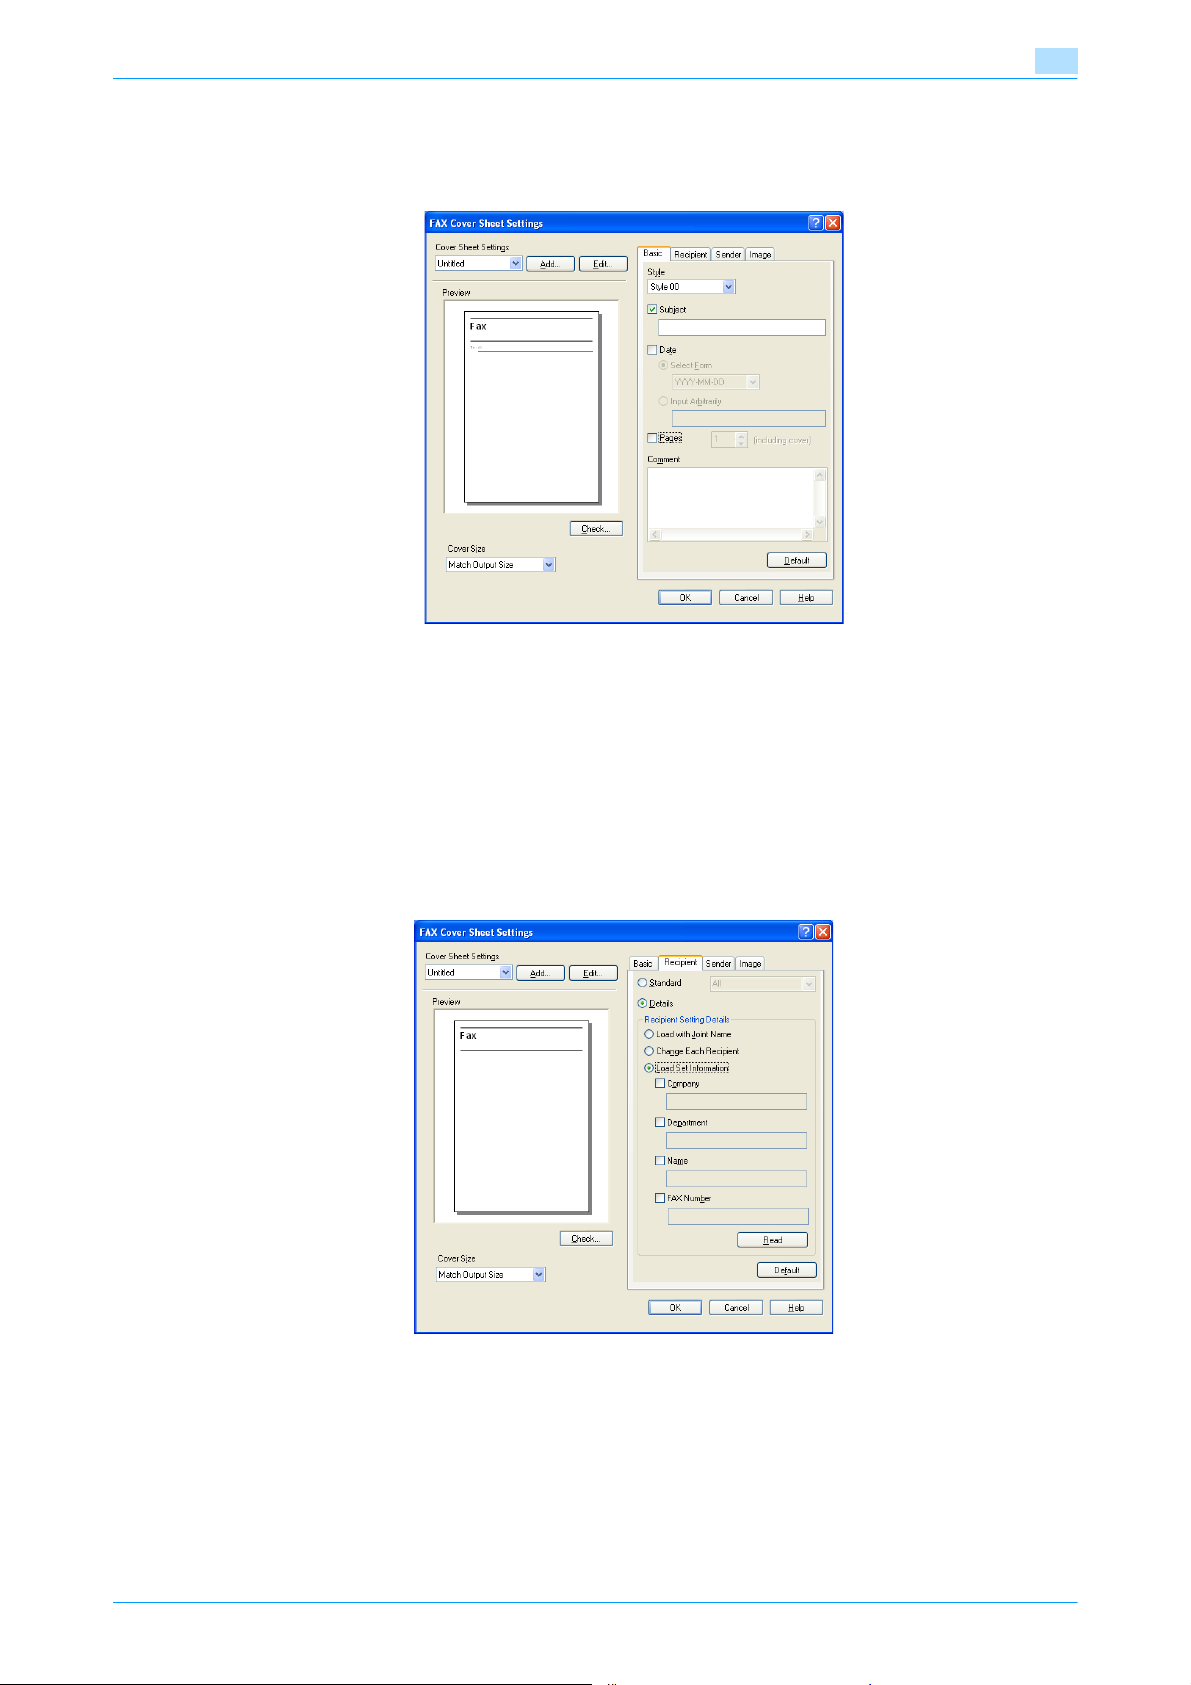
2 Click the [Settings] button.
The FAX Cover Sheet Settings dialog box appears.
3 Select the size of the cover sheet from the "Cover Size" drop-down list.
3
4 On the Basic tab, specify the format of the cover sheet and subject of the fax.
– Style: Selects the format design of the cover sheet.
– Subject: Enters the subject of the fax to be sent. Up to 64 characters can be entered in the "Subject"
text box.
– Date: Specifies the date. Select a format or enter any format. If entering a format, up to 20
characters can be entered in the "Input Arbitrarily" text box.
– Pages: Specifies the number of pages to be sent.
– Comment: Enters the text to be displayed in the comment box. Up to 640 characters can be entered
in the "Comment" text box, and returns are converted into two characters.
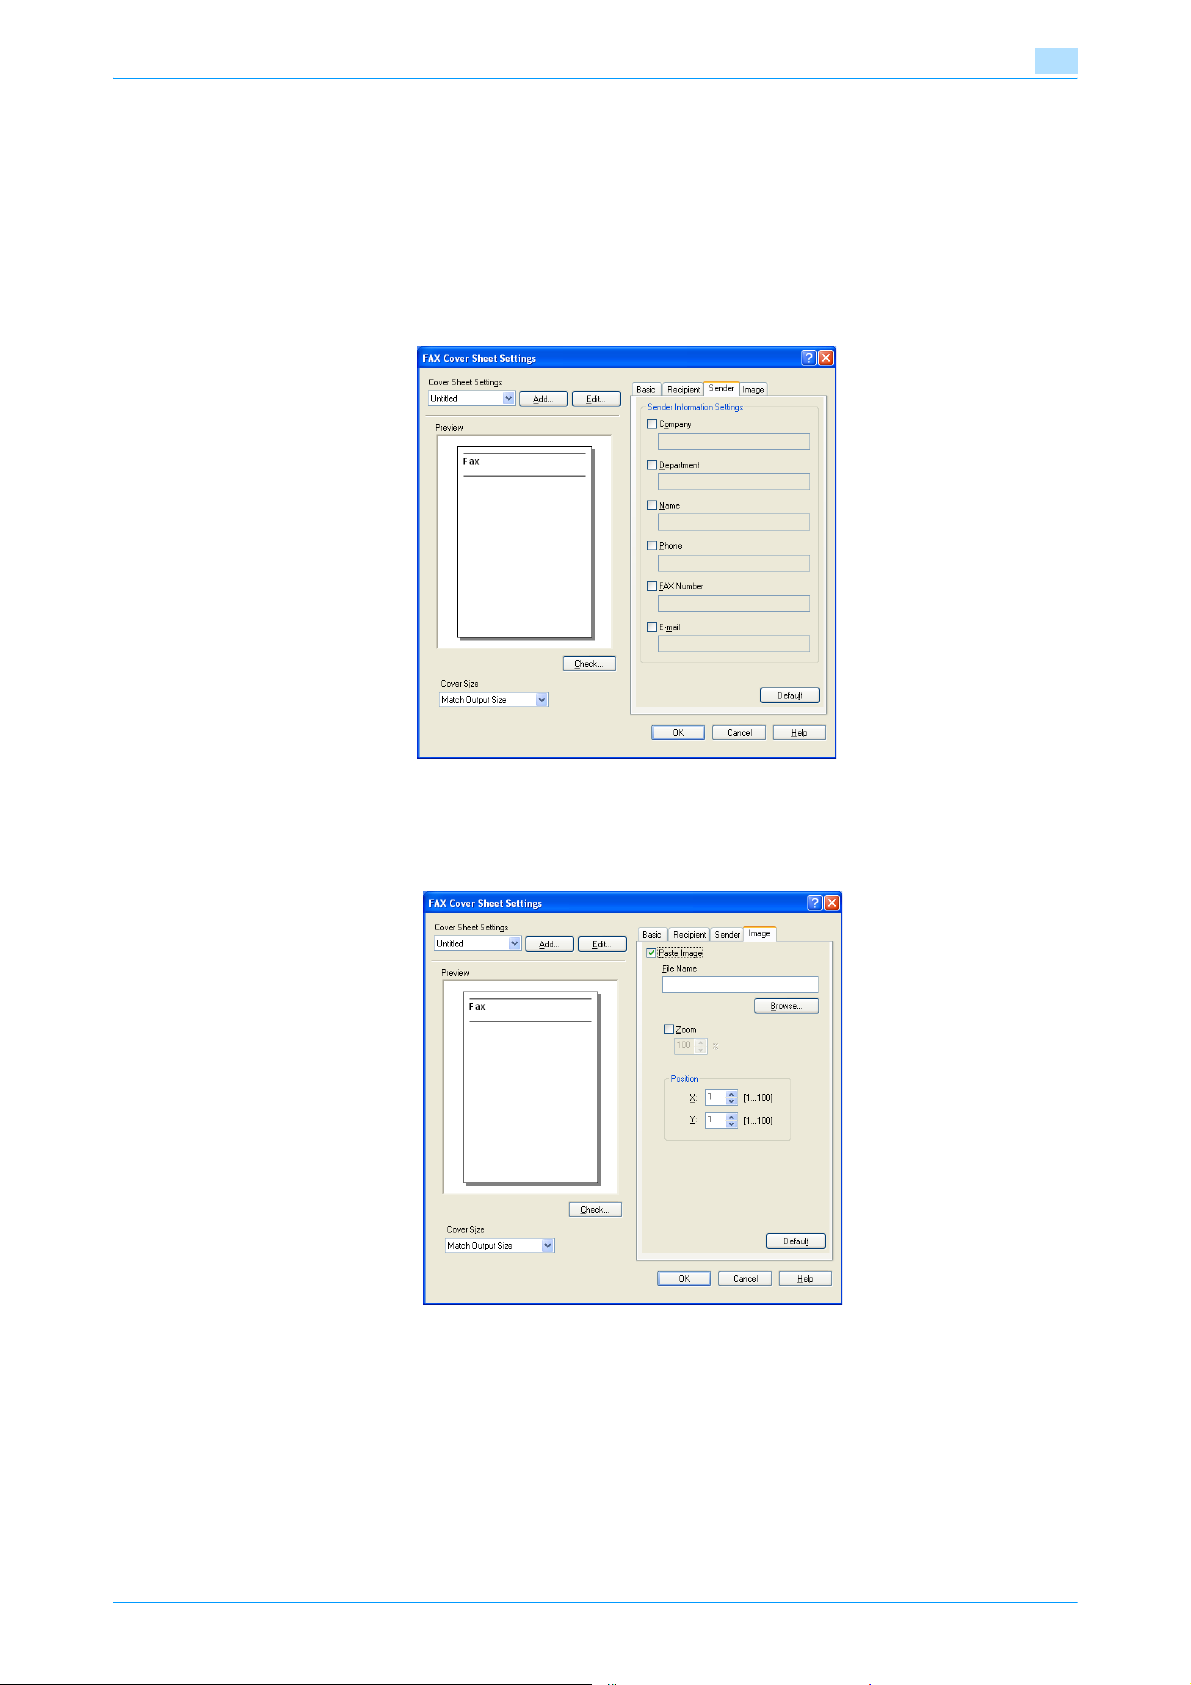
5 Specify the recipient information on the Recipient tab.
– Standard: Specifies standard text.
– Details: Specifies the details described under "Recipient Setting Details".
– Load with Joint Name: Lists the recipient with joint names. The items listed are the items shown
under "Recipient List" on the FAX Transmission Popup dialog box.
– Change Each Recipient: Changes the description for each recipient. The items listed are the items
shown under "Recipient List" on the FAX Transmission Popup dialog box.
– Load Set Information: Lists the information that was entered in the "Company", "Department",
"Name", and "FAX Number" text boxes.
– Read: Reads the information of the first recipient to the information box.
Fax Driver 3-6
Page 38
Setting up the fax driver (Windows)
– Up to 40 separate cover sheets can be created if "Change Each Recipient" is selected.
– Even if "Change Each Recipient" is selected, the first recipient is displayed as a sample in "Preview".
– If "Load with Joint Name" and "Change Each Recipient" are selected, the names that were added
are entered, but titles cannot be added.
– If a recipient is not specified on the FAX Transmission Popup dialog box, "Load Set Information"
cannot be selected. In addition, it cannot be selected on the FAX tab in the FAX Printing Preferences
dialog box as well.
6 Specify the sender information on the Sender tab.
Select the check box of the information to be listed, and then enter the information.
3
7 To place graphics such as a company logo or map on a cover sheet, specify the image file on the Image
tab.
Select the "Zoom" check box to specify the size, and set the position with the values in the "X" and "Y"
boxes.
8 Check the specified settings.
Click the [Check] button to check an enlarged preview image.
– Click the [Add] button to save the cover sheet settings. The settings can then be recalled from the
"Cover Sheet Settings" drop-down list the next time a cover sheet is used.
9 Click the [OK] button.
Fax Driver 3-7
Page 39
Setting up the fax driver (Windows)
3.2 Settings
3.2.1 Common settings
The following describes the common settings and buttons that are displayed on all tabs.
3
Button Function
OK Click this button to close the dialog box and apply any settings that have been
Cancel Click this button to cancel any settings that have been changed and close the dialog
Help Click this button to display the help for each item on the currently displayed dialog box.
Add (Favorite Setting) Click this button to save the current settings and to view them at a later time.
Edit (Favorite Setting) Click this button to change the saved settings.
Default Click this button to return the settings to their defaults, which were selected when the
View A preview of the page layout as specified in the current settings is displayed and a pre-
changed.
box.
driver was installed.
view image of the print job can be checked.
!
Detail
To enable any installed options, you must specify the Device Option settings. For details, refer to
"Specifying the Configure tab settings" on page 3-18.
Fax Driver 3-8
Page 40
Setting up the fax driver (Windows)
3.2.2 FAX tab
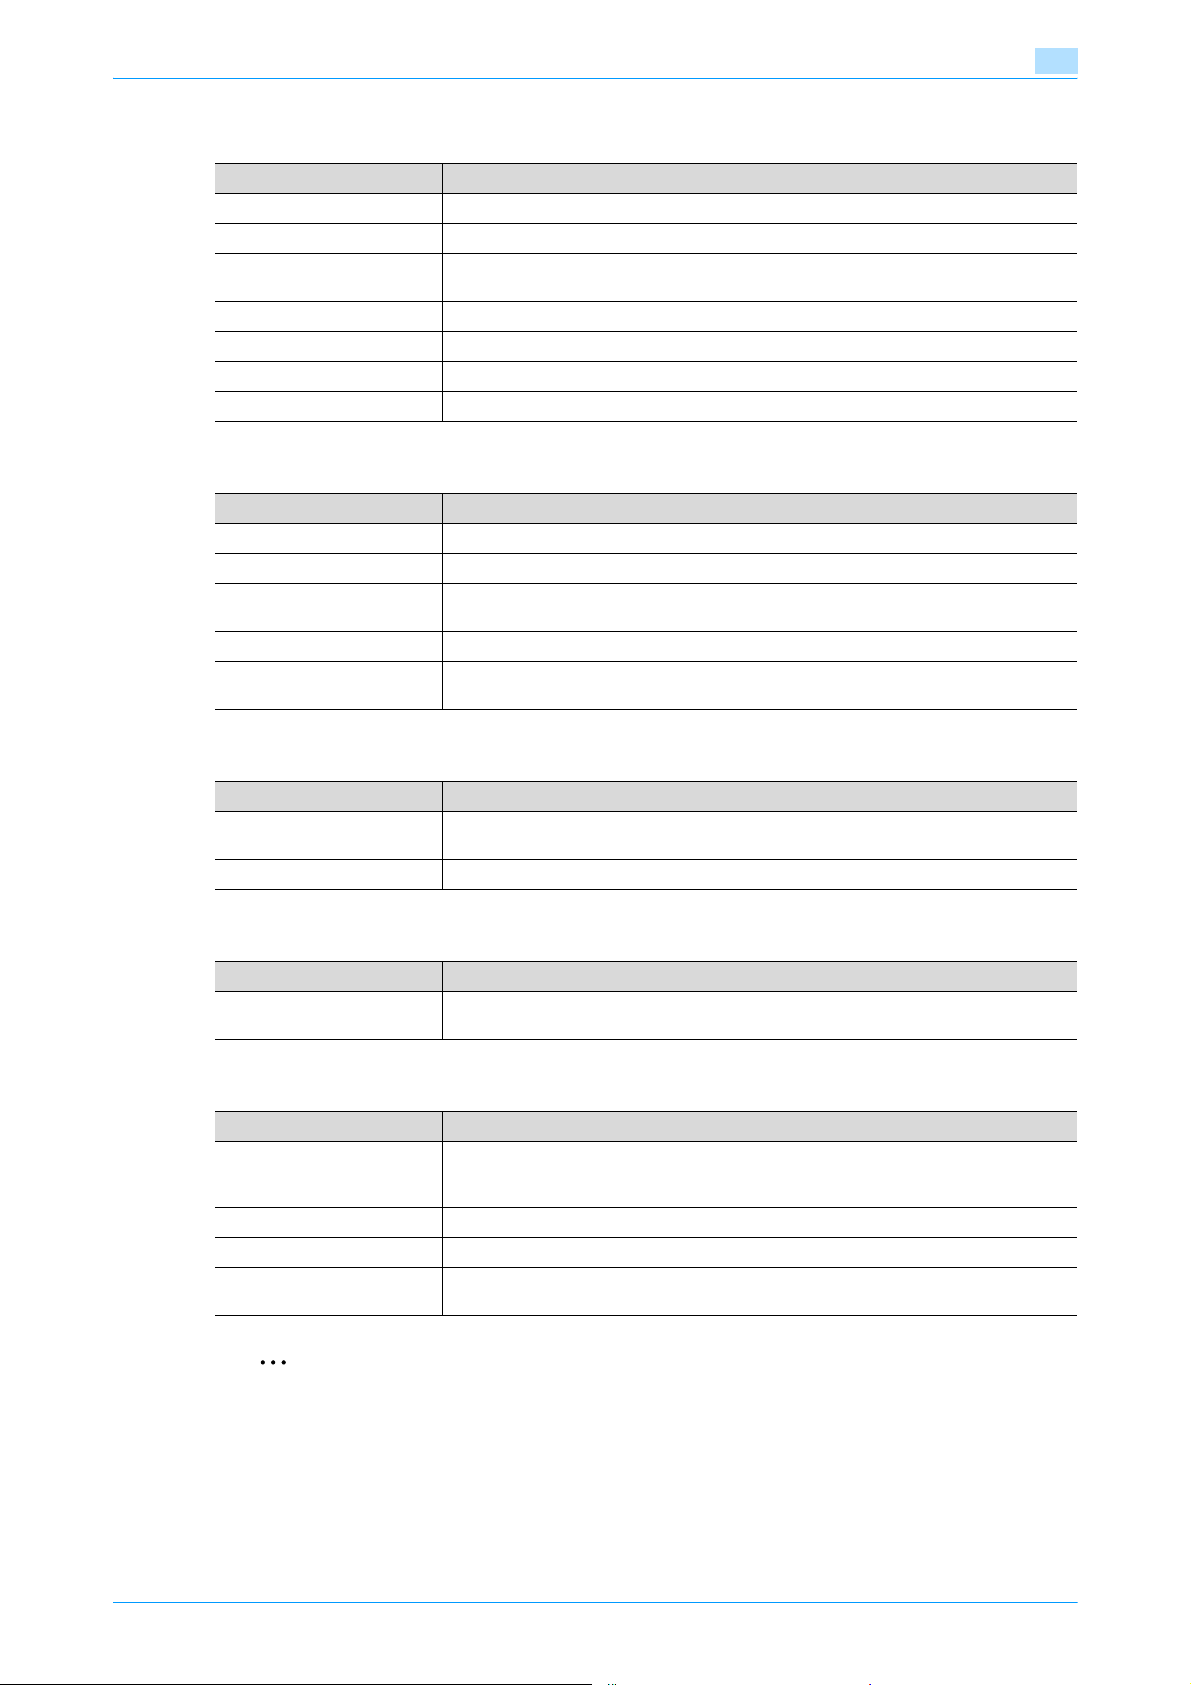
Item Function
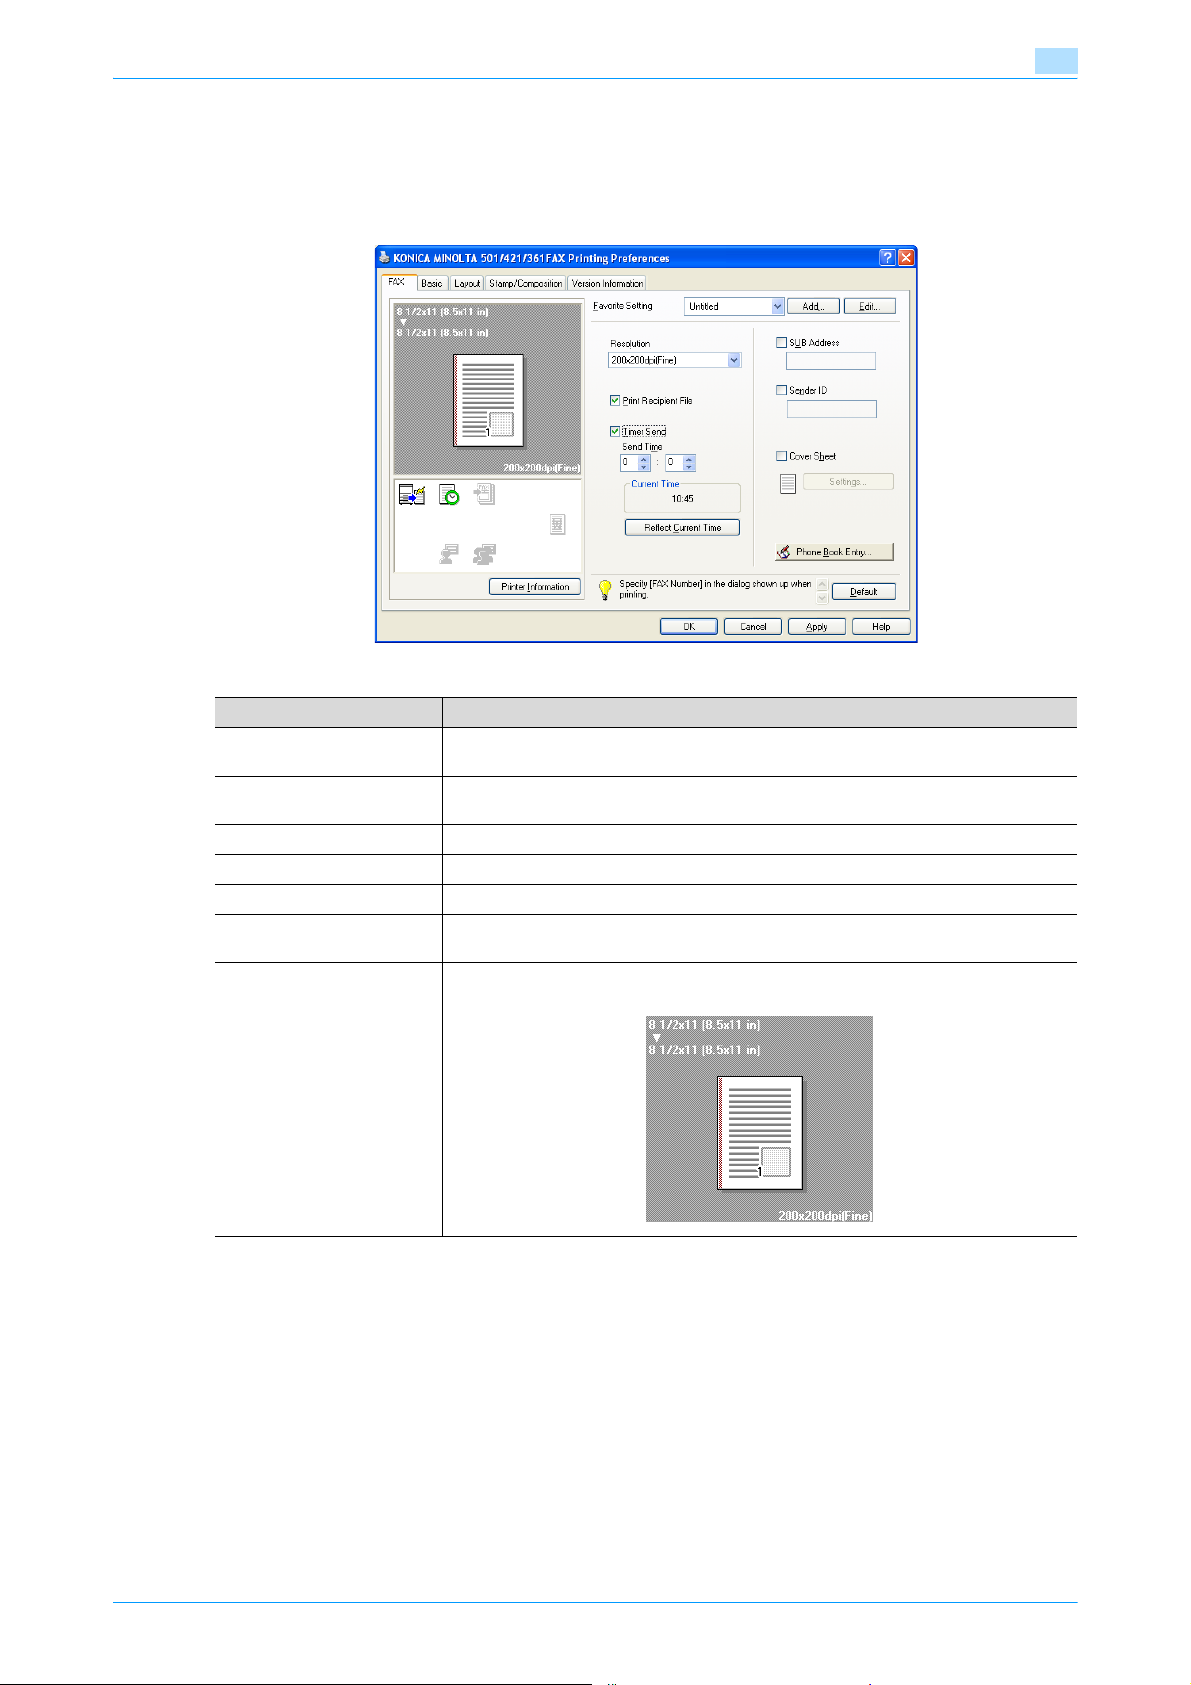
Resolution Specifies the fax resolution.
Print Recipient File Prints the document after the fax was sent.
Timer Send Sets the transmission time. By clicking the [Reflect Current Time] button, the current
SUB Address Specifies the sub address for sending confidential faxes using F-codes.
Sender ID Specifies the sender ID for sending confidential faxes using F-codes.
Cover Sheet Specifies the fax cover sheet.
Phone Book Entry Edits the phone book.
3.2.3 Basic tab
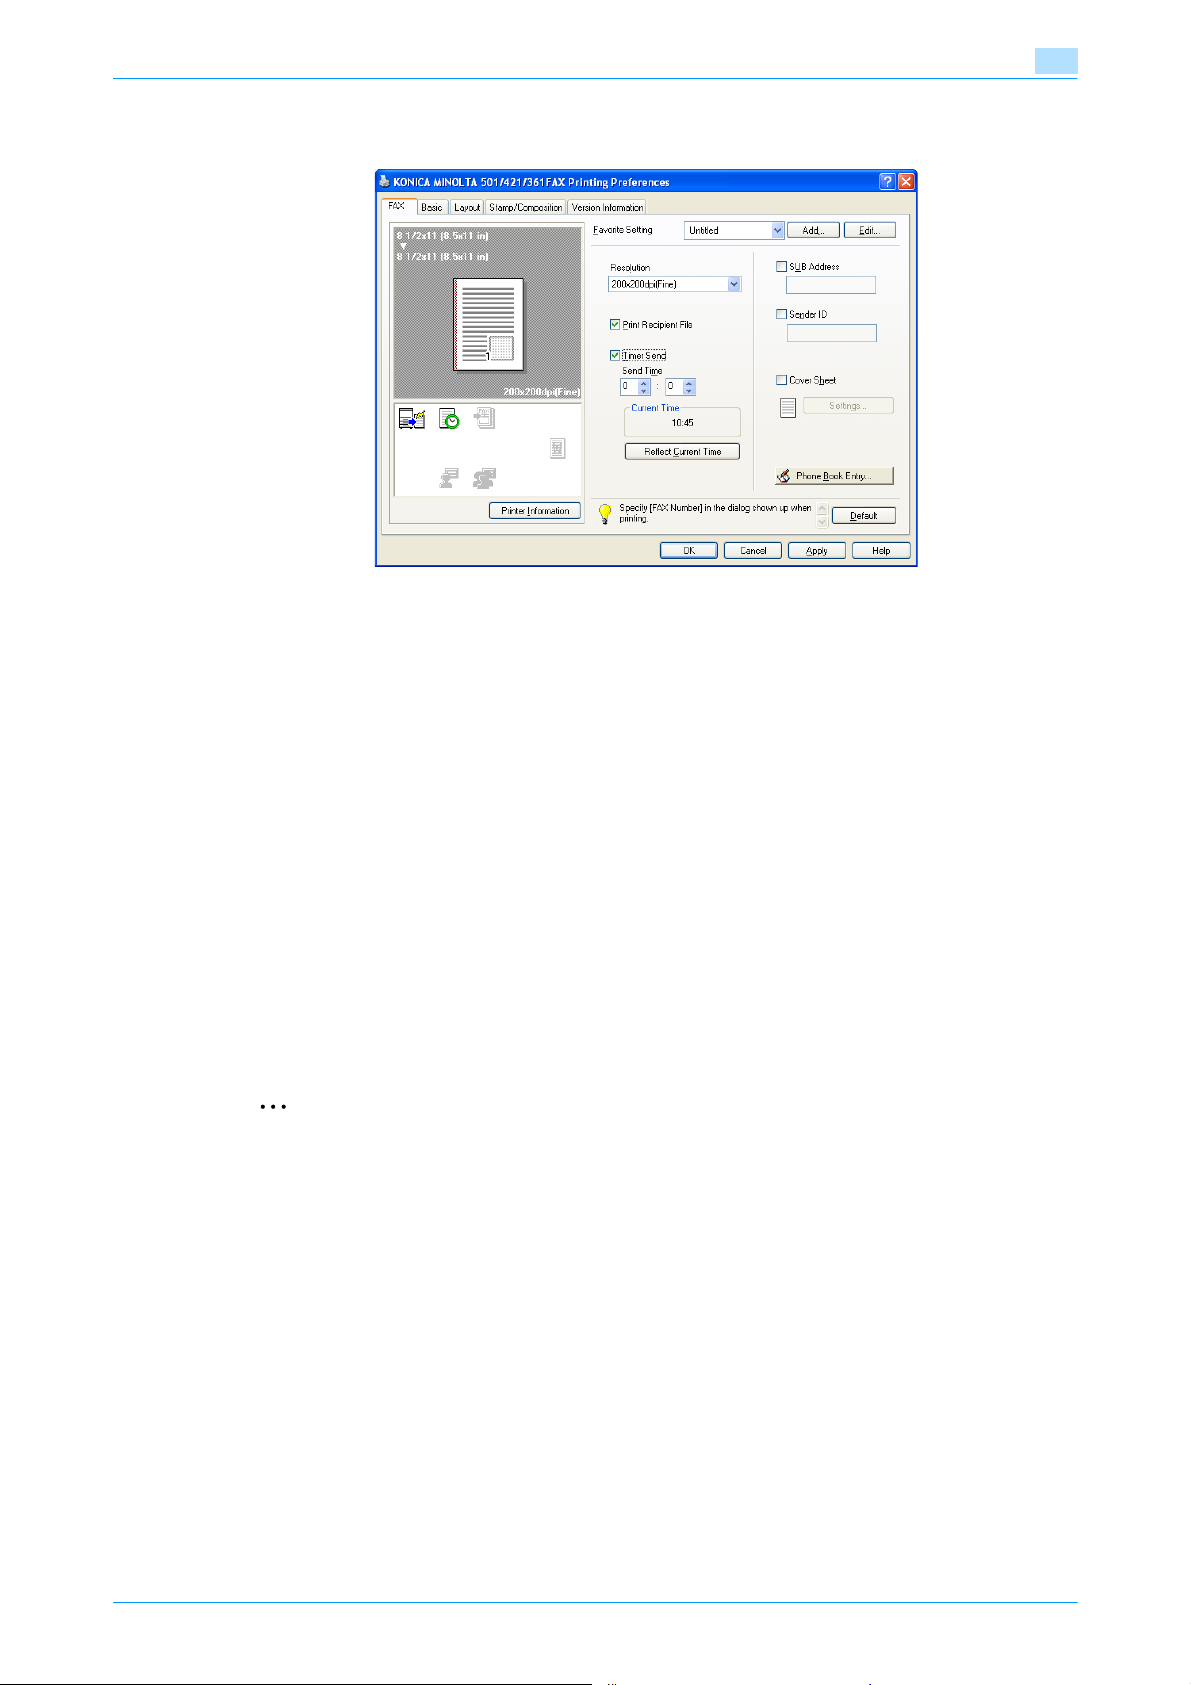
Item Function
Original Orientation Specifies the orientation of the original.
Original Size Specifies the size of the original.
Paper Size Specifies the output paper size of the recipient. Automatically enlarges or reduces
Zoom Specifies the enlargement and reduction ratio.
[Authentication/Account
Track]
3
time set on the computer is displayed in the "Send Time" boxes.
when the Original Size setting is changed.
Specifies the user name and password when performing user authentication, and the
department name and password when performing account track on this machine.
3.2.4 Layout tab
Item Function
Combination Prints multiple pages on one page, or prints one sheet of an original divided on multiple
Skip Blank Pages Does not print blank pages in the data.
3.2.5 Stamp/Composition tab
Item Function
Watermark Prints a watermark (text stamp) on the page being printed. Watermarks can be added,
3.2.6 Configure tab
Item Function
Device Option Specifies the status of the options that are installed on this machine and the status of
Acquire Device Information Communicates with this machine to read the status of the installed options.
Acquire Settings Specifies the status of the connection that executes getting the option information.
Encrypt. Passphrase Enter an "Encrypt. Passphrase" when it is defined by the user through communication
pages. Details can be specified by clicking the [Combination Details] button.
changed, or deleted by clicking the [Edit] button.
the user authentication and account track functions. Specify the status of each item
from the "Setting" drop-down list.
with this machine.
2
Note
To display the Configure tab, right-click the"FAX Driver" icon, and then click "Properties".
You cannot use the [Acquire Device Information] function if you are not connected to or able to
communicate with this machine.
Fax Driver 3-9
Page 41

Setting up the fax driver (Windows)
3.2.7 Settings tab
Item Function
EMF Spool Select this check box when meta file (EMF) spool is required for use in its own system
Display Constraint Message Displays a message when functions that cannot be specified at the same time were
Display paper set in Print
Server Properties
Verify Authentication settings before printing
Popup Authentication Dialog when printing
Confirm to Fax number Make a setup when you want the Fax number to be checked again before it is regis-
Store Custom Size Store the custom paper sizes.
2
Note
To display the Settings tab, right-click the "FAX Driver" icon, and then click "Properties".
3
environment.
enabled from the fax driver.
Uses the paper that was added in [Server Properties] of the printer folder.
Verifies the authentication settings for this machine before printing and displays a message if the settings are not compatible.
Displays the User Authentication/Account Track dialog box when a print job is specified to enter the user name and department name.
tered with the Recipient List.
Fax Driver 3-10
Page 42
Setting up the fax driver (Windows)
3.3 Specifying the FAX tab settings
Resolution: Specifies the fax resolution. If the resolution is increased, the transmission time may take longer.
Print Recipient File: Prints the document after a fax was sent. When sending a fax, this function can be
specified when specifying the transmission settings. For details, refer to "Specifying the transmission
settings" on page 3-5.
Timer Send: Sets the transmission time. By clicking the [Reflect Current Time] button, the current time set on
the computer is displayed in the "Send Time" boxes. When sending a fax, this function can be specified when
specifying the transmission settings. For details, refer to "Specifying the transmission settings" on
page 3-5.
SUB Address: Specifies the sub address for sending confidential faxes using F-codes. When sending a fax,
this function can be specified when specifying the transmission settings. For details, refer to "Specifying the
transmission settings" on page 3-5.
Sender ID: Specifies the sender ID for sending confidential faxes using F-codes. When sending a fax, this
function can be specified when specifying the transmission settings. For details, refer to "Specifying the
transmission settings" on page 3-5.
Cover Sheet: Specifies the fax cover sheet. This function can be specified when sending a fax. For details,
refer to "Creating a fax cover sheet" on page 3-5.
Phone Book Entry: Edits the phone book. For details, refer to "Adding a recipient to the phone book" on
page 3-20.
3
2
Note
When using Timer Send, check that the time set on the computer is synchronized with the time on this
machine. If the transmission time is earlier than the current time of this machine, the fax is sent the next
day.
If sending confidential faxes using F-codes to another fax model, enter the sub address and sender ID
in the "SUB Address" and the "Sender ID" text boxes. Up to 20 characters (numbers 0 through 9) can
be entered in the "Sub Address" text box. Up to 20 characters (numbers 0 through 9, #, and *) can be
entered in the "Sender ID" text box. For the details on the sub address and the sender ID, refer to the
User’s Guide [Network Scan/Fax/Network Fax Operations].
Fax Driver 3-11
Page 43
Setting up the fax driver (Windows)
3.4 Specifying the Basic tab settings
Original Orientation: Specifies the orientation of the original.
Original Size: Specifies the paper size of the original.
Paper Size: Specifies the output paper size of the recipient. Automatically enlarges or reduces when the
Original Size setting is changed.
Zoom: Specifies the enlargement and reduction ratio.
[Authentication/Account Track]: Specifies the user name and password when performing user authentication,
and the department name and password when performing account track on this machine.
3
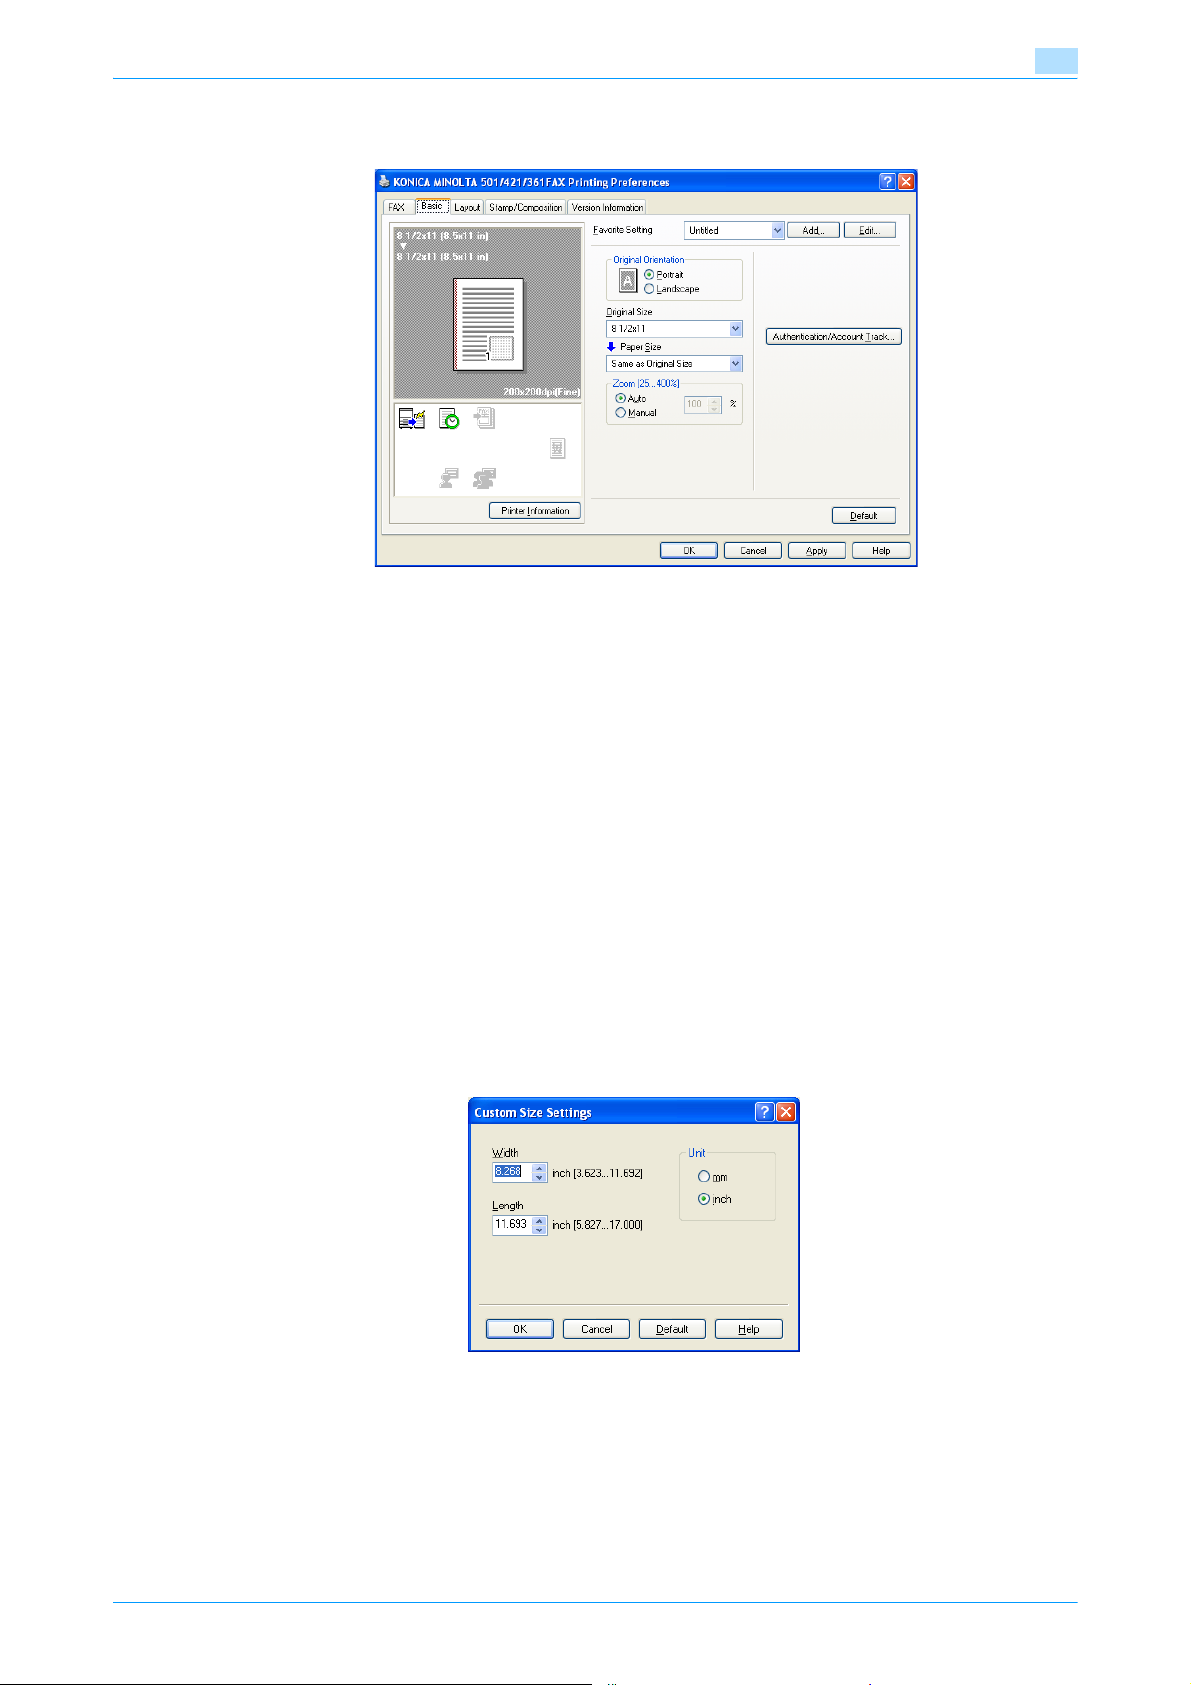
3.4.1 Specifying a custom size
If sending an original of a custom size, or if the recipient is using a custom paper size, you can specify the
paper size by following the procedure described below.
1 From the "Original Size" drop-down list, select "Custom Size".
The Custom Size Settings dialog box appears.
2 Specify settings for the following:
– Width: Specifies the width of the custom paper size according to the selected measurement unit.
– Length: Specifies the length of the custom paper size according to the selected measurement unit.
– Unit: Selects the measurement unit that specifies the size.
3 Click the [OK] button.
Fax Driver 3-12
Page 44
Setting up the fax driver (Windows)
3.4.2 Specifying the user authentication settings
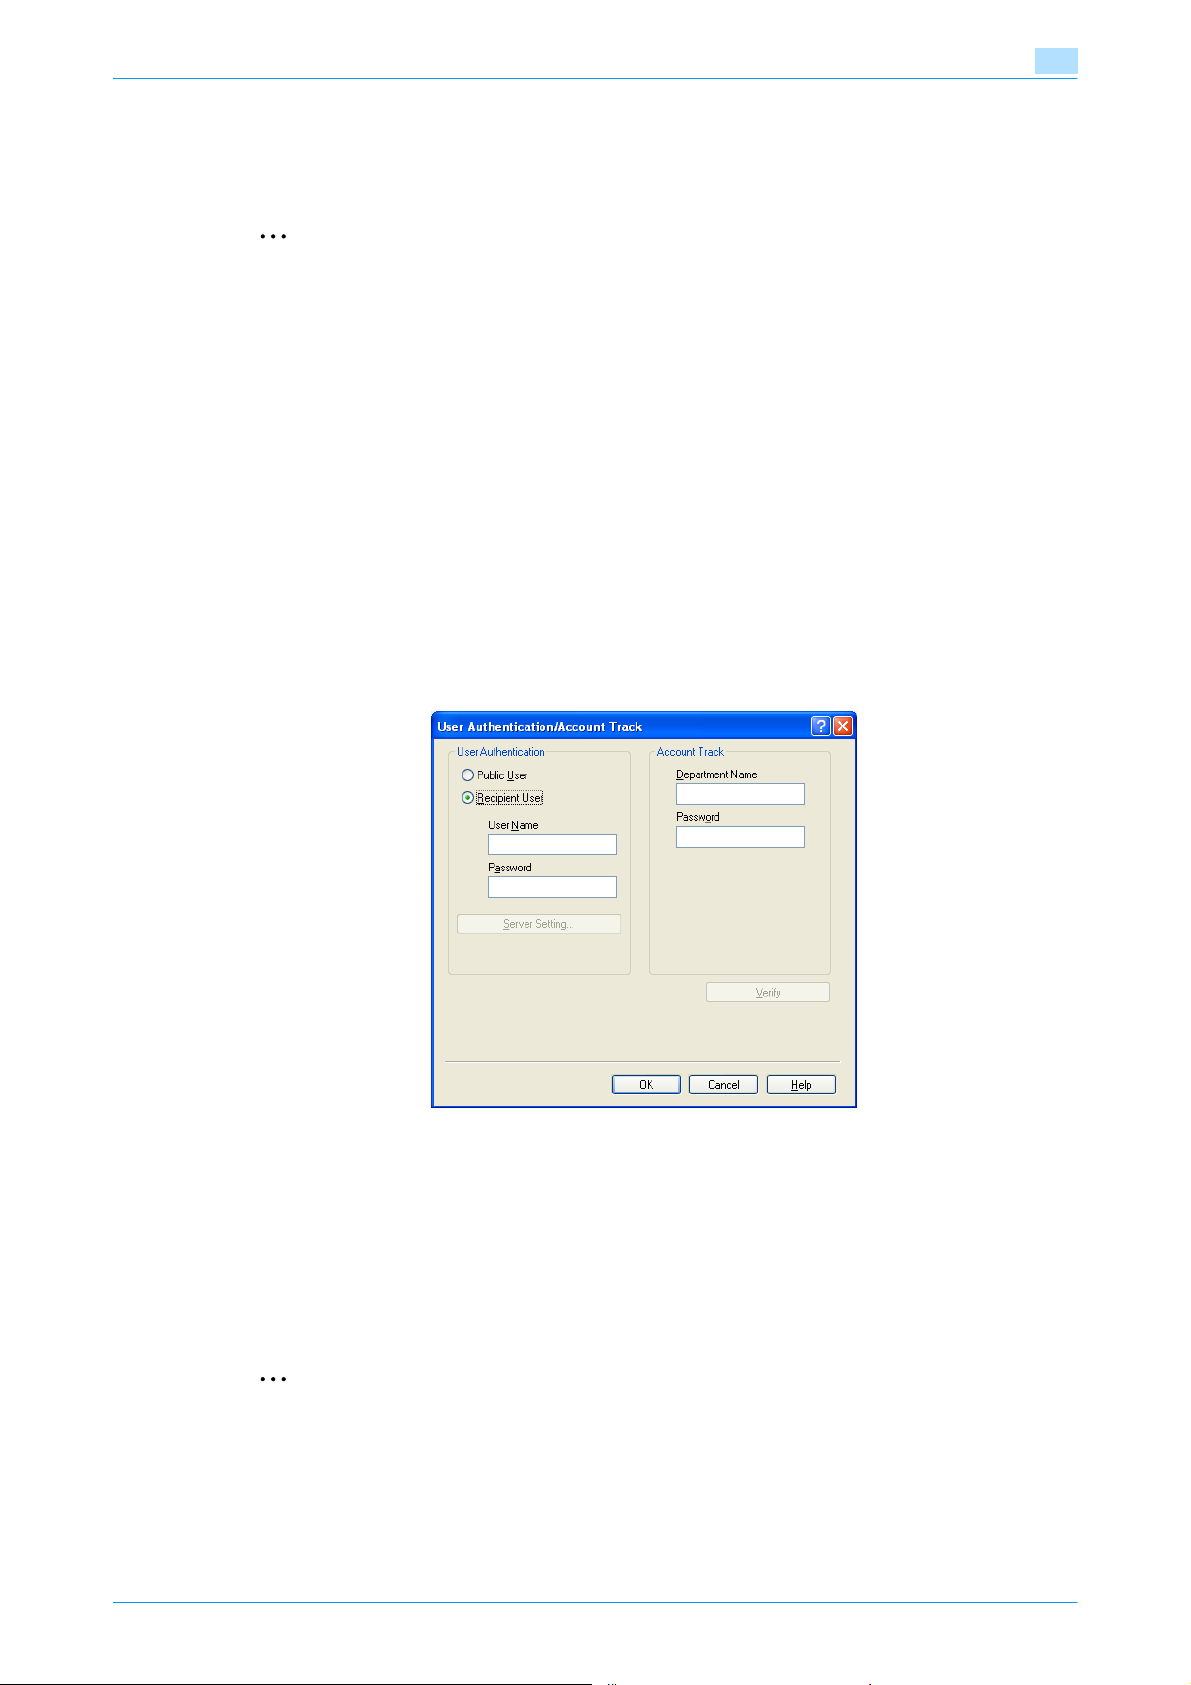
If the user authentication settings have been specified on this machine, you must enter a user name and
password.
2
Note
If a fax is sent using a user name or password that is not a registered account on this machine, or if a
fax is sent without selecting a user under "User Authentication", the operation is not authenticated by
this machine and the job is canceled.
If the user authentication settings are specified on this machine and the authentication operation
restriction function is in mode 2, the applicable user is locked and cannot be accessed if the
authentication information is not entered correctly.
!
Detail
If the user authentication settings are not specified on the Configure tab, user authentication cannot be
performed. If using the user authentication function, be sure to specify the settings on the Configure
tab. For details, refer to "Specifying the Configure tab settings" on page 3-18.
1 Click the Basic tab.
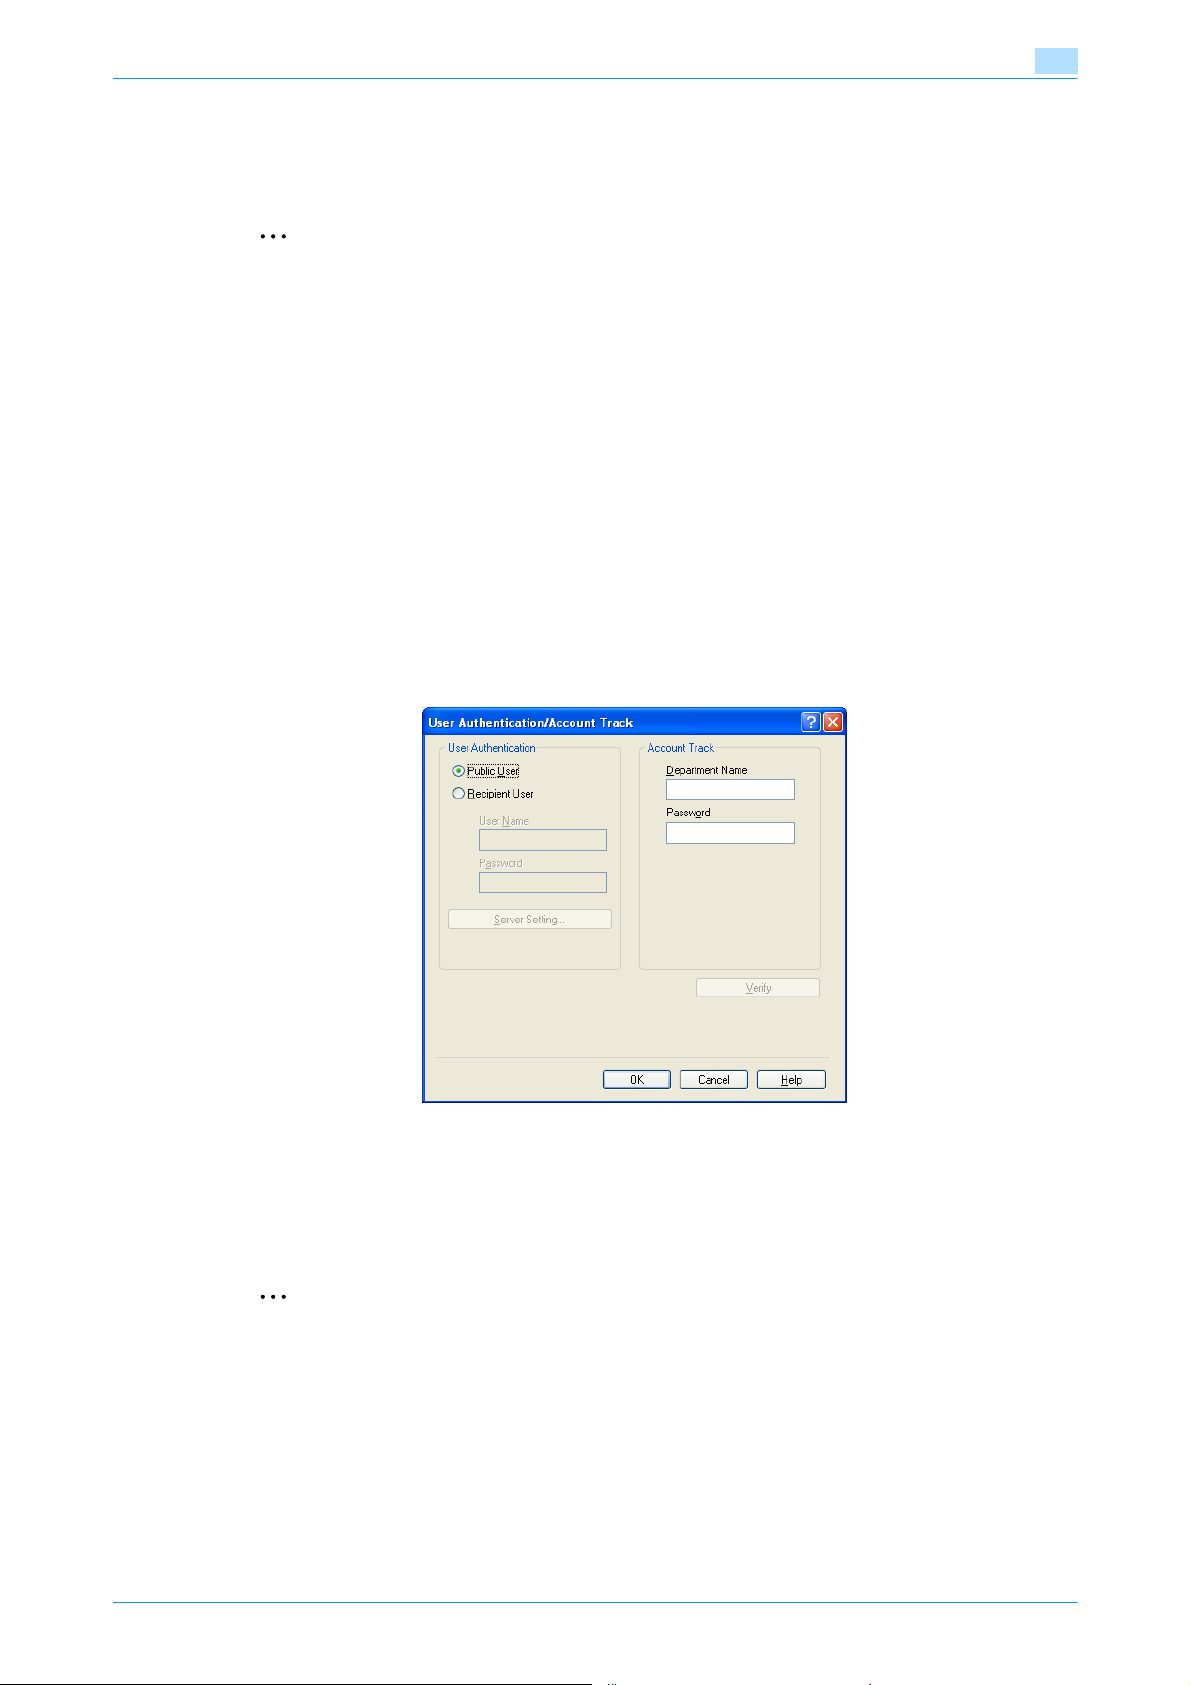
2 Click the [Authentication/Account Track] button.
3
3 Select "Recipient User", and then enter the user name and password.
– If this machine has been set to permit public users, the machine can be used without a user name
and password.
– If performing user authentication on a server, the server settings must be specified. Click the [Server
Setting] button to select the server.
– Click the [Verify] button to communicate with this machine and to check whether authentication can
be performed with the user that was entered. You cannot use this function if you are not connected
to or able to communicate with this machine.
4 Click the [OK] button.
2
Note
If the usage is not allowed, transmission cannot be performed even when used by a registered user.
For details on the user authentication function, consult the administrator of this machine.
If performing user authentication with an optional authentication unit, enter the user name and
password in step 3. For details, refer to the operation manual of the authentication unit.
Fax Driver 3-13
Page 45
Setting up the fax driver (Windows)
3.4.3 Specifying the account track settings
If the account track settings have been specified on this machine, you must enter a department name and
password.
2
Note
If a fax is sent using a department name or password that is not a registered account on this machine,
or if a fax is sent without "Account Track" selected, the operation is not authenticated by this machine
and the job is canceled.
When the account track settings are specified on this machine, the authentication operation restriction
function is in mode 2, and the authentication information is not entered correctly, the applicable
account is locked and cannot be accessed.
!
Detail
If the account track settings are not specified on the Configure tab, account track cannot be performed.
If using the account track function, be sure to specify the settings on the Configure tab. For details, refer
to "Specifying the Configure tab settings" on page 3-18.
1 Click the Basic tab.
2 Click the [Authentication/Account Track] button.
3
3 Enter the department name and password.
– Click the [Verify] button to communicate with this machine and to check whether authentication can
be performed with the user that was entered. You cannot use this function if you are not connected
to or able to communicate with this machine.
4 Click the [OK] button.
2
Note
If usage is not allowed, transmission cannot be performed even when used by a registered account.
For details on the account track function, consult the administrator of this machine.
Fax Driver 3-14
Page 46
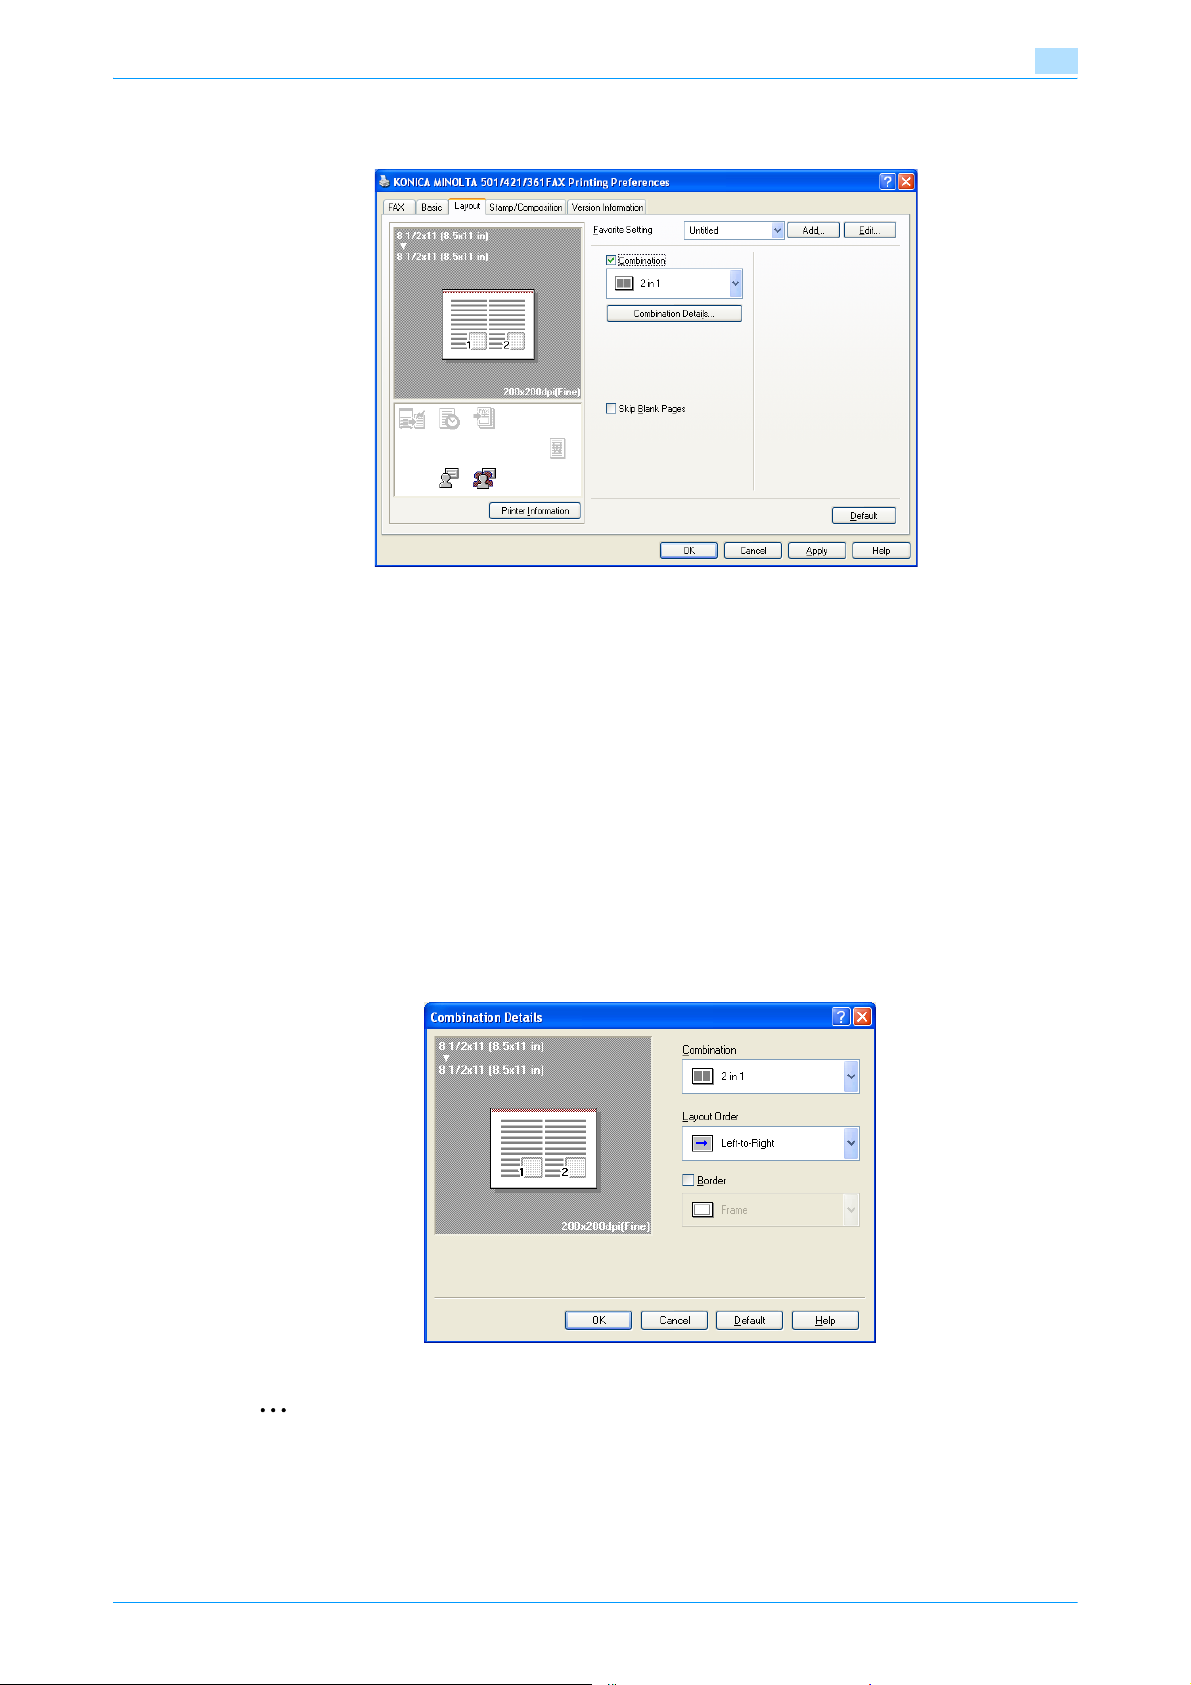
Setting up the fax driver (Windows)
3.5 Specifying the Layout tab settings
Combination: Prints multiple pages on one page, or prints one sheet of an original divided on multiple pages.
Details can be specified by clicking the [Combination Details] button.
Skip Blank Pages: Does not print blank pages in the data.
3
3.5.1 Printing multiple pages on one page (N in 1, Poster Mode)
You can specify whether to print multiple pages of text on one page with N in 1 printing, or print one sheet
of an original divided on multiple pages with Poster Mode printing.
N in 1 printing comes in handy when you want to reduce the number of output pages.
Poster Mode printing comes in handy when the recipient’s fax machine does not support large paper sizes.
1 Click the Layout tab.
2 Select the "Combination" check box, and then specify the setting from the drop-down list.
To change the "Border" and "Overlap width line" settings, click the [Combination Details] button, and
then change the settings in the dialog box that appears.
2
Reminder
When printing a job that contains pages of different sizes and orientations, images may be missing or
overlapping when the document is printed.
Fax Driver 3-15
Page 47
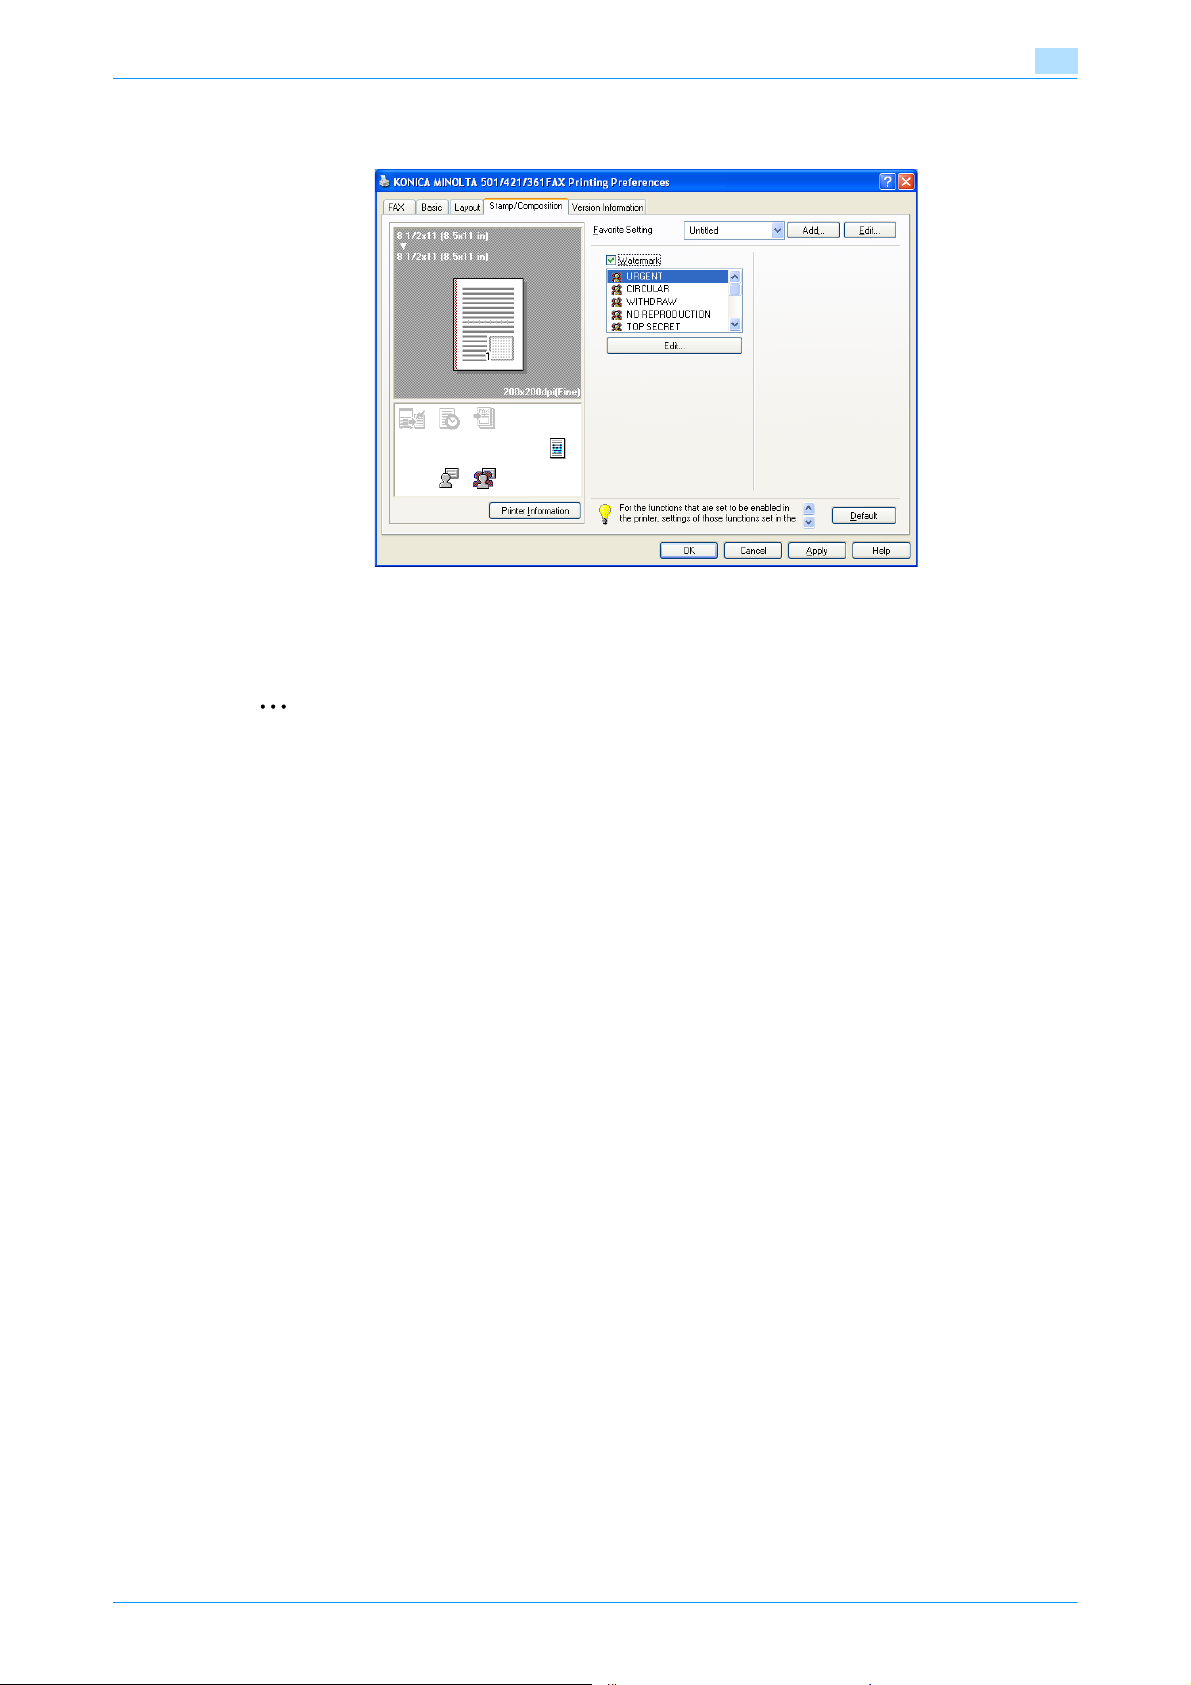
Setting up the fax driver (Windows)
3.6 Specifying the Stamp/Composition tab settings
3.6.1 Sending with an watermark
Specific text can be sent in the background as an watermark.
3
2
Note
For Windows Vista/7/Server 2008 64bit editions, "Watermark" cannot be selected with any of the
following functions at the same time.
- [User Authentication]
- [Account Track]
- [Verify Authentication settings before printing]
- [Popup Authentication Dialog when printing]
1 Click the Stamp/Composition tab.
2 Select the "Watermark" check box.
3 From the list, select the watermark that you want to print.
3.6.2 Editing a watermark
You can change the fonts and position of the watermark and you can register a new one.
1 Click the Stamp/Composition tab.
2 Select the "Watermark" check box.
3 Click the [Edit] button under "Watermark".
The Edit Watermark dialog box appears.
4 To create a watermark, click the [Add] button.
To change a watermark, select the watermark from the "Current Watermark" list.
Fax Driver 3-16
Page 48
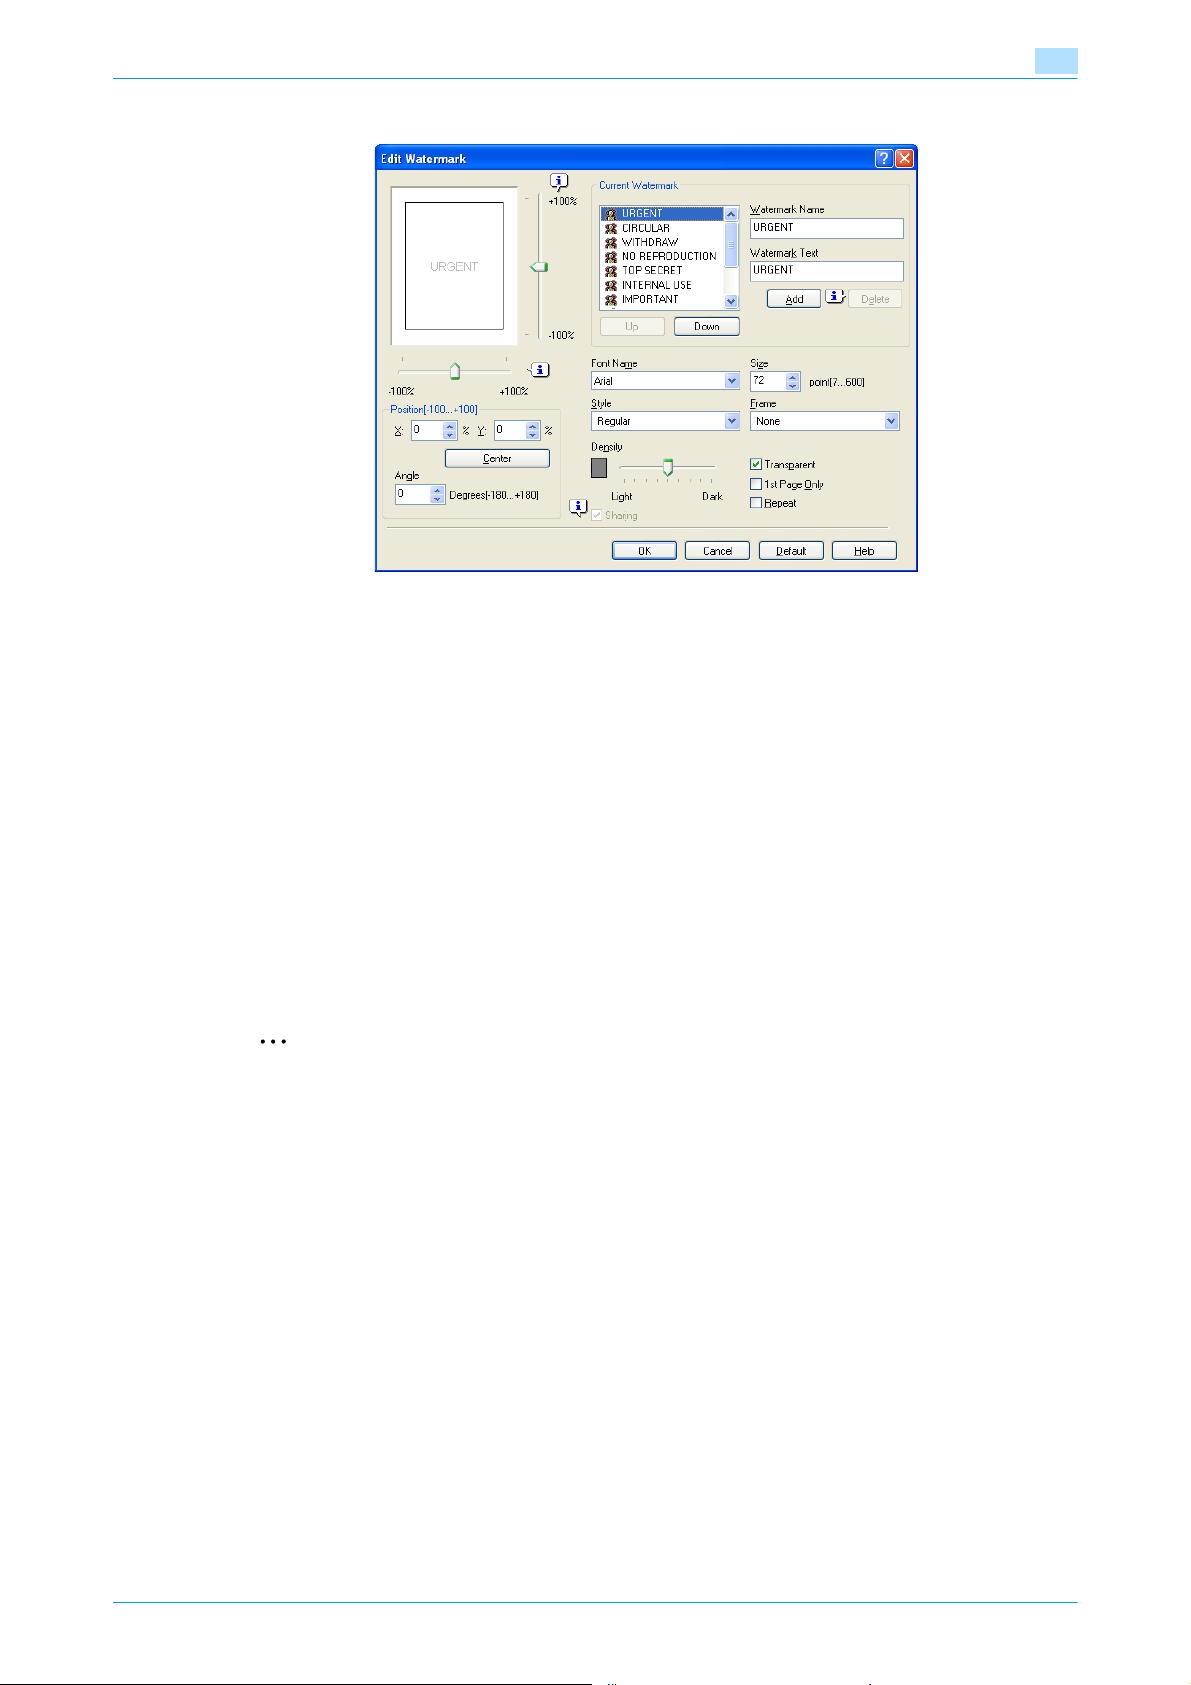
Setting up the fax driver (Windows)
5 Specify settings for the following:
– Watermark Name: Enters the name of the watermark.
– Watermark Text: Enters the text that is to be printed as a watermark.
– [Add]: Click to create a new watermark.
– [Delete]: Click to delete the selected watermark.
– Position: Specifies the vertical and horizontal positions. The watermark position can also be
specified by using the horizontal and vertical sliders in the dialog box.
– Angle: Specifies the watermark print angle.
– Font Name: Specifies the font.
– Size: Specifies the size.
– Style: Specifies the font style.
– Frame: Specifies the frame style.
– Density: Specifies the density of the text.
– Sharing: Specifies whether to register the watermark as public or private.
– Transparent: Prints the watermark as a transparent image.
– 1st Page Only: Prints the watermark on the first page only.
– Repeat: Prints several watermarks on a single page.
3
6 Click the [OK] button.
2
Note
Up to 30 watermarks can be registered with the shared setting, and up to 20 watermarks can be
registered with the private setting.
Only the administrator can select a setting under "Sharing".
Fax Driver 3-17
Page 49
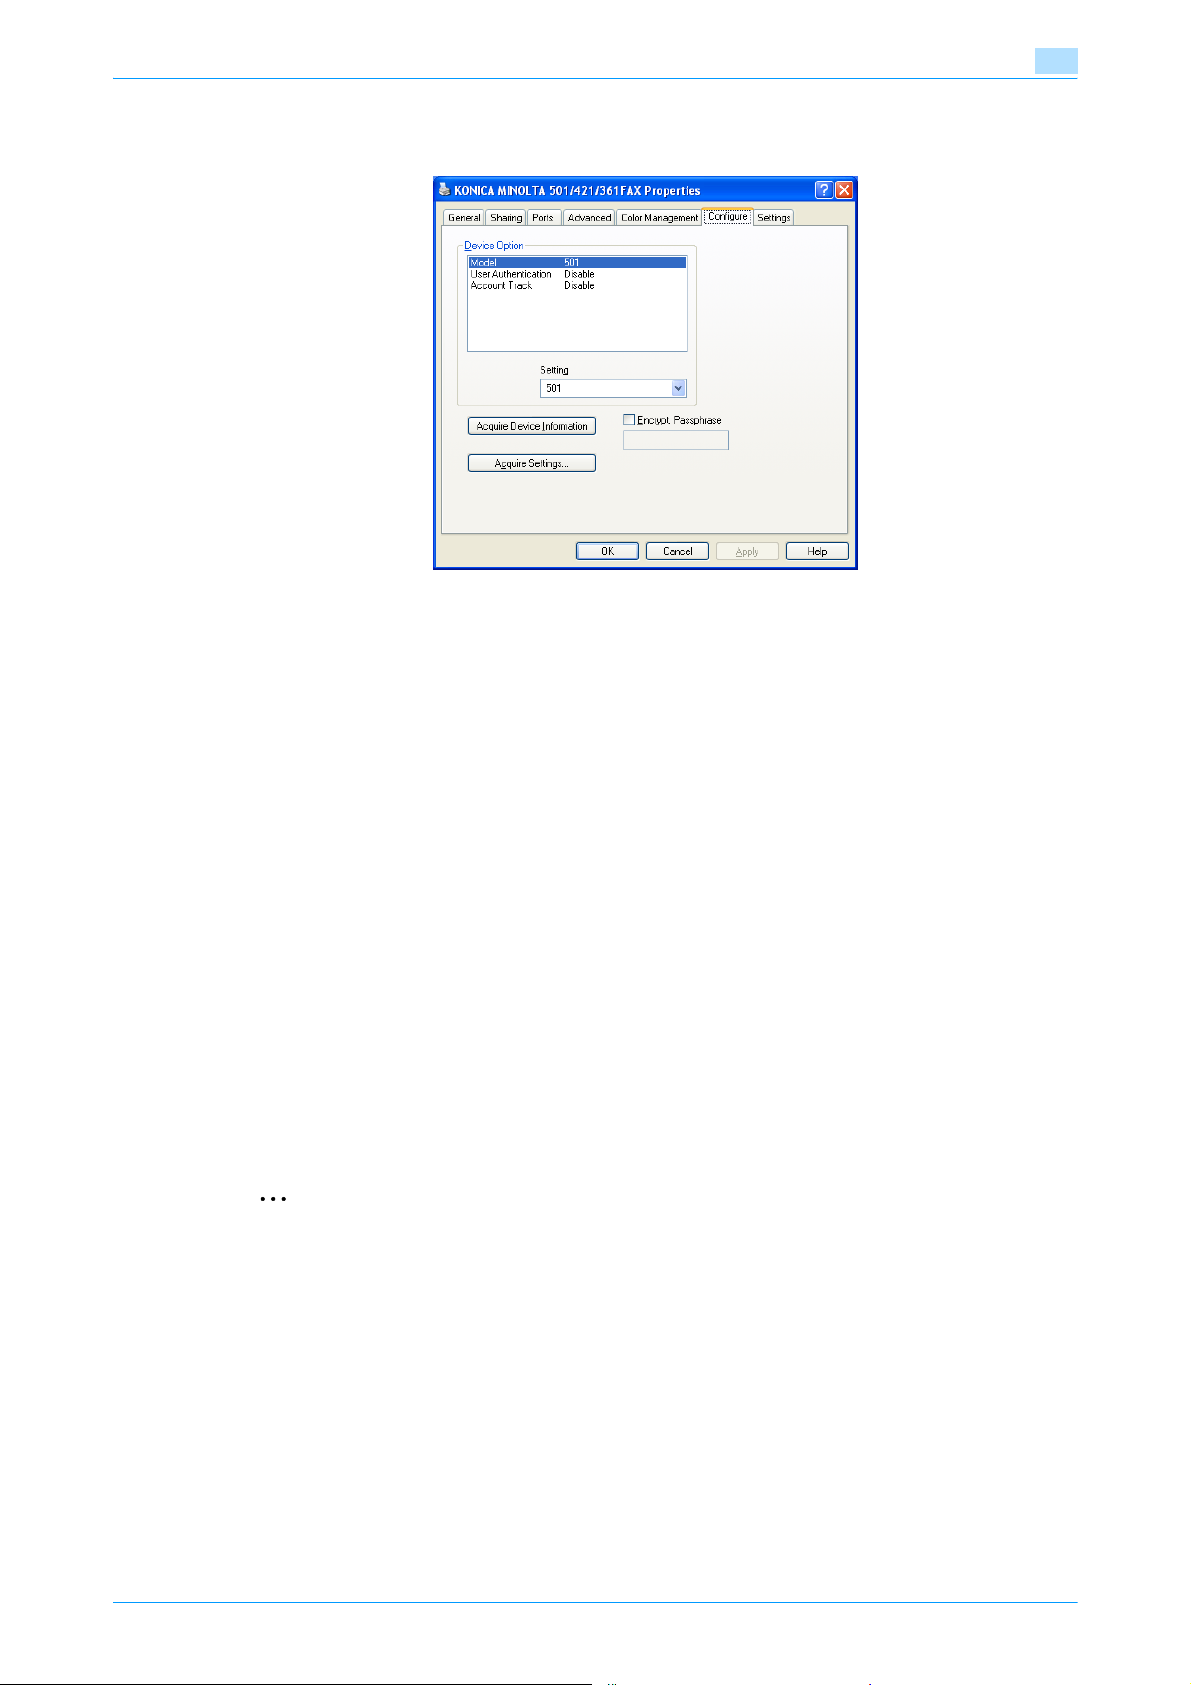
Setting up the fax driver (Windows)
3.7 Specifying the Configure tab settings
3.7.1 Selecting an option
You can specify whether an option is enabled so that the functions of this machine are available from the fax
driver.
If the installed options are not set using the Configure tab, the option function cannot be used with the fax
driver. When installing options, be sure to make the proper settings.
3
1 Open the Printers window or Printers and Faxes window.
– For Windows 2000/NT 4.0, click the [Start] button, point to "Settings", and then click the "Printers".
– For Windows XP/Server 2003, click the [Start] button, and then click "Printers and Faxes".
– For Windows Vista/Server 2008, click the [Start] button, open Control Panel, and then click "Printer"
from "Hardware and Sound".
– For Windows 7/Server 2008 R2, click the [Start] button, and then point to "Devices and Printers".
– If "Printers and Faxes" does not appear in the Start menu in Windows XP/Sever 2003, open the
Control Panel from the Start menu, select "Printers and Other Hardware", and then select "Printers
and Faxes".
2 Right-click the "xxxxxxx FAX" icon, and then click "Properties".
3 Click the Configure tab.
4 Select the options to be specified under "Device Option".
5 Select the status of the option that is installed from the "Setting" drop-down list.
2
Note
If a "Model" is available under "Device Option", select the model to be used.
Click the [Acquire Device Information] button to communicate with this machine and read the status of
the settings specified on this machine. You cannot use this function if you are not connected to or able
to communicate with this machine. The connection can be specified by clicking the [Acquire Settings]
button.
Fax Driver 3-18
Page 50

Setting up the fax driver (Windows)
3.7.2 Change Encrypt. Passphrase
When a user has defined an Encrypt. Passphrase for this machine, the same Encrypt. Passphrase as that for
this machine must be entered.
The Encrypt. Passphrase for the entered characters is automatically created, which is to be used for
communication with this machine.
!
Detail
Match the Encrypt. Passphrase to that specified by Driver Password Encryption Setting of this
machine. For details, refer to the User’s Guide [Print Operations (IC-207)].
1 Click the Configure tab.
2 Select the "Encrypt. Passphrase" check box.
3 Enter in "Encrypt. Passphrase".
3
Fax Driver 3-19
Page 51
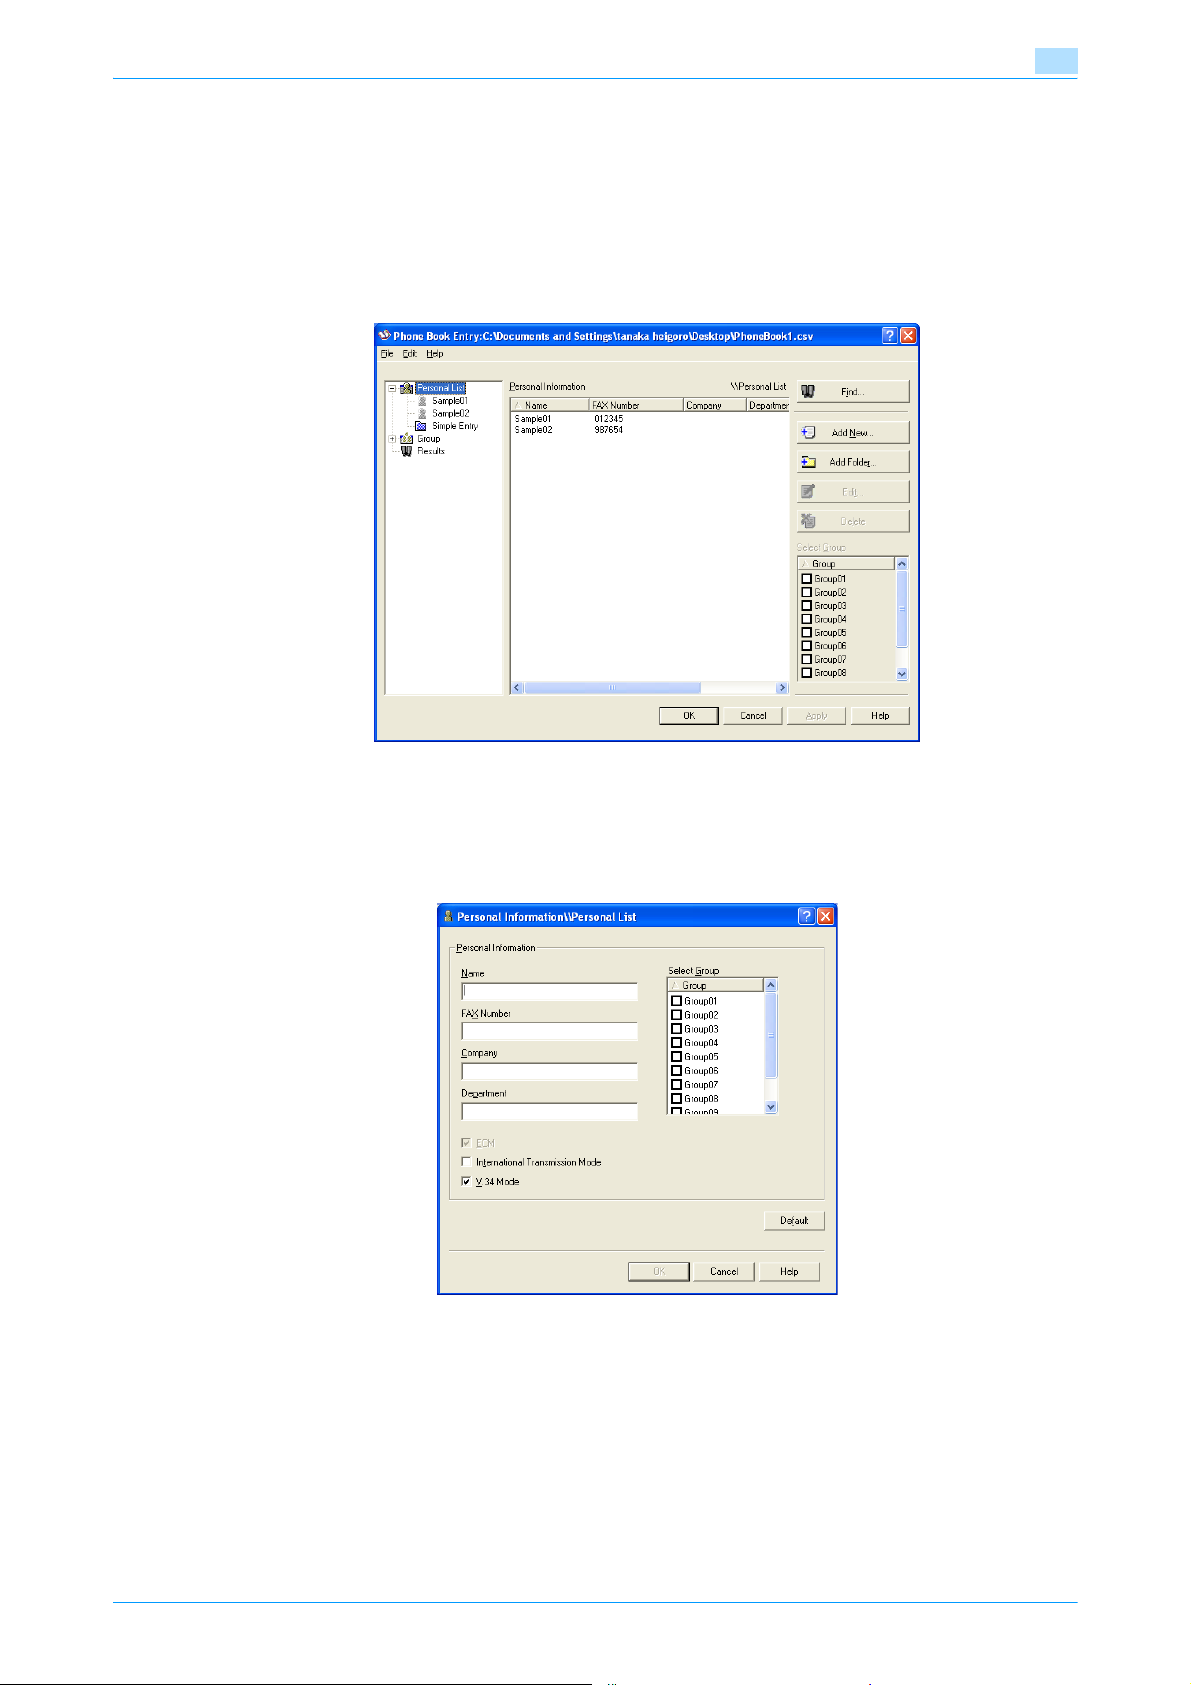
Setting up the fax driver (Windows)
3.8 Using a phone book
3.8.1 Adding a recipient to the phone book
When sending a fax, you can recall the fax numbers that are used frequently by adding them to a phone book.
A phone book can be added from the FAX tab in the FAX Printing Preferences dialog box.
1 From the FAX tab in the FAX Printing Preferences dialog box, click the [Phone Book Entry] button.
The Phone Book Entry dialog box appears.
3
2 From the left side of the dialog box, select "Personal List", and then click the [Add New] button.
The Personal Information\\Personal List dialog box appears.
3 Enter the appropriate information in the "Name", "Fax Number", "Company", and "Department" text
boxes.
– If entering a name for a fax cover sheet, titles cannot be added. To add a title to a fax cover sheet,
add the title in the "Name" text box.
– Up to 80 characters can be entered in the "Name", "Company", and "Department" text boxes.
– Up to 38 characters (numbers 0 through 9, hyphens (-), spaces, #, *, E, P, and T) can be entered in
the "Fax Number" text box. To send a fax overseas, be sure to enter the country code first.
Fax Driver 3-20
Page 52
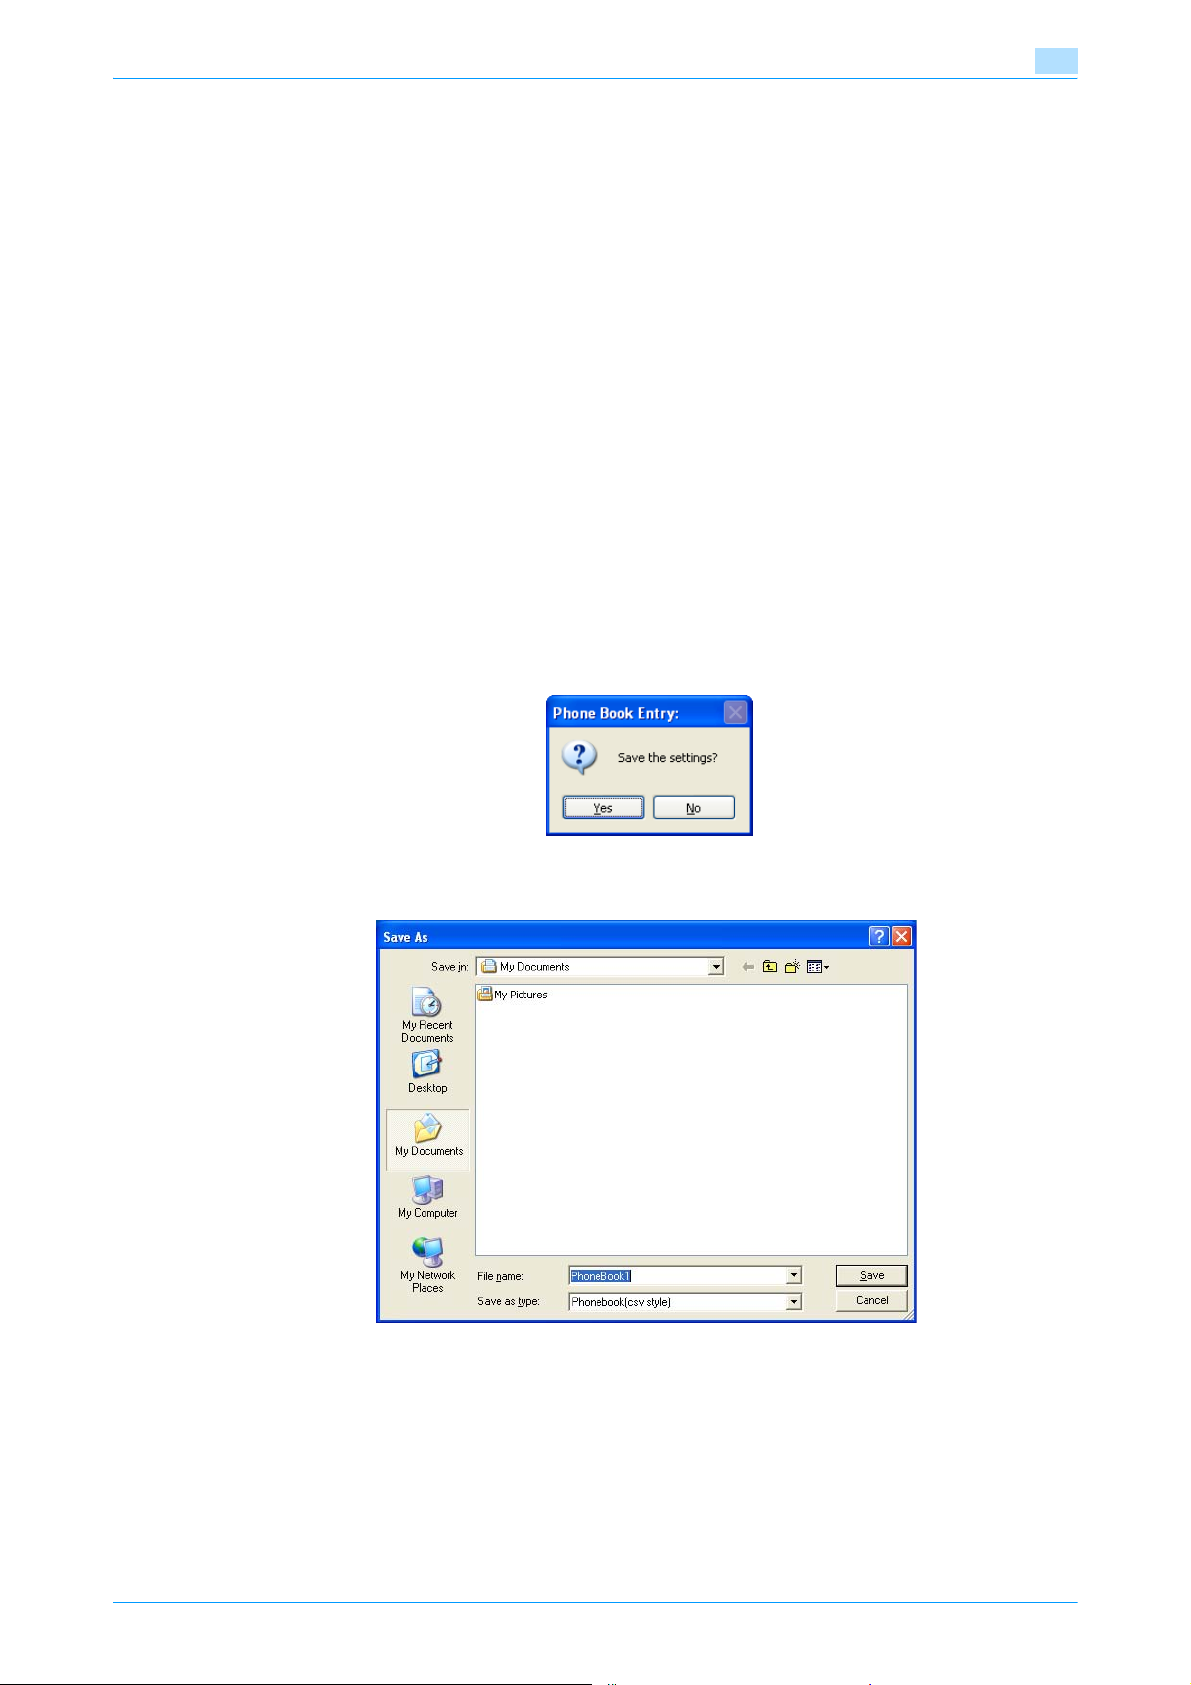
Setting up the fax driver (Windows)
– Change the transmission mode as necessary.
ECM: Specifies the ECM (Error Correction Mode). If the "V.34 Mode" check box is selected, the
"ECM" check box cannot be cleared.
International Transmission Mode: Slows the speed when sending faxes overseas. Select this check
box if errors occur when sending faxes overseas.
V.34 Mode: Specifies the Super G3 fax mode. For normal fax operations, leave this check box
selected. Clear it only if it is not possible to transmit in the recipient’s mode.
4 To add a recipient to a group, select the check box of the group to be added.
– If adding a recipient to a group, you can specify the recipient in a group (group transmission). To
send faxes to specific members, it comes in handy to add them to a group.
– Multiple groups can be selected and added.
– The group name can be changed.
5 Click the [OK] button.
The information of the recipient is registered and it is added to "Personal Information".
If a group was specified, the group that was added also appears in "Group".
6 Click the [OK] button.
If a name was added, the editing of the phone book is complete.
The first time you register a phone book, a dialog box to confirm whether you want to save the phone
book appears.
3
7 Click the [Yes] button.
The Save As dialog box appears.
8 Specify the storage location, enter the file name, and then click the [Save] button.
The phone book is saved as a file.
– The Save As dialog box appears when a phone book is registered for the first time. The Save As
dialog box does not appear from the second time the phone book is changed and thereafter since
the phone book file is automatically overwritten.
– The saved phone book file automatically appears the next time you open the phone book. To open
a different phone book, select "Open" from the "File" menu in the Phone Book Entry dialog box. If
multiple phone books have been saved, you can use the phone books by switching between them.
– A new phone book can be created by clicking "New" from the "File" menu in the Phone Book Entry
dialog box. You can save a file under a different name by clicking "Save As" from the "File" menu.
– The file extension for the phone book files is ".csv".
Fax Driver 3-21
Page 53
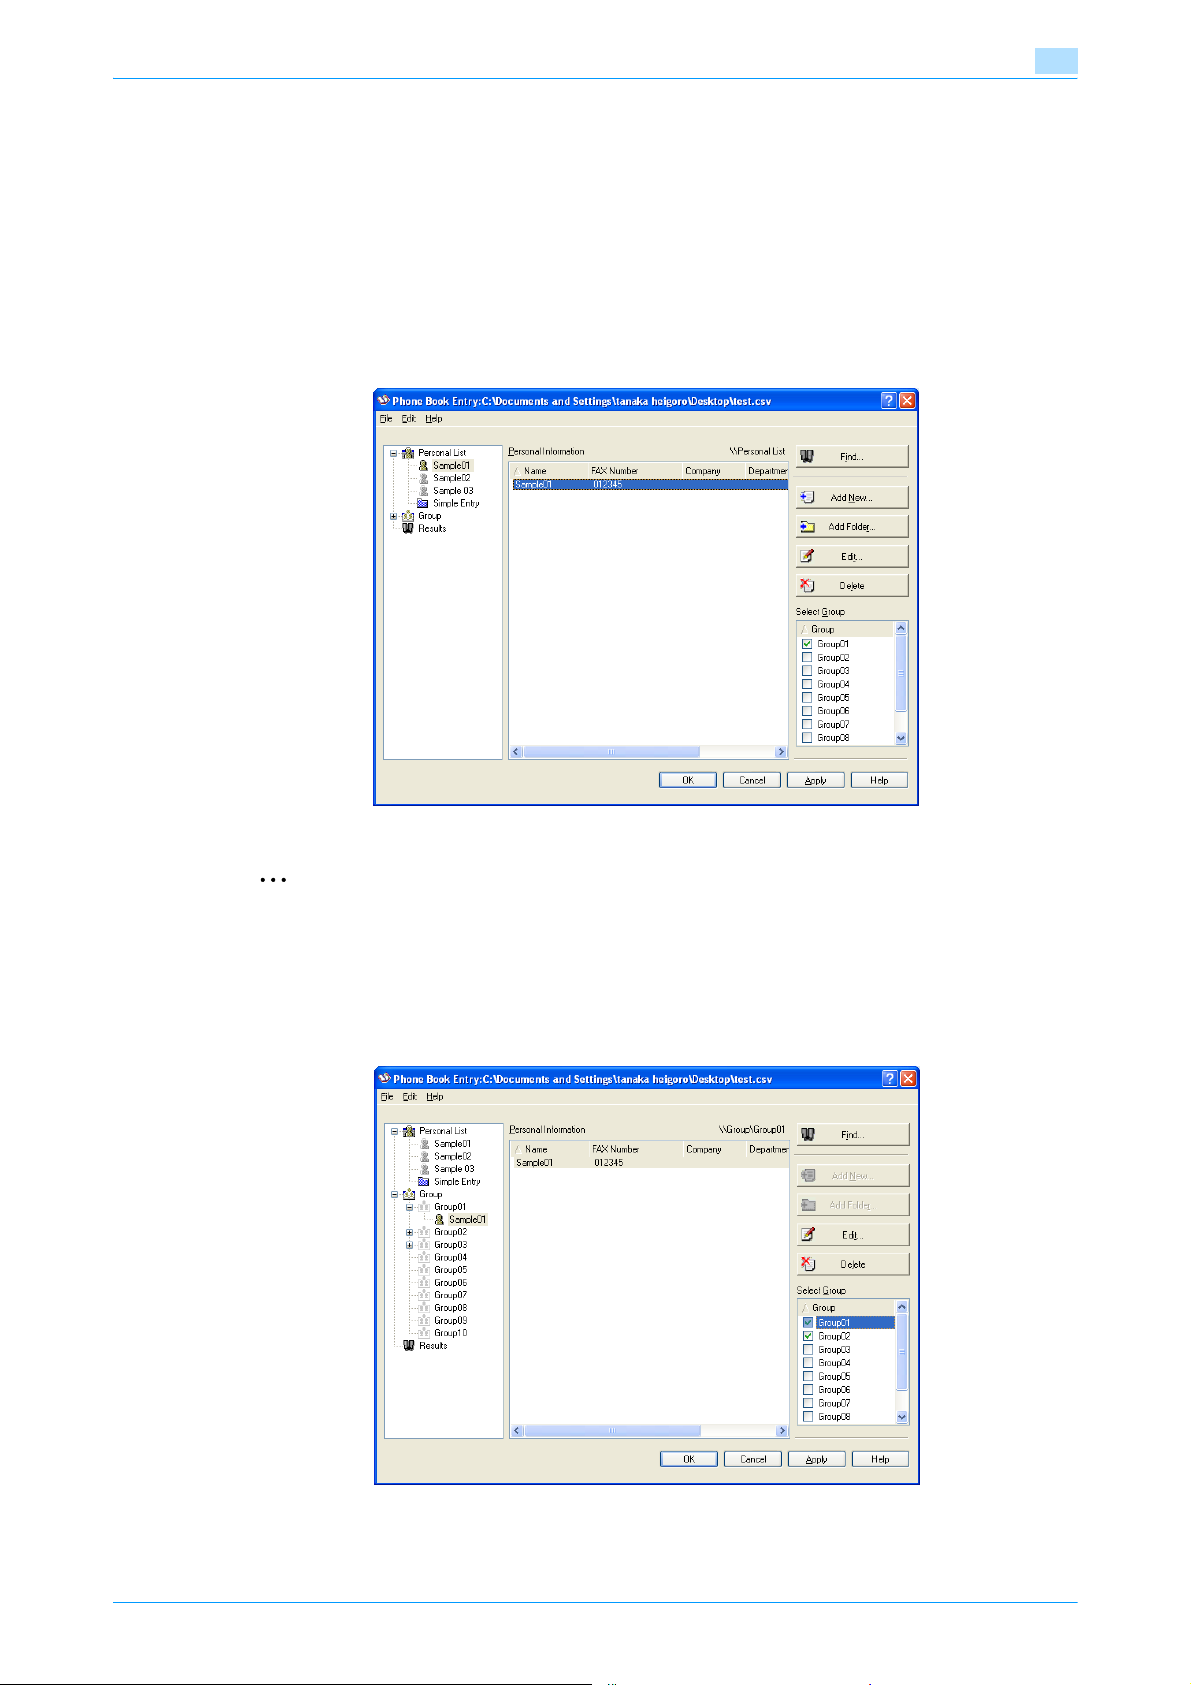
Setting up the fax driver (Windows)
3.8.2 Editing a phone book
You can easily change the personal information that was registered, change the group names, edit, or
organize the phone books.
To change the personal information:
Select the name you want to change from "Personal List" on the left side of the dialog box, and then click the
[Edit] button on the right. The same Personal Information\\Personal List dialog box that appeared when you
registered the phone book appears, allowing you to change the information.
You can select the name that you want to change from "Personal List" on the left side of the dialog box, and
you can delete a recipient by clicking the [Delete] button on the right. If a recipient is deleted, it is also deleted
from the registered group.
3
2
Note
When sending a fax, the names and fax numbers that were entered manually and registered by clicking
the [Register To Phone Book] button, appear in the "Simple Entry" folder of the phone book.
To change a registered recipient to a group: From "Personal List" on the left side of the dialog box, select the
name you want to change, and then select or clear the check box of the group under the "Select Group" dropdown list.
Fax Driver 3-22
Page 54

Setting up the fax driver (Windows)
2
Note
A recipient can even be added to a group by dragging the recipient’s name from "Personal List" on the
left side of the dialog box to the desired group. However, the name cannot be dragged out of the group.
Up to 100 recipients can be added to a group.
To change a group name:
Select the group that you want to change from "Group" on the left side of the dialog box, and then specify
"Change Group Name" from the "Edit" menu.
To create a folder:
Select "Personal List" on the left side of the dialog box, and then specify "Add Folder" from the "Edit" menu.
You can move names from "Personal List" by dragging them to a folder.
2
Note
Names can also be moved to the desired folder by right-clicking a name and selecting "Copy" or "Cut",
then selecting "Paste" on the target folder.
Up to 40 characters can be entered for the folder name.
A folder can be up to three layers deep.
3
To edit a folder, select the desired folder, and then click the [Edit] button.
To delete a folder, select the desired folder, and then click the [Delete] button.
To search the personal information:
Click the [Find] button on the left side of the dialog box to display the Find dialog box where the search
conditions can be specified.
Fax Driver 3-23
Page 55
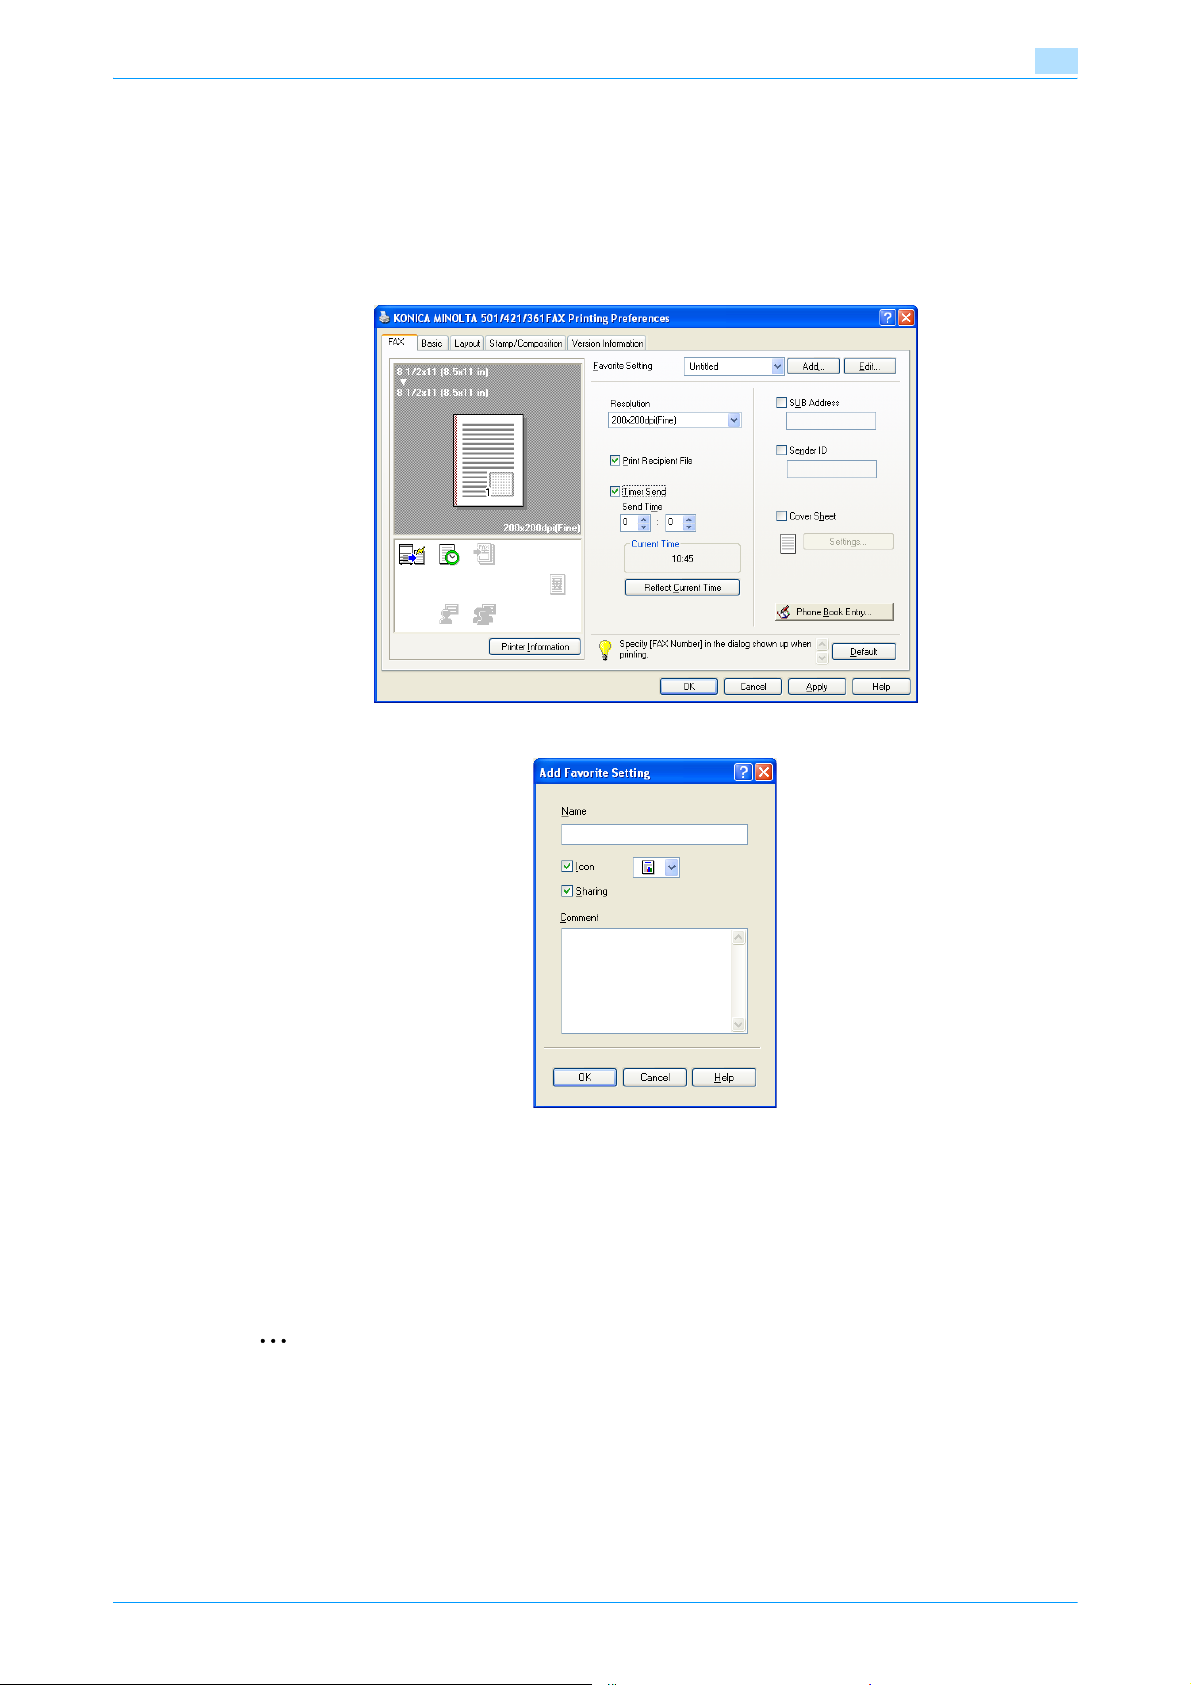
Setting up the fax driver (Windows)
3.9 Saving the driver settings
You can save the setting values of the changed driver and recall them as necessary.
3.9.1 Saving the driver settings
1 Change the driver settings from the Basic tab and the Layout tab.
2 Click the [Add] button next to the "Favorite Setting" drop-down list.
3
3 Specify settings for the following:
– Name: Enters the specified registration name.
– Icon: Specifies the icon. The settings can be registered even if the icon is not specified.
– Sharing: Specifies whether to register the specified file as public or private.
– Comment: Enters the detailed description of the specified file, if necessary.
4 Click the [OK] button.
The specified settings are registered in the "Favorite Setting" drop-down list.
2
Note
Up to 30 shared settings and up to 20 private settings can be registered.
Up to 30 characters can be entered in the "Name" text box. Up to 255 characters can be entered in the
"Comment" text box.
Only the administrator can select a setting under "Sharing".
Fax Driver 3-24
Page 56
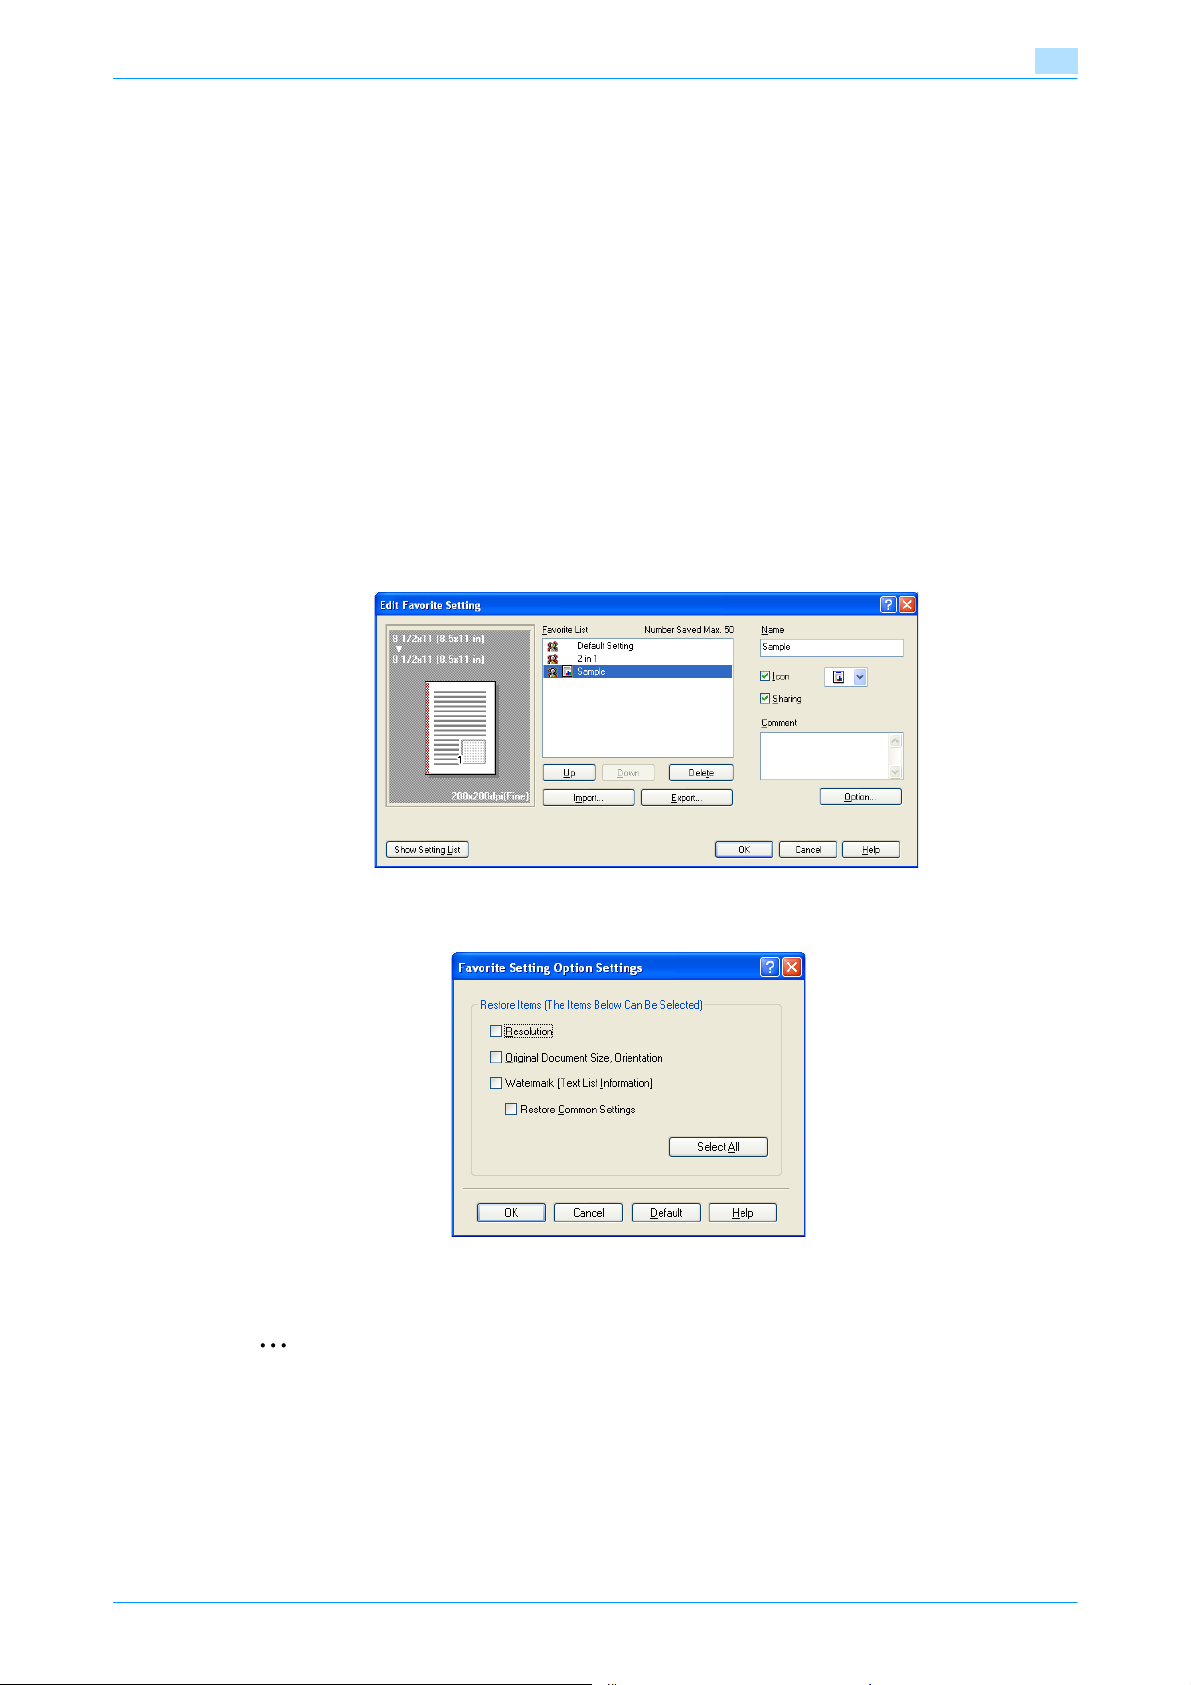
Setting up the fax driver (Windows)
!
Detail
The settings that were specified can also be saved (exported) to a file. For details, refer to "Importing
and exporting the driver settings" on page 3-26.
3.9.2 Recalling the settings
Select the settings to recall from the "Favorite Setting" drop-down list on the FAX Printing Preferences dialog
box.
The setting values are recalled, and the settings for the fax driver are changed.
3.9.3 Editing the settings
You can edit the recalled function items such as the specified names and comments.
1 In the FAX Printing Preferences dialog box, click the [Edit] button next to the "Favorite Setting" drop-
down list.
2 From the list, select the specified name that you want to change, and then change the setting.
To delete a setting, click the [Delete] button.
To switch the order displayed, click the [Up] button or the [Down] button.
3
3 Click the [Option] button, select the check box of the function that you want to recall, and then click the
[OK] button.
4 Click the [OK] button.
2
Note
The specified settings of the driver functions cannot be changed.
Fax Driver 3-25
Page 57

Setting up the fax driver (Windows)
3.9.4 Importing and exporting the driver settings
You can also save (export) or read (import) the settings that were specified to a file. This comes in handy when
you want to use the same settings on another computer.
1 In the FAX Printing Preferences dialog box, click the [Edit] button next to the "Favorite Setting" drop-
down list.
2 From the list, select the specified name that you want to export, and then click the [Export] button.
The dialog box to save the specified file appears.
3 Specify the location to save the file and enter the file name.
4 Click the [Save] button.
The specified file is created. The file extension is ".ksf".
2
Note
To read the specified file that was saved in the "Favorite Setting" drop-down list, click the [Import]
button and specify the file.
3
Fax Driver 3-26
Page 58

4
Troubleshooting
Page 59
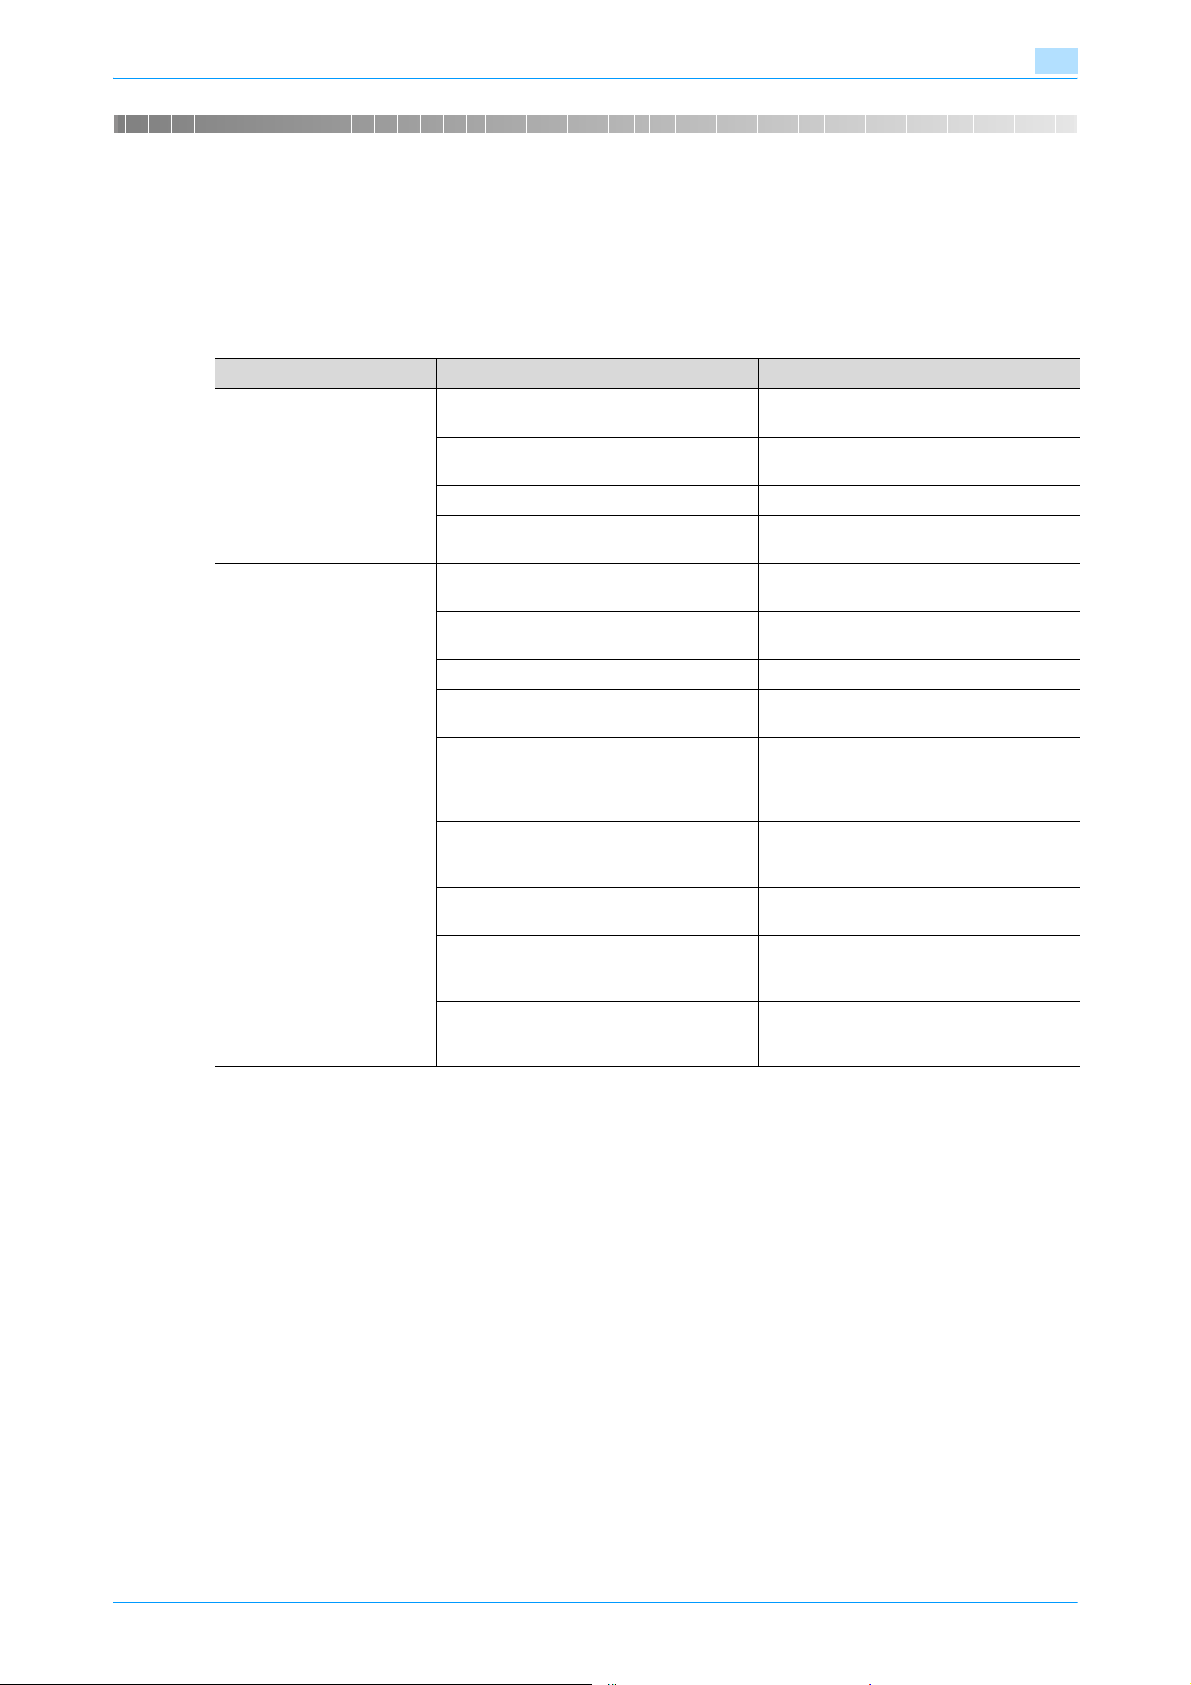
Troubleshooting
4 Troubleshooting
4.1 Unable to Fax
This chapter explains the troubleshooting procedures for possible malfunctions.
Perform the following troubleshooting procedures, in order, if the fax cannot be sent after the send command
is applied.
Symptom Probable cause Action
The message "No printers
are connected." or "Print
error" appears.
The machine does not start
faxing although the printing
operation was completed
on the computer.
The fax driver specified for faxing may not
be compatible with the image controller.
The network cable, or USB cable is disconnected.
An error has occurred in this machine. Check this machine’s control panel.
Available memory space is not sufficient. Perform a test print to check whether fax-
The fax driver specified for faxing may not
be compatible with the image controller.
The network cable, or USB cable is disconnected.
An error has occurred in this machine. Check this machine’s control panel.
A print job is queued in this machine, delaying printing.
If the account track settings have been
applied, an unregistered department
name (or password) may have been entered.
If the authentication settings have been
applied, an unregistered user name (or
password) may have been entered.
Available computer memory space is not
sufficient.
The connection of this machine to the network is not yet established (while connecting to a network).
The enhanced security mode may be enabled on this machine.
4
Check the printer name selected.
Check that the cable is connected properly.
ing is possible.
Check the printer name selected.
Check that the cable is connected properly.
Check the job order on the Active Jobs list
of the machine’s control panel.
Enter the correct department name (or
password).
Enter the correct user name (or password).
Perform a test print to check whether faxing is possible.
Consult with the network administrator.
Specify the authentication settings in the
enhanced security mode. For details,
consult with the network administrator.
If the problem persists after all of these procedures have been performed, read the User’s Guide [Copy
Operations], [Network Scan/Fax/Network Fax Operations] or [Print Operations (IC-207)].
Fax Driver 4-2
Page 60
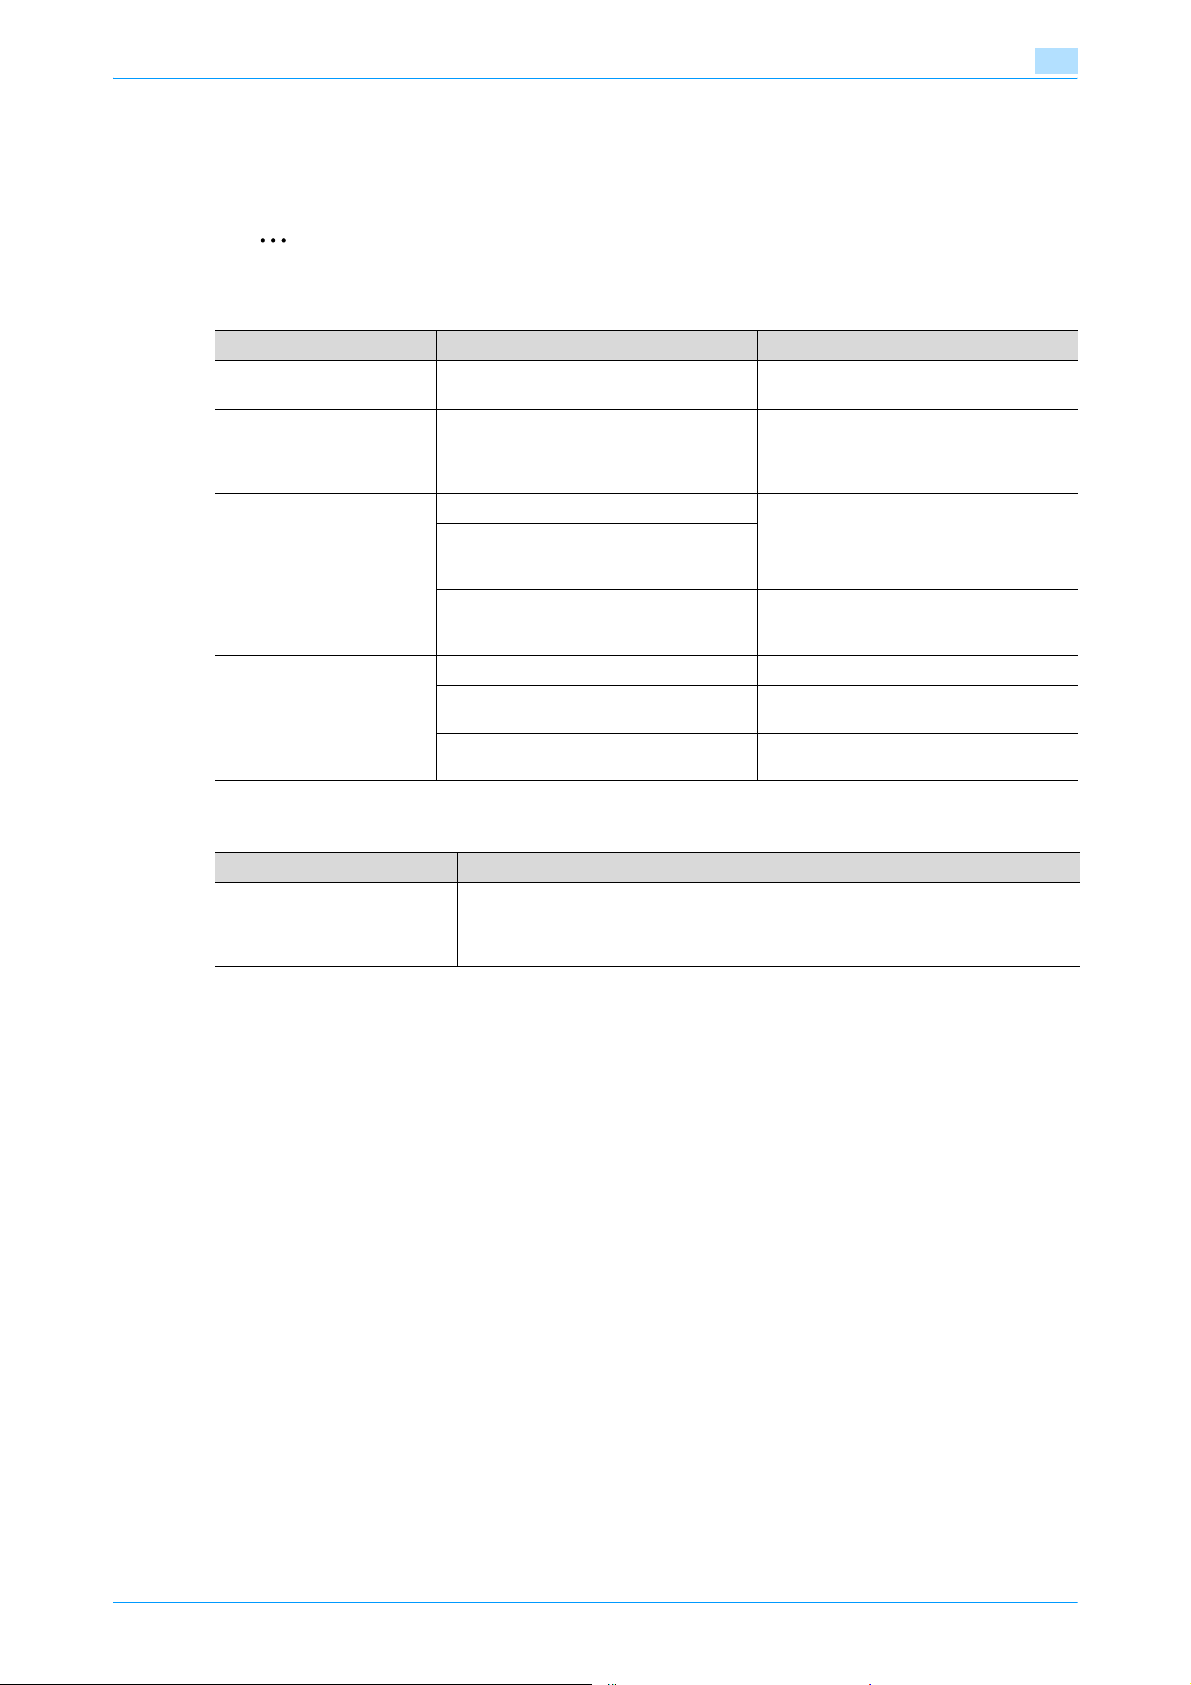
Troubleshooting
4.2 Unable to specify desired settings or unable to send as specified
Perform these troubleshooting procedures if settings cannot be specified in the fax driver or if the fax is not
sent as specified.
2
Note
Some of the fax driver functions cannot be combined with other functions.
Symptom Probable cause Action
A fax driver setting cannot
be selected.
The "Conflicts" message
with "Unable to Select" or
"Function Canceled" appears.
The fax is not sent as specified.
The watermark cannot be
attached.
Some functions cannot be combined. Do not try to select settings that are not
An incorrect combination of functions has
been specified.
Incorrect settings are specified. Check each setting in the fax driver.
A combination of functions, although
possible in the fax driver, is not possible
with this machine.
The paper size, orientation, and other settings specified in the application have priority over those specified in the fax driver.
The watermark is not correctly set. Check the watermark settings.
The watermark density is set to a level
that is too low.
Watermarks cannot be outputed in
graphics applications.
available.
Check the settings and specify the functions correctly.
Enter the correct settings in the application.
Check the density settings.
No watermark can be outputed in this
case.
4
4.2.1 Error message
Message Cause and remedy
Cannot connect to the network.
A connection to the network could not be established.
Check if the network cable is correctly connected. In addition, check that the Network Setting parameters on the Administrator Setting screen have been correctly
specified.
Fax Driver 4-3
Page 61

5
Appendix
Page 62
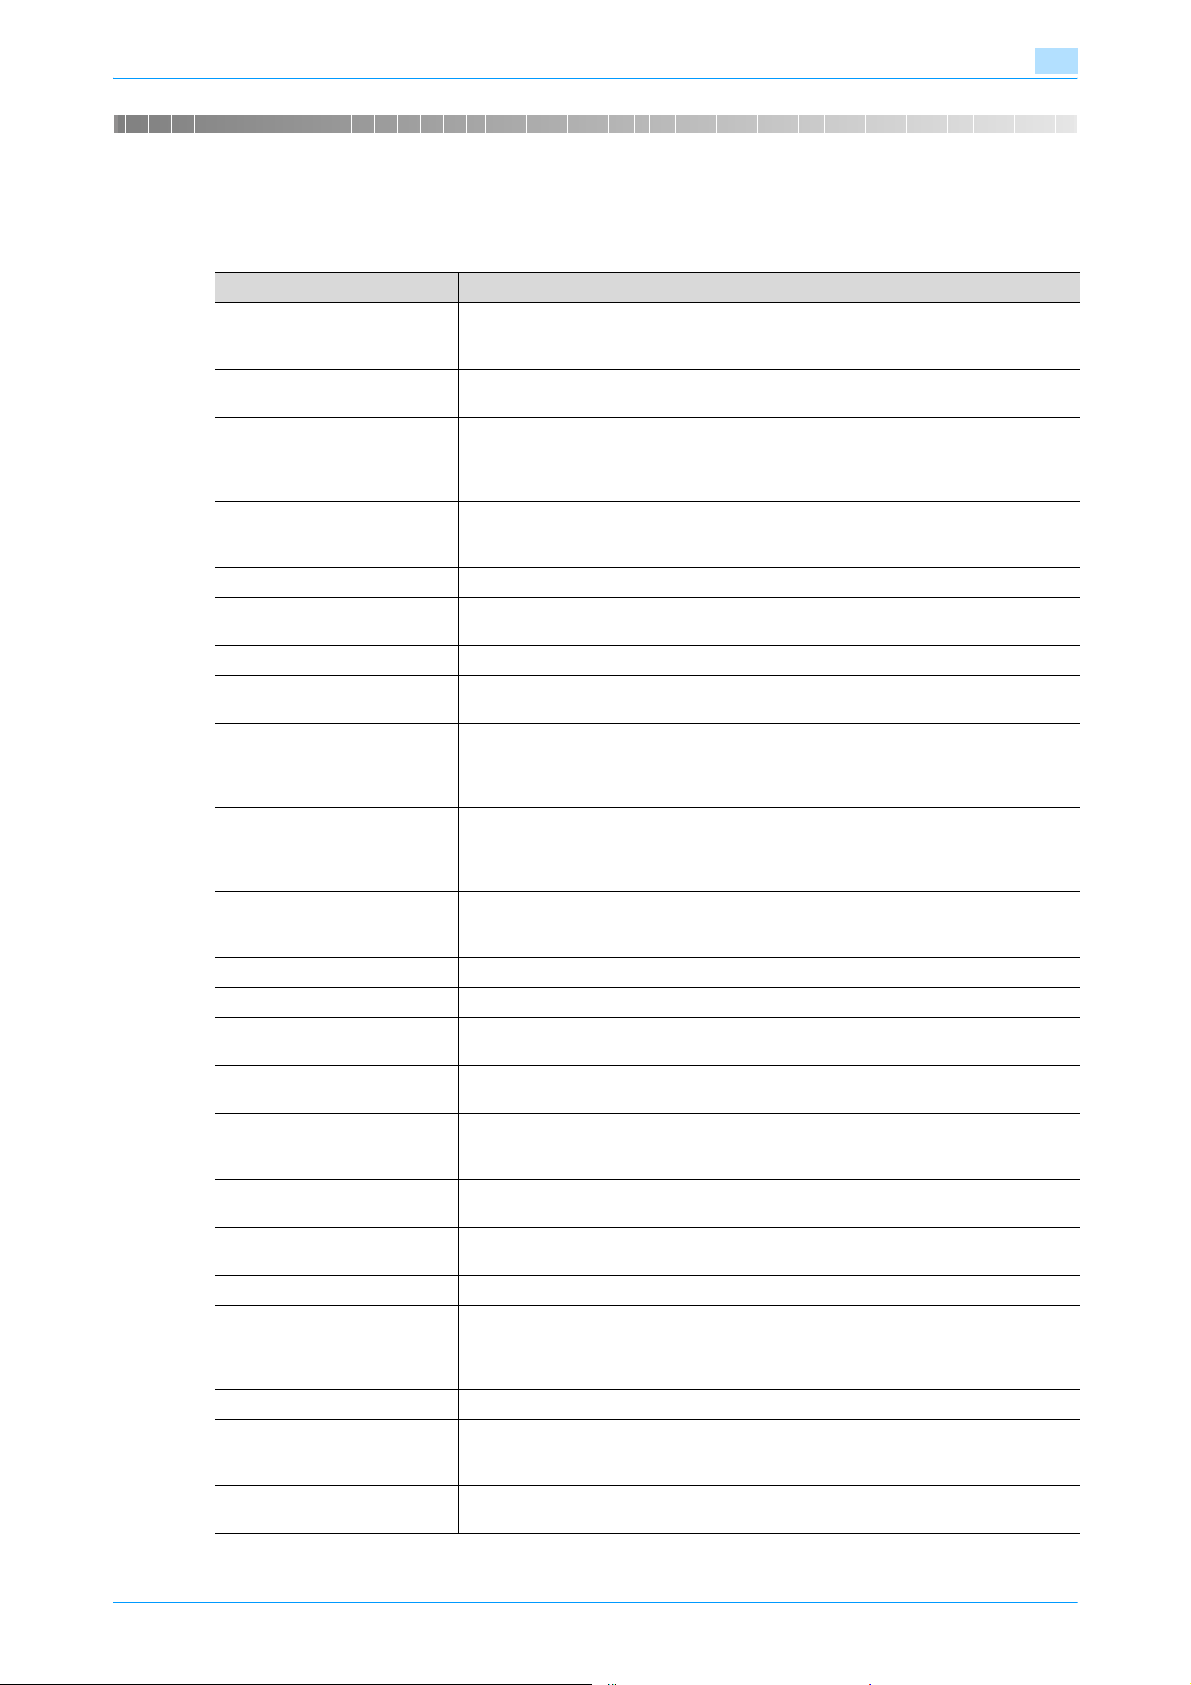
Appendix
5 Appendix
5.1 Glossary
Term Definition
10Base-T/100BaseTX/1000Base-T
bit Abbreviation for Binary Digit. The smallest unit of information (data quantity) on a
BMP Abbreviation for Bitmap. A file format for saving image data which uses the .bmp ex-
BOOTP Abbreviation for Bootstrap Protocol. A protocol in which a client computer on a
Brightness Brightness of a display screen
Byte Unit of information (data quantity) on a computer or printer. Configured as 1 byte
Client A computer that uses the services provided by a server through a network.
Default gateway A device, such as a computer or router, used as a "gateway" to access computers
DHCP Abbreviation for Dynamic Host Configuration Protocol. A protocol in which a client
DNS Abbreviation for Domain Name System. A system that acquires the supported IP ad-
DPI (dpi) Abbreviation for Dots Per Inch. A resolution unit used by printers and scanners. Indi-
Driver Software that works as a bridge between a computer and a peripheral device.
Ethernet LAN transmission line standard
Frame type Type of communication format used in a NetWare environment.
FTP Abbreviation for File Transfer Protocol. A protocol for transferring files over the Inter-
Gateway Hardware and software used as the point where a network is connected to a net-
Grayscale Monochrome image expressive form using the gradation information from black to
Hard disk Large capacity storage device for storing data. The data can be stored even if the
Host name Displayed name of a device over a network.
HTTP Abbreviation for HyperText Transfer Protocol. A protocol used to send and receive
Install To install hardware, operating systems, applications, printer drivers on to a computer
IPP Abbreviation for Internet Printing Protocol. A protocol that sends and receives print
IPX A protocol used with NetWare and works at the network layer of the OSI reference
5
An Ethernet standard, which is a cable consisting of twisted copper wire pairs. The
transmission speed of 10Base-T is 10 Mbps, of 100Base-TX is 100 Mbps, and of
1000Base-T is 1000 Mbps.
computer or printer. Displays data using 0 or 1.
tension. Commonly used on Windows platforms. You can specify the color depth
from monochrome (2 values) to full color (16,777,216 colors). Images are not usually
compressed when saved.
TCP/IP network automatically specifies the network settings from the server. Currently, DHCP, which is an advanced protocol based on BOOTP, is mainly used.
equals 8 bits.
not on the same LAN.
computer on a TCP/IP network automatically specifies the network settings from the
server. With collective management of the IP address for DHCP clients on the DHCP
server, you can avoid duplication of an address and you can build a network easily.
dresses from host names in a network environment. DNS allows the user to access
other computers over a network by specifying host names, instead of difficult to
memorize and understand IP addresses.
cates how many dots per inch are represented in an image. The higher the value, the
higher the resolution.
Communication is not possible if the same frame type is not used.
net or an intranet on the TCP/IP network.
work. A gateway also changes data formats, addresses, and protocols according to
the connected network.
white
power is turned off.
data between a Web server and a client (Web browser). Documents containing images, recordings, and video clips can be exchanged with the expressive form information.
data and controls printers over the Internet on a TCP/IP network. Data can also be
sent to printers in remote areas to print over the Internet.
model
Fax Driver 5-2
Page 63

Appendix
5
Term Definition
IPX/SPX Abbreviation for Internetwork Packet Exchange/Sequenced Packet Exchange. A
protocol developed by Novell, Inc. that is commonly used under a NetWare environment.
IP address A code (address) that is used to identify individual network devices over the Internet.
IPv4 (Internet Protocol version 4), widely spread today, is expressed such as
192.168.1.10 using 32-bit numbers divided into four. In the next generation IPv6 (Internet Protocol version 6), 128-bit IP addresses are used.
IP addresses are assigned to devices, including computers, which are connected to
the Internet.
LAN Abbreviation for Local Area Network. A network which connects computers on the
same floor, in the same building, or in neighboring buildings.
Local printer A printer connected to a parallel or USB port of a computer.
LPD Abbreviation for Line Printer Daemon. A printer protocol t hat uses TC P/I P and is plat-
form-independent. Originally developed for BSD UNIX, it has become the standard
printing protocol and can be used with any general computer.
LPR/LPD Abbreviation for Line Printer Request/Line Printer Daemon. A printing method over a
network in a Windows NT system or UNIX system. Using TCP/IP, you can output
print data from Windows or Unix to a printer over a network.
MAC address Abbreviation for Media Access Control address. With a special ID number for each
Ethernet card, data can be sent and received between the cards. A number consists
of 48 bits. The first 24 bits consist of a special number for each manufacture controlling and assigning IEEE. The last 24 bits consist of a number that the manufacturer
assigns uniquely to the card.
Memory Storage device for storing data temporally. When the power is turned off the data
may or may not be erased.
NDPS Abbreviation for Novell Distributed Print Services. Provides a highly efficient printing
solution in an NDS environment. By using the NDPS as a printer server, you can output from the desired printer, automatically download the printer driver of a newly installed printer, simplify and automate complicated management environments
related to printer use, and integrate management related to the network printer.
NDS Abbreviation for Novell Directory Services. The servers and printers on a network and
the shared resources of the user’s information, as well as the user’s access authority
over these items can be consolidated in the hierarchy structure.
NetBIOS Abbreviation for Network Basic Input Output System. A communication interface de-
veloped by IBM.
NetBEUI Abbreviation for NetBIOS Extended User Interface. A network protocol developed by
IBM. By simply specifying the computer name, you can build a small-scale network.
NetWare Network operating system developed by Novell. NetWare IPX/SPX is used as the
communication protocol.
Nprinter/Rprinter Remote printer support module for using a printer server under a NetWare environ-
ment. Use NetWare 3.x with Rprinter, and NetWare 4.x with Nprinter.
OS Abbreviation for Operating System. Basic software for controlling the system of a
computer.
Outline font A font using lines and curves to display an outline of a character. Large-size charac-
ters can be displayed on a screen or printed with no jagged edges.
PDF Abbreviation for Portable Document Format. An electronically formatted document
which uses the .pdf extension. Based on the PostScript format, you can use the free
Adobe Acrobat Reader software to view documents.
PDL Abbreviation for Page Description Language. The language for specifying the print
image per page to a printer when printing using a page printer.
Plug-and-play Ability to automatically find and use the appropriate driver when a peripheral device
is connected to a computer.
Preview A function that allows you to view an image before processing a print or scan job.
Printer buffer Memory domain temporarily used for data processing of a print job
Print Job Print request transmitted from a computer to a printing device.
Print queue A software system which queues the generated print job in the devices.
Profile Color attribute file
The dedicated file that contains the summarized correlation of the input and output
of each primary color used so that the color input and output devices can reproduce
the color.
Fax Driver 5-3
Page 64
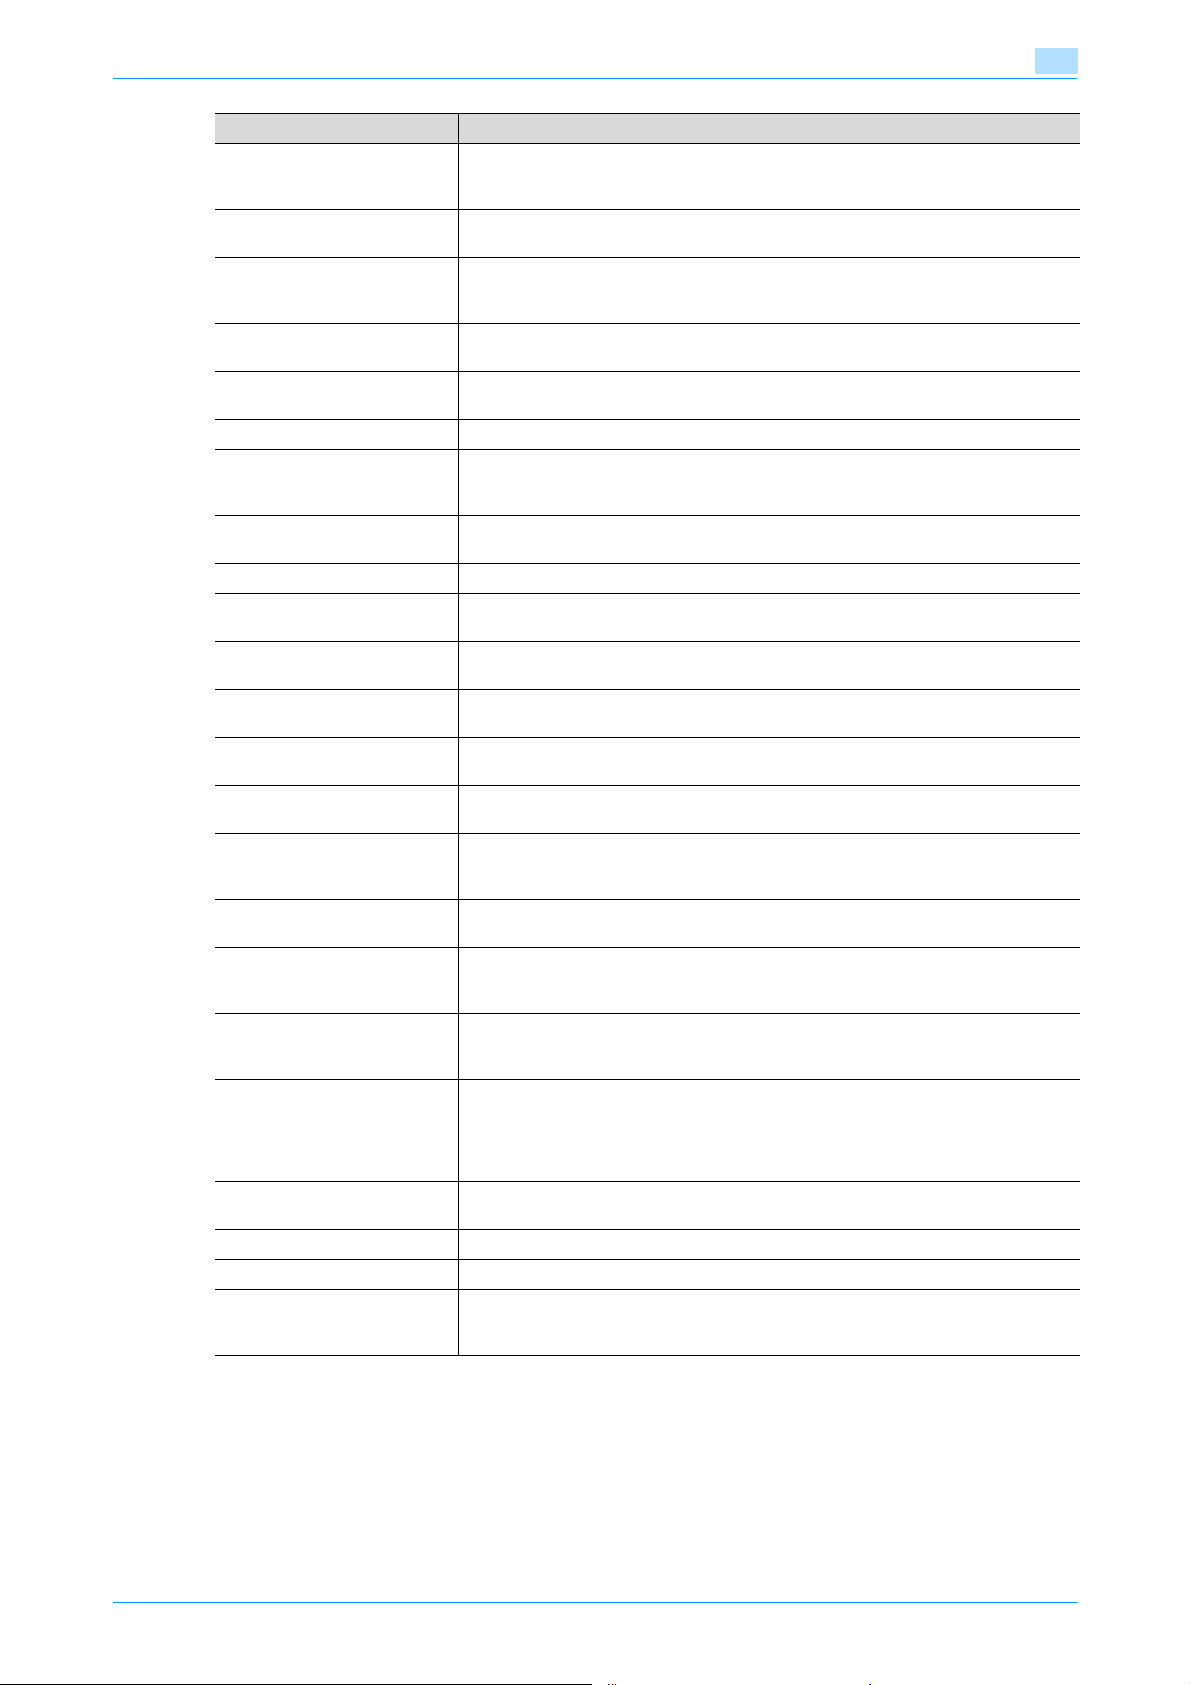
Appendix
5
Term Definition
Property Attribute information
When using a printer driver, various functions can be specified in the file properties.
In the file properties, you can check the attribute information of the file.
Protocol The rules that allow computers to communicate with other computers or peripheral
devices
Proxy server A server that is installed to act as an intermediary connection between each client
and different servers to effectively ensure security over the entire system for Internet
connections.
PServer Print server module under a NetWare environment that monitors, changes, pauses,
restarts, or cancels a print job.
Queue name • Name specified to each device that allows printing when network printing.
• Required logical printer name for LPD/LPR printing
Resolution Displays the ability to reproduce the details of images and print matter correctly.
RIP Abbreviation for Raster Image Processor. Process that develops picture images from
described text data using the PostScript page description language. The processor
is usually integrated in the printer.
Samba UNIX server software that uses SMB (Server Message Block) so that UNIX system
resources can be used from a Windows environment.
Screen font A font for displaying text and symbols on a CRT monitor.
Shared printer A printer setup that allows the printer to be used by multiple computers connected
to a server over a network.
SLP Abbreviation for Service Location Protocol. A protocol capable of finding services
over a TCP/IP network and automatically specifying a client.
SMB Abbreviation for Server Message Block. A protocol that shares files and printers over
a network and which is mainly used by Microsoft Windows.
SMTP Abbreviation for Simple Mail Transfer Protocol. A protocol for sending and forward-
ing e-mail.
SNMP Abbreviation for Simple Network Management Protocol. A management protocol in
a network environment using TCP/IP.
Spool Abbreviation for Simultaneous Peripheral Operation On-Line. For printer output, data
is not sent directly to the printer, it is temporarily stored in another location, then sent
to the printer collectively.
Subnet mask The unit used to divide a TCP/IP network into small networks (subnetworks). It is
used to identify the bits in a network address that are higher than the IP address.
TCP/IP Abbreviation for Transmission Control Protocol/Internet Protocol. The de facto
standard protocol used by the Internet that uses IP addresses to identify each network device.
TrueType An outline font that was developed by Apple Computer and Microsoft. It is used as
a standard by Macintosh and Microsoft Windows and can be used both on a display
and in print.
Touch & Print Function that allows you to print the job that was sent from the printer driver when
performing user authentication by only positioning the finger or IC card on the authentication unit that is connected to this machine.
To use the Touch & Print function, an authentication unit must be installed on this
machine, and the finger vein pattern or IC card IDs for each user must be registered.
USB Abbreviation for Universal Serial Bus. A general interface standard for connecting a
mouse, printer, and other devices to a computer.
Uninstall To delete software installed on a computer
Web browser Software such as Internet Explorer and Netscape Navigator for viewing Web pages.
WINS Abbreviation for Windows Internet Naming Service. A service for recalling named
servers for the conversion of computer names and IP address in a Windows environment.
Fax Driver 5-4
Page 65

6
Index
Page 66

6
6Index
6.1 Index
Index
A
Account track ......................................................3-14
Add printer
Adding to the phone book ...................................3-20
Automatic installation
............................................................. 2-7
............................................2-4
B
Basic tab ......................................................3-9, 3-12
Border ..................................................................3-15
C
Combination ........................................................3-15
Configure tab
Connecting
Custom page sizes ..............................................3-12
...............................................3-9, 3-18
............................................................ 1-4
D
Driver settings ...................................................... 3-24
E
Editing a phone book ..........................................3-22
Editing a watermark .............................................3-16
Encrypt. Passphrase
Error message
Exporting .............................................................3-26
...........................................3-19
.......................................................4-3
F
Fax cover sheet ..................................................... 3-5
Fax driver
Fax operation .........................................................3-2
FAX tab
Fax Transmission Popup
.......................................................2-2, 3-2
........................................................3-9, 3-11
.......................................3-2
I
Image controller .....................................................1-2
Importing
Installer
Installing ........................................................2-2, 2-4
IP address
IPP
IPPS ....................................................................... 2-4
.............................................................3-26
..................................................................2-4
......................................................2-4, 2-7
.........................................................................2-4
L
Layout tab ....................................................3-9, 3-15
Local connection
LPD ........................................................................2-7
........................................................................2-7
LPR
................................................... 1-5
Operating environment ..................................1-4, 2-4
Operating system
Options
Overlap width line ................................................3-15
................................................................3-18
..................................................1-4
P
PC-FAX operation ..................................................1-3
PCL driver
Phone book .................................................3-3, 3-20
Plug and play
Port9100
Poster mode ........................................................3-15
Printer driver
..............................................................2-2
.......................................................2-15
........................................................2-4, 2-7
..........................................................2-2
R
RAW port ...............................................................2-4
S
Sending a fax .........................................................3-2
Setting up the system ............................................1-5
Settings tab
Stamp/Composition tab
.........................................................3-10
..............................3-9, 3-16
T
TCP/IP Settings .............................................2-4, 2-7
Timer Send
Transmission settings
Troubleshooting .....................................................4-2
............................................................3-5
............................................3-5
U
Unable to fax .........................................................4-2
Unable to specify desired settings
Uninstall ...............................................................2-19
Uninstalling
USB connection
User authentication ..............................................3-13
..........................................................2-19
.....................................................2-2
........................4-3
W
Watermark ...........................................................3-16
Windows
Windows 2000 ...........................................2-12, 2-18
Windows 7
Windows NT 4.0
Windows Server 2003 ..................................2-7, 2-15
Windows Server 2008
Windows Vista
Windows XP ................................................2-7, 2-15
................................................................1-4
...........................................................2-10
..................................................2-12
..........................................2-10
...........................................2-10, 2-16
N
N in 1 ...................................................................3-15
Network connection ......................................1-5, 2-2
O
6-2 Fax Driver
Page 67

http://konicaminolta.com
2010
Copyright
2010. 3A0R59551-FD-22
 Loading...