


 Loading...
Konica Minolta DI2010, DI2010F, DI2510, DI3510, DI3010 Manual
...4514-7704-01
IP Scanner

Contents
Contents
1 |
Introduction |
|
|
|
1.1 |
Welcome ........................................................................................ |
1-1 |
|
|
Trademark Acknowledgements .................................................. |
1-1 |
|
1.2 |
Precautions.................................................................................... |
1-2 |
|
|
General precautions ................................................................... |
1-2 |
|
1.3 |
Enclosed Accessories .................................................................. |
1-3 |
|
1.4 |
Preparing the LAN Cable and IP Address................................... |
1-3 |
|
1.5 |
Acceptance of the End User License Agreement ...................... |
1-3 |
|
1.6 |
Compatible Operating Systems................................................... |
1-4 |
|
1.7 |
Operating Environment of Utilities.............................................. |
1-4 |
|
1.8 |
Specifying the IP Address............................................................ |
1-5 |
2 Making Connections
2.1 |
LAN Connection ............................................................................ |
2-1 |
|
Connecting the LAN cable.......................................................... |
2-1 |
|
LED indicators ............................................................................ |
2-2 |
2.2 |
Installing IP Scanner..................................................................... |
2-3 |
|
Utilities disk................................................................................. |
2-3 |
|
Installing IP Scanner |
|
|
(Windows Me, 98/95, XP, 2000 and NT4.0) ............................... |
2-3 |
|
Uninstalling (Windows Me, 98/95 and NT4.0) ............................ |
2-7 |
|
Uninstalling (Windows XP and 2000) ......................................... |
2-8 |
3 Using IP Scanner
3.1 |
IP Scanner...................................................................................... |
3-1 |
|
Using a dial-up router ................................................................. |
3-2 |
|
Using a modem or terminal adapter ........................................... |
3-2 |
3.2 |
IP Scanner Window and Dialog Boxes........................................ |
3-3 |
|
Main window............................................................................... |
3-3 |
|
Main window (menu bar) ............................................................ |
3-5 |
|
Scanner Settings dialog box....................................................... |
3-8 |
|
Sort Settings dialog box............................................................ |
3-11 |
|
Divided Settings dialog box ...................................................... |
3-14 |
|
Notify Settings dialog box ......................................................... |
3-17 |
|
ViewWindow ............................................................................. |
3-20 |
|
|
|
IP Scanner |
|
i |

|
|
|
|
Contents |
|
|
|
|
|
|
|
3.3 |
Basic Transmission.................................................................... |
3-21 |
|||
|
|
|
Programming the scanner button (from the computer) ............ |
3-21 |
|
|
|
|
Scanning documents (from the copier) .................................... |
3-24 |
|
|
|
|
Viewing the scanned image (from the computer) .................... |
3-25 |
|
ii |
IP Scanner |

Introduction |
1 |
|
1 Introduction
1.1Welcome
This manual provides descriptions on the use of IP Scanner.
For precautions concerning the use and safety of the main device, refer to the User Manual provided with the device.
Store the User Manual and utilities disk in a safe place.
Trademark Acknowledgements
Windows®, Windows NT®, Microsoft® and its logo are registered trademarks of Microsoft Corporation in the United States and other countries.
Network FAX is a registered trademark of Comuse Co., Ltd.
All other company names and product names mentioned in this manual are trademarks or registered trademarks of their respective companies.
IP Scanner |
1-1 |

1 |
Introduction |
|
1.2Precautions
General precautions
1.The reproduction of the content of this manual, either partially or in full, is prohibited without prior permission.
2.The content of this manual is subject to change without notice.
3.Unauthorized duplication or modification is strictly prohibited.
4.This manual was created with careful attention to content; however, if inaccuracies, errors or omissions are noticed, please contact your sales or service representative.
5.Some network application functions may not be supported, depending on the operating environment or other software.
The actual performance of network application functions is determined by various factors, such as the system configuration, customer data and operator controls.
Since the operating environment of network application functions differs depending on the customer, the configuration of specific products and the suitability of the application software should be determined specifically for the customer.
6.We assume no responsibility for consequences arising from use, regardless of items 4 and 5 mentioned above.
7.The software provided with the device, the software included on the CD-ROM and information such as the design of and materials related to this manual are the sole property of NEC Corporation, NEC Access Technica and their licensors.
NEC Corporation, NEC Access Technica and their licensors own all patents, copyrights and titles to this manual, from the design, production and duplication to the use and marketing rights. However, these limitations do not apply if written permission to transfer the above-mentioned rights to another company is received.
8.The touch panel screens and computer windows and dialog boxes shown in this manual may differ slightly from the actual products.
1-2 |
IP Scanner |

Introduction |
1 |
|
1.3Enclosed Accessories
Internet Fax & Network Scan Kit
CD-ROM containing electronic manuals
Utility Disk (CD-ROM)
Tip
In order to use the IP Scanner, the Network Interface Card and the Internet Fax & Network Scan Kit must be installed.
CAUTION
Only use the CD-ROM in a player that is CD-ROM-compatible.
If a player not compatible with the CD-ROM format is used, your ears or speakers may be damaged by the loud noise produced.
1.4Preparing the LAN Cable and IP Address
In order to use the IP Scanner, a LAN cable and a registered IP address are required.
The LAN cable is not included; it must be prepared by the user.


 Note
Note
The LAN cable should be a cable for Fast Ethernet 100BASE-TX (Category 5).
1.5Acceptance of the End User License Agreement
In order to use the network functions, you must agree not to make illegal copies of or pass to unlicensed persons the software provided with the device or the software included on the CD-ROM. Before using these functions, you must read the enclosed End User License Agreement and agree to the terms of use for the software.
IP Scanner |
1-3 |

1 |
Introduction |
|
1.6Compatible Operating Systems
Utility |
Operating System |
IP Scanner |
Windows® Me/Windows® 98/Windows® 95/Windows® 2000/ |
|
Windows® NT4.0/Windows® XP |
|
|
1.7Operating Environment of Utilities
|
IP Scanner |
|
Processor |
Pentium 133 MHz or higher |
|
|
|
|
Memory |
32 |
MB or more (64 MB recommended)* |
|
|
|
Hard disk free space |
50 |
MB or more |
|
|
|
* 64 MB or more (128 MB recommended) for Windows® XP or Windows® 2000
1-4 |
IP Scanner |
Introduction |
1 |
|
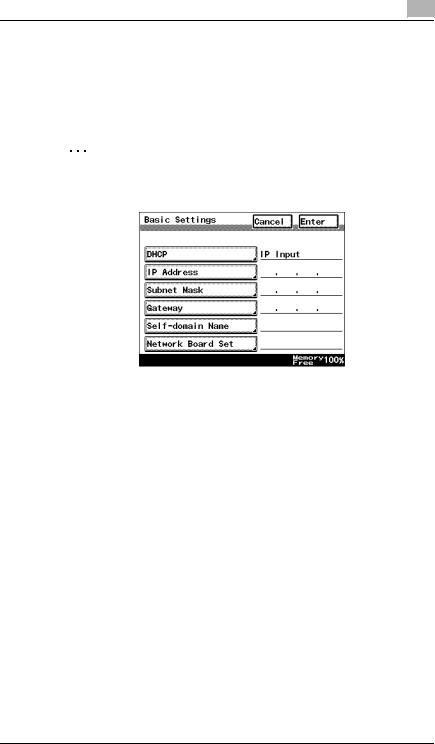
1.8Specifying the IP Address
Be sure to specify the IP address of the copier before using the IP Scanner.
Specify the IP address from the Basic Settings screen.
Note
After changing the settings, turn the unit off, then on again.
Parameter |
Description |
DHCP |
Specify whether to automatically retrieve the IP |
|
address from the DHCP server or to specify a |
|
fixed IP address. |
|
|
IP Address |
Type in the IP address of this unit. |
|
*Type in the IP address only if the “DHCP” |
|
parameter is set to “IP Input”. |
|
|
Subnet Mask |
Type in the subnet mask of the connected |
|
network. |
|
*Type in the subnet mask only if the “DHCP” |
|
parameter is set to “IP Input”. |
|
|
Gateway |
Type in the default gateway address of the |
|
connected network. |
|
*Type in the default gateway address only if the |
|
“DHCP” parameter is set to “IP Input”. |
|
|
IP Scanner |
1-5 |

1 |
Introduction |
|
1 Press the [Utility] key on the copier control panel.
2 Touch [Administrator Management].
3 Use the keypad to type in the administrator access code, and then touch [Enter].
4 Touch [Admin. 2].
5 Touch [Network Set].
6 Touch [Basic Setting].
7 Specify the settings described above.
8 Touch [Enter].
Note
In order to apply the new settings, the unit must be turned off, then on again.
1-6 |
IP Scanner |

Making Connections |
2 |
|
|
|
|
2 Making Connections
2.1LAN Connection
This copier can transmit with the TCP/IP protocol on a LAN. Therefore, the LAN cable must be connected.
Connect to the LAN by using a LAN cable (cable for Fast Ethernet 100BASE-TX).
Connecting the LAN cable
Insert one plug on the LAN cable into the connector (marked LAN) at the back of the machine, and then insert the other plug into the hub.
Tip
The connector is at the back of the machine.
The LAN cable should be a cable for Fast Ethernet 100BASE-TX (Category 5).
The LAN cable is not included as an accessory.
Connector for LAN cable
LAN USB
USB printer connector (optional)
LED indicator • For more details, refer to the manual for the printer controller.
Power cord connector
IP Scanner |
2-1 |
2 |
|
|
|
Making Connections |
||
|
|
|
|
|
|
|
|
|
|
LED indicators |
|
|
|
|
|
|
|
|
|
|
|
|
|
LED Color |
Condition |
Meaning |
|
|
|
|
Green |
Lit |
The LAN is connected correctly. |
|
|
|
|
|
|
|
|
|
|
|
|
Off |
The copier has not been turned on. |
|
|
|
|
|
|
The LAN is not connected correctly. |
|
|
|
|
|
|
|
|
|
|
|
|
Flashing |
Data is being sent or received. |
|
|
|
|
|
|
|
|
|
|
|
Red |
Lit |
Operating at 100 Mbps |
|
|
|
|
|
|
|
|
|
|
|
|
Off |
Operating at 10 Mbps |
|
|
|
|
|
|
|
|
2-2 |
IP Scanner |

Making Connections |
2 |
|
|
|
|
2.2Installing IP Scanner
The procedure for installing IP Scanner is described below.
Precautions
For details on installing the Network FAX, refer to the Network FAX User’s Manual.
Note
Do not install IP Scanner onto computers used as mail servers or computers where a mail server is installed.
Utilities disk
The utilities disk contains the IP Scanner and Network FAX applications.
In order to install each utility, the amount of hard disk space shown below must be available.
IP Scanner: About 5 MB
Network FAX: About 22 MB
Installing IP Scanner (Windows Me, 98/95, XP, 2000 and NT4.0)
1Start up Windows, and then insert the utilities disk (CD-ROM) into the CD-ROM drive.
The Installer starts up, and the Installer dialog box appears.
Tip
If the installer does not start up automatically, double-click “My Computer” on the desktop, and then double-click the icon for the CD-ROM drive containing the CD-ROM. Double-click [setup.exe] on the CD-ROM to start up the installer.
2 Click the [GO] button beside Install IP Scanner.
IP Scanner |
2-3 |

2 |
Making Connections |
|
3 Check the contents of the dialog box, and then click the [Next] button.
4Check which folder IP Scanner will be installed into, and then click the [Next] button.
To change the folder where IP Scanner will be installed, click the [Browse...] button, and then select the desired folder.
While specifying settings in the installer dialog boxes, if you choose the wrong setting or want to change a setting, click the [Back] button to return to the previous dialog box and specify the settings as desired.
2-4 |
IP Scanner |

Making Connections |
2 |
|
|
|
|
5Select the folder where IP Scanner will be registered, and then click the [Next] button.
The installation begins.
6 Click the [Finish] button.
A message may appear, informing you that the computer should be restarted.
Restart the computer to complete the installation.
7 In the Installer dialog box, click the [Close] button.
IP Scanner |
2-5 |
Loading...