


 Loading...
User s Guide [Print Operations]

Table Of Contents
1 |
Introduction |
|
|
|
1.1 |
Welcome .......................................................................................................................................... |
1-2 |
|
1.1.1 |
User's guides ..................................................................................................................................... |
1-2 |
|
1.1.2 |
User's Guide ...................................................................................................................................... |
1-2 |
|
1.2 |
Conventions used in this manual .................................................................................................. |
1-3 |
|
1.2.1 |
Symbols used in this manual ............................................................................................................. |
1-3 |
|
|
To use this machine safely................................................................................................................. |
1-3 |
|
|
Procedural instruction........................................................................................................................ |
1-3 |
|
|
Key symbols....................................................................................................................................... |
1-4 |
|
1.2.2 |
Original and paper indications ........................................................................................................... |
1-4 |
|
|
Original and paper sizes .................................................................................................................... |
1-4 |
|
|
Original and paper indications ........................................................................................................... |
1-4 |
2 |
Overview |
|
|
|
2.1 |
Printer Controller ............................................................................................................................ |
2-2 |
|
2.1.1 |
Roles of the printer controller ............................................................................................................ |
2-2 |
|
|
Standard controller ............................................................................................................................ |
2-2 |
|
|
Optional Image Controller.................................................................................................................. |
2-3 |
|
2.1.2 |
Flow of printing .................................................................................................................................. |
2-4 |
|
2.2 |
Operating environment................................................................................................................... |
2-5 |
|
2.2.1 |
Connectable computers and operating systems............................................................................... |
2-5 |
|
2.2.2 |
Interface used for connection ............................................................................................................ |
2-6 |
|
|
USB interface..................................................................................................................................... |
2-6 |
|
|
Ethernet.............................................................................................................................................. |
2-6 |
|
|
Connection diagram........................................................................................................................... |
2-6 |
|
2.3 |
Setup procedure ............................................................................................................................. |
2-8 |
|
2.3.1 |
For local connection (USB port)......................................................................................................... |
2-8 |
|
2.3.2 |
For network connection ..................................................................................................................... |
2-8 |
3 |
Installing the Printer Driver |
|
|
|
3.1 |
Printer drivers compatible with respective operating systems.................................................. |
3-2 |
|
3.2 |
Connection methods able to be selected in each operating system......................................... |
3-3 |
|
3.2.1 |
Windows Vista/7/Server 2008/Server 2008 R2.................................................................................. |
3-3 |
|
3.2.2 |
Windows XP/Server 2003 .................................................................................................................. |
3-4 |
|
3.3 |
Installation using installer .............................................................................................................. |
3-5 |
|
3.3.1 |
Operating environment of the installer............................................................................................... |
3-5 |
|
3.3.2 |
For USB connection........................................................................................................................... |
3-5 |
|
3.3.3 |
For network connection ..................................................................................................................... |
3-6 |
|
3.4 |
Manual installation using the Add Printer Wizard........................................................................ |
3-7 |
|
3.4.1 |
Windows Vista/7/Server 2008/Server 2008 R2.................................................................................. |
3-7 |
|
|
For network connection (LPR/Port 9100) .......................................................................................... |
3-7 |
|
|
For network connection (IPP)........................................................................................................... |
3-10 |
|
|
For network connection (Web service print) .................................................................................... |
3-11 |
|
|
For local connection ........................................................................................................................ |
3-12 |
|
|
Updating the driver after connecting this machine.......................................................................... |
3-12 |
|
3.4.2 |
Windows XP/Server 2003 ................................................................................................................ |
3-13 |
|
|
For network connection (LPR/Port 9100) ........................................................................................ |
3-13 |
|
|
For network connection (IPP)........................................................................................................... |
3-15 |
|
|
For local connection ........................................................................................................................ |
3-16 |
|
3.5 |
Uninstalling the printer driver ...................................................................................................... |
3-17 |
|
3.5.1 |
Manual uninstallation ....................................................................................................................... |
3-17 |
bizhub 215 |
Contents-1 |

|
|
|
|
|
|
|
|
4 |
Setting the GDI/PCL Printer Driver |
|
|
|
4.1 |
Printer driver setting window......................................................................................................... |
4-2 |
|
4.1.1 |
Displaying the setting window ........................................................................................................... |
4-2 |
|
4.1.2 |
Print settings window......................................................................................................................... |
4-3 |
|
4.1.3 |
Properties window ............................................................................................................................. |
4-4 |
|
4.2 |
[Device Options] tab ....................................................................................................................... |
4-5 |
|
4.2.1 |
[Device Options]................................................................................................................................. |
4-5 |
|
4.3 |
Common operations ....................................................................................................................... |
4-6 |
|
4.3.1 |
Common settings............................................................................................................................... |
4-6 |
|
4.3.2 |
Saving the settings ([Easy Set]).......................................................................................................... |
4-7 |
|
4.4 |
[Setup] tab ....................................................................................................................................... |
4-8 |
|
4.4.1 |
Function list........................................................................................................................................ |
4-8 |
|
4.4.2 |
Setting Custom Size .......................................................................................................................... |
4-9 |
|
4.4.3 |
Using Secure Print ........................................................................................................................... |
4-10 |
|
|
Specifying from the printer driver .................................................................................................... |
4-10 |
|
|
Outputting in this machine............................................................................................................... |
4-11 |
|
4.5 |
[Layout] tab.................................................................................................................................... |
4-12 |
|
4.6 |
[Per Page Setting] tab .................................................................................................................. |
4-13 |
|
4.7 |
[Watermark] tab ............................................................................................................................ |
4-14 |
|
4.7.1 |
Function list...................................................................................................................................... |
4-14 |
|
4.7.2 |
Creating a new watermark............................................................................................................... |
4-14 |
|
4.7.3 |
Editing a watermark ......................................................................................................................... |
4-15 |
|
4.8 |
[Quality] tab ................................................................................................................................... |
4-17 |
|
4.8.1 |
Function list...................................................................................................................................... |
4-17 |
|
4.8.2 |
Setting the font ................................................................................................................................ |
4-18 |
5 |
Setting the XPS Printer Driver |
|
|
|
5.1 |
Printer driver setting window......................................................................................................... |
5-2 |
|
5.1.1 |
Displaying the setting window ........................................................................................................... |
5-2 |
|
5.1.2 |
Print settings window......................................................................................................................... |
5-3 |
|
5.1.3 |
Properties window ............................................................................................................................. |
5-4 |
|
5.2 |
[Device Options] tab ....................................................................................................................... |
5-5 |
|
5.2.1 |
[Device Options]................................................................................................................................. |
5-5 |
|
5.3 |
Common operations ....................................................................................................................... |
5-6 |
|
5.3.1 |
Common settings............................................................................................................................... |
5-6 |
|
5.3.2 |
Saving the settings ([Easy Set]).......................................................................................................... |
5-7 |
|
5.4 |
[Setup] tab ....................................................................................................................................... |
5-8 |
|
5.5 |
[Layout] tab...................................................................................................................................... |
5-9 |
|
5.6 |
[Quality] tab ................................................................................................................................... |
5-10 |
6 |
Operating the Panel for Printer Functions |
|
|
|
6.1 |
Printer operation ............................................................................................................................. |
6-2 |
|
6.1.1 |
Printer Indicator ................................................................................................................................. |
6-2 |
|
6.1.2 |
Starting Printing ................................................................................................................................. |
6-2 |
|
6.1.3 |
Canceling a print job.......................................................................................................................... |
6-3 |
|
6.1.4 |
Power Save mode.............................................................................................................................. |
6-4 |
7 |
PageScope Web Connection |
|
|
|
7.1 |
Overview .......................................................................................................................................... |
7-2 |
|
7.1.1 |
Operating environments..................................................................................................................... |
7-2 |
|
7.2 |
How to use PageScope Web Connection..................................................................................... |
7-3 |
|
7.2.1 |
How to access ................................................................................................................................... |
7-3 |
|
7.2.2 |
How to view the screen ..................................................................................................................... |
7-3 |
bizhub 215 |
Contents-2 |

|
|
|
|
|
|
|
|
|
7.2.3 |
..................................................................................................User mode and administrator mode |
7-4 |
|
7.2.4 |
How to operate .................................................................................................................................. |
7-4 |
|
7.3 |
User mode ....................................................................................................................................... |
7-5 |
|
7.3.1 |
[System] - [Summary]......................................................................................................................... |
7-5 |
|
7.3.2 |
[System] - [Details] ............................................................................................................................. |
7-5 |
|
7.3.3 |
[System] - [Maintenance] - [Counter] ................................................................................................. |
7-6 |
|
7.3.4 |
[System] - [Maintenance] - [Power Save Setting] .............................................................................. |
7-7 |
|
7.3.5 |
[System] - [Online Assistance] ........................................................................................................... |
7-7 |
|
7.3.6 |
[Print Job] - [Print Job Management]................................................................................................. |
7-8 |
|
7.3.7 |
[Print Job] - [File Download]............................................................................................................... |
7-8 |
|
7.3.8 |
[Print] - [Settings] - [Paper Handling] ................................................................................................. |
7-9 |
|
7.3.9 |
[Print] - [Settings] - [Paper Layout]..................................................................................................... |
7-9 |
|
7.3.10 |
[Print] - [Settings] - [Printer Setting] ................................................................................................. |
7-10 |
|
7.3.11 |
[Print] - [Test Print] ........................................................................................................................... |
7-11 |
|
7.3.12 |
[Print] - [Font Information] ................................................................................................................ |
7-11 |
|
7.3.13 |
[Address] - [One-Touch Dial Setting] ............................................................................................... |
7-12 |
|
7.3.14 |
[Address] - [Speed Dial Setting]....................................................................................................... |
7-12 |
|
7.3.15 |
[Address] - [Group Dial Setting] ....................................................................................................... |
7-13 |
|
7.3.16 |
[Network] - [Summary] ..................................................................................................................... |
7-13 |
8 |
Troubleshooting |
|
|
|
8.1 |
Main messages and troubleshooting............................................................................................ |
8-2 |
|
8.2 |
Handling print data when an error occurs.................................................................................... |
8-3 |
|
8.2.1 |
[MACHINE TROUBLE] error............................................................................................................... |
8-3 |
|
8.2.2 |
Temporary error ................................................................................................................................. |
8-3 |
9 |
Appendix |
|
|
|
9.1 |
Print specifications ......................................................................................................................... |
9-2 |
10 |
Index |
|
|
|
10.1 |
Index by item ................................................................................................................................. |
10-2 |
|
10.2 |
Index by button.............................................................................................................................. |
10-3 |
bizhub 215 |
Contents-3 |

1
Introduction

1.1 |
Welcome |
1 |
|
|
|
|
|
||
|
|
|
|
|
|
|
|
|
|
1 Introduction
1.1Welcome
Thank you for purchasing this machine.
This User's Guide describes the functions, operating instructions, precautions for correct operation, and simple troubleshooting guidelines of this machine. In order to obtain maximum performance from this product and use it effectively, please read this User's Guide as necessary.
1.1.1 |
User's guides |
|
|
|
|
Printed manual |
|
Overview |
|
|
|
|||
|
|
|
|
|
|
[Quick Guide Copy/Print/Fax/Scan Operations] |
|
This manual describes operating procedures and the |
|
|
|
|
most frequently used functions in order to enable you |
|
|
|
|
to begin using this machine immediately. |
|
|
User's guide CD manuals |
|
Overview |
|
|
|
|||
|
|
|
|
|
|
[User's Guide Copy Operations] |
|
This manual describes details on copy mode opera- |
|
|
|
|
tions and the settings of this machine. |
|
|
|
|
• Specifications of originals and copy paper |
|
|
|
|
• |
Copy function |
|
|
|
• |
Maintaining this machine |
|
|
|
• |
Troubleshooting |
|
|
|
|
|
|
[User's Guide Fax Operations] |
|
This manual describes details on fax mode operations |
|
|
|
|
and settings. |
|
|
|
|
• |
G3 fax function |
|
|
|
• |
Internet Fax |
|
|
|
• |
PC-FAX |
|
|
|
|
|
|
[User's Guide Print Operations] |
|
This manual describes details on printer functions. |
|
|
|
|
• |
Printer function |
|
|
|
• Setting the printer driver |
|
|
|
|
|
|
|
[User's Guide Scan Operations] |
|
This manual describes details on scan functions. |
|
|
|
|
• |
Scan Function |
|
|
|
• Setting the TWAIN/WIA scan driver |
|
|
|
|
• Network scan (E-mail TX, FTP Send, and SMB |
|
|
|
|
|
Send) |
|
|
|
• |
Scan to USB |
|
|
|
|
|
|
[User's Guide Network Administrator] |
|
This manual describes details on setting methods for |
|
|
|
|
each function using the network connection. |
|
|
|
|
• |
Network settings |
|
|
|
• Settings using PageScope Web Connection |
|
|
|
|
|
|
|
[Trademarks/Copyrights] |
|
This manual describes details on trademarks and |
|
|
|
|
copyrights. |
|
|
|
|
• |
Trademarks and copyrights |
|
|
|
|
|
1.1.2User's Guide
This User's Guide is intended for users ranging from those using this machine for the first time to administrators.
It describes basic operations, functions that enable more convenient operations, maintenance procedures, simple troubleshooting operations, and various setting methods of this machine.
Note that basic technical knowledge about the product is required to enable users to perform maintenance work or troubleshooting operations. Limit your maintenance and troubleshooting operations to the areas explained in this manual.
Should you experience any problems, please contact your service representative.
bizhub 215 |
1-2 |
1.2 |
Conventions used in this manual |
1 |
|
|
|
|
1.2Conventions used in this manual
1.2.1Symbols used in this manual
Symbols are used in this manual to express various types of information.
The following describes each symbol related to correct and safe usage of this machine.
To use this machine safely
7 WARNING
-This symbol indicates that a failure to heed the instructions may lead to death or serious injury.
7 CAUTION
-This symbol indicates that negligence of the instructions may lead to mishandling that may cause injury or property damage.
NOTICE
This symbol indicates a risk that may result in damage to this machine or documents.
Follow the instructions to avoid property damage.
Procedural instruction
0This check mark indicates an option that is required in order to use conditions or functions that are prerequisite for a procedure.
1This format number "1" represents the first step.
2This format number represents the order of serial steps.
% This symbol indicates a supplementary explanation of a pro- |
The operation |
cedural instruction. |
procedures are |
|
described using |
|
illustrations. |
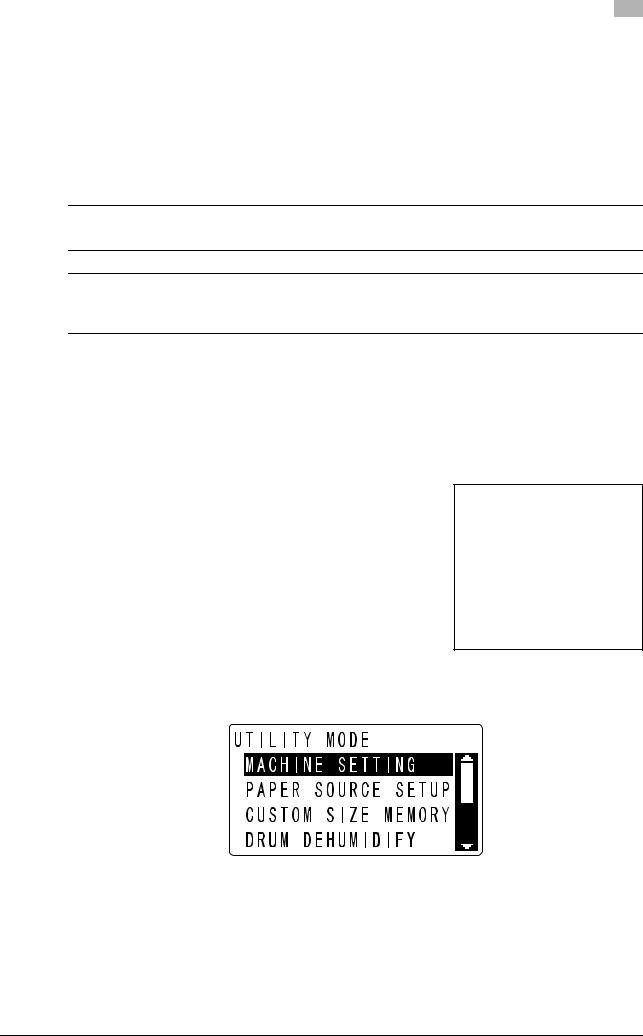
%This symbol indicates transition of the Display to access a desired menu item.
This symbol indicates a desired page.
dReference
This symbol indicates a reference.
View the reference as required.
bizhub 215 |
1-3 |
1.2 |
Conventions used in this manual |
1 |
|
|
|
|
|
|
Key symbols |
|
|
|
[ ] |
|
|
|
Display items, key names on the computer screen, or a name of a user guide by these brackets. |
|
|
|
Bold text |
|
|
|
Key names, part names, product names and option names on the Control Panel are indicated in bold text. |
||
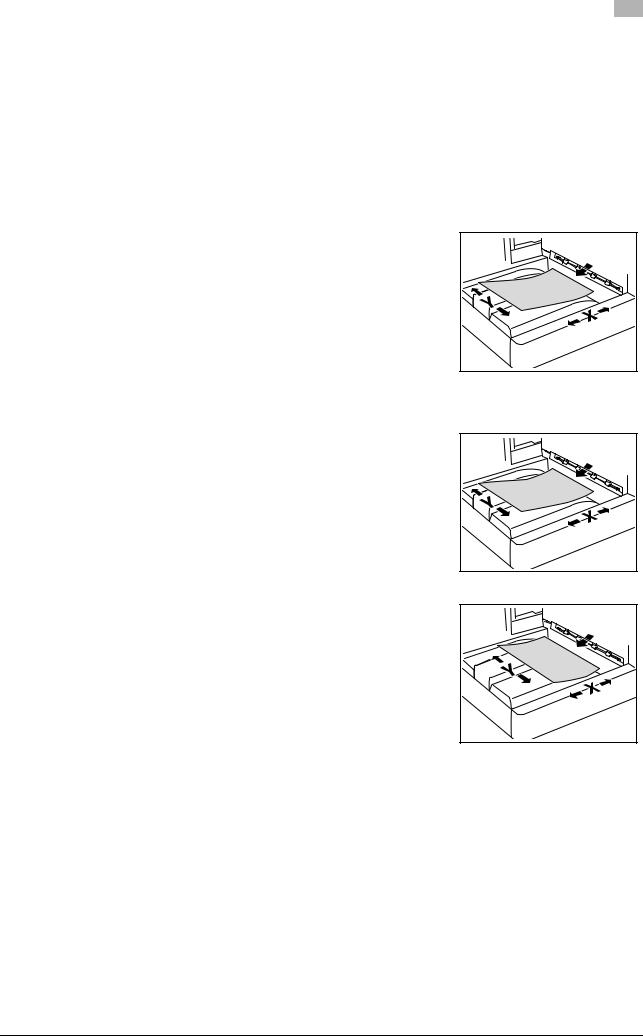
1.2.2Original and paper indications
Original and paper sizes
The following explains the indication for originals and paper described in this manual.
When indicating the original or paper size, the Y side represents the width and the X side the length.
Original and paper indications
w indicates the paper size with the length (X) being longer than the width (Y).
v indicates the paper size where the length (X) is shorter than the width (Y).
bizhub 215 |
1-4 |

2 Overview

2.1 |
Printer Controller |
2 |
|
|
|
|
|
||
|
|
|
|
|
|
|
|
|
|
2 Overview
2.1Printer Controller
The printer controller is a device that enables the printing function on this machine.
2.1.1Roles of the printer controller
Incorporating the printer controller enables this machine to function as a printing system, which enables printing through the use of applications loaded on the computer connected to this machine. When using this machine as a network printer, you can print using applications loaded on the computer. Two types of controllers are available for this machine: The standard controller and the optional Image Controller IC-209.
Standard controller
The standard controller can be connected to the computer via a USB port, and uses the GDI printer driver for
printing.
1.This machine
2.Printer controller
3.Printing system
The standard printer controller provides the following functions:
-Printing data sent from a printer driver on a computer
-Controlling the number of pages to be printed (Account Track functions)
-Fax transmission direct from a computer (PC-FAX transmission)
If optional Network Card NC-504 is installed, you can use functions via the network in the same way as when optional Image Controller IC-209 is installed.
bizhub 215 |
2-2 |
2.1 |
Printer Controller |
2 |
|
|
|
|
Optional Image Controller
The optional image controller can be connected to the computer via a USB or network port, and uses the PCL printer driver for printing.
1.This machine
2.Printer controller
3.Printing system
Optional Image Controller IC-209 provides the following functions:
-Printing data sent from a printer driver on a computer
-Supporting network protocols including TCP/IP (IPv4/IPv6)
-Printing via the network using Web service (Windows Vista/7/Server 2008/Server 2008 R2), LPR or IPP printing
-Configuring settings for this machine and the printer controller from a client computer via the network (using a Web browser)
-Controlling the number of pages to be printed (Account Track functions)
-Fax transmission direct from a computer (PC-FAX transmission)
dReference
The PC-FAX transmission requires optional Fax Kit FK-510 and Extended Operation Panel MK-733. For details on the PC-FAX transmission, refer to the [User's Guide Fax Operations].
bizhub 215 |
2-3 |
2.1 |
Printer Controller |
2 |
|
|
|
|
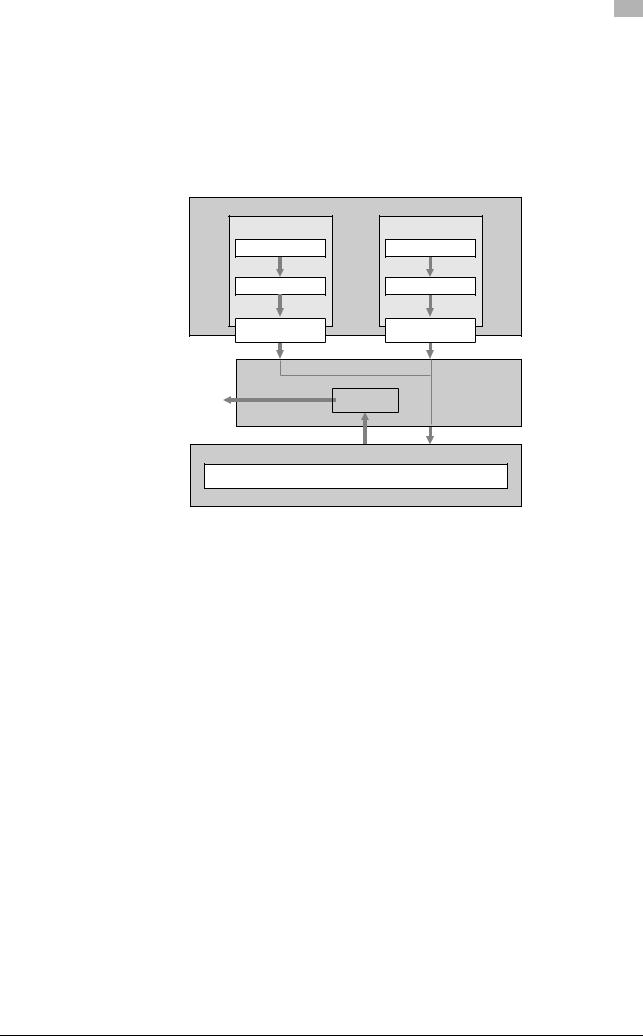
2.1.2Flow of printing
The following outlines the flow of operations for using this printing system as a printer.
Print data sent from an application is received by the printer driver.
The data is sent to this machine via the USB interface for USB connection or Ethernet (TCP/IP) for network connection. Then the data is passed from this machine to the printer controller. The printer controller rasterizes images (expands output target characters and images to bitmap data). This data is printed from this machine.
|
Computer |
When using USB |
When using network |
connection |
connection (Option) |
Application |
Application |
Printer driver |
Printer driver |
USB |
Ethernet (TCP/IP) |
This machine
|
Print Operation |
|
|
|
|
Printer controller
GDI/PCL processing (Rasterization)
When a print job is received during copying, the data is stored in the memory of this machine. When the copying is completed, the print job is automatically printed.
bizhub 215 |
2-4 |

2.2 |
Operating environment |
2 |
|
|
|
|
2.2Operating environment
This section describes the system requirements for using the printing system including the standard printer controller or optional Image Controller IC-209, and the interfaces used for connection.
2.2.1Connectable computers and operating systems
Ensure that the computer to be connected meets the following conditions.
Operating system |
Windows XP (x86, SP3 or later) |
|
Windows XP (x64, SP2 or later) |
|
Windows Server 2003 (x86/x64, SP2 or later) |
|
Windows Vista (x86/x64, SP2 or later) |
|
Windows Server 2008 (x86/x64) |
|
Windows Server 2008 R2 (x64) |
|
Windows 7 (x86/x64) |
|
|
CPU |
Windows XP, Windows Server 2003: 300 MHz or higher specification is recom- |
|
mended |
|
Windows Vista: 1 GHz or higher specification is recommended |
|
Windows Server 2008, Windows 7: 2 GHz or higher specification is recommend- |
|
ed |
|
|
Memory |
Windows XP, Windows Server 2003: 128 MB |
|
Windows Vista: 1 GB |
|
Windows Server 2008, Windows 7: 2 GB |
|
Sufficient memory resource is required for your operating system and the appli- |
|
cations to be used. |
|
|
Drive |
CD-ROM drive |
|
|
bizhub 215 |
2-5 |
2.2 |
Operating environment |
2 |
|
|
|
|
2.2.2Interface used for connection
To connect this printing system to the computer, the following interfaces can be used.
USB interface
Use this interface to use this printing system via a USB connection. The USB interface can be connected to a computer running Windows. A USB cable is required for connection. Use a type A (4 pin, male) or type B (4 pin, male) USB cable.
Ethernet
Use this interface to use this printing system via a network connection. Optional Image Controller IC-209 or Network Card NC-504 is required.
It supports 100Base-TX and 10Base-T standards. In addition, TCP/IP (LPD/LPR, IPP) and Web service protocols are supported.
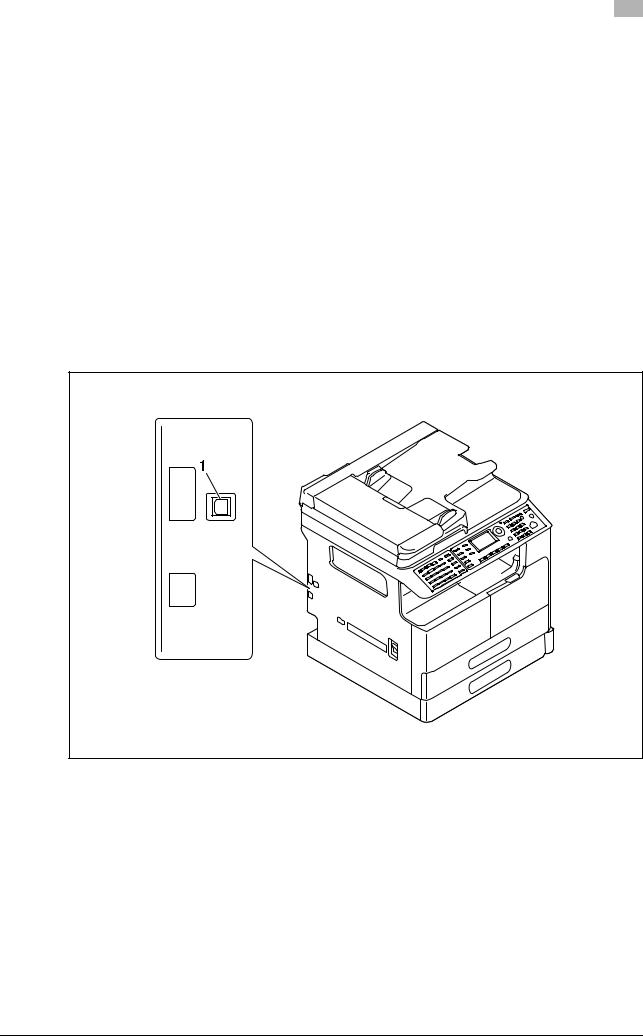
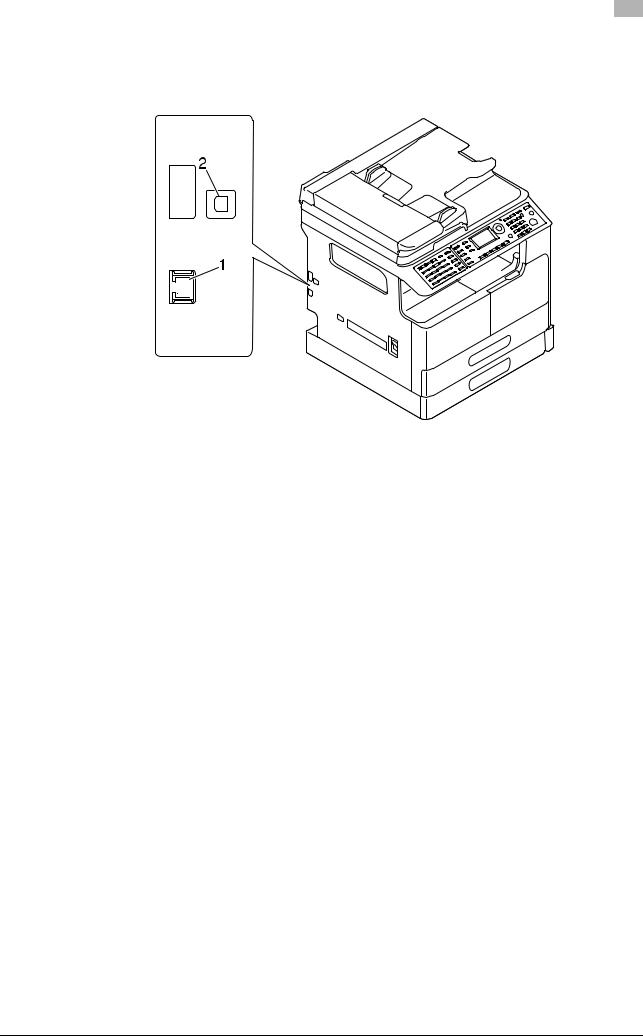
Connection diagram
The printer cables are connected to each port on this machine.
Back side of the machine (Standard printer controller)
1. USB port (type B) for USB 2.0/1.1
bizhub 215 |
2-6 |
2.2 |
Operating environment |
2 |
|
||||||
|
|
|
|
|
|
|
|
|
|
|
|
Back side of the machine (Optional Image Controller IC-209) |
|
|
|||||
|
|
|
|
|
|
|
|
|
|
|
|
|
|
|
|
|
|
|
|
|
|
|
|
|
|
|
|
|
|
|
|
|
|
|
|
|
|
|
|
|
|
|
|
|
|
|
|
|
|
|
|
|
|
|
|
|
|
|
|
|
|
|
|
|
|
|
|
|
|
|
|
|
|
|
|
|
|
|
|
|
|
|
|
|
|
|
|
|
|
|
|
|
|
|
|
|
|
|
|
1.Network connector (10 Base-T/100 Base-TX)
2.USB port (type B) for USB 2.0/1.1
bizhub 215 |
2-7 |

2.3 |
Setup procedure |
2 |
|
|
|
|
2.3Setup procedure
To use this printing system, you must complete the setup in advance.
The setup refers to a series of procedures for connecting the machine to the computer and installing the printer driver to the computer.
Perform the setup using the following procedures.
2.3.1For local connection (USB port)
1
2
Connect this machine to the computer.
Install the printer driver.
%If the standard printer controller is installed, install the GDI printer driver.
%If optional Image Controller IC-209 is installed, install the PCL printer driver.
%When you install the printer driver, WIA and TWAIN scan drivers are installed at the same time.
2.3.2For network connection
1
2
3
4
5
Connect this machine to the computer.
Check that the computer to be used is connected to the network.
Specify the IP address of this machine, and then connect it to the network.
Change the network settings for this machine according to the connection method or protocol.
%LPR: From [TCP/IP Configuration]-[LPD Setting], enable LPD printing.
%Port 9100: In [IPv4 Configuration], enable the RAW port number (initial setting: [9100]).
%IPP: In [IPP Configuration], enable IPP printing.
%Web Service Print: In [WSD Configuration], enable [Use WSD Browsing].
%When you install the printer driver, WIA and TWAIN scan drivers are installed at the same time.
Install the printer driver.
%If Network Card NC-504 is installed on the standard printer controller, install the GDI printer driver.
%If optional Image Controller IC-209 is installed, install the PCL printer driver.
%Specify the network port for the printer driver according to the connection method or protocol.
Tips
-After installing the printer driver, perform test print to make sure that the connections are made properly.
dReference
For details on the network settings, refer to the [User's Guide Network Administrator].
The procedure for installing the printer driver varies depending on the connection method, operating system of the computer, and printer driver. For details, refer to page 3-2.
To update an existing printer driver, uninstall it first. For details, refer to page 3-17.
bizhub 215 |
2-8 |

3 Installing the Printer Driver

3.1 |
Printer drivers compatible with respective operating systems |
3 |
|
|
|
|
|
||
|
|
|
|
|
|
|
|
|
|
3 Installing the Printer Driver
3.1Printer drivers compatible with respective operating systems
Before using this printing system, you must install the printer driver.
The following lists the printer drivers included on the CD and the supported operating systems. Select the required printer driver.
Printer driver |
Page de- |
Supported Operating Systems |
|
scription lan- |
|
|
guage |
|
|
|
|
KONICA MINOL- |
GDI |
Windows XP (e86, SP3 or later) |
TA GDI Driver |
|
Windows XP (e64, SP2 or later) |
(GDI driver) |
|
Windows Server 2003 (e86/e64, SP2 or later) |
|
|
Windows Vista (e86/e64, SP2 or later) |
|
|
Windows Server 2008 (e86e64) |
|
|
Windows Server 2008 R2 (e64) |
|
|
Windows 7 (e86/e64) |
|
|
|
KONICA MINOL- |
PCL |
Windows XP (e86, SP3 or later) |
TA PCL Driver |
|
Windows XP (e64, SP2 or later) |
(PCL driver) |
|
Windows Server 2003 (e86/e64, SP2 or later) |
|
|
Windows Vista (e86/e64, SP2 or later) |
|
|
Windows Server 2008 (e86/e64) |
|
|
Windows Server 2008 R2 (e64) |
|
|
Windows 7 (e86/e64) |
|
|
|
KONICA MINOL- |
XPS |
Windows Vista (e86/e64, SP2 or later) |
TA XPS Driver |
|
Windows Server 2008 (e86/e64) |
(XPS driver) |
|
Windows Server 2008 R2 (e64) |
|
|
Windows 7 (e86/e64) |
|
|
|
Fax driver |
|
Windows XP (e86, SP3 or later) |
|
|
Windows XP (e64, SP2 or later) |
|
|
Windows Server 2003 (e86/e64, SP2 or later) |
|
|
Windows Vista (e86/e64, SP2 or later) |
|
|
Windows Server 2008 (e86/e64) |
|
|
Windows Server 2008 R2 (e64) |
|
|
Windows 7 (e86/e64) |
|
|
|
Tips
-Select the page description language according to the application used for printing.
-Either of the installer or Add Printer Wizard can be used to install the printer driver.
-The XPS driver does not support account track functions. If you are using account track functions on this machine, use another driver.
-To use the PCL driver for printing, optional Image Controller IC-209 is required.
-To use the fax driver for PC-FAX transmission, optional Fax Kit FK-510 and Extended Operation Panel MK-733 are required.
dReference
For details on the fax driver, refer to the [User's Guide Fax Operations].
bizhub 215 |
3-2 |

3.2 |
Connection methods able to be selected in each operating system |
3 |
|
|
|
|
3.2Connection methods able to be selected in each operating system
The connection method for this machine varies depending on the operating system of the computer. The printer driver installation method also varies depending on the connection method. This machine can be connected via a network or a USB interface. In network connection, the printer driver installation method varies depending on the protocol to be used. For network connection, optional Image Controller IC-209 or Network Card NC-504 is required.
Network connection (Ethernet):
This machine is connected as a network printer.
This printing system supports 100Base-TX and 10Base-T standards. In addition, TCP/IP (LPD/LPR, IPP) protocols are supported.
The applicable protocols vary depending on the operating system of the computer.
USB interface:
This machine is connected as a local printer. The USB interface can be connected to a computer running Windows.
For USB connection, this manual covers only the plug and play based setup procedures.
3.2.1Windows Vista/7/Server 2008/Server 2008 R2
Setup procedures |
Connection method |
Reference page |
|
|
|
|
|
Connection meth- |
Port 9100 |
A network connection using the |
p. 3-5 |
od in which install- |
|
Port 9100 print service. It uses a |
|
er-based setup is |
|
TCP/IP protocol and the RAW |
|
possible |
|
printing port. |
|
|
|
|
|
|
USB |
A connection using a USB port. |
|
|
|
|
|
Connection meth- |
LPR |
A network connection using the |
p. 3-7 |
od in which setup |
|
LPR (Line Printer Remote) print |
|
is possible using |
|
service. It uses a TCP/IP protocol |
|
Add Printer Wizard |
|
and the LPR printing port. |
|
|
|
|
|
|
Port 9100 |
A network connection using the |
|
|
|
Port 9100 print service. It uses a |
|
|
|
TCP/IP protocol and the RAW |
|
|
|
printing port. |
|
|
|
|
|
|
IPP |
A network connection using the |
|
|
|
IPP (Internet Printing Protocol) |
|
|
|
print service. Printing via the In- |
|
|
|
ternet is possible with the HTTP |
|
|
|
(HyperText Transfer Protocol) of |
|
|
|
the TCP/IP protocol. |
|
|
|
|
|
|
Web service |
It is a connection corresponding |
|
|
to Web Service function of Win- |
|
|
|
|
dows Vista/7/Server 2008/Server |
|
|
|
2008 R2 and capable of automat- |
|
|
|
ically detecting printers on the |
|
|
|
network. |
|
|
|
|
|
|
USB |
A connection using a USB port. |
|
|
|
|
|
Connection meth- |
USB |
A connection using a USB port. |
p. 3-12 |
od in which plug |
|
|
|
and play-based |
|
|
|
setup is possible |
|
|
|
|
|
|
|
Tips
-Log on to the computer using a user name that has the Administrator privilege, then install the printer driver.
-The installer does not support installation in IPv6 environments.
dReference
Before you can use this machine in the network environment, you must configure network settings for this machine. For details, refer to the [User's Guide Network Administrator].
bizhub 215 |
3-3 |

3.2 |
Connection methods able to be selected in each operating system |
3 |
|
|
|
|
3.2.2Windows XP/Server 2003
Setup procedures |
Connection method |
Reference page |
|
|
|
|
|
Connection meth- |
Port 9100 |
A network connection using the |
p. 3-5 |
od in which install- |
|
Port 9100 print service. It uses a |
|
er-based setup is |
|
TCP/IP protocol and the RAW |
|
possible |
|
printing port. |
|
|
|
|
|
|
USB |
A connection using a USB port. |
|
|
|
|
|
Connection meth- |
LPR |
A network connection using the |
p. 3-13 |
od in which setup |
|
LPR (Line Printer Remote) print |
|
is possible using |
|
service. It uses a TCP/IP protocol |
|
Add Printer Wizard |
|
and the LPR printing port. |
|
|
|
|
|
|
Port 9100 |
A network connection using the |
|
|
|
Port 9100 print service. It uses a |
|
|
|
TCP/IP protocol and the RAW |
|
|
|
printing port. |
|
|
|
|
|
|
IPP |
A network connection using the |
|
|
|
IPP (Internet Printing Protocol) |
|
|
|
print service. Printing via the In- |
|
|
|
ternet is possible with the HTTP |
|
|
|
(HyperText Transfer Protocol) of |
|
|
|
the TCP/IP protocol. |
|
|
|
|
|
|
USB |
A connection using a USB port. |
|
|
|
|
|
Connection meth- |
USB |
A connection using a USB port. |
p. 3-16 |
od in which plug |
|
|
|
and play-based |
|
|
|
setup is possible |
|
|
|
|
|
|
|
Tips
-Log on to the computer using a user name that has the Administrator privilege, then install the printer driver.
-The installer does not support installation in IPv6 environments.
dReference
Before you can use this machine in the network environment, you must configure network settings for this machine. For details, refer to the [User's Guide Network Administrator].
bizhub 215 |
3-4 |
3.3 |
Installation using installer |
3 |
|
|
|
|
3.3Installation using installer
The installer automatically detects the printer on the same TCP/IP network as your computer or the machine connected via USB to your computer, and allows you to install the required printer driver. You can also install the printer driver by manually specifying the connection destination.
The printer drivers that can be installed using the installer are PCL driver, GDI driver, XPS driver and fax driver.
3.3.1Operating environment of the installer
Operating system |
Windows XP (e86/e64, SP2 or later) |
|
|
Windows Server 2003 |
(e86/e64) |
|
Windows Vista (e86/e64) |
|
|
Windows Server 2008 |
(e86/e64) |
|
Windows Server 2008 |
R2 (e64) |
|
Windows 7 (e86/e64) |
|
|
|
|
CPU |
Any processor of the same or higher specifications as recommend- |
|
|
ed for your operating system |
|
|
|
|
Memory |
Memory capacity as recommended for your operating system |
|
|
Sufficient memory resource is required for your operating system |
|
|
and the applications to be used. |
|
|
|
|
Tips
-Administrator authority is required for installation.
-If a wizard window for adding new hardware opens when using USB connection, click [Cancel].
-When you install the printer driver, WIA and TWAIN scan drivers are installed at the same time.
3.3.2For USB connection
The USB cable must be connected during the last installation step. Do not connect the USB cable to this machine until a message appears on the screen instructing you to connect the cable.
1 Insert the printer driver CD-ROM into the CD-ROM drive of the computer.
%The required CD-ROM varies depending on the printer driver. Select the CD-ROM corresponding to the printer driver used.
2
3
4
5
6
Open the printer driver folder on the CD-ROM, and double-click [Setup.exe].
% If the [User Account Control] screen appears, click [Continue] or [Yes]. The installer starts.
Select a language, then click [OK].
Click [Next].
After checking all terms in the license agreement, select [I accept the terms of the License Agreement], then click [Next].
% If you disagree, you will not be able to install the driver.
Select this machine in [Select Model].
%Select [KONICA MINOLTA XXX PCL XPS] if the optional Image Controller IC-209 is already installed when installing the XPS driver.
7 Select port [USB] to connect, then click [Next].
%In Windows Vista/Server 2008/7, when the Verify the publisher dialog box of [Windows Security] appears, click [Install this driver software anyway].
%In Windows XP/Server 2003, when the [Windows logo testing] or [Digital Signature] window appears, click [Continue Anyway] or [Yes].
The installation starts.
bizhub 215 |
3-5 |

3.3 |
Installation using installer |
3 |
|
|
|
|
8 When a message appears instructing you to connect the USB cable, connect the USB cable between the computer and this machine.
%If the window instructing you to connect the USB cable does not appear, operate according to the instructions on the currently displayed window.
9 Click [Finish].
3.3.3For network connection
To use this machine as part of a network, connect the computer with this machine via the network and check the IP address and RAW port number (initial setting: [9100]) before installing the printer driver.
dReference
The IP address and RAW port number can be checked in [IPv4 Configuration]. For details on the network settings, refer to "Network settings" of [User's Guide Network Administrator], and PageScope Web Connection - [Network] - [TCP/IP Configuration] and [Network]-[IPv4 Configuration].
1
2
Insert the printer driver CD-ROM into the CD-ROM drive of the computer.
%The required CD-ROM varies depending on the printer driver. Select the CD-ROM corresponding to the printer driver used.
Open the printer driver folder on the CD-ROM, and double-click [Setup.exe].
% If the [User Account Control] screen appears, click [Continue] or [Yes]. The installer starts.
3
4
5
6
Select a language, then click [OK].
Click [Next].
After checking all terms in the license agreement, select [I accept the terms of the License Agreement], then click [Next].
% If you disagree, you will not be able to install the driver.
Select this machine in [Select Model].
%Select [KONICA MINOLTA XXX PCL XPS] if the optional Image Controller IC-209 is already installed when installing the XPS driver.
7 Select port [Network] to connect, and click [Search]. The connected machine is automatically detected.
8
9
10
Select the IP address of the machine, then click [OK].
Click [Next].
%If the machine is not detected by [Search], you can enter the IP address directly.
%In Windows Vista/Server 2008/7, when the Verify the publisher dialog box of [Windows Security] appears, click [Install this driver software anyway].
%In Windows XP/Server 2003, when the [Windows logo testing] or [Digital Signature] window appears, click [Continue Anyway] or [Yes].
The installation starts.
Click [Finish].
bizhub 215 |
3-6 |

3.4 |
Manual installation using the Add Printer Wizard |
3 |
|
|
|
|
3.4Manual installation using the Add Printer Wizard
3.4.1Windows Vista/7/Server 2008/Server 2008 R2
This chapter describes the procedure for installing the Windows printer driver using the standard Windows Add Printer function, without using the installer.
For network connection (LPR/Port 9100)
In Windows Vista/7/Server 2008/Server 2008 R2, you can install the printer driver either by searching for the printer on the network, or by creating a new printer port.
Settings for the machine
To use Port 9100 or LPR printing, you must configure the network settings for the machine in advance.
Items to be configured |
Description |
|
|
IP address |
In [NETWORK SETTING] on the Control Panel of this machine, spec- |
|
ify the IP address. |
|
|
RAW port number |
To use Port 9100 printing: |
|
In [IPv4 Configuration] for the machine, enable the RAW port number |
|
(initial setting: [9100]). |
|
|
LPD Setting |
To use LPR printing: |
|
From [TCP/IP Configuration] - [LPD Setting] for the machine, enable |
|
LPD printing. |
|
|
dReference
For details on the network settings of this machine, refer to "Network settings" and PageScope Web Connection - [Network] - [TCP/IP Configuration] and [Network]-[IPv4 Configuration] of [User's Guide Network Administrator].
Installing the printer driver by searching for the printer using the Add Printer Wizard.
0 Administrator authority is required for installation.
0Since the printer is searched for during the installation, be sure to connect this machine to the network before turning it on.
1Insert the printer driver CD-ROM into the CD-ROM drive of the computer.
%The required CD-ROM varies depending on the printer driver. Select the CD-ROM corresponding to the printer driver used.
2Click [Start], then [Control Panel].
3Select the desired printer function in [Hardware and Sound].
%In Windows Vista/Server 2008, click [Printers] under [Hardware and Sound]. If [Control Panel] is displayed in Classic View, double-click [Printers].
%In Windows 7/Server 2008 R2, click [View devices and printers] under [Hardware and Sound]. If [Control Panel] appears in the icon display, double-click [Devices and Printers].
4On the toolbar, click the additional functions of the printer.
%Click [Add a printer] on the toolbar.
The [Add Printer] wizard appears.
5 Click [Add a network, wireless or Bluetooth printer]. Connected printers are detected.
%If no printer is detected, turn this machine off, then on again.
In this case, turn off the printer, and then wait approximately 10 seconds before turning it on again. If you turn this machine on immediately after turning it off, it may not function correctly.
bizhub 215 |
3-7 |

3.4 |
Manual installation using the Add Printer Wizard |
3 |
|
|
|
|
6 Select your machine from the list, then click [Next].
%It may take some time to finish searching the entire list of printers.
%If installation starts automatically, go to Step 12.
%If the screen for selecting drivers appears, go to Step 7.
7
8
9
Click [Have Disk..].
Click [Browse...].
Select the driver information file in the desired printer driver folder on the CD-ROM, then click [Open].
%Select a folder according to the printer driver, operating system, and language to be used.
%The driver information file is "KMWTG.inf" for the GDI driver, "KMWTP.inf" for the PCL driver and "ONX.inf" for the XPS driver.
10 Click [OK].
The [Printers] list appears.
11 Click [Next].
12 Follow the instructions on the pages that follow.
%If the [User Account Control] window appears, click [Continue] or [Yes].
%When the Verify the publisher dialog box of [Windows Security] appears, click [Install this driver software anyway].
13 Click [Finish].
14 After finishing the installation, ensure that the icon for the installed printer appears in the [Printers] or [Devices and Printers] window.
15 Remove the CD-ROM from the CD-ROM drive. This completes the printer driver installation.
Installing the printer driver by creating a printer port
0 Administrator authority is required for installation.
0Since the printer is searched for during the installation, be sure to connect this machine to the network before turning it on.
1Insert the printer driver CD-ROM into the CD-ROM drive of the computer.
%The required CD-ROM varies depending on the printer driver. Select the CD-ROM corresponding to the printer driver used.
2Click [Start], then [Control Panel].
3Select the desired printer function in [Hardware and Sound].
%In Windows Vista/Server 2008, click [Printers] under [Hardware and Sound]. If [Control Panel] is displayed in Classic View, double-click [Printers].
%In Windows 7/Server 2008 R2, click [View devices and printers] under [Hardware and Sound]. If [Control Panel] appears in the icon display, double-click [Devices and Printers].
4On the toolbar, select the additional printer information.
%Click [Add a printer] on the toolbar.
The [Add Printer] wizard appears.
5 Click [Add a local printer].
The [Choose a printer port] dialog box appears.
6 Click [Create a new port:], and then select the port type.
% To use the LPR/Port 9100 protocol, select [Standard TCP/IP Port].
7 Click [Next].
bizhub 215 |
3-8 |

3.4 |
Manual installation using the Add Printer Wizard |
3 |
|
|
|
|
8 Specify the IP address.
% To use the LPR/Port 9100 protocol, select [TCP/IP Device], and enter the IP address.
9 Click [Next].
10
11
%If the [Additional Port Information Required] or [More Port Information Required] window appears, go to Step 10.
%If the [Install the printer driver] dialog box appears, go to Step 13.
Check [Custom] and click [Settings...].
Change the settings according to the port, and then click [OK].
%For LPR connection, select [LPR], and then enter "Print" in the [Queue Name:] box.
%You must discriminate between upper and lower case letters when entering it.
%For Port 9100, select [Raw], and then enter a RAW port number (initial setting: [9100]) in the [Port Number:] box.
%If both LPR and Port 9100 are enabled on this machine, the printer driver is connected to this machine using LPR.
12 Click [Next].
The [Install the printer driver] dialog box appears.
13
14
15
Click [Have Disk..].
Click [Browse...].
Select the driver information file in the desired printer driver folder on the CD-ROM, then click [Open].
%Select a folder according to the printer driver, operating system, and language to be used.
%The driver information file is "KMWTG.inf" for the GDI driver, "KMWTP.inf" for the PCL driver and "ONX.inf" for the XPS driver.
16 Click [OK].
The [Printer] list appears.
17
18
19
20
21
Click [Next].
Follow the instructions on the pages that follow.
%If the [User Account Control] window appears, click [Continue] or [Yes].
%When the Verify the publisher dialog box of [Windows Security] appears, click [Install this driver software anyway].
Click [Finish].
After finishing the installation, ensure that the icon for the installed printer appears in the [Printers] or [Devices and Printers] window.
Remove the CD-ROM from the CD-ROM drive.
This completes the printer driver installation.
bizhub 215 |
3-9 |

3.4 |
Manual installation using the Add Printer Wizard |
3 |
|
|
|
|
For network connection (IPP)
Settings for the machine
To use IPP printing, you must configure the network settings for the machine in advance.
Items to be configured |
Description |
|
|
IP address |
In [NETWORK SETTING] on the Control Panel of this machine, spec- |
|
ify the IP address. |
|
|
IPP Settings |
In [IPP Configuration] for the machine, enable IPP printing. |
|
|
dReference
For details on the network settings of this machine, refer to "Network settings" and PageScope Web Connection - [Network] - [IPP Configuration] of [User's Guide Network Administrator].
Installing the printer driver using the Add Printer Wizard
0Administrator authority is required for installation.
1Insert the printer driver CD-ROM into the CD-ROM drive of the computer.
%The required CD-ROM varies depending on the printer driver. Select the CD-ROM corresponding to the printer driver used.
2Click [Start], then [Control Panel].
3Select the desired printer function in [Hardware and Sound].
%In Windows Vista/Server 2008, click [Printers] under [Hardware and Sound]. If [Control Panel] is displayed in Classic View, double-click [Printers].
%In Windows 7/Server 2008 R2, click [View devices and printers] under [Hardware and Sound]. If [Control Panel] appears in the icon display, double-click [Devices and Printers].
4On the toolbar, select the additional printer information.
%Click [Add a printer] on the toolbar.
The [Add Printer] wizard appears.
5 Click [Add a network, wireless or Bluetooth printer]. Connected printers are detected.
6
7
8
9
10
In the window for detected printers, click [The printer that I want isn't listed].
In the [Select a shared printer by name] box, enter the URL for the machine in the following format, and then click [Next].
%http://<IP address for the machine>/ipp
Example: When the IP address for the machine is 192.168.1.20, http://192.168.1.20/ipp
Click [Have Disk..].
Click [Browse...].
Select the driver information file in the desired printer driver folder on the CD-ROM, then click [Open].
%Select a folder according to the printer driver, operating system, and language to be used.
%The driver information file is "KMWTG.inf" for the GDI driver, "KMWTP.inf" for the PCL driver and "ONX.inf" for the XPS driver.
11 Click [OK].
The [Printer] list appears.
12 Click [OK].
bizhub 215 |
3-10 |

3.4 |
Manual installation using the Add Printer Wizard |
3 |
|
|
|
|
13
14
15
16
Follow the instructions on the pages that follow.
%If the [User Account Control] window appears, click [Continue] or [Yes].
%When the Verify the publisher dialog box of [Windows Security] appears, click [Install this driver software anyway].
Click [Finish].
After finishing the installation, ensure that the icon for the installed printer appears in the [Printers] or [Devices and Printers] window.
Remove the CD-ROM from the CD-ROM drive.
This completes the printer driver installation.
Once the settings for the printer have been configured, you can use the printer in the same way as a general local printer.
For network connection (Web service print)
In Windows Vista/7/Server 2008/Server 2008 R2, printers supporting the Web service print function on the network can be located and installed.
dReference
To install a different printer driver in the computer where one has already been installed, you must uninstall the whole package of the currently installed printer driver. For details, refer to page 3-17.
Settings for the machine
To use the Web service print, you must configure the network settings for the machine in advance.
Items to be configured |
Description |
|
|
IP address |
In [NETWORK SETTING] on the Control Panel of this machine, spec- |
|
ify the IP address. |
|
|
Web Service Settings |
In [WSD Configuration], enable [Use WSD Browsing]. |
|
|
dReference
For details on the network settings of this machine, refer to "Network settings" and PageScope Web Connection - [Network] - [WSD Configuration] of [User's Guide Network Administrator].
Recognizing the printer driver from the Network window
When using Web service print, install the printer driver before having the system recognize it using plug and play.
0Administrator authority is required for installation.
1Install the printer driver for this machine.
%Install the printer driver using the installer or Add Printer Wizard. The printer driver can be installed in any port.
For details, refer to page 3-5 or page 3-7.
2Turn on the power of the machine while it is connected to the network.
Since the printer is searched for, be sure to connect the machine to the network.
3To use the Web service print, check that [Network discovery] is enabled in [Network and Sharing Center] on the computer.
4Open the [Network] window.
%In Windows Vista/Server 2008, click [Start], then [Network].
%In Windows 7/Server 2008 R2, open [Computer] and click [Network].
If [Network] does not appear in [Computer], click the [Network and Internet] category in [Control Panel], then click [View network computers and devices].
Connected computers and devices are detected.
bizhub 215 |
3-11 |
Loading...