


 Loading...
PageScope
Authentication Manager Ver. 3.0
User’s Guide
Authentication Manager

Contents
1 Introduction |
|
|
1.1 |
What is Authentication Manager? .................................................... |
1-1 |
1.2 |
General setup operation.................................................................... |
1-2 |
1.2.1 |
Server settings ................................................................................ |
1-2 |
1.2.2 |
Setting up the device ...................................................................... |
1-2 |
2 Basic operations |
|
|
2.1 |
Logging on to Enterprise Suite......................................................... |
2-1 |
2.2 |
Basic operations ................................................................................ |
2-2 |
2.2.1 |
Top Menu page .............................................................................. |
2-2 |
2.2.2 |
Pages for the functions .................................................................. |
2-3 |
3 |
Authentication Manager |
|
|
|
3.1 |
User List.............................................................................................. |
3-1 |
|
3.1.1 |
Available operations in the User List page ..................................... |
3-1 |
|
3.1.2 |
Viewing the user list ........................................................................ |
3-2 |
|
3.1.3 |
Specifying display settings for the user list .................................... |
3-3 |
|
3.1.4 |
Registering a new user ................................................................... |
3-4 |
|
3.1.5 |
Editing user information ................................................................. |
3-7 |
|
3.1.6 |
Editing information of multiple users .............................................. |
3-7 |
|
3.1.7 |
Deleting a user ................................................................................ |
3-8 |
|
3.1.8 |
Importing data ................................................................................ |
3-9 |
|
3.1.9 |
Importing from a file ..................................................................... |
3-10 |
|
3.1.10 |
Creating an import file .................................................................. |
3-11 |
|
3.1.11 |
Creating a deletion file .................................................................. |
3-15 |
|
3.1.12 |
Checking the import result ........................................................... |
3-16 |
|
3.1.13 |
Importing from a device ............................................................... |
3-18 |
|
|
Selecting a device to be imported................................................ |
3-18 |
|
|
Selecting a user to be imported ................................................... |
3-20 |
|
3.1.14 |
Checking the import result ........................................................... |
3-21 |
Authentication Manager |
i |

|
|
|
|
|
|
3.1.15 |
................................................Importing from an external server |
3-23 |
|
Selecting an external server ......................................................... |
3-23 |
|
Specifying user search conditions and acquired information ...... |
3-24 |
|
Selecting a user............................................................................ |
3-26 |
3.1.16 |
Checking the import result ........................................................... |
3-28 |
3.1.17 |
Deleting a user according to the external server .......................... |
3-29 |
|
Selecting an external server ......................................................... |
3-29 |
|
Selecting a user............................................................................ |
3-29 |
3.1.18 |
Exporting data .............................................................................. |
3-30 |
3.1.19 |
Editing an exported file ................................................................. |
3-32 |
|
Editing an exported file................................................................. |
3-32 |
|
Editing a text or CSV file............................................................... |
3-32 |
3.2 |
User Counter .................................................................................... |
3-34 |
3.2.1 |
Displaying the device list .............................................................. |
3-34 |
3.2.2 |
Selecting a specific device ........................................................... |
3-35 |
3.2.3 |
Displaying counter totals .............................................................. |
3-35 |
3.2.4 |
Specifying display settings for the counter list ............................. |
3-36 |
3.3 |
Account Track List........................................................................... |
3-38 |
3.3.1 |
Available operations in the Account Track List page ................... |
3-38 |
3.3.2 |
Displaying the account track list .................................................. |
3-39 |
3.3.3 |
Registering a new account ........................................................... |
3-40 |
3.3.4 |
Editing an account ........................................................................ |
3-40 |
3.3.5 |
Deleting an account ...................................................................... |
3-41 |
3.3.6 |
Importing data .............................................................................. |
3-41 |
3.3.7 |
Importing from a file ..................................................................... |
3-41 |
3.3.8 |
Creating a file to be imported ....................................................... |
3-43 |
3.3.9 |
Creating a deletion file .................................................................. |
3-47 |
3.3.10 |
Checking the import result ........................................................... |
3-48 |
3.3.11 |
Importing from a device ............................................................... |
3-50 |
|
Selecting a device to be imported................................................ |
3-50 |
|
Selecting the account to be imported .......................................... |
3-52 |
3.3.12 |
Checking the import result ........................................................... |
3-53 |
3.3.13 |
Exporting data .............................................................................. |
3-54 |
3.4 |
Account Track Counter ................................................................... |
3-56 |
3.4.1 |
Displaying counter totals .............................................................. |
3-56 |
3.5 |
Specifying a function permission template ................................... |
3-58 |
Authentication Manager |
ii |

|
|
|
|
|
|
3.5.1 |
...............Registering and editing function permission templates |
3-59 |
|
Registering templates................................................................... |
3-59 |
|
Editing templates.......................................................................... |
3-61 |
3.5.2 |
Deleting function permission templates ....................................... |
3-62 |
3.6 |
Specifying a function permission ................................................... |
3-63 |
3.6.1 |
Setting by User ............................................................................. |
3-63 |
|
Setting by User page.................................................................... |
3-63 |
|
Setting by User (by Device) page ................................................. |
3-66 |
3.6.2 |
Setting by Account Track ............................................................. |
3-69 |
|
Setting by Account Track page.................................................... |
3-69 |
|
Setting by Account Track (by Device) page ................................. |
3-72 |
3.6.3 |
Function permission operations ................................................... |
3-75 |
|
Giving priority to Setting by User ................................................. |
3-75 |
|
Giving priority to Setting by Account Track ................................. |
3-76 |
3.7 |
Specifying a user group................................................................... |
3-77 |
3.7.1 |
Registering and editing groups .................................................... |
3-77 |
|
Specifying display settings for the group list ............................... |
3-79 |
3.7.2 |
Deleting a group ........................................................................... |
3-79 |
3.8 |
Account Group Settings .................................................................. |
3-80 |
3.8.1 |
Registering and editing groups .................................................... |
3-80 |
|
Specifying display settings for the group list ............................... |
3-82 |
3.8.2 |
Deleting a group ........................................................................... |
3-82 |
3.9 |
Specifying a template ...................................................................... |
3-83 |
3.9.1 |
Registering and editing user templates ........................................ |
3-84 |
|
Registering user templates........................................................... |
3-84 |
|
Editing user templates.................................................................. |
3-85 |
3.9.2 |
Deleting user templates ................................................................ |
3-87 |
3.9.3 |
Registering and editing account track templates ......................... |
3-87 |
|
Registering account track templates............................................ |
3-88 |
|
Editing account track templates................................................... |
3-89 |
3.9.4 |
Deleting account track templates ................................................. |
3-90 |
3.9.5 |
Registering and editing external server templates ....................... |
3-90 |
|
Registering external server templates .......................................... |
3-91 |
|
Editing external server templates ................................................. |
3-92 |
3.9.6 |
Deleting external server templates ............................................... |
3-93 |
3.10 Specifying an external server ......................................................... |
3-94 |
|
3.10.1 Registering a new server .............................................................. |
3-95 |
|
Authentication Manager |
iii |

|
|
|
|
|
|
|
|
3.10.2 |
...........................................................................Editing a server |
3-102 |
|
3.10.3 |
Deleting a server ......................................................................... |
3-102 |
|
3.11 Managing a specific device........................................................... |
3-103 |
||
3.11.1 |
Editing device settings ............................................................... |
3-104 |
|
3.11.2 Function Permission Setting for Public User .............................. |
3-110 |
||
3.11.3 |
SSFC Authentication Settings .................................................... |
3-111 |
|
3.11.4 Specifying a list (User name) ...................................................... |
3-112 |
||
|
Displaying a user template on the device panel......................... |
3-113 |
|
|
Displaying login history on the device panel .............................. |
3-114 |
|
3.11.5 Specifying a list (Account name) ................................................ |
3-114 |
||
|
Displaying an account track template on the device panel ....... |
3-115 |
|
|
Displaying login history on the device panel .............................. |
3-116 |
|
3.11.6 Specifying a list (External server name) ...................................... |
3-116 |
||
|
Displaying an external server template on the device panel...... |
3-117 |
|
|
Displaying login history on the device panel .............................. |
3-118 |
|
3.11.7 Registering a specific device ...................................................... |
3-118 |
||
3.11.8 Unregistering a specific device .................................................. |
3-121 |
||
3.11.9Checking the result of registering or unregistering a specific
|
device ......................................................................................... |
3-122 |
3.12 |
IC card information ........................................................................ |
3-123 |
|
Registering card information ...................................................... |
3-123 |
3.12.1 Enabling/disabling IC card information ...................................... |
3-124 |
|
3.12.2 Checking or modifying card information .................................... |
3-125 |
|
3.12.3 Specifying how to display IC cards ............................................ |
3-127 |
|
3.12.4 Deleting IC card information ....................................................... |
3-127 |
|
3.13 |
IC Card Authentication Setting..................................................... |
3-128 |
3.13.1 IC card self-registration setting .................................................. |
3-128 |
|
3.13.2 |
IC card self-registration .............................................................. |
3-129 |
3.14 |
IC Card Information Template Settings ....................................... |
3-130 |
3.14.1 Registering and editing an IC card information template ........... |
3-131 |
|
|
Registering templates................................................................. |
3-131 |
|
Editing a template....................................................................... |
3-132 |
|
Registering IC card information (when the data type is "Bit").... |
3-132 |
|
Registering IC card information (when the data type is |
|
|
"Byte") ........................................................................................ |
3-133 |
3.14.2 Deleting an IC card information template ................................... |
3-133 |
|
3.15 |
Biometric information.................................................................... |
3-134 |
Authentication Manager |
iv |

|
|
|
|
|
|
|
|
...................................................................3.15.1 Displaying a user list |
3-135 |
||
3.15.2 Changing the biometric unit No. ................................................ |
3-136 |
||
3.15.3 |
Deleting biometric information ................................................... |
3-136 |
|
3.16 |
Bio Auth Setting ............................................................................. |
3-137 |
|
3.16.1 Biometric information self-registration setting ........................... |
3-137 |
||
3.16.2 |
Biometric information self-registration ....................................... |
3-138 |
|
|
Self-registering biometric information ........................................ |
3-138 |
|
3.17 |
Biometric Authentication Server Setting ..................................... |
3-139 |
|
3.18 |
Changing the password ................................................................ |
3-141 |
|
3.19 |
Checking the Biometric Unit No................................................... |
3-142 |
|
3.20 |
Specifying an administrator .......................................................... |
3-143 |
|
3.20.1 |
Specifying the administrator ....................................................... |
3-143 |
|
3.20.2 |
Adding an administrator ............................................................. |
3-144 |
|
3.20.3 |
Deleting an administrator ........................................................... |
3-145 |
|
3.21 |
Specifying a group manager......................................................... |
3-146 |
|
3.21.1 Adding a group manager ............................................................ |
3-147 |
||
3.21.2 Deleting a group manager .......................................................... |
3-148 |
||
3.22 |
Version ............................................................................................ |
3-148 |
|
3.23 |
Using with Account Manager........................................................ |
3-149 |
|
|
Precautions for use with Account Manager ............................... |
3-149 |
|
3.23.1 Real-time Upper Limit Settings .................................................. |
3-150 |
||
3.23.2Operation when the Real-time Upper Limit Settings is
enabled ....................................................................................... |
3-150 |
3.23.3 Device panel display when logging on ....................................... |
3-151 |
If the residual number of pages for a user is greater than |
|
the reserved number of printable pages when a user uses |
|
the device: .................................................................................. |
3-151 |
If the residual number of pages by a user is smaller than |
|
the reserved number of printable pages when a user uses |
|
the device: .................................................................................. |
3-152 |
If the residual number of pages by a user group is greater than |
|
the reserved number of printable pages when a user uses |
|
the device: .................................................................................. |
3-152 |
3.24Precautions on using Gateway for Biometric Authentication
Manager .......................................................................................... |
3-153 |
3.25 Operation for authentication......................................................... |
3-154 |
3.25.1 Internal authentication and external authentication ................... |
3-154 |
Authentication Manager |
v |

|
|
|
|
|
|
|
|
3.25.2 |
.............................................Handling a user for authentication |
3-154 |
|
|
Handling regardless of internal authentication or external |
|
|
|
authentication............................................................................. |
3-154 |
|
|
Handling regardless of the external server to perform |
|
|
|
authentication in the external authentication ............................. |
3-155 |
|
3.25.3 |
Account track authentication ..................................................... |
3-155 |
|
3.25.4 |
Default external server ................................................................ |
3-156 |
|
3.25.5 |
Logging on to the device as the device administrator ............... |
3-156 |
|
3.25.6 |
License and authentication ........................................................ |
3-156 |
|
4 Setting by Purpose
4.1Performing device authentication using Authentication
|
Manager .............................................................................................. |
4-1 |
|
Performing device authentication................................................... |
4-1 |
4.2 |
Restricting available device functions by user group or user ....... |
4-2 |
|
Restricting device functions ........................................................... |
4-2 |
4.3Switching available functions between devices in the account track to which a user belongs and devices in other account
|
tracks .................................................................................................. |
4-3 |
|
Template setting............................................................................. |
4-3 |
4.4 |
Linking with an existing Active Directory for authentication......... |
4-4 |
|
Linking with Active Directory .......................................................... |
4-4 |
4.5 |
Simplifying authentication with IC card........................................... |
4-5 |
|
Registering a card .......................................................................... |
4-5 |
4.6Easily registering new card information for a user who lost an
IC card................................................................................................. |
4-6 |
Easily registering card information ................................................. |
4-6 |
4.7Easily registering a card already registered as one of other
|
user...................................................................................................... |
4-7 |
|
Easily registering a card user ......................................................... |
4-7 |
4.8 |
Using biometric authentication to enhance security level............. |
4-8 |
|
Performing biometric authentication .............................................. |
4-8 |
4.9 |
Using Public User............................................................................... |
4-9 |
|
Configuring Public User Settings ................................................... |
4-9 |
4.10 |
Changing your password ................................................................ |
4-10 |
|
Changing a password .................................................................. |
4-10 |
4.11Performing counter management by job or work besides
user.................................................................................................... |
4-11 |
Authentication Manager |
vi |

5 Troubleshooting
5.1 |
Problems on Device Management ................................................... |
5-1 |
5.2 |
Problems on User Import .................................................................. |
5-2 |
5.3 |
Problems on Authentication ............................................................. |
5-3 |
Authentication Manager |
vii |

About this product
Authentication Manager is a utility for centrally managing devices, such as multifunctional peripherals, on the network. When used in a Web browser, Authentication Manager can manage accounts, users and external servers used by the network devices, total copies and prints, and apply specified function limitations.
Authentication Manager is an application that runs on Device Manager. Device Manager must be installed in order for you to be able to install Authentication Manager.
Authentication Manager |
viii |

Abbreviation of product names
This manual describes product names with the following abbreviations.
Product name |
Abbrev. |
KONICA MINOLTA PageScope Enterprise Suite |
Enterprise Suite |
|
|
KONICA MINOLTA PageScope Web Connection |
Web Connection |
|
|
KONICA MINOLTA PageScope Net Care Device |
Device Manager |
Manager |
|
|
|
KONICA MINOLTA PageScope Authentication Man- |
Authentication Manager |
ager |
|
|
|
KONICA MINOLTA PageScope Account Manager |
Account Manager |
|
|
KONICA MINOLTA Registration Tool for User Au- |
Registration Tool for User Authen- |
thentication |
tication |
|
|
KONICA MINOLTA Gateway for Biometric Authenti- |
Gateway for Biometric Authenti- |
cation Manager |
cation Manager |
|
|
KONICA MINOLTA PageScope Enterprise Suite Ter- |
Enterprise Suite Terminal |
minal Professional |
|
|
|
KONICA MINOLTA PageScope Enterprise Suite Ter- |
|
minal UltraLight |
|
|
|
Authentication Manager |
ix |
Trademarks and registered trademarks
Trademark acknowledgements
KONICA MINOLTA and KONICA MINOLTA logo are registered trademarks or trademarks of KONICA MINOLTA HOLDINGS, INC.
PageScope is a registered trademark or trademark of KONICA MINOLTA BUSINESS TECHNOLOGIES, INC.
Microsoft, Active Directory, Excel, SQL Server and Windows are either registered trademarks or trademarks of Microsoft Corporation in the United States and/or other countries.
All other company and product names are either trademarks or registered trademarks of their respective companies.
!
Detail
The dialog boxes that appear in this document may differ from those that appear on your computer, depending on the installed devices and specified settings.
Note
Unauthorized reproduction, translation or duplication of this document, whether in its entirety or in part, is strictly prohibited.
The content of this document is subject to change without notice.
Copyright © 2007 KONICA MINOLTA BUSINESS TECHNOLOGIES, INC. All rights reserved.
Authentication Manager |
x |

Introduction |
1 |
|
1Introduction
1.1What is Authentication Manager?
Accounts, users and external servers used by the network devices can be managed, and copies and printouts can be totaled. In addition, permissions can be applied to the functions available to users by registering function permission templates and configuring settings.
For details, refer to "Authentication Manager" on page 3-1.
Authentication Manager |
1-1 |

Introduction |
1 |
|
1.2General setup operation
In order to use Authentication Manager, configure settings in the following order.
1.2.1Server settings
Log on to Enterprise Suite as a system administrator, and then specify settings for the following. The following settings are necessary to enable Authentication Manager.
Function |
Description |
Device List |
• Device Auto Discovery: Specify the conditions for searching for |
|
devices to be registered. |
|
• Manual Device Registration: Manually register devices that can- |
|
not be found automatically. |
|
• Device Management Settings: From the found devices, specify |
|
the devices to be managed. |
|
• Device Information Settings: Specify the communication set- |
|
tings for each device. |
|
For details, refer to the "Device Manager User's Guide". |
|
|
Authentication Manager |
• External Server Settings: If authentication is performed by using |
|
an external server, register the name of the external server. |
|
(page 3-94) |
|
• Device Management: Determine the devices that are authenti- |
|
cated by Authentication Manager. Various settings for authenti- |
|
cating devices can also be specified. (page 3-103) |
|
|
Server Settings |
• E-mail Server Settings: Select whether or not to use e-mail func- |
|
tions, such as notifications. |
|
For details, refer to the "Device Manager User's Guide". |
|
|
1.2.2Setting up the device
In order to use Authentication Manager, configure the following device settings.
Before installing the application, use Web Connection to configure the following settings.
- Click the "Security" tab, click "SSL/TLS Setting", and then configure SSL settings.
- Click the "Network" tab, select "OpenAPI Setting", and then select the "Use SSL/TLS" check box, or select "Accept SSL communication only" from the drop-down list.
- Click the "Network" tab, select "TCP Socket Setting", and then select the "Use SSL/TLS" check box.
2
Reminder
For details on using Web Connection, refer to the User's Guide for the device.
Authentication Manager |
1-2 |

Basic operations |
2 |
|
2 Basic operations
This chapter provides details on logging on to Enterprise Suite.
2.1Logging on to Enterprise Suite
For details on logging on to the Enterprise Suite server, refer to the "Device Manager User's Guide".
Authentication Manager |
2-1 |
Basic operations |
2 |
|
2.2Basic operations
The basic operation of Authentication Manager is described below.
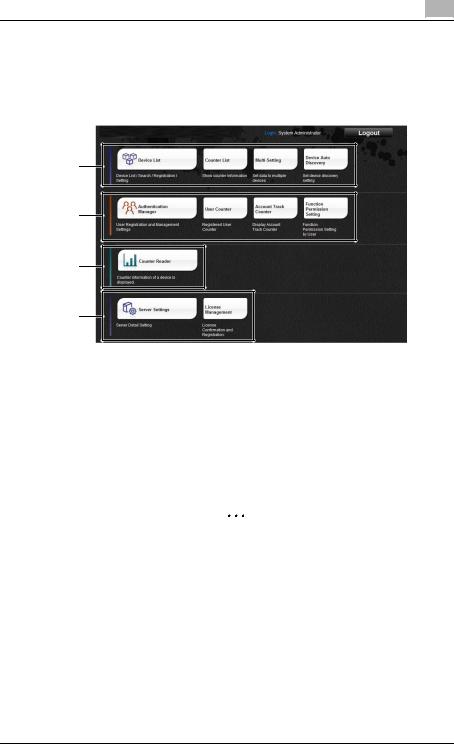
2.2.1Top Menu page
1
2
3
4
No. |
Function |
Description |
1 |
Device List |
Register and manage devices. For details, refer to the "De- |
|
|
vice Manager User's Guide". |
|
|
|
2 |
Authentication Manager |
Manage accounts, users, and external servers used by the |
|
|
network devices, and add up values on copies and print- |
|
|
outs. In addition, permissions can be applied to the func- |
|
|
tions available to users by registering function permission |
|
|
templates and configuring settings. For details, refer to |
|
|
"3 Authentication Manager". |
|
|
2 |
|
|
Reminder |
|
|
Limits may be applied to the available functions |
|
|
according to the user permissions. For details, |
|
|
refer to "3 Authentication Manager". |
|
|
|
3 |
Counter Reader |
The number of copies and printouts are totaled for each |
|
|
registered device. For details, refer to the "Device Manager |
|
|
User's Guide". |
|
|
|
4 |
Server Settings |
Configure the server settings for Authentication Manager. |
|
|
For details, refer to the "Device Manager User's Guide". |
|
|
|
Authentication Manager |
2-2 |

Basic operations |
2 |
|
2.2.2 Pages for the functions
1 |
2 |
|
|
|
|
|
|
|
|
|||||||||||
3 |
|
|
|
|
|
|
|
|
|
|
|
|
|
|
|
|
|
|
|
5 |
|
|
|
|
|
|
|
|
|
|
|
|
|
|
|
|
|
|
|
||
|
|
|
|
|
|
|
|
|
|
|
|
|
|
|
|
|
|
|
||
|
|
|
|
|
|
|
|
|
|
|
|
|
|
|
|
|
|
|
|
|
|
|
|
|
|
|
|
|
|
|
|
|
|
|
6 |
||||||
|
|
|
|
|
|
|
|
|
|
|
|
|
|
|||||||
|
|
|
|
|
|
|
|
|
|
|
|
|
|
7 |
||||||
|
|
|
|
|
|
|
|
|
|
|||||||||||
|
|
|
|
|
|
|
|
|
|
|
|
|
|
|||||||
|
|
|
|
|
|
|
|
|
|
|
|
|
|
8 |
||||||
|
|
|
|
|
|
|
|
|
|
|||||||||||
|
|
|
|
|
|
|
|
|
|
|
|
|
|
|||||||
|
|
|
|
|
|
|
|
|
|
|
|
|
|
|
|
|
|
|
|
9 |
|
|
|
|
|
|
|
|
|
|
|
|
|
|
|
|
|
|
|||
4 |
|
|
|
|
|
|
|
|
|
|
|
|
|
10 |
||||||
|
|
|
|
|
|
|
|
|
||||||||||||
|
|
|
|
|
|
|
|
|
|
|
|
|
||||||||
|
|
|
|
|
|
|
|
|
|
|
|
|
|
|
|
|
|
|
|
|
|
|
|
|
|
|
|
|
|
|
|
|
|
|
|
|
|
|
|
|
|
|
|
|
|
|
|
|
|
|
|
|
|
|
|
|
|
|
|
|
|
|
No. |
Function |
Description |
|
|
|
1 |
Login user name |
Displays the name of the user who has logged in. |
|
||
|
|
|
|||
2 |
Logout |
Click this button to log off of Enterprise Suite server and |
|||
|
|
display the Login page. |
|
|
|
|
|
|
|||
3 |
Go to Top Menu |
Click this button to display the top page of Enterprise Suite. |
|||
|
|
|
|
|
|
4 |
Menu |
The menu items are displayed. |
|
|
|
|
|
Click a menu item to display details on the right side of the |
|||
|
|
page. |
|
|
|
|
|
2 |
|
|
|
|
|
Reminder |
|
|
|
|
|
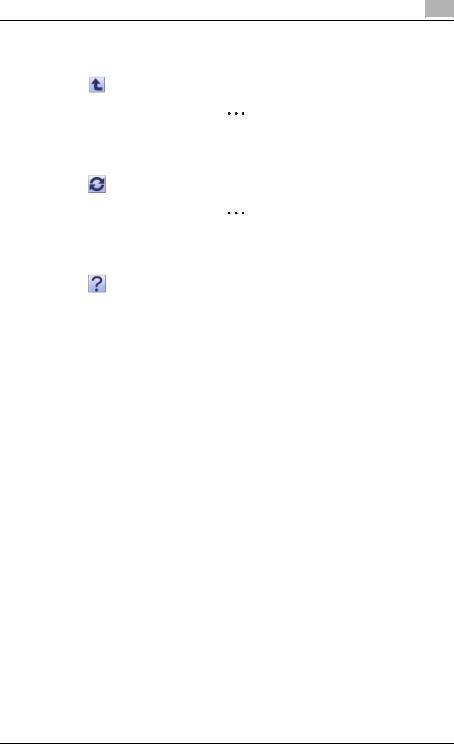
If |
appears beside the menu title, click |
to |
|
|
|
display the collapsed menu. Click |
to close |
||
the menu.
Authentication Manager |
2-3 |
Basic operations |
2 |
|
No. |
Function |
Description |
5 |
|
Click this button to display the page for the item one level |
|
|
higher in the menu. |
|
|
2 |
|
|
Note |
|
|
The "Back" button of the Web browser cannot |
|
|
be used. |
|
|
|
|
|
Click this button to update the information on the current |
|
|
page. |
|
|
2 |
|
|
Note |
|
|
Do not use the "Update" button of the Web |
|
|
browser. |
|
|
|
|
|
Click this button to display the Help information for the cur- |
|
|
rent page. |
|
|
|
6 |
Select View Target |
Select the target to be displayed in the list. |
|
|
|
7 |
Search Condition |
When a list is displayed in the page, the listed items can be |
|
|
narrowed. |
|
|
Select a column to search from the drop-down list, and |
|
|
then type in the text to be searched for in the text box. |
|
|
|
8 |
Select All/Uncheck All but- |
When a list is displayed in the page, all items can be select- |
|
ton |
ed or cleared. |
|
|
|
9 |
Maximum number of dis- |
When a list is displayed on the page, select the number of |
|
played lines |
data items displayed in the list. |
|
|
For example, if "10" is clicked, 10 data items are displayed |
|
|
in the current page. |
|
|
|
10 |
Sort |
When a list is displayed in the page, click an item name in |
|
|
the list to sort the entire list using the item as a sort key. |
|
|
|
Authentication Manager |
2-4 |

Authentication Manager |
3 |
|
3Authentication Manager
3.1User List
3.1.1Available operations in the User List page
From the User List page, settings can be specified with the following.
|
Function |
Details |
|
[Register User] button |
Click this button to register a new user. |
|
|
|
|
[Edit User] button |
Click this button to edit the information for a registered us- |
|
|
er. |
|
|
|
|
[Delete User] button |
Click this button to delete a registered user. |
|
|
|
|
[Import] button |
Click this button to import user information to register the |
|
|
users. |
|
|
|
|
[Export] button |
Click this button to export the information for the currently |
|
|
registered users and save it. |
|
|
|
|
[Display Settings] button |
Click this button, and then select the items to be displayed |
|
|
in the user list. |
|
|
|
|
Display Details |
Select a category of each user to be displayed in the list. |
|
|
|
|
Search Condition |
Specify the condition to narrow down users to be displayed |
|
|
in the list. |
|
|
|
2 |
|
|
Note
The user name is not case-sensitive. For example, "USER1" and "user1" are considered to be the same user name.
2
Reminder
When logged on as a "group manager", only information for managed groups and users can be edited or deleted. For details on "group manager" settings, refer to "Specifying a group manager" on page 3-146.
Authentication Manager |
3-1 |
Authentication Manager |
3 |
|
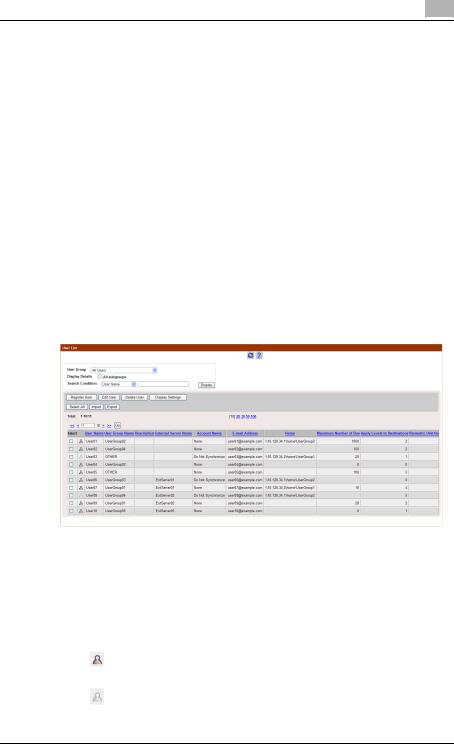
3.1.2Viewing the user list
The list of registered users can be viewed.
1 From the [User Group] drop-down list, select the user group to be displayed.
–To display all users, select "All Users".
–If master and subordinate relationships are specified in the group, select the [All subgroups] check box of [Display Details] to display all users, including those in subordinate groups.
–Specifying the search condition can narrow down users to be displayed in the list. Select a column to search from the drop-down list, and then type in the text to be searched for in the text box. Click the [Display] button to display user groups based on the specified condition.
2 Click the [Display] button.
A list of users registered in the selected group appears.
The following items are displayed in the user list.
Function |
Description |
|
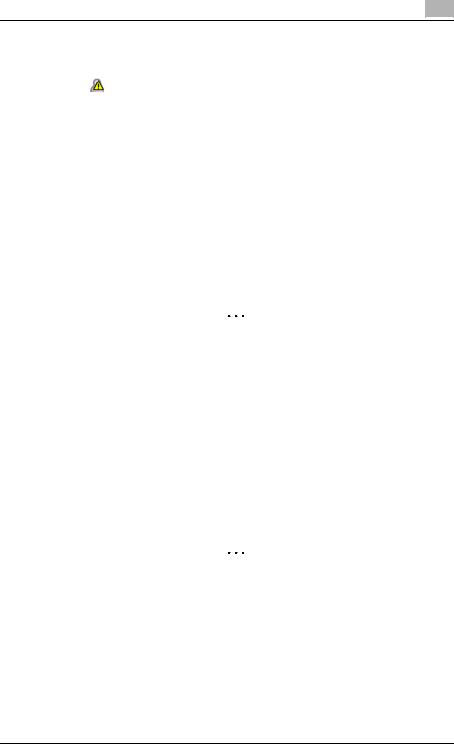
(Icon) |
Displays whether the user is enabled. |
|
|
|
|
|
|
The user is enabled. |
|
|
|
|
|
The user is disabled. |
|
|
|
Authentication Manager |
3-2 |
Authentication Manager |
3 |
|
Function |
Description |
|
|
|
The user is deleted via an external server. |
|
|
|
User Name |
Displays the user name. |
|
|
|
|
User Group Name |
Displays the name of the group to belong to. |
|
|
|
|
Description |
Displays the description of the user. |
|
|
|
|
External Server Name |
Displays the name of the registered external server. |
|
|
|
|
Account Name |
Displays the account track information of the user. If you do |
|
|
|
not synchronize the user and account when managing the |
|
|
account, "Do Not Synchronize" is displayed. When you |
|
|
synchronize them, the account name is displayed if the |
|
|
name of the account that the user belongs to is specified. |
|
|
"None" is displayed if no account name is specified. |
|
|
|
E-mail Address |
Displays the e-mail address of the user. |
|
|
|
|
Home |
Displays the address of the SMB server that is normally |
|
|
|
used by the user. |
|
|
2 |
|
|
Reminder |
|
|
To use "Home" (send the scanned data to the |
|
|
Home address) for the device, the following |
|
|
conditions must be satisfied. |
|
|
- The device supports the use of "Home". |
|
|
- Active Directory is used to perform authenti- |
|
|
cation of the external server. |
|
|
If other than Active Directory is used for authen- |
|
|
tication, "Home" cannot be used for the device. |
|
|
|
Maximum Number of Box |
Displays the upper limit on the number of boxes that the |
|
|
|
user can create. The upper limit of the user with this item |
|
|
blank is not managed. |
|
|
|
Apply Level |
Displays the access permission level for the address book. |
|
|
|
|
Biometric Unit No. |
Displays the biometric unit No. |
|
|
|
2 |
|
|
Reminder |
|
|
This page is displayed when the license for |
|
|
Gateway for Biometric Authentication Manager |
|
|
is registered. |
|
|
|
3.1.3Specifying display settings for the user list
The items to be displayed or hidden in the user list can be selected. Settings can be specified for the following parameters.
-User Name
-User Group Name
-Description
Authentication Manager |
3-3 |
Authentication Manager |
3 |
|
- External Server Name
- Account Name
- E-mail Address
- Home
- Maximum Number of Box
- Apply Level
- Biometric Unit No.
2 |
Reminder |
|
|
|
- The user name must be displayed. |
|
- "Biometric Unit No." is displayed when the license for Gateway for |
|
Biometric Authentication Manager is registered. |
1 |
Click the [Display Settings] button on the User List page. |
|
The User List Display Setting page appears. |
2 |
Select the check box for the items to be displayed, and then click the |
|
[Apply] button. |
–To clear the entered information, click the [Clear] button.
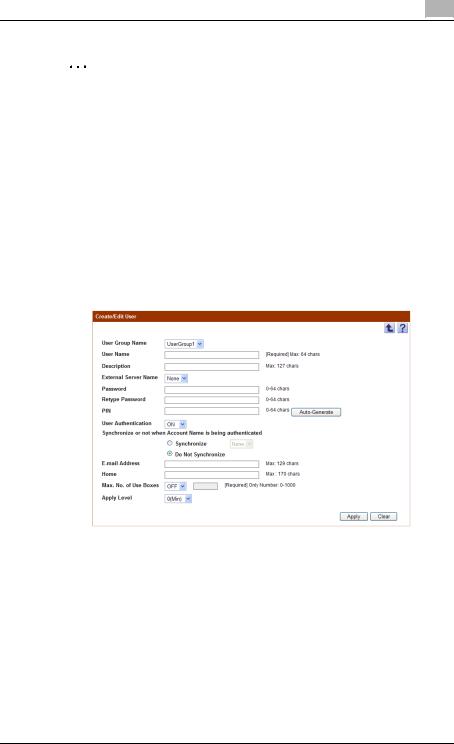
3.1.4Registering a new user
New users who can log on can be registered. The following information is required for registration.
Function |
Details |
User Group Name |
From the drop-down list, select the group to belong to. If |
|
the group does not exist, register the group before starting |
|
this operation. For details on registering groups, refer to |
|
"Registering and editing groups" on page 3-77. |
|
|
User Name |
Type in a user name. |
|
|
Description |
Type in a description of the user. |
|
|
Authentication Manager |
3-4 |

Authentication Manager |
3 |
|
Function |
Details |
External Server Name |
If user authentication is performed by using an external |
|
server, select the appropriate external server from the |
|
drop-down list. |
|
|
Password |
Specify the password necessary for logging on to Enter- |
|
prise Suite and the device. For confirmation, type in the |
|
password again. |
|
|
PIN |
Specify the PIN code used to log in to a device. |
|
The PIN code can be specified using up to 64 numerals. |
|
Clicking the [Auto-Generate] button automatically creates a |
|
random PIN code. |
|
2 |
|
Reminder |
|
A PIN code can only contain numerical values. |
|
2 |
|
Reminder |
|
A PIN code that is identical to a user name can- |
|
not be specified. |
|
|
User Authentication |
From the drop-down list, select whether to enable the user. |
|
Selecting "OFF" does not authenticate the user. |
|
|
Synchronize or not when Account |
Select whether or not to synchronize the user and account |
Name is being authenticated |
when managing the account. When you select [Synchro- |
|
nize], select an account name to synchronize from the |
|
drop-down list. |
|
2 |
|
Reminder |
|
If "Synchronize" is selected but "None" is spec- |
|
ified for the account name to be synchronized, |
|
the account track management authentication |
|
is required when the user is authenticated for |
|
the first time. After the account track manage- |
|
ment has been successfully authenticated, the |
|
account entered by the user is synchronized |
|
with the user authentication. |
|
|
E-mail Address |
Type in the e-mail address of the user. |
|
|
Home |
Specify the address of the SMB server that is normally used |
|
by the user. |
|
|
Max. No. of Use Boxes |
Specify the maximum number of use boxes that can be |
|
created by the user. |
|
• To manage the upper limit on the number of boxes, se- |
|
lect [ON] from the drop-down list, and then type in the |
|
upper limit (0 to 1000) in the text box. |
|
• If you do not manage the upper limit on the number of |
|
use boxes, select [OFF]. |
|
|
Apply Level |
Specify the access permission level (between 0 and 5) for |
|
the address book. |
|
|
Authentication Manager |
3-5 |
Authentication Manager |
3 |
|
2
Note
-The external server name must first be specified. For details, refer to "Specifying an external server" on page 3-94.
-Special single-byte characters (for example, single-byte katakana characters) are treated as double-byte characters.
-We do not recommend that names (such as Public, BoxAdmin or Admin), which can be used by devices, be registered as Authentication Manager users. When performing authentication with Authentication Manager, the user names listed above cannot be used to log on to the device.
-The maximum number of use boxes that can be created can be limited with "Max. No. of Use Boxes".
%Specify the settings necessary for registering the user, and then click the [Apply] button.
– To clear the entered information, click the [Clear] button.
Authentication Manager |
3-6 |
Authentication Manager |
3 |
|
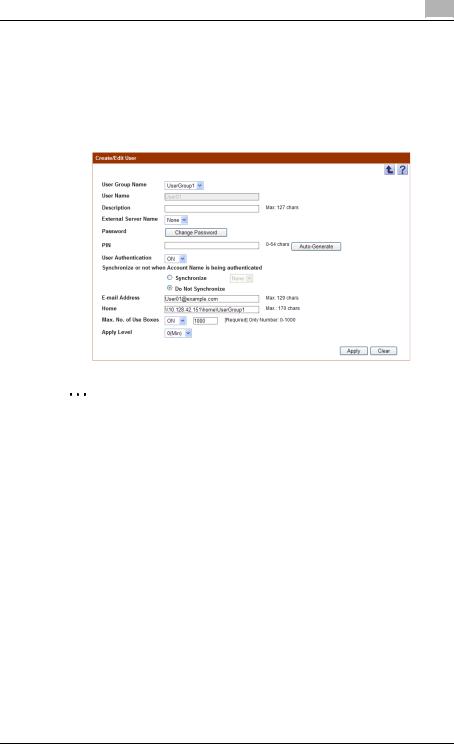
3.1.5Editing user information
The information for registered users can be viewed and edited.
%Specify the settings for the user information to be edited, and then click the [Apply] button.
–To clear the entered information, click the [Clear] button.
–To change the password, click the [Change Password] button.
2
Reminder
For details on the settings, refer to "Registering a new user" on page 3-4. - Information of multiple users can be edited at the same time. For details, refer to "Editing information of multiple users" on page 3-7.
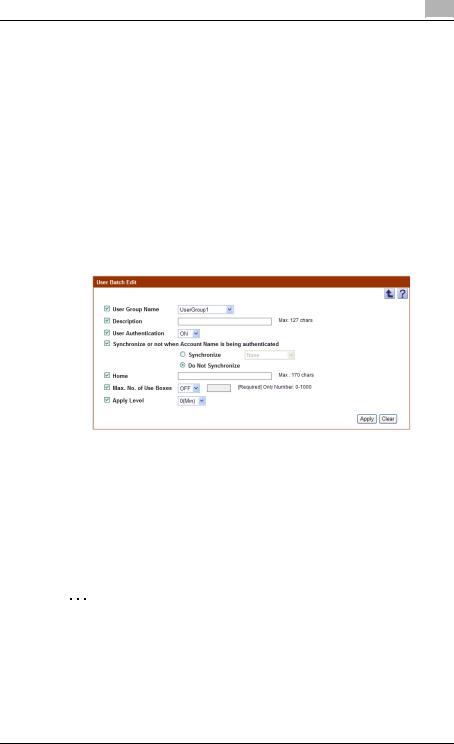
3.1.6Editing information of multiple users
The information for registered multiple users can be edited. The following information can be edited.
Function |
Details |
User Group Name |
From the drop-down list, select the group to belong to. If |
|
the group does not exist, register the group before starting |
|
this operation. For details on registering groups, refer to |
|
"Registering and editing groups" on page 3-77. |
|
|
Description |
Type in a description of the user. |
|
|
User Authentication |
From the drop-down list, select whether to enable the user. |
|
Selecting "OFF" does not authenticate the user. |
|
|
Synchronize or not when Account |
Select whether or not to synchronize the user and account |
Name is being authenticated |
when managing the account. When you select [Synchro- |
|
nize], select an account name to synchronize from the |
|
drop-down list. |
|
|
Authentication Manager |
3-7 |
Authentication Manager |
3 |
|
Function |
Details |
Home |
Specify the address of the SMB server that is normally used |
|
by the user. |
|
|
Max. No. of Use Boxes |
Specify the maximum number of use boxes that can be |
|
created by the user. |
|
• To manage the upper limit on the number of boxes, se- |
|
lect [ON] from the drop-down list, and then type in the |
|
upper limit (0 to 3000) in the text box. |
|
• If you do not manage the upper limit on the number of |
|
use boxes, select [OFF]. |
|
|
Apply Level |
From the drop-down list, select the apply level (between 0 |
|
and 5) for the address book. |
|
|
1 In the User List page, select the user to be edited, and then click the [Edit User] button.
The User Batch Edit page appears.
2
3
Select the check box for the item for the user information to be edited.
Specify the settings, and then click the [Apply] button.
–To clear the entered information, click the [Clear] button.
3.1.7Deleting a user
The information for the selected user can be deleted.
2
Note
If this operation is executed, all data for the user will be deleted from the database.
1 In the User List page, select the user to be deleted, and then click the [Delete User] button.
Authentication Manager |
3-8 |
Authentication Manager |
3 |
|
2 Check the message that appears, and then click the [OK] button to delete the template.
The user is deleted.
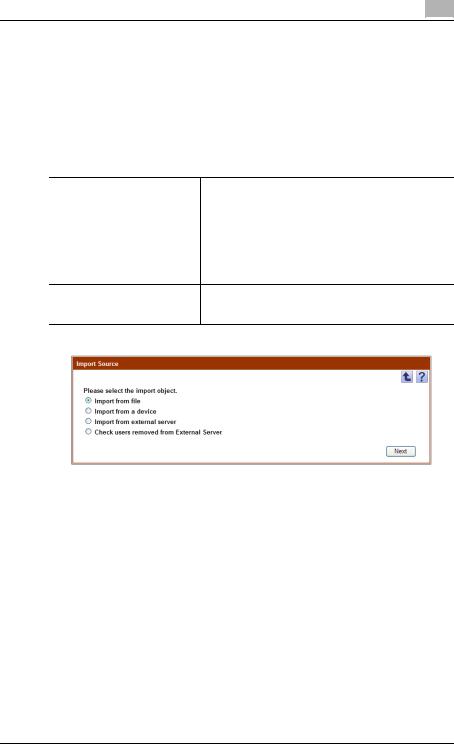
3.1.8Importing data
Click this button to import user information. Data can be imported using one of the following options.
Function |
Details |
Import from file |
Select this option to import user group and user informa- |
|
tion from a specified file. |
|
|
Import from a device |
Select this option to import user information from a speci- |
|
fied device. |
|
|
Import from external server |
Select this option to import user information from a speci- |
|
fied external server. |
Check users removed from ExterSelect this option to check for users deleted from the external Server nal server, and delete the relevant user information from the
user list.
%Select the import method, and then click the [Next] button.
Authentication Manager |
3-9 |
Authentication Manager |
3 |
|
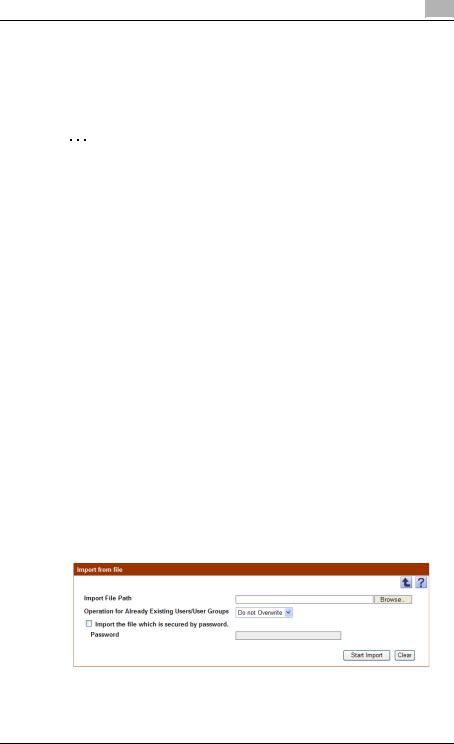
3.1.9Importing from a file
Select this option to import user information or user group data already saved in a file and register user information. Specify settings for the following parameters when importing.
2
Note
- To save data, set the file format to the readable one with Enterprise Suite.
When data is saved in the text (tab-delimited) format (.txt) or CSV (comma-delimited) format (.csv), change the character code of a file to UTF-8. To select a character code, click "Accessories" - "Notepad" to open the saved file, and save it as a new file.
-10001 or more data items cannot be imported. Be sure to confirm that the number of data items is 10000 or less.
-If there are too many users, it may take time to register them.
Function |
Details |
Import File Path |
Type in the path to the file to be imported. The file path can |
|
also be specified by clicking the [Browse] button. |
|
|
Operation for Already Existing Us- |
When the imported user name already exists, specify |
ers/User Groups |
whether or not to overwrite the user information with the |
|
specified contents. If the imported user group name al- |
|
ready exists, specify whether or not to overwrite the data in |
|
"Parent User Group Name" and "Description". |
|
|
Import the file which is secured by |
Select this option to import a file with a password specified |
password. |
or a encrypted file. |
|
Select the [Import the file which is secured by password.] |
|
check box, and then type in the password specified for the |
|
file in [Password]. |
|
|
%Specify the settings necessary for importing, and then click the [Start Import] button.
– To clear the entered information, click the [Clear] button.
The result of the import operation appears.
Authentication Manager |
3-10 |

Authentication Manager |
3 |
|
2
Note
Specifying incorrect information in "Password" may import incorrect information.
2
Reminder
Clicking the [Start Import] button displays a confirmation message. If a deletion file has been imported, the corresponding users are deleted. Because deleted users cannot be restored, check the contents to be deleted carefully and click the [OK] button.
For details on the result page, refer to "Checking the import result" on page 3-16.
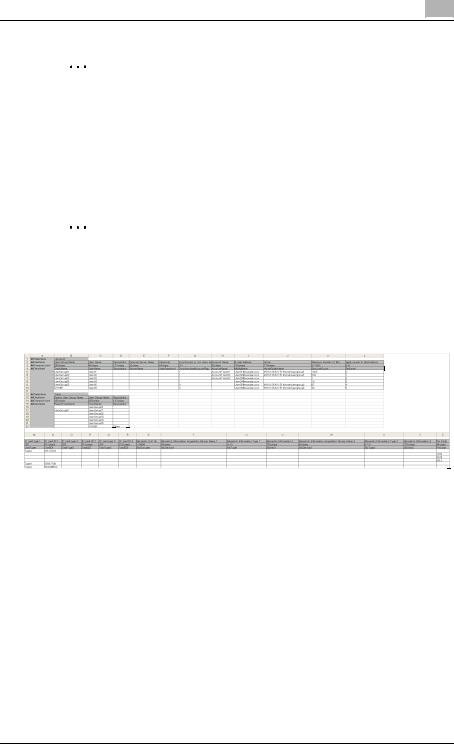
3.1.10 Creating an import file
A file to be imported can be created in a spreadsheet application.
2
Reminder
- You can create an import file by clicking the [Export] button to export a file, then entering the data.
For details on editing the exported file in a spreadsheet application, refer to "Editing an exported file" on page 3-32.
- When registering IC card information (IC card type and IC card ID) or biometric authentication information (biometric unit No., biometric information device name, biometric information type and biometric information), create an import file with Registration Tool.
For details on using Registration Tool, refer to the Help for the application.
1
2
Open the data in a spreadsheet application.
Create data, and then save it as a new file.
–To save data, set the file format to the readable one with Enterprise Suite.
–When data is saved in the text (tab-delimited) format (.txt) or CSV (comma-delimited) format (.csv), change the character code of a file to UTF-8. To select a character code, click "Accessories" - "Notepad" to open the saved file, and save it as a new file.
Authentication Manager |
3-11 |
Authentication Manager |
3 |
|
2
Reminder
The following shows the file formats that are available for importing data.
-Excel 97 to Excel 2003 book formats (.xls)
-Excel book format (Office Excel 2007 or later) (.xlsx)
-XML spreadsheet format (XML format importable with Excel) (.xml)
-Text (tab-delimited) format (.txt)
-CSV (comma-delimited) format (.csv)
-Binary format (system file) (.bin)
2
Note
The four rows following "##TableName" contain basic information for the data. Do not change the data in these rows. Type in the data for the user by starting with the fifth row.
Be sure to enter data for the items marked as "Required".
1 |
|
|
|
|
|
|
|
|
|
|
|
|
|
|
|
|
|
|
|
|
|
|
|
|
|
|
2 |
|
|
|
|
|
|
|
|
|
|
|
|
|
|
|
|
|
|
|
|
|
|
|
|
|
|
|
|
|
|
|
|
|
|
|
|
|
|
|
|
|
|
|
|
|
|
|
|
|
|
|
|
|
3 |
|
|
|
|
|
|
|
|
|
|
|
|
|
|
|
|
|
|
|
|
|
|
|
|
|
|
|
|
|
|
|
|
|
|
|
|
|
|
|
|
|
|
|
|
|
|
|
|
|
|
|
|
|
4 |
|
|
|
|
|
|
|
|
|
|
|
|
|
|
|
|
|
|
|
|
|
|
|
|
|
|
12 |
|
|
|
|
|
|
5 |
|
|
6 |
|
|
|
|
|
7 |
|
|
|
|
8 |
|
|
|
|
|
13 |
|
|
|
|
|
|
|
|
|
|
|
|
|
|
|
|
|
|
|
|
|
|
|
|
|
|
14 |
|
|
|
|
|
|
|
|
|
|
|
|
|
|
|
|
|
|
|
|
|
|
|
|
|
|
|
|
|
|
|
|
|
|
|
|
|
|
|
|
|
|
|
|
|
|
|
|
|
|
|
|
|
15 |
|
|
|
|
|
|
|
|
|
|
|
|
|
|
|
|
|
|
|
|
|
|
|
|
|
|
|
|
|
|
|
|
|
|
|
|
|
|
|
|
|
|
|
|
|
|
|
|
|
|
|
|
|
|
|
|
|
|
|
|
16 |
|
|
17 |
|
|
18 |
|
|
|
|
|
|
|
|
|
|
|
|
|
|
|
|
|
|
|
|
|
|
|
|
|
|
|
|
|
|
|
|
|
|
|
|
|
|
|
|
|
|
|
|
|
|
|
|
|
|
|
|
|
|
|
|
|
|
|
|
|
|
|
|
|
|
|
|
|
|
|
|
|
|
|
|
|
|
|
|
|
|
|
|
|
|
|
|
|
|
|
|||
|
|
|
|
|
|
|
|
9 |
|
|
|
|
|
|
|
|
|
|
10 |
|
|
11 |
|
|||
|
|
|
|
|
|
|
|
|
|
|
|
|
|
|
|
|
|
|
|
|
||||||
|
|
|
|
|
|
|
|
|
|
|
|
|
|
|
|
|
|
|
|
|
|
|
|
|
|
|
No. |
Re- |
Function |
Details |
|
quir |
|
|
|
ed |
|
|
1 |
o |
##TableName |
Indicates user and authentication data. Enter "##TableNa- |
|
|
|
me" and "UserAuth" to the right of the first column of the |
|
|
|
first row. |
|
|
|
|
Authentication Manager |
3-12 |

Authentication Manager |
3 |
|
No. |
Re- |
Function |
Details |
|
quir |
|
|
|
ed |
|
|
2 |
|
##DispName |
Enter item titles to be displayed in a page. Type in "## Dis- |
|
|
|
pName", "User Group Name", "User Name", "Description", |
|
|
|
"External Server Name", "Password", "Synchronize or not |
|
|
|
when Account Name is being authenticated", "Account |
|
|
|
Name", "E-mail Address", "Home", "Maximum Number of |
|
|
|
Box", "Apply Levels to Destinations", "Card Type 1", "Card |
|
|
|
ID 1", "Card Type 2", "Card ID 2", "Card Type 3", "Card ID |
|
|
|
3", "Biometric Unit No.", "Biometric Information Acquisition |
|
|
|
Device Name 1", "Biometric Information Type 1", "Biomet- |
|
|
|
ric Information 1", "Biometric Information Acquisition De- |
|
|
|
vice Name 2", "Biometric Information Type 2", "Biometric |
|
|
|
Information 2", and "Pin Code" to the right of the first col- |
|
|
|
umn of the second row. |
|
|
|
|
3 |
|
##CharacterLimit |
Type in the number of characters for each item. Enter "## |
|
|
|
CharacterLimit", "256chars", "64chars", "127chars", |
|
|
|
"32chars", "64chars", "0-1", "32chars", "129chars", |
|
|
|
"170chars", "0-1000", "0-5", "255", "64chars", "255", |
|
|
|
"64chars", "255", "64chars", "1-9999", "64chars", "0-10", |
|
|
|
"752chars", "64chars", "0-10", "752chars", and "64chars" |
|
|
|
to the right of the first column of the third row. |
|
|
|
|
4 |
o |
##DataName |
Enter item titles to perform the database-based manage- |
|
|
|
ment. Enter "## DataName", "TrackName", "UserName", |
|
|
|
"Description", "ServerName", "UserPassword", "Synchro- |
|
|
|
nizedAccountFlag", "AccountName", "MailAddress", |
|
|
|
"HomeFolderName", "BoxLimitCount", "RefLevel", |
|
|
|
"CardType1", "CardID1", "CardType2", "CardID2", |
|
|
|
"CardType3", "CardID3", "BioGroupNo", "BioDevice1", |
|
|
|
"BioType1", "BioInfo1", "BioDevice2", "BioType2", |
|
|
|
"BioInfo2", and "PinCode" to the right of the first column of |
|
|
|
the fourth row. |
|
|
|
|
5 |
|
User Group Name |
Type in the name of the group that the user belongs to. |
|
|
|
|
6 |
o |
User Name |
Type in a user name. |
|
|
|
|
7 |
|
Description |
Type in a description of the user. |
|
|
|
|
|
|
External Server |
If user authentication is performed by using an external |
|
|
Name |
server, type in the name of the external server. |
|
|
|
|
|
|
Password |
Type in the password necessary for logging on. |
|
|
|
2 |
|
|
|
Note |
|
|
|
All passwords for the file exported using the |
|
|
|
[Export] button will be shown by "+" (single- |
|
|
|
byte). To change the password, delete "+", and |
|
|
|
then type in a new password. |
|
|
|
If you do not change the password, "+" must be |
|
|
|
used as it is. |
|
|
|
For an additional new password, the "+" char- |
|
|
|
acter cannot be used. |
|
|
|
|
Authentication Manager |
3-13 |
Loading...