


 Loading...
User Guide
English
IC-312 Print Controller, Powered by Creo Server Technology, for the Konica Minolta bizhub PRESS C1100/C1085
Version 1.0
731-02146A-EN Rev A

Copyright
Eastman Kodak, 2014. All rights reserved.
This document is also distributed in Portable Document Format (PDF). You may reproduce the document from the PDF file for internal use. Copies produced from the PDF file must be reproduced in whole.
Trademarks
Creo, InSite, Kodak, and Prinergy are trademarks of Kodak.
Acrobat, Adobe, Distiller, Illustrator, Photoshop, and PostScript are trademarks of Adobe Systems Incorporated.
Apple, AppleShare, AppleTalk, iMac, ImageWriter, LaserWriter, Mac OS, Power Macintosh, and TrueType are registered trademarks of Apple Inc. Macintosh is a trademark of Apple Inc., registered in the U.S.A. and other countries.
Hexachrome, PANTONE, PANTONE Goe, PANTONE Hexachrome, and PANTONE MATCHING SYSTEM are the property of Pantone, Inc.
PEARL, PEARLdry, PEARLgold, PEARLhdp, and PEARLsetter are registered trademarks of Presstek, Inc.
EMC requirements
|
EMC requirements |
|
United States |
|
FCC 47CFR part 15: 2005, subpart B class B |
|
|
|
Canada |
|
ICES-003: 2004 issue 4, class B |
|
|
|
European EMC standards |
|
|
|
|
|
Radiated Emissions |
|
EN55022:2006+A1:2007:Class A |
|
|
|
EN 55022 and EN 55024 Statements
This product is compliance in accordance with the application of Council Directive 2004/108/EC, Article 4a. Conformity is declared by the application of EN 55022 Class A (CISPR 22) and EN 55024.
WARNING: This is a Class A product. In a domestic environment, this product may cause radio interference, in which case the user may be required to take appropriate measures.
FCC compliance
Creo equipment complies with the requirements in part 15 of the FCC Rules for a Class B digital device.
Class B Equipment (For Home Use Broadcasting & Communication Equipment)
This equipment is home use (Class B) electromagnetic wave suitability equipment and to be used mainly at home and it can be used in all areas.
Equipment recycling
In the European Union, this symbol indicates that when the last user wishes to discard this product, it must be sent to appropriate facilities for recovery and recycling. Contact your local Print On-Demand Solutions representative or refer to www.kodak.com/go/recycle for additional information on the collection and recovery programs available for this product.
REACH
Please consult www.kodak.com/go/REACH for information about the presence of substances included on the candidate list according to article 59(1) of Regulation (EC) No. 1907/2006 (REACH).
Limitation of liability
The product, software or services are being provided on an "as is" and "as available" basis. Except as may be stated specifically in your contract, Kodak, its subsidiaries, and affiliates expressly disclaim all warranties of any kind, whether express or implied, including, but not limited to, any implied warranties of merchantability, fitness for a particular purpose and non-infringement.
You understand and agree that, except as may be stated specifically in your contract, Kodak, its subsidiaries, and affiliates shall not be liable for any direct, indirect, incidental, special, consequential or exemplary damages, including but not limited to, damages for loss of profits, goodwill, use, data or
other intangible losses (even if Kodak has been advised of the possibility of such damages), resulting from: (i) the use or the inability to use the product or software; (ii) the cost of procurement of substitute goods and services resulting from any products, goods, data, software, information or services purchased; (iii) unauthorized access to or alteration of your products, software or data; (iv) statements or conduct of any third party; (v) any other matter relating to the product, software, or services.
The text and drawings herein are for illustration and reference only. The specifications on which they are based are subject to change. Kodak may, at any time and without notice, make changes to this document. Kodak, for itself and on behalf of its subsidiaries, and affiliates, assumes no liability for technical or editorial errors or omissions made herein, and shall not be liable for incidental, consequential, indirect, or special damages, including, without limitation, loss of use, loss or alteration of data, delays, or lost profits or savings arising from the use of this document.
www.creoservers.com/
Internal 731-02146A-EN Rev A
Revised 2014-06-24

Contents |
|
|
1 |
Getting started....................................................................................................... |
1 |
|
Printing this guide.................................................................................................................................... |
1 |
|
System overview..................................................................................................................................... |
2 |
|
Hardware and software components................................................................................................ |
2 |
|
Supported formats............................................................................................................................ |
3 |
|
Optional kits...................................................................................................................................... |
3 |
|
Turning on the IC-312 print controller...................................................................................................... |
6 |
|
Turning off the IC-312 print controller...................................................................................................... |
6 |
|
Overview of the workspace..................................................................................................................... |
7 |
|
Customizing the workspace toolbar ..................................................................................................... |
11 |
|
Customizing the user interface font size .............................................................................................. |
12 |
2 Setting up your computer for printing.................................................................. |
13 |
|
|
Setting up your computer—overview.................................................................................................... |
13 |
|
Setting up printing on a Windows computer.......................................................................................... |
15 |
|
Adding a network printer to Windows Server 2008/2003/XP.......................................................... |
15 |
|
Adding a network printer to Windows 7/Vista................................................................................. |
16 |
|
Loading the Print Driver software for the first time......................................................................... |
16 |
|
Shortcut for adding a printer........................................................................................................... |
17 |
|
Deactivating the Print Driver software............................................................................................ |
18 |
|
Removing the Print Driver software................................................................................................ |
18 |
|
Downloading fonts.......................................................................................................................... |
19 |
|
Setting up a TCP/IP Printer in Windows 7...................................................................................... |
19 |
|
Setting up printing in Mac OS X............................................................................................................ |
21 |
|
Installing the Print Driver software in Mac OS X 10.6 (64 bit) and later......................................... |
21 |
|
Defining a printer with the Print Driver software in Mac OS X 10.6 (64 bit) and later..................... |
22 |
|
Removing the Print Driver software in Mac OS X .......................................................................... |
23 |
3 |
Calibration........................................................................................................... |
25 |
|
Calibration overview.............................................................................................................................. |
25 |
|
Creating calibration tables with the X-Rite i1/i1iO/iSis spectrophotometer........................................... |
26 |
|
Connecting the X-Rite i1/i1iO/iSis spectrophotometer to the IC-312 print controller...................... |
26 |
|
Using the X-Rite i1 spectrophotometer to create a calibration table ............................................. |
27 |
|
Using the X-Rite iSis spectrophotometer to create a calibration table .......................................... |
31 |
|
Using the X-Rite i1iO spectrophotometer to create a calibration table .......................................... |
35 |
|
Creating calibration tables with the Konica Minolta FD-5 spectrodensitometer.................................... |
41 |
|
Connecting the Konica Minolta FD-5 spectrophotometer to the IC-312 print controller................. |
41 |
|
Using the Konica Minolta FD-5 spectrodensitometer to create a calibration table ........................ |
43 |
|
Troubleshooting calibration................................................................................................................... |
49 |
4 Printing a file in Windows and Mac OS............................................................... |
51 |
|
|
Printing a file to the IC-312 print controller............................................................................................ |
51 |
|
Using a hot folder to print...................................................................................................................... |
51 |
|
Password protect jobs........................................................................................................................... |
52 |
5 Processing and printing from the Creo server..................................................... |
55 |
|
File processing...................................................................................................................................... |
55 |
Importing and printing a job................................................................................................................... |
56 |
Resubmitting a job................................................................................................................................. |
56 |

vi |
IC-312 Print Controller, Powered by Creo Server Technology, for the Konica Minolta bizhub PRESS |
|
|
|
C1100/C1085 1.0 |
|
Resubmitting several jobs via a virtual printer....................................................................................... |
57 |
|
Printing copies of a job.......................................................................................................................... |
57 |
|
Job Editor tool....................................................................................................................................... |
57 |
|
Merging jobs................................................................................................................................... |
58 |
|
Replacing specific pages in your job.............................................................................................. |
58 |
|
Proofing a job........................................................................................................................................ |
59 |
|
Job Preview tool............................................................................................................................. |
60 |
|
Proofing the job using color sets.................................................................................................... |
60 |
|
Export for Proof.............................................................................................................................. |
62 |
|
Verifying the content of the job.............................................................................................................. |
63 |
|
Performing an extended preflight check......................................................................................... |
64 |
|
Viewing and printing a preflight report............................................................................................ |
64 |
|
Preflight report window................................................................................................................... |
65 |
|
Submitting urgent jobs........................................................................................................................... |
67 |
|
Running a job immediately............................................................................................................. |
67 |
|
Secure printing overview....................................................................................................................... |
68 |
6 |
Managing jobs..................................................................................................... |
69 |
|
Archiving and retrieving jobs................................................................................................................. |
69 |
|
Archiving a job................................................................................................................................ |
69 |
|
Retrieving a job............................................................................................................................... |
69 |
|
Forwarding a job to another Creo server .............................................................................................. |
70 |
|
Duplicating jobs..................................................................................................................................... |
71 |
|
Accounting Viewer................................................................................................................................. |
71 |
|
Customization of the Accounting Viewer........................................................................................ |
71 |
|
Deleting records from the Accounting Viewer table........................................................................ |
73 |
|
Exporting the accounting log.......................................................................................................... |
73 |
|
Job report.............................................................................................................................................. |
74 |
|
Exporting the job report.................................................................................................................. |
74 |
7 |
Managing color.................................................................................................... |
75 |
|
Color management on the IC-312 print controller................................................................................. |
75 |
|
IPDS and AFP color management........................................................................................................ |
75 |
|
Profiles ................................................................................................................................................. |
76 |
|
Creating a destination profile using an external device ................................................................. |
76 |
|
Managing profiles........................................................................................................................... |
86 |
|
Mapping media using the Media and Color Manager tool..................................................................... |
88 |
|
Managing calibration tables................................................................................................................... |
90 |
|
Calibrations window........................................................................................................................ |
90 |
|
Calibration table list........................................................................................................................ |
90 |
|
Calibration table Info Data tab........................................................................................................ |
90 |
|
Calibration table Info Graph tab...................................................................................................... |
91 |
|
Adding an entry to a calibration table............................................................................................. |
92 |
|
Spot Color Editor overview ................................................................................................................... |
93 |
|
Adding a spot color - Global Library............................................................................................... |
94 |
|
Editing a spot color - Global Library............................................................................................... |
95 |
|
Deleting a spot color - Global Library............................................................................................. |
95 |
|
Adding a spot color - Media type library......................................................................................... |
96 |
|
Editing a spot color - Media type library......................................................................................... |
96 |
|
Deleting a spot color - Media type library....................................................................................... |
97 |
|
Test–printing spot colors................................................................................................................ |
97 |
|
Measuring a spot color with the X-Rite i1 spectrophotometer........................................................ |
98 |
|
Spot color variations overview........................................................................................................ |
98 |

Contents |
vii |
|
|
Protecting specific colors ............................................................................................................. |
100 |
|
Color adjustment with the Gradation Tool .......................................................................................... |
102 |
|
Creating and editing a gradation table.......................................................................................... |
103 |
|
Correcting an image using Photo Touch-up........................................................................................ |
104 |
|
Printing with black toner...................................................................................................................... |
106 |
|
Printing a job in grayscale mode.................................................................................................. |
106 |
|
Printing a job that contains grayscale RGB elements using black toner ..................................... |
106 |
|
Preserving black color in a job containing grayscale CMYK elements......................................... |
106 |
8 |
Production workflows........................................................................................ |
107 |
|
Printing using imposition..................................................................................................................... |
107 |
|
Imposition overview...................................................................................................................... |
107 |
|
Imposition methods...................................................................................................................... |
107 |
|
Previewing an imposition layout .................................................................................................. |
109 |
|
Printing a business card job......................................................................................................... |
110 |
|
Printing a saddle-stitch job........................................................................................................... |
111 |
|
Printing a nested saddle-stitch job................................................................................................ |
112 |
|
Printing a folded signature job...................................................................................................... |
113 |
|
Imposition Template Builder tool.................................................................................................. |
116 |
|
Printing with mixed media................................................................................................................... |
123 |
|
Mixed media overview.................................................................................................................. |
123 |
|
Creating a rule set for mapping dynamic page exceptions........................................................... |
124 |
|
Printing dynamic page exceptions................................................................................................ |
125 |
|
Printing a file with mixed paper sizes........................................................................................... |
126 |
|
Setting custom page exceptions via the job parameters window................................................. |
127 |
|
Working with the Creo Server Tabs plug-in for Acrobat...................................................................... |
128 |
|
Tabs plug-in overview................................................................................................................... |
128 |
|
Tabs plug-in window..................................................................................................................... |
129 |
|
Adding tabs to a file...................................................................................................................... |
133 |
|
Managing tabs.............................................................................................................................. |
136 |
|
Working with near-line finishers.......................................................................................................... |
138 |
|
Near-line finisher overview........................................................................................................... |
138 |
|
Generating a corner mark and bar code....................................................................................... |
139 |
|
Working in IPDS mode........................................................................................................................ |
140 |
|
IPDS overview.............................................................................................................................. |
140 |
|
Selecting the IPDS workflow mode.............................................................................................. |
141 |
|
Enabling end of job timeout.......................................................................................................... |
141 |
|
Creating and editing an IPDS printer............................................................................................ |
142 |
|
Setting up the IPDS host.............................................................................................................. |
142 |
|
IPDS printer parameters............................................................................................................... |
143 |
|
Working with Job Definition Format..................................................................................................... |
159 |
|
About Job Definition Format......................................................................................................... |
159 |
|
Submitting pages from Prinergy using basic JDF instructions..................................................... |
160 |
9 |
Scanning documents......................................................................................... |
161 |
|
Remote Scan Application.................................................................................................................... |
161 |
|
Installing the Remote Scan Application in Windows........................................................................... |
161 |
|
Installing the Remote Scan Application in the Mac OS....................................................................... |
162 |
|
Creating a scan box............................................................................................................................ |
163 |
|
Scanning a document on the Konica Minolta bizhub PRESS C1100/C1085...................................... |
166 |
|
Saving scanned jobs to your computer............................................................................................... |
166 |

viii |
IC-312 Print Controller, Powered by Creo Server Technology, for the Konica Minolta bizhub PRESS |
|
|
|
C1100/C1085 1.0 |
10 Variable data printing jobs................................................................................. |
169 |
|
|
Variable data printing jobs................................................................................................................... |
169 |
|
VDP document formats....................................................................................................................... |
169 |
|
Variable Print Specification........................................................................................................... |
170 |
|
PPML............................................................................................................................................ |
170 |
|
About PDF/VT file formats............................................................................................................ |
171 |
|
Deleting reusable elements................................................................................................................. |
171 |
11 Job parameters................................................................................................. |
173 |
|
|
Print tab in the job parameters window............................................................................................... |
173 |
|
Imposition tab in the job parameters window...................................................................................... |
177 |
|
Quality tab in the job parameters window........................................................................................... |
183 |
|
Color tab in the job parameters window.............................................................................................. |
187 |
|
Photo touch-up tab in the job parameters window.............................................................................. |
192 |
|
Finishing tab in the job parameters window........................................................................................ |
192 |
|
Exceptions tab in the job parameters window..................................................................................... |
201 |
|
Services tab in the job parameters window......................................................................................... |
202 |
|
Summary tab in the job parameters window....................................................................................... |
206 |
12 Setting up your Creo server.............................................................................. |
207 |
|
|
Preferences window............................................................................................................................ |
207 |
|
Setting up e-mail and text message accounts..................................................................................... |
212 |
|
Setting up a virtual printer................................................................................................................... |
213 |
|
Virtual printers.............................................................................................................................. |
213 |
|
Adding and editing a virtual printer............................................................................................... |
214 |
|
Restoring the settings for a default virtual printer......................................................................... |
215 |
|
Removing a virtual printer............................................................................................................. |
215 |
|
Best practices for maximizing performance........................................................................................ |
216 |
|
Using mark sets................................................................................................................................... |
216 |
|
Mark sets...................................................................................................................................... |
216 |
|
Creating a custom mark set.......................................................................................................... |
217 |
|
Adding a barcode ........................................................................................................................ |
218 |
|
Maintaining your settings..................................................................................................................... |
220 |
|
Backing up the configuration........................................................................................................ |
220 |
|
Restoring the configuration........................................................................................................... |
220 |
|
Tools for maintaining your system................................................................................................ |
221 |
13 Working with Creo server tools......................................................................... |
223 |
|
|
Remote Site Manager overview.......................................................................................................... |
223 |
|
Activating the remote tools........................................................................................................... |
223 |
|
Installing the Remote Site Manager in Windows.......................................................................... |
224 |
|
Installing the Remote Site Manager in Mac OS X 10.6 (64 bit) and later..................................... |
224 |
|
Adding Creo servers to the Remote Site Manager ...................................................................... |
225 |
|
Using the EZ Connect tool to view the printer status.................................................................... |
225 |
|
Removing the Remote Site Manager in Windows........................................................................ |
225 |
|
Removing the Remote Site Manager in Mac OS X...................................................................... |
226 |
|
Remote Workspace overview.............................................................................................................. |
226 |
|
Connecting to the Remote Workspace......................................................................................... |
227 |
|
Overview of the Web Center............................................................................................................... |
227 |
|
Connecting to the Web Center..................................................................................................... |
227 |
|
Office Hot Folder tool.......................................................................................................................... |
227 |

Contents |
ix |
Installing the Office Hot Folder tool.............................................................................................. |
228 |
Creating an Office hot folder......................................................................................................... |
228 |
Using the Office Hot Folder tool to print....................................................................................... |
228 |
Remote Job Ticket software................................................................................................................ |
229 |
Remote Job Ticket overview........................................................................................................ |
229 |
Language settings........................................................................................................................ |
230 |
Installing the Remote Job Ticket software in Windows................................................................ |
230 |
Installing the Remote Job Ticket software in Mac OS X............................................................... |
230 |
Creating and managing job tickets............................................................................................... |
231 |
Updates........................................................................................................................................ |
236 |
Removing the Remote Job Ticket from Windows......................................................................... |
237 |
Removing the Remote Job Ticket from Mac OS X....................................................................... |
237 |
Changing the Network settings to TCP/IPv6 on a remote computer............................................ |
237 |
14 Troubleshooting................................................................................................. |
239 |
Job History window............................................................................................................................. |
239 |
Handling alerts and jobs...................................................................................................................... |
240 |
Aborting a job...................................................................................................................................... |
241 |
Resume printing........................................................................................................................... |
241 |
Alerts window...................................................................................................................................... |
241 |
Printing system messages.................................................................................................................. |
242 |
15 Glossary............................................................................................................ |
243 |
Glossary.............................................................................................................................................. |
243 |
x |
IC-312 Print Controller, Powered by Creo Server Technology, for the Konica Minolta bizhub PRESS |
|
C1100/C1085 1.0 |

1 Getting started
Printing this guide
Change the paper size to print this document on any printer.
1.Open the PDF file in Adobe Acrobat.
2.From the File menu, select Print. The Print dialog box appears.
3.Select the desired paper size, for example, A4 or letter.
4.In the Page Scaling list, select Fit To Printable Area or Shrink To Printable Area.
Note: The names in the Page Scaling list vary according to the version of the Adobe Acrobat software.
5.Click OK.
This document is printed to the selected paper size on your printer.
2 |
Chapter 1—Getting started |
System overview
The IC-312 print controller, powered by Creo Server Technology, for the Konica Minolta bizhub PRESS C1100/C1085 is an ondemand prepress system that runs on a Microsoft Windows Embedded Standard 7 (WES) SP1 operating system and uses advanced prepress technologies to drive the Konica Minolta bizhub PRESS C1100/C1085.
The IC-312 print controller enables you to print from computers running the Microsoft Windows operating system, Apple Mac OS X operating system software, and The Open Group UNIX client workstations. Using raster image processor (RIP) technology, the IC-312 print controller performs pre-RIP preflight on each file that is imported to the IC-312 print controller and converts image files in page-description language (PDL) formats (for example, Adobe PostScript, PDF, and variable data printing formats) to a suitable ready-to-print (RTP) format for direct high-quality digital printing. The IC-312 print controller also streamlines the printing process by allowing you to print with preset workflows.
In combination with the printer, the IC-312 print controller enables you to efficiently print business cards, print flyers, brochures, pamphlets, catalogs, short-run trials, and print-on-demand publications.
The IC-312 print controller combines RIP functionalities, automation, control tools, and special hardware development capabilities with Windows-based architecture.
If you have the Trans Pack, the IC-312 print controller supports transactional printing using the IPDS workflow including bidirectional communication with an IPDS host. You can configure the IC-312 print controller to either:
●File submission mode, which enables you to print from any computer, import and process all the supported file formats, apply and edit the job parameters, and manage your files (including AFP files).
●IPDS mode, which enables you to process and print IPDS jobs from the IPDS host computer. In IPDS mode you can apply and edit the IPDS printer parameters.
Hardware and software components
The IC-312 print controller includes:
Supported formats |
3 |
●Creo hardware, including the dedicated interface (fusion) board
●DVD-RW drive with DVD burning software
●The following software:
○IC-312 print controller software
○Windows Embedded Standard 7 (WES) SP1 x64 operating system
○Adobe Acrobat 10 and PDF 1.7
○Enfocus PitStop Edit 11
○Microsoft Internet Explorer 8
Supported formats
The IC-312 print controller supports the following file formats:
●PostScript (composite files) (levels 1, 2, and 3)
●Adobe PDF (versions 1.2 through 1.7)
●EPS
●Creo VPS (Variable Print Specification)
●PPML (Personalized Print Markup Language)
●PPML.zip
●PPML/VDX
●TIFF/IT
●PDF/VT - PDF/VT1 and PDF/VT2
●JDF/JMF
●XPS
●AFP—part of the Trans Pack
●JPEG
●TIFF—supports TIFF 6.0 files saved with sliced internal data structure, regardless of the BPP (Bits per Pixel) and compression method. Includes support for multi-page TIFF
Optional kits
The following optional kits are available with theIC-312 print controller.
4 |
Chapter 1—Getting started |
Action Pack
To activate the features in the software you need to install the dongle that is supplied with the pack.
This pack includes the following features:
●Progressive Printing
●Enfocus PitStop Edit
●Global Reusable Elements Management tool
●Imposition Template Builder
●Exception Mapping and Rules Set—Dynamic Exceptions (SPD)
●Folded signatures
●Mark sets
●Estimated printing time
Fast Pack
To activate these features in the IC-312 print controller software, you need to install the dongle included in the pack.
This pack includes the following features:
●Additional RIP process node (total of 3 RIP process nodes)
●Parallel RIP at job level
●Enhanced parallel RIP at page level
●Batching in the Process queue
●Keep job in original order
●Full Gallop
Preps Pack
This pack is optional. To activate these features in the IC-312 print controller software, you need to install the dongle included in the pack.
This pack enables you to build custom signatures, and define where marks or groups of marks are placed on a sheet. In addition, there is an interactive job ganging option.
Installing the Preps Pack |
5 |
Installing the Preps Pack
To activate the features in the Preps Pack, install the dongle that is supplied with the pack.
1.Log on to your computer as an Administrator.
2.Obtain the software files. The
Preps_7-0-0_Win_Installer.exe file is available on the DVD.
3.Insert the DVD, and double-click the .exe file.
4.Click Install and follow the on-screen instructions until the installation is complete.
5.When the iKey driver window appears, type your license key to complete the installation.
Match Pack
This pack is optional. To activate these features in the IC-312 print controller software, you need to connect the dongle included in the pack. .
This pack includes the following features:
●Edit spot color per media type
●Export for Proof
●Import device link profile
●Spot color based on destination profiles
●Color picker
●Predefined color sets
●Print color set samples
●Spot color variations
●Print spot test book
●Photo touch up (KPT)
Trans Pack
This pack is optional. To activate these features in the IC-312 print controller software, you need to connect the dongle included in the pack.
The Trans Pack enables transactional printing using the Intelligent Printer Data Stream (IPDS) workflow including bidirectional communication with an IPDS host.
You can configure the IC-312 print controller to work in either:
●File submission mode—enables you to print from any computer, import and process all the supported file formats,
6 |
Chapter 1—Getting started |
apply and edit the job parameters, and manage your files. This includes Advanced Function Printing (AFP) file format support, which enables you to import, process, and print AFP files directly in file submission mode.
●IPDS mode—enables you to process and print IPDS jobs from the IPDS host over bidirectional and secured communications.
Turning on the IC-312 print controller
1.Turn on the monitor.
2.Turn on the printer.
3.Open the door on the front of the IC-312 print controller, and push the power control button.
The power indicator on the front panel lights up, and the Windows operating system logon screen appears.
The IC-312 print controller splash screen appears, followed by the workspace.
Note: If the workspace does not automatically appear, open the application from the Windows Start menu. By default, the Windows screen saver is off.
See also:
Preferences window on page 207
Turning off the IC-312 print controller
1. From the File menu in the workspace, select Exit.
Note: Alternatively, if you want to exit the Workspace only (and not shut down the Creo server), select Exit Workspace. This is useful when you make a change to the settings that require you to close and open the Workspace, for example, when customizing the font size in the user interface. To restart the Workspace, right-click on the Creo server icon in the system tray and click Start.
A confirmation message appears.
2.Click Yes.
The IC-312 print controller software closes. This may take a few minutes.
Note: If you move the cursor over the server icon on the taskbar, the following tooltip appears: Creo Server is Stopping. Please Wait.
3.Verify that the IC-312 print controller icon does not appear on the taskbar.
Overview of the workspace |
7 |
4.From the Windows Start menu, select Shut Down, and click
OK.
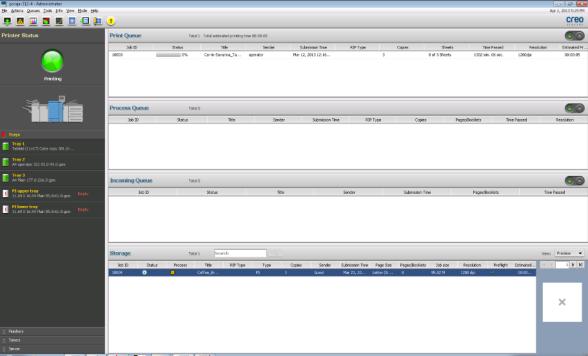
Overview of the workspace
The workspace automatically appears when you start the software .
Note: When the IPDS workflow mode is selected, certain features and options are not available in the workspace.
The workspace contains different areas that enable you to monitor your job during the process and print stages. In addition, the workspace includes tools and options that enable you to fully customize and manage your server and jobs.
8 Chapter 1—Getting started
Workspace area |
Description |
|
|
|
|
|
|
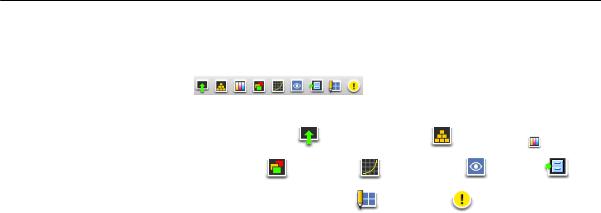
Toolbar |
|
|
|
|
|
|
|
|
Consists of shortcut buttons to commonly used tools and windows such |
||||||
|
as Import window |
, Resource Center |
, Calibration |
, Spot |
|||
|
Color Editor |
, Gradation |
, Job Preview |
, Archive |
, |
||
|
Imposition Template Builder |
, and Alerts |
|
. |
|
||
|
In addition, you can customize the toolbar area by adding, removing, |
||||||
|
and rearranging toolbar buttons from the repository in the Toolbar |
||||||
|
customization window. |
|
|
|
|
|
|
|
Note: The icons that appear vary according to the optional packs in |
||||||
|
use. |
|
|
|
|
|
|
|
|
||||||
Printer Status pane |
The Printer Status pane displays information about the current printer |
||||||
|
status—for example, Printing, Ready, Warming up. |
|
|||||
|
The printer icon changes according to the configuration of the printer |
||||||
|
and the finishing devices connected. |
|
|
|
|||
|
|
||||||
Resource details |
Click Input Trays, Finishers, Toners, or Server to display information |
||||||
|
about the size and type of paper in each tray, the connected finishing |
||||||
|
devices, the available toner, status of consumables, and disk space |
||||||
|
and network details. |
|
|
|
|
|
|
|
The Server area provides network, workflow mode (either IPDS or File |
||||||
|
Submission Mode) and disk space details. In IPDS workflow mode, |
||||||
|
the IPDS Connection Status appears, that is, Disconnected or |
||||||
|
Connected. |
|
|
|
|
|
|
|
Note: You can change the workflow mode in the Preferences window. |
||||||
|
Under Server, you can also view the date when the printer was last |
||||||
|
calibrated. Progress bars display information about incoming and |
||||||
|
outgoing jobs. Details about the status of the system and image disks, |
||||||
|
for example, the amount of available disk space on each disk, are |
||||||
|
shown. In addition, the date of the last calibration (if applicable) and the |
||||||
|
data cables connected is shown. |
|
|
|
|
||
|
In IPDS mode, you can click Abort Job to abort all the IPDS jobs in the |
||||||
|
queues. The jobs and RTP files are deleted. If you need to disconnect |
||||||
|
from the IPDS host, click Disconnect. |
|
|
|
|||
|
If there is a problem with one of the printer components or with the |
||||||
|
server, a red indicator appears in the printer icon and next to the |
||||||
|
relevant component—for example, if a tray is empty. |
|
|||||
|
|
|
|
|
|
|
|

Overview of the workspace |
9 |
Workspace area |
Description |
Incoming Queue, Process |
The Incoming Queue area lists all incoming jobs. This queue is |
Queue and Print Queue |
available by selecting the Full View option from the View menu. |
|
The Process Queue area lists the files to be processed. After a file has |
|
been processed successfully, it moves either to the Print Queue area |
|
or to the Storage area. |
|
In the Print Queue area, you can view the estimated printing time for |
|
each job. The printing time is calculated according to when the first |
|
page in the job starts printing until the last page finishes printing. |
|
Indicates that the queue is ready for processing or printing. |
|
Indicates that the queue is suspended. You need to release the |
|
queue in order to process and print the jobs in this queue. |
|
Note: When a queue is suspended you can open and edit the job |
|
parameters of a job, unless the job is active or printing in the print |
|
queue. |
|
A preflight check is automatically executed on files running in the |
|
incoming queue. This checks for the existence of external files/ |
|
elements (high resolution files), SPD/dynamic exceptions, page size, |
|
and AFP resources. If the auto preflight passes and you then want to |
|
check for other resources (for example, fonts or spot colors), you |
|
should run a full preflight check as described in Verifying the content of |
|
the job. If the job fails, the preflight check it is moved to the Storage |
|
area and marked with a red X (failed) in the Preflight column. |
|
Note: If a job fails the preflight check, you can view the preflight report |
|
by right-clicking on the job and selecting Preflight Report. For more |
|
information, see Viewing and printing a preflight report. |
|
|

10 Chapter 1—Getting started
|
Workspace area |
|
Description |
|
|
|
Storage area |
|
The Storage area contains jobs that were: |
|
|
|
|
|
● |
Successfully printed |
|
|
|
|
● Held, aborted, or failed during processing or printing |
|
|
|
|
|
● Sent directly from the client workstation, or imported into the |
|
|
|
|
|
|
Storage area |
|
|
|
|
There are three different views available in the Storage area: List, |
|
|
|
|
|
Preview, and Gallery. |
|
|
|
|
|
Icons in the Process column indicate the following processing |
|
|
|
|
|
information: |
|
|
|
|
|
● |
: The file requires processing |
|
|
|
|
● |
: The file was partially processed |
|
|
|
|
● |
: The file was fully processed |
|
|
|
|
You can modify the columns and information that is displayed in the |
|
|
|
|
|
Storage area. Right-click on a column in the Storage area and select |
|
|
|
|
|
the column that you want to add or remove. |
|
|
In addition, the Storage area displays a thumbnail of the selected job.
Note: Selecting Copies enables you to change the number of copies for that job and submit it for printing without opening and editing the job parameters.
Customizing the workspace toolbar |
11 |
Customizing the workspace toolbar
Add shortcut buttons to the workspace toolbar, remove buttons from the toolbar, and rearrange buttons on the toolbar.
1. From the Tools menu, select Toolbar customization.
2.Perform any of the following actions:
○To add a button to the toolbar, select the button from the
Available toolbar buttons area and click Add.
○To remove a button from the toolbar, select the button from the Current toolbar buttons area and click Remove.
○To move a button to a different position on the toolbar, select the button in the Current toolbar buttons area, and then click any of the following sorting icons:
● : Moves the toolbar button to the first position (on the
left end of the toolbar)
●
●
 : Moves the toolbar button one position to the left
 : Moves the toolbar button one position to the right
● : Moves the toolbar button to the last position (on the
right end of the toolbar)
3.Click Save.
The workspace toolbar displays your latest changes.
12 |
Chapter 1—Getting started |
Customizing the user interface font size
Select a font size for the user interface that accommodates the resolution of your monitor.
1.From the File menu, select Preferences.
2.Click UI Customization.
3.In the Font size area, select a font size.
The Preview area displays a phrase showing the font sample.
4.Click Apply.
5.When a message appears telling you to exit and restart the software, click OK.
6.Click Save.
Next: For the new settings to take effect, exit and then restart the workspace.
2 |
Setting up your |
|
|
|
computer for printing |
Setting up your computer—overview
Printing Methods
Methods for printing with the IC-312 print controller:
●Submit the job to one of the IC-312 print controller virtual printers. The job is spooled, analyzed, and then processed or printed (according to the selected job flow of the virtual printer). If you use this method, you can print from any software (for example, Adobe Acrobat) and use any file format from any Windows and Mac computer.
●Drag the job to a hot folder. The job is spooled, analyzed, and then processed or printed (according to the selected job flow of the corresponding virtual printer). If you use the hot folder method, you can print most PDL files (for example, PostScript, PDF, EPS, Variable Print Specification, and PPML).
●Drag Microsoft Office files to a special hot folder and then submit the files for printing.
Network printers
To print your file using a IC-312 print controller virtual printer, you first need to install the virtual printer as a network printer on your computer.
After you install a network printer on your computer, you can submit files for printing. By default, the network printers are installed with the Print Driver software. You can change the default settings of the network printer to use the PPD parameters instead of the Print Driver software.
The IC-312 print controller supports printing from the following operating systems:
●Microsoft Windows Server 2008, Microsoft Windows Server 2003, Microsoft Windows 7, Windows 8, Microsoft Windows Vista, and Microsoft Windows XP
The IC-312 print controller provides default network printers, referred to here as virtual printers.
14 |
Chapter 2—Setting up your computer for printing |
A virtual printer contains preset workflows that are automatically applied to all print jobs processed with that virtual printer. The default virtual printers are published on the network with specific parameters set for processing and printing.
The default virtual printers are:
●Print—Files sent to this printer are automatically processed and immediately sent to the printer for printing.
●Process—Files sent to this printer are automatically processed and stored in ready-to-print (RTP) format in the Storage area. Later, you can submit an RTP job for printing, or change the parameters of the job and resubmit it for processing or printing.
●Store—Files sent to this printer are spooled to the Storage area and wait until you submit them for processing and printing. The files remain in PDL format (such as PS, PDF, VPS, and PPML).
●Print&Delete—Files sent to this printer are processed and printed. After the job is printed successfully, the RTP is deleted.
Print Driver software
Use the print driver software to set job parameters when you are submitting a job to the IC-312 print controller from any application in your computer. The Print Driver software provides a graphical user interface that is similar to the IC-312 print controller job parameters window. The software is automatically installed on a Windows computer when you set up a network printer.
Note: On a Mac computer, you must install the Print Driver software manually.
In the Print Driver window, you can perform the following actions:
●Define or change job parameters regardless of whether your computer is connected to the server.
●Lock a job for secure printing.
●Save a set of parameters. Sets are useful when you want to print different jobs with the same parameters, or if you want to reprint a job.
●Retrieve a saved set of parameters.
●Check the status of the printer.
●Define PostScript parameters for the job.
●Preview imposition layout.
Setting up printing on a Windows computer |
15 |
Note: Custom imposition templates, including the pre-defined Folded Signature imposition templates, cannot be previewed from the Printer Driver software.
Setting up printing on a Windows computer
Adding a network printer to Windows Server 2008/2003/XP
To print from a Windows computer, you first need to add an
IC-312 print controller virtual printer to your client workstation.
Tip: Following are some shortcut tips for setting up a printer. The full procedure is detailed below.
●Locate the IC-312 print controller in My Network Places, and then double-click on the network printer you want to install. The network printer is automatically installed on your computer and appears in the list of printers.
●If you know the name of your IC-312 print controller, click Start > Run, and then type \\server name. The IC-312 print controller opens showing a list of all the network printers. Double-click on the network printer you want to install.
1.From the Start menu, select Settings > Printers and Faxes. The Printers and Faxes window appears.
2.In the Printer Tasks area, select Add a printer.
Note: Your computer might have slightly different wording from what appears in this task.
The Add Printer Wizard appears.
3.Select Next.
4.Select A network printer, or a printer attached to another computer, and click Next.
5.Select Browse for a printer, and click Next.
6.Find the IC-312 print controller, and double-click it to display the list of network printers.
7.Select the desired printer, and click Next.
8.When a message appears, click Yes.
9.Select Yes if you want to set this printer as the default printer on your computer, otherwise, select No, and click Next.
10.Click Finish to close the wizard.
The IC-312 print controller network printer is added to your printer list. In addition, the Print Driver software and PPD file are automatically copied.
16 |
Chapter 2—Setting up your computer for printing |
Adding a network printer to Windows 7/Vista
To print from a Windows computer, you first need to add an
IC-312 print controller virtual printer to your client workstation.
Tip: Following are some shortcut tips for setting up a printer. The full procedure is detailed below.
●Locate the IC-312 print controller in My Network Places, and then double-click on the network printer you want to install. The network printer is automatically installed on your computer and appears in the list of printers.
●If you know the name of your IC-312 print controller, click Start > Run, and then type \\server name. The IC-312 print controller opens showing a list of all the network printers. Double-click on the network printer you want to install.
1.From the Start menu, select Devices and Printers.
2.Select Add a printer.
3.In the Add Printer wizard, select Add a network, wireless or Bluetooth printer.
4.Select The printer that I want isn't listed.
5.In the Select a shared printer by name box, type the IC-312 print controller name, and click Next.
6.Click Next.
7.Select whether you want this to be the default printer, and then click Finish to complete the setup.
The IC-312 print controller network printer is added to your printer list. When you add a network printer, the Print Driver software and PPD file are installed on your computer.
Loading the Print Driver software for the first time
Requirements:
A network printer must be defined on your Windows-based computer.
Shortcut for adding a printer |
17 |
Load the Print Driver software after installing a network printer so that the IC-312 print controller will be ready for printing.
1.Open a file with its corresponding application—for example, open a PDF file in Adobe Acrobat.
2.From the File menu, select Print. The Print dialog box appears.
3.Select one of the network printers—for example, Print and click Properties.
A message tells you that the software is loading.
Note: This process might take a few minutes.
After the software loads successfully, click Finish. The job parameters window appears.
4.Close the job parameters window and the Print Dialog box to complete the installation of the Print Driver.
The network printer is set up for printing using the Print Driver software.
Shortcut for adding a printer
1.From the Start menu, select Run.
2.In the Open box, type \\, followed by the host name or IP address of the Creo server, and click OK.
The server window opens.
3.Double-click the icon for the desired network printer.
The IC-312 print controller network printer is added to your printer list.
18 |
Chapter 2—Setting up your computer for printing |
Deactivating the Print Driver software
The Print Driver software is active by default. Deactivate the Print
Driver software if you want to access the PPD file parameters.
1.Perform one of the following actions:
○For Windows Server 2008/2003/XP, from the Windows
Start menu, select Settings > Printers and Faxes
○For Windows Vista, Windows 7, or Windows 8, from the Windows Start menu, select Devices and Printers
2.Right-click the network printer icon for which you want to deactivate the Print Driver, and do one of the following:
○For Windows 2008/2003/XP, select Properties
○For Windows Vista, Windows 7, or Windows 8, select
Printer properties
3.Click the Print Driver tab.
4.From the Enable enhanced user interface list, select off.
5.Click Apply.
6.Click OK.
Removing the Print Driver software
Perform this procedure if you need to upgrade to a later version of the Print Driver software.
Requirements:
All applications must be closed before removing the Print Driver software.
1.From the Windows Start menu, select Run.
2.In the Open box, type \\, followed by the host name or IP address of the server, and click OK.
The server window opens.
3.Navigate to D:\Utilities\PC Utilities\Driver Extension.
4.Perform one of the following:
○If you are using Windows XP, double-click
DEX_Uninstaller.exe
○If you are using Windows Vista, Windows 7, or Windows 8, right-click DEX_Uninstaller.exe, and select Run as Administrator.
Downloading fonts |
19 |
The Print Driver software is removed.
Downloading fonts
Use the HF_FontDownLoader hot folder, located in D: \HotFolders, to install new or missing fonts to the IC-312 print controller fonts directory.
The HF_FontDownLoader hot folder can be used with the following operating systems:
●Windows Server 2008
●Windows Server 2003
●Windows Vista
●Windows XP
●Windows 7
●Windows 8
●Mac OS X 10.6 (64 bit) and later
You can drag the required fonts from the computer to the HF_FontDownLoader hot folder. In the Resource Center, you can set a default font and delete fonts.
Note: You can only copy fonts if the font license permits.
Setting up a TCP/IP Printer in Windows 7
Set up a TCP/IP printer on a Windows 7 computer.
1.Open the Devices and Printers window.
2.In the Devices and Printers window, select Add a printer. The Add Printer Wizard appears.
3.Select Add a local printer.
4.Select Create a new port, and from the Type of port list, select Standard TCP/IP Port.
5.Click Next.
If you have Print Services for UNIX installed on your computer, you can also select LPR Port from the Type of port list.
6.In the Hostname or IP Address box, type the exact name of the IC-312 print controller (the name is case-sensitive). You can leave the Port Name as is.
7.Clear the Query the printer and automatically select the driver to use check box.
8.Click Next.
20 |
Chapter 2—Setting up your computer for printing |
9.In the Device Type area, select Custom, and then click
Settings.
10.For Protocol, select LPR.
11.Under LPR Settings, set the values as follows:
a.For Queue Name, type the exact name of the network printer to which you want to send jobs for printing—for example, Creo_Server_Print.
b.Select the LPR Byte Counting Enabled check box.
12.Click OK, and then click Next.
13.Click Have Disk.
14.Click Browse, and locate the OEMSETUP.INF file in the \
\<server_name>\Utilities\PC Utilities\Printer Driver\Printer driver application\US-Letter or Europe-A4 folder.
15.Select the file, and click OK.
16.Click Next.
17.In the Printer name box, delete the default printer name and type the printer name exactly as it appears in the Resource Center—for example, %Server Name%_Print.
18.Click Next.
19.Make sure that Do not share this printer is selected, and click Next.
20.Clear the Set as default printer check box.
21.Click Finish.
22.In the Devices and Printers dialog box, right-click the newly created printer, and select Printer Properties.
23.Click the Print Driver tab.
24.Click the Server Hostname, and type the host name of the Creo server.
25.Click Apply, and then click OK.
26.When you send a job to print via the Print Driver software, note that the Print Driver is Online.
You have successfully installed a network printer for the IC-312 print controller and are ready to start printing.
Loading...