


 Loading...
Quick Guide
1Before Getting Started
2Let's Make Prints
3Installing Software
4Basic Operations
5Maintaining the Finishing Quality
6Troubleshooting
7Appendix
IC-602

Welcome
Thank you for purchasing this machine.
This Quick Guide describes basic operations, maintenance, troubleshooting for this machine. This information will be useful to enable the full capabilities of this machine and to utilize such functionality efficiently.
Please keep this manual in a safe place where you can access them easily.
Notations and symbols used in this manual
WARNING
This symbol indicates that negligence of the instructions may lead to death or serious injury.
CAUTION
This symbol indicates that negligence of the instructions may lead to mishandling that may cause injury or property damage.
NOTICE
This symbol indicates a risk that may result in damage to this machine or originals.
Follow the instructions to avoid property damage.
Tips
This symbol indicates information that complements the topic or optional devices required to use a certain function.
Reference
This symbol indicates a function or functions that are related to the topic.
The meaning of other notations and symbols are as follows.
Notation/Symbol |
Description |
|
|
[ ] |
These brackets indicate the name of a key on the touch panel or of a button on a |
|
computer screen. |
|
|
Bold |
Words in bold type indicate the name of a key on the control panel, of a part, of an |
|
option, or of User's Guide. |
|
|
|
This check mark indicates a prerequisite of a procedural step. |
|
|

bizhub PRESS C1070/C1070P/C1060 bizhub PRO C1060L
Intended use of this machine
Intended use
This machine is designed to be used as a digital printing system for the following purposes:
-Print, copy and scan documents.
-Use available finishing functions such as duplexing, stapling, hole-punching, multi-folding and booklet creation if appropriate options are installed.
-Store documents to reprint on the HDD of this machine.
The intended use also requires that:
-The system is used within the limits of device specifications and specifications of optional components,
-All safety instructions in the related user's guides are observed,
-Legal restrictions on copying or printing (refer to instruction booklet "Safety Information") are observed,
-Inspection and maintenance instructions are adhered to,
-General, national and company safety provisions are observed.
Impermissible operating conditions
The system may not be operated if:
-Errors or damage have been discovered,
-Maintenance intervals have been exceeded,
-Mechanical or electrical functions do not work as they should.
Exclusion of liability
The manufacturer of the system assumes no liability for damages if the system was operated under impermissible conditions.
Target groups
The user's guides are intended for the following users of the system;
-Operator: Person who has been trained by Konica Minolta or authorized partner to operate the system for its intended use as well as manage consumables, and perform the maintenance and troubleshooting described in user's guides.
-Administrator: Person who has been trained by Konica Minolta or authorized partner to manage consumables, adjust system settings, and establish network connections and security systems.
Everyone who uses this system must have read and understood the related user's guides.
x-i

Configuration and Usage of this Guide
Configuration and Usage of this Guide
There are two types of User's Guides for this machine: booklet manuals and User's Guide CD.
When you want to learn about detailed functions or operation procedures, refer to the HTML User's Guide included in the User's Guide CD.
For information about how to use the HTML User's Guide, refer to Section 7.1 "Good Use of the HTML User's Guide" in this guide.
Title of booklet manual |
Overview |
Quick Guide for IC-602 (This Guide) |
This guide describes basic operations of this machine, how to install the |
|
printer driver and applications required to use the Image Controller IC- |
|
602, and how to replace consumables. |
|
|
Quick Guide for Fiery Color Server |
This guide describes basic operations of this machine, how to install the |
|
printer driver and applications required to use the Image Controller IC- |
|
415 or Image Controller IC-308, and how to replace consumables. |
|
|
Safety Information |
This guide provides precautions and requests that should be followed to |
|
ensure safety usage of this machine. |
|
Be sure to read this guide before using the machine. |
|
|
User's Guide Security |
This guide describes the security functions. |
|
This guide is available when you want to know how to use the Enhanced |
|
Security mode or how to operate this machine when using the Enhanced |
|
Security function. |
|
|
|
|
Title of manual in User's Guide CD |
Overview |
HTML User's Guide |
This guide describes basic operations, functions that enable more con- |
|
venient operations, how to carry out maintenance, simple troubleshoot- |
|
ing, and various settings of this machine. |
|
|
Note that basic technical knowledge about the machine is required to enable users to perform maintenance work or troubleshooting operations. Maintenance and troubleshooting operations should be carried out as instructed in this guide and the HTML User's Guide included in the User's Guide CD.
Should you experience any problems, contact your service representative.
x-ii

bizhub PRESS C1070/C1070P/C1060 bizhub PRO C1060L
HTML User's Guide operating environment
)Supported Operating Systems/Browsers
This guide describes the operation verification in the operating systems and browsers shown below.
Operating system |
Web browser |
Windows Vista (SP2) |
Internet Explorer 9.x |
|
|
Windows 7 (SP1)/Windows 8 |
Internet Explorer 10.x |
|
Firefox 28.x |
|
|
Windows 8.1 |
Internet Explorer 11.x |
|
Firefox 28.x |
|
|
Mac OS X 10.5/10.6 |
Safari 5.x |
|
|
Mac OS X 10.7/10.8 |
Safari 6.x |
|
|
Tips
-Check that [JavaScript] of your Web browser is enabled. The HTML User's Guide uses [JavaScript] for the page display or search function.
-Note that some of the functions may not work normally depending on your system environment. Please be forewarned.
-Problems may be able to be solved by using the latest Web browser.
)Display resolution
1024 e 768 pixels or more
How to display the top page of the HTML User's Guide
)In a Windows environment
When the User's Guide CD is inserted into the CD-ROM drive of your computer, an auto play message is displayed. If you click [Run rundll32.exe], the top page is displayed.
If the top page is not displayed, open [Computer], right-click the [Users_Guide_CD] icon, then click [Open]. Doubleclick [index.html] in the folder to open the top page.
To open [Computer], perform the following procedure.
-Windows 8.1: In the Start window, click  , then click [PC].
-Windows 8: Right-click the Start window, then click [All Apps] - [Computer].
-Windows Vista/Windows 7: Open the [Start] menu, then click [Computer].
)In a Macintosh environment
Open the CD icon on the desktop, then double-click [index.html] to display the top page.
NOTICE
In Mac OS X 10.7 or later, the CD icon may not be displayed on the desktop even when the User's Guide CD is inserted into the drive. In this case, the mount setting may be disabled. Check whether or not the mount setting is disabled in "Preferences" of Finder.
x-iii

Configuration and Usage of this Guide
Conventions used in this guide
This guide describes product names and system configurations as follows.
Product name |
Conventions used in this guide |
bizhub PRESS C1070/C1070P/C1060, |
This machine: Indicates the entire system including options and |
bizhub PRO C1060L |
functions. |
|
The main body: Indicates a part of the machine such as a tray or the |
|
control panel. |
|
The machine: Indicates a mechanical part related to the structure or |
|
mechanism. |
|
|
bizhub PRESS C1070P |
Printer model |
|
|
Microsoft Windows |
Windows |
|
|
Optional products are described with no model number added as follows unless otherwise specified.
Product name |
Conventions used in this guide |
Image Controller IC-602 |
Image controller |
Image Controller IC-415 |
|
Image Controller IC-308 |
|
|
|
Finisher FS-531 |
Finisher |
Finisher FS-532 |
|
Finisher FS-612 |
|
|
|
Reverse Automatic Document Feeder |
ADF |
DF-626 |
|
|
|
Saddle Stitcher SD-506 |
Saddle Stitcher |
Saddle Stitcher SD-510 |
|
|
|
The convention above is also applied to other optional devices.
x-iv
bizhub PRESS C1070/C1070P/C1060 bizhub PRO C1060L
Make a Note about This Machine Information
Checking the mounted optional devices
Get to know the optional devices mounted on this machine.
You can check a part of the mounted optional devices on the [MACHINE] screen of the touch panel.
Select the check boxes ( 
 ) of the installed optional devices; this is convenient to manage optional devices.
Output-related optional devices
Finisher FS-531 |
Folding Unit FD-503 |
|
|
Finisher FS-532 |
Punch Kit PK-512 |
|
|
Finisher FS-612 |
Punch Kit PK-513 |
|
|
Perfect Binder PB-503 |
Punch Kit PK-522 |
|
|
Saddle Stitcher SD-506 |
Relay Unit RU-509 |
|
|
Saddle Stitcher SD-510 |
Relay Unit RU-510 |
|
|
Large Capacity Stacker Handcart LC-501 |
Multi Puncher GP-501 |
|
|
Large Capacity Stacker LS-505 |
Auto Ring Binder GP-502 |
|
|
Large Capacity Stacker LS-506 |
|
|
|
|
|
Feeding-related optional devices |
|
Paper Feeder Unit PF-602m |
Multi-Sheet Bypass Tray MB-506 |
|
|
Paper Feeder Unit PF-707 |
Post Inserter PI-502 |
|
|
Large Capacity Unit LU-202 |
|
|
|
|
|
Electronic optional devices |
|
Image Controller IC-602 |
Image Controller IC-308 |
|
|
Image Controller IC-415 |
Authentication Unit AU-201 |
|
|
|
|
Original-related optional devices |
|
Reverse Automatic Document Feeder DF-626 |
Original Cover OC-509 |
|
|
The available optional devices vary depending on your model.
x-v
Make a Note about This Machine Information
Checking network information
Make a note about network information required to use functions of this machine such as printer functions and various applications.
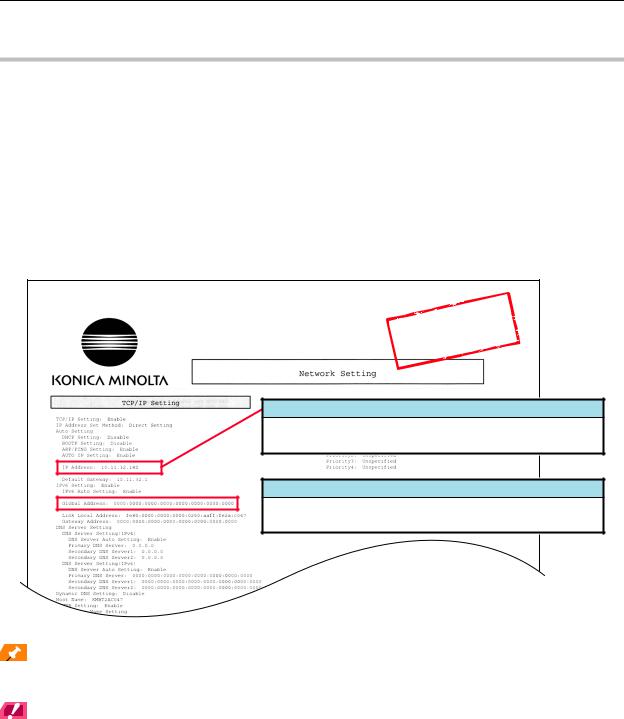
To check network information, print out the Configuration Page Print.
)Printing out the Configuration Page Print
AFrom [MACHINE] screen on the touch panel, select [Controller] - [Report Type] - [Network Setting], then press [Execute].
Note down the IP address printed on the Configuration Page Print in the entry field according to your environment.
Sample
IP address (IPv4 address) entry field
 Global address (IPv6 address) entry field
Tips
-If necessary, note down other network information in the following table.
-To check network information, the administrator privilege may be required. Contact your machine administrator.
NOTICE
Some notes may include confidential information. Handle this guide with great care.
In particular, do not enter information such as the password.
Item |
Entry field |
Example: JSP port number |
Example: 30081 |
|
|
|
|
|
|
|
|
|
|
|
|
|
|
|
|
x-vi

bizhub PRESS C1070/C1070P/C1060 bizhub PRO C1060L
Contents
Intended use of this machine . . . . . . . . . . . . . . . . . . . . . . . . . . . . . . . . . . . . . . . . . . . . . . . . . . . . x-i
Intended use . . . . . . . . . . . . . . . . . . . . . . . . . . . . . . . . . . . . . . . . . . . . . . . . . . . . . . . . . . . . . . x-i
Impermissible operating conditions . . . . . . . . . . . . . . . . . . . . . . . . . . . . . . . . . . . . . . . . . . . . x-i
Exclusion of liability. . . . . . . . . . . . . . . . . . . . . . . . . . . . . . . . . . . . . . . . . . . . . . . . . . . . . . . . . x-i
Target groups. . . . . . . . . . . . . . . . . . . . . . . . . . . . . . . . . . . . . . . . . . . . . . . . . . . . . . . . . . . . . . . . x-i
Configuration and Usage of this Guide . . . . . . . . . . . . . . . . . . . . . . . . . . . . . . . . . . . . . . . . . . . . x-ii
HTML User's Guide operating environment . . . . . . . . . . . . . . . . . . . . . . . . . . . . . . . . . . . . . x-iii Supported Operating Systems/Browsers. . . . . . . . . . . . . . . . . . . . . . . . . . . . . . . . . . . . . x-iii Display resolution . . . . . . . . . . . . . . . . . . . . . . . . . . . . . . . . . . . . . . . . . . . . . . . . . . . . . . . x-iii
How to display the top page of the HTML User's Guide . . . . . . . . . . . . . . . . . . . . . . . . . . . x-iii In a Windows environment . . . . . . . . . . . . . . . . . . . . . . . . . . . . . . . . . . . . . . . . . . . . . . . . x-iii In a Macintosh environment . . . . . . . . . . . . . . . . . . . . . . . . . . . . . . . . . . . . . . . . . . . . . . . x-iii
Conventions used in this guide . . . . . . . . . . . . . . . . . . . . . . . . . . . . . . . . . . . . . . . . . . . . . . . x-iv
Make a Note about This Machine Information . . . . . . . . . . . . . . . . . . . . . . . . . . . . . . . . . . . . . . . x-v
Checking the mounted optional devices. . . . . . . . . . . . . . . . . . . . . . . . . . . . . . . . . . . . . . . . . x-v
Checking network information . . . . . . . . . . . . . . . . . . . . . . . . . . . . . . . . . . . . . . . . . . . . . . . x-vi Printing out the Configuration Page Print. . . . . . . . . . . . . . . . . . . . . . . . . . . . . . . . . . . . . x-vi
Contents. . . . . . . . . . . . . . . . . . . . . . . . . . . . . . . . . . . . . . . . . . . . . . . . . . . . . . . . . . . . . . . . . . . x-vii
1Before Getting Started
1.1 |
Turning the Power ON/OFF . . . . . . . . . . . . . . . . . . . . . . . . . . . . . . . . . . . . . . . . . . . . . . . . . . . . . |
1-1 |
|
Power supply . . . . . . . . . . . . . . . . . . . . . . . . . . . . . . . . . . . . . . . . . . . . . . . . . . . . . . . . . . . |
1-1 |
|
Turning the power on . . . . . . . . . . . . . . . . . . . . . . . . . . . . . . . . . . . . . . . . . . . . . . . . . . . . . |
1-1 |
|
Turning the power off . . . . . . . . . . . . . . . . . . . . . . . . . . . . . . . . . . . . . . . . . . . . . . . . . . . . . |
1-2 |
|
Power saving function . . . . . . . . . . . . . . . . . . . . . . . . . . . . . . . . . . . . . . . . . . . . . . . . . . . . |
1-3 |
1.2 |
Available Operations in this Machine . . . . . . . . . . . . . . . . . . . . . . . . . . . . . . . . . . . . . . . . . . . . . . |
1-5 |
Major functions of this machine . . . . . . . . . . . . . . . . . . . . . . . . . . . . . . . . . . . . . . . . . . . . . . . 1-5 Print functions. . . . . . . . . . . . . . . . . . . . . . . . . . . . . . . . . . . . . . . . . . . . . . . . . . . . . . . . . . . 1-5 Copy functions . . . . . . . . . . . . . . . . . . . . . . . . . . . . . . . . . . . . . . . . . . . . . . . . . . . . . . . . . . 1-5 Scan functions . . . . . . . . . . . . . . . . . . . . . . . . . . . . . . . . . . . . . . . . . . . . . . . . . . . . . . . . . . 1-6 Hold function of print jobs using the HDD . . . . . . . . . . . . . . . . . . . . . . . . . . . . . . . . . . . . . 1-6 Device control function (PageScope Web Connection) . . . . . . . . . . . . . . . . . . . . . . . . . . . 1-6
Application functions. . . . . . . . . . . . . . . . . . . . . . . . . . . . . . . . . . . . . . . . . . . . . . . . . . . . . . . . 1-7 Color management function (Color Centro) . . . . . . . . . . . . . . . . . . . . . . . . . . . . . . . . . . . . 1-7 Job management function (Job Centro). . . . . . . . . . . . . . . . . . . . . . . . . . . . . . . . . . . . . . . 1-7 Other applications . . . . . . . . . . . . . . . . . . . . . . . . . . . . . . . . . . . . . . . . . . . . . . . . . . . . . . . 1-7
2Let's Make Prints
2.1 |
Printing Flow. . . . . . . . . . . . . . . . . . . . . . . . . . . . . . . . . . . . . . . . . . . . . . . . . . . . . . . . . . . . . . . . . |
2-1 |
Step 1: Prepare the printer driver and applications . . . . . . . . . . . . . . . . . . . . . . . . . . . . . . . . 2-1
Step 2: Load paper into a tray . . . . . . . . . . . . . . . . . . . . . . . . . . . . . . . . . . . . . . . . . . . . . . . . 2-1
Step 3: Configure information of the paper loaded into a tray in this machine . . . . . . . . . . . 2-2
Step 4: Use the printer driver to print data . . . . . . . . . . . . . . . . . . . . . . . . . . . . . . . . . . . . . . . 2-2
Step 5: Check the finishing . . . . . . . . . . . . . . . . . . . . . . . . . . . . . . . . . . . . . . . . . . . . . . . . . . . 2-3
3Installing Software
3.1 |
Installing the Printer Driver . . . . . . . . . . . . . . . . . . . . . . . . . . . . . . . . . . . . . . . . . . . . . . . . . . . . . . |
3-1 |
Operating environment . . . . . . . . . . . . . . . . . . . . . . . . . . . . . . . . . . . . . . . . . . . . . . . . . . . . . . 3-1 In a Windows environment . . . . . . . . . . . . . . . . . . . . . . . . . . . . . . . . . . . . . . . . . . . . . . . . . 3-1 In a Macintosh environment . . . . . . . . . . . . . . . . . . . . . . . . . . . . . . . . . . . . . . . . . . . . . . . . 3-1
Characteristics of printer driver. . . . . . . . . . . . . . . . . . . . . . . . . . . . . . . . . . . . . . . . . . . . . . . . 3-1
In a Windows environment . . . . . . . . . . . . . . . . . . . . . . . . . . . . . . . . . . . . . . . . . . . . . . . . . . . 3-2
x-vii

Contents
Installation . . . . . . . . . . . . . . . . . . . . . . . . . . . . . . . . . . . . . . . . . . . . . . . . . . . . . . . . . . . . . 3-2 Default setting . . . . . . . . . . . . . . . . . . . . . . . . . . . . . . . . . . . . . . . . . . . . . . . . . . . . . . . . . . 3-4
In a Macintosh environment . . . . . . . . . . . . . . . . . . . . . . . . . . . . . . . . . . . . . . . . . . . . . . . . . . 3-5 Installation . . . . . . . . . . . . . . . . . . . . . . . . . . . . . . . . . . . . . . . . . . . . . . . . . . . . . . . . . . . . . 3-5 Default setting . . . . . . . . . . . . . . . . . . . . . . . . . . . . . . . . . . . . . . . . . . . . . . . . . . . . . . . . . . 3-8
3.2 |
Installing Applications . . . . . . . . . . . . . . . . . . . . . . . . . . . . . . . . . . . . . . . . . . . . . . . . . . . . . . . . . |
3-9 |
Operating environment . . . . . . . . . . . . . . . . . . . . . . . . . . . . . . . . . . . . . . . . . . . . . . . . . . . . . . 3-9 Color Centro. . . . . . . . . . . . . . . . . . . . . . . . . . . . . . . . . . . . . . . . . . . . . . . . . . . . . . . . . . . . 3-9 Job Centro . . . . . . . . . . . . . . . . . . . . . . . . . . . . . . . . . . . . . . . . . . . . . . . . . . . . . . . . . . . . . 3-9
Color Centro setup . . . . . . . . . . . . . . . . . . . . . . . . . . . . . . . . . . . . . . . . . . . . . . . . . . . . . . . . 3-10 Function overview . . . . . . . . . . . . . . . . . . . . . . . . . . . . . . . . . . . . . . . . . . . . . . . . . . . . . . 3-10 Installation . . . . . . . . . . . . . . . . . . . . . . . . . . . . . . . . . . . . . . . . . . . . . . . . . . . . . . . . . . . . 3-11 Start . . . . . . . . . . . . . . . . . . . . . . . . . . . . . . . . . . . . . . . . . . . . . . . . . . . . . . . . . . . . . . . . . 3-12
Job Centro setup . . . . . . . . . . . . . . . . . . . . . . . . . . . . . . . . . . . . . . . . . . . . . . . . . . . . . . . . . 3-13 Function overview . . . . . . . . . . . . . . . . . . . . . . . . . . . . . . . . . . . . . . . . . . . . . . . . . . . . . . 3-13 Installation . . . . . . . . . . . . . . . . . . . . . . . . . . . . . . . . . . . . . . . . . . . . . . . . . . . . . . . . . . . . 3-14 Start . . . . . . . . . . . . . . . . . . . . . . . . . . . . . . . . . . . . . . . . . . . . . . . . . . . . . . . . . . . . . . . . . 3-15
4Basic Operations
4.1 |
Loading Paper . . . . . . . . . . . . . . . . . . . . . . . . . . . . . . . . . . . . . . . . . . . . . . . . . . . . . . . . . . . . . . |
. 4-1 |
|
Loading paper into the main body tray. . . . . . . . . . . . . . . . . . . . . . . . . . . . . . . . . . . . . . . . . |
. 4-1 |
|
Loading paper into the Paper Feeder Unit PF-602m . . . . . . . . . . . . . . . . . . . . . . . . . . . . . . . |
4-3 |
|
Loading Paper in Post Inserter of Folding Unit FD-503 . . . . . . . . . . . . . . . . . . . . . . . . . . . . . |
4-4 |
4.2 |
Paper Setting . . . . . . . . . . . . . . . . . . . . . . . . . . . . . . . . . . . . . . . . . . . . . . . . . . . . . . . . . . . . . . . . |
4-5 |
|
Specifying paper information for a tray . . . . . . . . . . . . . . . . . . . . . . . . . . . . . . . . . . . . . . . . . |
4-5 |
4.3 |
Printer Driver Setting . . . . . . . . . . . . . . . . . . . . . . . . . . . . . . . . . . . . . . . . . . . . . . . . . . . . . . . . . |
4-10 |
Printer driver functions . . . . . . . . . . . . . . . . . . . . . . . . . . . . . . . . . . . . . . . . . . . . . . . . . . . . . 4-10 [Color Mode]: Select an output color . . . . . . . . . . . . . . . . . . . . . . . . . . . . . . . . . . . . . . . . 4-10 [Color Mode]: 2-Color Printing . . . . . . . . . . . . . . . . . . . . . . . . . . . . . . . . . . . . . . . . . . . . . 4-11 [Management]: Color Configuration . . . . . . . . . . . . . . . . . . . . . . . . . . . . . . . . . . . . . . . . . 4-12 [Management]: Manual setting of a color conversion . . . . . . . . . . . . . . . . . . . . . . . . . . . 4-13
5Maintaining the Finishing Quality
5.1 |
Both Sides Adjustment . . . . . . . . . . . . . . . . . . . . . . . . . . . . . . . . . . . . . . . . . . . . . . . . . . . . . . . . |
5-1 |
Both Sides Adjustment . . . . . . . . . . . . . . . . . . . . . . . . . . . . . . . . . . . . . . . . . . . . . . . . . . . . . . 5-1
Adjustment flow . . . . . . . . . . . . . . . . . . . . . . . . . . . . . . . . . . . . . . . . . . . . . . . . . . . . . . . . . . . 5-1
Making the Both Sides Adjustment for each tray . . . . . . . . . . . . . . . . . . . . . . . . . . . . . . . . . . 5-2 Gap Adjustment . . . . . . . . . . . . . . . . . . . . . . . . . . . . . . . . . . . . . . . . . . . . . . . . . . . . . . . . . 5-2 Chart Adjustment . . . . . . . . . . . . . . . . . . . . . . . . . . . . . . . . . . . . . . . . . . . . . . . . . . . . . . . . 5-7 Zoom and Image Shift Adjustment . . . . . . . . . . . . . . . . . . . . . . . . . . . . . . . . . . . . . . . . . 5-14
5.2 |
Image Quality Adjustment . . . . . . . . . . . . . . . . . . . . . . . . . . . . . . . . . . . . . . . . . . . . . . . . . . . . . |
5-17 |
Image Quality adjustment . . . . . . . . . . . . . . . . . . . . . . . . . . . . . . . . . . . . . . . . . . . . . . . . . . . 5-17 To manage the daily image quality. . . . . . . . . . . . . . . . . . . . . . . . . . . . . . . . . . . . . . . . . . 5-17 To specify the reference image quality . . . . . . . . . . . . . . . . . . . . . . . . . . . . . . . . . . . . . . 5-17
Daily image quality management (Calibration) . . . . . . . . . . . . . . . . . . . . . . . . . . . . . . . . . . . 5-18 Calibration timing . . . . . . . . . . . . . . . . . . . . . . . . . . . . . . . . . . . . . . . . . . . . . . . . . . . . . . . 5-19
Maximum Density Auto Adjustment . . . . . . . . . . . . . . . . . . . . . . . . . . . . . . . . . . . . . . . . . . . 5-21
Color Density Control . . . . . . . . . . . . . . . . . . . . . . . . . . . . . . . . . . . . . . . . . . . . . . . . . . . . . . 5-23 Auto setting of Color Density Control . . . . . . . . . . . . . . . . . . . . . . . . . . . . . . . . . . . . . . . 5-23 Manual setting of Color Density Manual Control . . . . . . . . . . . . . . . . . . . . . . . . . . . . . . . 5-26
Executing calibration using the image controller . . . . . . . . . . . . . . . . . . . . . . . . . . . . . . . . . 5-28
Specifying the reference image quality. . . . . . . . . . . . . . . . . . . . . . . . . . . . . . . . . . . . . . . . . 5-34
5.3 |
Adjusting the Finisher and Saddle Stitcher . . . . . . . . . . . . . . . . . . . . . . . . . . . . . . . . . . . . . . . . |
5-35 |
Opening the screen to be adjusted . . . . . . . . . . . . . . . . . . . . . . . . . . . . . . . . . . . . . . . . . . . 5-35 Adjustable settings. . . . . . . . . . . . . . . . . . . . . . . . . . . . . . . . . . . . . . . . . . . . . . . . . . . . . . 5-36
x-viii
bizhub PRESS C1070/C1070P/C1060 bizhub PRO C1060L
6Troubleshooting
6.1 |
Replenish and Replace Consumables . . . . . . . . . . . . . . . . . . . . . . . . . . . . . . . . . . . . . . . . . . . . . |
6-1 |
|
Replacing a toner bottle . . . . . . . . . . . . . . . . . . . . . . . . . . . . . . . . . . . . . . . . . . . . . . . . . . . |
6-1 |
|
Replacing a staple cartridge. . . . . . . . . . . . . . . . . . . . . . . . . . . . . . . . . . . . . . . . . . . . . . . . |
6-3 |
|
Replacing a waste toner box . . . . . . . . . . . . . . . . . . . . . . . . . . . . . . . . . . . . . . . . . . . . . . . |
6-5 |
6.2 |
Clearing Paper Jams . . . . . . . . . . . . . . . . . . . . . . . . . . . . . . . . . . . . . . . . . . . . . . . . . . . . . . . . . . |
6-7 |
How to view the animation guide . . . . . . . . . . . . . . . . . . . . . . . . . . . . . . . . . . . . . . . . . . . . . . 6-7 [JAM Position] screen. . . . . . . . . . . . . . . . . . . . . . . . . . . . . . . . . . . . . . . . . . . . . . . . . . . . . 6-7 Illustration screen for Jam handling . . . . . . . . . . . . . . . . . . . . . . . . . . . . . . . . . . . . . . . . . . 6-8
6.3 |
If the Specified Paper is not Found . . . . . . . . . . . . . . . . . . . . . . . . . . . . . . . . . . . . . . . . . . . . . . |
6-10 |
|
Replacing with the specified paper . . . . . . . . . . . . . . . . . . . . . . . . . . . . . . . . . . . . . . . . . |
6-10 |
|
Forcibly printing using the loaded paper . . . . . . . . . . . . . . . . . . . . . . . . . . . . . . . . . . . . . |
6-12 |
6.4 |
If an Error has been Displayed during Scanning . . . . . . . . . . . . . . . . . . . . . . . . . . . . . . . . . . . . |
6-13 |
|
HDD space insufficiency. . . . . . . . . . . . . . . . . . . . . . . . . . . . . . . . . . . . . . . . . . . . . . . . . . |
6-13 |
6.5 |
Hue Adjustment . . . . . . . . . . . . . . . . . . . . . . . . . . . . . . . . . . . . . . . . . . . . . . . . . . . . . . . . . . . . . |
6-14 |
|
When calibration is executed for daily management . . . . . . . . . . . . . . . . . . . . . . . . . . . . . . |
6-14 |
|
When calibration is not executed . . . . . . . . . . . . . . . . . . . . . . . . . . . . . . . . . . . . . . . . . . . . . |
6-14 |
6.6 |
Image Position Adjustment . . . . . . . . . . . . . . . . . . . . . . . . . . . . . . . . . . . . . . . . . . . . . . . . . . . . |
6-15 |
7Appendix
7.1 |
Good Use of the HTML User's Guide . . . . . . . . . . . . . . . . . . . . . . . . . . . . . . . . . . . . . . . . . . . . . |
7-1 |
|
|
(1) |
Let's master the search function! . . . . . . . . . . . . . . . . . . . . . . . . . . . . . . . . . . . . . . . . . |
7-1 |
|
(2) |
Confirm the setting required for the target finishing in an operation example! . . . . . . . |
7-1 |
7.2 |
Name of each Component . . . . . . . . . . . . . . . . . . . . . . . . . . . . . . . . . . . . . . . . . . . . . . . . . . . . . . |
7-2 |
|
|
External components . . . . . . . . . . . . . . . . . . . . . . . . . . . . . . . . . . . . . . . . . . . . . . . . . . . . . . . |
7-2 |
|
|
Internal components . . . . . . . . . . . . . . . . . . . . . . . . . . . . . . . . . . . . . . . . . . . . . . . . . . . . . . . . |
7-4 |
|
|
Control Panel Layout. . . . . . . . . . . . . . . . . . . . . . . . . . . . . . . . . . . . . . . . . . . . . . . . . . . . . . . . |
7-6 |
|
7.3 |
Convenient Use of Scan Function (Scan to SMB) . . . . . . . . . . . . . . . . . . . . . . . . . . . . . . . . . . . . |
7-8 |
|
Step 1: Prepare the destination computer . . . . . . . . . . . . . . . . . . . . . . . . . . . . . . . . . . . . . . . 7-8 In a Windows environment . . . . . . . . . . . . . . . . . . . . . . . . . . . . . . . . . . . . . . . . . . . . . . . . . 7-8 In a Macintosh environment . . . . . . . . . . . . . . . . . . . . . . . . . . . . . . . . . . . . . . . . . . . . . . . . 7-9
Step 2: Connect this machine to the network. . . . . . . . . . . . . . . . . . . . . . . . . . . . . . . . . . . . 7-10
Step 3: Prepare the operating environment for SMB transmission . . . . . . . . . . . . . . . . . . . 7-10
Step 4: Configure settings according to your environment . . . . . . . . . . . . . . . . . . . . . . . . . 7-10
Step 5: Send scan data to a public folder. . . . . . . . . . . . . . . . . . . . . . . . . . . . . . . . . . . . . . . 7-10
7.4 |
Major Specifications. . . . . . . . . . . . . . . . . . . . . . . . . . . . . . . . . . . . . . . . . . . . . . . . . . . . . . . . . . |
7-11 |
Machine. . . . . . . . . . . . . . . . . . . . . . . . . . . . . . . . . . . . . . . . . . . . . . . . . . . . . . . . . . . . . . . . . 7-11
Feeding-related optional devices . . . . . . . . . . . . . . . . . . . . . . . . . . . . . . . . . . . . . . . . . . . . . 7-12 Paper Feeder Unit PF-602m. . . . . . . . . . . . . . . . . . . . . . . . . . . . . . . . . . . . . . . . . . . . . . . 7-12 Paper Feeder Unit PF-707 . . . . . . . . . . . . . . . . . . . . . . . . . . . . . . . . . . . . . . . . . . . . . . . . 7-13 Large Capacity Unit LU-202. . . . . . . . . . . . . . . . . . . . . . . . . . . . . . . . . . . . . . . . . . . . . . . 7-14 Multi Bypass Tray MB-506 . . . . . . . . . . . . . . . . . . . . . . . . . . . . . . . . . . . . . . . . . . . . . . . . 7-15 Post Inserter (Folding Unit FD-503) . . . . . . . . . . . . . . . . . . . . . . . . . . . . . . . . . . . . . . . . . 7-16 Post Inserter PI-502 . . . . . . . . . . . . . . . . . . . . . . . . . . . . . . . . . . . . . . . . . . . . . . . . . . . . . 7-17
Output-related optional devices . . . . . . . . . . . . . . . . . . . . . . . . . . . . . . . . . . . . . . . . . . . . . . 7-18 Relay Unit RU-509 . . . . . . . . . . . . . . . . . . . . . . . . . . . . . . . . . . . . . . . . . . . . . . . . . . . . . . 7-18 Relay Unit RU-510 . . . . . . . . . . . . . . . . . . . . . . . . . . . . . . . . . . . . . . . . . . . . . . . . . . . . . . 7-18 Folding Unit FD-503 . . . . . . . . . . . . . . . . . . . . . . . . . . . . . . . . . . . . . . . . . . . . . . . . . . . . . 7-19 Large Capacity Stacker LS-505 . . . . . . . . . . . . . . . . . . . . . . . . . . . . . . . . . . . . . . . . . . . . 7-21 Large Capacity Stacker LS-506 . . . . . . . . . . . . . . . . . . . . . . . . . . . . . . . . . . . . . . . . . . . . 7-22 Saddle Stitcher SD-506 . . . . . . . . . . . . . . . . . . . . . . . . . . . . . . . . . . . . . . . . . . . . . . . . . . 7-23 Perfect Binder PB-503 . . . . . . . . . . . . . . . . . . . . . . . . . . . . . . . . . . . . . . . . . . . . . . . . . . . 7-24 Finisher FS-531 . . . . . . . . . . . . . . . . . . . . . . . . . . . . . . . . . . . . . . . . . . . . . . . . . . . . . . . . 7-25 Finisher FS-532 . . . . . . . . . . . . . . . . . . . . . . . . . . . . . . . . . . . . . . . . . . . . . . . . . . . . . . . . 7-27 Finisher FS-612 . . . . . . . . . . . . . . . . . . . . . . . . . . . . . . . . . . . . . . . . . . . . . . . . . . . . . . . . 7-30 Multi Puncher GP-501 . . . . . . . . . . . . . . . . . . . . . . . . . . . . . . . . . . . . . . . . . . . . . . . . . . . 7-33
x-ix

Contents
Auto Ring Binder GP-502. . . . . . . . . . . . . . . . . . . . . . . . . . . . . . . . . . . . . . . . . . . . . . . . . 7-34
Electronic optional devices. . . . . . . . . . . . . . . . . . . . . . . . . . . . . . . . . . . . . . . . . . . . . . . . . . 7-35 Image Controller IC-602. . . . . . . . . . . . . . . . . . . . . . . . . . . . . . . . . . . . . . . . . . . . . . . . . . 7-35 Image Controller IC-415. . . . . . . . . . . . . . . . . . . . . . . . . . . . . . . . . . . . . . . . . . . . . . . . . . 7-35 Image Controller IC-308. . . . . . . . . . . . . . . . . . . . . . . . . . . . . . . . . . . . . . . . . . . . . . . . . . 7-35 Authentication Unit AU-201 . . . . . . . . . . . . . . . . . . . . . . . . . . . . . . . . . . . . . . . . . . . . . . . 7-35
Original-related optional devices . . . . . . . . . . . . . . . . . . . . . . . . . . . . . . . . . . . . . . . . . . . . . 7-36 Reverse Automatic Document Feeder DF-626 . . . . . . . . . . . . . . . . . . . . . . . . . . . . . . . . 7-36
7.5 |
Weight for each size and copying speed. . . . . . . . . . . . . . . . . . . . . . . . . . . . . . . . . . . . . . . . . . |
7-37 |
|
Weight for each size . . . . . . . . . . . . . . . . . . . . . . . . . . . . . . . . . . . . . . . . . . . . . . . . . . . . . |
7-37 |
|
Copying speed . . . . . . . . . . . . . . . . . . . . . . . . . . . . . . . . . . . . . . . . . . . . . . . . . . . . . . . . . |
7-37 |
7.6 |
Maximum paper size and printing area . . . . . . . . . . . . . . . . . . . . . . . . . . . . . . . . . . . . . . . . . . . |
7-40 |
x-x

bizhub PRESS C1070/C1070P/C1060 bizhub PRO C1060L
1Before Getting Started
1.1Turning the Power ON/OFF
)Power supply
This machine has two power switches: main power switch and sub power switch.
NOTICE
The main power switch is normally kept turned on.
The main power switch must be turned on or off only when you start this machine for the first time or when you restart this machine.
)Turning the power on
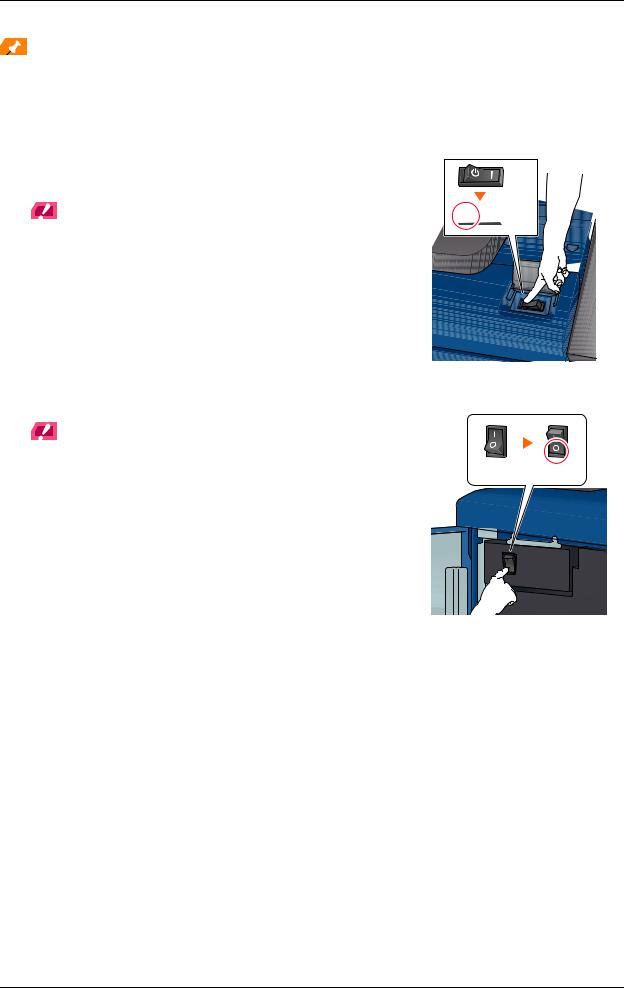
AOpen the front door of the main body, then turn the main power switch on.
When the main power switch is turned on, the Power LED on the control panel lights up in red.
BTurn on the sub power switch on the upper-right corner of the main body.
When the sub power switch is turned on, the Power LED on the control panel lights up in green.
 OFF
OFF
OFF ON
ON
1
After the start screen has been displayed, the default screen is displayed.
The default screen can be selected from
Utility/Counter. For details, refer to the HTML
User's Guide.
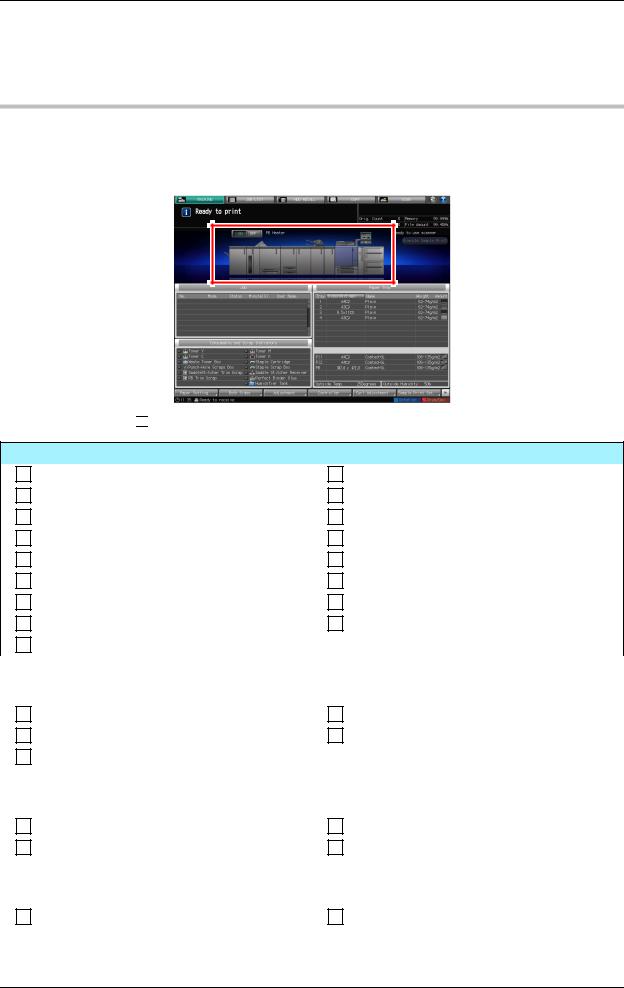
When [Ready to print] is displayed on the [MACHINE] screen, you can use this machine.
1-1
1.1Turning the Power ON/OFF
Tips
If [Machine is warming up] is displayed on the [MACHINE] screen, it indicates that this machine is in the warm-up state. Warm-up processing takes approximately 6.5 minutes.
)Turning the power off
ATurn off the sub power switch.
The touch panel display is cleared, and the Power LED on the control panel is changed from green to red.
NOTICE
While the following message is displayed, do not turn off the main power switch. Otherwise, a problem such as a toner fixation in the machine may occur.
[Cooling in progress / Power is turned off automatically]
[Power off in progress / Please do not turn the main power off]
ON
 OFF
OFF
BTurn off the main power switch.
NOTICE
When turning the main power switch off then on, be sure to wait for 10 |
|
|
|
seconds or longer before turning the main power switch on again. If the |
ON |
OFF |
|
main power switch is turned on again within 10 seconds, the machine |
|||
|
|
||
may not function normally. |
|
|
1-2

bizhub PRESS C1070/C1070P/C1060 bizhub PRO C1060L
)Power saving function
Using the following functions can reduce the power consumption of this machine and provide greater power saving effects.
Function |
|
Description |
|
|
Power Save func- |
Auto Low Power |
Turns off the touch panel display to reduce the power consumption |
|
|
tion |
|
of this machine. This machine is placed into the Auto Low Power |
|
|
|
|
mode when: |
|
|
|
|
• The specified period of time has elapsed with no print jobs exe- |
|
|
|
|
cuted in the printable state |
|
|
|
|
• Power Save on the control panel has been pressed for a sec- |
|
|
|
|
ond or more |
|
|
|
|
This mode is available when [Auto Low Power] is selected by select- |
|
|
|
|
ing Utility/Counter - [Administrator Setting] - [System Setting] - |
|
|
|
|
[Power Save Setting] - [Power Save Function Setting]. |
|
|
|
|
There are eight power saving time periods available: 5, 10, 15, 30, |
|
|
|
|
60, 90, 120, and 240 minutes, from which you can select the desired |
|
|
|
|
one. |
|
|
|
|
Power saving time periods, 90, 120, and 240 minutes, may not be |
|
|
|
|
displayed depending on regions. |
|
|
|
|
|
|
|
|
Auto Shut OFF |
Turns off all LEDs except Power Save and Power on the control |
|
|
|
|
panel, to reduce the power consumption of this machine. This ma- |
|
|
|
|
chine is placed into the Auto Shut OFF mode when: |
|
|
|
|
• The specified period of time has elapsed with no print jobs exe- |
|
|
|
|
cuted in the printable state |
|
|
|
|
• Power Save on the control panel has been pressed for a sec- |
|
|
|
|
ond or more |
|
|
|
|
If the Auto Shut OFF mode is kept for a long time, it may take a while |
|
|
|
|
to warm up this machine upon restart. |
|
|
|
|
This mode is available when [Auto Shut OFF] is selected by selecting |
|
|
|
|
Utility/Counter - [Administrator Setting] - [System Setting] - [Power |
|
|
|
|
Save Setting] - [Power Save Function Setting]. |
|
|
|
|
There are seven power saving time periods available: 0, 1, 30, 60, |
|
|
|
|
90, 120, and 240 minutes, from which you can select the desired |
|
|
|
|
one. |
|
|
|
|
|
|
|
|
Auto Wake-up |
Specifies whether to automatically release the Auto Shut OFF mode |
|
|
|
Cond. (Displayed |
for all print jobs or for only some print jobs. When print jobs are re- |
|
|
|
1 |
|||
|
only when the Im- |
ceived in the Auto Shut OFF mode, the Auto Shut OFF mode is au- |
|
|
|
age Controller IC- |
tomatically released according to this setting and the jobs are |
|
|
|
602 is installed.) |
printed. |
|
|
|
|
If you press [All Jobs] to highlight the button, the Shut OFF mode is |
|
|
|
|
automatically released even during Auto Shut OFF, and all print jobs |
|
|
|
|
can be output. |
|
|
|
|
If the button highlight display is released, during Auto Shut OFF, the |
|
|
|
|
Shut OFF mode is automatically released and print jobs can be out- |
|
|
|
|
put only when they are received from [PS Plug-in driver] or [Page- |
|
|
|
|
Scope Direct Print]. To process other jobs, use this machine after |
|
|
|
|
releasing the Shut OFF mode. |
|
|
|
|
|
|
|
ErP Setting |
|
Turns the main power off after the Auto Low Power mode, Auto Shut |
|
|
|
|
OFF mode, or the sub power switch is kept in the off state for the |
|
|
|
|
specified period of time. |
|
|
|
|
There are six power saving time periods available: Do Not Switch,12, |
|
|
|
|
24, 36, 48, 60, and 72 Hours, from which you can select the desired |
|
|
|
|
one. |
|
|
|
|
If the Weekly Timer is set to [Weekly Timer ON], [ErP Setting] ap- |
|
|
|
|
pears dimmed and you cannot configure this setting. |
|
|
|
|
|
|
|
Monochrome Energy-save Mode |
For monochrome printing, you can carry out it in energy-save mode. |
|
|
|
|
|
|
|
|
Weekly Timer |
|
Automatically turns the power of this machine on or off based on the |
|
|
|
|
specified time or day of the week. |
|
|
|
|
|
|
|
1-3

1.1Turning the Power ON/OFF
Tips
-Utility/Counter - [Administrator Setting] - [System Setting] - [Power Save Setting] - [Power Save Function Setting] is the same as Utility/Counter - [User Setting] - [System Setting] - [Power Save Setting] - [Power Save Function Setting]: use either of the methods to configure a setting.
-If Power Save on the control panel is pressed for one second or more, either of Auto Low Power and Auto Shut OFF is enabled. To enable either function, select [Administrator Setting] - [System Setting] - [Power Save Setting] - [Power Save Function Setting].
Reference
For details, refer to the HTML User's Guide.
NOTICE
If this machine is turned off because the Weekly Timer has started, job data is not received even if it is sent. While this machine can be used normally, send job data again.
1-4

bizhub PRESS C1070/C1070P/C1060 bizhub PRO C1060L
1.2Available Operations in this Machine
Major functions of this machine
)Print functions
This machine can be used as a printing system by installing an optional Image Controller.
You can print data on this machine via the printer driver using the application software installed on your computer. You can configure a layout or finish setting by implementing a simple action when printing data.
)Copy functions
You can specify conditions such as the original scan setting, paper size, or finish setting to copy data. More originals can be scanned in a short time by mounting an optional ADF.
1
Tips
Copy functions are not available in the Printer model.
1-5

1.2Available Operations in this Machine
)Scan functions
You can send the scanned original data as an E-mail attachment, send it to a shared computer (SMB server), WebDAV server, or FTP server, and save it to the USB flash drive installed on this machine by mounting an optional Image controller.
In addition, you can give a scan instruction from a computer on the network to import the scanned original data to your computer.
FTP  WebDAV
Tips
Scan functions are not available in the Printer model.
)Hold function of print jobs using the HDD
You can temporarily save an executed print or copy job to reprint it from the job list or save it on the HDD of this machine.
)Device control function (PageScope Web Connection)
PageScope Web Connection is a device control utility program provided by the HTTP server built in the machine.
You can access an Image Controller via the network using the Web browser of the computer to check the status of this machine or configure various settings remotely from PageScope Web Connection.
1-6
bizhub PRESS C1070/C1070P/C1060 bizhub PRO C1060L
Application functions
)Color management function (Color Centro)
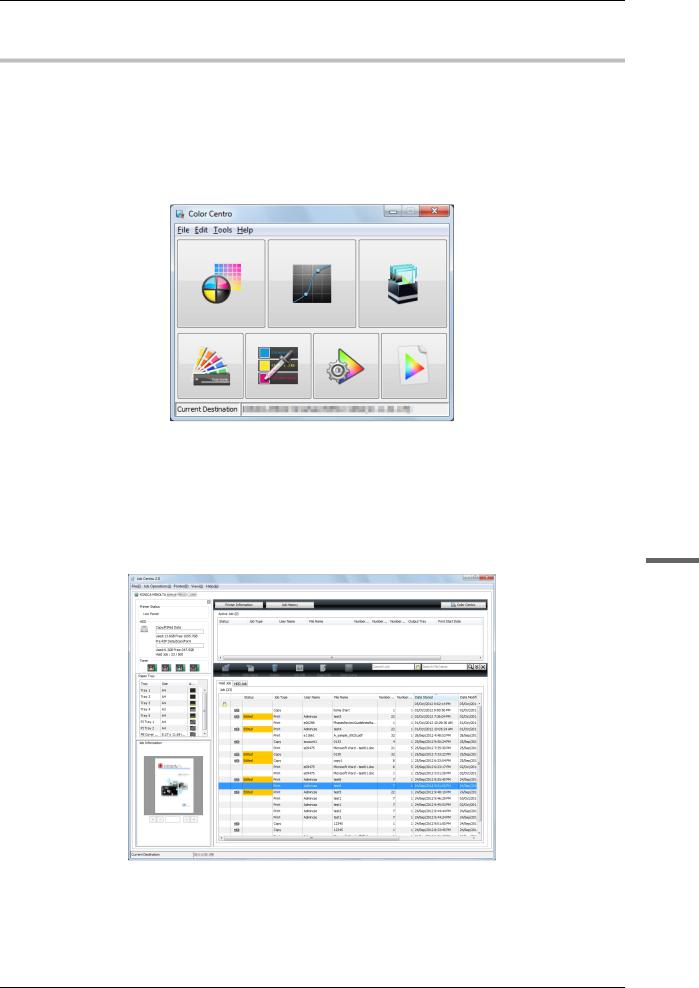
Color Centro is an application that enables efficient color management of the image controller through a computer.
To successfully print in color, you can calibrate the image controller, and edit and manage profiles and replacement tables to adjust colors.
)Job management function (Job Centro)
Job Centro is an application that is used to manage the job on the printing system.
Using this function, you can execute a print or copy job, monitor a scan job, operate and edit jobs temporarily saved on this machine, and edit pages. In addition, you can acquire device information such as printer status, consumable information, or tray information to check the status of this machine through your computer.
1
)Other applications
In addition to the above, there are various PageScope applications to manage this machine or users. For details, refer to the HTML User's Guide.
1-7
2.1Printing Flow
2Let's Make Prints
This chapter describes a basic print workflow using this machine.
First confirm the basic flow to print data, then add detailed settings and adjustment to meet your requirements.
Reference
For information about application settings of this machine and adjustment procedures, refer to the HTML User's Guide.
2.1Printing Flow
First check that your original data is printed in the following flow.
The detailed operations or setting procedures are described in the reference page for each step.
Tips
The User's Guide CD supplied with this machine includes a sample PDF file for printing. This file is helpful if you have no original data.
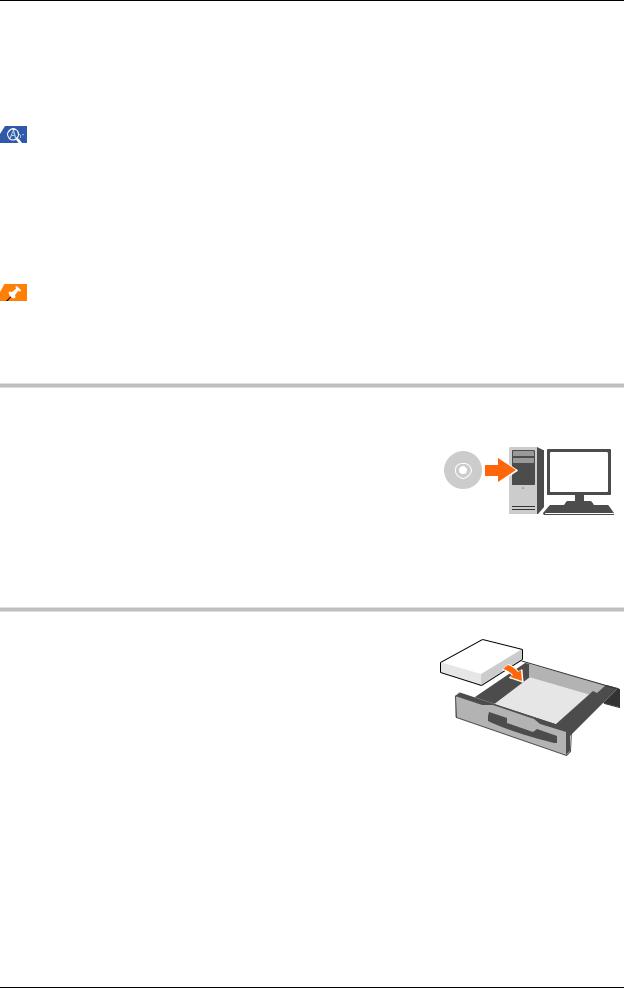
Step 1: Prepare the printer driver and applications
Install the printer driver and applications in your computer.
After installation is completed, configure information of the mounted devices using the printer driver in order to use optional functions.
For details, refer to the following pages.
- To install the printer driver: Refer to page 3-1.
- To install applications: Refer to page 3-9.
Step 2: Load paper into a tray
Load paper into the Main Body Trays or an optional paper tray.
For details, refer to the following pages.
- To load paper into the Main Body Trays: Refer to page 4-1.
-To load paper into Paper Feeder Unit: Refer to page 4-3.
-To load paper into another optional device: Refer to page 4-4.
2-1
bizhub PRESS C1070/C1070P/C1060 bizhub PRO C1060L
Step 3: Configure information of the paper loaded into a tray in this machine
Specify the type, size, weight, and other values of paper.
For details, refer to page 4-5.
Step 4: Use the printer driver to print data
Print original data through your computer.
0Check the application environment of original data in advance. This guide shows a procedure example to use
Adobe Reader XI in a Windows 7 environment.
AClick [Print] in the file menu of the application software to display the Print window.
BSelect the installed printer driver from [Printers], then click [Properties].
2
2-2

2.1Printing Flow
CClick the [General] tab on the setting screen of the printer driver, then select the paper size of the original data in [Original Size].
Check the setting, then click [OK].
-In [Paper Tray], you can select a tray to load paper to be printed into.
-For information about other functions of the printer driver, refer to the HTML User's Guide.
DClick [Print].
Original data is printed, and printed sheets are output to the output tray of the main body.
-You can save print jobs on the HDD of this machine.
If print jobs are saved on the HDD, you can make prints without reconfiguring settings the next time you print; which makes simple reprinting jobs easier.
The items you can configure or adjust vary depending on where print jobs are saved on the HDD. For details, refer to the HTML User's Guide.
-For information about how to take an action when data is printed with an incorrect paper size, refer to page 6-10.
Step 5: Check the finishing
Check the image quality reproducibility, printing position misalignment, fold or staple position, and other items after printing data.
For information about finishing checkpoints and adjustment procedures, refer to the HTML User's Guide.
2-3

bizhub PRESS C1070/C1070P/C1060 bizhub PRO C1060L
3Installing Software
3.1Installing the Printer Driver
Operating environment
)In a Windows environment
Item |
Specifications |
Operating System |
Windows Server 2003, Windows Server 2003 R2, Windows Vista, Windows Server |
|
2008, Windows Server 2008 R2, Windows 7, Windows 8, Windows 8.1, Windows |
|
Server 2012, Windows Server 2012 R2 |
|
|
CPU |
Any processor of the same or higher specifications as recommended for your oper- |
|
ating system |
|
|
Memory |
Memory capacity as recommended for your operating system |
|
The memory must have a sufficient free space to support the operating system and |
|
required applications. |
|
|
Drive |
CD or DVD drive |
|
|
)In a Macintosh environment
Item |
Specifications |
Operating System |
Mac OS X 10.5/10.6/10.7/10.8/10.9 |
|
|
CPU |
PowerPC, Intel Processor |
|
|
Memory |
Memory capacity as recommended for your operating system |
|
|
Drive |
CD or DVD drive |
|
|
Reference
For details about how to install the Linux driver, refer to the HTML User's Guide.
Characteristics of printer driver
|
|
|
|
|
|
|
|
|
|
|
|
|
|
|
|
|
|
3 |
|
There are the following types of printer drivers that can be installed on this machine. |
||||
|
|
|
|
|
Printer driver |
Page descrip- |
Description |
|
|
|
tion language |
|
|
|
PS Plug-in Driver |
PostScript 3 |
Available when exactly printing data that is created using the ap- |
|
|
|
(Adobe genuine |
plication software compatible with PS such as Adobe. |
|
|
|
product) |
This driver is commonly used in applications where good color re- |
|
|
|
|
producibility is important. |
|
|
|
|
This driver provides various configurable functions compared with |
|
|
|
|
the PPD driver. |
|
|
|
|
|
|
|
PPD driver |
PostScript 3 |
Available when exactly printing data that is created using the ap- |
|
|
|
(Adobe genuine |
plication software compatible with PS such as Adobe. |
|
|
|
product) |
This driver is commonly used in applications where good color re- |
|
|
|
|
producibility is important. |
|
|
|
|
|
|
|
3-1
3.1Installing the Printer Driver
Reference
The PPD driver is only supported in Windows. However, the PPD driver is not supported by Windows Server 2003 R2. In a Mac OS X environment, use the PS Plug-in driver.
For details about the PPD driver, refer to the HTML User's Guide.
In a Windows environment
)Installation
Start the installer from the Driver CD supplied with this machine, then install the printer driver on your computer. This guide describes an example procedure to install the PS Plug-in driver in a Windows 7 environment.
0 For information about how to install another printer driver, refer to the HTML User's Guide.
0A network setting must be configured on this machine before beginning the installation procedure. For details, refer to the HTML User's Guide.
0 To carry out this task, the computer's administrator privilege is required.
AInsert the Driver CD into the CD or DVD drive of the computer.
If the installer does not start, open the printer driver folder on the Driver CD, double-click [Autorun.exe], then proceed to the procedure 2.
B C
Select [Printer Install], then select [PS Plugin Driver].
Select [EN].
When the [User Account Control] window is displayed, click [Continue] or [Yes].
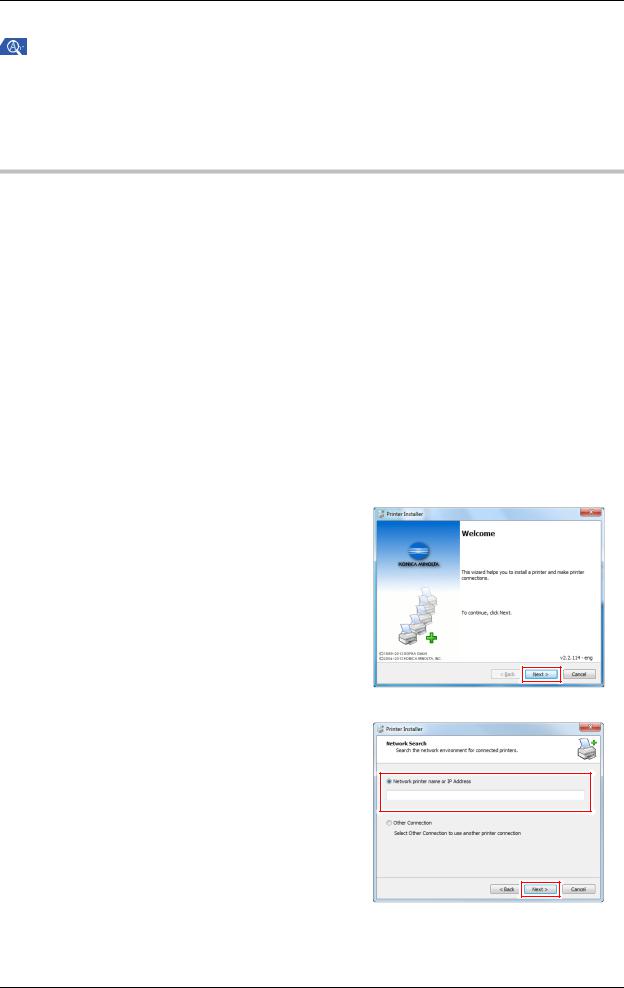
DClick [Next].
EEnter the printer name or IP address, then click [Next].
-The printer is created using the Ipr port.
-To connect to a different printer (NetBIOS or port9100), select [Other Connection]. For details, refer to the HTML User's Guide.
3-2

bizhub PRESS C1070/C1070P/C1060 bizhub PRO C1060L
FSelect the name of the printer to be installed, then click [Next].
If the required printer name cannot be found, click [Have Disk], then directly specify the [Setup.inf] file.
GClick [Finish].
If the [Windows Security] window is displayed, click [Install this driver software anyway].
Then, configure the default setting for the printer driver. For details, refer to page 3-4.
3
3-3
3.1Installing the Printer Driver
)Default setting
Check that optional information of this machine is configured correctly on the printer driver.
0If optional information of this machine is not configured correctly on the printer driver, you cannot use optional functions. If any optional function is mounted, be sure to configure a setting.
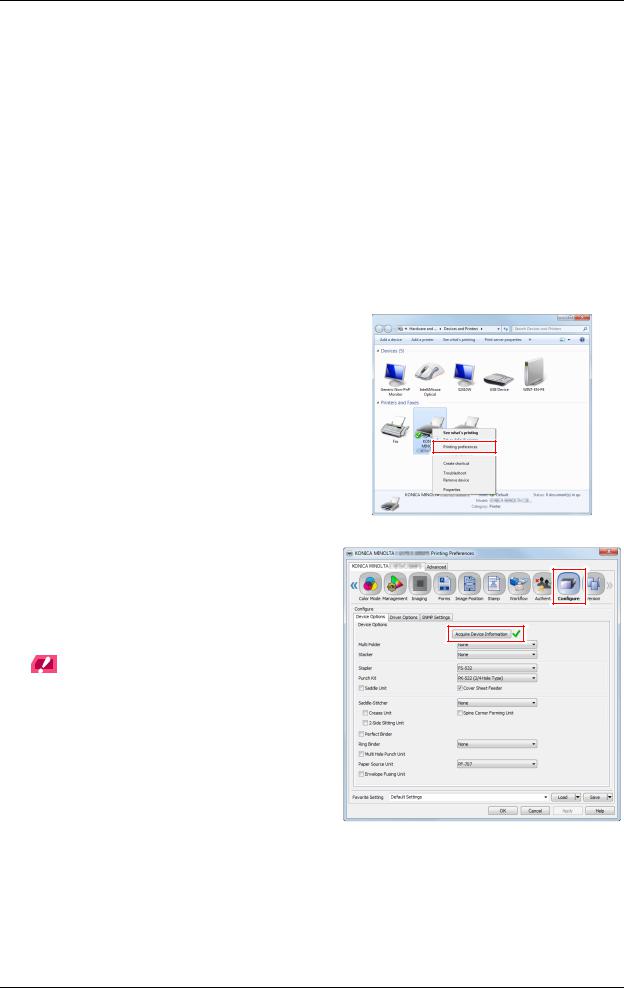
ADisplay the printer window.
-In Windows 7/Windows Server 2008 R2, open the Start menu, then click [Devices and Printers].
-In Windows 8/Windows Server 2012, right-click on the Start screen, click [All Apps], then select [Control Panel] - [Hardware and Sound] - [View devices and printers].
-In Windows 8.1/Windows Server 2012 R2, on the Start window, click  , then click [Control Panel] - [Hardware and Sound] - [Devices and Printers].
-In Windows Vista/Windows Server 2008, open the Start menu, select [Control Panel] - [Hardware and Sound], then click [Printers].
-In Windows Server 2003/Windows Server 2003 R2, open the Start menu, then click [Printers and Faxes].
BOpen [Printing Preferences].
Right-click the icon of the installed printer, then click [Printing Preferences].
CClick  on the upper-right corner of the window, then click [Configure] that is displayed.
Check that  is shown on the right-hand side of [Acquire Device Information]. If this mark is not shown, click [Acquire Device Information] to acquire device option information.
NOTICE
If you have failed to acquire device option information, check the network setting.
DClick [OK].
The device option information setting is then completed.
3-4
bizhub PRESS C1070/C1070P/C1060 bizhub PRO C1060L
In a Macintosh environment
)Installation
Install the printer driver on your computer from the Driver CD supplied with this machine, then add the desired printer to the computer.
This guide describes how to install the PS Plug-in driver in a Mac OS X 10.6 environment and add a Bonjour-connected printer.
0For information about how to add a printer in another connection method (AppleTalk, LPR, or IPP), refer to the
HTML User's Guide.
0A network setting must be configured on this machine before beginning the installation procedure. For details, refer to the HTML User's Guide.
0 To carry out this task, the computer's administrator privilege is required.
0 Exit all applications before starting this task.
AInsert the Driver CD into the CD or DVD drive of the computer.
NOTICE
In OS X 10.7 or later, even when the Driver CD is inserted into the drive, the CD icon may not be displayed on the desktop. In this case, the mount setting may be disabled. Check whether or not the mount setting is disabled in "System Setting" of Finder.
BOpen the folder that contains the desired printer driver in the Driver CD.
Select a folder according to the printer driver, operating system, and language to be used.
CCopy the [XXXXXX.pkg] file matching the model name to the desktop, then doubleclick it.
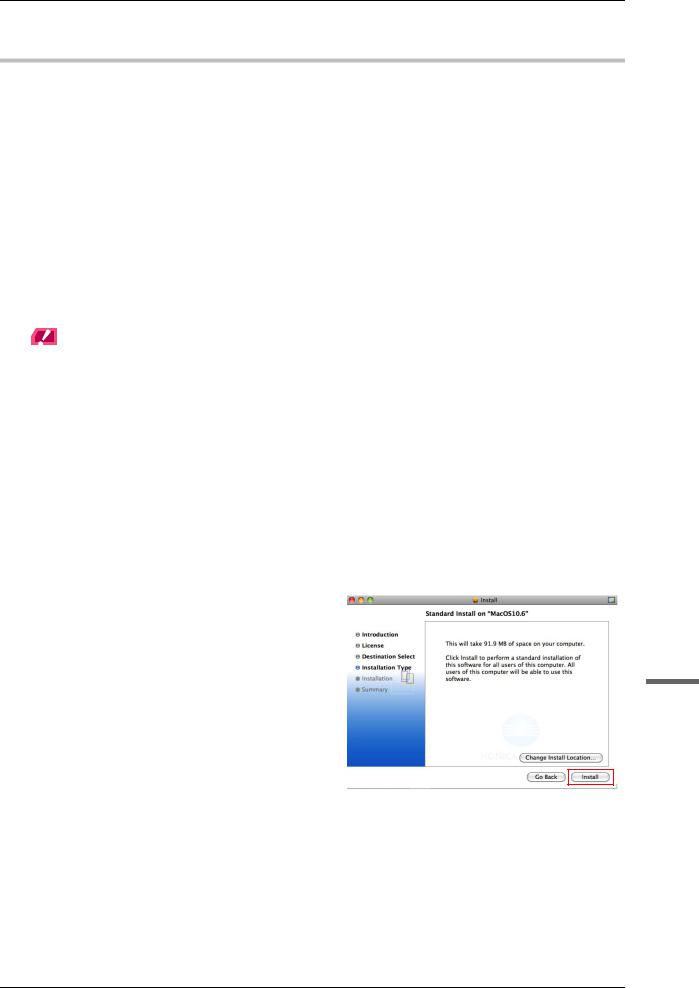
The installer starts.
DFollow the on-screen instructions to click [Continue].
When the screen for entering [Name] and [Password] is displayed, enter the computer administrator's name and password into the respective fields.
EIf the installation window is displayed, click [Install].
3
3-5
3.1Installing the Printer Driver
FWhen the installation has been completed, click [Close].
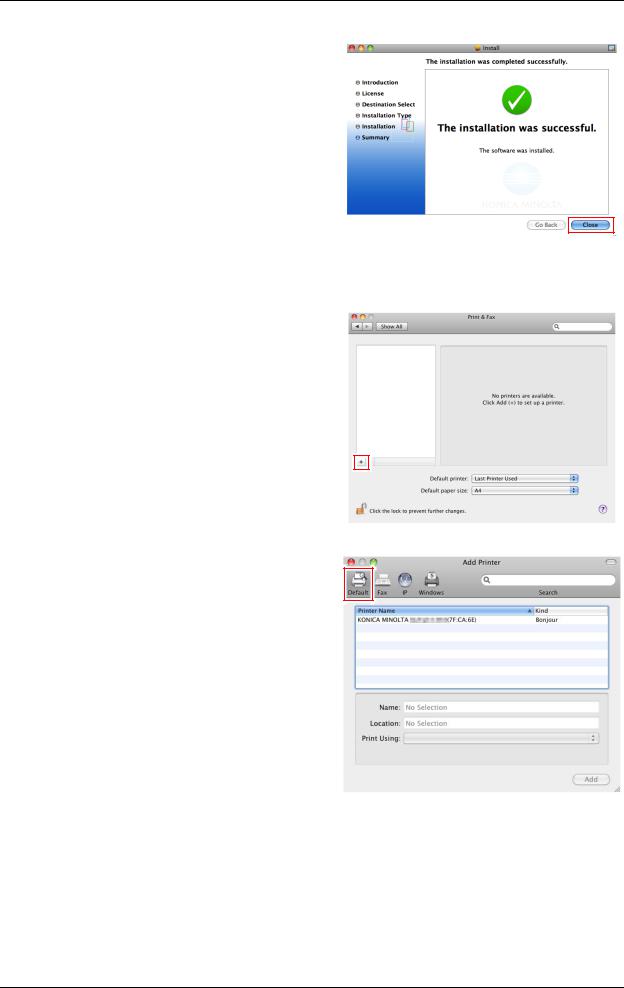
Then, add a Bonjour-connected printer to your computer.
GIn the Apple Menu, select [System Preferences], then click the [Print & Fax] ([Print & Scan] in OS X10.7/10.8, [Printer & Scanner] in OS X 10.9) icon.
HClick [+].
IClick [Default].
Connected printers are detected. If no printer is detected, restart this machine.
3-6
bizhub PRESS C1070/C1070P/C1060 bizhub PRO C1060L
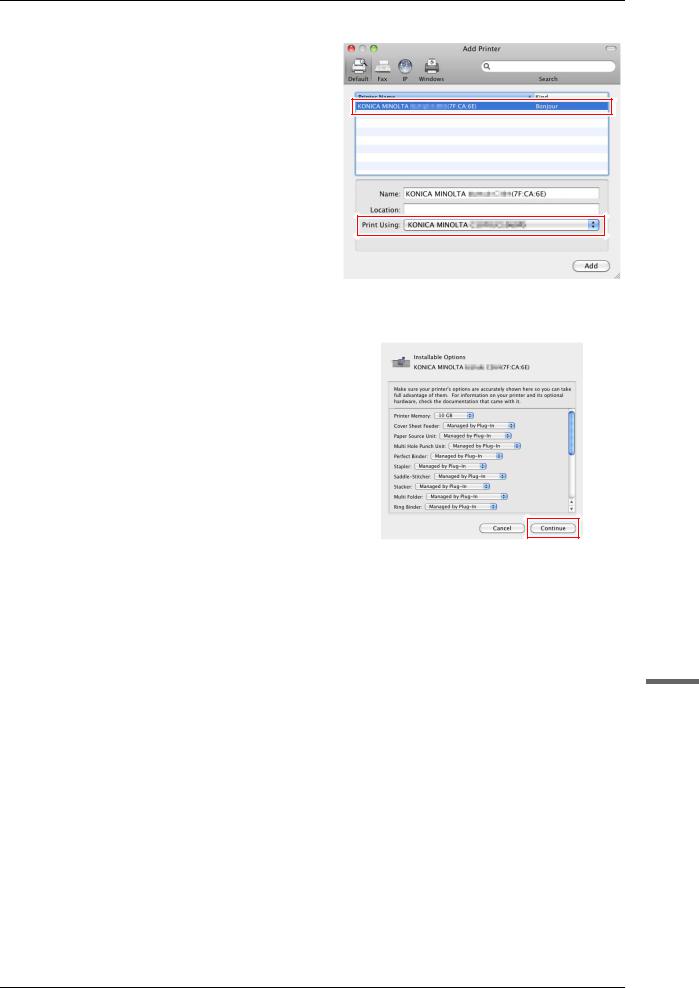
JSpecify the Bonjour-connected printer to be added in the [Printer Name] list.
- Specifying a printer displays the appropriate
printer driver in the [Print Using] field. If the printer driver is not displayed correctly, select [Select Printer Software...], then directly specify the desired printer driver.
-To check the printer name of this machine, select [Administrator Setting] - [Network Setting] - [NIC Setting] - [Bonjour Setting].
KClick [Add].
LConfigure optional information of this machine, then click [OK] or [Continue].
Then, configure the default setting for the printer driver. For details, refer to page 3-8.
3
3-7
3.1Installing the Printer Driver
)Default setting
Check that optional information of this machine is configured correctly on the printer driver.
0If optional information of this machine is not configured correctly on the printer driver, you cannot use optional functions. If any optional function is mounted, be sure to configure a setting.
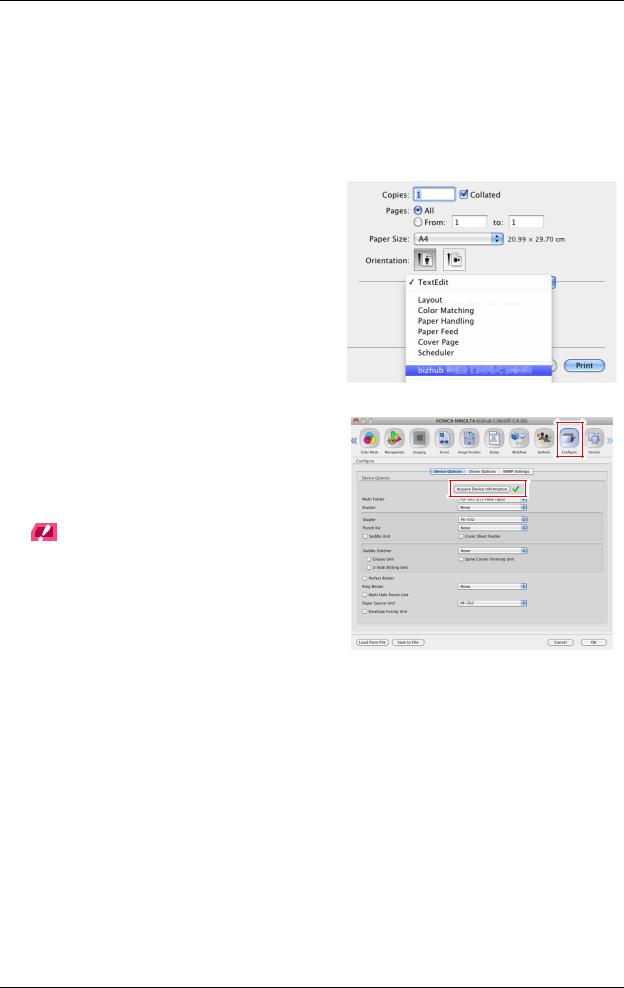
ASelect a print command of the application, then select the required printer name from [Print].
BSelect [bizhub PRESS C1070/C1060PS] from the pull-down list in the window, then click [Settings].
CClick  on the upper right-hand side of the window, then click [Configure] that is displayed.
Check that  is shown on the right-hand side of [Acquire Device Information]. If this mark is not shown, click [Acquire Device Information] to acquire device option information.
NOTICE
If you have failed to acquire device option information, check the network setting.
DClick [OK].
The device option information setting is then completed.
3-8
Loading...