


 Loading...
Plain-paper digital Fax/Copier/Printer/Scanner
Message Board Guide

Chapter 1 Overview of Message Board
Chapter 2 User information settings
Chapter 3 Machine settings
Chapter 4 Machine management settings
Chapter 5 Machine information
Chapter 6 Troubleshooting
1
2
3
4
5
6

Contents
How to read this manual.............................................................................................. |
v |
Operational and safety information.......................................................................... |
v |
Key descriptions.......................................................................................................... |
v |
About the screens........................................................................................................ |
v |
Chapter 1 Overview of Message Board |
|
|
|
Introduction to Message Board............................................................................... |
1-2 |
Logging in / Logging out............................................................................................ |
1-4 |
Connecting to Message Board................................................................................. |
1-4 |
Logging in................................................................................................................. |
1-4 |
Logging out............................................................................................................... |
1-9 |
About the display...................................................................................................... |
1-10 |
Footer Names and Functions................................................................................ |
1-10 |
Checking the display on the control panel........................................................... |
1-11 |
Message Board menu list........................................................................................ |
1-12 |
Chapter 2 User information settings |
|
|
|
Registering users........................................................................................................ |
2-2 |
“User Registration” screen...................................................................................... |
2-2 |
Registering users..................................................................................................... |
2-3 |
Changing user information..................................................................................... |
2-7 |
Deleting user information....................................................................................... |
2-7 |
Exporting user information..................................................................................... |
2-8 |
Registering addresses.......................................................................................................... |
2-9 |
“Address Book” screen............................................................................................. |
2-9 |
Registering destinations........................................................................................ |
2-11 |
Changing destinations........................................................................................... |
2-17 |
Deleting destinations............................................................................................. |
2-18 |
Exporting destination............................................................................................ |
2-19 |
Grouping multiple destinations............................................................................ |
2-20 |
Registering shortcuts............................................................................................... |
2-25 |
Registering folder shortcuts.................................................................................. |
2-25 |
Registering FTP shortcuts.................................................................................... |
2-29 |
Setting templates...................................................................................................... |
2-33 |
Setting document names....................................................................................... |
2-33 |
Setting e-mail templates....................................................................................... |
2-35 |
Chapter 3 Machine settings |
|
|
|
Setting the network environment........................................................................... |
3-2 |
Setting the e-mail environment............................................................................... |
3-5 |
SMTP/POP settings................................................................................................. |
3-5 |
ii Contents

Setting the e-mail operating environment............................................................. |
3-9 |
Setting the LDAP server......................................................................................... |
3-12 |
“LDAP Server Settings” list screen...................................................................... |
3-12 |
Registering new LDAP server search settings..................................................... |
3-13 |
Changing LDAP server search settings................................................................ |
3-16 |
Deleting LDAP server search settings................................................................. |
3-17 |
SNMP settings............................................................................................................ |
3-18 |
Setting an internet time.......................................................................................... |
3-21 |
Specifying device settings...................................................................................... |
3-22 |
Specifying other network settings........................................................................ |
3-22 |
Registering the user install................................................................................... |
3-23 |
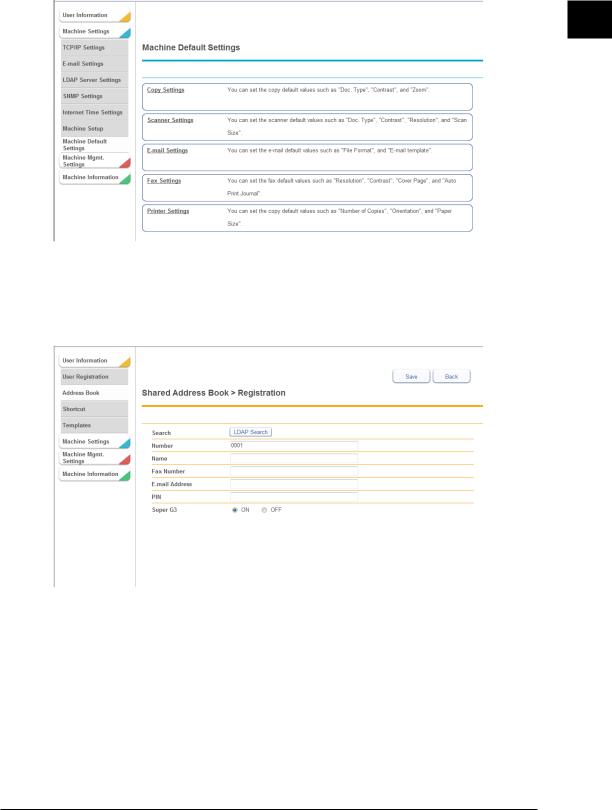
Specifying default machine settings.................................................................... |
3-24 |
Chapter 4 Machine management settings
Distributing received documents........................................................................... |
4-2 |
“Auto Distribution” screen....................................................................................... |
4-2 |
Setting auto distribution (general settings)........................................................... |
4-3 |
Setting auto distribution (individual settings)...................................................... |
4-4 |
Specifying distribution destinations....................................................................... |
4-8 |
Testing auto distribution....................................................................................... |
4-10 |
Changing individual auto distribution settings................................................... |
4-11 |
Deleting individual auto distribution settings..................................................... |
4-11 |
User access management........................................................................................ |
4-12 |
“User Access Management” screen....................................................................... |
4-12 |
Checking the usage status.................................................................................... |
4-13 |
Printing the usage status...................................................................................... |
4-13 |
Downloading the usage status.............................................................................. |
4-14 |
Resetting the counters........................................................................................... |
4-14 |
Setting user policies................................................................................................. |
4-15 |
Registering new user policies................................................................................ |
4-15 |
Selecting users....................................................................................................... |
4-18 |
Changing a user policy.......................................................................................... |
4-19 |
Deleting a user policy............................................................................................ |
4-19 |
Setting security......................................................................................................... |
4-20 |
Setting the machine policy.................................................................................... |
4-20 |
Setting access restrictions..................................................................................... |
4-24 |
Specifying SSL certificate settings....................................................................... |
4-27 |
Archive settings......................................................................................................... |
4-30 |
Specifying archive settings.................................................................................... |
4-30 |
Specifying archive destinations............................................................................ |
4-32 |
Setting DocIndex....................................................................................................... |
4-36 |
“DocIndex Settings” screen.................................................................................... |
4-36 |
DocIndex settings.................................................................................................. |
4-37 |
About the DocIndex file name............................................................................... |
4-42 |
Contents iii

Chapter 5 Machine information
Communication jobs................................................................................................... |
5-2 |
Checking communication jobs................................................................................. |
5-2 |
Canceling communication jobs in progress............................................................ |
5-3 |
Print jobs....................................................................................................................... |
5-4 |
Checking print jobs.................................................................................................. |
5-4 |
Canceling print jobs................................................................................................. |
5-4 |
Communication history............................................................................................. |
5-5 |
Checking the communication history..................................................................... |
5-5 |
Printing the communication history....................................................................... |
5-6 |
Downloading the communication history............................................................... |
5-6 |
Print job history.......................................................................................................... |
5-7 |
Machine status............................................................................................................. |
5-8 |
Setting the machine status..................................................................................... |
5-8 |
Exporting machine settings.................................................................................. |
5-10 |
Importing machine settings.................................................................................. |
5-11 |
Chapter 6 Troubleshooting |
|
|
|
Troubleshooting.......................................................................................................... |
6-2 |
To solve website’s security certificate error............................................................ |
6-3 |
iv Contents

How to read this manual
Operational and safety information
In this manual, the following symbols are used with the items where important operational and safety information must be observed.
|
|
Symbol |
Meaning |
||
|
|
|
|
|
|
|
|
|
|
|
Describes warnings to protect yourself and others from serious or |
|
|
|
|
|
potentially fatal injury if you handle the machine incorrectly. For safe |
|
|
|
|
|
operation, please follow instructions carefully. |
|
|
|
|
|
|
|
|
|
|
|
Notes a caution to protect yourself and others from personal injury or |
|
|
|
|
|
damage to properties if you handle the machine incorrectly. For safe |
|
|
|
|
|
operation, please follow instructions carefully. |
|
|
|
|
|
|
|
|
|
|
|
Describes important conditions or restrictions you should carefully |
|
|
IMPORTANT |
|
||
|
|
|
observe to avoid problems caused by incorrect operations. |
||
|
|
|
|
|
|
|
|
|
|
|
|
|
|
|
|
|
Describes reference information and additional notes for operation. |
|
|
NOTE |
|
|
|
|
|
|
|
||
|
|
|
|
|
|
Key descriptions
In this manual, the operating keys are described as follows:
< > : Keys on the control panel
For example, the start key <Start> [ ] : Buttons on the display and computer
For example, the “Setting” button [Setting]
About the screens
This manual uses the screens of the bizhub 25e standard model, unless otherwise stated. The screens you see may differ, depending on the options installed.
How to read this manual v

This page intentionally left blank.
vi How to read this manual

Chapter 1
Overview of Message Board
Introduction to Message Board............................................................................... |
1-2 |
Logging in / Logging out............................................................................................ |
1-4 |
Connecting to Message Board................................................................................. |
1-4 |
Logging in................................................................................................................. |
1-4 |
Logging out............................................................................................................... |
1-9 |
About the display...................................................................................................... |
1-10 |
Footer Names and Functions................................................................................ |
1-10 |
Checking the display on the control panel........................................................... |
1-11 |
Message Board menu list........................................................................................ |
1-12 |
Introduction to Message Board
With Message Board, you can control your machine through network. Here are some examples what Message Board enables you.
 IMPORTANT
A web browser is required to operate Message Board. For details on the supported web browsers, see chapter 5, “General” in “Specifications” in the Administrator’s Guide. In this chapter, we use Internet Explorer as an example for the procedures.
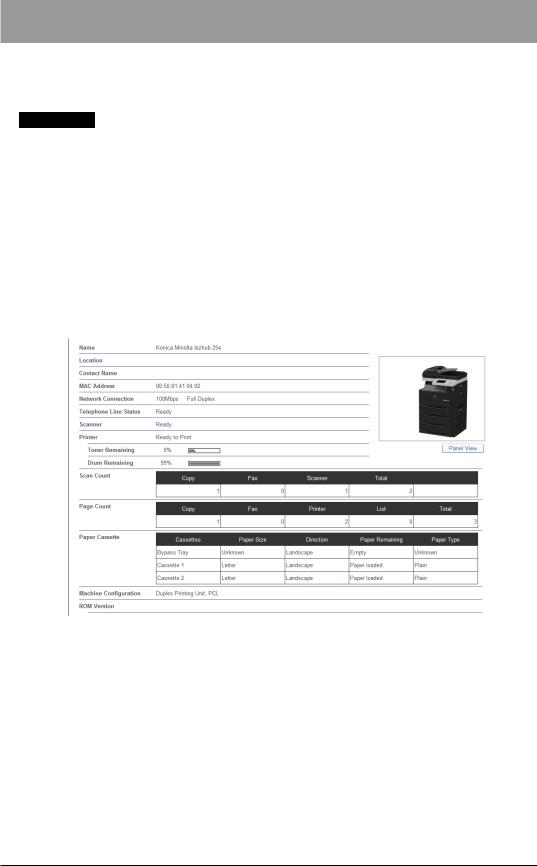
Check the status of your machine
Through your web browser, you can access to your machine and check its status. Some examples:
•Status of the printer
•Printed pages and scanned pages on your machine
•Message on the display
•Communication history
•Print Job history
1-2 Introduction to Message Board
Check and change the machine set-up
Access your machine without walking to it, and check or change settings. All the set-up menus are available not only from the control panel but from Message Board (page 1-12).
1
Overview of Message Board
Register destinations easily
When you register new addresses, it may be troublesome to enter letters on the machine’s control panel. Access your machine through Message Board, and register them using your computer.
Introduction to Message Board 1-3
Logging in / Logging out
Connecting to Message Board
1 Start the web browser.
If there is a shortcut to Message Board on your desktop, double click the shortcut to start the web browser and access Message Board.
2 Enter the IP address of the machine in the “Address” bar of the web browser, and press [Enter].
Logging in
You can log in to Message Board as either of the following three user types; “Administrator”, “User”, or “Guest”.
User |
Description |
|
|
Administrator |
Administrator can enter from “Administrator screen” to Message Board. |
|
|
User |
Authenticated users can enter from “User screen” to Message Board. |
|
|
Guest |
Users who are not authenticated can enter from “User screen” as “Guest” to |
|
Message Board. |
|
|
User login
User login screen differs according to the machine policy setting. For details on the machine policy settings, see “Setting the machine policy” (page 4-20).

 NOTE
NOTE
When the machine policy is set to “stand alone”, you should be registered as Message Board user to log in as user. For details, see “Registering users” (page 2-2).
Log in from the user list
1
2
Connect to Message Board (page 1-4).
Click [User Login].
1-4 Logging in / Logging out
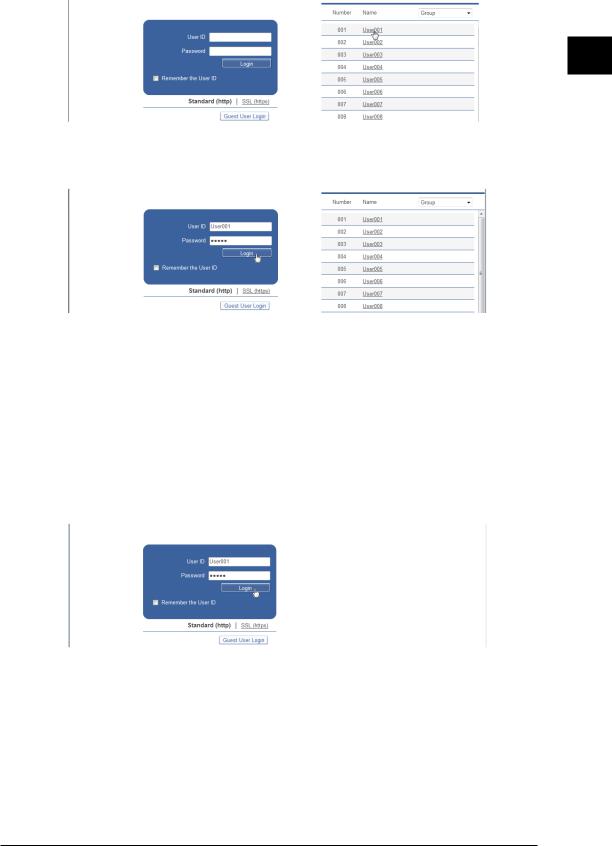
3 Click the user name in the user list.
•The user ID of the user name you clicked is automatically entered in “User ID”.
•When you click “Group”, you can filter the user name by their registered groups.
4 Enter the password in “Password” column, and click [Login].
If you select “Remember the User ID”, the account ID you enter will be stored on your computer. Next time you access Message Board, the stored user ID is automatically entered.
Log in by entering a user ID
According to the machine setting, the user list may not be displayed. In such case, follow the following steps.
1 Connect to Message Board (page 1-4).
2 Click [User Login].
3 Enter the “User ID” and “Password”, and click [Login].
1
Overview of Message Board
If you select “Remember the User ID”, the account ID you enter is stored on your computer. The next time you access Message Board, the stored user ID is automatically entered.
Logging in / Logging out 1-5
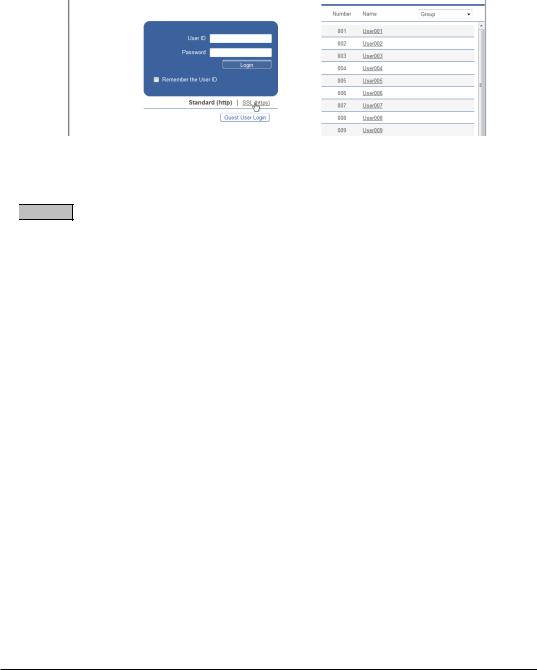
Login using SSL
Message Board supports SSL (Secure Socket Layer) security for data communication. SSL communication encrypts the data communicated between the computers and Message Board to prevent the theft and modification of data by outside parties. When you perform an SSL login, the [SSL] icon is displayed on the header of Message Board screen.
1 Connect to Message Board (page 1-4).
2 Click [User Login].
3 Click [SSL (https)].
4 Perform the login procedure.

 NOTE
NOTE
If you use SSL, the response time will be slower than a regular login because encryption and authentication are performed for the data.
When you are not a registered user
When you are not a registered user, there are three options to log in to Message Board:
•Log in as a guest.
•Enter a new user name and password and log in. This login is available when the machine policy is set to “Single Sign On.” For details on the machine policy settings, see “Setting the machine policy” (page 4-20).
•When “If you do not have a User ID, click here.” is displayed on the login screen, you can click this link and register yourself as a user. This login is available when user registration is available for guest policy. For details, see page 4-17.
1-6 Logging in / Logging out
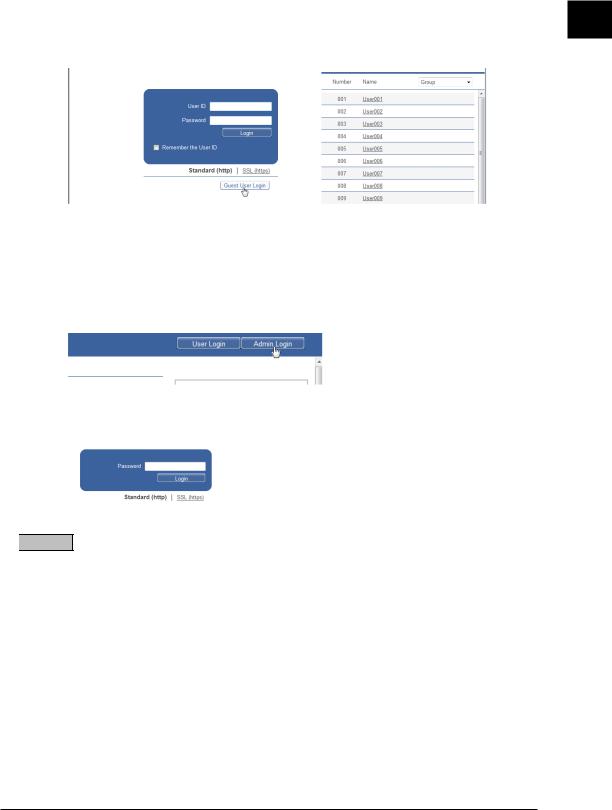
Guest login
1 Connect to Message Board (page 1-4).
2 Click [User Login].
3 Click [Guest User Login].
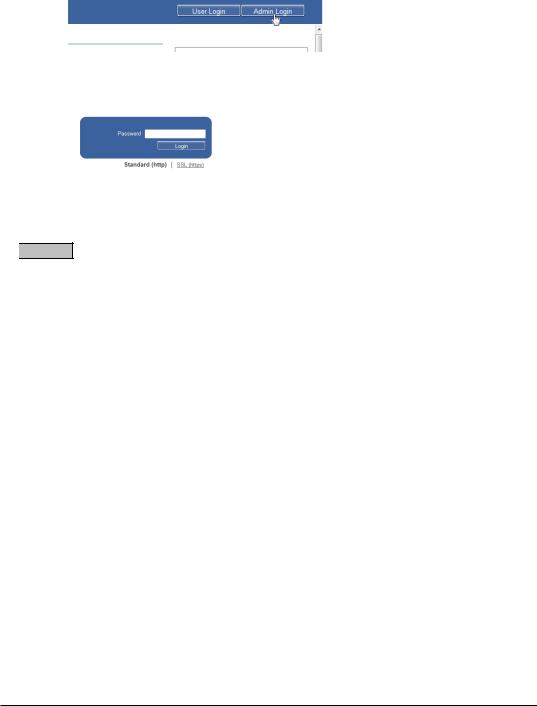
Administrator screen login
1 Connect to Message Board (page 1-4).
2 Click [Admin Login].
If an administrator password is not set, this concludes the procedure.
3 Enter the administrator password, and click [Login].

 NOTE
NOTE
The administrator password entry screen is displayed only when “Administrator Password” is set at machine policy or “Admin Password” is set on the control panel. For details, see “Setting the machine policy” (page 4-20) or chapter 2, ”Setting the administrators password” in “Setting security codes” in the Administrator’s Guide.
1
Overview of Message Board
Logging in / Logging out 1-7
Login as administrator using SSL
Message Board supports SSL (Secure Socket Layer) security for data communication. SSL communication encrypts the data communicated between the computers and Message Board to prevent the theft and modification of data by outside parties. When you perform an SSL login, the [SSL] icon is displayed on the header of Message Board screen.
1 Connect to Message Board (page 1-4).
2 Click [Admin Login].
If an administrator password is not set, this concludes the procedure.
3 Click [SSL (https)].
4 Enter the administrator password, and click [Login].

 NOTE
NOTE
•If you use SSL, the response time will be slower than a regular login because encryption and authentication are performed for the data.
•When the administrator password is not set, enter Message Board by entering the IP address of the machine beginning with “https://”and click [Enter].
Log in to Message Board when no user is registered
When no user is registered, you can log in as a guest by the following procedures:
1
2
Connect to Message Board (page 1-4).
Click [User Login].
1-8 Logging in / Logging out
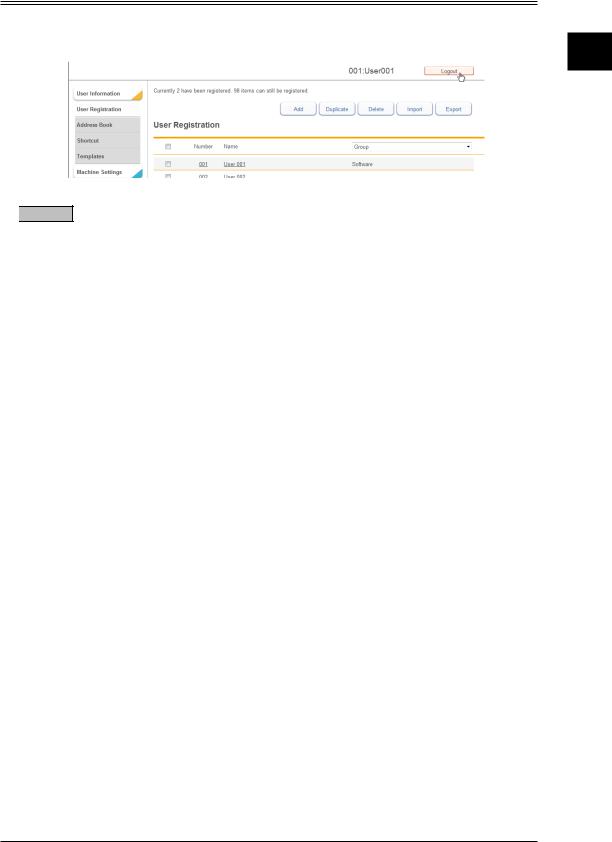
Logging out
Log out when you close Message Board screen or switch users.
1 Click [Logout].

 NOTE
NOTE
Make sure to log out for security purposes. If you do not access Message Board for 30 minutes, you are automatically logged out.
1
Overview of Message Board
Logging in / Logging out 1-9
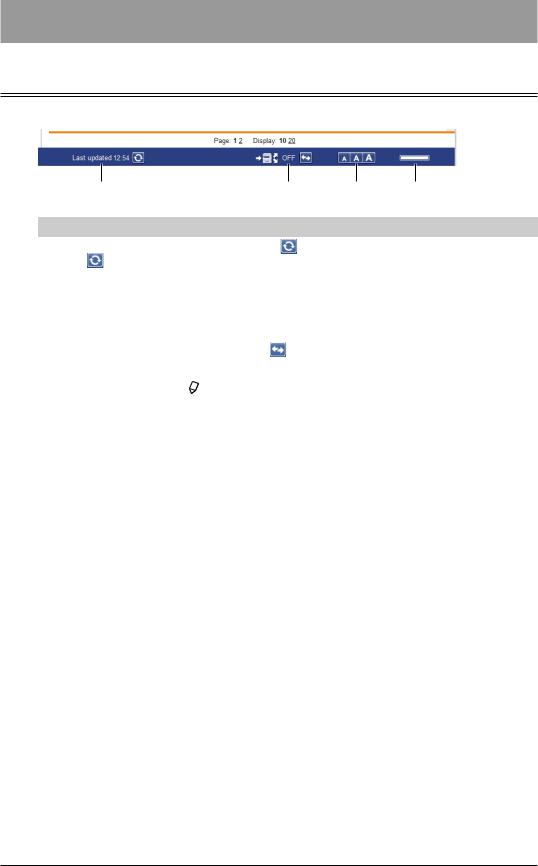
About the display
Footer Names and Functions
|
|
1 |
|
|
|
2 |
3 |
4 |
|
|
|
|
|
|
|
|
|
|
|
Item |
|
|
|
|
Description |
|
|
|
|
|
|
|
|
||
1 |
Screen refresh time |
|
When you click the |
|
(manual refresh) button, the screen is |
|||
|
and |
(manual |
|
refreshed. |
|
|
|
|
|
refresh) button |
|
The last time when the screen was updated (hour : minute) is |
|||||
|
|
|
|
displayed. |
|
|
|
|
|
|
|
|
|
||||
2 |
Auto distribution |
|
Displays the current auto distribution settings status. |
|||||
|
settings switch |
|
If the auto distribution settings are enabled, “ON” is displayed; if they |
|||||
|
|
|
|
are disabled, “OFF” is displayed. |
|
|||
|
|
|
|
You can click the |
(auto distribution switch) button to enable/ |
|||
|
|
|
|
disable the auto distribution settings. |
|
|||
|
|
|
|
|
|
|
|
|
|
|
|
|
NOTE |
|
|
|
|
|
|
|
|
If the “Auto Distribution” is disabled in the user policy settings, the |
||||
|
|
|
|
auto distribution settings status is not displayed (page 4-2). |
||||
|
|
|
|
|
||||
3 |
Change font size |
|
There are three font sizes; large, medium, and small. (The default font |
|||||
|
|
|
|
size is medium.) |
|
|
|
|
|
|
|
|
The font size setting is retained until it is changed, even after a logout |
||||
|
|
|
|
is performed. |
|
|
|
|
|
|
|
|
|
||||
4 |
Remaining disk space |
|
Displays a graph of the remaining space on the data disk of the |
|||||
|
|
|
|
machine. |
|
|
|
|
|
|
|
|
|
|
|
|
|
1-10 About the display
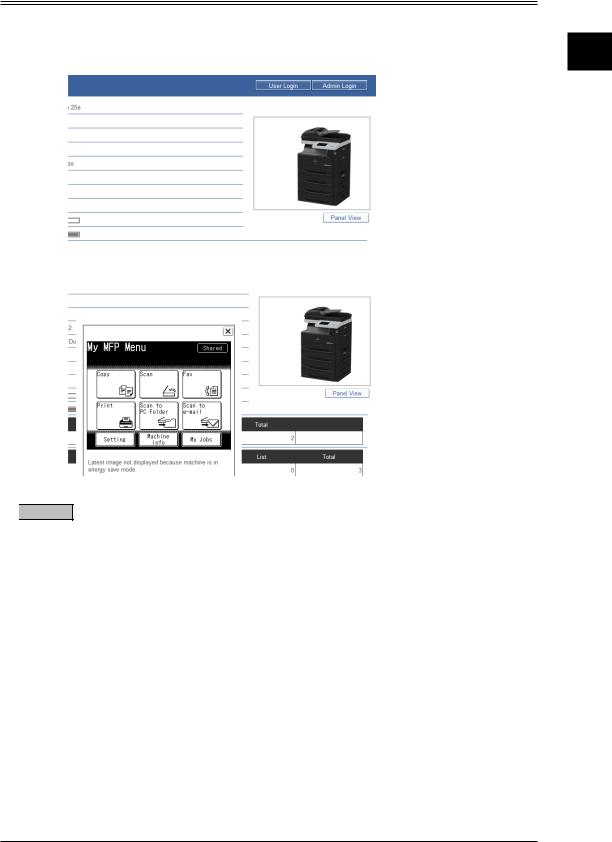
Checking the display on the control panel
You can check the display on the control panel using the Message Board screen even when you are not at the machine.
1 When you are connected to Message Board (page 1-4), click [Panel View].
2 Check the display on the control panel.

 NOTE
NOTE
In following situations, the display will not be updated.
•When someone is operating the machine on the control panel
•When someone is entering a password on the control panel
•When the machine is scanning a document
•When a user is logged in on the control panel
•While the machine is in energy save mode
1
Overview of Message Board
About the display 1-11

Message Board menu list
On Message Board, the following settings are available. Some settings may not be available according to user policy setting. For details on the user policy settings, see “Setting user policies” (page 4-15).
|
Items |
Description |
Reference |
|
Page |
||
|
|
|
|
|
|
|
|
User Information |
|
|
|
|
|
|
|
|
User Registration |
Register, edit or delete users and user groups. |
2-2 |
|
|
|
|
|
Address Book |
Register, edit or delete destinations, destination groups. |
2-9 |
|
|
|
|
|
Shortcut |
Register, edit or delete folder shortcuts and FTP server |
2-25 |
|
|
shortcuts. |
|
|
|
|
|
|
|
|
|
|
Templates |
Register, edit or delete document names and e-mail |
2-33 |
|
|
templates. |
|
|
|
|
|
|
|
|
|
Machine Settings |
|
|
|
|
|
|
|
|
TCP/IP Settings |
Setup network environment. |
3-2 |
|
|
|
|
|
E-mail Settings |
Setup scan to e-mail environment. |
3-5 |
|
|
|
|
|
LDAP Server |
Setup Lightweight Directory Access Protocol (LDAP) |
3-12 |
|
Settings |
servers. |
|
|
|
||
|
|
|
|
|
SNMP Setting |
Setup SNMP settings. |
3-18 |
|
|
|
|
|
Internet Time |
Setup internet time server synchronization. |
3-21 |
|
Settings |
|
|
|
|
|
|
|
|
|
|
|
Machine Setup |
Setup machine setting such as e-mail gateway and network |
3-22 |
|
|
connection setting, or default settings (user install). |
|
|
|
|
|
|
|
|
|
|
Machine Default |
Setup the machine default settings. |
3-24 |
|
Settings |
|
|
|
|
|
|
|
|
|
|
Machine Management Settings |
|
||
|
|
|
|
|
Auto Distribution |
Register, edit or delete distribution settings. |
4-2 |
|
|
|
|
|
User Access |
Setup user access management, and check the usage |
4-12 |
|
Management |
status. |
|
|
|
||
|
|
|
|
|
User Policy |
Setup user policies. |
4-15 |
|
|
|
|
|
Secure Settings |
Setup network filter, SSL certificate, or machine policies. |
4-20 |
|
|
|
|
|
Archive Settings |
Setup to sent communicated documents to a specified |
|
|
|
destination via fax or e-mail, or store them in a specified |
4-30 |
|
|
folder. |
|
|
|
|
|
|
DocIndex Setting |
The DocIndex feature allows you to create image data and |
|
|
|
metadata (data indicating the attributes and processing |
4-36 |
|
|
method of the image file) in a single scan. |
|
|
|
|
|
Machine Information |
|
|
|
|
|
|
|
|
Communication |
Check the fax and e-mail transmission reservation status, |
5-2 |
|
Job |
and the progress of the communication job being executed. |
|
|
|
||
|
|
|
|
|
Print Job |
Check the progress of print jobs being printed or reserved |
5-4 |
|
|
for printing. |
|
|
|
|
|
|
|
|
|
|
Machine Status |
Check the machine status. Export or import machine |
5-8 |
|
|
settings. |
|
|
|
|
|
|
|
|
|
|
Communication |
Check the history of transmitted and received jobs. |
5-5 |
|
History |
|
|
|
|
|
|
|
|
|
|
|
Print Job History |
Check the document print job history. |
5-7 |
|
|
|
|
1-12 Message Board menu list

Chapter 2
User information settings
Registering users........................................................................................................ |
2-2 |
“User Registration” screen...................................................................................... |
2-2 |
Registering users..................................................................................................... |
2-3 |
Changing user information..................................................................................... |
2-7 |
Deleting user information....................................................................................... |
2-7 |
Exporting user information..................................................................................... |
2-8 |
Registering addresses.......................................................................................................... |
2-9 |
“Address Book” screen............................................................................................. |
2-9 |
Registering destinations........................................................................................ |
2-11 |
Changing destinations........................................................................................... |
2-17 |
Deleting destinations............................................................................................. |
2-18 |
Exporting destination............................................................................................ |
2-19 |
Grouping multiple destinations............................................................................ |
2-20 |
Registering shortcuts............................................................................................... |
2-25 |
Registering folder shortcuts.................................................................................. |
2-25 |
Registering FTP shortcuts.................................................................................... |
2-29 |
Setting templates...................................................................................................... |
2-33 |
Setting document names....................................................................................... |
2-33 |
Setting e-mail templates....................................................................................... |
2-35 |
Registering users
“User Registration” screen
The “User Registration” screen displays a list of the registered users.
6 |
1 |
2 |
3 |
4 |
5 |
7
8
|
|
10 |
11 |
9 |
Buttons |
|
|
|
|
|
|
|
|
|
|
Button name |
|
Description |
|
|
|
|
|
|
1 |
[Add] |
Registers new user information. |
|
|
|
|
|
||
2 |
[Duplicate] |
Copies user information that is already registered. The user |
||
|
|
information can be edited and used as information for another user. |
||
|
|
|
|
|
3 |
[Delete] |
Deletes user information. |
|
|
|
|
|
||
4 |
[Import] |
Imports user information from an external file. |
||
|
|
|
||
5 |
[Export] |
Exports user information in the vCard file format. |
||
|
|
|
|
|
List items |
|
|
|
|
|
|
|
|
|
|
Item |
|
Description |
|
|
|
|
|
|
6 |
Message area |
Displays message. |
|
|
|
|
|
|
|
7 |
Number |
The number assigned to the user. |
|
|
|
|
|
|
|
8 |
Name |
Displays the name registered. |
|
|
|
|
|
||
9 |
Group |
Displays the name of the group that the user belongs to. You can filter |
||
|
|
the displayed users by group name. |
|
|
|
|
|
||
10 |
Page |
Enables you to switch pages when the user list does not fit on one |
||
|
|
page. (The number of pages differs according to how many items are |
||
|
|
displayed on each page.) |
|
|
|
|
|
||
11 |
Number of displayed |
Switches the number of users displayed on one screen. |
||
|
items switch |
|
|
|
|
|
|
|
|
2-2 Registering users
Registering users
Register users either by entering it new, copying an existing user or importing a vCard format file.

 NOTE
NOTE
Up to 100 users can be registered.
Registering new users
1 Log in to Message Board (page 1-4).
2 Click [User Information].
3 Click [User Registration].
4 Click [Add].
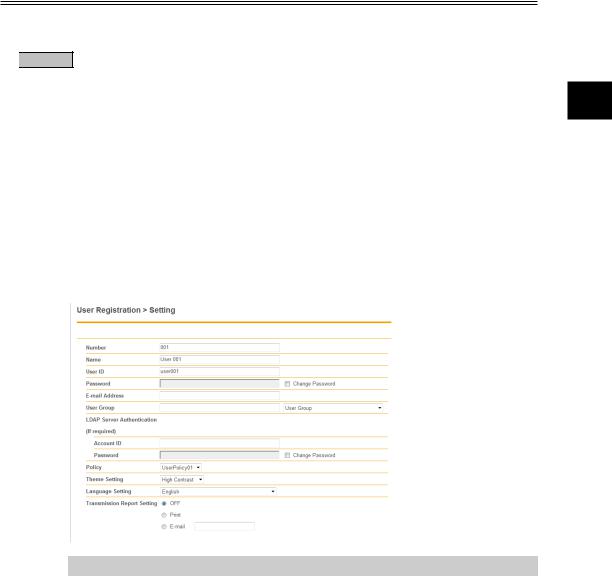
5 Register the user information.
1
2
User information settings
|
Setting |
Description |
|
Settings |
|
|
|
|
|
|
Number |
The smallest free number is automatically |
|
001 - 100 |
|
|
entered. You can change it to a number of your |
|
|
|
|
choice. This item is required. |
|
|
|
|
You cannot enter an existing number. |
|
|
|
|
|
|
|
|
Name |
Enter the user name. |
|
64 characters |
|
|
|
|
|
|
User ID |
Enter the ID used for identifying the user. |
|
64 characters |
|
|
You cannot enter an existing user ID. |
|
(\, /, [, ], ", :, ;, |, <, >, |
|
|
This item is required. |
|
+, =, ,, *, ? cannot be |
|
|
|
|
used.) |
|
|
|
|
|
|
Password*1 |
Enter the password used for logging in. |
|
28 characters |
|
E-mail Address |
Enter the e-mail address of the user. |
|
50 characters |
|
|
|
|
|
|
User Group |
Enter the name of the group that the user |
|
30 characters |
|
|
belongs to. |
|
|
|
|
If the group name is already registered, you can |
|
|
|
|
also select it from the pull-down menu on the |
|
|
|
|
right. |
|
|
|
|
|
|
|
|
|
|
|
|
|
|
|
Registering users 2-3 |
|

Setting |
|
|
|
|
Description |
Settings |
|
|
|
|
|
|
|
|
|
LDAP Server |
|
|
|
|
|
49 characters |
|
|
Account ID |
Enter the account for logging in |
|||||
Authentication |
|
|
|
|
to the LDAP server. |
29 characters |
|
(If required) |
|
|
|
|
|
||
|
|
|
|
|
|
|
|
|
Password*1 |
Enter the password for logging |
|
||||
|
|
|
|||||
|
|
|
|
|
in to the LDAP server. |
|
|
|
|
|
|
|
|
|
|
|
|
|
|
|
|
|
|
Policy |
Select a user policy. This defines which |
– |
|||||
|
operation/setting the user can use on the |
|
|||||
|
machine. For details on the user policy, see |
|
|||||
|
“Setting user policies” (page 4-15). |
|
|||||
|
|
|
|
|
|
|
|
Theme Setting |
Select the color theme for the screen. |
Default Theme |
|||||
|
|
|
|
|
|
|
High Contrast |
|
|
|
|
|
|
|
Low Contrast |
|
|
|
|
|
|
|
|
Language Setting |
Select the display language on Message Board |
English |
|||||
|
for this user. |
|
|
French |
|||
|
|
|
|
|
|
|
Spanish |
|
|
|
|
|
|
|
|
Transmission |
Select how to deal with the transmission report. |
OFF |
|||||
Report Setting |
This setting will be the default for “Tx Report” |
||||||
|
when you are logged in on the control panel and |
||||||
|
send a fax. |
|
|
|
|
||
|
|
|
|
|
|
|
|
|
|
Option |
|
|
Description |
|
|
|
|
|
|
|
|
|
|
|
|
OFF |
|
Do not need a transmission report. |
|
||
|
|
|
|
|
|
|
|
|
|
|
Print the transmission report. |
|
|||
|
|
|
|
|
|
|
|
|
|
|
Send the transmission report via |
|
|||
|
|
|
|
e-mail. If you select this option, |
|
||
|
|
|
|
enter an e-mail address where you |
|
||
|
|
|
|
want to send the report. |
|
||
|
|
|
|
|
|
|
|
|
|
|
|
|
|
|
|
*1 The password is not displayed on the screen. To change the password, check “Change Password” and enter the new password.
6 Click [Save].
Click [Back] not to save the setting and return to the “User Registration” list screen.

 NOTE
NOTE
Underlined values are the default settings specified at the time of shipment.
2-4 Registering users

Copying user information
You can copy user information that is already registered to register a new user. The user group information will be copied.
1 |
Log in to Message Board (page 1-4). |
|
2 |
Click [User Information]. |
|
3 |
Click [User Registration]. |
|
4 |
Select the checkbox of the user you want to copy. |
|
|
|
|
|
|
|
|
You cannot copy multiple users at the same time. |
5 |
Click [Duplicate]. |
|
The “Registration” screen is displayed. |
6 |
Change the settings to those for the new user to register. |
7 |
Click [Save]. |
|
Click [Back] not to save the setting and return to the “User Registration” list screen. |
1
2
User information settings
Registering users 2-5
Importing user information
You can import data from an external file in vCard format and register it as user information.
The user information that can be imported and their corresponding vCard item names are indicated below. The letters enclosed in parentheses are the vCard item names.
•Name (N)
•User ID (FN)
•E-Mail Address (EMAIL)

 NOTE
NOTE
•Only vCard format files can be imported.
•If the “User ID” is already registered, it will be overwritten with the imported information.
1 |
Log in to Message Board (page 1-4). |
2 |
Click [User Information]. |
3 |
Click [User Registration]. |
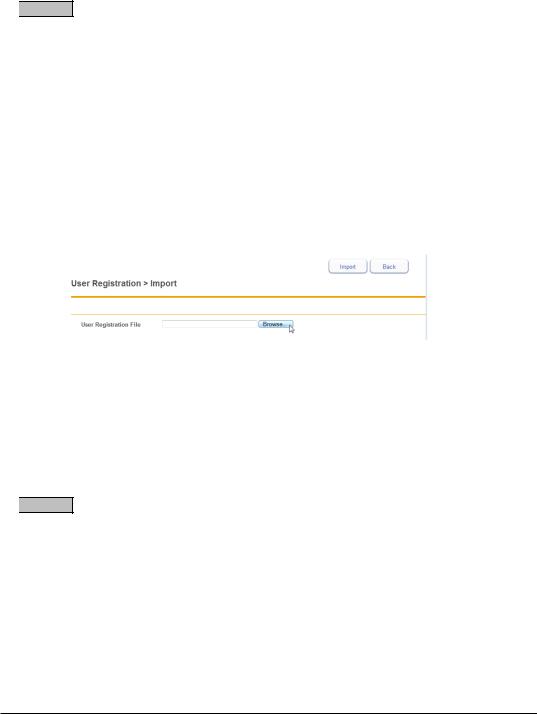
4 |
Click [Import]. |
5 |
Click [Browse], and specify the location and name of the file to import. |
6 Click [Import].
A confirmation message is displayed.
7 Click [OK].
•The import process starts.
•When the import process is complete, the display returns to the “User Registration” list screen.

 NOTE
NOTE
When the display returns to the list screen, the number of successful records is displayed. If the import process failed, message is displayed.
Some examples:
•Could not analyze the imported file.
•Failed to import. An invalid e-mail address(es) has been included.
•Failed to register. The registration capacity has been reached.
•Failed to import. An invalid user ID(s) has been included. Identical user IDs cannot be registered in the “User Registration”.
•Failed to import. An invalid user ID(s) has been included.
2-6 Registering users

Changing user information
You can change user information that has been registered.
1 Log in to Message Board (page 1-4).
2 Click [User Information].
3 Click [User Registration].
4 Click the number or name of the user you want to change.
5 Change the user information.
6 Click [Save].
Click [Back] not to save the setting and return to the “User Registration” list screen.
Deleting user information
You can delete unnecessary user information from the “User Registration” list screen. You can select multiple users to delete.

 NOTE
NOTE
•You cannot delete the user that is currently logged in on the control panel.
•You cannot delete users registered as auto distribution destinations.
1 |
Log in to Message Board (page 1-4). |
|
2 |
Click [User Information]. |
|
3 |
Click [User Registration]. |
|
4 |
Select the checkbox of the users you want to delete. |
|
|
|
|
|
|
|
•To select all the displayed user information, select the top checkbox.
•Click the same checkbox to deselect the item.
5 Click [Delete].
6 Click [OK].
1
2
User information settings
Registering users 2-7

Exporting user information
You can export the selected user information to an external file in the vCard format.
The user information that can be exported and their corresponding vCard item names are indicated below. The letters enclosed in parentheses are the vCard item names.
•Display Name (N)
•User ID (FN)
•E-Mail Address (EMAIL)

 NOTE
NOTE
Only one file is created, even when you select multiple users to export.
1 |
Log in to Message Board (page 1-4). |
|
2 |
Click [User Information]. |
|
3 |
Click [User Registration]. |
|
4 |
Select the checkbox of the users you want to export. |
|
|
|
|
|
|
|
•To select all the displayed user information, select the top checkbox.
•Click the same checkbox to deselect the item.
•If you click [Export] without selecting users, all the users are exported.
5 Click [Export].
6 Click [Save].
The “Save As” dialog box is displayed.
7 Specify the name and location to save the file, and click [Save].
The export process starts.
2-8 Registering users

Registering addresses
You can register frequently used destination information (fax numbers and e-mail addresses) in the address book. By registering the destinations in the address book, you can easily specify the fax number or e-mail address at fax transmission or Scan to e-mail. There are two kinds of address books; the shared address book, which all users can use, and the personal address book, which can be created for each user.
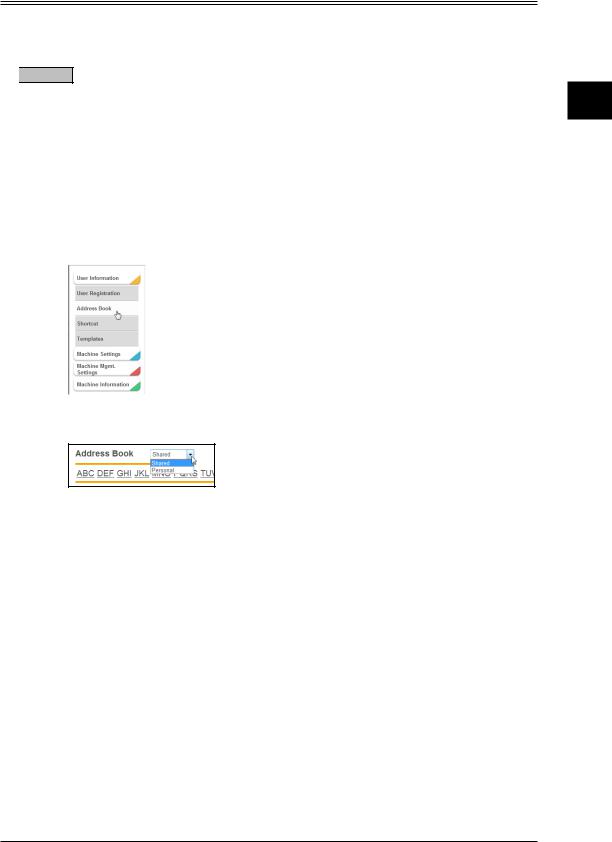
“Address Book” screen
The “Address Book” list screen displays a list of the registered destinations.
Switch the address book between personal and share using the pull-down menu (item 7) next to the title. You can filter the list using the index menu (item 8) located under the title.
1 |
2 |
3 |
4 |
5 |
|
|
||||||||
6 |
|
|
|
|
|
|
|
|
|
|
|
|
|
|
|
|
|
|
|
|
|
|
|
|
|
|
|
|
|
7 |
|
|
|
|
|
|
|
|
|
|
|
|
|
15 |
|
|
|
|
|
|
|
|
|
|
|
|
|
||
8 |
|
|
|
|
|
|
|
|
|
|
|
|
||
|
|
|
|
|
|
|
|
|
|
|
|
|
||
1
2
User information settings
9 |
10 |
11 |
12 |
|
13 |
14 |
|
Button
|
Button name |
Description |
|
|
|
1 |
[Add] |
Registers new destinations. |
|
|
|
2 |
[Duplicate] |
Copies destinations that is already registered. The destination can be |
|
|
edited and used as another destination. |
|
|
|
3 |
[Delete] |
Deletes destinations. |
|
|
|
4 |
[Import] |
Imports destinations from an external file. |
|
|
|
5 |
[Export] |
Exports destinations in the specified file format. |
|
|
|
Registering addresses 2-9

List items
|
Item |
|
|
Description |
|
|
|
|
|
6 |
Message |
Displays message. |
||
|
|
|
|
|
7 |
Personal / Shared |
Switches the displayed Address Book between personal and shared |
||
|
switch |
destinations. |
||
|
|
|
|
|
|
|
|
NOTE |
|
|
|
This switch is only displayed when you have logged in as a user. |
||
|
|
|
|
|
8 |
Filter |
Enables you to filter the displayed destination list according to a letter, |
||
|
|
symbol (Others), all or group. |
||
|
|
|
|
|
9 |
Number |
The number assigned to the destination. |
||
|
|
|
|
|
10 |
Name |
Displays the destination names. |
||
|
|
|
|
|
11 |
Fax Number |
Displays the fax numbers of the registered destination. |
||
|
|
|
|
|
12 |
E-mail Address |
Displays the e-mail addresses of the registered destination. |
||
|
|
|
|
|
13 |
Page Switch |
Enables you to switch pages when destination does not fit on one |
||
|
|
page. (The number of pages differs according to how many items are |
||
|
|
displayed on each page.) |
||
|
|
|
|
|
14 |
Number of displayed |
Switches the number of destinations displayed on one screen. |
||
|
items switch |
|
|
|
|
|
|
|
|
15 |
Destination Search |
Enables you to search for destination. |
||
|
|
You can search for the following items. |
||
|
|
• Name |
||
|
|
• Fax Number |
||
|
|
• E-Mail Address |
||
|
|
Searching is performed separately for personal and shared destinations. |
||
|
|
You can also search groups when groups are displayed. In this case, |
||
|
|
searching is performed for the group name. |
||
|
|
|
|
|
2-10 Registering addresses
Registering destinations
Register destinations either by entering it new, from LDAP server, copying an existing address or importing from an external file.

 NOTE
NOTE
Up to 1,000 destinations can be registered, including both personal and shared destinations.
Registering new destinations
1 Log in to Message Board (page 1-4).
2 Click [User Information].
3 Click [Address Book].
1
2
User information settings
4 Select whether to register the destination as personal or shared information.
If you have logged in to Administrator screen or as a guest, this menu is not display. You can use only the shared address book.
5 Click [Add].
The “Registration” screen is displayed.
Registering addresses 2-11
Loading...