


FGH 710 A1
®
Garden Cultivator |
Kultywator ogrodowy |
|
Translation of original operation manual |
Tłumaczenie oryginalnej instrukcji obsługi |
|
Rotációs kapa |
Vrtni kultivator |
|
Az |
originál használati utasítás fordítása |
Prevod originalnega navodila za uporabo |
Zahradní kultivátor |
Záhradný kultivátor |
|
Překlad originálního provozního návodu |
Preklad originálneho návodu na obsluhu |
|
Kultivator za vrt |
Gartenkultivator |
|
Prijevod originalnih uputa za uporabu |
Originalbetriebsanleitung |
|
|
|
|

Before reading, unfold the page containing the illustrations and familiarise yourself with all functions of the device.
Przed przeczytaniem proszę rozłożyć stronę z ilustracjami, a następnie proszę zapoznać się z wszystkimi funkcjami urządzenia.
Olvasás előtt kattintson az ábrát tartalmazó oldalra és végezetül ismerje meg a készülék mindegyik funkcióját.
Pred branjem odprite stran s slikami navzven in se nato seznanite z vsemi funkcijami naprave.
Před čtením si otevřete stranu s obrázky a potom se seznamte se všemi funkcemi přístroje.
Pred čítaním si odklopte stranu s obrázkami a potom sa oboznámte so všetkými funkciami prístroja.
Prije nego što pročitate tekst, otvorite stranicu sa slikama i upoznajte se na osnovu toga sa svim funkcijama uređaja.
Klappen Sie vor dem Lesen die Seite mit den Abbildungen aus und machen Sie sich anschließend mit allen Funktionen des Gerätes vertraut.
GB |
Translation of original operation manual |
Page |
4 |
PL |
Tłumaczenie oryginalnej instrukcji obsługi |
Strona |
13 |
HU |
Az originál használati utasítás fordítása |
Oldal |
23 |
SI |
Prevod originalnega navodila za uporabo |
Stran |
32 |
CZ |
Překlad originálního provozního návodu |
Strana |
43 |
SK |
Preklad originálneho návodu na obsluhu |
Strana |
52 |
HR |
Prijevod originalnih uputa za uporabu |
Stranica |
61 |
DE/ AT/ CH |
Originalbetriebsanleitung |
Seite |
70 |
|
|
|
|
A |
1a |
1b |
B |
|
|
|
|
1a |
1b |
2 |
|
|
|
13 |
|
|
|
|
|
|
|
|
|
3a |
3a |
|
|
|
|
|
|
|
4 |
|
|
|
|
|
15 |
|
|
|
14 |
14 |
|
|
|
|
|
4 |
|
|
2 |
|
5 |
|
|
5 |
3b |
|
|
5 |
||
|
|
|
||
3b |
|
|
|
15 |
6 |
|
|
|
|
|
|
|
|
|
|
|
|
14 |
14 |
|
|
|
|
|
7 |
|
|
C |
17 |
|
|
|
18 |
|
8 |
|
|
|
|
|
|
|
16 |
|
9 |
|
|
|
2 |
|
|
|
12 |
|
10 |
|
|
|
|
11 |
|
|
12 |
|
D |
|
|
E |
|
|
22 |
|
|
6 |
|
|
|
15 |
|
|
|
|
|
|
|
|
|
20 |
15 |
|
|
|
|
|
|
21 |
|
19 |
|
|
|
11 |
|
|
|
|
|
|
|
|
|
23 10 |
|
|
GB |
|
Contents |
|
Safety notes.......................................... |
4 |
Symbols ............................................. |
4 |
General safety notes.......................... |
5 |
Functional description......................... |
7 |
Functional parts.................................... |
8 |
Intended purpose ................................ |
8 |
Assembly instructions......................... |
8 |
Scope of delivery ............................... |
8 |
Fitting the grip tubing ......................... |
8 |
Operation............................................... |
9 |
Switching on and off........................... |
9 |
Operating instructions........................ |
9 |
Cleaning, maintenance, storage ....... |
10 |
General cleaning and maintenance |
|
work.................................................... |
10 |
Changing the tines........................... |
10 |
Storage ............................................. |
11 |
Guarantee............................................. |
11 |
Replacement parts .............................. |
11 |
Disposal, environmental protection . 12 |
|
Technical specifications.................... |
12 |
EC Declaration of Conformity ........... |
80 |
Exploded diagram .............................. |
83 |
Grizzly Service-Center ....................... |
85 |
Safety notes
This section deals with the basic safety regulations while working with the electric tiller.
Symbols
Symbols on the tool
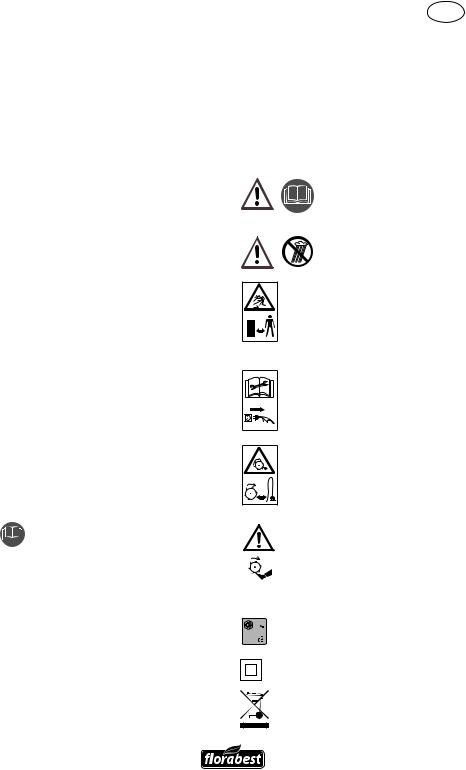
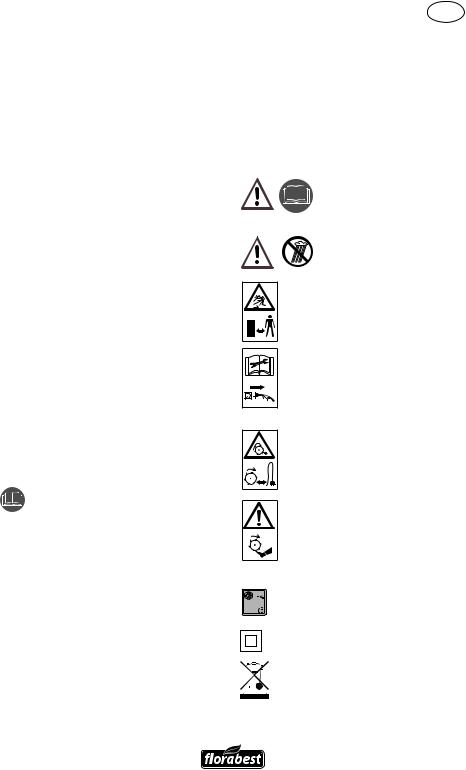
Warning!
Read the user manual
Warning! Protect from rain and damp
Danger of injury from objects |
spinning off! Keep surrounding |
persons away form the hazard |
area. |


 Warning! Switch off the tool and disconnect it from the mains be-
 fore carrying out any cleaning or
  maintenance work.
Before first using the machine, please read this instruction manual carefully, for your own safety and for the safety of others. Keep the manual in a safe place and pass it on to any subsequent owner to ensure that the information contained therein is available at all times.
Danger from damaged mains cable. Keep mains cables away from tines!
Danger of injury from rotating parts. The tines will continue to rotate after the tool has been switched off. Wait for them to stop moving.
93 |
Sound power level LWA in dB. |
|
Safety class II
Do not dispose of electrical equipment in household waste.
4

Symbols in the manual
Warning symbols with information on damage and injury prevention.
Instruction symbols (the instruction is explained at the place of the exclamation mark) with information on preventing damage.
Help symbols with information on improving tool handling.
General safety notes
Warning! Improper use of this tool may lead to serious injury. Read this instruction manual carefully before you start working with the tool, and familiarise yourself with its controls.
•Keep the manual in a safe place and pass it on to any subsequent owner to ensure that the information it contains is always available.
•Remember: the user is responsible for accidents involving other people or their property.
Please read the following safety guidelines in order to avoid risk of fire, electric shock, personal injury and damage to objects:
Preparation:
•The equipment is to be used only by people who are adequately trained.
•For safety reasons, do not allow children or young people under 16 or anyone not familiarised with this instruction manual to use the tool.
GB
•This equipment is not intended for use by people (including children) with limited physical, sensory or intellectual abilities or lack of experience and/or lack of knowledge, other than with the supervision of a person responsible for their safety or with the instruction of the same in terms of how to use the equipment.
•Children must be supervised in order to ensure that they do not play with the equipment.
•Never use the tool while others, especially children or pets, are close by.
•Familiarise yourself with handling the tool and pay attention to all possible dangers that may be overheard while working with the tool.
•Check the terrain on which you will be using the tool, and remove stones, sticks, wires or other foreign objects that may be caught up and spun off.
•Wear proper working clothes, such as firm footwear with non-slip soles and strong long trousers. Do not use the tool barefoot or wearing open-toed sandals.
•To prevent injury from the tines, only switch the tool on in its working position.
•Examine the tool beforehand every time you use it. Do not use the tool when the safety components (such as the power safety catch or guard), cutting parts or bolts are missing, worn or damaged. In particular, check the mains cable and dead-man lever for damage.
•Only replace damaged bolts or tines in complete sets to prevent imbalance.
•Only use replacement and accessory parts delivered and recommended by the manufacturer. Using foreign parts will immediately lead to loss of guarantee.
5

GB
Working with the tool:
Keep your hands and feet away from the tines while working, especially when starting up the tool
–injury hazard!
•Observe any noise-prevention regulations and local by-laws. Using the tool may be limited or prohibited on certain days such as Sundays or public holidays, or during certain times of the day (midday, at night) or in certain areas (such as at health spas and hospitals).
•Do not use the tool to chop up stones or till lawn soil, as such use may damage the tool.
•Do not use the tool in rain, foul weather or damp surroundings (such as near garden ponds or swimming pools). Only use in daylight or good lighting conditions.
•Be sensible. Do not use the tool if you are tired or easily distracted, or after the use of alcohol or medicines. Take a break as soon as you need one.
•Make sure that you are standing firmly when using the tool, especially on slopes. If working on a slope, work along the slope, not upwards or downwards. Be particularly careful when changing direction on the slope. Do not use the tool on excessively steep slopes.
•If there is any danger of slipping on sloped ground, have a second person secure the tool with a rod or cable. The second person should stand up the slope at a safe distance from the tool.
•Always hold the tool securely in both hands while working with it.
•Make sure that the grips are dry and clean. Be careful while moving backwards – danger of tripping over!
•Take particular care when turning or raising the machine.
6
•If the chopping knife is blocked by a foreign body, switch off the equipment and disconnect at the plug. Remove the foreign body (e.g. root) before restarting the equipment.
•Do not use the tool if it is damaged, incomplete or altered without the approval of the manufacturer. In particular, do not work with the tool if guards or protection fittings are damaged or missing.
•Do not overload the tool. Only work in the performance range stated. Do not use tools that do not have sufficient power for heavy jobs. Do not use the tool for any use other than that intended by the manufacturer.
•Avoid damage to the tool. Do not apply extra weight and do not drag the tool over hard surfaces such as tiles or steps.
Stopping work:
Warning! The tines will continue to turn for a few seconds after you switch the tool off. Wait until they have stopped moving – injury hazard!
•Do not lift or transport the tool while the motor is running. Turn the tool off and wait for the tines to stop moving, then disconnect the tool from the mains before changing the area you are working on.
•Never leave the tool unattended where you were using it.
•Switch the tool off, wait for the tines to stop moving and disconnect the tool from the mains under the following circumstances:
-Always before leaving the tool.
-Before removing remnants of soil and plants
-When the tool is not in use
-Before you conduct maintenance or cleaning work on the tool

-If the mains cable is damaged or caught up
-If the tool collides with an obstacle or starts to vibrate in an unusual manner. In this case, examine the tool for damage, and have it repaired if necessary.
•Use the tool away from flammable fluids or gases. Failure to do so may result in fire or explosion.
Maintenance and storage:
•Make sure that all nuts, bolts and screws are tight and that the tool is in safe working order.
•Do not attempt to repair the tool yourself unless you are qualified to do so. Return the tool to our service centre to carry out any work not listed in the user manual.
•Keep the tool in a dry place out of children’s reach.
•Be careful in handling the tool. Keep the tines sharp and clean to improve its working safety and effectiveness.
•Follow the maintenance regulations.
Electrical safety:
Warning! Do not use the tool if the mains or extension cable is damaged – danger of electrical shock.
•Keep the mains cable away from the tines. Always trail the mains cable behind you or the person operating the tool. If the cable becomes damaged during use, immediately disconnect it from the mains.
Never touch the mains cable before unplugging it from the mains.
GB
•Make sure that the mains voltage matches the data on the tool’s rating label.
•If possible, connect the tool to a socket with a residual-current (RC) trip switch at a triggering current of not more than 30 mA.
•Avoid skin contact with earthed objects such as metal fences and posts.
•Make sure that the connector on the extension cable is protected from splash water, and is made of rubber or has a rubber covering. Only use extension cables that are intended for outdoor use and are labelled as such. Use extension cables with a cable core diameter of at least one square millimetre. Always completely unwind the cable reel before use. Check the cable for damage.
•Use the cable hanger fitted for the purpose when using an extension cable.
•Do not carry the tool by the cable. Do not unplug the cable by tugging on it. Keep the cable away from heat, oil and sharp edges.
•If the power cable for this equipment is damaged, it must be replaced with a special power cable, which is available from the manufacturer or a customer service agent of the same.
Functional description
Your hand-operated garden tiller is equipped with a maintenance free electric motor and a gearbox with sump lubrication.
The tool is fitted with four rotating tine wheels that automatically dig themselves into the ground.
The aluminium frame can be folded to aid storage.
Please refer to the following descriptions for the function of the controls.
7
GB
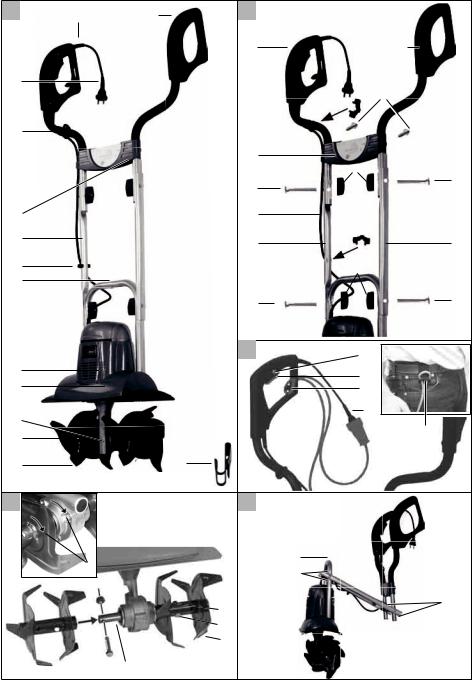
The major functional parts are shown on the foldout pages.
Functional parts
|
1a |
Right-hand fork grip with dead- |
A |
||
|
|
man lever, safety release catch |
|
|
|
|
|
and cable tension relief |
|
1b |
Left-hand fork grip |
2 |
Mains cable |
|
4 |
Plastic cross-plate |
|
5 |
Two central tubes |
|
6 |
Frame tubing |
|
|
3a |
Large cable clip |
|
3b |
Small cable clip |
7 |
Vent |
|
8 |
Motor housing |
|
9 |
Gearbox |
|
10 |
Driveshaft |
|
11 |
Tines |
|
12 |
Belt clip |
|
Intended purpose
The tool is intended for breaking up and tilling coarse soil for the purpose of mixing in fertiliser, peat and compost in domestic areas.
Any use other than that specifically named in this manual may lead to damage to the tool and represents a serious injury hazard for the operator.
The operator or user of the tool is responsible for any damage or injury caused to other persons or property.
This tool is intended for use by adults. Children and persons unfamiliar with the manual must not be allowed to use the tool. Do not use the tool in rain or damp surroundings.
The manufacturer shall not be held liable for damage arising from improper use or incorrect operation of the tool.
8
Assembly instructions
Always disconnect the tool from the mains before conducting any work on it.
Scope of delivery
Carefully remove the tool from the packaging and check that the following parts are complete:
•Motor housing with tines and frame tubing
•Right-hand fork with dead-man lever and permanently fixed mains cable
•Left-hand fork grip
•Plastic cross-plate with cable guide
•Assembly tools, cable clips and belt clip
•User manual
While assembling the tool, make sure that the mains cable does not become caught and has enough slack.
Fitting the grip tubing
B1. Push the two fork grips (1a/1b) into the plastic cross-plate (4), and screw the plate into the corresponding holes in the grip tubing from behind using the bolts provided (13).
2.Screw both central tubes (5) onto the fork handles (1a/1b). To do this, push the enclosed screws
(14)inwards through the holes from the outside and screw them in place with the wing nuts (15).
3.Position the handle rod with the pipe ends to the left and right on the lower frame tubing ( A 6) and screw it in place with the enclosed screws (14) and wing nuts
When assembled correctly, the handle ends point away from the equipment front with the ventilation slits (see 7).
4.Fasten the mains cable with the cable clips supplied:
-Large cable clip (3a) above the cross-plate
-Small cable clip (3b) at the frame tubing.
Operation
Observe noise-abatement laws and local by-laws.
Switching on and off
Note: Before switching the tool on, make sure that the tool is not touching any other objects and hold it firmly in both hands.
C1. Plug the tool into the extension cable.
2.Loop the end of the extension cable and hang it onto the cable tension relief (16) to ease the tension on the cable.
3.Plug the tool into the mains.
4.Hang the extension cable onto the belt clip (12) and fasten it to your trouser belt.
5.To switch on, press the safety release catch (17) and then squeeze the dead-man lever (18). Release the safety release catch (17).
The tines ( A 11) will begin to rotate and dig themselves into the earth.
6.To switch off, release the deadman lever (18).
GB
Warning! The tines will continue to turn for a few seconds after the tool has been switched off. Do not touch the rotating tines – injury hazard!
Operating instructions
Always keep a firm grip on the tool with booth hands and watch your feet.
The tines may cause an accident.
Be careful while moving backwards – danger of tripping!
Do not touch the gearbox, as it may become hot during operation – danger of burns!
To avoid damage to the tool:
•Never lift or drag the tool with the motor running.
•Lift the tool while moving it over hard surfaces such as tiles or steps.
Switch the tool off after working with it and for transport; disconnect from the mains and wait for the tines to stop moving.
• Walk the tool through the soil at normal pace and in a line as straight as possible.
•Always work away from the mains socket. Make sure that the cable is kept well away from the working area. Hanging the cable into the belt clip included in the package will help.
•Overload protection: The motor will cut out immediately if overloaded. The tool cannot be used until it has completely cooled down again.
9
GB
Cleaning, maintenance, storage
Warning! Always return the tool to the service centre for work not described in the manual. Only use original parts.
Switch the tool off, unplug it from the mains, and wait for the tines to stop moving before carrying out any maintenance or cleaning work on the tool.
Perform regular maintenance and cleaning on the tool. This will ensure long, reliable service.
General cleaning and maintenance work
Do not spray the tool down with water (especially not under pressure), and do not clean it under running water.
Wear protective gloves when carrying out maintenance and cleaning work on the tool to avoid injury from cuts.
Always clean the tool thoroughly after each use. Always keep the tool clean. Do not use cleaning fluids or solvents.
•Remove any soil and dirt residues stuck to the tines, driveshaft, tool surface and vents with a brush or dry cloth.
•Spray or rub biodegradable oil into the tines.
•Clean soiled grips with a damp cloth.
•Always check the tool for obvious damage such as loose, worn or damaged parts before using it. Check that all nuts, bolts, and screws are tight.
10
•Check the covers and guards for damage and correct fit. Change them if necessary.
We shall not be held responsible for any damage caused in any of the following ways:
-Improper repair
-Use of non-original parts
-Use other than for the intended purpose
Changing the tines
The tool is fitted with four tine wheels that can easily be changed in pairs. Both of the tine-wheel pairs can be fitted on the left or right, as required.
Alwayschangebothtinepairsatthe sametimetoavoiddamagetothe toolfromimbalance.
Switch the tool off, unplug it and wait for the tines to stop turning.
D1. Unscrew the hex bolt (19) and the self-locking nut (20) on the tine-wheel pair (11).
2.Slide the tine-wheel pair off the shaft (10).
3.Clean the driveshaft with biological oil.
4.Slide the new tines onto the driveshaft with the holes on the axles aligned to the holes on the driveshaft (21).
Make sure that the tines are set to their proper turning direction. The arrows on the gearbox and tines should point the same way
( D No. 22).
5.Slide the hex bolt through the hole and tighten on the selflocking nut (supplied with each new tine wheel pair 23).
Storage
•Leave the motor to cool down before you put the tool into a closed space.
•Keep the tool clean, dry and out of the reach of children.
•Do not cover the tool in plastic bags as moisture may form.
E
Unscrew the wing nuts
and fold the fork grips down to reduce the space taken by the tool.
Make sure that the cable does not become jammed.
•The frame tubing also serves as a hook to hang up the tool at the place of storage.
Do not use the tool with the handle folded closed.
Guarantee
•This tool is subject to a guarantee period of thirty-six months. A shorter guarantee period of 12 months shall apply for commercially used and replacement tools according to statutory regulations.
If you have a justified guarantee claim, please contact us at our service centre (see last page for our telephone number, fax number, and e-mail address). We will then give you the details on the claims procedure.
GB
•Damage caused by natural wear, overload, or improper use is not covered by guarantee. Certain components are subject to normal wear and are not covered by guarantee. Such components particularly include: tines.
•Guarantee service is also conditional upon compliance with cleaning and maintenance instructions
•Any damage caused by faults in materials or manufacturing shall be remedied by free repair or replacement.
•You may have repairs not covered by guarantee carried out for a charge at our service centre. Our service centre will be pleased to supply you with a cost estimate.
We can only process orders on tools sent in with adequate postage and packing.
•Tools sent in by express, measurement cargo or other special forms of postage with freight collect will be refused.
•We will dispose of tools free of charge.
Replacement parts
Use the service address or fax number supplied to order replacement parts. Make sure you include the order number in your order.
Set of tines |
|
Right/left ................... |
Order No. 30261000 |
Please contact our service address for all other replacement part numbers.
11

GB
Disposal, environmental protection
Be environmentally friendly. Return the tool, accessories and packaging to a recycling centre when you have finished with them.
Do not dispose of electrical appliances in household waste.
Return the tool to a recycling centre. The plastic and metal parts used can be separated and sorted for recycling. Ask our service centre for details.
Technical specifications
FGH 710 A1 Electric Tiller
Motor power input........................... |
710 W |
Mains voltage ............................. |
230V AC |
Mains frequency.............................. |
50 Hz |
Safety class......................................... |
II |
Degree of protection.......................... |
IP24 |
Working width ............................. |
360 mm |
Max working depth ...................... |
180 mm |
Number of tine wheels............................ |
4 |
Nominal rotation rate....... |
Approx 230 rpm |
Weight .......................................... |
7.85 kg |
Acoustic pressure level (LpA)
....................69,3 dB(A); KpA = 1,41 dB(A) Measured sound power level (LwA)
...................89,3 dB(A); KwA = 1,41 dB(A) Guaranteed sound power level
.....................................................93 dB(A) Vibration at hand grip (an)
................................2,7 m/s2; K = 1,4 m/s2
Noise and vibration values have been determined according to the standards and regulations named in the declaration of conformity.
Technical and optical alterations may be made without notice for the purposes of improvement. No guarantee can be given for the accuracy of dimensions, notices and specifications stated in this manual. The manufacturer shall therefore not accept liability for statutory claims arising from the manual.
12
Spis treści |
|
Zasady bezpieczeństwa...................... |
13 |
Symbole............................................ |
13 |
Ogólne zasady bezpieczeństwa ....... |
14 |
Opis działania ...................................... |
17 |
Elementy funkcyjne............................. |
17 |
Przeznaczenie...................................... |
17 |
Instrukcja montażu.............................. |
17 |
Zawartość opakowania ..................... |
17 |
Montaż trzonków pałąka ................... |
18 |
Obsługa................................................ |
18 |
Włączanie i wyłączanie..................... |
18 |
Wskazówki dotyczące pracy z |
|
urządzeniem ..................................... |
18 |
Oczyszczanie, konser-wacja, |
|
przechowywanie.................................. |
19 |
Ogólne prace z zakresu oczyszczania i |
|
konserwacji ....................................... |
19 |
Wymiana noży pielących .................. |
20 |
Przechowywanie urządzenia ............ |
20 |
Gwarancja ............................................ |
21 |
Części zamienne.................................. |
21 |
Utylizacja, ochrona środowiska......... |
21 |
Dane techniczne.................................. |
22 |
Deklaracja zgodności z normami UE.80 |
|
Rysunek samorozwijający.................. |
83 |
Grizzly Service-Center ........................ |
85 |
PL
Zasady bezpieczeństwa
Ten rozdział zawiera podstawowe przepisy bezpieczeństwa, obowiązujące przy pracy z kultywatorem ogrodowym.
Symbole
Napisy na urządzeniu
Uwaga!
Przeczytaj instrukcję obsługi.
Uwaga! Chroń przed deszczem i wodą
Niebezpieczeństwo zranienia przez wyrzucone części! Stojące dookoła osoby muszą
się trzymać poza niebezpieczną strefą
Uwaga! Przed rozpoczęciem oczyszczania i konserwacji wyłącz urządzenie i wyjmij wtyczkę z gniazdka sieciowego.
Niebezpieczeństwo wskutek uszkodzenia kabla sieciowego. Trzymaj przewody z daleka od noży pielących!
Przed pierwszym uruchomieniem |
|
|
|
Niebezpieczeństwo zranienia |
|
|
|
||
urządzenia uważnie przeczytaj |
|
|
|
przez obrotowe części! Po |
tę instrukcję obsługi. Przechowuj |
|
|
|
wyłączeniu urządzenia noże |
tę instrukcję w dobrze zabezpi- |
|
|
|
pracują jeszcze przez pewien |
eczonym miejscu i przekazuj ją |
|
|
|
czas. Zaczekaj na zatrzymanie |
|
|
|
||
każdemu kolejnemu właścicielowi |
|
|
|
noży. |
urządzenia, aby zawarte w niej in- |
|
|
|
|
formacje były zawsze dostępne dla |
|
93 |
|
Poziom ciśnienia akustycznego |
osób używających urządzenia. |
|
|
Lwa w dB |
|
|
|
|
Typ zabezpieczenia II
Urządzeń elektrycznych nie należy wyrzucać razem z odpadami domowymi.
13

PL
Symbole w instrukcji obsługi
Symbol niebezpieczeństwa z informacjami na temat ochrony osób i zapobiegania szkodom materialnym.
Znak nakazu (w miejscu wykrzyknika objaśnienie nakazu) z informacjami na temat zapobiegania szkodom.
Znak informacyjny ze wskazówkami ułatwiającymi posługiwanie się urządzeniem.
Ogólne zasady bezpieczeństwa
Ostrzeżenie! Nieprawidłowe obchodzenie się z urządzeniem może spowodować poważne zranienia! Przed rozpoczęciem pracy z urządzeniem uważnie przeczytaj całą instrukcję obsługi i zapoznaj się dokładnie z wszystkimi elementami obsługi urządzenia.
•Przechowuj tę instrukcję w dobrze zabezpieczonym miejscu i przekazuj ją każdemu kolejnemu właścicielowi urządzenia, aby zawarte w niej informacje były zawsze dostępne dla osób używających urządzenia.
•Pamiętaj, że użytkownik urządzenia ponosi odpowiedzialność za wypadki z udziałem innych osób lub ich własności.
Proszę przeczytać następujące wskazówki w celu uniknięcia szkód osobowych i rzeczowych:
Czynności przygotowawcze:
•Urządzenie może być używane tylko przez dostatecznie wyszkolone osoby.
•Ze względów bezpieczeństwa urządzenie nie może być używane przez dzieci i osoby młodociane poniżej 16 roku życia oraz przez osoby nie znające instrukcji obsługi.
•Nigdy nie używaj urządzenia, jeżeli w pobliżu znajdują się ludzie, a szczególnie dzieci i zwierzęta domowe.
•Zapoznaj się z otoczeniem i zwracaj uwagę na możliwe
niebezpieczeństwa, których odgłosów możesz nie dosłyszeć podczas pracy.
•Sprawdź teren, na którym będziesz używać urządzenia i usuń kamienie, gałęzie, druty i inne przedmioty, które mogłyby zostać pochwycone i odrzucone przez urządzenie.
•Noś odpowiednie ubranie robocze, takie jak zabezpieczone przed przecięciem obuwie z podeszwą
przeciwpoślizgową oraz mocne, długie spodnie. Nie używaj urządzenia, jeżeli jesteś boso lub masz na nogach otwarte sandały.
•Aby uniknąć skaleczenia, nie włączaj urządzenia, dopóki nie znajdzie się ono w pozycji roboczej.
•Przed każdym użyciem przeprowadź kontrolę wzrokową urządzenia. Nie używaj urządzenia, jeżeli brakuje mu zabezpieczeń (np. blokady włącznika lub osłony ochronnej), części mechanizmu tnącego lub trzpieni bądź jeżeli elementy te są zużyte albo uszkodzone. W szczególności sprawdź, czy nie są uszkodzone przewód sieciowy oraz dźwignia włącznika.
•W celu wyeliminowania objawów niewyważenia uszkodzone narzędzia i bolce można wymieniać tylko w komplecie.
•Używaj tylko dostarczonych i zalecanych przez producenta części zamiennych i akcesoriów. Stosowanie części innych producentów prowadzi do natychmiastowej utraty uprawnień gwarancyjnych.
14

Praca z urządzeniem:
Podczas pracy – szczególnie podczas włączania urządzenia – trzymaj stopy i ręce z daleka od noży. Niebezpieczeństwo zranienia!
•Przestrzegaj zasad ochrony przed hałasem i przepisów lokalnych. Korzystanie z urządzenia może być ograniczone lub zakazane w określone dni (np. niedziele i święta), w określonych porach dnia (sjesta, cisza nocna) lub w specjalnych strefach (kurorty, kliniki itp.).
•Urządzenia nie wolno stosować do rozdrabniania kamieni ani do przekopywania połaci trawników. Grozi to uszkodzeniem urządzenia.
•Nie używaj urządzenia podczas deszczu, przy złej pogodzie, w wilgotnych miejscach (np. przy sadzawkach ogrodowych albo basenach). Pracuj wyłącznie podczas dnia i przy dobrym oświetleniu.
•Pracuj rozsądnie. Nie pracuj urządzeniem, jeżeli jesteś zmęczony, masz trudności z koncentracją lub jeżeli piłeś alkohol albo przyjmowałeś tabletki. Zawsze dostatecznie wcześnie rób przerwy na odpoczynek.
•Przy pracy zapewnij sobie stabilną postawę, szczególnie na zboczach i wzniesieniach. Zawsze pracuj w poprzek wzniesienia, nigdy do góry albo na dół. Zachowaj szczególną ostrożność przy zmianach kierunku ruchu na wzniesieniu. Nie pracuj na zbyt stromych wzniesieniach.
•Jeżeli na pochyłych powierzchniach istnieje niebezpieczeństwo ześlizgnięcia, urządzenie musi być przytrzymywane przez drugą osobę drążkiem lub na lince. Pomocnik musi się znajdować powyżej urządzenia w wystarczającej odległości od narzędzi roboczych.
PL
•Podczas pracy zawsze pewnie trzymaj urządzenie obydwoma rękami.
•Uważaj, by wszystkie uchwyty były suche i czyste.
Zachowaj uwagę przy chodzeniu do tyłu. Niebezpieczeństwo potknięcia!
•Zachowuj szczególną ostrożność przy zawracaniu maszyny i przyciąganiu jej do siebie.
•Jeżeli dojdzie do blokady noża przez ciało obce, wyłącz urządzenie i wyjmij wtyczkę sieciową z gniazdka. Przed włączeniem urządzenia usuń ciało obce (np. korzeń).
•Nie pracuj uszkodzonym, niekompletnym lub przebudowanym bez zgody producenta urządzeniem. Nigdy nie pracuj urządzeniem z uszkodzonymi lub brakującymi elementami zabezpieczającymi.
•Nie przeciążaj urządzenia. Pracuj tylko w podanym zakresie mocy. Nie używaj maszyn o małej mocy do wykonywania ciężkich prac. Nie używaj urządzenia do celów niezgodnych z jego przeznaczeniem.
•Unikaj uszkodzeń urządzenia. Nie zakładaj żadnych dodatkowych obciążeń i nie ciągnij urządzenia po twardych podłożach, takich jak płytki posadzkowe czy schody.
Przerwy w pracy:
Uwaga! Po wyłączeniu urządzenia noże obracają się jeszcze
przez kilka sekund. Zaczekaj, aż noże zostaną zatrzymane. Niebezpieczeństwo zranienia.
•Urządzenia nie można podnosić ani przenosić, dopóki pracuje silnik. Gdy zmieniasz miejsce pracy, wyłącz urządzenie i zaczekaj na zatrzymanie noży. Następnie wyjmij wtyczkę urządzenia z gniazdka.
•Nigdy nie zostawiaj urządzenia bez opieki w miejscu pracy.
15

PL
• Wyłączaj urządzenie, czekaj na |
Bezpieczeństwo elektryczne: |
zatrzymanie noży i wyjmuj wtyczkę |
|
urządzenia z gniazdka sieciowego: |
Uwaga! Urządzenia wolno używać |
- zawsze, gdy zostawiasz maszynę |
tylko z nieuszkodzonym przewo- |
bez nadzoru, |
dem prądowym i przedłużającym. |
- podczas usuwania części gleby i |
Niebezpieczeństwo porażenia |
roślin, |
prądem. |
- gdy urządzenie nie jest używane, |
|
- przy wszelkich pracach konser- |
• Trzymaj przewód prądowy z daleka |
wacyjnych i przy oczyszczaniu |
od pracujących narzędzi tnących. |
urządzenia, |
Kabel prądowy powinien być zawsze |
- jeżeli kabel prądowy jest uszkodzo- |
prowadzony za osobą pracującą |
ny albo splątany, |
urządzeniem. Jeżeli przewód został |
- jeżeli podczas pracy urządzenie |
uszkodzony podczas użytkowania, |
trafi na przeszkodę albo nietypowo |
należy go natychmiast odłączyć od |
wibruje. W takiej sytuacji sprawdź, |
sieci. |
czy urządzenie nie jest uszkodzone |
Nigdy nie dotykaj kabla przed |
i oddaj je w razie potrzeby do na- |
wyjęciem wtyczki urządzenia z gniaz- |
prawy. |
dka sieciowego. |
• Nie używaj urządzenia w pobliżu pal- |
• Uważaj, by napięcie sieciowe było |
nych cieczy lub gazów. Nieprzestrze- |
zgodne z danymi znajdującymi się na |
ganie tej wskazówki pociąga za sobą |
tabliczce znamionowej. |
niebezpieczeństwo pożaru lub wybu- |
• Przyłączaj urządzenie w miarę |
chu. |
możliwości tylko do gniaz- |
Konserwacja i przechowywanie: |
dek wyposażonych w element |
zabezpieczający przez prądem |
|
• Regularnie sprawdzaj, czy wszystkie |
uszkodzeniowym (bezpiecznik Fi) o |
nakrętki, trzpienie i śruby są dobrze |
wartości nie większej od 30 mA. |
dokręcone, a urządzenie znajduje się |
• Unikaj kontaktu części ciała z uzie- |
w bezpiecznym i sprawnym stanie. |
mionymi częściami (np. ogrodzenia |
• Nie próbuj samodzielnie naprawiać |
metalowe, słupki metalowe). |
urządzenia, jeżeli nie posiadasz po- |
• Złącza przedłużacza musi być zabez- |
trzebnych do tego kwalifikacji. Prace, |
pieczone przed bryzgami wody i być |
które nie zostały opisane w tej instruk- |
wykonane z gumy lub powleczone |
cji obsługi, należy zlecać naszemu |
gumą. Używaj tylko przedłużaczy |
Centrum Serwisowemu. |
przeznaczonych do stosowania na |
• Przechowuj urządzenie w suchym, |
dworze i odpowiednio oznakowany- |
zamkniętym i niedostępnym dla dzieci |
ch. Przekrój żyły kabla przedłużacza |
miejscu. |
musi wynosić co najmniej 1,5 mm2. |
• Obchodź się z urządzeniem starannie |
Przed użyciem zawsze odwijaj kabel z |
i ostrożnie. Dbaj o to, by narzędzia |
bębna kablowego. Zawsze sprawdzaj, |
były zawsze ostre i czyste – umożliwi |
czy kabel nie jest uszkodzony. |
Ci to wydajniejszą i bezpieczniejszą |
• Do mocowania kabla przedłużającego |
pracę. |
używaj tylko przewidzianego do tego |
• Przestrzegaj przepisów konserwacji. |
celu zaczepu kabla. |
|
• Nie noś urządzenia za kabel. Nie |
|
wyciągaj wtyczki z gniazdka, ciągnąc |
|
za kabel. Chroń kabel przed gorącem, |
|
olejem i ostrymi krawędziami. |
16
Opis działania
Prowadzony ręcznie glebogryzarka elektryczna jest wyposażony w bezkonserwacyjny silnik elektryczny i przekładni w kąpieli olejowej.
Mechanizm tnący urządzenia składa się z czterech obrotowych, hartowanych noży pielących, wżerających się samoczynnie w glebę.
Ramę aluminiową można składać, co ułatwia przechowywanie urządzenia. Funkcje elementów urządzenia są podane w poniższym opisie.
Rysunek ilustrujący najważniejsze elementy funkcyjne znajdziesz na rozkładanej stronie.
PL
Każdy inny sposób używania urządzenia, który nie jest jednoznacznie określony jako dozwolony w niniejszej instrukcji obsługi, może spowodować uszkodzenie urządzenia i stanowić poważne zagrożenie dla użytkownika.
Osoba obsługująca urządzenie lub jego użytkownik odpowiada za wszelkie wypadki lub szkody poniesione przez innych ludzi albo uszkodzenia ich własności. Urządzenie może być używane tylko przez osoby dorosłe. Dzieci i osoby, które nie znają tej instrukcji obsługi, nie mogą używać urządzenia. Używanie urządzenia podczas deszczu lub w wilgotnych miejscach jest zabronione.
Producent nie odpowiada za szkody wywołane niezgodnym z przeznaczeniem użytkowaniem lub nieprawidłową obsługą urządzenia.
Elementy funkcyjne |
Instrukcja montażu |
|||||
|
1a |
Prawy uchwyt widełkowy z |
|
|
Przed rozpoczęciem jakichkolwiek |
|
A |
||||||
|
|
|||||
|
|
dźwignią włącznika, przyciskiem |
|
|
czynności i prac przy urządzeniu wy- |
|
|
|
|||||
|
|
odblokowującym i zaczepem |
|
|
jmij wtyczkę z gniazdka sieciowego. |
|
|
|
odciążającym |
Zawartość opakowania |
|||
|
1b |
Lewy uchwyt widełkowy |
||||
2 |
Kabel sieciowy |
|
|
|
||
|
3a |
Duży zacisk kabla |
Ostrożnie wyjmij urządzenie z opakowa- |
|||
|
3b |
Mały zacisk kabla |
nia i sprawdź, czy w opakowaniu znajdują |
|||
4Pałąk poprzeczny z tworzywa szsię wszystkie wymienione niżej części: tucznego
5 |
Słupki środkowe |
• |
Obudowa silnika z nożami tnącymi i |
6 |
Trzonek pałąka |
|
trzonkiem pałąka. |
7 |
Szczeliny wentylacyjne |
• |
Prawy uchwyt widełkowy z |
8 |
Obudowa silnika |
|
włącznikiem i zamontowanym na stałe |
9 |
Przekładnia |
|
kablem sieciowym. |
10 |
Wał napędowy |
• |
Lewy uchwyt widełkowy |
11 |
Noże pielące |
• |
Poprzeczny pałąk z tworzywa sztucz- |
12 |
Zaczep na pasek |
|
nego z prowadnicą kabla. |
Przeznaczenie |
• Akcesoria montażowe, zaciski kabla i |
||
|
zaczep na pasek. |
||
Urządzenie jest przeznaczone do pielenia |
• |
Instrukcja obsługi |
|
|
|
||
i rozdrabniania gleby o dużych bryłach i do |
|
Przy montażu urządzenia uważaj, |
|
wprowadzania nawozu, torfu i kompostu w |
|
żeby nie zakleszczyć kabla i |
|
ogrodach domowych. |
|
pozostawić mu wystarczającą |
|
|
|
|
swobodę ruchu. |
|
|
|
17 |
PL
Montaż trzonków pałąka
B1. Wsuń oba uchwyty widłowe (1a/1b) do pałąka poprzecznego
(3).Przykręć je dostarczonymi śrubami (13) od tyłu do przewidzianych w tym celu otworów w trzonku uchwytu.
2.Przykręć oba słupki środkowe
(5)do uchwytów widełkowych (1a/1b). W tym celu przesuń obie dołączone śruby (14) od zewnątrz do wewnątrz przez otwory i dokręć je nakrętkami motylkowymi (15).
3.Przystaw uchwyt z końcami rurek skierowanymi na boki z prawej i lewej strony do dolnego trzonka pałąka (6), po czym przykręć
go dołączonymi śrubami (14) i nakrętkami motylkowymi (15).
Przy prawidłowym montażu końce uchwytu są skierowane szczelinami wentylacyjnymi od przedniej strony urządzenia (patrz 7).
4.Zamocuj kabel sieciowy dostarczonymi zaciskami:
-duży zacisk kabla (3a) powyżej pałąka poprzecznego,
-mały zacisk kabla (3b) na trzonku.
Obsługa
Przestrzegaj zasad ochrony przed hałasem i przepisów lokalnych.
Włączanie i wyłączanie
Ostrożnie! Przed włączeniem urządzenia upewnij się, że nie dotyka ono żadnych przedmiotów i trzymaj je pewnie obydwiema rękami.
C1. Połącz kabel przedłużający z wtyczką prądową urządzenia.
2.Aby zabezpieczyć kabel przedłużający przed siłą ciągu, uformuj z jego końca pętlę i zawieś ją w zaczepie odciążającym (16).
3.Przyłącz urządzenie do sieci elektrycznej.
4.Zawieś kabel przedłużający w zaczepie na pasek (12) i zamocuj zaczep do paska spodni.
5.Aby włączyć urządzenie, wciśnij przycisk odblokowujący (17) w uchwycie, a następnie naciśnij dźwignię włącznika (18). Zwolnij przycisk odblokowujący (17).
Noże zaczynają się obracać i wkopują się w glebę.
6.Aby wyłączyć urządzenie, zwolnij dźwignię włącznika (18).
Uwaga! Po wyłączeniu urządzenia noże obracają się jeszcze
przez kilka sekund. Nie dotykaj obracających się noży. Niebezpieczeństwo zranienia.
Wskazówki dotyczące pracy z urządzeniem
Podczas pracy zawsze pewnie trzymaj urządzenie obydwoma rękami i uważaj na swoje stopy. Niebezpieczeństwo wypadku – noże pielące.
Zachowaj uwagę przy chodzeniu do tyłu. Niebezpieczeństwo potknięcia!
Nie dotykaj przekładni – po długiej pracy może się ona silnie rozgrzewać. Niebezpieczeństwo oparzenia!
18
Aby zapobiec uszkodzeniu urządzenia:
•Nigdy nie podnoś ani nie ciągnij urządzenia z pracującym silnikiem.
PL
Przed rozpoczęciem wszelkich prac konserwacyjnych i oczyszczania wyłącz urządzenie, wyjmij wtyczkę sieciową z gniazdka i zaczekaj, aż noże zostaną zatrzymane.
•Podnoś urządzenie, gdy prze-
nosisz je po twardych powierzRegularnie wykonuj wymienione poniżej chniach, np. płytkach posadzczynności konserwacyjne. Zapewni to
kowych czy schodach. |
długą, niezawodną pracę urządzenia. |
Po pracy i przed przeniesieniem wyłącz urządzenie, wyjmij wtyczkę sieciową z gniazdka i zaczekaj, aż nóż się zatrzyma.
• Prowadź urządzenie w glebie tylko z szybkością idącego człowieka po jak najprostszych torach.
•Pracując oddalaj się zawsze od gniazdka sieciowego. Uważaj, żeby kabel nie dostał się do obszaru pracy! Pomoże Ci
w tym dostarczony razem z urządzeniem zaczep na pasek, służący do zawieszania kabla.
•Zabezpieczenie przeciążeniowe: W razie przeciążenia silnik wyłącza się automatycznie. Urządzenie jest znów gotowe do pracy dopiero po całkowitym ostygnięciu.
Oczyszczanie, konserwacja, przechowywanie
Ostrożnie! Prace, które nie zostały opisane w tej instrukcji obsługi, należy zlecać naszemu Centrum Serwisowemu. Stosuj tylko oryginalne części.
Ogólne prace z zakresu oczyszczania i konserwacji
Nie spryskuj urządzenia wodą (szczególnie wodą pod wysokim ciśnieniem) i nie myj go pod bieżącą wodą.
Podczas oczyszczania i konserwacji urządzenia noś rękawice ochronne, aby uniknąć skaleczeń.
Po każdym użyciu dokładnie oczyść urządzenie. Zawsze utrzymuj urządzenie w czystości. Nie używaj środków czyszczących ani rozpuszczalników.
•Usuwaj resztki gleby i zanieczyszczenia z noży, wału napędowego, powierzchni urządzenia i szczelin wentylacyjnych przy użyciu szczotki lub suchej szmatki.
•Spryskuj lub nacieraj noże olejem ulegającym biodegradacji.
•Zabrudzone uchwyty oczyszczaj wilgotną szmatką.
•Przed każdym użyciem sprawdzaj, czy urządzenie nie wykazuje widocznych wad i usterek, takich jak np. luźne, zużyte lub uszkodzone części. Sprawdzaj, czy wszystkie nakrętki, trzpienie i śruby są dobrze przykręcone.
•Sprawdzaj, czy osłony i elementy zabezpieczające nie są uszkodzone i czy są one dobrze zamocowane. W razie potrzeby wymień te części na nowe.
19
PL
Nie odpowiadamy za szkody wywołane przez nasze urządzenia, które zostały spowodowane
-przed nieprawidłowe naprawy,
-przez używanie nieoryginalnych części,
-przez niezgodne z przeznaczeniem użytkowanie.
Wymiana noży pielących
Urządzenie jest wyposażone w cztery noże pielące, które można łatwo
wymieniać parami. Obie pary noży można montować z lewej lub prawej strony.
Zawszewymieniajobieparynoży jednocześnie,pozwolitozapobiec uszkodzeniomurządzeniawskutek niewyważenia.
Wyłącz urządzenie, wyjmij wtyczkę urządzenia z gniazdka sieciowego i zaczekaj na zatrzymanie noży.
D1. Poluzuj śrubę z łbem sześciokątnym (19) i nakrętkę samozabezpieczającą (20) pary noży (11).
2.Zsuń parę noży z wału napędowego (10).
3.Oczyść wał napędowy olejem ulegającym biodegradacji.
4.Nasuń nowy nóż na wał napędowy w taki sposób, aby otwory osi noża znalazły się w pozycji zgodnej z otworami na wale napędowym (21).
Zwróć uwagę na prawidłowy kierunek obrotu noży pielących. Strzałki na przekładni i nożach muszą wskazywać ten sam kierunek ( D 22).
20
5.Wsuń śrubę z łbem sześciokątnym przez otwór i przykręć nową nakrętkę samozabezpieczającą (dołączoną do nowego noża) (23).
Przechowywanie urządzenia
•Przed odstawieniem urządzenia w zamkniętym pomieszczeniu zaczekaj na ostygnięcie silnika.
•Przechowuj urządzenie w suchym i niedostępnym dla dzieci miejscu.
Poluzuj nakrętki motylkowe ( A 4) i przełóż uchwyty widełkowe na dół, aby urządzenie zajmowało mniej miejsca.
Nie wolno przy tym zacisnąć kabli.
•Trzonek pałąka ( B 5) służy też do wieszania urządzenia w miejscu przechowywania.
•Nie zawijaj urządzenia w worki plastikowe, może w nich powstawać wilgoć.
Urządzenia nie wolno używać z przełożonym trzonkiem uchwytu.
Gwarancja
•Na niniejsze urządzenie udzielamy 36-miesiącznej gwarancji. W przypadku użytkowania zarobkowego i urządzeń wymiennych obowiązuje ustawowy skrócony okres gwarancji wynoszący 12 miesięcy.
W razie wystąpienia uprawnionego roszczenia gwarancyjnego prosimy o kontakt telefoniczny z naszym Centrum Serwisowym (nr tel., nr telefaksu, e-mail zobacz ostatnią stronę). Otrzymasz tu dalsze informacje na temat załatwiania reklamacji.
•Szkody wywołane przez naturalne zużycie, przeciążenie lub
nieprawidłową obsługę są wykluczone z zakresu gwarancji. Niektóre części konstrukcyjne ulegają normalnemu zużyciu i są wykluczone z zakresu gwarancji. Są to w szczególności: noże pielące.
•Warunkiem skorzystania z uprawnień gwarancyjnych jest ponadto przestrzeganie wskazówek dotyczących oczyszczania i konserwacji urządzenia.
•Szkody wywołane wadami materiałowymi lub produkcyjnymi zostaną bezpłatnie usunięte przez dostarczenie zastępczego urządzenia bądź przez naprawę.
•Naprawy nie objęte gwarancją można zlecać odpłatnie naszemu Centrum Serwisowemu. Nasze Centrum Serwisowe chętnie sporządzi kosztorys naprawy.
Przyjmujemy tylko urządzenia, które zostały nam przysłane w odpowiednim opakowaniu z opłaceniem pełnego kosztu przesyłki.
•Przesyłki nadane bez uiszczenia wystarczającej opłaty pocztowej, w charakterze przesyłki o nietypowych wymiarach, ekspresem lub inną przesyłką specjalną nie będą przyjmowane.
PL
•Utylizację Twoich urządzeń przeprowadzimy bezpłatnie.
Części zamienne
Nabywaj części zamienne pod podanym adresem serwisowym lub numerem telefaksu: przy składaniu zamówienia koniecznie podaj przyporządkowany zamawianej części numer katalogowy.
Komplet noży pielących |
|
prawy / lewy.................. |
Nr kat. 30261000 |
Wszystkie inne numery części zamiennych otrzymasz pod adresem naszego serwisu.
Utylizacja, ochrona środowiska
Przekaż urządzenie, jego akcesoria i opakowanie do zgodnej z przepisami o ochronie środowiska naturalnego utylizacji.
Urządzeń elektrycznych nie należy wyrzucać razem z odpadami domowymi.
Oddaj urządzenie w punkcie utylizacji odpadów. Użyte w produkcji urządzenia elementy z tworzyw sztucznych i metalu można od siebie oddzielić i poddać osobnej utylizacji. Zwróć się po poradę do naszego Centrum Serwisowego.
21

PL
Dane techniczne
Glebogryzarka elektryczna.FGH 710 A1
Moc pobierana silnika..................... |
710 W |
Napięcie sieciowe........................... |
230V~ |
Częstotl. sieciowa............................ |
50 Hz |
Klasa ochronności.............................. |
II |
Rodzaj ochrony.................................. |
IP24 |
Szerokość robocza ...................... |
360 mm |
Głębokość robocza.............. |
max. 180 mm |
Ilość noży................................................. |
4 |
Robocza pr. obrotowa ...... |
ok. 230 obr/min |
Ciężar............................................ |
7,85 kg |
Poziom ciśnienia |
|
akustycznego (LpA) |
|
................ 69,3 dB (A); KpA = 1,41 dB (A) poziom mocy
akustycznej (LWA)
................. 89,3 dB (A); KWA = 1,41 dB (A) gwarantowany poziom mocy
akustycznej................................. |
93 dB (A) |
Wibracja (an)........... |
2,7 m/s2 ; K = 1,4 m/s2 |
Wartości akustyczne i prędkość wibracji zostały określone zgodnie z wymogami norm podanych w deklaracji producenta. Zmiany techniczne i optyczne mogą być dokonywane bez zapowiedzi w ramach procedur rozwoju technicznego. Wszelkie wymiary, wskazówki i dane tej instrukcji obsługi są w związku z tym niewiążące. W związku z tym wyklucza się wszelkie roszczenia prawne zgłaszane na podstawie tej instrukcji obsługi.
22
Tartalom |
|
Biztonsági utasítások.......................... |
23 |
Szimbólumok .................................... |
23 |
Általános biztonsági utasítások ........ |
24 |
Működés leírása .................................. |
26 |
Működési elemek................................. |
27 |
Alkalmazási célok................................ |
27 |
Szerelési útmutató .............................. |
27 |
Szállítás terjedelme .......................... |
27 |
Markolatok szerelése ....................... |
27 |
Kezelés ................................................ |
28 |
Beés kikapcsolás ........................... |
28 |
Kezelési útmutató ............................ |
28 |
Tisztítás, karbantartás, tárolás........... |
29 |
Általános tisztítási és karbantartási |
|
munkálatok ....................................... |
29 |
Kapakések cseréje ........................... |
29 |
Tárolás.............................................. |
30 |
Garancia............................................... |
30 |
Pótalkatrészek ..................................... |
31 |
Eltávolítás és környezetvédelem ...... |
31 |
Műszaki adatok ................................... |
31 |
EG konformitás nyilatkozat................ |
81 |
Műszaki adatok.................................... |
83 |
Grizzly Service-Center ........................ |
85 |
Kérjük, olvassa el az első üzembe helyezés előtt figyelmesen a használati utasítást. Őrizze meg jól az utasítást, és adja tovább minden következő felhasználónak, hogy az információk mindenkor kéznél legyenek.
HU
Biztonsági utasítások
Ez a fejezet a rotációs kapával végzett munkára vonatkozó alapvető biztonsági előírásokat tartalmazza.
Szimbólumok
Feliratok a gépen
Vigyázat!
Olvassa el a használati utasítást!
Vigyázat! Óvjuk az esőtől és nedvességtől
Sérülés veszélye áll fenn felcsapott tárgyak által! A közelben tartózkodó személyeket tartsuk távol a veszélyes területtől.
Vigyázat! Tisztítási és karbantartási munkálatok előtt kapcsoljuk ki a gépet és húzzuk ki a hálózati kapcsolót.
Megrongálódott hálózati kábel esetén sérülés veszélye áll fenn. A csatlakozó vezetékeket tartsuk távol a kapakésektől!
A forgó részek által sérülés veszélye áll fenn! A gép kikapcsolása után a kések tovább futnak. Várjuk meg, míg teljesen leállnak.
93 |
Hangteljesítményszint megadása |
|
LWA dB-ben. |
||
|
||
|
Védőcsoport II |
Elektromos szerszámok nem tartoznak a háztartási hulladékba.
23
HU
Szimbólumok az utasításban
Veszélyjelek a személyi sérülés vagy anyagi kár elhárítására vonatkozó utasításokkal.
Utasító jelzések (felkiáltó jel helyett az utasítás magyarázata áll) az anyagi kár elhárítására vonatkozó utasításokkal.
Tájékoztató jelzések, amelyek a szerszámgép optimális kezeléséről informálnak.
Általános biztonsági utasítások
Figyelem! Ez a szerszámgép helytelen kezelés esetén komoly sérüléseket okozhat. Mielőtt a géppel dolgozni kezdene, olvassa el figyelmesen a használati utasítást és ismerkedjen meg jól a gép kezelési elemeivel.
•Őrizze meg jól az utasítást, és adja tovább minden következő felhasználónak, hogy az információk mindenkor kéznél legyenek.
•Gondoljon arra, hogy a felhasználó felelős más személyek balesetéért, vagy azok tulajdonáért.
A személyi és anyagi károk elkerülése érdekében olvassa el következő biztonsági tudnivalókat:
Előkészületek:
•A berendezést csak megfelelően képzett személyek kezelhetik.
•Biztonsági okokból gyermekek és 16 éven aluli fiatalok, valamint olyan személyek, akik nem ismerik a használati utasítást, nem használhatják a szerszámgépet.
24
•Ne használja sohasem a gépet, ha személyek, különösen gyermekek vagy háziállatok tartózkodnak a közelben.
•Ismerkedjen meg környezetével, és ügyeljen a lehetséges veszélyekre, amelyeket munkavégzés közben esetleg nem hallana.
•Vegye szemügyre a terepet, amelyen a gépet használni fogja és távolítsa el a köveket, vesszőket, drótdarabokat és más idegen tárgyakat, amelyeket a gép elkaphat és tovaröpíthet.
•Viseljen megfelelő munkaruhát, mint csukott, csúszásgátló cipőt és robusztus, hosszúszárú nadrágot. Ne használja a gépet mezítláb vagy nyitott szandálban.
•Vágási serülések elkerülése érdekében ne kapcsolja be a gépet, ha az nincs munkapozícióban.
•Minden használat előtt nézze át a gépet. Ne használja a gépet, ha a biztonsági berendezések (pl. bekapcsolásgátló vagy védőburkolat), a vágóberendezés részei vagy csapszegei hiányoznak, kopottak vagy megrongálódtak. Ellenőrizze különösen, hogy a hálózati csatlakozó vezeték és az indítókar nem sérült-e.
•A kiegyensúlyozatlanság elkerülése érdekében a megrongálódott vágószerszámokat és csapszegeket csak készletenként szabad cserélni.
•Csak a gyártó által szállított és ajánlott alkatrészeket és tartozékokat használjon, idegen alkatill. tartozékrészek alkalmazása esetén a garanciaigény azonnal érvényét veszti.
A szerszámgép kezelése:
Munka közben - különösen üzembe helyezéskor - tartsa távol kezeit és lábait a késektől. Sérülés veszélye áll fenn!

•Vegye figyelembe a zajvédelmet és a helyi előírásokat. A szerszámgép használata bizonyos napokon (pl. vasárés ünnepnapokon), bizonyos napszakokban (déli szünet, éjjeli pihenő) vagy speciális területeken (pl. üdülőhelyek, klinikák stb.) korlátozott vagy tiltott lehet.
•A szerszámgépet nem szabad kőaprításra vagy füves területek felásására használni. Az ilyen használat a szerszámgép megrongálódásához vezethet.
•Ne használja a szerszámgépet esőben, rossz időjáráskor vagy nedves környezetben (pl. kerti tavak vagy úszómedencék környékén). Csak nappali fénynél vagy jó megvilágításnál dolgozzon.
•Fogjon értelmesen a munkához. Ne dolgozzon a géppel, ha fáradt vagy nem tud koncentrálni ill. ha alkoholt fogyasztott vagy tablettát vett be. Tartson mindig időben munkaszünetet.
•Ügyeljen arra, hogy munka közben biztosan álljon, különösen lejtőkön. Mindig a lejtőre merőlegesen haladjon, sohasem a lejtőn felvagy lefelé. Legyen különösen óvatos, ha lejtőn irányt változtat. Ne dolgozzon túlságosan meredek lejtőkön.
•Ha lejtős terepen fennáll a csúszás veszélye, a gépet egy kísérő személy rúd vagy kötél segítségével tartsa. A kísérő személy a gép felett, a munkaeszközöktől kellő távolságra haladjon.
•Tartsa a gépet munka közben mindig szorosan mindkét kezével.
•Ügyeljen arra, hogy a markolatok szárazak és tiszták legyenek. Vigyázat! Ha hátrafelé halad, megbotlás veszélye áll fenn!
•Legyen különösen óvatos, ha megfordítaná a gépet, vagy magához húzná azt.
•Amennyiben az aprítókést idegentest blokkolná, kapcsolja ki a berendezést és húzza ki a hálózati csatlakozót. Tá-
HU
volítsa el az idegentestet (pl. gyökeret), mielőtt újra üzembe helyezné a berendezést.
•Ne dolgozzon sérült, hiányos vagy a gyártó engedélye nélkül átalakított szerszámgéppel. Mindenek előtt ne dolgozzon olyan géppel, amelyen megrongálódott vagy hiányzik a védőberendezés.
•Ne terhelje túl a gépet. Csak a megadott teljesítménytartományban dolgozzon. Ne használjon alacsony teljesítőképességű gépet nehéz munkához. Ne használja gépét olyan célokra, amelyek nem felelnek meg rendeltetésének.
•Kerülje a szerszámgép megrongálódását. Ne helyezzen rá nehezéket, és ne húzza a gépet kemény felületen, mint pl. padlólapokon vagy lépcsőkön.
Munkamegszakítások:
Vigyázat! A szerszámgép kikapcsolása után a kések még néhány másodpercig tovább forognak.
Várja meg, míg a kések leállnak. Sérülés veszélye áll fenn.
•A szerszámgépet nem szabad megemelni vagy szállítani, amíg a motor dolgozik. Ha munkaterületet változtat, kapcsolja ki a gépet és várjon, amíg a kések leállnak. Ezután húzza ki a hálózati csatlakozó dugót.
•Ne hagyja a szerszámgépet sohasem felügyelet nélkül a munkahelyen.
•Kapcsolja ki a gépet, várja meg, míg a kések leállnak, és húzza ki a hálózati csatlakozó dugót:
-mindig, ha elhagyja a gépet,
-ha földet vagy növényrészeket távolít el,
-ha a gépet nem használja,
-minden karbantartási és tisztítási műveletnél,
-ha a csatlakozó vezeték megrongálódott vagy összegabalyodott,
25

HU
-ha a gép akadályba ütközik vagy szokatlan vibrálás lép fel. Ilyen esetekben ellenőrizze, hogy a gép megrongálódott-e és szükség esetén javíttassa meg.
•Ne használja a gépet gyúlékony anyagok vagy gázok közelében. Ellenkező esetben tűzés robbanásveszély áll fenn.
Karbantartás és tárolás:
•Gondoskodjon róla, hogy az anyák, a csapszegek és csavarok szorosan meg legyenek húzva és a gép biztonságos, munkára alkalmas állapotban legyen.
•Ne próbálkozzon maga a gép megjavításával, ha erre nincs kiképezve. Minden olyan munkát, amely nem szerepel ebben az utasításban, csak szerviz központunk végezhet.
•Tartsa a gépet száraz, gyermekektől elzárt helyen.
•Bánjon kíméletesen gépével. Tartsa a szerszámokat éles és tiszta állapotban, így jobban és biztonságosabban tud dolgozni.
•Vegye figyelembe a karbantartási előírásokat.
Elektromos biztonság:
•Ügyeljen arra, hogy a hálózati feszültség megegyezzen a típuscímke adataival.
•Kapcsolja a szerszámgépet lehetőleg csak hibaáram-védőberendezéssel (FIkapcsoló) rendelkező aljzatba, amely nem több mint 30 mA-os névleges áramot szolgáltat.
•Mellőzze testének földelt tárgyakkal való érintkezését (pl. fémkerítés, fémoszlop).
•A hosszabbító kábel kuplungjának gumiból vagy gumival átvont, fröccsenő víztől védett anyagból kell lennie.
Csak olyan hosszabbító kábelt használjon, amely kültéri használatra alkalmas és a megfelelő jelöléssel rendelkezik. A hosszabbító kábel zsinórkeresztmetszete legalább 1,5 mm2 legyen. Használat előtt tekerje le mindig az egész kábeldobot. Ellenőrizze, hogy a kábel nem sérült- e.
•Használja a hosszabbító kábel elhelyezéséhez az erre szánt kábelfelfüggesztést.
•Ne a kábelnél fogva vigye a gépet. Ne használja a kábelt arra, hogy annál fogva húzza ki a csatlakozó dugót az aljzatból. Óvja a kábelt hőtől, olajtól és éles szélű tárgyaktól.
Vigyázat! A gépet csak ép csatla- |
Működés leírása |
kozóés hosszabbító vezetékkel |
|
szabad használni. Áramütés ves- |
|
zélye áll fenn. |
A kézzel irányított kerti elektromos talajkapa |
• Tartsa távol a hálózati csatlakozó ve- |
nem igényel karbantartást, a meghajtás |
kenése olajfürdő segítségével történik. A |
|
zetéket a vágószerszámoktól. Vezesse |
gép vágóberendezése négy forgó, edzett |
a hálózati kábelt elvből mindig maga |
kapakésből áll, amelyek önműködően hatol- |
mögött. Ha a vezeték használat közben |
nak a talajba. |
megsérülne, húzza ki azonnal a hálózati |
Az alumíniumváz a könnyebb tárolás ér- |
aljzatból. |
dekében összecsukható. |
Semmiképpen se nyúljon a hálózati |
A kezelési elemek működését a |
kábelhez, amíg a hálózati csatlakozó |
következő leírásban találja. |
dugót ki nem húzta. |
|
26
 Loading...