


Petrol Grass Trimmer FBS 43 A1
K |
N |
Petrol Grass Trimmer |
Benzinmotoros fűkasza |
Operation and Safety Notes |
Kezelési és biztonsági utalások |
Original operating instructions |
Eredeti használati utasítás |
V
Bencinska kosilnica z nitjo
Navodila za upravljanje in varnostna opozorila Originalna navodila za uporabo
D
Benzinový křovinořez
Pokyny pro obsluhu a bezpečnostní pokyny Originální návod k obsluze
W |
T |
Benzínový vyžínač |
Kosa spalinowa |
Pokyny pre obsluhu a bezpečnostné pokyny Originálny návod na obsluhu
F A C
Benzin-Sense
Wskazówki dotyczące obsługi i bezpieczeństwa Instrukcją oryginalną
Bedienungsund Sicherheitshinweise / Originalbetriebsanleitung
IAN 87780
N V
D W T
Anleitung_3401993_LB4.indb 1 |
04.12.12 15:42 |

K
Before reading, unfold the page containing the illustrations and familiarise yourself with all functions of the device.
N
Olvasás előtt kattintson az ábrát tartalmazó oldalra és végezetül ismerje meg a készülék mindegyik funkcióját.
V
Pred branjem stran s slikami odprite navzven in se nato seznanite z vsemi funkcijami naprave.
D
Před čtením si otevřete stranu s obrázky a potom se seznamte se všemi funkcemi přístroje.
W
Pred čítaním si odklopte stranu s obrázkami a potom sa oboznámte so všetkými funkciami prístroja.
T
Przed przeczytaniem proszę rozłożyć stronę z ilustracjami, a następnie proszę zapoznać się z wszystkimi funkcjami urządzenia.
F A C
Klappen Sie vor dem Lesen die Seite mit den Abbildungen aus und machen Sie sich anschließend mit allen Funktionen des Gerätes vertraut.
GB |
Operation and Safety Notes |
Page |
8 |
HU |
Kezelési és biztonsági utalások |
Oldal |
23 |
|
|
|
|
SI |
Navodila za upravljanje in varnostna opozorila |
Stran |
40 |
|
|
|
|
CZ |
Pokyny pro obsluhu a bezpečnostní pokyny |
Strana |
55 |
SK |
Pokyny pre obsluhu a bezpečnostné pokyny |
Strana |
70 |
|
|
|
|
PL |
Wskazówki dotyczące obsługi i bezpieczeństwa |
Strona |
86 |
|
|
|
|
DE/AT/CH |
Bedienungsund Sicherheitshinweise |
Seite |
104 |
|
- 2 - |
|
|
Anleitung_3401993_LB4.indb 2 |
04.12.12 15:42 |
1
4 5
3
8 |
7 |
6 |
1
9
2
 10
10
11
12
2 |
13 |
14 |
15 |
16 |
17 |
|
|
18a |
18b |
|||||||||||
|
|
|
|
|
|
|
|
|
|
|
|
|
|
|
|
|
|
|
|
|
|
|
|
|
|
|
|
|
|
|
|
|
|
|
|
|
|
|
|
|
|
|
|
|
|
|
|
|
|
|
|
|
|
|
|
|
|
|
|
|
|
|
|
|
|
|
|
|
|
|
|
|
|
|
|
|
|
|
|
|
|
|
|
|
|
|
|
|
|
|
|
|
|
|
|
|
|
|
|
|
|
|
|
|
|
|
|
|
|
|
|
|
|
|
|
|
|
|
|
|
|
|
|
|
|
34 |
33 |
32 |
30 |
29 |
28 |
27 |
26 |
21 |
20 |
19 |
- 3 -
Anleitung_3401993_LB4.indb 3 |
04.12.12 15:42 |
3a |
|
|
|
|
19 |
|
3 |
|
4a |
|
|
2 |
1 |
A |
5a |
|
|
6b
22
3b |
|
|
|
|
20 |
|
|
21 |
4b |
|
|
34 |
32 |
A |
|
B |
|
|
33 |
|
5b |
|
15 |
|
|
|
|
|
16 |
6c |
|
|
|
|
18 |
|
|
- 4 - |
3c
 20
20
4c |
|
|
6a |
18a |
18b |
25 24 23 22
6d
23
Anleitung_3401993_LB4.indb 4 |
04.12.12 15:42 |

|
|
|
|
|
|
|
|
|
|
|
|
|
|
|
|
|
|
|
|
|
|
|
|
|
|
|
|
|
|
|
|
|
|
|
|
|
|
|
|
|
|
|
|
|
|
|
|
|
|
|
|
|
|
|
|
|
|
|
|
|
|
|
|
|
|
|
|
6e |
|
|
|
|
|
|
|
|
|
6f |
|
|
|
|
6g |
|
|
|
|
|
|
|
|
|
||||||
|
|
|
|
|
|
|
|
|
|
|
|
|
|
|
|
|
|
|
|
|
|
|
|
|
|
|
|
|
|
|
|
|
|
|
|
|
|
25 |
|
|
|
|
|
|
|
|
|
|
|
|
|
|
|
|
|||||||||||
|
|
|
|
|
|
|
|
|
|
|
24 |
|
|
|
|
|
|
|
|
27 |
|
|
|
|
|
|
|
|
|
|
||
|
|
|
|
|
|
|
|
|
|
|
|
|
|
|
|
|
|
|
|
|
|
|
|
|
|
|
|
|
||||
|
|
|
|
|
|
|
|
|
|
|
|
|
|
|
|
|
|
|
|
|
|
|
|
|
|
|
|
|
||||
|
|
|
|
|
|
|
|
|
|
|
|
|
|
|
|
|
|
|
|
|
|
|
|
|
|
|
|
|
|
|
||
|
|
|
|
|
|
|
|
|
|
|
|
|
|
|
|
|
|
|
|
|
|
|
|
|
|
|
|
|
|
|
||
|
|
|
|
|
|
|
|
|
|
|
|
|
|
|
|
|
|
|
|
|
|
|
|
|
|
|
|
|
|
|
|
|
|
|
|
|
|
|
|
29 |
|
7a |
|
|
7b |
|
7c |
22 |
|
|
|
|
|
|
|
|
|
|
|
|
|
F |
|
|
|
|
|
|
15 |
G |
14 |
15 |
14 |
13 |
H |
29 |
|
8a |
|
|
8b |
|
8c |
|
|
|
8d |
|
|
8e |
|
8f |
|
|
|
|
|
|
|
- 5 - |
|
|
|
|
Anleitung_3401993_LB4.indb |
5 |
|
|
|
|
04.12.12 |
15:43 |
|
|
|
|
|
|
|
|
|
|
|
|
|
|
|
|
|
|
|
|
|
|
|
|
|
|
|
|
|
|
|
|
|
|
|
|
|
|
|
|
|
|
|
|
|
|
|
|
|
|
|
|
|
|
|
|
|
|
|
|
|
|
|
|
|
9a |
|
|
|
|
|
|
|
|
|
9b |
|
|
|
|
9c |
|
|
|
|
|
|
|
|
|
||||
|
|
|
|
|
|
|
|
|
|
|
|
|
|
|
|
|
|
|
|
|
|
|
|
|
|
|
|
|
|
|
|
|
|
|
|
|
|
|
|
|
|
|
|
|
|
|
|
|
|
|
|
|
|
|
|
|
|
|
|
|
|
9d |
|
|
9e |
|
|
9f |
|
|
|
|
|
|
|
|
|
|
|
|
|
|
|
|
|
10a
8
11a |
|
|
36 |
Anleitung_3401993_LB4.indb |
6 |
10b
35
11b |
- 6 - |
10c |
|
31 |
|
35 |
|
12a |
|
04.12.12 |
15:43 |
|
|
|
|
|
|
|
|
|
|
|
|
|
|
|
|
|
|
|
|
|
|
|
|
|
|
|
|
|
|
|
|
|
|
|
|
|
|
|
|
|
|
|
|
|
|
|
|
|
|
|
|
|
|
12b |
|
|
|
|
|
|
|
|
|
|
|
12c |
|
|
|
|
|
|
|
|
|||
|
|
|
|
|
|
|
|
|
|
|
|
|
|
|
|
|
|
|
|
|
|
|
|
|
|
K
12d |
|
12e |
|
|
|
K
12f |
13a |
|
F |
13b
D C E
14 |
1 |
2 |
3 |
4 |
5 |
6 |
7 |
|
|
8 |
9 |
10 |
11 |
|
12 |
13 |
|
|
|
|
|
- 7 - |
|
|
|
|
Anleitung_3401993_LB4.indb |
7 |
|
|
|
|
04.12.12 |
15:43 |
|

|
|
GB |
Table of contents |
|
|
1. |
Introduction.................................................................................................................................................. |
9 |
2. |
Safety regulations ....................................................................................................................................... |
9 |
3. |
Layout and items supplied........................................................................................................................ |
12 |
4. |
Intended use .............................................................................................................................................. |
12 |
5. |
Technical data ........................................................................................................................................... |
13 |
6. |
Before starting the equipment .................................................................................................................. |
13 |
7. |
Operation .................................................................................................................................................. |
15 |
8. |
Maintenance and ordering of spare parts.............................................................................................. |
17 |
9. |
Storage and transport .............................................................................................................................. |
19 |
10. |
Cleaning .................................................................................................................................................... |
19 |
11. |
Disposal and recycling ............................................................................................................................. |
19 |
12. |
Troubleshooting......................................................................................................................................... |
20 |
13. |
Declaration of conformity......................................................................................................................... |
21 |
14. |
Warranty certificate .................................................................................................................................. |
22 |
The reprinting or reproduction by any other means, in whole or in part, of documentation and papers accompanying products is permitted only with the express consent of the iSC GmbH.
Subject to technical changes
- 8 -
Anleitung_3401993_LB4.indb 8 |
04.12.12 15:44 |

GB
1. Introduction
Congratulations on your new purchase.
You have decided in favor of a high-quality product. The operating instructions are a part of this product. They contain information of importance for your safety, for the use of the product and for its disposal. Before you use the product, acquaint yourself with all the information concerning its operation and safety. Use the product only as described and only for the listed areas of application. If you hand on the product to other people, give them all the documentation as well.
2.Safety regulations
Caution!
Read all safety regulations and instructions.
Any errors made in following the safety regulations and instructions may result in an electric shock, fire and/or serious injury.
Keep all safety regulations and instructions in a safe place for future use.
Safety devices
When working with the equipment, the appropriate plastic guard hood for cutting blade mode or cutting line mode must be fitted to prevent objects being thrown out by the equipment. The integrated blade in the cutting line guard hood automatically cuts the line to the optimum length.
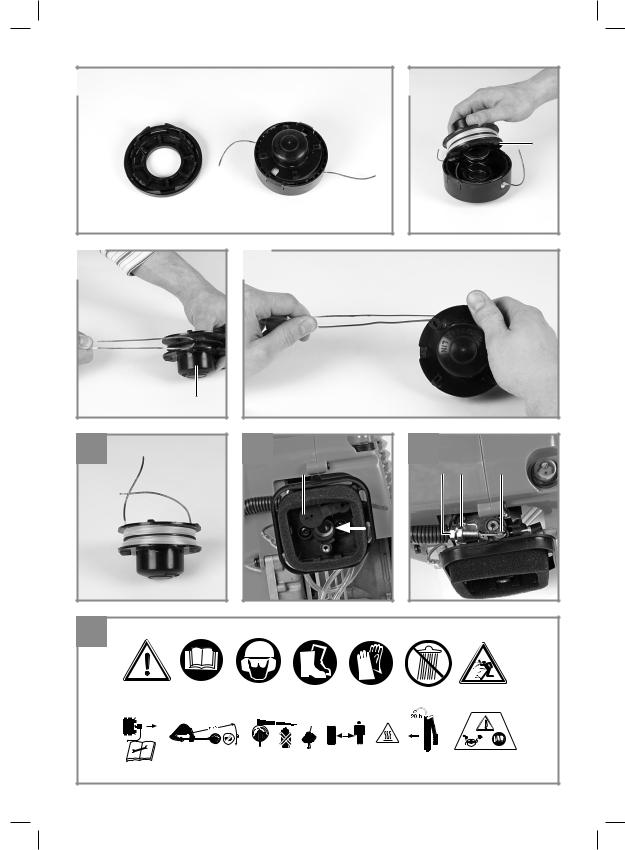
Explanation of the information signs on the equipment (Fig. 14):
1.Warning!
2.Read the instructions before using for the first time!
3.Wear protective headgear, goggles and ear muffs!
4.Wear sturdy, non-slip footwear!
5.Wear safety gloves!
6.Protect the equipment from rain and damp!
7.Be careful of objects being catapulted away!
8.Always switch off the equipment and pull out the spark boot plug before carrying out any maintenance work!
9.The distance between the equipment and persons in the vicinity must be at least 15 m!
10.The cutting tool (blade/cutting line) continues to rotate after the machine is switched off!
11.Caution: Hot equipment parts. Keep your distance!
12.Add a little grease (gear grease) after every 20 hours in operation!
13.Note: Left-handed thread. Turn clockwise
to undo the tool, turn counter-clockwise to tighten it.
Safety information
•Read the operating instructions carefully. Familiarize yourself with the settings and with the proper use of the equipment.
•Never allow other persons who are not familiar with the operating instructions to use the equipment. Contact your local governmental agency for information regarding minimum age requirements for the user.
•Never mow in the direct vicinity of persons - especially children - or animals.
Warning!
Maintain a safety distance of 15m. If approached, switch off the equipment immediately. Always keep in mind that the user of the equipment is responsible for accidents involving other persons or their property.
•Important: Danger of poisoning. Emissions, fuels and lubricants are toxic. Do not inhale emissions.
Before using
•Always wear sturdy, non-slip footwear and long trousers when mowing. Never mow barefoot or in sandals.
•Check the ground on which the equipment will be used and remove all objects that could be caught up and catapulted away.
•Warning! Petrol is highly flammable! Therefore:
-Only store petrol in containers designed to hold petroleum-based liquids.
-Only refuel out in the open and do not smoke during the refuelling process.
-Always refuel before starting the engine. Do not open the fuel tank cap and do not refuel
- 9 -
Anleitung_3401993_LB4.indb 9 |
04.12.12 15:44 |

GB
while the engine is running or when the equipment is hot.
-If petrol has overflowed, do not under any circumstances attempt to start the engine. Instead, remove the equipment from the affected area. Avoid starting the engine until the petrol fumes have completely evaporated.
-For safety reasons, the petrol tank and the tank cap must be replaced if they are damaged.
•Replace defective silencers.
•Before using the scythe, visually inspect it to ensure that the blade, mounting bolts and the entire cutting apparatus are in good working order (i.e. not worn out or damaged). To prevent any imbalance, replace worn out or damaged blades and mounting bolts as a set only (if applicable).
Handling
(operation, storage, monitoring)
•Wear close-fitting work clothing which is in good condition and which offers protection, such as long trousers, sturdy work shoes, hard-wearing gloves, a helmet, a face mask or goggles to protect your eyes, and good quality cotton wool in your ears or some other ear protectors to reduce the noise.
•Store the equipment in a safe place. Open the petrol tank cap slowly to release any pressure that may have formed in the petrol tank. To prevent the risk of fire, move at least 3 meters from the refueling area before you start the equipment.
•Switch off the equipment before you put it down.
•Always hold the equipment firmly in both hands. Your fingers and thumbs should be wrapped around the handles.
•Ensure that all screws and connecting elements are secure. Never use the equipment if it has not been properly adjusted or has not been fully or safely assembled.
•Make sure that the handles are clean and dry and that there is no petrol mixture on them.
•Set the line spool to the required height. Avoid touching small objects such as stones with the line spool.
•When carrying out mowing work on a slope always stand at a lower level than the cutting tool. Never cut or trim on a smooth, slippery hill or slope.
•Keep all parts of your body and items of clothing away from the line spool when you start the engine and when the engine is running. Before you start the engine ensure that the line spool will not strike an obstacle.
•Always switch off the engine before working on the cutting tool.
•Store the equipment and accessories in a safe place protected from naked flames and heat/ spark sources such as gas geyser heaters, tumble driers, oil stoves or portable radiators, etc.
•Keep the guard hood, line spool and engine clear of mowing debris at all times.
•Only adequately trained people and adults may use, adjust and maintain the equipment.
•If you are not familiar with the equipment, practice handling it with the engine off.
•Always check the site you want to mow before you begin your work. Solid objects such as pieces of metal, bottles, stones, etc. can be catapulted away and cause serious injuries and permanent damage to the equipment. If you touch a solid object with the equipment by mistake, switch off the engine immediately and check the equipment for signs of damage. Never use the equipment if it is damaged or defective.
•Always operate the equipment in its high speed range for trimming and cutting. Do not let the engine run at low speed at the start of mowing or during trimming work.
•Only use the equipment for the purpose for which it is intended, such as trimming and mowing weeds.
•Never hold the line spool above knee height when the equipment is in operation.
•Do not use the equipment if other people or animals are in the immediate vicinity. Keep a minimum distance of 15 m between yourself and other people or animals when mowing. Keep a distance of 30 m if you are mowing down to the ground.
- 10 -
Anleitung_3401993_LB4.indb 10 |
04.12.12 15:44 |
GB
Additional instructions
•Do not use any fuel other than that recommended in the operating instructions. Always follow the instructions in the section „Fuel and oil“. Do not use petrol that has not been mixed correctly with 2-stroke oil. Otherwise there is a risk of causing permanent damage to the engine and of voiding the manufacturer‘s guarantee.
•Do not smoke while refueling or using the equipment.
•Never use the equipment without the exhaust pipe.
•Do not touch the exhaust pipe with your hands or body. Hold the equipment so that your fingers and thumbs are wrapped around the handled
•Do not use the equipment in an uncomfortable posture, off balance, with extended arms or with only one hand. Always use both hands on the equipment and wrap your fingers and thumbs around the handles.
•Always keep the line spool on the ground whilst the equipment is in operation.
•Use the equipment only for the purpose for which it is intended, such as trimming and mowing weeds.
•Do not use the equipment over a lengthy period of time - take regular breaks.
•Do not use the equipment when under the influence of alcohol or drugs.
•Use the equipment only when the guard hood is fitted and in good working order.
•Any modifications to the product may place your personal safety at risk and cause the manufacturer’s warranty to be voided.
•Never use the equipment near inflammable liquids or gases, neither in enclosed rooms nor outdoors. This may cause explosions and/
or fire.
•Do not use any other cutting tools. For your own safety you must use only the accessories and attachments which are listed in the operating instructions or which are recommended or specified by the manufacturer. The use of cutting tools or accessories other than those recommended in the operating instructions
or catalog may place your personal safety at risk.
Safety precautions for handling the blade
•Take not of all warnings and instructions relating to operating and fitting the blade.
•The blade can recoil suddenly from objects if it cannot cut or mow through them. This can cause injuries to the arms or legs. Keep bystanders and animals at least 15 m away from where you are working. If the equipment strikes a foreign body, stop the engine immediately and wait for the blade to come to a standstill. Check the blade for signs of
damage. Always replace the blade if it is bent or cracked.
•The blade is liable to catapult away objects with high force. This can cause blindness or injuries. Wear protection on your eyes, face and legs. Always remove objects from your working area before you use the blade.
•Carefully check the equipment and its fittings for signs of damage every time before use. Do not use the equipment unless all the blade fittings are installed correctly.
•When you release the throttle lever, the blade will continue to rotate and will only gradually come to a standstill. A blade which is in the process of rotating to a standstill can cause you or bystanders injuries through cutting. Before you start any work on the blade, switch off the engine and ensure that the blade has come to a standstill.
•The danger zone has a radius of 15 meters. Bystanders may suffer blindness or injuries. Keep a distance of 15 meters between yourself and other people or animals.
- 11 -
Anleitung_3401993_LB4.indb 11 |
04.12.12 15:44 |

GB
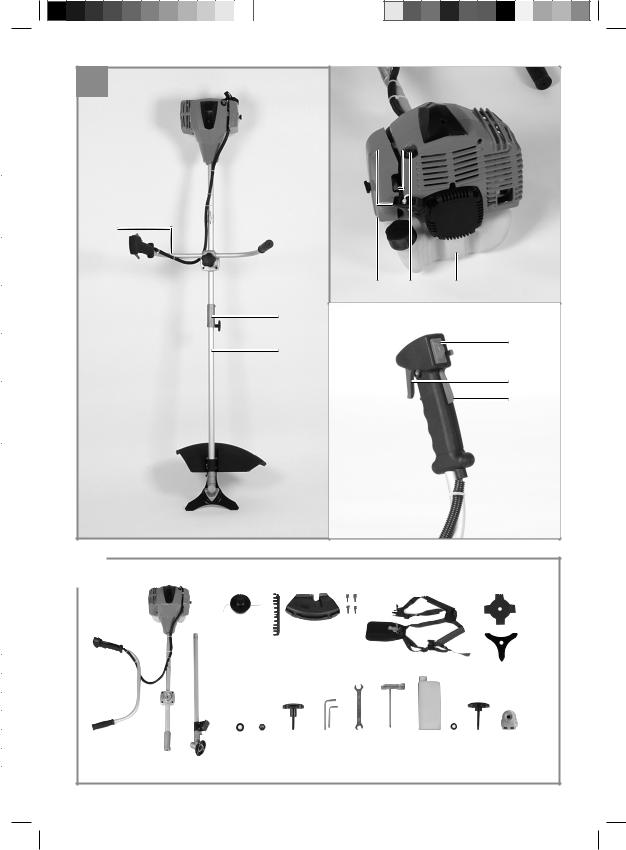
3.Layout and items supplied
3.1 Layout (Fig. 1-13)
1. Connecting piece for long handle
2.Long handle
3.Steady grip
4.Starter line / starter cable
5.Choke lever
6.Petrol tank
7.Fuel pump „primer“
8.Air filter housing cover
9.On/Off switch
10.Throttle lever lock
11.Throttle lever
12.Throttle lock
13.Line spool with cutting line
14.Cutting line guard hood
15.Cutting blade guard hood
16.Screw M5 (4x)
17.Carrying strap
18a. Cutting blade (4 teeth)
18b. Cutting blade (3 teeth)
19.Holder for steady grip
20.Handle screw M8
21.Washer Ø 8mm
22.Carrier plate
23.Pressure plate
24.Pressure plate cover
25.Nut M10 (left-hand thread)
26.Oil/petrol mixing bottle
27.Spark plug wrench
28.Open-ended wrench 8/10 mm
29.Hex wrench 4 mm
30.Hex wrench 5 mm
31.Protective cap for spark boot plug
32.Handle screw M6
33.Nut M6
34.Washer Ø 6mm
35.Air filter
36.Spark boot plug
The cutting blade (18a/18b) and the line spool (13) are jontly referred to in the text as the cutting tool (generic term).
3.2 Items supplied
•Open the packaging and take out the equipment with care.
•Remove the packaging material and any packaging and/or transportation braces (if available).
•Check to see if all items are supplied.
•Inspect the equipment and accessories for transport damage.
•If possible, please keep the packaging until the end of the guarantee period.
Important!
The equipment and packaging material are not toys. Do not let children play with plastic bags, foils or small parts. There is a danger of swallowing or suffocating!
4.Intended use
The equipment (cutting blade mode) is designed for cutting high grass and sparse scrub with the 4-tooth blade and for cutting dense scrub and slender wood growth with the 3-tooth blade. The equipment (line spool mode) is designed for cutting lawns and small weeds. The operating instructions as supplied by the manufacturer must be obeyed to ensure that the equipment is used properly.
Any use which is not expressly permitted in these instructions may result in damage to the equipment and place the user in serious danger. Be sure to observe the restrictions in the safety information.
Please note that our equipment has not been designed for use in commercial, trade or industrial applications. Our warranty will be voided if the equipment is used in commercial, trade or industrial businesses or for equivalent purposes.
Caution! Due to the high risk of physical injury to the user, the equipment must not be used to carry out the following work: to clean dirt and debris off walkways, or to chop up tree or hedge clippings. Similarly, the equipment must not be used to level out high areas such as molehills. For safety rea-
- 12 -
Anleitung_3401993_LB4.indb 12 |
04.12.12 15:44 |

GB
sons, the equipment is not allowed to be used as a drive unit for other tools of any kind.
The equipment is allowed to be used only for its intended purpose. Any other use is deemed to be a case of misuse. The user/operator and not the manufacturer will be liable for any damage or injuries of any kind resulting from such misuse.
5.Technical data
Engine type ...............................................................
........ 2-stroke engine, air-cooled, chrome cylinder
Engine power (max.) .................. |
1.35 kW/ 1.8 hp |
Displacement ............................................ |
42.7 ccm |
Idle engine speed ................................. |
3000 min-1 |
Max. engine speed |
|
with blade: ............................................. |
9000 min-1 |
with line spool: ...................................... |
8400 min-1 |
Max. cutting speed |
|
with blade: ............................................. |
6800 min-1 |
with line spool: ...................................... |
6300 min-1 |
Ignition ..................................................... |
Electronic |
Drive ............................................ |
Centrifugal clutch |
Weight (with empty tank) ............................. |
7.5 kg |
Wear ear -muffs.
The impact of noise can cause damage to hearing.
Operation
Vibration emission value ah = 4.1 m/s2 K uncertainty = 1.5 m/s2
Keep the noise emissions and vibrations to a minimum.
•Only use appliances which are in perfect working order.
•Service and clean the appliance regularly.
•Adapt your working style to suit the appliance.
•Do not overload the appliance.
•Have the appliance serviced whenever necessary.
•Switch the appliance off when it is not in use.
•Wear protective gloves.
6.Before starting the equipment
6.1 Assembly
Cutting circle diameter of line ...................... |
41 cm |
Cutting circle diameter of blade |
.................. 23 cm |
Cutting line length .......................................... |
8.0 m |
Cutting line diameter .................................. |
2.0 mm |
Tank capacity ................................................... |
0.8 l |
Spark plug .................................. |
Champion RCJ6Y |
Fuel consumption at |
|
max. engine power .................................. |
0.6 kg/h |
Specific fuel consumption |
|
at max. engine power ........................ |
446 g/kWh |
Sound and vibration |
|
LpA sound pressure level ........................... |
98 dB(A) |
KpA uncertainty ............................................. |
1.5 dB |
LWA sound power level ........................... |
110 dB(A) |
KWA uncertainty ............................................ |
1.5 dB |
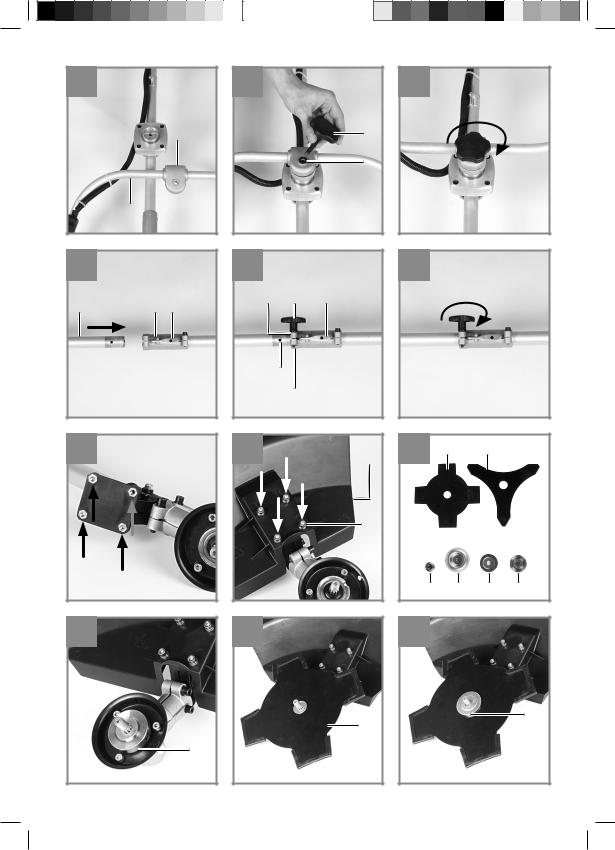
6.1.1Fitting the steady grip (Fig. 3a-3c)
Fit the steady grip (3) as shown in Figures 3a-3c. Do not tighten the screw (20) until you have set the optimum working position with the carrying strap (17) (see also section 6.2). The steady grip should be aligned as shown in Figure 1. To dismantle, proceed in reverse order.
6.1.2Fitting the long handle (Fig. 4a-4c)
Pass the handle screw (32) through the washer (34) and into the connecting piece of the long handle (1). Secure the handle screw loosely with the nut (33). Now press the locking lever
(A) and push the long handle (Fig. 4a/Item 2) carefully into the connecting piece for the long handle. While doing so, ensure that the drive shafts on the inside of the long handle slide into each other (turn the line spool (13) / cutting blade (18a/18b) gently if required). The lug of the locking lever (A) must latch into the hole (B). Now tighten the handle screw as shown in Figure 4c. To
- 13 -
Anleitung_3401993_LB4.indb 13 |
04.12.12 15:44 |

GB
dismantle, simply slacken the handle screw and actuate the locking lever.
6.1.3Fitting the blade guard hood
Important: The cutting blade guard hood (15) must be fitted when you want to work with the cutting blade.
The guard hood for the cutting blade must be installed as shown in Figures 5a – 5b.
6.1.4Fitting/Replacing the cutting blade
The procedure for fitting the cutting blade (18a/18b) is shown in Figures 6a-6g. To dismant-
le, proceed in reverse order.
• Fit the carrier plate (22) onto the spline shaft
• |
as shown in Figure 6b. |
Secure the cutting blade (18a/18b)) on the |
|
• |
carrier plate (Fig. 6c). |
Place the pressure plate (23) over the thread |
|
• |
of the spline shaft (Fig. 6d). |
Plug on the cover of the pressure plate (24) |
|
• |
(Fig. 6e). |
Look for the hole in the carrier plate, line up |
|
|
with the notch underneath, lock with the sup- |
|
plied hex wrench (29), and then tighten the |
|
nut (25) with the spark plug wrench (27) (Fig. |
• |
6f/6g). Important: Left-hand thread |
The cutting blades (18a/18b) are delivered |
|
|
with plastic protective caps fitted to them. |
|
Remove these caps before use and refit them |
|
after use. |
6.1.5 Fitting the cutting line guard hood on the cutting blade guard hood
Important: The cutting line guard hood (14) must be fitted in addition when you want to work with the cutting line.
The guard hood for the cutting line must be installed as shown in Figures 7a – 7b. Make sure that the cutting line guard hood engages correctly. A blade (Fig. 7a/ Item F) on the underside of the guard hood automatically cuts the cutting line to the optimum length. It is covered by a guard (Fig. 7a/Item G).
Remove the guard before you start working and replace it when you have finished working.
6.1.6 Fitting/Replacing the line spool
The procedure for fitting the line spool (13) is shown in Figure 7c. To dismantle, proceed in reverse order. The line spool is already fitted when the equipment is delivered.
Look for the hole in the carrier plate (22), line up with the notch beneath it, lock with the supplied hex wrench (29), and screw the line spool onto the thread.
Important: Left-hand thread
6.2 Setting the cutting height
•Fit the carrying strap (17) as shown in Figures 8a-8c.
•Hook the equipment to the carrying belt (Fig. 8d).
•Adjust to the perfect working and cutting position using the various strap adjusters on the carrying strap (Fig. 8e).
•To confirm the optimum length of the carrying strap, make a few swinging movements with the engine off (Fig. 9a).
The carrying strap is fitted with a quick-release mechanism. Pull the red strap section (Fig. 8f) if you need to remove the strap quickly.
Important: Always use the strap when working with the equipment. Attach the strap as soon as you have started the engine and it is running in idle mode. Switch off the engine before you take off the carrying strap.
6.3 Fuel and oil
Recommended fuels
Use only a mixture of unleaded petrol and special 2-stroke engine oil.
Mix the fuel mixture as indicated in the fuel mixing table.
Important: Do not use a fuel mixture which has been stored for longer than 90 days. Important: Never use 2-stroke oil with a recommended mixing ratio of 100:1. The manufacturer’s warranty will be voided in case of engine damage due to inadequate lubrication.
Important: Only use containers designed and approved for the purpose to transport and store
- 14 -
Anleitung_3401993_LB4.indb 14 |
04.12.12 15:44 |

GB
fuel. Pour the correct quantities of petrol and 2-stroke oil into the mixing bottle (see scale printed on the bottle). Then shake the bottle well.
6.4 Fuel mixing table
Mixing procedure: 40 parts petrol to 1 part oil
Petrol |
2-stroke oil |
|
|
1 liter |
25 ml |
|
|
5 liters |
125 ml |
|
|
7. Operation
Please note that the statutory regulations governing noise abatement may differ from one location to another.
Each time before use, check the following :
•That there are no leaks in the fuel system.
•That the equipment is in perfect condition and that the safety devices and cutting devices are complete.
•That all screws are securely fastened.
•That all moving parts move smoothly.
7.1 Starting the engine when cold
Fill the tank with the oil/petrol mix. See also „Fuel and oil“.
1.Set the equipment down on a hard, level surface.
2.Press the fuel pump (primer) (Fig. 1/Item 7) 10 times.
3.Move the On/Off switch (Fig. 1/Item 9) to „I“.
4.Secure the throttle lever (Fig. 1 / Item 11). To do this, press the throttle lever lock (Fig. 1/Item 12) and then press the throttle lever (Fig. 1/Item 11) and lock the throttle lever by
pressing the lock (Fig. 1/Item 10) at the same time.
5.Set the choke lever (Fig. 1/Item 5) to “ ”.
”.
6.Hold the equipment firmly and pull out the starter cable (Fig. 1/Item 4) until you feel it begin to resist. Then tug sharply on the starter cable 4 times. The equipment should start. Important: Never allow the starter line to snap back. This may result in damage.
Important: Since the throttle lever is secured, the cutting tool starts to operate when the engine is started.
Then release the throttle lever by actuating it once. Actuating the throttle lever will also release the choke lever. (The engine returns to its idle state).
7.If the engine does not start up, repeat steps 4-6 above.
Please note: If the engine does not start up even after several attempts, read the section „Troubleshooting“.
Please note: Always pull out the starter cable in a straight line. If it is pulled out at an angle, friction will occur on the eyelet.
As a result of this friction, the starter line will become frayed and will wear away faster. Always hold the starter cable when the starter line retracts.
Never allow the starter line to snap back when it has been pulled out.
7.2 Starting the engine when warm
(The equipment has been idle for less than 15-20 min.)
1.Set the equipment down on a hard, level surface.
2.Switch the On/Off switch to “I” (Fig. 1 / Item 9).
3.Secure the throttle lever (Fig. 1 / Item 11) (in the same way as described in “Starting the engine when cold”).
4.Hold the equipment firmly and pull out the starter cable until you feel it start to resist. Then tug sharply on the starter cable. The equipment should start after 1-2 tugs. If the equipment does not start after 6 tugs, repeat steps 1 – 7 of the procedure for starting the engine from cold.
- 15 -
Anleitung_3401993_LB4.indb 15 |
04.12.12 15:44 |

GB
7.3 Switching off the engine
Emergency Stop procedure:
If it becomes necessary to stop the equipment immediately, set the On/Off switch (9) to “Stop” or “0”.
Normal procedure:
Let go of the throttle lever (11) and wait until the engine has changed to idling speed. Then set the On/Off switch (9) to “Stop” or “0”.
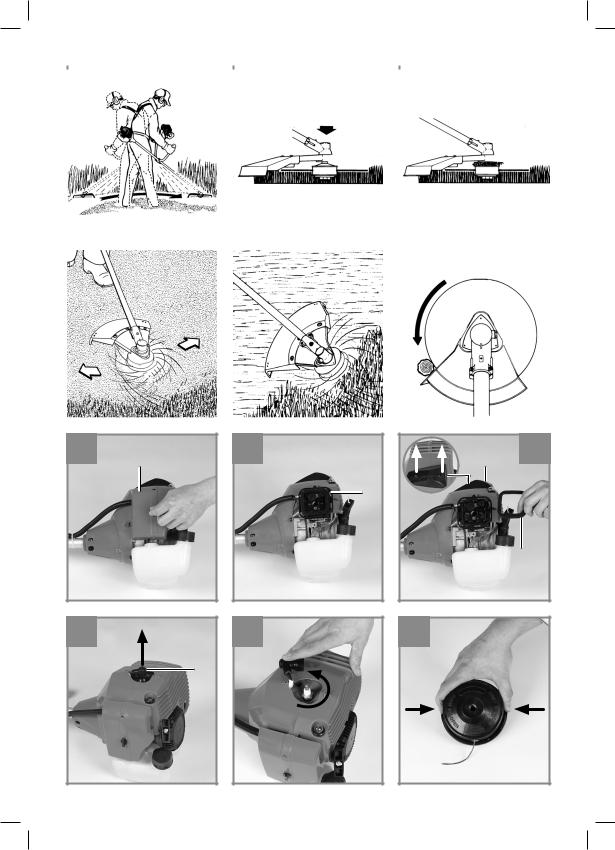
7.4 Practical tips
Practice all the work steps with the engine switched off before you start to use the equipment.
Warning! Take extreme care during mowing work. When doing such work keep a distance of 30 meters between yourself and other people or animals.
Extending the cutting line
Warning! Do not use any kind of metal wire or metal wire encased in plastic in the line spool. This may cause serious injuries to the user.
To extend the cutting line (13), run the engine at full speed and tap the line spool on the ground. This will automatically extend the line. The blade on the guard hood will cut the line to the permissible length (Fig. 9b).
Important: Remove all grass and weed remnants at regular intervals to prevent the equipment from overheating.
Grass and weed remnants become trapped under the guard hood (Fig. 9c) and prevent the equipment from cooling sufficiently. Remove the remnants carefully using a screwdriver or the like.
Different cutting methods
When the equipment is correctly assembled it will cut weeds and long grass in places which are difficult to access, e.g. along fences, walls and foundations and also around trees. It can also be used for „mowing“ down vegetation so that a garden can be better prepared or a certain area cleared down to the soil.
Please note: Even if it is used carefully, cutting around foundations, stone or concrete walls, etc. will result in the line suffering more than the normal level of wear.
Trimming/mowing (with line spool/cutting blade)
Swing the equipment from side to side in a scything motion. Always keep the cutting tool parallel to the ground.
Check the site and decide which cutting height you require. Guide and hold the cutting tool at the required height to ensure that you cut evenly (Fig. 9d).
Low trimming (with line spool)
Hold the equipment right in front of you at a slight angle so that the underside of the line spool is above the ground and the line strikes the correct target. Always cut away from yourself. Never draw the equipment towards yourself.
Cutting along fences/foundations (with line spool)
Approach wire mesh fences, lath fences, natural stone walls and foundations slowly so that you can cut close to them without striking the obstacle with the line. If, for example, the line strikes stones, stone walls or foundations, it will wear or fray. If the line strikes wire fencing, it will break.
Trimming around trees (with line spool)
When trimming around tree trunks, approach slowly so that the line does not strike the bark. Walk around the tree and take care not to damage the tree. Approach grass or weeds with the tip of the line and tilt the line spool forwards slightly.
Mowing down to the ground (with line spool)
When mowing down to the ground you will cut all the vegetation. To do this, set the line spool at an angle of 30° to the right. Place the handle in the required position (Fig. 9e).
Caution! Increased risk of injury to the user, bystanders and animals, and increased risk of damaging property due to objects (e.g. stones) being catapulted away.
- 16 -
Anleitung_3401993_LB4.indb 16 |
04.12.12 15:44 |

GB
Caution! Do not use the equipment to remove objects from footpaths, etc.
The petrol scythe is a powerful tool and can catapult small stones and other objects a distance of 15 meters or more, causing injuries and damage to cars, houses and windows.
Sawing
The equipment is not suitable for sawing.
Jamming
If the cutting tool jams as a result of attempting to cut vegetation that is too dense, switch off the engine immediately. Remove the grass and scrub from the equipment before you restart it.
Preventing recoil
When you work with the blade, there is a risk of recoil if it strikes solid objects (tree trunks, branches, tree stumps, stones or the like). This will throw the equipment backwards in the direction opposite to the rotation of the cutting tool. This can cause you to lose control of the equipment. Do not use the blade near fences, metal posts, boundary stones or foundations. For cutting slender wood growth, position the equipment as shown in Fig. 9f in order to prevent recoil.
8.Maintenance and ordering of spare parts
Always switch off the equipment and pull out the spark boot plug (36) before carrying out any maintenance work.
8.1 Replacing the line spool/cutting line
1.Dismantle the line spool (13) as described in section 6.1.6. Press the spool together (Fig. 12a) and remove one half of the housing (Fig. 12b).
2.Take the spool plate (K) out of the line spool housing (Fig. 12c).
3.Remove any remaining cutting line.
4.Place the new cutting line in the center and hang the loop which has formed into the recess in the spool splitter. (Fig. 12d)
5.Wind up the line counter-clockwise and under
tension. The spool splitter will separate the two halves of the line. (Fig. 12e)
6.Hook the last 15 cm of the two ends of the line onto the opposite lying line holders of the spool plate. (Fig. 12f)
7.Thread the two ends of the line through the metal eyelets in the line spool housing (Fig. 12c).
8.Press the spool plate into the line spool housing (Fig. 12b).
9.Pull the two line ends sharply to release them from the line holders.
10.Join the housing parts together again.
11.Cut the excess line to a length of around 13 cm. This will reduce the load on the engine when starting and warming up.
12.Refit the line spool (see section 6.1.6). If you are replacing the complete line spool, skip points 3-6.
8.2 Maintenance of the air filter
Soiled air filters reduce the engine output by supplying too little air to the carburetor.
Regular checks are therefore essential.
The air filter (35) should be checked after every 25 hours of use and cleaned if necessary. If the air contains a lot of dust, the air filter should be checked more frequently.
1.Remove the cover from the air filter housing (Fig. 10a / Item 8)
2.Remove the air filter (Fig. 10b/10c)
3.Clean the air filter by tapping it or blowing it out (with compressed air).
4.Assemble in reverse order.
Important: Never clean the air filter with petrol or inflammable solvents.
- 17 -
Anleitung_3401993_LB4.indb 17 |
04.12.12 15:44 |

GB
8.3 Maintenance of the spark plug
Electrode gap = 0.6 mm (distance between the electrodes between which the ignition spark is created). Tighten the spark plug with 12 to 15 Nm using a torque wrench (available from your dealer). Check the spark plug for dirt and grime after 10 hours of operation and if necessary clean it with a copper wire brush.
Thereafter service the spark plug after every 50 hours of operation.
1.Dismantle the protective cap (Fig. 10c/Item
31)using a screwdriver.
2.Pull off the spark boot plug (Fig. 11a/Item
3.Remove the spark plug (Fig. 11b) with the supplied spark plug wrench (27).
4.Assemble in reverse order.
8.4Sharpening the guard hood blade
The guard hood blade (Fig. 7a/Item F) can become blunt over time. If you notice this, undo the two screws holding the guard hood blade to the guard hood. Clamp the blade in a vise. Sharpen the blade with a flat file and make sure that the angle of the cutting edge is not altered in the process. File in one direction only.
8.5Carburetor settings
Important: Settings on the carburetor are allowed to be made by authorized customer service personnel.
The air filter housing cover must be removed before any work on the carburetor, as shown in Figures 10a and 10b.
Setting the throttle cable:
If the maximum speed of the equipment drops over time and you have ruled out all the other possible causes listed in the section „Troubleshooting“, it may be necessary to adjust the throttle cable.
First of all check whether the carburetor opens fully when the throttle lever is pressed right through. This is the case if the carburetor slide (Fig. 13a/ Item F) is completely opened when the throttle is fully activated.
Figure 13a shows the correct setting. If the carburetor slide is not completely open, it must be
adjusted.
The following steps are required to adjust the throttle cable:
•Undo the lock nut (Fig. 13b/Item C) a few turns.
•Undo the adjusting screw (Fig. 13b/Item D) until the carburetor slide is completely open when the throttle is fully activated, as shown in Figure 13a.
•Retighten the lock nut.
Setting the idling speed:
Caution! Set the idling speed when the equipment is warm.
If the engine stalls when the throttle is not pressed and you have ruled out all the other possible causes listed in the section „Troubleshooting“, the idling speed must be adjusted. To do this turn the idling speed screw (Fig. 13b/Item E) clockwise until the equipment runs smoothly at idling speed. If the idling speed is so fast that the cutting tool turns as well, it has to be reduced by turning the idling speed screw for as long as is required for the cutting tool to stop turning as well.
8.6Applying grease to the gear unit
Add a little gear grease (approx. 10 g) after every 20 hours in operation. To do so, open the screw H (Fig. 7c).
8.7Environmental protection
Dispose of soiled maintenance material and operating materials at the appropriate collection point.
Recycle packaging material, metal and plastics.
8.8 Ordering replacement parts
Please provide the following information on all orders for spare parts:
•Type of unit
•Article number of the unit
•ID number of the unit
For current prices and information please visit www.isc-gmbh.info
- 18 -
Anleitung_3401993_LB4.indb 18 |
04.12.12 15:44 |

GB
9.Storage and transport
9.1 Storage
Important: Never put the equipment into storage for longer than 30 days without carrying out the following steps.
Storing the equipment
If you intend to store the equipment for longer than 30 days, it must be prepared accordingly. Otherwise the fuel still remaining in the carburetor will evaporate and leave a rubbery sediment. This can cause problems when starting up the equipment and may require expensive repairs.
1.Slowly remove the fuel tank cap to release any pressure that may have formed in the tank. Carefully empty the tank (6).
2.To remove the fuel from the carburetor, start the engine and let it run until the equipment stops.
3.Leave the engine to cool (approx. 5 minutes).
4.Remove the spark plug (see 8.3).
5.Add one teaspoon of 2-stroke engine oil into the combustion chamber. Slowly pull the starter cord several times to apply a layer of oil to all internal components. Fit the spark plug again.
Note: Store the equipment in a dry place and far away from possible ignition sources such as an oven, a gas-fired hot water boiler, a gas-fired dryer, etc.
9.2 Transport
To transport the equipment, empty the petrol tank as described in the section “Storage”. Clean coarse dirt off the equipment with a brush or hand brush. Dismantle the steady grip and the long hande as described in section 6.1.1 and 6.1.2.
10.Cleaning
Always switch off the equipment and pull out the spark boot plug before carrying out any cleaning work.
•The equipment should be cleaned thoroughly every time after it has been used. This applies particularly to the cutting tool and the guard hoods.
•Keep the air vents and the motor housing free of dirt and dust as far as possible. Wipe the equipment with a clean cloth or blow it down with compressed air at low pressure.
•It is easiest to remove dirt and grass immediately after mowing.
•Clean the equipment regularly with a damp cloth and some soft soap. Do not use cleaning agents or solvents; these may be aggressive to the plastic parts in the equipment. Ensure that no water can get into the interior of the equipment.
Putting the equipment back into operation
1.Remove the spark plug (see 8.3).
2.Quickly tug on the starter line to remove excess oil from the combustion chamber.
3.Clean the spark plug and check that the electrode gap is correct, or insert a new spark plug with the correct electrode gap.
4.Prepare the equipment for operation.
5.Fill the tank with the relevant mixture of fuel and oil. See the section “Fuel and oil”.
11. Disposal and recycling
The equipment is supplied in packaging to prevent it from being damaged in transit. The raw materials in this packaging can be reused or recycled. The equipment and its accessories are made of various types of material, such as metal and plastic. Defective components must be disposed of as special waste. Fuel and oil must be disposed of only at special refuse collection centers. Ask your dealer or your local council.
- 19 -
Anleitung_3401993_LB4.indb 19 |
04.12.12 15:44 |

GB
12.Troubleshooting
Fault |
|
Possible cause |
Troubleshooting |
||
|
|
|
|
|
|
The equipment does |
- |
Correct starting procedure not follo- |
- Follow the instructions for starting |
||
not start |
|
wed |
|
|
|
|
- |
Sooted or damp spark plug |
- Clean the spark plug or replace it |
||
|
|
|
with a new one |
||
|
- |
Incorrect carburetor setting |
- Contact an authorized customer |
||
|
|
|
service outlet or send the equipment |
||
|
|
|
to ISC-GmbH |
||
|
|
|
|
|
|
The equipment starts |
- |
Incorrect choke lever (5) setting |
- Set the choke lever to “ |
|
” |
|
|||||
but does not deve- |
- |
Soiled air filter (35) |
- Clean the air filter |
||
lop its full power |
- |
Incorrect carburetor setting |
- Contact an authorized customer |
||
|
|
|
service outlet or send the equipment |
||
|
|
|
to ISC-GmbH |
||
|
|
|
|
|
|
The engine does not |
- |
Incorrect electrode gap on the |
- Clean the spark plug and adjust the |
||
run smoothly |
|
spark plug |
electrode gap or fit a new spark |
||
|
|
|
plug |
||
|
- |
Incorrect carburetor setting |
- Contact an authorized customer |
||
|
|
|
service outlet or send the equipment |
||
|
|
|
to ISC-GmbH |
||
Engine smokes ex- |
- |
Incorrect fuel mix |
- Use the correct fuel mix (see fuel |
||
cessively |
|
|
mixing table) |
||
|
|
|
- Contact an authorized customer |
||
|
- |
Incorrect carburetor setting |
service outlet or send the equipment |
||
|
|
|
to ISC-GmbH |
||
- 20 -
Anleitung_3401993_LB4.indb 20 |
04.12.12 15:44 |
GB
13.Declaration of conformity
Einhell Germany AG · Wiesenweg 22 · D-94405 Landau/Isar Konformitätserklärung
D |
erklärt folgende Konformität gemäß EU-Richtlinie und |
PL |
deklaruje zgodność wymienionego poniżej artykułu z |
GB |
Normen für Artikel |
BG |
następującymi normami na podstawie dyrektywy WE. |
explains the following conformity according to EU directi- |
декларира съответното съответствие съгласно |
||
F |
ves and norms for the following product |
LV |
Директива на ЕС и норми за артикул |
déclare la conformité suivante selon la directive CE et les |
paskaidro šādu atbilstību ES direktīvai un standartiem |
||
I |
normes concernant l’article |
LT |
apibūdina šį atitikimą EU reikalavimams ir prekės normoms |
dichiara la seguente conformità secondo la direttiva UE e |
RO |
declară următoarea conformitate conform directivei UE şi |
|
NL |
le norme per l’articolo |
GR |
normelor pentru articolul |
verklaart de volgende overeenstemming conform EU |
δηλώνει την ακόλουθη συμμόρφωση σύμφωνα με την |
||
E |
richtlijn en normen voor het product |
HR |
Οδηγία ΕΚ και τα πρότυπα για το προϊόν |
declara la siguiente conformidad a tenor de la directiva y |
potvrđuje sljedeću usklađenost prema smjernicama EU i |
||
P |
normas de la UE para el artículo |
|
normama za artikl |
declara a seguinte conformidade, de acordo com a |
|
Izjava o sukladnosti za ovaj proizvod dostupna je na |
|
DK |
directiva CE e normas para o artigo |
BIH |
internet stranici www.lidl.hr. |
attesterer følgende overensstemmelse i medfør af |
potvrđuje sljedeću usklađenost prema smjernicama EU i |
||
S |
EU-direktiv samt standarder for artikel |
RS |
normama za artikl |
förklarar följande överensstämmelse enl. EU-direktiv och |
potvrđuje sledeću usklađenost prema smernicama EZ i |
||
FIN |
standarder för artikeln |
|
normama za artikal |
vakuuttaa, että tuote täyttää EU-direktiivin ja standardien |
RUS следующим удостоверяется, что следующие продукты |
||
EE |
vaatimukset |
|
соответствуют директивам и нормам ЕС |
tõendab toote vastavust EL direktiivile ja standarditele |
UKR проголошує про зазначену нижче відповідність виробу |
||
CZ |
vydává následující prohlášení o shodě podle směrnice EU |
MK |
директивам та стандартам ЄС на виріб |
|
a norem pro výrobek |
ја изјавува следната сообрзност согласно |
|
SLO potrjuje sledečo skladnost s smernico EU in standardi za |
TR |
ЕУ-директивата и нормите за артикли |
|
SK |
izdelek |
Ürünü ile ilgili AB direktifleri ve normları gereğince aşağıda |
|
vydáva nasledujúce prehlásenie o zhode podľa smernice |
N |
açıklanan uygunluğu belirtir |
|
H |
EÚ a noriem pre výrobok |
erklærer følgende samsvar i henhold til EU-direktivet og |
|
a cikkekhez az EU-irányvonal és Normák szerint a |
IS |
standarder for artikkel |
|
|
következő konformitást jelenti ki |
Lýsir uppfyllingu EU-reglna og annarra staðla vöru |
|
Benzin-Sense FBS 43 A1 (Florabest)

 87/404/EC_2009/105/EC

 2005/32/EC_2009/125/EC

 2006/95/EC

 2006/28/EC X 2004/108/EC
 2004/22/EC
 1999/5/EC
 97/23/EC

 90/396/EC_2009/142/EC

 89/686/EC_96/58/EC
 2011/65/EC
X 2006/42/EC
Annex IV
Notified Body:
Notified Body No.:
Reg. No.:
X2000/14/EC_2005/88/EC X Annex V
Annex VI
Noise measured: LWA = 104,7 dB (A); guaranteed LWA = 110 dB (A) P = 1,35 KW; L/Ø = cm
Notified Body:
X2004/26/EC
Emission No.: e11*97/68SA*2004/26*1181*00
Standard references: EN ISO 11806; EN ISO 14982
Landau/Isar, den 30.11.2012
|
|
Weichselgartner/General-Manager |
|
Sun/Product-Management |
|
|
|
|
|
|
|
First CE: 10 |
I.-No.: 11022 |
|
Archive-File/Record: NAPR006181 |
||
Art.-No.: 34.019.93 |
|
Documents registrar: Robert Mayn |
|||
Subject to change without notice |
|
Wiesenweg 22, D-94405 Landau/Isar |
|||
- 21 -
Anleitung_3401993_LB4.indb 21 |
04.12.12 15:44 |

GB
14.Warranty certificate
Dear Customer,
All of our products undergo strict quality checks to ensure that they reach you in perfect condition. In the unlikely event that your device develops a fault, please contact our service department at the address shown on this guarantee card. Of course, if you would prefer to call us then we are also happy to offer our assistance under the service number printed below. Please note the following terms under which guarantee claims can be made:
1.These guarantee terms cover additional guarantee rights and do not affect your statutory warranty rights. We do not charge you for this guarantee.
2.Our guarantee only covers problems caused by material or manufacturing defects, and it is restricted to the rectification of these defects or replacement of the device. Please note that our devices have not been designed for use in commercial, trade or industrial applications. Consequently, the guarantee is invalidated if the equipment is used in commercial, trade or industrial applications or for other equivalent activities. The following are also excluded from our guarantee: compensation for transport damage, damage caused by failure to comply with the installation/assembly instructions or damage caused by unprofessional installation, failure to comply with the operating instructions (e.g. connection to the wrong mains voltage or current type), misuse or inappropriate use (such as overloading of the device or use of non-approved tools or accessories), failure to comply with the maintenance and safety regulations, ingress of foreign bodies into the device (e.g. sand, stones or dust), effects of force or external influences (e.g. damage caused by the device being dropped) and normal wear resulting from proper operation of the device. This applies in particular to rechargeable batteries for which we nevertheless issue a guarantee period of 12 months. The guarantee is rendered null and void if any attempt is made to tamper with the device.
3.The guarantee is valid for a period of 3 years starting from the purchase date of the device. Guarantee claims should be submitted before the end of the guarantee period within two weeks of the defect being noticed. No guarantee claims will be accepted after the end of the guarantee period. The original guarantee period remains applicable to the device even if repairs are carried out or parts are replaced. In such cases, the work performed or parts fitted will not result in an extension of the guarantee period, and no new guarantee will become active for the work performed or parts fitted. This also applies when an on-site service is used.
4.In order to assert your guarantee claim, please send your defective device postage-free to the address shown below. Please enclose either the original or a copy of your sales receipt or another dated proof of purchase. Please keep your sales receipt in a safe place, as it is your proof of purchase. It would help us if you could describe the nature of the problem in as much detail as possible. If the defect is covered by our guarantee then your device will either be repaired immediately and returned to you, or we will send you a new device.
Of course, we are also happy offer a chargeable repair service for any defects which are not covered by the scope of this guarantee or for units which are no longer covered. To take advantage of this service, please send the device to our service address.
IAN 87780
- 22 -
Anleitung_3401993_LB4.indb 22 |
04.12.12 15:44 |

|
|
HU |
Tartalomjegyzék |
|
|
1. |
Bevezetés................................................................................................................................................... |
24 |
2. |
Biztonsági utasítások ................................................................................................................................ |
24 |
3. |
A készülék leírása és a szállítás terjedelme ........................................................................................... |
27 |
4. |
Rendeltetésszerűi használat .................................................................................................................... |
27 |
5. |
Technikai adatok ....................................................................................................................................... |
28 |
6. |
Beüzemeltetés előtt ................................................................................................................................... |
28 |
7. |
Kezelés....................................................................................................................................................... |
30 |
8. |
Karbantartás és pótalkatrész megrendelés ............................................................................................ |
32 |
9. |
Tárolás és szállítás..................................................................................................................................... |
34 |
10. |
Tisztítás....................................................................................................................................................... |
34 |
11. |
Megsemmisítés és újrahasznosítás .......................................................................................................... |
35 |
12. |
Hibakeresési terv....................................................................................................................................... |
36 |
13. |
Konformkijelentés...................................................................................................................................... |
37 |
14. |
Garanciaokmány .................................................................................................................................... |
38 |
A termékek dokumentációjának és a kisérőpapírjainak az utánnyomtatása vagy egyébb sokszorosítása, kivonatosan is csak az iSC GmbH kihangsúlyozott beleegyezésével engedélyezett.
Technikai változtatások jogát fenntartva
- 23 -
Anleitung_3401993_LB4.indb 23 |
04.12.12 15:44 |

HU
1. Bevezetés
Szívből gratulálunk az új készülék vásárlásához. Ezáltal egy különös mindőségű termék mellett döntött. Ennek a terméknek az alkatrészei közé tartozik a használati utasítás is. Amely fontos utasításokat tartalmaz a biztonsággal, használattal és a megsemmisítéssel kapcsolatban. A termék használata előtt ismerkedjen meg minden kezelési és biztonsági utasítással. A terméket csak a leírottak szerint és a megadott bevetési területeken használni. A termék továbbadásánál más személyeknek, kézbesítse ki vele az összes dokumentumokat.
2.Biztonsági utasítások
Figyelmeztetés!
Olvason minden biztonsági utalást és utasítást el. A biztonsági utalások és utasítások betartásán belüli mulasztások következménye áramcsapás, tűz és/vagy nehéz sérülések lehetnek. Őrizze meg a biztonsági utalásokat
és utasításokat a jövőre nézve.
Biztonsági berendezések
A készülékkel való dolgozásnál fel kell, a késnek vagy a fonalüzemnek megfelelő műanyag védőkupaknak szerelve lennie, azért hogy megakadályozza a tárgyak elhajítását. A vágófonalvédőkupakba integrált kés automatikusan levágja a fonalat az optimális hosszúságra.
A készüléken található jelzőtáblák magyarázata (ábra 14):
1.Figyelmeztetés!
2.A beüzemeltetés előtt elolvasni a használati utasítást!
3.Szem-/fej- és zajcsökkentő fülvedőt hordani!
4.Szilárd lábbelit hordani!
5.Védőkesztyűket hordani!
6.Óvni a készüléket eső és nedvesség elől!
7.Ügyeljen az elhajított részekre!
8.Karbantartási munkálatok előtt leállítani a készüléket és lehúzni a gyújtógyertyadugót!
9.A gép és a körülálló személyek közötti távolságnak legalább 15 m-nek kell lennie!
10.Utánfut a vágószerszám (vágókés/vágófonal)!
11.Figyelem forró részek. Távolságot tartani!
12.Minden 20 üzemóra után valamennyi zsírt (hajtómű folyózsír) kiegészíteni!
13.Figyelem balmenet. A szerszámot az óramutató forgási irányába ereszteni meg, az óramutató járásával ellenkező irányba húzni meg.
Biztonsági utasítások
•Olvassa gondosan el a használati utasítást. Ismerkedjen meg a készülék beállításaival és a helyes használatával.
•Ne engedje meg sohasem a készüléket más személyeknek használni, akik nem ismerik a használati utasítást. A helyi határozatok megszabhatják a kezelő alsó korhatárát.
•Sohasem kaszáljon addig amig személyek, főleg ha gyerekek vagy állatok vannak a közelben.
Figyelmeztetés:
Tartson be egy 15 m-es biztonsági távolságot. Közeledés esetén állítsa azonnal le a készüléket. Gondoljon arra, hogy a használó felelős más személyekkel vagy mások tulajdonával szemben történő balesetekért.
•Figyelem: Mérgezés veszélye, kipufogó gázok, üzemanyagok és kenőanyagok mérgezőek, a kipufogó gázokat nem szabad belélegezni.
Használat előtt
•A kaszálás ideje alatt mindig feszes lábbelit és hosszú nadrágot hordani. Ne kaszáljon mezítláb vagy könnyű szandálban.
•Ellenőrizze le azt a területet ahol használni fogja a készüléket és távolítson minden olyan tárgyakat el, amelyek el lehetnének kapva vagy hajítva.
•Figyelmeztetés: A benzin magasfokúan lobbanékony:
-Tárolja a benzint az arra előrelátott tartályokban.
-Csak a szabadban feltankolni és ne dohányozzon a betöltési folyamat ideje alatt.
-A benzint a motor beindítása előtt kell betölteni. A motor futása alatt, vagy egy forró kés-
- 24 -
Anleitung_3401993_LB4.indb 24 |
04.12.12 15:44 |

HU
züléknél nem szabad kinyitni a tartályzárat, vagy benzint utántölteni.
-Ha túlfolyt a benzin, akkor nem szabad megpróbálni a motort beindítani. Ahelyett el kell távolítani a készüléket a benzin által
szennyezett felülettől. Minden gyujtási próbát addig el kell kerülni, amig a benzinpárák el nem párologtak.
-Biztonsági okokból megrongálódások esetén ki kell cserélni a benzintartályt és a tartályzárakat.
•Cserélye ki a károsult hangtompítókat.
•Használat előtt mindig egy szemmeli vizsgálat altal leellenőrizni, hogy a vágószerszámok, a rögzítő csapszeg és az egész vágóegység elhasználódott vagy károsult e. Kiegyensúlyozatlanság elkerüléséhez az elkopott vagy károsult végószerszámokat és rögzítőcsapszegeket csak készletenként szabad kicserélni.
Kezelés (kezelés, tárolás, kontrolla)
•Testhez álló munkaruhát hordani, amely védelmet nyújt, mint például egy hosszú nadrágot, biztos munkacipőket, strapálható munkakesztyűket, egy védősisakot, egy védőmaszkot az arcra vagy egy védőszemüveget a szemek védelmére és jó fülvattát vagy más zajcsökkentő fülvédőt a zaj ellen.
•A készüléket mindig egy biztos helyen őrizni meg. Lassan kinyitni a benzíntartályt, azért hogy leengedjea tartályfedélben esetleg keletkezett nyomást. Tűzveszély megelőzéséhez távolodjon a készülék beindítása előtt legalább 3 méterre el a feltankolás helyétől.
•Kapcsolja ki a készüléket, mielőtt leállítaná.
•A készüléket mindig mind a két kézzel feszesen tartani. Ennél a hüvelyujjaknak és az ujjaknak át kell zárniuk a fogantyúkat.
•Ügyeljen arra, hogy a csavarok és a csatlakoztó egységek feszesre meg legyenek húzva. Ne kezelje a készüléket sohasem, ha nincs helyesen beállítva, vagy nincs teljesen és biztosan összeszerelve.
•Ügyeljen arra, hogy a fogantyúk szárazak és tiszták legyenek és ne ragadjon rajtuk semmilyen fajta benzinkeverék.
•A fonalorsót a kívánt magasságban vezetni. Kerülje el a kis tárgyaknak (mint például köveknek) a fonalorsóval való megérintését.
•Lejtőn történő fűnyírásnál kérjük mindig a vágószerszámtól lejebb állni. Ne vágjon vagy trimmeljen sohasem egy sima, csúszós dombon vagy lejtőn.
•Ha beindítsa vagy futni hagyja a motort, akkor minden testrészt és ruhadarabot távol tartani a fonalorsótól. Mielőtt biindítaná
a motort, győződjön meg arról, hogy a fonalorsó nem kerül semmilyen akadállyal érintkezésbe.
•A vágószerszámon történő munkálatok előtt mindig leállítani a motort.
•A készüléket és a tartozékokat biztosan és nyílt tűztől valamint hő-/szikraforrások, mint átfolyós rendzserű gázvízmelegítő, ruhaszárító, olajkályha vagy hordozható radiátorok elöl védve tárolni.
•A védkupakot, a fonalorsót és a motort tárolásnál mindig a kaszálási maradékoktól mentesen tartani.
•A készüléket csak elegendően kioktatott személyeknek és felnőtteknek szabad a kezelniük, beállítani és karbantartani.
•Ha nem jártas a készülékkel, akkor nem futó motor melett gyakorolni a bánásmódot.
•A munka előtt leellenőrizni a kaszálandó területet, feszes testeket mint fémrészket, üvegeket, köveket vagy hasonlóakat elhajíthat és ezáltal a kezelőnél komoly sérüléseket okozhat valamint maradóan megsértheti
a készüléket. Ha véletlenül megérintene a készülékkel egy feszes tátgyat, akkor kapcsolja azonnal ki a motort és vizsgálja meg a készüléket esetleges károkra. Ne használja sohasem a készüléket, ha megrongálódott vagy hiányokat mutatna fel.
•Mindig a felső fordulatszámrészlegben trimmelni és vágni. Ne hagyja a motort a kaszálás kezdeténél vagy a trimmelés ideje alatt alacsony fordulatszámmal futni.
•Csak az előrelátott célra, mint trimmelésre és a gaz kaszálására használni fel a készüléket.
•Ha üzemben van a készülék, akkor ne tartsa sohasem a fonalorsót térgy magasság felett.
•Ne használja a készüléket, ha nézők vagy
- 25 -
Anleitung_3401993_LB4.indb 25 |
04.12.12 15:44 |

HU
álatok lennének a közvetlen közelben. A kaszálási munkálatok ideje alatt a használó és más személyek vagy álatok között legalább egy 15 m-es távolságot tartani. A talajig menő lekaszálások esetén legalább egy 30 m-es távolságot tartani be.
Kiegészítő utasítások
•Ne használjon a használati utasitásban ajánlott üzemanyagtól eltérőeket. Tartsa mindig be ebben az utasításban levő „Üzemanyag és olaj” szakasz utasításit. Ne használjon oljan benzínt, amely nincs helyesen keverve a 2-ütemű-motorolajjal. Különben fennáll a motoron egy maradandó kár veszélye, amely által megszünik a gyártó szavatossága.
•Ne dohányozzon, amig feltankolja vagy üzemelteti a készüléket.
•Ne kezelje a készüléket kipufogó nélkül.
•Ne érintse meg a kipufogót sem a kezeivel sem a testével. Tartsa a készüléket úgy, hogy a hüvelykujjai és az ujjai körül zárják a fogantyúkat.
•Ne kezelje a készüléket egy kényelmetlen állásban, ha nincs kiegyensúlyozva, kinyújtott karokkal vagy csak egy kézzel. A kezeléshez mindig mind a két kezét használni és fogja ennél a hüvelykujjaival és az ujjaival körül a fogantyúkat.
•Ha üzemben van a készülék, akkor tartsa mindig a talajon a fonalorsót.
•Csak az előrelátott célra, mint fűtrimmelésre és kaszálási munkákra használni fel a készüléket.
•Ne használja hosszabb időtartamon keresztül a készüléket, csináljon rendszeresen szüneteket.
•Ne üzemeltese a készüléket alkohol vagy kábítószer befolyása alatt.
•A készüléket csak akkor használni, ha installáva és jó állapotban van a megfelelő védőkupak.
•A terméken történő bármiljen fajta megváltoztatás veszélyeztetheti a személyi biztonságát és elavulni hagyja a gyártó szavatosságát.
•Ne használja sohasem a készüléket gyúlékony folyadékok vagy gázok közelében, sem
zárt teremben sem a szabadban. Ennek robbanás és/ vagy tűz lehet a következménye.
•Ne használjon semmiljen fajta más vágószerszámokat. Saját biztonságáért, csak a használati utasításban megadott vagy a gyártó által ajánlott vagy megadott kellékeket és pótkészülékeket használni. A használati utasításban ajánlott vágószerszámoktól vagy kellékektől eltérőek használata egy személyes sérülési veszélyt jelenthet az Ön számára.
Biztonsági intézkedések a vágókéssel való bánásmódnál
•Betartani minden, az üzemmel és a vágókésfelszereléssel kapcsolatos figyelmeztetést és utasítást.
•A vágókés egy hirtelen mozdulattal el lehet hajítva a tárgyaktól, ha nem tudja őket átvágni/ - kaszálni. Ez a kezeken és a lábakon sérülésekhez vezethet. A körülálló személyeket és álatokat a munkahelytől minden irányba legalább 15 m-re távol tartani. Ha idegen testre találna a készülék, akkor azonnal leállítani a motor és megvárni amig a vágókés nyugalmi állapotba nem került.
Ellenőrize le a vágókéseket sérülésekre. A vágókést mindig kicserélni, ha el van görbülve vagy repedve.
•A vágókés erősen elhajítsa a tárgyakat. Ez vakulásokat vagy sérüléseket okozhat. Hordjon szem, arc és lábvédőt. Mielőtt használná a vágókést, távolítson mindig minden tárgyat el a munkakörből.
•Minden használat előtt leellenőrizni a készüléket és a felszereléseket sérülésekre. Ne használja a készüléket, ha nincsen minden vágókésfelszerelés rendeltetés szerűen installálva.
•Ha elengedte a gázszabályozó kart, akkor kifut a vágókés. Egy kifutó vágókés vágási sérüléseket okozhat önnek vagy a körülállóknak. Mielőtt valamilyen munkát végezne el a vágókésen, állítsa le a motort és győződjön meg arról, hogy a vágókés nyugalmi állapotban került.
•15 m-es átmérőjű veszélyeztetett környezet. A körülálló személyek vakulást vagy sérüléseket szenvedhetnek el. Tartson maga és más sze-
- 26 -
Anleitung_3401993_LB4.indb 26 |
04.12.12 15:44 |

HU
mélyek vagy állatok között minden irányba egy 15 méteres távolságot.
3.A készülék leírása és a szállítás terjedelme
3.1 A készülék leírása (ábrák 1-től – 13-ig)
1.Csatlakozó darab, vezetőnyél
2.Vezetőnyél
3.Vezetőfogantyú
4.Indítózsinór / indító kötélhúzó szerkezet
5.Hidegindító-kar
6.Banzíntartály
7.Üzemanyagszivattyú „Primer”
8.Burkolat légszűrőgépház
9.Be-/ki- kapcsoló
10.Arretálás gázszabályozó kar
11.Gázszabályozó kar
12.Gázszabályozó karzár
13.Fonalorsó vágófonallal
14.Vágófonal-védőkupak
15.Vágókés-védőkupak
16.4 x csavar M5
17.Heveder
18a. Vágókés (4 fog)
18b. Vágókés (3 fog)
19.Tartó a vezetőfogantyúnak
20.Fogantyúcsavar M8
21.Betéttárcsa Ø 8mm
22.Menesztőkorong
23.Nyomólemez
24.Burkolat nyomólemez
25.Anya M10 (balmenet)
26.Olaj/benzinkeverő palack
27.Gyújtógyertyakulcs
28.Villás csavarkulcs 8/10mm
29.Hatlapú kulcs 4 mm
30.Hatlapú kulcs 5 mm
31.Védősapka a gyújtógyertyadugóhoz
32.Fogantyúcsavar M6
33.Anya M6
34.Betéttárcsa Ø 6mm
35.Légszűrő
36.Gyújtógyertyadugó
A szövegben a vágókés (18a/18b) és a fonalorsó (13) vágószerszámként
(gyüjtőfogalomként) is össze van foglalva.
3.2 A szállítás terjedelme
•Nyissa ki a csomagolást és vegye ki óvatosan a készüléket a csomagolásból.
•Távolítsa el a csomagolási anyagot valamint a csomagolási- / és szállítási biztosítékot (ha létezik).
•Ellenőrizze le, hogy teljes a szállítás terjedelme.
•Ellenőrizze le a készüléket és a tartozékrészeket szállítási károkra.
•Ha lehetséges, akkor őrizze meg a csomagolást a garanciaidő lejáratának a végéig.
Figyelem!
A készülék és a csomagolási anyag nem gyerekjáték! Nem szabad a gyerekeknek a műanyagtasakokkal, foliákkal és aprórészekkel játszaniuk! Fennáll a lenyelés és a megfulladás veszélye!
4.Rendeltetésszerűi használat
A készülék (a vágókés használata) a 4-fogú- késsel magas fű és gyenge bozót vágására alkalmas és a 3-fogú-késsel a sűrű bozót és gyenge fanövények vágására.
A készülék (fonalorsó használata vágófonallal) pázsitfelületek és könnyű gaz vágására alkalmas. A készülék rendeltetés szerüi haszálatának a feltétele, a gyártó által mellékelt használati utasításnak a betartása.
Minden más fajta használat, amelyik ebben a használati utasításban nem kifejezetten engedélyezett, károkat okozhat a készüléken és a kezelő számára egy komoly veszélyt jelenthet. Vegye okvetlenül figyelebe a biztonsági utasításokban foglalt fenntartásokat.
Kérjük vegye figyelembe, hogy a készülékeink rendeltetésük szerint nem az ipari, kézműipari vagy gyári használatra lettek konstruálva.
Nem vállalunk szavatosságot, ha a készülék ipari, kézműipari vagy gyári üzemek valamint
- 27 -
Anleitung_3401993_LB4.indb 27 |
04.12.12 15:44 |

HU
egyenértékű tevékenységek területén van használva.
Figyelem! A használó testi veszélyeztetése miatt a következő munkálatokra nem szabad használni a készüléket: a gyalogutak tisztítására és szecskevágógépként a faés a sövénylevágottak összeaprítására. Továbbá nem szabad a készüléket a talajemelkedések, mint példaul vakondtúrások elsimítására felhasználni. Biztonsági okokból nem szabad a készüléket más bármilyen fajta készülékek meghajtóaggregátumaként használni.
A készüléket csak a rendeltetése szerint szabad használni. Ezt túlhaladó bármilyen használat, nem számít rendeltetésszerűnek. Ebből adódó bármilyen kárért vagy bármilyen fajta sérülésért a használó ill. a kezelő felelős és nem a gyártó.
5.Technikai adatok
Motortípus2-ütemű-motor, léghűtésű, krómhenger
Motorteljesítmény (max.) ........... |
1,35 kW/ 1,8 PS |
Lökettérfogat ........................................... |
42,7 ccm |
A motor üresjáratú fordulatszáma ..... 3000 perc-1
Max. fordulatszám motor |
|
Késsel: .................................................. |
9000 perc-1 |
Fonalorsóval: ....................................... |
8400 perc-1 |
Max. vágássebesség |
|
Késsel: .................................................. |
6800 perc-1 |
Fonalorsóval: ....................................... |
6300 perc-1 |
Gyújtás ................................................. |
Elektronikus |
Hajtómű ................................ |
Centrifugális kuplung |
Súly (üres tartály) .......................................... |
7,5 kg |
Vágókör-fonal Ø .......................................... |
41 cm |
Vágókör-kés Ø ............................................. |
23 cm |
Fonalhossz ...................................................... |
8,0 m |
Fonal-Ø ....................................................... |
2,0 mm |
Zaj és vibrálás |
|
Hangnyomásmérték LpA ........................... |
98 dB(A) |
Bizonytalanság KpA ...................................... |
1,5 dB |
Hangteljesítménymérték LWA.................... |
110 dB(A) |
Bizonytalanság KWA ..................................... |
1,5 dB |
Hordjon egy zajcsökkentő fülvédőt.
A zaj befolyása hallásvesztességhez vezethet.
Üzem
Rezgésemisszióérték ah = 4,1 m/s2 Bizonytalanság K = 1,5 m/s2
Csökkentse le a zajkibocsátást és a vibrálást egy minimumra!
•Csak kifogástalan készülékeket használni.
•A készüléket rendszeresen karbantartani és megtisztítani.
•Illessze a munkamódját a készülékhez.
•Ne terhelje túl a készüléket.
•Hagyja adott esetben leellenőrizni a készüléket.
•Kapcsolja ki a készüléket, ha nem használja.
•Hordjon kesztyűket.
6.Beüzemeltetés előtt
6.1 Összeszerelés
6.1.1 A vezetőfogantyú felszerelése (ábrák 3a-tól – 3c-ig)
Szerelje fel a 3a-tól – 3c-ig levő ábrák szerint a vezeztőfogantyút (3). A csavart (20) csak akkor teljesen feszesre húzni, ha beállította a hevederrel (17) való optimális munkaállást (lásd ehhez a 6.2-es szakaszt is). A vezetőfogantyúnak az 1-es ábra szerint kellene kiigazítva lennie. A leszerelés fordítva történik.
Tartálytartalom ................................................. |
0,8 l |
Gyújtógyertya ............................ |
Champion RCJ6Y |
Üzemanyagfogyasztás |
|
max. motorteljesítménynél ................... |
0,6 kg/óra |
Specifikus üzemanyagfogyasztás max. motorteljesítménynél .........................................446 g/kWh
6.1.2 A vezetőnyél felszerelése (ábrák 4a-tól – 4c-ig)
Tolja a fogantyúcsavart (32) az alátétkarikán (34) keresztül a vezetőnyél (1) csatlakoztató darabjába. Csavarozza lazán össze a fogantyúcsavart az anyával (33). Nyomja most meg az arretáló kart (A) és tolja óvatosan a vezetőnyelet (ábra 4a/poz. 2) a vezetőnyél csatlakoztató dara-
- 28 -
Anleitung_3401993_LB4.indb 28 |
04.12.12 15:44 |

HU
bjába. Ügyeljen ennél arra, hogy a meghajtótengelyek a vezetőnyél belsejében egymásba csússzanak, adott esetben enyhén csavarni a fonalorsón (13) / a vágókésen (18a/18b). Az arretálókar (A) orrának be kell reteszelnie a lyukba (B). A 4c ábrán mutatottak szerint meghúzni a fogantyúcsavart. A leszereléshez csak meg kell lazítani a fogantyúcsavart és üzemeltetni az arretáló kart.
6.1.3A vágókés-védőkupak felszerelése
Figyelem: A vágókéssel való dolgozásnál a vágókés-védőkupaknak (15) fel kell szerelve lennie.
A vágókés-védőkupak felszerelése az 5a-tól – 5b-ig levő ábrákon mutatottak szerint történik.
6.1.4A vágókés felszerelése/kicserélése
A vágókés (18a/18b) felszerelése a 6a-tól – 6gig levő képeken látható. A leszerelés az ellenkező
sorrendben történik.
• A 6b ábrán mutatottak szerint feldugni a fo-
• |
gastengelyre a menesztőkorongot (22). |
A menesztőkorongon arretálni a vágókést |
|
• |
(18a/18b) (ábra 6c) |
Rádugni a fogastengely menetére a nyomóla- |
|
• |
pot (23) (ábra 6d) |
Feldugni a nyomólap burkolatát (24) (ábra |
|
• |
6e) |
Megkeresni a menesztőkorong furatait, |
|
|
egymás fölé hozni az alattal fekvő rovátkával |
|
és arretálni a vele szállított hatlapú kulccsal |
|
(29), azért hogy most meg tudja húzni a |
|
gyújtógyertyakulccsal (27) az anyát (25) |
• |
(ábra 6f/6g). Figyelem: Balmenet |
A leszállításnál a vágókések (18a/18b) plas- |
|
|
ztik védősapkákkal vannak ellátva. Használat |
|
előtt ezeket el kell távolítani és használat után |
|
ismét fel kell őket rakni. |
6.1.5 A vágófonal-védőkupaknak a vágókés-védőkupakjára való felszerelése
Figyelem: A vágófonallal való dolgozásnál még kiegészítően fel kell szerelni a vágófonalvédőkupakot (14).
A vágófonal-védőkupak felszerelése a 7a-tól – 7b-ig levő ábrákon mutatottak szerint történik.
Ügyeljen arra, hogy helyesen bereteszeljen a vágófonal-védőkupak. Az automatikus fonalhossz szabályozáshoz a védőkupak alulsó oldalán egy kés található (ábra 7a/poz. F). Ez fedve van egy védővel (ábra 7a/poz. G).
A munka kezdete előtt eltávolítani ezt a védőt és a munka befejezése után ismét feltenni.
6.1.6 A fonalorsó felszerelése/kicserélése
A fonalorsó (13) felszerelése a 7c képen látható. A leszerelés fordítva történik. A fonalorsó a leszállításnál már fel van szerelve.
Megkeresni a menesztőtárcsa (22) fuaratait, egymás fölé hozni az alatta fekvő rovátkával és arretálni a vele szállított hatlapú kulccsal (29), azért hogy most rácsavarozza a fonalorsót a menetre. Figyelem: Balmenet
6.2 A vágási magasság beállítása
•A 8a-tól - 8c-ig levő ábrákon mutatottak szerint felfektetni a hevedert (17).
•Beakasztani a készüléket a hevederen (ábra 8d).
•A hevederen levő különböző övelállítókkal beállítani az optimális munka és vágási pozíciót (ábra 8e).
•Az optimális hevederhosszúság megállapításához végezzen utánna egy pár lengőmozgást el, anélkül hogy bekapcsolná a motort (ábra 9a).
A heveder egy gyorsnyitó mechanizmussal van felszerelve. Ha szükséges a készülék gyors lerakása, akkor húzzon a piros övrészen (ábra 8f).
Figyelem: Használja mindig az övet, ha dolgozik a készülékkel. Tegye az övet azonnal fel miután beindította a motort és az üresmenetben fut. Kapcsolja ki a motort mielőtt levenné a hevedert.
6.3 Üzemanyag és olaj
Ajánlott üzemanyagok
Csak egy ólommentes benzinből és egy 2-ütemű- motorolajból álló keveréket használni. Keverje be az üzemanyagkeveréket az üzemanyag-keverék- táblázat szerint.
- 29 -
Anleitung_3401993_LB4.indb 29 |
04.12.12 15:44 |

HU
Figyelem: Ne használjon sohasem olyan üzemanyagkeveréket, amelyik 90 naptól hosszabb ideig tárolva lett.
Figyelem: Ne használjon olyan 2-ütemű-olajat, amely egy 100:1-hez levő keverékarányt ajánl. Nem elegendő kenés miatti motorkároknál megszűnik a gyártó motorszavatossága. Figyelem: Az üzemanyag szállítására és tárolására csak az arra előrelátott és engedélyezett tartályt használni. Mindig a megfelelő benzín
és 2-ütemű-olaj mennyiséget adni a mellékelt keverőpalackba (lásd a felnyomtatott skálát). Azután rázza jól fel a tartályt.
6.4 Üzemanyag-keveréktáblázat
Keverési eljárás: 40 rész benzínt 1 rész olajra
Benzin |
2-ütemű-olaj |
|
|
1 Liter |
25 ml |
|
|
5 Liter |
125 ml |
|
|
7. Kezelés
Kérjük vegye figyelembe a törvényi határozatokat a zajvédelmi rendeletekkel kapcsolatban, amelyek helyenként különbözőek lehetnek.
Minden üzembevétel előtt leellenőrizni a készüléket:
•Az üzemanyagszisztéma tömörségét.
•A védőberendezéseket és a vágóberendezést kifogástalan állapotára és teljességére.
•Minden csavarkötést feszes ülésére.
•Minden mozgatható részt könnyűjáratúságára.
7.1 Indítás hideg motornál
Töltse fel a tartályt benzin/olaj-keverékkel. Lásd az „Üzemanyag és olaj”-at is.
1.A készüléket egy kemény, sík felületre állítani.
2.10x megnyomni az üzemanyagszivattyút (primer) (1-es ábra/poz. 7).
3.A be-/ki-kapcsolót (1-es ábra/poz. 9) az „I”-re kapcsolni.
4.Rögzíteni a gázszabályozó kart (1-es ábra/ poz. 11). Ehhez a gázszabályozó karzárat (1-es ábra/poz. 12) és utánna a
gázszabályozó kart (1-es ábra/poz. 11) üzemeltetni és az arretálás (1-es ábra/poz. 10) egyidejűleges nyomása által rögzíteni a gázszabályozó kart.
5.Hidegindító-kart (1-es ábra/poz. 5) a „ ”-ra állítani.
6.Jó feszesen megfogni a készüléket és az indítózsinórt (1-es ábra/poz. 4) az első ellenállásig kihúzni. Most a start kötélhúzó szerkezetet 4x gyorsan meghúzni. A készüléknek indítania kellene.
Figyelem: Ne hagyja az indítózsinórt visszacsapódni. Ez sérülésekhez vezethet. Figyelem: A rögzített gázszabályozó kar által az induló motornál dolgozni kezd a vágószerszám.
Azután egyszerű üzemeletetés által kireteszelni a gázszabályozó kart. Egyidejűleg a gázsza-
balyozó kar üzemeltetése által ki lesz reteszelve a hidegindító-kar. (A motor visszatér üresmenetbe).
7.Ha nem indítana a motor, akkor ismételje meg a 4-től – 6-ig levő lépéseket. Figyelembe venni: Ha több kisérlet után sem ugrik be a motor, akkor olvassa el a „Hibakeresési terv” fejezetet.
Figyelembe venni: A start kötélhúzó szerkezetet mindig csak egyenesen kifelé húzni. Ha szögben lesz kihúzva, akkor súrlódás keletkezik a karikán. Ez a súrlódás által át lesz dörzsölve az indítózsinór és gyorsabban elkopódik. Fogja mindig az indító kötélhúzó szerkezetet, amikor az indítózsinór ismét behúzódik. Ne hagyja sohasem az indítózsinórt a kihúzott állapotból visszacsapódni.
7.2 Indítás meleg motornál
(A készülék 15-20 perctől kevesebb ideig ált nyugodtan)
1.A készüléket egy kemény, sík felületre állítani.
2.A be-/kikapcsolót az „I”-re kapcsolni (1-es ábra / poz. 9).
3.Rögzíteni a gázszabályozó kart (1-es ábra / poz. 11) (analog az „Indítás hideg motornál“).
4.Jó feszesen megfogni a készüléket és az indítózsinórt az első ellenállásig kihúzni. Most
- 30 -
Anleitung_3401993_LB4.indb 30 |
04.12.12 15:44 |
 Loading...