Florabest FGPA 1000 A1 User Manual [cs, en, de, pl]
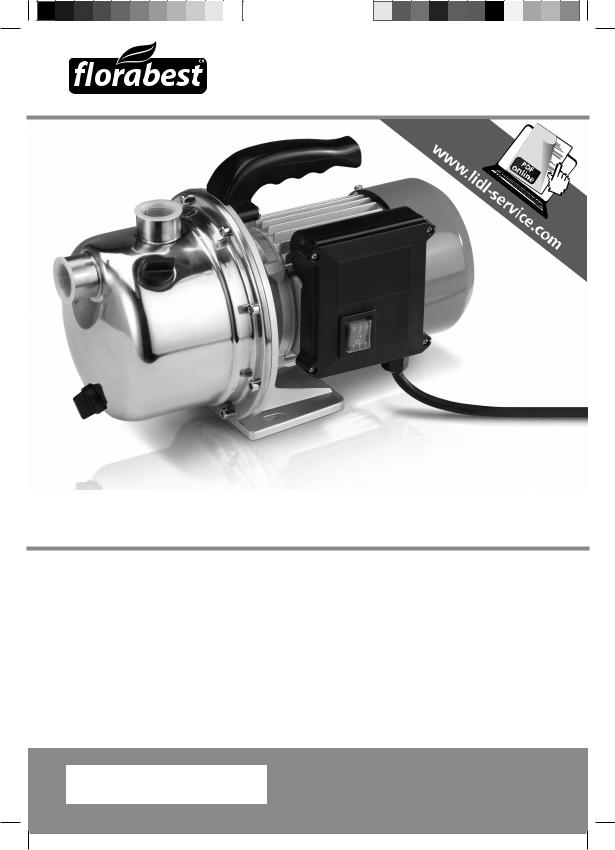
Garden Pump Set FGPA 1000 A1
K |
V |
Garden Pump Set |
Komplet z vrtno črpalko |
Operation and Safety Notes |
Navodila za upravljanje in varnostna opozorila |
Original operating instructions |
Originalna navodila za uporabo |
D |
W |
Zahradní čerpadlo |
Súprava záhradného čerpadla |
Pokyny pro obsluhu a bezpečnostní pokyny Originální návod k obsluze
Pokyny pre obsluhu a bezpečnostné pokyny Originálny návod na obsluhu
T |
F A C |
Zestaw dla pomp ogrodowych |
Gartenpumpen-Set |
Wskazówki dotyczące obsługi i bezpieczeństwa |
Bedienungsund Sicherheitshinweise |
Instrukcją oryginalną |
Originalbetriebsanleitung |
IAN 78961
VD
WT
Anleitung_4180303.indb 1 |
21.09.12 10:43 |
K
Before reading, unfold the page containing the illustrations and familiarise yourself with all functions of the device.
V
Pred branjem stran s slikami odprite navzven in se nato seznanite z vsemi funkcijami naprave.
D
Před čtením si otevřete stranu s obrázky a potom se seznamte se všemi funkcemi přístroje.
W
Pred čítaním si odklopte stranu s obrázkami a potom sa oboznámte so všetkými funkciami prístroja.
T
Przed przeczytaniem proszę rozłożyć stronę z ilustracjami, a następnie proszę zapoznać się z wszystkimi funkcjami urządzenia.
F A C
Klappen Sie vor dem Lesen die Seite mit den Abbildungen aus und machen Sie sich anschließend mit allen Funktionen des Gerätes vertraut.
GB |
Operation and Safety Notes |
Page |
5 |
SI |
Navodila za upravljanje in varnostna opozorila |
Stran |
14 |
|
|
|
|
CZ |
Pokyny pro obsluhu a bezpečnostní pokyny |
Strana |
23 |
|
|
|
|
SK |
Pokyny pre obsluhu a bezpečnostné pokyny |
Strana |
33 |
PL |
Wskazówki dotyczące obsługi i bezpieczeństwa |
Strona |
43 |
|
|
|
|
DE/AT/CH |
Bedienungsund Sicherheitshinweise |
Seite |
53 |
|
|
|
|
|
- 2 - |
|
|
Anleitung_4180303.indb 2 |
21.09.12 10:43 |
1
6 |
7 |
8 |
9
5
4 |
|
2 |
1 |
|
|
|
|
|
|
|
|
|
10 |
|
|
3 |
13 |
11 |
|
|
|
|
12 |
|
2 |
3 |
|
|
|
|
|
|
3 |
|
|
- 3 - |
|
|
|
Anleitung_4180303.indb |
3 |
|
21.09.12 |
10:43 |

- 4 -
Anleitung_4180303.indb 4 |
21.09.12 10:44 |

|
|
GB |
Table of contents |
|
|
1. |
Introduction.................................................................................................................................................. |
6 |
2. |
Safety regulations ....................................................................................................................................... |
6 |
3. |
Layout and items supplied.......................................................................................................................... |
7 |
4. |
Intended use ................................................................................................................................................ |
7 |
5. |
Technical data ............................................................................................................................................. |
8 |
6. |
Operating instructions................................................................................................................................. |
8 |
7. |
Fitting the carry handle............................................................................................................................... |
8 |
8. |
Fitting the suction hose................................................................................................................................ |
8 |
9. |
Mains connection ....................................................................................................................................... |
8 |
10. |
Fitting a suction pipe................................................................................................................................... |
8 |
11. |
Fitting a pressure pipe................................................................................................................................. |
9 |
12. |
Starting up ................................................................................................................................................... |
9 |
13. |
Cleaning and maintenance........................................................................................................................ |
9 |
14. |
Replacing the mains cable ......................................................................................................................... |
9 |
15. |
Storage ...................................................................................................................................................... |
10 |
16. |
Ordering spare parts ................................................................................................................................ |
10 |
17. |
Disposal and recycling ............................................................................................................................. |
10 |
18. Troubleshooting guide................................................................................................................................ |
11 |
|
19. |
Declaration of conformity......................................................................................................................... |
12 |
20. |
Warranty certificate .................................................................................................................................. |
13 |
The reprinting or reproduction by any other means, in whole or in part, of documentation and papers accompanying products is permitted only with the express consent of the iSC GmbH.
Subject to technical changes
- 5 -
Anleitung_4180303.indb 5 |
21.09.12 10:44 |
GB
1. Introduction
Congratulations on your new purchase.
You have decided in favor of a high-quality product. The operating instructions are a part of this product. They contain information of importance for your safety, for the use of the product and for its disposal. Before you use the product, acquaint yourself with all the information concerning its operation and safety. Use the product only as described and only for the listed areas of application. If you hand on the product to other people, give them all the documentation as well.
2.Safety regulations
Caution!
Read all safety regulations and instructions.
Any errors made in following the safety regulations and instructions may result in an electric shock, fire and/or serious injury.
Keep all safety regulations and instructions in a safe place for future use.
Protect yourself and your environment from risks and accidents by taking the appropriate precautionary measures.
•This equipment is not designed to be used by people (including children) with limited physical, sensory or mental capacities or those with no experience and/or knowledge unless they are supervised by a person who is responsible for their safety or they have received instructions from such a person in to how to use the equipment safely. Children must always be supervised in order to ensure that they do not play with the equipment.
•Keep the plastic packaging out of the reach of babies and children.
Risk of suffocation!
•The operator is responsible for the safety of other people in the work area.
•Before starting, a test must be carried out by a specialist to ensure that the required electrical safety measures are in place.
•Caution!
In stagnant water bodies, garden ponds, swimming ponds and their surrounding areas the pump may only be used with an earthleakage circuit breaker with an actuating rated fault current of up to 30 mA (as stipulated in VDE 0100 parts 702 and 738).
•The pump is not designed for use in any kind of swimming pools and paddling pools or in other bodies of water in which people or animals may be present during its operation.
•It is prohibited to operate the pump if a person or animal is in the danger zone. Ask your electrician!
•Always inspect the equipment visually before using it. Do not use the equipment if safety devices are damaged or worn. Never disable any safety devices.
•Use the equipment only for the purposes indicated in these original operating instructions.
•You are responsible for safety in the operating area.
•If the power cable for this machine is damaged, it must be replaced by the manufacturer or the manufacturer’s after-sales service or by similarly trained personnel to avoid danger.
•The voltage of 230 V alternating voltage specified on the rating plate of the pump must be the same as the mains voltage.
•Never use the power cable to lift, transport or secure the pump.
•Ensure that the electrical plug connections are in areas that are not at risk of flooding and protect them from moisture.
•Always pull out the power plug before doing any work on the pump!
•Do not expose the pump to a direct jet of water.
•The operator is responsible for complying with local safety and installation regulations (ask an electrician if you are in any doubt).
•The user is required to take suitable measures (e.g. installing an alarm system or a reserve pump, etc.) to prevent damage arising as a result of flooded rooms in the event of faults with the pump.
•In the event of a failure of the pump, repair work may only be carried out by an electrici-
- 6 -
Anleitung_4180303.indb 6 |
21.09.12 10:44 |
GB
• |
an or by ISC after-sales service personnel. |
Use only original spare parts. |
|
• |
The pump must never run dry or be used |
|
when the intake line is fully closed. The |
|
manufacturer’s warranty does not cover |
|
damage caused to the pump as a result of |
• |
running it dry. |
The pump must not be used to operate swim- |
|
• |
ming pools. |
The pump must not be installed in the drinking |
|
• |
water pipeline. |
The maximum temperature of the fluid must not |
|
• |
exceed +35°C. |
Do not use this equipment to pump inflamma- |
|
• |
ble, gassing or explosive fluids. |
The pumping of aggressive liquids (acid, |
|
|
alkali, silo seepage, etc.) and liquids with |
|
abrasive (emerizing) substances (sand) must |
|
likewise be avoided. |
3.Layout and items supplied
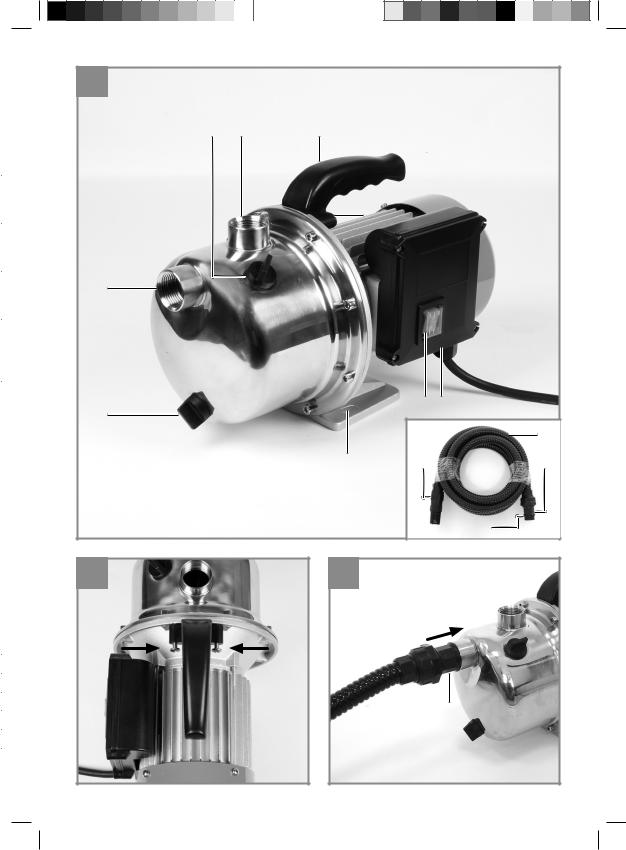
3.1 Layout (Fig. 1)
1.Garden pump
2.On/Off switch
3.Mounting holes
4.Water drain screw
5.Suction connector
6.Water filler screw
7.Pressure connector
8.Carry handle
9.Screw (2x)
10.Suction hose 4m
11.Connection adapter approx. 33.3 mm (R1) male thread and approx. 42 mm (R1 1/4) male thread
12.Sealing ring
13.Non-return valve and intake filter
3.2 Items supplied
•Open the packaging and take out the equipment with care.
•Remove the packaging material and any packaging and/or transportation braces (if present).
•Check to see if all the items are supplied.
•Inspect the equipment and accessories for damage in transit.
•If possible, keep the packaging until the end of the guarantee period.
Important
The equipment and packaging material are not toys! Do not let children play with plastic bags, plastic sheets and small parts! There is a risk of choking and suffocating!
•Garden pump
•Carry handle
•Screw (2x)
•Suction hose 4m
•Connection adapter approx. 33.3 mm (R1) male thread and approx. 42 mm (R1 1/4) male thread
•Non-return valve and intake filter
•Original operating instructions
4.Intended use
Range of applications
•For irrigating and watering landscaped areas, vegetable beds and gardens.
•For operating lawn sprinklers.
•With preliminary filter for drawing water from ponds, streams, rainwater butts, rainwater cisterns and wells.
Pumping media
For the pumping of clear water (freshwater), rainwater and mild suds/ service water.
•The maximum temperature of the fluid must not exceed +35°C.
•Do not use this equipment to pump inflammable, gassing or explosive fluids.
- 7 -
Anleitung_4180303.indb 7 |
21.09.12 10:44 |
•The pumping of aggressive liquids (acid, alkali, silo seepage, etc.) and liquids with abrasive (emerizing) substances (sand) must likewise be avoided.
GB
8.Fitting the suction hose
Fit the suction hose as illustrated in Fig. 3. Make sure that the end of the adapter (Fig. 1/ Item 11) with the sealing ring (Fig. 1/Item 12) is screwed into the equipment.
5.Technical data
Mains connection: ........................... |
230V ~ 50 Hz |
Power rating: .............................................. |
1000 W |
Max. delivery rate ................................... |
4600 l/h |
Max. delivery head ......................................... |
45 m |
Max. delivery pressure........... |
4.5 bar (0.45 MPa) |
Max. suction height ........................................... |
7 m |
Pressure and suction connector: ..............................
..................... approx. 33.3 mm (R1 female thread)
Max. water temperature................................. |
35°C |
Sound pressure level LpA .................... |
72.03 dB (A) |
Uncertainty KpA .......................................... |
3 dB (A) |
Peak noise level: |
|
Measured ........................................... |
84.62 dB (A) |
Uncertainty KWA.......................................... |
3 dB (A) |
Guaranteed.............................................. |
86 dB (A) |
Protection class......................................................... |
I |
Protection type .................................................. |
IPX4 |
Weight ............................................................ |
8.9 kg |
6.Operating instructions
As a basic principle, we recommend the use of a preliminary filter and a suction set with suction hose, intake cage and non-return valve, in order
to prevent long priming periods and unnecessary damage to the pump as a result of stones and solid foreign bodies.
7. Fitting the carry handle
Fasten the carry handle with the 2 screws supplied (see Fig. 2).
9.Mains connection
•The mains connection needs a 230 V ~ 50 Hz shock-proof socket. Minimum 10-amp fuse required. Please ensure that the power socket is easily accessible.
•Switch on/off at the built-in switch (see Fig. 1/Item 2).
•The motor is protected from overload or blockage by a built-in temperature monitor. In case of overheating the temperature monitor automatically switches the pump off. After the equipment has cooled down, the pump will switch on again automatically.
10.Fitting a suction pipe
•Screw a suction pipe (min. 19 mm (3/4“) plastic pipe with spiral reinforcement) either directly or with the aid of a threaded nipple approx. 33 mm (R1) male thread onto the intake line connection approx. 33 mm (R1) female thread of the pump (Fig. 1/Item 5).
•The suction hose should have an intake valve. If the intake valve cannot be used then a nonreturn valve should be installed in the intake line.
•Position the intake line so that it rises from the water withdrawal point to the pump. Avoid positioning the intake line higher than the pump as this would delay the escape of air bubbles from the intake line and impede the priming process.
•Install the intake and discharge lines in such a way that they do not exert any mechanical pressure on the pump.
•The intake valve should be low enough in the water to ensure that the pump will not run dry if the water level falls.
- 8 -
Anleitung_4180303.indb 8 |
21.09.12 10:44 |
GB
•A leaking intake line will draw in air and therefore not draw in any water.
•Take measures to prevent the intake of foreign bodies (sand, etc.). If necessary install a coarse filter.
11. Fitting a pressure pipe
•The discharge line min. 19 mm (3/4“) must be connected either directly or with the aid of a threaded nipple approx. 33.3 mm (R1) female thread to the discharge line connection approx. 33 mm (R1) female thread of the pump (Fig. 1/Item 7) .
•You can also use a pressure hose of approx. 13 mm (1/2“) with the relevant couplings. The pump rate is reduced when using the smaller discharge line.
•During the priming process, the shut-off devices present in the discharge line (spray nozzles, valves, etc.) must be completely open so that the air in the intake line can escape freely.
12.Starting up
•Place the pump on a firm and level surface.
•Before starting the pump, it must be securely mounted on the surface using the holes in the stand (see Fig. 1/Item 3).
•Fit intake line so that it is ready for use.
•Fill pump with water at the filler screw (Fig. 1/ Item 6) up to the full point.
•During the priming process, the shut-off devices present in the discharge line (spray nozzles, valves, etc.) must be completely open so that the air in the intake line can escape freely.
•The initial intake process can take approx. 30 seconds to 5 minutes, depending on the suction height and volume of air in the intake line. The pump should be topped up with water if the priming time is longer.
•If the pump is removed after use, it is essential that it is filled with water again the next time it is connected and started.
•Establish electrical connection.
13.Cleaning and maintenance
•The pump is largely maintenance-free. In order to ensure a long service life, however, we recommend regular checks and product care.
Caution!
The pump must be disconnected from the power supply by removing the power plug before carrying out any maintenance.
•Before lengthy periods of inactivity or winter storage rinse the pump thoroughly, empty it completely and store it in a dry place.
•To drain the pump housing, undo the water drain screw (Fig. 1/Item 4) and tilt the pump slightly.
•The pump must be completely emptied if there is a risk of frost.
•After relatively long periods of storage, switch on and off briefly to check whether the rotor is turning properly.
•If the pump is clogged, connect the discharge line to the water line and disconnect the intake line. Open the water line. Switch on the pump several times for approx. two seconds. This should resolve the majority of clog-rela- ted problems.
•We recommend lukewarm water to clean the motor and pump housing.
14.Replacing the mains cable
Caution!
Disconnect the unit from the power supply! A defective mains cable may only be replaced by a qualified electrician.
- 9 -
Anleitung_4180303.indb 9 |
21.09.12 10:44 |
GB
15.Storage
Store the equipment and accessories out of reach of children in a dark and dry place above freezing.
The ideal storage temperature is between 5 and 30 °C. Store the equipment in its original packaging.
16.Ordering spare parts
Please provide the following information when ordering spare parts:
•Model/type of unit
•Article number of unit
•ID number of unit
For current prices and information please visit www.isc-gmbh.info
17. Disposal and recycling
The equipment is supplied in packaging to prevent it from being damaged in transit. The raw materials in this packaging can be reused or recycled. The equipment and its accessories are made
of various types of material, such as metal and plastic. Defective components must be disposed of as special waste. Ask your dealer or your local council.
For EU countries only
Never place any electric power tools in your household refuse.
To comply with European Directive 2002/96/EC concerning old electric and electronic equipment and its implementation in national laws, old electric power tools have to be separated from other waste and disposed of in an environment-friendly fashion, e.g. by taking to a recycling depot.
Recycling alternative to the return request:
As an alternative to returning the equipment to the manufacturer, the owner of the electrical equipment must make sure that the equipment is properly disposed of if he no longer wants to keep the equipment. The old equipment can be returned to a suitable collection point that will dispose of the equipment in accordance with the national recycling and waste disposal regulations. This does not apply to any accessories or aids without electrical components supplied with the old equipment.
- 10 -
Anleitung_4180303.indb 10 |
21.09.12 10:44 |
GB
18. Troubleshooting guide
Motor not running
Cause |
Remedy |
|
- Power supply not connected |
- |
Check voltage supply |
- Impeller blocked, thermostat has switched off |
- Take pump apart and clean it |
|
|
|
|
Pump not priming |
|
|
|
|
|
Cause |
Remedy |
|
- Intake valve not in the water |
- Place intake valve in water |
|
- No water in the pump chamber |
- Fill pump housing with water |
|
- Air in the intake line |
- Check sealing of intake line |
|
- Intake valve leaking |
- |
Clean intake valve |
- Intake cage (intake valve) blocked |
- |
Clean intake cage |
- Max. intake height exceeded |
- |
Check intake height |
|
|
|
Insufficient pumping rate |
|
|
|
|
|
Cause |
Remedy |
|
- Intake height too high |
- |
Check intake height |
- Intake cage soiled |
- |
Clean intake cage |
- Water level falling rapidly |
- Place intake valve lower down |
|
- Pump performance reduced by foreign bodies |
- Clean pump and replace wearing parts |
|
(sand, stones, etc.) |
|
|
|
|
|
Thermostat switches off the pump |
|
|
|
|
|
Cause |
Remedy |
|
|
|
|
- Motor overloaded, excessive friction caused |
- Dismantle and clean pump, prevent intake of |
|
by foreign bodies |
|
foreign bodies (filter) |
|
|
|
Caution! The pump must not run dry.
- 11 -
Anleitung_4180303.indb 11 |
21.09.12 10:44 |

GB
19.Declaration of conformity
Einhell Germany AG · Wiesenweg 22 · D-94405 Landau/Isar Konformitätserklärung
D |
erklärt folgende Konformität gemäß EU-Richtlinie und |
PL |
deklaruje zgodność wymienionego poniżej artykułu z |
GB |
Normen für Artikel |
BG |
następującymi normami na podstawie dyrektywy WE. |
explains the following conformity according to EU directi- |
декларира съответното съответствие съгласно |
||
F |
ves and norms for the following product |
LV |
Директива на ЕС и норми за артикул |
déclare la conformité suivante selon la directive CE et les |
paskaidro šādu atbilstību ES direktīvai un standartiem |
||
I |
normes concernant l’article |
LT |
apibūdina šį atitikimą EU reikalavimams ir prekės normoms |
dichiara la seguente conformità secondo la direttiva UE e |
RO |
declară următoarea conformitate conform directivei UE şi |
|
NL |
le norme per l’articolo |
GR |
normelor pentru articolul |
verklaart de volgende overeenstemming conform EU |
δηλώνει την ακόλουθη συμμόρφωση σύμφωνα με την |
||
E |
richtlijn en normen voor het product |
HR |
Οδηγία ΕΚ και τα πρότυπα για το προϊόν |
declara la siguiente conformidad a tenor de la directiva y |
potvrđuje sljedeću usklađenost prema smjernicama EU i |
||
P |
normas de la UE para el artículo |
|
normama za artikl |
declara a seguinte conformidade, de acordo com a |
|
Izjava o sukladnosti za ovaj proizvod dostupna je na |
|
DK |
directiva CE e normas para o artigo |
BIH |
internet stranici www.lidl.hr. |
attesterer følgende overensstemmelse i medfør af |
potvrđuje sljedeću usklađenost prema smjernicama EU i |
||
S |
EU-direktiv samt standarder for artikel |
RS |
normama za artikl |
förklarar följande överensstämmelse enl. EU-direktiv och |
potvrđuje sledeću usklađenost prema smernicama EZ i |
||
FIN |
standarder för artikeln |
|
normama za artikal |
vakuuttaa, että tuote täyttää EU-direktiivin ja standardien |
RUS следующим удостоверяется, что следующие продукты |
||
EE |
vaatimukset |
|
соответствуют директивам и нормам ЕС |
tõendab toote vastavust EL direktiivile ja standarditele |
UKR проголошує про зазначену нижче відповідність виробу |
||
CZ |
vydává následující prohlášení o shodě podle směrnice EU |
MK |
директивам та стандартам ЄС на виріб |
|
a norem pro výrobek |
ја изјавува следната сообрзност согласно |
|
SLO potrjuje sledečo skladnost s smernico EU in standardi za |
TR |
ЕУ-директивата и нормите за артикли |
|
SK |
izdelek |
Ürünü ile ilgili AB direktifleri ve normları gereğince aşağıda |
|
vydáva nasledujúce prehlásenie o zhode podľa smernice |
N |
açıklanan uygunluğu belirtir |
|
H |
EÚ a noriem pre výrobok |
erklærer følgende samsvar i henhold til EU-direktivet og |
|
a cikkekhez az EU-irányvonal és Normák szerint a |
IS |
standarder for artikkel |
|
|
következő konformitást jelenti ki |
Lýsir uppfyllingu EU-reglna og annarra staðla vöru |
|
Gartenpumpe FGPA 1000 A1 (Florabest)

 87/404/EC_2009/105/EC
 2005/32/EC_2009/125/EC
X 2006/95/EC
 2006/28/EC X 2004/108/EC
  2004/22/EC
  1999/5/EC

 97/23/EC

 90/396/EC_2009/142/EC
 89/686/EC_96/58/EC
X 2011/65/EC

 2006/42/EC
Annex IV
Notified Body:
Notified Body No.:
Reg. No.:
X2000/14/EC_2005/88/EC X Annex V
Annex VI
Noise measured: LWA = 84,62 dB (A); guaranteed LWA = 86 dB (A) P = KW; L/Ø = cm
Notified Body:
2006/28/EC
Emission No.:
Standard references: EN 60335-1; EN 60335-2-41; EN 62233;
EN 55014-1; EN 55014-2; EN 61000-3-2; EN 61000-3-3
Landau/Isar, den 03.09.2012
|
|
Weichselgartner/General-Manager |
|
Wang/Product-Management |
|
|
|
|
|
|
|
First CE: 12 |
I.-No.: 11012 |
|
Archive-File/Record: NAPR005890 |
||
Art.-No.: 41.803.13 |
|
Documents registrar: Helmut Bauer |
|||
Subject to change without notice |
|
Wiesenweg 22, D-94405 Landau/Isar |
|||
- 12 -
Anleitung_4180303.indb 12 |
21.09.12 10:44 |
GB
20. Warranty certificate
Dear Customer,
All of our products undergo strict quality checks to ensure that they reach you in perfect condition. In the unlikely event that your device develops a fault, please contact our service department at the address shown on this guarantee card. Of course, if you would prefer to call us then we are also happy to offer our assistance under the service number printed below. Please note the following terms under which guarantee claims can be made:
1.These guarantee terms cover additional guarantee rights and do not affect your statutory warranty rights. We do not charge you for this guarantee.
2.Our guarantee only covers problems caused by material or manufacturing defects, and it is restricted to the rectification of these defects or replacement of the device. Please note that our devices have not been designed for use in commercial, trade or industrial applications. Consequently, the guarantee is invalidated if the equipment is used in commercial, trade or industrial applications or for other equivalent activities. The following are also excluded from our guarantee: compensation for transport damage, damage caused by failure to comply with the installation/assembly instructions or damage caused by unprofessional installation, failure to comply with the operating instructions (e.g. connection to the wrong mains voltage or current type), misuse or inappropriate use (such as overloading of the device or use of non-approved tools or accessories), failure to comply with the maintenance and safety regulations, ingress of foreign bodies into the device (e.g. sand, stones or dust), effects of force or external influences (e.g. damage caused by the device being dropped) and normal wear resulting from proper operation of the device. This applies in particular to rechargeable batteries for which we nevertheless issue a guarantee period of 12 months. The guarantee is rendered null and void if any attempt is made to tamper with the device.
3.The guarantee is valid for a period of 3 years starting from the purchase date of the device. Guarantee claims should be submitted before the end of the guarantee period within two weeks of the defect being noticed. No guarantee claims will be accepted after the end of the guarantee period. The original guarantee period remains applicable to the device even if repairs are carried out or parts are replaced. In such cases, the work performed or parts fitted will not result in an extension of the guarantee period, and no new guarantee will become active for the work performed or parts fitted. This also applies when an on-site service is used.
4.In order to assert your guarantee claim, please send your defective device postage-free to the address shown below. Please enclose either the original or a copy of your sales receipt or another dated proof of purchase. Please keep your sales receipt in a safe place, as it is your proof of purchase. It would help us if you could describe the nature of the problem in as much detail as possible. If the defect is covered by our guarantee then your device will either be repaired immediately and returned to you, or we will send you a new device.
Of course, we are also happy offer a chargeable repair service for any defects which are not covered by the scope of this guarantee or for units which are no longer covered. To take advantage of this service, please send the device to our service address.
IAN 78961
- 13 -
Anleitung_4180303.indb 13 |
21.09.12 10:44 |
|
|
SI |
Vsebina |
|
|
1. |
Uvod .......................................................................................................................................................... |
15 |
2. |
Varnostni napotki ...................................................................................................................................... |
15 |
3. |
Opis aparata in obseg dobave ............................................................................................................... |
16 |
4. |
Predpisana namenska uporaba............................................................................................................... |
16 |
5. |
Tehnični podatki ........................................................................................................................................ |
17 |
6. |
Navodila za uporabo .............................................................................................................................. |
17 |
7. |
Montaža nosilnega ročaja....................................................................................................................... |
17 |
8. |
Montaža priložene sesalne cevi.............................................................................................................. |
17 |
9. |
Električni priključek ................................................................................................................................... |
17 |
10. |
Montaža sesalne napeljave .................................................................................................................... |
17 |
11. |
Montaža tlačne napeljave....................................................................................................................... |
18 |
12. |
Prvi zagon.................................................................................................................................................. |
18 |
13. |
Čiščenje in vzdrževanje............................................................................................................................ |
18 |
14. |
Menjava omrežne napeljave................................................................................................................... |
18 |
15. |
Skladiščenje .............................................................................................................................................. |
19 |
16. |
Naročanje nadomestnih delov ................................................................................................................ |
19 |
17. |
Odstranjevanje in ponovna uporaba...................................................................................................... |
19 |
18. |
Načrt iskanja napak ................................................................................................................................. |
20 |
19. |
Izjava o skladnosti .................................................................................................................................... |
21 |
20. |
Garancijska listina .................................................................................................................................. |
22 |
Ponatis ali kakršnokoli razmnoževanje dokumentacije in spremljajočih papirjev o proizvodu, tudi po izvlečkih, je dovoljeno samo z izrecnim soglasjem ISC GmbH.
Pridržana pravica do tehničnih sprememb
- 14 -
Anleitung_4180303.indb 14 |
21.09.12 10:44 |
SI
1. Uvod
Čestitamo vam za nakup vaše nove naprave. Odločili ste se za kakovosten izdelek. Navodila za uporabo so sestavni del tega izdelka. Vsebujejo pomembne napotke o varnosti, uporabi in odstranjevanju naprave. Pred uporabo izdelka se seznanite z vsemi napotki za upravljanje in varnost. Izdelek vedno uporabljajte le v skladu z
opisom in za navedene namene. Če boste izdelek izročili drugi osebi, ji predajte tudi vso dokumentacijo.
2.Varnostni napotki
Opozorilo!
Preberite varnostne napotke in navodila.
Neupoštevanje varnostnih napotkov in navodil ima lahko za posledico električni udar, požar in/ ali hude poškodbe. Shranite vse varnostne napotke in navodila za kasnejšo uporabo.
Zaščitite sebe in Vaše okolje s primernimi varnostnimi ukrepi pred nevarnostjo nezgod.
•Ta naprava ni namenjena za to, da bi jo uporabljale osebe (vključno otroci) z omejenimi fizičnimi, senzoričnimi ali duševnimi sposobnostmi ali osebe s pomanjkljivimi izkušnjami in/ali znanji razen, če so za lastno varnost pod nadzorom odgovorne osebe ali pa so od le-te dibile navodila za uporabo naprave. Otroci morajo biti pod nadzorom, da bo zagotovljeno, da naprave ne bodo uporabljali kot igrače.
•Folijo, ki se uporablja za pakiranje, hranite zunaj dosega dojenčkov in otrok.Nevarnost zadušitve!
•Uporabnik je na delovnem področju naprave odgovoren za tretje osebe.
•Pred zagonom naj strokovnjak zagotovi, da obstajajo vsi zahtevani električni varnostni ukrepi.
•Opozorilo!
Uporaba črpalke na stoječi vodi, v vrtnih ali plavalnih ribnikih in v okolici je dovoljena le z
|
zaščitnim stikalom za okvarni tok z izmerjenim |
|
okvarnim tokom do 30 mA (po VDE 0100 |
• |
dela 702 in 738). |
Črpalka ni primerna za uporabo v plavalnih |
|
|
bazenih, bazenčkih za otroke kakršnekoli vrs- |
|
te in drugih vodi, v kateri se med delovanjem |
• |
naprave lahko nahajajo ljudje ali živali. |
Delovanje črpalke ni dovoljeno, če se v pre- |
|
|
delu nevarnosti zadržujejo ljudje ali živali. |
• |
Posvetujte se s svojim električarjem! |
Pred vsako uporabo izvršite vizuelno kontrolo |
|
|
naprave. Naprave ne uporabljajte, če je |
|
zaščitna oprema poškodovana ali izrabljena. |
• |
Nikoli ne izklapljajte varnostne opreme. |
Napravo uporabljajte izključno za namene, ki |
|
• |
so opisani v originalnih navodilih za uporabo. |
Vi ste odgovorni za varnost v delovnem |
|
• |
območju. |
Če se priključek za omrežje te naprave |
|
|
poškoduje, ga mora zamenjati izdelovalec, |
|
izdelovalčev servis za stranke ali druga |
|
ustrezno usposobljena oseba, da ne pride do |
• |
nevarnih situacij. |
Navedena napetost 230 voltov izmeničnega |
|
|
toka, ki je navedena na tipski tablici črpalke, |
• |
mora ustrezati napetosti obstoječega omrežja. |
Črpalke nikoli ne dvigajte, transportirajte ali |
|
• |
pritrjujte z omrežnim kablom. |
Zagotovite, da so vtične povezave zaščitene |
|
• |
pred poplavljenjem ali vlago. |
Pred vsemi delu na črpalki izvlecite omrežno |
|
• |
stikalo! |
Preprečite izpostavljenost črpalke neposred- |
|
• |
nemu vodnemu curku. |
Za upoštevanje krajevnih varnostnih in vgrad- |
|
|
nih določil je odgovoren uporabnik (za nas- |
|
vet vprašajte električarja). |
• |
Posledične škode zaradi poplavljenosti pros- |
|
torov pri motnja na črpalki mora uporabnik |
|
izključiti z ustreznimi ukrepi (npr. namestitev |
|
alarmne naprave, rezervne črpalke ali po- |
• |
dobnega). |
Pri morebitnem črpalke naprave sme popra- |
|
|
vila izvajati le električar ali služba za stranke |
• |
ISC. |
Uporabite samo originalne nadomestne dele. |
|
• |
Črpalka ne sme nikoli delovati na suhem ali s |
- 15 -
Anleitung_4180303.indb 15 |
21.09.12 10:44 |
povsem zaprto sesalno napeljavo. Za škodo na črpalki, ki nastane zaradi suhega teka, ugasne garancija proizvajalca.
•Črpalke ni dovoljeno uporabljati za bazene.
•Črpalke ne smete vgraditi v krogotok pitne vode.
•Najvišja temperatura črpane tekočine ne sme presegati +35 °C.
•S to črpalko ne smete prenašati gorljivih, eksplozivnih tekočin in tekočin, ki tvorijo pline.
•Preprečite tudi prenos agresivnih tekočin (kislin, lugov, tekočin, ki pronicajo iz silosov ipd.) ter tekočin z abrazivnimi (hrapavimi) snovmi (pesek).
3.Opis aparata in obseg dobave
3.1 Opis naprave (slika 1)
1.Vrtna črpalka
2.Stikalo za vklop/izklop
3.Pritrdilne luknje
4.Vijak za izpust vode
5.Sesalni priključek
6.Vijak za dolivanje vode
7.Tlačni priključek
8.Nosilni ročaj
9.2 vijaka
10.Sesalna cev 4 m
11.Priključni adapter ca. 33,3 mm (R1) zunanji navoj in ca. 42 mm (R1 1/4) zunanji navoj
12.Tesnilni obroč
13.Povratni ventil in sesalni filter
SI
3.2 Obseg dobave
•Odprite embalažo in previdno vzemite napravo iz embalaže.
•Odstranite embalažni material in embalažne in transportne varovalne priprave (če obstajajo).
•Preverite, če je obseg dobave popoln.
•Preverite morebitne poškodbe naprave in delov pribora, do katerih bi lahko prišlo med transportom.
•Po možnosti shranite embalažo do poteka garancijskega roka.
Opozorilo
Naprava in embalažni material nista igrača za otroke! Otroci se ne smejo igrati s plastičnimi vrečkami, folijo in malimi deli opreme! Obstaja nevarnost zadušitve in zaužitja takšnih delov materiala!
•Vrtna črpalka
•Nosilni ročaj
•2 vijaka
•Sesalna cev 4 m
•Priključni adapter ca. 33,3 mm (R1) zunanji navoj in ca. 42 mm (R1 1/4) zunanji navoj
•Povratni ventil in sesalni filter
•Originalna navodila za uporabo
4.Predpisana namenska uporaba
Območje uporabe
•Za navodnjavanje in zalivanje zelenic, zelenjavnih gredic in vrtov.
•Za škropilnike zelenic.
•S predfiltrom za odvzem vode iz ribnikov, potokov, sodov za deževnico, cistern za deževnico in vodnjakov.
Mediji črpanja
Za črpanje bistre vode (sladka voda), deževnice ali blagega luga za pranje/porabne vode.
•Najvišja temperatura črpane tekočine ne sme presegati +35 °C.
- 16 -
Anleitung_4180303.indb 16 |
21.09.12 10:44 |
SI
•S to črpalko ne smete prenašati gorljivih, eksplozivnih tekočin in tekočin, ki tvorijo pline.
•Preprečite tudi prenos agresivnih tekočin (kislin, lugov, tekočin, ki pronicajo iz silosov ipd.) ter tekočin z abrazivnimi (hrapavimi) snovmi (pesek).
8.Montaža priložene sesalne cevi
Sesalno cev montirajte, kot je prikazano na sliki 3. Pazite, da boste stran na adapterju (sl. 1/poz. 11) privijačili v napravo s tesnilnim obročem (sl. 1/poz. 12).
5.Tehnični podatki
Električni priključek: ....................... |
230 V ~ 50 Hz |
Poraba energije: ........................................ |
1000 W |
Črpalka količina maks............................. |
4600 l/h |
Črpalna višina maks. ....................................... |
45 m |
Črpalki tlak maks. .................. |
4,5 bar (0,45 MPa) |
Sesalna višina maks........................................... |
7 m |
Tlak in sesalni |
|
priključek: ........................... |
pribl. 33,3 mm (R1 IG) |
Temperatura vode maks ................................. |
35°C |
Nivo zvočnega tlaka LpA ................... |
72,03 dB (A) |
Negotovost KpA .......................................... |
3 dB (A) |
Jakost zvočnega tlaka: |
|
Izmerjena............................................ |
84,62 dB (A) |
Negotovost KWA ......................................... |
3 dB (A) |
Zagotovljena ............................................ |
86 dB (A) |
Razred zaščite.......................................................... |
I |
Vrsta zaščite....................................................... |
IPX4 |
Teža ............................................................... |
8,9 kg |
6.Navodila za uporabo
Načeloma priporočamo uporabo predfiltra in sesalne garniture s sesalno cevjo, sesalno košaro in protipovratnim ventilom. S tem preprečite dolgo čakanje na ponovno sesanje in nepotrebne poškodbe črpalke zaradi kamnov in trdih tujkov.
7. Montaža nosilnega ročaja
Nosilni ročaj morate montirati z 2 priloženima vijakoma (glejte sliko 2).
9.Električni priključek
•Omrežni priključek je na vtičnico z zaščitnim kontaktom 230 V ~ 50 Hz. Varovalka mora imeti vsaj 10 amperov. Zagotovite dobro dostopnost vtičnice.
•Vklop in izklop poteka z vgrajenim stikalom (glejte sliko 1/poz. 2).
•Vgrajeno temperaturno stikalo ščiti motor pred preobremenitvami ali blokado. V primeru pregretja temperaturno stikalo samodejno izklopi črpalko in jo spet vklopi, ko se ohladi.
10.Montaža sesalne napeljave
•Sesalno cev (plastično cev z vsaj 19 mm (3/4”) s spiralno ojačitvijo) priključite neposredno ali z navojnim nastavkom ca. 33,3 mm (R1) zunanji navoj na priključek sesalne napeljave ca. 33 mm (R1 notranji navoj) črpalke (sl. 1/poz. 5).
•Uporabljena sesalna cev mora imeti sesalni ventil. Če sesalnega ventila ne morete uporabiti, morate v sesalno napeljavo namestiti protipovratni ventil.
•Sesalno napeljavo položite tako, da se od odvzema vode do črpalke vzpenja. Sesalne napeljave nikoli ne položite nad višino
črpalke, saj zračni mehurčki v sesalni napeljavi ovirajo in zakasnijo postopek sesanja.
•Sesalno in tlačno napeljavo namestite tako, da ne izvajata mehanskega pritiska na črpalko.
•Sesalni ventil mora biti dovolj globoko v vodi, da z nižanjem vodostaja preprečite suhi tek črpalke.
•Netesna sesalna naprava preprečuje sesanje
- 17 -
Anleitung_4180303.indb 17 |
21.09.12 10:44 |
SI
vode, saj se vsesava zrak.
•Preprečite vsesavanje tujkov (peska ipd.); po potrebi namestite predfilter.
11. Montaža tlačne napeljave
•Tlačna napeljava (naj bo vsaj 19 mm (3/4”)) mora biti priključena neposredno na ali prek navojnega spojnika ca. 33,3 mm (R1) zunanji navoj na priključek tlačne napeljave ca. 33 mm (R1 notranji navoj) črpalke (sl. 1/poz. 7).
•Z ustreznimi privijačenji lahko uporabite tudi ca. 13 mm (1/2”) tlačno cev. Zmogljivost prenosa se z manjšo tlačno cevjo zmanjša.
•Med postopkom sesanja povsem odprite zaporne elemente (brizgalne šobe, ventile ipd.) v tlačni napeljavi, da lahko zrak prosto uhaja iz sesalne napeljave.
12.Prvi zagon
•Črpalko postavite samo na čvrsto in ravno podlago.
•Pred zagonom morate črpalko dobro pritrditi na podlago s pomočjo pritrdilnih lukenj v oporni nogi (glejte sliko 1/poz. 3).
•Namestite sesalne napeljave, pripravljene na delovanje.
•Črpalko napolnite z vodo na vijaku za vlivanje vode (slika 1/poz. 6) do mesta polnjenja.
•Med postopkom sesanja povsem odprite zaporne elemente (brizgalne šobe, ventile ipd.) v tlačni napeljavi, da lahko zrak prosto uhaja iz sesalne napeljave.
•Glede na višino sesanja in količino zraka v sesalni napeljavi lahko prvi postopek sesanja traja pribl. 0,5 min - 5 min. Pri daljšem času sesanja ponovno napolnite z vodo.
•Če črpalko po uporabi ponovno odstranite, jo morate pri ponovnem priključku in zagonu obvezno napolniti z vodo.
•Vzpostavite električni priključek.
13.Čiščenje in vzdrževanje
•Črpalka je skoraj brez vzdrževanja. Za daljšo življenjsko dobo priporočamo, da jo redno pregledujete in negujete.Opozorilo!
Pred vsakim vzdrževanjem morate črpalko izklopiti iz električnega omrežja; izvlecite omrežno stikalo črpalke iz vtičnice.
•Pred daljšo neuporabo ali prezimovanjem črpalko temeljito splaknite z vodo, jo popolnoma izpraznite in shranite na suhem.
•Za praznjenje ohišja črpalke odpustite vijak za izpust vode (slika 1/poz. 4) in črpalko nekoliko nagnite.
•Če obstaja nevarnost zmrzali, črpalko povsem izpraznite.
•Po daljših obdobjih mirovanja s kratkim vklopom/izklopom preverite, ali se rotor brezhibno obrača.
•Pri morebitni zamašitvi črpalke priključite tlačno napeljavo na vodno napeljavo in snemite sesalno cev. Odprite vodno napeljavo. Črpalko večkrat vklopite za ca. dve sekundi. Na tak način lahko v večini primerov odstranite vzrok zamašitve.
•Za čiščenje ohišja motorja in črpalke priporočamo mlačno vodo.
14.Menjava omrežne napeljave
Opozorilo!
Napravo izključite iz električnega omrežja! Če je omrežna napeljava okvarjena, jo lahko menja samo električar.
- 18 -
Anleitung_4180303.indb 18 |
21.09.12 10:44 |
SI
15.Skladiščenje
Napravo in pribor za napravo skladiščite na temnem, suhem in pred mrazom zaščitenem in za otroke nedostopnem mestu.
Optimalna temperatura shranjevanja je med 5 in 30 ˚C. Napravo shranjujte v originalni ovojnini.
16.Naročanje nadomestnih delov
Pri naročanju nadomestnih delov je potrebno navesti naslednje navedbe:
•Tip naprave
•Art. številko naprave
•Identštevilko naprave
Aktualne cene in informacije najdete na spletni strani www.isc-gmbh.info
17.Odstranjevanje in ponovna uporaba
Naprava se nahaja v embalaži, da ne bi prišlo do poškodb med transportom. Ta embalaža je surovina in s tem ponovno uporabna ali pa jo je možno reciklirati. Naprava in njen pribor sta izdelana iz različnih materialov kot npr. kovine in plastika. Pokvarjene sestavne dele odstranite
med posebne odpadke. V ta namen povprašajte v tehnični trgovini ali na občinski upravi!
Samo za dežele EU
Električnega orodja ne mečite med gospodinjske odpadke!
V skladu z evropsko smernico 2002/96/EG o starih električnih in elektronskih napravah in v skladu z izvajanjem nacionalne zakonodaje
morate ločeno zbirati izrabljena električna orodja in jih predati v okoljsko varno ponovno predelavo.
Reciklažna alternativa za poziv za vračanje: Lastnik električne naprave je alternativno zavezan, da namesto vračanja sodeluje pri pri strokovno ustreznem recikliranju v primeru predaje lastnine. Staro napravo se lahko v ta namen tudi prepusti na odvzemnem mestu, ki izvaja odstranjevanje v smislu nacionalne zakonodaje o odstranjevanju takšnih odpadkov. To se ne nanaša na starim napravam priložene dele pribora in opreme brez električnih komponent.
- 19 -
Anleitung_4180303.indb 19 |
21.09.12 10:44 |
SI
18.Načrt iskanja napak
Ni teka motorja
Vzrok |
Odpravljanje |
|
- Ni omrežne napetosti |
- |
Preverite napetost |
- Kolo črpalke je blokirano, termo stikalo je iz- |
- Razstavite in očistite črpalko |
|
klopilo |
|
|
|
|
|
Črpalka ne sesa |
|
|
|
|
|
Vzrok |
Odpravljanje |
|
- Sesalni ventil ni v vodi |
- Sesalni ventil dajte v vodo |
|
- Prostor črpalke nima vode |
- Ohišje črpalke napolnite z vodo |
|
- V sesalni napeljavi je zrak |
- Preverite tesnost sesalnih napeljav |
|
- Sesalni ventil ne tesni |
- |
Očistite sesalni ventil |
- Sesalna košara (sesalni ventil) je zamašena |
- |
Očistite sesalno košaro |
- Maks. sesalna višina je prekoračena |
- |
Preverite sesalno višino |
|
|
|
Količina črpanja ne zadošča |
|
|
|
|
|
Vzrok |
Odpravljanje |
|
- Višina črpanja je previsoka |
- |
Preverite sesalno višino |
- Sesalna košara je umazana |
- |
Očistite sesalno košaro |
- Vodni nivo naglo upada |
- Sesalni ventil položite nižje |
|
- Zmogljivost črpalke je zmanjšana zaradi tujkov |
- Črpalko očistite in zamenjajte obrabne dele |
|
(pesek, kamenje ipd.) |
|
|
|
|
|
Temperaturno stikalo črpalko izklaplja |
|
|
|
|
|
Vzrok |
Odpravljanje |
|
|
|
|
- Motor preobremenjen, trenje zaradi tujkov pre- |
- Črpalko demontirajte in očistite, preprečite vse- |
|
veliko |
|
savanje tujkov (filter) |
|
|
|
Opozorilo! Črpalka ne sme delati na suho.
- 20 -
Anleitung_4180303.indb 20 |
21.09.12 10:44 |
 Loading...