


®
Cordless Grass & Shrub Trimmer FGS 3.6 A1
Cordless Grass & |
Akumulatorske škarje za rezanje |
Shrub Trimmer |
trave in grmičevja |
Translation of the original instructions |
Prevod originalnega navodila za uporabo |
|
|
Akumulátorové nůžky |
Akumulátorové nožnice na |
na trávu a keře |
trávnik a kríky |
Překlad originálního provozního návodu |
Preklad originá lneho návodu na obsluhu |
Akku-Gras- und |
|
Strauchschere |
|
Originalbetriebsanleitung |
|
IAN 102887

Before reading, unfold the page containing the illustrations and familiarise yourself with all functions of the device.
Pred branjem odprite stran s slikami in se nato seznanite z vsemi funkcijami naprave.
Před čtením si otevřete stranu s obrázky a potom se seznamte se všemi funkcemi přístroje.
Pred čítaním si odklopte stranu s obrázkami a potom sa oboznámte so všetkými funkciami prístroja.
Klappen Sie vor dem Lesen die Seite mit den Abbildungen aus und machen Sie sich anschließend mit allen Funktionen des Gerätes vertraut.
GB |
Translationof the original instructions |
Page |
4 |
|
SI |
Prevod originalnega navodila za uporabo |
Stran |
19 |
|
CZ |
Překlad originálního provozního návodu |
Strana |
35 |
|
SK |
Preklad originálneho návodu na obsluhu |
Strana |
51 |
|
DE / AT / CH |
Originalbetriebsanleitung |
Seite |
67 |
|
1 |
2 3 |
4 |
|
|
|
|
|
|
|
|
|
|
5 |
9 |
|
|
|
10 |
|
|
|
|
6 |
|
|
|
|
|
|
|
|
|
7 |
|
9 |
8 |
|
|
11 |
|
16 |
|
|
12 |
|
|
|
|
|
|
|
|
|
13 |
|
17 |
|
|
14 |
|
|
|
|
|
5 |
6 |
16 |
|
9 |
|
|
|
|
|
|
|
|
|
10 |
|
|
|
|
1 |
7 |
|
|
|
|
17 |
|
|
|
|
1 |
3 |
|
|
12 |
|
|
|
|
|
|
|
|
|
13 |
|
|
|
|
1 |

GB |
|
Contents |
|
Introduction.................................. |
4 |
Intended use................................. |
4 |
General description...................... |
5 |
Extent of the delivery........................ |
5 |
Overview....................................... |
5 |
Function description......................... |
6 |
Technical data............................... |
6 |
Safety Instructions........................ |
7 |
Symbols......................................... |
7 |
General safety instructions for power |
|
tools............................................... |
7 |
Special Safety Directions for the |
|
cordless grass & shrub cutter........... |
10 |
Safety Directions for the battery |
|
charger........................................ |
11 |
Charging process........................ |
12 |
Operation................................... |
12 |
Switching on and off...................... |
12 |
Inserting/replacing the blade.......... |
13 |
General working instructions........... |
13 |
Use as a grass trimmer................... |
13 |
Use as a hedge trimmer................. |
13 |
Cleaning/Maintenance................ |
14 |
Storage...................................... |
14 |
Disposal and the environment.... |
14 |
Telescopic arm as an accessory... |
15 |
Assembling the telescopic arm........ |
15 |
Adjust the height of the telescopic |
|
arm.............................................. |
15 |
Adjusting the working angle........... |
15 |
Switching on and off |
|
(with telescopic arm)...................... |
15 |
Working with the telescopic arm ..... |
15 |
Spare parts/Accessories.............. |
16 |
Trouble shooting......................... |
16 |
Guarantee.................................. |
17 |
Repair Service............................ |
18 |
Service-Center............................ |
18 |
Importer..................................... |
18 |
Translation of the original EC |
|
declaration of conformity............ |
84 |
Exploded Drawings.................... |
87 |
4
Introduction
Congratulations on the purchase of your new device. With it, you have chosen a high quality product. During production, this equipment has been checked for quality and subjected to a final inspection. The functionality of your equipment is therefore guaranteed.
The operating instructions constitute part of this product. They contain
important information on safety, use and disposal.
Before using the product, familiarise yourself with all of the operating and safety instructions. Use the product only as described and for the applications specified. Keep this manual safely and in the event that the product is passed on, hand over all documents to the third party.
Intended use
The unit is to be used for cutting and trimming twigs on hedges, bushes and shrubs and for trimming grass at the edges and on smaller surfaces in domestic application only.
The unit is only to be used by adults.
People under 16 should only use this unit under adult supervision.
Any other use not specifically mentioned in this manual can lead to damage to the unit and may present a serious hazard to the user.
The operator or user is responsible for accidents or damage to other persons or their property.
This equipment is not suitable for commercial use. Commercial use will invalidate the guarantee.

GB
The manufacturer will not be held respon- |
Overview |
|||||||||||
sible for damage or injuries caused by use |
|
|
|
Equipment |
||||||||
outside that stipulated by the manual or by |
|
|
|
|||||||||
|
|
|
||||||||||
improper handling. |
|
|
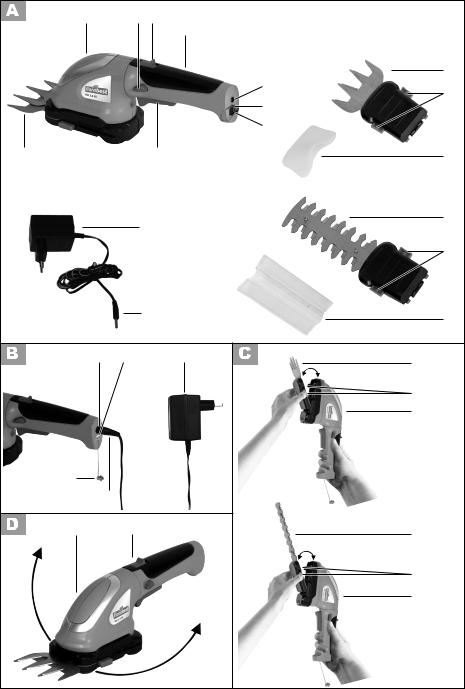
1 |
Cutter head |
||||||||
|
|
|||||||||||
General description |
2 |
Switch lock, unit |
||||||||||
3 |
Lever to turn the cutter head |
|||||||||||
|
|
|
|
|
|
|
|
|
4 |
Unit handle |
||
|
|
|
|
|
|
|
The illustration of the princi- |
5 |
Charging socket + plug socket |
|||
|
|
|
|
|
|
|
pal functioning parts can be |
|
|
|
for plug connection telescopic |
|
|
|
|
|
|
|
|
|
|
|
|||
|
|
|
|
|
|
|
|
|
|
|||
|
|
|
|
|
|
|
|
|
|
|||
|
|
|
|
|
|
|
found on the front and back |
|
|
|
arm |
|
|
|
|
|
|
|
|
foldout pages. |
6 |
Charge display (LED) |
|||
Extent of the delivery |
7 |
Safety key |
||||||||||
8 |
On/off switch, unit |
|||||||||||
Carefully unpack the appliance and check |
|
|
|
Cutter |
||||||||
that it is complete. |
9 |
Grass shear blade |
||||||||||
Dispose of the packaging material cor- |
10 |
Unlock button for grass cutter |
||||||||||
rectly. |
11 |
Blade guard for grass shear |
||||||||||
|
|
|
|
|
|
|
|
|
|
|
|
blade |
- Device with mounted grass shear |
12 |
Shrub shear blade |
||||||||||
|
blade, blade guard, safety key |
13 |
Blade guard for shrub shear |
|||||||||
- Shrub shear blade + blade guard |
|
|
|
blade |
||||||||
- |
Recharger |
14 |
Unlock button for shrub cutter |
|||||||||
- |
Instruction Manual |
|
|
|
Battery charger |
|||||||
|
|
|
|
|
|
|
|
|
|
|
|
|
|
|
|
|
|
Device is delivered without a |
16 |
Power supply unit |
|||||
|
|
|
|
|
telescopic arm. Alternatively, a |
17 |
Recharger cable plug |
|||||
|
|
|
|
|
telescopic arm including wheels |
|
18 |
Telescopic arm with wheels (not |
||||
|
|
|
|
|
can be ordered (see “Spare parts/ |
|
|
|||||
|
|
|
|
|
|
|
||||||
|
|
|
|
|
accessories”). |
|
|
|
|
included in the scope of delivery) |
||
|
|
|
|
|
|
|
|
|
||||
|
|
|
|
|
|
|
|
|
|
19 |
Guide rail |
|
|
|
|
|
|
|
|
|
|
|
|||
|
|
|
|
|
|
|
|
|
|
20 |
Equipment holder |
|
|
|
|
|
|
|
|
|
|
|
|||
|
|
|
|
|
|
|
|
|
21 |
Plug connection |
||
|
|
|
|
|
|
|
|
|
|
22 |
Adjusting screw for length adjust- |
|
|
|
|
|
|
|
|
|
|
|
|||
|
|
|
|
|
|
|
|
|
|
|
|
ment |
|
|
|
|
|
|
|
|
|
|
|
|
|
|
|
|
|
|
|
|
|
|
23 |
Release switch |
||
|
|
|
|
|
|
|
|
|
|
24 |
Switch lock, telescopic shaft |
|
|
|
|
|
|
|
|
|
|
|
|||
|
|
|
|
|
|
|
|
|
|
25 |
On/off switch, telescopic shaft |
|
|
|
|
|
|
|
|
|
|
|
|||
5

GB
Function description
The cordless grass & shrub trimmer is a combination unit with two interchangeable cutting devices. These are coated with plastic (Teflon non-stick coating) to prevent rust.
For use as a shrub trimmer, a double-sided blade block is used as the cutting head.
The catching blades are round off at the side to prevent accidents, and positioned in an offset arrangement to reduce the risk of injury. A cutting head with several blades is provided for use as a grass trimmer. The safety key protects the devices from being started unintentionally.
Please read the following descriptions for the function of the various controlling parts of the unit.
Technical data
Unit |
|
|
|
|
|
|
Motor voltage............................ |
|
|
3.6 V |
|
|
|
|
|
|
||||
Rated speed........................... |
|
1000 min-1 |
||||
Protection class.................................... |
|
|
|
|
III |
|
Protection category.......................... |
|
|
IP20 |
|||
Grass-trimming blade |
|
|
|
|
|
|
Cutting width............................ |
|
|
|
73 mm |
||
Blade width.............................. |
|
|
|
80 mm |
||
Shrub-trimming blade |
|
|
|
|
|
|
Cutting length ......................... |
|
|
120 mm |
|||
Distance between teeth..... |
approx. 8 mm |
|||||
Weight (incl. accessories)... |
approx 0.85 kg |
|||||
Sound pressure level |
|
|
|
|
|
|
(LpA).................. |
57 dB(A), KpA=3 dB(A) |
|||||
Sound power level (LwA) |
|
92 dB(A) |
||||
guaranteed............................ |
|
|
||||
measured....... |
79.1 dB(A); KwA=3 dB(A) |
|||||
Vibration (ah) |
1.39 m/s2, K=1.5 m/s2 |
|||||
at handle.......... |
||||||
Battery (Li-Ion) |
|
|
|
|
|
|
Nominal voltage.......... |
3.6 V |
|
1.3 Ah |
|||
|
||||||
Loading time................... |
|
approx. 3-5 h |
||||
6
Charger.............................. |
DK-MGB-48 |
Voltage input.................... |
230 V~, 50 Hz |
Nominal consumption...................... |
8 W |
Voltage output................................ |
4.8 V |
Recharging current...................... |
450 mA |
Performance output....................... |
3.6 VA |
Protection class................................ |
II |
Protection category........................... |
IPX0 |
The noise and vibration levels have been calculated according to the norms stated in the conformity statement. Technical and optical alterations to serve progress may be made without notice. All measurements, instructions and other data given in this manual are therefore given without guarantee of correctness. Legal claims made on the basis of this manual are therefore excluded.
The stated vibration emission value was measured in accordance with a standard testing procedure and may be used to compare one power tool to another. The stated vibration emission value may also be used for a preliminary exposure assessment.
Warning: The vibration emission value may differ during actual use of the power tool from the stated value depending on the manner in which the power tool is used.Safety precautions aimed at protecting the user should be based on estimated exposure under actual usage conditions (all parts of the operating cycle are to be considered, including, for example, times during which the power tool is turned off and times when the tool is turned on but is running idle).

Safety Instructions
This unit can cause serious injury if not used correctly. Before using the unit, carefully read through the instruction manual and familiarise yourself with all of its controls.
Symbols
Symbols on the unit
Remember that the cutting equipment will continue to move after switching the unit off.
Attention!
Before using for the first time, carefully read through the user manual.
Do not use the unit during rain, bad weather damp surroundings or on wet grass or hedges.
LWA |
Guaranteed sound power level |
dB |
|
Do not dispose of the device with the battery installed in household waste.
Cutting length Shrub shear blade
Symbols on the recharger
Read the manual.
Pole orientation
The recharger is for indoor use only.
Protection class II
GB
Machines do not belong with domestic waste.
Symbols in the manual
Warning symbols (instead of the exclamation mark, the danger may be explained) with information on damage and injury prevention.
Instruction symbols (the instruction may be explained at the place of the exclamation mark) with information on preventing damage.
Help symbols with information on improving tool handling.
General safety instructions for power tools
WARNING! Read all safety directions and instructions.
Omissions in the compliance with safety directions and instructions can cause electrical shock, fire and/or severe injuries.
Retain all safety directions and instructions for future use.
The term “Power Tools” used in the safety instructions refers to mains-operated power tools (with power cord) and to battery-op- erated power tools (without power cord).
1) WORK AREA SAFETY
a)Keep work area clean and well lit. Cluttered or dark areas invite accidents.
b)Do not operate power tools in explosive atmospheres, such as in the presence of flammable
7

GB
Iiquids, gases or dust. Power tools create sparks which may ignite the dust or fumes.
c)Keep children and bystanders away while operating a power tool. Distractions can cause you to lose control.
2) ELECTRICAL SAFETY
a)Power tool plugs must match the outlet. Never modify the plug in any way. Do not use any adapter plugs with earthed (grounded) power tools. Unmodified plugs and matching outlets will reduce risk of electric shock.
b)Avoid body contact with earthed or grounded surfaces, such as pipes, radiators, ranges and refrigerators. There is an increased risk of electric shock if your body is earthed or grounded.
c)Do not expose power tools to rain or wet conditions. Water entering a power tool will increase the risk of electric shock.
d)Do not abuse the cord. Never use the cord for carrying, pulling or unplugging the power tool. Keep cord away from heat, oil, sharp edges or moving parts.
Damaged or entangled cords increase the risk of electric shock.
e)When operating a power tool outdoors, use an extension cord suitable for outdoor use. Use of a cord suitable for outdoor use reduces the risk of electric shock.
f)If operating a power tool in a damp location is unavoidable, use a residual current device (RCD) protected supply. Use of an RCD reduces the risk of electric shock.
8
3) PERSONAL SAFETY
a)Stay alert, watch what you are doing and use common sense when operating a power tool. Do not use a power tool while you are tired or under the influence of drugs, alcohol or medication. A moment of inattention white operating power tools may result in serious personal injury.
b)Use personal protective equipment. Always wear eye protection. Protective equipment such as dust mask, non-skid safety shoes, hard hat, or hearing protection used for appropriate conditions will reduce personal injuries.
c)Prevent unintentional starting. Ensure the switch is in the offposition before connecting to power source and/or battery pack, picking up or carrying the tool. Carrying power tools with your finger on the switch or energising power tools that have the switch on invites accidents.
d)Remove any adjusting key or wrench before turning the power tool on. A wrench or a key left attached to a rotating part of the power tool may result in personal injury.
e)Do not overreach. Keep proper footing and balance at all times.
This enables better control of the power tool in unexpected situations.
f)Dress properly. Do not wear loose clothing or jewellery. Keep your hair, clothing and gloves away from moving parts. Loose clothes, jewellery or long hair can be caught in moving parts.
g)If devices are provided for the connection of dust extraction and collection facilities, ensure

these are connected and properly used. Use of dust collection can
reduce dust-related hazards.
4) POWER TOOL USE AND CARE
a)Do not force the power tool. Use the correct power tool for your application. The correct power tool will do the job better and safer at the rate for which it was designed.
b)Do not use the power tool if the switch does not turn it on and off. Any power tool that cannot be controlled with the switch is dangerous and must be repaired.
c)Disconnect the plug from the power source and/or the battery pack from the power tool before making any adjust -ments, changing accessories, or storing power tools. Such preventive safety measures reduce the risk of starting the power tool accidentaIly.
d)Store idle power tools out of the reach of children and do not allow persons unfamiliar with the power tool or these instructions to operate the power tool. Power tools are dangerous in the hands of untrained users.
e)Maintain power tools. Check for misalignment or binding of moving parts, breakage of parts and any other condition
that may affect the power tool’s operation. If damaged, have the power tool repaired before use. Many accidents are caused by poorly maintained power tools.
f)Keep cutting tools sharp and clean. Properly maintained cutting tools with sharp cutting edges are less Iikely to bind and are easier to control.
GB
g)Use the power tool, accessories and tool bits etc. in accordance with these instructions, taking into account the working conditions and the work to be performed. Use of the power tool for operations different from those intended could result in a hazardous situation.
5)CAREFUL HANDLING AND USE OF BATTERY DEVICES
a)Charge the batteries only in chargers that are recommended by the manufacturer. Risk of fire if a charger that is suitable for a specific type of battery is used with other batteries.
b)In the power tools, use only the batteries designed for the purpose. The use of other batteries may result in injuries and risk of fire.
c)Keep the unused battery away from paper clips, coins, keys, nails, screws and other small metal objects, which could cause bridging of the contacts.
A short circuit between the battery contacts may cause burns or fire.
d)If used incorrectly, liquid may leak from the battery. Avoid contact with this. In the event of accidental contact, rinse off with water. If the liquid gets into eyes, seek medical assistance.
Leaking battery fluid may cause skin irritations or burns.
6) SERVICE
a)Have your power tool serviced by a qualified repair person using only identical replacement parts. This will ensure that the safety of the power tool is maintained.
9

GB
Special Safety Directions for the cordless grass & shrub cutter
1)SPECIAL SAFETY DIRECTIONS FOR HEDGE TRIMMERS
a)Keep all body parts away from the blade. Do not attempt to remove clippings while the blade is operating or to hold on to material which is to be cut. Only remove trapped clippings when the tool is switched off. One moment of carelessness in the usage of the hedge trimmer can lead to severe injury.
b)Carry the hedge trimmer at the handle with an idle blade. Always pull on the protective
cover during transport and storage of the hedge trimmer.
Careful handling of the tool reduces the risk of injury from the blade.
c)Hold the power tool only on the insulated handle surfaces, as the cutting blade may come into contact with concealed power cables. Contact between the cutting blade and a live cable may render metallic components live and result in an electric shock.
d)Before the work, search the hedge for concealed objects, e.g. cable etc. To avoid damaging the equipment.
e)Hold the hedge trimmer correctly, e.g. with both hands on the handles, if there are two handles. Loss of control of the equipment may result in injuries.
f)Wear suitable clothing and work clothes when working with the equipment. Do not hold
10
the equipment by the cutting blade or lift it on the cutting blade. Contact with the cutting blade
can cause injuries.
2) FURTHER SAFETY DIRECTIONS
For your personal safety:
Wear suitable work clothes such as boots with non-slip soles, sturdy long trousers, gloves and goggles. Hearing protection must be used in case the device is used over prolonged periods of time. Do not wear long flowing clothing or
jewellery, as this may be caught by moving parts. Do not use this tool while walking barefooted or while wearing open sandals.
a)Only switch on the tool when hands, feet and all other body parts are at a secure distance to the tool. Risk of injury from cuts.
b)Take care that you do not injure your hands and feet with the cutting elements.
c)Remove the power supply unit before working with the equipment. Do not use extension cables. The power supply unit is to be used only in enclosed spaces. Water entry increases the risk of electric shock.
d)Do not use the shrub cutter in combination with the telescopic shaft. There is a risk of cut wounds.
e)The tool is designed to trim hedges. Do not use the tool to cut branches, hard wood or other. To avoid damaging the equipment.
f)Do not attempt to dislodge a blocked/trapped blade before switching the tool off. There is a
risk of injury.
g)Always switch off the tool and remove the battery (if applicable)
-if you leave the tool unsupervised
-before removing jams
-before controlmaintenanceor cleaning tasks
-if you have come into contact with a foreign object
-whenever the machine starts to vibrate uncontrollably
How to avoid accidents and injuries.
3)SPECIAL SAFETY DIRECTIONS FOR BATTERY-OPERATED TOOLS
a)Do not subject the battery to strong sunlight over long periods and do not leave it on a heater. Heat damages the battery and there is a risk of explosion.
b)Allow a hot battery to cool before charging.
c)Do not open up the battery and avoid mechanical damage to the battery. Risk of short circuit and fumes may be emitted that irritate the respiratory tract. Ensure fresh air and seek medical assistance in the event of discomfort.
Safety Directions for the battery charger
1)CORRECT HANDLING OF THE BATTERY CHARGER
•This appliance can be used by children aged from 8 years and above and persons with reduced physical, sensory or mental capabilities or lack of experience and knowledge if they have been given supervision or instruction concerning use of the appliance in a
GB
safe way and understand the hazards involved.
•Children shall not play with the appliance. Cleaning and user maintenance shall not be made by children without supervision.
•To charge the battery, use only the charger supplied. Risk of fire and explosion. This ensures that the safety of the device is maintained.
•Before each use, check the charger, cable and plug and have them repaired by qualified professionals and only with original parts. Do not use a defective charger and do not open it up yourself. This ensures that the safety of the device is maintained.
•Connect the charger only to a socket with an earth. Ensure that the mains voltage matches the specifications on the charger rating plate. Risk of electric shock.
•Disconnect the charger from the mains before closing or opening connection to the battery / power tool / device. This ensures that the battery and charger are not damaged.
•Keep the charger clean and away from wet and rain. Do not use the charger outdoors.
Dirt and the entry of water increase the risk of electric shock.
•Operate the charger only with the appropriate original batteries. Charging other batteries may result in injuries and risk of fire.
•Avoid mechanical damage to the charger. This can result in internal short circuits.
•Do not operate the charger on a combustible surface (e.g. paper, textiles). Risk of fire due to heating
11

GB
during charging. |
|
riods in succession. |
|||||
• If the power cable for this |
• Use the charger supplied to charge the |
||||||
equipment is damaged, it must |
|
Li-ion battery installed in the equipment. |
|||||
be replaced by the manufac- |
• Recharge the battery if the equipment |
||||||
turer, a customer service agent |
|
runs too slowly. |
|||||
of the same or a similarly quali- |
• In all cases, observe the applicable |
||||||
fied person in order to prevent |
|
safety information as well as the regula- |
|||||
hazards. |
|
tions and directions for environmental |
|||||
• Do not use the charger to charge non- |
|
protection. |
|||||
rechargeable batteries. |
• Defects resulting from improper han- |
||||||
Charging process |
|
dling are not subject to the guarantee. |
|||||
|
|
|
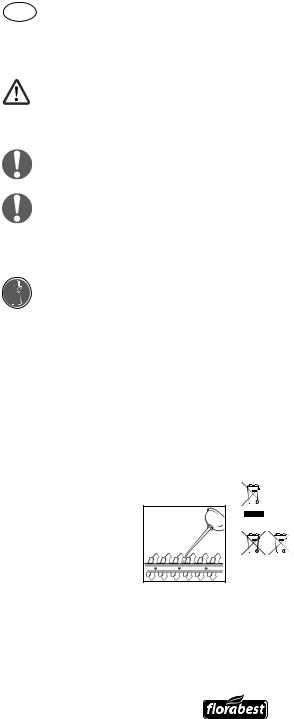
1. Remove the safety key (7). |
||||
Do not expose the battery to |
|
|
|
||||
|
|
|
2. |
Connect the charger cable plug |
|||
|
|
||||||
extreme conditions such as |
|
|
|
|
(17) with the charger socket on |
||
heat and impact. There is a |
|
|
|
|
the tool (5). |
||
risk of injury from leaking |
3. |
Connect the power supply unit |
|||||
electrolyte solution! In case |
|
|
|
|
(16) to a socket. |
||
of contact, rinse with water |
|
|
|
|
The charging indicator (6) lights |
||
or neutraliser and consult a |
|
|
|
|
up: |
||
doctor if contact has occurred |
|
|
|
|
Red: Equipment charging. |
||
with eyes etc. |
|
|
|
|
Green: Charging finished. |
||
Charge the battery only in |
|
|
|
|
The recommended charging time |
||
|
|
|
|
is max. 3 – 5 hours. |
|||
dry areas. |
4. |
After the recharging process is |
|||||
Do not switch on the device |
|
|
|
|
completed, first unplug the charg- |
||
while charging it and make |
|
|
|
|
er from the wall outlet, and then |
||
sure that the safety key ( |
|
|
|
|
|
|
remove the charger cable plug |
|
|
|
|
|
|||
7) has been removed. |
|
|
|
|
|
|
from the tool. |
There is a risk of injury from |
Operation |
||||||
electric shock. |
|||||||
Ensure that the equipment is |
|
|
|
Keep to noise abatement regulations |
|||
charged for no longer than |
|
|
|
and other by-laws. |
|||
3-5 hours without interruption. The |
Switching on and off |
||||||
battery and equipment could be |
|||||||
damaged and they consume energy |
|
|
|
|
|
||
unnecessarily in case of longer |
|
1. |
Remove the blade guard (11/14) |
||||
|
|||||||
charging time. Overcharging invali- |
|
|
|
|
before switching the unit on. |
||
|
|
|
|
||||
dates the guarantee. |
2. |
Insert the safety key (7) into the |
|||||
• Before initial use, charge the battery |
|
|
|
|
device. |
||
3. |
To switch on, hold the switch lock |
||||||
installed in the equipment. Do not |
|
|
|
|
(2) depressed and operate the |
||
charge the battery for several short pe- |
|
|
|
|
on/off switch (8). Then release |
||
12

the switch lock.
The equipment runs at top speed.
4.In order to switch off, let go of the on/off switch (8).
After switching the unit off, the blades take a short time to stop moving. Let the blades come to a complete standstill. Do not touch the moving blades and do not
try to stop them moving. Injury hazard!
Inserting/replacing the blade
Prior to each exchange of the blades, make sure the device is switched off and the safety key and in order to avoid danger and injuries!
Remove blade
1.Press the unlock buttons (10/13) on the blade and remove the
entire blade.
Insert blade
2.Insert the grass shear blade (9) or the shrub shear blade (12) into the recess in the cutter head (1).
3.Press the blade into the direction of the cutter head (1). It locks into place audibly.
General working instructions
While trimming, take care that there are no objects such as wire, metal parts, stones etc. come into contact with the blades. This can lead to cutting head damage. If the blades become blocked by solid objects, switch off the unit at once.
GB
•Check the grass and bush trimmer blades for obvious defects such as loose, worn or damaged parts. Check that the screws are seated firmly in the blade block.
•Remove the power supply unit before working with the equipment. Do not use extension cables. The power supply unit is to be used only in enclosed spaces.
•Only use sharp blades to achieve a good cutting performance and preserve the battery.
•Do not work the unit so hard that it comes to a standstill.
•Pay attention to the instructions on unit maintenance and cleaning.
Use as a grass trimmer
•Grass is best cut when dry and not too long.
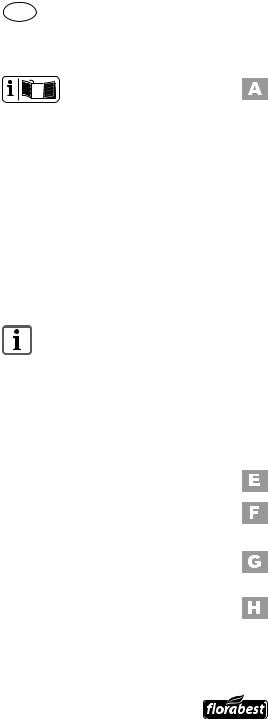
Adjusting the working angle
For a comfortable edge cut, the cutter head
(1)can be rotated by 90° to the right or left.
1.Operate the lever (3) and turn the cutter head (1) into the desired position.
2.Release the lever (3), the cutter head locks into place.
Use as a hedge trimmer
•Move the unit forward evenly.
•The double-sided cutting heads enable cutting in both directions or by swinging the unit from side to side.
13
GB
Cleaning/Maintenance
Leave any work not covered in this manual to our Service Centre. Only use original parts. There is a risk of injury!
Ensure that the safety key (  7) is removed before all tasks.
Never use cleaning agents or solvents, which can cause irreparable damage to the unit. Chemicals can attack the plastic components on the unit.
Wear gloves when handling the blades (  9/12). There is a risk of injury from cuts!
Clean and service the unit regularly as follows. This guarantees a long life for your unit:
•Check the covers and guards for damage and correct position. If necessary, replace.
We are not liable for damage caused by the use of the unit if the original cause was improper repair or the use of non-original parts or through use other than that designated in this manual.
Storage
•Keep the equipment in the blade guard supplied, dry and out of reach of children.
•Store the battery only in a partially charged state. The state of charge should be 40 – 60 % over a longer storage period.
•Store the equipment between 10° C and 25° C. During storage, avoid extreme cold or heat so the battery does not lose power.
•During a longer storage period, check the state of charge of the battery and recharge if necessary roughly every
3 months.
Disposal and the environment
•Keep the ventilation slits, motor housing Be environmentally friendly. Return the tool,
and handles on the equipment clean. To do this, use a damp cloth or brush.
•Always keep the blade clean.
After using the equipment, it is imperative to:
-Clean the blade (with an oily cloth);
-Oil the blade shaft with an oil can or spray.
•Slight notches on the blades can be evened out. For this, sand down the blades with an oil stone. Only sharp blades can cut properly.
•Blunt, bent or damaged blades must be changed.
14
accessories and packaging to a recycling centre when you have finished with them.
Machines do not belong with domestic waste.
Do not dispose of the device with the battery installed in


 household waste, fire (risk of explosion) or water. Damaged batteries may damage the environment and your health if toxic fumes or liquids leak out.
•Dispose of the equipment with the battery discharged. Do not open the equipment or the battery.
•Dispose of the equipment in accordance

GB
with the local regulations. Take the equipment to a collection point, where it will be recycled in an environmentally friendly manner. For information about this, ask your local waste management company or our service centre.
•Defective units returned to us will be disposed of for free.
•Place cut branches in compost and not in the dustbin.
Telescopic arm as an accessory
Ensure that the safety key (  7) is removed before all tasks.
Device is delivered without a telescopic arm. Alternatively, a telescopic arm including wheels can be ordered (see “Spare parts/accessories”).
Assembling the telescopic arm
Putting the telescopic arm together:
1.Put both parts of the telescopic arm (18) together and tighten the screw.
Make sure that the cable is not
clamped.
Assembling/dismantling the telescopic arm:
2.Push the device along the guide rail (19) into the equipment holder (20) of the telescopic arm. It locks into place audibly.
3.Plug the plug connection (21) into the charging socket (5) on the back of the equipment handle (4).
4.To dismantle, release the plug connection (21). Press the unlock button on the bottom side of the equipment holder (20) of the
telescopic arm and pull the device out (see small image).
Adjust the height of the telescopic arm
Adjust the length of the telescopic arm for your size with the help of the adjusting screw (22).
Adjusting the working angle
For a comfortable edge cut, the equipment holder (20) of the telescopic arm can be rotated to the right or left (90 °).
Set the desired position by pulling the release switch (23) and rotating the equipment holder (20) of the telescopic arm. The equipment holder locks into the desired position when the release switch is released.
Switching on and off (with telescopic arm)
1.Remove the blade guard (  11/14) before switching the device on.
2.Insert the safety key (  7) into the device.
3.To switch on, hold the switch lock (24) on the handle of the telescopic arm and simultaneously press the on/off switch (25). Release the switch lock, device runs at top speed.
4.To turn it off, release the on/off switch (25).
Working with the telescopic arm
•Slowly push the device on the wheels over the floor. By doing so, you will achieve an even cutting height.
15

GB
Spare parts/Accessories
Spare parts and accessories can be obtained at www.grizzly-service.eu
If you do not have internet access, please contact the Service Centre via telephone (see “Service-Center” page 18). Please have the order number mentioned below ready.
Item |
Description |
|
|
|
|
|
|
|
|
|
Order No. |
||||||
|
|
|
|
|
|
|
|
|
|
|
|
|
|
|
|
|
|
|
|
7 |
Safety key |
|
|
|
|
|
|
|
|
|
91103520 |
||||
|
|
|
|
|
|
|
|
|
|
|
|||||||
|
|
|
|
|
|
|
|
|
|
|
|
|
|
|
|
|
|
|
9/11 |
Grass shear blade + blade gard |
91103521 |
||||||||||||||
|
|||||||||||||||||
|
|
|
|
|
|
|
|
|
|
|
|
|
|
|
|
|
|
|
12/14 |
Shrub shear blade + blade gard |
91103522 |
||||||||||||||
|
|||||||||||||||||
|
|
|
|
|
|
|
|
|
|
|
|
|
|
|
|
|
|
|
16/17 |
Battery charger EU |
|
|
|
|
80001071 |
||||||||||
|
|
|
|
|
|||||||||||||
|
|
|
|
|
|
|
|
|
|
|
|
|
|
|
|
|
|
|
18 |
Telescopic shaft with carrier |
|
|
80002070 |
||||||||||||
|
|
|
|||||||||||||||
|
|
|
|
|
|
|
|
|
|
|
|
|
|
|
|
|
|
Trouble shooting |
|
|
|
|
|
|
|
|
|
|
|||||||
|
|
|
|
|
|
|
|
|
|
|
|
|
|
|
|||
Problem |
|
Possible Cause |
Error correction |
|
|||||||||||||
|
|
|
|
|
|
|
|
|
|
|
|
|
|
|
|
|
|
|
|
|
|
Equipment is not charged |
Charge equipment (see „Charging |
||||||||||||
|
|
|
|
process“) |
|
||||||||||||
|
|
|
|
|
|
|
|
|
|
|
|
|
|
|
|
||
Device doesn‘t |
|
Switch lock ( |
|
|
|
2) has not |
Switch on (see „Operation“) |
||||||||||
|
|
|
|
||||||||||||||
|
|
|
|
||||||||||||||
|
been operated properly |
|
|
|
|||||||||||||
start |
|
|
|
|
|
|
|
|
|
|
|
|
|
|
|
||
|
On/off switch ( |
|
|
8) may |
Repair by Service Centre |
||||||||||||
|
|
|
|||||||||||||||
|
|
|
|
|
|
||||||||||||
|
|
|
|
be defective |
|
|
|||||||||||
|
|
|
|
|
|
|
|
|
|||||||||
|
|
|
|
|
|
|
|
|
|
|
|
|
|
|
|
|
|
|
|
|
|
Safety key ( |
|
7) not in- |
Insert safety key (see "Operation") |
||||||||||
|
|
|
|
|
|||||||||||||
|
|
|
|
serted |
|
|
|
|
|
|
|
||||||
|
|
|
|
|
|
|
|
|
|
|
|
|
|
||||
|
|
|
|
Too much friction due to |
Lubricate blade ( |
|
9/12) |
||||||||||
|
|
|
|
|
|||||||||||||
|
|
|
|
lack of lubrication |
(see „Cleaning/Maintenance“) |
||||||||||||
|
|
|
|
|
|
|
|
|
|
|
|
|
|
|
|
|
|
|
|
|
|
Dirty blade |
|
|
Clean blade (see „Cleaning/Mainte- |
||||||||||
Bad cutting results |
( |
|
9/12) |
|
|
nance“) |
|
||||||||||
|
|
|
|
|
|
|
|
|
|
|
|
|
|
||||
Blade ( |
|
9/12) is blunt |
Sharpen blade (see „Cleaning/ |
||||||||||||||
|
|
|
|
|
|||||||||||||
|
|
|
|
|
Maintenance“) or replace (see „Spare |
||||||||||||
|
|
|
|
or has nicks |
|
|
|||||||||||
|
|
|
|
|
|
parts/Accessories“) |
|
||||||||||
|
|
|
|
|
|
|
|
|
|
|
|
|
|
|
|
||
|
|
|
|
|
|
|
|
|
|
|
|
|
|
|
|
|
|
|
|
|
|
Blade ( |
|
9/12) is dam- |
Replace blade (see „Spare parts/ |
||||||||||
|
|
|
|
|
|||||||||||||
|
|
|
|
aged |
|
|
|
|
|
|
|
Accessories“) |
|
||||
|
|
|
|
|
|
|
|
|
|
|
|
|
|
|
|
|
|
16

Guarantee
Dear Customer,
This equipment is provided with a 3-year guarantee from the date of purchase.
In case of defects, you have statutory rights against the seller of the product. These statutory rights are not restricted by our guarantee presented below.
Terms of Guarantee
The term of the guarantee begins on the date of purchase. Please retain the original receipt. This document is required as proof of purchase.
If a material or manufacturing defect occurs within three years of the date of purchase of this product, we will repair or replace – at our choice – the product for you free of charge. This guarantee requires the defective equipment and proof of purchase to be presented within the three-year period with a brief written description of what constitutes the defect and when it occurred.
If the defect is covered by our guarantee, you will receive either the repaired product or a new product. No new guarantee period begins on repair or replacement of the product.
Guarantee Period and Statutory Claims for Defects
The guarantee period is not extended by the guarantee service. This also applies for replaced or repaired parts. Any damages and defects already present at the time of purchase must be reported immediately after unpacking. Repairs arising after expiry of the guarantee period are chargeable.
GB
Guarantee Cover
The equipment has been carefully produced in accordance with strict quality guidelines and conscientiously checked prior to delivery.
The guarantee applies for all material and manufacturing defects. This guarantee does not extend to cover product parts that are subject to normal wear and may therefore be considered as wearing parts (e.g. cutter bars and carbon brushes) or to cover damage to breakable parts (e.g. switches, batteries).
This guarantee shall be invalid if the product has been damaged, used incorrectly or not maintained. Precise adherence to all of the instructions specified in the operating manual is required for proper use of the product. Intended uses and actions against which the operating manual advises or warns must be categorically avoided.
The product is designed only for private and not commercial use. The guarantee will be invalidated in case of misuse or improper handling, use of force, or interventions not undertaken by our authorised service branch.
Processing in Case of Guarantee
To ensure quick handling of you issue, please follow the following directions:
•Please have the receipt and identification number (IAN 102887) ready as proof of purchase for all enquiries.
•Please find the item number on the rating plate.
•Should functional errors or other defects occur, please initially contact the
service department specified below by telephone or by e-mail. You will then receive further information on the processing of your complaint.
17

GB
•After consultation with our customer service, a product recorded as defective can be sent postage paid to the service address communicated to you, with the proof of purchase (receipt) and specification of what constitutes the defect and when it occurred. In order to avoid acceptance problems and additional costs, please be sure to use only the address communicated to you. Ensure that the consignment is not sent carriage forward or by bulky goods, express or other special freight. Please send the equipment inc. all accessories supplied at the time of purchase and ensure adequate, safe transport packaging.
Repair Service
For a charge, repairs not covered by the guarantee can be carried out by our ser-
vice branch, which will be happy to issue a cost estimate for you.
We can handle only equipment that has been sent with adequate packaging and
postage.
Attention: Please send your equipment to our service branch in clean condition and with an indication of the defect.
Equipment sent carriage forward or by bulky goods, express or other special freight will not be accepted.
We will dispose of your defective devices free of charge when you send them to us.
Service-Center
GB Service Great Britain
Tel.: 0871 5000 720
(£ 0.10/Min.)
E-Mail: grizzly@lidl.co.uk
IAN 102887
Importer
Please note that the following address is not a service address. Please initially contact the service centre specified above.
Grizzly Tools GmbH & Co. KG
Stockstädter Straße 20
63762 Großostheim Germany www.grizzly-service.eu
18

Kazalo |
|
Predgovor.................................. |
19 |
Namen uporabe......................... |
19 |
Splošni opis................................ |
20 |
Obseg dobave............................... |
20 |
Opis delovanja.............................. |
20 |
Pregled.......................................... |
20 |
Tehnični podatki......................... |
21 |
Varnostni napotki....................... |
21 |
Slikovni znaki................................. |
21 |
Splošni varnostni predpisi za |
|
električna orodja............................ |
22 |
Posebni varnostni predpisi za akumula- |
|
torske škarje za travo in grmičevje.... |
25 |
Varnostni predpisi za polnilnik akumula- |
|
torskih baterij.................................... |
26 |
Postopek polnjenja..................... |
27 |
Uporaba..................................... |
28 |
Vklop in Izklop............................... |
28 |
Namestitev/menjava rezila.............. |
28 |
Splošni delovni napotki................... |
28 |
Uporaba kot škarje za travo............. |
28 |
Uporaba kot škarje za grmovje........ |
29 |
Čiščenje/Vzdrževanje................. |
29 |
Shranjevanje.............................. |
29 |
Odstranitev/varstvo okolja......... |
30 |
Teleskopski ročaj kot dodatna |
|
oprema...................................... |
31 |
Montaža teleskopskega ročaja......... |
31 |
Nastavitev višine teleskopskega |
|
ročaja........................................... |
31 |
Nastavitev delovnega kota.............. |
31 |
Vklop in izklop |
|
(s teleskopskim ročajem).................. |
31 |
Delo s teleskopskim ročajem............ |
31 |
Nadomestni deli/Pribor.............. |
32 |
Odpravljanje napak................... |
32 |
Garancijski list............................ |
33 |
Prevod originalne izjave o |
|
skladnosti CE.............................. |
84 |
Eksplozijska risba....................... |
87 |
SI
Predgovor
Čestitke ob nakupu vaše nove naprave. Odločili ste se za visokokakovosten izdelek. Kakovost naprave je bila preverjena med postopkom proizvodnje in pri končnem preverjanju, s čimer je zagotovljeno pravilno delovanje vaše naprave.
Izdelku so priložena navodila za
uporabo. Vsebujejo pomembna navodila glede varnosti uporabe in odstranitve. Pred uporabo izdelka se seznanite z navodili za uporabo in varnostnimi navodili. Izdelek uporabljajte zgolj na opisani način in v naštete namene.
Navodila skrbno shranite in pri predaji naprave tretji osebi priložite tudi vso dokumentacijo.
Namen uporabe
Naprava je namenjena samo rezanju in obrezovanju tankih poganjkov pri živi meji, grmovju in okrasnih grmovjih ter košnji trave ob robovih ter na manjših površinah okoli hiše.
To orodje ni primerno za uporabo v komercialne namene. V primeru uporabe v komercialne namene ugasne pravica do uveljavljanja garancije.
Napravo lahko uporabljajo odrasle osebe. Mladostniki nad 16 let lahko uporabljajo napravo le pod nadzorom.
Vsaka druga vrsta uporabe, ki v teh navodilih za uporabo ni izrecno dovoljena, lahko privede do poškodb naprave in predstavlja resno nevarnost za uporabnika.
Uporabnik je odgovoren za poškodbe drugih oseb in povzročeno materialno škodo. Proizvajalec ne odgovarja za škodo, nastalo zaradi nenamenske ali napačne uporabe naprave.
19
SI
Splošni opis
Slike najdete na prednji in zadnji strani pokrova.
Obseg dobave
Orodje vzemite iz embalaže in preverite, ali je popolno. Embalažo odstranite v skladu s predpisi.
-Orodje z nameščenim rezilom škarij za travo, zaščito rezila in varnostnim ključem
-Rezilo škarij za grmičevje + zaščita rezila
-Polnilnik baterij
-Navodila za uporabo
Orodje je dobavljeno brez teleskopskega ročaja. Kot dodatno opremo je mogoče naročiti teleskopski ročaj s kolesi (glejte „Nadomestni deli/ pribor“).
Opis delovanja
Škarje za travo in grmičevje na baterije so kombinirana naprava z dvema zamenljivima rezalnima pripravama.
Prijemalni zobci so iz varnostnih razlogov ob strani zaobljeni in nameščeni z zamikom, da se zmanjša nevarnost poškodb.
Pri uporabi kot škarje za travo se kot rezalna priprava uporabi rezilo z večimi zobci. Varnostni ključ zagotavlja zaščito pred nenamernim vklopom.
Opise delovanja upravljalnih delov najdete spodaj.
20
Pregled
Orodje
1Rezalna glava
2Zapora vklopa, naprava
3 Ročica za vrtenje rezalne glave
4 Ročaj naprave
5Polnilna doza + vtični nastavek za vtični spoj teleskopskega ro-
čaja
6 Prikaz polnjenja (LED)
7 Varnostni ključ
8Stikalo za Vklop/Izklop, naprava
Rezalna priprava
9 Rezilo škarij za travo
10Tipka za sprostitev škarij za travo
11Zaščita rezila škarij za travo
12Rezilo škarij za grmičevje
13Zaščita rezila škarij za grmičevje
14Tipka za sprostitev škarij za grmičevje
Polnilnik baterij
16Polnilnik
17Vtič kabla polnilnika
18Teleskopski ročaj s kolesi (ni vključen v obseg dobave)
19Vodilo
20ležišče orodja
21Vtični spoj
22Nastavitveni vijak za nastavitev dolžine
23Stikalo za deblokiranje
24Zapora vklopa, teleskopski ročaj
25Stikalo za Vklop/Izklop, teleskopski ročaj
Tehnični podatki
Naprava |
|
|
|
Napetost motorja....................... |
3,6 V |
|
|
|
|||
Nazivno število vrtljajev............ |
1000 min-1 |
||
Razred zaščite...................................... |
|
III |
|
Vrsta zaščite.................................... |
IP20 |
||
Rezilo škarij za travo |
|
|
|
Širina reza................................ |
73 mm |
||
Širina rezila.............................. |
80 mm |
||
Rezilo škarij za grmovje |
|
|
|
Dolžina reza........................... |
120 mm |
||
Razmik med zobmi............. |
pribl. 8 mm |
||
Teža (vključno s priborom)... pribl. 0,85 kg Raven zvočnega tlaka
(LpA).................. |
|
|
57 dB(A), KpA=3 dB(A) |
|||
Raven zvočne moči (LwA) |
|
92 dB(A) |
||||
zajamčena............................. |
|
|
|
|
||
izmerjena....... |
|
79,1 dB(A); KwA=3 dB(A) |
||||
Vibracije ročaja a |
... |
1,39 m/s2, K=1,5 m/s2 |
||||
Baterija (Li-Ion) |
n |
|
|
|
|
|
|
|
|
|
|
|
|
Nazivna napetost........ |
3,6 V |
|
1,3 Ah |
|||
|
||||||
Čas polnjenja.................... |
|
|
|
pribl. 3-5 ur |
||
Polnilnik baterij................ |
|
DK-MGB-48 |
||||
Vhodna napetost/Input...... |
230 V~, 50 Hz |
|||||
Nazivna moč.................................. |
|
|
|
|
|
8 W |
Izhodna napetost/Output................ |
|
|
4,8 V |
|||
Tok polnitve................................ |
|
|
|
|
450 mA |
|
Izhodna moč................................ |
|
|
|
|
|
3,6 VA |
Razred zaščite................................. |
|
|
|
|
|
II |
Vrsta zaščite..................................... |
|
|
|
|
|
IPX0 |
Vrednosti hrupa in vibriranja so bile dolo-
čene v skladu s standardi in določili imenovanimi v Izjavi o skladnosti.
Tehnične in optične spremembe v okviru nadaljnjega razvoja se lahko izvedejo nenapovedano. Za navedbe dimenzij, napotkov in podatkov v teh navodilih za uporabo zato ne jamčimo. Pravni zahtevki v skladu s temi navodili za uporabo torej niso veljavni.
SI
Navedena vrednost vibracij je izmerjena po standardiziranem postopku ter jo je možno uporabiti za medsebojno primerjavo električnih orodij. Navedeno vrednost vibracij je prav tako možno uporabiti za oceno izpostavljenosti uporabnika.
Opozorilo:
Vrednost vibracij med dejansko uporabo se lahko razlikuje od navedene vrednosti, odvisno od načina uporabe električnega orodja. Določiti je treba varnostne ukrepe za zaščito uporabnika, ki so odvisni od ocene izpostavljenosti med dejansko uporabo (pri tem je treba upoštevati tudi čas, ko je orodje izključeno, in čas, ko je vključeno, vendar deluje brez obremenitve).
Varnostni napotki
Ta naprava lahko v primeru nepravilne uporabe povzroči resne poškodbe. Preden jo začnete uporabljati, si skrbno preberite navodila za uporabo in se dobro seznanite z vsemi upravljalnimi deli.
Slikovni znaki
Simboli v navodilih za uporabo
Opozorilni simboli (namesto narekovaja je lahko navedena nevarnost) z napotki za preprečevanje poškodb in materialne škode.
Simbol za obveznost (namesto klicaja je podana zapoved) z navedbami za preprečevanje škode.
21

SI
Obvestilni simbol z informacijami za boljše rokovanje z napravo.
Slikovni znaki na napravi
 Rezalno orodje se še premika.
Opozorilo!
Pred prvim zagonom skrbno preberite navodila za uporabo.
Naprave ne uporabljajte v dežju, slabem vremenu, v vlažnem okolju ali na mokrih živih mejah ter zelenicah.
 LWA Navedba nivoja zvočne moči Lwa v
  dB dB.
Dolžina reza, rezilo škarij za grmovje
Orodja z vgrajeno akumulatorsko baterijo ne mečite med gospodinjske odpadke.
Slikovni znaki na polnilniku
Preberite navodila za uporabo.
Polarnost
Polnilnik je primeren samo za uporabo v prostorih.
Razred zaščite II
Električne naprave ne spadajo v hišne smeti.
22
Splošni varnostni predpisi za električna orodja
OPOZORILO! Preberite vsa varnostva opozorila in na-
vodila. Neupoštevanje varnostnih navodil in opozoril lahko povzroči električni udar, požar in/ali težke poškodbe.
Varnostna navodila in opozorila shranite za prihodnjo uporabo.
Pojem ,,električno orodje”, uporabljen v varnostnih navodilih, se nanaša na električna orodja s priklopom na omrežje (s priključnim kablom) in na akumulatorska električna orodja (brez priključnega kabla).
1) VARNOST NA DELOVNEM MESTU
a)Poskrbite, da bo vaše delovno mesto vedno čisto in dobro osvetljeno. Nered ali neosvetljena delovna področja lahko povzročijo nezgode.
b)Električnega orodja ne uporabljajte v okolju, kjer obstaja nevarnost eksplozije in v katerem se nahajajo gorljive tekočine, plini ali prah. Električna orodja povzročajo iskrenje, zato se gorljiv prah ali pare lahko vnamejo.
c)Ne dovolite otrokom in drugim osebam, da bi se med delom približale električnemu orodju. Druge osebe lahko odvrnejo vašo pozornost in izgubili boste nadzor nad orodjem.
2) ELEKTRIČNA VARNOST
a)Priključni vtič električnega orodja mora ustrezati vtičnici. V nobenem primeru vtiča ne smete spreminjati. Uporaba adapterskih vtičev v kombinaciji z zaščitno

SI
ozemljenimi električnimi orodji ni dovoljena. Nespremenjen vtič in
ustrezna vtičnica zmanjšujeta nevarnost električnega udara.
b)Izogibajte se telesnemu stiku z ozemljenimi površinami, na primer s cevmi, grelci, štedilniki in hladilniki. Če je ozemljeno tudi vaše telo, obstaja povečano tveganje električnega udara.
c)Električno orodje zavarujte pred dežjem in vlago. Vstop vode v električno orodje povečuje nevarnost električnega udara.
d)Električnega kabla ne uporabljajte za prenašanje ali obešanje električnega orodja in ne vlecite vtiča iz vtičnice tako, da vlečete za kabel. Kabel zavarujte pred vročino, oljem, ostrimi robovi in premikajočimi se deli orodja. Poškodovan ali zavozlan kabel povečuje nevarnost električnega udara.
e)Če električno orodje uporabljate na prostem, uporabljajte samo podaljšek, ki je primeren za delo na prostem. Uporaba podaljševalnega kabla, ki je primeren za uporabo na prostem, zmanjšuje nevarnost električnega udara.
f)Če se ne morete izogniti uporabi električnega orodja v vlažnem okolju, uporabite zaščitno stikalo okvarnega toka. Uporaba zaščitnega stikala okvarnega toka zmanjša tveganje električnega udara.
oziroma zdravil. En sam trenutek nepazljivosti pri uporabi električnega orodja ima lahko za posledico resne telesne poškodbe.
b)Uporabljajte osebno zaščitno opremob)in vedno nosite zaščitna očala. Nošenje osebne zaščitne opreme, na primer nedrsečih zaščitnih čevljev, zaščitne čelade ali glušnikov, zmanjšuje tveganje telesnih poškodb.
c)Izogibajte se nenamernemu vklopu orodja. Preden električno orodje priključite na električno omrežje, ga dvignete ali prenašate, se prepričajte, da je izključeno.
Če pri nošenju električnega orodja držite prst na stikalu ali če vklopljeno orodje priključite na omrežje, lahko pride do
nesreče.
c)Pred vklopom z električnega orodja odstranite nastavitvena orodja ali vijačni ključ. Orodje ali ključ, ki se nahaja na vrtečem se delu orodja, lahko povzročita nezgodo.
d)Izogibajte se nenormalni telesni drži. Poskrbite za varno stojišče in ohranite ravnotežje. Tako boste lahko v nepričakovani situaciji bolje obvladali električno orodje.
e)Uporabljajte primerno obleko. Ne nosite širokih oblačil ali nakita. Lasje, oblačila in rokavice naj se ne približujejo premikajočim se delom orodja. Premikajoči se deli orodja lahko zagrabijo ohlapno obleko, nakit ali dolge lase.
3) VARNOST OSEB |
4) UPORABA IN RAVNANJE Z ELEK- |
|
TRIČNIM ORODJEM |
a)Bodite zbrani in pazite, kaj dela-
te. Dela z električnim orodjem se a) Ne preobremenjujte orodja. Upo-
lotite razumno. Električnega orodja ne uporabljajte, ko ste utrujeni ali pod vplivom mamil, alkohola
rabljajte samo električno orodje, ki je predvideno za opravljanje določenega dela. Z ustreznim električ-
23

SI
nim orodjem boste delali bolje in varneje v predvidenem območju zmogljivosti.
b)Ne uporabljajte električnega orodja, ki ima pokvarjeno stikalo. Električno orodje, ki ga ni možno vklopiti ali izklopiti, je nevarno in ga je treba popraviti.
c)Pred nastavljanjem naprave, zamenjavo pribora ali odlaganjem naprave vedno izvlecite vtič iz električne vtičnice. Ta previdnostni ukrep onemogoča nenamerni zagon električnega orodja.
d)Električno verižno orodje, ki ga ne uporabljate, shranjujte izven dosega otrok. Osebam, ki orodja ne poznajo ali niso prebrale teh navodil, ne dovolite uporabljati orodja. Električna orodja so nevarna, če jih uporabljajo neizkušene osebe.
e)Električno orodje skrbno vzdržujte. Prepričajte se, da gibljivi deli delujejo brezhibno in da niso stisnjeni. Prav tako ne smejo biti zlomljeni ali poškodovani do te mere, da ovirajo delovanje električnega orodja. Pred ponovno uporabo je treba poškodovani del orodja popraviti. Vzrok za številne nezgode so prav slabo vzdrževana električna orodja.
f)Rezalna orodja naj bodo ostra in
čista. Skrbno negovana rezalna orodja z ostrimi robovi se manj zatikajo in so lažje vodljiva.
g)Električno orodje, pribor, nastavke itd. uporabljajte v skladu s temi navodili. Pri tem upoštevajte delovne pogoje in vrsto dela, ki ga nameravate opravljati. Zaradi uporabe električnega orodja v druge, nepredvidene namene, lahko nastanejo nevarne situacije.
24
5)SKRBNO RAVNANJE Z AKUMULATORSKIMI ORODJI IN NJIHOVA UPORABA
a)Akumulatorske baterije polnite samo v polnilnikih, ki jih priporoča proizvajalec. Na polnilniku, predvidenem za polnjenje določene vrste akumulatorskih baterij, lahko pride do požara, če ga uporabite za polnjenje drugih vrst akumulatorskih baterij.
b)Za pogon električnih orodij uporabljajte samo zanje predvidene akumulatorske baterije. Uporaba drugačnih akumulatorskih baterij lahko povzroči telesne poškodbe in požar.
c)Akumulatorska baterija, ki ni v uporabi, ne sme priti v stik s
pisarniškimi sponkami, kovanci, ključi, žeblji, vijaki ali z drugimi kovinskimi predmeti, ki bi lahko
povzročili premostitev kontaktov.
Kratek stik med kontakti akumulatorske baterije lahko povzroči opekline ali požar.
d)Pri napačni uporabi lahko iz akumulatorske baterije izteče tekočina. Izogibajte se kontaktu z njo. Če vseeno pride do stika, prizadeto mesto spirajte z vodo. Če pride tekočina v oči, po spiranju poiščite zdravniško pomoč. Iztekajoča tekočina lahko povzroči draženje kože in opekline.
6) SERVIS
a)Električno orodje lahko popravlja samo usposobljen strokovnjak, in to izključno z originalnimi nadomestnimi deli. Le tako bo tudi vnaprej zagotovljena varna raba električnega orodja.

SI
Posebni varnostni predpisi za akumulatorske škarje za travo in grmičevje
1) POSEBNA VARNOSTNA OPOZO-
RILA ZA ŠKARJE ZA ŽIVO MEJO
•Rezila ne približujte delom telesa. Pri delujočem orodju ne poskušajte odstraniti vej in med delom ne držite vej. Veje, ki so se zagozdile, lahko odstranite samo, ko je orodje izključeno.
En sam trenutek nepazljivosti pri uporabi škarij za živo mejo ima lahko za posledico resne telesne poškodbe.
•Škarje za živo mejo prenašajte samo, ko je rezilo zaustavljeno, tako da jih držite za ročaj.
Pri transportu ali shranjevanju
škarij za živo mejo nanje vedno nataknite zaščitni pokrov. Če z orodjem ravnate skrbno, zmanjšate nevarnost poškodb z rezilom.
•Električno orodje držite le za izolirane prijemalne površine, saj lahko rezilo pride v stik s skritimi električnimi vodi. Ob stiku rezila z vodom pod napetostjo lahko napetost preide na druge kovinske dele orodja in povzroči električni udar.
2)NADALJNJA VARNOSTNA OPOZORILA
Za svojo osebno varnost:
Nosite primerno delovno obleko, kot so trdna obutev z nedrsečim podplatom, robustne dolge hlače, rokavice in zaščitna očala. Med dolgotrajnejšo uporabo orodja nosite zaščito za sluh. Ne nosite dolgih oblačil ali nakita, ker jih lahko zagrabijo premikajoči se deli orodja. Orodja ne uporabljajte, če ste bosi ali obuti v natikače.
a)Orodje vključite le, ko so roke, stopala in vsi drugi deli telesa na varni razdalji od orodja. Nevarnost ureznin.
b)Pazite, da si z rezalnimi elementi ne poškodujete rok in stopal.
c)Odstranite polnilnik, preden se lotite dela z orodjem. Ne uporabljajte podaljševalnega kabla. Polnilnik je dovoljeno uporabljati samo v zaprtih prostorih. Vdor vode poveča tveganje električnega udara.
d)Škarij za grmičevje ne uporabljajte v kombinaciji s teleskopskim ročajem. Nevarnost ureznin.
•Kabla ne približujte rezilu. Med e) Orodje je namenjeno rezanju žive
delom je lahko kabel skrit v grmovju, zaradi česar ga lahko nehote prerežete.
•Pred delom preverite, da v živi meji ni skirith predmetov, kot je na primer žica ipd. Tako preprečite poškodbe orodja.
•Škarje za živo mejo držite pravilno – z obema rokama za oba ročaja, če je orodje opremljeno z dvema ročajema. Če izgubite nadzor nad orodjem, se lahko poškodujete.
meje. Z orodjem ne režite vej, trdega lesa ali drugega. Tako pre-
prečite poškodbe orodja.
f)Blokiranega/ukleščenega lista ne poskušajte sprostiti, dokler ne izključite orodja. Nevarnost poškodb.
g)Vedno najprej izključite orodje in odstranite akumulatorsko baterijo (če je to primerno)
-če pustite orodje brez nadzora
-preden odstranjujete blokade
-pred preverjanjem, čiščenjem ali vzdrževalnimi deli
25

SI
-ko ste naleteli na oviro
-vedno, ko začne orodje vibrirati na nenavaden način
Za preprečevanje nesreč in poškodb.
e)Pred delom živo mejo preglejte glede skritih predmetov, npr. žice itn. Orodje vedno držite tako, da roka trdno oklepa ročaj.
f)Orodja ne uporabljajte v bližini gorljivih tekočin ali plinov. V primeru kratkega stika obstaja nevarnost požara in eksplozije.
g)Rezila redno preverjajte glede obrabe in jih dajte v brušenje. Topa rezila obremenjujejo orodje. Garancija ne krije poškodb, ki izvirajo iz tega.
h)Orodja ne poskušajte popraviti, razen če ste za to ustrezno usposobljeni. Vsa dela, ki niso navedena v teh navodilih za uporabo, lahko opravi izključno naš servisni center.
3)POSEBNA VARNOSTNA OPOZORILA ZA AKUMULATORSKA ORODJA
a)Akumulatorske baterije/električnega orodja/naprave ne izpostavljajte močnim sončnim in ne odlagajte na grelne naprave.
Akumulatorska baterija je občutljiva na vročino in obstaja nevarnost eksplozije.
b)Pred polnjenjem počakajte, da se segreta akumulatorska baterija ohladi.
c)Akumulatorske baterije ne odpirajte in jo zaščitite pred mehanskimi poškodbami. Obstaja nevarnost kratkega stika in uhajanja hlapov, ki dražijo dihala. Poskrbite za dotok svežega zraka in v primeru težav poiščite zdravniško pomoč.
26
Varnostni predpisi za polnilnik akumulatorskih baterij
1)PRAVILNA UPORABA POLNILNIKA AKUMULATORSKIH BATERIJ
•To napravo lahko uporabljajo otroci, stari 8 let ali več, ter osebe z omejenimi fizičnimi, senzoričnimi ali mentalnimi sposobnostmi ali osebe s pomanjkanjem znanja in izkušenj, če so nadzorovani ali so bili poučeni o varni uporabi naprave in razumejo morebitne nevarnosti.
•Otroci se z napravo ne smejo igrati.
Otroci ne smejo čistiti ali vzdrževati naprave brez nadzora.
•Za polnjenje akumulatorske baterije uporabljajte izključno priloženi polnilnik. Obstaja nevarnost požara in eksplozije.
•Pred vsako uporabo preverite polnilnik, kabel in vtič. Popravlja jih lahko samo usposobljeno strokovno osebje in to izključno z originalnimi nadomestnimi deli. Poškodovanega polnilnika ne uporabljajte in ga ne odpirajte. Le tako bo tudi vnaprej zagotovljena varna raba orodja.
•Polnilnik priklopite le na vtičnico z ozemljitvijo. Bodite pozorni, da omrežna napetost ustreza podatkom na tipski ploščici na polnilniku. Sicer obstaja nevarnost električnega udara.
•Polnilnik izklopite iz omrežja preden začnete polniti ali ko končate s polnjenjem akumulatorske baterije/električnega orodja/naprave. Tako boste preprečili poškodbe akumulatorske baterije in polnilnika.
•Polnilnik zavarujte pred umazani-

jo, vlago in dežjem. Polnilnika nikoli ne uporabljajte na prostem. Umazanija in vdor vode povečujeta tveganje električnega udara.
•Polnilnik lahko uporabljate le s pripadajočimi originalnimi akumulatorskimi baterijami. Polnjenje drugačnih akumulatorskih baterij lahko povzroči telesne poškodbe in požar.
•Preprečite mehanske poškodbe polnilnika. Povzročijo lahko kratek stik v notranjosti aparata.
•Polnilnika ne uporabljajte na gorljivi podlagi (npr. papirju, blagu).
Zaradi segrevanja med polnjenjem obstaja nevarnost požara.
•Če se poškoduje priključni kabel tega orodja, naj ga zaradi varnostnih razlogov zamenja proizvajalec, njegova servisna služba ali podobno ustrezno usposobljen strokovnjak.
Postopek polnjenja
Akumulatorske baterije ne izpostavljanje ekstremnim razmeram, kot so vročina in udarci. Nevarnost poškodb zaradi iztekajoče elektrolitske raztopine! Če pride tekočina v oči ali v stik s kožo, jo takoj sperite z vodo ali nevtralizirajte z nevtralizatorjem ter poiščite zdravniško pomoč.
Akumulatorsko baterijo polnite samo v suhih prostorih. Orodja med polnjenjem ne vklapljajte in bodite pozorni, da je varnostni ključ ( 7) izvlečen. Nevarnost poškodb zaradi električnega udara.
SI
Orodja neprekinjeno ne polnite več kot 3-5 ur. Akumulatorska baterija ali orodje se lahko poškodujeta, poleg tega pa pri daljšem času polnjenja po nepotrebnem porabljate energijo. Če akumulatorsko baterijo prekomerno napolnite, niste upravi-
čeni do uveljavljanja garancije.
•Pred prvo uporabo napolnite akumulatorsko baterijo v orodju. Akumulatorske baterije ne polnite večkrat zapored po malo.
•Za polnjenje akumulatorske baterije, vgrajene v orodje, uporabljajte prilo-
ženi polnilnik za litij-ionske akumulatorske baterije.
•Če orodje deluje prepočasi, akumulatorsko baterijo dodatno napolnite.
•V vsakem primeru upoštevajte vsa veljavna varnostna navodila ter predpise in nasvete za varovanje okolja.
•Garancija ne velja za okvare, ki nastanejo zaradi nepravilne uporabe.
1.Izvlecite varnostni ključ (7).
2.Vtič kabla polnilnika (17) povežite z vtičnico za polnjenje naprave (5).
3.Vtaknite polnilnik (16) v vtičnico.
Prikaz polnjenja (6) sveti: rdeča: baterija orodje se polni. zelena: polnjenje je končano. Priporočeni čas polnjenja znaša največ 3–5 ur.
4.Po končanem postopku polnjenja najprej vtič potegnite iz vtičnice in potem vtič kabla polnilnika
(17) potegnite iz naprave.
27

SI
Uporaba
Upoštevajte zaščito pred hrupom in lokalne predpise.
Vklop in Izklop
1.Pred vklopom snemite zaščito rezila (  11/14).
2.Vstavite varnostni ključ (7) v orodje.
3.Za vklop držite pritisnjeno varnostno zaporo vklopa (2) ter pritisnite stikalo za vklop in izklop
(8). Ponovno izpustite varnostno zaporo vklopa.
Orodje deluje z najvišjo hitrostjo.
4.Za izklop stikalo za Vklop/Izklop (8) spustite.
Po izklopu naprave se rezila še nekaj časa premikajo naprej. Počakajte, da se rezila v celoti ustavijo. Premikajočih se rezil se ne dotikajte in jih ne zavirajte. Nevarnost poškodbe!
Namestitev/menjava rezila
Bodite pozorni, da pred menjavo rezila vsakič izključite orodje ter izvlečete varnostni vtič, da preprečite nevarnost in poškodbe.
Odstranitev rezila:
1.Pritisnite tipki za sprostitev (10/13) na rezilu ter snemite
celotno rezilo.
Namestitev rezila
2.Vstavite rezilo škarij za travo
(9)ali rezilo škarij za grmičevje
28
(12) v utor na rezalni glavi (1).
3.Pritisnite rezilo v smeri rezalne glave (1). Orodje se slišno zaskoči.
Splošni delovni napotki
Pri rezanju pazite, da v rezilo ne zaidejo nobeni predmeti, kot na primer žica, kovinski deli, kamni itd. To lahko privede do poškodb rezalne priprave. V primeru blokade rezil zaradi trdnih predmetov napravo takoj izklopite.
•Napravo pred vsako uporabo preverite glede očitnih pomanjkljivosti, kot so razrahljani, obrabljeni ali poškodovani deli. Preverite trdno prileganje vijakov v dvostranskem rezilu.
•Odstranite polnilnik (  16), preden se lotite dela z orodjem. Ne uporabljajte podaljševalnega kabla. Polnilnik uporabljajte samo v zaprtih prostorih.
•Uporabljajte samo ostra rezila, da dosežete dobro rezalno zmogljivost in obvarujete napravo in akumulator.
•Naprave med delom ne obremenjujte tako zelo, da obmiruje.
•Upoštevajte napotke za vzdrževanje in čiščenje naprave.
Uporaba kot škarje za travo
•Travo lahko najlažje režete, ko je suha in kratka.
Nastavitev delovnega kota:
Za udobno oblikovanje robov lahko rezalno glavo (1) obrnete za 90° v desno ali levo.
 Loading...