


2-IN-1 LONG-REACH HEDGE TRIMMER / PRUNER FHEHS 900 A1
2-IN-1 LONG-REACH HEDGE TRIMMER / PRUNER
Translation of original operation manual
NŮŽKY NA ŽIVÝ PLOT A
ODVĚTVOVAČ 2 V 1
Překlad originálního provozního návodu
LANGSTIEL-HECKENSCHERE / HOCHENTASTER
Originalbetriebsanleitung
ŠKARJE ZA ŽIVO MEJO / REZALNIK VEJ Z DOLGIM ROČAJEM
Prevod originalnega navodila za uporabo
NOŽNICE NA ŽIVÝ PLOT /
ODVETVOVAČ
Preklad originálneho návodu na obsluhu
IAN 102878

Before reading, unfold the page containing the illustrations and familiarise yourself with all functions of the device.
Pred branjem odprite stran s slikami in se nato seznanite z vsemi funkcijami naprave.
Před čtením si otevřete stranu s obrázky a potom se seznamte se všemi funkcemi přístroje.
Pred čítaním si odklopte stranu s obrázkami a potom sa oboznámte so všetkými funkciami prístroja.
Klappen Sie vor dem Lesen die Seite mit den Abbildungen aus und machen Sie sich anschließend mit allen Funktionen des Gerätes vertraut.
GB |
Translation of original operation manual |
Page |
1 |
SI |
Prevod originalnega navodila za uporabo |
Stran |
13 |
CZ |
Překlad originálního provozního návodu |
Strana |
25 |
|
|
|
|
SK |
Preklad originálneho návodu na obsluhu |
Strana |
37 |
|
|
|
|
DE / AT / CH |
Originalbetriebsanleitung |
Seite |
49 |


A |

GB
Contents
Introduction . . . . . . . . . . . . . . . . . . . . . . . . . . . . . . . . . . . . . . . . . . . . . . . . . . . . . . . . . . . . . . . . . . . . . . . . . . . . . . . . . . . . 2
Intended use of the long-reach hedge trimmer . . . . . . . . . . . . . . . . . . . . . . . . . . . . . . . . . . . . . . . . . . . . . . . . . . . . . . . . . . . . . . . . . . . . . . . . . 2 Intended use of the pole pruner . . . . . . . . . . . . . . . . . . . . . . . . . . . . . . . . . . . . . . . . . . . . . . . . . . . . . . . . . . . . . . . . . . . . . . . . . . . . . . . . . . . . 2 Intended use . . . . . . . . . . . . . . . . . . . . . . . . . . . . . . . . . . . . . . . . . . . . . . . . . . . . . . . . . . . . . . . . . . . . . . . . . . . . . . . . . . . . . . . . . . . . . . . . . . . 2 Features . . . . . . . . . . . . . . . . . . . . . . . . . . . . . . . . . . . . . . . . . . . . . . . . . . . . . . . . . . . . . . . . . . . . . . . . . . . . . . . . . . . . . . . . . . . . . . . . . . . . . . . 2 Package contents. . . . . . . . . . . . . . . . . . . . . . . . . . . . . . . . . . . . . . . . . . . . . . . . . . . . . . . . . . . . . . . . . . . . . . . . . . . . . . . . . . . . . . . . . . . . . . . . 3 Technical data . . . . . . . . . . . . . . . . . . . . . . . . . . . . . . . . . . . . . . . . . . . . . . . . . . . . . . . . . . . . . . . . . . . . . . . . . . . . . . . . . . . . . . . . . . . . . . . . . . 3
General Power tool Safety Warnings . . . . . . . . . . . . . . . . . . . . . . . . . . . . . . . . . . . . . . . . . . . . . . . . . . . . . . . . . . . . . . . 4
1. Work area safety . . . . . . . . . . . . . . . . . . . . . . . . . . . . . . . . . . . . . . . . . . . . . . . . . . . . . . . . . . . . . . . . . . . . . . . . . . . . . . . . . . . . . . . . . . . . . 4 2. Electrical safety . . . . . . . . . . . . . . . . . . . . . . . . . . . . . . . . . . . . . . . . . . . . . . . . . . . . . . . . . . . . . . . . . . . . . . . . . . . . . . . . . . . . . . . . . . . . . . . 4 3. Personal safety . . . . . . . . . . . . . . . . . . . . . . . . . . . . . . . . . . . . . . . . . . . . . . . . . . . . . . . . . . . . . . . . . . . . . . . . . . . . . . . . . . . . . . . . . . . . . . . 4 4. Power tool use and care . . . . . . . . . . . . . . . . . . . . . . . . . . . . . . . . . . . . . . . . . . . . . . . . . . . . . . . . . . . . . . . . . . . . . . . . . . . . . . . . . . . . . . . . 4 5. Service . . . . . . . . . . . . . . . . . . . . . . . . . . . . . . . . . . . . . . . . . . . . . . . . . . . . . . . . . . . . . . . . . . . . . . . . . . . . . . . . . . . . . . . . . . . . . . . . . . . . . 4 Appliance-specific safety instructions for hedge trimmers . . . . . . . . . . . . . . . . . . . . . . . . . . . . . . . . . . . . . . . . . . . . . . . . . . . . . . . . . . . . . . . . . 5 Complementary safety instructions for hedge trimmers . . . . . . . . . . . . . . . . . . . . . . . . . . . . . . . . . . . . . . . . . . . . . . . . . . . . . . . . . . . . . . . . . . . 5 Appliance-specific safety instructions for pole pruners . . . . . . . . . . . . . . . . . . . . . . . . . . . . . . . . . . . . . . . . . . . . . . . . . . . . . . . . . . . . . . . . . . . 6 Precautions against kickback. . . . . . . . . . . . . . . . . . . . . . . . . . . . . . . . . . . . . . . . . . . . . . . . . . . . . . . . . . . . . . . . . . . . . . . . . . . . . . . . . . . . . . . 6 Further safety instructions. . . . . . . . . . . . . . . . . . . . . . . . . . . . . . . . . . . . . . . . . . . . . . . . . . . . . . . . . . . . . . . . . . . . . . . . . . . . . . . . . . . . . . . . . . 7 Original accessories/auxiliary equipment . . . . . . . . . . . . . . . . . . . . . . . . . . . . . . . . . . . . . . . . . . . . . . . . . . . . . . . . . . . . . . . . . . . . . . . . . . . . 7
Before initial use . . . . . . . . . . . . . . . . . . . . . . . . . . . . . . . . . . . . . . . . . . . . . . . . . . . . . . . . . . . . . . . . . . . . . . . . . . . . . . . . 7
Motor unit . . . . . . . . . . . . . . . . . . . . . . . . . . . . . . . . . . . . . . . . . . . . . . . . . . . . . . . . . . . . . . . . . . . . . . . . . . . . . . . . . . . . . . . . . . . . . . . . . . . . . 7 Attaching the round handle . . . . . . . . . . . . . . . . . . . . . . . . . . . . . . . . . . . . . . . . . . . . . . . . . . . . . . . . . . . . . . . . . . . . . . . . . . . . . . . . . . . . . . . . 7 Fitting the quick release mechanism . . . . . . . . . . . . . . . . . . . . . . . . . . . . . . . . . . . . . . . . . . . . . . . . . . . . . . . . . . . . . . . . . . . . . . . . . . . . . . . . . 7 Fixing/attaching the shoulder strap. . . . . . . . . . . . . . . . . . . . . . . . . . . . . . . . . . . . . . . . . . . . . . . . . . . . . . . . . . . . . . . . . . . . . . . . . . . . . . . . . . 7 Mounting the hedge trimmer . . . . . . . . . . . . . . . . . . . . . . . . . . . . . . . . . . . . . . . . . . . . . . . . . . . . . . . . . . . . . . . . . . . . . . . . . . . . . . . . . . . . . . . 7 Mounting the pole pruner . . . . . . . . . . . . . . . . . . . . . . . . . . . . . . . . . . . . . . . . . . . . . . . . . . . . . . . . . . . . . . . . . . . . . . . . . . . . . . . . . . . . . . . . . 7 Swivelling the hedge trimmer. . . . . . . . . . . . . . . . . . . . . . . . . . . . . . . . . . . . . . . . . . . . . . . . . . . . . . . . . . . . . . . . . . . . . . . . . . . . . . . . . . . . . . . 7 Swivelling the pole pruner . . . . . . . . . . . . . . . . . . . . . . . . . . . . . . . . . . . . . . . . . . . . . . . . . . . . . . . . . . . . . . . . . . . . . . . . . . . . . . . . . . . . . . . . . 7 Mounting the saw chain and blade . . . . . . . . . . . . . . . . . . . . . . . . . . . . . . . . . . . . . . . . . . . . . . . . . . . . . . . . . . . . . . . . . . . . . . . . . . . . . . . . . 7 Tightening and checking the saw chain . . . . . . . . . . . . . . . . . . . . . . . . . . . . . . . . . . . . . . . . . . . . . . . . . . . . . . . . . . . . . . . . . . . . . . . . . . . . . . 8 Lubricating the chain . . . . . . . . . . . . . . . . . . . . . . . . . . . . . . . . . . . . . . . . . . . . . . . . . . . . . . . . . . . . . . . . . . . . . . . . . . . . . . . . . . . . . . . . . . . . . 8 Sharpening the saw chain . . . . . . . . . . . . . . . . . . . . . . . . . . . . . . . . . . . . . . . . . . . . . . . . . . . . . . . . . . . . . . . . . . . . . . . . . . . . . . . . . . . . . . . . . 8
Initial use . . . . . . . . . . . . . . . . . . . . . . . . . . . . . . . . . . . . . . . . . . . . . . . . . . . . . . . . . . . . . . . . . . . . . . . . . . . . . . . . . . . . . . 8
Switching on and o . . . . . . . . . . . . . . . . . . . . . . . . . . . . . . . . . . . . . . . . . . . . . . . . . . . . . . . . . . . . . . . . . . . . . . . . . . . . . . . . . . . . . . . . . . . . . 8 Adjusting the handle . . . . . . . . . . . . . . . . . . . . . . . . . . . . . . . . . . . . . . . . . . . . . . . . . . . . . . . . . . . . . . . . . . . . . . . . . . . . . . . . . . . . . . . . . . . . . 8 Working with the hedge trimmer . . . . . . . . . . . . . . . . . . . . . . . . . . . . . . . . . . . . . . . . . . . . . . . . . . . . . . . . . . . . . . . . . . . . . . . . . . . . . . . . . . . . 8 Cutting techniques . . . . . . . . . . . . . . . . . . . . . . . . . . . . . . . . . . . . . . . . . . . . . . . . . . . . . . . . . . . . . . . . . . . . . . . . . . . . . . . . . . . . . . . . . . . . . . . 8 Working with the pole pruner . . . . . . . . . . . . . . . . . . . . . . . . . . . . . . . . . . . . . . . . . . . . . . . . . . . . . . . . . . . . . . . . . . . . . . . . . . . . . . . . . . . . . . 8 Sawing techniques . . . . . . . . . . . . . . . . . . . . . . . . . . . . . . . . . . . . . . . . . . . . . . . . . . . . . . . . . . . . . . . . . . . . . . . . . . . . . . . . . . . . . . . . . . . . . . 8 Working safely . . . . . . . . . . . . . . . . . . . . . . . . . . . . . . . . . . . . . . . . . . . . . . . . . . . . . . . . . . . . . . . . . . . . . . . . . . . . . . . . . . . . . . . . . . . . . . . . . 9
Transport . . . . . . . . . . . . . . . . . . . . . . . . . . . . . . . . . . . . . . . . . . . . . . . . . . . . . . . . . . . . . . . . . . . . . . . . . . . . . . . . . . . . . . 9
Maintenance and cleaning . . . . . . . . . . . . . . . . . . . . . . . . . . . . . . . . . . . . . . . . . . . . . . . . . . . . . . . . . . . . . . . . . . . . . . . . 9
Storage . . . . . . . . . . . . . . . . . . . . . . . . . . . . . . . . . . . . . . . . . . . . . . . . . . . . . . . . . . . . . . . . . . . . . . . . . . . . . . . . . . . . . . . 9
Troubleshooting: pole pruner. . . . . . . . . . . . . . . . . . . . . . . . . . . . . . . . . . . . . . . . . . . . . . . . . . . . . . . . . . . . . . . . . . . . . 10
Troubleshooting: hedge trimmer . . . . . . . . . . . . . . . . . . . . . . . . . . . . . . . . . . . . . . . . . . . . . . . . . . . . . . . . . . . . . . . . . . 10
Maintenance intervals: pole pruner . . . . . . . . . . . . . . . . . . . . . . . . . . . . . . . . . . . . . . . . . . . . . . . . . . . . . . . . . . . . . . . 10
Maintenance intervals: hedge trimmer . . . . . . . . . . . . . . . . . . . . . . . . . . . . . . . . . . . . . . . . . . . . . . . . . . . . . . . . . . . . . 10
Warranty . . . . . . . . . . . . . . . . . . . . . . . . . . . . . . . . . . . . . . . . . . . . . . . . . . . . . . . . . . . . . . . . . . . . . . . . . . . . . . . . . . . . . 10
Service . . . . . . . . . . . . . . . . . . . . . . . . . . . . . . . . . . . . . . . . . . . . . . . . . . . . . . . . . . . . . . . . . . . . . . . . . . . . . . . . . . . . . . . 11
Importer . . . . . . . . . . . . . . . . . . . . . . . . . . . . . . . . . . . . . . . . . . . . . . . . . . . . . . . . . . . . . . . . . . . . . . . . . . . . . . . . . . . . . . 11
Disposal . . . . . . . . . . . . . . . . . . . . . . . . . . . . . . . . . . . . . . . . . . . . . . . . . . . . . . . . . . . . . . . . . . . . . . . . . . . . . . . . . . . . . . 11
Replacement parts . . . . . . . . . . . . . . . . . . . . . . . . . . . . . . . . . . . . . . . . . . . . . . . . . . . . . . . . . . . . . . . . . . . . . . . . . . . . . 11
Translation of the original Conformity Declaration . . . . . . . . . . . . . . . . . . . . . . . . . . . . . . . . . . . . . . . . . . . . . . . . . . . 12
FHEHS 900 A1 |
1 |

2-IN-1 LONG-REACH HEDGE TRIMMER / GB PRUNER FHEHS 900 A1
Introduction
Congratulations on the purchase of your new appliance. You have selected a high quality product. The operating instructions are part of this product. They contain important information on safety, usage and disposal. Before using the product, familiarise yourself with all handling and safety instructions. Use the product only as described and for the range of applications specified. Hand over all documents to any future owner(s).
Intended use of the long-reach hedge trimmer
This appliance is intended for the cutting and trimming of hedges, bushes and flowering shrubs in the home environment. This is a hand-held appliance with an integrated motor unit with linear reciprocating cutting blades.
 WARNING!
► Hedge trimmers are not suitable for use by children.
Intended use of the pole pruner
This appliance is intended for trimming branches in trees.
Intended use
Use this product only as described and for the areas of applications specified. The appliance is not meant for commercial use. The appliance is designed for use by adults. This appliance is not intended for use by persons (including children) with reduced physical, sensory or mental capabilities, or lack of experience and knowledge The use of the appliance in rain or humid environments is prohibited.
Any other usage of or modification to the appliance is deemed to be improper and carries a significant risk of accidents. The manufacturer shall assume no liability for damage attributable to misuse.
Features
Motor unit
 Tommy screw
 Nut
Nut
 Boom
Boom
 Screw
Screw
 Round handle
 Carrying eyelet
 Turning element
 Release button
 Safety lock-out
 On/O switch
 Power cable
 Strain relief
Hedge trimmer attachment
 Cutter bar
 Transmission case
 Lock/release
 Base plate (hedge shears)
 Control lever
 Handle
 Front boom
 Locking pin
 Drive shaft
 Protective cap
Pole pruner attachment
 Grinder support
 Saw chain
 Blade
Blade
 Stop
Stop
 Oil tank
 Nut
Nut
 Thread
 Sprocket cover
 Blade hole
 Blade guide
 Guide rail
 Oil dispenser
 Chain-tensioner screw
 Chain sprocket
 Chain tensioner pin
 Front boom
 Drive shaft
 Protective cap
 Locking pin
 Protective ring
 Control lever
 Base plate (pole pruner)
 Lock/release
  Oil filler cap
2 |
FHEHS 900 A1 |
|

Package contents
1Motor unit FHEHS 900 A1
1Hedge trimmer attachment FHS 1 (hereinafter hedge trimmer)
1Pole pruner attachment FHE 1 (hereinafter pole pruner)
Accessories
1 Shoulder strap
1 Protective cover for the chain
1 Protective cover for blade
1 100 ml organic chain oil
1 Mounting tool
1User manual
Technical data
Motor unit |
FHEHS 900 A1 |
Rated voltage: |
230 V ~ 50 Hz |
Nominal power: |
900 W |
Protection class: |
II / |
Weight: |
|
(without handle and |
|
carrying strap): |
approx. 2.6 kg |
Pole pruner: |
FHE 1 |
Weight (ready for use): |
approx. 1.6 kg |
Recommended fill level (oil tank)100 ml |
|
Cut length: |
approx. 260 mm |
Blade: |
Oregon Type 91 100SDEA041 |
Saw chain |
Oregon 91P040X |
|
Oregon 91P040E |
Hedge trimmer |
FHS 1 |
Idle speed: |
2000 min-1 |
Cut length: |
410 mm |
Tooth spacing: |
20 mm |
Weight (ready for use): |
approx. 2.1 kg |
Noise and vibration data:
The A-rated noise level of the power tool is typically as follows:
Pole pruner: |
FHE 1 |
|
Sound pressure level: |
88.18 |
dB(A) |
Uncertainty K: |
3 |
dB |
Sound power level: |
100.63 |
dB(A) |
Uncertainty K: |
3 |
dB |
Hedge trimmer |
FHS 1 |
|
Sound pressure level: |
87.08 |
dB(A) |
Uncertainty K: |
3 |
dB |
Sound power level: |
98.37 |
dB(A) |
Guaranteed |
|
|
sound power level: |
102 |
dB(A) |
Uncertainty K: |
3 |
dB |
Vibration values (vector total of three directions) determined in accordance |
|
with EN 60745 |
GB |
Pole pruner:
Vibration at the front handle: Vibration emission value
ah,D = 1.018 m/s2 Uncertainty K = 1.5 m/s2
Vibration at the rear handle: Vibration emission value
ah,D = 1.213 m/s2 Uncertainty K = 1.5 m/s2
Hedge trimmer
Vibration at the front handle: Vibration emission value
ah,D = 1.447 m/s2 Uncertainty K = 1.5 m/s2
Vibration at the rear handle: Vibration emission value
ah,D = 1.773 m/s2 Uncertainty K = 1.5 m/s2
Wear hearing protection!
NOTE
►The vibration level specified in these instructions has been measured in accordance with a standardised measuring procedure specified in EN 60745 and can be used to make equipment comparisons. The specified vibration emission value can also be used to make an initial exposure estimate.
 WARNING!
►The vibration level varies in accordance with the use of the power tool and may be higher than the value specified in these instructions in some cases. There is a risk of underestimation of the vibration load if the power tool is used regularly in this manner. For an accurate estimate of the vibration load during a specific working period, the periods during which the appliance is switched o or is running but not actually being used must also be taken into consideration. This can significantly reduce the vibration load over the total working period.
Explanation of symbols on the appliance!
Read the operating instructions and safety advice before initial operation.
Wear protective gloves!
Wear safety shoes!
Wear ear protection!
Wear a hard hat!
Wear protective glasses!
FHEHS 900 A1 |
3 |

GB |
Keep bystanders away from the appliance! |
Protect the appliance against rain or moisture!
Risk of fatal electrical shock! Keep at least 10 m away from overhead power lines!
Attention! Falling objects.
Especially when cutting above head height.
Attention! Risk of injury due to running blades!
Unplug the appliance immediately if the cable is damaged or has been cut.
Sound power level LWA data in dB.
3. Personal safety
a)Stay alert, watch what you are doing and use common sense when operating a power tool. Do not use a power tool while you are tired or under the influence of drugs, alcohol or medication. A moment of inattention while operating power tools may result in serious personal injury.
b)Use personal protective equipment. Always wear eye protection. Protective equipment such as dust mask, non-skid safety shoes, hard hat, or hearing protection used for appropriate conditions will reduce personal injuries.
c)Prevent unintentional starting. Ensure the switch is in the o position before connecting to a power source and/or battery pack, picking up or carrying the tool. Carrying power tools with your finger on the switch or energising power tools that have the switch on invites accidents.
d)Remove any adjusting key or wrench before turning the power tool on. A wrench or a key left attached to a rotating part of the power tool may result in personal injury.
e)Do not overreach. Keep proper footing and balance at all times.
This enables better control of the power tool in unexpected situations.
f)Dress properly. Do not wear loose clothing or jewellery. Keep your hair, clothing and gloves away from moving parts. Loose clothes, jewellery or long hair can be caught in moving parts.
g)If devices are provided for the connection of dust extraction and collection facilities, ensure these are connected and properly used.
Use of dust collection systems can can reduce dust-related hazards.
General Power tool
Safety Warnings
 WARNING!
►Read all safety warnings and all instructions. Failure to follow the warnings and instructions may result in electric shock, fire and/or serious injury.
Save all warnings and instructions for future reference.
The term "power tool" in the warnings refers to your mains-operated (cable) power tools or battery-operated (cableless) power tool.
1. Work area safety
a)Keep work area clean and well lit. Cluttered or dark areas invite accidents.
b)Do not operate power tools in explosive atmospheres, such as in the presence of flammable liquids, gases or dust. Power tools create sparks which may ignite the dust or fumes.
c)Keep children and bystanders away while operating a power tool.
Distractions can cause you to lose control.
2. Electrical safety
a)Power tool plugs must match the outlet. Never modify the plug in any way. Do not use any adapter plugs with earthed (grounded) power tools.
Unmodified plugs and matching outlets will reduce risk of electric shock.
b)Avoid body contact with earthed or grounded surfaces, such as pipes, radiators, ranges and refrigerators. There is an increased risk of electric shock if your body is earthed or grounded.
c)Do not expose power tools to rain or wet conditions. Water entering a power tool will increase the risk of electric shock.
d)Do not abuse the cord. Never use the cord for carrying, pulling or unplugging the power tool. Keep cord away from heat, oil, sharp edges or moving parts. Damaged or entangled cords increase the risk of electric shock.
e)When operating a power tool outdoors, use an extension cable suitable for outdoor use. Use of a cable suitable for outdoor use reduces the risk of electric shock.
f)If operating a power tool in a damp location is unavoidable, use a residual current device (RCD) protected supply. Use of an RCD reduces the risk of electric shock.
4. Power tool use and care
■Do not overload the appliance. Use the correct power tool for your application. The correct power tool will do the job better and safer at the rate for which it was designed.
■Never use an electrical hand hand tool that has a defective switch.
Any power tool that cannot be controlled with the switch is dangerous and must be repaired.
■Disconnect the plug from the power source and/or the battery pack from the power tool before making any adjustments, changing accessories, or storing power tools. Such preventive safety measures reduce the risk of starting the power tool accidentally.
■Store unused electrical hand tools out of the reach of children. Do not allow persons unfamiliar with the power tool or these instructions to operate the power tool. Power tools are dangerous in the hands of untrained users.
■Maintain power tools. Check for misalignment or binding of moving parts, breakage of parts and any other condition that may a ect the power tool’s operation. If damaged, have the power tool repaired before use. Many accidents are caused by poorly maintained power tools.
■Keep cutting tools sharp and clean. Properly maintained cutting tools with sharp cutting edges are less likely to bind and are easier to control.
■Use the power tool, accessories and tool bits etc. in accordance with these instructions, taking into account the working conditions and the work to be performed. Use of the power tool for operations di erent from those intended could result in a hazardous situation.
■Inspect the surface to be cut carefully and remove any wires or other obstructions.
■Hold the power tool only by the insulated grips as the cutting blades could come into contact with hidden power lines or the appliance’s own power cord. Contact between the blades and a live wire may make exposed metal parts of the power tool live and could give the operator an electric shock.
5. Service
a)Have your power tool serviced by a qualified repair person using only identical replacement parts. This will ensure that the safety of the power tool is maintained.
4 |
FHEHS 900 A1 |
|

Appliance-specific safety instructions for hedge trimmers
■Keep your hands away from the cutting blades. Do not attempt to clear cuttings or hold onto the material to be cut while the blades are still in motion. Remove any jammed clippings only when the appliance has been switched o . Also remove the plug from the power socket.
A moment of inattention while operating the hedge trimmer may result in serious personal injury.
■Carry the hedge trimmer by the front handle when switched o , the cutter bar facing away from your body. When transporting or storing the trimmer always put on the protective cover. Careful handling of the appliance reduces the likelihood of accidental contact with the moving blades.
■Hold the power tool only by the insulated grips as the cutting blades could come into contact with hidden power lines or the appliance’s own power cord. Contact between the blades and a live wire may make exposed metal parts of the power tool live and could give the operator an electric shock.
■Keep the cable out of the cutting area. While working, the cable can be hidden in the bushes and be accidentally cut.
NOTE
►The hedge trimmer is supplied completely assembled.
►Graphical representations illustrating the usage of the hedge trimmer and its operating controls can be found on the fold-out page.
►Notes and graphical representations on the settings, maintenance and user lubrication can be found in this guide.
►Notes on the working position (see fold-out page)
►Notes on the operating controls (see fold-out page)
►Notes on exchange and repair (see section Maintenance and cleaning/service).
►Explanation of all graphical symbols used on the hedge trimmer and technical data can be found in this guide.
►The features of the hedge trimmer can be found in the technical data.
► Blocked tool: remove any blockages from the cutter bar .
 ATTENTION!
►In the event of imminent danger or an emergency switch o the motor immediately and unplug the appliance.
Complementary safety instructions for hedge |
|
trimmers |
GB |
■RISK OF ELECTRIC SHOCK! When working outdoors, connect the appliance via a fault current circuit breaker with a maximum tripping current of 30 mA. Use only an extension cord approved for outdoor use. Hold the hedge trimmer firmly with both hands on the handles provided.
■Wait until the power tool has come to a standstill before putting it down.
■During operation, no other person or animal may be within a radius of 3 metres. The operator is responsible for third parties within the working area.
■Never extend the hedge trimmers while anybody, especially children or pets, is in the immediate vicinity.
■The operator or user is responsible for accidents or damage to other people or their property.
■ Never grasp the hedge trimmer by the cutter bar .
■Never use the hedge trimmer while barefoot or while wearing open sandals. Always wear sturdy footwear and long trousers. Wear heavy gloves, non-slip shoes and safety glasses. Do not wear loose clothing or jewellery that could get caught in moving parts.
■While trimming, ensure that you do not come into contact with objects such as fence wire or plant supports. They could cause damage to the
cutter bar . Inspect the hedge to be cut carefully and remove any wires or other foreign bodies.
■Before use, always check whether the blades, the blade screws and other parts of the cutting tool are not worn or damaged. Never work with a damaged or heavily worn blade.
■Acquaint yourself with the operation of the hedge trimmer so that you know how to stop immediately in an emergency.
■After making settings to the working angle, check whether both setting levers are clicked firmly into place. If one of the setting levers remains
open, the second could be unintentionally be released by a branch and the cutter bar  could swing down.
■Only operate the hedge trimmer in daylight or good artificial light.
■Never use the hedge trimmer with defective or missing safety guards.
■Ensure that all supplied handles and safety guards are mounted when operating the hedge trimmer. Never attempt to operate an incompletely assembled hedge trimmer or a hedge trimmer with non-approved modifications.
■Never grasp the hedge trimmer by the safety guards.
■During operation, ensure that you have proper footing and balance at all times, especially when used on steps or ladders.
■Be aware of your environment and all possible hazards that you may be unable to hear while cutting the hedge.
NOTE
►Remove the plug from the power socket:
–before checking, removing a blockage or working on the trimmer.
–after hitting a foreign object. Check the hedge trimmer immediately for damage and have it repaired if necessary.
–if the hedge trimmer exhibits unusual vibrations. Check the hedge trimmer immediately for damage or loose components and have it repaired if necessary.
■Store the hedge trimmer in a dry, high or closed space out of the reach of children.
■For safety's sake, change worn or damaged parts.
■Do not attempt to repair the equipment unless you have received the necessary training.
FHEHS 900 A1 |
5 |
Appliance-specific safety instructions for pole GB pruners
■Always wear a hard hat, hearing protection and safety gloves. Also wear eye protection to prevent splashes of oil or saw dust from falling into your eyes. Wear a dust mask to protect yourself from dust.
■Never use the appliance while standing on a ladder.
■Do not lean too far forwards while using the appliance. Ensure you are standing firmly and keep your balance at all times. Use the supplied carrying strap to spread the weight evenly on the body.
■Wear sturdy, non-slip boots.
■Do not use the appliance in the rain.
■Do not use the appliance near overhead power lines. Ensure a minimum distance of 10 m to overhead power lines.
■Do not stand under the branches that you want to cut o , to avoid injuries due to falling branches. Be aware of branches that may spring back, to avoid injuries. Work at an angle of approximately 60°.
■Be aware that the appliance can kick back.
■Keep an eye not only on the branches being cut, but also on falling material, to avoid tripping.
■After 30 minutes' work, take a break of at least one hour.
■Always wear safety gloves.
■Disconnect the appliance from the power supply in the event of a faulty power cord, after completion of the work or for cleaning.
■Cover the guide rail and the chain during transport during transport and storage using the cover.
■Do not use the appliance in a potentially explosive environment containing flammable liquids, gases or dusts. The sparks generated by the machine could ignite the vapours or gases.
■The power outlet used must be suitable for the plug. To avoid electrical shocks, never try to modify the plug.
■Never remove the plug from the power supply by pulling on the power cord. Always pull the plug itself. Do not drag or carry the appliance using the power cord. Keep power cord away from heat, oil, sharp edges or moving parts.
■Avoid unintentional starting of the appliance.
■Appliances with defective switches must be repaired immediately to avoid damage or injuries.
■Store the appliance outside of the reach of children. Only those who are fully acquainted with the operator's manual and the appliance itself may operate the appliance.
■Maintain power tools carefully. Check for misalignment or binding of moving parts, breakage of parts and any other condition that may a ect the power tool’s operation. If damaged, have the power tool repaired before use. Many accidents are caused by poorly maintained power tools.
■Keep cutting tools sharp and clean. Properly maintained cutting tools with sharp cutting edges are less likely to bind and are easier to control.
■Therefore, have the appliance checked by qualified specialists. Use only the replacement parts recommended by the manufacturer.
Precautions against kickback
 CAUTION KICKBACK!
►Be aware of the danger of kickback when working with the appliance. There is a risk of personal injury. You can avoid kickbacks by being careful and using the correct sawing technique.
■Contact with the tip of the rail can, in some cases, lead to an unexpected rearwards reaction resulting in the guide rail flying upwards towards the operator (see Fig. A).
Bild 1 |
Fig. A
■Kickbacks can occur if the tip of the guide rail touches an object or if the wood bends and the saw chain gets caught in the cut (see Fig. B).
Fig. B
■If the saw chain jams in the upper edge of the guide rail, the rail can kick back violently towards the operator.
■Any such reaction can lead to you losing control over the saw and possibly injuring yourself. Do not rely solely on the chainsaw's built-in safety devices. As the user of a chainsaw, you can take a number
of measures to avoid accidents and injury. A kickback is caused by incorrect use or misuse of the power tool. It can be avoided by taking proper precautions as given below.
■Hold the saw firmly with both hands, with your thumb and finger around the handles of the chainsaw. Hold your body and arms in a position in which you can withstand kickback forces. If suitable measures are taken, the operator can control the recoil forces. Never let go of the chainsaw.
■Avoid an abnormal posture and do not saw above shoulder height.
This will prevent inadvertent contact with the tip of the rail and allows a better control of the chainsaw in unexpected situations.
■Always use the replacement rails and saw chains specified by the manufacturer. Incorrect replacement rails and saw chains can lead to a tearing of the saw chain and/or kickback.
■Follow the manufacturer's instructions for sharpening and maintenance of the saw chain. Setting the depth stop too low can increase the risk of kickback.
■Do not saw with the tip of the blade. This can lead to a kickback.
■Ensure that there are no objects on the ground that you can trip over.
6 |
FHEHS 900 A1 |
|
Further safety instructions
 CAUTION! RISK OF INJURY!
►To prevent injuries, do not touch the appliance above the protective ring  while the appliance is running.
■Children should be supervised to ensure that they do not play with the appliance.
■It is necessary to have training before the usage of this tool.
■Damaged power cords, connectors and plugs or non-compliant extension leads may not be used. If the mains cable is damaged or cut, unplug the appliance from the mains immediately.
■Do not work with a damaged or incomplete appliance or an appliance that has been modified without the consent of the manufacturer. Never use the unit with defective protective equipment. Do not use the appliance if it has a defective on/o switch. Before use, check the security state of the appliance, especially the blade and the saw chain. If the appliance has been dropped, check for significant damage or defects.
■Never start the appliance before the blade, saw chain and sprocket covers have been fitted correctly.
■When starting and operating the appliance, ensure that it does not come into contact with the ground, stones, wire, other foreign material. Switch the appliance o before you put it down.
■Do not cut any wood that is lying on the ground and do not attempt to saw roots that are protruding from the soil. Avoid immersing the saw chain in the soil at all costs, as this could blunt the saw chain.
Original accessories/auxiliary equipment
■Use only the additional equipment and accessories detailed in the operating instructions. The use of tools and accessories other than those recommended in the operating instructions could lead to an increased risk of personal injury for you.
Before initial use
 CAUTION! RISK OF INJURY!
►Before any work on the appliance, disconnect the plug. Danger of electrical shocks.
Motor unit
Attaching the round handle
♦ |
Place the round handle |
in the desired position on the boom . |
♦ |
Tighten the screw . |
|
Fitting the quick release mechanism
♦Hook in the carabiner and secure it with the red strap on the quick
release mechanism (see figures). Pull on the red strap if you have to release the appliance quickly.
Fixing/attaching the shoulder strap
♦ Hook the shoulder strap  into the carrying eyelet .
♦Adjust the length of the shoulder strap  to your size so that carrying eyelet
  is at hip height when hooked in place.
Mounting the hedge trimmer
♦ |
Push the front boom |
of the hedge trimmer to the boom of the |
GB |
|
motor unit. |
|
|
♦ |
The locking pin must engage. |
|
|
♦ |
Secure the two booms |
with the tommy screw ; to do this, fit |
|
|
the nut on the opposite side. |
|
|
Mounting the pole pruner
♦Push the front boom  of the pole pruner to the boom
  of the motor unit.
♦The locking pin  must engage.
♦ Secure the two booms  with the tommy screw ; to do this, fit the nut
  on the opposite side.
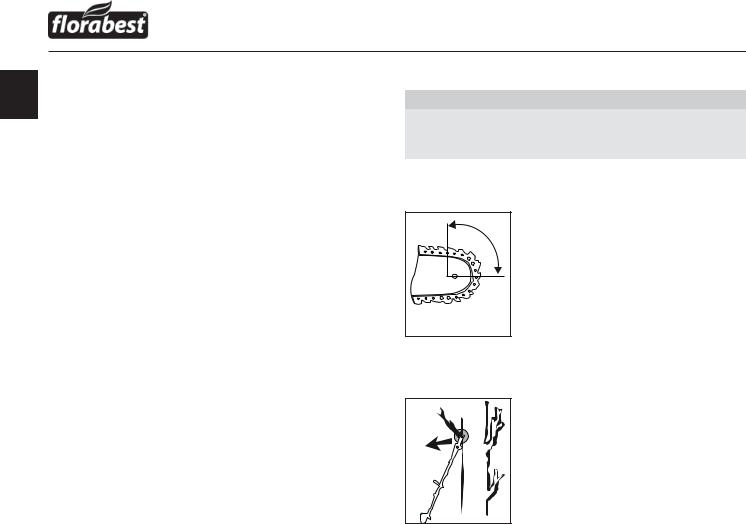
Swivelling the hedge trimmer
♦ Release the lock/release .
♦Press the control lever  and swivel the hedge trimmer into the desired position.
♦Allow the control lever  and the locking/release
  to click into the
recess in the base plate (hedge trimmer) .
Swivelling the pole pruner
♦ Release the lock/release .
♦Press the control lever  and swivel the pole pruner into the desired position.
♦Allow the control lever  and the locking/release
  to click into the
recess in the base plate (pole pruner) .
Mounting the saw chain and blade
 WARNING!
►Wear protective gloves! There is a danger of injury from the sharp cutting teeth.
NOTE
► Pay close attention to the running direction of the saw chain  on the blade
  and at the sprocket cover .
►The blade  and the saw chain
  are already installed on delivery.
►Depending of wear and tear, the blade  can be turned.
♦ |
Loosen the nut |
with the mounting tool . |
|
|
♦ |
Remove the sprocket cover . |
|
||
♦ |
You may have to relax the saw chain to remove the blade |
|||
|
and the saw chain |
. (see section Tightening and checking the saw |
||
|
chain). Follow these instructions in reverse order. |
|||
♦ |
Remove the blade |
with the saw chain |
from the base plate . |
|
♦ |
Reset the saw chain |
starting at the top of the blade . |
||
♦ |
Lay the guide rail |
over the blade guide |
, while inserting the chain |
|
|
tensioner pin |
in the blade hole . At the same time, lay the saw |
||
chain  over the chain sprocket .
♦Now you can tighten the saw chain  (see section Tightening and checking the saw chain).
♦Replace the sprocket cover and tighten the nut
  gently.
FHEHS 900 A1 |
7 |
Tightening and checking the saw chain
GB  WARNING!
►Wear protective gloves! There is a danger of injury from the sharp cutting teeth.
♦Turn the chain tensioner screw  with the mounting tool
  in a clockwise direction to increase the tension.
♦The saw chain  must lie against the underside of the blade. Check
whether the saw chain  can be drawn by hand over the blade .
NOTE
► A new saw chain  stretches and must be tightened more regularly.
Lubricating the chain
♦ |
Remove the oil filler cap . |
♦ |
Fill the oil tank with approx. 100 ml of organic chain oil . |
 WARNING!
►Never work without chain lubrication!
If the saw chain runs dry, the cutting equipment may become irreparably damaged in a short time. Always check chain lubrication and oil level in the tank before starting work.
NOTE
►Use only saw chain oil. Preferably biodegradable. Do not use waste oil, motor oil, etc.
►While working, check whether the automatic chain lubrication is working correctly. Check the chain lubricator before and during work.
Initial use
NOTE
►Comply with regulations regarding noise protection and local rules. Using the appliance on certain days (e.g. on Sundays and public holidays), during certain times (midday period, night time) or in certain locations (e.g. health resorts, clinics, etc.) may be restricted or prohibited.
Switching on and o
Switching on:
♦Connect the power cord  to the extension cable.
♦Form a loop at the end of the extension cable and attach this to the
strain relief |
. |
♦ |
Press the safety lock-out |
and keep it pressed and then press the |
|
on/o switch . |
|
Switching o : |
|
|
♦ |
Release the on/o switch . |
|
♦ |
Remove the extension cable from the strain relief . |
|
♦ |
Disconnect the power cord |
from the extension cable. |
Adjusting the handle
♦ Press the release button |
. |
♦ Turn the turning element to the desired position. Let go of the release button ; this must click into place.
Sharpening the saw chain
NOTE
►A grinder can be attached to the grinder support  for a secure grip during grinding.
►You will find detailed information on sharpening in the sharpening set, e.g. from Oregon.
►Alternatively, you can use an electrical saw chain sharpening device and follow the instructions of the manufacturer.
►If you have any doubts about implementing the work, the saw chain should be replaced.
Working with the hedge trimmer
Cutting techniques
■ See fold-out page (Figure A).
NOTE
► Remove thicker branches with a branch cutter.
Working with the pole pruner
Sawing techniques
 WARNING!
►Pay attention to falling clippings.
►Be aware of the danger of branches flying back.
NOTE
►Place the stop  on the branch. This will help you work more safely and quietly.
►Only then can you begin with the sawing.
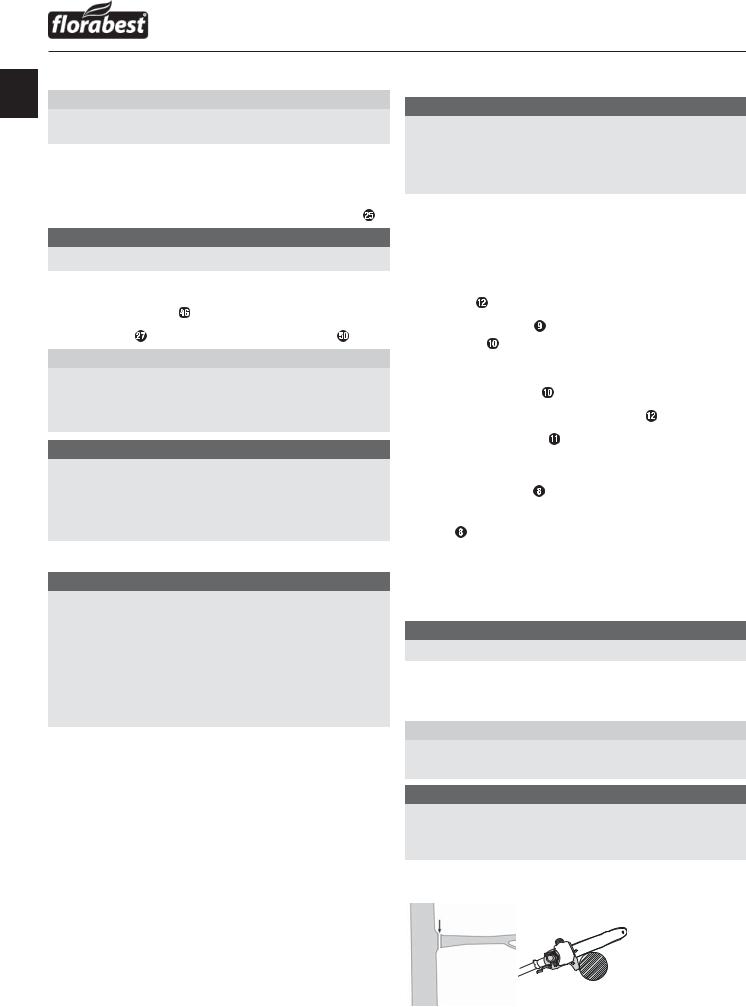
Sawing o small branches
♦ Saw small branches (Ø 0–8 cm) from the top down (see figure).
8 |
FHEHS 900 A1 |
|
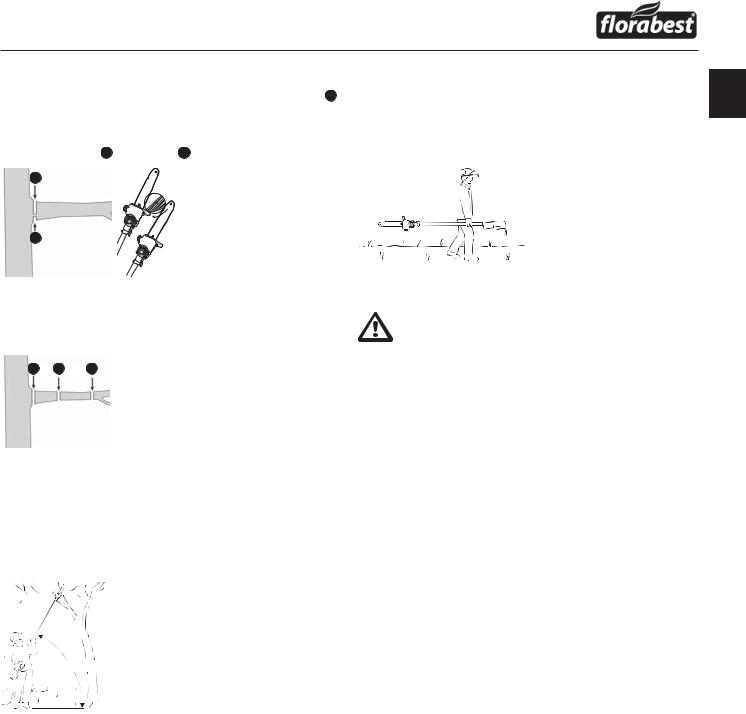
♦Sawing o larger branches
♦When sawing larger branches (Ø 8–25 cm), first make a relief cut A (see figure).
■ A relief cut also prevents peeling of the bark on the main trunk.
♦ Saw from the top B to the bottom A .
B
2
1
A
Saw in sections.
Long or thick branches should be shortened before making the final cut (see figure).
Cc |
bB |
Aa |
Working safely
■Keep the appliance, the cutting mechanism and the protective cover for the blade  in good condition to prevent injury.
■If the appliance has been dropped, check for significant damage or defects.
■Maintain the specified angle 60°±10° to ensure safe working (see figure).
max. 60°±10° |
■Do not use the appliance while standing on a ladder or with unsteady footing.
■Do not be tempted into making a poorly considered cut. You could endanger yourself and others.
■Children should be supervised to ensure that they do not play with the appliance.
■Change your working position regularly. Using the appliance for a long time can lead to vibration-related circulation disorders of the hands. You can extend the usage duration by means of appropriate gloves or by taking regular breaks. Note that any personal predisposition to poor blood circulation, low external temperatures or large prehensile forces can reduce the usage period.
Transport
GB
■Use the protective cases 
 for transporting the appliance.
■Ensure that the appliance cannot switch on during transport (see figure).
Maintenance and cleaning
WARNING! If the connecting cable needs to be replaced, this must be carried out by the manufacturer or his representative in order to avoid safety hazards.
■The motor unit must always be kept clean, dry and free from oil or grease.
■The pole pruner must be cleaned of sawdust at regular intervals.
♦Use a soft, dry cloth to clean the housing.
♦Remove the sprocket cover  .
.
♦Remove the saw chain  from the blade
  and clean the guide rail
  .
.
♦Keep the saw chain  sharp and check the tension; check the oil level and the oil supply.
♦Check the hedge trimmer for loose screws on the cutter bar  and tighten these if necessary.
♦Remove stuck cuttings.
♦Maintain the cutter bar  with an oil spray or an oil can.
Storage
■Always clean the appliance thoroughly before storing.
■Store the appliance in its protective cases 
 in a dry place and out of the reach of children.
■Store the appliance horizontally or secured against falling.
■Empty the oil tank  .
.
■Organic chain oil  can resinify or leak through the vent hole in the oil filler cap
  .
.
FHEHS 900 A1 |
9 |

Troubleshooting: pole pruner
GB |
|
|
|
|
Problem |
Possible cause |
Troubleshooting |
||
|
||||
|
|
|
|
|
|
Motor is running, |
Hedge trimmer attachment |
Check assembly |
|
|
saw chain |
or pole pruner attachment |
|
|
|
does not move |
is not connected properly |
|
|
|
|
to the motor unit |
|
|
|
No progress |
Saw chain dry/ |
Top up with oil or |
|
|
|
overheating or is |
grind, replace or |
|
|
|
hanging down |
tighten the saw |
|
|
|
|
chain |
Troubleshooting: hedge trimmer
Problem |
Possible cause |
Troubleshooting |
|
|
|
Motor is running, |
Hedge trimmer attachment |
Check assembly |
blades do not |
or pole pruner attachment |
|
move |
is not connected properly |
|
|
to the motor unit |
|
|
|
|
Maintenance intervals: pole pruner
The figures given here are based on normal operating conditions. In the event of more di cult conditions, such as strong dust generation and longer daily working hours, the given intervals are to be reduced correspondingly.
Appli- |
Action |
Before |
Weekly |
In the |
In the |
As re- |
ance |
|
starting |
|
event |
event |
quired |
part |
|
work |
|
of |
of dam- |
|
|
|
|
|
faults |
age |
|
|
|
|
|
|
|
|
Lubricat- |
check |
|
|
|
|
|
ing the |
|
X |
|
|
|
|
chain |
|
|
|
|
|
|
|
|
|
|
|
|
|
Saw |
check |
|
|
|
|
|
chain |
and note |
X |
|
|
|
|
|
sharpness |
|
|
|
|
|
|
check |
|
|
|
|
|
|
chain |
X |
|
|
|
|
|
tension |
|
|
|
|
|
|
|
|
|
|
|
|
|
sharpen |
|
|
|
|
X |
|
|
|
|
|
|
|
Guide |
check |
|
|
|
|
|
rail |
(wear, |
X |
|
|
|
|
|
damage) |
|
|
|
|
|
|
clean |
|
X |
X |
|
|
|
and turn |
|
|
|
||
|
|
|
|
|
|
|
|
|
|
|
|
|
|
|
deburr |
|
X |
|
|
|
|
|
|
|
|
|
|
|
replace |
|
|
|
X |
X |
|
|
|
|
|
|
|
Sprocket |
check |
|
X |
|
|
|
|
|
|
|
|
|
|
|
replace |
|
|
|
|
X |
|
|
|
|
|
|
|
Maintenance intervals: hedge trimmer
The figures given here are based on normal operating conditions. In the event of more di cult conditions, such as strong dust generation and longer daily working hours, the given intervals are to be reduced correspondingly.
Appli- |
Action |
Before |
After |
As re- |
ance |
|
starting |
com- |
quired |
part |
|
work |
pletion |
|
|
|
|
of work |
|
|
|
|
|
|
Cutting |
visual inspection |
X |
|
|
blades |
|
|
|
|
clean |
|
X |
X |
|
|
|
|||
|
|
|
|
|
Warranty
You are provided a 3-year warranty on this appliance, valid from the date of purchase. This appliance has been manufactured with care and inspected meticulously prior to delivery. Please retain your receipt as proof of purchase. In the event of a warranty claim, please contact your Customer Service unit by telephone. This is the only way to guarantee free return of your merchandise.
The warranty only covers claims for material and manufacturing defects, not for damage sustained during carriage, components subject to wear and tear or damage to fragile components such as switches or batteries. This appliance is intended solely for domestic, not commercial, use.
The warranty shall be deemed void in the case of misuse or improper handling, use of force or interventions which were not carried out by one of our authorised Service centres. Your statutory rights are not restricted by this warranty.
The warranty period is not prolonged by repairs made under the warranty. This also applies to replaced and repaired components. Any damage or defects present at the time of purchase must be reported immediately after unpacking, but no later than two days after the date of purchase. Repairs carried out after expiry of the warranty period shall be subject to charge.
10 |
FHEHS 900 A1 |
|

Service
 WARNING!
►Have the power tool repaired by the Service centre or a qualified electrician and only using genuine replacement parts. This will ensure the ongoing safety of the appliance.
►Always ensure that the power plug or the mains cable is replaced only by the manufacturer of the appliance or by that party's approved Customer Service unit. This will ensure the ongoing safety of the appliance.
 Service Great Britain
Tel.: 0871 5000 720 (£ 0.10/Min.)
E-Mail: kompernass@lidl.co.uk
IAN 102878
Hotline availability: Monday to Friday 08:00 - 20:00 (CET)
Importer
KOMPERNASS HANDELS GMBH
BURGSTRASSE 21
44867 BOCHUM
GERMANY
www.kompernass.com
Disposal
GB
The packaging is made from environmentally friendly material and can be disposed of at your local recycling plant. The appliance and its accessories are made from various materials, such as metal and plastic.
Your local community or municipal authorities can provide information on how to dispose of the worn-out appliance.
Environmental protection
■Carefully empty the oil tank  and dispose of your appliance at a recycling plant. The plastic and metal parts used can be separated and recycled. Ask our Service Center for more information.
■Dispose of waste oil at a waste collection centre, do not dump it into the sewerage or drainage system.
■Dispose of contaminated maintenance material and working materials at a collection point provided for this purpose.
Do not dispose of power tools in normal domestic waste!
European Directive 2012/19/EU requires that worn-out power tools be collected separately and recycled in an environmentally compatible manner.
Replacement parts
Replacement parts can be ordered directly from the service centre. Please provide the following details when making an order: machine type and part number.
FHEHS 900 A1 |
11 |

Translation of the original Conformity GB Declaration
We, KOMPERNASS HANDELS GMBH, Custodian of Documents: Mr. Semi Uguzlu, BURGSTR. 21, 44867 BOCHUM, GERMANY, hereby declare that this appliance complies with the following standards, normative documents and EC directives:
Machinery Directive (2006/42/EC)
EC Low Voltage Regulations (2006/95/EC)
EMC (Electromagnetic Compatibility) (2004/108/EC)
Noise Emission Directive (2000/14/EC)
RoHS Directive (2011/65/EU)
Applied harmonised standards:
EN 60745-1: 2009+A11
EN ISO 10517: 2009+A1
EN ISO 11680-1: 2011
EN 55014-1: 2006+A1+A2
EN 55014-2: 1997+A1+A2
EN 61000-3-2: 2006+A1+A2
EN 61000-3-3: 2013
Type/appliance designation:
2-in-1 Long-Reach Hedge Trimmer / Pruner FHEHS 900 A1
Year of manufacture: 11 - 2014
Serial number: IAN 102878
Bochum, 08/07/2014
Semi Uguzlu
- Quality Manager -
The right to e ect technical changes in the context of further development is reserved.
12 |
FHEHS 900 A1 |
|

Kazalo
SI
Uvod . . . . . . . . . . . . . . . . . . . . . . . . . . . . . . . . . . . . . . . . . . . . . . . . . . . . . . . . . . . . . . . . . . . . . . . . . . . . . . . . . . . . . . . . . 14
Predvidena uporaba obrezovalnik za živo mejo z dolgim ročajem . . . . . . . . . . . . . . . . . . . . . . . . . . . . . . . . . . . . . . . . . . . . . . . . . . . . . . . . 14 Predvidena uporaba obrezovalnika za veje . . . . . . . . . . . . . . . . . . . . . . . . . . . . . . . . . . . . . . . . . . . . . . . . . . . . . . . . . . . . . . . . . . . . . . . . . . 14 Predvidena uporaba . . . . . . . . . . . . . . . . . . . . . . . . . . . . . . . . . . . . . . . . . . . . . . . . . . . . . . . . . . . . . . . . . . . . . . . . . . . . . . . . . . . . . . . . . . . . 14 Oprema . . . . . . . . . . . . . . . . . . . . . . . . . . . . . . . . . . . . . . . . . . . . . . . . . . . . . . . . . . . . . . . . . . . . . . . . . . . . . . . . . . . . . . . . . . . . . . . . . . . . . . 14 Vsebina kompleta . . . . . . . . . . . . . . . . . . . . . . . . . . . . . . . . . . . . . . . . . . . . . . . . . . . . . . . . . . . . . . . . . . . . . . . . . . . . . . . . . . . . . . . . . . . . . . 15 Tehnični podatki. . . . . . . . . . . . . . . . . . . . . . . . . . . . . . . . . . . . . . . . . . . . . . . . . . . . . . . . . . . . . . . . . . . . . . . . . . . . . . . . . . . . . . . . . . . . . . . . 15
Splošni varnostni napotki za električna orodja . . . . . . . . . . . . . . . . . . . . . . . . . . . . . . . . . . . . . . . . . . . . . . . . . . . . . . 16
1. Varstvo pri delu . . . . . . . . . . . . . . . . . . . . . . . . . . . . . . . . . . . . . . . . . . . . . . . . . . . . . . . . . . . . . . . . . . . . . . . . . . . . . . . . . . . . . . . . . . . . . . 16 2. Električna varnost . . . . . . . . . . . . . . . . . . . . . . . . . . . . . . . . . . . . . . . . . . . . . . . . . . . . . . . . . . . . . . . . . . . . . . . . . . . . . . . . . . . . . . . . . . . . 16 3. Varnost oseb . . . . . . . . . . . . . . . . . . . . . . . . . . . . . . . . . . . . . . . . . . . . . . . . . . . . . . . . . . . . . . . . . . . . . . . . . . . . . . . . . . . . . . . . . . . . . . . . 16 4. Uporaba in ravnanje z električnim orodjem . . . . . . . . . . . . . . . . . . . . . . . . . . . . . . . . . . . . . . . . . . . . . . . . . . . . . . . . . . . . . . . . . . . . . . . . 16 5. Servis. . . . . . . . . . . . . . . . . . . . . . . . . . . . . . . . . . . . . . . . . . . . . . . . . . . . . . . . . . . . . . . . . . . . . . . . . . . . . . . . . . . . . . . . . . . . . . . . . . . . . . 17 Posebni varnostni napotki za obrezovalnike za živo mejo . . . . . . . . . . . . . . . . . . . . . . . . . . . . . . . . . . . . . . . . . . . . . . . . . . . . . . . . . . . . . . . 17 Dodatni varnostni napotki za obrezovalnike za živo mejo . . . . . . . . . . . . . . . . . . . . . . . . . . . . . . . . . . . . . . . . . . . . . . . . . . . . . . . . . . . . . . . 17 Posebni varnostni napotki za obrezovalnike za veje . . . . . . . . . . . . . . . . . . . . . . . . . . . . . . . . . . . . . . . . . . . . . . . . . . . . . . . . . . . . . . . . . . . . 18 Previdnostni ukrepi proti vzvratnemu udarcu . . . . . . . . . . . . . . . . . . . . . . . . . . . . . . . . . . . . . . . . . . . . . . . . . . . . . . . . . . . . . . . . . . . . . . . . . . 18 Osnovni varnostni napotki . . . . . . . . . . . . . . . . . . . . . . . . . . . . . . . . . . . . . . . . . . . . . . . . . . . . . . . . . . . . . . . . . . . . . . . . . . . . . . . . . . . . . . . . 19 Originalni pribor/dodatne priprave . . . . . . . . . . . . . . . . . . . . . . . . . . . . . . . . . . . . . . . . . . . . . . . . . . . . . . . . . . . . . . . . . . . . . . . . . . . . . . . . 19
Pred prvo uporabo . . . . . . . . . . . . . . . . . . . . . . . . . . . . . . . . . . . . . . . . . . . . . . . . . . . . . . . . . . . . . . . . . . . . . . . . . . . . . 19
Enota motorja . . . . . . . . . . . . . . . . . . . . . . . . . . . . . . . . . . . . . . . . . . . . . . . . . . . . . . . . . . . . . . . . . . . . . . . . . . . . . . . . . . . . . . . . . . . . . . . . . 19 Montaža okroglega ročaja . . . . . . . . . . . . . . . . . . . . . . . . . . . . . . . . . . . . . . . . . . . . . . . . . . . . . . . . . . . . . . . . . . . . . . . . . . . . . . . . . . . . . . . 19 Montaža mehanizma za hitro sprostitev . . . . . . . . . . . . . . . . . . . . . . . . . . . . . . . . . . . . . . . . . . . . . . . . . . . . . . . . . . . . . . . . . . . . . . . . . . . . . 19 Pritrditev/montaža ramenskega pasu . . . . . . . . . . . . . . . . . . . . . . . . . . . . . . . . . . . . . . . . . . . . . . . . . . . . . . . . . . . . . . . . . . . . . . . . . . . . . . . 19 Montaža obrezovalnika za živo mejo. . . . . . . . . . . . . . . . . . . . . . . . . . . . . . . . . . . . . . . . . . . . . . . . . . . . . . . . . . . . . . . . . . . . . . . . . . . . . . . 19 Montaža obrezovalnika za veje . . . . . . . . . . . . . . . . . . . . . . . . . . . . . . . . . . . . . . . . . . . . . . . . . . . . . . . . . . . . . . . . . . . . . . . . . . . . . . . . . . . 19 Nagibanje obrezovalnika za živo mejo . . . . . . . . . . . . . . . . . . . . . . . . . . . . . . . . . . . . . . . . . . . . . . . . . . . . . . . . . . . . . . . . . . . . . . . . . . . . . 19 Nagibanje obrezovalnika za veje . . . . . . . . . . . . . . . . . . . . . . . . . . . . . . . . . . . . . . . . . . . . . . . . . . . . . . . . . . . . . . . . . . . . . . . . . . . . . . . . . . 19 Montaža verige žage in žaginega lista . . . . . . . . . . . . . . . . . . . . . . . . . . . . . . . . . . . . . . . . . . . . . . . . . . . . . . . . . . . . . . . . . . . . . . . . . . . . . 19 Napenjanje in preverjanje verige žage. . . . . . . . . . . . . . . . . . . . . . . . . . . . . . . . . . . . . . . . . . . . . . . . . . . . . . . . . . . . . . . . . . . . . . . . . . . . . . 20 Mazanje verige . . . . . . . . . . . . . . . . . . . . . . . . . . . . . . . . . . . . . . . . . . . . . . . . . . . . . . . . . . . . . . . . . . . . . . . . . . . . . . . . . . . . . . . . . . . . . . . . 20 Brušenje verige žage . . . . . . . . . . . . . . . . . . . . . . . . . . . . . . . . . . . . . . . . . . . . . . . . . . . . . . . . . . . . . . . . . . . . . . . . . . . . . . . . . . . . . . . . . . . . 20
Pred prvo uporabo . . . . . . . . . . . . . . . . . . . . . . . . . . . . . . . . . . . . . . . . . . . . . . . . . . . . . . . . . . . . . . . . . . . . . . . . . . . . . 20
Vklop/izklop . . . . . . . . . . . . . . . . . . . . . . . . . . . . . . . . . . . . . . . . . . . . . . . . . . . . . . . . . . . . . . . . . . . . . . . . . . . . . . . . . . . . . . . . . . . . . . . . . . 20 Prestavitev ročaja. . . . . . . . . . . . . . . . . . . . . . . . . . . . . . . . . . . . . . . . . . . . . . . . . . . . . . . . . . . . . . . . . . . . . . . . . . . . . . . . . . . . . . . . . . . . . . . 20 Uporaba obrezovalnika za živo mejo . . . . . . . . . . . . . . . . . . . . . . . . . . . . . . . . . . . . . . . . . . . . . . . . . . . . . . . . . . . . . . . . . . . . . . . . . . . . . . . 20 Tehnike obrezovanja . . . . . . . . . . . . . . . . . . . . . . . . . . . . . . . . . . . . . . . . . . . . . . . . . . . . . . . . . . . . . . . . . . . . . . . . . . . . . . . . . . . . . . . . . . . . 20 Uporaba obrezovalnika za veje . . . . . . . . . . . . . . . . . . . . . . . . . . . . . . . . . . . . . . . . . . . . . . . . . . . . . . . . . . . . . . . . . . . . . . . . . . . . . . . . . . . 20 Tehnike žaganja . . . . . . . . . . . . . . . . . . . . . . . . . . . . . . . . . . . . . . . . . . . . . . . . . . . . . . . . . . . . . . . . . . . . . . . . . . . . . . . . . . . . . . . . . . . . . . . 20 Varno delo. . . . . . . . . . . . . . . . . . . . . . . . . . . . . . . . . . . . . . . . . . . . . . . . . . . . . . . . . . . . . . . . . . . . . . . . . . . . . . . . . . . . . . . . . . . . . . . . . . . . 21
Prevoz . . . . . . . . . . . . . . . . . . . . . . . . . . . . . . . . . . . . . . . . . . . . . . . . . . . . . . . . . . . . . . . . . . . . . . . . . . . . . . . . . . . . . . . 21
Vzdrževanje in čiščenje. . . . . . . . . . . . . . . . . . . . . . . . . . . . . . . . . . . . . . . . . . . . . . . . . . . . . . . . . . . . . . . . . . . . . . . . . . 21
Shranjevanje . . . . . . . . . . . . . . . . . . . . . . . . . . . . . . . . . . . . . . . . . . . . . . . . . . . . . . . . . . . . . . . . . . . . . . . . . . . . . . . . . . 21
Iskanje napak pri obrezovalniku za veje . . . . . . . . . . . . . . . . . . . . . . . . . . . . . . . . . . . . . . . . . . . . . . . . . . . . . . . . . . . 22
Iskanje napak pri obrezovalniku za živo mejo . . . . . . . . . . . . . . . . . . . . . . . . . . . . . . . . . . . . . . . . . . . . . . . . . . . . . . 22
Intervali vzdrževanja pri obrezovalniku za veje . . . . . . . . . . . . . . . . . . . . . . . . . . . . . . . . . . . . . . . . . . . . . . . . . . . . . 22
Intervali vzdrževanja pri obrezovalniku za živo mejo . . . . . . . . . . . . . . . . . . . . . . . . . . . . . . . . . . . . . . . . . . . . . . . . 22
Proizvajalec . . . . . . . . . . . . . . . . . . . . . . . . . . . . . . . . . . . . . . . . . . . . . . . . . . . . . . . . . . . . . . . . . . . . . . . . . . . . . . . . . . . 22
Servis . . . . . . . . . . . . . . . . . . . . . . . . . . . . . . . . . . . . . . . . . . . . . . . . . . . . . . . . . . . . . . . . . . . . . . . . . . . . . . . . . . . . . . . . 22
Garancijski list . . . . . . . . . . . . . . . . . . . . . . . . . . . . . . . . . . . . . . . . . . . . . . . . . . . . . . . . . . . . . . . . . . . . . . . . . . . . . . . . . 23
Odstranjevanje med odpadke . . . . . . . . . . . . . . . . . . . . . . . . . . . . . . . . . . . . . . . . . . . . . . . . . . . . . . . . . . . . . . . . . . . . 23
Nadomestni deli . . . . . . . . . . . . . . . . . . . . . . . . . . . . . . . . . . . . . . . . . . . . . . . . . . . . . . . . . . . . . . . . . . . . . . . . . . . . . . . 23
Prevod izvirne izjave o skladnosti. . . . . . . . . . . . . . . . . . . . . . . . . . . . . . . . . . . . . . . . . . . . . . . . . . . . . . . . . . . . . . . . . 24
FHEHS 900 A1 |
13 |

ŠKARJE ZA ŽIVO MEJO / REZALNIK VEJ Z DOLGIM ROČAJEM FHEHS 900 A1
SI Uvod
Iskrene čestitke ob nakupu vaše nove naprave. Odločili ste se za kakovosten izdelek. Navodila za uporabo so sestavni del tega izdelka. Vsebujejo pomembne napotke za varnost, uporabo in odstranjevanje naprave med odpadke. Preden začnete izdelek uporabljati, se seznanite z vsemi napotki o njegovi uporabi in varnosti. Izdelek uporabljajte le tako, kot je opisano
v navodilih, in samo za navedena področja uporabe. Ob predaji izdelka tretji osebi zraven priložite vso dokumentacijo.
Predvidena uporaba obrezovalnik za živo mejo z dolgim ročajem
Ta naprava je predvidena za rezanje in obrezovanje živih mej, grmovja ter okrasnega grmičevja na zasebnih območjih. Naprava se vodi ročno in ima vgrajen pogon, ki premika linearno nameščena rezila sem in tja.
 OPOZORILO!
►Obrezovalniki za živo mejo niso primerni za to, da bi jih uporabljali otroci.
Predvidena uporaba obrezovalnika za veje
Ta naprava je predvidena za odstranjevanje vej z dreves.
Predvidena uporaba
Napravo uporabljajte samo, kot je opisano tukaj, in samo na navedenih področjih uporabe. Naprava ni predvidena za poslovno uporabo. Napravo smejo uporabljati samo odrasle osebe. Uporaba naprave na dežju ali v vlažni okolici je prepovedana.
Vsaka druga vrsta uporabe ali sprememba naprave velja za nepredvideno in pomeni bistveno nevarnost nezgod. Proizvajalec ne prevzema nobene odgovornosti za škodo, nastalo zaradi nepredvidene uporabe.
Oprema
Enota motorja
 pritezni vijak
 matica
 drog
drog
 vijak
vijak
 okrogli ročaj
 nosilno uho
 vrtilni element
 tipka za sprostitev
 zapora vklopa
 stikalo za vklop/izklop
 električni kabel
 razbremenilo natega
Priključni obrezovalnik za živo mejo
 prečka z rezili
 ohišje pogona
 sprostitev/zapora
 osnovna plošča (obrezovalnika za živo mejo)
 prestavni vzvod
 ročaj
ročaj
 sprednji drog
 pritrdilni zatič
 pogonska gred
 zaščitna kapica
Priključni obrezovalnik za veje
 pripomoček za namizni brusilnik
 veriga žage
 žagin list
 omejevalo
 posoda za olje
 matica
 navoj
navoj
 pokrov zobnika verige
 vrtina v žaginem listu
 vodilo žaginega lista
 vodilna tirnica
 oljna mazalka
 vijak za napenjanje verige
 zobnik verige
 zatič za napenjanje verige
 sprednji drog
 pogonska gred
 zaščitna kapica
 pritrdilni zatič
 zaščitni obroč
 prestavni vzvod
 osnovna plošča (obrezovalnik za veje)
 sprostitev/zapora
  pokrov posode za olje
14 |
FHEHS 900 A1 |
|

Vsebina kompleta
1enota motorja FHEHS 900 A1
1priključni obrezovalnik za živo mejo FHS 1 (spodaj imenovan obrezovalnik za živo mejo)
1priključni obrezovalnik za veje FHE 1 (spodaj imenovan obrezovalnik za veje)
Pribor
1  ramenski pas
1  zaščitni ovoj za verigo
1  zaščitni ovoj za žagin list
1  100 ml bioolja za verigo
1  montažno orodje
1 navodila za uporabo
Tehnični podatki
Enota motorja: |
FHEHS 900 A1 |
Nazivna napetost: |
230 V 50 Hz |
Nazivna moč: |
900 W |
Razred zaščite: |
II/ |
Teža (brez ročaja in ramenskega pasu): pribl. 2,6 kg |
|
Obrezovalnik za veje: |
FHE 1 |
Teža (pripravljen za delovanje): |
pribl. 1,6 kg |
Priporočena vsebina posode za olje: |
100 ml |
Dolžina reza: |
pribl. 260 mm |
Žagin list: |
Oregon tip 91 100SDEA041 |
Veriga žage: |
Oregon 91P040X |
|
Oregon 91P040E |
Obrezovalnik za živo mejo: |
FHS 1 |
Število hodov v prostem teku: |
2000 min-1 |
Dolžina reza: |
410 mm |
Razmik zobcev: |
20 mm |
Teža (pripravljen za delovanje): |
pribl. 2,1 kg |
Informacije o hrupu in vibracijah:
A-vrednotena raven hrupa pri električnem orodju tipično znaša:
Obrezovalnik za veje: |
FHE 1 |
|
Raven zvočnega tlaka: |
88,18 |
dB(A) |
Negotovost K: |
3 |
dB |
Raven moči zvoka: |
100,63 |
dB(A) |
Negotovost K: |
3 |
dB |
Obrezovalnik za živo mejo: FHS 1 |
|
|
Raven zvočnega tlaka: |
87,08 |
dB(A) |
Negotovost K: |
3 |
dB |
Raven moči zvoka: |
98,37 |
dB(A) |
Zajamčena raven |
|
|
moči zvoka: |
102 |
dB(A) |
Negotovost K: |
3 |
dB |
Vrednosti tresljajev (vektorska vsota treh smeri), izračunane v skladu z |
|
||
EN 60745: |
|
|
|
Obrezovalnik za veje: |
|
|
|
Vibracije na sprednjem ročaju: vrednost emisij tresljajev |
SI |
||
a |
h,D |
= 1,018 m/s2 |
|
negotovost K = 1,5 m/s2 Vibracije na zadnjem ročaju: vrednost emisij tresljajev
ah,D = 1,213 m/s2 negotovost K = 1,5 m/s2
Obrezovalnik za živo mejo:
Vibracije na sprednjem ročaju: vrednost emisij tresljajev
ah,D = 1,447 m/s2 negotovost K = 1,5 m/s2
Vibracije na zadnjem ročaju: vrednost emisij tresljajev
ah,D = 1,773 m/s2 negotovost K = 1,5 m/s2
Nosite zaščito sluha!
NAPOTEK
►Raven tresljajev, navedena v teh navodilih, je bila izmerjena v skladu z merilnim postopkom, določenim v standardu EN 60745, in se lahko uporablja za primerjavo naprav. Navedena vrednost emisij tresljajev se lahko uporablja tudi za uvodno oceno izpostavljenosti.
 OPOZORILO!
►Raven tresljajev se spreminja v skladu z uporabo električnega orodja in je lahko v določenih primerih tudi nad vrednostjo v teh navodilih. Obremenitev zaradi tresljajev je mogoče podcenjevati, če se električno orodje dlje časa uporablja na določen način. Za natančno oceno obremenitve zaradi tresljajev v določenem času dela z napravo je treba upoštevati tudi čase, ko je naprava izklopljena ali teče, vendar se pri tem dejansko ne uporablja. To lahko bistveno zmanjša obremenitev zaradi tresljajev med celotnim obdobjem dela z napravo.
Opis tablic z napotki na napravi:
Pred prvo uporabo preberite navodila za uporabo in varnostne napotke!
Nosite zaščitne rokavice!
Nosite varnostne čevlje!
Nosite zaščito sluha!
Nosite zaščitno čelado!
Nosite zaščitna očala!
Osebam v bližini ne dovolite približevanja napravi!
FHEHS 900 A1 |
15 |

Napravo zaščitite pred dežjem in vlago!
SI |
|
Smrtna nevarnost zaradi električnega udara! |
|
||
|
|
Od daljnovodov ohranjajte najmanj 10 metrov |
|
|
razdalje. |
|
||
|
|
|
Pozor! Padajoči predmeti.
Še posebej pri obrezovanju nad glavo.
Pozor! Nevarnost poškodb zaradi delujočih rezil.
Vtič takoj ločite od omrežja, če poškodujete ali prerežete napeljavo.
Navedba ravni zvočne moči LWA v dB.
Splošni varnostni napotki za električna orodja
 OPOZORILO!
►Preberite vse varnostne napotke in navodila. Napake pri upoštevanju varnostnih napotkov in navodil lahko povzročijo električni udar, požar in/ali težke telesne poškodbe.
Vse varnostne napotke in navodila shranite za prihodnjo uporabo.
Izraz »električno orodje«, ki se uporablja v varnostnih napotkih, se nanaša na električna orodja z napajanjem iz električnega omrežja (z električnim kablom) in na električna orodja z akumulatorskim napajanjem (brez
električnega kabla).
1. Varstvo pri delu
a)Svoje delovno območje ohranjajte čisto in dobro osvetljeno. Nered in neosvetljena delovna področja lahko privedejo do nezgod.
b)Električnega orodja ne uporabljajte na območju nevarnosti eksplozije, na katerem so goreče tekočine, plini ali prah. Električna orodja povzročajo iskre, ki lahko povzročijo vnetje prahu ali hlapov.
c)Otrokom in drugim osebam med uporabo električnega orodja ne pustite blizu. Zaradi odvračanja pozornosti lahko izgubite nadzor nad napravo.
2. Električna varnost
a)Priključni vtič električnega orodja mora biti primeren za vtičnico. Vtiča ni dovoljeno spreminjati na noben način. Ne uporabljajte prilagojevalnih vtičev skupaj z zaščitno ozemljenimi električnimi orodji. Nespremenjeni vtiči in primerne vtičnice zmanjšajo tveganje električnega udara.
b)Izogibajte se telesnemu stiku z ozemljenimi površinami, kot so cevi, radiatorji, štedilniki in hladilniki. Če je vaše telo ozemljeno, obstaja povečano tveganje zaradi električnega udara.
c)Električnega orodja ne izpostavljajte dežju ali vlagi. Vdor vode v električno napravo poveča tveganje električnega udara.
d)Kabla ne uporabljajte za druge namene, na primer za prenašanje ali obešanje električnega orodja za kabel ali za vlečenje vtiča iz vtičnice. Kabla ne približujte virom vročine, olju, ostrim robovom ali premikajočim se delom naprave. Poškodovani ali zasukani kabli in vtiči povečajo tveganje električnega udara.
e)Če z električnim orodjem delate na prostem, uporabljajte samo podaljške kablov, ki jih je dovoljeno uporabljati na prostem. Uporaba podaljška kabla, primernega za uporabo na prostem, zmanjša tveganje električnega udara.
f)Če uporabe električnega orodja v vlažni okolici ni mogoče preprečiti, uporabite zaščitno stikalo za okvarne tokove. Uporaba zaščitnega stikala za okvarne tokove zmanjšuje tveganje električnega udara.
3. Varnost oseb
a)Bodite vedno pozorni, pazite, kaj počnete, dela z električnim orodjem se lotite premišljeno. Električnega orodja ne uporabljajte, ko ste utrujeni ali pod vplivom drog, alkohola ali zdravil. Že en sam trenutek nepazljivosti pri uporabi električnega orodja lahko privede do resnih telesnih poškodb.
b)Nosite osebno zaščitno opremo in zmeraj uporabljajte tudi zaščitna očala. Uporaba osebne zaščitne opreme, kot je maska za zaščito pred prahom, nedrseči zaščitni čevlji, zaščitna čelada ali zaščita sluha, odvisno od vrste in uporabe električnega orodja zmanjša tveganje poškodb.
c)Izogibajte se nehotenemu zagonu naprave. Prepričajte se, da je električno orodje izključeno, preden ga priključite na vir električnega toka, ga dvignete ali prenašate. Če pri prenašanju električnega orodja s prstom pritiskate na stikalo ali že vklopljeno napravo priključite na oskrbo s tokom, lahko to privede do nezgod.
d)Pred vklopom električnega orodja odstranite nastavitvena orodja ali izvijače. Orodje ali izvijač v vrtečem se delu naprave lahko privede do poškodb.
e)Izogibajte se neobičajni drži telesa. Poskrbite za varen položaj in vedno ohranjajte ravnotežje. Tako lahko električno orodje še posebej v nepričakovanih situacijah bolje nadzorujete.
f)Nosite primerna oblačila. Ne nosite ohlapnih oblačil ali nakita. Lase, oblačila in rokavice imejte zunaj dosega premikajočih se delov.
Premikajoči se deli lahko zagrabijo ohlapna oblačila, nakit ali lase.
g)Če lahko vgradite priprave za sesanje ali prestrezanje prahu, se prepričajte, da so te priključene in se pravilno uporabljajo. Uporaba naprave za sesanje prahu lahko zmanjša nevarnost zaradi prahu.
4. Uporaba in ravnanje z električnim orodjem
■Naprave ne preobremenjujte. Za svoje delo uporabljajte zanj predvideno električno orodje. Delo s primernim električnim orodjem v navedenem območju moči je boljše in varnejše.
■Ne uporabljajte električnih orodij z okvarjenim stikalom. Električno orodje, ki ga ni mogoče vklopiti in izklopiti, je nevarno in ga je treba popraviti.
■Preden začnete izvajati nastavitve naprave, menjavati njene dele in preden napravo odložite, potegnite vtič iz vtičnice. Ta previdnostni ukrep prepreči nehoteni zagon električnega orodja.
■Ko električnih orodij ne uporabljate, jih hranite zunaj dosega otrok. Naprave naj ne uporabljajo osebe, ki z uporabo niso seznanjene ali niso prebrale teh navodil. Električna orodja so nevarna, če jih uporabljajo neizkušene osebe.
■Električna orodja skrbno vzdržujte. Preverjajte, ali premični deli naprave delujejo brezhibno in niso zataknjeni, ali deli niso odlomljeni ali tako poškodovani, da je ovirano delovanje električnega orodja. Pred uporabo naprave poskrbite za popravilo poškodovanih delov.
Veliko nezgod nastane zaradi slabo vzdrževanih električnih orodij.
■Vaša rezalna orodja naj bodo ostra in čista. Skrbno vzdrževana rezalna orodja z ostrimi rezili se manj zatikajo in so lažje vodljiva.
■Električno orodje, pribor, delovno orodje itd. uporabljajte v skladu s temi navodili. Pri tem upoštevajte delovne pogoje in vrsto opravila, ki ga izvajate. Uporaba električnih orodij za nepredvideno uporabo lahko privede do nevarnih situacij.
■Skrbno preglejte površino za rezanje in odstranite vse žice ali druge tujke.
■Električno orodje držite le za izolirane površine ročajev, saj lahko rezilo pride v stik s skritimi električnimi napeljavami ali lastnim električnim kablom. Stik rezila z napeljavo pod napetostjo lahko povzroči prenos napetosti na kovinske dele naprave in privede do električnega udara.
16 |
FHEHS 900 A1 |
|
 Loading...