

90
o
90
o
90
o
90
o
Q E
R T
2a 2b 2c
1
2
4.1
4.2
W
nährstoffarm, ihr Hauptwert liegt im Humusgehalt, darum
ist auch eine zusätzliche Anreicherung mit Nährstoffen
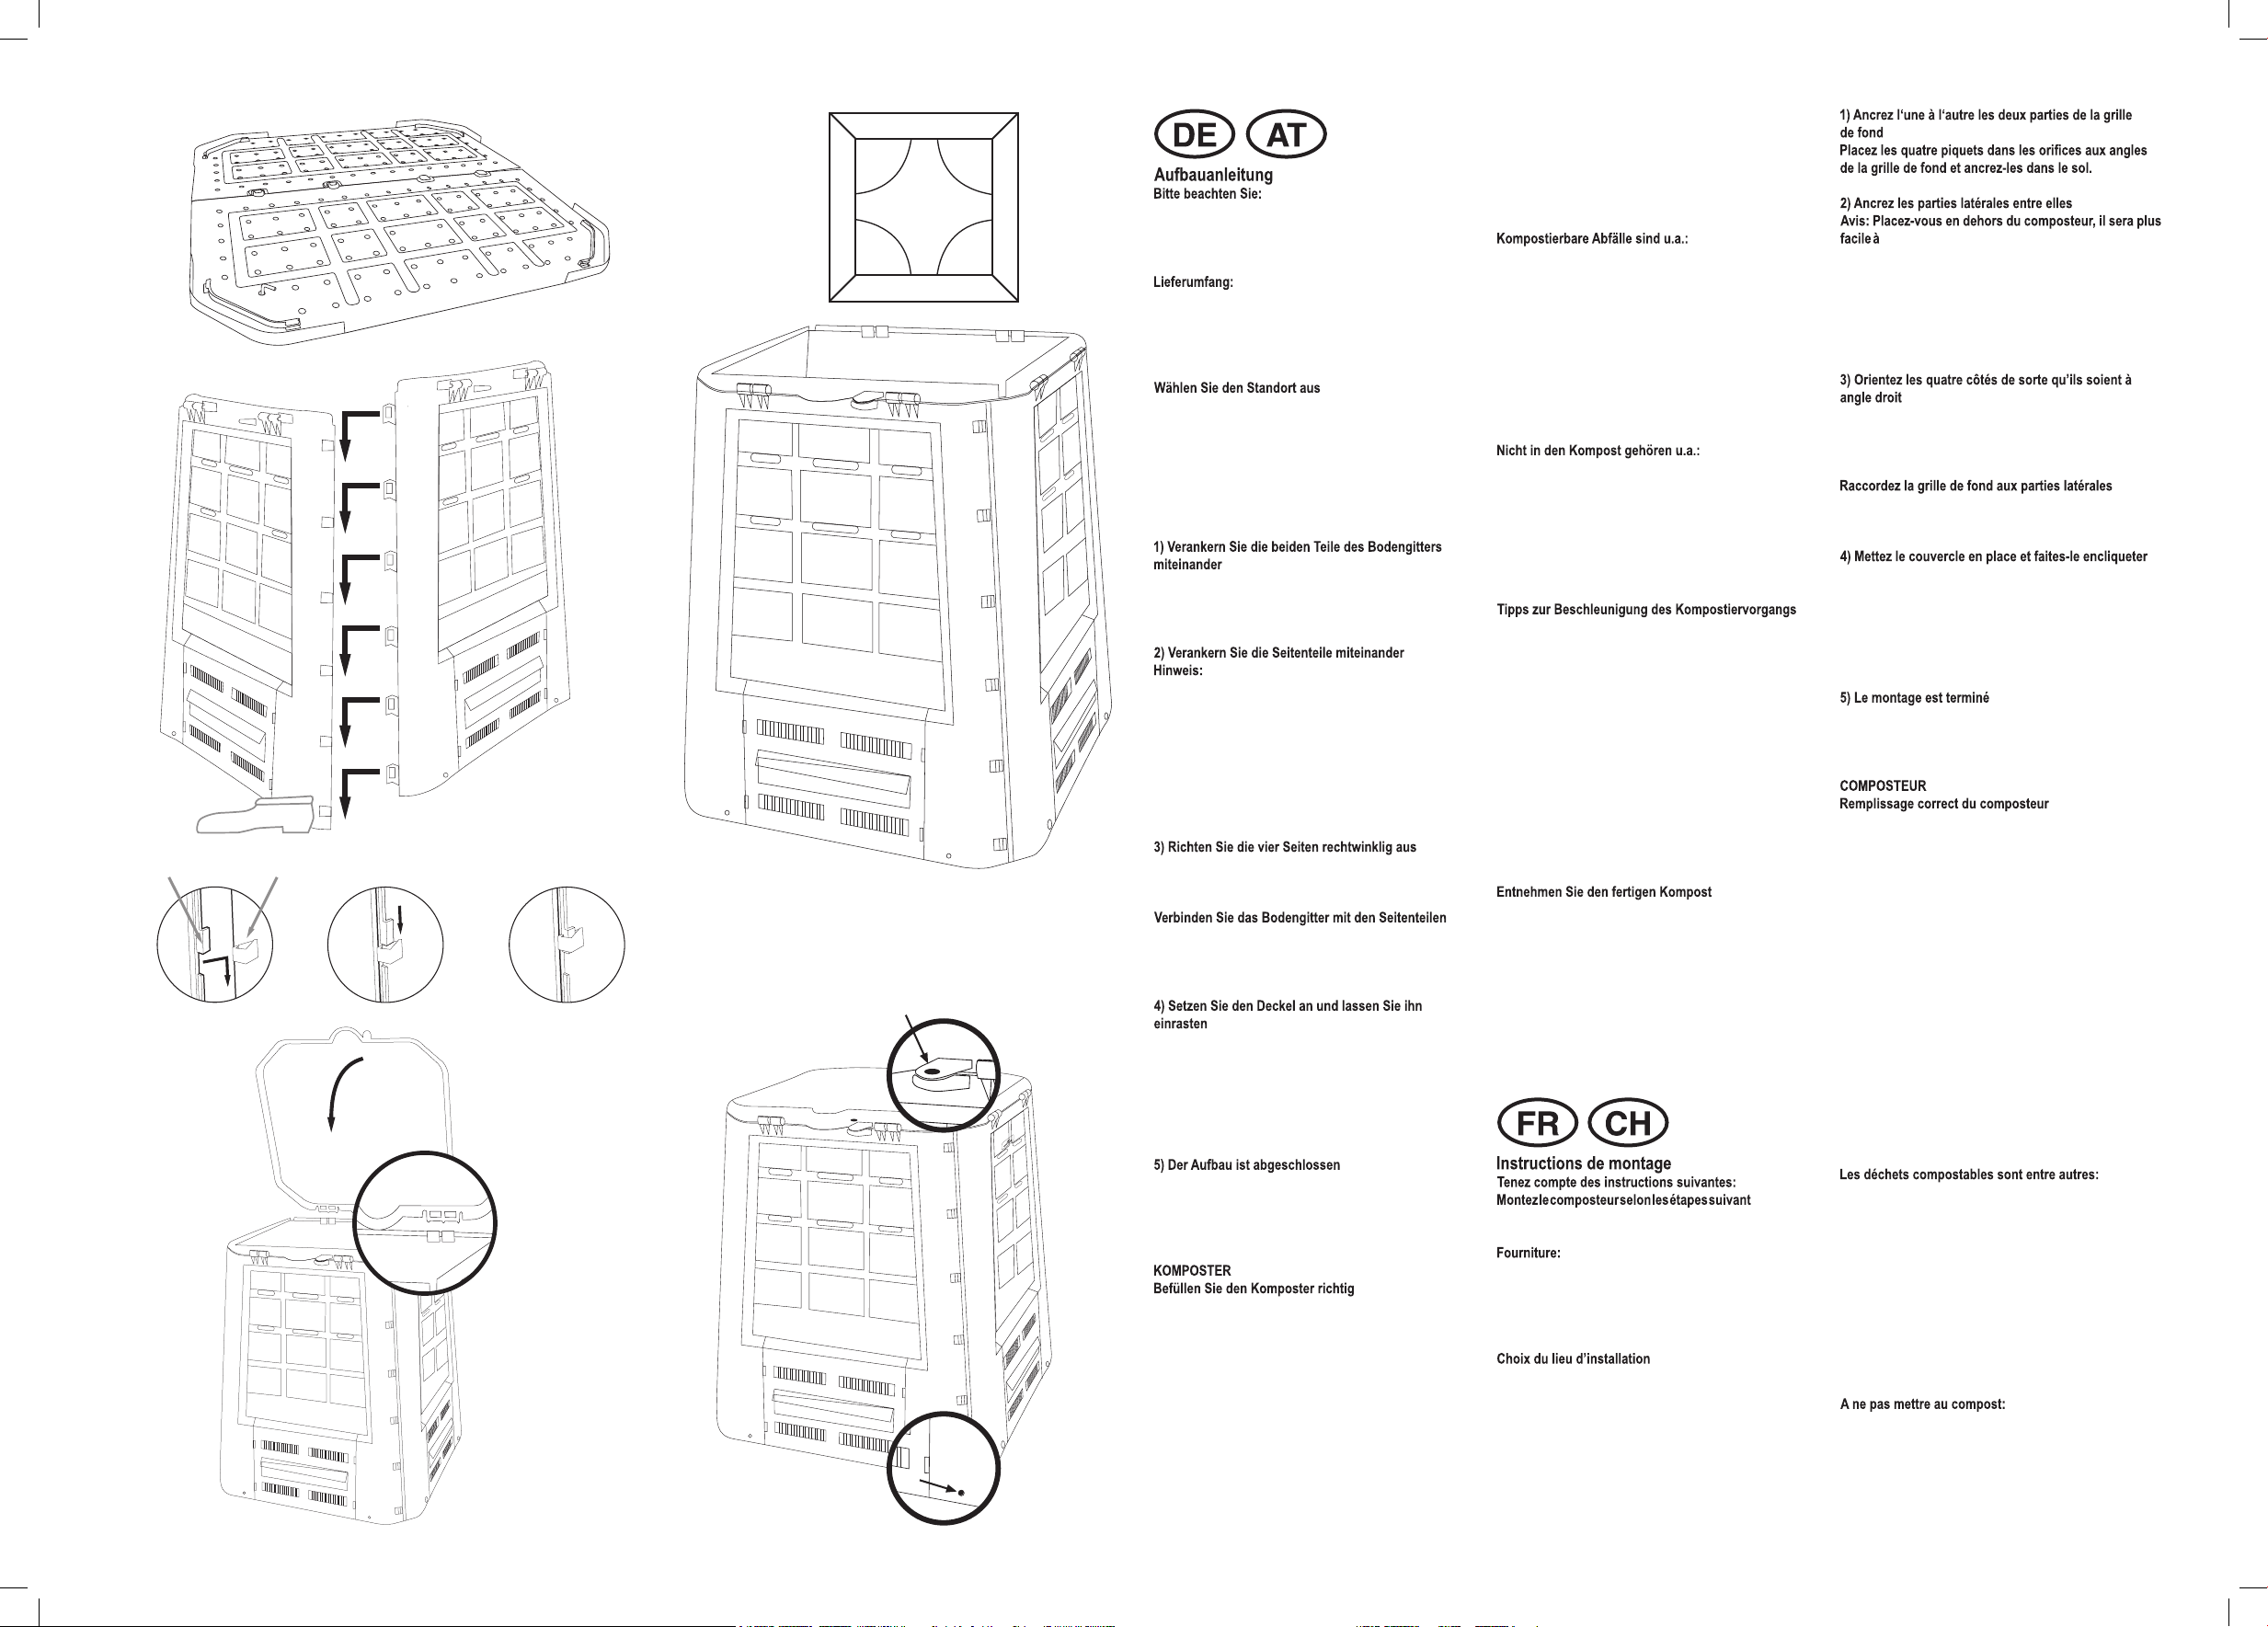
Bauen Sie den Komposter in den nachfolgend
beschriebenen Schritten und stellen Sie ihn nur auf ebenem
Untergrund auf.
4 x Seitenteile mit jeweils vormontiertem Entnahmeschieber
1 x Deckel
1 x Bodengitter
4 x Erdspieße
Der günstigste Standort für den Komposter ist im
Halbschatten von Blumen und Hecken. Sorgen Sie dafür,
dass der Komposter direkten Kontakt zur Gartenerde hat.
Dadurch können die notwendigen Bodenorganismen
ungehindert arbeiten. Zur Erhaltung der Feuchtigkeit sind
eine Schicht Reisig, Schredderabfälle oder Torf am besten
geeignet.
Stecken Sie die vier Erdspieße durch die Löcher an den
Ecken des Bodengitters und verankern Sie diese mit
dem Boden.
Stellen Sie sich außerhalb des Komposters,
so lässt er sich leichter aufbauen. Fixieren Sie mit
Hilfe des linken Fußes das jeweils linke Seitenteil,
und schieben Sie die Befestigungsnasen des jeweils
rechten Seitenteiles in die Nuten des jeweils linken
Seitenteiles.
2a Befestigungsnase (1) & Nut (2)
2b Befestigungsnase in Nut schieben
2c Runterdrücken
Richten Sie die vier -wie in 2 zusammen geschobenenSeitenteile rechtwinklig (90°) aus.
Setzen Sie die verbundenen Seitenteile auf das
Bodengitter. Drücken Sie diese etwas runter und lassen Sie
die Seitenteile einrasten.
Deckel leicht nach vorn anwinkeln, ... Runterdrücken
und einrasten Setzen Sie den Deckel an einem beliebigen
Seitenteil an den Scharnierpunkten an und lassen Sie
ihn einrasten (siehe Skizze). Bei Beschädigung eines
Scharnierteils kann das Scharnierteil eines anderen
Seitenteiles verwendet werden.
(z.B. Stalldünger) günstig
• vermeiden Sie eine völlige Austrocknung des Kompostes
(speziell in den Sommermonaten), indem Sie den
Kompost ab und zu wässern
• anfallende Gartenabfälle (gehäckselt oder klein
geschnitten)
• geschnittenes, leicht angetrocknetes Gras
• Laub (möglichst zerkleinert)
• Baum- oder Heckenschnitt (geschreddert)
• Kaffeesatz mit Filtertüte, Teebeutel, Eierschale
• Holzasche und Ruß
Werfen Sie alle Abfälle möglichst locker ein. Drücken
oder stampfen Sie die Abfälle niemals fest, damit die
Organismen im Kompost arbeiten können.
• Küchenabfälle wie Reste von Fleisch, Fisch, Käse
Suppen, Bratfett, Öl, Knochen und Brot. Diese Produkte
tragen zur Schimmelbildung bei! • mit chemischen Mitteln
behandelte Schalen von Kartoffeln sollten ebenfalls
vermieden werden
• Schalen von Zitrusfrüchten gehören keinesfalls in den
Kompost
Wie schnell ein Komposter zur Reife gelangt, ist im
wesentlichen abhängig von der Materialzusammensetzung,
deren Feuchtigkeitsgehalt und der Temperatur.
Grasschnitte, Gemüse- und Gartenabfälle, Stallmist
verrotten in wenigen Monaten.
Der Rotteprozess wird weiter beschleunigt, wenn man die
einzelnen gut vermischten und durchfeuchteten Lagen
mit Kompoststartern aus dem Fachhandel, organischen
Mischdünger und alter Kompostererde bestreut oder
durch Zugabe von Regenwürmern. Alternativ kann auch
die Gartenerde, Gesteinsmehl oder Algenkalk verwendet
werden. Speziell in den Sommermonaten vermehren sich
die Mikroorganismen stark und bewirken eine rasche
Zersetzung der Panzenteile.
• Prüfen Sie zunächst den Reifegrad des Kompostes.
Öffnen Sie den Schieber, um die Struktur des Humus
zu erkennen. Fertige Komposterde sollte dunkelbraun,
körnig sein und nach Waldboden riechen.
• Sieben Sie die fertige Komposterde vor der Verwendung
(nicht zu fein) durch. Geben Sie nicht verrottete
Bestandteile wie z.B. Aststücke dann erneut in den
Komposter.
monter ainsi. A l’aide du pied gauche, xez la
partie latérale gauche respective, et poussez les ergots
de xation de la partie latérale droite respective dans
les rainures de la partie gauche respective.
2a Ergot de xation (1) & rainure (2)
2b Pousser l’ergot de xation dans la rainure
2c Presser vers le bas
Orientez les quatre parties latérales – poussées les unes
dans les autres comme il l’a été mentionné au point 2 – de
sorte qu’elles soient à angle droit (90°).
Placez sur la grille de fond les parties latérales reliées entre
elles. Pressez-les vers le bas et faites-les encliqueter.
Mettre le couvercle légèrement à angle vers l’avant,
appuyer vers le bas et le faire encliqueter. Placez le
couvercle aux points de charnière sur l’une des parties
latérales quelconques et faites-le encliqueter (voir croquis).
Si l’une des charnières est endommagée, il est possible
d’utiliser la charnière d’une autre partie latérale.
Le composteur dispose d’un orice de fermeture (voir ill.
4.1). Fermez le composteur si nécessaire à l’aide d’un
cadenas (le cadenas n’est pas fourni).
• Commencez par une couche de terre
• puis des ordures de jardin; dans la mesure du possible
avec une couche intermédiaire de bois et de feuilles, c’est-
à-dire mélanger des déchets verts riches en azote et des
déchets riches en carbone
• les diverses couches devraient avoir une hauteur ne
dépassant pas 15 cm env.
• évitez les odeurs désagréables; pour cela, il est judicieux
de mélanger un peu, à l’aide d’une fourche, les produits
à composter placés dans le composteur – cet apport d’air
frais accélère le processus de décomposition
• les substances passant dans le composteur ont un taux
de substances nutritives relativement faibles, leur valeur
principale réside dans le taux d’humus, c’est pourquoi un
enrichissement supplémentaire en substances nutritives
(par exemple fumier d’écurie) est favorable
• évitez que le compost ne sèche complètement (en
particulier pendant les mois d’été), arrosez le compost de
temps à autre
Der Komposter verfügt über eine Schlossbohrung (siehe
Abb. 4.1). Verriegeln Sie den Komposter bei Bedarf mit
einem Vorhängeschlosses (das Schloss ist nicht im
Lieferumfang enthalten).
• beginnen Sie mit einer Lage Erde
• dann Gartenabfälle; möglichst mit zwischen gelagertem
Holz und Blättern, d.h. stickstoffreiche, grüne Abfälle mit
kohlenstoffreichen gemischt
• die einzelnen Lagen sollten eine Höhe von etwa 15 cm
nicht übersteigen
• vermeiden Sie Geruchsbelästigung; dazu ist es hilfreich,
wenn Sie das eingegebene Kompostiergut im Komposter
mit einer Grabegabel leicht durchmischen - durch
diese Frischluftzufuhr wird der Verrottungsprozess
vorangetrieben
• Stoffe, die in den Komposter gelangen sind relativ
placez-le uniquement sur une surface plane.
es et
4 x parties latérales avec poussoir de retrait prémonté
1 x couvercle
1 x grille de fond
4 x piquets
Le lieu d’installation le plus favorable pour le composteur
est dans le clair-obscur de eurs et de haies. Veillez à ce
que le composteur soit en contact direct avec la terre du
jardin. Ceci permet aux organismes nécessaires contenus
dans le sol de travailler sans gêne. Pour maintenir
l’humidité, une couche de bois mort, de déchets hachés ou
de tourbe sont le mieux adaptés.
• les déchets produits au jardin (hachés ou coupés en petits
morceaux)
• l’herbe coupée légèrement séchée
• les feuilles (coupées dans la mesure du possible)
• les tombées d’arbre ou de haies (hachées)
• le marc de café avec les ltres en papier, les sachets de
thé, les coquilles d’oeuf
• les cendres de bois et la suie Jetez les déchets sur le
compost sans presser. Ne pressez et n’écrasez jamais les
déchets, an que les organismes puissent travailler dans
le compost.
• les déchets de cuisine tels que les restes de viande, de
poisson, de fromages, de soupes, de graisse de cuisson,
d’huile, d’os et de pain. Ces produits contribuent à la
formation de moisissure!
• évitez également les pelures de pommes de terre traitées
avec des produits chimiques
• ne pas mettre non plus d’écorces d’agrumes au compost
La vitesse de maturation d’un compost dépend pour
l’essentiel de sa composition, de son taux d’humidité et de
la température. L’herbe coupée, les déchets de légumes
et de jardin et les fumiers d’écurie se décomposent en
quelques mois. Le processus de décomposition peut
également être accéléré si l’on saupoudre les diverses
couches, bien mélangées et humidiées, avec des
accélérateurs de compostage en vente dans le commerce
spécialisé, des mélanges de fumiers organiques ou de la
vieille terre de compost, ou en y ajoutant des vers de terre.
Il est également possible, à titre d’alternative, d’utiliser de
la terre du jardin, de la roche pulvérisée ou du calcaire
d’algues. Pendant les mois d’été en particulier, les microorganismes se multiplient rapidement et entraînent une
décomposition rapide des éléments végétaux.
• Contrôlez tout d’abord le degré de maturité du compost.
Ouvrez le verrou pour déterminer la structure de l’humus.
Le compost prêt devrait être marron foncé, granuleux et
sentir le sol de forêt.
• Avant de l’utiliser, passez le compost au crible (pas trop
n). Remettez dans le composteur les éléments non
décomposés, comme par exemple les morceaux de
branches.
Montare il composter nel modo descritto di seguito e
posizionarlo solo su una supercie piana.
4 pezzi laterali con dispositivo di prelievo già montato.
1 coperchio
1 Rete da pavimento
4 picchetti
La posizione adatta per il composter è a mezz’ombra di ori
e siepi. Fare sì che il composter abbia il contatto diretto con
la terra del giardino. In questo modo gli organismi della terra
necessari possono lavorare senza impedimenti. Uno strato
di sterpi oppure torba sono adatti per mantenere l’umidità.
Inserite i 4 picchetti attraverso i fori agli angoli della
rete da pavimento e ancorateli al pavimento.
Posizionatevi al di fuori del composter, in modo
da poterlo montare più facilmente. Fissare con il piede
la parte sinistra ed inserire i naselli di ssaggio della
parte destra nei incavi della parte sinistra.
2a Nasello di ssaggio (1) & Incavo (2)
2b Inserire il nasello di ssaggio dell’incavo
2c Premere verso il basso
Sistemare le quattro parti laterali – assemblati come in 2 –
in modo rettangolare (90°).
Inserite i pezzi laterali collegati sulla rete da pavimento.
Premeteli un poco verso il basso e fate incastrare i pezzi
laterali.
Orientare il coperchio leggermente verso in avanti…
premere ed incastrare
Apporre il coperchio su qualsiasi parte laterale nei
punti di cerniera e farlo incastrare (schema). In caso di
danneggiamento della parte della cerniera, è possibile
usare la parte della cerniera di un’altra parte laterale.
Il composter è provvisto di un foro per lucchetto (vedi Fig.
4.1). In caso di necessità serrare il composter con un
lucchetto (il lucchetto non è compreso nella fornitura).
• iniziare con uno strato di terra
• poi riuti da giardino: possibilmente con qualche legno e
foglia, cioè riuti verdi ricchi di azoto mischiati con riuti
ricchi di carbonio.
• i singoli strati non dovrebbero superare circa 15 cm di
altezza
• impedite disturbi olfattivi: per questo è bene mischiare il
materiale di compostaggio nel composter con una forca da
giardino – in questo modo si fa entrare dell’aria fresca che
velocizza il processo di decomposizione.
• Materiali che entrano nel composter sono abbastanza
poveri di sostanze nutritive; il loro valore principale sta
nella percentuale di humus; per questo si consiglia
l’arricchimento con sostanze nutritive (p.es. stallatico).
• impedire che il composto si asciughi completamente
(specialmente nei mesi estivi), mettendone dell’acqua di
tanto in tanto.
• riuti da giardino (tagliati in pezzettini)
• erba tagliata e leggermente asciugata
• foglie (possibilmente tritturati)
• Tagli di alberi e siepi (triturati)
• Fondo da caffè, buste da tè, gusci d’uova
• Cenere di legno e fuliggine
Immettere tutti i riuti in modo leggero Non premere o
comprimere i riuti, in modo che gli organismi nel composto
possano lavorare.
• Riuti da cucina come carnem pesce, formaggio, zuppa,
grasso, olio, ossa e pane. Questi prodotti possono creare
muffe!
• si dovrebbe evitare inoltre le bucce di patate trattate con
mezzi chimici.
• Non immettere mai le bucce di agrumi nel composto
Quanto tempo serve per arrivare alla maturità del
composto, dipende dalla composizione del materiale, dal
contenuto di umidità e dalla temperatura. Tagli di erba, riuti
di verdura e da giardino, si decompongono in pochi mesi.
Il processo di decomposizione può essere velocizzato, se
si sparge i singoli strati ben mischiati ed umidi con avviatori
di compostaggio (nel commercio), con concime organico
e terra vecchia da compostaggio oppure se si aggiunge
lombrichi. In alternativa si può usare anche terra
da giardino, farina di pietra oppure calcare d’alghe.
Specialmente nei mesi estivi i microrganismi aumentano
fortemente e decompongono velocemente le parti di piante.
• Controllare prima il grado di maturazione del composto.
Aprire il dispositivo di prelievo per riconoscere la struttura
del humus. La terra di composto dovrebbe essere marrone
scuro e granulosa e odorare di terra di bosco.
• Setacciare la terra di compostaggio prima dell’uso
(non troppo ne). La parte non decomposta come
p.es. pezzi di rami, vanno messi nuovamente nel
composter.
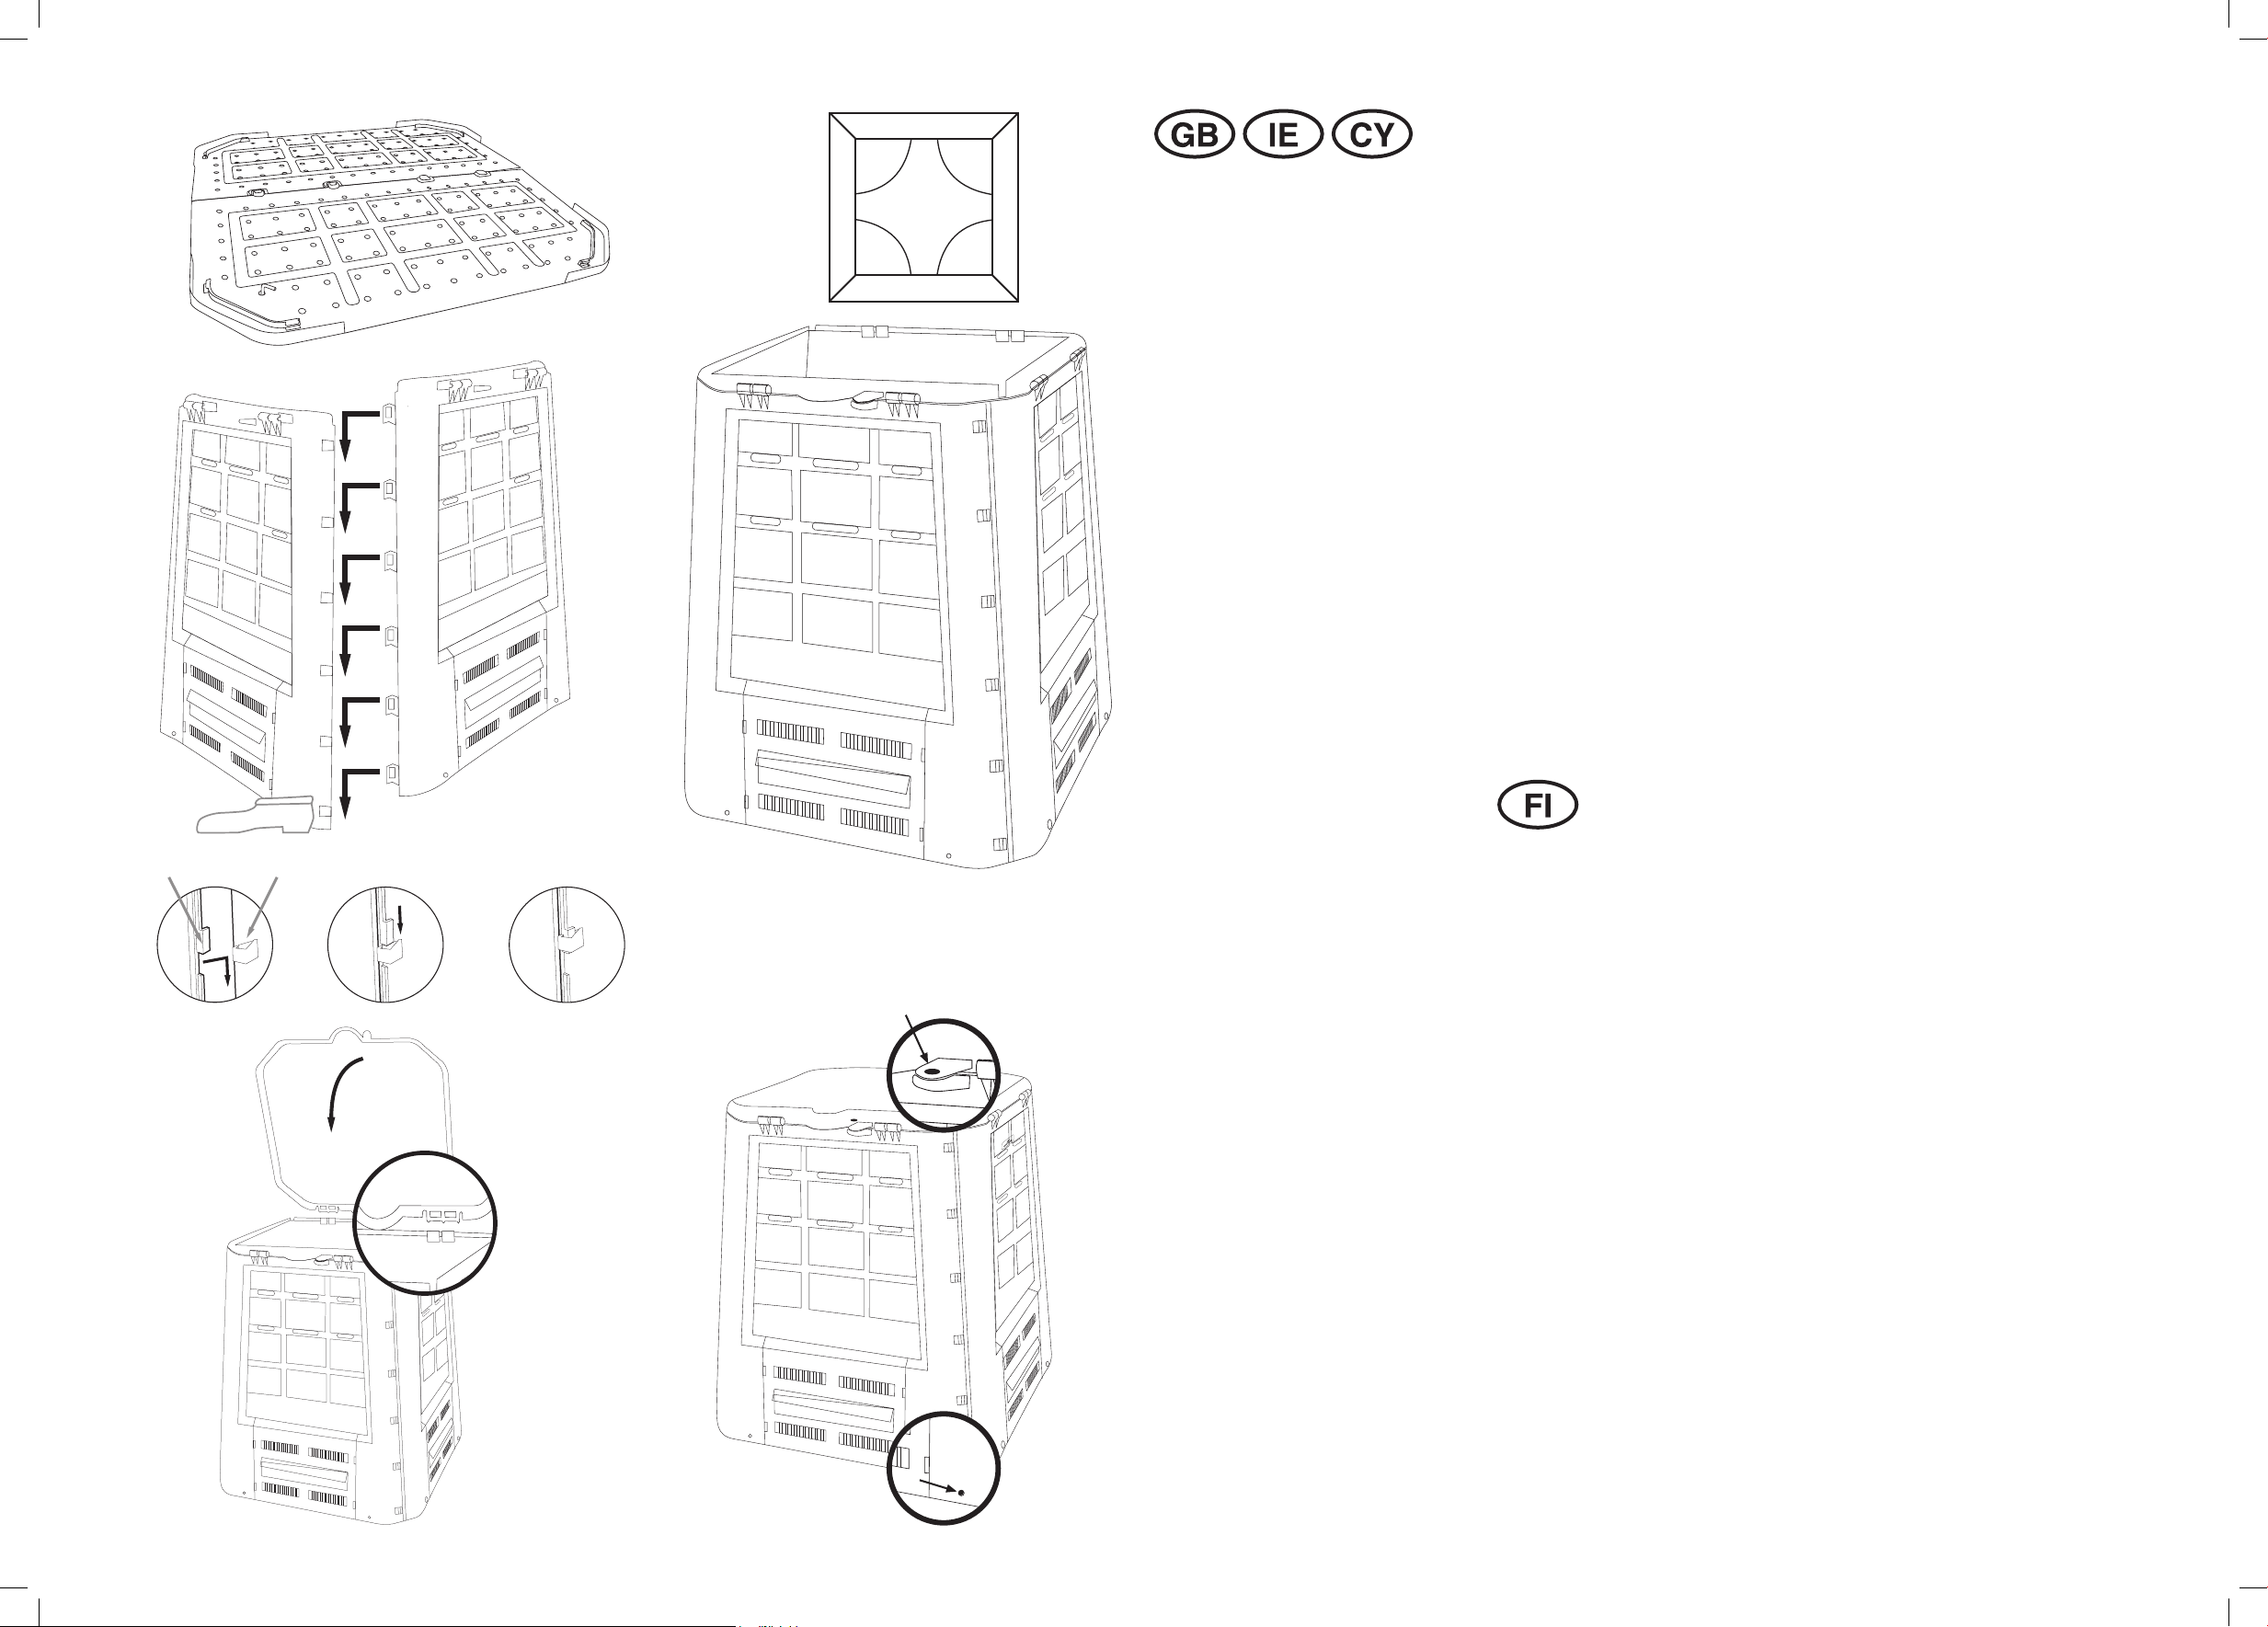
Assemble your composter in accordance with the
following instructions, placing it on a level supporting
surface.
4 x sides, each with a pretted slide opening for
removal
1 x lid
1 x bottom screen
4 x ground spikes
The ideal site for the composter is in the half shade
of owers or hedges. Ensure that the composter is in
direct contact with garden soil. This will allow essential
garden organisms to work unhindered on your
compost. A layer of coarser stalks, shredded material
or grass sods is perfect for ensuring the correct
moisture content is maintained.
Push the fastening nose (1) into the slot (2) until it
engages. Insert the 4 ground spikes through the holes
in the corners of the bottom screen and anchor them to
the ground.
You will nd it easier to assemble the composter
if you stand outside it. Using your left foot to steady the
left hand side part of each corner, slide the fastening
lugs of the right hand side part into the corresponding
slots ofthe left hand side part.
2a Fastening lug (1) & slot (2)
2b Slide the fastening lug into the slot
2c Press down
Adjust the four sides – once you have slid them
together as instructed in 2 – so that they are at right
angles (90°) to one another.
Set down the connected sides on the bottom screen.
Press them down slightly so that the sides engage.
Angle the lid towards the front, ... Press it down and
engage it Attach the lid to any side part by the hinge
points and engage it (see sketch). If the hinge part on
any side part gets damaged you can use the hinge part
on another side.
The composter has a hole for a lock (see Fig. 4.1).
If necessary you can lock the composter with a padlock
(padlock not included).
• begin with a layer of earth
• then add garden waste, if possible with intermediate
layers woody material and leaves, i.e. create a mixture
of nitrogen-rich green waste and carbon-rich materials
• the individual layers should not be thicker than 15 cm
• to avoid smells building up, it is helpful to lightly mix
through the composting material in the composter
using a garden fork. This will allow fresh air to be
introduced into the rotting process
• the materials in the composter are relatively poor in
nutrient content but are important for their humus
content, therefore it may be benecial to enrich the
mixture by adding nutrients, for example farmyard
dung
• water the compost from time to time to avoid it drying
out completely, especially in the summer months
• garden waste (chopped or cut into small pieces)
• cut grass, allowed to dry slightly rst
• leaves (in small pieces if possible)
• tree or hedge cuttings (shredded)
• coffee grounds, lters, teabags, eggshells
• wood ashes and soot
Introduce the waste in such a way that it is as loose as
possible. Do not press or pat down the waste to form
a sold mass, otherwise this could prevent the microorganisms from working properly on the compost.
• kitchen wastes containing meat, sh, cheese, soup,
cooking fat, oil, bones or bread. These materials
contribute to the formation of mould.
• materials treated with chemicals, likewise avoid
potato peelings
• never place citrus fruit peel in your compost
How quickly your composter processes the waste
depends mainly on the mixing of the materials,
moisture content and temperature. Grass cuttings,
vegetable and garden waste, and farmyard dung rot
down in a few months. The rotting process can be
further accelerated if you sprinkle each layer of well
mixed and thoroughly damp material with a compost
starter (obtainable from a garden centre), mixed organic
fertilisers and old compost earth or by adding garden
worms. You can also add garden earth, stone dust or
crushed coral. In the summer months in particular, the
num-ber of micro-organisms increases greatly and this
leads to a speedy breakdown of the green waste.
• First test whether the compost is ready. Slide open
the opening so that you can see the structure of the
humus. When the compost is ready it has a dark
brown, grainy appearance and smells like the forest
oor.
• Sieve the nished compost before use (not too ne).
Return any materials that are not completely rotted,
e.g. pieces of branch, back into the composter.
IAN: 28504
Kunststofferzeugnisse Reinhard Simon
Scherershüttenstraße 7
D-99885 Ohrdruf
90
o
90
o
90
o
90
o
Q E
R T
2a 2b 2c
1
2
4.1
4.2
W
• évitez que le compost ne sèche complètement (en
particulier pendant les mois d’été), arrosez le compost de
Instructions de montage
Tenez compte des instructions suivantes:
Montez le composteur selon les étapes suivantes et placez-
le uniquement sur une surface plane.
Fourniture:
4 x parties latérales avec poussoir de retrait prémonté
1 x couvercle
1 x grille de fond
4 x piquets
Choix du lieu d’installation
Le lieu d’installation le plus favorable pour le composteur
est dans le clair-obscur de eurs et de haies. Veillez à ce
que le composteur soit en contact direct avec la terre du
jardin. Ceci permet aux organismes nécessaires contenus
dans le sol de travailler sans gêne. Pour maintenir
l’humidité, une couche de bois mort, de déchets hachés ou
de tourbe sont le mieux adaptés.
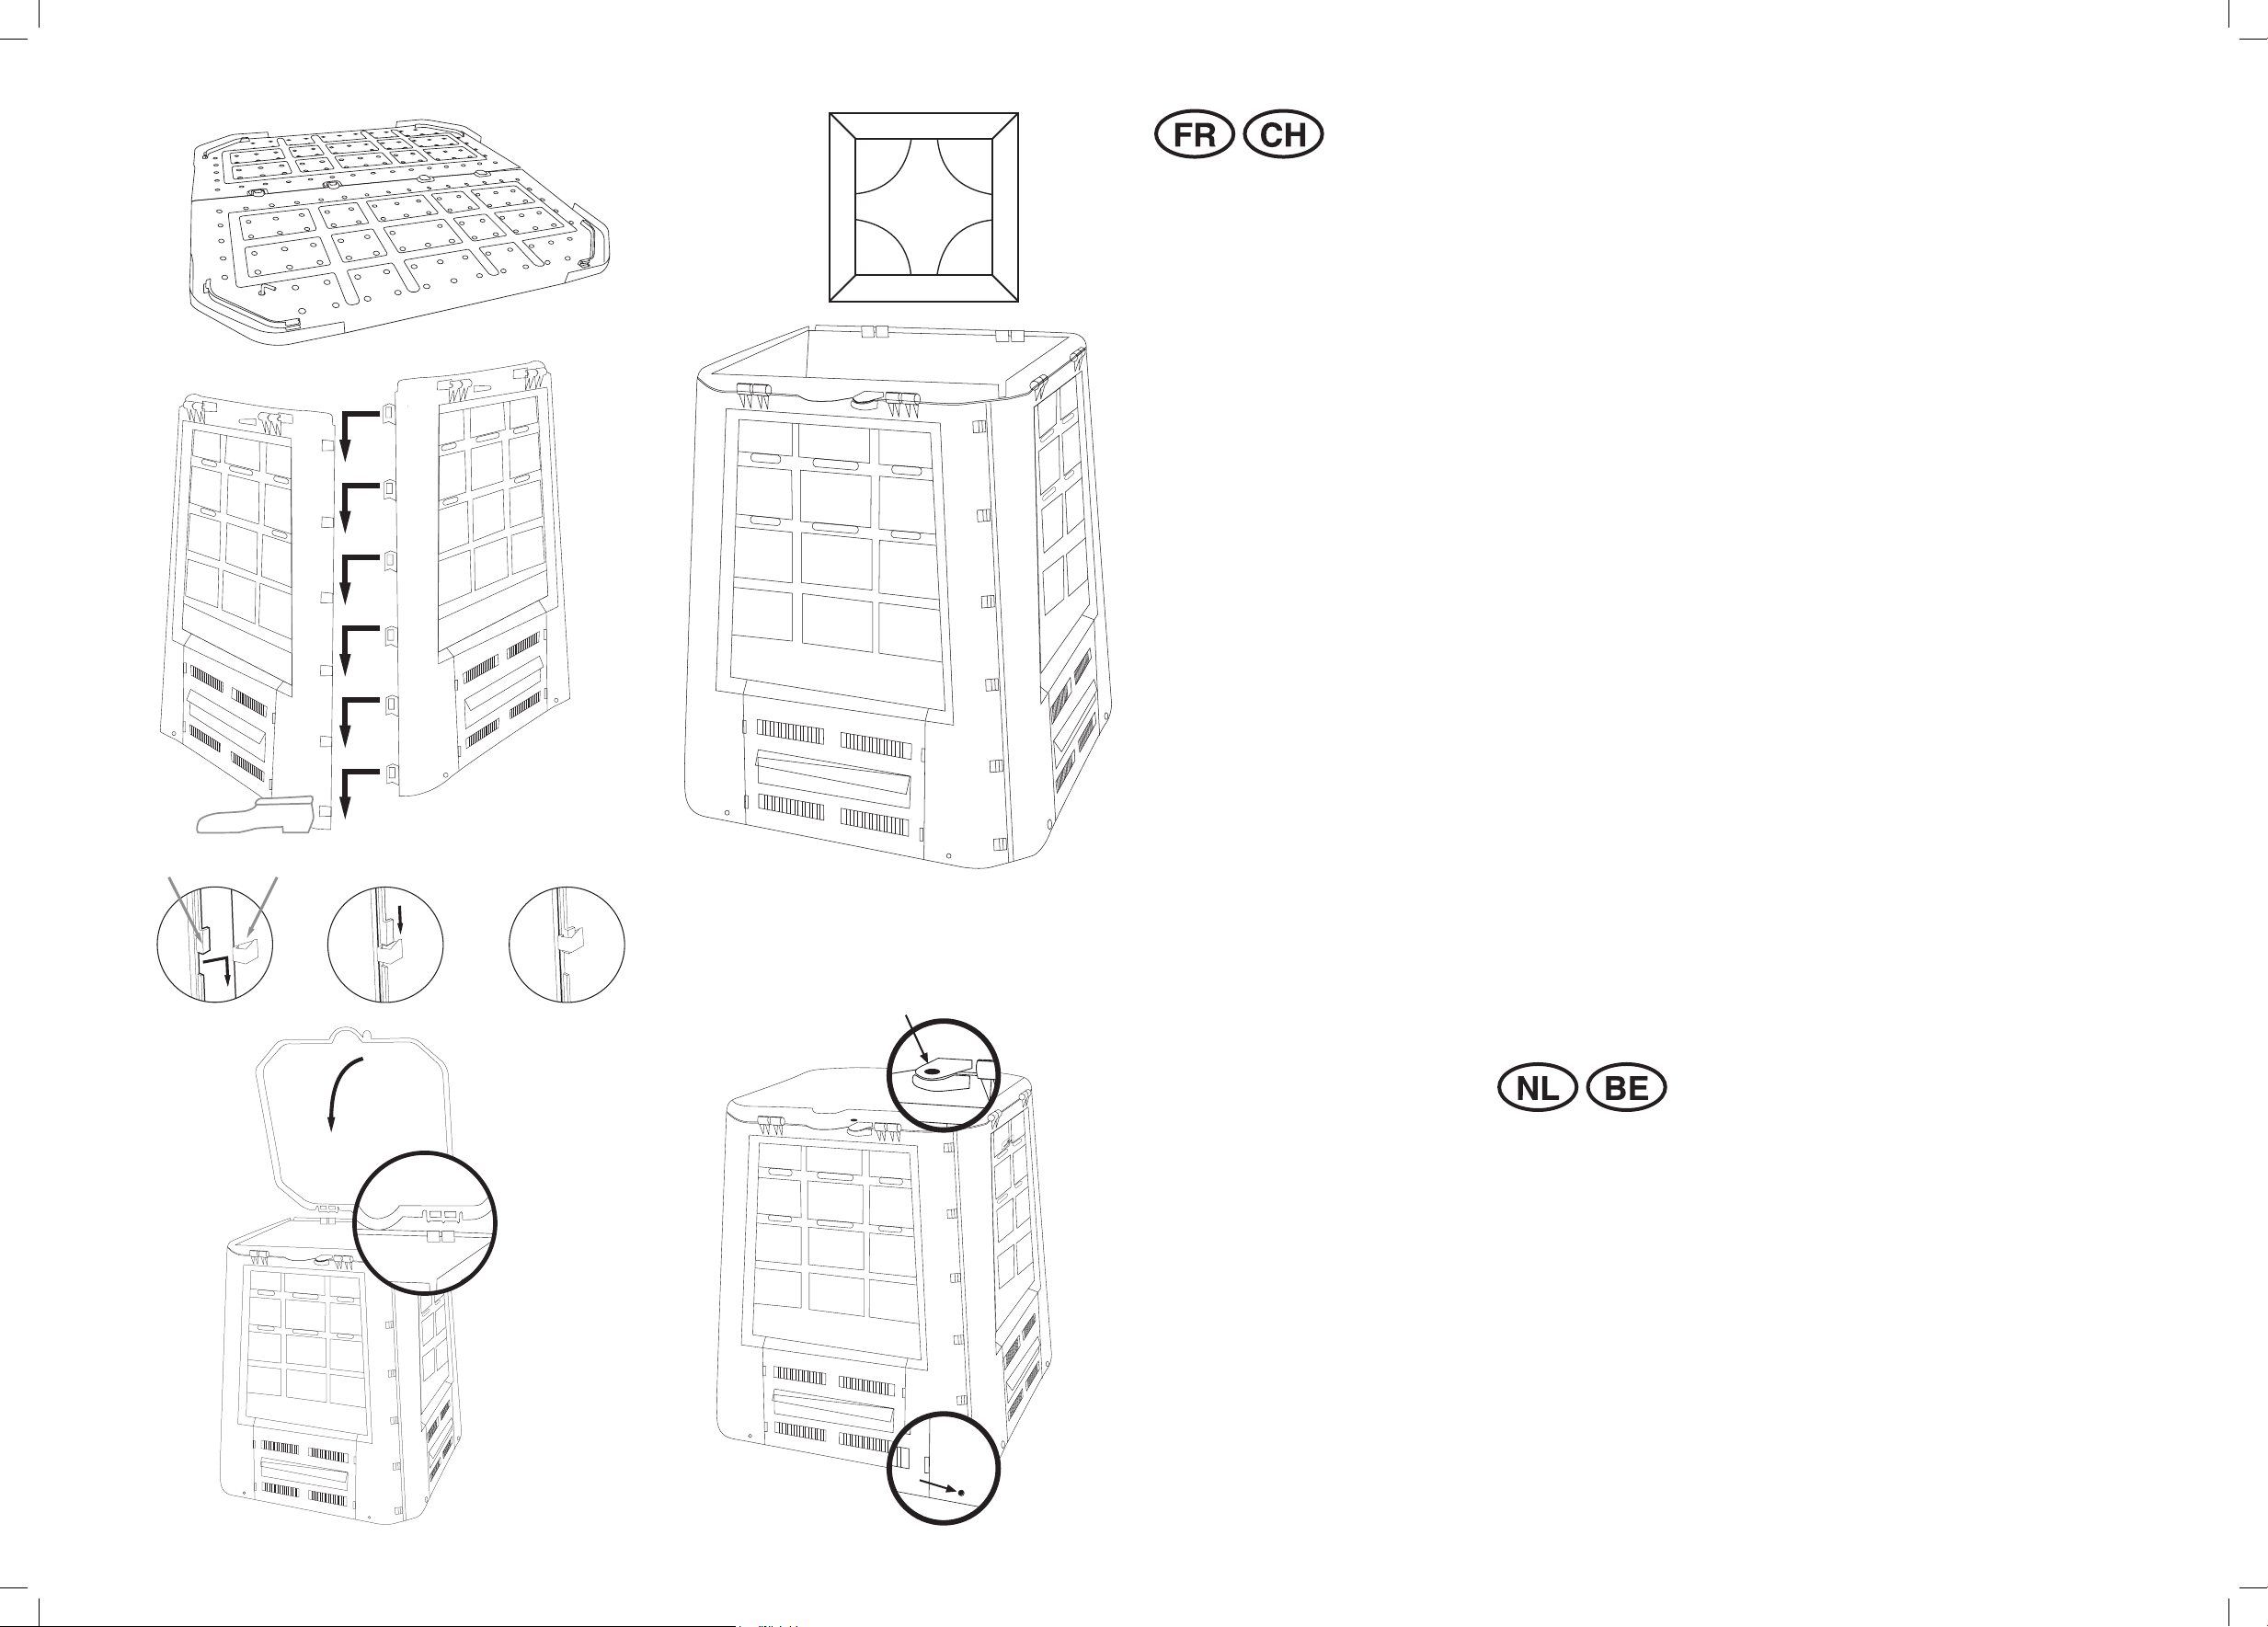
1) Ancrez l‘une à l‘autre les deux parties de la grille
de fond
Placez les quatre piquets dans les orices aux angles
de la grille de fond et ancrez-les dans le sol.
2) Ancrez les parties latérales entre elles
Avis: Placez-vous en dehors du composteur, il sera plus
facile à monter ainsi. A l’aide du pied gauche, xez la partie
latérale gauche respective, et poussez les ergots de xation
de la partie latérale droite respective dans les rainures de la
partie gauche respective.
2a Ergot de xation (1) & rainure (2)
2b Pousser l’ergot de xation dans la rainure
2c Presser vers le bas
3) Orientez les quatre côtés de sorte qu’ils soient à
angle droit
Orientez les quatre parties latérales – poussées les unes
dans les autres comme il l’a été mentionné au point 2 – de
sorte qu’elles soient à angle droit (90°).
Raccordez la grille de fond aux parties latérales
Placez sur la grille de fond les parties latérales reliées entre
elles. Pressez-les vers le bas et faites-les encliqueter.
4) Mettez le couvercle en place et faites-le encliqueter
Mettre le couvercle légèrement à angle vers l’avant,
appuyer vers le bas et le faire encliqueter. Placez le
couvercle aux points de charnière sur l’une des parties
latérales quelconques et faites-le encliqueter (voir croquis).
Si l’une des charnières est endommagée, il est possible
d’utiliser la charnière d’une autre partie latérale.
5) Le montage est terminé
Le composteur dispose d’un orice de fermeture (voir ill.
4.1). Fermez le composteur si nécessaire à l’aide d’un
cadenas (le cadenas n’est pas fourni).
COMPOSTEUR
Remplissage correct du composteur
• Commencez par une couche de terre
• puis des ordures de jardin; dans la mesure du possible
avec une couche intermédiaire de bois et de feuilles, c’est-
à-dire mélanger des déchets verts riches en azote et des
déchets riches en carbone
• les diverses couches devraient avoir une hauteur ne
dépassant pas 15 cm env.
• évitez les odeurs désagréables; pour cela, il est judicieux
de mélanger un peu, à l’aide d’une fourche, les produits
à composter placés dans le composteur – cet apport d’air
frais accélère le processus de décomposition
• les substances passant dans le composteur ont un taux
de substances nutritives relativement faibles, leur valeur
principale réside dans le taux d’humus, c’est pourquoi un
enrichissement supplémentaire en substances nutritives
(par exemple fumier d’écurie) est favorable
temps à autre
Les déchets compostables sont entre autres:
• les déchets produits au jardin (hachés ou coupés en petits
morceaux)
• l’herbe coupée légèrement séchée
• les feuilles (coupées dans la mesure du possible)
• les tombées d’arbre ou de haies (hachées)
• le marc de café avec les ltres en papier, les sachets de
thé, les coquilles d’oeuf
• les cendres de bois et la suie Jetez les déchets sur le
compost sans presser. Ne pressez et n’écrasez jamais les
déchets, an que les organismes puissent travailler dans
le compost.
A ne pas mettre au compost:
• les déchets de cuisine tels que les restes de viande, de
poisson, de fromages, de soupes, de graisse de cuisson,
d’huile, d’os et de pain. Ces produits contribuent à la
formation de moisissure!
• évitez également les pelures de pommes de terre traitées
avec des produits chimiques
• ne pas mettre non plus d’écorces d’agrumes au compost
Conseils pour l’accélération du processus de
compostage
La vitesse de maturation d’un compost dépend pour
l’essentiel de sa composition, de son taux d’humidité et de
la température. L’herbe coupée, les déchets de légumes
et de jardin et les fumiers d’écurie se décomposent en
quelques mois. Le processus de décomposition peut
également être accéléré si l’on saupoudre les diverses
couches, bien mélangées et humidiées, avec des
accélérateurs de compostage en vente dans le commerce
spécialisé, des mélanges de fumiers organiques ou de la
vieille terre de compost, ou en y ajoutant des vers de terre.
Il est également possible, à titre d’alternative, d’utiliser de
la terre du jardin, de la roche pulvérisée ou du calcaire
d’algues. Pendant les mois d’été en particulier, les microorganismes se multiplient rapidement et entraînent une
décomposition rapide des éléments végétaux.
Retrait du compost prêt
• Contrôlez tout d’abord le degré de maturité du compost.
Ouvrez le verrou pour déterminer la structure de l’humus.
Le compost prêt devrait être marron foncé, granuleux et
sentir le sol de forêt.
• Avant de l’utiliser, passez le compost au crible (pas trop
n). Remettez dans le composteur les éléments non
décomposés, comme par exemple les morceaux de
branches.
Montage-instructie
Let op:
bouw de compostbereider op volgens de onderstaand
beschreven stappen en plaats hem alléén op een vlakke
ondergrond.
Leveringsomvang:
4 x zijelementen, elk met voorgemonteerde uitneemschuif
1 x deksel
1 x bodemrooster
4 x grondpennen
Kies de standplaats
De meest gunstige standplaats voor de compost-bereider is
in de halfschaduw van bloemen en heggen. Zorg ervoor dat
de compostbereider direct contact heeft met de tuingrond.
Op deze wijze kunnen de vereiste grondorganismen
ongehinderd hun werk doen. Voor het behoud van de
vochtigheid is een laag rijshout, shredderafval of turf het
best geschikt.
1) Veranker de beide roosterdelen aan elkaar
Steek de vier grondpennen door de gaten aan de
hoeken van het bodemrooster en veranker deze in de
grond.
2) Veranker de zijelementen met elkaar
Opmerking: als u buiten de compostbereider staat, kunt
u deze eenvoudiger opbouwen. Fixeer met behulp van de
linkervoet telkens het linker zijelement en schuif de
bevestigingsnokken van het rechter zijelement in de
gleuven van het linker zijelement.
2a Bevestigingsnok (1) & Gleuf (2)
2b Schuif de bevestigingsnok in de gleuf
2c Omlaag drukken
3) Lijn de vier zijden haaks uit
Lijn de vier zijelementen -zoals onder 2 - zijden in elkaar
geschoven, haaks (90°) uit.
Verbind het bodemrooster met de zijdelen
Plaats de verbonden zijdelen op het bodemrooster. Druk ze
iets naar beneden en klik de zijdelen vast.
4) Zet het deksel aan en laat het inklikken
Deksel licht naar voor aanzetten, … Omlaag drukken
en inklikken Plaats het deksel bij een willekeurig zijelement
op de scharnierpunten en laat het inklikken (zie afb.).
Bij beschadigingen van een scharnierelement kan het
scharnier van een ander zijelement worden gebruikt.
5) De montage is voltooid
De compostbereider beschikt over een slotboring (zie afb.
4.1). Vergrendel de compostbereider indien nodig met een
hangslot (het slot is niet bij de levering inbegrepen).
COMPOSTBEREIDER
Vul de compostbereider op de juiste manier
• begin met een laag grond
• daarna het tuinafval indien mogelijk met tijdelijk
opgeslagen hout en bladen d.w.z. stikstofrijk, groen afval
gemengd met koolstofrijk afval
• de afzonderlijke lagen dienen niet hoger te zijn dan 15 cm
• vermijd stankoverlast; hiervoor kunt u het composteergoed
in de compostbereider met een graafvork een beetje
doormengen – door deze verse luchttoevoer wordt het
rottingsproces versneld.
• stoffen die in de compostbereider terechtkomen, zijn
relatief arm aan voedingsstoffen, hun belangrijkste waarde
ligt in het humusgehalte, daarom is een verrijking met
voedingstoffen (bijv. stalmest) gunstig
• vermijd een volledige uitdroging van de compostbereider
(vooral in de zomermaanden), door de compost af en toe
met water te besproeien
Voor compost geschikt afval is o.a.:
• voorkomend tuinafval (gehakseld of kleingesneden)
• gesneden, licht gedroogd gras
• loof (indien mogelijk kleingemaakt)
• boom- of hegsnoeiing (gehakseld)
• kofedik met lterzakje, theezakje, eierschaal
• houtas en roet
Gooi al het afval zo los mogelijk in de compost-bereider.
Druk of stamp het afval nooit aan, zodat de organismen in
de compost kunnen werken.
Niet in de compostbereider behoort o.a.:
• keukenafval zoals resten van vlees, vis, kaas, soep,
braadvet, olie, botten en brood. Deze producten
bevorderen schimmelvorming!
• met chemische middelen behandelde schillen van
aardappels dienen eveneens te worden vermeden
• schillen van citrusvruchten behoren in géén geval in de
compostbereider
Tips voor een versnelling van de
composteringsprocedure
Hoe snel een compostbereider werkt, is in principe
afhankelijk van de materiaalsamenstelling, het
vochtigheidsgehalte en de temperatuur. Gesneden gras,
groente- en tuinafval en stalmest rotten in enkele maanden.
Het rottingsproces wordt verder versneld wanneer de
afzonderlijke, goed gemengde en vochtige lagen met
compoststarters uit de vakhandel, organisch mengmest en
oude compostgrond worden bestrooid of door toevoegen
van regenwormen. Als alternatief kan ook tuingrond,
steengruis of algenkalk worden gebruikt. Vooral in de
zomermaanden vermeerderen zich de micro-organisme
sterk, waardoor de plantenresten snel vergaan.
Verwijder de gebruiksklare compost
• Controleer de rijpheid van de compost. Open de schuif om
de structuur van de humus te herkennen. Gebruiksklare
compostgrond dient donkerbruin en korrelig te zijn en
moet naar bosgrond ruiken.
• Zeef de gebruiksklare compostgrond voor gebruik (niet
te jn). Deponeer niet verrotte bestanddelen zoals bijv.
resten van takken opnieuw in de compostbereider.
Aufbauanleitung
Bitte beachten Sie:
Bauen Sie den Komposter in den nachfolgend
beschriebenen Schritten und stellen Sie ihn nur auf ebenem
Untergrund auf.
Lieferumfang:
4 x Seitenteile mit jeweils vormontiertem Entnahmeschieber
1 x Deckel
1 x Bodengitter
4 x Erdspieße
Wählen Sie den Standort aus
Der günstigste Standort für den Komposter ist im
Halbschatten von Blumen und Hecken. Sorgen Sie dafür,
dass der Komposter direkten Kontakt zur Gartenerde hat.
Dadurch können die notwendigen Bodenorganismen
ungehindert arbeiten. Zur Erhaltung der Feuchtigkeit sind
eine Schicht Reisig, Schredderabfälle oder Torf am besten
geeignet.
1) Verankern Sie die beiden Teile des Bodengitters
miteinander
Stecken Sie die vier Erdspieße durch die Löcher an den
Ecken des Bodengitters und verankern Sie diese mit
dem Boden.
2) Verankern Sie die Seitenteile miteinander
Hinweis: Stellen Sie sich außerhalb des Komposters, so
lässt er sich leichter aufbauen. Fixieren Sie mit Hilfe des
linken Fußes das jeweils linke Seitenteil, und schieben Sie
die Befestigungsnasen des jeweils rechten Seitenteiles in
die Nuten des jeweils linken Seitenteiles.
2a Befestigungsnase (1) & Nut (2)
2b Befestigungsnase in Nut schieben
2c Runterdrücken
3) Richten Sie die vier Seiten rechtwinklig aus
Richten Sie die vier -wie in 2 zusammen geschobenenSeitenteile rechtwinklig (90°) aus.
Verbinden Sie das Bodengitter mit den Seitenteilen
Setzen Sie die verbundenen Seitenteile auf das
Bodengitter. Drücken Sie diese etwas runter und lassen Sie
die Seitenteile einrasten.
4) Setzen Sie den Deckel an und lassen Sie ihn
einrasten
Deckel leicht nach vorn anwinkeln, ... Runterdrücken
und einrasten Setzen Sie den Deckel an einem beliebigen
Seitenteil an den Scharnierpunkten an und lassen Sie
ihn einrasten (siehe Skizze). Bei Beschädigung eines
Scharnierteils kann das Scharnierteil eines anderen
Seitenteiles verwendet werden.
5) Der Aufbau ist abgeschlossen
Der Komposter verfügt über eine Schlossbohrung (siehe
Abb. 4.1). Verriegeln Sie den Komposter bei Bedarf mit
einem Vorhängeschlosses (das Schloss ist nicht im
Lieferumfang enthalten).
KOMPOSTER
Befüllen Sie den Komposter richtig
• beginnen Sie mit einer Lage Erde
• dann Gartenabfälle; möglichst mit zwischen gelagertem
Holz und Blättern, d.h. stickstoffreiche, grüne Abfälle mit
kohlenstoffreichen gemischt
• die einzelnen Lagen sollten eine Höhe von etwa 15 cm
nicht übersteigen
• vermeiden Sie Geruchsbelästigung; dazu ist es hilfreich,
wenn Sie das eingegebene Kompostiergut im Komposter
mit einer Grabegabel leicht durchmischen - durch
diese Frischluftzufuhr wird der Verrottungsprozess
vorangetrieben
• Stoffe, die in den Komposter gelangen sind relativ
nährstoffarm, ihr Hauptwert liegt im Humusgehalt, darum
ist auch eine zusätzliche Anreicherung mit Nährstoffen
(z.B. Stalldünger) günstig
• vermeiden Sie eine völlige Austrocknung des Kompostes
(speziell in den Sommermonaten), indem Sie den
Kompost ab und zu wässern
Kompostierbare Abfälle sind u.a.:
• anfallende Gartenabfälle (gehäckselt oder klein
geschnitten)
• geschnittenes, leicht angetrocknetes Gras
• Laub (möglichst zerkleinert)
• Baum- oder Heckenschnitt (geschreddert)
• Kaffeesatz mit Filtertüte, Teebeutel, Eierschale
• Holzasche und Ruß
Werfen Sie alle Abfälle möglichst locker ein. Drücken
oder stampfen Sie die Abfälle niemals fest, damit die
Organismen im Kompost arbeiten können.
Nicht in den Kompost gehören u.a.:
• Küchenabfälle wie Reste von Fleisch, Fisch, Käse
Suppen, Bratfett, Öl, Knochen und Brot. Diese Produkte
tragen zur Schimmelbildung bei! • mit chemischen Mitteln
behandelte Schalen von Kartoffeln sollten ebenfalls
vermieden werden
• Schalen von Zitrusfrüchten gehören keinesfalls in den
Kompost
Tipps zur Beschleunigung des Kompostiervorgangs
Wie schnell ein Komposter zur Reife gelangt, ist im
wesentlichen abhängig von der Materialzusammensetzung,
deren Feuchtigkeitsgehalt und der Temperatur.
Grasschnitte, Gemüse- und Gartenabfälle, Stallmist
verrotten in wenigen Monaten.
Der Rotteprozess wird weiter beschleunigt, wenn man die
einzelnen gut vermischten und durchfeuchteten Lagen
mit Kompoststartern aus dem Fachhandel, organischen
Mischdünger und alter Kompostererde bestreut oder
durch Zugabe von Regenwürmern. Alternativ kann auch
die Gartenerde, Gesteinsmehl oder Algenkalk verwendet
werden. Speziell in den Sommermonaten vermehren sich
die Mikroorganismen stark und bewirken eine rasche
Zersetzung der Panzenteile.
Entnehmen Sie den fertigen Kompost
• Prüfen Sie zunächst den Reifegrad des Kompostes.
Öffnen Sie den Schieber, um die Struktur des Humus zu
erkennen. Fertige Komposterde sollte dunkelbraun, körnig
sein und nach Waldboden riechen.
• Sieben Sie die fertige Komposterde vor der Verwendung
(nicht zu fein) durch. Geben Sie nicht verrottete
Bestandteile wie z.B. Aststücke dann erneut in den
Komposter.
Assembly instructions
Please note:
Assemble your composter in accordance with the
following instructions, placing it on a level supporting
surface.
Included components:
4 x sides, each with a pretted slide opening for
removal
1 x lid
1 x bottom screen
4 x ground spikes
Selecting a suitable site
The ideal site for the composter is in the half shade
of owers or hedges. Ensure that the composter is in
direct contact with garden soil. This will allow essential
garden organisms to work unhindered on your
compost. A layer of coarser stalks, shredded material
or grass sods is perfect for ensuring the correct
moisture content is maintained.
1) Anchor the two parts of the bottom screen together
Push the fastening nose (1) into the slot (2) until it
engages. Insert the 4 ground spikes through the holes
in the corners of the bottom screen and anchor them to
the ground.
2) Attaching the sides to one another
Note: You will nd it easier to assemble the composter
if you stand outside it. Using your left foot to steady the
left hand side part of each corner, slide the fastening
lugs of the right hand side part into the corresponding
slots ofthe left hand side part.
2a Fastening lug (1) & slot (2)
2b Slide the fastening lug into the slot
2c Press down
3) Squaring up the four sides
Adjust the four sides – once you have slid them
together as instructed in 2 – so that they are at right
angles (90°) to one another.
Connecting the bottom screen to the sides
Set down the connected sides on the bottom screen.
Press them down slightly so that the sides engage.
4) Putting on and engaging the lid
Angle the lid towards the front, ... Press it down and
engage it Attach the lid to any side part by the hinge
points and engage it (see sketch). If the hinge part on
any side part gets damaged you can use the hinge part
on another side.
5) The assembly is complete
The composter has a hole for a lock (see Fig. 4.1).
If necessary you can lock the composter with a padlock
(padlock not included).
COMPOSTER
It is important to ll your composter correctly
• begin with a layer of earth
• then add garden waste, if possible with intermediate
layers woody material and leaves, i.e. create a mixture
of nitrogen-rich green waste and carbon-rich materials
• the individual layers should not be thicker than 15 cm
• to avoid smells building up, it is helpful to lightly mix
through the composting material in the composter
using a garden fork. This will allow fresh air to be
introduced into the rotting process
• the materials in the composter are relatively poor in
nutrient content but are important for their humus
content, therefore it may be benecial to enrich the
mixture by adding nutrients, for example farmyard
dung
• water the compost from time to time to avoid it drying
out completely, especially in the summer months
Compostable wastes include:
• garden waste (chopped or cut into small pieces)
• cut grass, allowed to dry slightly rst
• leaves (in small pieces if possible)
• tree or hedge cuttings (shredded)
• coffee grounds, lters, teabags, eggshells
• wood ashes and soot
Introduce the waste in such a way that it is as loose as
possible. Do not press or pat down the waste to form
a sold mass, otherwise this could prevent the microorganisms from working properly on the compost.
Items unsuitable for composting include:
• kitchen wastes containing meat, sh, cheese, soup,
cooking fat, oil, bones or bread. These materials
contribute to the formation of mould.
• materials treated with chemicals, likewise avoid
potato peelings
• never place citrus fruit peel in your compost
Tips for accelerating the composting process
How quickly your composter processes the waste
depends mainly on the mixing of the materials,
moisture content and temperature. Grass cuttings,
vegetable and garden waste, and farmyard dung rot
down in a few months. The rotting process can be
further accelerated if you sprinkle each layer of well
mixed and thoroughly damp material with a compost
starter (obtainable from a garden centre), mixed organic
fertilisers and old compost earth or by adding garden
worms. You can also add garden earth, stone dust or
crushed coral. In the summer months in particular, the
num-ber of micro-organisms increases greatly and this
leads to a speedy breakdown of the green waste.
Removing the nished compost
• First test whether the compost is ready. Slide open
the opening so that you can see the structure of the
humus. When the compost is ready it has a dark
brown, grainy appearance and smells like the forest
oor.
• Sieve the nished compost before use (not too ne).
Return any materials that are not completely rotted,
e.g. pieces of branch, back into the composter.
IAN: 28504
Kunststofferzeugnisse Reinhard Simon
Scherershüttenstraße 7
D-99885 Ohrdruf
90
o
90
o
90
o
90
o
Q E
R T
2a 2b 2c
1
2
4.1
4.2
W
• coffee grounds, lters, teabags, eggshells
• wood ashes and soot
Assembly instructions
Please note:
Assemble your composter in accordance with the following
instructions, placing it on a level supporting surface.
Included components:
4 x sides, each with a pretted slide opening for removal
1 x lid
1 x bottom screen
4 x ground spikes
Selecting a suitable site
The ideal site for the composter is in the half shade of
owers or hedges. Ensure that the composter is in direct
contact with garden soil. This will allow essential garden
organisms to work unhindered on your compost. A layer of
coarser stalks, shredded material or grass sods is perfect
for ensuring the correct moisture content is maintained.
1) Insert the 4 ground spikes through the holes in the
corners of the bottom screen and anchor them to the
ground.
2) Attaching the sides to one another
Note: You will nd it easier to assemble the composter if
you stand outside it. Using your left foot to steady the left
hand side part of each corner, slide the fastening lugs of the
right hand side part into the corresponding slots ofthe left
hand side part.
2a Fastening lug (1) & slot (2)
2b Slide the fastening lug into the slot
2c Press down
3) Squaring up the four sides
Adjust the four sides – once you have slid them together
as instructed in 2 – so that they are at right angles (90°) to
one another.
Connecting the bottom screen to the sides
Set down the connected sides on the bottom screen. Press
them down slightly so that the sides engage.
4) Putting on and engaging the lid
Angle the lid towards the front, ... Press it down and engage
it Attach the lid to any side part by the hinge points and
engage it (see sketch). If the hinge part on any side part
gets damaged you can use the hinge part on another side.
5) The assembly is complete
The composter has a hole for a lock (see Fig. 4.1).
If necessary you can lock the composter with a padlock
(padlock not included).
COMPOSTER
It is important to ll your composter correctly
• begin with a layer of earth
• then add garden waste, if possible with intermediate
layers woody material and leaves, i.e. create a mixture of
nitrogen-rich green waste and carbon-rich materials
• the individual layers should not be thicker than 15 cm
• to avoid smells building up, it is helpful to lightly mix
through the composting material in the composter using a
garden fork. This will allow fresh air to be introduced into
the rotting process
• the materials in the composter are relatively poor in
nutrient content but are important for their humus content,
therefore it may be benecial to enrich the mixture by
adding nutrients, for example farmyard dung
• water the compost from time to time to avoid it drying out
completely, especially in the summer months
Compostable wastes include:
• garden waste (chopped or cut into small pieces)
• cut grass, allowed to dry slightly rst
• leaves (in small pieces if possible)
• tree or hedge cuttings (shredded)
Introduce the waste in such a way that it is as loose as
possible. Do not press or pat down the waste to form a sold
mass, otherwise this could prevent the micro-organisms
from working properly on the compost.
Items unsuitable for composting include:
• kitchen wastes containing meat, sh, cheese, soup,
cooking fat, oil, bones or bread. These materials contribute
to the formation of mould.
• materials treated with chemicals, likewise avoid potato
peelings
• never place citrus fruit peel in your compost
Tips for accelerating the composting process
How quickly your composter processes the waste depends
mainly on the mixing of the materials, moisture content
and temperature. Grass cuttings, vegetable and garden
waste, and farmyard dung rot down in a few months. The
rotting process can be further accelerated if you sprinkle
each layer of well mixed and thoroughly damp material
with a compost starter (obtainable from a garden centre),
mixed organic fertilisers and old compost earth or by adding
garden worms. You can also add garden earth, stone dust
or crushed coral. In the summer months in particular, the
num-ber of micro-organisms increases greatly and this
leads to a speedy breakdown of the green waste.
Removing the nished compost
• First test whether the compost is ready. Slide open the
opening so that you can see the structure of the humus.
When the compost is ready it has a dark brown, grainy
appearance and smells like the forest oor.
• Sieve the nished compost before use (not too ne).
Return any materials that are not completely rotted, e.g.
pieces of branch, back into the composter.
Asennusohje
Huomioon otettavaa:
Asenna kompostori jäljempänä kuvattujen toimenpiteiden
mukaisesti, ja aseta se vain tasaiselle maapohjalle.
Toimituslaajuus:
4 x sivuosaa, joihin kuhunkin on esiasennettu
poistoluukku
1 x kansi
1 x pohjaverkon
4 x kiinnitystappia
Sijaintipaikan valinta
Kompostorille sopiva sijaintipaikka on kukkien ja
pensasaitojen muodostama puolivarjo. Huolehdi siitä,
että kompostorista on suora yhteys ruokamultaan.
Siten välttämätön maaeliöstö voi työskennellä. Risu-,
kuivahajotusjäte- tai turvekerros on parhaiten omiaan
ylläpitämään kosteutta.
1) Kiinnitä pohjaverkon molemmat osat toisiinsa.
Työnnä neljä kiinnitystappia pohjaverkon kulmissa
olevien reikien läpi ja ankkuroi ne kiinni maaperään.
2) Ankkuroi sivuosat toisiinsa
Ohje: Asetu kompostorin ulkopuolelle, jolloin se on
helpompi asentaa. Kiinnitä vasemman jalan avulla
kulloinenkin vasen sivuosa ja työnnä oikean sivuosan kukin
kiinnitysnokka vastaaviin uriin vasemmassa sivuosassa.
2a Kiinnitysnokka (1) & Ura (2)
2b Työnnä kiinnitysnokka uraan
2c Alaspainaminen
3) Järjestä neljä sivua suoraan kulmaan
Järjestä neljä sivuosaa suorakulmaisesti (90°) kuten
kohdassa 2 yhteentyönnetyt osat.
Liitä pohjaverkko ja seinät toisiinsa.
Aseta toisiinsa liitetyt seinät pohjaverkon päälle. Paina niitä
hieman alaspäin ja anna seinien lukkiutua paikoilleen.
4) Kiinnitä kansi ja anna sen lukittua
Taivuta kantta kevyesti eteenpäin,... paina alaspäin
ja lukitse Kiinnitä kansi mihin tahansa sivuosan
saranakohtiin ja anna sen lukittua (katso kuva).
Jonkun toisen sivuosan saranakohtaa voidaan käyttää
saranakohdan vaurioituessa.
5) Rakenne on suljettu
Kompostorissa on käytettävissä lukkoporaus (katso kuva
4.1). Lukitse kompostori tarvittaessa riippulukolla (lukko
ei sisälly toimituslaajuuteen).
KOMPOSTORI
Täytä kompostori oikein
• aloita laittamalla kerros maata
• sen jälkeen puutarhajätteet; mahdollisimman kerroksittain
puuainesta ja lehtiä, ts. typekkäät, vihreät jätteet
sekoitettuina runsashiilisiin
• yksittäiset kerrokset eivät saa ylittää noin 15 cm korkeutta
• vältä hajuhaittoja; lisäksi on avuksi, jos sekoitat kevyesti
laitettua kompostorimassaa kompostorissa kaivulapiolla
perin pohjin – tällä raitisilmatuuletuksella nopeutetaan
lahotusprosessia
• kompostoriin suhteellisen ravinneköyhinä päässeiden
aineksien pääarvo on niiden humuspitoisuudessa, siksi
myös lisärikastaminen ravintoaineilla (esim. karjanlanta)
on eduksi
• vältä kompostin täydellistä kuivumista (erityisesti
kesäkuukausina) kastelemalla komposti ajoittain
Kompostoitavia jätteitä ovat mm.:
• kertyneet puutarhajätteet (silputtuina tai pieniksi
leikattuina)
• leikattu, hiukan kuivunut ruoho
• lehdet (mahdollisimman pieniksi pilkottu)
• puu- tai pensasleikkeet (hajotettu)
• kahvinporo suodatinpusseineen, teepussi, munankuoret
• puutuhka ja roskat
Heitä kaikki jätteet mahdollisimman löyhästi.
Älä milloinkaan paina jätteitä tiiviiksi tai sullo
niitä, jotta eliöstö voi työskennellä kompostissa.
Kompostiin eivät kuulu mm.:
• keittiöjätteet kuten lihan, kalan, juuston, liemen,
paistinrasvan, öljyn, luun ja leivän jätteet. Nämä tuotteet
myötävaikuttavat homeen muodostumiseen!
• samoin kemiallisilla aineilla käsiteltyjä perunankuoria tulee
välttää
• sitrushedelmien kuoret eivät missään tapauksessa kuulu
kompostiin
Vinkkejä kompostointiprosessin nopeuttamiseen
Se, kuinka nopeasti kompostointi etenee, riippuu oleellisesti
aineskoostumuksesta, sen kosteuspitoisuudesta ja
lämpötilasta. Ruohonleikkuu-, vihannes- ja puutarhajätteet,
karjanlanta mätänevät muutamassa kuukaudessa.
Mätänemisprosessia edelleen kiihdytetään, kun sirotellaan
yksittäisiä hyvin sekoitettuja ja läpikostutettuja kerroksia,
joissa on erikoisliikkeestä saatavia kompostikäynnistimiä,
orgaanista sekalannoitetta ja vanhaa kompostorimaata tai
kompostiin lisätään kastematoja. Vaihtoehtoisesti voidaan
käyttää myös puutarhamaata, kivijauhetta tai leväkalkkia.
Erityisesti kesäkuukausina mikro-organismit lisääntyvät
voimakkaasti ja saavat aikaan nopean kasvinosien
hajoamisen.
Poista valmis komposti
• Tarkasta ensiksi kompostin kypsyysaste. Avaa luukku
humuskoostumuksen toteamiseksi. Valmiin kompostimaan
tulee olla tummanruskeaa, rakeista ja haista
metsäpohjalle.
• Seulo valmis kompostin maa-aines ennen käyttöä (ei liian
hienoksi). Laita sen jälkeen mätänemättömät ainesosat,
kuten esim. oksan kappaleet, uudelleen kompostoriin.

Monteringsanvisning
Observera:
Montera komposteraren enligt nedanstående steg och
placera den på jämnt underlag.
I leveransen ingår:
4 x sidodelar med förmonterat spjäll
1 x lock
1 x bottengaller
4 x jordpålar
Välj ut placering
Bästa placeringen för komposteraren är en skuggig plats.
Se till att komposteraren har direktkontakt med marken.
De nödvändiga organismerna i marken kan frodas utan
problem. Använd ris, gräsklipp eller torv för att bevara
fuktigheten.
1) Sätt ihop bottengallrets båda delar
Stick ner de fyra jordpålarna genom hålen i
bottengallrets hör och skjut ner dem i jorden.
2) Montera ihop sidodelarna med varandra
Tips: Stå utanför komposteraren, det underlättar
monteringen. Håll fast den vänstra sidodelen med vänster
fot och skjut in fästena på den högra sidodelen i spåren
på den vänstra.
2a Fäste (1) & Spår (2)
2b Skjut fästet i spåret
2c Tryck ner
3) Ställ upp de fyra sidorna i rät vinkel
Ställ upp de fyra sammanfogade delarna i 90° vinkel.
Sätt ihop bottengallret med sidodelarna
Placera den sammanskjutna sidodelarna på bottengallret.
Tryck ner dem och låt sidodelarna haka i.
4) Sätt på locken och låt dem haka i.
Vinkla locket lätt framåt …. Tryck ner och låt haka i Placera
locket på en av sidodelarna vid gångjärnen och låt de haka
i (se skissen). Om gångjärnet är skadat kan en annan
sidodel och gångjärn användas.
5) Monteringen är klar
Komposteraren är utrustad med låsborrning (se bild 4.1).
Lås komposteraren med ett hänglås om det behövs (lås
ingår inte i leveransen).
KOMPOSTERARE
Fyll komposteraren riktig
• Börja med ett lager jord
• Sedan trädgårdsavfall, om möjligt mellan kvistar och blad,
d.v.s. kvävehaltigt grönt avfall blandat med syrerikt avfall.
• De olika lagren bör inte vara högre än 15 cm.
• Undvik dålig lukt genom att regelbundet blanda komposten
med högaffel. Genom tillförsel av frisk luft påskyndas
komposteringen.
• Allt material som hamnar i komposten brukar vara
näringsfattig, komposteringen behöver därför tillskott av
näring, t.ex. dynga eller gödsel.
• Se till att inte komposten torkar, speciellt under
sommarmånaderna kan det vara aktuellt att vattna
komposten ibland.
Komposterbart avfall är bl.a.:
• Trädgårdsavfall, kört genom en kompostkvarn i mindre
omfattning
• Gräsklipp, lätt torkat
• Torra löv, småskuret om möjligt
• Avfall från träd eller häckar, kört genom kompostkvarn
• Kaffe och lterpåsar, tepåsar, äggskal
• Aska och sot
Lägg ned allt avfall så luftigt som möjligt. Tryck
inte ner komposten och stampa inte i avfallet, låt
de naturliga organismerna ta hand om komposten.
Följande ämnen hör inte hemma i komposten:
• Köksavfall t.ex. rester av kött, sk, ost, soppa, fett,
olja, ben eller bröd. Dessa produkter förorsakar bara
svampbildning.
• Undvik även kemiskt behandlade produkter eller sprutade
grönsaker, t.ex. potatisskal.
• Citronskal eller apelsinskal hör heller inte hemma i
komposten
Tips för snabbare kompostering
Hur snabb komposten bildas beror helt och hållet på
kompostmaterialet, fuktigheten och temperaturen.
Gräsklipp, grönsaks- och trädgårdsavfall samt dynga
komposterar på några månader.
Förruttningsprocessen påskyndas ytterligare om man tillför
kompostämnen, nns att köpa i fackhandeln, organisk
blandgödsel eller äldre kompostjord till de olika lagren.
Bland genom lagren ordentligt ibland. Även tillförseln av
vanlig trädgårdsmask påskyndar processen
Alternativt kan även trädgårdsjord, stenmjöl eller algkalk
användas. Speciellt under sommarmånaderna ökar
mikroorganismerna och påverkar snabbare förruttning.
Ta ur den färdiga komposten
• Kontrollera först om komposten är färdig. Öppna spjället
för att kontrollera resultatet. Färdig kompostjord skall vara
mörkbrun, kornig och lukta skogsjord.
• Sila den färdiga kompostjorden innan du strör ut den
(inte för ntkornigt). Lägg tillbaka sådant som inte blivit
komposterat, t.ex. grenar och kvistar.
Monteringsanvisning
Observere:
Montere komposter ifølge faser beskrevne nede og placere
den kun på et jævnt underlag.
Leveranceomfang:
4 x sidedele med formonterede skubbere for
komposttømning
1 x låg
1 x jordgitter
4 x jordspyd
Valg af placering
En god placering for en kompostor er halvskygge af
blomster og buske. Observer at komposter kommer
til direkte kontakt med havemuld. Så kan nødvendige
jordorganismer fungere uden forhindring. For at opretholde
fuktighet i komposten passer det bedst med et lag kvas, tørt
opløst affald eller tørv.
1) De to dele af bundgitret forbindes med hinanden
De re jordspyd stikkes gennem huller i bundgitrets
hjørner und forankres i jorden.
2) Fæstne sidedeler til hverandre
Anvisning: Still dig udenfor komposter så det er lettere at
montere. Fæstn hver sidedel med hjælp af venstre foden og
skubb hver højre sidedels fastgørelsetap i furen på
respektive venstre sidedel.
2a fastgørelsetap (1) og fure (2)
2b Skubb fastgørelsetap i furen
2c Tryk ned
3) Rette ud de 4 sider til retvinklede
Rette ud de 4 sidedele retvinklede (90°) – ligesom de
skubbedes sammen på punkt 2.
Bundgitret forbindes med sidedelene
De forbundne sidedele stilles på bundgitret. De skal nu
presses lidt nedad. Sidedelene låser sig fast til gitret.
4) Sæt låget på og lad den låse sig
Låget er lett at vende fremad,… trykke nedad og låse
Sæt låget i hvad som helst sidedel på hængsler-punkter og
lad den låse sig (se på skabelon). Hvis en hængslerdel
bliver skaded kan man anvende hængslerdel af en anden
sidedel.
5) Montering er færdig
Kompostor kan anvendes med låsboring (se på Billede 4.1).
Lås komposten efter behov med hængelås (ikke
medleveret).
KOMPOSTER
At fylde kompost rigtigt
• Begynd med et lag jord
• Derefter haveaffald; imellem et lag træ og løv, med andre
ord kvælstofrig grøn affald mikset med kulstofrig affald
• Enkeltstående lag skal ikke overskride ca 15 cm’s højde
• Undvig lugtulemper; desuden hjælper det til hvis du lett
blander kompostpræparat i kompostor med en greb –
dette medfør frisk luft i komposten noget som ger fart til
rådningsproces
• Stoffer der kommer i komposten er ganske fattige med
næringsmidler. Deres hovedværdi er humusholdighet,
derfor det også er ønskeligt at anvende ekstra berigning
med næringsmidler (t.ex. kvæggødning)
• Observer at komposten ikke tørrer ud (speciellt om
sommer). Vande komposten tidvis.
Komposterbart affald er bl.a.:
• nedfaldent haveaffald (skåret eller klippet i stykker)
• klippet, lidt tørret græs
• løv (så nskåret som muligt)
• mejet træ eller buske (tørrsplittet)
• kaffegrums med lter, Teblade med lter, æggeskaller
• grene og sod
Kast bort alt affald i så små dele som muligt. Aldrig stamp
eller trykk affald for at organismer skal kunne fungere vel i
komposten.
Ikke komposterbart affald er bl.a.:
• Køkkenaffald ligesom kødaffald, sk, ost, supper,
stegefedt, olie, ben og brød. Disse produkter medvirker
formning af mug!
• Kartoffelskræler behandlede med kemiske stof skal også
undviges
• Citrusskaller hør absolut ikke til kompost!
Tips for at sætte fart i kompostering
Hvor hurtigt modnes komposten beror væsentligt på
sammensætning af stoffet, dens fugtighet og temperatur.
Klippet græs, grønsags- og haveaffald og kvæggødning
rådner i nogle monader.
Rådningsprocessen acceleres hvis enkeltstående
velblandede og vandede lag dækkes med kompoststarter (sælges i specielforretninger), organiske blandede
gødninger og gammel kompostmuld. Regnorme
hjælper også til. Et alternativ er at anvende havejord,
stenpulver eller alpenkalk. Specielt om sommeren vokser
mikroorganismer kraftigt og medvirker hurtig opløsning af
plantedele.
Tømning af moden kompost
• Kontroller først kompostens modenhedsgrad. Åbn
skubbere for at genkende strukturen af humus. Færdig
kompostmuld skal vare mørkebrun, grynet og lugte som
skovbund.
• Sigt færdig kompostmuld føre anvendning (ikke før nt).
Sæt derefter ikke rådnede dele, ligesom t.ex. grendele, i
komposten igen.
Aufbauanleitung
Bitte beachten Sie:
Bauen Sie den Komposter in den nachfolgend
beschriebenen Schritten und stellen Sie ihn nur auf ebenem
Untergrund auf.
Lieferumfang:
4 x Seitenteile mit jeweils vormontiertem Entnahmeschieber
1 x Deckel
1 x Bodengitter
4 x Erdspieße
Wählen Sie den Standort aus
Der günstigste Standort für den Komposter ist im
Halbschatten von Blumen und Hecken. Sorgen Sie dafür,
dass der Komposter direkten Kontakt zur Gartenerde hat.
Dadurch können die notwendigen Bodenorganismen
ungehindert arbeiten. Zur Erhaltung der Feuchtigkeit sind
eine Schicht Reisig, Schredderabfälle oder Torf am besten
geeignet.
1) Verankern Sie die beiden Teile des Bodengitters
miteinander
Stecken Sie die vier Erdspieße durch die Löcher an den
Ecken des Bodengitters und verankern Sie diese mit
dem Boden.
2) Verankern Sie die Seitenteile miteinander
Hinweis: Stellen Sie sich außerhalb des Komposters, so
lässt er sich leichter aufbauen. Fixieren Sie mit Hilfe des
linken Fußes das jeweils linke Seitenteil, und schieben Sie
die Befestigungsnasen des jeweils rechten Seitenteiles in
die Nuten des jeweils linken Seitenteiles.
2a Befestigungsnase (1) & Nut (2)
2b Befestigungsnase in Nut schieben
2c Runterdrücken
3) Richten Sie die vier Seiten rechtwinklig aus
Richten Sie die vier -wie in 2 zusammen geschobenenSeitenteile rechtwinklig (90°) aus.
Verbinden Sie das Bodengitter mit den Seitenteilen
Setzen Sie die verbundenen Seitenteile auf das
Bodengitter. Drücken Sie diese etwas runter und lassen Sie
die Seitenteile einrasten.
4) Setzen Sie den Deckel an und lassen Sie ihn
einrasten
Deckel leicht nach vorn anwinkeln, ... Runterdrücken
und einrasten Setzen Sie den Deckel an einem beliebigen
Seitenteil an den Scharnierpunkten an und lassen Sie
ihn einrasten (siehe Skizze). Bei Beschädigung eines
Scharnierteils kann das Scharnierteil eines anderen
Seitenteiles verwendet werden.
5) Der Aufbau ist abgeschlossen
Der Komposter verfügt über eine Schlossbohrung (siehe
Abb. 4.1). Verriegeln Sie den Komposter bei Bedarf mit
einem Vorhängeschlosses (das Schloss ist nicht im
Lieferumfang enthalten).
KOMPOSTER
Befüllen Sie den Komposter richtig
• beginnen Sie mit einer Lage Erde
• dann Gartenabfälle; möglichst mit zwischen gelagertem
Holz und Blättern, d.h. stickstoffreiche, grüne Abfälle mit
kohlenstoffreichen gemischt
• die einzelnen Lagen sollten eine Höhe von etwa 15 cm
nicht übersteigen
• vermeiden Sie Geruchsbelästigung; dazu ist es hilfreich,
wenn Sie das eingegebene Kompostiergut im Komposter
mit einer Grabegabel leicht durchmischen - durch
diese Frischluftzufuhr wird der Verrottungsprozess
vorangetrieben
• Stoffe, die in den Komposter gelangen sind relativ
nährstoffarm, ihr Hauptwert liegt im Humusgehalt, darum
ist auch eine zusätzliche Anreicherung mit Nährstoffen
(z.B. Stalldünger) günstig
• vermeiden Sie eine völlige Austrocknung des Kompostes
(speziell in den Sommermonaten), indem Sie den
Kompost ab und zu wässern
Kompostierbare Abfälle sind u.a.:
• anfallende Gartenabfälle (gehäckselt oder klein
geschnitten)
• geschnittenes, leicht angetrocknetes Gras
• Laub (möglichst zerkleinert)
• Baum- oder Heckenschnitt (geschreddert)
• Kaffeesatz mit Filtertüte, Teebeutel, Eierschale
• Holzasche und Ruß
Werfen Sie alle Abfälle möglichst locker ein. Drücken
oder stampfen Sie die Abfälle niemals fest, damit die
Organismen im Kompost arbeiten können.
Nicht in den Kompost gehören u.a.:
• Küchenabfälle wie Reste von Fleisch, Fisch, Käse
Suppen, Bratfett, Öl, Knochen und Brot. Diese Produkte
tragen zur Schimmelbildung bei! • mit chemischen Mitteln
behandelte Schalen von Kartoffeln sollten ebenfalls
vermieden werden
• Schalen von Zitrusfrüchten gehören keinesfalls in den
Kompost
Tipps zur Beschleunigung des Kompostiervorgangs
Wie schnell ein Komposter zur Reife gelangt, ist im
wesentlichen abhängig von der Materialzusammensetzung,
deren Feuchtigkeitsgehalt und der Temperatur.
Grasschnitte, Gemüse- und Gartenabfälle, Stallmist
verrotten in wenigen Monaten.
Der Rotteprozess wird weiter beschleunigt, wenn man die
einzelnen gut vermischten und durchfeuchteten Lagen
mit Kompoststartern aus dem Fachhandel, organischen
Mischdünger und alter Kompostererde bestreut oder
durch Zugabe von Regenwürmern. Alternativ kann auch
die Gartenerde, Gesteinsmehl oder Algenkalk verwendet
werden. Speziell in den Sommermonaten vermehren sich
die Mikroorganismen stark und bewirken eine rasche
Zersetzung der Panzenteile.
Entnehmen Sie den fertigen Kompost
• Prüfen Sie zunächst den Reifegrad des Kompostes.
Öffnen Sie den Schieber, um die Struktur des Humus zu
erkennen. Fertige Komposterde sollte dunkelbraun, körnig
sein und nach Waldboden riechen.
• Sieben Sie die fertige Komposterde vor der Verwendung
(nicht zu fein) durch. Geben Sie nicht verrottete
Bestandteile wie z.B. Aststücke dann erneut in den
Komposter.
Instructions de montage
Tenez compte des instructions suivantes:
Montez le composteur selon les étapes suivantes et
placez-le uniquement sur une surface plane.
Fourniture:
4 x parties latérales avec poussoir de retrait prémonté
1 x couvercle
1 x grille de fond
4 x piquets
Choix du lieu d’installation
Le lieu d’installation le plus favorable pour le
composteur
est dans le clair-obscur de eurs et de haies. Veillez
à ce que le composteur soit en contact direct avec
la terre du jardin. Ceci permet aux organismes
nécessaires contenus dans le sol de travailler sans
gêne. Pour maintenir l’humidité, une couche de bois
mort, de déchets hachés ou de tourbe sont le mieux
adaptés.
1) Ancrez l‘une à l‘autre les deux parties de la grille
de fond Placez les quatre piquets dans les orices aux
angles de la grille de fond et ancrez-les dans le sol.
2) Ancrez les parties latérales entre elles
Avis: Placez-vous en dehors du composteur, il sera
plus facile à monter ainsi. A l’aide du pied gauche, xez
la partie latérale gauche respective, et poussez les
ergots de xation de la partie latérale droite respective
dans les rainures de la partie gauche respective.
2a Ergot de xation (1) & rainure (2)
2b Pousser l’ergot de xation dans la rainure
2c Presser vers le bas
3) Orientez les quatre côtés de sorte qu’ils soient
à angle droit Orientez les quatre parties latérales –
poussées les unes dans les autres comme il l’a été
mentionné au point 2 – de sorte qu’elles soient à angle
droit (90°).
Raccordez la grille de fond aux parties latérales
Placez sur la grille de fond les parties latérales reliées
entre elles. Pressez-les vers le bas et faites-les
encliqueter.
4) Mettez le couvercle en place et faites-le encliqueter
Mettre le couvercle légèrement à angle vers l’avant,
appuyer vers le bas et le faire encliqueter. Placez le
couvercle aux points de charnière sur l’une des parties
latérales quelconques et faites-le encliqueter (voir
croquis). Si l’une des charnières est endommagée, il
est possible d’utiliser la charnière d’une autre partie
latérale.
5) Le montage est terminé
Le composteur dispose d’un orice de fermeture (voir
ill. 4.1). Fermez le composteur si nécessaire à l’aide
d’un cadenas (le cadenas n’est pas fourni).
COMPOSTEUR
Remplissage correct du composteur
• Commencez par une couche de terre
• puis des ordures de jardin; dans la mesure du
possible avec une couche intermédiaire de bois et de
feuilles, c’est-à-dire mélanger des déchets verts riches
en azote et des déchets riches en carbone
• les diverses couches devraient avoir une hauteur ne
dépassant pas 15 cm env.
• évitez les odeurs désagréables; pour cela, il est
judicieux de mélanger un peu, à l’aide d’une fourche,
les produits à composter placés dans le composteur
– cet apport d’air frais accélère le processus de
décomposition
• les substances passant dans le composteur ont un
taux de substances nutritives relativement faibles,
leur valeur principale réside dans le taux d’humus,
c’est pourquoi un enrichissement supplémentaire en
substances nutritives (par exemple fumier d’écurie)
est favorable
• évitez que le compost ne sèche complètement (en
particulier pendant les mois d’été), arrosez le compost
de temps à autre
Les déchets compostables sont entre autres:
• les déchets produits au jardin (hachés ou coupés en
petits morceaux)
• l’herbe coupée légèrement séchée
• les feuilles (coupées dans la mesure du possible)
• les tombées d’arbre ou de haies (hachées)
• le marc de café avec les ltres en papier, les sachets
de thé, les coquilles d’oeuf
• les cendres de bois et la suie Jetez les déchets sur le
compost sans presser. Ne pressez et n’écrasez
jamais les déchets, an que les organismes puissent
travailler dans le compost.
A ne pas mettre au compost:
• les déchets de cuisine tels que les restes de viande,
de poisson, de fromages, de soupes, de graisse
de cuisson, d’huile, d’os et de pain. Ces produits
contribuent à la formation de moisissure!
• évitez également les pelures de pommes de terre
traitées avec des produits chimiques
• ne pas mettre non plus d’écorces d’agrumes au
compost
Conseils pour l’accélération du processus de
compostage La vitesse de maturation d’un compost
dépend pour l’essentiel de sa composition, de son taux
d’humidité et de la température. L’herbe coupée, les
déchets de légumes et de jardin et les fumiers d’écurie
se décomposent en quelques mois. Le processus de

décomposition peut également être accéléré si l’on
saupoudre les diverses couches, bien mélangées et
humidiées, avec des accélérateurs de compostage en
vente dans le commerce spécialisé, des mélanges de
fumiers organiques ou de la vieille terre de compost,
ou en y ajoutant des vers de terre. Il est également
possible, à titre d’alternative, d’utiliser de la terre du
jardin, de la roche pulvérisée ou du calcaire d’algues.
Pendant les mois d’été en particulier, les microorganismes se multiplient rapidement et entraînent une
décomposition rapide des éléments végétaux.
Retrait du compost prêt
• Contrôlez tout d’abord le degré de maturité du
compost. Ouvrez le verrou pour déterminer la
structure de l’humus. Le compost prêt devrait être
marron foncé, granuleux et sentir le sol de forêt.
• Avant de l’utiliser, passez le compost au crible (pas
trop n). Remettez dans le composteur les éléments
non décomposés, comme par exemple les morceaux
de branches.
Montage-instructie
Let op:
bouw de compostbereider op volgens de onderstaand
beschreven stappen en plaats hem alléén op een vlakke
ondergrond.
Leveringsomvang:
4 x zijelementen, elk met voorgemonteerde
uitneemschuif
1 x deksel
1 x bodemrooster
4 x grondpennen
5) De montage is voltooid
De compostbereider beschikt over een slotboring
(zie afb. 4.1). Vergrendel de compostbereider indien
nodig met een hangslot (het slot is niet bij de levering
inbegrepen).
COMPOSTBEREIDER
Vul de compostbereider op de juiste manier
• begin met een laag grond
• daarna het tuinafval indien mogelijk met tijdelijk
opgeslagen hout en bladen d.w.z. stikstofrijk, groen
afval gemengd met koolstofrijk afval
• de afzonderlijke lagen dienen niet hoger te zijn dan
15 cm
• vermijd stankoverlast; hiervoor kunt u het
composteergoed in de compostbereider met een
graafvork een beetje doormengen – door deze verse
luchttoevoer wordt het rottingsproces versneld.
• stoffen die in de compostbereider terechtkomen, zijn
relatief arm aan voedingsstoffen, hun belangrijkste
waarde ligt in het humusgehalte, daarom is een
verrijking met voedingstoffen (bijv. stalmest) gunstig
• vermijd een volledige uitdroging van de
compostbereider (vooral in de zomermaanden), door
de compost af en toe met water te besproeien
Voor compost geschikt afval is o.a.:
• voorkomend tuinafval (gehakseld of kleingesneden)
• gesneden, licht gedroogd gras
• loof (indien mogelijk kleingemaakt)
• boom- of hegsnoeiing (gehakseld)
• kofedik met lterzakje, theezakje, eierschaal
• houtas en roet
Gooi al het afval zo los mogelijk in de compostbereider. Druk of stamp het afval nooit aan, zodat de
organismen in de compost kunnen werken.
Kies de standplaats
De meest gunstige standplaats voor de compostbereider is in de halfschaduw van bloemen en heggen.
Zorg ervoor dat de compostbereider direct contact
heeft met de tuingrond.
Op deze wijze kunnen de vereiste grondorganismen
ongehinderd hun werk doen. Voor het behoud van de
vochtigheid is een laag rijshout, shredderafval of turf
het best geschikt.
1) Veranker de beide roosterdelen aan elkaar
Steek de vier grondpennen door de gaten aan de
hoeken van het bodemrooster en veranker deze in de
grond.
2) Veranker de zijelementen met elkaar
Opmerking: als u buiten de compostbereider staat, kunt
u deze eenvoudiger opbouwen. Fixeer met behulp van
de linkervoet telkens het linker zijelement en schuif de
bevestigingsnokken van het rechter zijelement in de
gleuven van het linker zijelement.
2a Bevestigingsnok (1) & Gleuf (2)
2b Schuif de bevestigingsnok in de gleuf
2c Omlaag drukken
3) Lijn de vier zijden haaks uit
Lijn de vier zijelementen -zoals onder 2 - zijden in elkaar
geschoven, haaks (90°) uit.
Verbind het bodemrooster met de zijdelen
Plaats de verbonden zijdelen op het bodemrooster.
Druk ze iets naar beneden en klik de zijdelen vast.
4) Zet het deksel aan en laat het inklikken
Deksel licht naar voor aanzetten, … Omlaag drukken
en inklikken Plaats het deksel bij een willekeurig
zijelement op de scharnierpunten en laat het inklikken
(zie afb.). Bij beschadigingen van een scharnierelement
kan het scharnier van een ander zijelement worden
gebruikt.
Niet in de compostbereider behoort o.a.:
• keukenafval zoals resten van vlees, vis, kaas, soep,
braadvet, olie, botten en brood. Deze producten
bevorderen schimmelvorming!
• met chemische middelen behandelde schillen van
aardappels dienen eveneens te worden vermeden
• schillen van citrusvruchten behoren in géén geval in
de compostbereider
Tips voor een versnelling van de
composteringsprocedure
Hoe snel een compostbereider werkt, is in principe
afhankelijk van de materiaalsamenstelling, het
vochtigheidsgehalte en de temperatuur. Gesneden
gras, groente- en tuinafval en stalmest rotten in enkele
maanden. Het rottingsproces wordt verder versneld
wanneer de afzonderlijke, goed gemengde en vochtige
lagen met compoststarters uit de vakhandel, organisch
mengmest en oude compostgrond worden bestrooid
of door toevoegen van regenwormen. Als alternatief
kan ook tuingrond, steengruis of algenkalk worden
gebruikt. Vooral in de zomermaanden vermeerderen
zich de micro-organisme sterk, waardoor de
plantenresten snel vergaan.
Verwijder de gebruiksklare compost
• Controleer de rijpheid van de compost. Open de
schuif om de structuur van de humus te herkennen.
Gebruiksklare compostgrond dient donkerbruin en
korrelig te zijn en moet naar bosgrond ruiken.
• Zeef de gebruiksklare compostgrond voor gebruik
(niet te jn). Deponeer niet verrotte bestanddelen
zoals bijv. resten van takken opnieuw in de
compostbereider.
IAN: 28504
Kunststofferzeugnisse Reinhard Simon
Scherershüttenstraße 7
D-99885 Ohrdruf

90
o
90
o
90
o
90
o
Q E
R T
2a 2b 2c
1
2
4.1
4.2
W
• leaves (in small pieces if possible)
• tree or hedge cuttings (shredded)
Assembly instructions
Please note:
Assemble your composter in accordance with the following
instructions, placing it on a level supporting surface.
Included components:
4 x sides, each with a pretted slide opening for removal
1 x lid
1 x bottom screen
4 x ground spikes
Selecting a suitable site
The ideal site for the composter is in the half shade of
owers or hedges. Ensure that the composter is in direct
contact with garden soil. This will allow essential garden
organisms to work unhindered on your compost. A layer of
coarser stalks, shredded material or grass sods is perfect
for ensuring the correct moisture content is maintained.
1) Anchor the two parts of the bottom screen together
Insert the 4 ground spikes through the holes in the
corners of the bottom screen and anchor them to the
ground.
2) Attaching the sides to one another
Note: You will nd it easier to assemble the composter if
you stand outside it. Using your left foot to steady the left
hand side part of each corner, slide the fastening lugs of
the right hand side part into the corresponding slots ofthe
left hand side part.
2a Fastening lug (1) & slot (2)
2b Slide the fastening lug into the slot
2c Press down
3) Squaring up the four sides
Adjust the four sides – once you have slid them together
as instructed in 2 – so that they are at right angles (90°) to
one another.
Connecting the bottom screen to the sides
Set down the connected sides on the bottom screen. Press
them down slightly so that the sides engage.
4) Putting on and engaging the lid
Angle the lid towards the front, ... Press it down and engage
it. Attach the lid to any side part by the hinge points and
engage it (see sketch). If the hinge part on any side part
gets damaged you can use the hinge part on another side.
5) The assembly is complete
The composter has a hole for a lock (see Fig. 4.1). If
necessary you can lock the composter with a padlock
(padlock not included).
COMPOSTER
It is important to ll your composter correctly
• begin with a layer of earth
• then add garden waste, if possible with intermediate layers
woody material and leaves, i.e. create a mixture of nitrogenrich green waste and carbon-rich materials
• the individual layers should not be thicker than 15 cm
• to avoid smells building up, it is helpful to lightly mix
through the composting material in the composter using a
garden fork. This will allow fresh air to be introduced into the
rotting process
• the materials in the composter are relatively poor in
nutrient content but are important for their humus content,
therefore it may be benecial to enrich the mixture by
adding nutrients, for example farmyard dung
• water the compost from time to time to avoid it drying out
completely, especially in the summer months
Compostable wastes include:
• garden waste (chopped or cut into small pieces)
• cut grass, allowed to dry slightly rst
• coffee grounds, lters, teabags, eggshells
• wood ashes and soot
Introduce the waste in such a way that it is as loose as
possible. Do not press or pat down the waste to form a sold
mass, otherwise this could prevent the micro-organisms
from working properly on the compost.
Items unsuitable for composting include:
• kitchen wastes containing meat, sh, cheese, soup,
cooking fat, oil, bones or bread. These materials contribute
to the formation of mould.
• materials treated with chemicals, likewise avoid potato
peelings
• never place citrus fruit peel in your compost
Tips for accelerating the composting process
How quickly your composter processes the waste depends
mainly on the mixing of the materials, moisture content and
temperature. Grass cuttings, vegetable and garden waste,
and farmyard dung rot down in a few months.
The rotting process can be further accelerated if you
sprinkle each layer of well mixed and thoroughly damp
material with a compost starter (obtainable from a garden
centre), mixed organic fertilisers and old compost earth or
by adding garden worms. You can also add garden earth,
stone dust or crushed coral. In the summer months in
particular, the num-ber of micro-organisms increases greatly
and this leads to a speedy breakdown of the green waste.
Removing the nished compost
• First test whether the compost is ready. Slide open the
opening so that you can see the structure of the humus.
When the compost is ready it has a dark brown, grainy
appearance and smells like the forest oor.
• Sieve the nished compost before use (not too ne).
Return any materials that are not completely rotted, e.g.
pieces of branch, back into the composter.
Instrukcja montażu
Prosimy pamiętać:
Kompostownik należy zmontować w sposób niżej opisany i
usadowić go wyłącznie na równym podłożu.
Produkt składa się z następujących części:
4 x elementy boczne z zamontowaną klapą do
pobierania kompostu
1 x pokrywa
1 x kratą spodnią
4 x kotwy
Wybrać stanowisko
Korzystną lokalizacją kompostownika jest
miejsce znajdujące się w półcieniu kwiatów
lub żywopłotu. Należy pamiętać, aby kompostownik
miał bezpośredni kontakt z ogrodową
ziemią. Dzięki temu organizmy żyjące w ziemi
potrzebne do procesu kompostowania będą
mieć wolny dostęp do składowanych w nim
odpadów. Do utrzymania wilgoci najlepiej
nadaje się warstwa chrustu, kory lub torfu.
1) Połączyć ze sobą obie części kraty spodniej
Wsunąć cztery kotwy w otwory znajdujące się
w narożnikach kraty spodniej i zakotwiczyć
w podłożu.
2) Połączyć ze sobą elementy boczne
Wskazówka: ustawić się na zewnątrz
kompostownika, dzięki temu można będzie go
łatwiej zmontować. Lewą stopą unieruchomić
lewy element boczny i wsunąć noski mocujące
prawej części bocznej do rowków znajdujących
się w części lewej.
2a Nosek mocujący (1) & rowek (2)
2b Wsunąć nosek mocujący do rowka
2c Docisnąć elementy
3) Wszystkie cztery boki ustawić pod kątem
prostym
Wszystkie cztery elementy boczne złączone w sposób opisany
w pkt. 2 należy teraz ustawić względem siebie pod kątem
prostym (90°).
Połączyć kratę spodnią ze ścianami bocznymi.
Nasadzić połączone ściany boczne na kratę spodnią. Docisnąć
w dół do momentu ich zazębienia.
4) Przyłożyć i docisnąć pokrywę tak, aby się ona wyraźnie
zazębiła
Pokrywę ustawić lekko pod kątem w kierunku do przodu, i
docisnąć w dół aż do jej słyszalnego zazębienia się.
Przyłożyć pokrywę do dowolnego elementu bocznego w
punktach, w których znajdują się zawiasy i docisnąć ją aż do jej
zazębienia się (patrz szkic). W przypadku uszkodzenia części
zawiasu możemy użyć zawiasu innego elementu bocznego
5) Montaż jest zakończony
Kompostownik posiada otwór zamkowy (patrz ilustracja 4.1).
W razie potrzeby kompostownik można zamknąć przy pomocy
kłódki (kłódka nie jest zawarta w wyposażeniu).
KOMPOSTOWNIK
Prawidłowe napełnianie kompostownika
• należy zacząć od warstwy ziemi
• następnie odpady ogrodowe; o ile to możliwe poprzedzielane
warstwami drewna i liści, odpadki zielone o dużej zawartości
azotu zmieszane z odpadkami o dużej zawartości węgla
• poszczególne warstwy nie powinny przekraczać grubości 15 cm
• unikajmy nadmiernego tworzenia się nieprzyjemnego
zapachu; pomocne w tym celu będzie lekkie przemieszanie
kompostowanego materiału widłami – dzięki doprowadzeniu
świeżego powietrza proces rozpadu ulegnie przyspieszeniu
• Materiał dostający się do kompostownika jest relatywnie
ubogi w substancje odżywcze, jego główna wartość kryje
się w zawartości humusu, dlatego korzystne jest dodatkowe
nawożenie (np. obornikiem)
• unikajmy całkowitego wysychania kompostu (szczególnie w
miesiącach letnich), od czasu do czasu nawadniając go.
Odpady nadające się do kompostowania to m in.:
• odpady ogrodowe (rozdrobnione)
• skoszona, lekko wysuszona trawa
• liście (w miarę możliwości rozdrobnione)
• ścinki po pielęgnacji drzew i żywopłotów (rozdrobnione)
• fusy z kawy wraz z papierowymi wkładami ltrującymi, herbata
ekspresowa w saszetkach, skorupki jajek
• popiół drzewny
Wrzucane odpady powinny być w miarę luźne. Nigdy mocno
nie ugniatać odpadów, aby umożliwić pracę organizmom
przerabiającym masę organiczną.
Do kompostownika nie należy wrzucać m in.:
• odpadów kuchennych takich jak resztki mięsa, ryb, serów,
zup, tłuszczu ze smażenia, oleju, kości i chleba - produkty te
przyczyniają się do powstawania pleśni!
• należy także unikać łupin kartoanych traktowanych środkami
chemicznymi
• w żadnym wypadku nie wrzucać do kompostownika skórek
po cytrusach
Wskazówki dla przyspieszenia procesu kompostowania
Szybkość procesu powstawania dojrzałego kompostu zależy
w dużej mierze od składu zgromadzonego w kompostowniku
materiału, jego wilgotności i temperatury. Ścięta trawa, odpady
owocowe i warzywne, obornik rozkładają się w ciągu kilku
miesięcy.
Proces rozkładu można przyspieszyć dzięki mieszaniu warstw
kompostowanego materiału, dobremu napowietrzeniu i
dodawaniu starterów dostępnych w sklepach specjalistycznych,
nawozów organicznych i starej ziemi kompostowej bądź też
dżdżownic. Alternatywnie można użyć także ziemi ogrodowej,
mączki kamiennej lub wapna glonowego. Mikroorganizmy
biorące udział w procesie kompostowania rozmnażają się
szczególnie intensywnie w okresie lata powodując szybki
rozkład odpadów roślinnych.

Wybieranie gotowego kompostu
• Najpierw należy sprawdzić stopień dojrzałości kompostu.
Otworzyć klapę i sprawdzić strukturę humusu. Gotowa ziemia
kompostowa powinna mieć ciemnobrązową barwę, powinna być
ziarnista i pachnieć leśną ściółką.
• Gotową ziemię kompostową przed użyciem należy przesiać
(nie za drobno). Składniki nierozłożone jak np. fragmenty gałęzi
należy ponownie umieścić w kompostowniku.
Szerelési útmutató
Kérjük vegye gyelembe:
Szerelje a komposztálót az alábbiakban leírt lépések szerint és
állítsa azt fel kizárólag egy vízszintes terepre.
A szállítmány tartalma:
4 x oldalrész előre felszerelt üritő tolóajtóval
1 x fedél
1 x fenékrács
4 x földcövek
Vlassza ki a telepítés helyét
A komposztáló kedvező telepítési helye sövények vagy virágok
félárnyékos környéke. Godoskodjon róla, hogy a komposztáló
közvetlen kapcsolatban legyen a kert talajával. Ezáltal a
szükséges talaj-mikroorganizmusok zavartalanul végezhetik
munkájukat. A nedvesség megtartására egy réteg rőzse, kerti
apritott hulladék, vagy tőzeg a legalkalmasabb.
1) Erősítse össze egymással a fenékrács két részét
Dugja a négy földcöveket a fenékrács sarkain található
lyukakon át és rögzítse azt a földhöz.
2) Erősítse össze egymással az oldalsó részeket
Utalás: Álljon a komposztálón kívül, így könnyebben
szeszerelheti azt össze. Rögzítse ballábával a mindenkori
baloldali oldalsó részt, és tolja a mindenkori jobboldali oldalsó
részek rögzítő kampóit a baloldali oldalsó rész megfelelő
nyílásaiba.
2a rögzítő kampó (1) & nyílás (2)
2b a rögzítő kampó betolása a nyílásokba
2c lenyomás
3) Állítsa fel a négy oldalsó részt úgy, hogy azok egymással
derékszöget alkossanak
Állítsa fel az 2 pont szerint összetolt oldalsó részeket úgy, hogy
azok egymással derékszöget (90°) alkossanak.
Kösse össze fenékrácsot az oldalrészekkel
Helyezze az összeszerelt oldalrészeket a fenékrácsra. Nyomja
azokat egy keveset le és hagyja az oldalrészeket bepattanni.
4) Helyezze rá a fedelet, nyomja le amíg az beugrik
A fedelet mozdítsa enyhén előre,... nyomja le ugrassza be
Helyezze a fedelet egy tetszőleges oldalsó részen a
csuklóhelyekre és hagyja beugrani (lásd az ábrát). Az egyik
csuklóhely megsérülése esetén egy másik oldal csuklóhelyeit
használhatja.
5) Az összeszerelést befejezte
A komposztáló egy lakat számára készült furattal rendelkezik
(lásd a 4.1 ábrát). Szükség esetén zárja le a komposztálót egy
lakattal (a lakat nem része a szállítmánynak).__
KOMPOSZTÁLÓ
Töltse meg helyesen a kompsztálóját
• kezdje egy földréteggel
• azután kerti hulladékokkal; lehetőleg időközben tárolt
fahulladékokkal és levelekkel vagyis nitrogénben gazdag, zöld
hulladékok keverve magas széntartalmúakkal
• az egyes rétegek vastagsága ne haladja meg a kb.15 cm-t
• kerülje a kellemetlen szagok keletkezését; ebben segítségére
lehet, ha a berakott komposztáladó anyagot a komposztálóban
egy kerti villával enyhén összevegyíti – ezáltal friss levegőt
vezet közéje, ami a rothadási folyamatot felgyorsítja
• A komposztálóba juttatott anyagok tápanyagtartalma
viszonylag szegényes, a fő értéküket a humusztartalmuk jelenti,
ezért jó ha azokat pótlólag tápanyagokkal (pld. istálótrágyával)
is kiegészíti.
• kerülje el a komposzt teljes mértékű kiszáradását (különösen
a nyári hónapokban) azáltak, hogy időnként a komposztot
megvizezi
Komposztálható hulladékok többek között:
• lehulló kerti hulladékok (apritorr vagy feldarabolt állapotban)
• levágott, enyhén száradt fű
• lomb (lehetőleg apróra vágva)
• fa- vagy sövénynyíradék (aprítva)
• kávézacc, teászacskó, tojáshéj
• fahamu és korom
Dobja be a hulladékokat lehetőleg lazán. Ne nyomja a
hulladékokat soha össze, hogy a mikroorganizmusok a
komposztban szabadon dolgozhassanak.
Nem a komposztba tartoznak többek között:
• Konyhai hulladékok mint például hús-, hal-, sajt-,
levesmaradékok, sült zsír, olaj, csontok és kenyér. Ezek a
termékek a penész létrejöttének kedveznek!
• Vegyszerekkel kezelt burgonyahéj bekerülését szintén el kell
kerülni.
• Semmiképpen sem tartozik a komposztba a citromfélék héja.
Tippek a komposztálási eljárás meggyorsítására.
Hogy a komposzt milyen gyorsan készül el, lényegében
az anyag összetételétől, nedvességtartalmától és a
hőmérsékletétől függ. A nyírott fű, a zöldség- és kerti
hulladékok, az istállótrágya pár hónap alatt beérik.
A beérési folyamat tovább gyorsul, ha az egyenként jól
összevegyített és átnedvesített rétegeket a kereskedelemben
beszerezhető komposztálás-indítóval, szerves keverttrágyával
és régi komposztfölddel beszórja, vagy ha földi gilisztákat
telepít belé. Alternativaként kerti földet, kőlisztet vagy
algameszet is lehet használni. Különösen a nyári hónapokban
a mikroorganizmusok nagyon gyorsan szaporodnak és ezek a
növényi részek gyors felbomlásához vezetnek.
Vegye ki a kész komposztot
• Előbb vizsgálja meg a komposzt érettségi fokát. A humusz
szerkezetének a felismerése végett nyissa ki a tolóajtót. A kész
komposztföldnek sötétbarnának, szemcsésnek és erdei földszagúnak kell lenni.
• A kész komposztföldet a felhasználás előtt rostálja át (ne túl
nomra). A még nem elrothadt részeket mint pld. ágdarabokat
tegye be újra a komposztálóba.
Navodilo za montažo
Prosimo upoštevajte:
Sestavite komposter kot je opisano v korakih, opisanih v
nadaljevanju, in ga nato postavite na ravno podlago.
Obseg dobave:
4 x stranski deli s predmontiranimi loputami za odvzem
1 x pokrov
1 x talno rešetko
4 x klini za pritrditev v zemljo
Izberite lokacijo
Najugodnejša lokacija za komposter je v polsenci rož in žive
meje. Skrbite za to, da ima komposter direktni stik z vrtno
zemljo. Na ta način lahko potrebni talni organizmi nemoteno
delajo. Za vzdrževanje vlage je najbolj primerna ena plast
dračja, odpadkov od drobljenja ali šote.
1) Oba dela talne rešetke pritrdite drug na drugega.
Štiri kline za pritrditev v zemljo vtaknite skozi odprtine v
kotih talne rešetke in jih zasidrajte v tleh.
2) Stranske dele pritrdite drug na drugega
Napotek: Stojte zunaj komposterja, tako lahko komposter
enostavneje zmontirate. S pomočjo leve noge vsakokrat
ksirajte levi stranski del in potisnite pritrdilne nastavke desnega
stranskega dela v utore na levem stranskem delu.
2a pritrdilni nastavek in (1) & utor (2)
2b pritrdilni nastavek potisnite v utor
2c pritisnite navzdol
3) Vse štiri stranske dele pravokotno poravnajte
Vse štiri stranske dele – potisnjene skupaj kot je opisano pod
točko 2 – pravokotno (90°) poravnajte.
Talno rešetko spojite s stranskimi deli
Med seboj povezane stranske dele postavite na talno rešetko.
Nekoliko jih potisnite navzdol, da se zaskočijo.
4) Namestite pokrov in pustite, da se zaskoči
Pokrov upognite rahlo naprej, ... ga pritisnite navzdol, tako da
se zaskoči Pokrov namestite na poljubnem stranskem
delu na tečaje, tako da se zaskoči (glejte skico). Če je eden od
tečajev poškodovan, lahko uporabite tečaj na nekem drugem
stranskem delu komposterja.
5) Montaža je končana
Komposter ima na voljo eno odprtino za ključavnico (glejte sliko
4.1). Po potrebi komposter zapahnite z žabico (ključavnica ni
vsebovana v obsegu dobave).
KOMPOSTER
Komposter pravilno napolnite
• začnite z eno plastjo zemlje
• nato dodajte vrtne odpadke; po možnosti z vmes naloženim
lesom in listjem, to pomeni z dušikom bogate, zelene odpadke
zmešane z ogljikom bogatimi odpadki
• posamezne plasti naj ne presegajo višine 15 cm
• izogibajte se nastajanju smradu; v ta namen je koristno, če
dodan material za kompostiranje v komposterju s pomočjo
prekopnih vil rahlo premešate – s takšnim dovajanjem svežega
zraka se pospeši proces razkrajanja
• snovi, ki pridejo v komposter, vsebujejo relativno malo
hranilnih snovi, pri njih je najpomembnejša vsebnost humusa,
zaradi tega je ugodna tudi dodatna obogatitev s hranilnimi
snovmi (npr. hlevskim gnojem)
• izogibajte se popolni izsušitvi komposta (še posebno v
poletnih mesecih), tako da kompost kdaj pa kdaj zalivate
Za kompostiranje primerni odpadki so med drugim:
• vrtni odpadki (sesekljani ali razrezani na majhne kose)
• pokošena, rahlo posušena trava
• listje (čim bolj zdrobljeno)
• porezana drevesa ali žive meje (zdrobljena)
• kavna usedlina s ltrsko vrečko, čajne vrečke, jajčne lupine
• lesni pepel in saje
Vse odpadke vrzite v komposter čim bolj razrahljane. Odpadkov
nikoli ne stiskajte ali teptajte, tako da lahko organizmi v
kompostu delajo.
V kompost ne spadajo med drugim:
• Kuhinjski odpadki kot so ostanki mesa, rib, sira, juh, maščobe
od pečenja, olja, kosti in kruha. Ti izdelki povzročajo nastajanje
plesni!
• prav tako se je treba izogibati dodajanju s kemičnimi sredstvi
obdelovanih olupkov krompirja
• lupine agrumov prav tako nikakor ne spadajo v kompost
Nasveti za pospeševanje procesa kompostiranja
Kako hitro je kompost gotov, je v glavnem odvisno od sestave
materiala, njegove vsebnosti vlage in temperature. Pokošena
trava, zelenjavni in vrtni odpadki, hlevski gnoj se razkrojijo v
nekaj mesecih.
Proces razkrajanja lahko še bolj pospešimo, če posamezne
dobro premešane in navlažene plasti posujemo z
vzpodbujevalniki nastajanja komposta iz specializiranih trgovin,
organskimi mešanimi gnojili in staro kompostno zemljo ali
z dodajanjem deževnikov. Alternativno se lahko uporablja tudi
vrtno zemljo, kamninsko moko ali kalcij iz alg. Še posebno
v poletnih mesecih se mikroorganizmi hitro razmnožujejo in
vplivajo na hitro razkrojevanje rastlinskih delov.
Gotovi kompost vzemite iz komposterja
• Najprej preverite stopnjo zrelosti komposta. Odprite loputo, da
prepoznate strukturo humusa. Gotova kompostna zemlja mora
biti temno rjava, zrnata in imeti duh po gozdni zemlji.
• Gotovo kompostno zemljo je treba pred uporabo presejati (ne
preveč na drobno). Sestavine, ki še niso razkrojene, kot so
na primer kosi vej, je treba dati nazaj v komposter.
Montážní návod
Dbejte laskavě na to:
Kompostér namontujte v následujících popsaných krocích a
postavte jej jen na rovný podklad.
Rozsah dodávky:
4 x boční díly se vždy předmontovaným posunovačem k vyjmutí
1 x víko
1 x mřížky
4 x zemních kolíků
Zvolte místo postavení
Nejpříznivější místo postavení pro kompostér je v polostínu
květin a živých plotů. Pečujte o to, aby měl kompostér přímý
kontakt se zahradní zemí. Tím mohou nezbytné zemní
organismy neomezeně pracovat. K udržování vlhkosti se hodí
vrstva klestí, odpady z drtiče či rašelina.
1) Spojte spolu oba díly mřížky dna
Čtyři zemní kolíky prostrčte děrami na rozích
mřížky dna a spojte je se dnem.
2) Boční díly spojte dohromady
Upozornění: Postavte se mimo kompostér, tak jej lze snadněji
smontovat. Pomocí levé nohy xujte levý boční díl, a zasuňte
boční upevňovací nosy tohoto pravého bočního dílu do drážek
levého dílu.
2a Upevňutvsrqponovací noswv (1) & drážka (2)
2b Upevňovací nos zasuňte do drážky
2c Přitlačte dolů
3) Ty čtyři strany seřiďte pravoúhle
Seřiďte ty čtyři boční díly - jak byly k sobě přisunuty – pravoúhle
(90°)
Spojení mřížky dna s bočními díly
Spojené boční díly nasaďte na mřížku dna. Zatlačte je trochu
dolů a nechejte boční díly zapadnout.
4) Nasaďte víko a nechejte je zasmeknout
Víko mírně dopředu ohněte,... přitlačte dolů a zasmekněte
Víko nasaďte na libovolném bočním dílu na bodech kloubového
závěsu a nechejte je zasmeknout (viz náčrtek). Při poškození
dílu kloubového závěsu lze použít dílu kloubového závěsu
jiného bočního dílu.
5) Montáž je skončena
Kompostér má k dispozici vývrt pro zámek (viz obr. 4.1). V
případě potřeby zavřete kompostér visacím zámkem (zámek
není zahrnut v rozsahu dodávky).
KOMPOSTÉR
Kompostér správně naplňte
• začněte s vrstvou půdy
• pak zahradní odpad, pokud možno s mezitím uloženým
dřevem a listím, tzn. zelený odpad bohatý na dusík smíšený s
odpadem bohatým na uhlík
• jednotliví vrstvy by neměly překročit výšku 15 cm
• vyhněte se obtěžování zápachem, k tomu je nápomocné,
promícháte-li lopatou kompost vložený do kompostéru
– vzhledem k tomuto přívodu čerstvého vzduchu se tlecí proces
urychlí
• látky, které se dostaly do kompostéru jsou relativně chudé na
živiny, jejich hlavní hodnota spočívá v obsahu humusu, proto
je také příznivé přídavné obohacení živinami (např. chlévskou
mrvou)
• vyhněte se úplnému vyschnutí kompostu (speciálně v letních
měsících) tím, že kompost občas zavlažíte
Kompostovatelné odpady jsou mj.:
• připadnuté zahradní odpady (z řezačky nebo drobně
nařezané)
• nasekaná, mírně usušená tráva
• listí (pokud možno rozdrcené)
• řezivo ze stromů a živých plotů (rozdrcené)
• usazenina z kávy s ltračním pytlíkem, skořápka z vajec
• popel ze dřeva a saze
Odpady vhoďte pokud možno volně. Nikdy odpady pevně
nestlačujte či nedusejte, aby mohly organizmy v kompostu
pracovat.
Do kompostu nepatří mj.:
• kuchyňské opady, jako jsou zbytky masa, ryby, sýru, polévek,
tuk na smažení, olej, kosti a chléb. Tyto výrobky přispívají k
vytvoření plísní!
• slupkám z brambor zpracovaným chemickými prostředky by
se mělo rovněž vyhnout
• kůry z citrusových plodů nepatří v žádném případě do
kompostu
Tipy k urychlení postupu kompostování
Jak rychle kompost dozraje, je zásadně závislé na složení
materiálu, obsahu vlhkosti a teploty. Nasekaná tráva,
zeleninové a zahradní odpady, chlévský hnůj zpráchnivějí v
několika měsících. Proces zpráchnivění se dále urychlí tím, že
se jednotlivě dobře promíchané a provlhčené vrstvy posypou
počátečním hnojivem pro kompost z odborného obchodu,
organickým smíšeným hnojivem a starou kompostovanou
půdou nebo přidáním žížal. Jako alternativu lze použít
i zahradní půdu, kamennou moučku nebo vápník z řas.
Speciálně v letních měsících se mikroorganizmy silně rozmnoží
a způsobí rychlé rozložení rostlinných částí.
Vyjmutí hotového kompostu
• Nejprve přezkoušejte stupeň zralosti kompostu. Otevřete
posunovač, abyste rozpoznal strukturu humusu. Hotová
kompostovaná půda by měla být tmavohnědá, zrnitá a měla by
zavánět lesem.
• Před použitím hotovou kompostovanou půdu prosejte (ne
příliš jemně). Nezpráchnivělé části, jako jsou např. kusy
větviček, nevložte znovu do kompostéru.
Návod na montáž
Dodržiavajte prosím nasledovné pokyny:
Kompostér montujte po ďalej popísaných krokoch a umiestnite
ho na rovný podklad.
Obsah dodávky:
4 x bočné diely s namontovanou posuvnou časťou na vyberanie
1 x kryt
1 x spodnej mriežky
4 x zahrotených stĺpov
Vyberte si stanovište
Najvýhodnejším stanovišťom pre kompostér je umiestnenie
v polotieni kvetov a živých plotov. Zabezpečte, aby mal
kompostér priamy kontakt so záhradou. Len tak môžu potrebné
mikroorganizmy bez prekážok účinkovať. Na udržanie vlhkosti
je najlepšie vhodná vrstva konárov, podrvené drevo alebo
rašelina.
1) Spojte oba diely spodnej mriežky
Prestrčte štyri zahrotené stĺpy cez otvory na rohoch
mriežky a upevnite ich ku dnu.
2) Bočné diely navzájom pospájajte
Poznámka: Postavte sa vedľa kompostéra, montáž je tak
jednoduchšia. Pomocou ľavej nohy si pridržte ľavý bočný diel a
zasúvajte ho upevňovacím výstupkom pravého bočného dielu
do žliabku ľavého bočného dielu.
2a upevňovací výstupok (1) & žliabok (2)
2b upevňovací výstupok vsuňte do žliabku
2c zatlačte ho dovnútra
3) Všetky štyri bočné diely vyrovnajte do pravého uhla
Vyrovnajte štyri bočné diely – upevnené ako 2- do pravého uhla
(90°).
Spojte spodnú mriežku s bočnými dielmi
Postavte zmontované bočné diely na spodnú mriežku. Zatlačte
tieto smerom dolu a nechajte bočné diely zaklapnúť.
4) Nasaďte kryt a nechajte ho zapadnúť
Kryt ľahko ohnite dopredu,... zatlačte a nechajte ho zapadnúť
Kryt nasaďte na ľubovoľný bočný diel na závesy a nechajte ho
zapadnúť (pozri nákres). V prípade poškodenia niektorej časti
závesu na kryt môžete použiť iný bočný diel.
5) Montáž je tým ukončená
Kompostér je vybavený otvorom na zámok (pozri obr. 4.1).
V prípade potreby kompostér uzamknite pomocou visiaceho
zámku (zámok nie je súčasťou dodávky).
KOMPOSTÉR
Správne naplňte kompostér
• začnite vrstvou zeme
• potom dajte vrstvu záhradného odpadu; podľa možnosti s
vrstvami dreva a lístia, t. j. dusíka tý zelený odpad zmiešaný s
odpadom bohatým na uhlík
• jednotlivé vrstvy by nemali presahovať výšku asi 15 cm
• zabráňte prenikaniu zápachu do okolia; na to Vám pomôže,
keď jednotlivé komponenty kompostu v kompostéri zľahka
premiešate vidlicou/tyčou – takto zabezpečíte prívodom
čerstvého vzduchu odolnosť voči hnilobe
• látky, ktoré sa do kompostu dostávajú, sú väčšinou chudobné
na výživné látky, ich hlavným významom je obsah humusu,
preto sa odporúča obohatiť ich dodatočne živinami (napr.
maštaľným hnojom)
• zabráňte úplnému vysušeniu kompostu (hlavne v letných
mesiacoch), a to tým, že kompost občas zavlažíte
Materiál vhodný na kompostovanie je napr.:
• záhradný odpad (rozdrvený alebo narezaný na malé časti)
• pokosená, ľahko presušená tráva
• lístie (podľa možnosti rozdrvené)
• konáre stromov a kríkov (rozdrvené)
• zvyšky kávového výluhu s kávovým ltrom, čajové vrecúška,
vaječné škrupiny
• popol z dreva a sadze
Všetok odpad ukladajte na kompost podľa možnosti voľne.
Odpad nikdy neutláčajte a neubíjajte, aby organizmy v
komposte mohli pracovať.
Do kompostu nepatria medzi iným:
• kuchynský odpad ako zvyšky mäsa, rýb, syrov, polievky, masť
z pečenia, olej, kosti a chlieb. Tento odpad prispieva k tvorbe
plesní!
• mali by ste sa vyvarovať aj používania chemicky ošetrovaných
šupy zemiakov do kompostu
• šupy citrusových plodov v žiadnom prípade do kompostu
nepatria
Tipy na urýchlenie priebehu vyzrievania kompostu
Ako rýchlo kompost vyzrie, závisí vo veľkej miere od zloženia
kompostovaného materiálu, jeho vlhkosti a teploty. Pokosená
tráva, odpad z čistenia zeleniny a záhradný odpad, maštaľný
hnoj sa rozpadnú v priebehu niekoľkých mesiacov. Proces
rozpadu ďalej možno urýchliť, keď sa jednotlivé vrstvy dobre
premiešané a zavlažené posypú urýchľovačmi kompostu,
ktoré bežne dostanete kúpiť v špecializovaných predajniach,
organickými kombinovanými hnojivami a starou kompostovou
zeminou alebo ak pridáte do kompostu dážďovky. Alternatívne
môžete použiť aj záhradnú zeminu, kamennú múčku alebo
vápnik z morských rias. Predovšetkým v letných mesiacoch
sa mikroorganizmy rozmnožujú veľmi rýchlo a ovplyvňujú rýchly
rozpad rastlinných častí.
Hotový kompost vyberte
• Najprv skontrolujte stupeň vyzretia kompostu. Otvorte
posuvnú časť, aby ste zistili, aká je štruktúra humusu. Hotová
kompostová zemina by mala byť tmavohnedá a granulózna a
mala by mať vôňu lesnej zeminy.
• Pred použitím je potrebné hotovú kompostovú pôdu preosiať
(nie cez príliš jemné sito). Nespracované čas ti ako napr. kúsky
konárov vložte do nového kompostoviska.
Aufbauanleitung
Bitte beachten Sie:
Bauen Sie den Komposter in den nachfolgend
beschriebenen Schritten und stellen Sie ihn nur auf ebenem
Untergrund auf.
Lieferumfang:
4 x Seitenteile mit jeweils vormontiertem Entnahmeschieber
1 x Deckel
1 x Bodengitter
4 x Erdspieße
Wählen Sie den Standort aus
Der günstigste Standort für den Komposter ist im
Halbschatten von Blumen und Hecken. Sorgen Sie dafür,

dass der Komposter direkten Kontakt zur Gartenerde hat.
Dadurch können die notwendigen Bodenorganismen
ungehindert arbeiten. Zur Erhaltung der Feuchtigkeit sind
eine Schicht Reisig, Schredderabfälle oder Torf am besten
geeignet.
1) Verankern Sie die beiden Teile des Bodengitters
miteinander
Stecken Sie die vier Erdspieße durch die Löcher an den
Ecken des Bodengitters und verankern Sie diese mit
dem Boden.
2) Verankern Sie die Seitenteile miteinander
Hinweis: Stellen Sie sich außerhalb des Komposters, so
lässt er sich leichter aufbauen. Fixieren Sie mit Hilfe des
linken Fußes das jeweils linke Seitenteil, und schieben Sie
die Befestigungsnasen des jeweils rechten Seitenteiles in
die Nuten des jeweils linken Seitenteiles.
2a Befestigungsnase (1) & Nut (2)
2b Befestigungsnase in Nut schieben
2c Runterdrücken
3) Richten Sie die vier Seiten rechtwinklig aus
Richten Sie die vier -wie in 2 zusammen geschobenenSeitenteile rechtwinklig (90°) aus.
Verbinden Sie das Bodengitter mit den Seitenteilen
Setzen Sie die verbundenen Seitenteile auf das
Bodengitter. Drücken Sie diese etwas runter und lassen Sie
die Seitenteile einrasten.
4) Setzen Sie den Deckel an und lassen Sie ihn
einrasten
Deckel leicht nach vorn anwinkeln, ... Runterdrücken
und einrasten Setzen Sie den Deckel an einem beliebigen
Seitenteil an den Scharnierpunkten an und lassen Sie
ihn einrasten (siehe Skizze). Bei Beschädigung eines
Scharnierteils kann das Scharnierteil eines anderen
Seitenteiles verwendet werden.
5) Der Aufbau ist abgeschlossen
Der Komposter verfügt über eine Schlossbohrung (siehe
Abb. 4.1). Verriegeln Sie den Komposter bei Bedarf mit
einem Vorhängeschlosses (das Schloss ist nicht im
Lieferumfang enthalten).
• Küchenabfälle wie Reste von Fleisch, Fisch, Käse
Suppen, Bratfett, Öl, Knochen und Brot. Diese Produkte
tragen zur Schimmelbildung bei! • mit chemischen Mitteln
behandelte Schalen von Kartoffeln sollten ebenfalls
vermieden werden
• Schalen von Zitrusfrüchten gehören keinesfalls in den
Kompost
Tipps zur Beschleunigung des Kompostiervorgangs
Wie schnell ein Komposter zur Reife gelangt, ist im
wesentlichen abhängig von der Materialzusammensetzung,
deren Feuchtigkeitsgehalt und der Temperatur.
Grasschnitte, Gemüse- und Gartenabfälle, Stallmist
verrotten in wenigen Monaten.
Der Rotteprozess wird weiter beschleunigt, wenn man die
einzelnen gut vermischten und durchfeuchteten Lagen
mit Kompoststartern aus dem Fachhandel, organischen
Mischdünger und alter Kompostererde bestreut oder
durch Zugabe von Regenwürmern. Alternativ kann auch
die Gartenerde, Gesteinsmehl oder Algenkalk verwendet
werden. Speziell in den Sommermonaten vermehren sich
die Mikroorganismen stark und bewirken eine rasche
Zersetzung der Panzenteile.
Entnehmen Sie den fertigen Kompost
• Prüfen Sie zunächst den Reifegrad des Kompostes.
Öffnen Sie den Schieber, um die Struktur des Humus zu
erkennen. Fertige Komposterde sollte dunkelbraun, körnig
sein und nach Waldboden riechen.
• Sieben Sie die fertige Komposterde vor der Verwendung
(nicht zu fein) durch. Geben Sie nicht verrottete
Bestandteile wie z.B. Aststücke dann erneut in den
Komposter.
Kunststofferzeugnisse Reinhard Simon
Scherershüttenstraße 7
D-99885 Ohrdruf
E-Mail: verwaltung@simonkunststoffe.de
Garancijski list
1. S tem garancijskim listom jamčimo Kunststofferzeugnisse Reinhard Simon, da bo
izdelek v garancijskem roku ob normalni in pravilni uporabi brezhibno deloval in se
zavezujemo, da bomo ob izpolnjenih spodaj navedenih pogojih odpravili morebitne
pomanjkljivosti in okvare zaradi napak v materialu ali izdelavi oz. po svoji presoji
izdelek zamenjali ali vrnili kupnino.
2. Garancija je veljavna na ozemlju Republike Slovenije.
3. Garancijski rok za proizvod je 2 leti od dneva nabave.
4. Kupec je dolžan okvaro javiti pooblaščenemu servisu oz. se informirati o nadaljnjih
postopkih na zgoraj navedeni telefonski številki. Svetujemo vam, da pred tem natančno
preberete navodila o sestavi in uporabi izdelka.
5. Kupec je dolžan pooblaščenemu servisu predložiti garancijski list in račun, kot
potrdilo in dokazilo o nakupu.
6. V primeru, da proizvod popravlja nepooblaščeni servis ali oseba, kupec ne more
uveljavljati zahtevkov iz te garancije.
7. Vzroki za okvaro oz. nedelovanje izdelka morajo biti lastnosti stvari same, in ne vzroki,
ki so zunaj proizvajalčeve oz. prodajalčeve sfere. Kupec ne more uveljavljati zahtevkov
iz te garancije, če se ni držal priloženih navodil za sestavo in uporabo izdelka ali, če je
izdelek kakorkoli spremenjen ali nepravilno vzdrževan.
8. Jamčimo servisiranje in rezervne dele za minimalno dobo, ki je zahtevana s strani
zakonodaje.
9. Obrabni deli oz. potrošni material so izvzeti iz garancije.
10. Vsi potrebni podatki za uveljavljanje garancije se nahajajo na dveh ločenih
dokumentih (garancijski list, račun).
11. Ta garancija proizvajalca ne izključuje pravic potrošnika, ki izhajajo iz odgovornosti
prodajalca za napake na blagu.
Prodajalec:
KOMPOSTER
Befüllen Sie den Komposter richtig
• beginnen Sie mit einer Lage Erde
• dann Gartenabfälle; möglichst mit zwischen gelagertem
Holz und Blättern, d.h. stickstoffreiche, grüne Abfälle mit
kohlenstoffreichen gemischt
• die einzelnen Lagen sollten eine Höhe von etwa 15 cm
nicht übersteigen
• vermeiden Sie Geruchsbelästigung; dazu ist es hilfreich,
wenn Sie das eingegebene Kompostiergut im Komposter
mit einer Grabegabel leicht durchmischen - durch
diese Frischluftzufuhr wird der Verrottungsprozess
vorangetrieben
• Stoffe, die in den Komposter gelangen sind relativ
nährstoffarm, ihr Hauptwert liegt im Humusgehalt, darum
ist auch eine zusätzliche Anreicherung mit Nährstoffen
(z.B. Stalldünger) günstig
• vermeiden Sie eine völlige Austrocknung des Kompostes
(speziell in den Sommermonaten), indem Sie den
Kompost ab und zu wässern
Kompostierbare Abfälle sind u.a.:
• anfallende Gartenabfälle (gehäckselt oder klein
geschnitten)
• geschnittenes, leicht angetrocknetes Gras
• Laub (möglichst zerkleinert)
• Baum- oder Heckenschnitt (geschreddert)
• Kaffeesatz mit Filtertüte, Teebeutel, Eierschale
• Holzasche und Ruß
Werfen Sie alle Abfälle möglichst locker ein. Drücken
oder stampfen Sie die Abfälle niemals fest, damit die
Organismen im Kompost arbeiten können.
Nicht in den Kompost gehören u.a.:
Lidl d.o.o.k.d., Pod lipami 1, SI-1218 Komenda
IAN: 28504
Gyártja/Výrobce/Výrobca:
Kunststofferzeugnisse Reinhard Simon
Scherershüttenstraße 7
D-99885 Ohrdruf
Dovozce: LIDL Česká republika v.o.s.
Nárožni 1359/11, 158 00 Praha 5
Származási hely/Vyrobeno c/Vyrobené v:
Németoszág/Německo/Nemecko

90
o
90
o
90
o
90
o
Q E
R T
2a 2b 2c
1
2
4.1
4.2
W
Los residuos adecuados para el compost son, entre
otros:
• residuos de jardín (triturados o cortados en trocitos)
Instrucciones de montaje
Tener en cuenta lo siguiente:
Montar el compostador siguiendo los siguientes pasos y
colocarlo sobre una base plana.
Volumen de entrega:
4 paneles laterales cada uno con compuerta de extracción
montada previamente
1 tapa
1 rejilla base
4 varillas de puesta a tierra
Elegir el lugar de colocación
El lugar ideal para colocar el compostador es parcialmente
a la sombra de ores y setos. Asegurarse de que el
compostador tenga contacto directo con la tierra del jardín.
Solo así podrán trabajar los organismos necesarios del
suelo. Para conservar la humedad lo más adecuado es una
capa de ramaje, residuos de trituradora o turba.
• Enganchar las dos piezas de la rejilla base entre sí
Introducir la pestaña de sujeción (1) en la ranura (2) y
dejar que encaje. Introducir las 4 varillas de puesta a tierra
a través de las perforaciones en las esquinas de la rejilla
base y engancharlas al suelo.
• Enganchar los paneles laterales entre sí. Advertencia:
Colocarse fuera del compostador para poder montarlo más
fácilmente. Con ayuda del pie izquierdo jar el panel lateral
izquierdo e introducir las pestañas de jación del panel
lateral derecho en las ranuras del panel lateral izquierdo.
2a Pestaña de sujeción (1) y ranura (2)
2b Introducir la pestaña de sujeción en la ranura
2c Presionar hacia abajo
• Colocar los cuatro paneles laterales de modo que
formen un cuadrado
Colocar los cuatro paneles laterales (2 juntados) de modo
que formen un cuadrado rectángulo.
Unir la rejilla base con los paneles laterales
Colocar los paneles laterales unidos sobre la rejilla base.
Presionarlas ligeramente hacia abajo y dejar que encajen
los paneles laterales.
• césped cortado, ligeramente seco
• follaje (a ser posible troceado)
• restos de poda de setos y árboles (triturados)
• posos de café con ltro, bolsitas de té, cáscaras de huevo
• ceniza de madera y hollín
Echar los residuos de forma que queden sueltos. No
presionar ni comprimirlos para que los organismos puedan
trabajar en el compost.
No echar en el compost, entre otros:
• residuos de la cocina como restos de carne, pescado,
queso, sopas, grasa de cocinar, aceite, huesos ni pan.
¡Estos productos contribuyen a la formación de moho!
• asimismo se deberán evitar las pieles de las patatas
tratadas con productos químicos
• no echar nunca al compost las pieles de los cítricos
Consejos para acelerar el proceso del compostaje
La rapidez del proceso de compostaje en el compostador
depende en gran medida de la composición de los
materiales, su contenido de humedad y temperatura.
Los residuos de césped, verduras y jardín y el estiércol
de establo se descomponen en pocos meses. El
proceso de descomposición se acelera si se esparce
activador de compostaje (a la venta en establecimientos
especializados), abono orgánico y tierra de compost usada
entre cada una de las capas bien mezcladas y húmedas,
o se añaden lombrices de tierra. De forma alternativa se
puede utilizar la tierra del jardín, polvo de roca o cal de
algas. Especialmente en los meses de verano proliferan los
microorganismos provocando una rápida descomposición
de las plantas.
Retirar el compost listo
• Primero comprobar el grado de madurez del compost.
Abrir la compuerta para analizar la estructura del humus.
La tierra de compost lista debe presentar un color marrón
oscuro, ser granulada y oler a tierra de bosque.
• Antes de utilizar la tierra de compost lista colarla (que
no quede extremadamente na). Volver a introducir
en el compostador los componentes que no se hayan
descompuesto bien, p. ej., ramaje.
2a Nasello di ssaggio (1) & Incavo (2)
2b Inserire il nasello di ssaggio dell’incavo
2c Premere verso il basso
3) Sistemare le quattro parti laterali in modo
rettangolare
Sistemare le quattro parti laterali – assemblati come in 2 –
in modo rettangolare (90°).
Collegate la rete da pavimento con i pezzi laterali
Inserite i pezzi laterali collegati sulla rete da pavimento.
Premeteli un poco verso il basso e fate incastrare i pezzi
laterali.
3) Inserire il coperchio e farlo incastrare
Orientare il coperchio leggermente verso in avanti…
premere ed incastrare
Apporre il coperchio su qualsiasi parte laterale nei
punti di cerniera e farlo incastrare (schema). In caso di
danneggiamento della parte della cerniera, è possibile
usare la parte della cerniera di un’altra parte laterale.
4) Il montaggio è terminato
Il composter è provvisto di un foro per lucchetto (vedi Fig.
4.1). In caso di necessità serrare il composter con un
lucchetto (il lucchetto non è compreso nella fornitura).
COMPOSTER
Riempire il composter in modo corretto
• iniziare con uno strato di terra
• poi riuti da giardino: possibilmente con qualche legno e
foglia, cioè riuti verdi ricchi di azoto mischiati con riuti
ricchi di carbonio.
• i singoli strati non dovrebbero superare circa 15 cm di
altezza
• impedite disturbi olfattivi: per questo è bene mischiare il
materiale di compostaggio nel composter con una forca da
giardino – in questo modo si fa entrare dell’aria fresca che
velocizza il processo di decomposizione.
• Materiali che entrano nel composter sono abbastanza
poveri di sostanze nutritive; il loro valore principale sta
nella percentuale di humus; per questo si consiglia
l’arricchimento con sostanze nutritive (p.es. stallatico).
• impedire che il composto si asciughi completamente
(specialmente nei mesi estivi), mettendone dell’acqua di
tanto in tanto.
• Colocar la tapa y dejar que encaje
Inclinar la tapa ligeramente hacia delante, presionar hacia
abajo y encajar
Colocar la tapa en el panel lateral deseado en los puntos
de la bisagra y dejar que se encaje (véase esquema). Si se
daña una pieza de la bisagra se podrá utilizar la pieza de la
bisagra de otro panel lateral.
• El montaje ha acabado
El compostador dispone de un oricio para el candado
(véase g. 4.1). En caso necesario, cerrar el compostador
con un candado (no incluido en el volumen de entrega).
COMPOSTADOR
Rellenar correctamente el compostador
• empezar con una capa de tierra
• seguir con residuos de jardín; a ser posible con capas de
madera y hojas entremedio, es decir, mezclar residuos
verdes ricos en nitrógenos y ricos en carbono
• las capas no deben superar los 15 cm de altura cada una
• evitar malos olores; para ello, mezclar ligeramente con un
rastrillo el compost dentro del compostador, así absorberá
aire fresco favoreciendo el proceso de descomposición
• los materiales que se tiran al compostador son
relativamente pobres en nutrientes, su valor principal
radica en el contenido de humus, por esto se recomienda
enriquecerlo adicionalmente con nutrientes (p. ej.,
estiércol)
• regar el compost de vez en cuando para evitar que se
seque completamente (especialmente en los meses de
verano)
Istruzione di montaggio
Per favore osservate:
Montare il composter nel modo descritto di seguito e
posizionarlo solo su una supercie piana.
Contenuto della fornitura:
4 pezzi laterali con dispositivo di prelievo già montato.
1 coperchio
1 Rete da pavimento
4 picchetti
Scegliere la posizione
La posizione adatta per il composter è a mezz’ombra di ori
e siepi. Fare sì che il composter abbia il contatto diretto con
la terra del giardino. In questo modo gli organismi della terra
necessari possono lavorare senza impedimenti. Uno strato
di sterpi oppure torba sono adatti per mantenere l’umidità.
1) Ancorate i due pezzi della rete tra loro
Inserite il naso di ssaggio (1) nell’incavo (2) e fateli
incastrare. Inserite i 4 picchetti attraverso i fori agli angoli
della rete da pavimento e ancorateli al pavimento.
2) Agganciare le parti laterali tra loro
Nota: Posizionatevi al di fuori del composter, in modo da
poterlo montare più facilmente. Fissare con il piede la parte
sinistra ed inserire i naselli di ssaggio della parte destra
nei incavi della parte sinistra.
Riuti adatti per il compostaggio sono tra l’altro:
• riuti da giardino (tagliati in pezzettini)
• erba tagliata e leggermente asciugata
• foglie (possibilmente tritturati)
• Tagli di alberi e siepi (triturati)
• Fondo da caffè, buste da tè, gusci d’uova
• Cenere di legno e fuliggine
Immettere tutti i riuti in modo leggero Non premere o
comprimere i riuti, in modo che gli organismi nel composto
possano lavorare.
Non immettere nel composto:
• Riuti da cucina come carnem pesce, formaggio, zuppa,
grasso, olio, ossa e pane. Questi prodotti possono creare
muffe!
• si dovrebbe evitare inoltre le bucce di patate trattate con
mezzi chimici.
• Non immettere mai le bucce di agrumi nel composto
Consigli per velocizzare la procedura di compostaggio
Quanto tempo serve per arrivare alla maturità del
composto, dipende dalla composizione del materiale, dal
contenuto di umidità e dalla temperatura. Tagli di erba, riuti
di verdura e da giardino, si decompongono in pochi mesi.
Il processo di decomposizione può essere velocizzato, se
si sparge i singoli strati ben mischiati ed umidi con avviatori
di compostaggio (nel commercio), con concime organico
e terra vecchia da compostaggio oppure se si aggiunge
lombrichi. In alternativa si può usare anche terra
da giardino, farina di pietra oppure calcare d’alghe.
Specialmente nei mesi estivi i microrganismi aumentano
fortemente e decompongono velocemente le parti di piante.

Togliere il composto pronto
• Controllare prima il grado di maturazione del composto.
Aprire il dispositivo di prelievo per riconoscere la struttura
del humus. La terra di composto dovrebbe essere marrone
scuro e granulosa e odorare di terra di bosco.
• Setacciare la terra di compostaggio prima dell’uso (non
troppo ne). La parte non decomposta come p.es. pezzi di
rami, vanno messi nuovamente nel composter.
Assembly instructions
Please note:
Assemble your composter in accordance with the following
instructions, placing it on a level supporting surface.
Included components:
4 x sides, each with a pretted slide opening for removal
1 x lid
1 x bottom screen
4 x ground spikes
Selecting a suitable site
The ideal site for the composter is in the half shade of
owers or hedges. Ensure that the composter is in direct
contact with garden soil. This will allow essential garden
organisms to work unhindered on your compost. A layer of
coarser stalks, shredded material or grass sods is perfect
for ensuring the correct moisture content is maintained.
1) Anchor the two parts of the bottom screen together
Push the fastening nose (1) into the slot (2) until it engages.
Insert the 4 ground spikes through the holes in the corners
of the bottom screen and anchor them to the ground.
2) Attaching the sides to one another
Note: You will nd it easier to assemble the composter if
you stand outside it. Using your left foot to steady the left
hand side part of each corner, slide the fastening lugs of the
right hand side part into the corresponding slots ofthe left
hand side part.
2a Fastening lug (1) & slot (2)
2b Slide the fastening lug into the slot
2c Press down
3) Squaring up the four sides
Adjust the four sides – once you have slid them together
as instructed in 2 – so that they are at right angles (90°) to
one another.
Connecting the bottom screen to the sides
Set down the connected sides on the bottom screen. Press
them down slightly so that the sides engage.
4) Putting on and engaging the lid
Angle the lid towards the front, ... Press it down and engage
it Attach the lid to any side part by the hinge points and
engage it (see sketch). If the hinge part on any side part
gets damaged you can use the hinge part on another side.
5) The assembly is complete
The composter has a hole for a lock (see Fig. 4.1).
If necessary you can lock the composter with a padlock
(padlock not included).
COMPOSTER
It is important to ll your composter correctly
• begin with a layer of earth
• then add garden waste, if possible with intermediate
layers woody material and leaves, i.e. create a mixture of
nitrogen-rich green waste and carbon-rich materials
• the individual layers should not be thicker than 15 cm
• to avoid smells building up, it is helpful to lightly mix
through the composting material in the composter using a
garden fork. This will allow fresh air to be introduced into
the rotting process
• the materials in the composter are relatively poor in
nutrient content but are important for their humus content,
therefore it may be benecial to enrich the mixture by
adding nutrients, for example farmyard dung
• water the compost from time to time to avoid it drying out
completely, especially in the summer months
Compostable wastes include:
• garden waste (chopped or cut into small pieces)
• cut grass, allowed to dry slightly rst
• leaves (in small pieces if possible)
• tree or hedge cuttings (shredded)
• coffee grounds, lters, teabags, eggshells
• wood ashes and soot
Introduce the waste in such a way that it is as loose as
possible. Do not press or pat down the waste to form a sold
mass, otherwise this could prevent the micro-organisms
from working properly on the compost.
Items unsuitable for composting include:
• kitchen wastes containing meat, sh, cheese, soup,
cooking fat, oil, bones or bread. These materials contribute
to the formation of mould.
• materials treated with chemicals, likewise avoid potato
peelings
• never place citrus fruit peel in your compost
Tips for accelerating the composting process
How quickly your composter processes the waste depends
mainly on the mixing of the materials, moisture content
and temperature. Grass cuttings, vegetable and garden
waste, and farmyard dung rot down in a few months. The
rotting process can be further accelerated if you sprinkle
each layer of well mixed and thoroughly damp material
with a compost starter (obtainable from a garden centre),
mixed organic fertilisers and old compost earth or by adding
garden worms. You can also add garden earth, stone dust
or crushed coral. In the summer months in particular, the
num-ber of micro-organisms increases greatly and this
leads to a speedy breakdown of the green waste.
Removing the nished compost
• First test whether the compost is ready. Slide open the
opening so that you can see the structure of the humus.
When the compost is ready it has a dark brown, grainy
appearance and smells like the forest oor.
• Sieve the nished compost before use (not too ne).
Return any materials that are not completely rotted, e.g.
pieces of branch, back into the composter.
Aufbauanleitung
Bitte beachten Sie:
Bauen Sie den Komposter in den nachfolgend
beschriebenen Schritten und stellen Sie ihn nur auf ebenem
Untergrund auf.
Lieferumfang:
4 x Seitenteile mit jeweils vormontiertem Entnahmeschieber
1 x Deckel
1 x Bodengitter
4 x Erdspieße
Wählen Sie den Standort aus
Der günstigste Standort für den Komposter ist im
Halbschatten von Blumen und Hecken. Sorgen Sie dafür,
dass der Komposter direkten Kontakt zur Gartenerde hat.
Dadurch können die notwendigen Bodenorganismen
ungehindert arbeiten. Zur Erhaltung der Feuchtigkeit sind
eine Schicht Reisig, Schredderabfälle oder Torf am besten
geeignet.
1) Verankern Sie die beiden Teile des Bodengitters
miteinander
Schieben Sie die Befestigungsnase (1) in die Nut (2) und
lassen sie diese einrasten. Stecken Sie die vier Erdspieße
durch die Löcher an den Ecken des Bodengitters und
verankern Sie diese mit dem Boden.
2) Verankern Sie die Seitenteile miteinander
Hinweis: Stellen Sie sich außerhalb des Komposters, so
lässt er sich leichter aufbauen. Fixieren Sie mit Hilfe des
linken Fußes das jeweils linke Seitenteil, und schieben Sie
die Befestigungsnasen des jeweils rechten Seitenteiles in
die Nuten des jeweils linken Seitenteiles.
2a Befestigungsnase (1) & Nut (2)
2b Befestigungsnase in Nut schieben
2c Runterdrücken
3) Richten Sie die vier Seiten rechtwinklig aus
Richten Sie die vier -wie in 2 zusammen geschobenenSeitenteile rechtwinklig (90°) aus.
Verbinden Sie das Bodengitter mit den Seitenteilen
Setzen Sie die verbundenen Seitenteile auf das
Bodengitter. Drücken Sie diese etwas runter und lassen Sie
die Seitenteile einrasten.
4) Setzen Sie den Deckel an und lassen Sie ihn
einrasten
Deckel leicht nach vorn anwinkeln, ... Runterdrücken
und einrasten Setzen Sie den Deckel an einem beliebigen
Seitenteil an den Scharnierpunkten an und lassen Sie
ihn einrasten (siehe Skizze). Bei Beschädigung eines
Scharnierteils kann das Scharnierteil eines anderen
Seitenteiles verwendet werden.
5) Der Aufbau ist abgeschlossen
Der Komposter verfügt über eine Schlossbohrung (siehe
Abb. 4.1). Verriegeln Sie den Komposter bei Bedarf mit
einem Vorhängeschlosses (das Schloss ist nicht im
Lieferumfang enthalten).
KOMPOSTER
Befüllen Sie den Komposter richtig
• beginnen Sie mit einer Lage Erde
• dann Gartenabfälle; möglichst mit zwischen gelagertem
Holz und Blättern, d.h. stickstoffreiche, grüne Abfälle mit
kohlenstoffreichen gemischt
• die einzelnen Lagen sollten eine Höhe von etwa 15 cm
nicht übersteigen
• vermeiden Sie Geruchsbelästigung; dazu ist es hilfreich,
wenn Sie das eingegebene Kompostiergut im Komposter
mit einer Grabegabel leicht durchmischen - durch
diese Frischluftzufuhr wird der Verrottungsprozess
vorangetrieben
• Stoffe, die in den Komposter gelangen sind relativ
nährstoffarm, ihr Hauptwert liegt im Humusgehalt, darum
ist auch eine zusätzliche Anreicherung mit Nährstoffen
(z.B. Stalldünger) günstig
• vermeiden Sie eine völlige Austrocknung des Kompostes
(speziell in den Sommermonaten), indem Sie den
Kompost ab und zu wässern
Kompostierbare Abfälle sind u.a.:
• anfallende Gartenabfälle (gehäckselt oder klein
geschnitten)
• geschnittenes, leicht angetrocknetes Gras
• Laub (möglichst zerkleinert)
• Baum- oder Heckenschnitt (geschreddert)
• Kaffeesatz mit Filtertüte, Teebeutel, Eierschale
• Holzasche und Ruß
Werfen Sie alle Abfälle möglichst locker ein. Drücken
oder stampfen Sie die Abfälle niemals fest, damit die
Organismen im Kompost arbeiten können.
Nicht in den Kompost gehören u.a.:
• Küchenabfälle wie Reste von Fleisch, Fisch, Käse
Suppen, Bratfett, Öl, Knochen und Brot. Diese Produkte
tragen zur Schimmelbildung bei! • mit chemischen Mitteln
behandelte Schalen von Kartoffeln sollten ebenfalls
vermieden werden
• Schalen von Zitrusfrüchten gehören keinesfalls in den
Kompost
Tipps zur Beschleunigung des Kompostiervorgangs
Wie schnell ein Komposter zur Reife gelangt, ist im
wesentlichen abhängig von der Materialzusammensetzung,
deren Feuchtigkeitsgehalt und der Temperatur.
Grasschnitte, Gemüse- und Gartenabfälle, Stallmist
verrotten in wenigen Monaten.
Der Rotteprozess wird weiter beschleunigt, wenn man die
einzelnen gut vermischten und durchfeuchteten Lagen
mit Kompoststartern aus dem Fachhandel, organischen
Mischdünger und alter Kompostererde bestreut oder
durch Zugabe von Regenwürmern. Alternativ kann auch
die Gartenerde, Gesteinsmehl oder Algenkalk verwendet
werden. Speziell in den Sommermonaten vermehren sich
die Mikroorganismen stark und bewirken eine rasche
Zersetzung der Panzenteile.
Entnehmen Sie den fertigen Kompost
• Prüfen Sie zunächst den Reifegrad des Kompostes.
Öffnen Sie den Schieber, um die Struktur des Humus zu
erkennen. Fertige Komposterde sollte dunkelbraun, körnig
sein und nach Waldboden riechen.
• Sieben Sie die fertige Komposterde vor der Verwendung
(nicht zu fein) durch. Geben Sie nicht verrottete
Bestandteile wie z.B. Aststücke dann erneut in den
Komposter.
Instruções de montagem
Tenha em atenção:
Monte o compostor seguindo os passos abaixo
descritos e coloque-o apenas em superfícies planas.
Fornecimento:
4 x partes laterais cada uma com válvula de extracção
pré-montada
1 x tampa
1 x grade de terra
4 x hastes de ligação à terra
Seleccione uma localização
A localização mais apropriada para o compostor é na
penumbra de ores e sebes. Tenha cuidado para que o
compostor não tenha contacto directo com a terra
do jardim. Assim os organismos do solo necessário
podem fazer o seu trabalho sem obstáculos. Para
a obtenção de humidade o mais apropriado é uma
camada de chamiço, lixo triturado ou turfa.
1) Une ambas as partes da grade de terra
Passe ambas as hastes pelos orifícios nos cantos da
grade de terra e xe estas ao solo.
2) Ancore as partes laterais umas com as outras
Indicação: Se se colocar do lado de fora do compostor,
a montagem deste torna-se mais fácil. Com a ajuda do
pé esquerdo xe a respectiva parte lateral esquerda
e empurre os bicos de xação da respectiva parte
lateral direita em direcção às ranhuras da parte lateral
esquerda.
2a Bico de xação (1) & ranhura (2)
2b Empurrar o bico de xação para a ranhura
2c Empurrar para baixo
3) Organize as quatro partes laterais de modo
rectangular
Oriente as 4 partes laterais de forma rectangular,
juntandoas como às duas (90°).
Une a grade de terra com as peças laterais
Coloque as peças laterais unidas sobre o grade de
terra. Exerça força para baixo e engate as peças
laterais.
4) Coloque a tampa e deixe-a encaixar
Incline a tampa um pouco para a frente, empurre para
baixo e deixe encaixar Coloque a tampa na parte lateral
desejada nos pontos de dobradiça e deixe engatar (ver
esquema). Em caso de danicação de uma peça da
dobradiça pode ser utilizada uma peça de dobradiça de
outra parte lateral.
5) A montagem está concluída
O compostor dispõe de uma anilha para colocar
um cadeado (ver Fig. 4.1). Se necessário bloqueie o
compostor com um cadeado (a fechadura não está
incluída no fornecimento).
COMPOSTOR
Encha o compostor de modo correcto
• comece com uma camada de terra
• depois lixo de jardim; se possível com madeira e
folhas intercaladas, i. e., lixo verde rico em azoto
misturado com lixo rico em carbono
• as camadas individuais não devem exceder uma
altura de cerca de 15 cm
• evite cheiros; para isso é uma grande ajuda mexer
os compostos introduzidos com uma forquilha através desta «lufada de ar fresco» o processo de
decomposição é acelerado
• Materiais que alcancem o compostor são
relativamente pobres em substâncias nutritivas, o seu
principal valor reside no conteúdo de húmus; por isso
é também aconselhável um enriquecimento adicional
com substâncias nutritivas (p.ex. estrume)
• Evite que o composto seque totalmente (sobretudo
em meses quentes), regando-o de vez em quando
Lixos susceptíveis de compostagem são,
entre outros:
• Lixo de jardim (em palhiço ou cortado em pequenos
pedaços)
• Relva levemente seca, cortada
• Folhagem (se possível triturada)
• Cortes de árvores ou sebes (triturado)
• Borras de café com ltro, saquinhos de chá, cascas
de ovo
• Cinzas e ferrugem
Coloque todos os lixos o mais possível soltos. Não
prima
ou calque o lixo de modo a que os organismos possam
trabalhar no composto.
Não podem ser colocados no composto, entre outros:
• Lixos e cozinha como restos de carne, peixe, queijo,
sopas, gordura de assar, óleo, ossos e pão. Estes
produtos contribuem para a formação de bolor!
• Cascas de batatas tratadas com agentes químicos
também devem ser evitadas
• Cascas de citrinos não podem, em circunstância
alguma, ser colocados no composto
Conselhos para aceleração do processo de
compostagem
A velocidade a que um composto apodrece depende da
composição dos materiais, do seu nível de humidade e
da sua temperatura. Relva cortada, restos de vegetais e
lixo de jardim, estrume decompõem-se em apenas
alguns
meses. O processo de decomposição é acelerado
quando se junta às camadas bem mexidas actuadores
de composta
IAN: 28504
Kunststofferzeugnisse Reinhard Simon
Scherershüttenstraße 7
D-99885 Ohrdruf

90
o
90
o
90
o
90
o
Q E
R T
2a 2b 2c
1
2
4.1
4.2
W
out completely, especially in the summer months
Assembly instructions
Please note:
Assemble your composter in accordance with the
following instructions, placing it on a level supporting
surface.
Included components:
4 x sides, each with a pretted slide opening for
removal
1 x lid
1 x bottom screen
4 x ground spikes
Selecting a suitable site
The ideal site for the composter is in the half shade
of owers or hedges. Ensure that the composter is in
direct contact with garden soil. This will allow essential
garden organisms to work unhindered on your
compost. A layer of coarser stalks, shredded material
or grass sods is perfect for ensuring the correct
moisture content is maintained.
1) Anchor the two parts of the bottom screen together
Push the fastening nose (1) into the slot (2) until it
engages. Insert the 4 ground spikes through the holes
in the corners of the bottom screen and anchor them to
the ground.
2) Attaching the sides to one another
Note: You will nd it easier to assemble the composter
if you stand outside it. Using your left foot to steady the
left hand side part of each corner, slide the fastening
lugs of the right hand side part into the corresponding
slots ofthe left hand side part.
2a Fastening lug (1) & slot (2)
2b Slide the fastening lug into the slot
2c Press down
3) Squaring up the four sides
Adjust the four sides – once you have slid them
together as instructed in 2 – so that they are at right
angles (90°) to one another.
Connecting the bottom screen to the sides
Set down the connected sides on the bottom screen.
Press them down slightly so that the sides engage.
4) Putting on and engaging the lid
Angle the lid towards the front, ... Press it down and
engage it Attach the lid to any side part by the hinge
points and engage it (see sketch). If the hinge part on
any side part gets damaged you can use the hinge part
on another side.
5) The assembly is complete
The composter has a hole for a lock (see Fig. 4.1).
If necessary you can lock the composter with a padlock
(padlock not included).
COMPOSTER
It is important to ll your composter correctly
• begin with a layer of earth
• then add garden waste, if possible with intermediate
layers woody material and leaves, i.e. create a mixture
of nitrogen-rich green waste and carbon-rich materials
• the individual layers should not be thicker than 15 cm
• to avoid smells building up, it is helpful to lightly mix
through the composting material in the composter
using a garden fork. This will allow fresh air to be
introduced into the rotting process
• the materials in the composter are relatively poor in
nutrient content but are important for their humus
content, therefore it may be benecial to enrich the
mixture by adding nutrients, for example farmyard
dung
• water the compost from time to time to avoid it drying
Compostable wastes include:
• garden waste (chopped or cut into small pieces)
• cut grass, allowed to dry slightly rst
• leaves (in small pieces if possible)
• tree or hedge cuttings (shredded)
• coffee grounds, lters, teabags, eggshells
• wood ashes and soot
Introduce the waste in such a way that it is as loose as
possible. Do not press or pat down the waste to form
a sold mass, otherwise this could prevent the microorganisms from working properly on the compost.
Items unsuitable for composting include:
• kitchen wastes containing meat, sh, cheese, soup,
cooking fat, oil, bones or bread. These materials
contribute to the formation of mould.
• materials treated with chemicals, likewise avoid
potato peelings
• never place citrus fruit peel in your compost
Tips for accelerating the composting process
How quickly your composter processes the waste
depends mainly on the mixing of the materials,
moisture content and temperature. Grass cuttings,
vegetable and garden waste, and farmyard dung rot
down in a few months. The rotting process can be
further accelerated if you sprinkle each layer of well
mixed and thoroughly damp material with a compost
starter (obtainable from a garden centre), mixed organic
fertilisers and old compost earth or by adding garden
worms. You can also add garden earth, stone dust or
crushed coral. In the summer months in particular, the
num-ber of micro-organisms increases greatly and this
leads to a speedy breakdown of the green waste.
Removing the nished compost
• First test whether the compost is ready. Slide open
the opening so that you can see the structure of the
humus. When the compost is ready it has a dark
brown, grainy appearance and smells like the forest
oor.
• Sieve the nished compost before use (not too ne).
Return any materials that are not completely rotted,
e.g. pieces of branch, back into the composter.
Upute za montažu
Molimo Vas obratite pažnju:
Sklopite spremnik za kompost prema opisanim koracima i
postavite ga na ravnu podlogu.
Sadržaj dostave:
4 x bočna dijela sa pripremljenim utorima za ubacivanje
otpada
1 x poklopac
1 x podna mreža
4 x motke
Odaberite mjesto
Najpogodnije mjesto spremnika za kompost je u polusjeni
cvijeća i živice. Vodite računa da spremnik za kompost
ima izravan kontakt sa vrtnom zemljom. Na taj način mogu
organizmi iz zemlje nesmetano raditi. Za održavanje vlage
najpogodniji je sloj suhih grančica, usitnjenog otpada i
treseta.
1) Međusobno pričvrstite oba dijela podne mreže
Progurajte sve četiri motke kroz rupe u kutu podne mreže i
pričvrstite je u zemlju.
2) Međusobno pričvrstite bočne dijelove
Napomena: Postavite se s vanjske strane spremnika
za kompost, jer se na taj način lakše sklopi. Uz pomoć
lijeve noge učvrstite lijevu stranu i ugurajte klinove za
učvršćivanje desne strane u utore lijeve strane.
2a klin za učvršćivanje (1) i utor (2)
2b ugurati klin za učvršćivanje u utor
2c pritisnuti
3) Poravnajte stranice pod pravim kutom
Poravnajte sva četiri zajedno spojena bočna dijela pod
pravim kutom (90°).
Povežite podnu mrežu sa bočnim dijelovima
Stavite povezane bočne dijelove na podnu mrežu. Pritisnite
ih malo dolje i pustite ih da se zaglave.
4) Stavite poklopac i pustite ga da se zaglavi
Poklopac lagano nagnuti prema naprijed, ... pritisnuti i
zaglaviti
Stavite poklopac na željenu stranicu na pante i pustite ga
da se zaglavi (vidi skicu). U slučaju oštećenja panta na
nekoj stranici, može se koristiti pant neke druge stranice.
5) Sklapanje je završeno
Spremnik za kompost raspolaže pripremom za lokot (vidi
sliku 4.1). Po potrebi zaključajte spremnik za kompost
lokotom (lokot nije sadržan u pošiljci).
SPREMNIK ZA KOMPOST
Pravilno napunite spremnik za kompost
• počnite sa redom zemlje
• zatim otpaci iz vrta; po mogućnosti granje i lišće, tj.,
dušikom bogati zeleni otpad sa bogatom smjesom ugljika
• pojedini slojevi ne bi smjeli prelaziti visinu od 15 cm
• sprječavanje mirisa; to možemo spriječiti tako da
kompost koji se nalazi u spremniku lagano promiješate
vilama – na taj način dovodimo svježi zrak koji pospješuje
proces truljenja
• tvari, koje dolaze u spremnik za kompost su relativno
slabe hranjivim tvarima, stoga njihova glavna vrijednost
leži u količini humusa, zato je potrebno dodatno
obogaćivanje hranjivim
tvarima (na primjer stajsko gnojivo)
• spriječite potpuno isušivanje komposta (naročito u
ljetnim mjesecima), tako da kompost s vremena na vrijeme
namočite
Pogodni otpaci za kompost su:
• otpaci iz dvorišta (usitnjeno ili rezano na male komade)
• košena, lagano sušena trava
• lišće (po mogućnosti usitnjeno)
• odrezano granje drveća ili živice (usitnjeno)
• talog kave sa ltar vrećicom, vrećica od čaja, ljuska od
jajeta
• pepeo i čađa
Ubacite sve otpatke što laganije.
Nikada nemojte jako pritiskati ili nabijati otpatke, da bi
organizmi u kompostu mogli djelovati.
Što ne spada u kompost:
• otpaci iz kuhinje, kao ostaci mesa, ribe, sira, masti za
prženje, ulje kosti i kruh. Ti proizvodi pridonose stvaranju
plijesni!
• kemijski tretirana kora krumpira treba se također
izbjegavati
• kore citrusa ni u kom slučaju ne spadaju u kompost
Savjeti za ubrzavanje procesa kompostiranja
Koliko brzo kompost sazrije uvelike ovisi o sastavu
materijala, njenom sadržaju vlage i temperaturi. Košena
trava, otpaci iz vrta i dvorišta, gnoj istrule za nekoliko
mjeseci. Proces truljenja ćemo ubrzati ako u pojedine
dobro izmiješane i navlažene slojeve dodamo sredstava
za pospješivanje kompostiranja, organsku smjesu
gnojiva ili dodatkom kišnih glista. Alternativno se može
upotrebljavati i vrtna zemlja, kameno brašno ili vapnenac.
U ljetnim mjesecima se mikroorganizmi naročito jako brzo
razmnožavaju te na taj način djeluju na brzo raspadanje
biljnih dijelova.
Uzmite gotov kompost
• Najprije provjerite stupanj zrelosti. Otvorite poklopac da
bi vidjeli strukturu humusa. Gotova kompostirana zemlja bi
trebala biti tamnosmeđe boje, zrnata i mirisati na šumsko
tlo.
• Prosijajte gotovu kompostiranu zemlju prije upotrebe (ne
preno). Nemojte ponovno stavljati istrunule dijelove u
spremnik za kompost kao na primjer granje.

Instrucţiuni de montaj
Vă rugăm respectaţi următoarele:
Montaţi recipientul pentru compost conform paşilor de mai
jos şi poziţionaţi-l numai pe o suprafaţă perfect plană.
Sfera de livrare:
4 x piese laterale, pe ecare în parte este montat în
prealabil un sertar de prelevare
1 x capac
1 x grilaj la bază
4 x ţăruşi
Alegeţi locul de amplasare
Locul de amplasare cel mai indicat pentru recipientul
pentru compost este în semiumbra unor ori sau tuşuri.
Asiguraţi-vă că recipientul pentru compost este amplasat
astfel încât să e în contact direct cu pământul din grădină.
Astfel microorganismele necesare pot să acţioneze fără
probleme. Pentru menţinerea umidităţii cel mai potrivit
este să se utilizeze un strat format e din încrengături de
mărăciniş, de deşeuri rezultate după mărunţire sau de
turbă.
1) Ancoraţi cele două părţi componente ale grilajului de la
bază
Introduceţi cei patru ţăruşi prin oriciile din colţurile
grilajului de la bază şi ancoraţi-le în pământ.
2) Ancoraţi piesele laterale una de cealaltă
Indicaţie: Staţi în afara recipientului pentru compost pentru
că din această poziţie se poate monta mult mai uşor. Fixaţi
cu piciorul stâng ecare piesă laterală stângă şi împingeţi
gheara de prindere de pe partea laterală dreaptă în canelura
de pe partea laterală stângă.
2a Gheara de prindere (1) & canelura (2)
2b Împingeţi gheara de prindere în canelură
2c Apăsaţi în jos
3) Ajustaţi cele patru laturi, astfel încât să e în unghi drept
Ajustaţi cele patru laturi astfel încât tot câte două laturi să
formeze un unghi drept (90°).
Îmbinaţi grilajul de la bază cu lateralele.
Aşezaţi lateralele îmbinate pe grilajul de la bază. Apăsaţi în
jos până când se înclichetează.
4) Aşezaţi capacul deasupra şi înclichetaţi-l
Înclinaţi capacul un pic înainte. ... Apăsaţi-l în jos şi
înclichetaţi-l. Aşezaţi balamalele capacului pe partea
laterală dorită şi înclichetaţi (vezi schiţa). În cazul în care se
deteriorează o balama, poate folosită balamaua unei alte
piese laterale.
5) Procesul de montare s-a încheiat
Recipientul pentru compost este dotat cu un oriciu pentru
încuietoare (vezi g. 4.1). În caz de necesitate încuiaţi
recipientul cu un lacăt (lacătul nu este cuprins în sfera de
livrare).
RECIPIENTUL PENTRU COMPOST
Umpleţi corect recipientul
• începeţi cu un strat de pământ
• apoi cu deşeuri din grădină, dacă se poate cu frunze şi
lemne care au fost depozitate în prealabil altundeva, adică
deşeuri bogate în azot, deşeuri încă verzi amestecate cu
deşeuri bogate în carbon
• ar bine ca ecare strat în parte să nu depăşească o
înălţime de aproximativ 15 cm
• evitaţi formarea de mirosuri neplăcute; pentru aceasta
este bine să amestecaţi uşor cu o furcă materialul de
compostat - prin această alimentare cu aer proaspăt se
accelerează procesul de putrezire
• materialele care ajung în recipientul pentru compost
de obicei nu conţin cantităţi mari de substanţe nutritive,
valoarea lor principală este în conţinutul de humus, de
aceea este de un real folos alimentarea cu substanţe
nutritive (de ex. cu gunoi de grajd)
• evitaţi uscarea completă a materialului de compostat (mai
ales în lunile de vară) prin udarea acestuia din când în când
Deşeuri compostabile sunt de exemplu:
• deşeurile din grădină (tocate sau mărunţite)
• iarba tăiată, uşor uscată
• frunze (tăiate mărunt)
• crengile copacilor sau tuşurilor (tocate mărunt)
• zaţ de cafea cu hârtia de la ltru, pliculeţele de ceai, cojile
de ouă
• cenuşă şi funingine
Aruncaţi toate materialele compostabile în recipientul
pentru compost, dar nu le îndesaţi. Nu le pisaţi sau nu
le ştampaţi pentru ca să poată activa organismele din
materialul de compostat.
Nu puneţi în recipientul pentru compost următoarele
materiale:
• deşeurile din bucătărie, cum ar resturi de carne, peşte,
brânză, supă, untură, ulei, oase şi pâine. Aceste produse
conduc la formarea de mucegai!
• de asemenea evitaţi să aruncaţi în recipientul pentru
compost coji de carto care au fost tratate cu chimicale
• în niciun caz nu aruncaţi coaja fructelor citrice în
compost.
Indicaţii de accelerare a procesului de compostare
Cât de repede ajunge compostul la maturitate depinde
în mare măsură de compoziţia materialului din care este
compus compostul, de gradul de umiditate a acestuia şi de
temperatură.
Iarba tăiată, deşeurile din gradină şi de la legume, gunoiul
de grajd intră în putrefacţie în câteva luni.
Procesul de putrefacţie poate accelerat dacă se presară
peste straturile bine amestecate şi umidicate produse
starter în compostare pe care le găsiţi în comerţ sau gunoi
organic amestecat şi compost matur ori prin adăugarea
de râme. Alternativ pot utilizate şi pământul din grădină,
praful din rocă primară sau calciul de alge.
În special în lunile de vară microorganismele se înmulţesc
foarte tare şi inuenţează o descompunere rapidă a
plantelor.
Scoaterea compostului matur
• vericaţi mai întâi gradul de maturitate a compostului.
Deschideţi sertarul pentru a putea vedea structura
humusului. Compostul matur ar trebui să e de culoare
maro închis, granulat şi să miroasă a pământ din pădure.
• cerneţi (nu prea n) compostul matur înainte de utilizare.
Introduceţi apoi materialele care nu au putrezit încă, cum
ar de exemplu crengile, înapoi în recipientul pentru
compost.
Указания за сглобяване
Моля, обърнете внимание на следното:
Сглобявайте компостера в посочената по-долу
последователност и го поставяйте единствено
върху равна основа.
Доставката включва:
4 бр. странични елементи, всеки от които с
предварително монтиран изходен шибър
1 бр. капак
1 бр. подова решетка
4 бр. колчета за закрепване
Изберете мястото на монтаж
Най-подходящото място за компостера е под
шарената сянка на цветя и живи плетове.
Погрижете се компостерът да се намира в пряк
контакт с градинската почва. Така нужните почвени
организми ще могат да работят безпроблемно.
Най-подходящи за поддържане на влажността са
пластове шума, остатъци от шредер или торф.
1) Закрепете двете части на подовата решетка една
към друга
Пъхнете четирите колчета през отворите в краищата
на подовата решетка и ги забийте в земята.
2) Закрепете страничните елементи един към друг
Указание: Застанете от външната страна на
компостера, тъй като по този начин той се
сглобява по-лесно. С левия си крак застопорете
левия елемент и поставете закрепващите издатъци
на десния страничен елемент в улеите на левия.
2a Закрепващ издатък (1) и улей (2)
2b Поставете закрепващия издатък в улея.
2c Натиснете надолу.
3) Поставете четирите страни перпендикулярно една
на друга
Поставете четирите елемента, сглобени по начина,
посочен в т. 2, перпендикулярно един на друг (под
ъгъл 90°).
Съединете подовата решетка със страничните
елементи
Поставете сглобените странични елементи върху
решетката. Натиснете леко надолу и ги фиксирайте.
4) Поставете капака и го фиксирайте
Поставете капака леко издаден напред, ... натиснете
го надолу и го фиксирайте. Закрепете капака към
шарнирните връзки на който и да е от страничните
елементи и го фиксирайте (вж. скицата). При
повреда на някоя от шарнирните връзки могат
да се използват тези на останалите странични
елементи.
5) С това сглобяването приключва
Компостерът разполага с отвор за заключване
(вж. сн. 4.1). При необходимост заключвайте
компостера с катинар (катинарът не е включен в
доставката).
КОМПОСТЕР
Пълнете компостера правилно
• Започнете със слой почва.
• Cлед това поставете градински отпадъци – по
възможност с поставени помежду сухи листа и
дървесина, т.е. богати на азот зелени отпадъци,
смесени с такива, богати на въглерод.
• Дебелината на отделните слоеве не трябва да
надвишава 15 см.
• Не позволявайте да се образува неприятна
миризма. За целта можете да размесите
поставения в компостера материал внимателно
с вила; подаването на свеж въздух ускорява
процеса на разлагане.
• Материалът в компостера е относително беден
на хранителни вещества; ползата от него се крие
в съдържанието на хумус, затова се препоръчва
допълнително обогатяване с хранителни вещества
(напр. оборска тор).
• Избягвайте пълното изсушаване на компоста
(особено през летните месеци); от време на време
навлажнявайте материала.
Годните за компостиране материали са:
• градински отпадъци (смлени или нарязани на
ситно)
• нарязана, леко изсушена трева
• шума (по възможност на ситно)
• дървесни отпадъци и такива от живи плетове
(смлени)
• утайка от кафе с филтъра, пакетчета чай, яйчени
черупки
• дървесна пепел и сажди
Поставяйте отпадъците възможно най-рехаво.
Никога не ги притискайте или уплътнявайте с крак,
за да могат огранизмите в компоста да работят
безпроблемно.
В компоста не трябва да се поставят:
• кухненски отпадъци като остатъци от месо, риба,
сирене, супи, мазнина за готвене, олио, кости и
хляб. Тези продукти допринасят за образуването
на плесен!
• Да се избягват и обелки от картофи, обработвани с
химични вещества.
• Обелките от цитрусови плодове нямат място в
компоста.
Съвети за ускоряване процеса на компостиране
Колко бързо ще бъде рециклиран материалът
зависи най-вече от състава му, от съдържанието
на влага в него и от температурата. Тревата,
зеленчуковите и градински отпадъци и оборската
тор се разграждат за няколко месеца.
Процесът на разграждане се ускорява, ако
отделните, добре размесени и овлажнени слоеве
се посипят с препарати за компостиране от
специализираните магазини, органични смесени
торове и стара компостирана почва или ако в тях
се пуснат дъждовни червеи. Като алтернатива
може да се използва и градинска почва, каменно
брашно или калций от водорасли. Особено през
летните месеци микроорганизмите се размножават
изключително интензивно и спомагат за бързото
разграждане на растителните материали.
Извадете готовия компост
• Най-напред проверете степента на разграждане
на компоста. Отворете шибъра, за да огледате
структурата на хумуса. Готовият компост трябва
да е тъмнокафяв, да има зърнеста структура и да
мирише на горска почва.
• Преди употреба пресейте готовата компостирана
почва (но не прекалено ситно). Не връщайте
изгнили частици като напр. парчета клони обратно
в компостера.
Οδηγίες Συναρμολόγησης
Λάβετε υπόψη:
Συναρμολογήστε τον κομποστοποιητή
ακολουθώντας τα παρακάτω βήματα.
Τοποθετήστε τον μόνο σε επίπεδο μέρος.
Παραδοτέα:
Επιλέξτε τη θέση τοποθέτησης
Η καλύτερη θέση τοποθέτησης του
κομποστοποιητή είναι στην ημισκιά λουλουδιών και
θάμνων. Φροντίστε ο κομποστοποιητής να βρίσκεται
σε άμεση επαφή με το χώμα του κήπου. Κατά αυτόν τον
τρόπο οι απαραίτητοι για τη διαδικασία οργανισμοί του
εδάφους μπορούν να εργαστούν ανενόχλητοι. Για τη
διατήρηση της υγρασίας το καταλληλότερο μέσο είναι μία
στρώση από κλαδιά, πριονίδι ή τύρφη.
2 Στερεώστε τις πλευρές μεταξύ τους
Υπόδειξη: Σταθείτε έξω από τον κομποστοποιητή μιας και
έτσι είναι πιο εύκολη η συναρμολόγηση του. Με τη βοήθεια
του αριστερού ποδιού στερεώστε κάθε φορά την αριστερή
πλευρά και σπρώξτε την προεξοχή στερέωσης της δεξιάς
πλευράς στις εγκοπές της αριστερής πλευράς.
2a Προεξοχή στερέωσης (1) & εγκοπή (2)
2b Σπρώξτε την προεξοχή στερέωσης στην
εγκοπή
2c Πιέστε προς τα κάτω
3 Ευθυγραμμίστε κάθετα τις τέσσερις πλευρές
Στερεώστε κάθετα (90°) τις τέσσερις πλευρές που έχετε
τοποθετήσει μαζί όπως στο σημείο 1.
Συνδέστε το δίκτυο έδαφος με τα πλευρικά τοιχώματα
Ορισμός των συνδεδεμένων κομμάτια πλευρά στο grid
πάτωμα. Πατήστε αυτό κάτω από ένα κομμάτι και αφήστε
τις πλευρές ασκούν.
4 Τοποθετήστε το καπάκι και αφήστε το να
ασφαλίσει
Γυρίστε το καπάκι ελαφρώς μπροστά, πιέστε το
προς τα κάτω και ακινητοποιήστε το
Τοποθετήστε το καπάκι στη επιθυμητή πλευρά
στα σημεία του μεντεσέ και αφήστε το να
ασφαλίσει (βλ. σχέδιο). Σε περίπτωση φθοράς
ενός μεντεσέ μπορεί να χρησιμοποιηθεί ο
μεντεσές μίας άλλης πλευράς.
5 Η συναρμολόγηση ολοκληρώθηκε
Ο κομποστοποιητής διαθέτει μία οπή για
κλειδαριά (βλ. Εικ. 4.1). Ασφαλίστε τον
κομποστοποιητή ανάλογα με τις ανάγκες, με ένα
λουκέτο (λουκέτο δε συμπεριλαμβάνεται στη
συσκευασία). Οι οπές (βλ. Εικ. 4.2) εξυπηρετούν
τη στερέωση στο έδαφος. Χρησιμοποιήστε
κατάλληλους πασσάλους (οι πάσσαλοι δε
συμπεριλαμβάνονται στη συσκευασία) για να
στερεώσετε τον κομποστοποιητή στο έδαφος.
ΚΟΜΠΟΣΤΟΠΟΙΗΤΗΣ
Επιλέξτε τη θέση τοποθέτησης
Η καλύτερη θέση τοποθέτησης του
κομποστοποιητή είναι στην ημισκιά λουλουδιών
και θάμνων. Φροντίστε ο κομποστοποιητής να
βρίσκεται σε άμεση επαφή με το χώμα του κήπου.
Κατά αυτόν τον τρόπο οι απαραίτητοι για τη
διαδικασία οργανισμοί του εδάφους μπορούν να
εργαστούν ανενόχλητοι. Για τη διατήρηση της
υγρασίας το καταλληλότερο μέσο είναι μία
στρώση από κλαδιά, πριονίδι ή τύρφη.
Γεμίστε σωστά τον κομποστοποιητή
• ξεκινήστε με ένα στρώμα χώματος
• κατόπιν απορρίμματα κήπων με ξύλα και φύλλα
ενδιάμεσα, εφόσον αυτό είναι δυνατό, δηλαδή
ανακατέψτε πράσινα απορρίμματα πλούσια σε
άζωτο με αυτά πλούσια σε άνθρακα
• η εκάστοτε πλευρά δε θα πρέπει να ξεπερνά
το ύψος των περίπου 15 cm
• αποφύγετε την άσχημη μυρωδιά. Σε αυτό
βοηθά εάν ανακατεύετε ελαφρώς το σωρό
του κομπόστ μέσα στον κομποστοποιητή με
ένα δικράνι για σκάλισμα – με αυτή την
εισαγωγή φρέσκου αέρα προωθείται η
διαδικασία αποσύνθεσης
• τα υλικά, τα οποία καταλήγουν στον
κομποστοποιητή είναι σχετικά φτωχά σε
θρεπτικά συστατικά, η βασική τους αξία
βρίσκεται στην περιεκτικότητα χούμου και
για αυτό είναι ωφέλιμος ο εμπλουτισμός με
θρεπτικά συστατικά (π.χ. κοπριά)
• αποφύγετε μία παντελή ξήρανση του κομποστοποιητή (ειδικά τους καλοκαιρινούς μήνες),
ποτίζοντας τον ανά τακτά διαστήματα
Απορρίμματα που μπορούν να κομποστοποιηθούν είναι μεταξύ άλλων:
• Απορρίμματα κήπου (ψιλοκομμένα ή κομμένα
σε μικρά κομμάτια)
• Κομμένο, ελαφρώς ξερό γρασίδι
• Φύλλα (το δυνατό θρυμματισμένα)
• Κλαδιά (θρυμματισμένα)
• Υπόλοιπα καφέ με φίλτρο, σακουλάκια
τσαγιού, τσόφλια αυγών
• Στάχτες από ξύλα και αιθάλη
Να ρίχνετε όλα τα απορρίμματα όσο το δυνατό
πιο χαλαρά. Μην πιέζετε ή στριμώχνετε ποτέ
τα απορρίμματα έτσι ώστε να μπορούν να εργαστούν οι οργανισμοί στο σωρό του κομπόστ.
Στο κομπόστ δεν ανήκουν μεταξύ άλλων:
• Απορρίμματα της κουζίνας όπως υπόλοιπα
κρέατος, ψάρι, τυρί, σούπες, λίπος τηγανίσματος, λάδι, κόκαλα και ψωμί. Τα προϊόντα αυτά
συμβάλουν στη δημιουργία μούχλας!
• Φλούδα πατάτας που έχουν υποστεί επεξεργασία με χημικά μέσα θα πρέπει επίσης να
αποφεύγονται
• Φλούδες εσπεριδοειδών δεν ανήκουν σε καμία
περίπτωση στο κομπόστ
Συμβουλές για την επιτάχυνση της διαδικασίας
κομποστοποίησης
Το πόσο γρήγορα ένας κομποστοποιητής
καταλήγει στην ωρίμανση εξαρτάται ουσιαστικά
από τη σύσταση των υλικών, την περιεκτικότητα
τους σε υγρασία και τη θερμοκρασία τους.
Το κομμένο γρασίδι, τα λαχανικά, τα
απορρίμματα κήπων και η κοπριά αποσυντίθενται
σε μερικούς μήνες.
Η διαδικασία αποσύνθεσης επιταχύνεται
περαιτέρω όταν κανείς απλώσει στις καλά
ανακατεμένες και υγρές στρώσεις εκκινητήρες
κομποστοποίησης από το εμπόριο, οργανικά
λιπάσματα και υπολείμματα από παλιό κομπόστ
ή με την πρόσθεση γαιοσκωλήκων. Εναλλακτικά
μπορούν να χρησιμοποιηθούν χώμα κήπων,
λιθάλευρο ή άλατα φυκιών. Ειδικά τους
καλοκαιρινούς μήνες πολλαπλασιάζονται
έντονα οι μικροοργανισμοί και διενεργούν τη
γρήγορη διάσπαση των φυτών
Συλλέξτε το έτοιμο κομπόστ
• Ελέγξτε αρχικά το βαθμό ωριμότητας του
κομπόστ. Ανοίξτε το σύρτη για να δείτε τη
δομή του χούμου. Το έτοιμο κοπρόχωμα θα
πρέπει να είναι καστανό σκούρο, με κόκκους
και να μυρίζει σαν το χώμα του δάσους.
• Κοσκινίστε το έτοιμο κοπρόχωμα πριν τη
χρήση (όχι πολύ λεπτό).
Μη τοποθετήσετε διασπασμένα
συστατικά όπως π.χ. κλαδιά εκ νέου
στον κομποστοποιητή.
Aufbauanleitung
Bitte beachten Sie:
Bauen Sie den Komposter in den nachfolgend
beschriebenen Schritten und stellen Sie ihn nur auf
ebenem
Untergrund auf.
Lieferumfang:
4 x Seitenteile mit jeweils vormontiertem
Entnahmeschieber
1 x Deckel
1 x Bodengitter
4 x Erdspieße
Wählen Sie den Standort aus
Der günstigste Standort für den Komposter ist im
Halbschatten von Blumen und Hecken. Sorgen Sie

dafür, dass der Komposter direkten Kontakt zur
Gartenerde hat.
Dadurch können die notwendigen Bodenorganismen
ungehindert arbeiten. Zur Erhaltung der Feuchtigkeit
sind eine Schicht Reisig, Schredderabfälle oder Torf am
besten geeignet.
1) Verankern Sie die beiden Teile des Bodengitters
miteinander
Stecken Sie die vier Erdspieße durch die Löcher an den
Ecken des Bodengitters und verankern Sie diese mit
dem Boden.
2) Verankern Sie die Seitenteile miteinander
Hinweis: Stellen Sie sich außerhalb des Komposters,
so lässt er sich leichter aufbauen. Fixieren Sie mit
Hilfe des linken Fußes das jeweils linke Seitenteil,
und schieben Sie die Befestigungsnasen des jeweils
rechten Seitenteiles in die Nuten des jeweils linken
Seitenteiles.
2a Befestigungsnase (1) & Nut (2)
2b Befestigungsnase in Nut schieben
2c Runterdrücken
3) Richten Sie die vier Seiten rechtwinklig aus
Richten Sie die vier -wie in 2 zusammen geschobenenSeitenteile rechtwinklig (90°) aus.
Verbinden Sie das Bodengitter mit den Seitenteilen
Setzen Sie die verbundenen Seitenteile auf das
Bodengitter. Drücken Sie diese etwas runter und lassen
Sie die Seitenteile einrasten.
4) Setzen Sie den Deckel an und lassen Sie ihn
einrasten
Deckel leicht nach vorn anwinkeln, ... Runterdrücken
und einrasten Setzen Sie den Deckel an einem
beliebigen Seitenteil an den Scharnierpunkten
an und lassen Sie ihn einrasten (siehe Skizze).
Bei Beschädigung eines Scharnierteils kann das
Scharnierteil eines anderen Seitenteiles verwendet
werden.
oder stampfen Sie die Abfälle niemals fest, damit die
Organismen im Kompost arbeiten können.
Nicht in den Kompost gehören u.a.:
• Küchenabfälle wie Reste von Fleisch, Fisch, Käse
Suppen, Bratfett, Öl, Knochen und Brot. Diese
Produkte tragen zur Schimmelbildung bei! • mit
chemischen Mitteln behandelte Schalen von Kartoffeln
sollten ebenfalls vermieden werden
• Schalen von Zitrusfrüchten gehören keinesfalls in den
Kompost
Tipps zur Beschleunigung des Kompostiervorgangs
Wie schnell ein Komposter zur Reife gelangt,
ist im wesentlichen abhängig von der
Materialzusammensetzung,
deren Feuchtigkeitsgehalt und der Temperatur.
Grasschnitte, Gemüse- und Gartenabfälle, Stallmist
verrotten in wenigen Monaten.
Der Rotteprozess wird weiter beschleunigt, wenn man
die
einzelnen gut vermischten und durchfeuchteten Lagen
mit Kompoststartern aus dem Fachhandel, organischen
Mischdünger und alter Kompostererde bestreut oder
durch Zugabe von Regenwürmern. Alternativ kann
auch die Gartenerde, Gesteinsmehl oder Algenkalk
verwendet werden. Speziell in den Sommermonaten
vermehren sich
die Mikroorganismen stark und bewirken eine rasche
Zersetzung der Panzenteile.
Entnehmen Sie den fertigen Kompost
• Prüfen Sie zunächst den Reifegrad des Kompostes.
Öffnen Sie den Schieber, um die Struktur des Humus
zu erkennen. Fertige Komposterde sollte dunkelbraun,
körnig sein und nach Waldboden riechen.
• Sieben Sie die fertige Komposterde vor der
Verwendung (nicht zu fein) durch. Geben Sie nicht
verrottete Bestandteile wie z.B. Aststücke dann erneut
in den Komposter.
5) Der Aufbau ist abgeschlossen
Der Komposter verfügt über eine Schlossbohrung
(siehe
Abb. 4.1). Verriegeln Sie den Komposter bei Bedarf mit
einem Vorhängeschlosses (das Schloss ist nicht im
Lieferumfang enthalten).
KOMPOSTER
Befüllen Sie den Komposter richtig
• beginnen Sie mit einer Lage Erde
• dann Gartenabfälle; möglichst mit zwischen
gelagertem Holz und Blättern, d.h. stickstoffreiche,
grüne Abfälle mit kohlenstoffreichen gemischt
• die einzelnen Lagen sollten eine Höhe von etwa 15 cm
nicht übersteigen
• vermeiden Sie Geruchsbelästigung; dazu ist es
hilfreich, wenn Sie das eingegebene Kompostiergut
im Komposter mit einer Grabegabel leicht
durchmischen - durch diese Frischluftzufuhr wird der
Verrottungsprozess vorangetrieben
• Stoffe, die in den Komposter gelangen sind relativ
nährstoffarm, ihr Hauptwert liegt im Humusgehalt,
darum ist auch eine zusätzliche Anreicherung mit
Nährstoffen (z.B. Stalldünger) günstig
• vermeiden Sie eine völlige Austrocknung des
Kompostes (speziell in den Sommermonaten), indem
Sie den Kompost ab und zu wässern
Kompostierbare Abfälle sind u.a.:
• anfallende Gartenabfälle (gehäckselt oder klein
geschnitten)
• geschnittenes, leicht angetrocknetes Gras
• Laub (möglichst zerkleinert)
• Baum- oder Heckenschnitt (geschreddert)
• Kaffeesatz mit Filtertüte, Teebeutel, Eierschale
• Holzasche und Ruß
Werfen Sie alle Abfälle möglichst locker ein. Drücken
IAN: 28504
 Loading...