


aprilia
ご覧になればaprilia
APRILIA WOULD LIKE TO THANK YOU
for choosing one of its products. We have compiled this booklet to provide a comprehensive overview of your vehicle's quality features. Please, read it carefully before riding the vehicle for the first time. It contains information, tips and precautions for using your vehicle. It also describes features, details and devices to assure you that you have made the right choice. We believe that if you follow our suggestions, you will soon get to know your new vehicle well and that it will continue to give you satisfactory service for many years to come. This booklet is an integral part of the vehicle and must be handed over to the new owner in the event of sale.
SL 750 SHIVER GT
Ed. 04 2009
apriliaaprilia
The instructions in this booklet have been compiled primarily to offer a simple and clear guide to using the vehicle; it also describes routine maintenance procedures and regular checks that should be carried out on the vehicle at an Aprilia Dealer or Authorised Workshop. This booklet also contains instructions for simple repairs. Any operations not specifically described in this booklet require the use of special tools and/or particular technical knowledge; for these operations, please take your vehicle to an Aprilia Dealer or Authorised Workshop.
2

|
Personal safety |
|
Failure to completely observe these instruc |
|
tions will result in serious risk of personal |
|
injury. |
|
Safeguarding the environment |
|
Sections marked with this symbol indicate the |
|
correct use of the vehicle to prevent damaging |
|
the environment. |
|
Vehicle intactness |
|
The incomplete or non-observance of these reg |
|
ulations leads to the risk of serious damage to |
|
the vehicle and sometimes even the invalidity |
|
of the guarantee. |
ル(特に" "
The symbols shown above are very important. They are used to highlight those parts of the booklet that should be read with particular care. As you can see, each sign consists of a different graphic symbol, making it quick and easy to locate the various topics. Before starting the engine, read this booklet thor oughly and the "SAFE RIDING" section in par ticular. Your safety as well as other's does not only depend on the quickness of your reflexes and agility, but also on how well you know your vehicle, the state of maintenance of the vehi cle itself and your knowledge of the rules for SAFE RIDING. For your safety, get to know your vehicle well so as to safely ride and master it in road traffic IMPORTANT This booklet is an integral part of the vehicle, and must be handed to the new owner in the event of sale.
3
4
|
|
|
|
|
|
|
INDEX |
.................................................. |
9 |
GENERAL RULES.............................................. |
9 |
.............................................. |
10 |
Foreword............................................... |
10 |
............................................ |
10 |
Carbon monoxide........................................ |
10 |
.................................................. |
11 |
Fuel................................................... |
11 |
...................................... |
12 |
Hot components......................................... |
12 |
............................................ |
12 |
Coolant................................................ |
12 |
.............. |
13 |
Used engine oil and gearbox oil........................ |
13 |
........................ |
14 |
Brake and clutch fluid................................. |
14 |
.......................... |
14 |
Battery hydrogen gas and electrolyte................... |
14 |
.............................................. |
16 |
Stand.................................................. |
16 |
.............................. |
16 |
Reporting of defects that affect safety................ |
16 |
................................ |
17 |
Information to recycle the scooter....................... |
17 |
...................................................... |
21 |
VEHICLE.................................................... |
21 |
................................ |
23 |
Arrangement of the main components....................... |
23 |
.......................................... |
25 |
Dashboard................................................ |
25 |
.............................................. |
27 |
Instrument panel......................................... |
27 |
.................................. |
28 |
Light unit............................................... |
28 |
.................................. |
29 |
Digital lcd display...................................... |
29 |
.............................................. |
32 |
Alarms................................................. |
32 |
...................................... |
35 |
Mapping selection...................................... |
35 |
.................................... |
38 |
Control buttons........................................ |
38 |
........................................ |
41 |
Advanced functions..................................... |
41 |
................................ |
49 |
Ignition switch........................................ |
49 |
........................................ |
50 |
Locking the steering wheel............................. |
50 |
.................................................. |
51 |
Horn button.............................................. |
51 |
............................ |
51 |
Switch direction indicators.............................. |
51 |
.................................. |
52 |
Passing button........................................... |
52 |
........................................ |
52 |
Flasher button........................................... |
52 |
........................................ |
53 |
Start-up button.......................................... |
53 |
............................................ |
53 |
Engine stop switch....................................... |
53 |
.......................... |
54 |
Immobilizer system operation........................... |
54 |
5
........................................ |
55 |
............................................ |
56 |
...................................... |
57 |
/ ............................. |
58 |
.................................................... |
59 |
...................................................... |
61 |
................................................ |
62 |
.................................................... |
65 |
.......................... |
67 |
.................................. |
69 |
............................ |
70 |
................................ |
71 |
.................................... |
72 |
.............................................. |
72 |
............................................ |
74 |
Ride by wire............................................ |
78 |
/ ............................................... |
79 |
............................................ |
86 |
.................................................... |
87 |
.......................... |
88 |
................................................ |
90 |
.............................. |
91 |
............................................ |
92 |
.............................................. |
99 |
............................ |
100 |
.................................. |
101 |
.................................. |
102 |
.................................................. |
104 |
................................ |
107 |
.................................. |
107 |
................................ |
108 |
........................................ |
109 |
.................................. |
111 |
...................................... |
112 |
.................................. |
113 |
................................ |
113 |
.................................. |
114 |
.................................... |
115 |
...................................... |
115 |
Glove-box................................................ |
|
55 |
Power supply |
socket...................................... |
56 |
Opening the saddle..................................... |
57 |
|
Glove/tool |
kit compartment............................. |
58 |
Identification........................................... |
59 |
|
USE........................................................ |
|
61 |
Checks................................................... |
|
62 |
Refuelling............................................... |
|
65 |
Rear shock absorbers adjustment.......................... |
67 |
|
Front fork adjustment.................................... |
69 |
|
Justering af |
greb til forbremse.......................... |
70 |
Rear brake pedal adjustment.............................. |
71 |
|
Clutch lever |
adjustment.................................. |
72 |
Running in............................................... |
|
72 |
Starting up the engine................................... |
74 |
|
Ride by wire............................................. |
|
78 |
Moving off / |
riding...................................... |
79 |
Stopping the |
engine...................................... |
86 |
Parking.................................................. |
|
87 |
Catalytic silencer....................................... |
88 |
|
Stand.................................................... |
|
90 |
Suggestion to prevent theft.............................. |
91 |
|
Basic safety |
rules....................................... |
92 |
MAINTENANCE................................................ |
|
99 |
Engine oil |
level check................................. |
100 |
Engine oil |
top-up...................................... |
101 |
Engine oil |
change...................................... |
102 |
Tyres.................................................... |
|
104 |
Spark plug dismantlement................................. |
107 |
|
Removing the |
sides....................................... |
107 |
Removing the |
air filter.................................. |
108 |
Cooling fluid level...................................... |
109 |
|
Checking the |
brake oil level............................. |
111 |
Braking system fluid top up............................ |
112 |
|
Checking clutch fluid.................................... |
113 |
|
Topping up |
clutch fluid................................ |
113 |
Use of a new battery................................... |
114 |
|
Checking the electrolyte level......................... |
115 |
|
Charging the battery................................... |
115 |
|
6
.................................... |
117 |
................................................ |
118 |
.................................................. |
121 |
.................................... |
124 |
................................ |
127 |
.................................... |
127 |
.................................... |
128 |
.................................... |
128 |
............................................ |
129 |
.......................... |
131 |
...................................... |
132 |
.................................................... |
134 |
.................................................... |
138 |
.................................... |
138 |
.................................... |
139 |
/ ......... |
139 |
.............................. |
140 |
...................................................... |
143 |
.............................................. |
152 |
.................................. |
153 |
.............................. |
154 |
Long periods of inactivity............................... |
117 |
Fuses.................................................... |
118 |
Lamps.................................................... |
121 |
Headlight adjustment................................... |
124 |
Front direction indicators............................... |
127 |
Rear optical unit........................................ |
127 |
Rear turn indicators..................................... |
128 |
Number plate light....................................... |
128 |
Rear-view mirrors........................................ |
129 |
Front and rear disc brake................................ |
131 |
Periods of inactivity.................................... |
132 |
Cleaning the vehicle..................................... |
134 |
Transport................................................ |
138 |
Chain backlash check................................... |
138 |
Chain backlash adjustment.............................. |
139 |
Checking wear of chain, front and rear sprockets....... |
139 |
Chain lubrication and cleaning......................... |
140 |
TECHNICAL DATA............................................. |
143 |
Kit equipment............................................ |
152 |
PROGRAMMED MAINTENANCE..................................... |
153 |
Scheduled maintenance table.............................. |
154 |
7
8
SL 750 SHIVER GT
01
Chap. 01 General rules
9

1 / 1 General rules
|
Foreword |
|
|
|
|
|
|
NOTE |
|
CARRY OUT MAINTENANCE OPERATIONS AT |
|
|
HALF THE INTERVALS SHOWN IF THE VE |
|
|
HICLE IS USED IN WET OR DUSTY AREAS, |
|
2 |
OFF ROAD OR FOR SPORTING APPLICA |
|
|
|
TIONS. |
|
|
Carbon monoxide |
|
|
|
If you need to keep the engine run |
|
|
|
ning in order to perform a proce |
|
|
|
dure, please ensure that you do so in |
|
|
|
an open or very well ventilated |
|
|
|
area. Never let the engine run in an |
|
|
|
enclosed area. If you do work in an |
|
|
|
enclosed area, make sure to use a |
|
|
|
smoke-extraction system. |
|
|
|||
|
|
||
|
|
CAUTION |
|
|
|
|
|
|
|
EXHAUST EMISSIONS CONTAIN CARBON |
|
|
|
MONOXIDE, A POISONOUS GAS WHICH CAN |
|
|
|
CAUSE LOSS OF CONSCIOUSNESS AND EVEN |
|
|
|
DEATH. |
10
|
Fuel |
|
|
|
|
|
|
CAUTION |
|
THE FUEL USED TO POWER INTERNAL |
|
|
COMBUSTION ENGINES IS HIGHLY FLAM |
|
|
MABLE AND MAY BE EXPLOSIVE UNDER |
|
|
CERTAIN CONDITIONS. IT IS THEREFORE |
|
|
RECOMMENDED TO CARRY OUT REFUELLING |
|
|
AND MAINTENANCE PROCEDURES IN A |
|
|
VENTILATED AREA WITH THE ENGINE |
|
|
SWITCHED OFF. DO NOT SMOKE DURING |
|
|
REFUELLING AND NEAR FUEL VAPOURS, |
|
|
AVOIDING ANY CONTACT WITH NAKED |
|
FLAMES, SPARKS OR OTHER SOURCES |
||
|
WHICH MAY CAUSE THEM TO IGNITE OR |
|
|
|
|
|
EXPLODE. |
|
|
DO NOT DISPERSE FUEL IN THE ENVI |
|
|
|
|
|
|
RONMENT. |
|
|
KEEP OUT OF THE REACH OF CHILDREN |
|
VEHICLE FALL OR EXCESSIVE INCLINA |
|
TION CAN CAUSE FUEL OUTFLOW. |
rules General 1 / 1
11

1 / 1 General rules
|
Hot components |
|
The engine and the exhaust system |
|
components get very hot and remain |
|
in this condition for a certain time |
|
interval after the engine has been |
|
switched off. Before handling these |
|
components, make sure that you are |
|
wearing insulating gloves or wait |
|
until the engine and the exhaust |
|
system have cooled down. |
|
Coolant |
||
|
The coolant contains ethylene glycol |
||
|
which, under certain conditions, can |
||
|
become flammable. When ethylene |
||
|
glycol burns, it produces an invis |
||
|
ible flame which can nevertheless |
||
cause burns. |
|||
|
|
||
|
|
|
|
|
CAUTION |
||
|
|||
TAKE CARE NOT TO POUR COOLANT ONTO |
|||
|
|||
|
HOT ENGINE OR EXHAUST SYSTEM COMPO |
||
|
NENTS; THE FLUID MAY CATCH FIRE AND |
||
|
BURN WITH INVISIBLE FLAMES. WHEN |
||
|
CARRYING OUT MAINTENANCE OPERATIONS, |
||
|
IT IS ADVISABLE TO WEAR LATEX |
||
|
GLOVES. EVEN THOUGH IT IS TOXIC, |
||
|
COOLANT HAS A SWEET FLAVOUR WHICH |
||
|
MAKES IT VERY ATTRACTIVE TO ANIMALS. |
||
|
NEVER LEAVE THE COOLANT IN OPEN |
||
CONTAINERS IN AREAS ACCESSIBLE TO |
|||
|
|
||
|
|
ANIMALS AS THEY MAY DRINK IT. |
|
12

|
KEEP OUT OF THE REACH OF CHILDREN |
|
DO NOT REMOVE THE RADIATOR CAP WHEN |
|
|
|
THE ENGINE IS STILL HOT. THE COOLANT |
|
IS UNDER PRESSURE AND MAY CAUSE |
|
BURNS. |
|
|
|
Used engine oil and gearbox |
||
|
oil |
||
|
|
||
|
|
|
|
|
CAUTION |
||
|
|||
IT IS ADVISABLE TO WEAR LATEX GLOVES |
|||
|
WHEN SERVICING THE VEHICLE. |
||
|
|
||
|
THE ENGINE OR GEARBOX OIL MAY CAUSE |
||
|
SERIOUS INJURIES TO THE SKIN IF |
||
|
HANDLED FOR PROLONGED PERIODS OF |
||
|
|
||
|
TIME AND ON A REGULAR BASIS. |
||
|
WASH YOUR HANDS CAREFULLY AFTER |
||
|
|
||
|
HANDLING OIL. |
||
|
HAND THE OIL OVER TO OR HAVE IT COL |
||
|
LECTED BY THE NEAREST USED OIL RE |
||
|
CYCLING COMPANY OR THE SUPPLIER. |
||
|
|
||
|
DO NOT DISPOSE OF OIL IN THE ENVI |
||
|
RONMENT |
||
|
|
||
|
KEEP OUT OF THE REACH OF CHILDREN |
||
|
|
||
rules General 1 / 1
13

1 / 1 General rules
|
Brake and clutch fluid |
|
Brake and clutch fluid |
|
|
|
|
|
BRAKE AND CLUTCH FLUIDS CAN DAMAGE |
|
THE PLASTIC OR RUBBER PAINTED SUR |
|
FACES. WHEN SERVICING THE BRAKING |
|
SYSTEM OR THE CLUTCH SYSTEM, PROTECT |
|
THESE COMPONENTS WITH A CLEAN CLOTH. |
|
ALWAYS WEAR PROTECTIVE GOGGLES WHEN |
|
SERVICING THESE SYSTEMS. BRAKE AND |
|
CLUTCH FLUIDS ARE EXTREMELY HARMFUL |
|
FOR YOUR EYES. IN THE EVENT OF AC |
|
CIDENTAL CONTACT WITH THE EYES, |
|
RINSE THEM IMMEDIATELY WITH ABUNDANT |
|
COLD, CLEAN WATER AND SEEK MEDICAL |
|
ADVICE. |
|
|
|
KEEP OUT OF THE REACH OF CHILDREN. |
|
|
膚に付着した場合は直ちに冷水で充分に 洗い流してください。
Battery hydrogen gas and electrolyte
CAUTION
THE BATTERY ELECTROLYTE IS TOXIC, CORROSIVE AND AS IT CONTAINS SUL PHURIC ACID, IT CAN CAUSE BURNS WHEN IN CONTACT WITH THE SKIN. WHEN HAN DLING BATTERY ELECTROLYTE, WEAR
14
|
TIGHT-FITTING GLOVES AND PROTECTIVE |
|
APPAREL. IN THE EVENT OF SKIN CON |
|
TACT WITH THE ELECTROLYTIC FLUID, |
15 |
RINSE WELL WITH PLENTY OF CLEAN WA |
|
TER. IT IS PARTICULARLY IMPORTANT TO |
|
PROTECT YOUR EYES BECAUSE EVEN TINY |
|
AMOUNTS OF BATTERY ACID MAY CAUSE |
|
BLINDNESS. IF THE FLUID GETS IN |
|
CONTACT WITH YOUR EYES, WASH WITH |
|
ABUNDANT WATER FOR FIFTEEN MINUTES |
|
AND CONSULT AN EYE SPECIALIST IMME |
|
DIATELY. IF THE FLUID IS ACCIDEN |
|
TALLY SWALLOWED, DRINK LARGE QUAN |
|
TITIES OF WATER OR MILK, FOLLOWED BY |
|
MILK OF MAGNESIA OR VEGETABLE OIL |
|
AND SEEK MEDICAL ADVICE IMMEDIATELY. |
THE BATTERY RELEASES EXPLOSIVE |
|
|
GASES; KEEP IT AWAY FROM FLAMES, |
|
|
|
SPARKS, CIGARETTES OR ANY OTHER HEAT |
|
SOURCES. ENSURE ADEQUATE VENTILATION |
|
WHEN SERVICING OR RECHARGING THE |
|
BATTERY. |
|
KEEP OUT OF THE REACH OF CHILDREN |
|
|
|
BATTERY LIQUID IS CORROSIVE. DO NOT |
|
POUR IT OR SPILL IT, PARTICULARLY ON |
|
PLASTIC COMPONENTS. ENSURE THAT THE |
|
ELECTROLYTIC ACID IS COMPATIBLE WITH |
|
THE BATTERY TO BE ACTIVATED. |
rules General 1 / 1
15

1 / 1 General rules
|
Stand |
|
BEFORE SETTING OFF, MAKE SURE THE |
|
|
STAND HAS BEEN COMPLETELY RETRACTED |
|
|
TO ITS |
POSITION. |
|
DO NOT REST THE RIDER OR PASSENGER |
|
|
WEIGHT |
ON THE SIDE STAND. |
Reporting of defects that affect safety
Unless otherwise specified in this Use and Maintenance Booklet, do not remove any mechanical or electrical component.
CAUTION
SOME CONNECTORS IN THE VEHICLE MAY BE ACCIDENTALLY SWAPPED AND MAY COMPROMISE NORMAL VEHICLE OPERATION IF INCORRECTLY INSTALLED.
16
01_01
01_02
(01_01, 01_02)
棄二輪車取扱店の証」が表示されていま す。
お近くの廃棄二輪車取扱店にご相談くだ さい。
が車体に貼付されています。
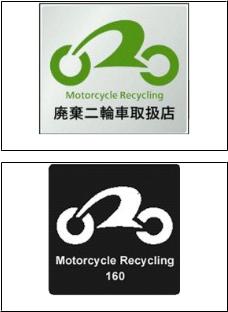
Information to recycle the scooter (01_01, 01_02)
SCRAP THE MOTORCYCLE
Please consult the nearest "Motor cycle scrap handling shop" when the motorcycle needs to be disposed of.
∙Motorcycle scrap handling shop
Such a location is designated to process the scrap motorcycle prop erly and it is registered by the Ja pan Mini Vehicles Association and as a large area waste management spec ification industry shop. "Proof of motorcycle scrap handling shop" is displayed in the shop.
∙Motorcycle Recycling cost
There is a cost to do proper pro cessing, and to recycle the scrap Motorcycle.
It is not necessary to pay the Mo torcycle Recycling fee if the vehi cle has Motorcycle Recycling mark on the body, because the recycling cost has already been included in the manufacturer suggested retail price of the vehicle.
However, cost concerning transpor tation and collection is not inclu ded. Therefore the cost concerning collection from the customer and transportation to the scrap motor cycle handling shops or a designated collection place is charged to the
rules General 1 / 1
17
1 / 1 General rules
および補修部品としての販売はいたして おりません。
http://www.jarc.or.jp/
03-3598-8075
9 30 17 00
customer. Therefore, please consult a near scrap motorcycle handling shop.
∙Handling of Motorcycle Re cycling mark
This motorcycle has Motorcycle Re cycling mark. The confirmation of the motorcycle recycling mark is necessary for scrap. Please never peel it off from the body. It is never reissued and it is never sold as a repair part even if it has been damage or flaking.
∙Position of Motorcycle Re cycling mark
Usually it is located near frame number or under the seat
∙Inquiries concerning scrap motorcycles
Please inquire at the nearest scrap motorcycle handling shop or follow ing.
Japan Automobile Recycling Promotion Center
Home page http://www.jarc.or.jp/
Motorcycle Recycling call center of Japan Automobile Recycling Promotion Center
Telephone: 03-3598-8075
18
Time in: AM 9:30 to PM 5:00 (Holiday, weekend and year end and new year are excluded.)
rules General 1 / 1
19
1 / 1 General rules
20
SL 750 SHIVER GT
02
Chap. 02 Vehicle
21
02_01
2 / 2 Vehicle
22

Vehicle 2 / 2
02_02
|
Arrangement of the main |
||
(02_02) |
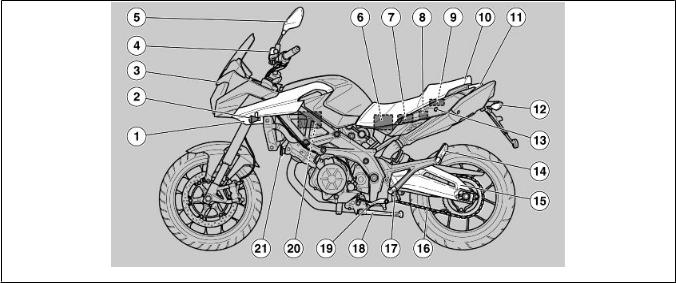
components (02_02) |
||
|
Key: |
|
|
1. |
|
1. |
Left side fairing |
2. |
|
2. |
Front left turn indicator |
|
|
3. |
Windshield |
3. |
|
4. |
Clutch fluid reservoir |
4. |
|
5. |
Left rear-view mirror |
5. |
|
6. |
Battery |
6. |
|
7. |
Glove-box / toolkit |
7. |
|
8. |
Main fuses |
|
|
9. |
Auxiliary fuses |
8. |
|
10. |
Saddle |
23
2 / 2 Vehicle
9. |
|
11. |
Rear light |
10. |
|
12. |
Rear left turn indicator |
11. |
|
13. |
Glove-box / toolkit lock |
12. |
|
14. |
Left passenger footrest |
13. |
|
|
(snap-on, closed / open) |
|
|
15. |
Rear fork |
14. |
|
16. |
Drive chain |
|
|
17. |
Left rider footrest |
15. |
|
18. |
Side stand |
16. |
|
19. |
Gear shift lever |
17. |
|
20. |
Control unit |
18. |
|
21. |
Horn |
19. |
|
22. |
Rear right turn indicator |
20. |
|
23. |
License plate holder light |
21. |
|
24. |
Fuel tank cap |
22. |
|
25. |
Fuel tank |
23. |
|
26. |
Right rear-view mirror |
24. |
|
27. |
Front brake fluid reservoir |
25. |
|
28. |
Plug socket |
26. |
|
29. |
Plug socket fuse |
27. |
|
30. |
Front right turn indicator |
|
|
31. |
Expansion tank cap |
28. |
|
32. |
Front headlamp |
29. |
|
33. |
Expansion tank |
30. |
|
34. |
Air filter |
|
|
35. |
Engine oil filter |
31. |
|
36. |
Engine oil plug |
|
|
37. |
Engine oil level |
32. |
|
38. |
Rear brake control lever |
33. |
|
39. |
Right rider footrest |
34. |
|
40. |
Rear brake pump |
35. |
|
41. |
Rear shock absorber |
36. |
|
42. |
Right passenger footrest |
37. |
|
|
(snap-on, closed / open) |
38. |
|
43. |
Rear brake fluid reservoir |
24
|
|
|
02_03 |
(02_03) |
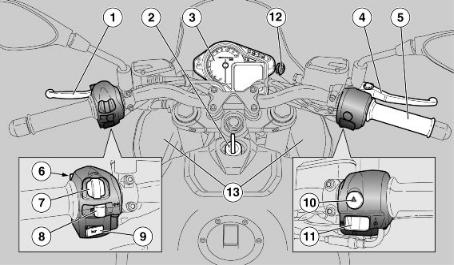
Dashboard (02_03) |
||
|
Instrument panel / controls location |
||
1. |
|
key |
|
|
|
||
2. |
|
1. |
Clutch control lever |
|
|
2. |
Ignition switch /steering |
3. |
|
|
lock |
Vehicle 2 / 2
25

2 / 2 Vehicle
4. |
|
3. |
Instrument panel |
5. |
|
4. |
Front brake lever |
6. |
|
5. |
Throttle grip |
7. |
MODE |
6. |
High-beam flashing switch |
8. |
|
7. |
MODE Control |
|
|
8. |
Turn indicator control |
9. |
|
9. |
Horn button |
10. |
|
10. |
Hazard |
11. |
|
11. |
Starter / engine stop / |
|
|
|
mapping selection button |
12. |
|
12. |
Plug socket |
13. |
|
13. |
Glove-boxes |
02_04
26
(02_04) |
Instrument panel (02_04) |
|||
|
key: |
|||
1. |
|
1. |
Rpm indicator |
|
2. |
|
2. |
Multifunctional digital |
|
|
|
|
display |
|
3. |
|
3. |
Warning lights |
|
|
The instrument panel has an immo |
|||
|
bilizer which prevents start-up in |
|||
|
case the system does not identify a |
|||
|
key which has been programmed be |
|||
2 |
fore. |
|||
|
The vehicle is supplied with two |
|||
4 |
keys already programmed. The in |
|||
|
strument panel accepts a maximum of |
|||
aprilia |
four keys at the same time: contact |
|||
|
an Official aprilia Dealer to enable |
|||
ON 10 |
these keys or to disable a key that |
|||
5 |
has been lost. When the vehicle is |
|||
|
delivered and approximately ten |
|||
|
seconds after the key is set to ON, |
|||
|
the instrument panel requests a |
|||
|
personal five-digit code to be en |
|||
|
tered. This request is no longer |
|||
|
displayed once the personal code is |
|||
entered. For code entering proce |
||||
|
dure, see the CODE MODIFICATION |
|||
|
|
|||
∙ |
|
section |
||
|
|
It |
is important to remember the |
|
|
|
|||
∙ |
personal code because: |
|||
|
||||
∙ the vehicle can be started |
||||
|
|
|||
|
|
|
if the immobilizer system is |
|
|
|
|
faulty |
|
Vehicle 2 / 2

∙ |
∙ |
the instrument panel need |
|
|
not be replaced should the |
|
∙ |
ignition switch be changed |
|
new keys can be programmed |
|
|
Light unit (02_05) |
|||
|
|||||
|
(02_05) |
Key: |
|
||
|
|
|
|
||
|
|
1. |
High-beam warning light, |
||
|
|
|
|||
|
1. |
|
|
blue |
|
|
2. |
Left turn indicator warning |
|||
|
|
|
|||
|
|
|
light, green |
||
|
2. |
|
|
||
|
3. |
General warning light, red |
|||
|
|
|
|||
|
|
4. |
Gear in neutral warning |
||
|
3. |
|
|||
|
|
light, green |
|||
|
4. |
|
|
||
|
5. |
Side stand lowered warning |
|||
02_05 |
|
|
|||
5. |
|
|
light, amber yellow |
||
6. |
ABS warning light, red (not |
||||
|
|
|
|||
|
|
|
active) |
||
6. |
ABS |
|
|||
7. |
Right turn indicator warning |
||||
7. |
|
||||
|
light, green |
||||
|
|
|
|
||
|
|
8. |
Low fuel warning light, am |
||
8. |
|
||||
|
|
||||
|
ber yellow |
|
2 / 2 Vehicle
28
02_06
02_07
02_08
(02_06, 02_07, 02_08, 02_09, 02_10, 02_11, 02_12)
∙'KEY ON' 2
-'SHIVER'
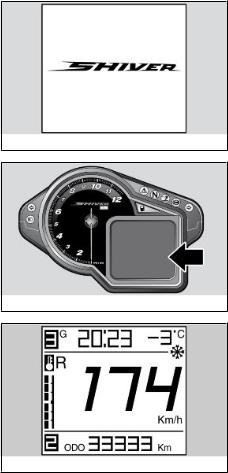
Digital lcd display (02_06, 02_07, 02_08, 02_09, 02_10, 02_11, 02_12)
∙By turning the ignition key to 'KEY ON', the following indicators on the instrument panel are lit for two sec onds:
-The 'SHIVER' logo
-All warning lights
∙The rpm indicator pointer moves to then go back to its initial position.
The general layout of the screen displayed for the user is the fol lowing:
-ambient temperature;
-clock;
-Selected mapping;
-speedometer;
-odometer, trip journal or addi tional functions.
Vehicle 2 / 2
29

2 / 2 Vehicle
MODE 1
- を引かなかった場合は、この値を算出す る必要があるため、少し遅れて表示され ます。
-AM / PM 2412
-°C °F
02_09 |
MODE 2 |
- 1
∙
- -
∙
- - -
∙The following functions are displayed at the top of the instrument panel:
MODE 1
-gear engaged: as this values should be calculated, it is dis played with a slight delay, only while riding and when the clutch is not pulled
-clock (displayed in 24 or 12 hours mode without AM / PM indication)
-ambient temperature measurement (displayed in °C or °F)
MODE 2
-revolution and time per revolution
∙The following functions are displayed in the central area:
-speed (speedometer)
-engine temperature bar
∙The following functions are displayed at the bottom:
-total odometer
-trip computer data
-possible alarms
30
 Loading...