Schneider Electric MNB-300 Installation Instructions

MNB-300
MicroNet BACnet
Unitary Controller
Installation Instructions
Application
The I/A Series® MicroNet™ BACnet® Unitary Controller is an interoperable controller
with native BACnet, IP, and MS/TP communications
support. The controller features Sensor Link (S-Link) support, LED status and output indication, screw terminal blocks, as well as a
panel mount sub-base with removable electronics module.
When programmed using WorkPlace Tech Tool, the Unitary Controller provides a wide range of control strategies for packaged rooftop, heat pump, fan coil, unit ventilator, and similar applications.
Model Chart
Model |
|
Inputs and Outputs |
|
||
Number |
UI |
|
UO |
|
DO (Triacs) |
MNB 300 |
6 |
|
3 |
|
6 |
Precautions
When installing the MNB 300 controller, be sure to follow the guidelines outlined in “Precautions” on page 4.
Location
The MNB-300 controller is suitable for indoor use only. The mounting location must clear the maximum dimensions of the controller case and allow sufficient clearance for access to wiring terminals.
Caution:
•Avoid locations where excessive moisture, corrosive fumes, vibration, or explosive vapors are present.
•Avoid electrical noise interference. Do not install near large contactors, electrical machinery, or welding equipment.
• Locate where ambient temperatures do not exceed 140°F (60°C) or fall below -40°F (-40°C) and relative humidity does not exceed 85% or fall below 5%, noncondensing.
Installation
Inspection
Inspect carton for damage. If damaged, notify carrier immediately. Inspect controllers for damage upon receipt.
Requirements
•Installer must be a qualified technician
The following items are not provided.
•Job wiring diagrams
•Tools:
–Drill and bits for mounting screws
–Screw drivers
–Nut drivers
–Digital Volt-ohm meter (DVM)
–Static protection wrist strap
•MNB-300-ENC enclosure for wall-mounting (optional)
•Class 2 power transformer supplying a nominal 12 VA at 24 Vac plus DO load; in European Community, transformer must conform to EN 60742
•Four #10 pan head screws for wall-mounting
•Four #10 pan head screws for panel-mounting
•If needed, end-of-line termination resistor, 120 Ω ±5%, part number 40 1758
Schneider Electric
Dimensions
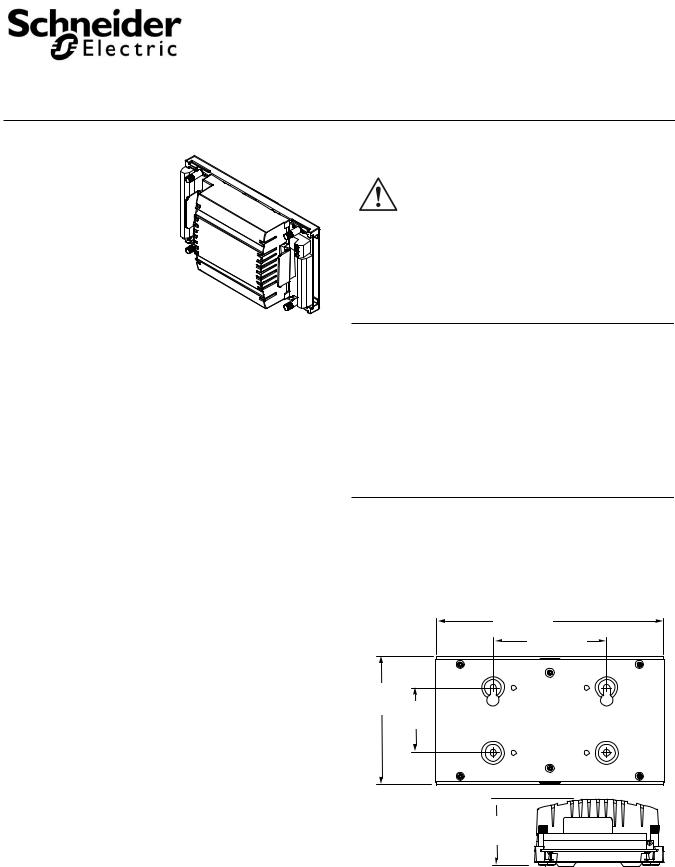
Mounting dimensions for the MNB 300 controller are shown in Figure 1. Refer to Figure 3 for mounting dimensions for optional enclosure MNB 300 ENC.
7 (177.8)
3-1/2 (88.9)
4
(101.6)
2
(50.8)
Dimensions shown  are in inches (mm). 2
(50.8)
Figure-1 Mounting Dimensions.
F-27345-4 |
May 2014 |

Mounting
2
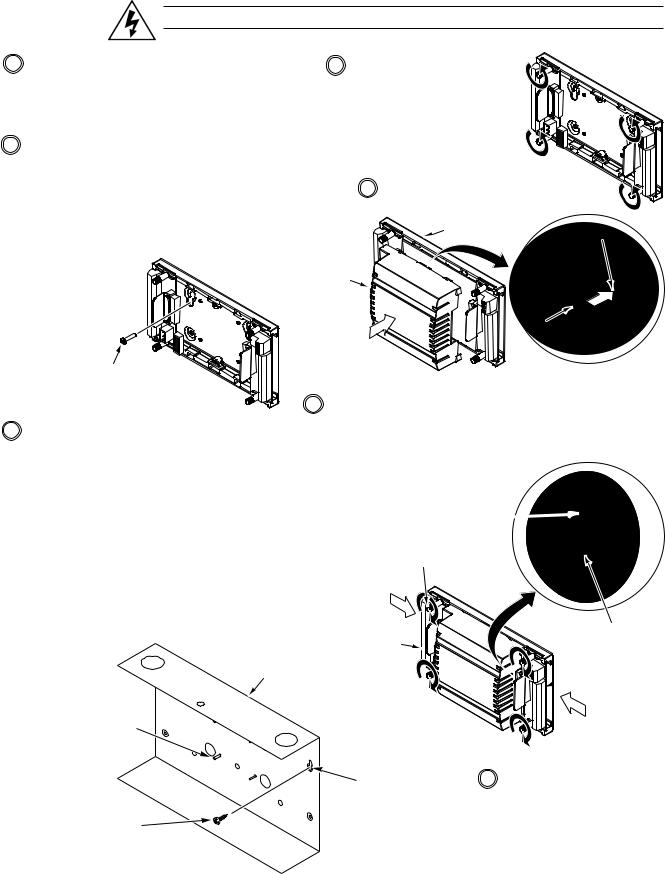
Mount the controller to the wall according to Figure 2.
Warning: Electrical shock hazard! Disconnect power before installing or removing the cover.
1Select a mounting location. The MNB-300 may be panelmounted or, optionally, enclosure-mounted. To panelmount the MNB-300, go to Step 2. To mount the MNB-300 inside optional Enclosure MNB-300-ENC, go to Step 3.
Note: The MNB-300 may be mounted in any orientation.
2To mount the MNB-300 to a panel, proceed as follows:
a.Holding the controller's base plate in position, mark the locations of the four mounting holes on the panel.
b.Set the base plate aside and drill the marked mounting holes, using a drill bit sized to the mounting screws.
c.Secure the base plate to the panel, using four #10 screws (not supplied).
4 Be sure the input and output boards are spread apart as far as possible. If needed, loosen the four thumb screws by turning them CCW and then reposition the boards.
5Position the controller onto the base plate.
Base Plate |
Slot |
|
d. Continue at Step 4.
Controller
Mounting Hole
(1 of 4) 
Tab
#10 Pan Head
Screw (1 of 4)
(not supplied)
6 Press on the aluminum tabs to slide the input and output boards into the controller, making sure the mating connectors engage fully.
3 Optional To mount the MNB-300 inside Enclosure MNB-300-ENC, proceed as follows:
a. Separate the enclosure cover from the enclosure base.
b. Holding the enclosure's base in position on the wall, mark the locations of the four mounting holes.
c. Set the enclosure base aside and drill the marked mounting holes, using a drill bit sized to the mounting screws.
d. Secure the enclosure base to the wall, using four #10 screws (not supplied).
e. Mount the controller's base plate onto the four threaded studs on the enclosure's base. Secure the base plate, using four #6-32 nuts (provided).
f. Continue at Step 4.
Base of Optional
Enclosure
MNB-300-ENC
Threaded Studs for Mounting Controller (1 of 4)
(part of enclosure base)
Note: The connectors are properly engaged when the gap between the controller and the input and output boards is even and minimal from top to bottom.
Connectors 
Thumb Screws
(1 of 4)
Aluminum
Input Tab (1 of 2)
Board
Output
 Board
Board
Mounting Hole
(1 of 4)
#10 Pan Head
Screw (1 of 4)
(not supplied)
7Tighten the four thumb screws CW to secure the input and output boards in place.
Figure-2 MNB 300 Mounting.
Schneider Electric
F-27345-4 |
May 2014 |
 Loading...