


 Loading...
Owner’s Manual
(Detailed Information)
Streaming Player
Model No. DMP-MST60
DMP-MS10
Unless otherwise indicated, illustrations in this Owner’s Manual are of DMP-MST60.
VQT4X69
|
|
|
F0113QK0 |
P |
|
PC |
|
|
|

Table of contents
Getting started
Accessories . . . . . . . . . . . . . . . . . . . . . . . . . . .3 Unit and media care . . . . . . . . . . . . . . . . . . . . .3 Control reference guide . . . . . . . . . . . . . . . . . .4
Connections & Settings
Connecting to a TV . . . . . . . . . . . . . . . . . . . . . .7 Connecting to the AC adaptor . . . . . . . . . . . . .7 Connecting to an amplifier/receiver . . . . . . . . .8 Connecting to the network . . . . . . . . . . . . . . . .8 Settings. . . . . . . . . . . . . . . . . . . . . . . . . . . . . .10
Playback
HOME menu . . . . . . . . . . . . . . . . . . . . . . . . . .13 Network Service (Enjoying Netflix, etc.) . . . . .14 Using Miracast™ . . . . . . . . . . . . . . . . . . . . . .15 Home Network feature . . . . . . . . . . . . . . . . . .16 Playing back USB devices . . . . . . . . . . . . . . .18 Operations during playback . . . . . . . . . . . . . .19 Enjoying 3D . . . . . . . . . . . . . . . . . . . . . . . . . .20 “HDMI CEC” . . . . . . . . . . . . . . . . . . . . . . . . . .20 Multi User Mode . . . . . . . . . . . . . . . . . . . . . . .21
Settings
Option menu . . . . . . . . . . . . . . . . . . . . . . . . . .22 Setup menu . . . . . . . . . . . . . . . . . . . . . . . . . .24
Reference
LED indicators . . . . . . . . . . . . . . . . . . . . . . . .28 Messages . . . . . . . . . . . . . . . . . . . . . . . . . . . .28 Troubleshooting guide . . . . . . . . . . . . . . . . . .29 Specifications . . . . . . . . . . . . . . . . . . . . . . . . .32
≥About Firmware updates (> 12)
- 2 -

Getting started
Accessories
Check the supplied accessories before using this unit.
≥Product numbers provided in this Owner’s Manual correct as of December 2012. These may be subject to change.
1Remote control
([MST60] N2QAYB000889 / [MS10] N2QAYB000883)
2Batteries for remote control
1AC adaptor
(VSK0811)
≥For use with this unit only. Do not use it with other equipment.
≥Do not use any other AC adaptors except
the supplied one.
1HDMI cable
(K1HY19YY0012)
[For_Canada]
The enclosed Canadian French label sheet corresponds to the English display on the unit.
Unit and media care
∫ Clean this unit with a soft, dry cloth
≥Never use alcohol, paint thinner or benzine to clean this unit.
≥Before using chemically treated cloth, carefully read the instructions that came with the cloth.
∫ To dispose or transfer this unit
The unit may keep the user settings information in the unit. If you discard this unit either by disposal or transfer, then follow the procedure to return all the settings to the factory presets to delete the user settings. (> 29, “To return all settings to the factory preset.”)
≥The operation history may be recorded in the memory of this unit.
- 3 -
Getting started
Control reference guide
Remote control
[MST60]
1
2 |
|
|
|
|
|
|
|
|
|
|
|
|
|
|
|
|
|
|
|
|
|
|
|
|
|
|
|
|
|
|
|
|
|
|
3 |
|
|
|
|
|
|
|
|
|
|
|
|
|
4 |
|
|
|
|
|
|
|
|
|
|
|
|
|
|
|
|
|
|||
|
|
|
|
|
|
|
5 |
|
|
|
|||
|
|
|
|
|
|
|
|
|
|
|
|
|
|
|
|
|
||||
|
|
|||||
6 |
|
|
|
|
|
|
|
|
|
|
|
|
|
|
|
|
|
|
|
|
|
|
|
|
|
||
|
|
|
|
|
||
|
|
|
|
|
|
|
7 |
|
|
|
|
|
|
|
|
|
|
|
|
|
|
|
|
|
|
|
|
|
|
|
|
|
|
|
8
9
10
11
12
13
14
15
16
17
18
19
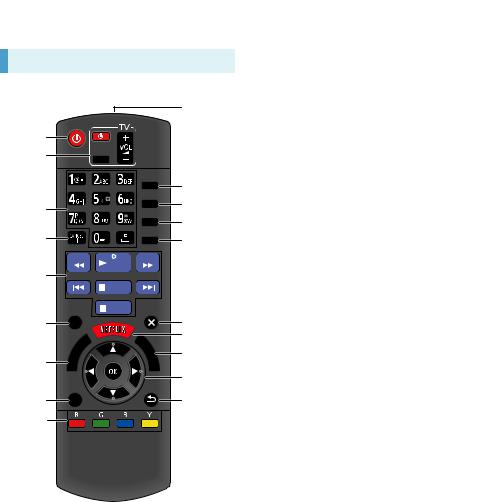
1Turn the unit on and off
2TV operation buttons
You can operate the Panasonic TV using the unit’s remote control. Some buttons may not work depending on the TV.
[Í TV] : Turn the TV on and off [AV] : Change input
[i j VOL] : Adjust the volume
3Enter numbers or characters
4Cancel
5Basic playback control buttons (> 19)
6Show Top menu (> 19)
7Show Miracast™ screen (> 15)
8Show Option menu (> 22)
9Colored buttons (red, green, blue, yellow) Used for various purposes depending on the display.
10Transmit the remote control signal
11Show status messages (> 19)
12Show Setup menu (> 24)
13Select audio (> 19)
14Show the Home screen of the Network Service
15Exit the menu screen
16Show Netflix screen (> 14)
17Show HOME menu (> 13)
18[3, 4, 2, 1] : Move the highlight for selection [OK] : Confirm the selection
19Return to previous screen
- 4 -
[MS10]
1
2
3
4
5
6
7
8
9
10
|
|
|
|
|
|
|
|
|
|
|
|
|
|
|
|
|
|
|
|
|
|
|
|
|
|
|
|
|
|
|
|
|
|||
|
|||||
|
|
|
|||
|
|
|
|
||
|
|
|
|||
|
|
|
|
|
|
|
|
|
|
|
|
|
|
||||
|
|||||
|
|
|
|
|
|
|
|
|
|
||
|
|
|
|||
|
|
|
|
||
|
|
|
|
|
|
|
|
|
|
|
|
|
|
|
|
|
|
|
|
|
|
|
|
|
|
|
|
|
|
11
12
13
14
15
16
17
18
19
20
Getting started
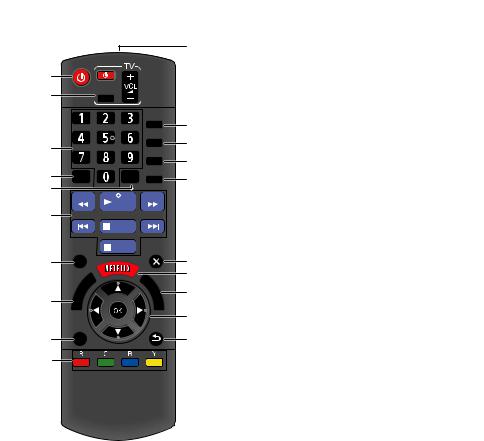
1Turn the unit on and off
2TV operation buttons
You can operate the Panasonic TV using the unit’s remote control. Some buttons may not work depending on the TV.
[Í TV] : Turn the TV on and off [AV] : Change input
[i j VOL] : Adjust the volume
3Enter numbers
4Cancel
5Select audio (> 19)
6Basic playback control buttons (> 19)
7Show Top menu (> 19)
8Show Miracast screen (> 15)
9Show Option menu (> 22)
10Colored buttons (red, green, blue, yellow) Used for various purposes depending on the display.
11Transmit the remote control signal
12Show status messages (> 19)
13Show Setup menu (> 24)
14Show Home Network menu (> 16)
15Show the Home screen of the Network Service
16Exit the menu screen
17Show Netflix screen (> 14)
18Show HOME menu (> 13)
19[3, 4, 2, 1] : Move the highlight for selection [OK] : Confirm the selection
20Return to previous screen
- 5 -
Getting started
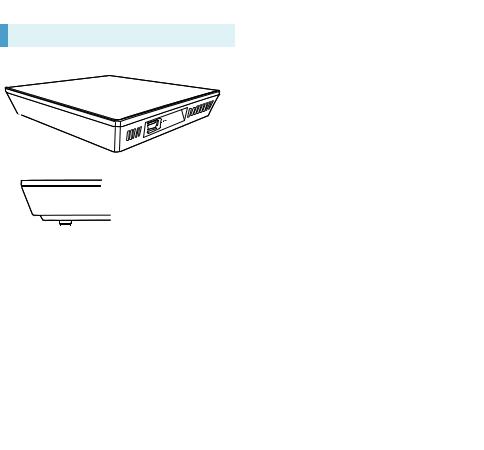
The Unit
Front View
1 |
4 |
POWER |
INFO |
2 |
3 |
Rear View
MST60
|
|
|
|
|
|
|
|
|
|
|
|
|
|
|
|
|
|
|
|
|
|
|
|
|
|
|
|
|
|
|
|
|
|
|
|
|
|
|
|
|
|
|
|
|
|
|
|
|
|
|
|
|
|
|
|
|
|
|
|
|
|
|
|
|
|
|
|
|
|
|
|
|
|
|
|
|
|
|
|
|
|
|
|
|
|
|
|
|
|
|
|
|
|
|
|
|
|
|
|
|
|
|
|
|
|
|
|
|
|
|
|
|
|
|
|
|
|
|
|
|
|
|
|
|
|
|
|
|
|
|
|
5 |
|
|
|
6 |
|
|
|
|
7 |
|
8 |
|
|
||||||||
MS10
|
|
|
|
|
|
|
|
|
|
|
|
|
|
|
|
|
|
|
|
|
|
|
|
|
|
|
|
|
|
|
|
|
|
|
|
|
|
|
|
|
|
|
|
|
|
|
|
|
|
|
|
|
|
|
|
|
|
|
|
|
|
|
|
|
|
|
|
|
|
|
|
|
|
|
|
|
|
|
|
|
|
|
|
|
|
|
|
|
|
|
|
|
|
|
|
|
|
|
|
|
|
|
|
|
|
|
|
|
|
|
|
|
|
|
|
|
|
|
|
|
|
|
|
|
|
|
|
|
|
|
|
5 |
|
|
7 |
|
6 |
|
|
|
|
8 |
|
|
|||||||||
1Remote control signal sensor Distance: Within approx. 7 m (23 feet)
Angle: Approx. 20e up and down, 30e left and right
2POWER LED
Blinks when the power is turned on.
Wait for the LED to turn solid green before using this unit.
3INFO LED (> 28, “LED indicators”) Displays the various states of this unit.
4USB port (> 18)
5DC IN terminal (> 7)
6LAN port (> 9)
7HDMI AV OUT terminal (> 7)
8Standby/on switch (POWER Í/I) (> 10) Press to switch the unit from on to standby mode or vice versa. In standby mode, the unit still consumes a small amount of power.
-6 -
Connections & Settings
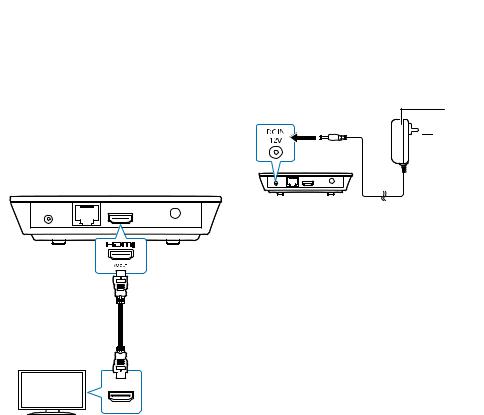
Connecting to a TV
≥Before making any connections, we recommend that you temporarily disconnect all the units from AC power.
≥Use the High Speed HDMI cables. Non-HDMI-compliant cables cannot be utilized. The HDMI-compliant cable is supplied with this unit.
It is recommended that you use Panasonic’s HDMI cable. When outputting 1080p signal, please use HDMI cables 5.0 meters (16.4 ft.) or less.

Connecting to the AC adaptor
Connect the AC adaptor after making all other connections.


A AC adaptor (supplied)
B To a household AC outlet
≥This unit consumes a small amount of AC power (> 32) even when turned off. For the purpose of power conservation, the unit can be disconnected if you will not be using it for extended period of time.
HDMI IN
A HDMI cable (supplied)
- 7 -

Connections & Settings
Connecting to an amplifier/receiver

HDMI IN |
HDMI OUT |
|
(ARC) |
Connecting to the network
The following services can be used when this unit is connected to broadband.
≥Firmware can be updated (> 12)
≥You can enjoy Network Service (> 14)
≥You can access other devices (Home Network) (> 16)
≥This unit supports Wi-Fi Direct™ and can make a wireless connection to wireless devices without router. You can use this function when enjoying Home Network feature, etc. Internet access is not available while connected via
Wi-Fi Direct™. (> 16, 25)
For details about connection method, refer to the instructions supplied with the connected equipment.

HDMI IN (ARC)
A HDMI cable (supplied)
B Amplifier/receiver
C HDMI cable
≥Set “Digital Audio Output” (> 25).
≥When using the TV or amplifier/receiver that does not have the indication of “(ARC)” (non-ARC-compatible) on the HDMI terminal, the amplifier/receiver and TV must also be connected using an optical digital cable in order to enjoy the TV’s sound through the amplifier/ receiver.
≥[MST60] When connecting to a non-3D compatible amplifier/receiver, connect this unit to a TV, then connect the TV and the amplifier/ receiver.
- 8 -

Connections & Settings
Wireless LAN connection
This unit has built-in Wi-Fi® and can be connected to a wireless router.


A Wireless router, etc.
B Internet
≥For up-to-date compatibility information on your wireless router, refer to http://panasonic.jp/support/global/cs/
(This site is in English only.)
For additional information about this unit refer to http://www.panasonic.com/help
(For U.S.A.)
≥The unit is not compatible with public wireless LAN services provided in airports, stations, cafes, etc.
≥See “Owner’s Manual (Essential Information)” for the precautions for wireless LAN connection.
LAN cable connection


A LAN Cable
B Broadband router, etc.
C Internet
≥Inserting any cable other than a LAN cable in the LAN port can damage the unit.
- 9 -
Connections & Settings
Settings
Easy Settings
After connecting your new unit for the first time and pressing [Í], the basic settings screen will appear.
Preparation
Turn on the TV and select the appropriate video input.
1 Press [Í].
Setup screen appears.
2 Follow the on-screen instructions to continue with the settings.
≥You can perform this setup anytime by selecting “Easy Settings” in the Setup menu. (> 27)
Easy Network Setting
After completing “Easy Settings”, you can perform “Easy Network Setting”.
Wired connection
Select “Wired” and press [OK].
Easy Network Setting
Select a connection mode.
Wired
Wireless
 OK
OK
RETURN
Follow the on-screen instructions to establish your connection settings.
Wireless connection
1 Select “Wireless” and press [OK].
2 Select “Search for wireless network” or “WPS (PUSH button method)” and press [OK], then follow the on-screen instructions to continue with the settings.
Wireless Settings
Select a connection method.
Please refer to the operating instructions of your wireless access point about connection methods.
Search for wireless network
WPS (PUSH button method)
∫ “WPS (PUSH button method)”
If you are using a wireless router that supports WPS (Wi-Fi Protected Setup™), you can easily perform the settings.
- 10 -

Connections & Settings
∫ “Search for wireless network”
The available wireless networks will be displayed.
To obtain your network name (SSID*) and encryption key (password).
The default settings may be printed on the router. If the SSID and password have been changed, consult the person responsible for setting up your network.
For more details, refer to the manual supplied with the wireless broadband router, or contact your Internet provider.
For more information or assistance, refer to http://www.panasonic.com/help
(U.S. customers only)
e.g.
SSID XXXXXXXXXXXX
KEY XXXXXXXXXXXX
PIN XXXXXXXXX
1Select your network name and press [OK].
≥If your network name is not displayed, search again by pressing the red button on the remote control. Stealth SSID will not be displayed; in this case, enter manually.
Connection Setting
Select a wireless network for connection.
SSID |
Reception |
XXXXXXXXXX
XXXXXXXXXX
XXXXXXXXXX
XXXXXXXXXX
3Enter your encryption key (password).
≥You can switch between capital and lower case letters by pressing the “Shift” key.
Encryption Key (Password)
l
Shift |
a |
|
b |
c |
d |
e |
f |
g |
1 |
2 |
3 |
Delete |
|
h |
|
i |
j |
k |
l |
m |
n |
4 |
5 |
6 |
Finish |
|
o |
|
p |
q |
r |
s |
t |
u |
7 |
8 |
9 |
|
|
v |
|
w |
x |
y |
z |
. |
@ |
* |
0 |
# |
|
|
Space |
/ |
: |
~ |
_ |
- |
, |
; |
|
|
|
|
|
|
Symbols |
|
|
Alphanumeric |
|
Other Characters |
|
||||
|
|
|
|
|
|
|
|
|
|
|
|
|
|
OK |
|
|
|
|
|
|
|
|
|
|
|
|
RETURN |
|
|
|
|
|
|
|
|
|
|
|
To enter your network name (SSID) manually
If your network name (SSID) is not displayed in step 1, follow these steps.
1To display the network name (SSID) input screen :
While displaying the HOME menu, press the [SETTINGS] button on the remote control
>select “Network” and press [OK]
>select “Network Settings” and press [OK]
>select “Wireless Settings” and press [OK]
>select “Connection Setting” and press [OK]
>select “Manual setting” and press [OK]
2Press [OK] to select “SSID” and enter your SSID.
Wireless Settings
Enter your network name (SSID) to connect.
SSID
Set
≥ If your wireless network is encrypted, go to step 2.
OK
Search again
OPTION 
 RETURN
When your wireless network is encrypted
2 Press [OK] to select “Encryption Key”.
Wireless Settings
Enter the encryption key (password) of the wireless network.
Encryption Key
Set
- 11 -
Loading...