


DMP-BDT380EB
Basic Operating Instructions
Blu-ray DiscTM Player
Model No. DMP-BDT380
Firmware updates
Panasonic is constantly improving the unit’s firmware
to ensure that our customers are enjoying the latest
technology.
Panasonic recommends updating your firmware as
soon as you are notified.
EB
GN GA
SQT1278
F1215BD0
Model number suffix “EB” denotes UK model.
R6/LR6, AA
(Alkaline or manganese
batteries)
abc
jkl
mno
pqrs tuv
wxyz
ㄅㄆㄇ
ㄈㄉㄊ
1
2
3
6
4
7
8
19
9
10
20
18
16
15
17
14
13
12
11
5
1
2
3
6
4
5
7
8
19
10
9
20
18
16
15
17
14
13
12
11
abc
jkl
mno
pqrs tuv
wxyz
ㄅㄆㄇ
ㄈㄉㄊ
[For_the_United_Kingdom_and_Ireland]
[For_Australia_and_New_Zealand]
[For_the_South_East_Asia]
1 Turn the unit on and off
85 6 7
1 2
3
4
Pull to flip down
the front panel.
[For_Australia_and_New_Zealand]
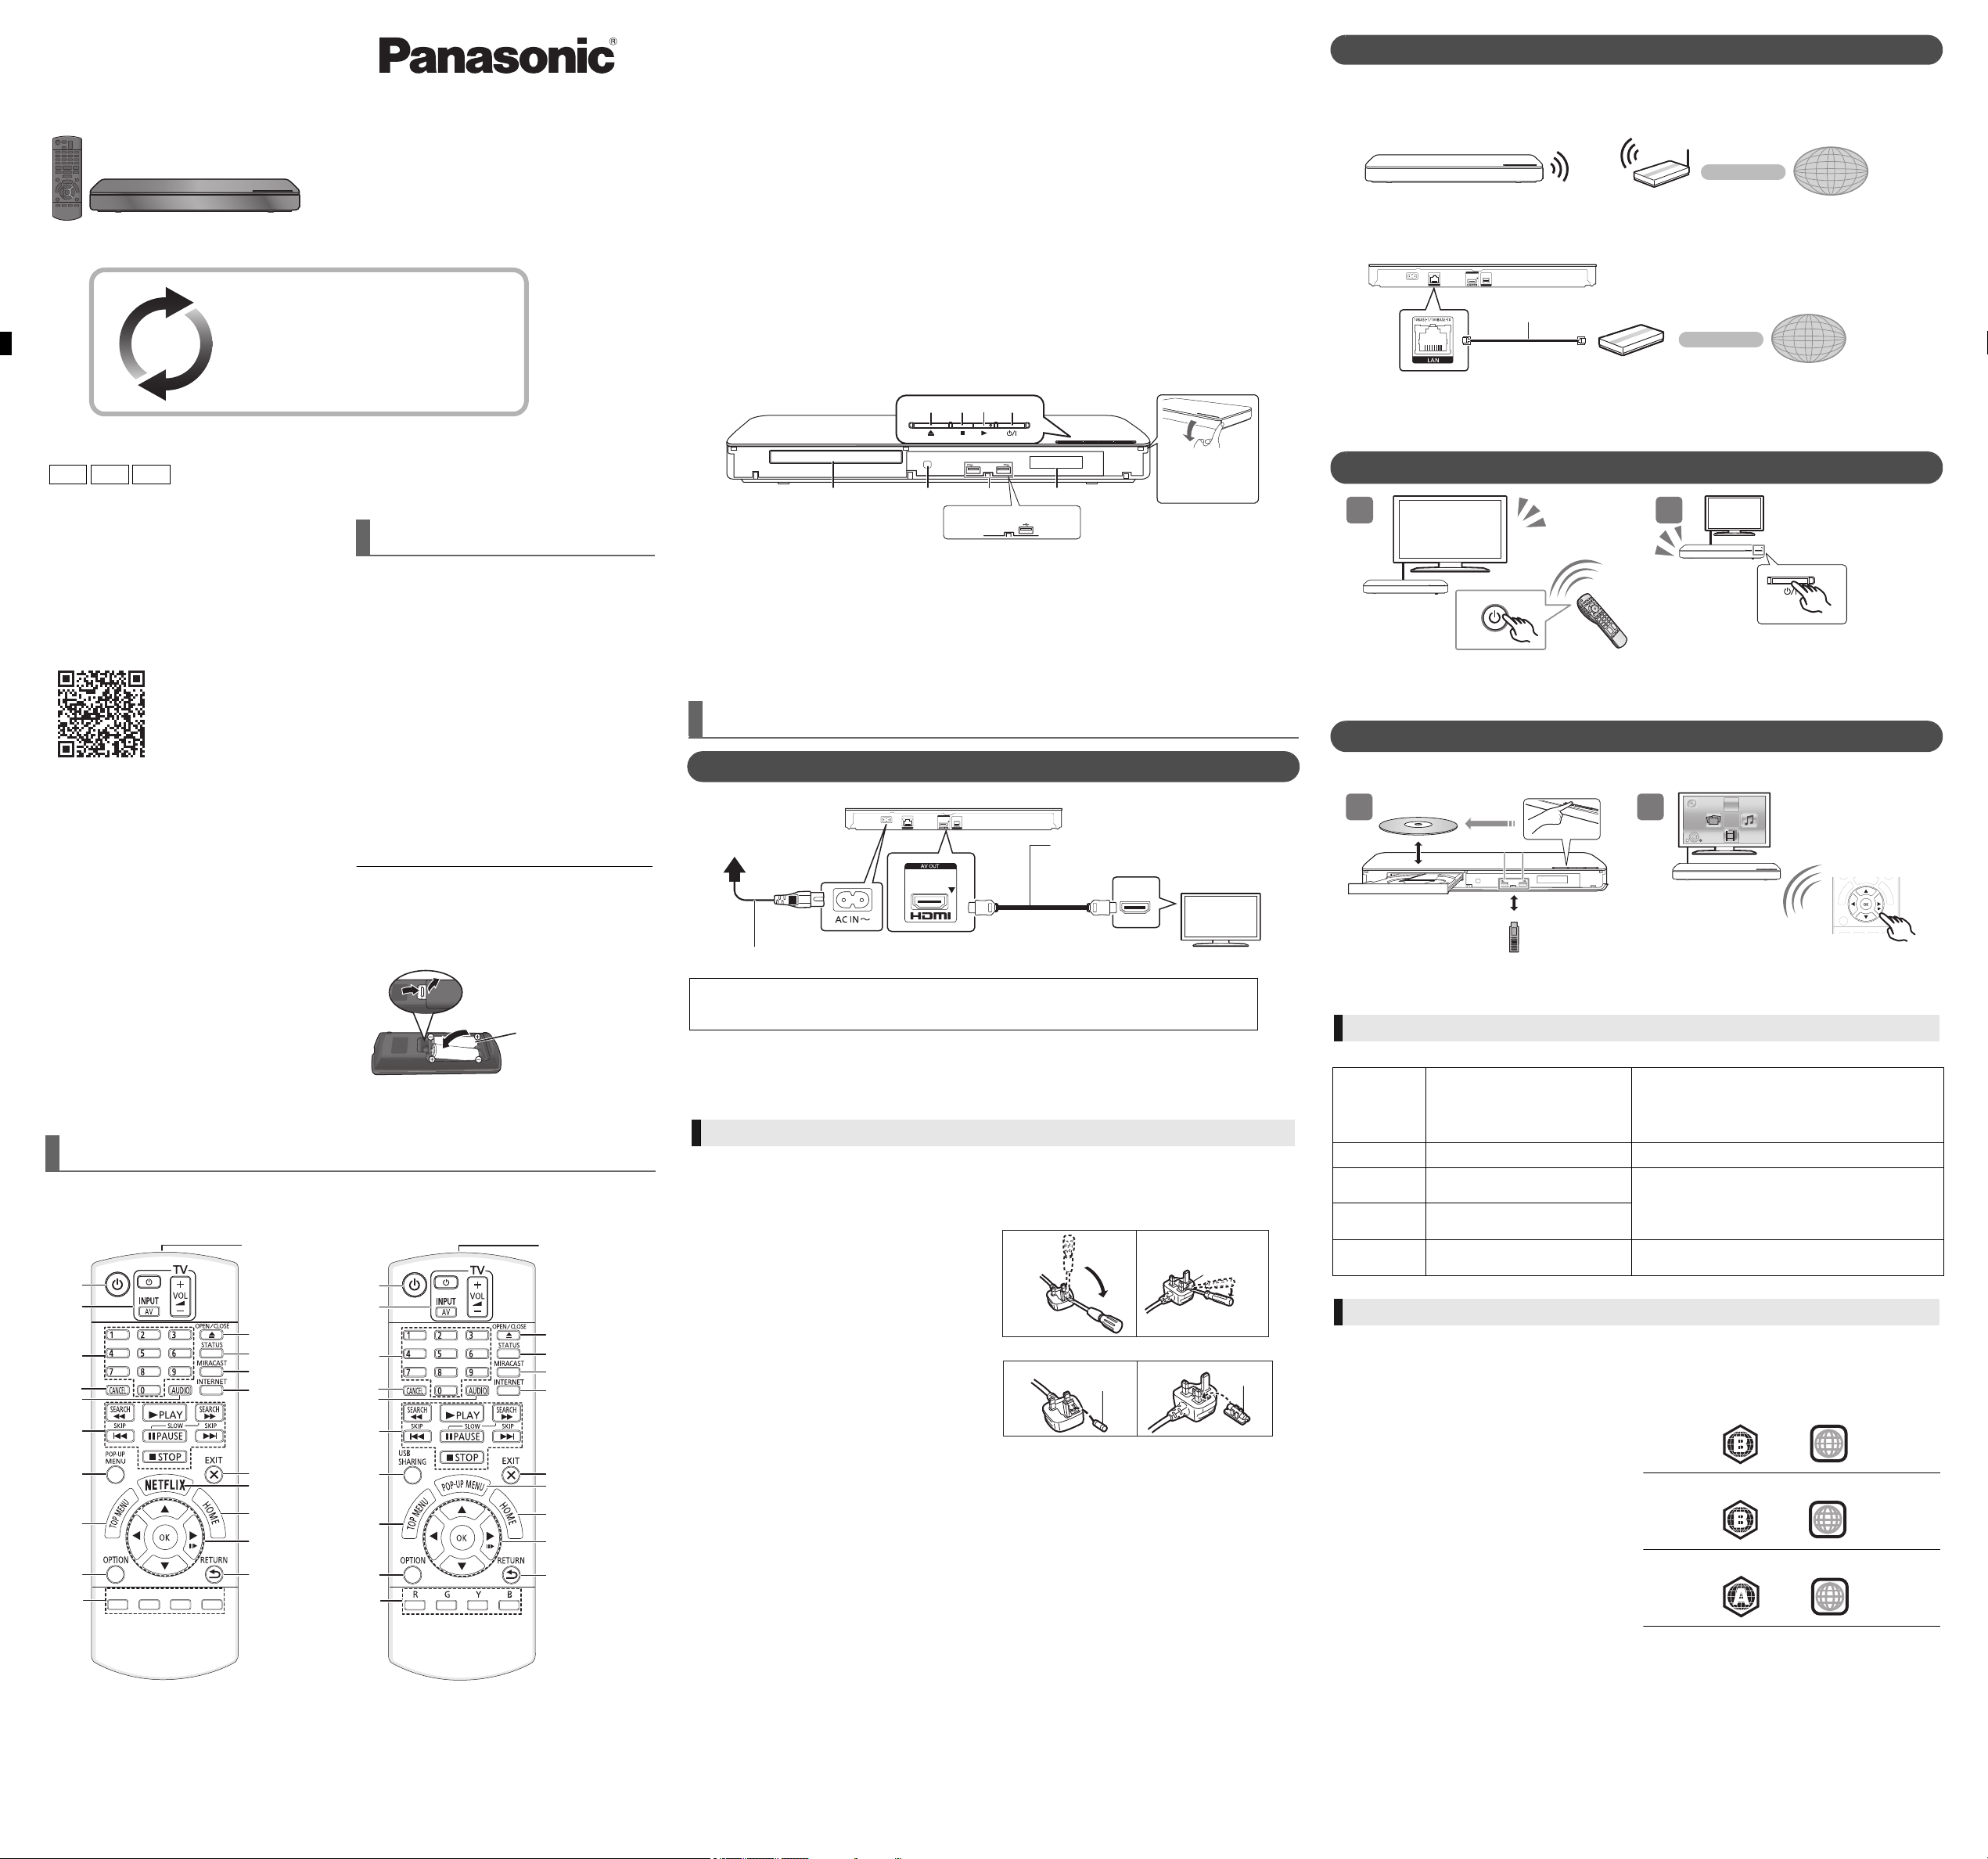
HDMI IN
To a household
mains socket
HDMI cable
([Except_the_United_Kingdom_and_Ireland] supplied)
AC mains lead (supplied)
Wireless router, etc.
Internet
Broadband router, etc.
Internet
LAN Cable
21
HDMI
HDMI
TV
e.g., [For_the_United_Kingdom_and_Ireland]
2
2 TV operation buttons
You can operate the Panasonic TV using this
unit’s remote control. Some buttons may not work
depending on the TV.
[Í TV] : Turn the TV on and off
[AV] : Change input
[ijVOL] : Adjust the volume
3 Select title numbers, etc./Enter numbers or
characters
4Cancel
5 Change soundtrack
6 Basic playback control buttons
[For_the_United_Kingdom_and_Ireland]
7
[For_Australia_and_New_Zealand]
Show Pop-up menu
[For_the_South_East_Asia]
Show USB Sharing menu
8 Show Top menu
9 Show Option menu
10 Coloured buttons (red, green, yellow, blue)
Used for various purposes depending on the
STEP 2 : Connecting to the network
display.
11 Transmit the remote control signal
∫ Wireless LAN connection
12 Open or close the disc tray
13 Show the status messages
TM
14 Show Miracast
screen
15 Show the Home Screen of Network Service
16 Exit the Menu screen
[For_the_United_Kingdom_and_Ireland]
17
[For_Australia_and_New_Zealand]
Show Netflix screen
[For_the_South_East_Asia]
Show Pop-up menu
∫ LAN cable connection
18 Show HOME menu
19 [3, 4, 2, 1] :
Move the highlight for selection
[OK] : Confirm the selection
(;1) : Frame-by-frame
20 Return to previous screen
Use category 5 or above straight LAN cables (STP) when connecting to peripheral devices.
STEP 3 : Settings
Thank you for purchasing this product.
Please read these instructions carefully before using
Accessories
this product, and save this manual for future use.
Check the supplied accessories before using this unit.
A more detailed operating instruction is available
in “Operating Instructions (PDF format)”. To read
it, download it from the website.
http://av.jpn.support.panasonic.com/support/
global/cs/bd/oi/index.html
1 Remote control
[For_the_United_Kingdom_and_Ireland]
[For_Australia_and_New_Zealand]
(N2QAYB001031)
[For_the_South_East_Asia]
(N2QAYB000959)
2 Batteries for remote control
1 AC mains lead
[For_the_United_Kingdom_and_Ireland]
(K2CT2CA00007)
[For_Australia_and_New_Zealand]
(K2CJ2DA00014)
[For_the_South_East_Asia]
You will need Adobe Reader to browse or print the
Operating Instructions (PDF format).
You can download and install a version of Adobe
Reader that you can use with your OS from the
following website.
http://www.adobe.com/products/acrobat/
readstep2.html
See “STEP 1: Connecting to a TV” for more
information.
[Except_the_United_Kingdom_and_Ireland]
1 HDMI Cable
≥ Product numbers are provided in these operating instructions
correct as of December 2015. These may be subject to change.
≥ Do not use AC mains lead with other equipment.
Using the remote control
– Insert the batteries to the terminal so that it (i and j)
matches those in the remote control.
Control reference guide
When other Panasonic devices respond to the remote control of the unit, change the remote control code.
1 Disc tray
2 Remote control signal sensor
Distance: Within approx. 7 m
Angle: Approx. 20e up and down, 30e left and right
3 USB ports
4 Display
5 Open or close the disc tray
6Stop
7Start play
8 Standby/on switch (Í/I)
Press to switch the unit from on to standby mode
or vice versa. In standby mode, the unit is still
consumes a small amount of power.
Quick Start Guide
STEP 1 : Connecting to a TV
[For_the_South_East_Asia]
2 AC mains leads are supplied.
Thailand: With a label
≥ This unit consumes a small amount of AC power (
For the purpose of energy conservation, the unit should be disconnected if you will not be using it for
extended period of time.
Caution for AC Mains Lead
(For the AC mains plug of three pins)
For your safety, please read the following text carefully.
This appliance is supplied with a moulded three pin mains plug for your
safety and convenience.
A 5-ampere fuse is fitted in this plug.
Should the fuse need to be replaced please ensure that the
replacement fuse has a rating of 5-ampere and that it is approved by
ASTA or BSI to BS1362.
Check for the ASTA mark Ï or the BSI m ark Ì on the body of the fuse.
If the plug contains a removable fuse cover you must ensure that it is
refitted when the fuse is replaced.
If you lose the fuse cover the plug must not be used until a replacement
cover is obtained.
A replacement fuse cover can be purchased from your local dealer.
Before use
Remove the connector cover.
> “Specifications”) even when turned off in standby mode.
How to replace the fuse
The location of the fuse differ according to the type of AC mains plug
(figures A and B). Confirm the AC mains plug fitted and follow the
instructions below.
Illustrations may differ from actual AC mains plug.
1. Open the fuse cover with a screwdriver.
Figure A Figure B
Fuse cover
2. Replace the fuse and close or attach the fuse cover.
Figure A Figure B
Fuse
(5 ampere)
Fuse
(5 ampere)
Turn on the TV and select the appropriate video
input.
Press [Í/I].
Follow the on-screen instructions to continue with
the settings.
STEP 4 : Playback
1
USB1 USB2
Insert the media.
Operating during playback
Following functions may not work depending on the media and contents.
Stop Press [∫STOP].
Pause Press [;PAUSE].
Search
Slow motion
Skip
Playable media
BD-Video: Video
BD-RE: Video, JPEG, MPO, AAC, ALAC, DSD,
FLAC, MP3, WAV, WMA
BD-R: Video, MKV, RMVB*, Xvid, AAC, ALAC, DSD,
FLAC, MP3, WAV, WMA
DVD-Video: Video
DVD-R/DVD-R DL : Video, AVCHD, MKV, RMVB*,
Xvid, JPEG, MPO, AAC, ALAC, DSD, FLAC, MP3,
WAV, WMA
DVD-RW/+R/+RW/+R DL : Video, AVCHD
Music CD : Music [CD-DA]
CD-R/CD-RW : MKV, RMVB*, Xvid, JPEG, MPO,
AAC, ALAC, FLAC, MP3, Music [CD-DA], WAV, WMA
USB devices (up to 4 TB) : MKV, MP4, MPEG2,
RMVB*, Xvid, JPEG, MPO, AAC, ALAC, DSD, FLAC,
MP3, WAV, WMA
While playing, press [SEARCH6]
or [SEARCH5].
While paused, press
[SEARCH5].
While playing or paused, press
[:] or [9].
2
Press [OK] or [3, 4, 2, 1] to select the item.
≥ If there are any other items, repeat this step.
The stopping point is memorized.
Resume play function
Press [1PLAY] to restart from this point.
≥ The point is cleared if the media is removed.
Press [;PAUSE] again or [1PLAY] to restart play.
The speed increases up to 5 steps.
≥ Press [1PLAY] to revert to normal playback speed.
Skip to the title, chapter or track.
∫ Region management information
The unit can play back BD-Video/DVD-Video discs of
the following regions codes, including “ALL”:
Example: BD-Video DVD-Video
[For_the_United_Kingdom_and_Ireland]
[For_Australia_and_New_Zealand]
[For_the_South_East_Asia]
* [For_the_South_East_Asia] only
4
3
 Loading...