

4
Handrail Set LHE 150 A1
KOMPERNASS GMBH
BURGSTRASSE 21 · D-44867 BOCHUM
www.kompernass.com
ID-Nr.: LHE 150 A1-10/11-V2
IAN: 71230
Handrail Set
Assembly Instructions
Kapaszkodó készlet
Összeszerelési utasítás
Zábradlí
Montážní návod
Handlauf-Set
Montageanleitung
Poręcz
Instrukcja montażu
Stopniščno oprijemalo
- komplet
Navodila za montažo
Držiak zábradlia
Návod na montáž
HANDRAIL SET 2
Carefully read these assembly instructions before the fi rst use and preserve this booklet for later
reference. Pass this booklet on to whoever might acquire the appliance at a future date.
PORĘCZ 4
Przed pierwszym użyciem urządzenia należy dokładnie przeczytać niniejszą instrukcję obsługi
i zachować ją na przyszłość. W przypadku przekazania urządzenia osobom trzecim należy
przekazać im także instrukcję.
KAPASZKODÓ KÉSZLET 6
Az első használat előtt fi gyelmesen olvassa el a szerelési útmutatót és őrizze meg arra az esetre,
ha később kérdései merülnének fel. A készülék harmadik fél részére történő továbbadásakor adja
át a leírást is.
STOPNIŠČNO OPRIJEMALO – KOMPLET 8
Pred montažo ta navodila skrbno preberite in jih shranite za poznejšo uporabo. Pri izročanju
naprave tretji osebi je treba predati tudi ta navodila.
ZÁBRADLÍ 10
Před prvním použitím si pozorně přečtěte montážní návod a uschovejte jej pro budoucí použití.
Při předávání zařízení třetím osobám předejte i tento návod.
DRŽIAK ZÁBRADLIA 12
Pred prvým použitím si pozorne prečítajte návod na montáž a uschovajte si ho pre prípadné
ďalšie použitie. Pri odovzdávaní zariadenia tretej osobe odovzdajte zariadenie spolu s návodom.
HANDLAUF-SET 14
Lesen Sie die Montageanleitung vor der ersten Verwendung aufmerksam durch und
heben Sie diese für den späteren Gebrauch auf. Händigen Sie bei Weitergabe des
Gerätes an Dritte auch die Anleitung aus.
- 1 -
HANDRAIL SET LHE 150 A1
Intended use
Assembly
Unpack the individual items, check that all items as
listed are available and they are undamaged.
This handrail serves as a holding and guiding
opportunity when climbing stairs.
Assembly in commercially or publicly used buildings
is considered to be improper use.
Technical Data
Length: approx. 155 cm
(with fi tted end caps)
Diameter: approx. 4.2 cm
Weight : approx. 2 kg
Items supplied
1 x Handrail
2 x End caps (pre-assembled)
2 x Ball ring holders
2 x S12 Wall plugs
2 x Hanger bolts M8 x 70
4 x Sunken-head screws M5 x 8
Assembly material required
Drill
Drill bit 12 mm
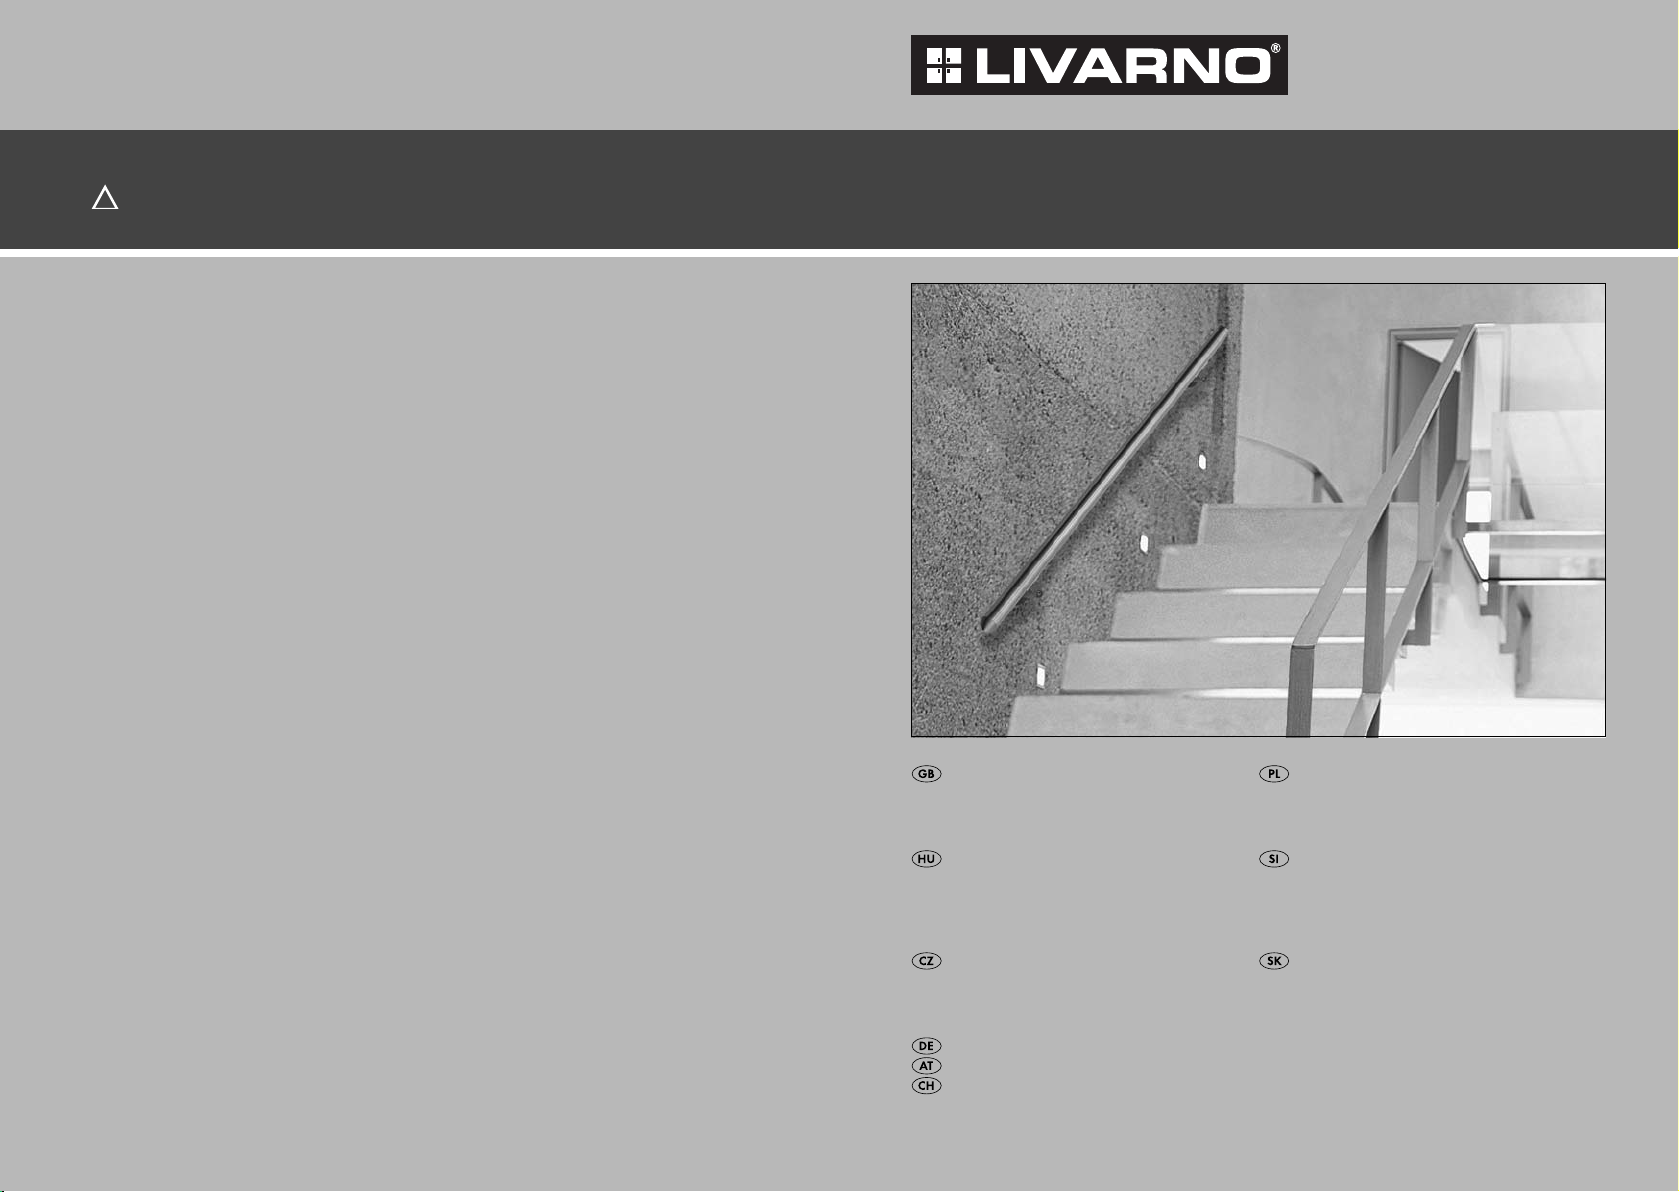
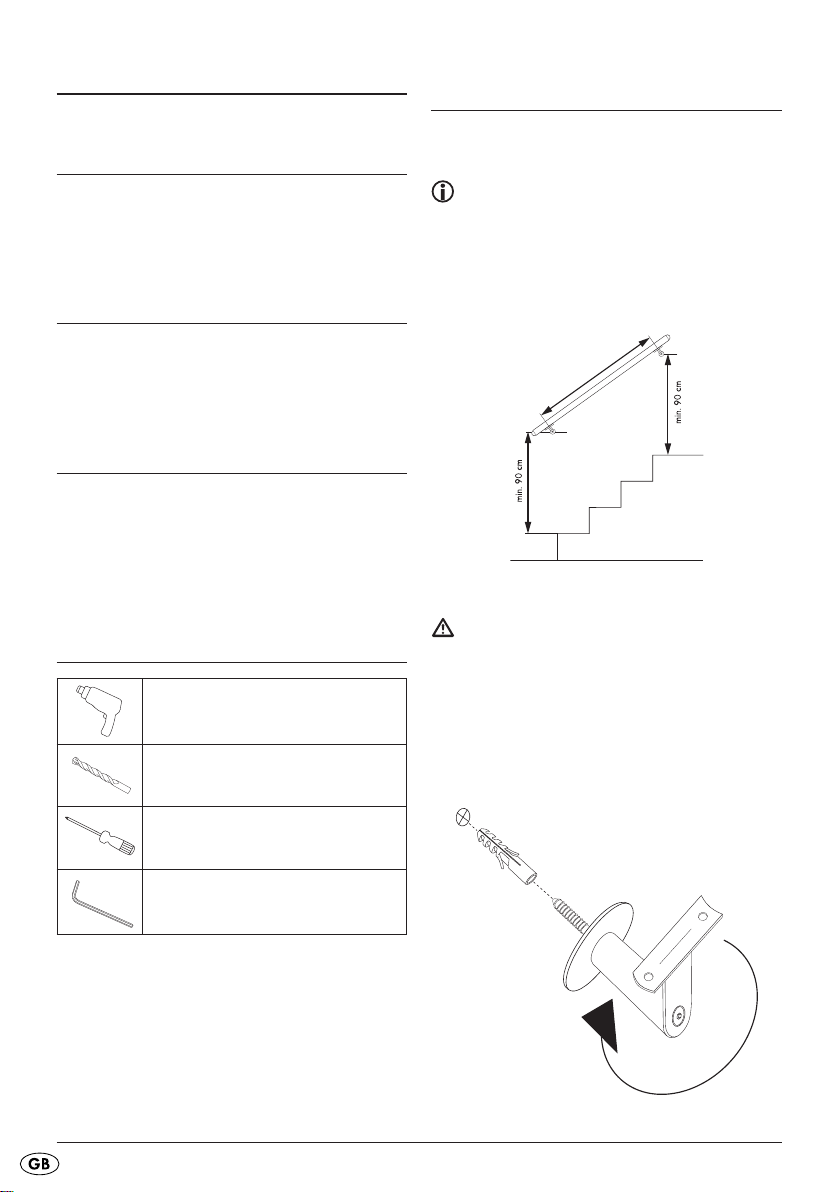
Note: As per DIN 18065, a handrail must be
at least 90 cm high.
The measurement is taken at the step front edge.
1. Measure the minimum height for the handrail
from the step front edge and mark the two
boreholes.
ca. 125 cm
Fig. Handrail minimum height
Attention: The supplied wallplugs are suitable
only for an attachment being made to a concrete or
brick wall. Please be sure to check your masonry for
its suitability for the wallplugs before carrying out the
attachment. If in doubt, consult a specialist.
2. Drill the holes with a 12 mm drill and insert the
plugs into them.
3. Screw the ball ring holders to the wall.
Crosshead screwdriver
Allen key SW4
Fig. Assembly of the ball ring holders
- 2 -
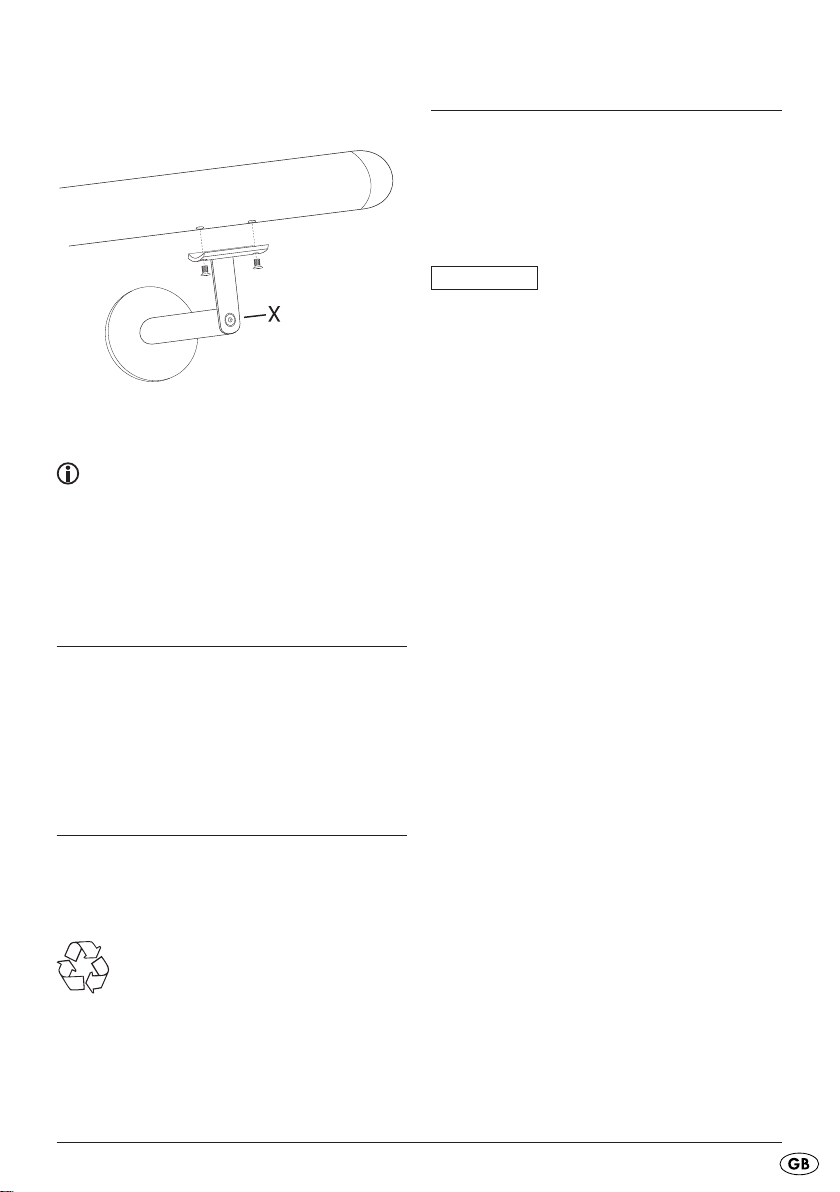
4. Place the handrail on the ball ring holders and
secure it with the sunken-head screws.
Fig. Securing the handrail onto the ball ring holders
Note: By loosening the Allen screw (X) you
can adjust the ball ring holders to the incline of the
handrail.
On completion of the assembly check all screw
connections and, if needs be, tighten them down.
Cleaning and care
For normal cleaning use a cloth and water with
some mild detergent.
For stubborn soiling you should additionally use
a standard commercial cleaner for stainless steel.
Pay heed to the instruction for use given by the
manufacturer of the cleaning agent.
Importer / Service
KOMPERNASS GMBH
BURGSTRASSE 21
44867 BOCHUM, GERMANY
Tel.: + 49 (0) 2327 / 30180
www.kompernass.com
IAN 71230
Disposal
Dispose of the handrail through an approved disposal
centre or at your community waste facility. Observe
the currently applicable regulations. In case of
doubt, please contact your waste disposal centre.
Dispose of all packaging materials in an
environmentally friendly manner.
- 3 -
PORĘCZ LHE 150 A1
Użycie zgodne
z przeznaczeniem
Poręcz służy za uchwyt pomocniczy przy
wchodzeniu po schodach. Montaż w budynkach
wykorzystywanych do celów komercyjnych lub
użyteczności publicznej jest niezgodny
z przeznaczeniem.
Dane techniczne
Długość: ok. 155 cm
(z zamontowanymi końcówkami)
Średnica: ok. 4,2 cm
Masa: ok. 2 kg
Zakres dostawy
1 x poręcz
2 x końcówki (zamontowane)
2 x uchwyty ścienne
2 x S12 kołki
2 x wkręty M8 x 70
4 x śruby z łbem wpuszczanym M5 x 8
Niezbędne narzędzia
do montażu
Wiertarka
Wiertło 12 mm
Montaż
Wyjmij z opakowania poszczególne elementy i
sprawdź, czy nie brakuje żadnego elementu, i czy
ewentualnie żaden element nie uległ uszkodzeniu.
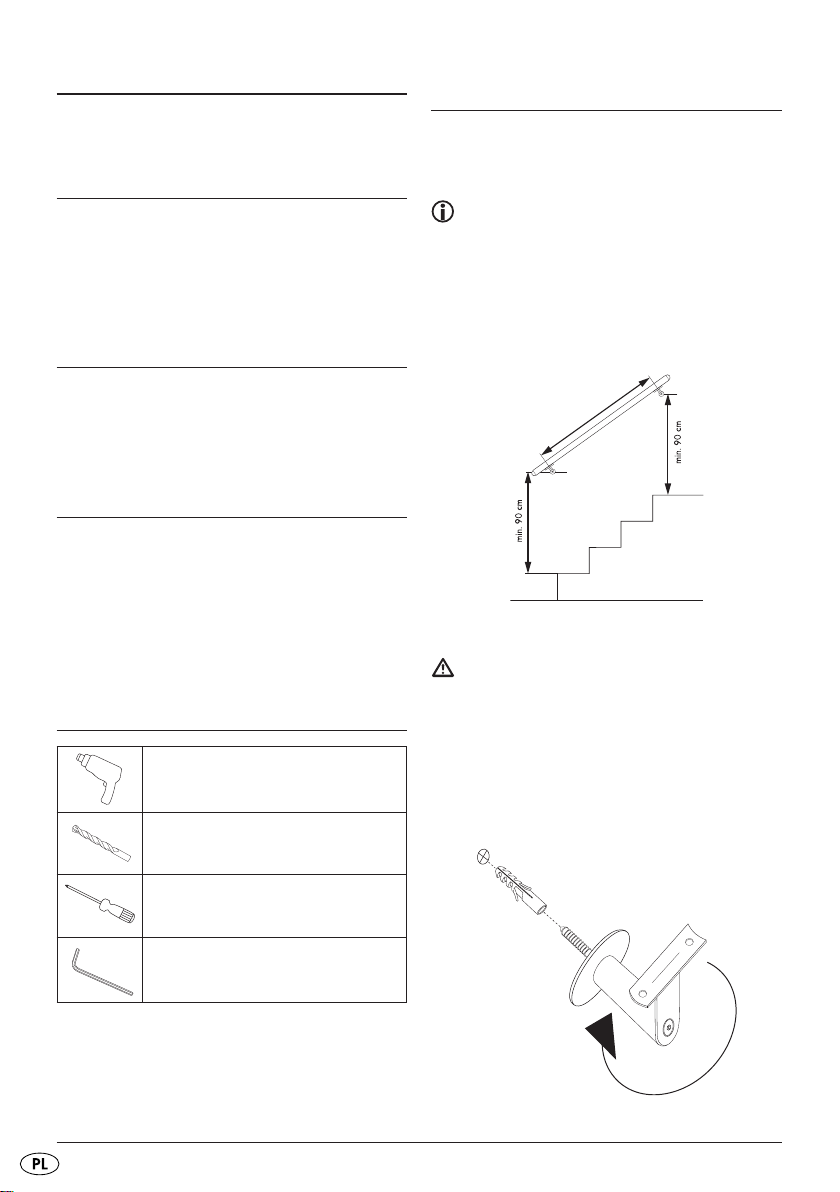
Wskazówka: Poręcz zgodnie z normą
DIN 18065 musi być przymocowana na wysokości
co najmniej 90 cm. Pomiaru tego dokonuje się od
przednich krawędzi stopni.
1. Przy przedniej krawędzi stopni zmierz minimalną
wysokość montażu poręczy i wykonaj dwa
zaznaczenia otworów.
ca. 125 cm
Ilustr. Minimalna wysokość montażu poręczy
Uwaga: Dołączone kołki nadają się wyłącznie
do mocowania w ścianie z betonu lub z kamienia.
Przed przystąpieniem do montażu koniecznie sprawdź,
czy ściana nadaje się do zamocowania kołków. W
razie potrzeby skorzystaj z pomocy specjalisty.
2. Wiertłem o średnicy 12 mm wykonaj otwory
i włóż do nich kołki.
3. Przykręć do ściany uchwyty.
Śrubokręt do śrub z łbem krzyżowym
Klucz imbusowy SW4
Ilustr. Montaż uchwytów do ściany
- 4 -

4. Przyłóż poręcz do uchwytów i przykręć ją
śrubami z łbem wpuszczanym.
Ilustr. Mocowanie poręczy w uchwytach
Wskazówka: Odkręcając śrubę z łbem
wpuszczanym (X) możesz dopasować uchwyty do
pochylenia poręczy.
Po zakończeniu montażu sprawdź wszystkie
połączenia i ewentualnie dokręć śruby.
Czyszczenie i konserwacja
Do zwykłego czyszczenia używaj szmatki i
wody z płynem do mycia. Do usuwania trudniej
zabrudzeń używaj dodatkowo specjalnego,
dostępnego w sprzedaży, środka do czyszczenia
stali nierdzewnej. Przestrzegaj wskazówek
producenta podanych na etykiecie używanego
środka czyszczącego.
Importer / Serwis
KOMPERNASS GMBH
BURGSTRASSE 21
44867 BOCHUM, GERMANY
Tel.: + 49 (0) 2327 / 30180
www.kompernass.com
IAN 71230
Utylizacja
Urządzenie należy usuwać poprzez akredytowane
lub komunalne zakłady utylizacji odpadów.
Przestrzegaj obowiązujących przepisów. W razie
pytań i wątpliwości odnośnie zasad utylizacji
skontaktować z najbliższy zakładem utylizacji.
Materiał opakowania oddawaj do
utylizacji zgodnie z przepisami o
ochronie środowiska.
- 5 -

KAPASZKODÓ KÉSZLET
LHE 150 A1
Rendeltetésszerű használat
A kapaszkodó kapaszkodási vagy vezetési
lehetőséget kínál lépcsőkön. Ipari vagy
kereskedelmi jellegű beszerelése vagy nyilvános
épületekben nem minősül rendeltetésszerűnek.
Műszaki adatok
Hosszúság: kb. 155 cm
(felszerelt végzáró elemmel)
Átmérő: kb. 4,2 cm
Súly: kb. 2 kg
Tartozékok
1 db kapaszkodó
2 db végzáró elem (előre felszerelve)
2 db fali konzol
2 db S12 dübel
2 db tőcsavar M8 x 70
4 db db süllyesztettfejű csavar M5 x 8
Szükséges szerszámok
fúrógép
12 mm-es fúró
Összeszerelése
Vegye ki a csomagolásból az egyes részeket és
ellenőrizze, hogy a csomagból nem hiányzik-e
valami és minden sértetlen állapotban van-e.
Tudnivaló: a kapaszkodó a DIN 18065-tel
megegyezően legalább 90 cm magas legyen.
A lépcső elülső szegélyétől mérjük a távolságot.
1. Mérje le a lépcső elülső peremétől a kapaszkodó
legkisebb kötelező magasságát és rajzolja meg
a két furat helyét.
ca. 125 cm
Ábra: A kapaszkodó legkisebb kötelező magasságá
Figyelem: a csomagban található dübelek
csak beton- vagy kőfalba történő rögzítéshez valók.
Szerelés előtt mindenképpen ellenőrizze a falat, hogy
alkalmas-e a dübelhez. Ha nem tud eligazodni,
forduljon szakemberhez.
2. Ezeket fúrja ki egy 12 mm-es fúróval és dugja
beléjük adübelt.
3. Csavarozza a fali konzolt a falra.
keresztcsavarhúzó
imbuszkulcs SW4
Ábra: A fali konzol felszerelése
- 6 -

4. Helyezze a kapaszkodót a fali konzolra és
rögzítse a süllyesztett fejű csavarokkal.
Ábra : A kapaszkodó fali konzolra való rögzítése
Tudnivaló: A hatlapos csavar kioldásával (X)
hozzá lehet igazítani a fali konzolt a kapaszkodó
emelkedéséhez.
A felszerelés után ellenőrizze a csavarkötéseket
és ha szükséges, húzza meg őket szorosabbra.
Tiszítás és ápolás
A szokásos tisztításhoz használjon mosogatórongyot
és mosogatószeres vizet.
Makacsabb szennyeződések esetén használjon
pluszban rozsdamentes acélhoz való tisztítószert.
Kövesse a felhasznált tisztítószer gyártójának
utasításait.
Gyártja / Szerviz
KOMPERNASS GMBH
BURGSTRASSE 21
44867 BOCHUM, GERMANY
Tel.: + 49 (0) 2327 / 30180
www.kompernass.com
IAN 71230
Ártalmatlanítás
A kapaszkodó ártalmatlanítását végeztesse engedélyezett céggel, vagy a helyi hulladékkezelő céggel.
Vegye fi gyelembe az aktuális előírásokat. Kétség
esetén vegye fel a kapcsolatot a hulladékfeldolgozó
vállalattal.
Valamennyi csomagolóanyagot juttasson
el a környezetbarát hulladékhasznosítóhoz.
- 7 -

STOPNIŠČNO OPRIJEMALO
– KOMPLET LHE 150 A1
Predvidena uporaba
Stopniščno oprijemalo služi kot pripomoček za
oprijemanje in pomoč pri hoji po stopnicah.
Montaža v zgradbah, ki se uporabljajo za izvajanje
obrti ali v javne namene, velja za nepredvideno.
Tehnični podatki
Dolžina: ca. 155 cm
(z montiranima zaključnima kapicama)
Premer: ca. 4,2 cm
Teža: ca. 2 kg
Vsebina kompleta
1 x oprijemalo
2 x zaključna kapica (montirana)
2 x stenska konzola
2 x S12 stenski vložek
2 x vijak hanger M8 x 70
4 x vijak z ugrezno glavo M5 x 8
Potreben montažni material
Vrtalni stroj
Sveder 12 mm
Montaža
Vzemite posamezne dele iz embalaže in preverite
obseg dobave glede popolnosti in morebitnih
poškodb.
Napotek: V skladu s standardom DIN 18065
mora biti stopniščno oprijemalo visoko najmanj 90 cm.
Višina montaže se izmeri od sprednjega roba stopnic.
1. Izmerite najmanjšo potrebno višino stopniščnega
oprijemala na sprednjem robu stopnic in zarišite
dve vrtini.
ca. 125 cm
Sl. Potrebna višina oprijemala
Pozor: Priloženi zidni vložki so primerni le
za pritrditev na betonsko ali kamnito steno. Pred
montažo obvezno preverite, ali je vaš zid primeren
za vstavljanje vložkov. Če dvomite o tem, za nasvet
vprašajte strokovnjaka.
2. Z 12 mm svedrom izvrtajte luknji in vanju vtaknite
stenska vložka.
3. Privijte stenski konzoli na zid.
Križni izvijač
Šestrobi ključ vel. 4
Sl. Montaža stenskih konzol
- 8 -

4. Namestite stopniščno oprijemalo na stenski
konzoli in ga pritrdite z vijaki z ugrezno glavo.
Sl. Pritrditev oprijemala na stenskih konzolah
Napotek: Z odvijanjem šestrobega vijaka (X)
stenski konzoli lahko prilagodite vzponu stopniščnega
oprijemala.
Po koncu montaže preverite vse vijačne povezave
in jih po potrebi zategnite.
Čiščenje in nega
Za normalno čiščenje uporabite krpo za pomivanje
in vodo z malce sredstva za pomivanje.
Pri močnejši umazaniji dodatno uporabite še
običajno sredstvo za čiščenje jekla iz trgovine.
Upoštevajte navodila proizvajalca sredstva za
čiščenje, ki ga nameravate uporabiti.
Proizvajalec/servis
KOMPERNASS GMBH
BURGSTRASSE 21
44867 BOCHUM, GERMANY
Tel.: + 49 (0) 2327 / 30180
www.kompernass.com
IAN 71230
Odstranitev
Oprijemalo oddajte pri registriranem podjetju za
predelavo odpadkov ali pri svojem komunalnem
podjetju za predelavo odpadkov. Upoštevajte
veljavne predpise. V primeru dvoma se obrnite na
svoje podjetje za predelavo odpadkov.
Embalažo oddajte za okolju primerno
odstranitev.
- 9 -

ZÁBRADLÍ LHE 150 A1
Účel použití
Montáž
Vyjměte jednotlivé díly z balení a prověřte rozsah
dodávky na úplnost a příp.poškození.
Madlo slouží k držení a jako možnost vedení při
chůzi do schodů.
Montáž v živnostenských nebo veřejně používaných budovách platí jako nesprávná montáž dle
předpisů.
Technické údaje
Délka: cca 155 cm
(s namontovanými koncovkami)
Průměr: cca 4,2 cm
Hmotnost: cca 2 kg
Rozsah dodávky
1 x madlo zábradlí
2 x koncovky (předběžně montované)
2 x nástěnné konzoly
2 x S12 hmoždinky
2 x závěsné šrouby M8 x 70
4 x šrouby se zápustnou hlavou M5 x 8
Potřebný montážní materiál
vrtačka
vrták 12 mm
Poznámka: Madlo zábradlí musí být dle
normy DIN 18065 minimálně 90 cm vysoko.
Měří se na přední hraně schodu.
1. Na přední hraně schodu odměřte minimální
výšku madla zábradlí a vyznačte si dvě značky
pro dva vývrty.
ca. 125 cm
Obr. Minimální výška madla zábradlí
Pozor: Dodané hmoždinky jsou vhodné pouze
pro montáž do betonové nebo kamenné zdi. Prosím,
zkontrolujte bezpodmínečně pečlivě před montáží
Vaše zdivo na vhodnost pro hmoždinky. V případě
pochybností požádejte o pomoc odborníka.
2. Vyvrtejte pomocí 12 mm vrtáku díry a zastrčte
do nich hmoždinky.
3. Našroubujte na zeď nástěnné konzoly.
křížový šroubovák
klíč s vnitřním šestihranem OK4
Obr. Montáž nástěnných konzol
- 10 -

4. Položte madlo zábradlí na nástěnné konzoly
a upevněte jej šrouby se zápustnou hlavou.
Obr. Upevnit madla zábradlí na nástěnné konzoly
Poznámka: Povolením šroubů s vnitřním šesti-
hranem (X) můžete nástěnné konzoly přizpůsobit
sklonu madla zábradlí.
Po ukončení montáže prověřte všechna šroubová
spojení a resp. tyto dotáhněte.
Čištění a údržba
Pro běžné čištění používejte hadřík na nádobí
a vodu s trochou mycího prostředku.
Při silném znečištění použijte dodatečně běžný čisticí prostředek na nerez. Dodržujte přitom pokyny
výrobce použitého čisticího prostředku.
Dovozce / servis
KOMPERNASS GMBH
BURGSTRASSE 21
44867 BOCHUM, GERMANY
Tel.: + 49 (0) 2327 / 30180
www.kompernass.com
IAN 71230
Likvidace
Madlo zábradlí zlikvidujte prostřednictví autorizovaného recyklačního podniku nebo Vaším komunálním
recyklačním zařízením. Dodržujte platné předpisy.
V případě pochyb se poraďte s recyklační fi rmou.
Zlikvidujte všechny obalové materiály
ekologicky.
- 11 -

DRŽIAK ZÁBRADLIA
LHE 150 A1
Montáž
Vyberte všetky diely z obalu a skontrolujte obsah
dodávky z hľadiska jeho úplnosti a príp. poškodení.
Používanie primerané účelu
Držadlo zábradlia slúži ako pomôcka na zachytenie
a vedenie pri chôdzi po schodoch.
Montáž v komerčných alebo verejnosťou používaných budovách sa považuje za nezodpovedajúcu
účelu použitia.
Technické údaje
Dĺžka: asi 155 cm
(s namontovanými koncovými krytmi)
Priemer: asi 4,2 cm
Hmotnosť: asi 2 kg
Obsah dodávky
1 ks držadlo zábradlia
2 ks koncové kryty (vopred namontované)
2 ks nástenné držiaky
2 ks hmoždinky S12
2 ks skrutky s metrickým aj obyčajným závitom
M8 x 70
4 ks skrutky so zápustnou hlavou M5 x 8
Náradie potrebné pre montáž
Vŕtačka
Vrták 12 mm
Upozornenie: Držadlo zábradlia musí byť
podľa normy DIN 18065 aspoň 90 cm vysoko.
Meria sa od prednej hrany schodového stupňa.
1. Od prednej hrany schodového stupňa odmerajte
výšku držadla zábradlia, ktorá musí byť vyššia
než je povolená najnižšia a vyznačte miesta pre
dva otvory.
ca. 125 cm
Obr. Minimálna výška držadla zábradlia
Pozor: Priložené hmoždinky sú vhodné len na
upevnenie do betónovej alebo kamennej steny.
Pred montážou bezpodmienečne skontrolujte
murivo, či je vhodné na použitie týchto hmoždiniek.
V prípade pochybností si zavolajte na pomoc
odborníka.
2. Vyvŕtajte otvory 12 mm vrtákom a zasuňte do
nich hmoždinky .
3. Naskrutkujte na stenu nástenné držiaky.
Krížový skrutkovač
Imbusový kľúč SW4
Obr. Montáž nástenných držiakov
- 12 -

4. Položte držadlo zábradlia na nástenné držiaky
a pripevnite ho skrutkami, ktoré majú na jednej
strane závit do hmoždinky a na druhej metrický.
Obr. Upevnenie držadla zábradlia na nástenné
držiaky
Upozornenie: Po uvoľnení imbusovej skrutky (X)
môžete nástenné držiaky prispôsobiť stúpaniu
držadla zábradlia.
Po skončení montáže skontrolujte všetky skrutkové
spoje a ak treba, pevne ich dotiahnite.
Čistenie a údržba
Dovozca a servis
KOMPERNASS GMBH
BURGSTRASSE 21
44867 BOCHUM, GERMANY
Tel.: + 49 (0) 2327 / 30180
www.kompernass.com
IAN 71230
Na normálne čistenie používajte handru a vodu
s trochou umývacieho prostriedku.
Pri odolnejších nečistotách použite aj bežne
dostupné čistiace prostriedky na nehrdzavejúcu
oceľ. Riaďte sa pritom pokynmi výrobcu použitého
čistiaceho prostriedku.
Likvidácia
Držadlo zábradlia zlikvidujte v oprávnenej fi rme na
likvidáciu odpadu alebo v zariadení na likvidáciu
komunálneho odpadu. Dodržte pritom aktuálne
platné predpisy. V prípade pochybností sa spojte
so zariadením na likvidáciu odpadu.
Všetok obalový materiál zlikvidujte
ekologickým spôsobom.
- 13 -

HANDLAUF-SET LHE 150 A1
Bestimmungsgemäße
Verwendung
Der Handlauf dient als Festhalte- und Führungsmöglichkeit beim Treppensteigen.
Die Montage in gewerblich oder öff entlich genutzten
Gebäuden gilt als nicht bestimmungsgemäß.
Technische Daten
Länge: ca. 155 cm
(mit montierten Endkappen)
Durchmesser: ca. 4,2 cm
Gewicht: ca. 2 kg
Lieferumfang
1 x Handlauf
2 x Endkappen (vormontiert)
2 x Wandkonsolen
2 x S12 Dübel
2 x Stockschrauben M8 x 70
4 x Senkkopfschrauben M5 x 8
Benötigtes Montagematerial
Bohrmaschine
Montage
Entnehmen Sie die Einzelteile aus der Verpackung
und überprüfen Sie den Lieferumfang auf
Vollständigkeit und evtl. Beschädigungen.
Hinweis: Ein Handlauf muss gemäß
DIN 18065 mindestens 90 cm hoch sein.
Gemessen wird an der Stufenvorderkante.
1. Messen Sie an der Stufenvorderkante die
Mindesthöhe des Handlaufs ab und zeichnen
Sie die zwei Bohrlöcher an.
ca. 125 cm
Abb. Mindesthöhe Handlauf
Achtung: Die mitgelieferten Dübel sind nur
für die Befestigung in einer Beton- oder Steinwand
geeignet. Bitte prüfen Sie unbedingt vor der Montage Ihr Mauerwerk auf Eignung für die Dübel.
Ziehen Sie im Zweifelsfall einen Fachmann hinzu.
Bohrer 12 mm
Kreuzschraubendreher
Innensechskantschlüssel SW4
2. Bohren Sie mit einem 12 mm Bohrer die Löcher
und stecken Sie die Dübel hinein.
3. Schrauben Sie die Wandkonsolen an die Wand.
Abb. Montage Wandkonsolen
- 14 -

4. Platzieren Sie den Handlauf auf den Wandkonsolen und befestigen Sie ihn mit den Senkkopfschrauben.
Abb. Handlauf auf Wandkonsolen befestigen
Hinweis: Durch Lösen der Innensechs-
kantschraube (X) können Sie die Wandkonsolen
an die Steigung des Handlaufs anpassen.
Überprüfen Sie nach Beendigung der Montage
alle Schraubverbindungen und ziehen Sie diese
evtl. nach.
Reinigen und Pfl egen
Importeur/Service
KOMPERNASS GMBH
BURGSTRASSE 21
D-44867 BOCHUM
Tel.: + 49 (0) 2327 / 30180
www.kompernass.com
IAN 71230
Für die normale Reinigung verwenden Sie ein
Spültuch und Wasser mit etwas Spülmittel.
Bei stärkeren Verschmutzungen verwenden Sie
zusätzlich ein handelsübliches Reinigungsmittel
für Edelstahl. Beachten Sie die Anweisungen des
Herstellers des anzuwendenden Reinigungsmittels.
Entsorgen
Entsorgen Sie den Handlauf über einen zugelassenen
Entsorgungsbetrieb oder über Ihre kommunale
Entsorgungseinrichtung. Beachten Sie die geltenden
Vorschriften. Setzen Sie sich im Zweifelsfall mit Ihrer
Entsorgungseinrichtung in Verbindung.
Führen Sie alle Verpackungsmaterialien
einer umweltgerechten Entsorgung zu.
- 15 -
 Loading...