


E INSTRUCTION MANUAL
9222-7300-11 HA-A205
2
BEFORE YOU BEGIN
Before installing the DiMAGE Viewer software, read the data-transfer section in the camera manual. This section details how to connect the camera to a computer using the supplied USB cable. The examples in this manual assume the camera is connected to the computer with a USB cable as described in the camera manual.
This instruction manual does not provide instruction in the basic operation of personal computers, or the basic operation of Windows or Macintosh operating systems; refer to the manuals supplied with the computer.
The examples in this manual use Windows software. The appearance of the screens may differ from the examples when using Macintosh or other Windows operating systems.
Every precaution has been taken to ensure the accuracy of this material. Contact Minolta if you have any questions. Minolta is not responsible for any loss or damage caused by the use of this software.
This instruction manual may not be copied either in part or in its entirety without the prior permission of Minolta.
3

TABLE OF CONTENTS |
|
System requirements ............................................................................................................................. |
6 |
DiMAGE Viewer ......................................................................................................................... |
6 |
QuickTime system requirements ............................................................................................... |
7 |
Before installing the DiMAGE Image Viewer Utility ................................................................... |
7 |
Installation ...................................................................................................................................... |
8 |
Installing the DiMAGE Viewer – Windows ................................................................................. |
8 |
Installing the DiMAGE Viewer – Macintosh ............................................................................. |
10 |
Starting up the Viewer .......................................................................................................................... |
12 |
Starting up the Viewer – Windows........................................................................................... |
12 |
Starting up the Viewer – Macintosh......................................................................................... |
13 |
Importing and editing images............................................................................................................... |
14 |
Loading image files.................................................................................................................. |
14 |
Updating the thumbnail window .............................................................................................. |
14 |
Opening audio files.................................................................................................................. |
15 |
Changing the display format.................................................................................................... |
16 |
Changing the thumbnail format ............................................................................................... |
17 |
Sorting image files................................................................................................................... |
18 |
Renaming single files .............................................................................................................. |
18 |
Renaming multiple files ........................................................................................................... |
19 |
Creating folders ....................................................................................................................... |
20 |
Moving images to another folder ............................................................................................. |
21 |
Copying images to another folder............................................................................................ |
22 |
Cut, copy, paste, and delete – Windows ................................................................................. |
23 |
Cut, copy, paste, and delete – Macintosh ............................................................................... |
23 |
Displaying and saving image information ................................................................................ |
24 |
Image information setup .......................................................................................................... |
25 |
Basic image processing ....................................................................................................................... |
26 |
Image-correction window......................................................................................................... |
26 |
Tool bars ..................................................................................................................... |
27 |
Displaying images in the image-correction window................................................................. |
28 |
Flip and rotate images............................................................................................................. |
29 |
Controlling the image display .................................................................................................. |
30 |
Fit-to-window button.................................................................................................... |
30 |
Resizing the viewer window........................................................................................ |
30 |
Grab tool ..................................................................................................................... |
31 |
Magnifying tool............................................................................................................ |
31 |
Menu options .............................................................................................................. |
31 |
Variation palette....................................................................................................................... |
32 |
Color-balance variation ............................................................................................... |
33 |
Brightness & contrast variation................................................................................... |
34 |
Saturation variation ..................................................................................................... |
35 |
Brightness, contrast, and color-balance palette ...................................................................... |
36 |
Auto-setting button...................................................................................................... |
36 |
Comparing preand post correction images ........................................................................... |
37 |
An introduction to color............................................................................................................ |
38 |
Undoing and redoing an image correction .............................................................................. |
39 |
4

Saving images .................................................................................................................................... |
40 |
Resizing an image to be saved ............................................................................................... |
40 |
Saving an image...................................................................................................................... |
41 |
Changing the image name or format....................................................................................... |
41 |
Printing .................................................................................................................................... |
42 |
Printing images........................................................................................................................ |
42 |
Advanced image processing ................................................................................................................ |
44 |
The tone curve / histogram palette.......................................................................................... |
45 |
Using the tone curve ............................................................................................................... |
46 |
Drawing tone curves by freehand............................................................................................ |
47 |
A short guide to tone-curve corrections .................................................................................. |
48 |
White, black, and gray-point corrections ................................................................................. |
50 |
Setting the white and black-point values ................................................................................. |
52 |
Tone-curve / histogram auto setting ........................................................................................ |
53 |
Displaying the color histograms............................................................................................... |
53 |
Histogram corrections.............................................................................................................. |
54 |
Hue, saturation, and lightness palette ..................................................................................... |
56 |
Auto-setting button...................................................................................................... |
56 |
Hue corrections ....................................................................................................................... |
57 |
Sharpness ............................................................................................................................... |
58 |
Saving a portion of an image – area marquee........................................................................ |
60 |
Tracking image corrections – snapshot button ........................................................................ |
61 |
Saving image corrections ........................................................................................................ |
62 |
Loading image-correction Jobs ............................................................................................... |
63 |
Processing RAW images ......................................................................................................... |
64 |
Saving RAW images................................................................................................................ |
66 |
Saving RAW Jobs.................................................................................................................... |
67 |
Loading RAW Jobs.................................................................................................................. |
67 |
Batch processing ..................................................................................................................... |
68 |
Movie Enhancer ................................................................................................................................... |
70 |
Flicker correction ..................................................................................................................... |
71 |
Editing movie files.................................................................................................................... |
72 |
Splicing two movie clips.............................................................................................. |
72 |
Copying sections from one movie to another ............................................................. |
73 |
Correcting movie images......................................................................................................... |
74 |
Advanced setup.................................................................................................................................... |
76 |
Customizing the viewer – Preferences .................................................................................... |
76 |
Color matching – Color preferences........................................................................................ |
78 |
Using device ICC profiles ........................................................................................................ |
80 |
Note on color measurement .................................................................................................... |
82 |
5

SYSTEM REQUIREMENTS
DiMAGE Viewer
IBM PC/AT compatible computers |
Apple Macintosh series computers |
|
133MHz Pentium processor or higher |
PowerPC 100MHz or higher |
|
Windows 98 / 98* Second Edition, |
|
|
Windows Me, Windows 2000 |
Mac OS 9 – 9.2.2 |
|
Professional, or Windows XP. |
|
|
64MB or more of RAM |
128MB or more of available RAM |
|
(128MB or more with Windows XP) |
||
|
||
200MB or more of available hard-disk |
200MB or more of available hard-disk |
|
space |
space |
|
A True Color (24 bit) or greater monitor |
A 24-bit color or greater monitor with a |
|
with a minimum resolution of 800 X |
minimum resolution of 800 X 600. 1024 |
|
600. 1024 X 768 (XGA) or higher is |
||
X 768 or higher is recommended. |
||
recommended. |
||
|
||
CD-ROM drive |
||
QuickTime 5 or later |
QuickTime 4 or later |
|
*Computers with Windows 98 operating systems require Microsoft Internet Explorer 5.0 or later.
6

QuickTime system requirements
IBM PC / AT Compatible
Pentium-based computer
Windows 95, 98, 98SE, NT, Me,
2000 Professional, or XP.
32MB or more of RAM
Sound Blaster or compatible sound card
DirectX 3.0 or later recommended
To install QuickTime, follow the instructions in the installer. Macintosh users can download the latest version of QuickTime free of charge from the Apple Computer web site: http://www.apple.com.
Before installing the DiMAGE Viewer
RAM-stationed programs such as anti-virus or installation-monitoring software may cause the installer to fail. Remove or disable these programs before installing the DiMAGE Viewer. Reinstall or enable the software when the installation is complete.
7

INSTALLATION
Installing the DiMAGE Viewer – Windows
In the example below, the hard disk drive is drive F. The letters designating the drives will vary between computers. With Windows 2000, or XP, the software should be installed with the Administrator privilege.
Turn on the computer to start Windows.
Insert the DiMAGE Software CD-ROM into the CD-ROM drive.
•The DiMAGE Viewer Installer window will open automatically.
Click the “Starting up the DiMAGE Viewer installer” button to begin installation.
The welcome window will open. Click “Next>” to continue.
The license agreement appears. If you accept the agreement, click “Yes” to continue the installation routine.
•Read the entire license agreement carefully before continuing. If you do not agree to the terms, click “No” to exit the installation program.
8
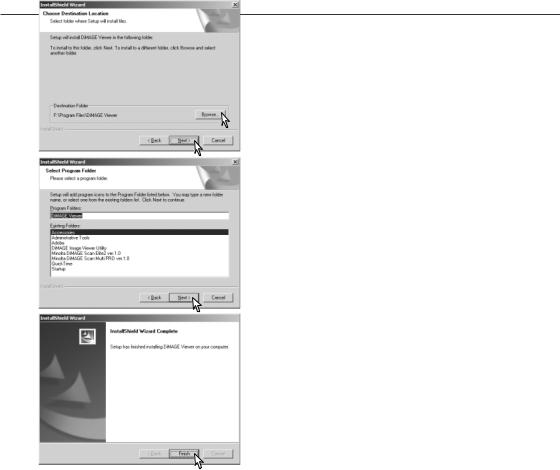
To install the software in the default location – F:\Program Files\DiMAGE Viewer, click “Next >.”
•To install the software in a different location, click browse button to display the folder selection window. Specify the directory in which to install the software.
The name of the default program folder is displayed. To install the software icons in this folder, click “Next>.” Installation will begin.
•To install the software icons in another folder, select one of the folders listed in the existing-folders box below. Click “Next>” to begin installation.
When the software installation has been completed, a message will be displayed. Click “Finish.”
•The DiMAGE Viewer installer window will be displayed. Click “Finish” to close the window.
9

INSTALLATION
Installing the DiMAGE Viewer – Macintosh
Turn on the computer to start the operating system. When the desktop appears, insert the DiMAGE Software CD-ROM into the CD-ROM drive. The contents of the CD-ROM appear automatically. If the contents do not appear, double-click the CD-ROM icon to open it.
Open the DiMAGE Viewer folder, and then open the appropriate language folder.
Double-click on the installer icon to start the
Installation program.
When the installation screen appears click “Next>” to begin the setup.
The license agreement appears. If you accept the agreement, click
“Yes” to continue the installation routine.
•Read the entire license agreement carefully before continuing. If you do not agree to the terms, click “No” to exit the installation program.
10
The location for the DiMAGE Viewer files must be specified. Click the reference button.
Using the folder-selection dialog box, select the location where the software should be installed. Click “Choose.”
Confirm the installation location on the installer screen. Click “Next >>” to install the DiMAGE Viewer.
A window will appear when the software has been installed.
Click “Finish” to exit the installer.
11

STARTING UP THE VIEWER
Starting up the Viewer – Windows
Select the DiMAGE Viewer from the DiMAGE Viewer folder in the program option of the start menu.
The utility will start up and the thumbnail window will be displayed.
12

Starting up the Viewer – Macintosh
Open the DiMAGE Viewer folder. Double-click the DiMAGE Viewer icon to start up the application. The main window of the utility will be displayed.
13

IMPORTING AND EDITING IMAGES
Loading image files
Images can be loaded directly from a digital camera or from image folders saved in the computer. Simply use the folder tree to select the file containing the images. For information on the camera’s folder organization, and connecting the camera to the computer, refer to the camera’s instruction manual.
Click on the positive (+) nodes to display the contents of a folder.
Clicking on a negative (–) node to hide the folder contents.
Click on the image folder to load the images. All still-image and movie files in the folder will be loaded.
Updating the thumbnail window
If any changes are made to the folder tree of thumbnail display, for example, the camera is disconnected from the computer, the window can be updated. Select the update option from the view menu to update the DiMAGE Viewer.
14

Opening audio files
Voice memos, audio captions, and audio recordings made with the camera can be played back with the DiMAGE Viewer. To confirm if your camera can make audio recordings, refer to the instruction manual. After setting up the preferences box (see below), simply click on the note button or double click on the audio file to play back the recordings.
Voice memo / Audio caption
Audio recording
Select the preferences option from the file menu to open the dialog box.
Click on the view button next to the WAV file playback application text box to display the open dialog box.
Locate the application to play back audio files; QuickTime or the Windows Media Player can be used for playback. Click the open button; the execution path will be displayed in the preferences window.
Click the OK button in the preferences window to complete the operation.
15

IMPORTING AND EDITING IMAGES
Changing the display format
The contents of a folder can be displayed as thumbnail images, icons, or in a list with file data. To change the display format, simply press the appropriate button located on the tool bar.
Thumbnail display button
Icon display button
List display button
16
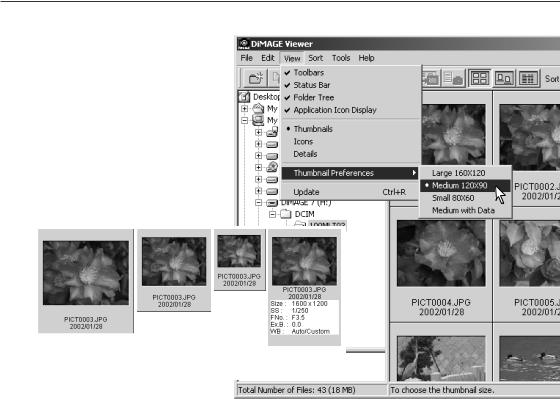
Changing the thumbnail format
The thumbnail format can be changed. Four format are available: large, medium, small, and medium with data.
To change the format, highlight the Thumbnail Preferences option on the view menu to display the format options. Highlight and click the desired thumbnail format; the thumbnail display will change accordingly.
Small
Medium
Large
Medium with data
17

IMPORTING AND EDITING IMAGES
Sorting image files
Image files can be sorted by name, date, or extension in ascending or descending order. This function works with the thumbnail, icon, or list displays (p. 16). To sort the displayed images, use the sort menu or the sort-by drop-down menu on the tool bar. Simply highlight the sorting category with the mouse.
Reverse-order button
The sort menu can also be used to change the display between ascending and descending order. The reverse-order button on the tool bar will also change the display order.
Renaming single files
Single files can be renamed in the thumbnail, icon, or list displays (p. 16). When rewriting file names, always include the original file extension.
Click on the thumbnail, icon, or file name to highlight it.
Click on the file name to activate the cursor or select rename from the edit menu. Use the keyboard to change the file name.
18
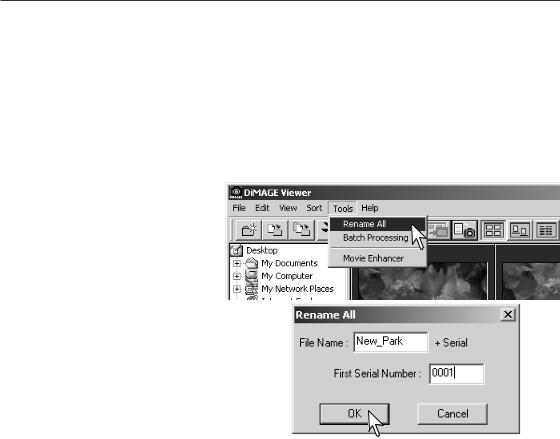
Renaming multiple files
Multiple files can be renamed in the thumbnail, icon, or list displays (p. 16).
Click on the thumbnail borders or file icon to select the images to be renamed.
•To select multiple images, press and hold the control key (Windows) or command key (Macintosh) and then click on each image to be renamed; the selected frames will have a dark border. To deselect an image, click on the thumbnail or icon a second time while holding the control key (Windows) or command key (Macintosh). To select consecutive images, press and hold the shift key and then click on the first and last image of the series. Press the control key (Windows) or command key (Macintosh) and “A” key at the same time to select all images.
From the tool menu, select the rename-all option. The rename-all window will open.
In the rename-all window, enter the new file name
(4) up to ten characters, and enter the first serial number (5) up to five digits.
Click the OK button to change the file names of the selected images.
19

IMPORTING AND EDITING IMAGES
Creating folders
New folders can be created to store images. Click on the desired location for the new folder. In this example the new folder will be placed in Camera Images.
Click on the new-folder button on the tool bar or select new folder from the file menu.The new folder will be created in the specified location.
The folder name can be changed with the keyboard.
20
Moving images to another folder
Multiple files can be moved from one folder to another.
Click on the thumbnail borders or file icon to select the images to be moved.
•To select multiple images, press and hold the control key (Windows) or command key (Macintosh) and then click on each image to be moved; the selected frames will have a dark border. To deselect an image, click on the thumbnail or icon a second time while holding the control key (Windows) or command key (Macintosh). To select consecutive images, press and hold the shift key and then click on the first and last image of the series. Press the control key (Windows) or command key (Macintosh) and “A” key at the same time to select all images.
Click on the move-to-folder button on the tool bar or select the move-to-folder option from the edit menu. The move-to-folder window will open.
In the move-to-folder window, click on the destination folder. Click the select button to move the specified images to the designated folder.
•A new folder can be created in this window. Click on the location for the new folder and click the new-folder button; a folder will appear in the folder tree in the window. The folder can be renamed.
•If the image has an attached audio, or thumbnail file, those files will also be copied.
New-folder button
21

IMPORTING AND EDITING IMAGES
Copying images to another folder
Multiple files can be copied from one folder to another.
Click on the thumbnail borders or file icon to select the images to be copied.
•To select multiple images, press and hold the control key (Windows) or command key (Macintosh) and then click on each image to be copied; the selected frames will have a dark border. To deselect an image, click on the thumbnail or icon a second time while holding the control key (Windows) or command key (Macintosh). To select consecutive images, press and hold the shift key and then click on the first and last image of the series. Press the control key (Windows) or command key (Macintosh) and “A” key at the same time to select all images.
Click on the copy-to-folder button on the tool bar or select the copy-to-folder option from the edit menu. The copy-to- folder window will open.
In the copy-to-folder window, click on the destination folder. Click the select button to copy the specified images to the designated folder.
•A new folder can be created in this window. Click on the location for the new folder and then click the new-folder button; a folder will appear in the folder tree in the window. The folder can be renamed.
•If the image has an attached audio, or thumbnail file, those files will also be copied.
New-folder button
22

Cut, copy, paste, and delete – Windows
The tool bar and edit menu can be used to cut, copy, paste, and delete folders and single or multiple images. These functions affect any audio or thumbnail files attached to an image. The delete key on the keyboard will also delete folders and images.
Cut |
|
Copy |
|
Paste |
|
Delete |
|
|
|
|
|
|
|
Select the folder or images to be moved. Click the cut or copy button. The display will not change when a cut is made until the paste has been completed. Click on the new location for the folder or images. Click the paste button to complete the operation.
When a delete command is given, a confirmation screen will appear. Clicking the yes button will execute the command and delete the data, clicking the no button will cancel the delete command.
Cut, copy, paste, and delete – Macintosh
The cut, copy, and paste functions are located in the edit menu. They can be used for editing file and folder names, but they cannot be used to cut, copy, or paste files and folders.
The delete button on the tool bar or pressing the command and delete button on the keyboard will erase files and folders. When a delete command is given, a confirmation screen will appear. Clicking the yes button will execute the command and delete the data, clicking the no button will cancel the delete command.
23
IMPORTING AND EDITING IMAGES
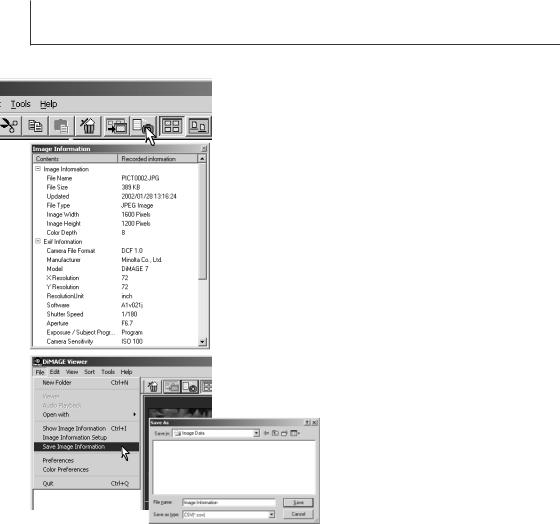
Displaying and saving image information
With an image selected in the thumbnail window, click the image-information button.
•If more than one thumbnail image is selected, one window for each image will open.
To close the window, click the close button in the top right corner.
•The information displayed on the window may vary between camera models.
Recording data is contained in an exif tag attached to the image file. If an image is opened in a image-processing application that does not support exif tag data, and then the image is saved overwriting the original data, the exif tag information will be erased. When using software other than the DiMAGE Viewer, always rename the image file to protect the exif tag data.
Image information can be saved as a special text file. Simply select single or multiple thumbnails and then select the save- image-information option from the file menu; the save-as dialog box will open.
The image-information file can be opened in spreadsheet software such as Microsoft Excel or with word processing application like Simple Text.
24
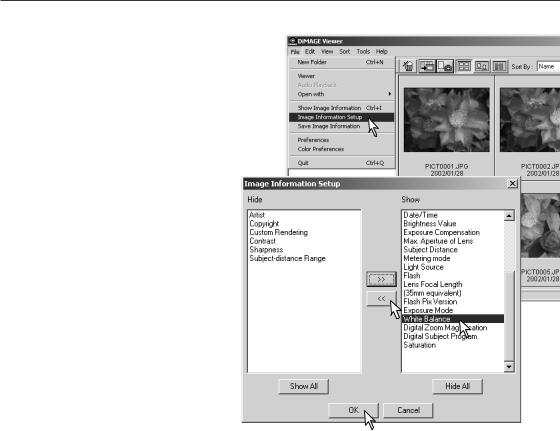
Image information setup
The Exif information displayed in the image information window can be edited. Select the image-information-setup option from the file menu to open the setup window.
Click on the item to be added to or removed from the image information display and click a move button.
>>: to move to the show list. <<: to move to the hide list.
The show-all and hide-all buttons adds or removes all items on the list to the image information display.
Click “OK” to save the setup.
25

BASIC IMAGE PROCESSING
Image-correction window
The image-correction window displays the utility’s image-processing tools. Adjustments to color, contrast, brightness, and saturation can be made. This section contains details on the basic image-pro- cessing tools. For descriptions of the advanced tools, see pages 44 though 69.
Tool bars
Snapshot display area (p. 61)
Image display area
Status bar
The view menu can turn the tool bars, snapshot display area, status bar, image information display, and color histograms on and off. Simple choose the menu option to show or hide the display.
Image information display (p. 24)
Color histogram display
Image display area only
26
 Loading...