


FHE 550 A1
®
|
|
|
Electric Pruner |
Elektrisk grensav til |
|
Translation of original operation manual |
højtsiddende grene |
|
|
|
Oversættelse af den originale driftsvejledning |
3 C 


Before reading, unfold the page containing the illustrations and familiarise yourself with all functions of the device.
Før du læser, vend siden med billeder frem og bliv bekendt med alle apparatets funktioner.
GB / IE |
Translation of original operation manual |
Page |
5 |
DK |
Oversættelse af den originale driftsvejledning |
Side |
19 |
|
|
|
|
A |
21 |
B |
|
|
|
3 |
|
|
14 |
|
|
|
|
|
|
4 |
|
|
|
|
5 |
|
|
|
|
6 |
|
|
7 |
|
|
|
|
|
15 |
|
C |
|
12 |
|
|
|
|
13 |
|
|
H |
|
|
14 |
7 |
|
|
|
|
|
|
a) |
|
13 |
|
|
|
|
|
|
|
|
15 |
|
|
|
b) |
|
|
|
I |
|
11 |
12 |
|
|
|
|
|
8 |
|
8 |
|
11 |
|
|
|
|
9 |
|
|
|
|
|
10 |
|
|
|
|
|
|
|
► |
|
|
|
9 |
10 |
|
|
|
◄ |
|
|
|
|
|
|
|
|
|
|
3 |

D |
|
|
|
17 |
|
|
|
|
|
|
|
|
|
|
4 |
|
|
|
|
|
|
|
|
16 |
|
2 |
|
|
6 |
|
|
|
|
|
E |
|
|
|
|
|
|
|
|
|
|
21 |
|
4 |
|
|
|
|
|
|
|
|
|
|
|
|
|
4 |
|
|
|
|
1 |
|
5 |
|
20 |
|
2 |
|
6 |
|
|
18 |
|
|
|
|
|
|
|
|
|
|
|
|
|
19 |
|
|
|
|
|
F |
|
1 |
J |
|
|
|
|
|
|
24 |
12 |
25 |
26 |
4 |
5 |
2 |
|
|
|
|
G |
23 |
|
|
|
|
|
|
|
|
|
|
|
|
|
22 |
|
|
|
|
|
4 |
|
|
|
|
|
|

Translation of the original instructions for use
Contents
Intended purpose .................................. |
6 |
Enclosed parts....................................... |
6 |
Notes on safety...................................... |
6 |
Symbols used in the instructions....... |
6 |
Symbols used on the saw ................. |
6 |
General notes on safety.................... |
7 |
Electric safety.................................... |
7 |
Precautions against spring-back....... |
9 |
General description............................. |
10 |
Fitting.................................................... |
10 |
Assembling the round handle.......... |
10 |
Attaching the shoulder strap ........... |
10 |
Installing the blade .......................... |
10 |
Fitting the saw chain ....................... |
10 |
Tensioning the saw chain................ |
11 |
Chain lubrication ............................. |
11 |
Operation startup ................................ |
12 |
Adjusting the telescopic handle....... |
12 |
Handle adjustment .......................... |
12 |
Resharpening of the saw chain.......... |
12 |
Accessories Enclosed ........................ |
12 |
Sawing techniques.............................. |
13 |
Working safely..................................... |
14 |
Transport.............................................. |
14 |
Cleaning and storage.......................... |
14 |
Waste disposal and environmental |
|
protection............................................. |
14 |
Guarantee............................................. |
15 |
Spare parts........................................... |
15 |
Technical Data ..................................... |
16 |
Maintenance Interval Table................. |
17 |
Trouble shooting ................................. |
18 |
CE Declaration of Conformity ............ |
32 |
Exploded Drawing............................... |
33 |
Grizzly Service-Center ........................ |
34 |
GB IE
Before first using the machine, please read this instruction manual carefully, for your own safety and for the safety of others. Keep the manual in a safe place and pass it on to any subsequent owner to ensure that the information contained therein is available at all times. Failure to adhere to the safety instructions and directions may result in electric shock, fire, and/or serious injury.
5

GB IE
Intended purpose
The high pruning saw is intended for pruning work on tree branches.
It is not designed for extensive sawing work, tree felling and cutting materials such as masonry, plastic or food.
The device is designed for use by adults. Young people over 16 years old may use the high pruning saw under supervision only.
It is essential to ensure that you are standing in a safe position, in order to prevent accidents.
The equipment is not intended for use by people of restricted physical, sensory or mental ability. This is also fundamentally applicable for children.
The manufacturer is not liable for damages, which were caused through use in applications for which it was not designed, or incorrect operation.
The high pruning saw is designed for employment in the do-it-yourselfer sector. It was not designed for continuous employment in the commercial sector.
Enclosed parts:
-High pruning saw
-Chain bar
-Saw chain
-Blade cover
-Shoulder strap
-Round handle
-60 ml Grizzly-Bio-Oil
Notes on safety
This section deals with the basic safety regulations while working with the high pruning saw.
An high pruning saw is a dangerous device, which can cause serious or even fatal injuries with incorrect or careless use. Thus, for your own safety and the safety of others, you should always take
6
note of the instructions on safety and, in case of difficulties, consult a specialist for advice.
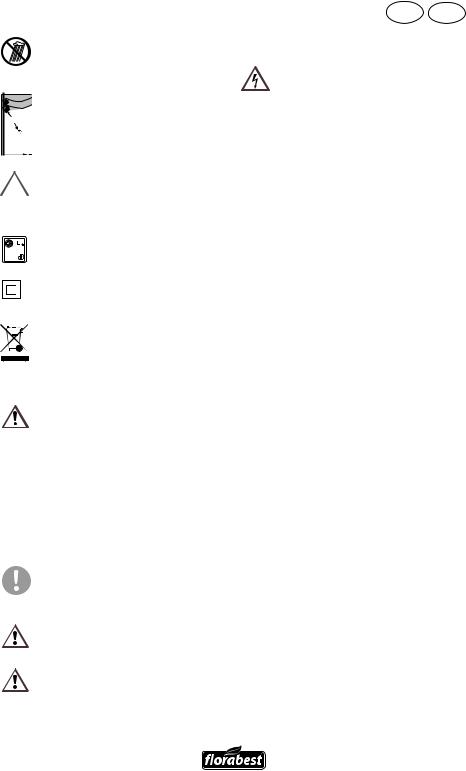
Symbols used in the instructions
Hazard symbols with information on prevention of personal injury and property damage.
Precaution symbol (explanation of precaution instead of exclamation mark) with information on prevention of harm / damage.
Notice symbol with information on how to handle the device properly.
Symbols used on the saw
Make yourself familiar with all control elements before any work. Practice handling the saw and have explained the functions, operating methods and sawing techniques by a practiced user or specialist.
Read and take note of the operating manual belonging to the machine!
Wear personal protective equipment. Basically, wear protective
goggles or, even better, face
protection, ear protection, safety helmet, cut-protection working clothes, cut-protection gloves, and cut-protection safety boots with anti-slip soles.
 Beware of falling objects.
Keep the equipment away from nearby people.
Do not expose the machine to the rain. Do not allow the equipment to become damp or operate it in a damp environment.
10 m |
Danger of death by electrocution! |
|
Keep at least 10m away from |

 power lines.
Caution! Remove the plug immedi- 
 ately from the plug socket in case
  of damage or cutting through of the
mains cable
104 |
Information of the acoustic power |
|
level L |
in dB. |
|
|
WA |
|
Safety class II
Machines do not belong with domestic waste.
General notes on safety
Before you do any work with the high pruning saw, make yourself familiar with all operating parts. Practise using the saw (sawing logs on a sawhorse) and get an experienced user or a specialist to explain to you the function of the saw, the way of working, the techniques of sawing and the personal protection equipment.
Also, read the following safety instructions in order to prevent injury to people and damage to property:
Observe noise protection and other local regulations.
Improper maintenance and the removal of safety devices will cause a risk of serious injury.
GB IE
Electric safety:
Read the safety instructions in order to avoid injuries and material damage.
Protection against of electric shock:
•Connect the high pruning saw only to a plug socket with leakage-current- operated circuit breaker (l.c.o. circuit breaker) with a rated current of not more than 30 mA.
•Make sure that the mains voltage agrees with the information of the label.
•Protect the device against moisture. The device must not be wet and should not be operated in a moist environment.
•Check the device and the power cable with plug for damage before every use. Avoid body contact with earthed parts (e.g. metal fences, metal posts).
•Employ only extension cords, which are stipulated for use in the open air. The flexible lead cross-section of the extension cord must be at least 1.5 mm2. Always roll a cable drum completely out before use. Check the cable for damages.
•Damaged cables, coupling and plugs or connecting leads, not corresponding to the specifications, must be not be employed. Remove the plug immediately from the plug socket in case of damage or cutting through of the mains cable.
•If the power cable for this equipment is damaged, it must be replaced by the manufacturer, a customer service agent of the same or a similarly qualified person in order to prevent hazards.
Working with thehigh pruning saw:
•When felling timber, observe noise protection and other local regulations. Local rules may render necessary a
7

GB IE
suitability test.Ask the forest administration for details.
•Do not work with the high pruning saw when you are tired or after the consumption of alcohol or medication. Always take a break in good time.
•Always wear suitable working clothes during working, which allow freedom of movement. Included with this are a safety helmet, ear muffs, protective goggles or face protection, gloves with cut-protection, safety shoes with cutprotection and solid soles and protective trousers with saw protection.
•The high pruning saw is designed for two-handed operation. Never work with one hand or above shoulder height.
•Basically the mains cable is dragged behind the operator. The cable must always lead away from the high pruning saw towards the rear.
•Keep your working area tidy. Only start work if your working area is free from obstruction and you have planned a safe path of escape when felling timber.
•Ensure no people or animals are located near the field of action. Pay particular attention to children.
•Ensure you have a secure stance during sawing. Do not work on a ladder, in the tree or on unstable locations. Be very cautious carrying out work on a slope.
•Never start the high pruning saw before the chain bar, saw chain and sprocket chain wheel covering are correctly assembled.
•Ensure, before the switch-on, that the chainsaw is not in contact with any objects. Switch off the chainsaw before you relocate it.
•Do not work in the rain, bad weather or in a moist environment. Work only with good lighting.
•Ensure that the grips are dry and clean during work.
•Work only within the indicated range of performance. Do not employ any
low-powered devices for difficult work. Do not use tools for purposes for which they are not intended.
•Do not work with an high pruning saw which is damaged, incomplete or changed without approval of the manufacturer. Never use the high pruning saw with defective protective equipment. Do not use any tools where the switch cannot be turned on and off. Check the safety status of the high
pruning saw, in particular the chain bar, chain brake and the chain, before use.
•Damaged protection fittings and parts must be properly repaired or replaced at our Service-Center (see P. 34 for the address), unless otherwise stated in the manual.
•Pull out the power plug in case of nonuse of the device, before maintenance, cleaning or replacement of accessories. Ensure the chainsaw is switched off when you stick the plug into the plug socket.
•All maintenance operations, which are not indicated in these directions, may be carried out only by the customer service for chainsaws.
•Use only those accessories which are recommended in these directions.
•Place the claw stop securely with every cut and do not begin with the sawing before this.
•Be extremely careful during sawing small bushes and branches. The thin branch thicket can snag in the saw and whip in your direction or make you unbalanced.
•Carefully follow the maintenance, control and service instructions in this operating manual.
•Avoid sawing thin wood and trimmed timber.
•Pay attention to a possible spring-back during the sawing of a branch which is under stress, if the stress force of the wood is suddenly released. Danger of injury exists.
8
•Ensure during any location change that the saw chain is secured with the chain brake and the chainsaw is switched off and the finger does not contact the On/ Off switch. Carry the high pruning saw with the chain and chain bar pointing to the rear.Attach the chain guard for transporting the high pruning saw.
•Do not use the high pruning saw near inflammable liquids or gases. With nonobservance, fire or explosion danger exists.
Handling the device with care:
•Do not carry the device by the cable. Do not use the cable in order to pull the plug from the plug socket. Protect the cable against heat, oil and sharp edges.
•Keepthesawchainsharpandclean,in ordertobeabletoworkbetterandmore safely.
•Keep unused devices in a dry, closed location and out of the reach of children.
•Put on the blade protection cover when transporting the high pruning saw.
•Do not cut wood that is lying on the ground.
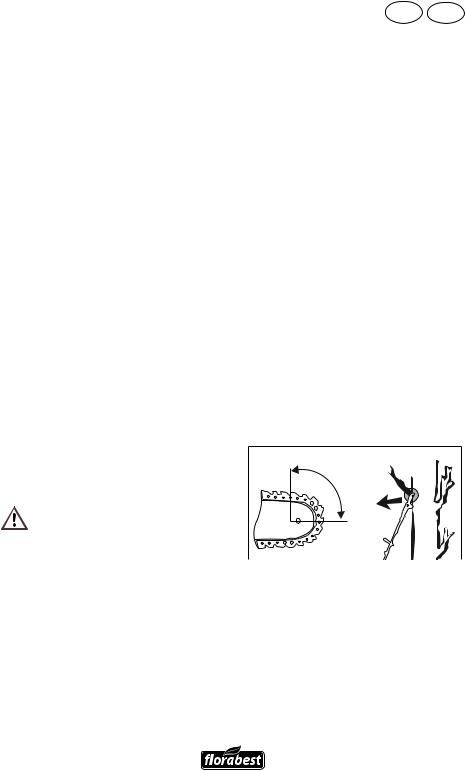
Precautions against springback
Beware of spring-back! Be careful of spring-back of the machine during work. There is danger of injury here. You can avoid spring-backs by exercising caution and using a correct sawing technique.
Spring-back is the designation for a light- ning-fast backwards impulse of the high pruning saw and the chain bar from the sawed object. It occurs if the rebound area (see Fig. 1, a) on the point of the blade is in contact with an object or if the wood jams the high pruning saw during cutting.
Whenaspring-backoccurs,theuserreceives astrongbackwardshockfromthehigh pruning saw andthechainbar.Theresultcanbe
GB IE
thathelosescontrolofthehigh pruning saw andseriouslyinjures
•Always grip the power saw firmly with both hands, with the right hand to the rear and with the left hand on the front handle. Thumb and finger must close over the handles securely.
•Do not saw with the point of the blade (see Fig. 1, b) or above shoulder height. Do not lean over too far during the sawing operation.
•You have better control when you saw with the bottom side of the chain bar and not with the top side of the chain bar.
•Be especially careful during the removal of branches. Ensure that there are no objects lying around on the ground that you can trip over.
•Pay attention to the instructions for sharpening and maintenance of the power saw.
(a)(b)
9

GB IE
General description
The operation and maintenance illustrations are on the front fold-out page.
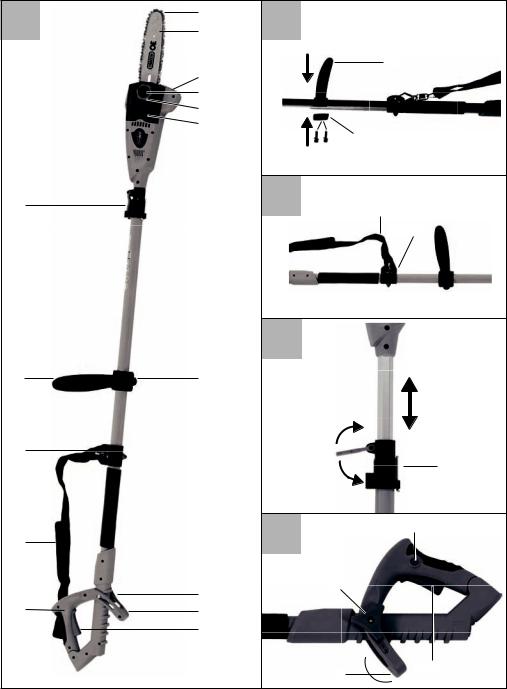
A
1.Saw chain
2.Chain bar
3.Bumber
4.Blade fixing screw
5.Chain adjustment ring
6.Sprocket chain wheel covering
7.Brake arm
8.Pivotal centre (not visible)
9.Adjustable handle
10.On/off switch
11.Safety lock (not visible)
12.Shoulder strap
13.Eye (for shoulder strap)
14.Round handle
15.Quick release (for telescopic handle)
Fitting
•Pull out the power plug before doing any work on the high pruning saw itself -– injury hazard!
•Alwayas wear cut-protection gloves
•In case of difficulties, consult a specialist for advice.
Before using the high pruning saw, you must:
-assebling the round handle
-attaching the shoulder strap
-fitting the blade
-fitting the saw chain
-tensioning the saw chain
-fill up with chain oil
10
Assembling the Round Handle
B
1.Set round handle 14 to the desired position on the telescopic handle.
2.Place brake arm 7 on the telescopic handle.
3.Screw together round handle 14 and brake arm 7.
4.The height or holding angle of round handle 14 can be adjusted at any time by slightly loosening the screws, pushing/turning, and retightening the screws.
Attaching the Shoulder Strap
C
Fix the spring hook on shoulder strap 12 into lifting lug 13 on the telescopic handle of the equipment.
Installing the Blade
D
1.Loosen blade fixing screw 4 and remove chain wheel cover 6.
2.Insert blade 2 with the central longitudinal hole over central blade guide 16.
Fitting the saw chain
E
1. Lay out saw chain 1 such that the bevelled cutting edges of the chain links point in a clockwise direction. See the detailed illustration.
2.Place saw chain 1 in blade groove 2 and on chain wheel 18.
3.Replace chain wheel cover 6 and screw on blade fixing 4. Blade fixing screw 4 is simply to be tightened lightly by hand.
Hole 20 on the blade is the holder for chain tensioning pin 21.Thread 19 is the holder for blade fixing screw 4.
Ensure that chain tensioning pin 21 is positioned in hole 20 on the blade.The pin must be completely inserted into the hole.
Tensioning the saw chain
GB IE
chain tensioning device 5.
Turn this quick tensioning device clockwise to increase the tension.
In the same way, the tension of saw chain 1 can be decreased by turning anticlockwise.
3. Turn blade fixing screw 4 clockwise to retighten blade 2.
Where saw chain 1 has been newly tensioned, readjust the chain tension after a short period in operation.
Check the chain tension before each use of the high pruning saw.
Chain lubrication
The tension of saw chain 1 is important both for your safety and for the function of the high pruning saw. A correctly tensioned saw chain will increase the lifetime of your equipment.
Saw chain 1 is correctly tensioned if it can be pulled around blade 2 by hand (wearing gloves) without sagging.
When the saw chain is tensioned with 9 N (approx. 1 kg), the gap between the saw chain and the guide rail may not be more than 2 mm.
Blade 2 and saw chain 1 must always be oiled. Non-observance of this will result in increased wear on the blade and saw chain.
The high pruning saw is equipped with an oil automatic system. As soon as the motor is speeded up, the oil also flows faster to the chain bar 2.
10 min |
A full tank will last for |
approx. 10 minutes of |
|
|
continuous operation. |
|
Check the oil level in good |
|
time. |
F
1.Turn blade fixing screw 4 anticlockwise to slightly loosen blade 2.
2.Set the tension of saw chain 1 using
G
•Check the oil fill level and regularly top up with oil. The oil tank holds 70 ml oil.
•Use Grizzly bio-oil; this product contains additives that reduce wear and tear and does not damage the pump system. bio-oil is available from our Service-Center (see P. 34 for the address).
11
 Loading...