


NPS-520
MFP Print Server
User’s Guide
Version 1.00 1/2007 Edition 2
www.zyxel.com

About This User's Guide
About This User's Guide
Intended Audience
This manual is intended for people who want to configure the NPS-520 using the ZyXEL utility or the web configurator. You should have at least a basic knowledge of TCP/IP networking concepts and topology.
Related Documentation
•Quick Start Guide
The Quick Start Guide is designed to help you get up and running right away. It contains information on setting up your network and configuring for Internet access.
•Online Help
Embedded web help for descriptions of individual screens and supplementary information.
•Supporting Disk
Refer to the included CD for support documents.
•ZyXEL Web Site
Please refer to www.zyxel.com for additional support documentation and product certifications.
User Guide Feedback
Help us help you. Send all User Guide-related comments, questions or suggestions for improvement to the following address, or use e-mail instead. Thank you!
The Technical Writing Team, ZyXEL Communications Corp., 6 Innovation Road II, Science-Based Industrial Park, Hsinchu, 300, Taiwan.
E-mail: techwriters@zyxel.com.tw
NPS-520 User’s Guide
3 |

Document Conventions
Document Conventions
Warnings and Notes
These are how warnings and notes are shown in this User’s Guide.
Warnings tell you about things that could harm you or your device.
"Notes tell you other important information (for example, other things you may need to configure or helpful tips) or recommendations.
Syntax Conventions
•The NPS-520 may be referred to as the “NPS-520” or the “print server” in this User’s Guide.
•Product labels, screen names, field labels and field choices are all in bold font.
•A key stroke is denoted by square brackets and uppercase text, for example, [ENTER] means the “enter” or “return” key on your keyboard.
•“Enter” means for you to type one or more characters and then press the [ENTER] key. “Select” or “choose” means for you to use one of the predefined choices.
•A right angle bracket ( > ) within a screen name denotes a mouse click. For example,
Maintenance > Log > Log Setting means you first click Maintenance in the navigation panel, then the Log sub menu and finally the Log Setting tab to get to that screen.
•Units of measurement may denote the “metric” value or the “scientific” value. For example, “k” for kilo may denote “1000” or “1024”, “M” for mega may denote “1000000” or “1048576” and so on.
•“e.g.,” is a shorthand for “for instance”, and “i.e.,” means “that is” or “in other words”.
4 |
NPS-520 User’s Guide
Document Conventions
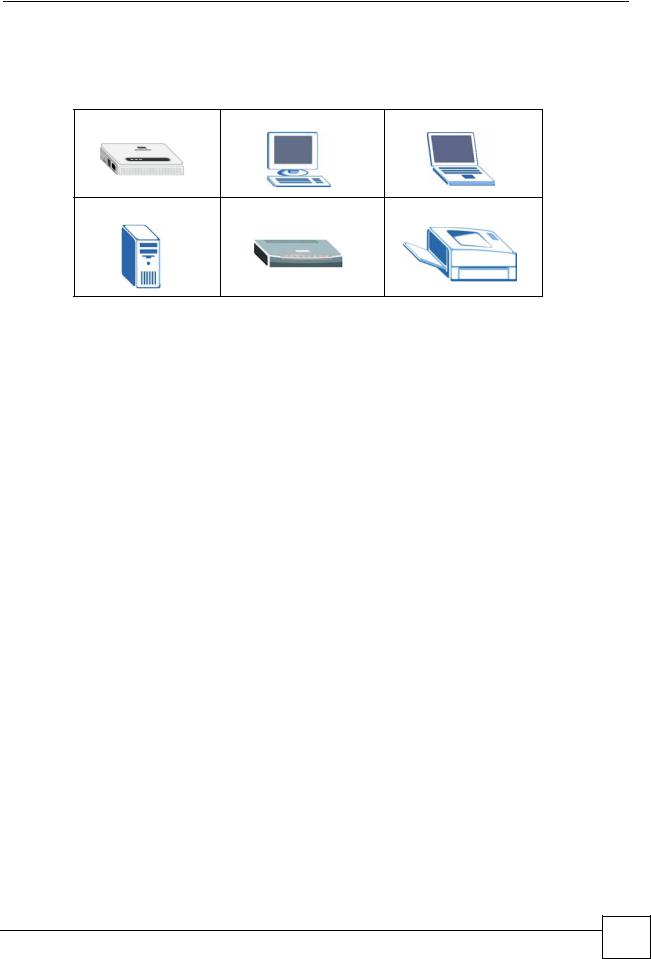
Icons Used in Figures
Figures in this User’s Guide may use the following generic icons. The NPS-520 icon is not an exact representation of your device.
NPS-520 |
Computer |
Notebook computer |
Server |
Modem or Router |
Printer |
NPS-520 User’s Guide
5 |

Safety Warnings
Safety Warnings
For your safety, be sure to read and follow all warning notices and instructions.
•Do NOT use this product near water, for example, in a wet basement or near a swimming pool.
•Do NOT expose your device to dampness, dust or corrosive liquids.
•Do NOT store things on the device.
•Do NOT install, use, or service this device during a thunderstorm. There is a remote risk of electric shock from lightning.
•Connect ONLY suitable accessories to the device.
•Do NOT open the device or unit. Opening or removing covers can expose you to dangerous high voltage points or other risks. ONLY qualified service personnel should service or disassemble this device. Please contact your vendor for further information.
•Make sure to connect the cables to the correct ports.
•Place connecting cables carefully so that no one will step on them or stumble over them.
•Always disconnect all cables from this device before servicing or disassembling.
•Use ONLY an appropriate power adaptor or cord for your device.
•Connect the power adaptor or cord to the right supply voltage (for example, 110V AC in North America or 230V AC in Europe).
•Do NOT allow anything to rest on the power adaptor or cord and do NOT place the product where anyone can walk on the power adaptor or cord.
•Do NOT use the device if the power adaptor or cord is damaged as it might cause electrocution.
•If the power adaptor or cord is damaged, remove it from the power outlet.
•Do NOT attempt to repair the power adaptor or cord. Contact your local vendor to order a new one.
•Do not use the device outside, and make sure all the connections are indoors. There is a remote risk of electric shock from lightning.
This product is recyclable. Dispose of it properly.
6 |
NPS-520 User’s Guide

Contents Overview
Contents Overview
Introducing the NPS-520 ........................................................................................................... |
17 |
ZyXEL Utility .............................................................................................................................. |
21 |
Web Configurator ....................................................................................................................... |
35 |
Adding a Printer on Your Computer ........................................................................................... |
45 |
Troubleshooting ......................................................................................................................... |
69 |
NPS-520 User’s Guide
7 |

Contents Overview
8 |
NPS-520 User’s Guide

Table of Contents
Table of Contents
About This User's Guide .......................................................................................................... |
3 |
|
Document Conventions............................................................................................................ |
4 |
|
Safety Warnings........................................................................................................................ |
6 |
|
Contents Overview ................................................................................................................... |
7 |
|
Table of Contents...................................................................................................................... |
9 |
|
List of Figures ......................................................................................................................... |
11 |
|
List of Tables........................................................................................................................... |
15 |
|
Chapter 1 |
|
|
Introducing the NPS-520 ........................................................................................................ |
17 |
|
1.1 |
Overview .............................................................................................................................. |
17 |
1.2 |
Ways to Manage the NPS-520 ............................................................................................ |
17 |
1.3 |
Good Habits for Managing the NPS-520 ............................................................................. |
18 |
1.4 |
Hardware and Utility Installation .......................................................................................... |
18 |
1.5 |
The Reset Button ................................................................................................................. |
18 |
1.6 |
LEDs .................................................................................................................................... |
19 |
Chapter 2 |
|
|
ZyXEL Utility............................................................................................................................ |
21 |
|
2.1 |
Accessing the ZyXEL Utility ................................................................................................. |
21 |
2.2 |
ZyXEL Utility Icon ................................................................................................................ |
21 |
2.3 |
ZyXEL Utility Screen Summary ........................................................................................... |
22 |
2.4 |
The Status Screen ............................................................................................................... |
22 |
2.5 |
The General Setting Screen ................................................................................................ |
25 |
2.6 |
The TCP/IP Setting Screen ................................................................................................. |
26 |
2.7 |
The System Setting Screen ................................................................................................. |
28 |
2.8 |
The About Screen ................................................................................................................ |
31 |
2.9 |
Uninstalling the ZyXEL Utility ............................................................................................... |
32 |
2.10 Upgrading the ZyXEL Utility .............................................................................................. |
32 |
|
Chapter 3 |
|
|
Web Configurator.................................................................................................................... |
35 |
|
3.1 |
Web Configurator Overview ................................................................................................. |
35 |
3.2 |
Accessing the NPS-520 Web Configurator .......................................................................... |
35 |
3.3 |
Navigating the NPS-520 Web Configurator ......................................................................... |
36 |
NPS-520 User’s Guide
9 |

Table of Contents |
|
|
|
3.3.1 Title Bar ...................................................................................................................... |
37 |
|
3.3.2 Navigation Panel ........................................................................................................ |
37 |
|
3.3.3 Main Window .............................................................................................................. |
37 |
3.4 |
The Status Screen ........................................................................................................... |
37 |
3.5 |
The System Screen ............................................................................................................. |
39 |
3.6 |
The Setup TCP/IP screen .................................................................................................... |
40 |
3.7 |
The Utilities Screen ............................................................................................................. |
41 |
|
3.7.1 Firmware Upgrade .................................................................................................... |
41 |
|
3.7.2 Load Defaults ............................................................................................................ |
43 |
|
3.7.3 Restart Screen .......................................................................................................... |
43 |
Chapter 4 |
|
|
Adding a Printer on Your Computer...................................................................................... |
45 |
|
4.1 |
Printing Protocol .................................................................................................................. |
45 |
|
4.1.1 LPR ............................................................................................................................ |
45 |
|
4.1.2 RAW ........................................................................................................................... |
45 |
|
4.1.3 IPP ............................................................................................................................. |
46 |
4.2 |
Adding a Printer in Windows ............................................................................................... |
46 |
|
4.2.1 Windows 2000/XP/2003 ............................................................................................. |
46 |
|
4.2.2 Windows 98 SE/Me .................................................................................................... |
57 |
4.3 |
Adding a Printer in Macintosh .............................................................................................. |
61 |
4.4 |
Adding a Printer in Linux/UNIX ............................................................................................ |
65 |
Chapter 5 |
|
|
Troubleshooting...................................................................................................................... |
69 |
|
Appendix |
A Product Specifications......................................................................................... |
73 |
Appendix |
B Setting up Your Computer’s IP Address.............................................................. |
83 |
Appendix |
C Pop-up Windows, JavaScripts and Java Permissions........................................ |
95 |
Appendix |
D Legal Information .............................................................................................. |
101 |
Appendix |
E Customer Support............................................................................................. |
105 |
Index....................................................................................................................................... |
|
109 |
10 |
NPS-520 User’s Guide
List of Figures
List of Figures
Figure 1 Application Overview ................................................................................................................ |
17 |
Figure 2 LEDs ......................................................................................................................................... |
19 |
Figure 3 ZyXEL Utility: System Tray Icon ............................................................................................... |
21 |
Figure 4 ZyXEL Utility Menu Summary .................................................................................................. |
22 |
Figure 5 ZyXEL Utility: Status ................................................................................................................. |
23 |
Figure 6 ZyXEL Utility: General Setting ................................................................................................. |
25 |
Figure 7 ZyXEL Utility: Login .................................................................................................................. |
26 |
Figure 8 ZyXEL Utility: TCP/IP Setting .................................................................................................. |
27 |
Figure 9 ZyXEL Utility: Login .................................................................................................................. |
28 |
Figure 10 ZyXEL Utility: System Setting ................................................................................................ |
29 |
Figure 11 About ..................................................................................................................................... |
31 |
Figure 12 Uninstall: Confirm ................................................................................................................. |
32 |
Figure 13 Uninstall: Finish ..................................................................................................................... |
32 |
Figure 14 Web Configurator: Login ........................................................................................................ |
36 |
Figure 15 Web Configurator: Main Screen ............................................................................................. |
36 |
Figure 16 Web Configurator: Status ...................................................................................................... |
38 |
Figure 17 Web Configurator: System ................................................................................................... |
39 |
Figure 18 Web Configurator: TCP/IP ...................................................................................................... |
40 |
Figure 19 Web Configurator: Utilities > Firmware Upgrade ................................................................... |
42 |
Figure 20 Firmware Upload Confirmation .............................................................................................. |
42 |
Figure 21 Firmware Upload Warning ..................................................................................................... |
42 |
Figure 22 Network Temporarily Disconnected ........................................................................................ |
43 |
Figure 23 Firmware Upload Successful ................................................................................................. |
43 |
Figure 24 Web Configurator: Utilities > Load Defaults .......................................................................... |
43 |
Figure 25 Web Configurator: Utilities > Restart ..................................................................................... |
44 |
Figure 26 Windows 2000: Start > Settings > Printers ............................................................................. |
46 |
Figure 27 Windows 2000: Add Printer Wizard: Welcome ....................................................................... |
47 |
Figure 28 Windows 2000: Add Printer Wizard: Local or Network Printer ............................................... |
47 |
Figure 29 Windows 2000: Add Printer Wizard: Locate Your Printer ...................................................... |
48 |
Figure 30 Windows 2000: Add Standard TCP/IP Printer Port Wizard ................................................... |
48 |
Figure 31 Windows 2000: Add Standard TCP/IP Printer Port Wizard: Add Port ................................... |
49 |
Figure 32 Windows 2000: Add Standard TCP/IP Printer Port Wizard: Port Information ....................... |
49 |
Figure 33 Windows 2000: Configure Standard TCP/IP Port Monitor ..................................................... |
50 |
Figure 34 Windows 2000: Add Standard TCP/IP Printer Port Wizard: Finish ....................................... |
50 |
Figure 35 Windows 2000: Add Printer Wizard: Printer Driver ............................................................... |
51 |
Figure 36 Windows 2000: Add Printer Wizard: Use Existing Driver ....................................................... |
51 |
Figure 37 Windows 2000: Add Printer Wizard: Name Your Printer ....................................................... |
52 |
Figure 38 Windows 2000: Add Printer Wizard: Printer Sharing ............................................................. |
52 |
NPS-520 User’s Guide
11 |

List of Figures |
|
Figure 39 Windows 2000: Add Printer Wizard: Print Test Page ............................................................ |
53 |
Figure 40 Windows 2000: Add Printer Wizard Complete ....................................................................... |
53 |
Figure 41 Windows 2000: Start > Settings > Printers ............................................................................. |
54 |
Figure 42 Windows 2000: Add Printer Wizard: Welcome ....................................................................... |
54 |
Figure 43 Windows 2000: Add Printer Wizard: Local or Network Printer ............................................... |
55 |
Figure 44 Windows 2000: Add Printer Wizard: Locate Your Printer ...................................................... |
55 |
Figure 45 Windows 2000: Add Printer Wizard: Printer Driver ............................................................... |
56 |
Figure 46 Windows 2000: Add Printer Wizard: Default Printer .............................................................. |
56 |
Figure 47 Windows 2000: Add Printer Wizard Complete ....................................................................... |
57 |
Figure 48 Windows Me: Start > Settings > Printers ................................................................................ |
57 |
Figure 49 Windows Me: Add Printer Wizard: Welcome .......................................................................... |
58 |
Figure 50 Windows Me: Add Printer Wizard: Local or Network Printer .................................................. |
58 |
Figure 51 Windows Me: Add Printer Wizard: Printer Driver .................................................................. |
59 |
Figure 52 Windows Me: Add Printer Wizard: Use Existing Driver .......................................................... |
59 |
Figure 53 Windows Me: Add Printer Wizard: Select Port ...................................................................... |
60 |
Figure 54 Windows Me: Network Port Quick Setup ............................................................................... |
60 |
Figure 55 Windows Me: Add Printer Wizard: Name Your Printer .......................................................... |
61 |
Figure 56 Windows Me: Add Printer Wizard: Print Test Page ............................................................... |
61 |
Figure 57 Macintosh Dock ...................................................................................................................... |
61 |
Figure 58 Macintosh HD Icon ................................................................................................................ |
62 |
Figure 59 Macintosh: HD ....................................................................................................................... |
62 |
Figure 60 Macintosh: Applications ......................................................................................................... |
62 |
Figure 61 Macintosh: Utilities ................................................................................................................ |
63 |
Figure 62 Macintosh: Printer List .......................................................................................................... |
63 |
Figure 63 Macintosh 10.3: Printer List .................................................................................................. |
64 |
Figure 64 Macintosh 10.4: Printer Browser .......................................................................................... |
64 |
Figure 65 Macintosh: Printer List Done ................................................................................................ |
65 |
Figure 66 Fedora Core 2: System > Administration > Printing ............................................................... |
65 |
Figure 67 Fedora Core 2: Printer Configuration .................................................................................... |
66 |
Figure 68 Fedora Core 2: Add a new print queue ................................................................................. |
66 |
Figure 69 Fedora Core 2: Add a new print queue: Queue name .......................................................... |
66 |
Figure 70 Fedora Core 2: Add a new print queue: Queue Type ............................................................ |
67 |
Figure 71 Fedora Core 2: Add a new print queue: Printer model .......................................................... |
67 |
Figure 72 Fedora Core 2: Add a new print queue: Finish ...................................................................... |
68 |
Figure 73 Fedora Core 2: Print a test page ........................................................................................... |
68 |
Figure 74 Fedora Core 2: Print a test page: Confirmation ..................................................................... |
68 |
Figure 75 WIndows 95/98/Me: Network: Configuration .......................................................................... |
84 |
Figure 76 Windows 95/98/Me: TCP/IP Properties: IP Address .............................................................. |
85 |
Figure 77 Windows 95/98/Me: TCP/IP Properties: DNS Configuration .................................................. |
86 |
Figure 78 Windows XP: Start Menu ........................................................................................................ |
87 |
Figure 79 Windows XP: Control Panel ................................................................................................... |
87 |
Figure 80 Windows XP: Control Panel: Network Connections: Properties ............................................. |
88 |
Figure 81 Windows XP: Local Area Connection Properties ................................................................... |
88 |
12 |
NPS-520 User’s Guide

|
|
List of Figures |
Figure 82 Windows XP: Advanced TCP/IP Settings .............................................................................. |
89 |
|
Figure 83 Windows XP: Internet Protocol (TCP/IP) Properties .............................................................. |
90 |
|
Figure 84 Macintosh OS 8/9: Apple Menu .............................................................................................. |
91 |
|
Figure 85 Macintosh OS 8/9: TCP/IP ..................................................................................................... |
91 |
|
Figure 86 Macintosh OS X: Apple Menu ................................................................................................ |
92 |
|
Figure 87 Macintosh OS X: Network ...................................................................................................... |
93 |
|
Figure 88 Pop-up Blocker ....................................................................................................................... |
95 |
|
Figure 89 |
Internet Options ..................................................................................................................... |
96 |
Figure 90 Internet Options ...................................................................................................................... |
97 |
|
Figure 91 Pop-up Blocker Settings ......................................................................................................... |
97 |
|
Figure 92 Internet Options ...................................................................................................................... |
98 |
|
Figure 93 |
Security Settings - Java Scripting ........................................................................................... |
99 |
Figure 94 |
Security Settings - Java .......................................................................................................... |
99 |
Figure 95 |
Java (Sun) ............................................................................................................................ |
100 |
NPS-520 User’s Guide
13 |

List of Figures
14 |
NPS-520 User’s Guide

List of Tables
List of Tables
Table 1 LEDs ......................................................................................................................................... |
19 |
||
Table 2 ZyXEL Utility: System Tray Icon ................................................................................................ |
21 |
||
Table 3 ZyXEL Utility Menu Summary ................................................................................................... |
22 |
||
Table 4 ZyXEL Utility: Status ................................................................................................................. |
23 |
||
Table 5 ZyXEL Utility: General Setting .................................................................................................. |
26 |
||
Table 6 |
ZyXEL Utility: TCP/IP Setting .................................................................................................... |
27 |
|
Table 7 |
ZyXEL Utility: System Setting ................................................................................................... |
29 |
|
Table 8 |
About ......................................................................................................................................... |
31 |
|
Table 9 |
Title Bar: Web Configurator Icons ............................................................................................. |
37 |
|
Table 10 Screens Summary .................................................................................................................. |
37 |
||
Table 11 Web Configurator: Status ........................................................................................................ |
38 |
||
Table 12 Web Configurator: System ...................................................................................................... |
39 |
||
Table 13 Web Configurator: TCP/IP ...................................................................................................... |
40 |
||
Table 14 |
Web Configurator: Utilities > Firmware Upgrade .................................................................... |
42 |
|
Table 15 |
Hardware Specifications ......................................................................................................... |
73 |
|
Table 16 |
Firmware Specifications .......................................................................................................... |
73 |
|
Table 17 |
NPS-520 Compatible USB Printers ........................................................................................ |
73 |
|
NPS-520 User’s Guide
15 |

List of Tables
16 |
NPS-520 User’s Guide
1
Introducing the NPS-520
This chapter introduces the main applications of the NPS-520. It also introduces the ways you can manage the NPS-520.
1.1 Overview
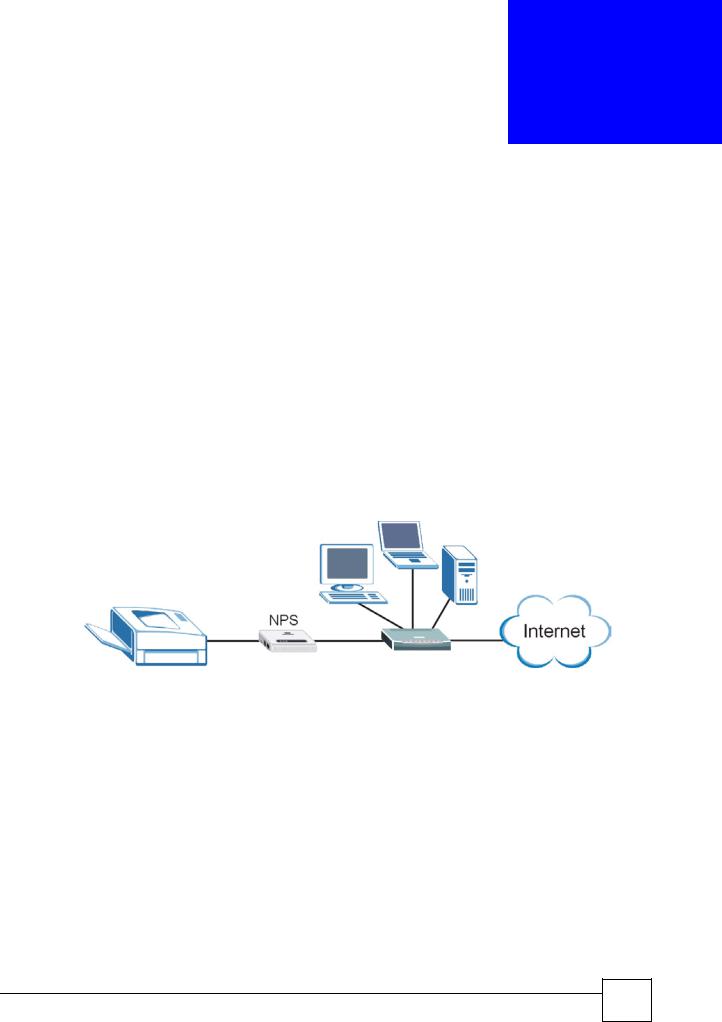
The NPS-520 (labeled NPS in the following graphic) is a print server that allows the computers in a network to share a printer, especially a multi-function printer (MFP). A MFP is a printer that can also work as a scanner, fax machine, copy machine, card reader and so on. The NPS-520 has one USB port and one Ethernet port. If a MFP comes with a USB port but no Ethernet port, the NPS-520 allows you to connect the MFP to your network and provides users on the network with shared access to the printer.
Figure 1 Application Overview
Windows 2000 SP4 and later computers connected to the NPS-520 can use all features available on an MFP, such as copying, printing, scanning and so on. They should also support LPR (Line Printer Remote) or IPP (Internet Printing Protocol). Other computers connected to the NPS-520 can only use the printer to print. Computers must take turns using the printer.
1.2 Ways to Manage the NPS-520
Use any of the following methods to manage the NPS-520.
•ZyXEL Utility. The utility is a tool that helps you configure the NPS-520 in a Windows computer.
•Web Configurator. You must use the web configurator if your are using a Linux/UNIX or Macintosh computer.
NPS-520 User’s Guide
17 |

Chapter 1 Introducing the NPS-520
1.3 Good Habits for Managing the NPS-520
Do the following things regularly to make the NPS-520 more secure and to manage the NPS520 more effectively.
•Change the password. Use a password that’s not easy to guess and that consists of different types of characters, such as numbers and letters.
•Write down the password and put it in a safe place. If you forget your password, you will have to reset the NPS-520 to its factory default settings.
1.4Hardware and Utility Installation
Follow the instructions in the Quick Start Guide to make hardware connections and install the ZyXEL utility.
1.5 The Reset Button
If you forget the password and cannot access the ZyXEL utility’s TCP/IP Setting and System Setting screens or the web configurator, you will need to use the Reset button on the side of the NPS-520. This means you will lose all configurations that you had previously. The password will be reset to 1234 and the IP address will be reset to 192.168.1.6.
1Make sure the Ready LED on the NPS-520’s panel is on (not blinking).
2Press the Reset button for more than five seconds and then release it.
3The Ready LED is off when you press the button. Then the Ready and Status LEDs flash once.
4When the Ready LED turns steady on, the defaults have been restored and the NPS-520 is ready.
18 |
NPS-520 User’s Guide
Chapter 1 Introducing the NPS-520
1.6 LEDs
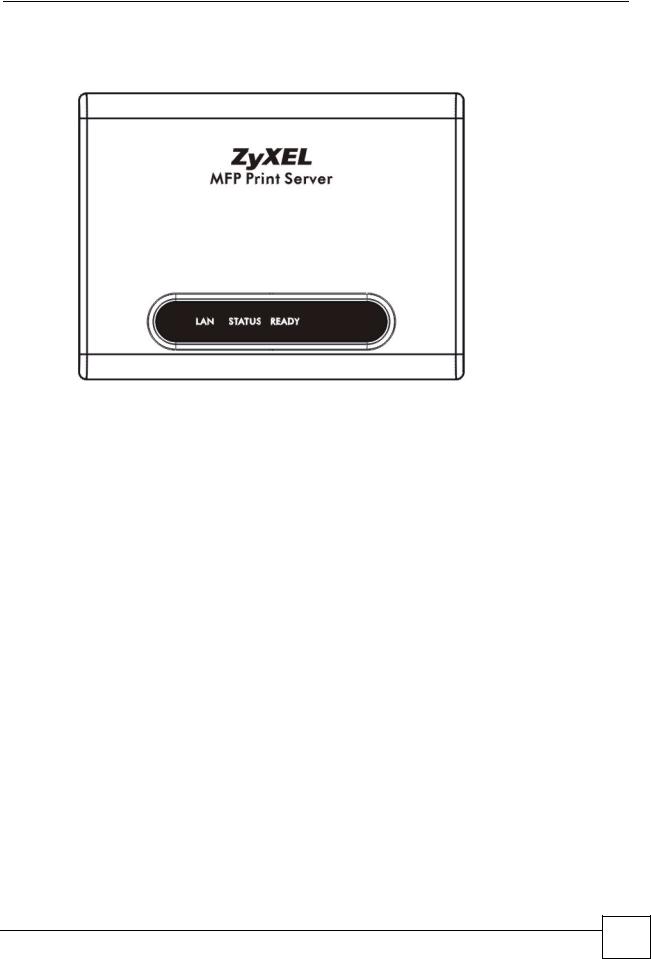
Figure 2 LEDs
The following table describes the lights (LEDs) on the NPS-520.
Table 1 |
LEDs |
|
|
|
LED |
|
COLOR |
STATUS |
DESCRIPTION |
LAN |
|
Blue |
On |
The NPS-520 has a successful connection on this port. |
|
|
|
|
|
|
|
|
Blinking |
The NPS-520 is sending/receiving data on this port. |
|
|
|
|
|
|
|
|
Off |
The NPS-520 does not have a connection on this port. |
|
|
|
|
|
STATUS |
|
Blue |
On |
Firmware upload is in progress or the printer has a paper |
|
|
|
|
jam or is out of paper. |
|
|
|
|
|
|
|
|
Blinking |
The NPS-520 is connected to a printer or sending a print |
|
|
|
|
job to a printer. |
|
|
|
|
|
|
|
|
Off |
The NPS-520 is not connected to a printer or receives no |
|
|
|
|
print jobs. |
|
|
|
|
|
READY |
|
Blue |
On |
The system is ready. |
|
|
|
|
|
|
|
|
Off |
The NPS-520 is not receiving power or failed to restart or |
|
|
|
|
firmware upload was not successful. |
|
|
|
|
|
NPS-520 User’s Guide
19 |

Chapter 1 Introducing the NPS-520
20 |
NPS-520 User’s Guide
2
ZyXEL Utility
This chapter shows you how to use the ZyXEL utility to configure your NPS-520.
2.1 Accessing the ZyXEL Utility
To open the ZyXEL utility, double-click the ZyXEL utility icon ( ) in the system tray or click Start > (All) Programs > ZyXEL NPS-520 Utility > NPS-520 Utility.
" |
|
|
Click the help icon ( |
) (located in the top right corner) to display the online |
|
|
help window. |
|
|
|
|
2.2 ZyXEL Utility Icon
After you install and start the ZyXEL utility, an icon for the ZyXEL utility appears in the system tray.
Figure 3 ZyXEL Utility: System Tray Icon
The ZyXEL utility system tray icon indicates the status of the NPS-520. Refer to the following table for details.
Table 2 ZyXEL Utility: System Tray Icon
ICON DESCRIPTION
The NPS-520 is not powered on or not connected to your computer or network.
The NPS-520 is not connected to a printer or other client computer is using the printer connected to the NPS-520.
The NPS-520 is powered on and connected to a printer.
NPS-520 User’s Guide
21 |

Chapter 2 ZyXEL Utility
2.3 ZyXEL Utility Screen Summary
This section describes the ZyXEL utility screens.
Figure 4 ZyXEL Utility Menu Summary
The following table describes the menus.
Table 3 ZyXEL Utility Menu Summary
TAB |
DESCRIPTION |
Status |
Use this screen to |
|
• scan for a print server in your network. |
|
• associate with a printer that is connected to the NPS-520. |
|
• view your current connection status. |
|
|
General Setting |
Use this screen to configure if you want to open the utility when you start the |
|
computer and general settings. |
|
|
TCP/IP Setting |
Use this screen to either manually configure the NPS-520’s IP address and |
|
subnet mask and a gateway IP address or set the NPS-520 to get the TCP/IP |
|
information from a DHCP server. |
|
|
System Setting |
Use this screen to configure the NPS-520’s description and password, upload |
|
firmware, reset the factory defaults, restart the NPS-520 and drop the connection |
|
between the printer and the associated computer. |
|
|
2.4 The Status Screen
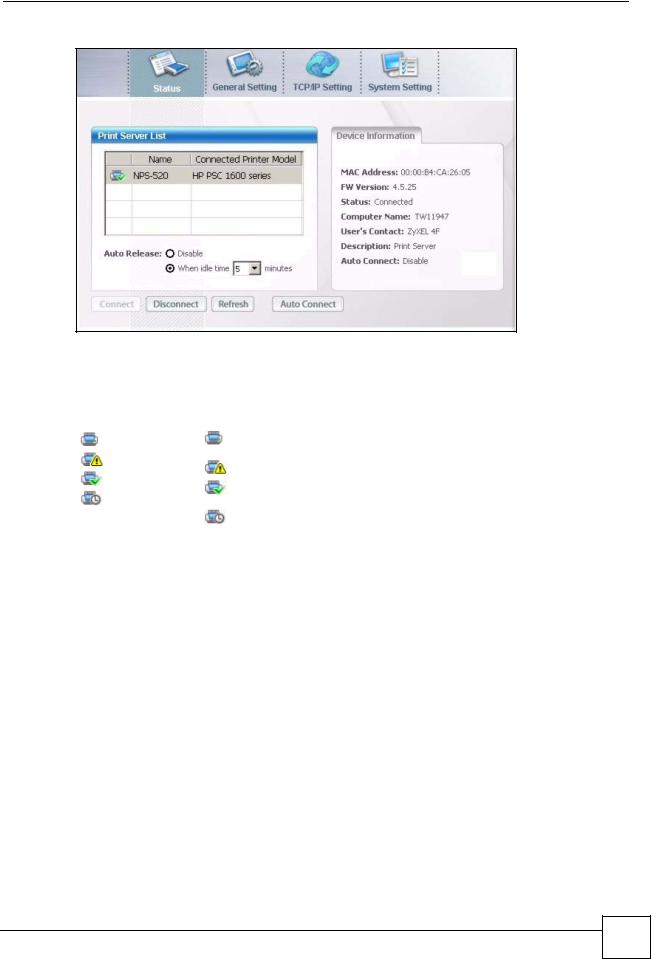
When the ZyXEL utility starts, the Status screen displays, showing the current configuration and connection status of the NPS-520.
22 |
NPS-520 User’s Guide
Chapter 2 ZyXEL Utility
Figure 5 ZyXEL Utility: Status
The following table describes the labels in this screen.
Table 4 ZyXEL Utility: Status
LABEL |
DESCRIPTION |
|
Print Server List |
The table below shows you the available print server(s) in your network. |
|
|
|
|
, |
denotes that a printer is connected to the print server, but your computer |
|
, |
is not associated with the printer. |
|
denotes that there is no printer connected to the print server. |
||
or |
||
denotes that a printer is connected to the print server, and your computer |
||
|
||
|
is also associated with the printer. |
|
|
denotes that the print server is busy and the printer connected is not |
|
|
available. |
|
|
|
|
Name |
This field displays the NPS-520’s name that you can configure during installing |
|
|
the utility or in the System Setting screen. |
|
|
|
|
Connected Printer |
This field displays the model name of the printer that is currently connected to |
|
Model |
the NPS-520. This field is blank if there is no printer connected to the NPS-520. |
|
|
|
NPS-520 User’s Guide
23 |

Chapter 2 ZyXEL Utility
Table 4 ZyXEL Utility: Status (continued)
LABEL |
DESCRIPTION |
Auto Release |
This allows you to configure whether your computer will be disconnected from |
|
the printer when there is no request sent to the printer. |
|
Note: The Auto Release and Auto Connect features are not |
|
configurable if your computer operating system version is |
|
older then Windows 2000 SP4. |
|
Select Disable to have your computer always connect to the printer even when |
|
there is no traffic between the computer and the printer. |
|
Note: If you disable Auto Release, only your computer can use |
|
the printer. Click Disconnect to manually drop the |
|
connection between your computer and the printer. |
|
Select When idle time and select a period of idle time (in minutes) that elapses |
|
before the NPS-520 drop the connection between the computer and the printer. |
|
Note: It’s strongly recommended that you enable Auto Release |
|
and/or Auto Connect on all Windows computers. This |
|
allows computers in the network take turns to use the |
|
printer. |
|
|
Device Information |
Click an entry in the Print Server List table to display the information of the |
|
selected print server. |
|
|
MAC Address |
This is the MAC address of the print server. |
|
|
FW Version |
This is the version of the current firmware on the print server. |
|
|
Status |
This shows whether your computer is associated with the printer (that is |
|
connected to the selected print server) (Connected) or not (Disconnected). |
|
|
Computer Name |
This is your computer’s “Computer Name”. |
|
|
User’s Contact |
This is your computer’s contact information that you configured in the General |
|
Setting screen. |
|
|
Description |
This is the NPS-520’s descriptions that you can configure during installing the |
|
utility or in the System Setting screen. |
|
|
Auto Connect |
This shows whether the Auto Connect feature is active (Enable) or not |
|
(Disable). |
|
|
Connect |
Select an entry in the Print Server List table and use this button to associate |
|
your computer with the printer which is connected to the print server. If a |
|
computer is connected to the printer already, this button is not applicable. |
|
|
Disconnect |
Select an entry in the Print Server List table and use this button to drop the |
|
connection between your computer and the printer which is connected to the |
|
print server. |
|
If another computer in your network is connected to the printer, this button is |
|
not applicable. Use the Force Release button in the System Setting screen to |
|
disconnect the connection between the printer and another computer. |
24 |
NPS-520 User’s Guide
|
|
Chapter 2 ZyXEL Utility |
|
Table 4 ZyXEL Utility: Status (continued) |
|
|
LABEL |
DESCRIPTION |
|
Refresh |
Use this button to scan for the available print server(s) in your network again |
|
|
and update the table above. |
|
|
|
|
Auto Connect |
Use this button to have the NPS-520 automatically associate your computer |
|
|
with the specified printer when you send out a job and the printer is available. |
|
|
When you click this button, a screen displays. Select a printer which is added to |
|
|
your computer and connected to the NPS-520, and click OK. |
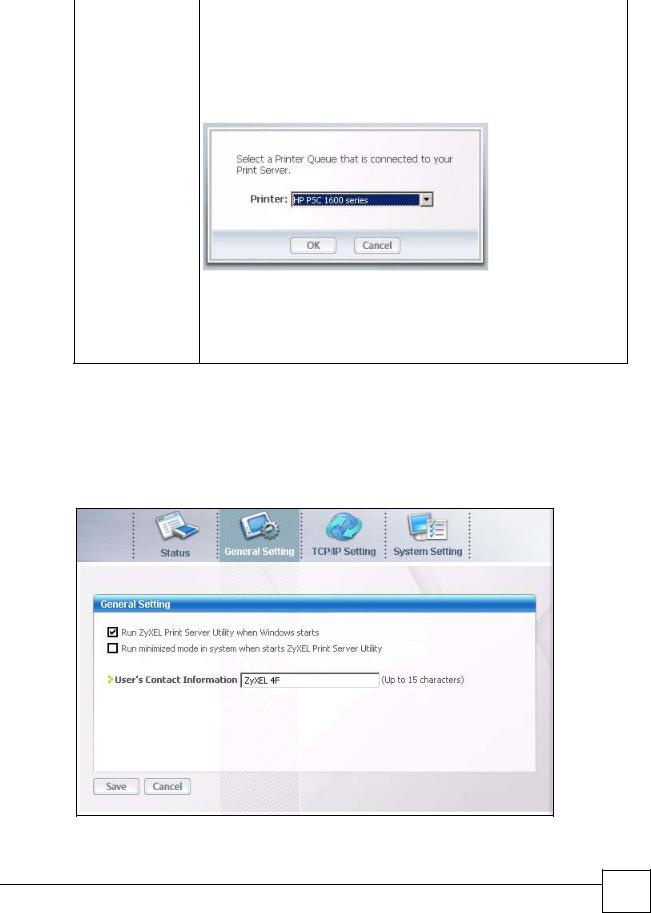
Note: When your print job is done and there is no other request (from your computer) sent to the printer in 20 seconds, the NPS-520 drops the connection between your computer and the printer.
2.5 The General Setting Screen
Use this screen to specify whether you want to open the utility when you start the computer or minimize the utility screen.
Figure 6 ZyXEL Utility: General Setting
NPS-520 User’s Guide
25 |
Chapter 2 ZyXEL Utility
The following table describes the labels in this screen.
Table 5 ZyXEL Utility: General Setting
LABEL |
DESCRIPTION |
General Setting |
|
|
|
Run ZyXEL Print |
Select this check box to have the ZyXEL utility open automatically each time |
Server Utility when |
you start Windows. |
Windows starts |
|
|
|
Run minimized mode |
Select this check box to minimize the ZyXEL utility screen each time you start |
in system when starts |
the utility. To restore it, double-click the utility icon in the system tray. |
ZyXEL Print Server |
|
Utility |
|
|
|
User’s Contact |
Enter your contact information (of up to 15 printable characters long), such as |
Information |
your location. |
|
|
Save |
Click this button to save your changes to the NPS-520. |
|
|
Cancel |
Click this button to return to the Status screen without saving changes. |
|
|
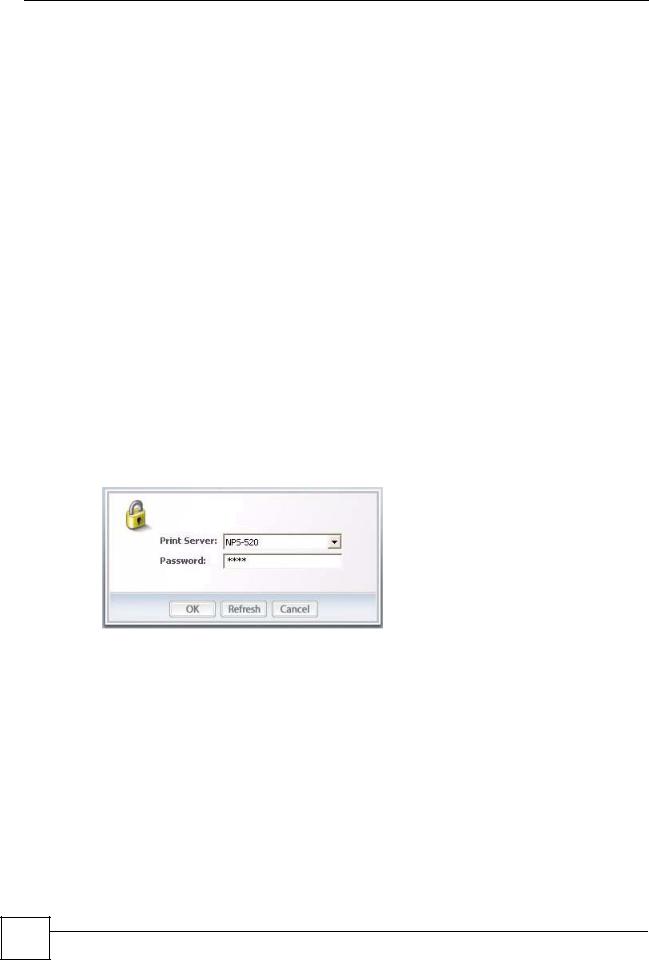
2.6 The TCP/IP Setting Screen
Use this screen to configure the NPS-520’s TCP/IP settings, such as IP address, subnet mask and gateway.
When you click the TCP/IP Setting tab, the following login screen displays. Select the name of your NPS-520 and enter the password (1234 by default).
Figure 7 ZyXEL Utility: Login
After you click OK, the TCP/IP Setting screen appears.
26 |
NPS-520 User’s Guide

Chapter 2 ZyXEL Utility
Figure 8 ZyXEL Utility: TCP/IP Setting
The following table describes the labels in this screen.
Table 6 ZyXEL Utility: TCP/IP Setting
LABEL |
DESCRIPTION |
Print Server |
This is the NPS-520’s descriptive name you configure in the System Setting |
|
screen. |
|
|
Static IP |
Select this option if there is not a DHCP server in the network to which the |
|
NPS-520 is connected and configure the TCP/IP information in the fields |
|
below. |
|
|
IP Address |
Enter the IP address of the NPS-520. The IP address should be in the same |
|
subnet of the network to which the NPS-520 is connected. |
|
Note: The NPS-520‘s default IP address is 192.168.1.6. |
|
|
Subnet Mask |
Enter the subnet mask of the NPS-520. |
|
|
Gateway |
Enter the IP address of the default gateway in the network to which the NPS- |
|
520 is connected. |
|
|
Dynamic IP |
Select this option to have the DHCP server (in the network to which the NPS- |
|
520 is connected) assign the NPS-520 an IP address automatically. |
|
The fields below are grayed out when you select this option. |
|
Note: We recommend you give the NPS-520 a static IP address |
|
or configure your DHCP server to always give it the same |
|
IP address (static DHCP). If the NPS-520's IP address |
|
changes, you need to uninstall and reinstall the ZyXEL |
|
utility on each computer that uses it. |
NPS-520 User’s Guide
27 |
Chapter 2 ZyXEL Utility
Table 6 ZyXEL Utility: TCP/IP Setting (continued)
LABEL |
DESCRIPTION |
Save |
Click this button to save your changes to the NPS-520. |
|
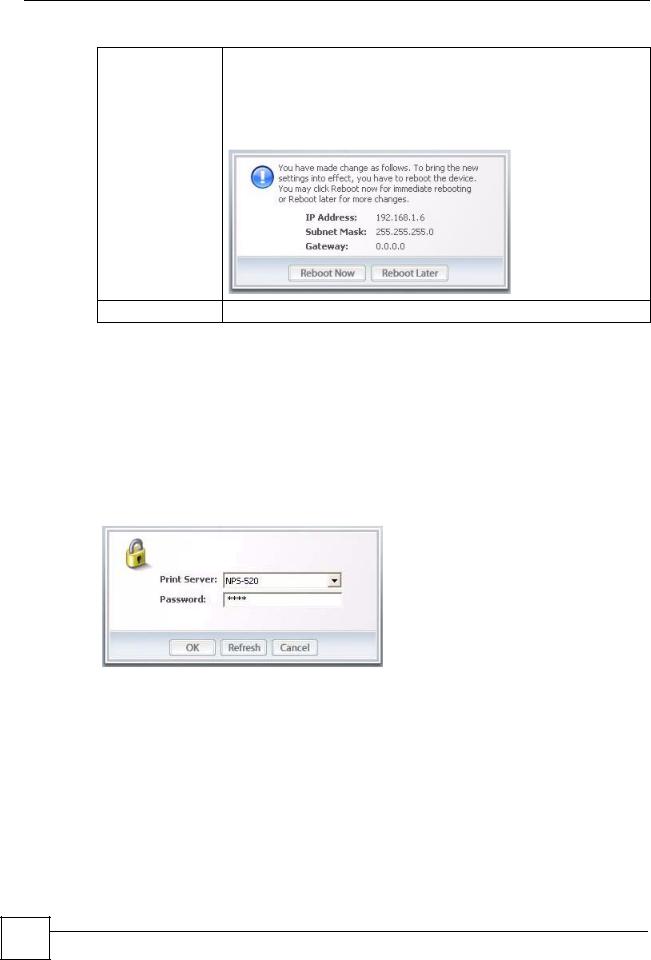
After you click the Save button, the following screen displays showing you the |
|
configured TCP/IP information. Click Reboot Now to restart the NPS-520 and |
|
have your new settings take effect immediately. Otherwise, click Reboot Later |
|
to restart the NPS-520 after you finish all changes. |
Cancel |
Click this button to return to the Status screen without saving changes. |
2.7 The System Setting Screen
This screen allows you to configure the NPS-520’s description and password, upload firmware, reset the factory defaults, restart the NPS-520 and drop the connection between the printer and the associated computer.
When you click the System Setting tab, the following login screen displays. Select the name of your NPS-520 and enter the password (1234 by default).
Figure 9 ZyXEL Utility: Login
After you click OK, the System Setting screen appears.
28 |
NPS-520 User’s Guide
Chapter 2 ZyXEL Utility
Figure 10 ZyXEL Utility: System Setting
The following table describes the labels in this screen.
Table 7 ZyXEL Utility: System Setting
LABEL |
DESCRIPTION |
System Setting |
|
|
|
Print Server Name |
Enter a descriptive name to replace the NPS-520’s unique generated device |
|
name (the last three characters of the NPS-520’s MAC address with the prefix |
|
“ZyXEL”). You can enter up to 15 printable characters. Spaces are allowed. |
|
|
Change Password |
Type a new administrator password for configuring the TCP/IP and system |
|
settings. You can enter up to seven printable characters. Spaces are allowed. |
|
Please note as you type a password, the screen displays a * for each character |
|
you type. |
|
|
Retype Password |
Type the new password for confirmation. |
|
|
Print Server |
Type additional descriptive text for the NPS-520 if you want. You can enter up |
Description |
to 15 ASCII characters. Spaces are allowed. |
|
|
Save |
Click this button to save your changes to the NPS-520. |
|
|
Cancel |
Click this button to return to the Status screen without saving changes. |
|
|
Firmware Upgrade |
Type in the location of the .bin file you want to upload in this field or click |
|
Browse to find it. |
|
|
Browse |
Click Browse to find the .bin file you want to upload. Remember that you must |
|
decompress compressed (.zip) files before you can upload them. |
|
Find firmware at www.zyxel.com in a file that (usually) uses the system model |
|
name with a .bin extension. |
|
|
NPS-520 User’s Guide
29 |
Chapter 2 ZyXEL Utility
Table 7 ZyXEL Utility: System Setting (continued)
LABEL |
DESCRIPTION |
Upgrade |
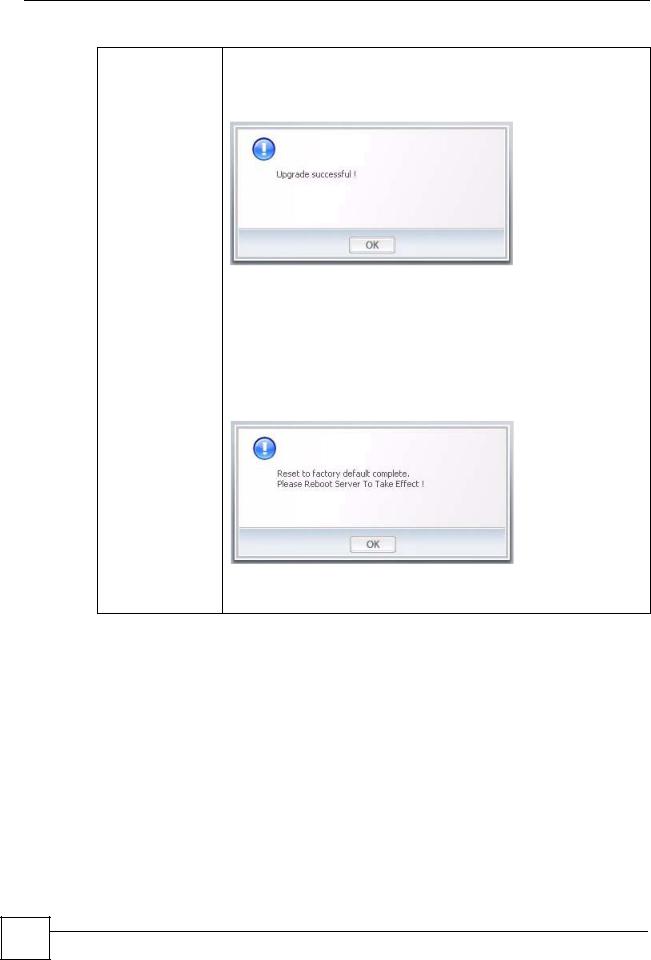
Click Upgrade to begin the upload process. |
|
The following screen displays when the upload is successful. Click OK to go |
|
back to the System Setting screen. |
|
Note: Only upload firmware for your specific model. |
|
Note: Do not turn off the NPS-520 while firmware upload is in |
|
process. |
|
|
Reset to factory |
Click OK to clear all user-entered configuration information and return the NPS- |
default |
520 to its factory defaults. |
|
When the following displays, click OK to go back to the System Setting |
|
screen. |
|
You can also use the hardware Reset button to reset the factory defaults of |
|
your NPS-520. See Section 1.5 on page 18 for more information on the Reset |
|
button. |
30 |
NPS-520 User’s Guide
 Loading...