

NSA-220 Plus
QUICK START GUIDE
Network Storage Appliance
Firmware v1.00
Edition 2, 12/2008
Color: Black / White
DEFAULT LOGIN DETAILS
Web Address: nsa220plus
Username: admin
Password: 1234
CONTENTS
ENGLISH 3
DEUTSCH 27
ESPAÑOL 51
FRANÇAIS 75
ITALIANO 99
日本語
NEDERLANDS 147
SVENSKA 169
繁體中文
www.zyxel.com
123
193
Copyright 2008 ZyXEL Communications Corporation
C

2
ENGLISH
ENGLISH
Introduction
The NSA lets you share files and back up data on your home network.
You can also play video, music, and show photo files stored on the NSA
using a media client such as the DMA-1000.
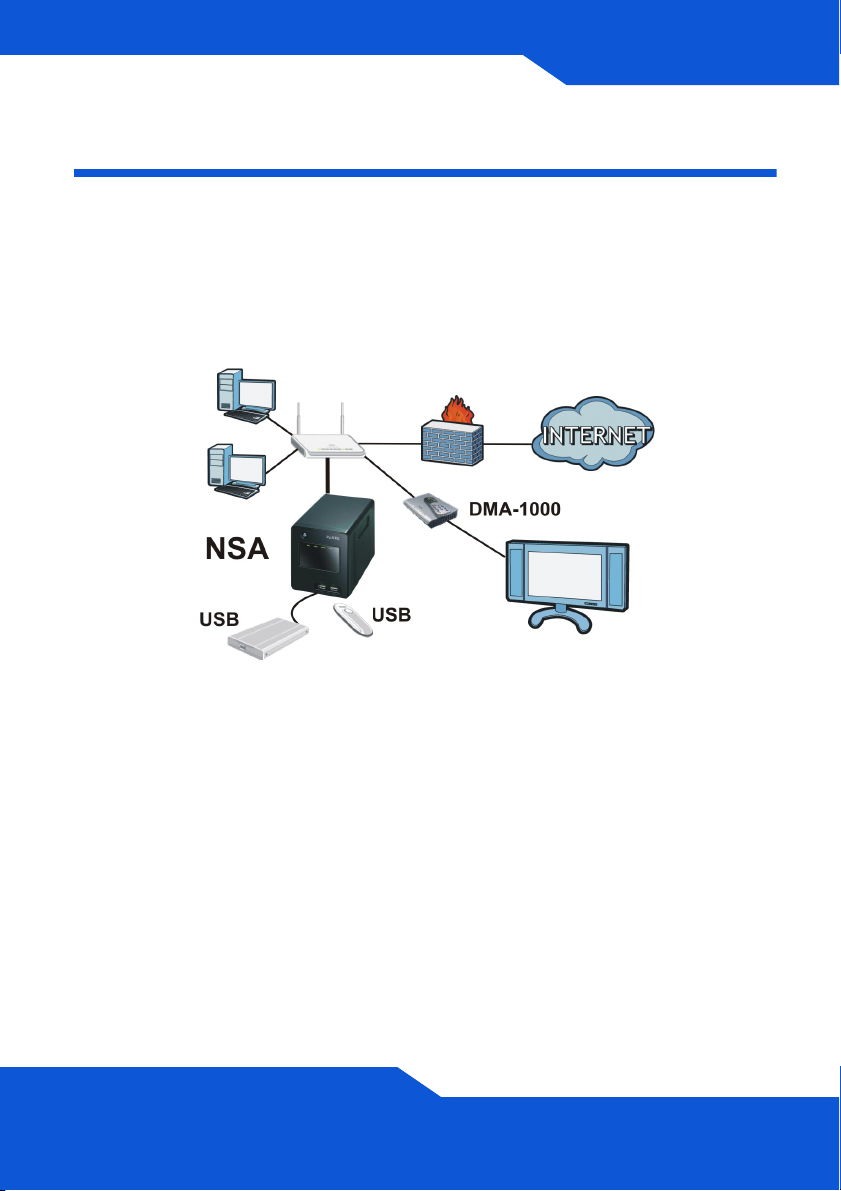
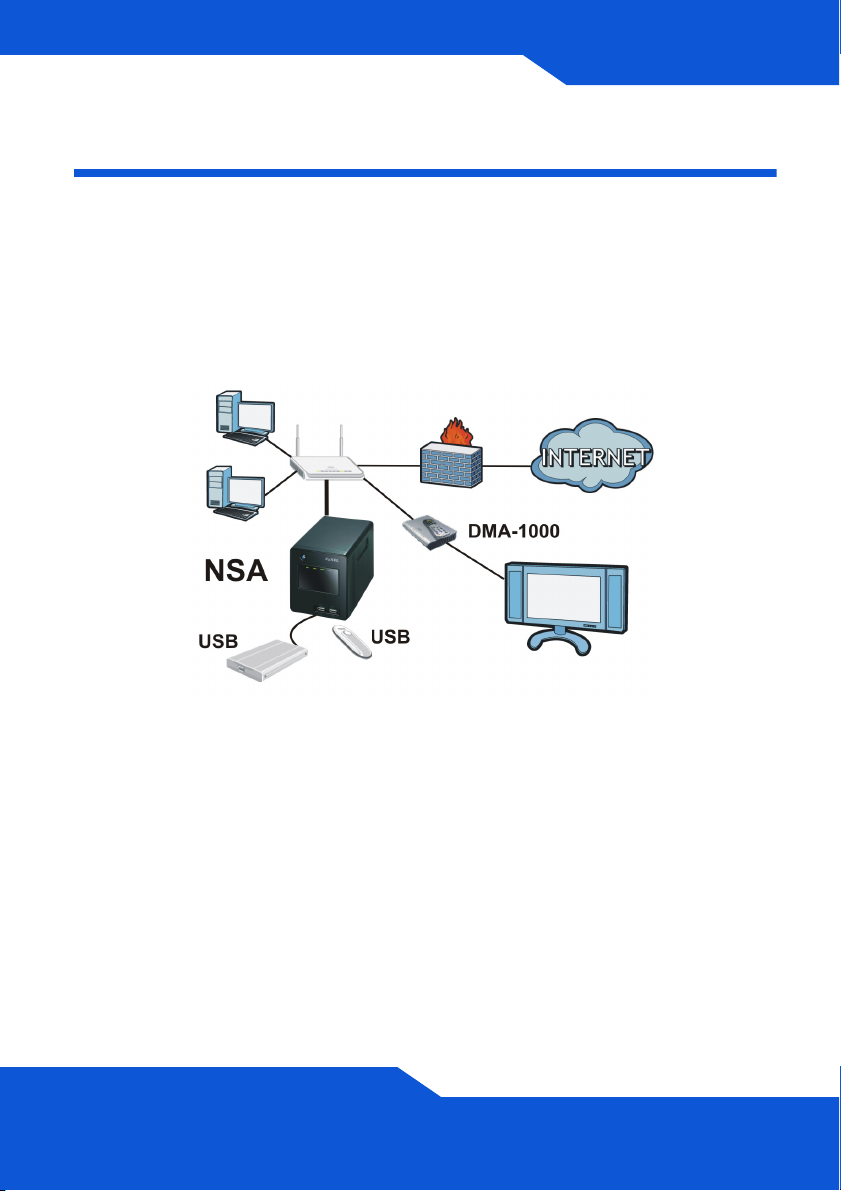
How It Works
Above is the NSA in a home network. Users back up and share data on
the NSA. The DMA-1000 plays the NSA’s media files on the TV. A USB
hard drive provides extra storage space and files are copied directly from
the USB memory stick to the NSA.
Place the NSA behind a firewall and/or IDP (Intrusion Detection and
Prevention) device to protect it from attacks from the Internet.
3

Getting Started
• Install Hard Drives, 6
• Connect the NSA, 9
• Access the NSA, 11
• NSA Login, 14
• Create a Volume, 15
• Map the NSA to Your Computer Network Drive, 18
• Backing up Files Using Memeo Autobackup, 20
See the User’s Guide on the included CD for details on configuring all of
the NSA’s features.
4

ENGLISH
Before You Begin
You need the following before you start:
• NSA
• Included CD containing the NSA Discovery Utility, Memeo
Autobackup program, Media Client software, and User’s Guide
• Power cord and power supply (external)
• Included Ethernet cable
• One or two SATA I or SATA II (3.0 Gbit/s) (Serial Advanced
Technology Attachment) compatible hard disk(s) with 15-pin SATA
power connectors
• Philips screwdriver to install hard disks in the disk trays
• USB cable (optional: you only need this if you want to expand
storage capacity by connecting compatible USB (version 2) drives).
It is recommended that the USB device use it’s own external power
adaptor if it has one.
• Computer with Network Interface Card (NIC) and TCP/IP installed
• Network device such as a switch, router, or hub
5
Install Hard Drives
Once you intall a hard drive on the NSA and create a volume, all existing
data on the disk will be erased. If you want to install two hard drives and
configure them as RAID volumes (see page 15), it is recommended to
use the same disk size and model for best performance.
Hard drives are NOT hot swappable. The NSA must
be turned off before you remove or install hard
drive(s).
Creating a volume formats the hard drives. All data
will be lost. Back up any files on the disk to another
location before you install the disk in the NSA.
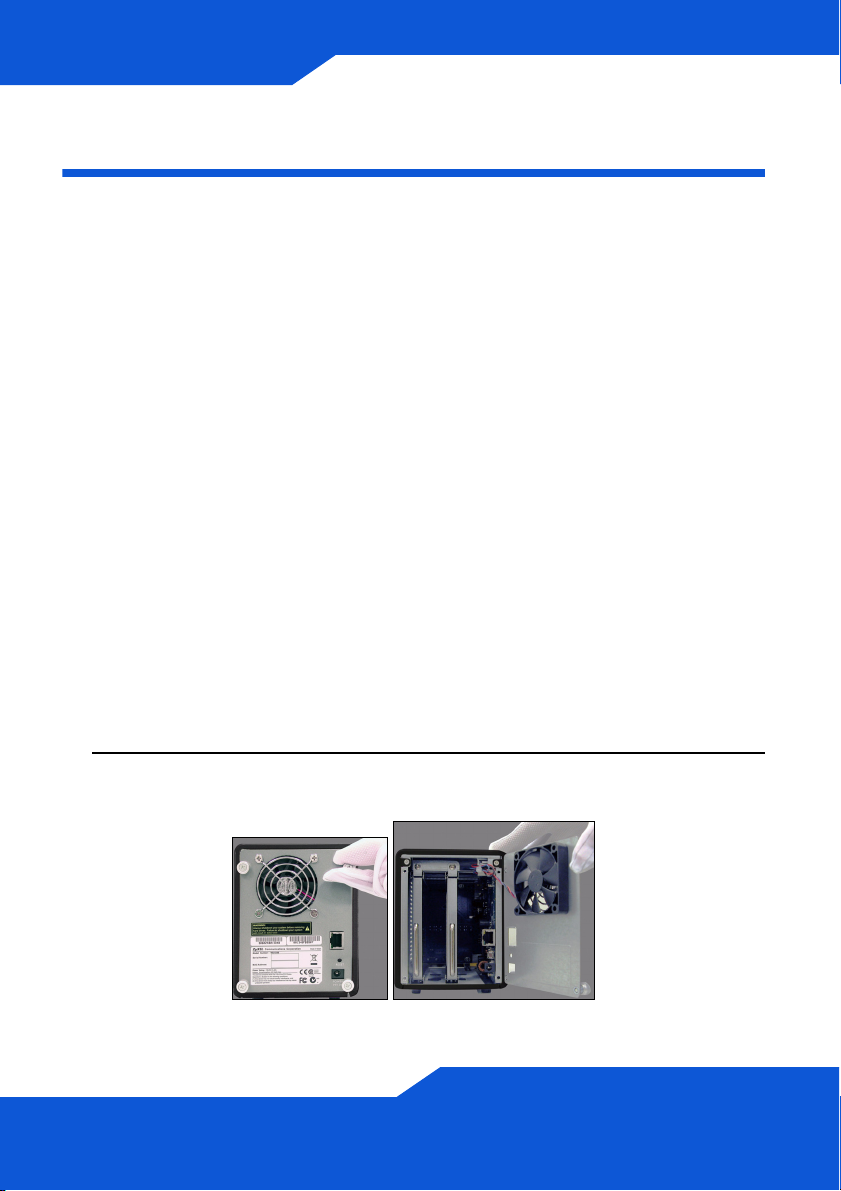
1. Make sure the power and Ethernet cords are disconnected from the
NSA.
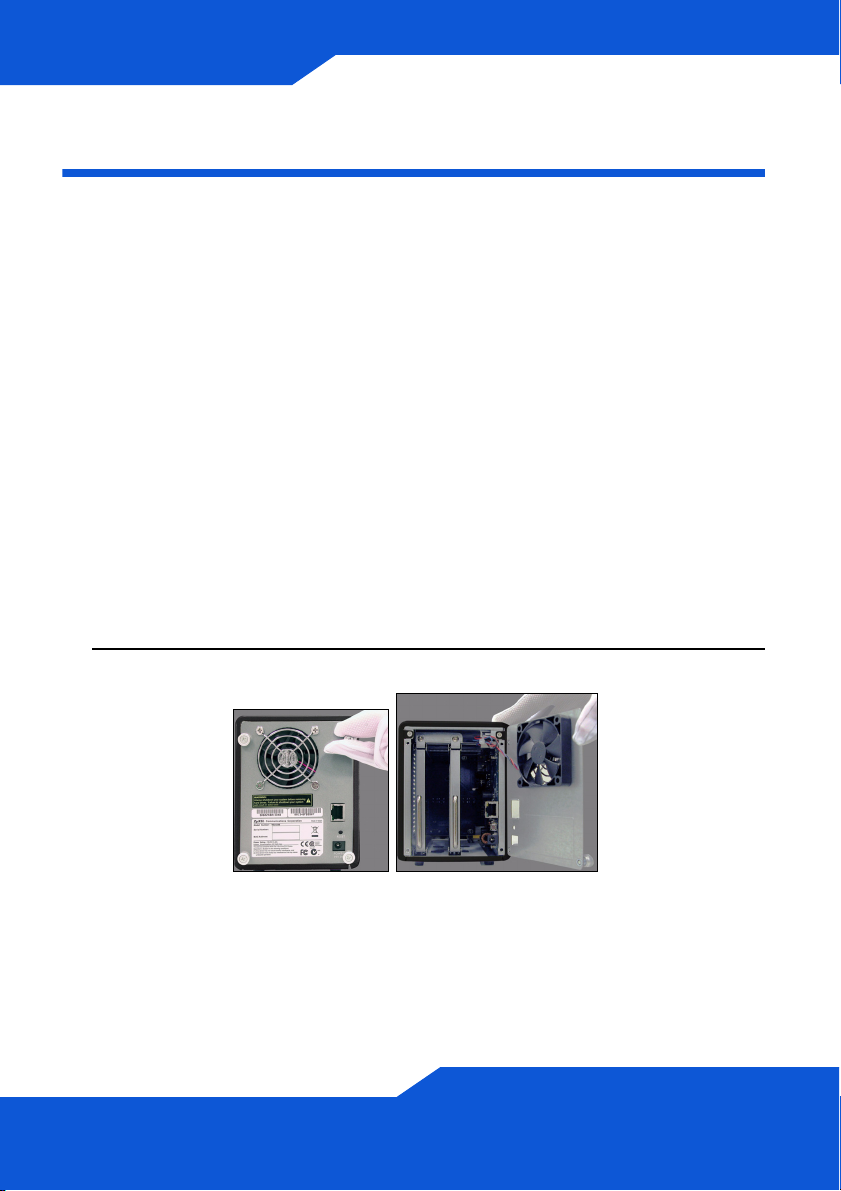
2. Loosen the thumbscrews on the rear panel and open it.
6
ENGLISH
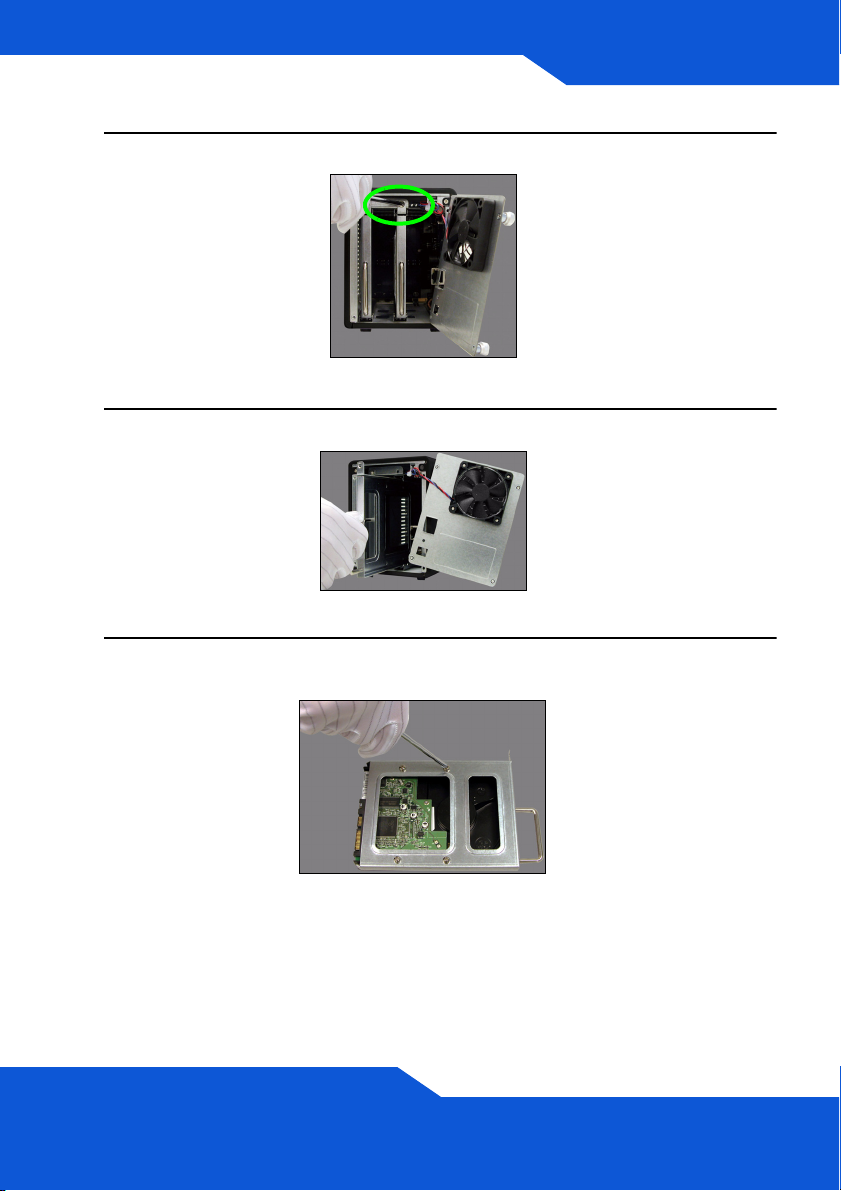
3. Use a screwdriver to remove the retaining screw from a disk tray.
4. Slide the disk tray out.
5. Place the disk on a flat surface with the screw holes facing up. Place
the disk tray on top of it and secure it with the screws as shown.
7

6. Slide the tray back into the disk bay. Make sure the screw hole is at
the top. Push the tray in all the way so the screw hole at the top is
flush with the internal frame.
7. Put the disk tray retaining screw back in.
8. Repeat steps 3 to 7 for a second hard drive if you have one.
9. Put the rear panel back on and tighten the thumbscrews.
8
ENGLISH
Connect the NSA
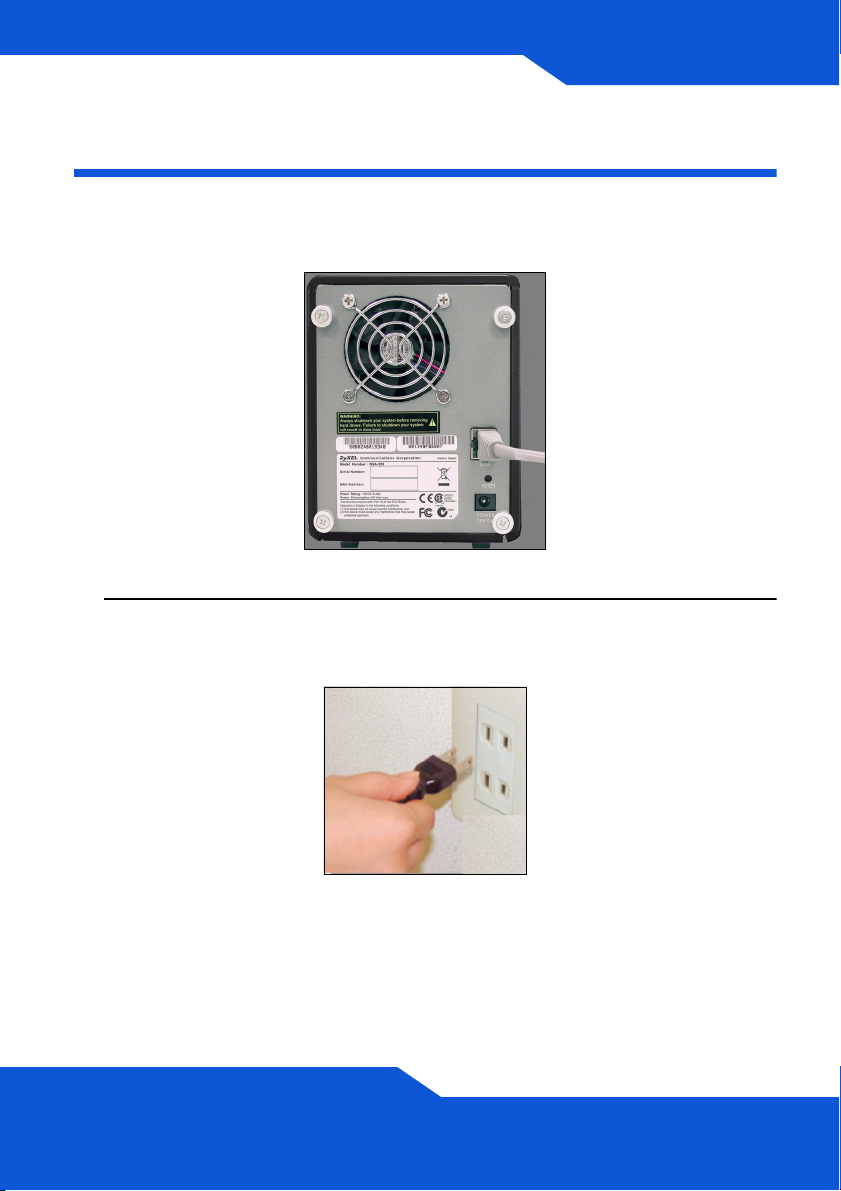
1. Use the included Ethernet cable to connect the LAN port on the rear
of the NSA to a computer, switch, or router on your network.
2. Connect one end of the power cord to the POWER socket on the rear
of the NSA and the other end to the external power supply. Connect
the external power supply to a power outlet.
Use ONLY the included power supply.
9
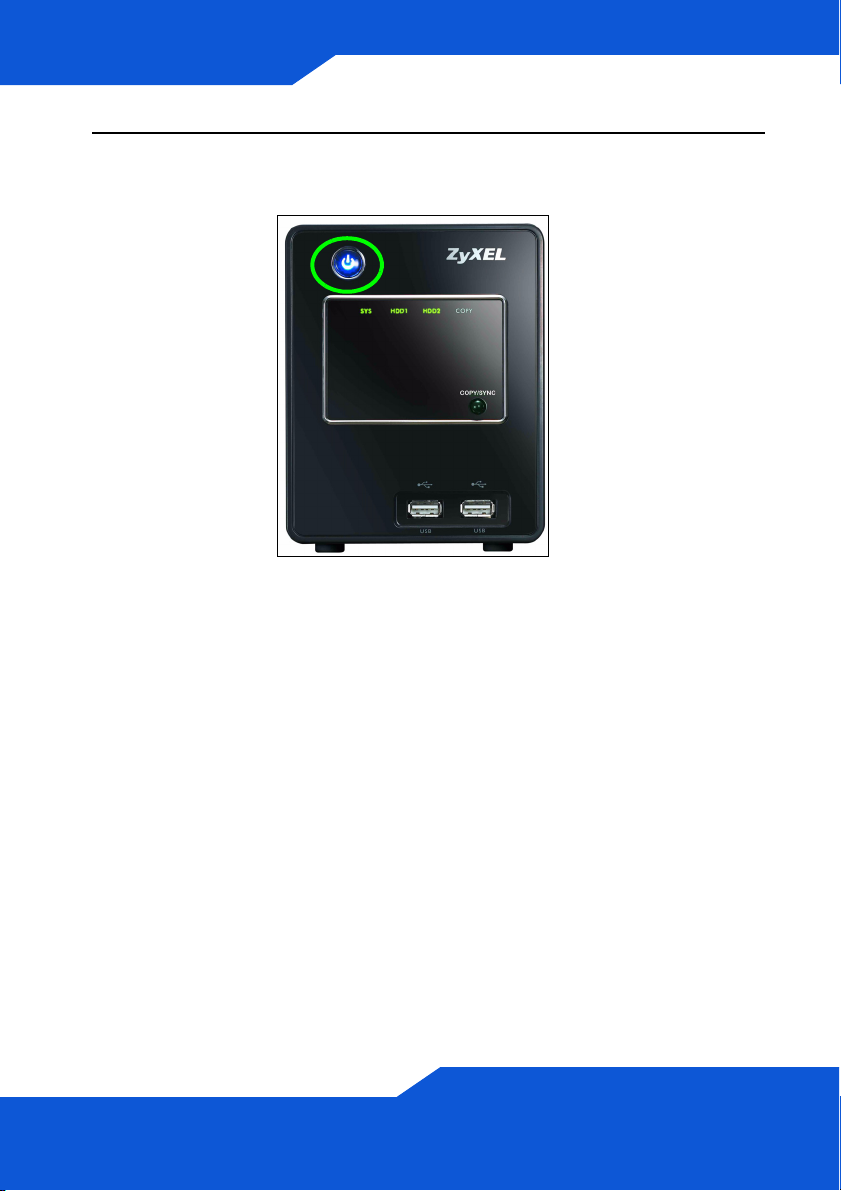
3. Press the power button on the front of the NSA to turn it on. Look at
the front panel lights.
If no lights turn on, make sure the power cord is not loose
and that the power source is turned on.
• The power button light turns steady blue.
• The SYS light turns steady green after a successful startup (it takes
about 50 seconds).
• The HDD lights come on if the NSA detects hard drives in the disk
bays.
• The rear panel LAN port has a light that turns on if the Ethernet port
is properly connected to your network. It blinks while sending or
receiving traffic.
To turn off the NSA, press the power button in and hold it until you
hear a beep. Then release the button.
10
ENGLISH
Access the NSA
For a Windows computer, use the Discovery Utility (see page 11).
For another type of computer (like Mac or Linux), use Direct Access (see
page 13).
Using the Discovery Utility to Access the NSA
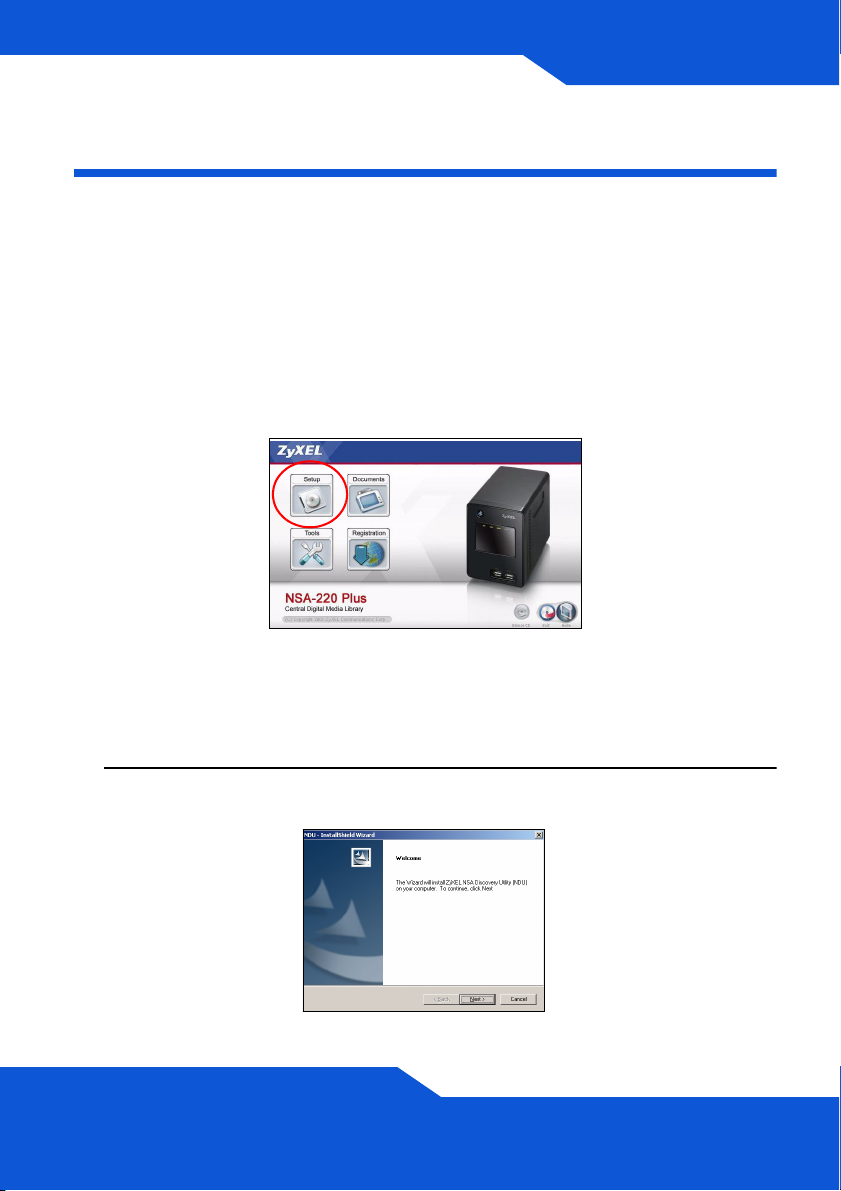
1. Insert the included CD into your CD-ROM drive. Click Setup in the
screen that displays. Then click the NSA Discovery Utility link.
If this screen does not display, use Windows Explorer (My
Computer) to go to the CD-ROM (commonly drive D).
Double-click setup.exe.
2. The installation wizard begins. Follow the installer instructions. Click
Finish to complete the installation.
11
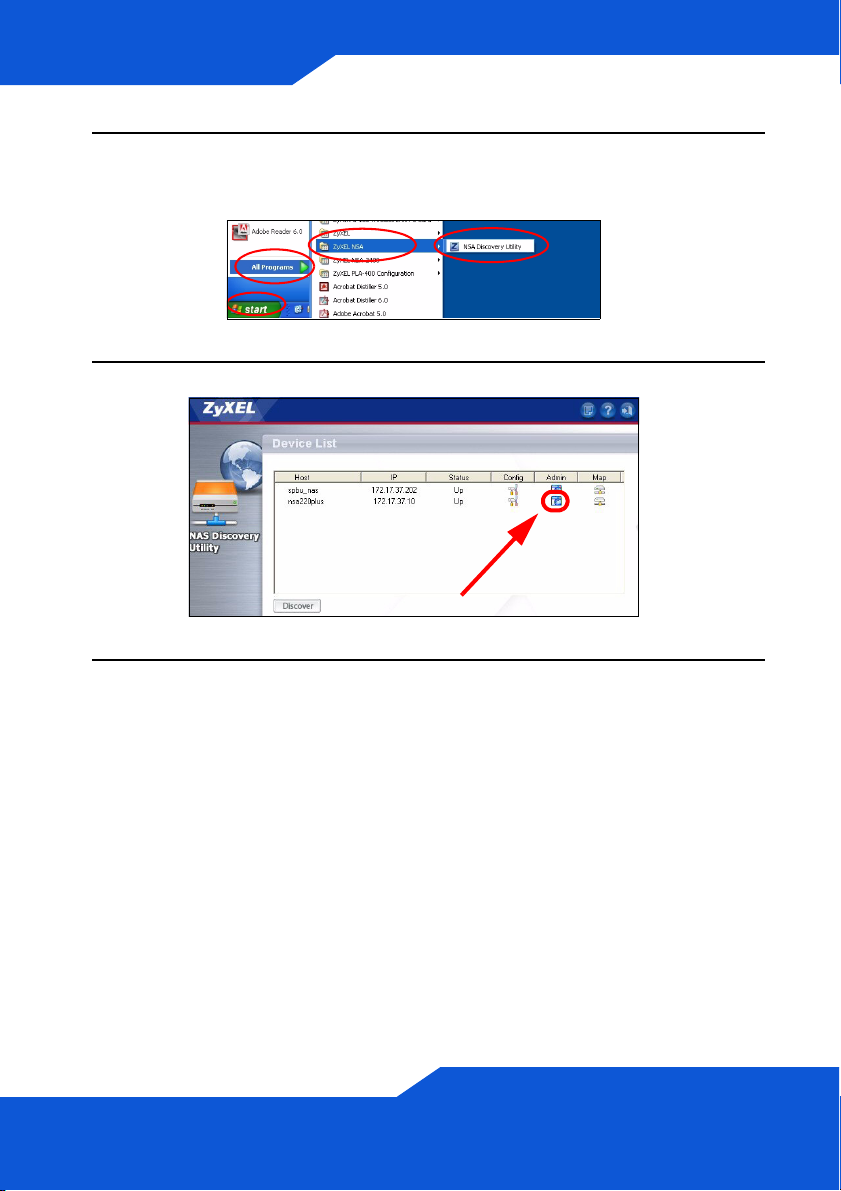
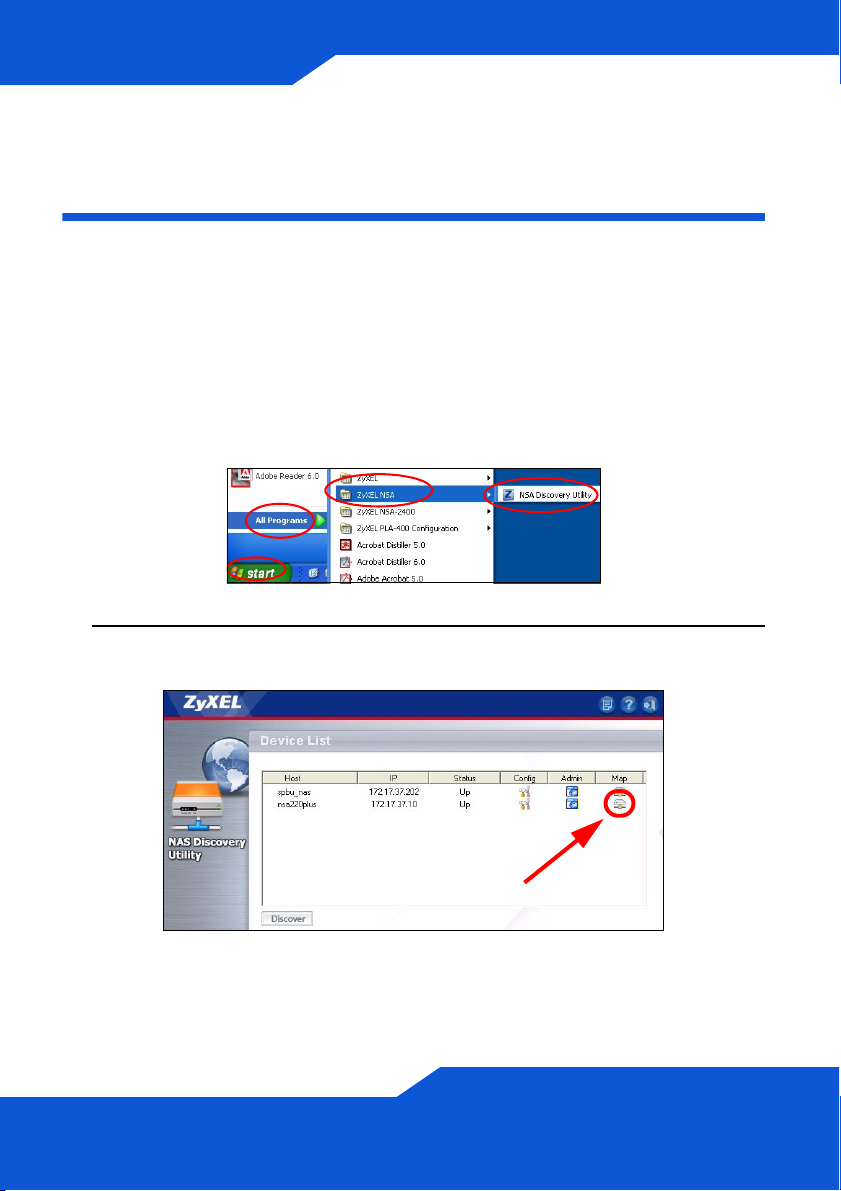
3. In Windows, click Start > All Programs > ZyXEL NSA > NSA
Discovery Utility to run the discovery utility. If your computer has
more than one network card, then you will be prompted to select one.
4. The utility lists the NSAs in your network.
5. Click the Admin icon to see the web configurator login screen (see
page 14).
• If you need to change the NSA IP address, click the icon under
Config.
• To map the NSA to a Windows network drive, click the icon under
Map (see page 18).
• To refresh the screen, click Discover.
12
ENGLISH
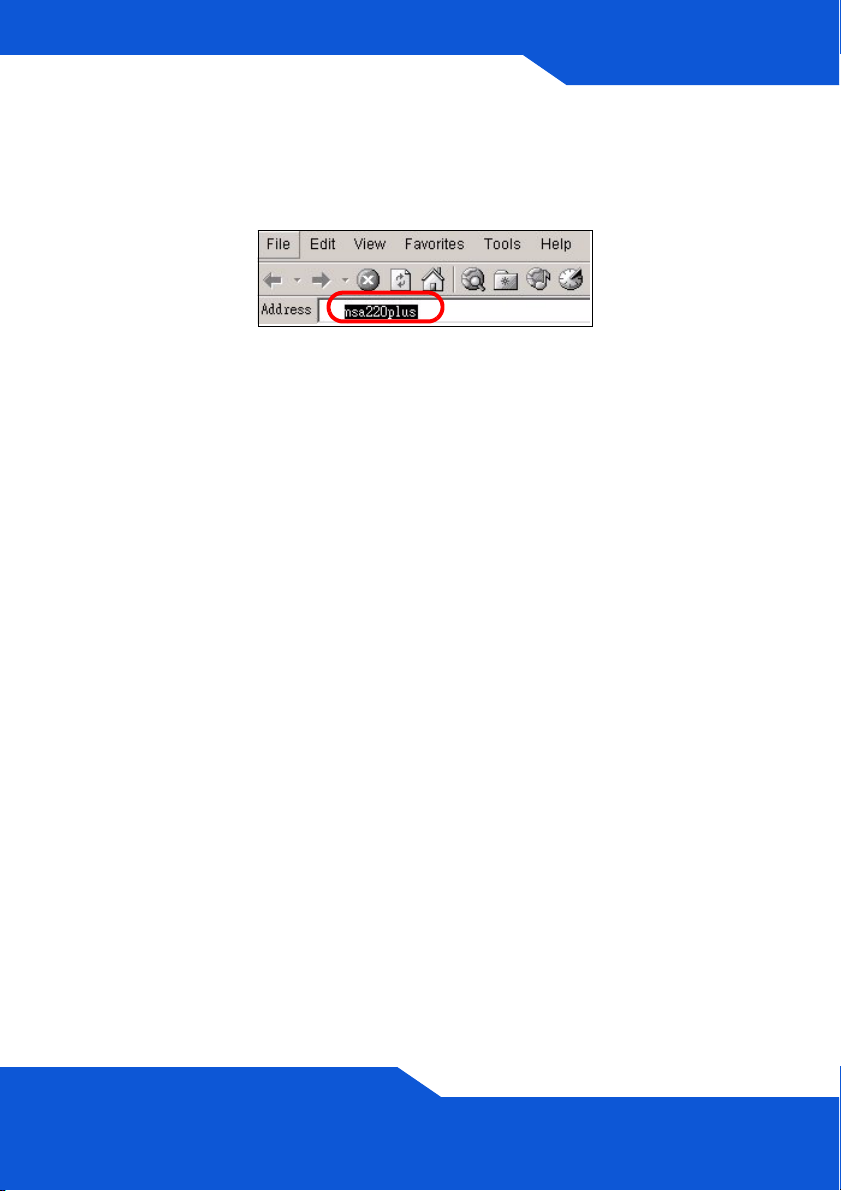
Direct Access
Open Internet Explorer (or another web browser like Firefox). Type
‘nsa220plus’ as the website address and press [Enter] or click Go.
13
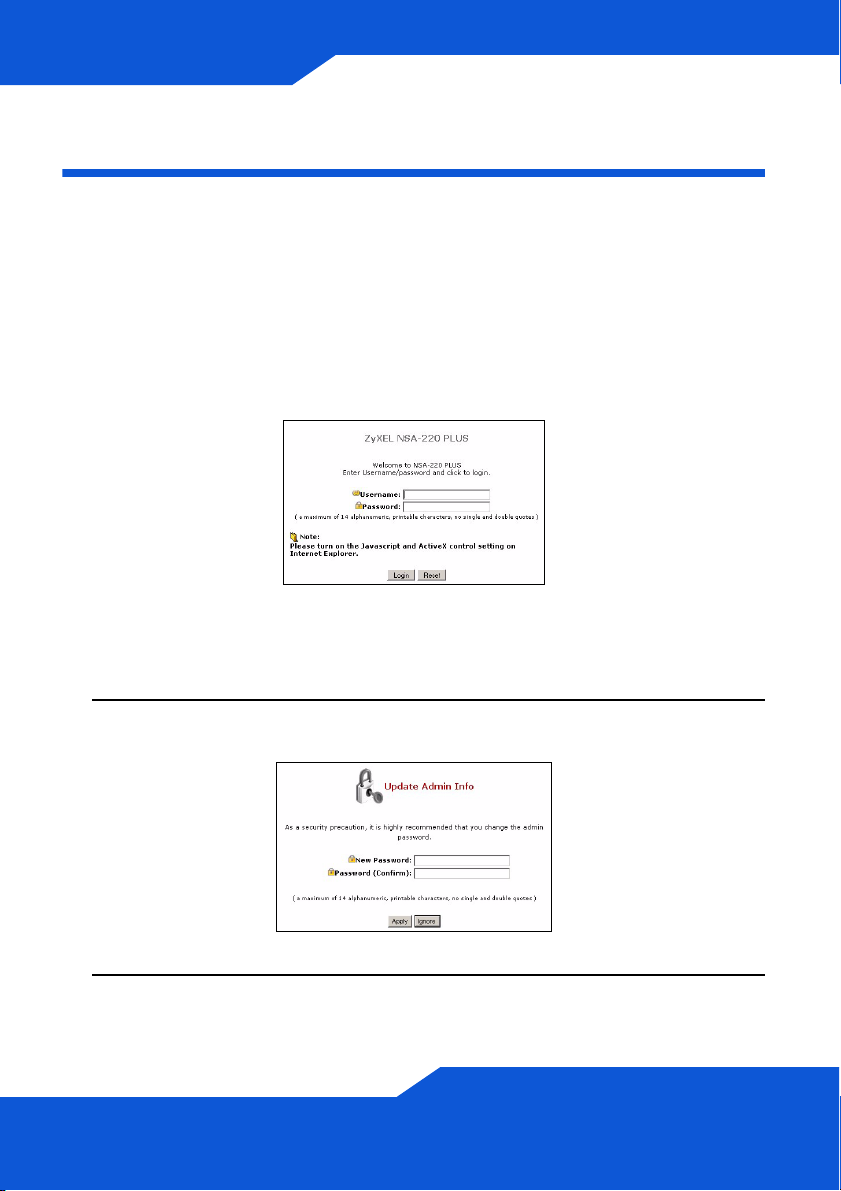
NSA Login
This section shows you how to log into the NSA and change the
administrator’s password.
If you cannot get to the login screen, see the troubleshooting
section at the end of this guide.
1. Enter the default username ‘admin’ and password ‘1234’ and click
Login.
The username and password are case sensitive. You may
need to make sure you don’t have the caps lock on.
2. It is recommended that you change to a new password (and write it
down). Click Apply to save your changes and go to the next screen.
3. The My NSA screen displays.
14
ENGLISH
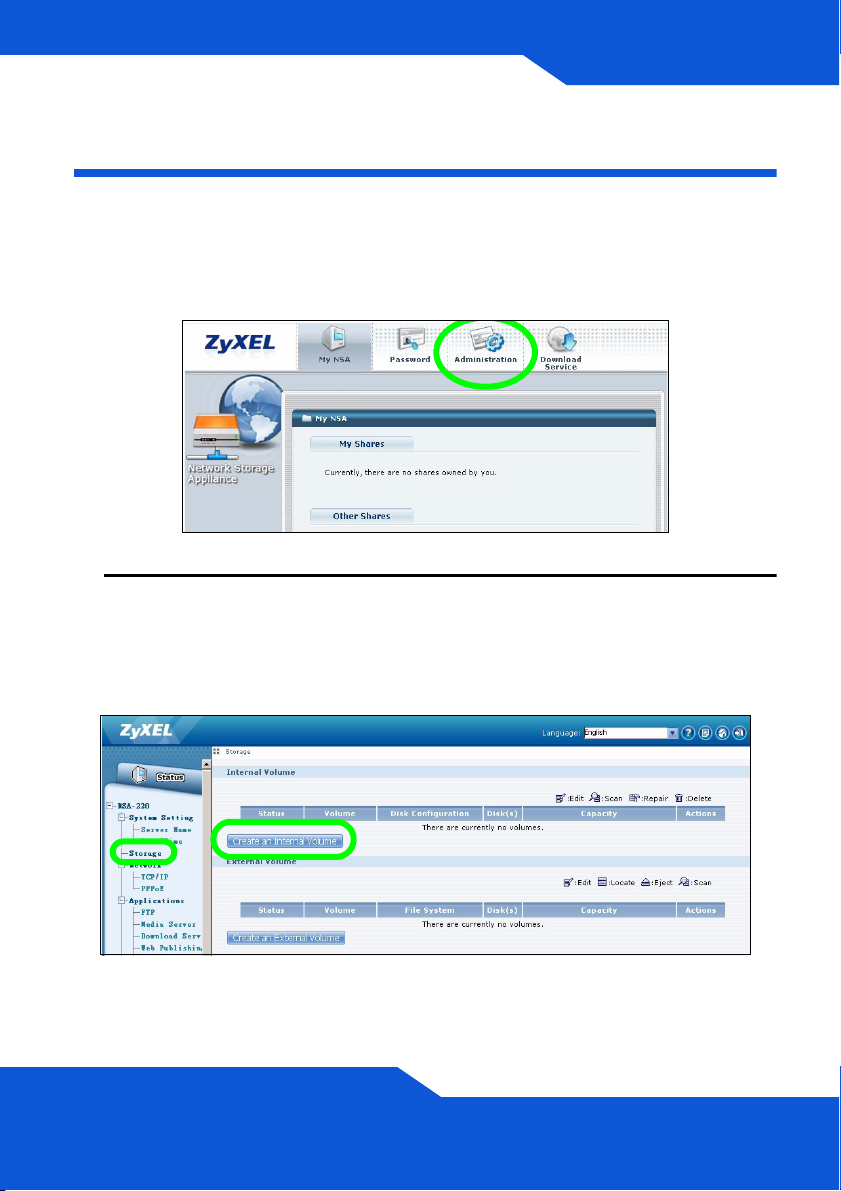
Create a Volume
This section shows you how to create an internal volume in the NSA. A
volume is a storage area on one or more hard drives.
1. Click Administration.
2. If there is not already an internal volume (storage area), click Storage
from the navigation panel, and then click Create an Internal Volume.
If your hard drive already has a volume that you want to use, skip to
section 6. If you want to delete an existing volume, see the Storage
Screens chapter in the User’s Guide.
Creating a volume formats the hard drives. All data
will be lost.
15

3. If you have two hard disks installed, select a disk configuration.
• JBOD (maximum data storage space)
Uses the whole storage capacity of each disk, even if there are
two hard disks with different storage capacities. With two hard
disks, you can create two volumes (one for each disk) so a
failure of one hard disk should not affect the other. With two hard
disks in a single JBOD volume, you lose all the data on both
disks if one disk fails.
• RAID 0 (not recommended)
Has the highest write speeds but if one disk fails, you lose all the
data on both disks. Only use RAID 0 for non-critical data
requiring high write speeds (like video, graphics, and games).
Total data storage space is limited to twice the capacity of the
smallest disk.
• RAID 1 (recommended)
Mirrors one disk’s data on the second disk for data security.
RAID 1 is slower than RAID 0, but you can recover all of your
data if a disk fails. Total data storage space is limited to the
capacity of the smallest disk.
16
ENGLISH
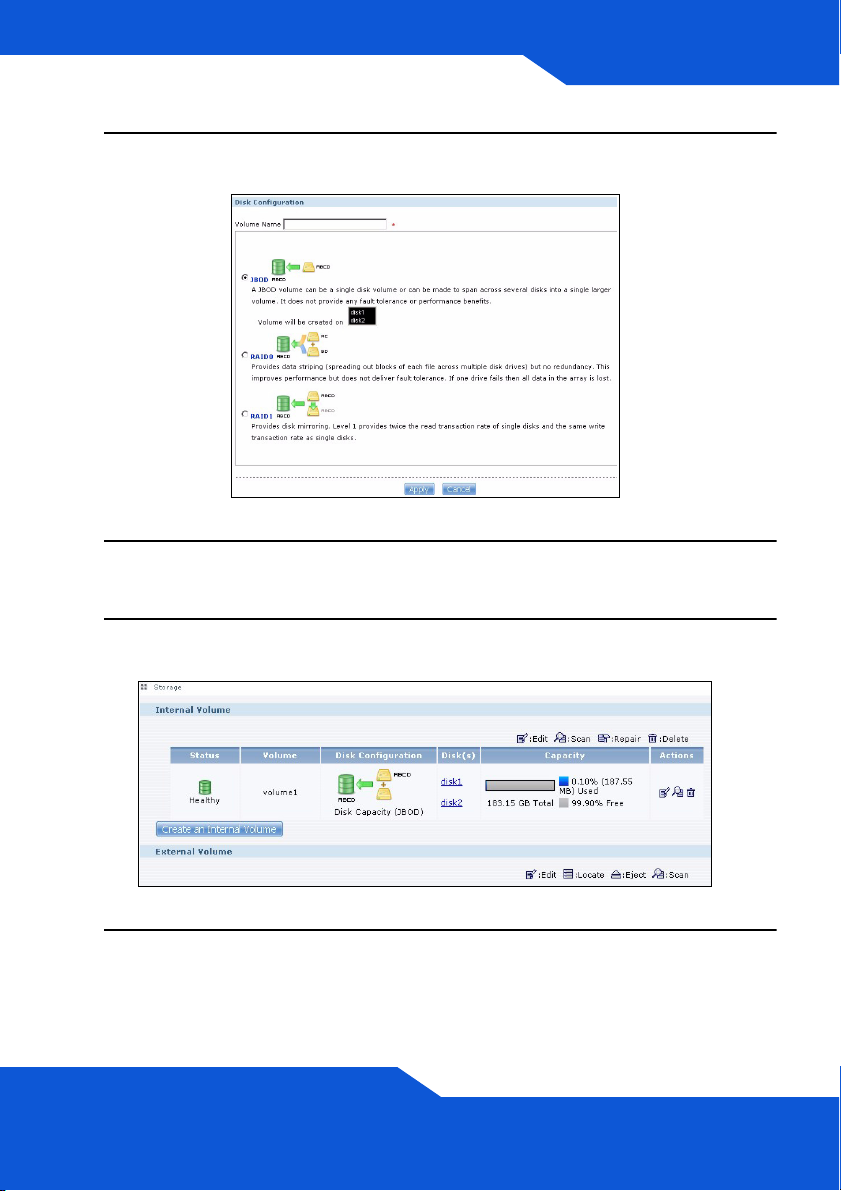
4. Enter a name in the Volume Name field. Click Apply to begin volume
creation.
5. Wait while the volume is being created.
6. You can use the volume after the status is Healthy. For a RAID
volume, the status is Resync until the volume is ready.
7. If two disks are installed and you created a single-disk JBOD volume,
repeat the steps to create a second volume on the other disk.
17
Map the NSA to Your Computer
Network Drive
You store files on the NSA in shares (these are like shared Windows
folders). Map a NSA share to a Windows network drive to be able to use
Windows Explorer to transfer files to and from the NSA. After mapping a
share, you can drag and drop files between your computer and the NSA.
1. In Windows, click Start > All Programs > ZyXEL NSA > NSA
Discovery Utility to run the discovery utility. If your computer has
more than one network card, then you will be prompted to select one.
2. The utility lists the NSAs in your network. Click the MAP icon in the
discovery utility.
18
ENGLISH
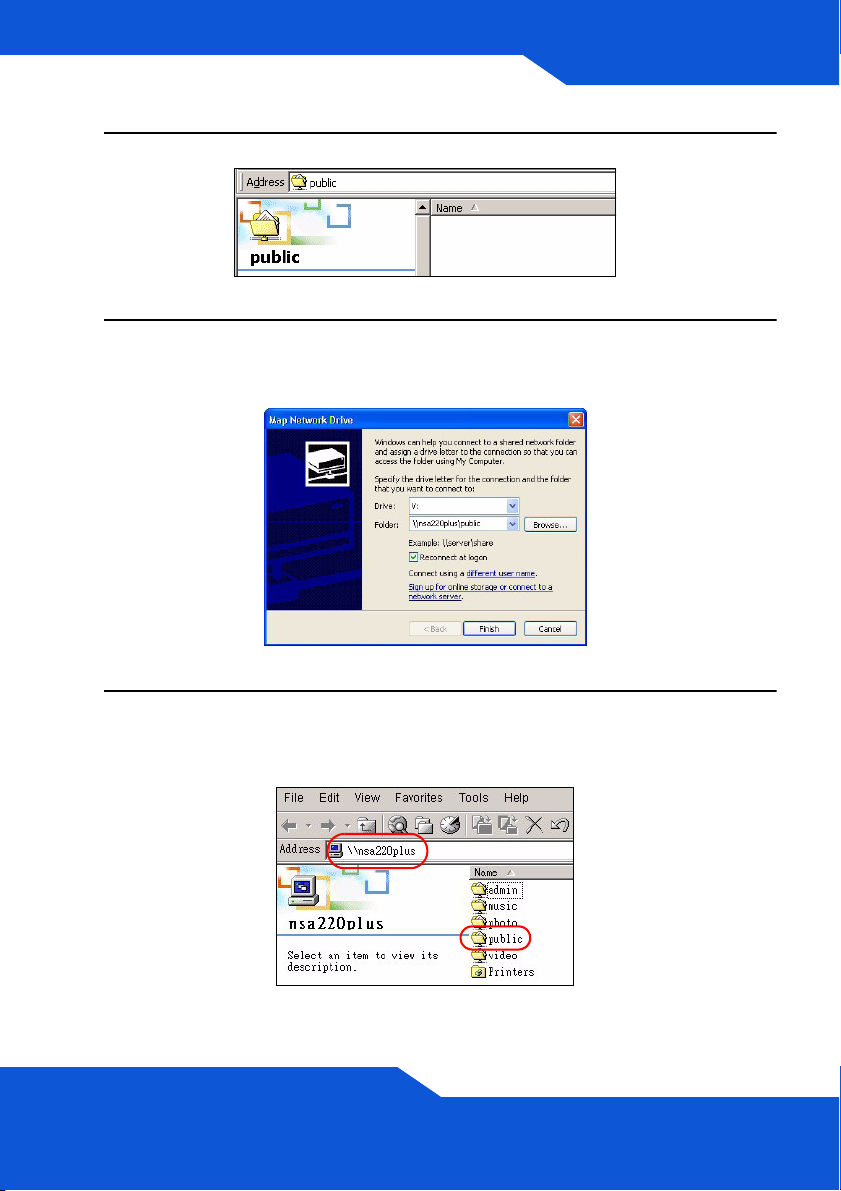
3. The NSA public folder displays in Windows Explorer.
4. Click Tools > Map Network Drive. In the Drive field, select a drive
letter to use for the NSA. In the Folder field, select the NSA (you may
need to browse to find it).
5. If your computer does not have the discovery utility installed, you can
open Windows Explorer and type two back slashes followed by the
NSA server name (nsa220plus by default) or IP address.
19

Backing up Files Using Memeo
Autobackup
Use the Memeo Autobackup software included on the CD to
automatically back up selected files from your computer to the NSA
whenever you modify the files.
Requirements
Memeo Autobackup works with Windows 2000 Workstation with Service
Pack 6, Windows XP Pro, or Windows XP Home Edition.
Memeo Autobackup Installation and Setup
The Memeo Autobackup program uses the same network
port as the discovery utility to discover the NSA. To avoid a
port conflict, turn off the discovery utility before using Memeo
Autobackup.
1. Since a computer restart is required, close your other files and
programs before installing the Memeo Autobackup software.
20
ENGLISH
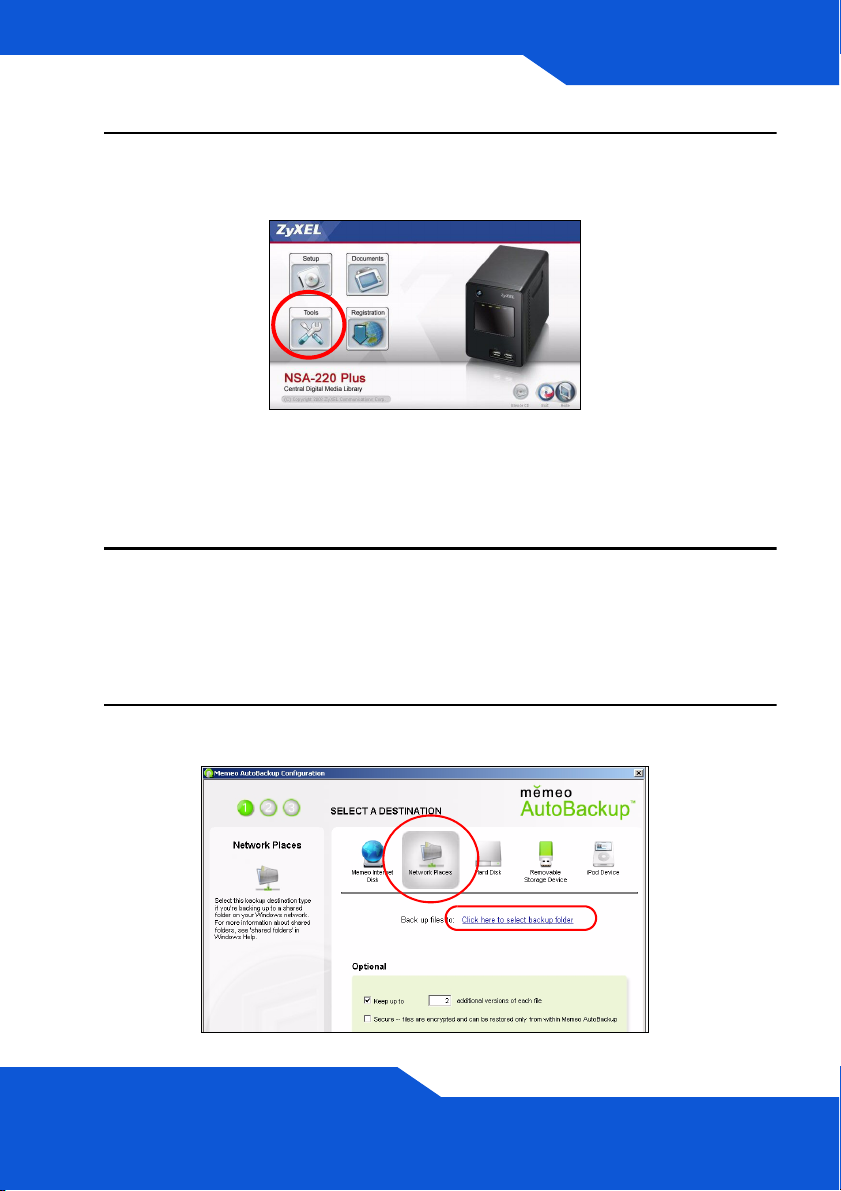
2. Insert the included CD into your CD-ROM drive. Click the Tools icon
in the screen that displays. Then click Memeo Instant Backup
Software.
If this screen does not display, use Windows Explorer (My
Computer) to go to the CD-ROM (commonly drive D).
Double-click setup.exe.
3. Follow the instructions to install the software.
Memeo Autobackup requires Microsoft.NET version 1.1. The wizard
installs it for you if it is not already on your computer.
4. When you see the following screen, select Network Places and click
the link to select your backup folder.
21
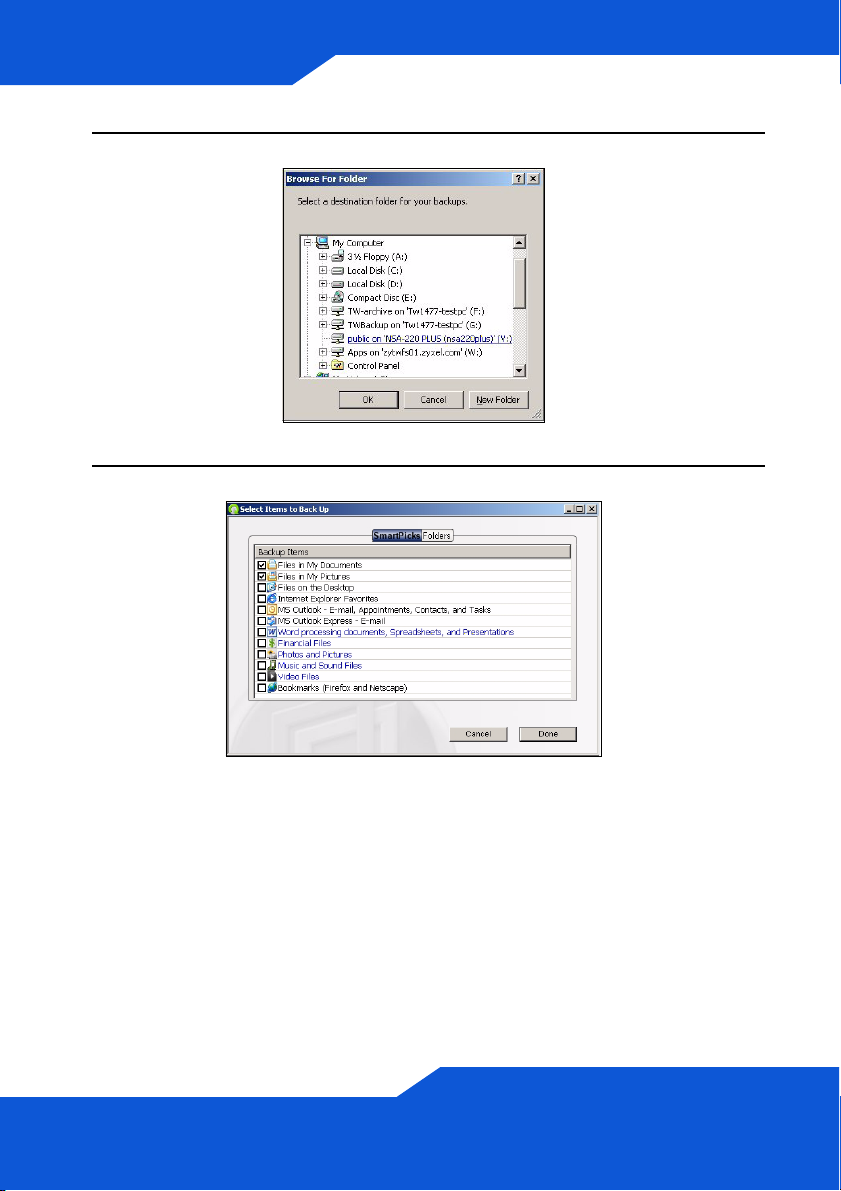
5. Select the NSA’s mapped drive and click OK.
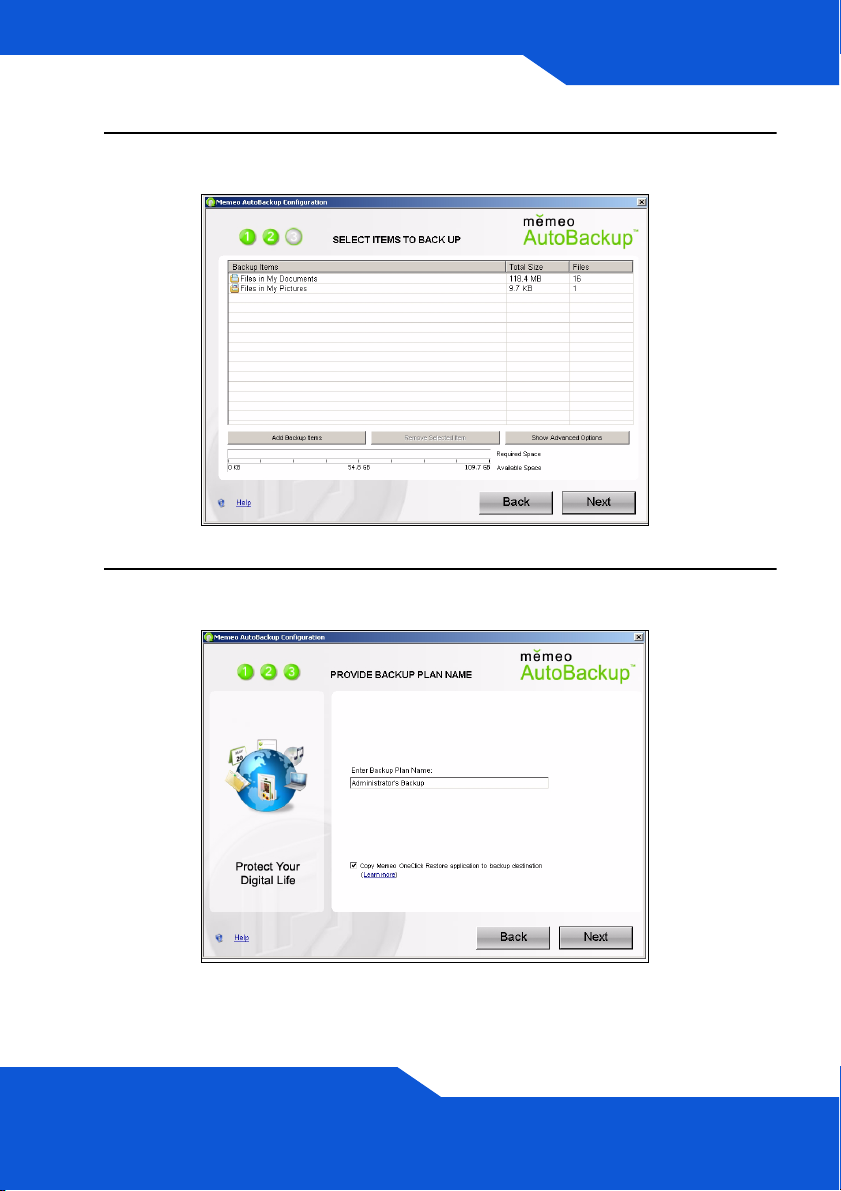
6. In this screen, select the items that you want to back up.
22
ENGLISH
7. This screen lists the items you selected for backup. Confirm your
selections and click Next.
8. Specify a name for your backup plan (or just use the default). Click
Next and then Done.
23
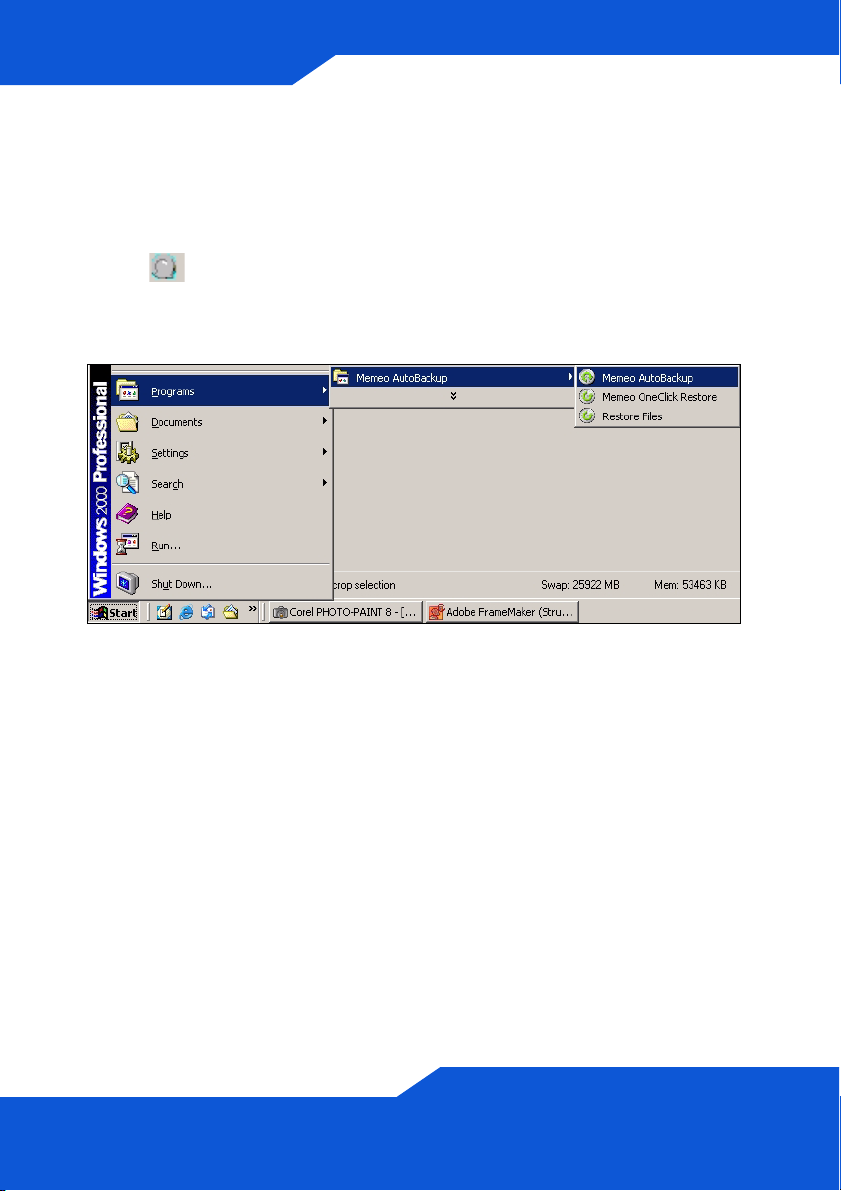
Using Memeo Autobackup After the Initial
Setup
After you have installed and configured Memeo Autobackup, doubleclick the icon in the system tray to open the program’s start screen.
If the icon is not displayed, you can click Start > Programs > Memeo
Autobackup > Memeo Autobackup to start it.
24

ENGLISH
Troubleshooting
Try the following if you cannot get to the NSA login screen.
• Make sure the NSA is turned on.
• Check the NSA’s cable connections. Make sure the NSA’s LAN
LED (located on the LAN port) is on or flashing.
• If you were trying to login directly by typing the server name (default
nsa220plus) into your web browsers address field, make sure you
typed it correctly. If it still doesn’t work, try using the discovery utility.
• Make sure your computer’s IP address is in the same subnet as the
NSA’s IP address. You can use the discovery utility to find the
NSA’s IP address. See the User’s Guide appendix on setting up
your computer’s IP address for how to change your computer’s IP
address. Skip this if you know that there are routers between your
computer and the NSA (like if you are connecting through the
Internet).
• Ping the NSA from your computer. Make sure your computer’s
Ethernet adapter is installed and functioning properly. In a
(Windows) computer, click Start, (All) Programs, Accessories
and then Command Prompt. In the Command Prompt window,
type “ping” followed by the NSA’s IP address and press [ENTER].
Use the discovery utility to find the NSA’s IP address if you don’t
know it.
• Use Internet Explorer 6.0, Mozilla Firefox 1.07, Netscape Navigator
7.0, or later versions of these with JavaScript enabled.
25

26
DEUTSCH
DEUTSCH
Einführung
Mit dem NSA können Sie in Ihrem Heimnetzwerk von verschiedenen
Geräten aus gemeinsam auf Dateien zugreifen und Daten sichern. Sie
können mit einem Medien-Client wie dem DMA-1000 auch Video-,
Musik- und Fotodateien abspielen, die auf dem NSA gespeichert sind.
So funktioniert es
Die obige Abbildung zeigt den NSA in einem Heimnetzwerk. Benutzer
sichern Daten auf dem NSA und haben gemeinsamen Zugriff darauf.
Der DMA-1000 spielt die Mediendateien des NSA auf dem Fernsehgerät
ab. Eine USB-Festplatte bietet zusätzlichen Speicherplatz, und Dateien
werden direkt vom USB-Memorystick auf das NSA geladen.
Schließen Sie das NSA hinter einer Firewall und/oder ein IDP-Gerät
(Intrusion Detection and Prevention), um es vor Angriffen aus dem
Internet zu schützen.
27

Erste Schritte
• Installieren der Festplatten, 30
• Anschließen des NSA, 33
• Zugreifen auf das NSA, 35
• NSA Anmelden, 38
• Erstellen eines Volumes, 39
• Mappen des NSA auf das Computernetzwerklaufwerk, 42
• Sichern von Dateien mit Memeo Autobackup, 45
Eine Beschreibung zum Konfigurieren aller Funktionen des NSA finden
Sie im Benutzerhandbuch, das auf der CD enthalten ist.
28

DEUTSCH
Vor der Installation
Bevor Sie anfangen, benötigen Sie Folgendes:
• NSA
• Die mitgelieferte CD (mit dem NSA Discovery Utility-Programm,
dem Memeo Autobackup-Programm, der Medienclient-Software
und dem Benutzerhandbuch)
• Netzkabel und Netzteil (extern)
• Das mitgelieferte Ethernet-Kabel
• Eine oder zwei Festplatten mit 15-poligen SATA-Anschlüssen, die
mit SATA I oder SATA II (3.0 Gbit/s) (Serial Advanced Technology
Attachment) kompatibel sind.
• Kreuzschlitzschraubendreher zum Festschrauben der Festplatten
in den Einschub.
• USB-Kabel (optional: Dieses benötigen Sie nur, wenn Sie durch
Anschließen von USB-Laufwerken (Ver. 2) die Speicherkapazität
erweitern möchten). Es wird empfohlen, USB-Geräte mit eigenem
Netzadapter zu verwenden.
• Computer mit Netzwerkkarte (NIC) und installiertem TCP/IP
• Netzwerkgerät wie Switch, Router oder Hub
29
Installieren der Festplatten
Sobald Sie eine Festplatte auf dem NSA installieren und ein Volume
erstellen, werden alle auf der Disk vorhandenen Daten gelöscht. Wenn
Sie zwei Festplatten installieren und sie als RAID-Volumes konfigurieren
möchten (siehe Seite 39), sollten Sie für eine optimale Leistung zweimal
dasselbe Festplattenmodell mit derselben Größe verwenden.
Festplatten dürfen NICHT bei eingeschaltetem
Gerät angeschlossen und abgetrennt werden.
Schalten Sie das NSA aus, bevor Sie die
Festplatte(n) einsetzen oder entfernen.
Beim Erstellen eines Volumes werden die
Festplatten formatiert. Alle Daten gehen verloren.
Bevor Sie die Disk auf dem NSA installieren, sollten
Sie alle anderen Dateien unbedingt an einem
anderen Speicherort sichern.
1. Stellen Sie sicher, dass das Netz- und das Ethernetkabel vom NSA
abgetrennt sind.
2. Lösen Sie die Rändelschrauben an der Rückseite des Gehäuses, und
öffnen Sie das Gehäuse.
30

DEUTSCH
3. Drehen Sie mit einem Schraubendreher die Rückhalteschraube aus
der Laufwerkslade heraus.
4. Ziehen Sie die Laufwerkslade heraus.
5. Legen Sie die Festplatte mit den Schraublöchern nach oben zeigend
auf eine flache Unterlage. Legen Sie die Laufwerkslade darauf, und
schrauben Sie sie wie abgebildet fest.
31

6. Schieben Sie die Lade zurück in den Schacht. Das Schraubloch
muss sich oben befinden. Schieben Sie die Lade so weit hinein, bis
das Schraubloch an der Oberseite mit dem inneren Rahmen bündig
ist.
7. Drehen Sie die Rückhalteschraube wieder in die Laufwerkslade ein.
8. Wenn Sie ein zweites Laufwerk installieren möchten, wiederholen Sie
die Schritte 3 bis 7.
9. Setzen Sie die Gehäuserückseite wieder auf, und drehen Sie die
Rändelschrauben fest.
32

DEUTSCH
Anschließen des NSA
1. Schließen Sie das mitgelieferte Ethernet-Kabel an den LAN-Port an
der Rückseite des NSA und an einen Computer, Switch oder Router
des Netzwerks an.
2. Schließen Sie ein Ende des Netzkabels an den POWER-Anschluss
an der Rückseite des NSA und das andere Ende an das externe
Netzteil an. Schließen Sie das externe Netzteil an eine
Netzsteckdose an.
Verwenden Sie NUR das mitgelieferte Netzteil.
33

3. Drücken Sie auf die Ein/Aus-Taste an der Vorderseite des NSA, um
das Gerät einzuschalten. Die LED-Anzeigen befinden sich an der
Gerätevorderseite.
Wenn keine Anzeige leuchtet, prüfen Sie noch einmal die
Kabelanschlüsse und die Stromquelle.
• Die Betriebsanzeige-LED leuchtet blau.
• Die SYS-LED leuchtet nach einem erfolgreichen Hochfahren des
Geräts grün (dies dauert etwa 50 Sekunden).
• Die HDD-LED leuchtet, wenn das NSA in den Laufwerkschächten
Festplatten erkennt.
• Der LAN-Anschluss an der Rückseite hat eine LED-Anzeige, die
leuchtet, wenn der Ethernet-Anschluss richtig mit dem Netzwerk
verbunden ist. Sie blinkt, wenn Daten gesendet oder empfangen
werden.
Um das NSA auszuschalten, drücken Sie so lange auf die Ein/AusTaste, bis ein Signalton zu hören ist. Lassen Sie dann die Taste los.
34

DEUTSCH
Zugreifen auf das NSA
Wenn Sie mit einem Windows-Computer arbeiten, verwenden Sie das
Discovery Utility (siehe Seite 35).
Für andere Computertypen (z. B. Mac oder Linux) verwenden Sie Direct
Access (siehe Seite 37).
Zugreifen auf das NSA mit dem Discovery
Utility
1. Legen Sie die mitgelieferte CD in das CD-ROM-Laufwerk ein. Klicken
Sie im nächsten Fenster auf Setup (Installieren). Klicken Sie dann
auf die Verknüpfung NSA Discovery Utility.
Wenn dieses Fenster nicht gezeigt wird, rufen Sie mit
Windows Explorer (Arbeitsplatz) die CD-ROM
(normalerweise Laufwerk D) auf. Klicken Sie doppelt auf
setup.exe.
35

2. Auf dem Bildschirm wird der Installationsassistent angezeigt. Führen
Sie die Anweisungen auf dem Bildschirm aus. Klicken Sie auf Finish
(Fertig stellen), um die Installation abzuschließen.
3. Um das Discovery Utility zu starten, klicken Sie bei Windows auf Start
> Alle Programme > ZyXEL NSA > NSA discovery Utility. Wenn
der Computer über mehr als eine Netzwerkkarte verfügt, werden Sie
aufgefordert, eine auszuwählen.
4. Das Utility-Programm listet die NSAs Ihres Netzwerks auf.
36

DEUTSCH
5. Klicken Sie auf das Symbol Admin (Administrator), um das
Anmeldefenster des Web-Konfigurators aufzurufen (siehe Seite 38).
• Wenn Sie die NSA IP-Adresse ändern müssen, klicken Sie auf das
Symbol unter Config (Konfigurieren).
• Um den NSA auf ein Windows-Netzwerklaufwerk zu mappen,
klicken Sie auf das Symbol unter Map (Mappen) (siehe Seite 42).
• Um die Bildschirmanzeige zu aktualisieren, klicken Sie auf
Discover (Erkennen).
Direct Access
Öffnen Sie Internet Explorer (oder einen anderen Internetbrowser wie
Firefox). Geben Sie als Adresse der Website nsa220plus ein, und
drücken Sie auf die Eingabetaste, oder klicken Sie auf Go (Gehe zu).
37

NSA Anmelden
In diesem Abschnitt wird beschrieben, wie Sie sich beim NSA anmelden
und das Administratorkennwort ändern.
Wenn das Anmeldefenster nicht angezeigt wird, lesen Sie im
Abschnitt Problembeseitigung am Ende dieser Anleitung
nach.
1. Geben Sie den Standardbenutzernamen admin und das Kennwort
1234 ein, und klicken Sie auf Login (Anmelden).
Achten Sie bei der Eingabe des Benutzernamens und des
Kennworts auf Groß- und Kleinschreibung. Die Feststelltaste
darf nicht aktiviert sein.
2. Es wird empfohlen, das Kennwort zu ändern (notieren Sie es sich).
Klicken Sie auf Apply (Übernehmen), um die Änderungen zu
speichern und zum nächsten Fenster zu wechseln.
3. Das Fenster My NSA (Mein NSA) wird angezeigt.
38

DEUTSCH
Erstellen eines Volumes
In diesem Abschnitt wird beschrieben, wie Sie im NSA ein internes
Volume erstellen. Ein Volume ist ein Speicherbereich auf einer oder
mehreren Festplatten.
1. Klicken Sie auf Administration.
2. Wenn es noch kein internes Volume (Speicherbereich) gibt, klicken
Sie im Navigationsfeld auf Storage (Speicher) und klicken Sie dann
auf Create an Internal Volume (Internes Volume erstellen). Wenn
Ihre Festplatte bereits ein Volume hat, das Sie verwenden möchten,
gehen Sie weiter zu Abschnitt 6. Wie Sie ein bestehendes Volume
löschen können, erfahren Sie im Benutzerhandbuch im Kapitel
Speicher-Fenster.
Beim Erstellen eines Volumes werden die
Festplatten formatiert. Alle Daten gehen verloren.
39

3. Wenn zwei Festplatten installiert sind, wählen Sie eine Disk-
Konfiguration.
• JBOD (maximale Speicherkapazität)
Hier wird die gesamte Speicherkapazität aller Festplatten
verwendet, auch wenn die einzelnen Festplatten
unterschiedliche Kapazitäten haben. Mit zwei Festplatten
können Sie zwei Volume erstellen (eins pro Festplatte), sodass
ein Ausfall einer Festplatte nicht die andere beeinträchtigt. Wenn
sich zwei Festplatten in einem JBOD-Volume befinden, gehen
beim Ausfall einer Festplatte die Daten auf beiden Festplatten
verloren.
• RAID 0 (nicht empfohlen)
Diese Konfiguration bietet die größte Geschwindigkeit, aber bei
Ausfall einer Festplatte gehen alle Daten auf beiden Festplatten
verloren. Verwenden Sie RAID 0 nur für unwichtige Daten, die
große Schreibgeschwindigkeiten erfordern (z. B. Videos,
Grafiken und Spiele). Der gesamte Datenspeicherplatz ist auf
das Doppelte der Kapazität der kleinsten Festplatte beschränkt.
• RAID 1 (empfohlen)
Hier werden die Daten der ersten Festplatte zur Sicherheit auf
die zweite Festplatte gespiegelt. RAID 1 ist langsamer als RAID
0, Sie können aber beim Ausfall einer Festplatte alle Daten
wiederherstellen. Der gesamte Datenspeicherplatz ist auf die
Kapazität der kleinsten Festplatte beschränkt.
40

DEUTSCH
4. Geben Sie im Namen Volume Name (Volume-Namen) einen Namen
ein. Klicken Sie auf Apply (Übernehmen), um ein Volume zu
erstellen.
5. Warten Sie, während das Volume erstellt wird.
6. Wenn der Status Healthy (In Ordnung) angezeigt wird, kann das
Volume verwendet werden. Bei einem RAID-Volumen wird der Status
Resync (Resynchronisieren) angezeigt, bis das Volume bereit ist.
7. Wenn Sie zwei Festplatten installiert und ein JBOD-Volume auf einer
Festplatte erstellt haben, wiederholen Sie diese Schritte, um auf der
anderen Festplatte ein zweites Volume zu erstellen.
41

Mappen des NSA auf das
Computernetzwerklaufwerk
Dateien werden auf dem NSA in Shares (diese können mit
gemeinsamen Windows-Ordnern verglichen werden) gespeichert.
Mappen Sie ein NSA-Share auf ein Windows-Netzwerklaufwerk, damit
Sie mit Windows Explorer Dateien vom und auf den NSA übertragen
können. Nach dem Mappen eines Shares können Sie Dateien zwischen
dem Computer und dem NSA verschieben.
1. Um das Discovery Utility zu starten, klicken Sie bei Windows auf Start
> Alle Programme > ZyXEL NSA > NSA Discovery Utility. Wenn
der Computer über mehr als eine Netzwerkkarte verfügt, werden Sie
aufgefordert, eine auszuwählen.
2. Das Utility-Programm listet die NSAs Ihres Netzwerks auf. Klicken Sie
im Discovery Utility-Programm auf das Symbol MAP.
42

DEUTSCH
3. Bei Windows Explorer wird der öffentliche NSA-Ordner angezeigt.
4. Klicken Sie auf Tools > Map Network Drive (Extras >
Netzwerklaufwerk mappen). Wählen Sie aus dem Feld Drive
(Laufwerk) einen Laufwerksbuchstaben aus, der für den NSA
verwendet werden soll. Wählen Sie aus dem Feld Folder (Ordner)
den NSA aus (möglicherweise müssen Sie die Verzeichnisse
durchsuchen).
43

5. Wenn auf dem Computer nicht das Discovery Utility-Programm
installiert ist, können Sie Windows Explorer aufrufen, zwei
Rückwärtsschrägstriche und den NSA-Servernamen (nsa220plus
standardmäßig) oder die IP-Adresse eingeben.
44

DEUTSCH
Sichern von Dateien mit Memeo
Autobackup
Die auf der CD enthaltene Memeo Autobackup-Software kann dazu
verwendet werden, automatisch die ausgewählten Dateien vom
Computer auf dem NSA zu sichern, sobald sie geändert werden.
Systemvoraussetzungen
Memeo Autobackup arbeitet mit Windows 2000 Workstation mit Service
Pack 6, Windows XP Pro und Windows XP Home Edition.
Installieren und Einrichten von Memeo
Autobackup
Die Memeo Autobackup-Software verwendet denselben
Netzwerkanschluss wie das Discovery Utility-Programm, um
den NSA zu erkennen. Um einen Port-Konflikt zu vermeiden,
beenden Sie zuerst das Discovery Utility-Programm, bevor
Sie Memeo Autobackup verwenden.
1. Da ein Neustart des Computer erforderlich ist, sollten Sie alle Dateien
und Programme schließen, bevor Sie die Memeo AutobackupSoftware installieren.
45

2. Legen Sie die mitgelieferte CD in das CD-ROM-Laufwerk ein. Klicken
Sie im nächsten Fenster auf Tools (Extras). Klicken Sie dann auf
Memeo Instant Backup Software.
Wenn dieses Fenster nicht gezeigt wird, rufen Sie mit
Windows Explorer (Arbeitsplatz) die CD-ROM
(normalerweise Laufwerk D) auf. Klicken Sie doppelt auf
setup.exe.
3. Führen Sie die Anweisungen aus, um die Software zu installieren.
Für Memeo Autobackup ist Microsoft.NET Version 1.1. erforderlich.
Der Assistent installiert es für Sie, wenn es noch nicht auf dem
Computer installiert ist.
4. Wenn das folgende Fenster angezeigt wird, wählen Sie Network
Places (Netzwerkposition), und klicken Sie auf die Verknüpfung, um
den Sicherungsordner auszuwählen.
46

DEUTSCH
5. Wählen Sie das auf das NSA gemappte Laufwerk, und klicken Sie auf
OK.
6. Wählen Sie in diesem Fenster die Elemente aus, die gesichert
werden sollen.
47

7. In diesem Fenster werden die Einträge aufgeführt, die Sie zum
Sichern ausgewählt haben. Bestätigen Sie Ihre Auswahl, und klicken
Sie auf Next (Weiter).
8. Geben Sie dem Sicherungsplan einen Namen (oder verwenden Sie
den Standardnamen). Klicken Sie auf Next (Weiter), und dann auf
Done (Fertig).
48

DEUTSCH
Verwenden von Memeo Autobackup nach der
Installation
Wenn Sie Memeo Autobackup installiert und konfiguriert haben, klicken
Sie doppelt auf das Symbol in der Taskleiste, um das Startfenster
des Programms aufzurufen.
Wenn das Symbol nicht angezeigt wird, können Sie auch auf Start >
Programme > Memeo Autobackup > Memeo Autobackup klicken, um
es zu starten.
49

Problembeseitigung
Wenn Sie nicht das Anmeldefenster des NSA aufrufen können,
versuchen Sie Folgendes.
• Stellen Sie sicher, dass der NSA eingeschaltet ist.
• Prüfen Sie die Kabelverbindungen des NSA. Stellen Sie sicher,
dass die LAN-LED des NSA (am LAN-Port) leuchtet oder blinkt.
• Prüfen Sie, ob Sie den Servernamen (Standard nsa220plus) richtig
in das Adressfeld des Internetbrowsers eingegeben haben.
Versuchen Sie es mit dem Discovery Utility-Programm.
• Stellen Sie sicher, dass sich die IP-Adresse des Computers im
selben Subnetz wie die des NSA befindet. Sie können die IPAdresse des NSA mit dem Discovery Utility ermitteln. Eine
Anleitung zum Einrichten oder Ändern der IP-Adresse des
Computers finden Sie im Anhang des Benutzerhandbuchs.
Überspringen Sie diesen Schritt, wenn sich zwischen dem
Computer und dem NSA keine Router befinden (wenn Sie z. B.
über das Internet verbunden sind).
• Versuchen Sie den NSA mit einem Ping vom Computer aus zu
erreichen. Stellen Sie sicher, dass der Ethernet-Adapter des
Computers angeschlossen ist und richtig funktioniert. Klicken Sie
bei einem Windows-Computer auf Start, (Alle) Programme,
Zubehör und dann auf Eingabeaufforderung. Geben Sie im
Fenster der Eingabeaufforderung "Ping" und dann die IP-Adresse
des NSA ein, und drücken Sie auf die Eingabetaste. Finden Sie die
IP-Adresse des NSA mit dem Discovery Utility-Programm heraus.
• Verwenden Sie Internet Explorer 6.0, Mozilla Firefox 1.07,
Netscape Navigator 7.0 oder spätere Versionen davon mit
aktivierter Java-Script-Unterstützung.
50

ESPAÑOL
ESPAÑOL
Introducción
El NSA le permite compartir archivos y copiar datos en su red
doméstica. También puede reproducir vídeo, música y mostrar archivos
de fotos guardados en el NSA utilizando un cliente de medios como
DMA-1000.
Cómo funciona
Arriba el NSA está en una red doméstica. Los usuarios realizan copias
de seguridad y comparten los datos en el NSA. El DMA-1000 reproduce
los archivos de medios del NSA en el televisor. Una unidad de disco
duro USB ofrece espacio de almacenamiento extra y los archivos son
copiados directamente de la unidad USB al NSA.
Proteja el NSA con un cortafuegos y/o un dispositivo IDP (Intrusion
Detection and Prevention) para protegerlo de los ataques de Internet.
51

Primeros pasos
• Instalar discos duros, 54
• Conecte el NSA, 57
• Acceso al NSA, 59
• Inicio de sesión NSA, 62
• Crear un volumen, 63
• Mapear el NSA en la unidad de red de su ordenador, 66
• Copiar archivos utilizando Memeo Autobackup, 68
Consulte la Guía del usuario en el CD incluido para más detalles sobre
la configuración de todas las características del NSA.
52

ESPAÑOL
Antes de comenzar
Necesita lo siguiente antes de comenzar:
• NSA
• El CD incluido que contiene la utilidad NSA Discovery, el programa
Memeo Autobackup, software cliente de medios y la Guía del
usuario
• Cable de alimentación y fuente de alimentación (externa)
• Cable Ethernet incluido
• Uno o dos discos compatibles SATA I o SATA II (3.0 Gbit/s) (Serial
Advanced Technology Attachment) con conectores de alimentación
SATA de 15 contactos
• Destornillador de estrella para instalar los discos duros en las
bandejas para discos
• Cable USB (opcional: sólo lo necesita si desea ampliar la
capacidad de almacenamiento conectando unidades USB (versión
2) compatibles). Se recomienda que el dispositivo USB utilice su
propio adaptador externo si tiene uno.
• Ordenador con Network Interface Card (NIC) y TCP/IP instalados
• Dispositivo de red como un switch, router o hub
53

Instalar discos duros
Una vez instalado el disco duro en el NSA y creado un volumen, se
borrarán todos los datos existentes en el disco. Si desea instalar dos
unidades de disco y configurarlas como volúmenes RAID (ver página
63), se recomienda utilizar el mismo tamaño de disco y modelo para
obtener el mejor rendimiento.
Los discos duros NO son intercambiables en
caliente. El NSA debe apagarse antes de quitar o
instalar la(s) unidad(es) de disco duro.
Al crear un volumen se formatean las unidades de
disco. Se perderán todos los datos. Realice copias
de seguridad de los archivos en el disco en otra
ubicación antes de instalar el disco en el NSA.
1. Compruebe que los cables Ethernet estén desconectados del NSA.
2. Afloje los tornillos del panel posterior y ábralo.
54

ESPAÑOL
3. Utilice un destornillador para quitar el tornillo de retención de una
bandeja de disco.
4. Extraiga la bandeja de disco.
5. Coloque el disco en una superficie plana con los agujeros de los
tornillos mirando hacia arriba. Coloque la bandeja del disco en la
parte superior y fíjela con los tornillos como se muestra.
55

6. Vuelva a introducir la bandeja de nuevo en la bahía para discos.
Compruebe que el agujero del tornillo esté en la parte superior.
Introduzca la bandeja hasta el fondo de manera que el agujero del
tornillo de la parte superior quede en línea con el marco interno.
7. Vuelva a colocar el tornillo de retención de la bandeja del disco.
8. Repita los pasos 3 al 7 para el segundo disco duro si tiene uno.
9. Vuelva a colocar el panel posterior de nuevo y apriete los tornillos.
56

ESPAÑOL
Conecte el NSA
1. Utilice el cable Ethernet incluido para conectar el puerto LAN de la
parte posterior del NSA a un ordenador, switch o router en su red.
2. Conecte un extremo del cable de alimentación en el zócalo POWER
de la parte posterior del NSA y el otro extremo en la fuente de
alimentación externa. Conecte la fuente de alimentación externa en
una toma de corriente.
Utilice SOLAMENTE la fuente de alimentación
incluida.
57

3. Pulse el botón de alimentación de la parte frontal del NSA para
encenderlo. Fíjese en las luces del panel frontal.
Si no se encienden luces, compruebe que el cable de
alimentación no esté suelto y que la fuente de alimentación
esté encendida.
• La luz del botón de alimentación permanece encendida en azul.
• La luz SYS permanece encendida en verde tras un arranque con
éxito (tarda unos 50 segundos).
• La luz HDD se enciende si el NSA detecta discos duros en las
bahías para discos.
• El puerto LAN del panel posterior tiene una luz que se enciende si
el puerto Ethernet está correctamente conectado en su red.
Parpadea mientras envía o recibe tráfico.
Apague el NSA, presione el botón de encendido y manténgalo
hasta que escuche un sonido. Luego suelte el botón.
58

ESPAÑOL
Acceso al NSA
Para un ordenador con Windows, utilice Discovery Utility (ver página
59).
Para otro tipo de ordenador (como Mac o Linux), utilice Direct Access
(ver página 61).
Utilizar la utilidad discovery para acceder al
NSA
1. Inserte el CD incluido en la unidad de CD-ROM. Haga clic en Setup
(Instalar) en la pantalla que aparece. Luego haga clic en el enlace
NSA Discovery Utility.
Si esta pantalla no aparece, utilice Windows Explorer (Mi
PC) para ir al CD-ROM (normalmente la unidad D). Haga
doble clic en setup.exe.
59

2. Comenzará el asistente para la instalación. Siga las instrucciones del
instalador. Haga clic en Finish (Finalizar) para completar la
instalación.
3. En Windows, haga clic en Inicio > Todos los programas > ZyXEL
NSA > NSA Discovery Utility para ejecutar la utilidad discovery. Si
su ordenador tiene más de una tarjeta de red, se le pedirá que
seleccione una.
4. La utilidad muestra los NSAs en su red.
60

ESPAÑOL
5. Haga clic en el icono Admin para ver la pantalla de inicio de sesión
del configurador web (ver página 62).
• Si necesita cambiar la dirección NSA IP, haga clic en el icono en
Config.
• Para mapear el NSA en una unidad de red de Windows, haga clic
en el icono en Map (ver página 66).
• Para actualizar la pantalla, haga clic en Discover (descubrir).
Acceso directo
Abra Internet Explorer (u otro explorador web como Firefox). Escriba
nsa220plus como dirección de sitio web y pulse [Entrar] o haga clic en
Ir.
61

Inicio de sesión NSA
Esta sección le muestra cómo acceder al NSA y cambiar la contraseña
de administrador.
Si no puede ir a la página de inicio de sesión, consulte la
sección solución de problemas al final de esta guía.
1. Escriba el nombre de usuario (admin) y la contraseña (1234)
predeterminados y haga clic en Login (Iniciar sesión).
El nombre de usuario y contraseña distinguen mayúsculas.
Asegúrese de no tener el bloqueo de mayúsculas si no lo
necesita.
2. Se recomienda que cambie a una nueva contraseña (y la escriba).
Haga clic en Apply (Aplicar) para guardar los cambios y vaya a la
pantalla siguiente.
3. Aparecerá la pantalla My NSA.
62

ESPAÑOL
Crear un volumen
Esta sección le muestra cómo crear un volumen de intervalo en el NSA.
Un volumen es un área de almacenamiento en una o más unidades de
disco.
1. Haga clic en Administración.
2. Si todavía no hay un volumen interno (área de almacenamiento),
haga clic en Storage (Almacenamiento) en el panel de navegación y
haga clic en Create an Internal Volume (Crear un volumen interno).
Si su disco duro ya tiene un volumen que desea utilizar, salte a la
sección 6. Si desea eliminar un volumen existente, consulte el
capítulo Storage Screens en la Guía del usuario.
Al crear un volumen se formatean las unidades de
disco. Se perderán todos los datos.
63

3. Si tiene dos discos duros instalados, seleccione una configuración de
disco.
• JBOD (espacio de almacenamiento de datos más alto)
Utiliza la capacidad de almacenamiento total de cada disco,
incluso si hay dos discos duros con suficiente capacidad de
almacenamiento. Con dos discos duros puede crear dos
volúmenes (uno para cada disco) de manera que un fallo en un
disco duro no debería afectar al otro. Con dos discos duros en
un único volumen JBOD, pierde todos los datos en ambos
discos si un disco falla.
• RAID 0 (no recomendado)
Tiene las velocidades de grabación más altas pero si un disco
falla, pierde todos los datos en ambos discos. Utilice RAID 0
solamente para datos no críticos que necesitan una velocidad
de grabación alta (como vídeo, gráficos y juegos). El espacio
total de almacenamiento de datos está limitado a la mitad de la
capacidad del disco más pequeño.
• RAID 1 (recomendado)
Copia los datos de un disco en un segundo disco para seguridad
de datos. RAID 1 es más lento que RAID 0, pero puede
recuperar todos sus datos si un disco falla. El espacio total de
almacenamiento de datos está limitado a la capacidad del disco
más pequeño.
64

ESPAÑOL
4. Escriba un nombre en el campo Volume Name (Nombre del
volumen). Haga clic en Apply (Aplicar) para iniciar la creación del
volumen.
5. Espere mientras el volumen está siendo creado.
6. Puede usar el volumen tras el estado Healthy (Saludable). Para un
volumen RAID, el estado es Resync hasta que el volumen está listo.
7. Si instala dos discos y ha creado un único volumen JBOD, repita los
pasos para el segundo volumen en el otro disco.
65

Mapear el NSA en la unidad de
red de su ordenador
Los archivos son almacenados en NSA de forma compartida (es como
las carpetas compartidas de Windows). Mapee NSA compartido en una
unidad de red de Windows para poder utilizar Windows Explorer para
transferir los archivos hacia y desde el NSA. Tras mapear un
compartido, puede arrastrar y soltar archivos entre su ordenador y el
NSA.
1. En Windows, haga clic en Inicio > Todos los programas > ZyXEL
NSA > NSA Discovery Utility para ejecutar la utilidad discovery. Si
su ordenador tiene más de una tarjeta de red, se le pedirá que
seleccione una.
2. La utilidad muestra los NSAs en su red. Haga clic en el icono MAP en
la utilidad discovery.
66

ESPAÑOL
3. La carpeta pública NSA aparece en Windows Explorer.
4. Haga clic en Tools > Map Network Drive (Herramientas > Mapear
unidad de red). En el campo Drive (Unidad), seleccione una unidad
para usar para el NSA. En el campo Folder (Carpeta), seleccione el
NSA (puede que necesite examinar para encontrarlo).
5. Si su ordenador no tiene la utilidad discovery instalada, puede abrir
Windows Explorer y escribir dos barras invertidas seguidas por el
nombre de servidor del NSA (nsa220plus por defecto) o la dirección
IP.
67

Copiar archivos utilizando
Memeo Autobackup
Utilice el software Memeo Autobackup incluido en el CD para copiar
automáticamente los archivos seleccionados de su ordenador al NSA
siempre que modifique los archivos.
Requisitos
Memeo Autobackup funciona con Windows 2000 Workstation con
Service Pack 6, Windows XP Pro o Windows XP Home Edition.
Instalación y configuración de Memeo
Autobackup
El programa Memeo Autobackup utiliza el mismo puerto de
red que la utilidad discovery para descubrir el NSA. Para
evitar un conflicto de puertos, apague la utilidad discovery
antes de utilizar Memeo Autobackup.
1. Como necesita reiniciar el ordenador, cierre los otros archivos y
programas antes de instalar el software Memeo Autobackup.
68

ESPAÑOL
2. Inserte el CD incluido en la unidad de CD-ROM. Haga clic en el icono
Tools (Herramientas) en la pantalla que aparece. Luego haga clic en
Memeo Instant Backup Software.
Si esta pantalla no aparece, utilice Windows Explorer (Mi
PC) para ir al CD-ROM (normalmente la unidad D). Haga
doble clic en setup.exe.
3. Siga las instrucciones para instalar el software.
Memeo Autobackup necesita Microsoft.NET versión 1.1. El
asistente lo instala por usted si no está ya instalado en su
ordenador.
4. Cuando vea la pantalla siguiente, seleccione Network Places
(Lugares de la red) y haga clic en el enlace para seleccionar su
carpeta de copia de seguridad.
69

5. Seleccione la unidad mapeada del NSA y haga clic en OK (Aceptar).
6. En esta pantalla, seleccione los elementos que desea copiar.
70

ESPAÑOL
7. Esta pantalla muestra los elementos seleccionados para realizar la
copia de seguridad. Confirme las selecciones y haga clic en Next
(Siguiente).
8. Especifique un nombre para su plan de copia de seguridad (o
simplemente utilice el predeterminado). Haga clic en Next (Siguiente)
y luego en Done (Listo).
71

Utilizar Memeo Autobackup tras la
configuración inicial
Tras haber instalado y configurado Memeo Autobackup, haga doble clic
en el icono en la bandeja del sistema para abrir la pantalla inicial del
programa.
Si el icono no aparece, puede hacer clic en Inicio > Programas >
Memeo Autobackup > Memeo Autobackup para abrirlo.
72

ESPAÑOL
Solución de problemas
Intente lo siguiente si no consigue acceder a la pantalla de inicio de
sesión del NSA.
• Asegúrese de que el NSA esté encendido.
• Compruebe las conexiones de cables del NSA. Compruebe que el
LED del NSA LAN (situado en el puerto LAN) esté encendido o
parpadeando.
• Si ha intentado iniciar sesión directamente escribiendo el nombre
del servidor (predeterminado nsa220plus) en el campo de
dirección del explorador, asegúrese de haberlo escrito
correctamente. Si todavía no funciona, inténtelo con la utilidad
discovery.
• Compruebe que la dirección IP del ordenador esté en la misma
subred que la dirección IP del NSA). Puede utilizar la utilidad
discovery para buscar la dirección IP del NSA. Consulte el
apéndice de la Guía del usuario sobre la configuración de la
dirección IP de su ordenador para cómo cambiar la dirección IP de
su ordenador. Sáltese esto si sabe que hay routers entre su
ordenador y el NSA (como si se conecta a través de Internet).
• Realice un ping al NSA desde su ordenador. Compruebe que el
adaptador Ethernet de su ordenador esté instalado y funcione
correctamente. En un ordenador (Windows), haga clic en Inicio,
(Todos los) programas, Accesorios y luego en Símbolo del
sistema. En la ventana Símbolo del sistema, escriba "Ping"
seguido por la dirección IP del NSA y pulse [ENTRAR]. Use la
utilidad discovery para buscar la dirección IP del NSA si no la sabe.
73

• Utilice Internet Explorer 6.0, Mozilla Firefox 1.07, Netscape
Navigator 7.0 o versiones posteriores a éstas con JavaScript
habilitado.
74

FRANÇAIS
FRANÇAIS
Introduction
Le NSA vous permet de partager des fichiers et de sauvegarder des
données sur votre réseau domestique. Vous pouvez aussi lire des
fichiers vidéo, de musique et afficher des photos stockés sur le NSA en
utilisant un client média comme le DMA-1000.
Comment cela fonctionne-t-il
Ci-dessus se trouve le NSA dans un réseau domestique. Les utilisateurs
sauvegardent et partagent les données sur le NSA. Le DMA-1000 lit les
fichiers média du NSA sur le téléviseur. Un disque dur USB offre un
espace de stockage supplémentaire et les fichiers sont directement
copiés depuis la clé USB sur le NSA.
Placez le NSA derrière un pare feu et/ou un dispositif IDP (Intrusion
Detection and Prevention (Détection d’intrusion et prévention)) pour le
protéger des attaques provenant d’Internet.
75

Mise en route
• Installer les disques durs, 78
• Connecter le NSA, 81
• Accéder au NSA, 83
• NSA Ouvrir une session, 86
• Créer un volume, 87
• Mappez le NSA sur votre ordinateur Lecteur réseau, 90
• Sauvegarder des fichiers à l’aide de Memeo Autobackup, 92
Consulter le guide de l’utilisateur sur le CD inclus pour les instructions
concernant la configuration de toutes les fonctionnalités du NSA.
76

FRANÇAIS
Avant de commencer
Vous avez besoin des éléments suivants avant de commencer :
• NSA
• CD inclus contenant l’utilitaire de découverte du NSA, le
programme Memeo Autobackup, logiciel client média, et le guide
de l’utilisateur
• Cordon d'alimentation et alimentation (externe)
• Câble Ethernet fourni
• Un ou deux disques durs compatibles SATA I ou SATA II (3.0 Gbit/
s) (Serial Advanced Technology Attachment) avec connecteurs
d'alimentation SATA 15 broches
• Tournevis cruciforme pour installer les disques durs dans les tiroirs
de disque
• Câble USB (en option : ceci est nécessaire seulement si vous
voulez augmenter la capacité de stockage en connectant des
lecteurs USB compatibles (version 2)). Il est recommandé d’utiliser
l’adaptateur d’alimentation externe propre au périphérique USB s’il
en est équipé.
• Ordinateur avec carte d'interface réseau (NIC) et TCP/IP installé
• Périphérique réseau tel que commutateur, routeur ou hub.
77

Installer les disques durs
Une fois que vous avez installé un disque dur sur le NSA et créé un
volume, toutes les données existantes sur le disque seront effacées. Si
vous voulez installer deux disques durs et les configurer en volumes
RAID (voir page 87), il est recommandé d’utiliser la même taille et le
même modèle de disque pour obtenir les meilleures performances.
Les disques durs NE SONT PAS échangeables à
chaud. Le NSA doit être éteint avant de retirer ou
d'installer le(s) disque(s) dur(s).
Le fait de créer un volume formate les disques
durs. Toutes les données seront perdues.
Sauvegardez tous les fichiers du disque sur un
autre emplacement avant d’installer le disque dans
le NSA.
1. Assurez-vous que les cordons d’alimentation et Ethernet sont
déconnectés du NSA.
2. Desserrez les vis papillon situées sur le panneau arrière et ouvrez-le.
78

FRANÇAIS
3. Utilisez un tournevis pour retirer les vis de fixation d’un tiroir de
disque.
4. Extrayez le tiroir de disque.
5. Placez le disque sur une surface plane avec les trous de vis dirigés
vers le haut. Placez le tiroir du disque sur celui-ci et fixez-le à l’aide
des vis comme indiqué.
79

6. Replacez le tiroir en le faisant coulisser dans la baie du disque.
Assurez-vous que le trou de vis se trouve au-dessus. Poussez le tiroir
vers l’intérieur sur toute sa longueur de façon à ce que le trou de vis
situé au-dessus soit aligné avec le cadre interne.
7. Replacez la vis de fixation du tiroir du disque.
8. Répétez les étapes 3 à 7 pour un second disque dur si nécessaire.
9. Replacez le panneau arrière et serrez les vis papillon.
80

FRANÇAIS
Connecter le NSA
1. Utilisez le câble Ethernet fourni pour connecter le port LAN situé au
dos du NSA à un ordinateur, commutateur ou routeur sur votre
réseau.
2. Connectez une extrémité du cordon d'alimentation à la prise POWER
(Alimentation) située au dos duNSA et l'autre extrémité à
l'alimentation externe. Connectez l'alimentation externe à une prise
de courant.
Utilisez UNIQUEMENT l’alimentation incluse.
81

3. Appuyez sur le bouton d’alimentation situé sur la façade du NSA
pour l’allumer. Observez les voyants en façade.
Si aucun voyant ne s’allume, vérifiez que le cordon
d’alimentation est correctement branché et que la source
d’alimentation est allumée.
• Le témoin du bouton d’alimentation s’allume en bleu.
• Le voyant SYS s'allume en vert après le démarrage (cela prend
environ 50 secondes).
• Les voyants de disques durs s’allument si le NSA détecte les
disques durs dans les baies de disques.
• Le voyant du port LAN du panneau arrière s’allume si le port
Ethernet du est correctement connecté à votre réseau. Il clignote
lors de l’émission ou la réception de données.
Pour éteindre le NSA, appuyez sur le bouton d'alimentation et
maintenez-le enfoncé jusqu'à entendre un bip. Relâchez ensuite le
bouton.
82

FRANÇAIS
Accéder au NSA
Pour un ordinateur Windows, utilisez l’utilitaire Discovery (voir page 83).
Pour un autre type d’ordinateur (comme Mac ou Linux), utilisez Direct
Access (voir page 85).
Utiliser l’utilitaire de découverte pour accéder
au NSA
1. Insérez le CD inclus dans votre lecteur de CD-ROM. Cliquez sur
Setup (Installer) dans l’écran qui s’affiche. Puis cliquez sur le lien
NSA Discovery Utility (Utilitaire de découverte du NSA-220).
Si cet écran n’apparaît pas, utilisez Windows Explorer (My
Computer) (Poste de travail) pour accéder au CD-ROM
(généralement lecteur D). Double cliquez sur setup.exe.
83

2. L'assistant d'installation démarre. Suivez les instructions de
l'installateur. Cliquez sur Finish (Terminer) pour terminer l'installation.
3. Dans Windows, cliquez sur Start (Démarrer) > All Programs (Tous
les programmes) > ZyXEL NSA > NSA Discovery Utility (utilitaire
de découverte NSA) pour exécuter l’utilitaire de découverte. Si votre
ordinateur est équipé de plusieurs cartes réseau, vous serez alors
invité à en choisir une.
4. L’utilitaire donne la liste des NSA dans votre réseau.
84

FRANÇAIS
5. Cliquez sur l’icône Admin pour voir l’écran d’ouverture de session du
configurateur web (voir page 86).
• (Si vous devez changer l'adresse NSAIP du , cliquez sous l'icône
sous Config.
• Pour mapper leNSA à un lecteur réseau Windows, cliquez sur
l’icône sous Map (voir page 90).
• Pour actualiser l'écran, cliquez sur Discover (Découvrir).
Accès direct
Ouvrez Internet Explorer (ou un autre navigateur web tel que Firefox).
Tapez ‘nsa220plus’ comme adresse de site web et appuyez sur [Enter]
(Entrée) ou cliquez sur Go (Envoyer).
85

NSA Ouvrir une session
Cette section vous indique comment ouvrir une session dans le NSA et
changer le mot de passe d’administrateur.
Si vous n’arrivez pas à accéder à l’écran d’ouverture de
session, consultez la section de dépannage à la fin de ce
guide.
1. Entrez le nom d’utilisateur ‘admin’ et le mot de passe ‘1234’ par
défaut et cliquez sur Login (Ouvrir une session).
Le nom de l'utilisateur et le mot de passe tiennent compte de
la casse. Vérifiez que le verrouillage de majuscule n’est pas
activé.
2. Il est conseillé de choisir un nouveau mot de passe (et de le noter).
Cliquez sur Apply (Appliquer) pour sauvegarder vos modifications et
passer à l'écran suivant.
3. L’écran My NSA s’affiche.
86

FRANÇAIS
Créer un volume
Cette section vous indique comment créer un volume interne dans le
NSA. Un volume est une zone de stockage sur un ou plusieurs disques
durs.
1. Cliquez sur Administration.
2. S’il n’y a pas encore de volume interne (zone de stockage), cliquez
sur Storage (Stockage) sur le panneau de navigation, et cliquez
ensuite sur Create an Internal Volume (Créer un volume interne). Si
votre disque dur comporte déjà un volume que vous voulez utiliser,
passez à la section 6. Si vous voulez supprimer un volume existant,
consultez le chapitre Storage Screens (Ecrans de stockage) dans le
guide de l’utilisateur.
Le fait de créer un volume formate les disques
durs. Toutes les données seront perdues.
87

3. Si vous avez deux disques durs installés, sélectionnez une
configuration de disque.
• JBOD (espace de stockage maximum des données)
Utilise la capacité de stockage complète pour chaque disque,
même s’il y a deux disques durs avec des capacités de stockage
différentes. Avec deux disques durs, vous pouvez créer deux
volumes (un pour chaque disque) de sorte que la panne d’un
disque n’affectera pas l’autre. Avec deux disques durs dans un
volume JBOD simple, vous perdez toutes les données sur les
disques si un disque tombe en panne.
• RAID 0 (non recommandé)
Présente les vitesses d’écriture les plus élevées, mais si un
disque tombe en panne, vous perdez toutes les données sur les
deux disques. Utilisez uniquement RAID 0 pour les données non
critiques nécessitant des vitesses d’écriture élevées (comme la
vidéo, les graphiques et les jeux). L’espace de stockage de
données est limité à deux fois la capacité du disque le plus petit.
• RAID 1 (recommandé)
Met en miroir les données d’un disque sur le second disque pour
assurer la sécurité des données. RAID 1 est plus lent que RAID
0, mais vous pouvez récupérer l’ensemble de vos données si un
disque tombe en panne. L’espace de stockage des données est
limité à la capacité du disque le plus petit.
88

FRANÇAIS
4. Entrez un nom dans le champ Volume Name (Nom du volume).
Cliquez sur Apply (Appliquer) pour commencer la création du
volume.
5. Patientez pendant la création du volume.
6. Vous pouvez utiliser le volume une fois que l’état est Healthy (Sain).
Pour un volume RAID, l’état est Resync jusqu’à ce que le volume soit
prêt.
7. Si deux disques sont installés et que vous avez créé un volume
JBOD sur un seul disque, répétez les étapes pour créer un second
volume sur l’autre disque.
89

Mappez le NSA sur votre
ordinateur Lecteur réseau
Vous stockez les fichiers sur le NSA dans partages (semblables à des
dossiers Windows partagés). Mapper unNSA partage sur un lecteur
réseau Windows pour pouvoir utiliser Windows Explorer (Explorateur
Windows) pour transférer des fichiers vers et à partir du NSA. Après
avoir mappé un partage, vous pouvez faire glisser et déplacer des
fichiers entre votre ordinateur et le NSA.
1. Dans Windows, cliquez sur Start (Démarrer) > All Programs (Tous
les programmes) > ZyXEL NSA > NSA Discovery Utility (utilitaire
de découverte NSA) pour exécuter l’utilitaire de découverte. Si votre
ordinateur est équipé de plusieurs cartes réseau, vous serez alors
invité à en choisir une.
2. L’utilitaire donne la liste des NSA dans votre réseau. Cliquez sur
l’icône MAP dans l’utilitaire de découverte.
90

FRANÇAIS
3. Le dossier public du NSA s’affiche dans Explorateur Windows.
4. Cliquez sur Tools (Outils) > Map Network Drive (Mapper le lecteur
réseau). Dans le champ Drive (Lecteur), sélectionnez une lettre de
lecteur à utiliser pour le NSA. Dans le champ Folder (Dossier),
sélectionnez le NSA (vous devrez peut-être parcourir pour le trouver).
5. Si l’utilitaire de découverte n’est pas installé sur votre ordinateur, vous
pouvez ouvrir Windows Explorer (Explorateur Windows) et taper deux
barres de fraction inversées suivies du nom du serveur (nsa220plus
par défaut) ou de l’adresse IP duNSA .
91

Sauvegarder des fichiers à l’aide
de Memeo Autobackup
Utilisez le logiciel Memeo Autobackup inclus sur le CD pour sauvegarder
automatiquement les fichiers sélectionnés depuis votre ordinateur sur le
NSA chaque fois que vous modifiez les fichiers.
Configuration requise
Memeo Autobackup fonctionne avec Windows 2000 Workstation avec
Service Pack 6, Windows XP Pro, ou Windows XP Edition familiale.
Installation et configuration de Memeo
Autobackup
Le programme Memeo Autobackup utilise le même port
réseau que l’utilitaire de découverte pour découvrir le .NSA
Pour éviter tout conflit de port, fermez d’abord l’utilitaire de
découverte avant d’utiliser Memeo Autobackup.
1. Etant donné que vous devez redémarrer votre ordinateur, fermez vos
autres fichiers et programmes avant d’installer le logiciel Memeo
Autobackup.
92

FRANÇAIS
2. Insérez le CD inclus dans votre lecteur de CD-ROM. Cliquez sur
l’icône Tools (Outils) dans l’écran qui s’affiche. Puis cliquez sur le
logiciel Memeo Instant Backup.
Si cet écran n’apparaît pas, utilisez Windows Explorer (My
Computer) (Poste de travail) pour accéder au CD-ROM
(généralement lecteur D). Double cliquez sur setup.exe.
3. Suivez les instructions pour installer le logiciel.
Memeo Autobackup nécessite Microsoft.NET version 1.1.
L’assistant l’installe pour vous s’il n’est pas déjà installé dans votre
ordinateur.
4. Quand vous voyez l’écran suivant, sélectionnez Network Places
(Emplacements du réseau) et cliquez sur link (Liaison) pour
sélectionner votre dossier de sauvegarde.
93

5. Sélectionnez le lecteur mappé du NSA et cliquez sur OK.
6. Dans cet écran, sélectionnez les éléments que vous voulez
sauvegarder.
94

FRANÇAIS
7. Cet écran donne la liste des éléments que vous avez sélectionnés
pour être sauvegardés. Confirmez vos sélections et cliques sur Next
(Suivant).
8. Spécifiez un nom pour votre plan de sauvegarde (ou utilisez
simplement le nom par défaut). Cliquez sur Next (Suivant) et ensuite
sur Done (Fait).
95

Utiliser Memeo Autobackup après
l’installation initiale
Après avoir installé et configuré Memeo Autobackup, double cliquez sur
l’icône dans la barre d’état pour ouvrir l’écran de démarrage du
programme.
Si l’icône ne s’affiche pas, vous pouvez cliquer sur Start (Démarrer) >
Programs (Programmes) > Memeo Autobackup > Memeo
Autobackup pour le démarrer.
96

FRANÇAIS
Dépannage
Procédez de la manière suivante si vous n’arrivez pas à obtenir
l’écranNSA d’ouverture de session.
• Assurez-vous que le NSA est allumé.
• Vérifiez les connexions des câbles du NSA. Vérifiez que la LED
LAN du NSA (située sur le port LAN) est allumée ou clignote.
• Si vous avez essayé d’ouvrir directement une session en tapant le
nom du serveur (nsa220plus par défaut) dans les champs
d’adresse de vos navigateurs web, assurez-vous que vous l’avez
correctement tapé. Si cela ne fonctionne toujours pas, essayez
d’utiliser l’utilitaire découverte.
• Vérifiez que l'adresse IP de votre ordinateur se trouve dans le
même sous-réseau que l'adresse IP du NSA. Vous pouvez utiliser
l’utilitaire de découverte pour trouver l’adresse IP du NSA.
Consultez l’appendice du guide de l’utilisateur pour la manière de
paramétrer l’adresse IP de votre ordinateur afin de pouvoir la
modifier. Sautez cette partie si vous savez que des routeurs sont
placés entre votre ordinateur et le NSA (comme si vous vous
connectiez par Internet).
• Envoyez une requête ping au NSA depuis votre ordinateur. Vérifiez
que l'adaptateur Ethernet de votre ordinateur est installé et
fonctionne correctement. Sur un ordinateur (Windows), cliquez sur
Start (Démarrer), (All) Programmes ((Tous) Programmes),
Accessories (Accessoires) et ensuite sur Command Prompt
(Invite de commandes). Dans la fenêtre Command Prompt (Invite
de commands), tapez “Ping” suivi de l’adresse IP du NSA et
appuyez sur [ENTER] (ENTRÉE). Utilisez l’utilitaire de découverte
pour trouver l’adresse IP duNSA si vous ne la connaissez pas.
97

• Utilisez Internet Explorer 6.0, Mozilla Firefox 1.07, Netscape
Navigator 7.0, ou des versions ultérieures à celles-ci avec
JavaScript activé.
98

ITALIANO
ITALIANO
Introduzione
L'NSA consente di condividere file e di eseguire il backup di dati nella
propria rete. È anche possibile riprodurre video, musica e visualizzare
file fotografici memorizzati sull'NSA utilizzando un client multimediale
come il DMA-1000.
Come funziona
L'illustrazione si riferisce all'NSA in una rete domestica. Gli utenti fanno
backup e condividono dati sull'NSA. Il DMA-1000 riproduce sulla TV i file
multimediali dell'NSA. Un'unità di archiviazione USB fornisce spazio di
archiviazione aggiuntivo e i file vengono copiati direttamente dalla penna
di memoria USB verso l'NSA.
Posizionare l'NSA dietro un firewall e/o un dispositivo IDP (Intrusion
Detection and Prevention) per proteggerlo da eventuali attacchi
provenienti da Internet.
99

Operazioni preliminari
• Installazione delle unità a disco rigido, 102
• Collegare l'NSA, 105
• Accesso all'NSA, 107
• NSA - Login, 110
• Creazione di un volume, 111
• Mappare l'NSA all'unità di rete del computer, 114
• Eseguire il backup dei file tramite Memeo Autobackup, 116
Fare riferimento alla Guida utente memorizzata sul CD fornito a corredo
per i dettagli sulla configurazione di tutte le funzioni dell'NSA.
100
 Loading...