


NBG-460N
Table of contents
 Loading...
Copyright © 2008. All rights reserved.
NBG460N
Wireless N Gigabit Router
Quick Start Guide
Version 3.60
3/2008
Edition 1
DEFAULT LOGIN
IP Address http://192.168.1.1
Password 1234
CONTENTS
ENGLISH 2
DEUTSCH 16
ESPAÑOL 30
FRANÇAIS 44
ITALIANO 58
SVENSKA 72
ENGLISH
2
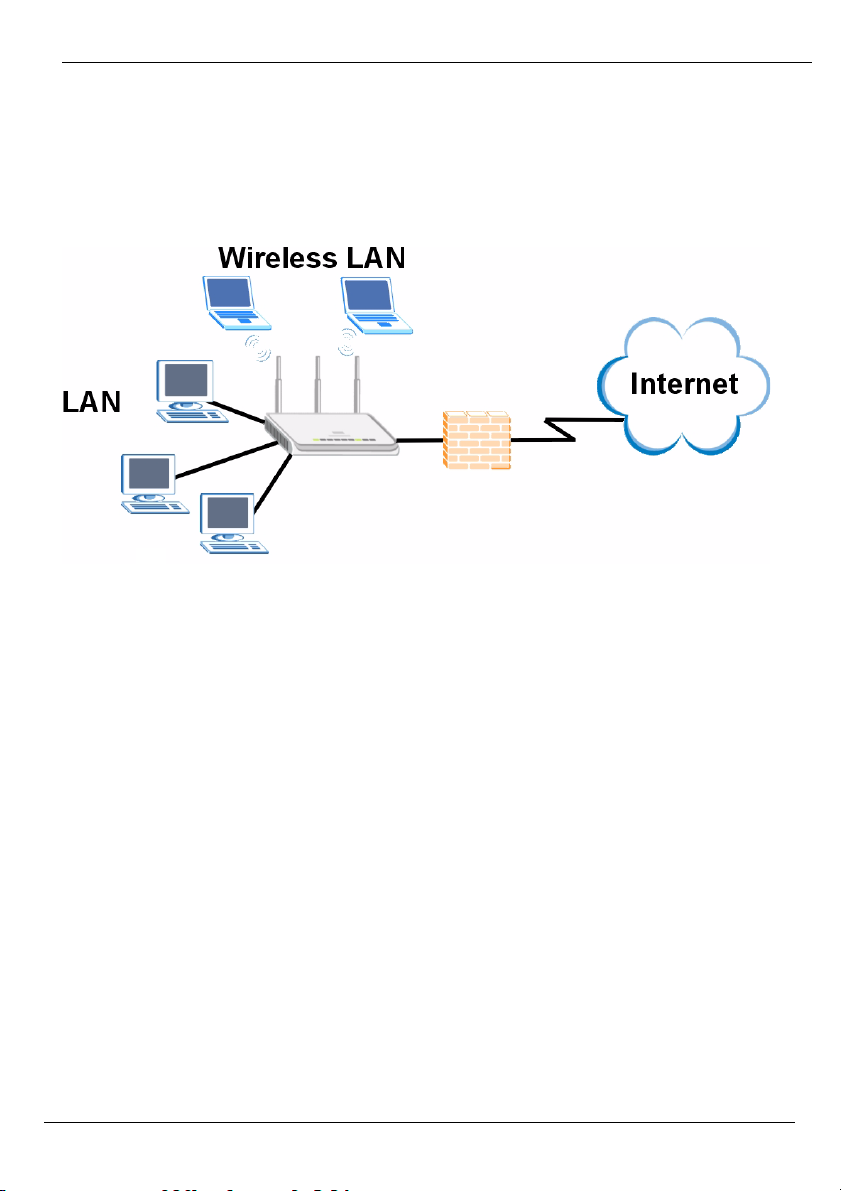
Overview
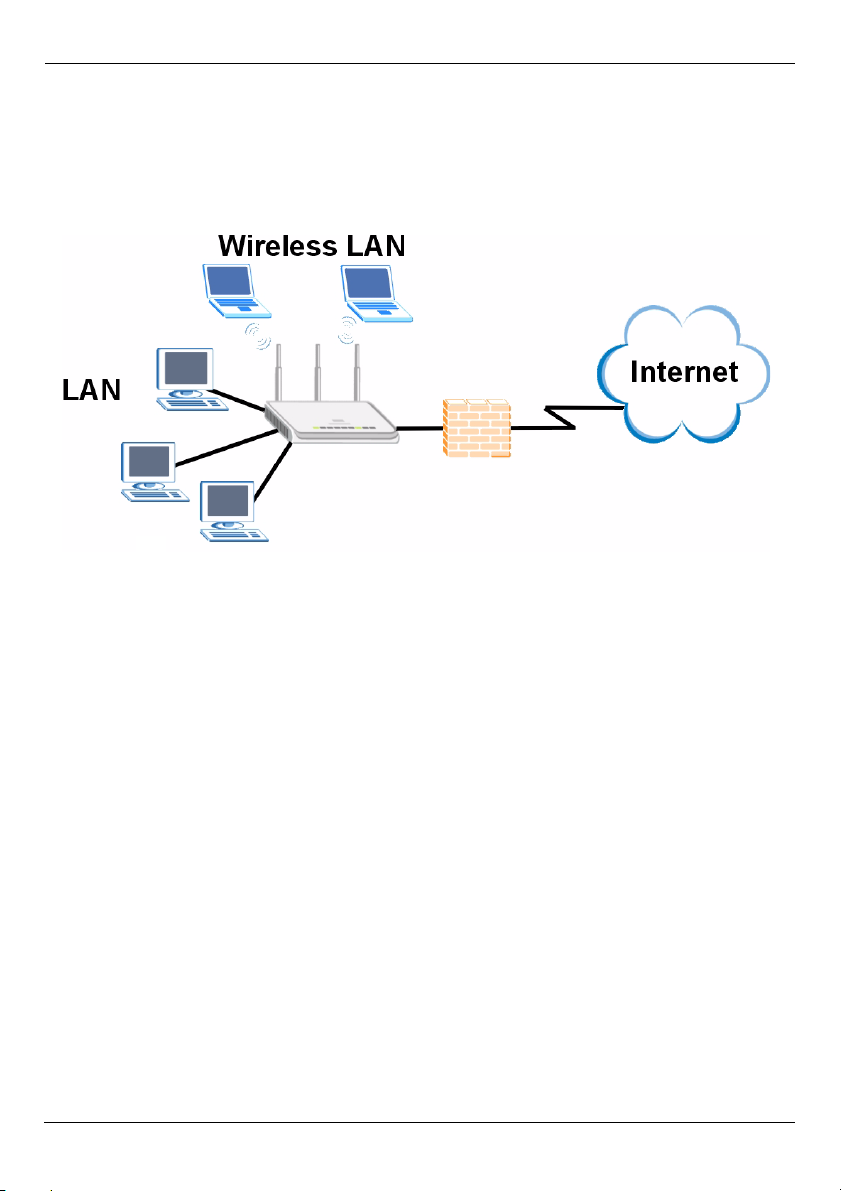
The NBG460N is an IEEE 802.11b/g/n wireless broadband router or access point (AP). As
a router, the NBG460N directs traffic between your wireless network and another network
such as the Internet as shown below, providing services such as content filtering,
bandwidth management and a firewall.
This Quick Start Guide shows you how to do the following with your NBG460N in router
mode:
1 Connecting Your Hardware
2 Accessing the Web Configurator
3 Connecting to the Internet with the Wizard
4 Set Up a Wireless Network Manually or with WPS
See your User’s Guide on the CD in the package on how to set up the NBG460N as an AP
and for more information on all features.
To read the User’s Guide insert the CD that came in the box into your CD-ROM drive. A
screen should pop up. Navigate to the User’s Guide from this screen. If a screen does not
pop up, open Windows Explorer (click My Computer), click on the CD-ROM drive (usually
drive D:) and navigate to it from there.
ENGLISH

ENGLISH
3
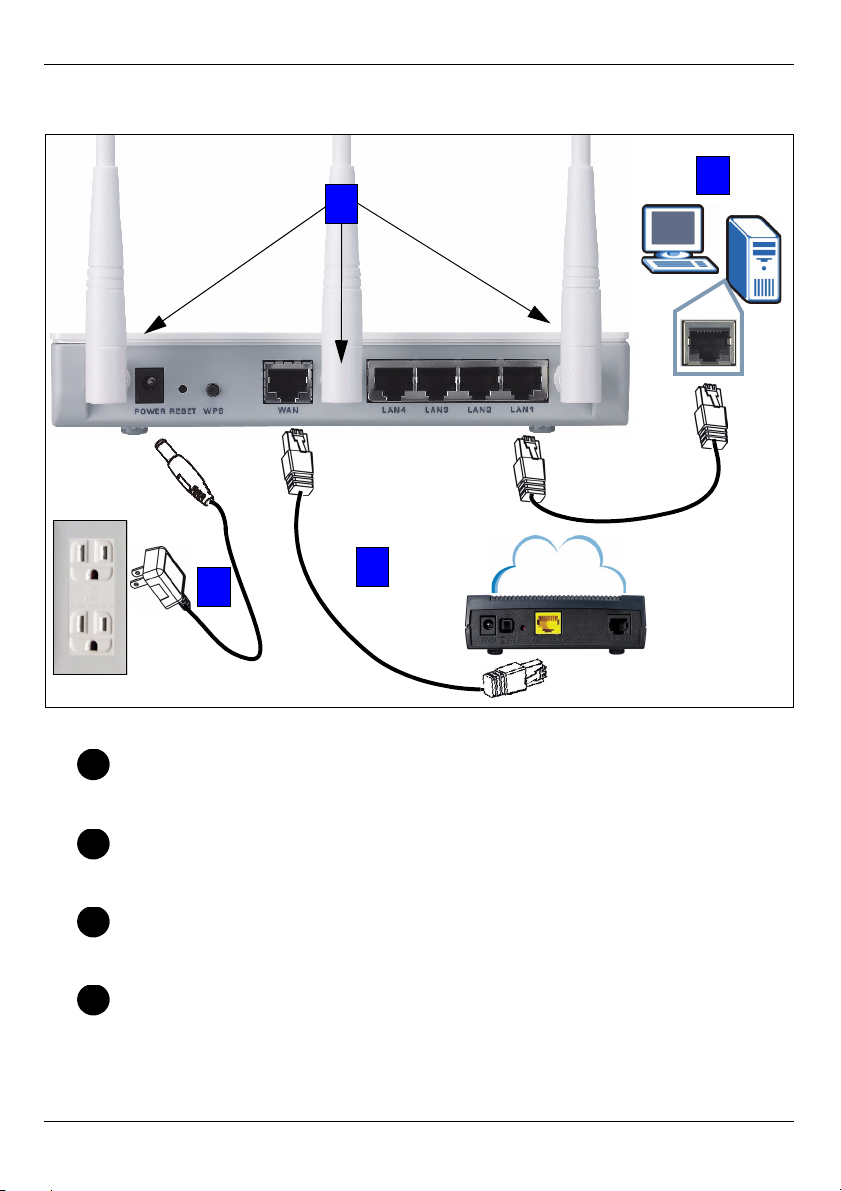
1 Hardware Connections
Do the following to make hardware connections for initial setup.
Antennas
Connect each antenna to an antenna socket, ensuring the antennas are screwed
in firmly and angled upwards.
LAN
Connect the Ethernet port on your computer to a LAN port on the NBG460N using
the included Ethernet cable.
WAN
Connect the WAN port on your NBG460N to the Ethernet port on the device with
which you are accessing the Internet (for example, a router or modem) using an
Ethernet cable.
POWER Connection
Use the power adapter from the package to connect the POWER socket to an
appropriate power source.
Internet
1
4
2
3
1
2
3
4
ENGLISH
4
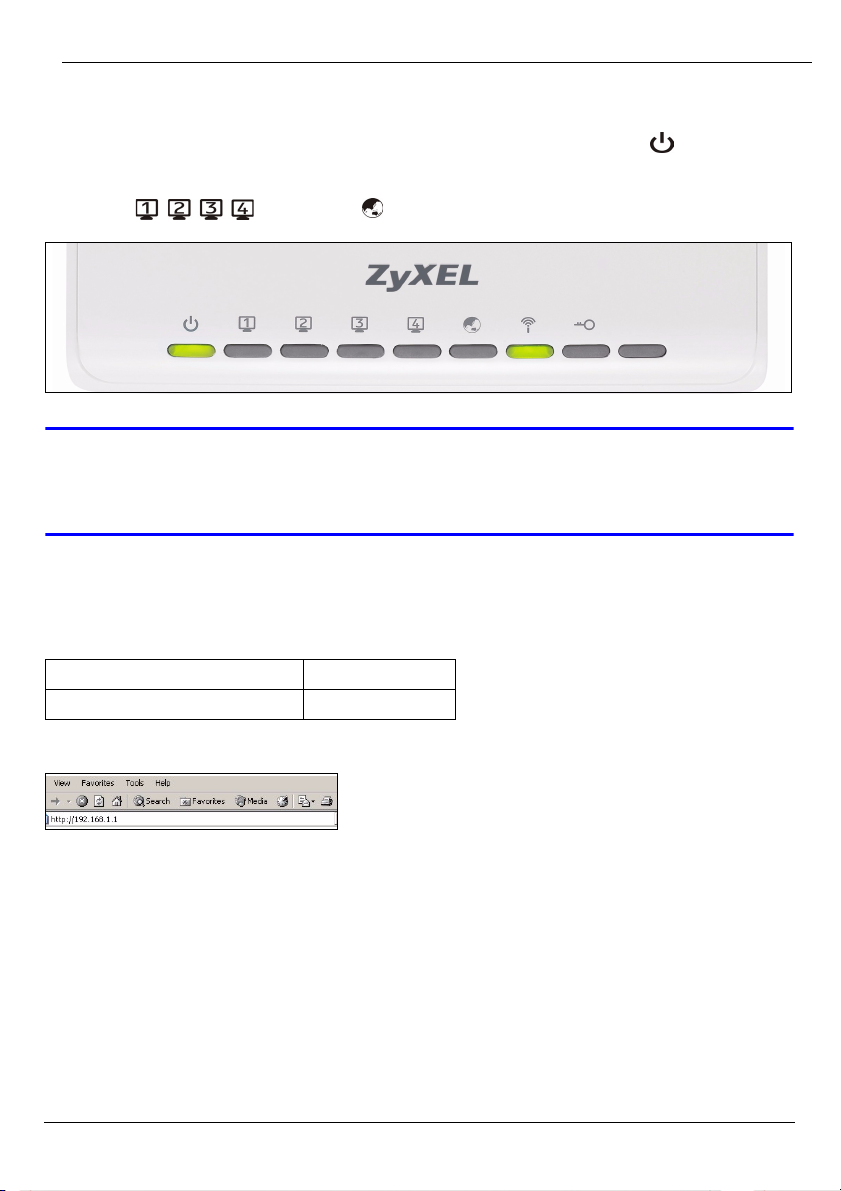
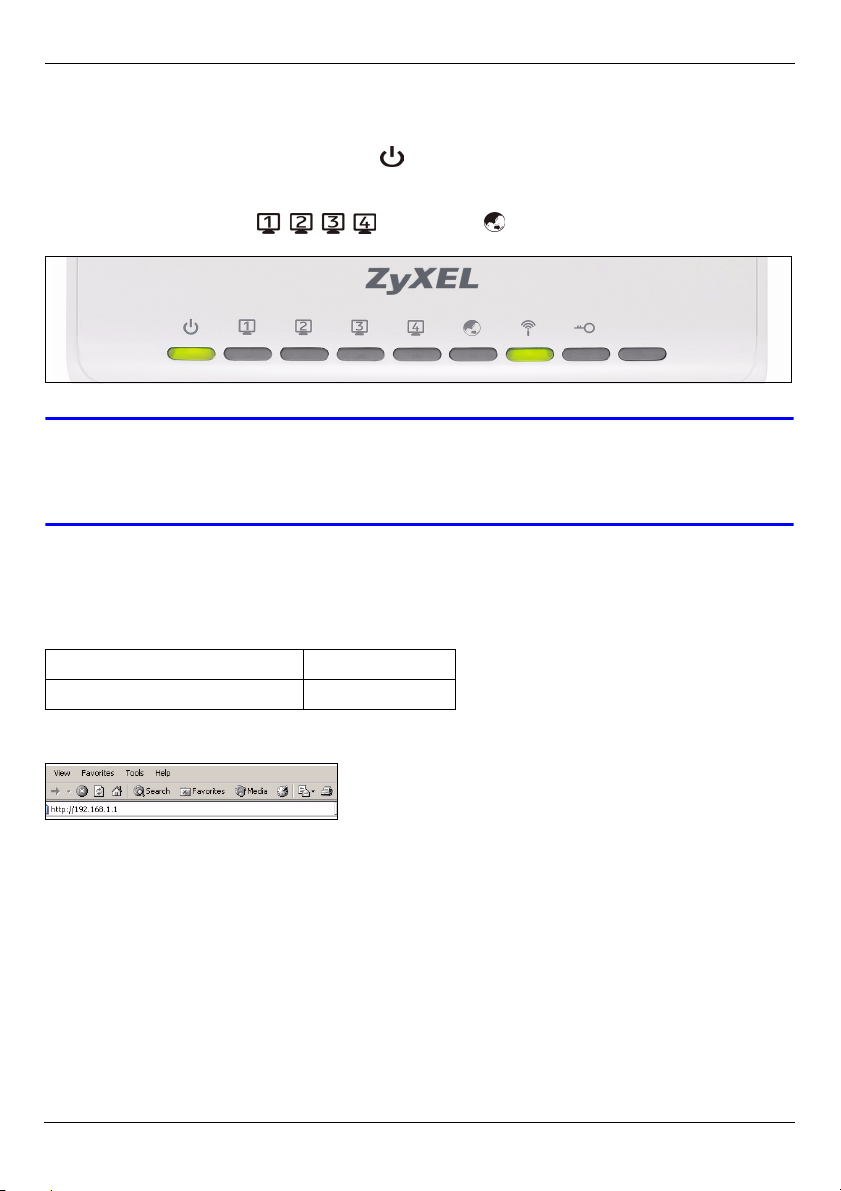
The LEDs
Look at the LEDs (lights). When you connect the power, the power LED ( ) blinks and
stays on once the device is ready.
The LAN ( ) and WAN ( ) LEDs turn on if the corresponding connections
are properly made.
V If an LED does not turn on, check your connections. If this doesn’t help,
disconnect the NBG460N from its power source, wait for a few seconds and
turn it back on.
2 Accessing the Web Configurator
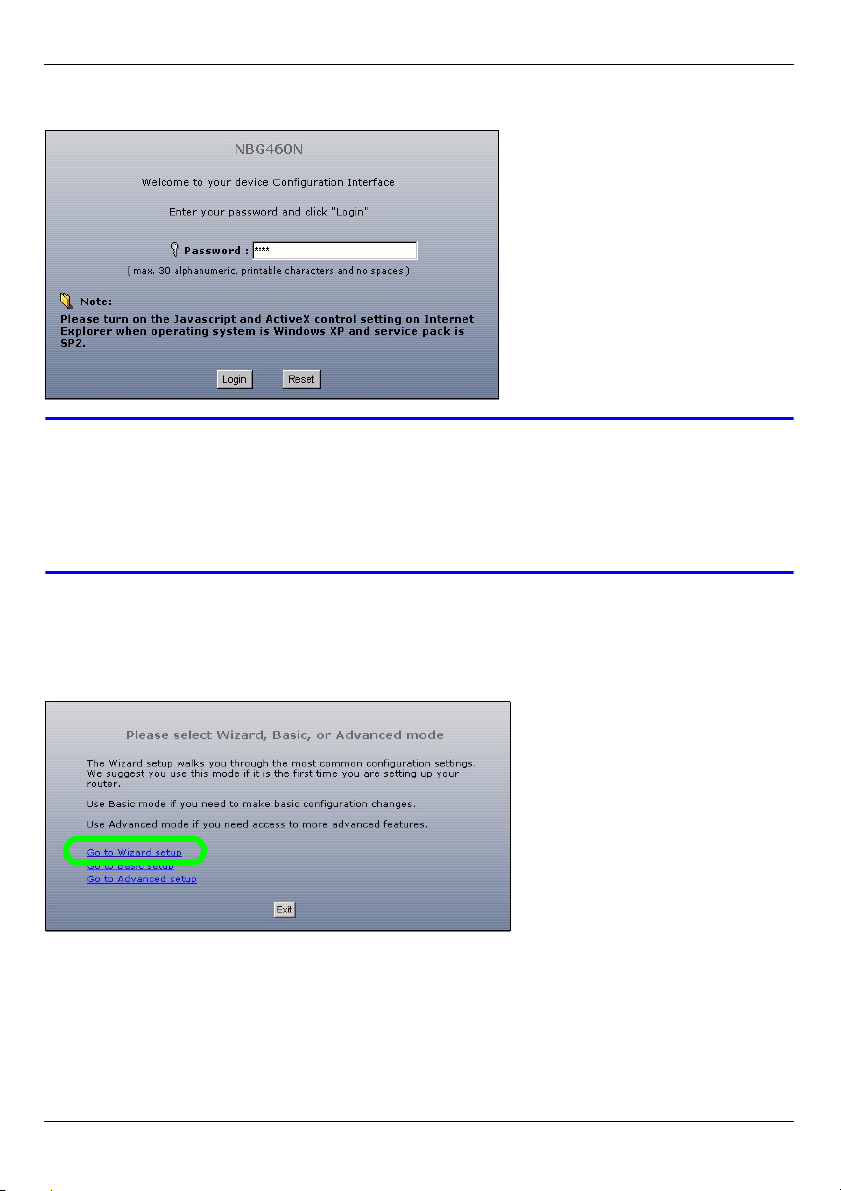
Default Login Information
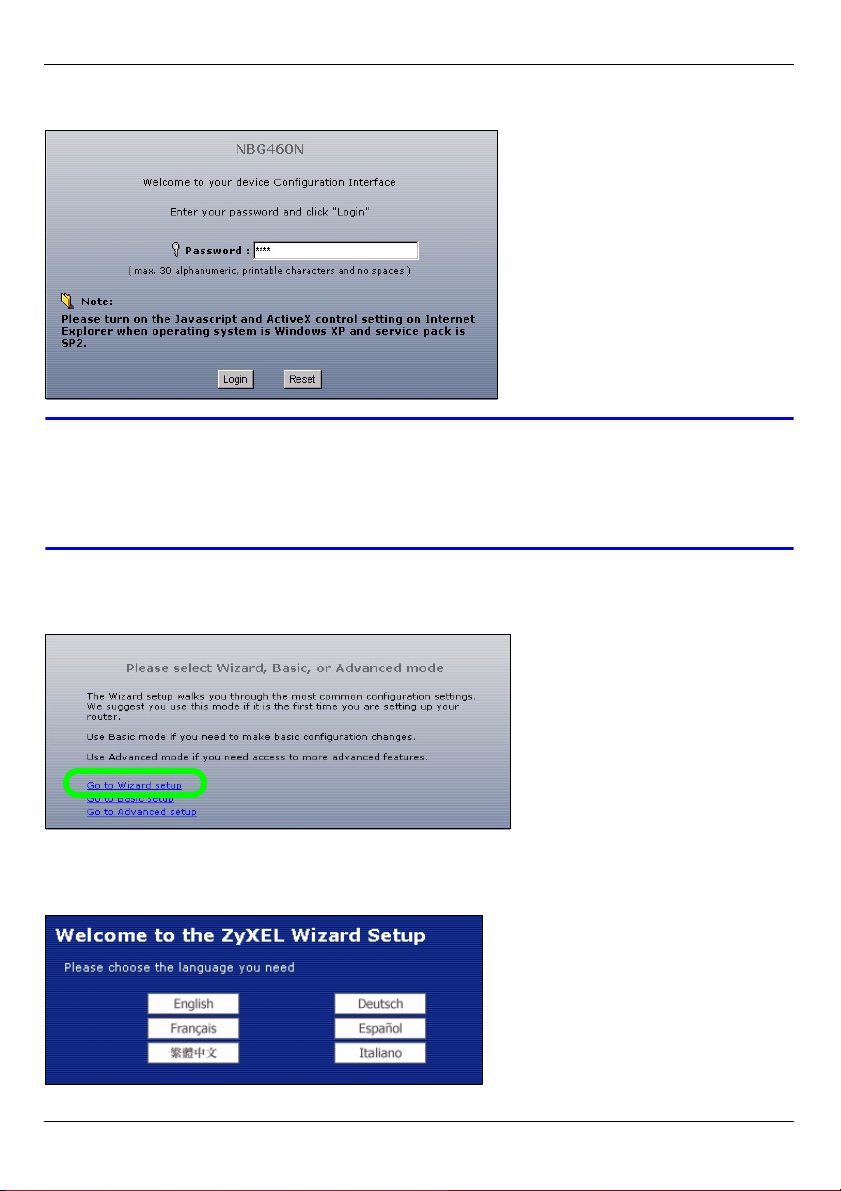
1 Launch an Internet browser such as Internet Explorer. Enter “http://192.168.1.1” as
shown below.
IP address http://192.168.1.1
administrator password 1234
ENGLISH
5
2 The Password window displays. Enter the password (“1234” is the default) and click
Login.
V If the login screen does not display, make sure your computer is set to
receive an IP address dynamically. If that doesn’t help, check your web
browser’s security settings (see the appendix in the User’s Guide for
information on both suggestions).
3 Change the password in the screen that follows and click Apply.
4 Click Go to Wizard setup to set up your NBG460N for the first time
3 Connection Wizard Setup
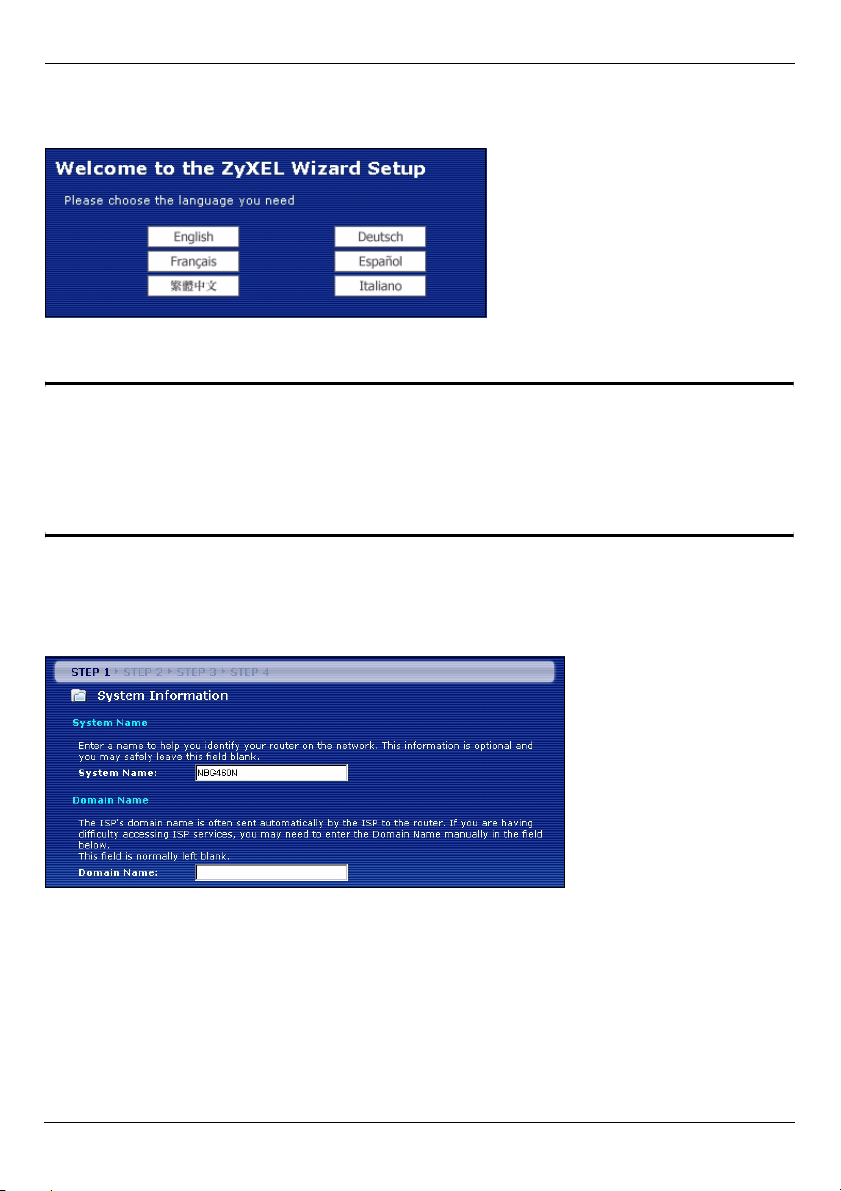
1 Select a language. Click Next.
ENGLISH
6
2 Click Next in the following screen to proceed with the Connection Wizard.
" Enter the Internet access information exactly as given to you by your ISP in
each wizard screen. Click Next to continue or click Back to return to the
previous screen. Current screen information will be lost if you click Back.
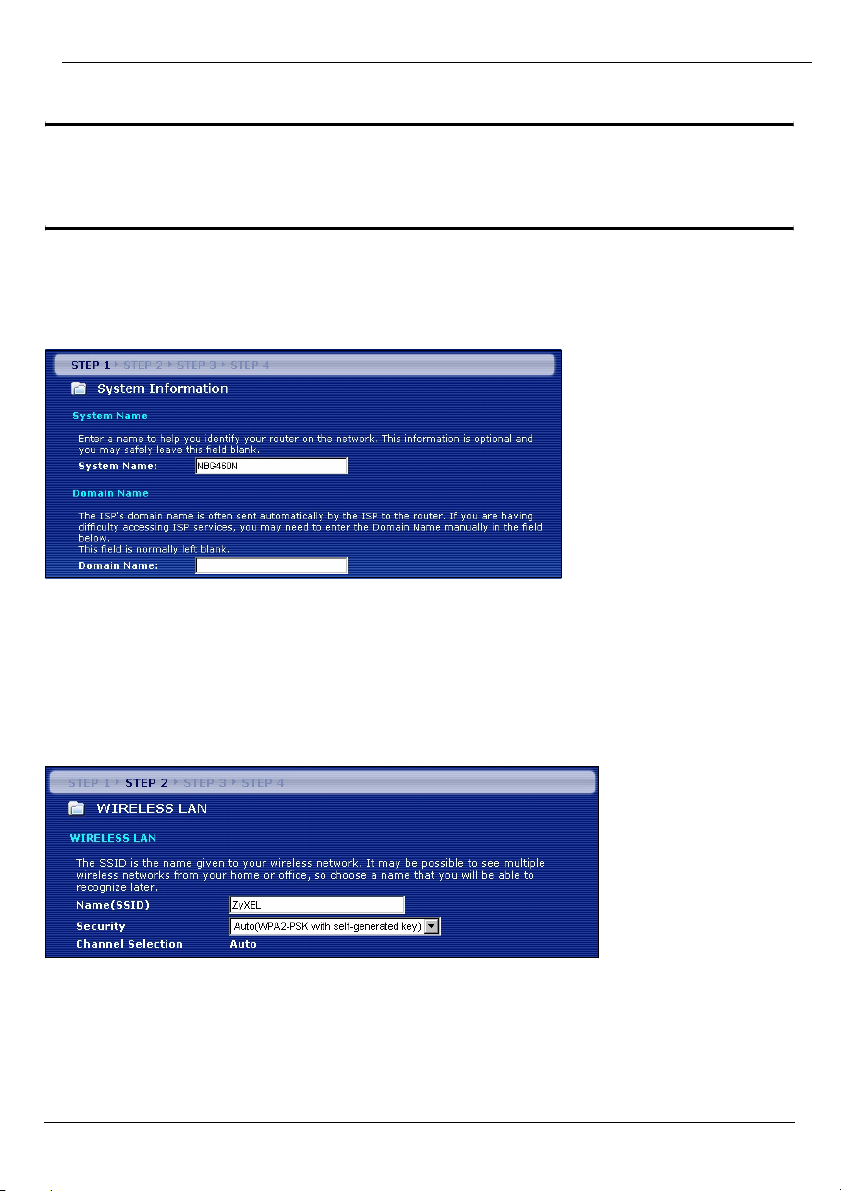
3.1 System Information
This screen is optional. You can just click Next.
3.2 Wireless LAN
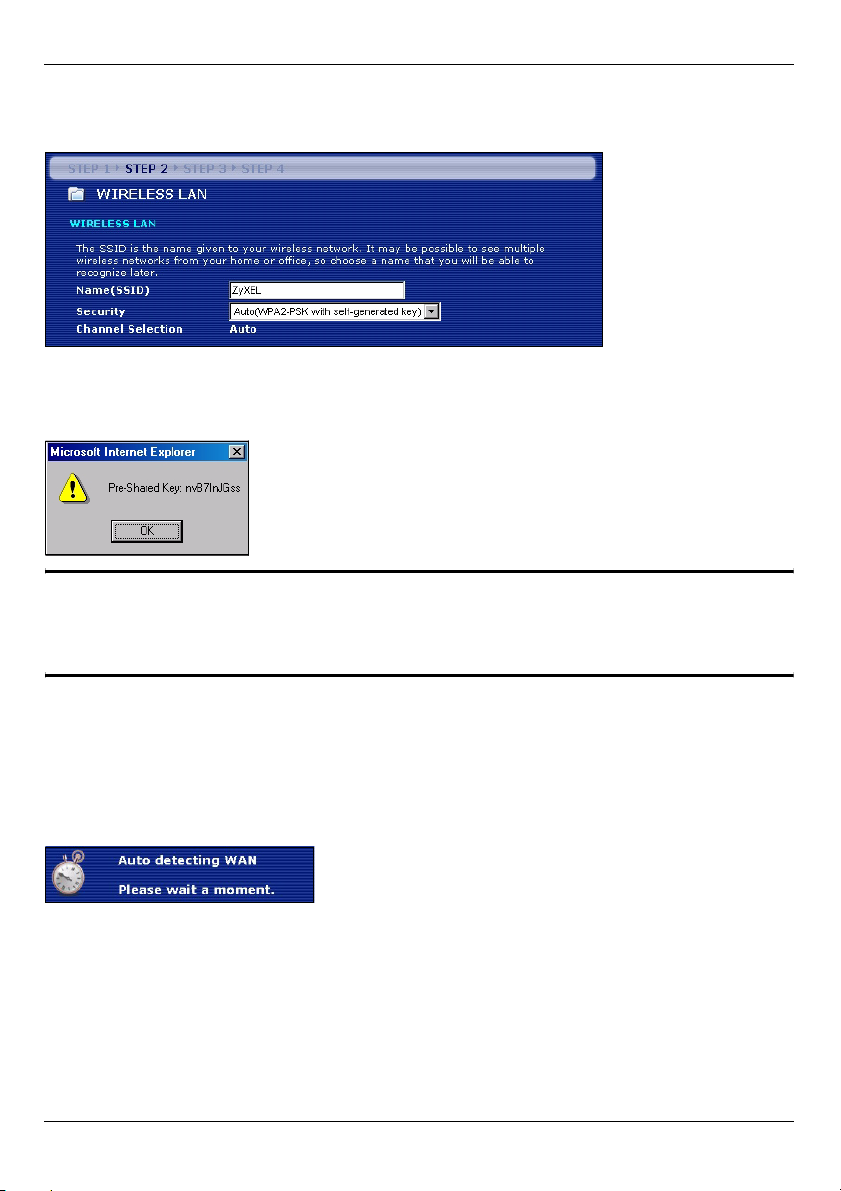
Configure your NBG460N to support a wireless network by following these steps.
1 Enter a unique Name (SSID) to identify the NBG460N on the wireless LAN.
2 Select Auto to automatically use WPA-PSK which provides a high level of security. See
your User’s Guide for information on other kinds of security. Click Next.
ENGLISH
7
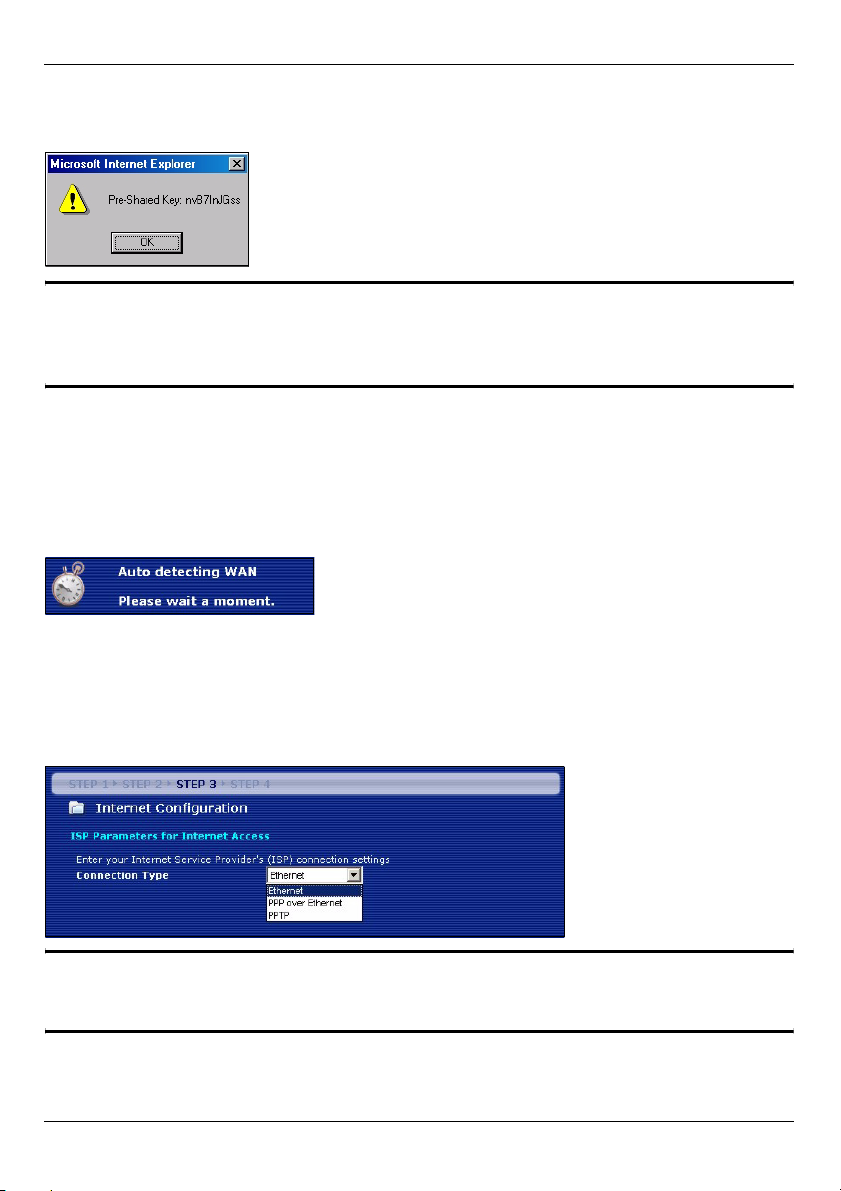
3 Write down the security key that displays in the pop-up screen. Computers on the wireless
network will need this security key to access the NBG460N. The security key is case-
sensitive so “ABCD” is not the same as “abcd”.
" Write down the security key, Name (SSID), Security and Channel
Selection for later use as the NBG460N and other devices on your wireless
network must use the same settings.
4 Click OK to continue.
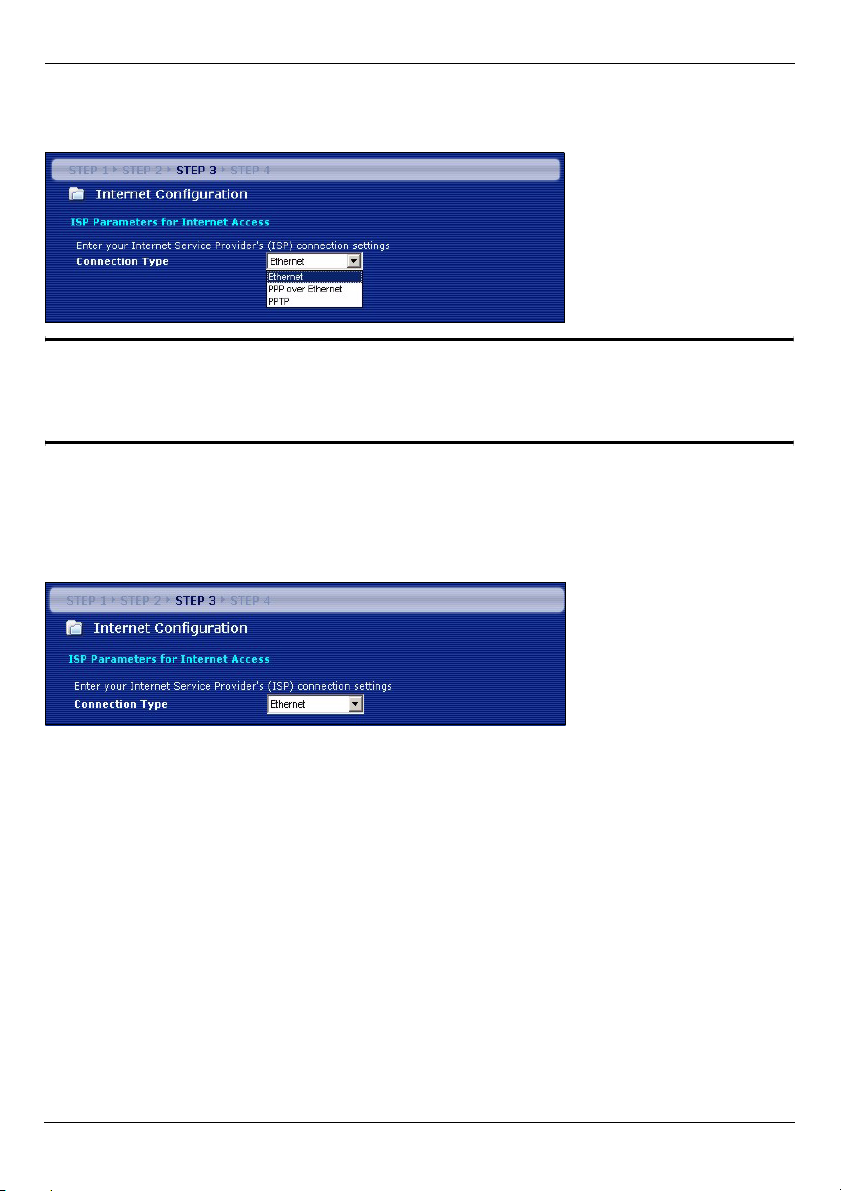
3.3 WAN Connection
You may need to wait several minutes while the wizard attempts to detect which WAN
connection type (Ethernet, PPP over Ethernet or PPTP) you are using.
• If the wizard detects your connection type, follow the steps for your connection type as
given below.
• If the wizard cannot detect a connection type, you must select your connection type from
the drop-down list box in the screen below. If you do not know what connection type to use,
check with your Internet Service Provider (ISP).
" If you were given Internet access settings, type them in the following fields.
Otherwise leave the default settings and click Next.
ENGLISH
8
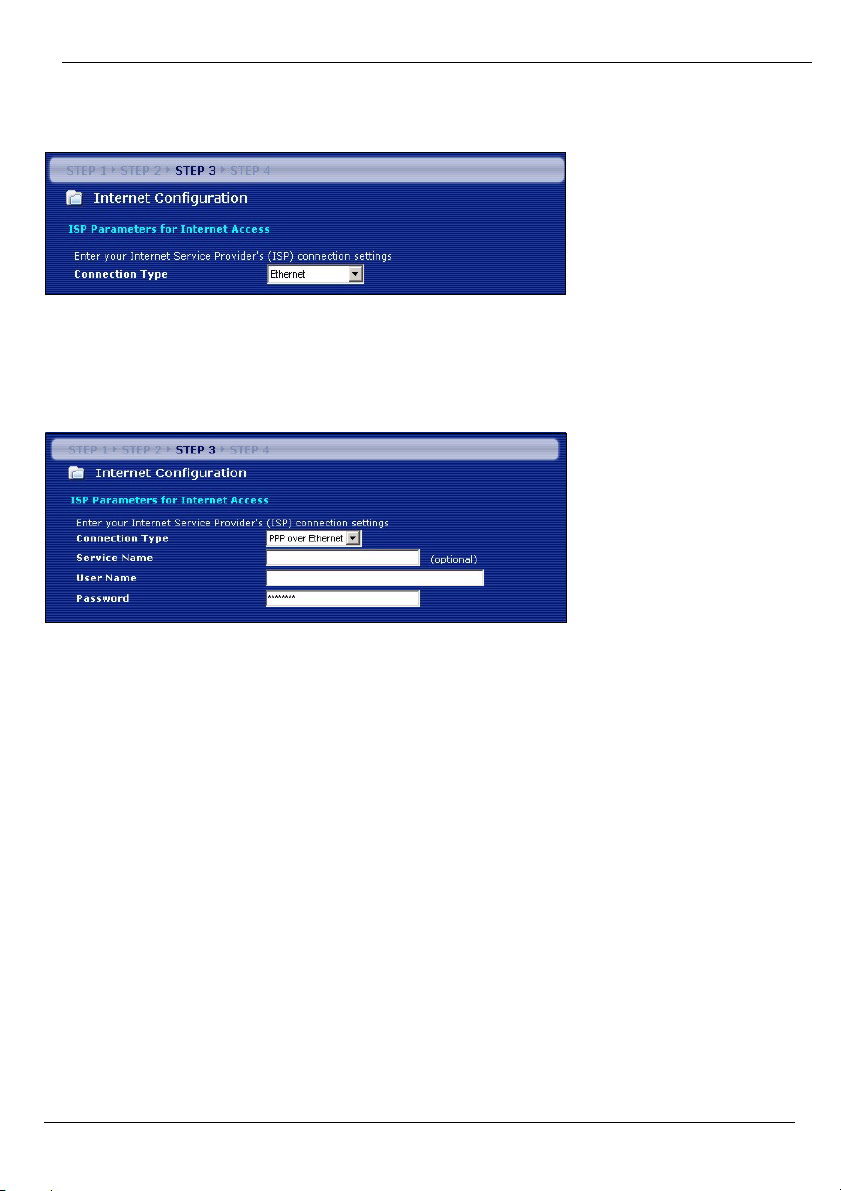
Ethernet Connection
Select Ethernet as your WAN connection type and click Next to go to section 3.4.
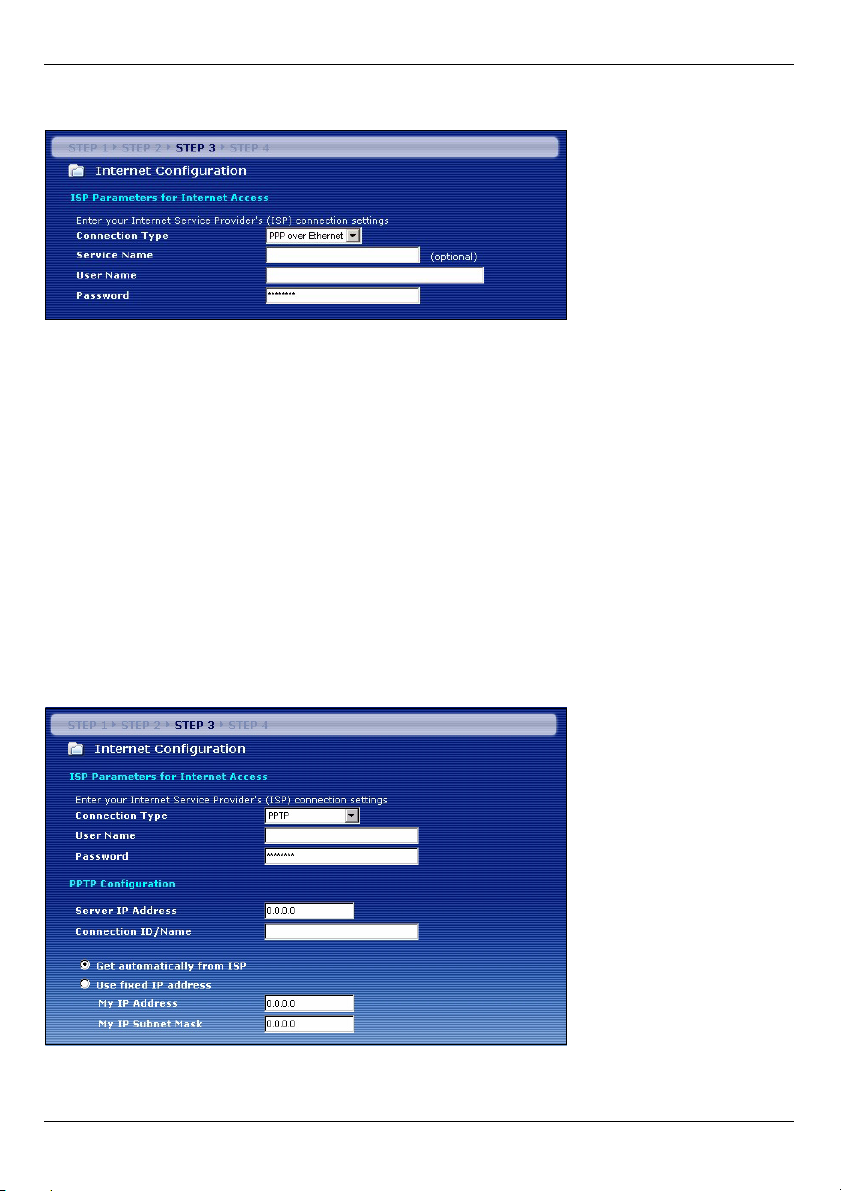
PPP over Ethernet Connection
1 Select PPP over Ethernet as your WAN connection type
2 Type a Service Name (if your ISP gave you one), User Name and Password. Click Next
to go to section 3.4.
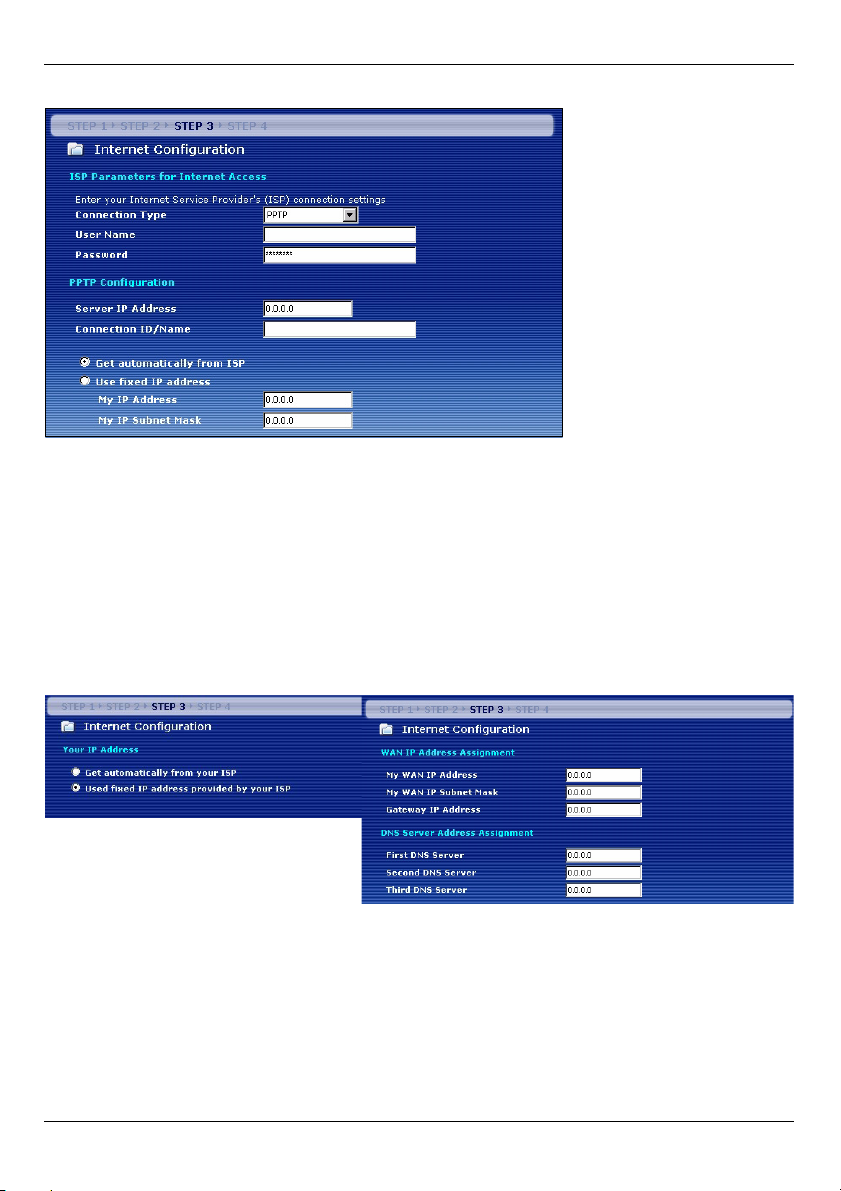
PPTP Connection
1 Select PPTP as your WAN connection type.
2 Type a User Name and Password.
3 Type a PPTP Server IP Address.
4 Type a Connection ID/Name (if provided by your ISP).
5 If your ISP did not assign you a fixed PPTP IP address, select Get automatically from
ISP.
6 If your ISP assigned you a fixed PPTP IP address, select Use fixed IP address to give
the NBG460N a fixed, unique PPTP IP address and subnet mask.
ENGLISH
9
7 Click Next to go to section 3.4.
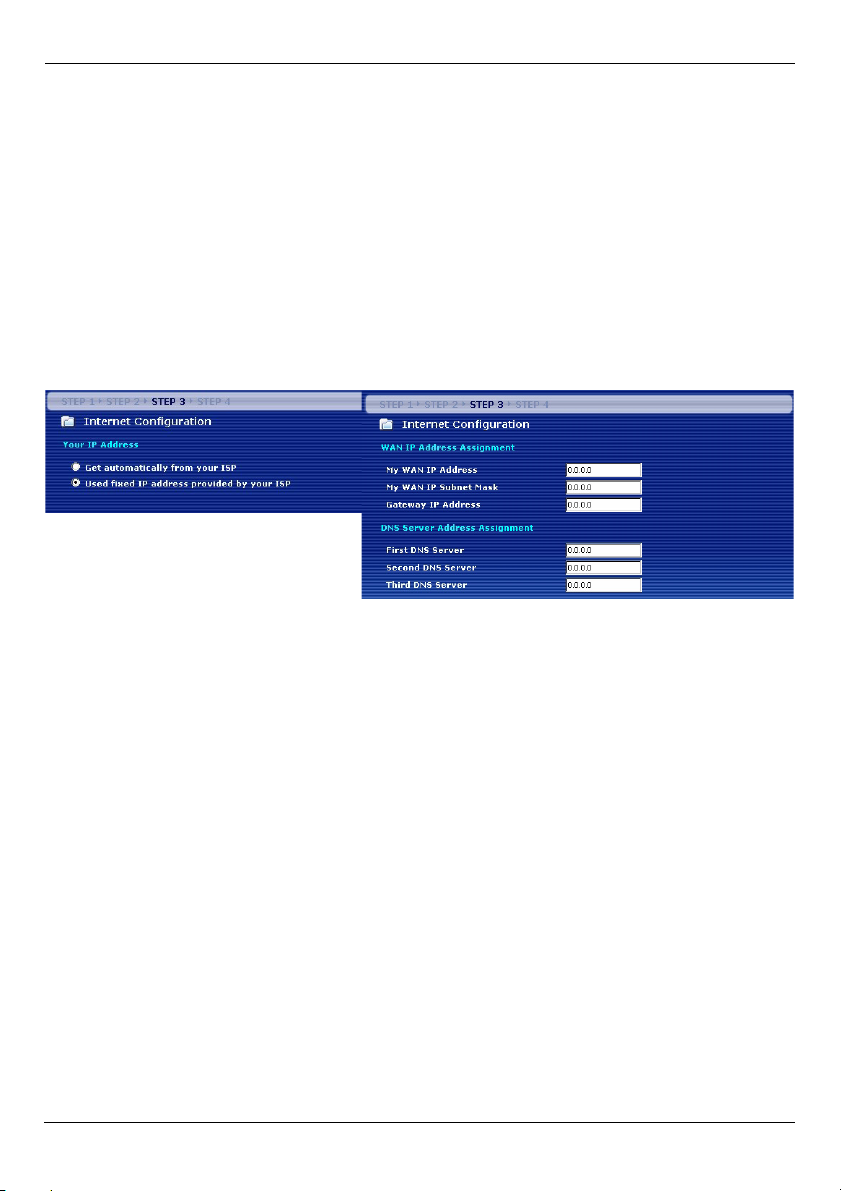
3.4 WAN IP Address
• If your ISP did not assign you a fixed IP address, select Get automatically from your ISP
and click Next to go to section 3.5.
• If your ISP gave you a fixed IP address:
1 Select Use fixed IP address provided by your ISP. Click Next.
2 In the next screen type the WAN IP address, WAN IP Subnet Mask and the gateway IP
address given by your ISP.
If you were given DNS server settings, type them in the fields. Otherwise leave the default
settings and click Next.
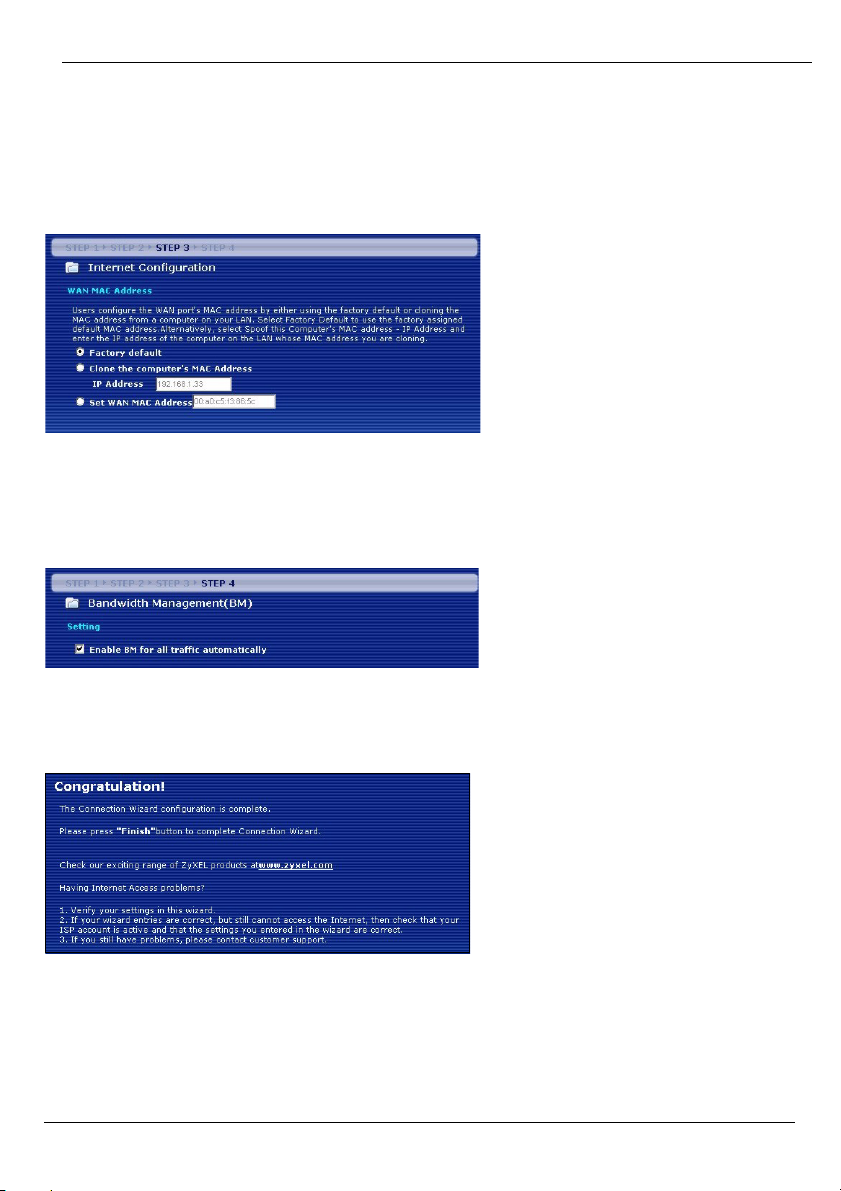
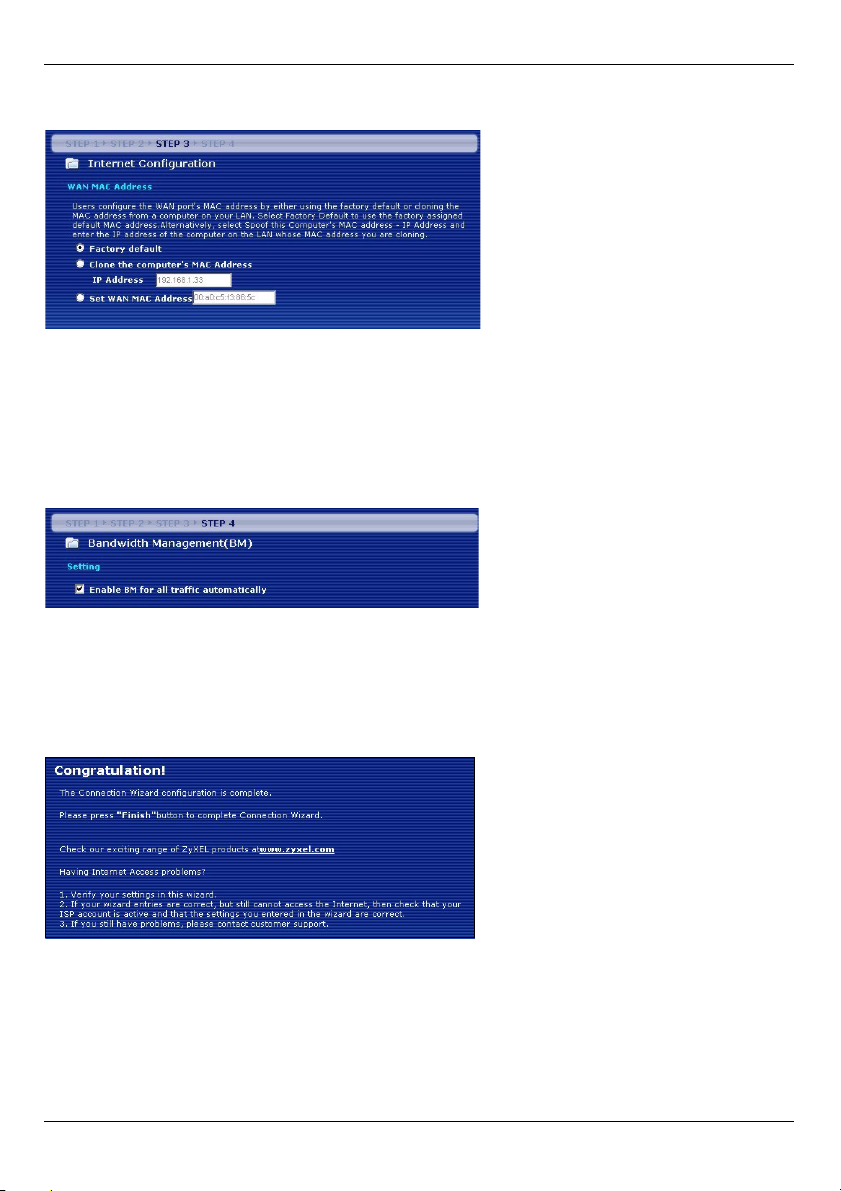
3.5 WAN MAC Address
A MAC address is a number which uniquely identifies a device on any network. Set the
WAN port’s MAC address by either using your device’s factory assigned default MAC
address or cloning the MAC address of a computer on your LAN. By default, the NBG460N
uses the factory assigned MAC address to identify itself on the WAN.
ENGLISH
10
•Select Factory Default to use the factory-assigned, default MAC address.
•Select Clone the Computer’s MAC Address to clone the MAC address from a computer
on your LAN. Type the IP address of the computer with the MAC address you are cloning. It
is advisable to clone the MAC address from a computer on your LAN even if your ISP does
not presently require MAC address authentication.
•Select Set WAN MAC Address if you know the MAC address you want to use.
3.6 Bandwidth Management
Select Enable BM for all traffic automatically to have the NBG460N prioritize data traffic
according to the its use. For example, video streaming may have higher priority than email.
Leave unchecked if unsure. Click Next.
3.7 Setup Complete
1 Click Apply to save your changes in the next screen that appears in the wizard.
2 Click Finish in the screen below to complete the wizard setup.
3 Congratulations. Open a web browser, such as Internet Explorer, to visit your favorite
website.

ENGLISH
11
V If you cannot access the Internet when your computer is connected to one
of the NBG460N’s LAN ports, check your connections. Then turn the
NBG460N off, wait for a few seconds and turn it back on. If this doesn’t
work run the wizard again, making sure you type the information correctly.
Also, if you are using a new Internet account, contact your ISP to make
sure it is active. See Troubleshooting in the User’s Guide for more
suggestions.
4 Set Up a Wireless Network
You can use Wi-Fi Protected Setup (WPS) to add wireless devices to your wireless
network. The other wireless devices must also support WPS.
If your wireless devices display the WPS logo as shown, go to
section 4.1 to use WPS to set up your wireless network.
If your wireless devices do not display the WPS logo, go to section
4.2 to manually set up a wireless network.
4.1 Set up Your Wireless Network with WPS
Follow these steps to set up your wireless network using WPS.
1 Place a WPS-enabled device within range of the NBG460N.

ENGLISH
12
2 Press the WPS button on both devices. It doesn’t matter which button is pressed first.
You must press the second button within two minutes of pressing the first one.
" Your NBG460N has a WPS button located on its housing, as well as a WPS
button available in the web configurator used to manage the NBG460N.
Other WPS-enabled devices should have at least one similar WPS button.
3 The WPS LED ( ) on the NBG460N blinks for a few seconds, then shines steadily.
4 Check if your devices are connected by trying to connect to the Internet using the
device you connected to the NBG460N. If you can do this, then your WPS connection is
successful.
5 To add another WPS enabled device to your wireless network, press the WPS buttons
on your NBG460N and your next WPS-enabled device.
Congratulations! You are now ready to connect to the Internet wirelessly through your
NBG460N.
2 minutes
ENGLISH
13
4.2 Set up a Wireless Network Manually
You can now connect wirelessly to your NBG460N from your computer and access the
Internet. You will need the Network Name (SSID) and also the Security Key (Pre-Shared
Key) if you set up security in the previous section. The connection procedure is shown
here using Windows XP as an example.
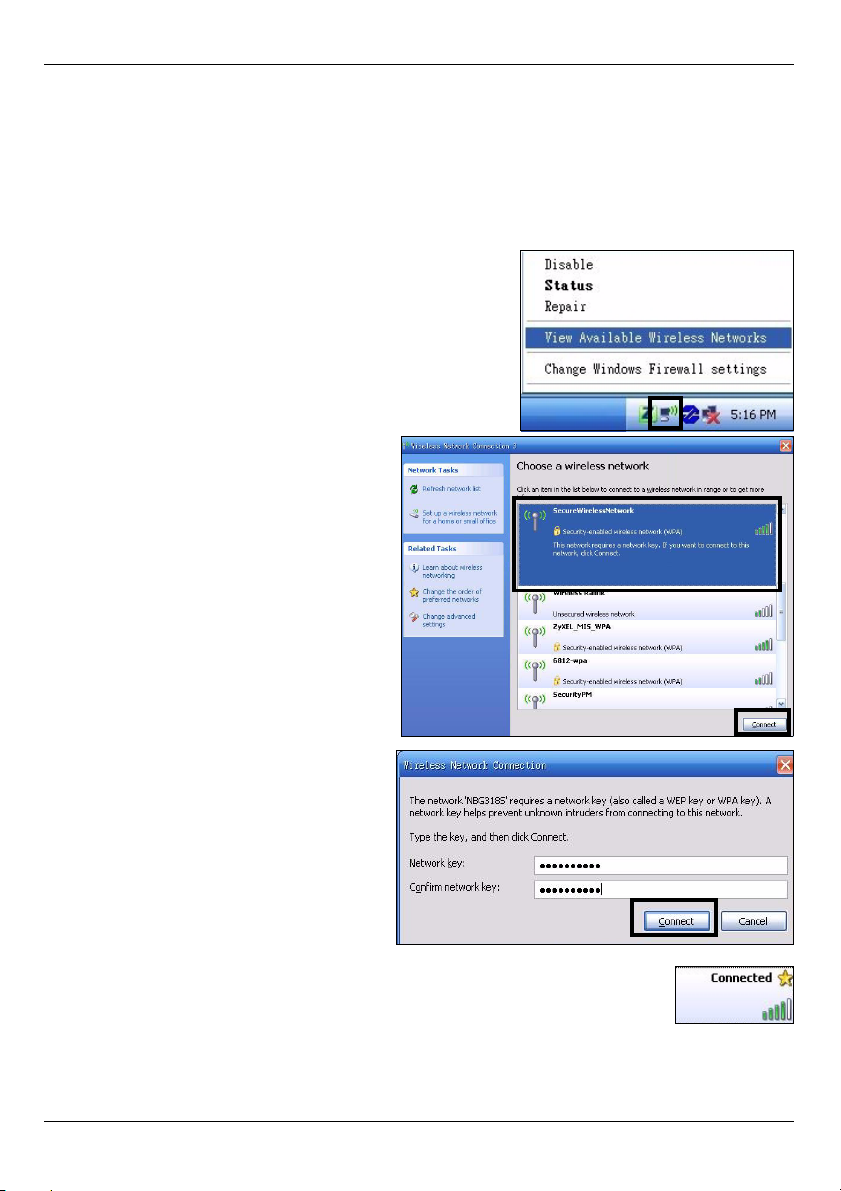
1 Right-click the wireless adapter icon which appears
in the bottom right of your computer monitor. Click
View Available Wireless Networks.
2 Select the SSID name you gave the
NBG460N and click Connect (A). The
SSID “SecureWirelessNetwork” is
given here as an example.
3 If you have set up wireless security,
you are prompted to enter a
password. Enter the Pre-Shared Key
you set up in the previous section
and click Connect (B).
4 You may have to wait several minutes
while your computer connects to the
wireless network.
5 You should now be securely connected wirelessly to the NBG460N.
Congratulations! You are now ready to connect to the Internet wirelessly
through your NBG460N.
A
B
ENGLISH
14
V If you cannot connect wirelessly to the NBG460N, check you have selected
the correct SSID and entered the correct security key. If that does not work,
ensure your network adapter is enabled by clicking on the wireless adapter
icon and clicking Enable. See the User’s Guide for more suggestions.
Procedure to View a Product’s Certification(s)
1 Go to www.zyxel.com.
2 Select your product from the drop-down list box on the ZyXEL home
page to go to that product's page.
3 Select the certification you wish to view from this page.

ENGLISH
15
DEUTSCH
16
Übersicht
Der NBG460N ist ein drahtloser IEEE 802.11b/g/n-Breitbandrouter und Access-Point (AP).
Als Router leitet der NBG460N den Datenverkehr zwischen dem Drahtlosnetzwerk und
einem anderen Netzwerk wie dem Internet wie unten dargestellt weiter und bietet Dienste
an wie Inhaltsfilter, Bandbreitenverwaltung und Firewall.
In dieser Kurzanleitung erfahren Sie, wie Sie Folgendes mit Ihrem NBG460N im Router-
Modus einrichten können:
1 Anschließen der Hardware
2 Zugreifen auf den Web-Konfigurator
3 Herstellen der Verbindung zum Internet mittels dem Assistenten
4 Manuelles Einrichten eines Drahtlosnetzwerks oder Einrichten mittels WPS Funktion
Weitere Informationen zu allen Funktionen, z. B., wie Sie den NBG460N als Access Point
(AP) verwenden, finden Sie im Benutzerhandbuch auf der CD.
Um das Benutzerhandbuch zu lesen, legen Sie die enthaltene CD in das CD-ROM-
Laufwerk Ihres Computers ein. Auf dem Bildschirm erscheint ein Fenster. Rufen Sie über
dieses Fenster das Benutzerhandbuch auf. Sollte dieses Fenster nicht angezeigt werden,
rufen Sie den Windows Explorer auf (klicken Sie auf Arbeitsplatz), klicken Sie auf das CD-
ROM-Laufwerk (normalerweise Laufwerksbezeichnung D:), und wählen Sie dann auf die
Datei des Benutzerhandbuchs.
DEUTSCH
DEUTSCH
17
1 Anschließen der Hardware
Bei der Erstinstallation müssen die folgenden Hardwareverbindungen hergestellt werden:
Antennen
Schließen Sie alle Antennen an den jeweiligen Antennenanschluss an. Stellen Sie
sicher, dass die Antennen fest eingedreht sind und aufrecht ausgerichtet sind.
LAN
Schließen Sie Ihren Computer mit dem mitgelieferten Ethernet-Kabel an einen
"LAN"-Anschluss an.
WAN
Schließen Sie Ihr Modem mit dem mitgelieferten Kabel an den "WAN"-Anschluss
an.
Anschließen an das Stromnetz
Schließen Sie das mitgelieferte Netzkabel an den POWER-Anschluss (Netzan-
schluss) und an eine geeignete Stromquelle an.
Internet
1
4
2
3
1
2
3
4
DEUTSCH
18
Die LED-Anzeigen
Das Gerät verfügt über LED-Anzeigen. Wenn Sie das Gerät an das Stromnetz
anschließen, beginnt die LED-Anzeige ( ) zu blinken. Wenn es bereit ist, hört sie auf zu
blinken und leuchtet stetig.
Die LED-Anzeigen LAN ( ) und WAN ( ) beginnen zu leuchten, wenn die
entsprechenden Verbindungen bestehen.
VSollte eine LED nicht leuchten, prüfen Sie die Verbindung. Leuchtet sie auch
dann nicht, trennen Sie den NBG460N von seiner Stromquelle, und schalten
Sie ihn einige Sekunden später wieder ein.
2 Zugriff auf den Web-Konfigurator
Standard-Anmeldeinformationen
1 Starten Sie einen Internet-Browser, z. B. Internet Explorer. Geben Sie wie unten
dargestellt “http://192.168.1.1” ein.
IP-Adresse http://192.168.1.1
Administratorkennwort 1234
DEUTSCH
19
2 Das Fenster Password (Kennwort) erscheint. Geben Sie das Kennwort ein ("1234" ist
das Standardkennwort), und klicken Sie auf Login (Anmelden).
V Wenn das Anmeldefenster nicht angezeigt wird, stellen Sie sicher, dass der
Computer so eingestellt ist, dass er eine dynamische IP-Adresse bezieht.
Wenn das Problem dadurch nicht behoben ist, prüfen Sie die
Sicherheitseinstellungen Ihres Webbrowsers (Informationen zu beiden
Möglichkeiten finden Sie im Anhang des Benutzerhandbuchs).
3 Ändern Sie im nachfolgenden Fenster das Kennwort und klicken Sie auf Apply
(Übernehmen).
4 Wenn Sie den NBG460N das erste Mal benutzen, klicken Sie auf Go Wizard setup
(Zum Einrichtungsassistenten).
DEUTSCH
20
3 Assistent zum Einrichten der Verbindung
1 Sprache wählen. Klicken Sie auf Next (Weiter).
2 Klicken Sie auf Next (Weiter) und fahren Sie mit dem Connection Wizard
(Verbindungsassistent) fort.
" Geben Sie die Daten für den Internetzugriff so ein, wie Sie sie von Ihrem
Internetdienstanbieter erhalten haben. Klicken Sie zum Fortfahren auf Next
(Weiter) oder auf Back (Zurück), um zum vorhergehenden Fenster
zurückzukehren. Wenn Sie auf Back (Zurück) klicken, gehen alle aktuell
auf dem Bildschirm vorhandenen Daten verloren.
3.1 Systeminformationen
Dieses Fenster ist optional. Sie können einfach auf Next (Weiter) klicken.
3.2 Wireless-LAN
Führen Sie die folgenden Schritte aus, um den NBG460N so zu konfigurieren, dass er ein
drahtloses Netzwerk unterstützt.
1 Geben Sie einen Namen (SSID) ein, mit dem der NBG460N im Wireless-LAN eindeutig
identifiziert wird.
DEUTSCH
21
2 Wählen Sie Auto (Automatisch), damit für einen hohen Sicherheitsstandard
automatisch WPA-PSK verwendet wird. Informationen zu anderen Arten der Sicherheit
finden Sie im Benutzerhandbuch. Klicken Sie auf Next (Weiter).
3 Notieren Sie sich den Sicherheitsschlüssel, der im Pop-up-Fenster angezeigt wird.
Computer im Drahtlosnetzwerk benötigen diesen Schlüssel, um auf den NBG460N
zugreifen zu können. Achten Sie bei diesem Schlüssel auf die Groß- und Kleinschreibung
(z.B. "BCD" ist etwas anderes als "bcd"!).
" Notieren Sie sich den Sicherheitsschlüssel, den Namen (SSID), die Art der
Sicherheit und den Kanal, da der NBG460N und andere Geräte im
drahtlosen Netzwerk dieselben Einstellungen verwenden müssen.
4 Klicken Sie auf OK.
3.3 Herstellen der WAN-Verbindung
Es kann einige Minuten lang dauern, bis der Assistent erkennt, welcher WAN-
Verbindungstyp (Ethernet, PPPoE oder PPTP) gerade verwendet wird.
• Hat er den Verbindungstyp erkannt, führen Sie die folgenden Schritte aus:
DEUTSCH
22
• Kann der Assistent den Verbindungstyp nicht ermitteln, wählen Sie aus dem Listenfeld des
nachfolgenden Fensters den Verbindungstyp manuell aus. Informationen dazu erhalten Sie
von Ihrem Internetdienstanbieter.
" Wenn Ihnen Zugangseinstellungen für das Internet vorgegeben wurden,
geben Sie diese in die folgenden Felder ein. Anderenfalls werden die
Standardeinstellungen belassen. Klicken Sie auf Next (Weiter).
Ethernet-Verbindung
Wählen Sie als WAN-Verbindungstyp die Option Ethernet, und klicken Sie auf Next (Weiter),
um zum nächsten Abschnitt 3.4 zu gelangen.
PPPoE-Verbindung
1 Wählen Sie als WAN-Verbindungstyp PPPoE.
2 Geben Sie bei Servicename (Dienstname) einen Dienstnamen ein (falls Sie diesen von
Ihrem Internetdienstanbieter erhalten haben), bei User Name (Benutzername) Ihren
DEUTSCH
23
Benutzernamen und bei Password (Kennwort) Ihr Kennwort ein. Klicken Sie auf Next
(Weiter), um zum Abschnitt 3.4 zu gelangen.
PPTP-Verbindung
1 Wählen Sie als Ihren WAN-Verbindungstyp PPTP.
2 Geben Sie bei User Name (Benutzername) Ihren Benutzernamen und bei Password
(Kennwort) Ihr Kennwort ein.
3 Geben Sie eine PPTP Server IP-Adresse ein.
4 Geben Sie bei Connection ID/Name (Verbindungs-ID/Name) eine Verbindungs-ID oder
einen Verbindungsnamen ein (wenn vorhanden).
5 Wählen Sie Get automatically from your ISP (Automatisch vom
Internetdienstanbieter laden), wenn Sie von Ihrem Internetdienstanbieter keine feste
PPTP IP-Adresse zugewiesen bekommen haben.
6 Wenn Ihr Internetdienstanbieter Ihnen eine feste PPTP IP-Adresse zugewiesen hat,
wählen Sie Use fixed IP address (Feste IP-Adresse verwenden), um dem NBG460N
eine feste und einmalige PPTP IP-Adresse und Subnetzmaske zu geben.
7 Klicken Sie auf Next (Weiter), um zum Abschnitt 3.4 zu gelangen.
DEUTSCH
24
3.4 WAN IP-Adresse
• Wählen Sie Get automatically from your ISP (Automatisch vom Internetdienstanbieter
laden), wenn Ihnen Ihr Internetdienstanbieter keine feste IP-Adresse zugewiesen hat.
Klicken Sie auf Next (Weiter), um zum Abschnitt 3.5 zu gelangen.
• Wenn Ihnen Ihr Internetdienstanbieter eine feste IP-Adresse zugewiesen hat,
1 Wählen Sie Use fixed IP address provided by your ISP (Vom Internetdienstanbieter
zugewiesene, feste IP-Adresse verwenden). Klicken Sie auf Next (Weiter).
2 Geben Sie im nächsten Fenster die WAN IP-Adresse, die WAN IP Subnet-Mask und die
Gateway-IP-Adresse ein, die Sie von Ihrem Internetdienstanbieter erhalten haben.
Wurden Ihnen DNS-Servereinstellungen vorgegeben, geben Sie diese in die
entsprechenden Felder ein. Anderenfalls werden die Standardeinstellungen belassen.
Klicken Sie auf Next (Weiter).
3.5 MAC-Adresse des WAN
Eine MAC-Adresse ist eine Nummer, die ein Gerät in jedem Netzwerk eindeutig
identifiziert. Konfigurieren Sie die MAC-Adresse des WAN-Ports entweder mit den
Standardeinstellungen oder "klonen" Sie die MAC-Adresse eines Computers Ihres LAN.
Standardmäßig verwendet der NBG460N die werkseitig zugewiesene MAC-Adresse, um
sich selbst im WAN zu identifizieren.
• Wählen Sie Factory Default (Standardwerte), um die werkseitig festgelegte Standard-
MAC-Adresse zu verwenden.
• Wählen Sie Clone the Computer’s MAC Address (MAC-Adresse des Computers
klonen), um die MAC-Adresse eines Computers im LAN zu klonen. Geben Sie die IP-
Adresse des Computers mit der MAC-Adresse ein, die geklont werden soll. Es wird emp-
fohlen, die MAC-Adresse eines Computers im LAN zu kopieren, auch wenn Ihr Internetdi-
enstanbieter gegenwärtig keine Authentifizierung der MAC-Adresse erfordert.
DEUTSCH
25
• Wählen Sie Set WAN MAC Address (WAN-MAC-Adresse einstellen), und geben Sie die
gewünschte MAC-Adresses ein.
3.6 Bandbreitenverwaltung
Wählen Sie Enable BM for all traffic automatically (BM automatisch für den gesamten
Verkehr einschalten), damit der NBG460N den Datenverkehr entsprechend der
Verwendung zu prioritisiert. Z. B. hat Video-Streaming eine höhere Priorität als E-Mails.
Wenn Sie sich nicht sicher sind, lassen Sie diese Funktion deaktiviert. Klicken Sie auf Next
(Weiter).
3.7 Setup abgeschlossen
1 Klicken Sie auf Apply (Übernehmen), um die Änderungen im nächsten Fenster des
Assistenten zu speichern.
2 Klicken Sie im folgenden Fenster auf Finish (Fertig stellen), um den Setup-Assistenten zu
beenden.
3 Herzlichen Glückwunsch. Öffnen Sie einen Internetbrowser (z. B. Internet Explorer),
um die gewünschte Website aufzurufen.

DEUTSCH
26
V Wenn Sie keine Verbindung zum Internet herstellen können, während der
Computer an einem der LAN-Anschlüsse des NBG460N angeschlossen ist,
prüfen Sie die Anschlüsse. Schalten Sie dann den NBG460N aus und nach
einigen Sekunden wieder ein. Wenn dadurch das Problem nicht behoben
ist, starten Sie erneut den Assistenten. Achten Sie auf die korrekte Eingabe
der Daten. Wenn Sie ein neues Internetkonto verwenden, stellen Sie bei
Ihrem Internetdienstanbieter sicher, dass es aktiv ist. Weitere
Lösungsmöglichkeiten finden Sie im Abschnitt Problembeseitigung des
Benutzerhandbuchs.
4 Einrichten eines Drahtlosnetzwerks
Mit der WPS-Funktion (Wi-Fi Protected Setup) können Sie Drahtlosgeräte zu Ihrem
Drahtlosnetzwerk hinzufügen. Die anderen Drahtlosgeräte müssen auch WPS
unterstützen.
Wenn auf Ihren Drahtlosgeräten das WPS-Logo zu sehen ist (siehe
rechts), können Sie Ihr Drahtlosnetzwerk mittels WPS komfortabel
einrichten. Eine Beschreibung dazu finden Sie in Abschnitt 4.1.
Wenn auf Ihren Drahtlosgeräten das WPS-Logo nicht angezeigt
wird, gehen Sie zu Abschnitt 4.2, um das Drahtlosnetzwerk manuell einzustellen.
4.1 Einrichten des Drahtlosnetzwerks mittels WPS
Führen Sie bitte die folgenden Schritte aus, um Ihr Drahtlosnetzwerk mittels WPS
einzurichten:
1 Setzen Sie ein WPS-aktiviertes Gerät in die Reichweite des NBG460N.
Loading...