


 Loading...
NWA5120 Series
NWA5121-N
NWA5121-NI
NWA5123-NI
802.11 a/b/g/n Unified Access Point
Version 4.10
Edition 1, 05/2014
Quick Start Guide
User’s Guide
Default Login Details
LAN IP Address |
http://192.168.1.2 |
|
|
|
|
User Name |
|
admin |
www.zyxel.com |
1234 |
|
Password |
|
|
|
|
|
Copyright © 2014 ZyXEL Communications Corporation

IMPORTANT!
READ CAREFULLY BEFORE USE.
KEEP THIS GUIDE FOR FUTURE REFERENCE.
This is a User’s Guide for a series of products. Not all products support all firmware features. Screenshots and graphics in this book may differ slightly from your product due to differences in your product firmware or your computer operating system. Every effort has been made to ensure that the information in this manual is accurate.
Related Documentation
•Quick Start Guide
The Quick Start Guide shows how to connect the NWA and access the Web Configurator.
•CLI Reference Guide
The CLI Reference Guide explains how to use the Command-Line Interface (CLI) and CLI commands to configure the NWA.
Note: It is recommended you use the Web Configurator to configure the NWA.
•Web Configurator Online Help
Click the help icon in any screen for help in configuring that screen and supplementary information.
NWA5120 Series User’s Guide
2

|
Contents Overview |
|
Contents Overview |
User’s Guide ....................................................................................................................................... |
10 |
Introduction ............................................................................................................................................. |
11 |
The Web Configurator ............................................................................................................................. |
19 |
Technical Reference .......................................................................................................................... |
30 |
Dashboard ............................................................................................................................................... |
31 |
Monitor .................................................................................................................................................... |
36 |
Management Mode ................................................................................................................................. |
49 |
Network ................................................................................................................................................... |
53 |
Wireless .................................................................................................................................................. |
57 |
User ......................................................................................................................................................... |
69 |
AP Profile ................................................................................................................................................ |
76 |
MON Profile ............................................................................................................................................. |
94 |
WDS Profile ............................................................................................................................................. |
98 |
Certificates ............................................................................................................................................ |
100 |
System .................................................................................................................................................. |
117 |
Log and Report ..................................................................................................................................... |
142 |
File Manager ......................................................................................................................................... |
154 |
Diagnostics ............................................................................................................................................ |
165 |
Reboot ................................................................................................................................................... |
167 |
Shutdown .............................................................................................................................................. |
168 |
Troubleshooting .................................................................................................................................... |
169 |
NWA5120 Series User’s Guide
3

|
Table of Contents |
|
|
|
|
|
|
Table of Contents |
Contents Overview .............................................................................................................................. |
3 |
|
Table of Contents ................................................................................................................................. |
4 |
|
Part I: User’s Guide ......................................................................................... |
10 |
|
Chapter |
1 |
|
Introduction......................................................................................................................................... |
11 |
|
1.1 |
Overview .......................................................................................................................................... |
11 |
|
1.1.1 Management Mode .................................................................................................................. |
12 |
|
1.1.2 MBSSID ................................................................................................................................... |
12 |
|
1.1.3 Dual-Radio ............................................................................................................................... |
13 |
|
1.1.4 Root AP ................................................................................................................................... |
14 |
|
1.1.5 Repeater .................................................................................................................................. |
15 |
1.2 Ways to Manage the NWA ................................................................................................................ |
16 |
|
1.3 |
Good Habits for Managing the NWA ................................................................................................. |
16 |
1.4 |
Hardware Connections ...................................................................................................................... |
16 |
1.5 |
LEDs ................................................................................................................................................. |
17 |
1.6 |
Starting and Stopping the NWA ......................................................................................................... |
17 |
Chapter |
2 |
|
The Web Configurator ........................................................................................................................ |
19 |
|
2.1 |
Overview ........................................................................................................................................... |
19 |
2.2 |
Access ............................................................................................................................................... |
19 |
2.3 |
Navigating the Web Configurator ...................................................................................................... |
20 |
|
2.3.1 Title Bar ................................................................................................................................... |
21 |
|
2.3.2 Navigation Panel ..................................................................................................................... |
24 |
|
2.3.3 Warning Messages .................................................................................................................. |
27 |
|
2.3.4 Tables and Lists ....................................................................................................................... |
27 |
Part II: Technical Reference............................................................................ |
30 |
|
Chapter |
3 |
|
Dashboard ........................................................................................................................................... |
31 |
|
3.1 |
Overview ........................................................................................................................................... |
31 |
|
3.1.1 What You Can Do in this Chapter ............................................................................................ |
31 |
NWA5120 Series User’s Guide
4

|
Table of Contents |
|
|
|
|
3.2 |
Dashboard ......................................................................................................................................... |
31 |
|
3.2.1 CPU Usage .............................................................................................................................. |
34 |
|
3.2.2 Memory Usage ........................................................................................................................ |
34 |
Chapter |
4 |
|
Monitor................................................................................................................................................. |
|
36 |
4.1 |
Overview ........................................................................................................................................... |
36 |
|
4.1.1 What You Can Do in this Chapter ............................................................................................ |
36 |
4.2 |
What You Need to Know ................................................................................................................... |
36 |
4.3 |
Network Status .................................................................................................................................. |
37 |
|
4.3.1 Network Status Graph ............................................................................................................ |
38 |
4.4 |
Radio List ......................................................................................................................................... |
39 |
|
4.4.1 AP Mode Radio Information .................................................................................................... |
40 |
4.5 |
Station List ........................................................................................................................................ |
42 |
4.6 |
WDS Link Info ................................................................................................................................... |
43 |
4.7 |
Detected Device ............................................................................................................................... |
44 |
4.8 |
View Log ........................................................................................................................................... |
45 |
Chapter |
5 |
|
Management Mode ............................................................................................................................. |
49 |
|
5.1 |
Overview ........................................................................................................................................... |
49 |
5.2 About CAPWAP ................................................................................................................................ |
49 |
|
|
5.2.1 CAPWAP Discovery and Management ................................................................................... |
49 |
|
5.2.2 Managed AP Finds the Controller ........................................................................................... |
50 |
|
5.2.3 CAPWAP and IP Subnets ........................................................................................................ |
50 |
|
5.2.4 Notes on CAPWAP .................................................................................................................. |
51 |
5.3 |
Management Mode Screen ............................................................................................................... |
51 |
Chapter |
6 |
|
Network................................................................................................................................................ |
|
53 |
6.1 |
Overview ........................................................................................................................................... |
53 |
|
6.1.1 What You Can Do in this Chapter ............................................................................................ |
53 |
6.2 |
IP Setting .......................................................................................................................................... |
53 |
6.3 VLAN ................................................................................................................................................. |
55 |
|
Chapter |
7 |
|
Wireless ............................................................................................................................................... |
|
57 |
7.1 |
Overview ........................................................................................................................................... |
57 |
|
7.1.1 What You Can Do in this Chapter ............................................................................................ |
57 |
|
7.1.2 What You Need to Know .......................................................................................................... |
58 |
7.2 AP Management ............................................................................................................................... |
58 |
|
7.3 MON Mode ........................................................................................................................................ |
60 |
|
|
7.3.1 Add/Edit Rogue/Friendly List ................................................................................................... |
61 |
NWA5120 Series User’s Guide
5

Table of Contents
7.4 |
Load Balancing ................................................................................................................................. |
62 |
|
7.4.1 Disassociating and Delaying Connections .............................................................................. |
63 |
7.5 DCS .................................................................................................................................................. |
64 |
|
7.6 |
Technical Reference .......................................................................................................................... |
66 |
Chapter |
8 |
|
User...................................................................................................................................................... |
|
69 |
8.1 |
Overview ........................................................................................................................................... |
69 |
|
8.1.1 What You Can Do in this Chapter ............................................................................................ |
69 |
|
8.1.2 What You Need To Know ......................................................................................................... |
69 |
8.2 |
User Summary .................................................................................................................................. |
70 |
|
8.2.1 Add/Edit User .......................................................................................................................... |
70 |
8.3 |
Setting .............................................................................................................................................. |
72 |
|
8.3.1 Edit User Authentication Timeout Settings .............................................................................. |
74 |
Chapter |
9 |
|
AP Profile............................................................................................................................................. |
76 |
|
9.1 |
Overview ........................................................................................................................................... |
76 |
|
9.1.1 What You Can Do in this Chapter ............................................................................................ |
76 |
|
9.1.2 What You Need To Know ......................................................................................................... |
76 |
9.2 |
Radio ................................................................................................................................................. |
77 |
|
9.2.1 Add/Edit Radio Profile ............................................................................................................. |
78 |
9.3 |
SSID ................................................................................................................................................. |
82 |
|
9.3.1 SSID List .................................................................................................................................. |
82 |
|
9.3.2 Add/Edit SSID Profile .............................................................................................................. |
83 |
9.4 |
Security List ....................................................................................................................................... |
85 |
|
9.4.1 Add/Edit Security Profile .......................................................................................................... |
86 |
9.5 |
MAC Filter List ................................................................................................................................... |
89 |
|
9.5.1 Add/Edit MAC Filter Profile ...................................................................................................... |
90 |
9.6 |
Layer-2 Isolation List ......................................................................................................................... |
91 |
|
9.6.1 Add/Edit Layer-2 Isolation Profile ............................................................................................ |
92 |
Chapter |
10 |
|
MON Profile ......................................................................................................................................... |
94 |
|
10.1 Overview ......................................................................................................................................... |
94 |
|
|
10.1.1 What You Can Do in this Chapter .......................................................................................... |
94 |
10.2 MON Profile ..................................................................................................................................... |
94 |
|
|
10.2.1 Add/Edit MON Profile ............................................................................................................ |
95 |
10.3 Technical Reference ........................................................................................................................ |
96 |
|
Chapter |
11 |
|
WDS Profile ......................................................................................................................................... |
98 |
|
11.1 Overview ......................................................................................................................................... |
98 |
|
NWA5120 Series User’s Guide
6

Table of Contents
11.1.1 What You Can Do in this Chapter .......................................................................................... |
98 |
11.2 WDS Profile ..................................................................................................................................... |
98 |
11.2.1 Add/Edit WDS Profile ............................................................................................................. |
99 |
Chapter |
12 |
|
|
Certificates ........................................................................................................................................ |
100 |
||
12.1 |
Overview ....................................................................................................................................... |
100 |
|
|
12.1.1 What You Can Do in this Chapter ........................................................................................ |
100 |
|
|
12.1.2 What You Need to Know ...................................................................................................... |
100 |
|
|
12.1.3 Verifying a Certificate ........................................................................................................... |
102 |
|
12.2 |
My Certificates ............................................................................................................................. |
103 |
|
|
12.2.1 Add My Certificates ............................................................................................................. |
104 |
|
|
12.2.2 Edit My Certificates .............................................................................................................. |
108 |
|
|
12.2.3 Import Certificates .............................................................................................................. |
110 |
|
12.3 |
Trusted Certificates ....................................................................................................................... |
111 |
|
|
12.3.1 Edit Trusted Certificates ...................................................................................................... |
113 |
|
|
12.3.2 Import Trusted Certificates .................................................................................................. |
115 |
|
12.4 Technical Reference ...................................................................................................................... |
116 |
||
Chapter |
13 |
|
|
System ............................................................................................................................................... |
|
|
117 |
13.1 |
Overview ....................................................................................................................................... |
117 |
|
|
13.1.1 What You Can Do in this Chapter ........................................................................................ |
117 |
|
13.2 |
Host Name .................................................................................................................................... |
117 |
|
13.3 |
Date and Time .............................................................................................................................. |
118 |
|
|
13.3.1 Pre-defined NTP Time Servers List ..................................................................................... |
120 |
|
|
13.3.2 Time Server Synchronization ............................................................................................... |
120 |
|
13.4 WWW Overview ............................................................................................................................ |
121 |
||
|
13.4.1 Service Access Limitations .................................................................................................. |
122 |
|
|
13.4.2 System Timeout ................................................................................................................... |
122 |
|
|
13.4.3 HTTPS ................................................................................................................................. |
122 |
|
|
13.4.4 Configuring WWW Service Control ..................................................................................... |
123 |
|
|
13.4.5 HTTPS Example .................................................................................................................. |
124 |
|
13.5 SSH ............................................................................................................................................ |
132 |
||
|
13.5.1 How SSH Works .................................................................................................................. |
132 |
|
|
13.5.2 SSH Implementation on the NWA ....................................................................................... |
133 |
|
|
13.5.3 Requirements for Using SSH ............................................................................................... |
134 |
|
|
13.5.4 Configuring SSH .................................................................................................................. |
134 |
|
|
13.5.5 Examples of Secure Telnet Using SSH ............................................................................... |
134 |
|
13.6 |
Telnet ............................................................................................................................................ |
136 |
|
13.7 |
FTP .............................................................................................................................................. |
136 |
|
13.8 SNMP ........................................................................................................................................... |
137 |
||
|
13.8.1 Supported MIBs ................................................................................................................... |
138 |
|
NWA5120 Series User’s Guide
7

Table of Contents
13.8.2 SNMP Traps ........................................................................................................................ |
139 |
13.8.3 Configuring SNMP ............................................................................................................... |
139 |
13.8.4 Adding or Editing an SNMPv3 User Profile ......................................................................... |
140 |
Chapter |
14 |
|
|
Log and Report ................................................................................................................................. |
142 |
||
14.1 |
Overview ....................................................................................................................................... |
142 |
|
|
14.1.1 What You Can Do In this Chapter ........................................................................................ |
142 |
|
14.2 |
Email Daily Report ........................................................................................................................ |
142 |
|
14.3 |
Log Setting ................................................................................................................................... |
144 |
|
|
14.3.1 Log Setting .......................................................................................................................... |
144 |
|
|
14.3.2 Edit System Log Settings ................................................................................................... |
146 |
|
|
14.3.3 Edit Remote Server ............................................................................................................ |
148 |
|
|
14.3.4 Active Log Summary .......................................................................................................... |
150 |
|
Chapter |
15 |
|
|
File Manager...................................................................................................................................... |
154 |
||
15.1 |
Overview ....................................................................................................................................... |
154 |
|
|
15.1.1 What You Can Do in this Chapter ........................................................................................ |
154 |
|
|
15.1.2 What you Need to Know ...................................................................................................... |
154 |
|
15.2 |
Configuration File .......................................................................................................................... |
155 |
|
|
15.2.1 Example of Configuration File Download Using FTP .......................................................... |
159 |
|
15.3 |
Firmware Package ....................................................................................................................... |
160 |
|
|
15.3.1 Example of Firmware Upload Using FTP ............................................................................ |
162 |
|
15.4 |
Shell Script ................................................................................................................................... |
162 |
|
Chapter |
16 |
|
|
Diagnostics ....................................................................................................................................... |
165 |
||
16.1 |
Overview ....................................................................................................................................... |
165 |
|
|
16.1.1 What You Can Do in this Chapter ........................................................................................ |
165 |
|
16.2 |
Diagnostics .................................................................................................................................... |
165 |
|
Chapter |
17 |
|
|
Reboot ............................................................................................................................................... |
|
|
167 |
17.1 |
Overview ....................................................................................................................................... |
167 |
|
|
17.1.1 What You Need To Know ..................................................................................................... |
167 |
|
17.2 |
Reboot ........................................................................................................................................... |
167 |
|
Chapter |
18 |
|
|
Shutdown........................................................................................................................................... |
|
168 |
|
18.1 |
Overview ....................................................................................................................................... |
168 |
|
|
18.1.1 What You Need To Know ..................................................................................................... |
168 |
|
18.2 |
Shutdown ...................................................................................................................................... |
168 |
|
NWA5120 Series User’s Guide
8

Table of Contents
Chapter |
19 |
|
|
Troubleshooting................................................................................................................................ |
169 |
||
19.1 |
Overview ....................................................................................................................................... |
169 |
|
19.2 |
Power, Hardware Connections, and LED ...................................................................................... |
169 |
|
19.3 |
NWA Access and Login ................................................................................................................ |
170 |
|
19.4 |
Internet Access ............................................................................................................................. |
171 |
|
19.5 |
Wireless Connections ................................................................................................................... |
172 |
|
19.6 |
Resetting the NWA ........................................................................................................................ |
175 |
|
19.7 |
Getting More Troubleshooting Help .............................................................................................. |
175 |
|
Appendix |
A Importing Certificates ................................................................................................... |
176 |
|
Appendix |
B IPv6 .............................................................................................................................. |
189 |
|
Appendix |
C Customer Support ........................................................................................................ |
198 |
|
Appendix |
D Legal Information ......................................................................................................... |
204 |
|
Index .................................................................................................................................................. |
|
|
210 |
NWA5120 Series User’s Guide
9

PART I
User’s Guide
10
1
Introduction
1.1 Overview
This User’s Guide covers the following models: NWA5121-N, NWA5121-NI, and NWA5123-NI. Your NWA is a wireless AP (Access Point). It extends the range of your existing wired network without additional wiring, providing easy network access to mobile users.
Table 1 NWA Series Comparison Table
FEATURES |
NWA5121-N |
NWA5121-NI |
NWA5123-NI |
Supported Wireless Standards |
IEEE 802.11b |
IEEE 802.11b |
IEEE 802.11a |
|
IEEE 802.11b |
||
|
IEEE 802.11g |
IEEE 802.11g |
|
|
IEEE 802.11g |
||
|
IEEE 802.11n |
IEEE 802.11n |
|
|
IEEE 802.11n |
||
|
|
|
|
|
|
|
|
Supported Frequency Bands |
2.4 GHz |
2.4 GHz |
2.4 GHz |
|
5 GHz |
||
|
|
|
|
|
|
|
|
Available Security Modes |
None |
None |
None |
|
WEP |
WEP |
WEP |
|
WPA |
WPA |
WPA |
|
WPA2 |
WPA2 |
WPA2 |
|
WPA2-MIX |
WPA2-MIX |
WPA2-MIX |
|
WPA-PSK |
WPA-PSK |
WPA-PSK |
|
WPA2-PSK |
WPA2-PSK |
WPA2-PSK |
|
WPA2-PSK-MIX |
WPA2-PSK-MIX |
WPA2-PSK-MIX |
|
|
|
|
Number of SSID Profiles |
32 |
32 |
32 |
|
|
|
|
Number of Wireless Radios |
1 |
1 |
2 |
|
|
|
|
Layer-2 Isolation |
Yes |
Yes |
Yes |
|
|
|
|
External Antennas |
Yes |
No |
No |
|
|
|
|
Maximum number of log messages |
512 event logs or 1024 debug logs |
||
|
|
|
|
You can set the NWA to operate in either standalone AP or managed AP mode. When the NWA is in standalone AP mode, it can serve as a normal AP, as an RF monitor to search for rouge APs to help eliminate network threats, or even as a root AP or a wireless repeater to establish wireless links with other APs in a WDS (Wireless Distribution System). A WDS is a wireless connection between two or more APs.
Your NWA’s business-class reliability, SMB features, and centralized wireless management make it ideally suited for advanced service delivery in mission-critical networks. It uses Multiple BSSID and VLAN to provide simultaneous independent virtual APs. Additionally, innovations in roaming technology and QoS features eliminate voice call disruptions.
The NWA controls network access with Media Access Control (MAC) address filtering, and rogue Access Point (AP) detection. It also provides a high level of network traffic security, supporting IEEE 802.1x, Wi-Fi Protected Access (WPA), WPA2 and Wired Equivalent Privacy (WEP) data encryption.
NWA5120 Series User’s Guide
11

Chapter 1 Introduction
Your NWA is easy to install, configure and use. The embedded Web-based configurator enables simple, straightforward management and maintenance. See the Quick Start Guide for how to make hardware connections.
1.1.1 Management Mode
An AP controller can use Control And Provisioning of Wireless Access Points (CAPWAP, see RFC 5415) to discover and configure multiple managed APs.
The NWA is a standalone AP by default. You can switch the NWA from being a standalone AP to acting as a managed AP to allow it to be managed by an AP controller, such as the NXC2500. To change between management modes, see Chapter 5 on page 49.
Table 2 NWA Management Mode Comparison
MANAGEMENT MODE |
DEFAULT IP ADDRESS |
UPLOAD FIRMWARE VIA |
Standalone AP |
Static (192.168.1.2) |
Web Configurator or FTP |
|
|
|
Managed AP |
Dynamic |
FTP |
|
|
|
When the NWA is in standalone AP mode, the NWA is set to have a static management IP address (192.168.1.2) by default. You can use either the web configurator or FTP to upload firmware. See Section 15.3 on page 160 for more information about firmware uploading.
When the NWA is in managed AP mode, it acts as a DHCP client and obtains an IP address from the AP controller. It can be configured ONLY by the AP controller. To change the NWA back to standalone AP mode, you need to check the AP controller for the NWA’s IP address and use FTP to upload firmware for standalone AP mode.
1.1.2 MBSSID
A Basic Service Set (BSS) is the set of devices forming a single wireless network (usually an access point and one or more wireless clients). The Service Set IDentifier (SSID) is the name of a BSS. In Multiple BSS (MBSSID) mode, the NWA provides multiple virtual APs, each forming its own BSS and using its own individual SSID profile.
You can configure multiple SSID profiles, and have all of them active at any one time.
You can assign different wireless and security settings to each SSID profile. This allows you to compartmentalize groups of users, set varying access privileges, and prioritize network traffic to and from certain BSSs.
To the wireless clients in the network, each SSID appears to be a different access point. As in any wireless network, clients can associate only with the SSIDs for which they have the correct security settings.
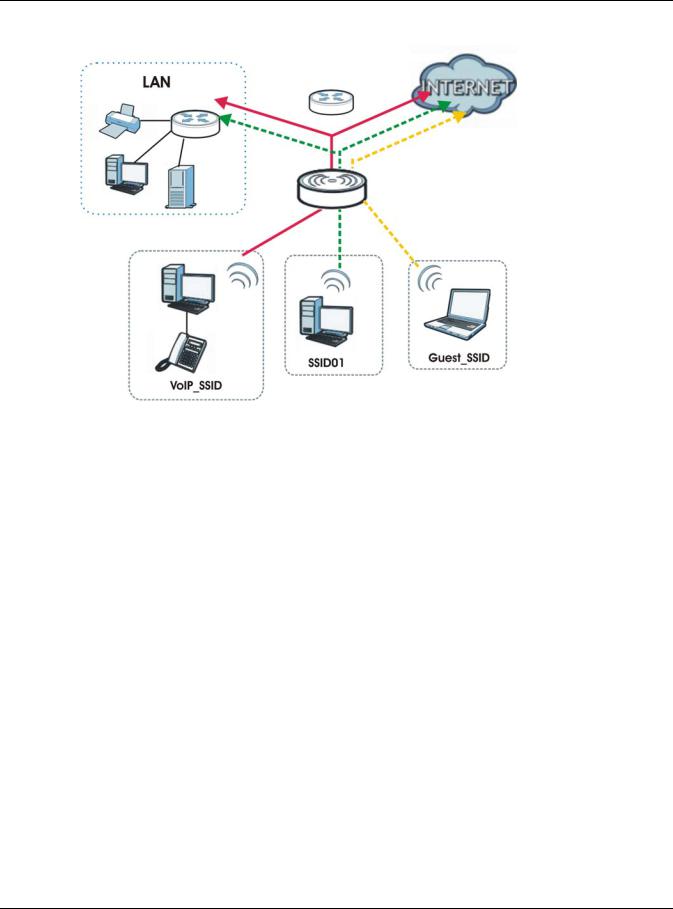
For example, you might want to set up a wireless network in your office where Internet telephony (VoIP) users have priority. You also want a regular wireless network for standard users, as well as a ‘guest’ wireless network for visitors. In the following figure, VoIP_SSID users have QoS priority, SSID01 is the wireless network for standard users, and Guest_SSID is the wireless network for guest users. In this example, the guest user is forbidden access to the wired Land Area Network (LAN) behind the AP and can access only the Internet.
NWA5120 Series User’s Guide
12
Chapter 1 Introduction
Figure 1 Multiple BSSs
1.1.3 Dual-Radio
The NWA5123-NI is equipped with dual wireless radios. This means you can configure two different wireless networks to operate simultaneously.
Note: A different channel should be configured for each WLAN interface to reduce the effects of radio interference.
You could use the 2.4 GHz band for regular Internet surfing and downloading while using the 5 GHz band for time sensitive traffic like high-definition video, music, and gaming.
NWA5120 Series User’s Guide
13

Chapter 1 Introduction
Figure 2 Dual-Radio Application
1.1.4 Root AP
In Root AP mode, the NWA (Z) can act as the root AP in a wireless network and also allow repeaters (X and Y) to extend the range of its wireless network at the same time. In the figure below, both clients A, B and C can access the wired network through the root AP.
Figure 3 Root AP Application
On the NWA in Root AP mode, you can have multiple SSIDs active for reqular wireless connections and one SSID for the connection with a repeater (repeater SSID). Wireless clients can use either
NWA5120 Series User’s Guide
14

Chapter 1 Introduction
SSID to associate with the NWA in Root AP mode. A repeater must use the repeater SSID to connect to the NWA in Root AP mode.
When the NWA is in Root AP mode, repeater security between the NWA and other repeater is independent of the security between the wireless clients and the AP or repeater. When repeater security is enabled, both APs and repeaters must use the same pre-shared key. See Section 7.2 on page 58 and Section 11.2 on page 98 for more details.
Unless specified, the term “security settings” refers to the traffic between the wireless clients and the AP. At the time of writing, repeater security is compatible with the NWA only.
1.1.5 Repeater
The NWA can act as a wireless network repeater to extend a root AP’s wireless network range, and also establish wireless connections with wireless clients.
Using Repeater mode, your NWA can extend the range of the WLAN. In the figure below, the NWA in Repeater mode (Z) has a wireless connection to the NWA in Root AP mode (X) which is connected to a wired network and also has a wireless connection to another NWA in Repeater mode (Y) at the same time. Z and Y act as repeaters that forward traffic between associated wireless clients and the wired LAN. Clients A and B access the AP and the wired network behind the AP throught repeaters Z and Y.
Figure 4 Repeater Application
When the NWA is in Repeater mode, repeater security between the NWA and other repeater is independent of the security between the wireless clients and the AP or repeater. When repeater security is enabled, both APs and repeaters must use the same pre-shared key. See Section 7.2 on page 58 and Section 11.2 on page 98 for more details.
Once the security settings of peer sides match one another, the connection between devices is made.
NWA5120 Series User’s Guide
15

Chapter 1 Introduction
At the time of writing, repeater security is compatible with the NWA only.
1.2 Ways to Manage the NWA
You can use the following ways to manage the NWA.
Web Configurator
The Web Configurator allows easy NWA setup and management using an Internet browser. This User’s Guide provides information about the Web Configurator.
Command-Line Interface (CLI)
The CLI allows you to use text-based commands to configure the NWA. You can access it using remote management (for example, SSH or Telnet). See the Command Reference Guide for more information.
File Transfer Protocol (FTP)
This protocol can be used for firmware upgrades and configuration backup and restore.
Simple Network Management Protocol (SNMP)
The NWA can be monitored by an SNMP manager. See the SNMP chapter in this User’s Guide.
1.3 Good Habits for Managing the NWA
Do the following things regularly to make the NWA more secure and to manage it more effectively.
•Change the password often. Use a password that’s not easy to guess and that consists of different types of characters, such as numbers and letters.
•Write down the password and put it in a safe place.
•Back up the configuration (and make sure you know how to restore it). Restoring an earlier working configuration may be useful if the device becomes unstable or even crashes. If you forget your password, you will have to reset the NWA to its factory default settings. If you backed up an earlier configuration file, you won’t have to totally re-configure the NWA; you can simply restore your last configuration.
1.4Hardware Connections
See your Quick Start Guide for information on making hardware connections.
NWA5120 Series User’s Guide
16
Chapter 1 Introduction
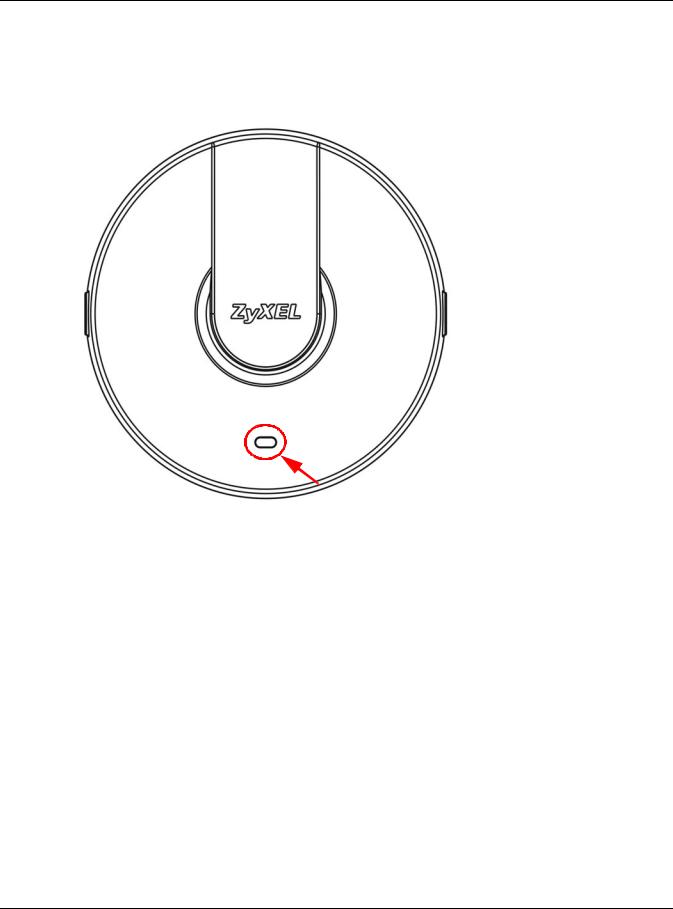
1.5 LEDs
The following are the LED descriptions for your NWA.
Figure 5 LED
Table 3 |
LED |
|
|
COLOR |
|
STATUS |
DESCRIPTION |
Amber |
|
On |
There is system error and the NWA cannot boot up, or the NWA doesn’t |
|
|
|
have an Ethernet connection with the LAN. |
|
|
|
|
|
|
Flashing |
The NWA is starting up. |
|
|
|
|
|
|
Off |
The NWA is receiving power and ready for use. |
|
|
|
|
Green |
|
On |
The WLAN is active. |
|
|
|
|
|
|
Blinking |
The WLAN is active, and transmitting or receiving data. |
|
|
|
|
|
|
Off |
The WLAN is not active. |
|
|
|
|
1.6 Starting and Stopping the NWA
Here are some of the ways to start and stop the NWA.
NWA5120 Series User’s Guide
17

Chapter 1 Introduction
Always use Maintenance > Shutdown or the shutdown command before you turn off the NWA or remove the power. Not doing so can cause the firmware to become corrupt.
Table 4 Starting and Stopping the NWA
METHOD |
DESCRIPTION |
Turning on the power |
A cold start occurs when you turn on the power to the NWA. The NWA powers up, |
|
checks the hardware, and starts the system processes. |
|
|
Rebooting the NWA |
A warm start (without powering down and powering up again) occurs when you use |
|
the Reboot button in the Reboot screen or when you use the reboot command. The |
|
NWA writes all cached data to the local storage, stops the system processes, and then |
|
does a warm start. |
|
|
Using the RESET |
If you press the RESET button on the back of the NWA, the NWA sets the |
button |
configuration to its default values and then reboots. See Section 19.6 on page 175 for |
|
more information. |
|
|
Clicking |
Clicking Maintenance > Shutdown > Shutdown or using the shutdown command |
Maintenance > |
writes all cached data to the local storage and stops the system processes. Wait for |
Shutdown > |
the device to shut down and then manually turn off or remove the power. It does not |
Shutdown or using |
turn off the power. |
the shutdown |
|
command |
|
|
|
Disconnecting the |
Power off occurs when you turn off the power to the NWA. The NWA simply turns off. |
power |
It does not stop the system processes or write cached data to local storage. |
|
|
The NWA does not stop or start the system processes when you apply configuration files or run shell scripts although you may temporarily lose access to network resources.
NWA5120 Series User’s Guide
18
2
The Web Configurator
2.1 Overview
The NWA Web Configurator allows easy management using an Internet browser.
In order to use the Web Configurator, you must:
•Use Internet Explorer 7.0 and later versions, Mozilla Firefox 9.0 and later versions, Safari 4.0 and later versions, or Google Chrome 10.0 and later versions.
•Allow pop-up windows.
•Enable JavaScript (enabled by default).
•Enable Java permissions (enabled by default).
•Enable cookies.
The recommended screen resolution is 1024 x 768 pixels and higher.
2.2Access
1Make sure your NWA is working in standalone AP mode (see Section 1.1.1 on page 12) and hardware is properly connected. See the Quick Start Guide.
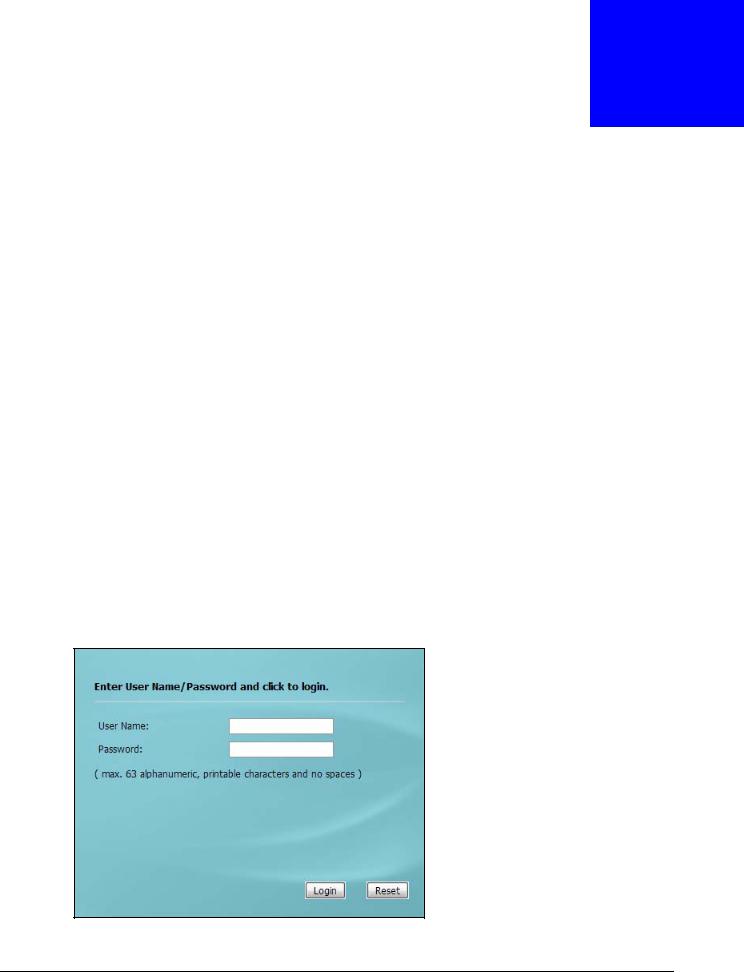
2Browse to https://192.168.1.2. The Login screen appears.
3 Enter the user name (default: “admin”) and password (default: “1234”).
NWA5120 Series User’s Guide
19

Chapter 2 The Web Configurator
4Click Login. If you logged in using the default user name and password, the Update Admin Info screen appears. Otherwise, the dashboard appears.
The Update Admin Info screen appears every time you log in using the default user name and default password. If you change the password for the default user account, this screen does not appear anymore.
2.3 Navigating the Web Configurator
The following summarizes how to navigate the web configurator from the Dashboard screen. This guide uses the NWA5123-NI screens as an example. The screens may vary slightly for different models.
NWA5120 Series User’s Guide
20
Chapter 2 The Web Configurator
Figure 6 The Web Configurator’s Main Screen
A
B
 C
C
The Web Configurator’s main screen is divided into these parts:
•A - Title Bar
•B - Navigation Panel
•C - Main Window
2.3.1Title Bar
The title bar provides some useful links that always appear over the screens below, regardless of how deep into the Web Configurator you navigate.
Figure 7 Title Bar
The icons provide the following functions.
Table 5 Title Bar: Web Configurator Icons
LABEL |
DESCRIPTION |
Logout |
Click this to log out of the Web Configurator. |
|
|
Help |
Click this to open the help page for the current screen. |
|
|
About |
Click this to display basic information about the NWA. |
|
|
Site Map |
Click this to see an overview of links to the Web Configurator screens. |
|
|
NWA5120 Series User’s Guide
21

|
|
Chapter 2 The Web Configurator |
|
|
|
|
Table 5 Title Bar: Web Configurator Icons (continued) |
|
|
LABEL |
DESCRIPTION |
|
Object |
Click this to open a screen where you can check which configuration items reference an |
|
Reference |
object. |
|
|
|
|
CLI |
Click this to open a popup window that displays the CLI commands sent by the Web |
|
|
Configurator. |
|
|
|
About
Click About to display basic information about the NWA.
Figure 8 About
The following table describes labels that can appear in this screen.
Table 6 About
LABEL |
DESCRIPTION |
Boot Module |
This shows the version number of the software that handles the booting process of the |
|
NWA. |
|
|
Current Version |
This shows the firmware version of the NWA. |
|
|
Released Date |
This shows the date (yyyy-mm-dd) and time (hh:mm:ss) when the firmware is released. |
|
|
OK |
Click this to close the screen. |
|
|
Site Map
Click Site MAP to see an overview of links to the Web Configurator screens. Click a screen’s link to go to that screen.
NWA5120 Series User’s Guide
22

Chapter 2 The Web Configurator
Figure 9 Site Map
Object Reference
Click Object Reference to open the Object Reference screen. Select the type of object and the individual object and click Refresh to show which configuration settings reference the object.
Figure 10 Object Reference
NWA5120 Series User’s Guide
23

Chapter 2 The Web Configurator
The fields vary with the type of object. The following table describes labels that can appear in this screen.
Table 7 Object References
LABEL |
DESCRIPTION |
Object Name |
This identifies the object for which the configuration settings that use it are displayed. Click |
|
the object’s name to display the object’s configuration screen in the main window. |
|
|
# |
This field is a sequential value, and it is not associated with any entry. |
|
|
Service |
This is the type of setting that references the selected object. Click a service’s name to |
|
display the service’s configuration screen in the main window. |
|
|
Priority |
If it is applicable, this field lists the referencing configuration item’s position in its list, |
|
otherwise N/A displays. |
|
|
Name |
This field identifies the configuration item that references the object. |
|
|
Description |
If the referencing configuration item has a description configured, it displays here. |
|
|
Refresh |
Click this to update the information in this screen. |
|
|
Cancel |
Click Cancel to close the screen. |
|
|
CLI Messages
Click CLI to look at the CLI commands sent by the Web Configurator. These commands appear in a popup window, such as the following.
Figure 11 CLI Messages
Click Clear to remove the currently displayed information.
Note: See the Command Reference Guide for information about the commands.
2.3.2 Navigation Panel
Use the menu items on the navigation panel to open screens to configure NWA features. Click the arrow in the middle of the right edge of the navigation panel to hide the navigation panel menus or drag it to resize them. The following sections introduce the NWA’s navigation panel menus and their screens.
NWA5120 Series User’s Guide
24

Chapter 2 The Web Configurator
Figure 12 Navigation Panel
Dashboard
The dashboard displays general device information, system status, system resource usage, and interface status in widgets that you can re-arrange to suit your needs.
For details on the Dashboard’s features, see Chapter 3 on page 31.
Monitor Menu
The monitor menu screens display status and statistics information.
Table 8 Monitor Menu Screens Summary
FOLDER OR LINK |
TAB |
FUNCTION |
Network Status |
|
Display general LAN interface information and packet statistics. |
|
|
|
Wireless |
|
|
|
|
|
AP Information |
Radio List |
Display information about the radios of the connected APs. |
|
|
|
Station Info |
|
Display information about the connected stations. |
|
|
|
WDS Link Info |
|
Display statistics about the NWA’s WDS connections. |
|
|
|
Detected Device |
|
Display information about suspected rogue APs. |
|
|
|
Log |
View Log |
Display log entries for the NWA. |
|
|
|
Configuration Menu
Use the configuration menu screens to configure the NWA’s features.
Table 9 Configuration Menu Screens Summary
FOLDER OR LINK |
TAB |
FUNCTION |
MGNT Mode |
|
Configure the NWA as a standalone AP, or a managed AP |
|
|
|
Network |
IP Setting |
Configuer the IP address for the NWA Ethernet interface. |
|
|
|
|
VLAN |
Manage the Ethernet interface VLAN settings. |
|
|
|
Wireless |
|
|
|
|
|
NWA5120 Series User’s Guide
25

Chapter 2 The Web Configurator
Table 9 Configuration Menu Screens Summary (continued)
FOLDER OR LINK |
TAB |
FUNCTION |
AP Management |
WLAN Setting |
Edit wireless AP information, remove APs, and reboot them. |
|
|
|
MON Mode |
Rogue/Friendly AP |
Configure how the NWA monitors for rogue APs. |
|
List |
|
|
|
|
Load Balancing |
|
Configure load balancing for traffic moving to and from wireless |
|
|
clients. |
|
|
|
DCS |
|
Configure dynamic wireless channel selection. |
|
|
|
Object |
|
|
|
|
|
Users |
User |
Create and manage users. |
|
|
|
|
Setting |
Manage default settings for all users, general settings for user |
|
|
sessions, and rules to force user authentication. |
|
|
|
AP Profile |
Radio |
Create and manage wireless radio settings files that can be |
|
|
associated with different APs. |
|
|
|
|
SSID |
Create and manage wireless SSID, security, MAC filtering, and |
|
|
layer-2 isolation files that can be associated with different APs. |
|
|
|
MON Profile |
|
Create and manage rogue AP monitoring files that can be |
|
|
associated with different APs. |
|
|
|
WDS Profile |
|
Create and manage WDS profiles that can be used to connect to |
|
|
different APs in WDS. |
|
|
|
Certificate |
My Certificates |
Create and manage the NWA’s certificates. |
|
|
|
|
Trusted Certificates |
Import and manage certificates from trusted sources. |
|
|
|
System |
|
|
|
|
|
Host Name |
|
Configure the system and domain name for the NWA. |
|
|
|
Date/Time |
|
Configure the current date, time, and time zone in the NWA. |
|
|
|
WWW |
|
Configure HTTP, HTTPS, and general authentication. |
|
|
|
SSH |
|
Configure SSH server and SSH service settings. |
|
|
|
TELNET |
|
Configure telnet server settings for the NWA. |
|
|
|
FTP |
|
Configure FTP server settings. |
|
|
|
SNMP |
|
Configure SNMP communities and services. |
|
|
|
Log & Report |
|
|
|
|
|
Email Daily |
|
Configure where and how to send daily reports and what reports |
Report |
|
to send. |
|
|
|
Log Setting |
|
Configure the system log, e-mail logs, and remote syslog servers. |
|
|
|
Maintenance Menu
Use the maintenance menu screens to manage configuration and firmware files, run diagnostics, and reboot or shut down the NWA.
Table 10 Maintenance Menu Screens Summary
FOLDER OR LINK |
TAB |
FUNCTION |
File Manager |
Configuration File |
Manage and upload configuration files for the NWA. |
|
|
|
|
Firmware Package |
View the current firmware version and to upload firmware. |
|
|
|
|
Shell Script |
Manage and run shell script files for the NWA. |
|
|
|
Diagnostics |
Diagnostics |
Collect diagnostic information. |
|
|
|
NWA5120 Series User’s Guide
26

|
|
|
Chapter 2 The Web Configurator |
|
|
|
|
|
|
|
Table 10 Maintenance Menu Screens Summary (continued) |
|||
|
FOLDER OR LINK |
TAB |
|
FUNCTION |
|
Reboot |
|
|
Restart the NWA. |
|
|
|
|
|
|
Shutdown |
|
|
Turn off the NWA. |
|
|
|
|
|
2.3.3 Warning Messages
Warning messages, such as those resulting from misconfiguration, display in a popup window.
Figure 13 Warning Message
2.3.4 Tables and Lists
The Web Configurator tables and lists are quite flexible and provide several options for how to display their entries.
2.3.4.1 Manipulating Table Display
Here are some of the ways you can manipulate the Web Configurator tables.
1 Click a column heading to sort the table’s entries according to that column’s criteria.
2Click the down arrow next to a column heading for more options about how to display the entries. The options available vary depending on the type of fields in the column. Here are some examples of what you can do:
•Sort in ascending alphabetical order
•Sort in descending (reverse) alphabetical order
•Select which columns to display
•Group entries by field
•Show entries in groups
NWA5120 Series User’s Guide
27

Chapter 2 The Web Configurator
• Filter by mathematical operators (<, >, or =) or searching for text.
3 Select a column heading cell’s right border and drag to re-size the column.
4Select a column heading and drag and drop it to change the column order. A green check mark displays next to the column’s title when you drag the column to a valid new location.
5Use the icons and fields at the bottom of the table to navigate to different pages of entries and control how many entries display at a time.
NWA5120 Series User’s Guide
28
Chapter 2 The Web Configurator
2.3.4.2 Working with Table Entries
The tables have icons for working with table entries. A sample is shown next. You can often use the [Shift] or [Ctrl] key to select multiple entries to remove, activate, or deactivate.
Table 11 Common Table Icons
Here are descriptions for the most common table icons.
Table 12 Common Table Icons
LABEL |
DESCRIPTION |
Add |
Click this to create a new entry. For features where the entry’s position in the numbered |
|
list is important (features where the NWA applies the table’s entries in order like the |
|
firewall for example), you can select an entry and click Add to create a new entry after |
|
the selected entry. |
|
|
Edit |
Double-click an entry or select it and click Edit to open a screen where you can modify |
|
the entry’s settings. In some tables you can just click a table entry and edit it directly in |
|
the table. For those types of tables small red triangles display for table entries with |
|
changes that you have not yet applied. |
|
|
Remove |
To remove an entry, select it and click Remove. The NWA confirms you want to remove |
|
it before doing so. |
|
|
Activate |
To turn on an entry, select it and click Activate. |
|
|
Inactivate |
To turn off an entry, select it and click Inactivate. |
|
|
Object Reference |
Select an entry and click Object Reference to open a screen that shows which settings |
|
use the entry. |
|
|
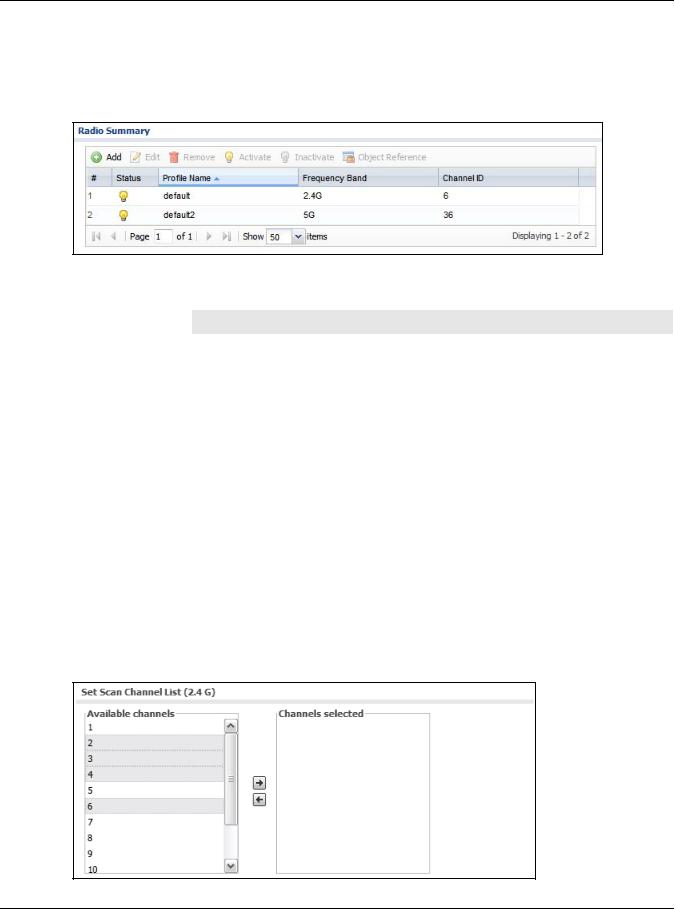
2.3.4.3 Working with Lists
When a list of available entries displays next to a list of selected entries, you can often just doubleclick an entry to move it from one list to the other. In some lists you can also use the [Shift] or [Ctrl] key to select multiple entries, and then use the arrow button to move them to the other list.
Figure 14 Working with Lists
NWA5120 Series User’s Guide
29

PART II
Technical Reference
30
Loading...